
JT-MC206GS-W-E - Hand dryers MITSUBISHI - Free user manual and instructions
Find the device manual for free JT-MC206GS-W-E MITSUBISHI in PDF.


| Product Type | Hand Dryer |
| Brand | Mitsubishi |
| Model | JT-MC206GS-W-E |
| Dimensions (H x W x D) | 300 x 200 x 150 mm |
| Weight | 2.5 kg |
| Power Supply | 220-240 V AC, 50/60 Hz |
| Power Consumption | 1500 W |
| Air Flow Technology | High-speed jet airflow |
| Drying Time | Approximately 10 seconds |
| Noise Level | ≤ 75 dB(A) |
| Automatic Sensor | Yes, infrared hands-free activation |
| Timer Function | Auto shut-off after set time |
| Motor Type | Brushless DC motor |
| Air Inlet Filter | Washable foam filter |
| Maintenance | Clean filter monthly; wipe exterior with damp cloth |
| Safety Features | Thermal cut-off, overheat protection, anti-vibration |
| Installation | Wall-mounted, included mounting kit |
| IP Rating | IP23 |
| Spare Parts | Filter, nozzle, motor assembly |
| Warranty | 2 years (manufacturer) |
| Color | White |
Frequently Asked Questions - JT-MC206GS-W-E MITSUBISHI
User questions about JT-MC206GS-W-E MITSUBISHI
0 question about this device. Answer the ones you know or ask your own.
Ask a new question about this device
Download the instructions for your Hand dryers in PDF format for free! Find your manual JT-MC206GS-W-E - MITSUBISHI and take your electronic device back in hand. On this page are published all the documents necessary for the use of your device. JT-MC206GS-W-E by MITSUBISHI.
USER MANUAL JT-MC206GS-W-E MITSUBISHI
Jet Towel Hand dryer
MODEL
JT-MC206GS-W-E
Unit color -W (White)
INSTRUCTION MANUAL
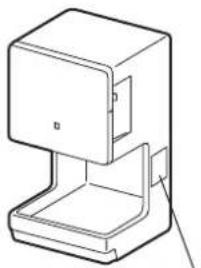
natural_image
Technical line drawing of a mechanical device with a lid and base (no text or symbols)CE
Location of Model Name display Location of power supply voltage display
Single-phase 220 - 240V AC
For User
Read the manual thoroughly before using the unit to ensure it is used safely and correctly. After reading the manual, store it in an easily accessible location for future reference.
You should not attempt to install the unit yourself, as this may affect the safety and functionality of the unit.
This unit is intended for the purpose of drying hands and is not covered by a warranty if used for any other purpose. It has no sterilizing or disinfecting functions.
INDEX
Safety Precautions 2
Names of Parts 3
How to use the unit 4
How to open/close the front cover 4
Precautions for when opening/closing the front cover .... 4
■ Turning the power on 5
If not using for a long period....5
How to use the unit 5
■ Turning the heater on....6
■ Adjusting the air speed 6
Maintenance 7
Precautions for when opening/closing the front cover 7
① Turning the power off before maintenance 8
② Cleaning the unit exterior and hand drying area....8
③ Cleaning the air filter 9
④ Cleaning the drain tank 10
Trouble shooting....11
Specifications 12
(Safety Precautions)
The dangers arising from improper handling and the extents of the dangers are classified and explained as shown below.
| Warning | The following may lead to death or serious personal injury if handled incorrectly. | ||
 Prohibited Prohibited | Do not install in locations where they may be leakages of combustible gas.This may cause fires.Do not use at locations where salt damage may occur or where corrosive, neutral or reductive gases are present.The above may cause fire, electric shocks or malfunctions. |  Do not disassemble Do not disassemble | Do not modify or disassemble the unit.Doing so may result in fires, electric shocks or injuries.When changing the installation place, consult your dealer or installer.There is a risk of injury. |
 Important !Follow instructions. Important !Follow instructions. | Use single- phase 220 – 240V AC power.Using the incorrect power supply may cause fires, electric shocks or malfunctions.Use exclusive wiring for the power source.Using this unit with other devices on a branch socket may cause abnormal heat, which may cause fires.Always turn off the power switch during maintenance work.Failure to do so may result in an electric shock.This unit is not intended for use by young children or infirm persons unless they are adequately supervised by a responsible person to ensure that they can use the unit safely. | ||
 Do not use in the baths/shower room. Do not use in the baths/shower room. | Do not use in a shower room or other locations with a great deal of humidity in the air or where condensation may form on the unit.This may cause electric shocks or malfunctions. | ||
 Do not allow the unit to get wet. Do not allow the unit to get wet. | Do not allow water to get on the unit.This may cause electric shocks or malfunctions. | ||

Caution


NOTE
- Do not use in the following locations.
- Outdoors • Locations where the temperature could be lower than 0°C. • Locations where there is a lot of dust.
- Locations where the temperature could be higher than 40^ . • Locations where there is a lot of condensation.
- Locations where salt damage may occur. • In vehicles (including ships and airplanes) • Near food or tableware
- Locations where the unit is in direct or strong sunlight (may cause the sensor to malfunction).
• Kitchens (Where there is a risk of water splashing.) - Locations where the unit may come into direct contact with water.
• Rooms that have a sterilization basin, swimming pools baths. - Locations where corrosive, neutral, or reductive gasses are present. (This may shorten the working life of the unit and/or cause malfunctions.)
- Do not use with chemicals on your hands.
(This may damage the surface of the unit or cause discoloration or cracking.)
- Please thoroughly wipe off any detergents or chemicals that may be on the unit. Do not use any detergents other than those that have been prescribed.
(Failure to do so may damage the surface of the unit, or cause discoloration or cracking.)
Please refer to "Maintenance" (Page 7) for details on detergents.
- If water enters the unit, do not let the air filter or intake area come in close contact with water as this may cause the machine to malfunction or cause the acoustic materials to absorb water and allow bacteria to grow.
Names of Parts
※ Shaded areas in the figure indicate antibacterial material (excluding outlet nozzle areas).
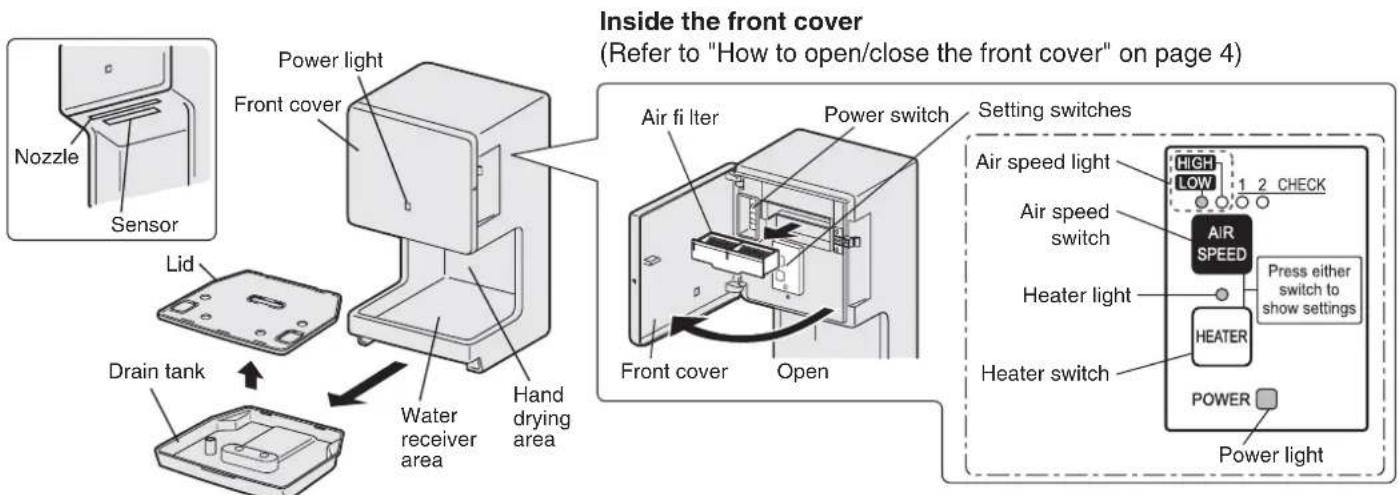
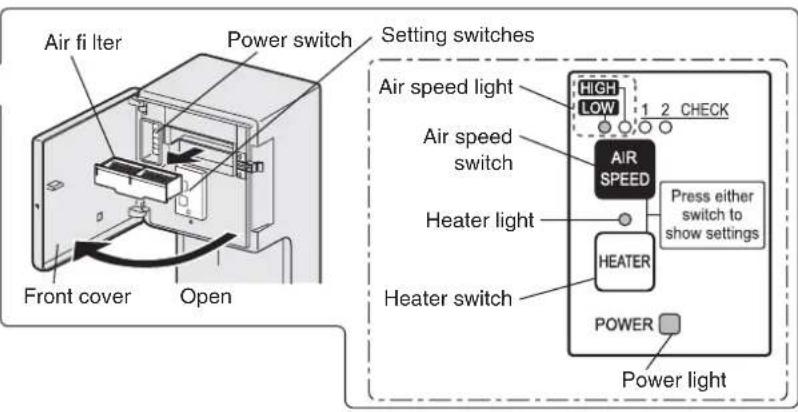
- Please refer to "Turning the heater on" (Page 6) while turning the heater on/off.
- Please refer to "Adjusting the air speed" (Page 6) while adjusting the air speed.
How to use the unit
How to open/close the front cover
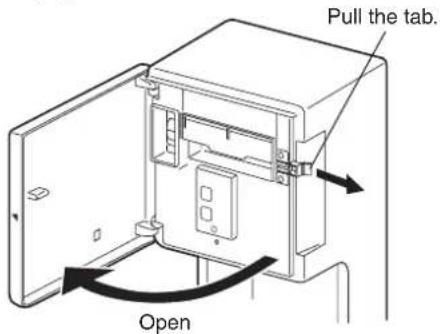
How to open the front cover
1 Pull the tab for opening the front cover.
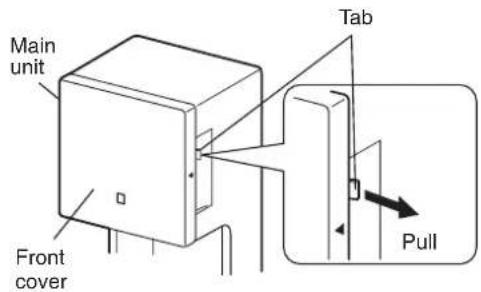
2 Hold the handle are on the right hand side of the main unit.
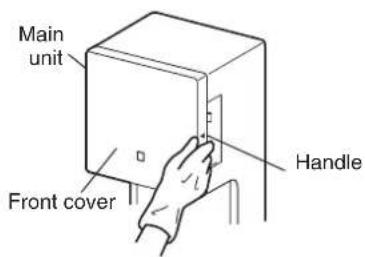
3 Open.
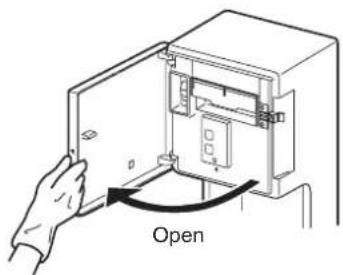
How to close the front cover
Close the front cover with the procedures for opening it in reverse.
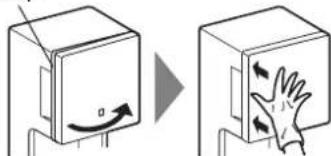
Close the front cover so that there is no gap between the front cover and the main unit and push the tab in to latch the front cover shut.
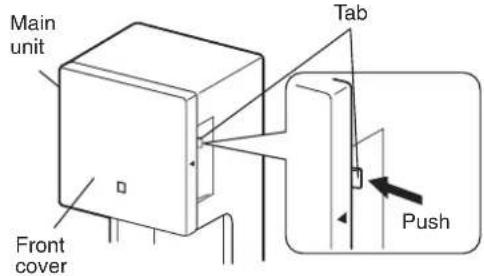
NOTE
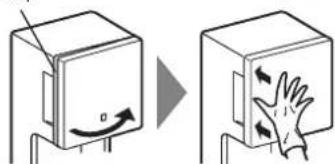
- Check to see that the front cover is fitted securely. Press the front cover on the upper and lower parts against the main unit so that it is securely closed.
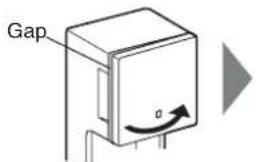
① Close the right side ②
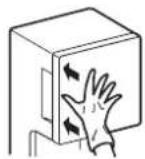
Close the left side (both the upper and lower parts)
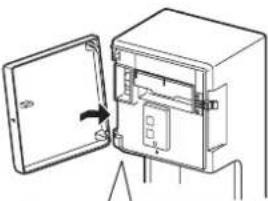
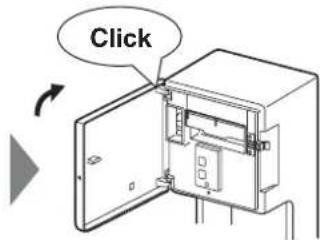
Precautions for when opening/closing the front cover
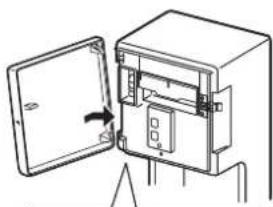
If the front cover comes off, please reattach it with the following procedures.
※ It is designed to come off in order to prevent damage if it is opened too far.
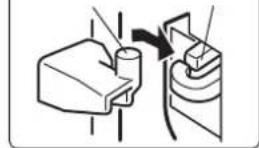
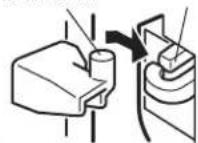
1 Press the bottom connecting part of the removed front cover into the bottom panel hook of the unit.
2 Press the top connecting part of the front cover into the top panel hook of the unit.
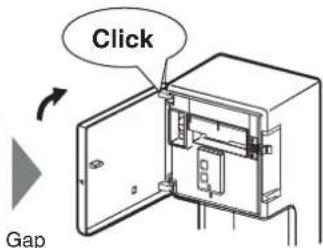
3 Check that the front cover is fitted securely.
natural_image
Diagram of a device with an open door and internal components, no visible text or symbolsConnecting part of the front cover
Panel hook of the unit
natural_image
Diagram showing two views of a device with hand gesture and rotation arrow (no text or symbols)Make sure that there is no gap between the front cover and the unit when the front cover is closed.
■ Turning the power on
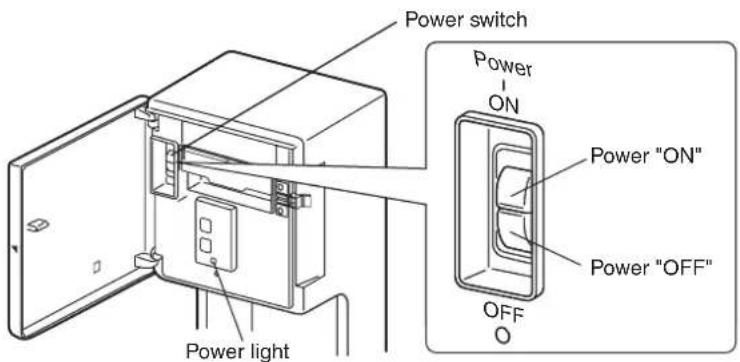
1 Open the front cover.
- Refer to "How to open/close the front cover" on page 4.
3 Close the front cover.
- Refer to "How to open/close the front cover" on page 4.
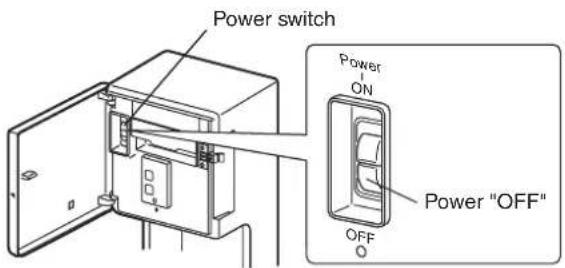
2 Turn the power switch "ON".
• The power light (blue) turns on.
Caution
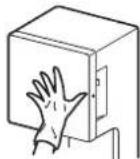
- Do not turn the power on when your hands or an object are inside the hand drying area.
The sensitivity of the sensor may be reduced if the power is turned on while your hands or objects are inside the hand drying area. If the sensitivity of the sensor is reduced, please turn the power off and then back on after one minute.
If not using for a long period
Turn the power switch "OFF".
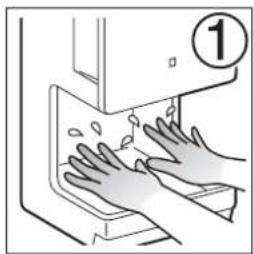
How to use the unit
natural_image
Illustration of hands cleaning a surface with a numbered label (1) above the device (no text or symbols on the diagram itself)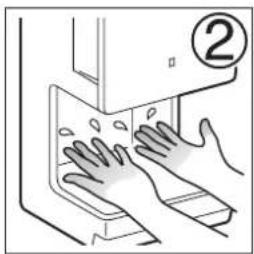
natural_image
Illustration of hands cleaning a surface with a numbered label (②), no text or symbols present.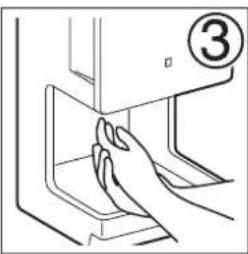
natural_image
Line drawing of a hand pressing down on a mechanical component (no text or symbols)Hand detection area
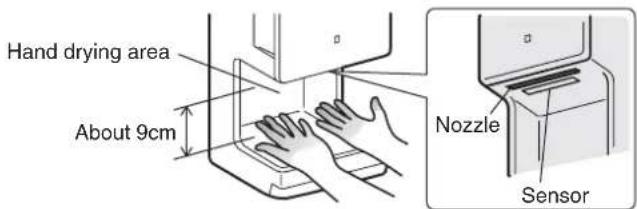
- Please use within the area above.
※ The hand detection area may differ depending on the environment.
Automatic Stop Function
The power light fl ashes and the dryer stops automatically if the unit is used continually for more than 40 seconds. To continue using the hand dryer, remove your hands, and then re-insert them.
Rub your hands together after the water is blown off.
● The dryer starts automatically when your hands enter the hand drying area.
※ Refer to "Hand detection area"
Caution
- Do not use with disinfectants such as alcohol or chemicals on your hands. (This may damage the unit.)
■ Turning the heater on
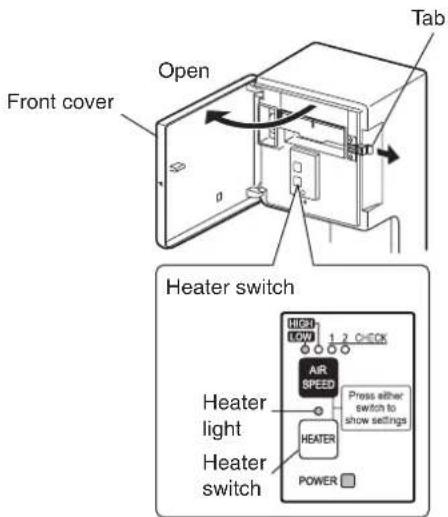
1 Open the front cover.
● Refer to "How to open/close the front cover" on page 4.
2 Press the air speed switch or the heater switch and let the settings light turn on.
3 Turn the heater switch "ON".
※ The heater may not operate during continued use as there is the danger of scalding when the temperature of the warm air rises.
The air may not feel warm when the room temperature is low (20°C or below).
Checking the settings
The heater light and air speed light turn off after about 10 seconds after their settings are made (to save energy). To check the settings, press either the heater or air speed switch.
Heater
It alleviates the sensation of cold air.
■ Adjusting the air speed
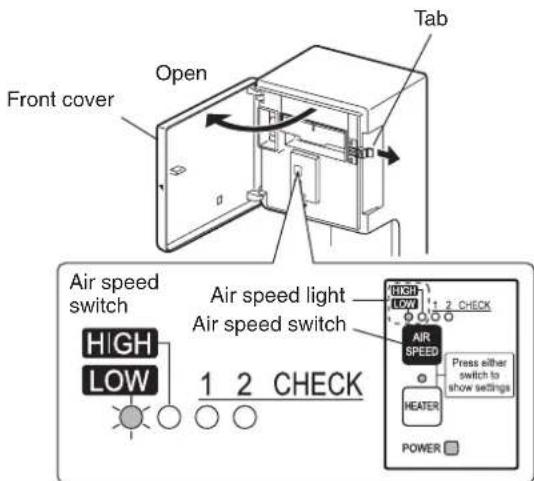
1 Open the front cover.
- Refer to "How to open/close the front cover" on page 4.
2 Press the air speed switch or the heater switch and let the settings light turn on.
3 Press the air speed switch.
- The modes change between "Low" and "High", and the air speed light turns on each time the air speed switch is pressed.
● Refer to "Settings and drying times guide" on page 12.
Checking the settings
The heater light and air speed light turn off after about 10 seconds after their settings are made (to save energy). To check the settings, press either the heater or air speed switch.
Maintenance

Warning
● Always turn off the power switch during maintenance work.
Failure to do so may result in an electric shock.
- Do not allow water to get on the unit.
This may cause electric shocks or malfunctions.

Caution
● Wear gloves during maintenance work. Not doing so may result in injuries.
Caution
- The unit exterior can be cleaned with alcohol, but be sure to wipe off any alcohol that remains after cleaning.
(Failure to do so may damage the surface of the unit, or cause discoloration or cracking.)
※ "Alcohol" means a disinfectant with an ethanol content of 83% or less.
After wiping the unit clean with alcohol, be sure to dispose of any alcohol that has collected in the drain tank.
※ Do not spray alcohol directly onto the unit.
- Do not use any of the following cleaning materials Solvents such as thinner or benzene
- Acid, alkaline or chlorine detergents • Mold and mildew removers
- Citrus-based or other plant-based detergents • Antiseptics.
Please also refrain from using nylon scourers or abrasives.
(They may damage the surface of the unit or cause discoloration or cracking.)
● Disinfectants cause damage to the unit.
- Do not turn the power on when your hands or an object are inside the hand drying area after maintenance.
- Disinfectants cause damage to the unit. - Do not turn the power on when your hands or an object are inside the hand drying area after maintenance.
The sensitivity of the sensor may be reduced if the power is turned on while your hands or objects are inside the hand drying area.
If the sensitivity of the sensor is reduced, please turn the power off and then back on after one minute.
NOTE
- When cleaning the unit, use a neutral detergent. (pH: 6 – 8)
(Please do not use plant-based detergents as they may cause damage to plastic parts.)
- When using a chemical cloth, be sure to follow the instructions carefully.
● Factors such as rust may shorten the working life of the unit.
- When cleaning the unit, use a neutral detergent. (pH: 6 – 8) (Please do not use plant-based detergents as they may cause damage to plastic parts.) - When using a chemical cloth, be sure to follow the instructions carefully. - Factors such as rust may shorten the working life of the unit.
(Damage to the unit caused by the use of prohibited agents such as solvents, detergents, and abrasives (also damage due to factors such as rust) is not covered by the warranty.)
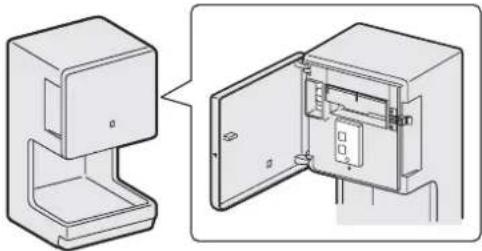
- The area that has undergone antibacterial processing (the shaded area in the right figure) produces antibacterial effects when bacteria adhere to the surface.
(The antibacterial effects are not produced when the surface is unclean.)
natural_image
Technical illustration of a door switch mechanism with open door and internal components (no text or symbols)Precautions for when opening/closing the front cover
If the front cover comes off, please reattach it with the following procedures.
※ It is designed to come off in order to prevent damage if it is opened too far.
1 Press the bottom connecting part of the removed front cover into the bottom panel hook of the unit.
2 Press the top connecting part of the front cover into the top panel hook of the unit.
3 Check that the front cover is fitted securely.
1 Press the bottom connecting part of the removed front cover into the bottom panel hook of the unit.
2 Press the top connecting part of the front cover into the top panel hook of the unit.
3 Check that the front cover is fitted securely.
natural_image
Line drawing of a door opening into a device housing (no text or symbols visible)Connecting part of the front cover
Gap
Make sure that there is no gap between the front cover and the unit when the front cover is closed.
Maintenance - Continuation
1
Turning the power off before maintenance
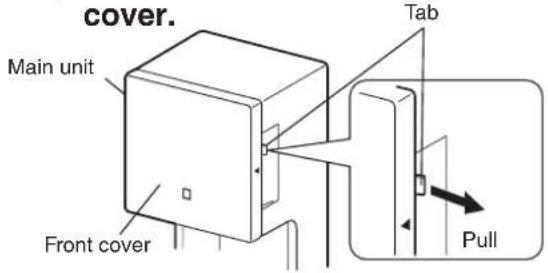
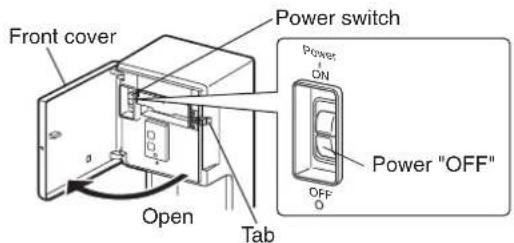
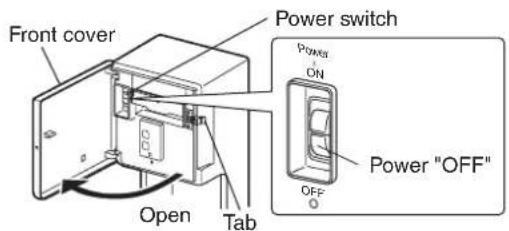
1 Pull the tab and open the front
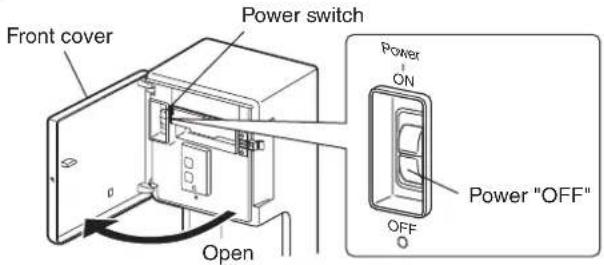
2 Open the front cover and turn the power switch "OFF".
2
Cleaning the unit exterior and hand drying area
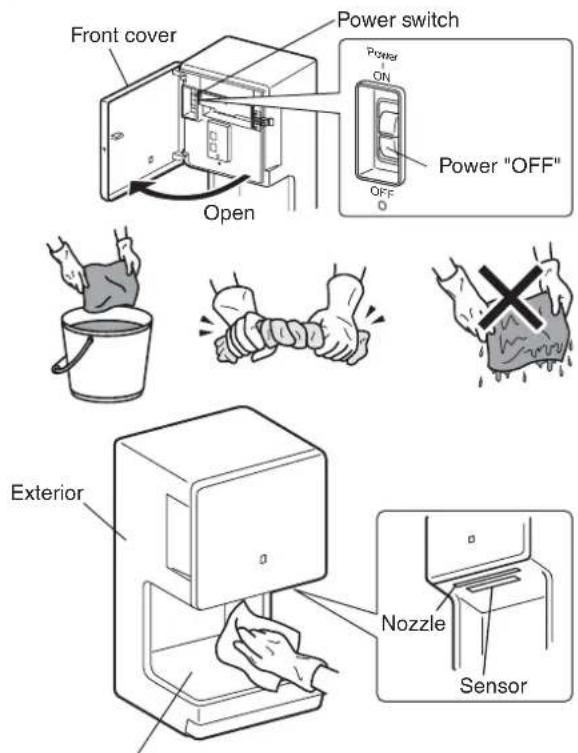
Hand drying area
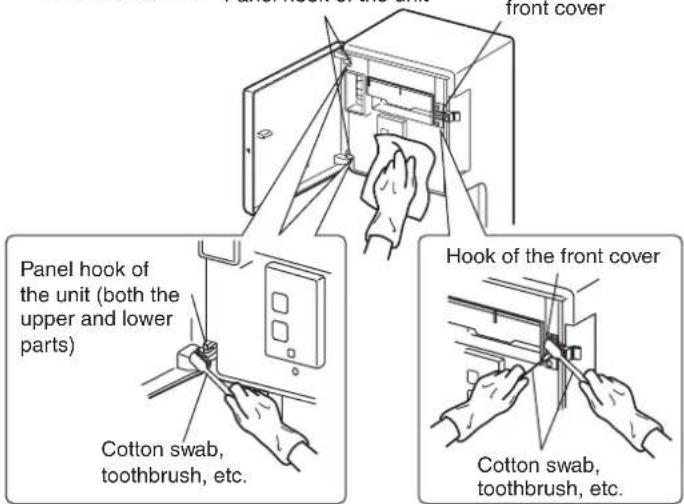
Panel hook of the unit Hook of the front cover

Caution
● Water may enter the unit and cause short circuits, electric shocks or damage if the front cover has been forgotten to be closed.
1 Pull the tab, open the front cover and turn the power switch "OFF".
- Refer to "How to open/close the front cover" on page 4.
2 Wipe the unit exterior, the inside of the front cover, and the hand drying area with a tightly wrung out piece of cloth.
- When it is unclean, wipe it with a piece of cloth that has been soaked in neutral detergent and tightly wrung out, thoroughly remove the remaining neutral detergent and wipe it with a dry piece of cloth.
- Please be sure to wipe with a piece of cloth that has been wrung out tightly as water may enter the unit and cause damage if it is wiped with a very wet piece of cloth.
- Clean the sensor area.
※ The sensor may lose its sensitivity and malfunction if the transparent surface inside the hand drying area is covered with a white-colored substance. Please clean it once a week.
3 Clean the dust off of the hook of the front cover with a commercially available toothbrush or cotton swab
NOTE
- The front cover is designed to come off in order to prevent damage if it is opened too far. If it comes off, please reattach it while referring to "Precautions for when opening/closing the front cover" (Page 4).
4 Turn the power switch "ON" and close the front cover so that there is no gap and push the tab.
natural_image
Pure mechanical diagram showing internal components with arrows indicating motion (no text or symbols)Maintenance - Continuation

Cleaning the air fi Iter
Around once a week
Caution
- If the airlfer is not cleaned, the working life of the motor and heater may be shortened, the drying performance may be decreased due to insufficient air volume and air speed and bacteria can grow in the filter area due to dust deposits.
natural_image
Diagram of a mechanical or electrical component with directional arrows indicating movement or flow (no text or symbols present)
Caution
● Water may enter the unit and cause short circuits, electric shocks or damage if the front cover has been forgotten to be closed.
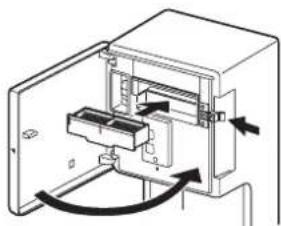
1 Pull the tab, open the front cover and turn the power switch "OFF".
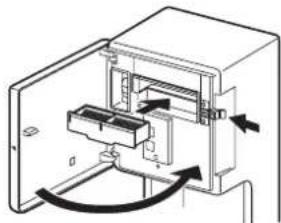
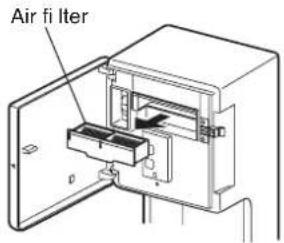
2 Remove the air filter.
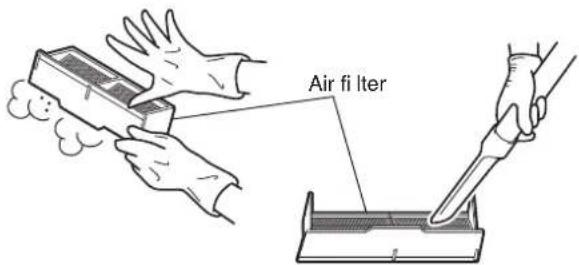
3 Clean the air filter.
● Tap it lightly or vacuum off the dust.
● Wipe with lukewarm or cold water if it is extremely unclean.
NOTE
● After washing the air filter with water, dry it thoroughly.
Caution
- Never dry the air filter with a heat source such as a fire or a dryer.
4 Reattach the air filter.
● Make sure that the air filter is fitted properly. (Dirt and dust may get into the unit and shorten its working life if the air filter is out of position.)
5 Turn the power switch "ON" and close the front cover so that there is no gap and push the tab.
Maintenance - Continuation
4
Cleaning the drain tank
Before it fills up (at least once a week)
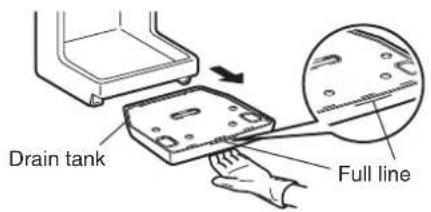
● Empty the drain water at least once a week before the drain water exceeds the full line.
- If the drain water is left inside, it can cause foul odors or the water can spill onto the floor and tarnish it.
natural_image
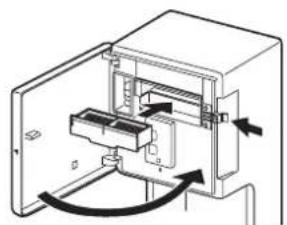
Diagram of a mechanical or electrical component with directional arrows indicating movement or force (no text or symbols present)1 Pull the tab, open the front cover and turn the power switch "OFF".
● Refer to "How to open/close the front cover" on page 4.
2 Remove the drain tank while keeping it upright.
- Keep it upright when carrying it so that the drain water does not spill.
Caution
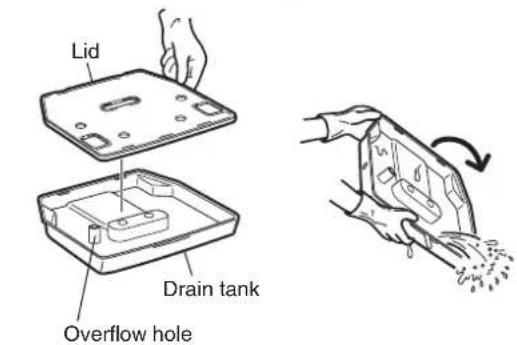
- If it is used after the full line has been exceeded, please be careful of water spilling out of the overflow hole. (The full line is reached at 0.6L.)
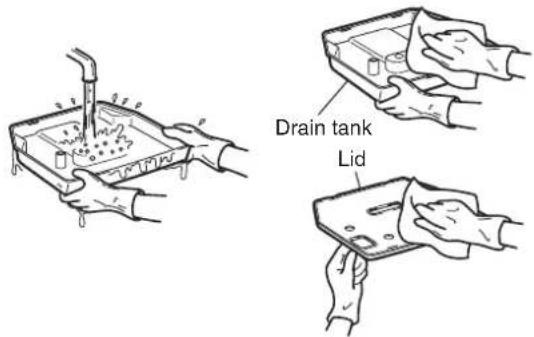
3 Open the lid and empty out the drain water.
4 Wash the drain tank and lid, and wipe them thoroughly.
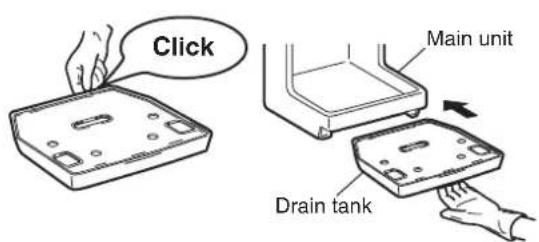
5 Put the lid back on the drain tank and reattach it to the main unit.
- Press the lid of the drain tank down using the tabs until they make clicking sounds, and make sure that it is fitted properly
- Push the drain tank all the way into to the main unit and make sure that it is fitted properly.
6 Turn the power switch "ON" and close the front cover so that there is no gap and push the tab.

Caution
● Water may enter the unit and cause short circuits, electric shocks or damage if the front cover has been forgotten to be closed.
Trouble shooting
Implement the inspections and procedures below in the following cases.
| In such cases Inspections Procedures | ||
| No air blows even if hands are inserted. | Are any lights in the display on?Has a blackout occurred? | ● Turn the ground fault circuit interrupter on.● Turn the power switch "ON". |
| Are you putting your hands in all the way? | ● Place your hands all the way inside the hand drying area. | |
| Was the power switch turned on while your hands or an object was inside the hand drying area? | ● Remove any foreign substances or dirt after turning the power switch "OFF" and the power light goes out. Wait for at least 1 minute after turning the power switch "OFF", and then turn it back "ON" again. | |
| Is the sensor blocked by dirt or dust? | ||
| Air does not stop. | Is the sensor in the hand drying area unclean? | |
| Stops operating during hand drying. | Has the dryer been used continually for more than 40 seconds?Are any lights fl ashing? | ● If the hand dryer is used continually for more than 40 seconds, the power light fl ashes and the dryer automatically stops. Remove your hands and then re-insert them. |
| The air is cold.Air does not warm up. | The heater switch is off. | ● Open the front cover and turn the heater switch "ON". |
| Air conditioning is not working (room temperature is 20°C or below). | ● This unit has a built-in heater, but the air may not feel warm when the room temperature is low. | |
| Is the room temperature too high? | ● The heater may not operate if it is used continually. | |
| The power light does not light up even when the power is switched on. | Was there a blackout?Is the ground fault circuit interrupter "OFF"? | ● Turn the ground fault circuit interrupter "ON" and then turn the power switch "ON". |
| The power light is fl ashing. | This may fl ash if there is a malfunction in the power supply. | ● Turn the power switch "OFF", check that all of the lights on the display section are off and then wait for 1 minute before switching the power back "ON". |
| Has the dryer been used continually for more than 40 seconds?Are any lights fl ashing? | ● If the hand dryer is used continually for more than 40 seconds, the power light fl ashes and the dryer automatically stops. Remove your hands and then re-insert them. | |
| The air speed light and heater light do not light up. | It turns off 10 seconds after the air speed switch or heater switch are controlled to save energy. | ● When the air speed switch or heater switch are pressed, the light turn back on in the state where the settings have been made. |
| The unit makes noise.The air is too strong. | The air speed can be adjusted. | ● Please refer to "Adjusting the air speed" (Page 6) while adjusting the air speed. |
| Turning the heater off. | The heater can be turned off. | ● Please refer to "Turning the heater on" (Page 6) while turning the heater off. |
| The front cover has come off. | Has the front cover been opened too far? | ● The front cover is designed to come off in order to prevent damage to the main unit if it is opened too far. Please reattach it while referring to "Precautions for when opening/closing the front cover" (Pages 4 and 7). |
| If the above procedures do not work, turn off the power and the ground fault circuit interrupter and have your dealer inspect and if necessary, repair the unit.(Costs are as agreed with the dealer.) | ||
(Specifications)
| Model | Voltage | Frequency | Heater | Power Input (W) | Current (A) | Weight (kg) | Dimensions (W × D × H) |
| JT-MC206GS-W-E | Single-phase 220 – 240V AC | 50-60Hz | ON 73 | 5 – 825 3.4 – 3.5 | 5 | 250 × 170 × 480 (mm) | |
| OFF 4 | 75 – 560 2.2 – 2.4 |
- The above are the figures when the air speed is set at "High". • The capacity of the drain tank is 0.6 L.
■ Settings and drying times guide
| Settings Drying times guide * | Noise | Use | |
| High (approx.) 13 – 15 seconds | (approx.)64dB | When drying quickly | |
| Low | (approx.) 24 – 27 seconds | (approx.)54dB | When keeping the noise level down during operation |
※ Drying times are based on Mitsubishi measurements. (50mg of water per hand)
Working life of the motor/heater
- The working life of the motor and heater is 7 years when used 120 times per day with the air speed set at "High". The working life may be shortened if the unit is used in a location where the power supply voltage is high or when the operation times per user are long.
- No air blows as the motor dies. (There may odors or noise when the motor dies, but this does not indicate a malfunction.) The air becomes cold when the heater dies. Please contact the dealer for a replacement when the heater dies. (subject to fees)
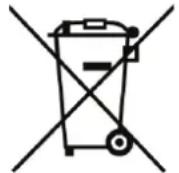
Note: This symbol mark is for EU countries only.
This symbol mark is according to the directive 2002/96/EC Article 10 Information for users and Annex IV, and/or to the directive 2006/66/EC Article 20 Information for end-users and Annex II.
English
Your MITSUBISHI ELECTRIC product is designed and manufactured with high quality materials and components which can be recycled and/or reused.
This symbol means that electrical and electronic equipment, batteries and accumulators, at their end-of-life, should be disposed of separately from your household waste.
If a chemical symbol is printed beneath the symbol shown above, this chemical symbol means that the battery or accumulator contains a heavy metal at a certain concentration. This will be indicated as follows:
Hg: mercury (0,0005%), Cd: cadmium (0,002%),
Pb: lead (0,004%)
In the European Union there are separate collection systems for used electrical and electronic products, batteries and accumulators.
Please, dispose of this equipment, batteries and accumulators correctly at your local community waste collection/recycling centre.
Please, help us to conserve the environment we live in!
Deutsch
Technical Document of Fan Efficiency
| Model Name JT-MC206GS | |
| Overall Efficiency 52.1% | |
| Measurement Category C | |
| Efficiency Category Static | |
| Efficiency Grade 61 | |
| VSD A variable speed drive is integrated within the fan | |
| Year of Manufacture 2012 | |
| Manufacturer | Mitsubishi Electric Corporationregistration number: ○ ○ ○ ○○HEAD OFFICE: TOKYO BLDG., 2-7-3, MARUNOUCHI, CHIYODA-KU, TOKYO 100-8310, JAPANAUTHORIZED REPRESENTATIVE IN EU:MITSUBISHI ELECTRIC EUROPE B.V.HARMAN HOUSE, 1GEORGE STREET, UXBRIDGE, MIDDLES |
| Motor Power Input (kW) 0.4 | |
| Flow Rate (m3/s) | 0.02 |
| Pressure (Pa) 9910 | |
| Rotations per Minute 23800 | |
| Specific Ratio 1.0 | |
| Information relevant for facilitatingdisassembly, recycling or disposal at end-of-life | Your product should be disposed of separately from household waste in line with local laws and regulations.When this product reaches its end of life, dispose of it at your local waste collection point/recycling centre.The separate collection and recycling of your product at the time of disposal will help conserve natural resources and ensure that it is recycled in a manner that protects human health and the environment.For more information for WEEE recyclers please contact us at http://www.mitsubishielectric.eu/contact_us_form |
| Information relevant to minimise impact onthe environment and ensure optimal lifeexpectancy as regards installation, use andmaintenance of the fan | Remove dust on air filter around once a week.Empty the drain water at least once a week before the drain water exceeds the full line. |
| Description of additional items used whendetermining the fan energy efficiency | The optimistic fan efficiency is measured in the composition of fan, motor and fan casing only. |

- Jet Towel Hand dryer
- JT-MC206GS-W-E
- INSTRUCTION MANUAL
- For User
- You should not attempt to install the unit yourself, as this may affect the safety and functionality of the unit.
- INDEX
- (Safety Precautions)
- Caution
- NOTE
- Names of Parts
- How to use the unit
- How to open/close the front cover
- How to open the front cover
- Pull the tab for opening the front cover.
- Hold the handle are on the right hand side of the main unit.
- Open.
- How to close the front cover
- Precautions for when opening/closing the front cover
- ■ Turning the power on
- Open the front cover.
- Close the front cover.
- Turn the power switch "ON".
- If not using for a long period
- Automatic Stop Function
- Rub your hands together after the water is blown off.
- ■ Turning the heater on
- Press the air speed switch or the heater switch and let the settings light turn on.
- Turn the heater switch "ON".
- Checking the settings
- Heater
- ■ Adjusting the air speed
- Press the air speed switch.
- Maintenance
- Warning
- Maintenance - Continuation
- 1
- Turning the power off before maintenance
- 2
- Cleaning the unit exterior and hand drying area
- Cleaning the air fi Iter
- Around once a week
- 4
- Cleaning the drain tank
- Before it fills up (at least once a week)
- Trouble shooting
- (Specifications)
- Working life of the motor/heater
- English
- Deutsch
Brand : MITSUBISHI
Model : JT-MC206GS-W-E
Category : Hand dryers