
Jalou - Smartphone SONY ERICSSON - Free user manual and instructions
Find the device manual for free Jalou SONY ERICSSON in PDF.


| Product Type | Smartphone |
| Brand | Sony Ericsson |
| Model | Jalou (F100i) |
| Dimensions (Closed) | 87 x 46 x 17 mm |
| Weight | Approx. 100 g |
| Display | 2.0 inch TFT, 240 x 320 pixels |
| Camera | 2.0 MP with digital zoom |
| Memory | Internal 100 MB, microSD up to 16 GB |
| Battery | Li-Ion 780 mAh |
| Operating System | Proprietary (feature phone OS) |
| Connectivity | GSM/GPRS, Bluetooth 2.0 |
| FM Radio | Yes, with RDS |
| Audio | Speaker, 3.5 mm headphone jack |
| Special Features | Diamond-like design, Swarovski elements (select models) |
| Power Source | Standard charger (micro USB or proprietary) |
| Maintenance | Clean with soft dry cloth; avoid water and extreme temperatures |
| Safety | Use only approved batteries and chargers; keep away from children |
| Spare Parts | Battery, charger, covers (contact service center) |
| General Information | User manual available in PDF; software updates via PC Suite |
Frequently Asked Questions - Jalou SONY ERICSSON
User questions about Jalou SONY ERICSSON
0 question about this device. Answer the ones you know or ask your own.
Ask a new question about this device
Download the instructions for your Smartphone in PDF format for free! Find your manual Jalou - SONY ERICSSON and take your electronic device back in hand. On this page are published all the documents necessary for the use of your device. Jalou by SONY ERICSSON.
USER MANUAL Jalou SONY ERICSSON
Turning on the phone....5
Help....5
Charging the battery....6
Phone overview....7
Screen icons....8
Menu overview....9
Navigation....10
Memory....11
Phone language....12
Entering text....12
Calling....14
Making and receiving calls....14
Contacts 15
Speed dial....18
More calling features....18
Imaging 22
Using the camera....22
More camera features....23
Viewing and tagging photos....23
Using photos....24
Working with photos....24
Sending content to a Web site....25
Printing photos....26
Music 27
Stereo portable handsfree....27
Music player....27
PlayNow™ 28
TrackID™ 28
Online music and video clips....29
Video player....29
Radio 29
MusicDJ™ 30
Record sound 30
Transferring and handling content......31
Handling content in the phone....31
Sending content to another phone....31
Using a USB cable....31
Transferring content to and from a computer....32
Phone name....32
Using Bluetooth™ wireless technology....32
Backing up and restoring....34
Messaging....35
Text and picture messages....35
Conversations......36
Voice messages....36
Email....36
Instant messaging 38
Internet 40
Bookmarks....40
History pages......40
More browser features......40
Internet security and certificates....41
Web feeds....41
YouTube™ 42
Synchronising....43
Synchronising using a computer....43
Synchronising using an Internet service....43
More features....44
Flight mode....44
Update Service....44
Location services....45
Alarms....45
Calendar....46
Notes 47
Tasks....47
Profiles....47
Time and date......47
Theme48
Main menu layout......48
Ringtones....48
Screen orientation......48
Mirror screen....49
Games....49
Applications....49
Locks....50
IMEI number....51
Troubleshooting....52
Common questions....52
Error messages....54
Index....56
Getting started
Instruction symbols
These symbols may appear in the User guide:

Note

Tip

Warning

Use a selection or navigation key to scroll and select. See Navigation on page 10.
Assembly
Before you start using your phone, you need to insert a SIM card and the battery.
To insert the SIM card

1 Remove the battery cover.
2 Slide the SIM card into its holder with the gold-coloured contacts facing down.
To insert the battery

1 Insert the battery with the label side up and the connectors facing each other.
2 Attach the battery cover.
Turning on the phone
To turn on the phone

natural_image
Pure diagram of a mechanical or architectural component with no visible text, numbers, or symbols.1 Press and hold down ⏻
2 Enter your SIM card PIN (Personal Identification Number), if requested, and select OK.
3 Select a language.
4 Follow the instructions that appear.
If you want to correct a mistake when you enter your PIN, press ⓒ.
SIM card
The SIM (Subscriber Identity Module) card, which you get from your network operator, contains information about your subscription. Always turn off your phone and detach the charger before you insert or remove the SIM card.
You can save contacts on the SIM card before you remove it from your phone. See To copy names and numbers to the SIM card on page 17.
PIN
You may need a PIN (Personal Identification Number) to activate the services and functions in your phone. Your PIN is supplied by your network operator. Each PIN digit appears as *, unless it starts with emergency number digits, for example, 112 or 911. You can see and call an emergency number without entering a PIN.
! If you enter the wrong PIN three times in a row, the SIM card is blocked. See SIM card lock on page 50.
Standby
After you have turned on your phone and entered your PIN, the name of the network operator appears. This view is called standby. Your phone is now ready for use.
Using other networks
Making and receiving calls, using messaging, and data transfer, for example, Internet-based services, outside your home network (roaming), may incur additional costs. Contact your operator for more information.
Help
In addition to this User guide, Feature guides and more information are available at www.sonyericsson.com/support.
Help and information are also available in your phone.
To access the User guide
- Select Menu > Settings > User help > User guide.
To view tips and tricks
- Select Menu > Settings > User help > Tips and tricks.
To view information about functions
- Scroll to a function and select Info, if available. In some cases, Info appears under Options.
To view the phone demonstration
- Select Menu > Entertainment > Demo tour.
To view the phone status
- Press the volume key. Phone, memory and battery information is shown.
Charging the battery
The phone battery is partly charged when you buy it.
To charge the battery

1 Connect the charger to the phone. It takes approximately 2.5 hours to fully charge the battery. Press a key to view the screen.
2 Remove the charger by tilting the plug upwards.
You can use your phone while it is charging. You can charge the battery at any time and for more or less than 2.5 hours. You can interrupt the charging without damaging the battery.
Phone overview
1 Ear speaker
2 Screen/Mirror screen
3 Selection keys
4 Connector for charger, handsfree and USB cable
5 Call key
6 Activity menu key
7 Microphone
8 End key, On/off key
9 C key (Clear)/Mirror key
10 Navigation keys
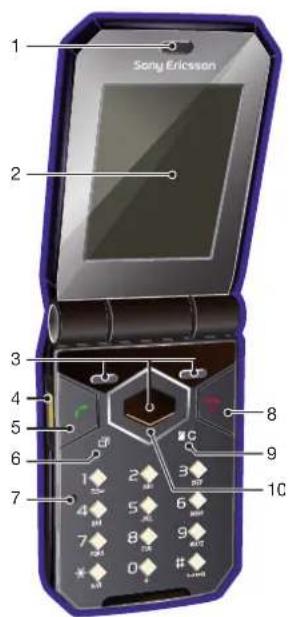
11 Camera
12 External display
13 Strap hole
14 Volume keys
15 Memory card slot (under the cover)
16 Loudspeaker

Screen icons
These icons may appear on the screen:
Icon Description
| The battery is almost fully charged | |
| The battery needs charging | |
| The network coverage is good | |
| No network coverage (also shown in flight mode) | |
| 3G | A 3G network is available |
| A UMTS HSPA network is available | |
| Missed calls | |
| Calls diverted | |
| Ongoing call | |
| The microphone is muted | |
| The loudspeaker is on | |
| The phone is in silent mode | |
| New text message | |
| New multimedia message | |
| New email | |
| The music player is playing | |
| The radio is playing | |
| A handsfree is connected | |
| The Bluetooth function is activated | |
| A Bluetooth headset is connected | |
| The phone is connected to the Internet | |
| Secure website | |
| An alarm is activated | |
| Appointment reminder | |
| Task reminder | |
| A Java application is activated |
Menu overview\*
PlayNow™
Camera
Alarms
Calls**

All

Answered

Dialled

Missed
Internet
Messaging
Write new
Inbox/Conversations
Messages
IM
Call voicemail
Contacts
Myself
New contact
Organiser
File manager **
Applications
Video call
Calendar
Tasks
Notes
Synchronisation
Timer
Stopwatch
Calculator
Code memo
Entertainment
Online services
TrackID™
Location services
Games
VideoDJ™
PhotoDJ™
MusicDJ™
Remote control
Record sound
Demo tour
Media
Photo
Music
Video
Games
Web feeds
Settings
Radio
Settings
General
Profiles
Time & date
Language
Update service
Voice control
New events
Shortcuts
Flight mode
Security
Accessibility
Phone status
Master reset
Sounds & alerts
Ring volume
Ringtone
Silent mode
Increasing ring
Vibrating alert
Message alert
Key sound
Display
Wallpaper
Main menu layout
Theme
Startup screen
Screen saver
Clock size
Brightness
Edit line names
Calls
Speed dial
Smart search
Divert calls
Switch to line 2
Manage calls
Time & cost
Show/hide my no.
Handsfree
Open to answer
Connectivity
Bluetooth
USB
Phone name
Synchronisation
Device management
Mobile networks
Data communication
Internet settings
Streaming settings
Message settings
SIP settings
Accessories
User help
User guide
Settings download
Basic setup
Tips and tricks
* Some menus are operator-, network- and subscription-dependent.
** You can use the navigation key to scroll between tabs in submenus. For more
information, see Navigation on page 10.
Navigation
To access the main menu
- When Menu appears on the screen, press the centre selection key to select Menu.
- If Menu does not appear on the screen, press and then press the centre selection key to select Menu.
To navigate the phone menus

- Press the navigation key ⬆, ⬇ or to move through the menus.
To select actions on the screen
- Press the left, centre or right selection key.
To view options for an item
- Select Options to, for example, edit.
To end a function
- Press
To return to standby
- Press
To navigate your media
1 Select Menu > Media.
2 Scroll to a menu item and press
3 To go back, press
To delete items
- Press ⓒ to delete items such as numbers, letters, pictures and sounds.
Tabs
Tabs may be available. For example, Calls have tabs.

To scroll between tabs
- Press the navigation key ◄or .
Shortcuts
You can use keypad shortcuts to go directly to functions from standby.
To use navigation key shortcuts
- Press 🔊, 🔔 or to go directly to a function.
To edit a navigation key shortcut
1 Select Menu > Settings > General > Shortcuts.
2 Scroll to an option and select Edit.
3 Scroll to a menu option and select Shortc..
Main menu shortcuts
Menu numbering starts from the top left icon and moves across and then down row by row.
To go directly to a main menu item
- Select Menu and press →, or .*±/清 0+ #—务
The Main menu layout must be set to Grid. See To change the main menu layout on page 48.
Activity menu
The activity menu gives you quick access to:
- New events – missed calls and new messages.
- Running apps – applications that are running in the background.
• My shortcuts – add your favourite functions to access them quickly. - Internet – quick access to the Internet.
To open the activity menu
- Press
Memory
You can save content on the memory card, in the phone memory and on the SIM card. Photos and music are saved on the memory card, if a memory card is inserted. If not, or if the memory card is full, photos and music are saved in the phone memory. Messages and contacts are saved in the phone memory, but you can choose to save them on the SIM card.
Memory card
! You may have to purchase a memory card separately.
Your phone supports a microSD ^™ memory card adding more storage space to your phone. It can also be used as a portable memory card with other compatible devices.
You can move content between a memory card and the phone memory. See Handling content in the phone on page 31.
To insert a memory card
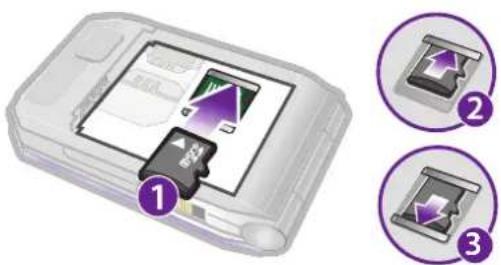
- Remove the battery cover and insert the memory card with the gold-coloured contacts facing down.
To remove a memory card

- Remove the battery cover and slide the memory card to remove it.
Phone language
You can select a language to use in your phone.
To change the phone language
1 Select Menu > Settings > General > Language > Phone language.
2 Select an option.
Entering text
You can use multitap text input or T9™ Text Input Tg to enter text. The T9 Text Input method uses a built-in dictionary.
To change writing language
- When you enter text, press and hold down
To change text input method
- When you enter text, press and hold down
To shift between capitals and lower-case letters
- When you enter text, press ✉a/A
To enter numbers
- When you enter text, press and hold down ⓐ+ 9
To enter full stops and commas
- When you enter text, press .1
To enter a symbol
1 When you enter text, select Options > Add symbol.
2 Scroll to a symbol and select Insert.
To enter text using T9 ^TM Text Input
1 Select, for example, Menu > Messaging > Write new > Message.
2 If Tg is not displayed, press and hold down to change to T9 Text Input.
3 Press each key only once, even if the letter you want is not the first letter on the key. For example, to write the word "Jane", press 5, 2, . Write the whole word before looking at the suggestions.
4 Use or to view suggestions.
5 Press to accept a suggestion and add a space.
To enter text using multitap text input
1 Select, for example, Menu > Messaging > Write new > Message.
2 If Tg is displayed, press and hold down to change to multitap text input.
3 Press 2 - repeatedly until the desired letter appears.
4 When a word is written, press #-n to add a space.
To add words to the built-in dictionary
1 When you enter text using T9 Text Input, select Options > Spell word.
2 Write the word using multitap text input and select Insert.
Calling
Making and receiving calls
You need to turn on your phone and be within range of a network.
To make a call
1 Enter a phone number (with international country code and area code, if applicable).
2 Press
You can call numbers from your contacts and call list. See Contacts on page 15, and Call list on page 15.
To end a call
- Press
To make international calls
1 Press and hold down until a “+” sign appears.
2 Enter the country code, area code (without the first zero) and phone number.
3 Press ↗.
To re-dial a number
- When Retry? appears select Yes.
Do not hold your phone to your ear when waiting. When the call connects, your phone gives a loud signal.
To answer a call
- Press ↗.
To reject a call
- Press
To change the ear speaker volume during a call
- Press the volume key up or down.
To mute the microphone during a call
1 Press and hold down .c appears.
2 Press and hold down again to resume.
To turn on the loudspeaker during a call
- Select SpkrOn. appears.
Do not hold the phone to your ear when using the loudspeaker. This could damage your hearing.
To view missed calls from standby
• appears. Press to open the call list.
Video call
During a video call, you can share video from the main camera.
Before making video calls
3G (UMTS) service is available when 30 or appears. To make a video call, both parties on the call must have a 3G (UMTS) phone subscription that supports 3G (UMTS) service and 3G (UMTS) coverage.
To make a video call
1 Enter a phone number (with international country code and area code, if applicable).
2 Select Options > Make video call.
To use the zoom with an outgoing video call
- Press or .
To share photos and videos during a video call
1 During a video call, press to switch to the video share mode tab.
2 Scroll to a video clip or photo and select Share.
To view video call options
• During the call, select Options.
Emergency calls
Your phone supports international emergency numbers, for example, 112 or 911. You can normally use these numbers to make emergency calls in any country, with or without the SIM card inserted, if you are within range of a network.
In some countries, other emergency numbers may also be promoted. Your network operator may therefore have saved additional local emergency numbers on the SIM card.
To make an emergency call
- Enter 112 (the international emergency number) and press ↗.
To view your local emergency numbers
1 Select Menu > Contacts.
2 Scroll to New contact and select Options > Special numbers > Emergency nos..
Networks
Your phone switches automatically between GSM and 3G (UMTS) or h networks depending on availability. Some network operators allow you to switch networks manually.
To switch networks manually
1 Select Menu > Settings > Connectivity > Mobile networks > GSM/3G networks.
2 Select an option.
Call list
You can view information about answered ☐, dialled and missed or rejected calls.
To call a number from the call list
1 Press and scroll to a tab.
2 Scroll to a name or a number and press ↗.
Contacts
You can save names, phone numbers and personal information in Contacts. Information can be saved in the phone memory or on the SIM card.
You can synchronise your contacts using the Sony Ericsson PC Suite.
Default contacts
You can choose which contact information is shown as default. If Phone contacts is selected as default, your contacts show all the information saved in Contacts. If you select SIM contacts as default, your contacts show names and numbers saved on the SIM card.
To select default contacts
1 Select Menu > Contacts.
2 Scroll to New contact and select Options > Advanced > Default contacts.
3 Select an option.
Phone contacts
Phone contacts can contain names, phone numbers and personal information. They are saved in the phone memory.
To add a phone contact
1 Select Menu > Contacts.
2 Scroll to New contact and select Add.
3 Enter the name and select OK.
4 Scroll to New number: and select Add.
5 Enter the number and select OK.
6 Select a number option.
7 Scroll between the tabs and add information to the fields.
8 Select Save.
Calling contacts
To call a contact
1 Select Menu > Contacts.
2 Scroll to a contact and press ↗.
To go directly to the contacts list
• Press and hold down (2) - .9
To call with Smart search
1 Press + to enter a sequence of (at least two) digits. All entries which match the sequence of digits or corresponding letters are shown in a list.
2 Scroll to a contact or a phone number and press ↗
To turn on or off Smart search
1 Select Menu > Settings > Calls > Smart search.
2 Select an option.
Editing contacts
To add information to a phone contact
1 Select Menu > Contacts.
2 Scroll to a contact and select Options > Edit contact.
3 Scroll between the tabs and select Add or Edit.
4 Select an option and an item to add or edit.
5 Select Save.
If your subscription supports Calling Line Identification (CLI) service, you can assign personal ringtones and pictures to contacts.
To copy names and numbers to phone contacts
1 Select Menu > Contacts.
2 Scroll to New contact and select Options > Advanced > Copy from SIM.
3 Select an option.
To copy names and numbers to the SIM card
1 Select Menu > Contacts.
2 Scroll to New contact and select Options > Advanced > Copy to SIM.
3 Select an option.
When you copy all contacts from your phone to the SIM card, all existing SIM card information is replaced.
To automatically save names and phone numbers on the SIM card
1 Select Menu > Contacts.
2 Scroll to New contact and select Options > Advanced > Auto save on SIM.
3 Select an option.
To save contacts on a memory card
1 Select Menu > Contacts.
2 Scroll to New contact and select Options > Advanced > Back up to m. card.
SIM contacts
SIM contacts can contain names and numbers only. They are saved on the SIM card.
To add a SIM contact
1 Select Menu > Contacts.
2 Scroll to New contact and select Add.
3 Enter the name and select OK.
4 Enter the number and select OK.
5 Select a number option and add more information, if available.
6 Select Save.
Deleting contacts
To delete all contacts
1 Select Menu > Contacts.
2 Scroll to New contact and select Options > Advanced > Delete all contacts.
3 Select an option.
Contact memory status
The number of contacts you can save in your phone or on the SIM card depends on available memory.
To view contact memory status
1 Select Menu > Contacts.
2 Scroll to New contact and select Options > Advanced > Memory status.
Myself
You can enter information about yourself and, for example, send your business card.
To enter Myself information
1 Select Menu > Contacts.
2 Scroll to Myself and select Open.
3 Scroll to an option and edit the information.
4 Select Save.
To add your own business card
1 Select Menu > Contacts.
2 Scroll to Myself and select Open.
3 Scroll to My contact info and select Add > Create new.
4 Scroll between the tabs and add information to the fields.
5 Enter the information and select Save.
Groups
You can create a group of phone numbers and email addresses from Phone contacts to send messages to. See Messaging on page 35. You can also use groups (with phone numbers) when you create accepted callers lists. See Accept calls on page 20.
To create a group of numbers and email addresses
1 Select Menu > Contacts.
2 Scroll to New contact and select Options > Groups.
3 Scroll to New group and select Add.
4 Enter a name for the group and select Continue.
5 Scroll to New and select Add.
6 For each contact phone number or email address you want to mark, scroll to it and select Mark.
7 Select Continue > Done.
Speed dial
Speed dialling lets you select nine contacts that you can dial quickly from standby. The contacts can be saved in positions 1-9.
To add contacts to speed dial numbers
1 Select Menu > Contacts.
2 Scroll to New contact and select Options > Speed dial.
3 Scroll to a position number and select Add.
4 Select a contact.
To speed dial
- Enter the position number and press ↗.
More calling features
Voicemail
If your subscription includes an answering service, callers can leave a voicemail message when you cannot answer a call.
To enter your voicemail number
1 Select Menu > Messaging > Messages > Settings > the Message settings tab > Voicemail number.
2 Enter the number and select OK.
To call your voicemail service
- Press and hold down ①.
Voice control
By creating voice commands you can:
• Voice dial – call someone by saying their name
• Answer and reject calls when you use a handsfree
To record a voice command using voice dialling
1 Select Menu > Settings > General > Voice control > Voice dialling > Activate.
2 Select Yes > New voice command and select a contact. If the contact has more than one number, select the number to add the voice command to.
3 Record a voice command such as "John mobile."
4 Follow the instructions that appear. Wait for the tone and say the command to record. The voice command is played back to you.
5 If the recording sounds OK, select Yes. If not, select No and repeat steps 3 and 4.
! Voice commands are saved in the phone memory only. They cannot be used in another phone.
To voice dial
1 Press and hold down a volume key.
2 Wait for the tone and say a recorded name, for example "John mobile." The phone plays the name back to you and connects the call.
To activate voice answering and record voice answer commands
1 Select Menu > Settings > General > Voice control > Voice answer > Activate.
2 Follow the instructions that appear and select Continue. Wait for the tone and say "Answer", or say any other word.
3 Select Yes to accept or No for a new recording.
4 Wait for the tone and say "Busy", or say any other word.
5 Select Yes to accept or No for a new recording.
6 Follow the instructions that appear and select Continue.
7 Select the environments in which you want to activate voice answering.
To answer a call using voice commands
- Say "Answer."
To re-record a voice command
1 Select Menu > Settings > General > Voice control > Voice dialling > Edit names.
2 Scroll to a command and select Options > Replace voice.
3 Wait for the tone and say the command.
Diverting calls
You can divert calls, for example, to an answering service.
When Restrict calls is used, some divert call options are not available. See Restricted dialling on page 21.
To divert calls
1 Select Menu > Settings > Calls > Divert calls.
2 Select a call type and a divert option.
3 Select Activate. ✗ appears.
4 Enter the number to divert calls to and select OK.
More than one call
You can handle more than one call at a time. For example, you can put an ongoing call on hold, while you make or answer a second call. You can also switch between the two calls. You cannot answer a third call without ending one of the first two calls.
Call waiting
You will hear a beep if you receive a second call while call waiting is active.
To activate call waiting
- Select Menu > Settings > Calls > Manage calls > Call waiting > Activate.
To make a second call
1 During the call, press ⓡ. This puts the ongoing call on hold.
2 Select Options > Add call.
3 Enter the number to call and press ↗.
To answer a second call
- During the call, press 📞. This puts the ongoing call on hold.
- During the call, press ⬆ and continue with the ongoing call.
To reject a second call
To end an ongoing call and answer a second call
• During the call, select Replace active call.
Handling two voice calls
You can have calls ongoing and on hold at the same time.
To switch between two calls
• During the call, press ↗
To join two calls
• During the call, select Options > Join calls.
To connect two calls
- During the call, select Options > Transfer call. You are disconnected from both calls.
To end an ongoing call and return to the call on hold
- First press and then.
Conference calls
With a conference call, you can have a joint conversation with up to five people.
To add a new participant
1 During the call, press .This puts the joined calls on hold.
2 Select Options > Add call.
3 Enter the number to call and press ↗
4 Select Options > Join calls to add the new participant.
5 Repeat this task to add more participants.
To release a participant
1 Select Options > Release party.
2 Select the participant to release.
To have a private conversation
1 During the call, select Options > Talk to and select the participant to talk to.
2 To resume the conference call, select Options > Join calls.
My numbers
You can view, add and edit your own phone numbers.
To check your phone numbers
1 Select Menu > Contacts.
2 Scroll to New contact and select Options > Special numbers > My numbers.
3 Select an option.
Accept calls
You can choose to receive calls from certain phone numbers only.
To add numbers to the accepted callers list
1 Select Menu > Settings > Calls > Manage calls > Accept calls > Only from list.
2 Scroll to New and select Add.
3 Select a contact or Groups.
See Groups on page 18.
To accept all calls
- Select Menu > Settings > Calls > Manage calls > Accept calls > All callers.
Restricted dialling
You can restrict outgoing and incoming calls. A password from your service provider is required.
! If you divert incoming calls, you cannot use some restrict calls options.
Restrict calls options
Standard options are:
• All outgoing – all outgoing calls
- Outgoing intl – all outgoing international calls
- Outgoing intl roam. – all outgoing international calls except to your home country
- All incoming – all incoming calls
- Inc. when roaming – all incoming calls when you are abroad
To restrict calls
1 Select Menu > Settings > Calls > Manage calls > Restrict calls.
2 Select an option.
3 Select Activate.
4 Enter your password and select OK.
Call time and cost
During a call, the phone shows how long you have been talking. You can also check on the duration of your last call, your outgoing calls and the total time of all your calls.
To check the call time
- Select Menu > Settings > Calls > Time & cost > Call timers.
Showing or hiding your phone number
You can decide to show or hide your phone number when you make a call.
To hide your phone number
1 Select Menu > Settings > Calls > Show/hide my no..
2 Select Hide number.
Imaging
You can take photos and record video clips to view, save or send. You find saved photos and video clips in Media and in File manager.
Using the camera
To activate the camera
- Select Menu > Camera.
Viewfinder and camera keys
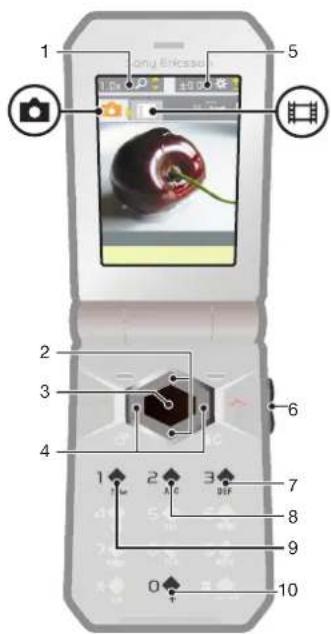
| 1 Zoom indicator | |
| 2 Zoom in or out | |
| 3 Take photos/Record video | |
| 4 Select still camera or video camera | |
| 5 Brightness indicator | |
| 6 Brightness | |
| 7 | Self-timer |
| 8 | Night mode |
| 9 | Camera: Shoot modeVideo: Video length |
| 10 Camera key guide | |
To take a photo
1 Activate the camera and press the navigation key to scroll to 📄.
2 Press the centre selection key to take a photo. The photo is automatically saved.
3 Press Back to return to the viewfinder to take another photo.
To record a video clip
1 Activate the camera and press the navigation key to scroll to
2 Press the centre selection key to start recording.
3 To stop recording, press the centre selection key. The video clip is automatically saved.
4 Press Back to return to the viewfinder to record another video clip.
To use zoom
- Press or
When taking a photo, zoom is available only in VGA picture size.
To adjust brightness
- Press the volume key up or down.
To view photos
1 Activate the camera and press the navigation key to scroll to
2 Select Options > View all photos
3 Press or to scroll to a photo.
To view video clips
1 Activate the camera and press the navigation key to scroll to
2 Select Options > View all clips.
3 Press ▶ or ◄ to scroll to a video clip and press the centre selection key. Video clips are indicated by ■ in the upper left corner.
More camera features
To change settings
• Activate the camera and select Options.
- Scroll to a setting and select Info.
To view information about settings
Photo fix
You can use Photo fix to improve photos. In a one-click operation, brightness, light and contrast are adjusted to give you the best possible photo. The improvements are saved as a copy of the photo. The original photo is not affected.
To improve a photo with Photo fix
1 Activate the camera and press the navigation key to scroll to 📄.
2 Make sure Review is set to On. Select Options > Review > On.
3 Take a photo.
4 During review, select Options > Photo fix.
5 Review the improvement and select Save to save.
6 If you do not want to save the improvement select Back.
Viewing and tagging photos
To view photos in a slide show
1 Select Menu > Media > Photo > Camera album.
2 Select a month.
3 Scroll to a photo and select View.
4 Select Options > Slide show.
5 Select a mood.
Viewing photos on a map
When you take a photo, you can attach your geographical position to it. This is called geo tagging. Geo-tagged photos are tagged with 📂n Media. If you cannot view photos on a map, see I cannot use Internet-based services on page 52.
Information provided by use of Geo Tagging is approximate and will require use of a compatible application. Sony Ericsson makes no warranty of any kind with respect to the accuracy of such location data.
To view photos on a map
1 Select Menu > Media > Photo > Camera album.
2 Select a month.
3 Scroll to a photo and select View.
4 Select Options > View on map.
To turn on or off geo tagging
1 Activate the camera and press the navigation key to scroll to
2 Select Options > Add position.
3 Select an option.
Photo tags
You can tag photos to categorise them in Photo tags. For example, you can create a tag called vacation and add it to all your vacation photos.
To create a new photo tag
1 Select Menu > Media > Photo > Camera album.
2 Select a month.
3 Scroll to a photo and select View.
4 Press ⏻ and select Options > New tag.
5 Enter a name and select OK.
6 Select an icon.
7 To tag the photo, select Options > Tag this photo.
To tag photos
1 Select Menu > Media > Photo > Camera album.
2 Select a month.
3 Scroll to a photo and select View.
4 Press ⬇ and scroll to a tag.
5 Select Options > Tag this photo.
6 For each photo you want to tag, scroll to the photo and select Options > Tag this photo.
Using photos
You can add a photo to a contact, use it during phone startup, as a wallpaper in standby or as a screen saver.
To use photos
1 Select Menu > Media > Photo > Camera album.
2 Select a month.
3 Scroll to a photo and select View.
4 Select Options > Use as.
5 Select an option.
Working with photos
You can view, enhance and organise your photos and video clips on your computer by installing the Adobe™ Photoshop™ Album Starter Edition. It is available for download at www.sonyericsson.com/support.
Use Media Go ^™ to transfer content to and from your phone. For more information, see Transferring content to and from a computer on page 32.
PhotoDJ™ and VideoDJ™
You can edit photos and video clips.
To edit and save a photo
1 Select Menu > Media > Photo > Camera album.
2 Select a month.
3 Scroll to a photo and select View.
4 Select Options > Edit in PhotoDJ™.
5 Edit the photo.
To edit and save a video clip
1 Select Menu > Organiser > File manager > Camera album.
2 Scroll to a video clip and select View.
3 Select Options > Edit in VideoDJ™.
4 Edit the video clip.
5 Select Options > Save.
To trim a video clip
1 Select Menu > Organiser > File manager > Camera album.
2 Scroll to a video clip and select Options > Edit in VideoDJ™ > Edit > Trim.
3 Select OK > Set > Start to set the starting point.
4 Select Set > End to set the ending point.
5 Select Trim > Options > Save.
Sending content to a Web site
If your subscription supports this service, you can send photos or video clips to a Web site. If you cannot send content to a Web site, see I cannot use Internet-based services on page 52.
! Web services may require a separate license agreement between you and the service provider. Additional regulations and charges may apply. Contact your service provider.
To send photos saved in your phone to a Web site
1 Select Menu > Media > Photo > Cam. album.
2 Select month and year.
3 Scroll to the photo and select Options > Send > To Web site.
4 Select a Web site.
5 Enter some text.
6 Select Continue > Send.
To send video clips saved in your phone to a Web site
1 Select Menu > Media > Video > Videos.
2 Scroll to a video clip and select Options > Send > To Web site.
3 Select a Web site from the list or select New Web site > Add.
4 Enter the email address used for sending to the Web site.
5 Enter the Web address and title.
6 Select Save.
7 Select a Web site from the list.
8 Enter text.
9 Select Continue > Send.
To send photos or video clips you have just taken to a Web site
1 When you have taken a photo or recorded a video clip, select Send > To Web site.
2 Select a Web site from the list or select New Web site > Add.
3 Enter the email address used for sending to the Web site.
4 Enter the Web address and title.
5 Select Save and select the Web site.
6 Enter text.
7 Select Continue > Send.
To go to a Web address from contacts
1 Select Menu > Contacts.
2 Scroll to a contact and select Open.
3 Scroll to a Web address and select Go to.
Printing photos
You can print photos using a USB cable connected to a PictBridge™ compatible printer.
You can also print using a Bluetooth compatible printer that supports the Object Push Profile.
To print photos using a USB cable
1 Select Menu > Organiser > File manager > Camera album > Open.
2 Select Options > Mark > Mark several or Mark all.
3 Select Options > Print and follow the instructions.
4 Connect the USB cable to the phone.
5 Connect the USB cable to the printer.
6 Wait for feedback in the phone.
7 Set printer settings if required and select Print.
Disconnect and re-connect the USB cable if there is a printer error.
Music
You can listen to music, audio books and podcasts. Use the Media Go™ application to transfer content to and from your phone. For more information, see Transferring content to and from a computer on page 32.
Stereo portable handsfree

natural_image
Illustration of a purple portable electronic device connected to earchairs and earplugs (no text or symbols visible)To use a handsfree
- Connect a portable handsfree. Music stops when you receive a call and resumes when the call has ended.
! If headphones are not included with the phone, you may purchase them separately.
Music player
To play music
1 Select Menu > Media > Music.
2 Browse by category using the navigation key.
3 Scroll to a title and select Play.
To stop playing music
- Press the centre selection key.
To fast forward and rewind
- Press and hold down or
To move between tracks
- Press or
To change the volume
- Press the volume key up or down.
To minimise the player
• Select Options > Minimise.
To return to the player
- Select Menu > Media.
Playlists
You can create playlists to organise your music. You can add tracks and folders to a playlist. It may take a few minutes for the phone to create a playlist.
To create a playlist
1 Select Menu > Media > Music > Playlists.
2 Scroll to New playlist and select Add.
3 Enter a name and select OK.
4 For each track you want to add, scroll to the track and select Mark.
5 Select Add to add the marked tracks to the playlist.
Audio books
If you use Media Go™ to transfer audio books to your phone from a computer, you can listen to the audio books in your phone. It may take a few minutes before a transferred audio book appears in the list of available audio books.
To access audio books
- Select Menu > Media > Music > Audio books.
You can find audio books in formats other than M4B and those that do not have ID3v2 chapter tags in the Tracks folder.
Buy Now
If you subscribe to a music service allowing limited, non-permanent use with your phone, you can mark a track you are interested in buying later. The next time you synchronise your music with Windows Media® Player on a computer with enabled Internet access, you should be asked if you want to buy the track you marked earlier. If you accept, the track is downloaded to your computer and your selected music service account is charged. This service requires a subscription and account with a downloadable music service, a computer with Microsoft® Windows Media® Player 11 or subsequent compatible version of Windows Media® Player, and a USB computer connection.
You cannot see that a track is marked. You cannot unmark tracks you have already marked.
To mark a track
- When the track you want to mark is playing, press and hold down .0 +
PlayNow™
When you select PlayNow™ you enter PlayNow™ arena, where you can download music, games, ringtones, themes and wallpapers. You can preview or listen to content before you purchase and download it to your phone. If you cannot use PlayNow™ and PlayNow™ arena, see I cannot use Internet-based services on page 52.
! This service is not available in all countries.
For extended functionality, you can also access the PlayNow™ arena Web shop on a computer from www.playnow-arena.com. For more information, go to www.sonyericsson.com/support to read the PlayNow™ arena Feature guide.
To use PlayNow™
1 Select Menu > PlayNow™.
2 Scroll through PlayNow™ arena and follow the instructions to preview and purchase content.
TrackID™
TrackID™ is a music recognition service. You can search for title, artist and album name for a track you hear playing through a loudspeaker or on the radio in your phone. If you cannot use TrackID™, see I cannot use Internet-based services on page 52.
To search for track information
- When you hear a track through a loudspeaker, select Menu > Entertainment > TrackID™ > Start.
- When the radio in your phone is playing select Options > TrackID™.

For best results, use TrackID ^TM in a quiet area.
Online music and video clips
You can view video clips and listen to music by streaming them to your phone from the Internet. If you cannot use the Internet, see I cannot use Internet-based services on page 52.
To select a data account for streaming
1 Select Menu > Settings > Connectivity > Streaming settings > Connect using:
2 Select the data account to use.
3 Select Save.
To stream music and video clips
1 Select Menu > Internet.
2 Select Options > Go to > Bookmarks.
3 Select a link to stream from.
Video player
To play videos
1 Select Menu > Media > Video > Videos.
2 Scroll to a title and select Play.
To stop playing videos
- Press the centre selection key.
To fast forward and rewind
- Press and hold down ◄ or ◀
To move between videos
- Press or
To change the volume
- Press the volume key up or down.
To change the video screen size
1 Select Options > Video size.
2 Select an option.
To save a picture from a video clip
1 To pause the video clip, press the centre selection key.
2 To save the paused image as a picture, select Options > Save picture.
Radio
Do not use your phone as a radio in places where this is prohibited.
To turn on the radio
1 Connect a handsfree to the phone.
2 Select Menu > Radio.
To search for channels automatically
- Select Search.
To search for channels manually
- Press or .
To change the volume
- Press the volume key up or down.
To minimise the radio
- Select Options > Minimise.
To return to the radio
- Select Menu > Radio.
Saving channels
You can save up to 20 preset channels.
To save channels automatically
- Select Options > Auto save.
To save channels manually
1 When you have found a radio channel, select Options > Save.
2 Scroll to a position and select Insert.
To select saved channels
1 Select Options > Channels.
2 Select a radio channel.
To switch between saved channels
- Press or
MusicDJ™
You can compose and edit your own melodies to use as ringtones. Pre-arranged sounds with different characteristics are available.
To compose a melody
1 Select Menu > Entertainment > MusicDJ™.
2 Select to Insert, Copy or Paste sounds.
3 Use , or to scroll between the sounds.
4 Select Options > Save melody.
Record sound
You can record a voice memo or a call. Recorded sounds can also be set as ringtones.
In some countries or states it is required by law that you inform the other person before recording the call.
To record a sound
- Select Menu > Entertainment > Record sound > Record.
To record a call
1 During an ongoing call, select Options > Record.
2 To save the recording, select Save.
To listen to a recording
1 Select Menu > Organiser > File manager.
2 Scroll to Music and select Open.
3 Scroll to a recording and select Play.
Transferring and handling content
You can transfer and handle content such as pictures and music.
You are not allowed to exchange some copyright-protected material. Identifies a protected item.
Handling content in the phone
You can use File manager to handle content saved in the phone memory or on a memory card. Tabs and icons in File manager show where the content is saved. If the memory is full, delete some content to create space.
To view memory status
1 Select Menu > Organiser > File manager.
2 Select Options > Memory status.
3 Select Memory card or Phone.
To select more than one item in a folder
1 Select Menu > Organiser > File manager.
2 Scroll to a folder and select Open.
3 Select Options > Mark > Mark several.
4 For each item you want to mark, scroll to the item and select Mark.
To move items between the phone memory and the memory card
1 Select Menu > Organiser > File manager.
2 Find an item and select Options > Manage file > Move.
3 Select Memory card or Phone.
4 Scroll to a folder and select Open.
5 Select Paste.
To view information about content
1 Select Menu > Organiser > File manager.
2 Find an item and select Options > Information.
Sending content to another phone
You can send content, for example, in messages or using Bluetooth ^™ wireless technology.
To send content
1 Scroll to an item and select Options > Send.
2 Select a transfer method.
! Make sure the receiving device supports the transfer method you select.
Using a USB cable
You can connect your phone to a computer with a USB cable. If you are using a PC, you are asked to install PC Companion the first time you connect.
You may have to purchase a USB cable separately. Only use a USB cable supported by your phone.
PC Companion
PC Companion lets you:
• Explore content in your phone.
• Use your phone as a modem.
• Install PC Software used to synchronise, transfer and back up phone content.

For more information, go to www.sonyericsson.com/support to read Feature guides.
To install PC Companion
1 Connect your phone to a PC with a USB cable supported by your phone.
2 Computer: Follow the instructions.
To disconnect the USB cable safely

Do not disconnect the USB cable when transferring content as this may corrupt the content.
1 Computer: Right-click the Safely Remove Hardware icon in Windows Explorer.
2 Select the drives you want to disconnect. Select Stop.
3 Wait for Windows to notify you that it is safe to remove the drive. Disconnect the USB cable.
Required operating systems
You need one of these operating systems to use Sony Ericsson PC software:
• Microsoft® Windows Vista™
• Microsoft® Windows XP, Service Pack 2 or higher
Drag and drop content
You can drag and drop content between your phone, a memory card and a computer in Microsoft Windows Explorer.
To drag and drop content
1 Connect your phone to a computer using a USB cable.
2 Computer: Wait until the phone memory and memory card appear as external disks in Windows Explorer.
3 Drag and drop selected files between the phone and the computer.
Transferring content to and from a computer
You can use Media Go ^™ to transfer media content between your phone and a computer.

Media Go™ is available for download through PC Companion or from www.sonyericsson.com/support.
To transfer content using Media Go ^TM
1 Connect the phone to a computer with a USB cable supported by your phone.
2 Computer: Select Start/Programs/Sony/Media Go™.
3 Select Transfer to or from Device using Media Go™ and click OK.
4 Wait until the phone appears in Media Go ^TM .
5 Move files between your phone and the computer in Media Go™.
Phone name
You can enter a name for your phone that is shown to other devices when using, for example, Bluetooth™ wireless technology.
To enter a phone name
1 Select Menu > Settings > Connectivity > Phone name.
2 Enter the phone name and select OK.
Using Bluetooth™ wireless technology
The Bluetooth ^™ function is free of charge and makes wireless connection to other Bluetooth devices possible. You can, for example:
- Connect to handsfree devices.
- Connect to several devices at the same time.
- Connect to computers and access the Internet.
• Exchange items.
• Play multiplayer games.
A range within 10 metres (33 feet), with no solid objects in between, is recommended for Bluetooth communication.
Before using Bluetooth wireless technology
You must turn on the Bluetooth function to communicate with other devices. You may also have to pair your phone with other Bluetooth devices.
To turn on the Bluetooth function
- Select Menu > Settings > Connectivity > Bluetooth > Turn on.
Make sure that the device you want to pair your phone with has the Bluetooth function activated and Bluetooth visibility turned on.
To pair the phone with a device
1 Select Menu > Settings > Connectivity > Bluetooth > My devices.
2 Scroll to New device and select Add to search for available devices.
3 Select a device.
4 Enter a passcode, if required.
To allow connection to the phone
1 Select Menu > Settings > Connectivity > Bluetooth > My devices.
2 Select a device from the list.
3 Select Options > Allow connection.
4 Select Always ask or Always allow.
This is only possible with devices that require access to a secure service.
To pair the phone with a Bluetooth handsfree for the first time
1 Select Menu > Settings > Connectivity > Bluetooth > Handsfree.
2 Select a device.
3 Enter a passcode, if required.
Power saving
You can save battery power with the Power save function. In Power save mode you can only connect with a single Bluetooth device. If you want to connect with more than one Bluetooth device at the same time you must turn this function off.
To turn on power save
- Select Menu > Settings > Connectivity > Bluetooth > Power save > On.
Transferring sound to and from a Bluetooth handsfree
You can transfer the sound to and from a Bluetooth handsfree using a phone key or the handsfree key.
To transfer sound
1 Select Menu > Settings > Connectivity > Bluetooth > Handsfree > Incoming call.
2 Select an option. In phone transfers sound to the phone. In handsfree transfers sound to the handsfree.
You need to answer the call with the phone key for this setting to apply.
To transfer sound during a call
1 During a call, select Sound.
2 Select from the list.
Backing up and restoring
You can back up and restore contacts, the calendar, tasks, notes and bookmarks using the Sony Ericsson PC Suite.
Before backing up and restoring, you need to install the Sony Ericsson PC Suite which is available through PC Companion or from www.sonyericsson.com/support.
You can back up and restore contacts in your phone using a memory card. You can move content between the memory card and the phone memory. See Handling content in the phone on page 31.
Back up your phone content regularly to make sure you do not lose it.
To make a backup using the Sony Ericsson PC Suite
1 Computer: Start the Sony Ericsson PC Suite from Start/Programs/Sony Ericsson/Sony Ericsson PC Suite.
2 Follow the instructions in the Sony Ericsson PC Suite for how to connect.
3 Go to the backup and restore section in the Sony Ericsson PC Suite and make a backup of your phone content.
To restore phone content using the Sony Ericsson PC Suite
The Sony Ericsson PC Suite will overwrite all the phone content during the restore process. You may damage your phone if you interrupt the process.
1 Computer: Start the Sony Ericsson PC Suite from Start/Programs/Sony Ericsson/Sony Ericsson PC Suite.
2 Follow the instructions in the Sony Ericsson PC Suite for how to connect.
3 Go to the backup and restore section in the Sony Ericsson PC Suite and restore your phone content.
Messaging
Text and picture messages
Messages can contain text, pictures, sound effects, animations, and melodies. You can also create and use templates for your messages.
When sending messages, the phone automatically selects the most suitable method (as a text or picture message) for sending the message.
If you cannot use picture messages, see I cannot use Internet-based services on page 52.
Sending messages
You can send messages from your phone. The maximum size of a standard text message is 160 characters including spaces if no other items are added to the message. If you enter more than 160 characters, a second message is created. Your messages are sent as one concatenated message.
To create and send a message
1 Select Menu > Messaging > Write new > Message.
2 Enter text. To add items to the message, press scroll and select an item.
3 Select Continue > Contacts look-up.
4 Select a recipient and select Send.
! If you send a message to a group, you may be charged for each member. Contact your service provider for details.
To copy and paste text in a message
1 When you write the message, select Options > Copy & paste.
2 Select Copy all or Mark & copy. Scroll to and mark text in the message.
3 Select Options > Copy & paste > Paste.
Receiving and saving messages
You are notified when you receive a message. ✉ or □ appears. Messages are automatically saved in the phone memory. When the phone memory is full, you can delete messages or save them on a memory card or on the SIM card.
To save an incoming message on a memory card
- Select Menu > Messaging > Messages > Settings > Save to > Memory card.
To save a message on the SIM card
1 Select Menu > Messaging > Messages and select a folder.
2 Scroll to a message and select Options > Save message.
To view a message from the inbox
1 Select Menu > Messaging > Messages > Inbox.
2 Scroll to the message and select View.
To call a number in a message
- When you view the message, scroll to the phone number and press ↗.
Message options
You can set some options, such as the Message alert and default storage location, to apply to all messages. You can set other options, such as the Delivery priority and Delivery time, for each message you send.
To set options for all messages
1 Select Menu > Messaging > Messages > Settings.
2 Select an option.
To set options for a specific message
1 When the message is ready and a recipient is selected, select Options > Advanced.
2 Scroll to an option and select Edit.
Conversations
You can choose whether to view your messages in Conversations or Inbox. A messaging conversation shows all messaging communication between you and one of your contacts.
To view messages in Conversations
- Select Menu > Messaging > Inbox > the Conversations tab.
- Select Menu > Messaging > Conversations and select a conversation.
To send a message from Conversations
1 Select Menu > Messaging.
2 Select Conversations, or select Inbox > the Conversations tab.
3 Select a conversation.
4 Write a message and select Send.
Voice messages
You can send and receive a sound recording as a voice message.
! The sender and recipient must have a subscription supporting picture messaging.
To record and send a voice message
1 Select Menu > Messaging > Write new > Voice message.
2 Record the message and select Stop > Send > Contacts look-up.
3 Select a recipient and select Send.
You can use standard email functions and your computer email address in your phone.
You can synchronise your email using Microsoft® Exchange ActiveSync® application.
Before using email
You can use the Basic setup to check if settings are available for your email account or you can enter them manually. You can also receive settings at www.sonyericsson.com/support.
To create an email account for the first time
1 To start the basic setup, select Menu > Messaging > Email.
2 Follow the instructions to create the account.
If you enter settings manually, you can contact your email provider for more information. An email provider could be the company that supplied your email address.
To write and send an email message
1 Select Menu > Messaging > Email > Write new.
2 Select Add > Enter email address. Enter the email address and select OK.
3 To add more recipients, scroll to To: and select Edit.
4 Scroll to an option and select Add > Enter email address. Enter the email address and select OK. When you are ready, select Done.
5 Select Edit and enter a subject. Select OK.
6 Select Edit and enter the text. Select OK.
7 Select Add and choose a file to attach.
8 Select Continue > Send.
To receive and read an email message
1 Select Menu > Messaging > Email > Inbox > Options > Check new email.
2 Scroll to the message and select View.
To save an email message
1 Select Menu > Messaging > Email > Inbox.
2 Scroll to the message and select View > Options > Save message.
To reply to an email message
1 Select Menu > Messaging > Email > Inbox.
2 Scroll to the message and select Options > Reply.
3 Write the reply and select OK.
4 Select Continue > Send.
To view an attachment in an email message
- When you view the message, select Options > Attachments > Use > View.
Active email account
If you have several email accounts, you can change which one is active. You can also automatically check for new email messages in the active account by setting a check interval.
To create additional email accounts
1 Select Menu > Messaging > Email > Accounts.
2 Scroll to New account and select Add.
To change the active email account
1 Select Menu > Messaging > Email > Accounts.
2 Select an account.
To set the interval for checking for new email messages
1 Select Menu > Messaging > Email > Accounts.
2 Select an account.
3 Select Settings > the Download tab > Check interval.
4 Select an option.
Push email
You can receive an immediate notification in your phone from your email server when you recieve a new email message.
When using push email, the phone stays connected to the email server and normal traffic rates apply. Contact your network operator for details.
To turn on push email
- Select Menu > Messaging > Email > Settings > Push email.
Instant messaging
You can connect and log in to the Instant messaging server to communicate online using chat messages. If you cannot use Instant messaging, see I cannot use Internet-based services on page 52.
Before using Instant messaging
If no settings exist in your phone, you need to enter server settings. Your service provider can provide standard settings information such as:
- Username
- Password
- Server address
- Internet profile
To enter Instant messaging server settings
1 Select Menu > Messaging > IM > Configure.
2 Scroll to a setting and select Add.
To log in to the Instant messaging server
- Select Menu > Messaging > IM > Log in.
To log out of the Instant messaging server
- Select Options > Log out.
To add a chat contact
1 Select Menu > Messaging > IM > the Contacts tab.
2 Select Options > Add contact.
To send a chat message
1 Select Menu > Messaging > IM > the Contacts tab.
2 Scroll to a contact and select Chat.
3 Write the message and select Send.
Status
You can show your status, for example, Happy or Busy, to your contacts only. You can also show your status to all users on the Instant messaging server.
To view my status
1 Select Menu > Messaging > IM.
2 You are the first contact listed.
To update your status
1 Select Menu > Messaging > IM > the Contacts tab.
2 Scroll to your name and select Change.
3 Edit the information and select Save.
Chat group
A chat group can be started by your service provider, by an individual Instant messaging user or by yourself. You can save chat groups by saving a chat invitation or by searching for a specific chat group.
To create a chat group
1 Select Menu > Messaging > IM > the Chat groups tab.
2 Select Options > Add chat group > New chat group.
3 Select who to invite from your contacts list and select Continue.
4 Enter a short invitation text and select Continue > Send.
To add a chat group
1 Select Menu > Messaging > IM > the Chat groups tab > Options > Add chat group.
2 Select an option.
! Conversation history is saved between log out and when you log in again to let you return to chat messages from previous conversations.
To save a conversation
1 Select Menu > Messaging > IM > the Conversations tab.
2 Enter a conversation.
3 Select Options > Advanced > Save conversation.
Internet
If you cannot use the Internet, see I cannot use Internet-based services on page 52.
To start browsing
1 Select Search.
2 Enter a Web address, a search phrase or the name of a bookmark.
3 Scroll to an item in the list and select Go to or Search.
To exit the browser
- Select Options > Exit browser.
Bookmarks
You can create and edit bookmarks as quick links to your favourite Web pages.
To create a bookmark
1 When you browse the Internet, select Options > Tools > Add bookmark.
2 Enter a title and an address. Select Save.
To select a bookmark
1 Select Menu > Internet.
2 Select Options > Go to > Bookmarks.
3 Scroll to a bookmark and select Go to.
History pages
You can view Web pages you have browsed.
To view history pages
- Select Menu > Internet > Options > Go to > History.
More browser features
To use pan and zoom on a Web page
1 When you browse the Internet, press #一号.
2 Use the navigation key to move the frame.
3 Press Zoom.
4 To switch back to pan, press
! To use pan and zoom, Smart-Fit must be turned off.
To turn on or off Smart-Fit Rendering™
1 Select Menu > Internet > Options > Advanced > Smart-Fit.
2 Select an option.
To make a call when you browse
- Press ↗.
To save a picture from a Web page
1 When you browse the Internet, select Options > Tools > Save picture.
2 Select a picture.
To find text on a Web page
1 Select Options > Tools > Find on page.
2 Enter text and select Find.
To send a link
1 When you browse the Internet, select Options > Tools > Send link.
2 Select a transfer method.
! Make sure the receiving device supports the transfer method you select.
Internet keypad shortcuts
You can use the keypad to go directly to an Internet browser function.
| Key Shortcut | |
| 1 | Bookmarks |
| 2 - 9 | Enter text to Enter address, Search Internet or search in Bookmarks |
| 0+ | Zoom |
| #~# | Pan & zoom (when Smart-Fit is off) |
To select Internet keypad shortcuts
1 Select Menu > Internet.
2 Select Options > Advanced > Keypad mode > Shortcuts.
Internet security and certificates
Your phone supports secure browsing. Certain Internet services, such as banking, require certificates in your phone. Your phone may already contain certificates when you buy it or you can download new certificates.
To view certificates in the phone
- Select Menu > Settings > General > Security > Certificates.
Web feeds
You can subscribe to and download frequently updated content, such as news, podcasts or photos, using Web feeds.
To add new feeds for a Web page
1 When you browse a page on the Internet that has Web feeds, indicated by ☑ select Options > Web feeds.
2 For each feed you want to add, scroll to the feed and select Mark.
3 Select Continue.
To search for Web feeds
1 Select Menu > Media > Web feeds.
2 Select New feed and enter a Web address.
To download content via Web feeds
1 Select Menu > Media > Web feeds.
2 Scroll to an updated feed and select View or ▶.
3 Select a heading to expand.
4 Select an icon depending on content, to open a Web page, to download an audio podcast, to download a video podcast or to download a photo.
You can also subscribe to and download content to a computer via feeds using Media Go™. You can then transfer the content to your phone.
Updating Web feeds
You can manually update your feeds, or schedule updates. When there are updates, 📋 appears on the screen.
To schedule Web feed updates
1 Select Menu > Media > Web feeds.
2 Scroll to a feed and select Options > Schedule update.
3 Select an option.
! Frequent updates may be costly.
Web feeds in standby
You can show news updates on the standby screen.
To show Web feeds in standby
1 Select Menu > Media > Web feeds.
2 Scroll to a feed and select Options > Settings > Standby ticker > Show in standby.
To access Web feeds from standby
1 Select Ticker.
2 To read more about a feed, press or to scroll to a headline and select Go to.
Podcasts
Podcasts are files, for example, radio programmes or video content, that you can download and play. You subscribe to and download podcasts using Web feeds.
To access audio podcasts
- Select Menu > Media > Music > Podcasts.
- Select Menu > Media > Video > Podcasts.
To access video podcasts
Photo feeds
You can subscribe to Photo feeds and download photos. To start using Photo feeds, see Web feeds on page 41.
To access photo feeds
- Select Menu > Media > Photo > Photo feeds.
YouTube™
You can watch video clips on your phone by using the YouTube™ application. You can search for video clips or upload your own videos.
To access YouTube
- Select Menu > Media > Video > YouTube.
To upload videos to YouTube, you need to access YouTube and follow the instructions in the application.
Synchronising
You can synchronise in two different ways. You can synchronise your phone using a computer program or you can synchronise using an Internet service.

Use only one of the synchronisation methods at a time with your phone.
For more information, go to www.sonyericsson.com/support to read the Synchronisation Feature guide.
Synchronising using a computer
You can use a USB cable or Bluetooth wireless technology to synchronise phone contacts, appointments, bookmarks, tasks and notes with a computer program such as Microsoft® Outlook®.
Before synchronising, you need to install the Sony Ericsson PC Suite.

Sony Ericsson PC Suite software is available for download through PC Companion or from www.sonyericsson.com/support.
See Required operating systems on page 32.
To synchronise using the Sony Ericsson PC Suite
1 Computer: Start Sony Ericsson PC Suite from Start/Programs/Sony Ericsson/Sony Ericsson PC Suite.
2 Follow the instructions in the Sony Ericsson PC Suite for how to connect.
3 When you are notified that the Sony Ericsson PC Suite has found your phone, you can start synchronising.

For usage details, see the Sony Ericsson PC Suite Help section once the software has been installed on your computer.
Synchronising using an Internet service
You can synchronise with an Internet service using SyncML™ or a Microsoft® Exchange Server using Microsoft Exchange ActiveSync. For more information, go to www.sonyericsson.com/support to read the Synchronisation Feature guide.
More features
Flight mode
In Flight mode the network and radio transceivers are turned off to prevent disturbance to sensitive equipment.
When the flight mode menu is activated you are asked to select a mode the next time you turn on your phone:
• Normal mode – full functionality
• Flight mode – limited functionality
To activate the flight mode menu
- Select Menu > Settings > General > Flight mode > Continue > Show at startup.
To select flight mode
1 When the flight mode menu is activated, turn off your phone.
2 Turn on your phone and select Flight mode. Appears.
Update Service
Your phone has software which you can update in order to improve performance. You can access Update Service using your phone or a PC with an Internet connection.
! Accessing Update Service using your phone is not possible in all countries/regions.
To view the current software in the phone
1 Select Menu > Settings > General > Update service.
2 Select Software version.
Update Service using the phone
You can update your phone over the air using your phone. You do not lose personal or phone information.
! Update Service using your phone requires data access such as GPRS, 3G or HSDPA.
To select settings for Update Service
- Select Menu > Settings > General > Update service > Settings > Internet settings.
To use Update Service using the phone
1 Select Menu > Settings > General > Update service.
2 Select Search for update and follow the instructions that appear.
Update Service using a PC
You can update your phone using a USB cable and an Internet-connected PC.
Make sure all personal data in your phone memory is backed up before you perform an update using a PC. See Backing up and restoring on page 34.
To use Update Service using a PC
- Go to www.sonyericsson.com/updateservice.
Location services
You can get help to find your way and save your favourite locations. With information from mobile towers near you, you may be able to view your approximate location on a map.
You can get more exact information about your location with a GPS accessory supported by your phone.
! If you cannot use some features of Location services, see I cannot use Internet-based services on page 52.
To use Google Maps ^TM for mobile
- Select Menu > Entertainment > Location services > Google Maps.
To learn more about Google Maps
- When you use Google Maps, select Options > Help.
To view your location
- When using Google Maps, press Ⓞ+
To view a saved location on a map
1 Select Menu > Entertainment > Location services > My favourites.
2 Scroll to a location and select Go to.
To access favourites from Google Maps
- Press *a/A.
Alarms
You can set a sound or the radio as an alarm signal. The alarm sounds even if the phone is turned off. When the alarm sounds you can silence it or turn it off.
To set the alarm
1 Select Menu > Alarms.
2 Scroll to an alarm and select Edit.
3 Scroll to Time: and select Edit.
4 Enter a time and select OK > Save.
To set the recurrent alarm
1 Select Menu > Alarms.
2 Scroll to an alarm and select Edit.
3 Scroll to Recurrent: and select Edit.
4 Scroll to a day and select Mark.
5 To select another day, scroll to the day and select Mark.
6 Select Done > Save.
To set the alarm signal
1 Select Menu > Alarms.
2 Scroll to an alarm and select Edit.
3 Scroll to the 🎯 tab.
4 Scroll to Alarm signal: and select Edit.
5 Find and select an alarm signal. Select Save.
To silence the alarm
- When the alarm sounds, press any key.
• To repeat the alarm, select Snooze.
To turn off the alarm
- When the alarm sounds, press any key, then select Turn off.
To cancel the alarm
1 Select Menu > Alarms.
2 Scroll to an alarm and select Turn off.
The alarm in silent mode
You can set the alarm not to sound when the phone is in silent mode.
To set an alarm to sound or not in silent mode
1 Select Menu > Alarms.
2 Scroll to an alarm and select Edit.
3 Scroll to the Jtab.
4 Scroll to Silent mode: and select Edit.
5 Select an option.
To set the snooze duration
1 Select Menu > Alarms.
2 Scroll to an alarm and select Edit.
3 Scroll to Snooze duration: and select Edit.
4 Select an option.
Calendar

You can synchronise your calendar with a computer calendar, with a calendar on the web or with a Microsoft® Windows Server® (Outlook®) application.
Appointments
You can add new appointments or reuse existing appointments.
To add an appointment
1 Select Menu > Organiser > Calendar.
2 Select a date.
3 Scroll to New appointment and select Add.
4 Enter the information and confirm each entry.
5 Select Save.
To view an appointment
1 Select Menu > Organiser > Calendar.
2 Select a date.
3 Scroll to an appointment and select View.
To edit an appointment
1 Select Menu > Organiser > Calendar.
2 Select a date.
3 Scroll to an appointment and select View.
4 Select Options > Edit.
5 Edit the appointment and confirm each entry.
6 Select Save.
To set when reminders should sound
1 Select Menu > Organiser > Calendar.
2 Select a date.
3 Select Options > Advanced > Reminders.
4 Select an option.
A reminders option set in calendar affects a reminders option set in tasks.
Notes
You can make notes and save them. You can also show a note in standby.
To add a note
1 Select Menu > Organiser > Notes.
2 Scroll to New note and select Add.
3 Write a note and select Save.
To show a note in standby
1 Select Menu >Organiser > Notes.
2 Scroll to a note and select Options > Show in standby.
To hide a note from standby
1 Select Menu > Organiser > Notes.
2 Scroll to the note shown in standby. This is marked with an icon. Select Options > Hide in standby.
Tasks
You can add new tasks or reuse existing tasks.
To add a task
1 Select Menu > Organiser > Tasks.
2 Select New task and select Add.
3 Select an option.
4 Enter details and confirm each entry.
To set when reminders should sound
1 Select Menu > Organiser > Tasks.
2 Scroll to a task and select Options > Reminders.
3 Select an option.
A reminders option set in tasks affects a reminders option set in calendar.
Profiles
You can change settings such as the ring volume and vibrating alert to suit different locations. You can reset all profiles to the phone's original settings.
To select a profile
1 Select Menu > Settings > General > Profiles.
2 Select a profile.
To view and edit a profile
1 Select Menu > Settings > General > Profiles.
2 Scroll to a profile and select Options > View and edit.
! You cannot rename the Normal profile.
Time and date
To set the time
1 Select Menu > Settings > General > Time & date > Time.
2 Enter the time and select Save.
To set the date
1 Select Menu > Settings > General > Time & date > Date.
2 Enter the date and select Save.
To set the time zone
1 Select Menu > Settings > General > Time & date > My time zone.
2 Select the time zone you are in.
! If you select a city, My time zone also updates the time when daylight saving time changes.
To change the clock size of the standby screen
1 Select Menu > Settings > Display > Clock size.
2 Select an option.
Theme
You can change the appearance of the screen through items such as colours and wallpaper. You can also create new themes and download them. For more information, go to www.sonyericsson.com/fun.
To set a theme
1 Select Menu > Settings > Display > Theme.
2 Scroll to a theme and select Set.
Main menu layout
You can change the layout of the icons in the main menu.
To change the main menu layout
1 Select Menu > Options > Main menu layout.
2 Select an option.
Ringtones
To set a ringtone
1 Select Menu > Settings > Sounds & alerts > Ringtone.
2 Find and select a ringtone.
To set the ringtone volume
1 Select Menu > Settings > Sounds & alerts > Ring volume.
2 Press ◆ or ◆ to change the volume.
3 Select Save.
To turn off the ringtone
- Press and hold down #...appears.
! The alarm signal is not affected.
To set the vibrating alert
1 Select Menu > Settings > Sounds & alerts > Vibrating alert.
2 Select an option.
Screen orientation
You can change between landscape and portrait orientation.
To change screen orientation in the browser
1 Select Menu > Internet.
2 Select Options > View.
3 Select Landscape or Portrait.
To change screen orientation in Media
1 Select Menu > Media > Settings > Orientation.
2 Select an option.
Mirror screen
You can use the phone screen as a mirror.
To activate the mirror
1 Open the phone.
2 Press □c
3 To deactivate the mirror, press any key or close the phone.
Games
Your phone contains preloaded games. You can also download games. For more information, go to www.sonyericsson.com/fun. Help texts are available for most games.
To start a game
1 Select Menu > Media > Games.
2 Select a game.
To end a game
- Press
Applications
You can download and run Java applications. You can also view information or set different permissions. If you cannot use Java applications, see I cannot use Internet-based services on page 52.
To select a Java application
1 Select Menu > Organiser > Applications.
2 Select an application.
To set permissions for a Java application
1 Select Menu > Organiser > Applications.
2 Scroll to an application and select Options > Permissions.
3 Set permissions.
Java application screen size
Some Java applications are designed for a specific screen size. For more information, contact the application vendor.
To set the screen size for a Java application
1 Select Menu > Organiser > Applications.
2 Scroll to an application and select Options > Screen size.
3 Select an option.
To set a Java ^TM application as a wallpaper
1 Select Menu > Settings > Display.
2 Select Wallpaper > Application.
3 Select a Java application.
You can only see the Java applications that have support for wallpaper.
Walk mate
Walk mate is a step counter application. It keeps track of how many steps you have walked and how many steps you have left towards a daily goal. You can put your phone in a pocket when you use Walk mate. You can also set Walk mate as wallpaper to view in standby.
To open Walk mate
- Select Menu > Organiser > Applications > Walk mate.
Locks
SIM card lock
This lock only protects your subscription. Your phone will work with a new SIM card. If the lock is on, you have to enter a PIN (Personal Identity Number).
If you enter your PIN incorrectly three times in a row, the SIM card is blocked and you need to enter your PUK (Personal Unblocking Key). Your PIN and PUK are supplied by your network operator.
To unblock the SIM card
1 When PIN blocked appears, enter your PUK and select OK.
2 Enter a new four-to-eight-digit PIN and select OK.
3 Re-enter the new PIN and select OK.
To edit the PIN
1 Select Menu > Settings > General > Security > Locks > SIM protection > Change PIN.
2 Enter your PIN and select OK.
3 Enter a new four-to-eight-digit PIN and select OK.
4 Re-enter the new PIN and select OK.
! If Codes do not match appears, you entered the new PIN incorrectly. If Wrong PIN appears, followed by Old PIN:, you entered your old PIN incorrectly.
To use the SIM card lock
1 Select Menu > Settings > General > Security > Locks > SIM protection > Protection.
2 Select an option.
3 Enter your PIN and select OK.
Phone lock
You can stop unauthorised use of your phone. Change the phone lock code (0000) to any four-to-eight-digit personal code.
It is important that you remember your new code. If you forget it, you have to take your phone to your local Sony Ericsson retailer.
To use the phone lock
1 Select Menu > Settings > General > Security > Locks > Phone protection > Protection.
2 Select an option.
3 Enter the phone lock code and select OK.
To unlock the phone
- When Phone locked appears, enter your phone lock code and select OK.
To change the phone lock code
1 Select Menu > Settings > General > Security > Locks > Phone protection > Change code.
2 Enter the old code and select OK.
3 Enter the new code and select OK.
4 Repeat the code and select OK.
IMEI number
Keep a copy of your IMEI (International Mobile Equipment Identity) number in case your phone is stolen.
To view your IMEI number
- Press (※a), (#一) 0+ 6 (#一)
Troubleshooting
Some problems can be fixed using Update Service. Using Update Service on a regular basis will optimise the phone's performance. See Update Service on page 44.
Some problems will require you to call your network operator.
For more support go to www.sonyericsson.com/support.
Common questions
Where can I find the regulatory information such as my IMEI number if I cannot turn on my phone?

natural_image
3D illustration of a device casing with a labeled internal component and an arrow pointing to it (no readable text or symbols)I have problems with memory capacity or the phone is working slowly
Restart your phone every day to free memory or do a Master reset.
Master reset
If you select Reset settings, the changes that you have made to settings will be deleted.
If you select Reset all, your settings and content, such as contacts, messages, pictures, sounds and downloaded games, will be deleted. You may also lose content that was in the phone at purchase.
To reset the phone
1 Select Menu > Settings > General > Master reset.
2 Select an option.
3 Follow the instructions that appear.
I cannot charge the phone or battery capacity is low
The charger is not properly connected or the battery connection is poor. Remove the battery and clean the connectors.
The battery is worn out and needs to be replaced. See Charging the battery on page 6.
No battery icon appears when I start charging the phone
It may take a few minutes before the battery icon appears on the screen.
Some menu options appear in grey
A service is not activated. Contact your network operator.
I cannot use Internet-based services
Your subscription does not include data capability. Settings are missing or incorrect.
You can download settings using the Settings download or from www.sonyericsson.com/support.
To download settings
1 Select Menu > Settings > User help > Settings download.
2 Follow the instructions that appear.

Contact your network operator or service provider for more information.
I cannot send messages from my phone
To send messages, you need to set a service centre number. The number is supplied by your service provider and is usually saved on the SIM card. If the number to your service centre is not saved on your SIM card, you must enter the number yourself.
To send most picture messages, you must set an MMS profile and the address of your message server. If no MMS profile or message server exists, you can receive all the settings automatically from your network operator, download settings using the Basic setup or at www.sonyericsson.com/support.
To enter a service centre number
1 Select Menu > Settings > Connectivity > Message settings > Text message and scroll to Service centre. The number is shown if it is saved on the SIM card.
2 If there is no number shown, select Edit.
3 Scroll to New ServiceCentre and select Add.
4 Enter the number, including the international “+” sign and country code.
5 Select Save.
To select an MMS profile
1 Select Menu > Settings > Connectivity > Message settings > Picture message.
2 Select an existing profile or create a new one.
To set the message server address
1 Select Menu > Settings > Connectivity > Message settings > Picture message.
2 Scroll to a profile and select Options > Edit.
3 Scroll to Message server and select Edit.
4 Enter the address and select OK > Save.
The phone does not ring or rings too softly
Make sure that Silent mode has not been set to On. See To turn off the ringtone on page 48.
Check the ringtone volume. See To set the ringtone volume on page 48.
Check the profile. See To select a profile on page 47.
Check the divert call options. See To divert calls on page 19.
The phone cannot be detected by other devices using Bluetooth wireless technology
You have not turned the Bluetooth function on. Make sure that the visibility is set to Show phone. See To turn on the Bluetooth function on page 33.
I cannot synchronise or transfer content between my phone and my computer, when using a USB cable.
The cable or software has not been properly installed. Go to www.sonyericsson.com/support to read Feature guides which contain detailed installation instructions and troubleshooting sections.
I have forgotten my code memo passcode
If you forget your passcode, you must reset the code memo. This means that all entries in the code memo are deleted. The next time you enter the code memo, you must proceed as if you are opening it for the first time.
To reset Code memo
1 Select Menu > Organiser > Code memo.
2 Enter an incorrect passcode three times.
3 Reset Code memo and delete all items? appears.
4 Select Yes.
Error messages
Insert SIM
There is no SIM card in your phone or you may have inserted it incorrectly.
See To insert the SIM card on page 4.
The SIM card connectors need cleaning. If the card is damaged, contact your network operator.
Insert correct SIM card
Your phone is set to work only with certain SIM cards. Check if you are using the correct operator SIM card.
Wrong PIN/Wrong PIN2
You have entered your PIN or PIN2 incorrectly.
Enter the correct PIN or PIN2 and select Yes.
PIN blocked/PIN2 blocked
You have entered your PIN or PIN2 code incorrectly three times in a row.
To unblock, see SIM card lock on page 50.
Codes do not match
Codes that you have entered do not match. When you want to change a security code, for example your PIN, you have to confirm the new code. See SIM card lock on page 50.
No netw. coverage
- Your phone is in flight mode. See Flight mode on page 44.
- Your phone is not receiving any network signal, or the received signal is too weak. Contact your network operator and make sure that the network has coverage where you are.
- The SIM card is not working properly. Insert your SIM card in another phone. If this works, it is probably your phone that is causing the problem. Please contact the nearest Sony Ericsson service location.
Emerg. calls only
You are within range of a network, but you are not allowed to use it. However, in an emergency, some network operators allow you to call the international emergency number 112. See Emergency calls on page 15.
PUK blocked. Contact operator.
You entered your personal unblocking key code (PUK) incorrectly 10 times in a row.
Sony Ericsson F100i
This User guide is published by Sony Ericsson Mobile Communications AB or its local affiliated company, without any warranty. Improvements and changes to this User guide necessitated by typographical errors, inaccuracies of current information, or Improvements to programs and/or equipment, may be made by Sony Ericsson Mobile Communications AB at any time and without notice. Such changes will, however, be incorporated into new editions of this User guide. All rights reserved.
©Sony Ericsson Mobile Communications AB, 2009
Publication number: 1230-0083.1
Attention: Some of the services and features described in this User guide are not supported by all networks and/or service providers in all areas. Without limitation, this applies to the GSM International Emergency
Number 112. Please contact your network operator or service provider to determine availability of any specific service or feature and whether additional access or usage fees apply.
Please read the Important information before you use your mobile phone.
Your mobile phone has the capability to download, store and forward additional content, e.g. ringtones. The use of such content may be restricted or prohibited by rights of third parties, including but not limited to restriction under applicable copyright laws. You, and not Sony Ericsson, are entirely responsible for additional content that you download to or forward from your mobile phone. Prior to your use of any additional content, please verify that your intended use is properly licensed or is otherwise authorized. Sony Ericsson does not guarantee the accuracy, integrity or quality of any additional content or any other third party content. Under no circumstances will Sony Ericsson be liable in any way for your improper use of additional content or other third party content.
Smart-Fit Rendering is a trademark or a registered trademark of ACCESS Co., Ltd.
Bluetooth is a trademark or a registered trademark of Bluetooth SIG Inc. and any use of such mark by Sony Ericsson is under license.
The Liquid Identity logo, BestPic, PlayNow, MusicDJ, PhotoDJ, SensMe, TrackID and VideoDJ are trademarks or registered trademarks of Sony Ericsson Mobile Communications AB.
TrackID™ is powered by Gracenote Mobile MusicID™. Gracenote and Gracenote Mobile MusicID are trademarks or registered trademarks of Gracenote, Inc.
Sony is a trademark or registered trademark of Sony Corporation.
Media Go is a trademark or registered trademark of Sony Media Software and Services.
microSD is a trademark or a registered trademark of SanDisk Corporation.
PictBridge is a trademark or registered trademark of Canon Kabushiki Kaisha Corporation.
Google™, Google Maps™, YouTube and the YouTube logo are trademarks or registered trademarks of Google, Inc. SyncML is a trademark or registered trademark of Open Mobile Alliance LTD.
Ericsson is a trademark or registered trademark of Telefonaktiebolaget LM Ericsson.
Adobe Photoshop Album Starter Edition is a trademark or registered trademark of Adobe Systems Incorporated in the United States and/or other countries.
Microsoft, Windows, Outlook, Windows Vista, Windows Server and ActiveSync are registered trademarks or trademarks of Microsoft Corporation in the United States and/or other countries.
T9™ Text Input is a trademark or a registered trademark of Tegic Communications. T9™ Text Input is licensed under one or more of the following: U.S. Pat. Nos. 5,818,437, 5,953,541, 5,187,480, 5,945,928, and 6,011,554; Canadian Pat. No. 1,331,057, United Kingdom Pat. No. 2236414B; Hong Kong Standard Pat. No. HK0940329; Republic of Singapore Pat. No. 51363; Euro.Pat. No. 842 463(96827260.8) DE/DK, FI, FR, IT, NL, PT, ES, SE, GB; and additional patents are pending worldwide.
This product is protected by certain intellectual property rights of Microsoft. Use or distribution of such technology outside of this product is prohibited without a license from Microsoft.
Content owners use Windows Media digital rights management technology (WMDRM) to protect their intellectual property, including copyrights. This device uses WMDRM software to access WMDRM-protected content. If the WMDRM software fails to protect the content, content owners may ask Microsoft to revoke the software's ability to use WMDRM to play or copy protected content. Revocation does not affect unprotected content. When you download licenses for protected content, you agree that Microsoft may include a revocation list with the licenses. Content owners may require you to upgrade WMDRM to access their content. If you decline an upgrade, you will not be able to access content that requires the upgrade.
This product is licensed under the MPEG-4 visual and AVC patent portfolio licenses for the personal and non-commercial use of a consumer for (i) encoding video in compliance with the MPEG-4 visual standard ("MPEG-4 video") or the AVC standard ("AVC video") and/or (ii) decoding MPEG-4 or AVC video that was encoded by a consumer engaged in a personal and non-commercial activity and/or was obtained from a video provider licensed by MPEG LA to provide MPEG-4 and/or AVC video. No license is granted or shall be implied for any other use. Additional information including that relating to promotional, internal and commercial uses and licensing may be obtained from MPEG LA, L.L.C. See http://www.mpegla.com. MPEG Layer 3 audio decoding technology licensed from Fraunhofer IIS and Thomson.
Java, JavaScript and Java-based trademarks and logos are trademarks or registered trademarks of Sun Microsystems, Inc. in the U.S. and other countries.
End-user license agreement for Sun Java Platform, Micro Edition.
-
Restrictions: Software is confidential copyrighted information of Sun and title to all copies is retained by Sun and/or its licensors. Customer shall not modify, decompile, disassemble, decrypt, extract, or otherwise reverse engineer Software. Software may not be leased, assigned, or sublicensed, in whole or in part.
-
Export Regulations: This product, including any software or technical data contained in or accompanying the product, may be subject to import and export regulations of the European Union, the United States and other countries. The user and any possessor of the product agrees to comply strictly with all such regulations and acknowledges that it is their responsibility to obtain any required licenses to export, re-export, or import this product. Without limiting the foregoing, and as an example, the user and any possessor of the product: (1) must not knowingly export or re-export Products to destinations identified pursuant to Articles in Chapter II of European Council Regulation (EC) 1334/2000; (2), must comply with U.S. government Export Administration Regulations ("EAR", 15 C.F.R. §§ 730-774, http://www.bis.doc.gov/) administered by Department of Commerce, Bureau of Industry and Security; and (3) must comply with economic sanctions regulations (30 C.F.R. §§ 500 et. seq., ..., http://www.treas.gov/offices/enforcement/ofac/) administered by the U.S. Department of Treasury, Office of Foreign Assets Control. The user and any possessor of the product may not transport or deliver the product, its accessories or separate software to any country, region, entity or person prohibited by these regulations.
Restricted Rights: Use, duplication or disclosure by the United States government is subject to the restrictions as set forth in the Rights in Technical Data and Computer Software Clauses in DFARS 252.227-7013(c) (1) (ii) and FAR 52.227-19(c) (2) as applicable.
Other product and company names mentioned herein may be the trademarks of their respective owners.
Any rights not expressly granted herein are reserved.
All illustrations are for illustration only and may not accurately depict the actual phone.
Index
A
activity menu ....11
alarms 45
answering service ....18
applications 49
appointments 46
assembly 4
audio book 28
B backing up and restoring ....34
battery capacity ....6 charging ....6 inserting ....4
Bluetooth™ wireless technology ....32
bookmarks 40
business card 17
C calendar ....46 call divert ....19 call list ....15 call numbers in message ....35 call time ....21 caller-specific ringtones ....16 calls
accepting 20
answering and rejecting 14
emergency 15
handling two calls 20
international 14
making and receiving 14
putting on hold 19
recording 30
video 14
camera ....22 printing ....26
code memo 53
conference calls ....20
contacts adding phone contacts ....16 default contacts ....15 groups ....18 Smart search ....16
costs 5
D date ....47 download settings ....53 downloading music ....28
E email ....36 emergency numbers ....15 entering text ....12
F file manager ....31 flight mode ....44
G games ....49 geo tagging ....24 groups ....18
H handsfree ....18, 27 Bluetooth™ wireless technology ....33
help 5
hiding number 21
Imaging 22
IMEI number 51
instant messaging 38
Internet bookmarks 40
screen orientation 49
security and certificates 41
settings 52
K keys ....7
L language ....12 location services ....45 lock phone ....50 SIM card ....50
M master reset ....52 Media Go™ ....32 media transfer ....32 memory ....11 memory card ....11 memory status ....17 menu overview ....9
messages email ....36 picture ....35 text ....35 voice ....36
microphone ....14 mirror ....49
MMS See picture messages model name ....6 music player ....27 MusicDJ™ ....30 my numbers ....20 my phone number ....6
N navigating menus ....10 notes ....47
O online music ....29 video clips ....29
P pan and zoom Web pages .....40 PC Companion .....31 PC Suite .....43 phone turning on .....5 phone memory .....6, 11 phone name .....32 photo fix .....23 PhotoDJ™ .....25 photos .....23
editing 25
feeds 42
geo tagging 24
improving 23
printing 26
tags 24
picture messages 35
pictures 23
PIN 5,50
playlists 27
PlayNow™ 28
podcasts ....42
power saving 33
profiles 47
PUK 50
push email 37
R
radio 29
recording
listening to 30
restricted dialling 21
ringtones 48
setting 48
roaming 5
RSS feeds See Web feeds
S
screen icons 8
screen orientation 48, 49
search
on Web pages 40
selection keys 10
setting
ringtones 48
setting
download 53
Internet 52
shortcuts 10
SIM card
copying to/from 16, 17
inserting 4
lock and unblock ....50
SMS See text messages
SOS See emergency numbers
sound recorder 30
speed dialling 18
standby 5
notes 47
step counter 50
streaming 29
synchronising 43
T
T9™ Text Input 12
tagging photos 23
tasks 47
text messages 35
theme 48
time 47,48
time zone 48
TrackID™ 28
transfer method
Bluetooth™ wireless technology ....32
USB cable 31
transferring
music 32
photos 32
sound 33
turning on/off
Bluetooth™ function 33
phone lock 50
SIM lock protection ....50
U
Update Service 44
USB cable 31
V
video editing 25
video player 29
video recorder 22
video ringtones ....48
VideoDJ™ 25
voice control 18
voice messages 36
voicemail 18
volume
ear speaker 14
ringtone 48
W
Walk mate ....50
Web feeds 41
Web pages
history 40
Y
YouTube 42
Z
zoom 23


- Calling....14
- Imaging 22
- Music 27
- Transferring and handling content......31
- Messaging....35
- Internet 40
- Synchronising....43
- More features....44
- Troubleshooting....52
- Getting started
- Instruction symbols
- Assembly
- Turning on the phone
- SIM card
- PIN
- Standby
- Using other networks
- Help
- To access the User guide
- To view tips and tricks
- To view information about functions
- To view the phone demonstration
- To view the phone status
- Charging the battery
- To charge the battery
- Phone overview
- Screen icons
- Menu overview\*
- Navigation
- Tabs
- Shortcuts
- To use navigation key shortcuts
- To edit a navigation key shortcut
- Main menu shortcuts
- To go directly to a main menu item
- Activity menu
- To open the activity menu
- Memory
- Memory card
- To insert a memory card
- To remove a memory card
- Phone language
- To change the phone language
- Entering text
- To change writing language
- To change text input method
- To shift between capitals and lower-case letters
- To enter numbers
- To enter full stops and commas
- To enter a symbol
- To enter text using T9 TM Text Input
- To enter text using multitap text input
- To add words to the built-in dictionary
- Calling
- Making and receiving calls
- To make a call
- To end a call
- To make international calls
- To re-dial a number
- To answer a call
- To reject a call
- To mute the microphone during a call
- To view missed calls from standby
- Video call
- Before making video calls
- To make a video call
- Emergency calls
- Networks
- To switch networks manually
- Call list
- To call a number from the call list
- Contacts
- Default contacts
- To select default contacts
- Phone contacts
- To add a phone contact
- Calling contacts
- To call a contact
- To go directly to the contacts list
- To call with Smart search
- To turn on or off Smart search
- Editing contacts
- To add information to a phone contact
- To copy names and numbers to phone contacts
- To copy names and numbers to the SIM card
- To automatically save names and phone numbers on the SIM card
- To save contacts on a memory card
- SIM contacts
- To add a SIM contact
- Deleting contacts
- To delete all contacts
- Contact memory status
- To view contact memory status
- Myself
- To enter Myself information
- To add your own business card
- Groups
- To create a group of numbers and email addresses
- Speed dial
- To add contacts to speed dial numbers
- To speed dial
- More calling features
- Voicemail
- To enter your voicemail number
- To call your voicemail service
- Voice control
- To record a voice command using voice dialling
- To voice dial
- To activate voice answering and record voice answer commands
- To answer a call using voice commands
- To re-record a voice command
- Diverting calls
- To divert calls
- More than one call
- Call waiting
- To activate call waiting
- To make a second call
- To answer a second call
- To reject a second call
- Handling two voice calls
- To switch between two calls
- Conference calls
- To add a new participant
- My numbers
- To check your phone numbers
- Accept calls
- To add numbers to the accepted callers list
- Restricted dialling
- Restrict calls options
- To restrict calls
- Call time and cost
- To check the call time
- Showing or hiding your phone number
- To hide your phone number
- Imaging
- Using the camera
- To take a photo
- To record a video clip
- To use zoom
- To adjust brightness
- To view photos
- To view video clips
- More camera features
- To change settings
- To view information about settings
- Photo fix
- To improve a photo with Photo fix
- Viewing and tagging photos
- To view photos in a slide show
- Viewing photos on a map
- To view photos on a map
- To turn on or off geo tagging
- Photo tags
- To create a new photo tag
- To tag photos
- Using photos
- To use photos
- Working with photos
- PhotoDJ™ and VideoDJ™
- To edit and save a photo
- To edit and save a video clip
- To trim a video clip
- Sending content to a Web site
- To send photos saved in your phone to a Web site
- To send video clips saved in your phone to a Web site
- To send photos or video clips you have just taken to a Web site
- To go to a Web address from contacts
- Printing photos
- To print photos using a USB cable
- Music
- Stereo portable handsfree
- To use a handsfree
- Music player
- To play music
- To stop playing music
- To fast forward and rewind
- To move between tracks
- To change the volume
- To minimise the player
- To return to the player
- Playlists
- To create a playlist
- Audio books
- To access audio books
- Buy Now
- To mark a track
- PlayNow™
- To use PlayNow™
- TrackID™
- To search for track information
- Online music and video clips
- Video player
- Radio
- Saving channels
- MusicDJ™
- Record sound
- Transferring and handling content
- Handling content in the phone
- To view memory status
- To select more than one item in a folder
- To move items between the phone memory and the memory card
- To view information about content
- Sending content to another phone
- To send content
- Using a USB cable
- PC Companion
- To install PC Companion
- To disconnect the USB cable safely
- Required operating systems
- Drag and drop content
- To drag and drop content
- Transferring content to and from a computer
- To transfer content using Media Go TM
- Phone name
- To enter a phone name
- Using Bluetooth™ wireless technology
- Before using Bluetooth wireless technology
- To turn on the Bluetooth function
- To pair the phone with a device
- To allow connection to the phone
- To pair the phone with a Bluetooth handsfree for the first time
- Power saving
- To turn on power save
- Transferring sound to and from a Bluetooth handsfree
- To transfer sound
- To transfer sound during a call
- Backing up and restoring
- To make a backup using the Sony Ericsson PC Suite
- To restore phone content using the Sony Ericsson PC Suite
- Messaging
- Text and picture messages
- Sending messages
- To create and send a message
- To copy and paste text in a message
- Receiving and saving messages
- To save an incoming message on a memory card
- To save a message on the SIM card
- To view a message from the inbox
- To call a number in a message
- Message options
- To set options for all messages
- To set options for a specific message
- Conversations
- To view messages in Conversations
- To send a message from Conversations
- Voice messages
- To record and send a voice message
- Before using email
- To create an email account for the first time
- To write and send an email message
- To receive and read an email message
- To save an email message
- To reply to an email message
- To view an attachment in an email message
- Active email account
- To create additional email accounts
- To change the active email account
- To set the interval for checking for new email messages
- Push email
- To turn on push email
- Instant messaging
- Before using Instant messaging
- Status
- Chat group
- To add a chat group
- To save a conversation
- Internet
- To start browsing
- Bookmarks
- To create a bookmark
- History pages
- More browser features
- To send a link
- Internet keypad shortcuts
- To select Internet keypad shortcuts
- Internet security and certificates
- To view certificates in the phone
- Web feeds
- To add new feeds for a Web page
- To search for Web feeds
- To download content via Web feeds
- Updating Web feeds
- To schedule Web feed updates
- Web feeds in standby
- To show Web feeds in standby
- To access Web feeds from standby
- Podcasts
- To access audio podcasts
- To access video podcasts
- Photo feeds
- To access photo feeds
- YouTube™
- To access YouTube
- Synchronising
- Synchronising using a computer
- To synchronise using the Sony Ericsson PC Suite
- Synchronising using an Internet service
- More features
- Flight mode
- Update Service
- Update Service using the phone
- Update Service using a PC
- Location services
- Alarms
- To set the alarm
- To set the recurrent alarm
- To set the alarm signal
- To silence the alarm
- To turn off the alarm
- To cancel the alarm
- The alarm in silent mode
- To set an alarm to sound or not in silent mode
- To set the snooze duration
- Calendar
- Appointments
- To add an appointment
- To view an appointment
- To edit an appointment
- To set when reminders should sound
- Notes
- To add a note
- To show a note in standby
- To hide a note from standby
- Tasks
- To add a task
- Profiles
- To select a profile
- To view and edit a profile
- Time and date
- To set the time
- To set the date
- To set the time zone
- To change the clock size of the standby screen
- Theme
- To set a theme
- Main menu layout
- To change the main menu layout
- Ringtones
- To set a ringtone
- To set the ringtone volume
- To turn off the ringtone
- To set the vibrating alert
- Screen orientation
- To change screen orientation in the browser
- To change screen orientation in Media
- Mirror screen
- To activate the mirror
- Games
- To start a game
- To end a game
- Applications
- To select a Java application
- To set permissions for a Java application
- Java application screen size
- To set the screen size for a Java application
- To set a Java TM application as a wallpaper
- Walk mate
- To open Walk mate
- Locks
- SIM card lock
- To unblock the SIM card
- To edit the PIN
- To use the SIM card lock
- Phone lock
- To use the phone lock
- To unlock the phone
- To change the phone lock code
- IMEI number
- To view your IMEI number
- Troubleshooting
- Common questions
- Master reset
- To reset the phone
- I cannot charge the phone or battery capacity is low
- No battery icon appears when I start charging the phone
- Some menu options appear in grey
- I cannot use Internet-based services
- To download settings
- I cannot send messages from my phone
- To enter a service centre number
- To select an MMS profile
- To set the message server address
- The phone does not ring or rings too softly
- The phone cannot be detected by other devices using Bluetooth wireless technology
- I cannot synchronise or transfer content between my phone and my computer, when using a USB cable.
- I have forgotten my code memo passcode
- To reset Code memo
- Error messages
- Insert SIM
- Insert correct SIM card
- Wrong PIN/Wrong PIN2
- PIN blocked/PIN2 blocked
- Codes do not match
- No netw. coverage
- Emerg. calls only
- PUK blocked. Contact operator.
- Sony Ericsson F100i
- Number 112. Please contact your network operator or service provider to determine availability of any specific service or feature and whether additional access or usage fees apply.
- Index
- R
- S
- T
- U
- V
- W
- Y
- Z
Brand : SONY ERICSSON
Model : Jalou
Category : Smartphone