
AOC-S3108L-H8IR - Régulateur Supermicro - Free user manual and instructions
Find the device manual for free AOC-S3108L-H8IR Supermicro in PDF.


| Product Type | SAS RAID Controller |
| Brand | Supermicro |
| Model | AOC-S3108L-H8IR |
| Controller Chip | Avago SAS 3108 |
| Host Interface | PCI-Express 3.0 x8 |
| Internal SAS Ports | 8 (via 2 mini SAS HD connectors) |
| Supported RAID Levels | 0, 1, 5, 6, 10, 50, 60 |
| Cache Memory | 2 GB DDR3 ECC Unbuffered (1866 MHz max) |
| Cache Protection | Optional SuperCap/CacheVault (BTR-TFM8G-LSICVM02) |
| Maximum Physical Devices | 240 |
| Data Transfer Rate | SAS: 1.5, 3.0, 6.0, 12.0 Gb/s; SATA: 3.0, 6.0 Gb/s |
| Supported Protocols | SSP, SMP, STP, SATA |
| Form Factor | Low-profile MD2 (2.71" x 6.6") |
| Dimensions (H x L) | 2.71" (68.83 mm) x 6.6" (167.64 mm) |
| Power Consumption | 23 Watts |
| Operating Temperature | 0°C to 55°C (32°F to 131°F) |
| Supported Operating Systems | Windows Server 2012, 2008 (64/32-bit), RedHat Enterprise Linux, SUSE Linux |
| Management Software | MegaRAID Storage Manager, MegaCLI (DOS) |
| Optional Accessories | CacheCade license (AOC-CHCD-PRO2-ESW), SuperCap/CacheVault kit (MCP-240-001270N) |
| Installation Precautions | Use ESD wrist strap, handle by edges, avoid contact with components |
| Warranty | Contact distributor for RMA; warranty covers normal consumer use |
Frequently Asked Questions - AOC-S3108L-H8IR Supermicro
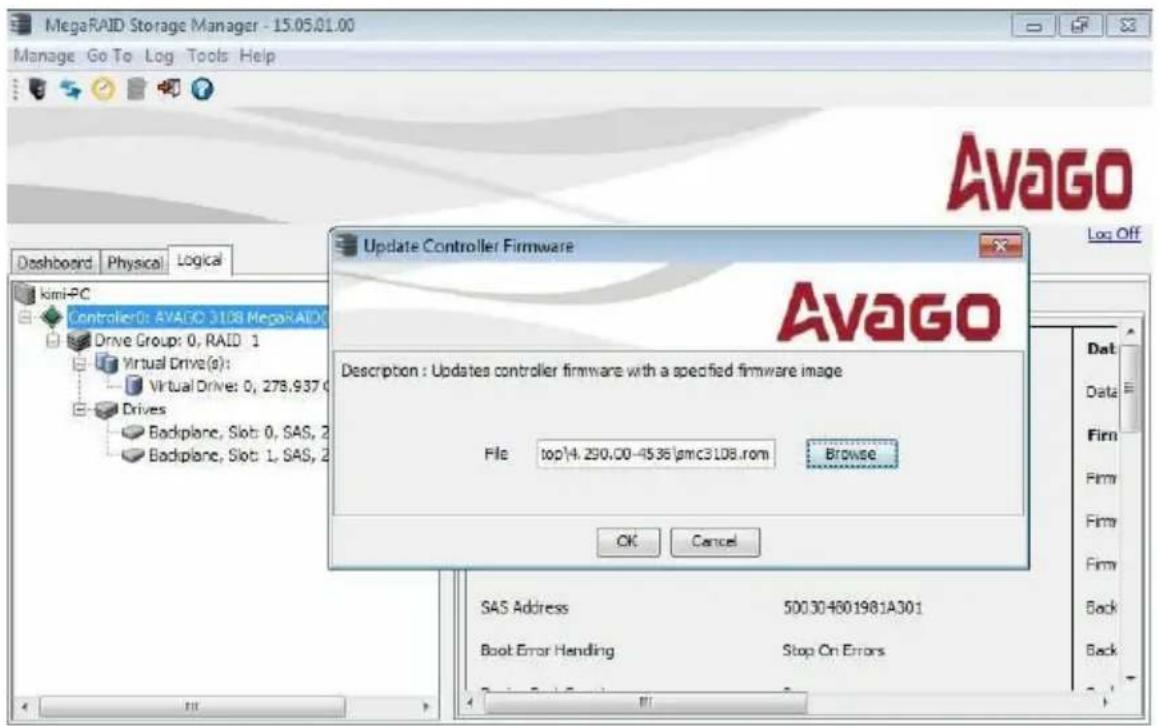
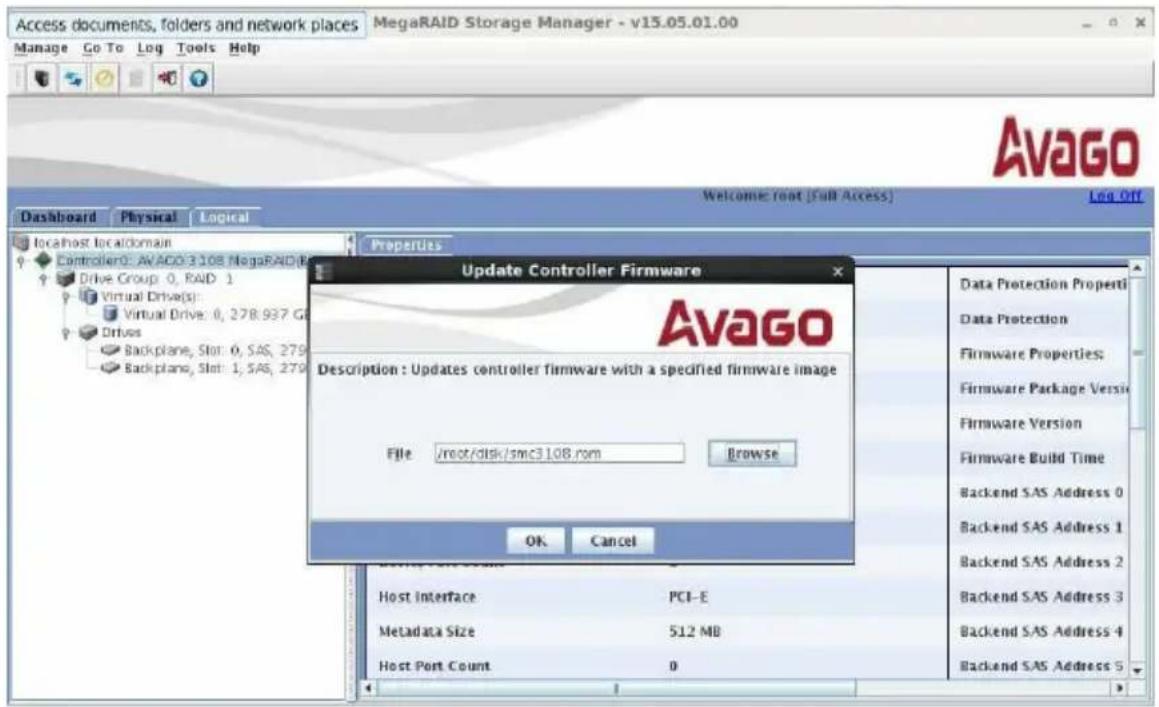
megacli -adpfwflash -f smc3108.rom -a0, or via MegaRAID Storage Manager by right-clicking the controller and selecting 'Update Controller Firmware'. Reboot after successful flash.User questions about AOC-S3108L-H8IR Supermicro
0 question about this device. Answer the ones you know or ask your own.
Ask a new question about this device
Download the instructions for your Régulateur in PDF format for free! Find your manual AOC-S3108L-H8IR - Supermicro and take your electronic device back in hand. On this page are published all the documents necessary for the use of your device. AOC-S3108L-H8IR by Supermicro.
USER MANUAL AOC-S3108L-H8IR Supermicro
The information in this User's Guide has been carefully reviewed and is believed to be accurate. The vendor assumes no responsibility for any inaccuracies that may be contained in this document, and makes no commitment to update or to keep current the information in this user's guide, or to notify any person or organization of the updates. Please Note: For the most up-to-date version of this user's guide, please see our Website at www.supermicro.com.
Super Micro Computer, Inc. ("Supermicro") reserves the right to make changes to the product described in this user's guide at any time and without notice. This product, including software and documentation, is the property of Supermicro and/or its licensors, and is supplied only under a license. Any use or reproduction of this product is not allowed, except as expressly permitted by the terms of said license.
IN NO EVENT WILL SUPER MICRO COMPUTER, INC. BE LIABLE FOR DIRECT, INDIRECT, SPECIAL, INCIDENTAL, SPECULATIVE OR CONSEQUENTIAL DAMAGES ARISING FROM THE USE OR INABILITY TO USE THIS PRODUCT OR DOCUMENTATION, EVEN IF ADVISED OF THE POSSIBILITY OF SUCH DAMAGES. IN PARTICULAR, SUPER MICRO COMPUTER, INC. SHALL NOT HAVE LIABILITY FOR ANY HARDWARE, SOFTWARE, OR DATA STORED OR USED WITH THE PRODUCT, INCLUDING THE COSTS OF REPAIRING, REPLACING, INTEGRATING, INSTALLING OR RECOVERING SUCH HARDWARE, SOFTWARE, OR DATA.
Any disputes arising between the manufacturer and the customer shall be governed by the laws of Santa Clara County in the State of California, USA. The State of California, County of Santa Clara shall be the exclusive venue for the resolution of any such disputes. Supermicro's total liability for all claims will not exceed the price paid for the hardware product.
FCC Statement: This equipment has been tested and found to comply with the limits for a Class A digital device pursuant to Part 15 of the FCC Rules. These limits are designed to provide reasonable protection against harmful interference when the equipment is operated in a commercial environment. This equipment generates, uses, and can radiate radio frequency energy and, if not installed and used in accordance with the manufacturer's instruction manual, may cause harmful interference with radio communications. Operation of this equipment in a residential area is likely to cause harmful interference, in which case you will be required to correct the interference at your own expense.
California Best Management Practices Regulations for Perchlorate Materials: This Perchlorate warning applies only to products containing CR (Manganese Dioxide) Lithium coin cells. "Perchlorate Material-special handling may apply. See www.dtsc.ca.gov/hazardouswaste/perchlorate".
WARNING: Handling of lead solder materials used in this product may expose you to lead, a chemical known to the State of California to cause birth defects and other reproductive harm.
User's Guide Revision 1.0
Release Date: Oct. 28, 2015
Unless you request and receive written permission from Super Micro Computer, Inc., you may not copy any part of this document.
Information in this document is subject to change without notice. Other products and companies referred to herein are trademarks or registered trademarks of their respective companies or mark holders.
Copyright © 2015 by Super Micro Computer, Inc.
All rights reserved.
Printed in the United States of America
Preface
About this User's Guide
This user's guide is written for system integrators, IT professionals, and knowledgeable end users. It provides information for the installation and use of the AOC-S3108L-H8iR add-on card.
An Important Note to the User
All images and layouts shown in this user's guide are based upon the latest PCB revision available at the time of publishing of this user guide. The add-on card you have received may or may not look exactly the same as the graphics shown in this user's guide.
Returning Merchandise for Service
A receipt or copy of your invoice marked with the date of purchase is required before any warranty service will be rendered. You can obtain service by calling your vendor for a Returned Merchandise Authorization (RMA) number. When returning to the manufacturer, the RMA number should be prominently displayed on the outside of the shipping carton and mailed prepaid or hand-carried. Shipping and handling charges will be applied for all orders that must be mailed when service is complete.
For faster service, RMA authorizations may be requested online (http://www.super-micro.com/support/rma/).
This warranty only covers normal consumer use and does not cover damages incurred in shipping or from failure due to the alteration, misuse, abuse or improper maintenance of products.
During the warranty period, contact your distributor first for any product problems.
During the warranty period, contact your distributor first for any product problems.
Conventions Used in the User's Guide
Pay special attention to the following symbols for proper system installation:
Warning: Important information given to ensure proper system installation and to avoid causing damage to the components or causing injury to yourself.

Note: Additional information given for proper system setup.
Important Links
For your system to work properly, please follow the links below to download all necessary drivers/utilities and the user's manual for your server.
• Supermicro product manuals: http://www.supermicro.com/support/manuals/
• Product drivers and utilities: ftp://ftp.supermicro.com
- Product safety info: http://www.supermicro.com/about/policies/safety_information.cfm
- If you have any questions, please contact our support team at: support@supermicro.com
This manual may be periodically updated without notice. Please check the Supermicro website for possible updates to the manual revision level.
Contacting Supermicro
Headquarters
Address: Super Micro Computer, Inc.
980 Rock Ave.
San Jose, CA 95131 U.S.A.
Tel: +1 (408) 503-8000
Fax: +1 (408) 503-8008
Email: marketing@supermicro.com (General Information)
support@supermicro.com (Technical Support)
Web Site: www.supermicro.com
Europe
Address: Super Micro Computer B.V.
's-Hertogenbosch, The Netherlands
Tel: +31 (0) 73-6400390
Fax: +31 (0) 73-6416525
Email: sales@supermicro.nl (General Information)
support@supermicro.nl (Technical Support)
rma@supermicro.nl (Customer Support)
Web Site: www.supermicro.nl
Asia-Pacific
Address: Super Micro Computer, Inc.
3F, No. 150, Jian 1st Rd.
Zhonghe Dist., New Taipei City 235
Taiwan (R.O.C)
Tel: +886-(2) 8226-3990
Fax: +886-(2) 8226-3992
Email: support@supermicro.com.tw
Web Site: www.supermicro.com.tw
Table of Contents
Preface
About this User's Guide .... 3
An Important Note to the User....3
Returning Merchandise for Service....3
Conventions Used in the User's Guide....3
Important Links....4
Contacting Supermicro....5
Chapter 1 Introduction
1-1 Overview 1-1
1-2 About this Add-on Card.... 1-1
1-3 Key Features.... 1-1
1-4 Supermicro Motherboard Support.... 1-2
Chapter 2 Hardware Components
2-1 Add-On Card Image and Layout.... 2-1
2-2 Major Onboard Components.... 2-1
2-3 SAS 3.0 Ports and CPLD JTAG Header 2-2
SAS Ports 2-2
CPLD JTAG Header 2-2
2-4 LED Indicators....2-3
SAS Activity LED 2-3
SAS Fault LED 2-3
System Heartbeat LED 2-3
Chapter 3 Installation
3-1 Static-Sensitive Devices.... 3-1
Precautions 3-1
3-2 Before Installation 3-2
3-3 Installing the Add-on Card 3-2
Chapter 4 Configuring the Avago MegaRAID Setting
4-1 RAID Minimum Drive Requirements 4-1
4-2 Using the Avagp MegaRAID Configuration Utility....4-2
4-3 The Avago MegaRAID Main Screen 4-3
4-4 VD Mgmt (Virtual Drive Management)....4-4
4-5 PD Mgmt (Physical Drive Management)....4-7
4-6 Ctrl Mgmt (Control Management) 4-8
4-7 Properties 4-9
4-8 Foreign View 4-10
Chapter 5 MegaRAID Controller Firmware Update Procedures
5-1 Flashing Firmware Using MegaCLI under DOS 5-11
5-2 Flashing Firmware Using MegaRAID Storage Manager 5-13
Chapter 6 MegaRAID CacheCade Configuration
6-1 Enabling MegaRAID CacheCade Support....6-1
Minimum System Configuration Requirements....6-1
CacheCade Key Activation 6-2
6-2 Configuring the CacheCade RAID Settings and Creating a Drive Group..... 6-4
6-3 Creating a CacheCade - SSD Caching Virtual Drive 6-7
6-4 Configuring Virtual Drive Settings.... 6-9
6-5 Enabling SSD Caching Support on a Virtual Drive 6-10
Notes
Chapter 1
Introduction
1-1 Overview
Congratulations on purchasing your add-on card from an acknowledged leader in the industry. Supermicro products are designed with the utmost attention to detail to provide you with the highest standards in quality and performance.
1-2 About this Add-on Card
The Supermicro AOC-S3108L-H8iR is the most technological-advanced, cost-effective, and reliable SAS MegaRAID adapter in today's market. With the Avago 3108 SAS controller, eight 12Gb/s SAS connectors, and a low-profile PCI-E Gen.3 x8 slot built in, this add-on card offers high-performance connectivity with enormous storage capacity to meet the growing needs of enterprise server platforms.
With the optional Supercap/TFM unit built-in, the AOC-S3108L-H8iR supports 2GB DDR3 on-card cache at a speed of 1866 MHz (maximum), providing cached data protection during catastrophic system failures.
In addition, the embedded Avago SAS 3108 I/O processor offers optimal RAID performance and a PCI-Express host interface for increased I/O bandwidth. The AOC-S3108L-H8iR adapter delivers an intelligent and robust RAID solution to the market. For more information regarding product support or updates, please refer to our website at http://www.supermicro.com/products/accessories/addon/aoc-s3108l-h8ir.cfm.
1-3 Key Features
The key features of this add-on card include the following:
• Avago SAS 3108 8-port PCI-E SAS-3.0 controller
• Eight internal SAS3 ports w/two mini SAS HD connectors
• Hardware RAID 0, 1, 5, 6, 10, 50, and 60 supported
- Onboard hardware I/O processor
• Supports up to 240 physical devices
- 2GB DDR3 ECC Unbuffered on-card cache with a speed of up to 1866MHz for cached data protection
- Advanced array configuration and management utilities
• Automatically-negotiated PCI-E link widths
• Port-independent auto-negotiation
• Supports SSP, SMP, STP and SATA protocols - Optional Supercap/CacheVault BTR-TFM8G-LSICVM02 (Installation kit PN=MCP-240-001270N)
• Supports MegaRAID Storage Manager software - Enlarged venting hole mounting bracket for improved airflow
- Supports 1.5, 3.0, 6.0 and 12.0 Gb/s SAS and 3.0 & 6.0 Gb SATA data transfer rates
• OS support: Windows 2012, 2k8 64/32-bit, RedHat Enterprise, and SUSE Linux
• Support Fastpath(Free) and Cachecade (AOC-CHCD-PRO2-ESW)
• Power consumption: 23 watts
• Operation temperatures: 0°C to 55°C (32°F to 131°F) - Dimensions 2.71" (H) x 6.6" (L) (68.83cm (H) x 167.64cm (L))
1-4 Supermicro Motherboard Support
This add-on card supports the following motherboards:
2-1 Add-On Card Image and Layout
2-2 Major Onboard Components
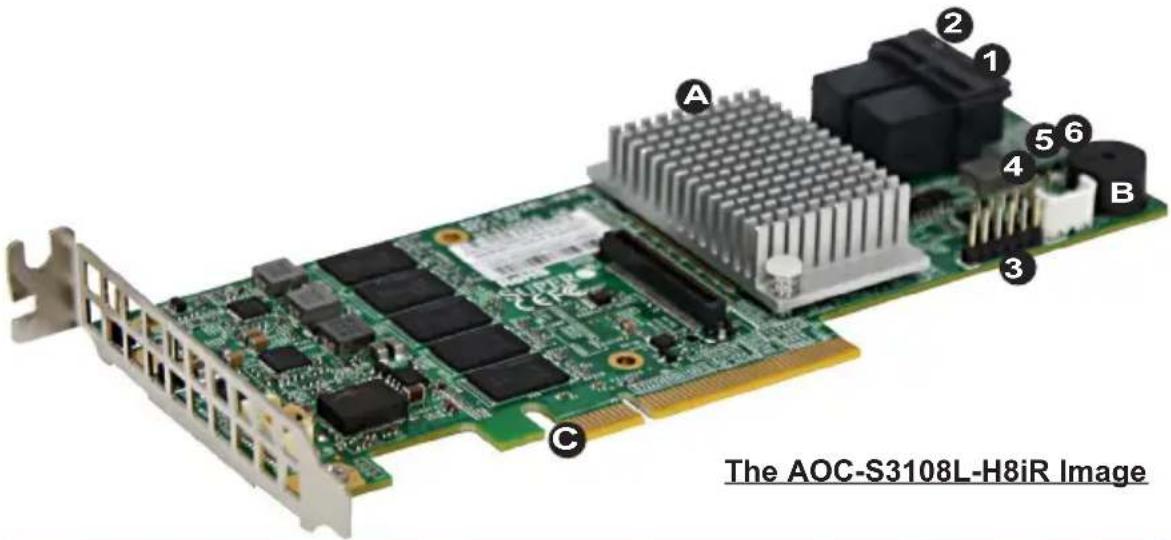
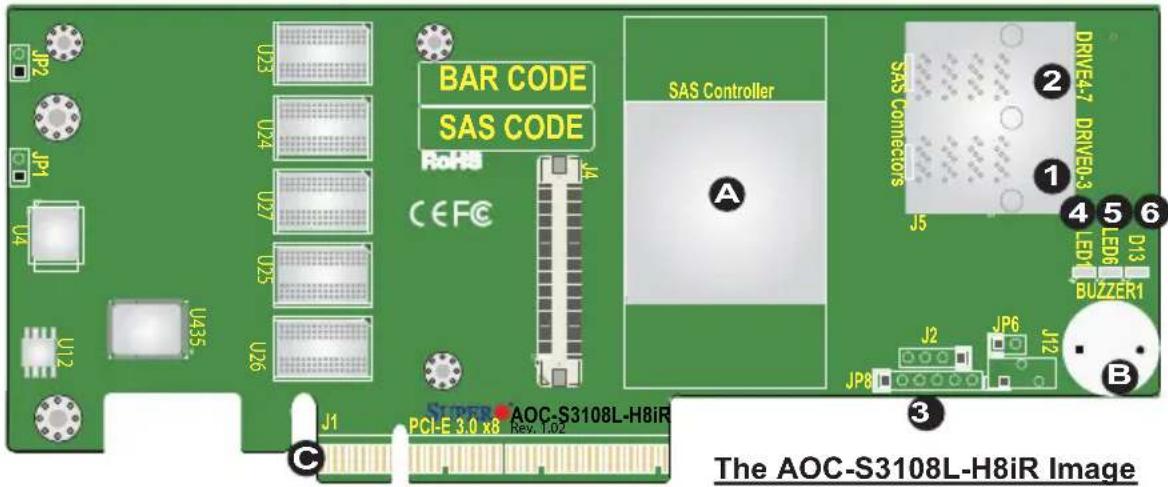
The following major components are installed on the AOC-S3108L-H8iR:
| Major Components | |||||
| No | Component Name | No | Component Name | No | Component Name |
| A | 3108 SAS CTRL | 1 | SAS ports 0~3 | 4 | LED1: Activity LED |
| B | Onboard Buzzer | 2 | SAS ports 4~7 | 5 | LED6: Fault LED |
| C | PCI-E 3.0 x8 slot | 3 | CPLD JTAG (header) | 6 | D13: SystemHeartbeat LED |
2-3 SAS 3.0 Ports and CPLD JTAG Header
SAS Ports
Eight SAS ports, supported by the Avago 3108 SAS controller, are located on the add-on card. SAS 0-3 and SAS 4-7 support SAS 3.0 connections. See the table below for pin definitions.
| SAS 3.0Pin Definitions | |
| Pin# | Signal |
| 1 | Ground |
| 2 | SATA_TXP |
| 3 | SATA_TXN |
| 4 | Ground |
| 5 | SATA_RXN |
| 6 | SATA_RXP |
| 7 | Ground |
CPLD JTAG Header
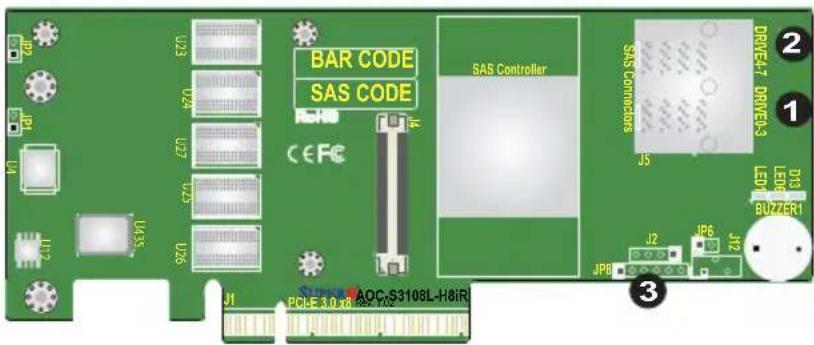
A 6-pin CPLD JTAG header, located at JP8, is used to scan complex-programmable logic devices. Connect a cable to JP8 for CPLD JTAG scan to enhance system security and data integrity. See the layout below for the location.
The SAS Activity LED is located at LED1 on the add-on card. When LED1 is blinking, the SAS connections supported by the Avago 3108 controller are active. See the table below for more information.
| SAS Activity LED Status | |
| Color/State | Definition |
| Green:Blinking | SAS: Active |
SAS Fault LED
LED6 is used to indicate if a SAS failure has occurred. When LED6 is on, an error has occurred to on-card SAS connections. See the table below for more information.
| SAS Fault LED Status | |
| Color/State | Definition |
| Red: On SAS | Error(s) detected |
System Heartbeat LED
The System Heartbeat LED is located at D13 on the add-on card. When D13 is blinking, the system is functioning normally. See the table below for more information.
| System Heartbeat LED Status | |
| Color/State | Definition |
| Green: Blinking System: Normal | |
| Off or Red System: Dis-abled or Failed | |
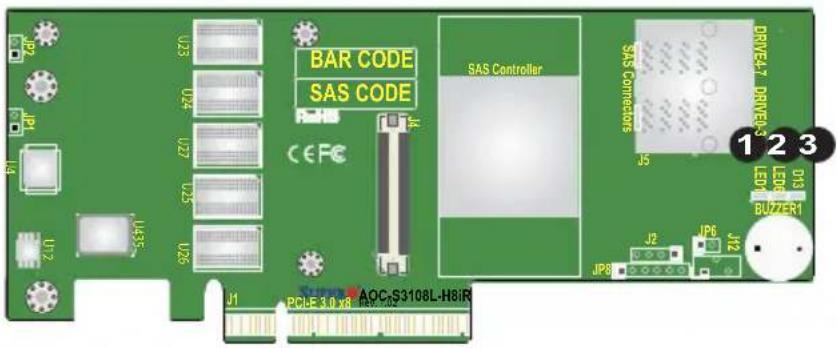
- SAS Activity LED
- SAS Fault LED
- System Heartbeat LED
Notes
Chapter 3
Installation

Note: Your system came with the AOC--S3108L-H8iR adapter pre-installed as a part of an integrated solution. We do not recommend that any part of your system components be removed and re-installed. However, if you do need to remove or re-install a system component, including this add-on card, please follow the instructions below to ensure proper system setup. Also, be sure to remove the power cord first before adding, removing or changing any hardware components to avoid damaging the system or components.
3-1 Static-Sensitive Devices
Electrostatic Discharge (ESD) can damage electronic components. To avoid damaging your add-on card, it is important to handle it very carefully. The following measures are generally sufficient to protect your equipment from ESD.
Precautions
- Use a grounded wrist strap designed to prevent static discharge.
- Touch a grounded metal object before removing the add-on card from the antistatic bag.
- Handle the add-on card by its edges only; do not touch its components, or peripheral chips.
- Put the add-on card back into the antistatic bags when not in use.
- For grounding purposes, make sure that your system chassis provides excellent conductivity between the power supply, the case, the mounting fasteners and the add-on card.
3-2 Before Installation
To install the add-on card properly, be sure to follow the instructions below.
- Power down the system.
- Remove the power cord from the wall socket.
- Use industry-standard anti-static equipment (such as gloves or wrist strap) and follow the instructions listed on Page 3-1 to avoid damage caused by ESD.
- Familiarize yourself with the server, motherboard, and/or chassis documentation.
- Make sure that your operating system includes the latest updates and hot-fixes.
3-3 Installing the Add-on Card
Follow the steps below to install the add-on card into your system.
- Remove the server cover and, if necessary, set aside any screws for later use.
- Remove the add-on card slot cover. If the case requires a screw, place the screw aside for later use.
- Position the add-on card in the slot directly over the connector, and gently push down on both sides of the card until it slides into the PCI connector.
- Secure the add-on card to the chassis. If required, use the screw that you previously removed.
- Attach any necessary external cables to the add-on card.
- Replace the chassis cover.
- Plug the power cord into the wall socket, and power up the system.
Chapter 4
Configuring the Avago MegaRAID Setting
This chapter provides instructions on how to configure MegaRAID settings for the Avago 3108 SAS controller. If you do not wish to configure MegaRAID settings, skip this section and go directly to OS installation.
4-1 RAID Minimum Drive Requirements
The AOC-S3108L-H8iR add-on card supports up to 240 HDD with RAID 0, 1, 5, 6, 10, 50 and 60. Use the table below to determine the minimum number of hard drives needed to set up a RAID environment.
| RAID Minimum Hard Drives | |
| RAID 0 2 | |
| RAID 1 2 | |
| RAID 5 3 | |
| RAID 6 3 | |
| RAID 10 4 (Two RAID 1 | arrays) |
| RAID 50 6 (Two RAID 5 | arrays) |
| RAID 60 6 (Two RAID 6 | arrays) |
4-2 Using the Avagp MegaRAID Configuration Utility
Follow the steps below to start the Avago MegaRAID Configuration Utility.
-
Power on the system.
-
Press
to enter the Avago MegaRAID Configuration Utility when the following screen displays.
AVAGO MegaRAID SAS-MFI BIOS
Version 6.25.03.8 (Build April 18, 2015)
Copyright(c) 2015 AVAGO Technologies
HA -0 (Bus 3 Dev 0) AVAGO 3108 MegaRAID
FU package: 24.9.0-0022

Battery Status: Missing
PCI Slot Number: 0

ID LUN VENDOR PRODUCT REVISION CAPACITY
--- --- ---
AVAGO AVAGO 3108 MegaRAID 4.290.00-4536 2048MB
8 0 HITACHI HUC103030CSS600 A540 206168MB
1 0 HITACHI HUC103030CSS600 A540 206168MB
0 AVAGO Virtual Drive RAID1 205632MB

1 Virtual Drive(s) found on the host adapter.
1 Virtual Drive(s) handled by BIOS

Press <Ctrl><R> to Run MegaRAID Configuration Utility
4-3 The Avago MegaRAID Main Screen
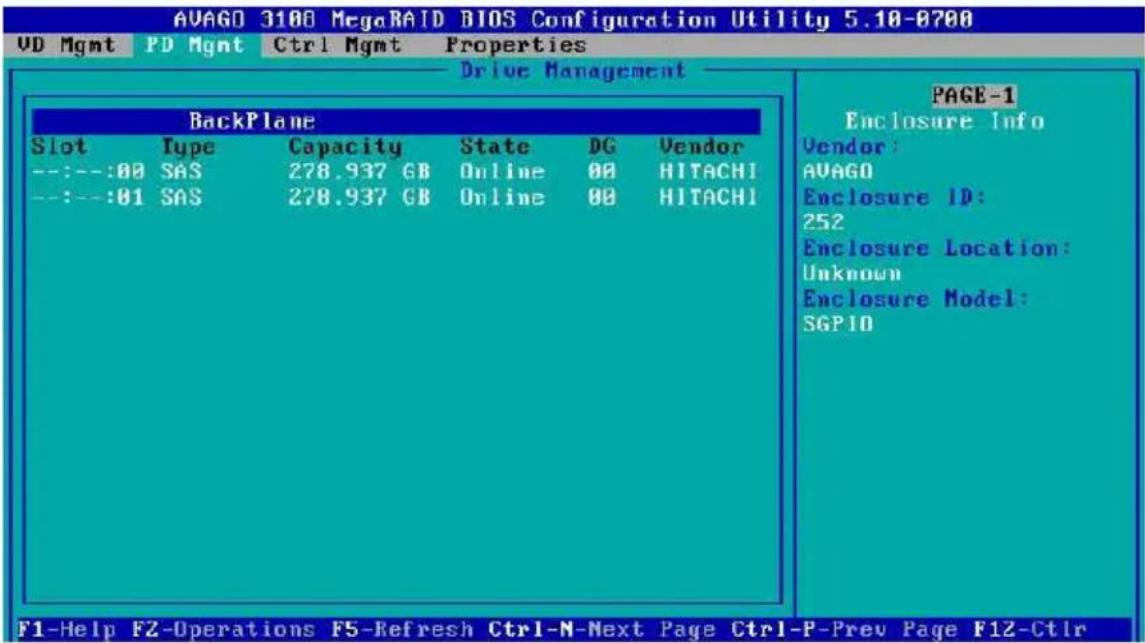
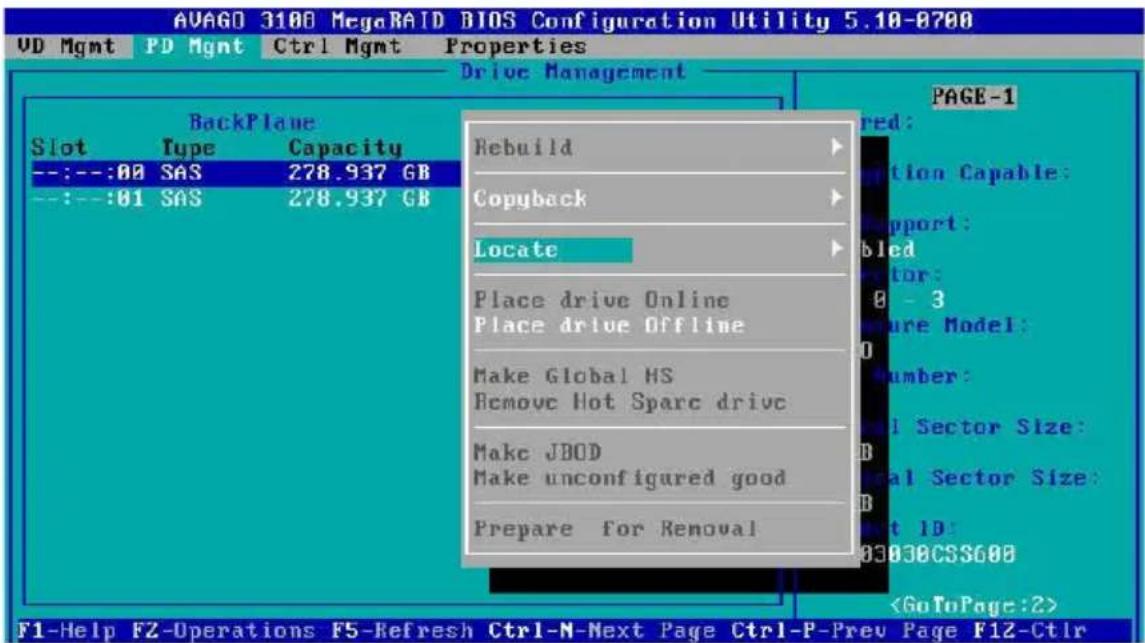
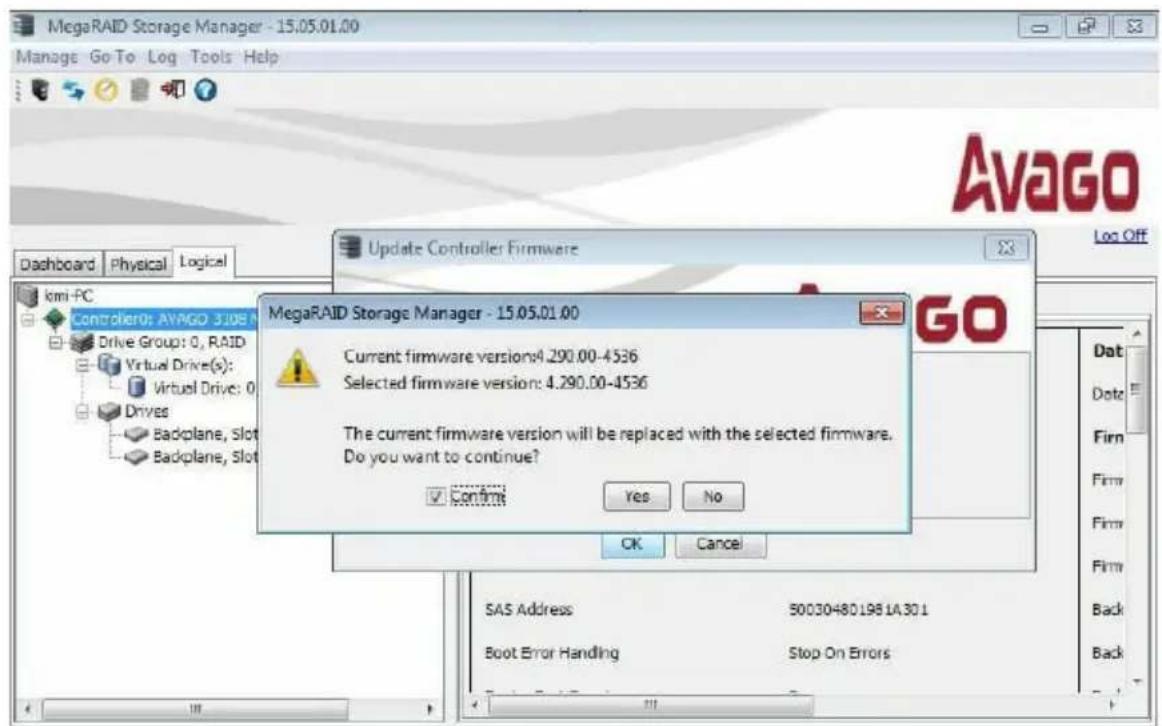
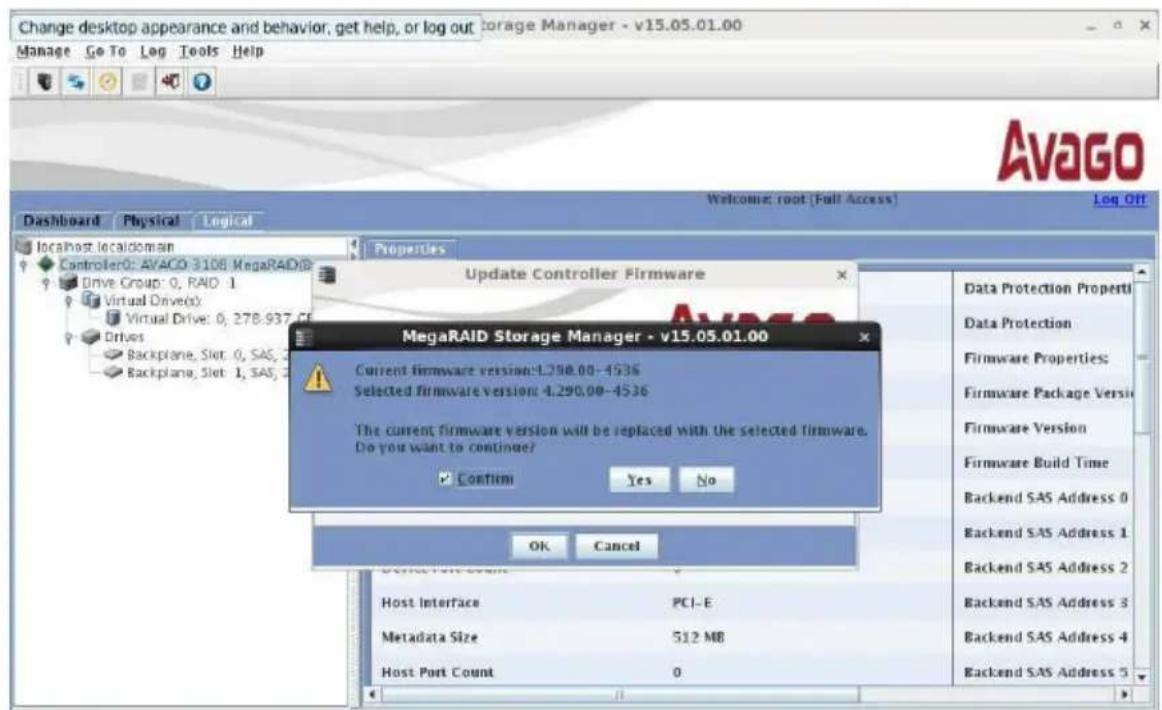
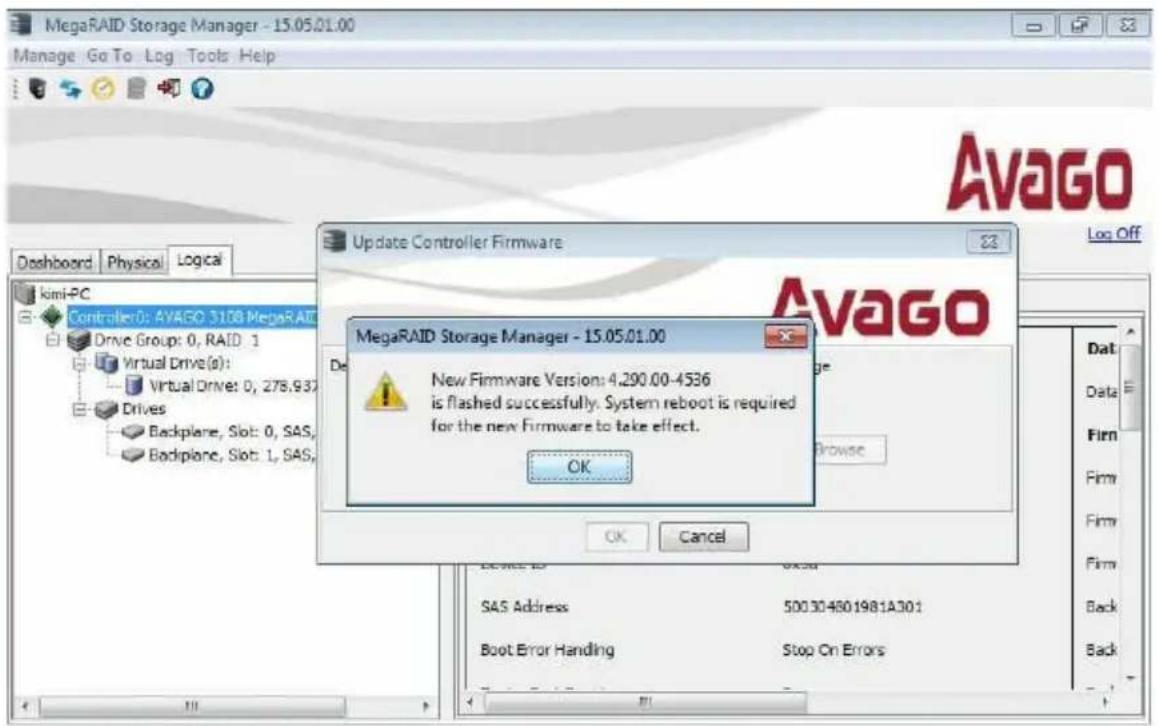
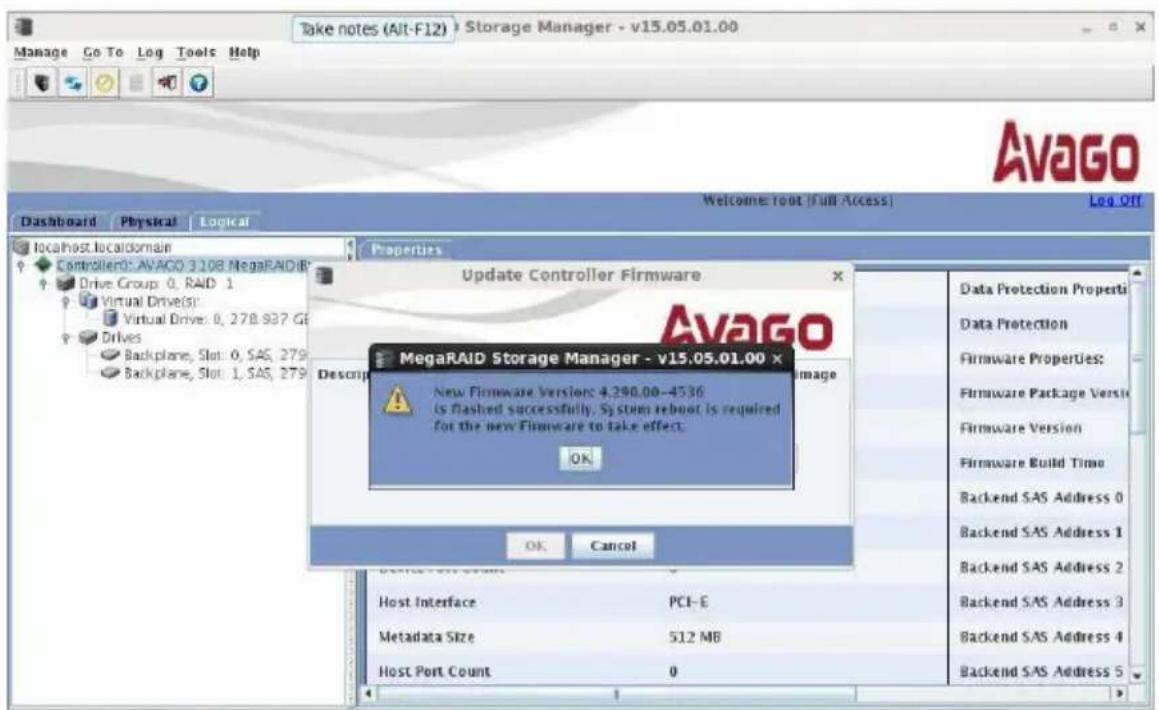
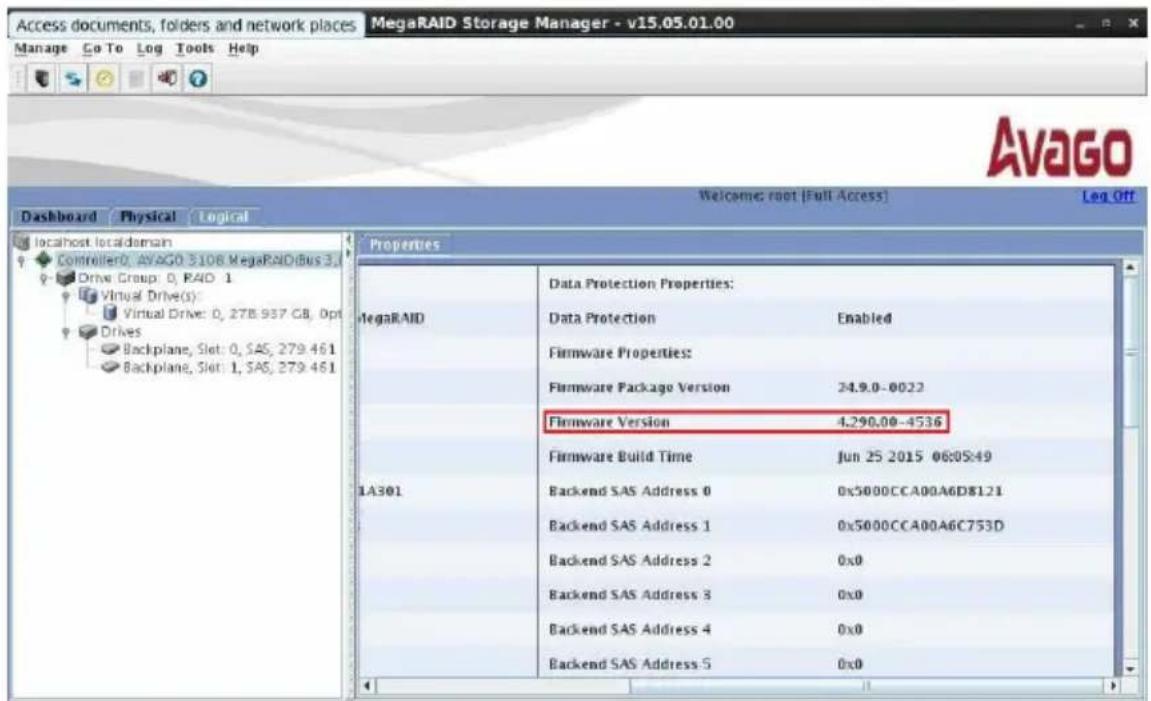
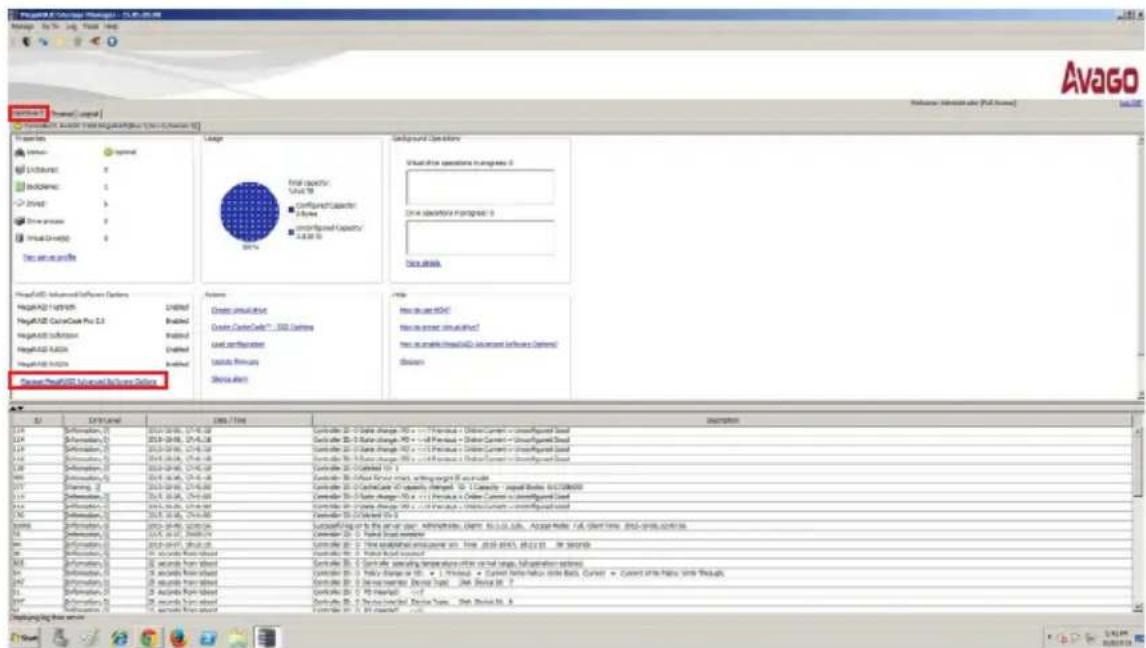
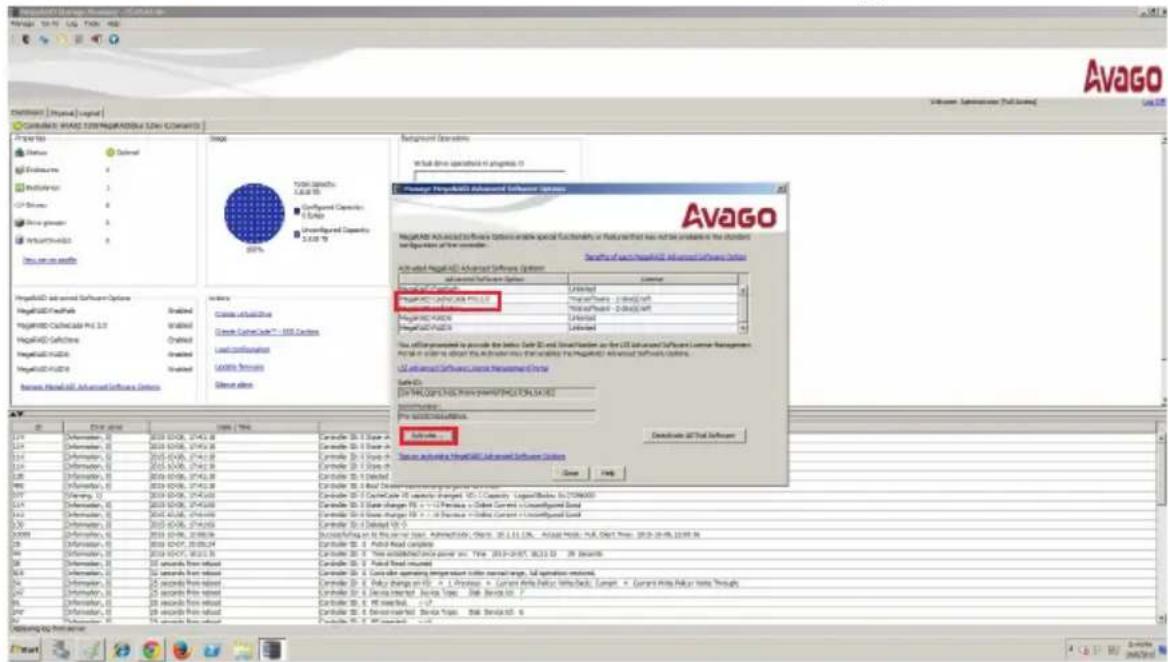
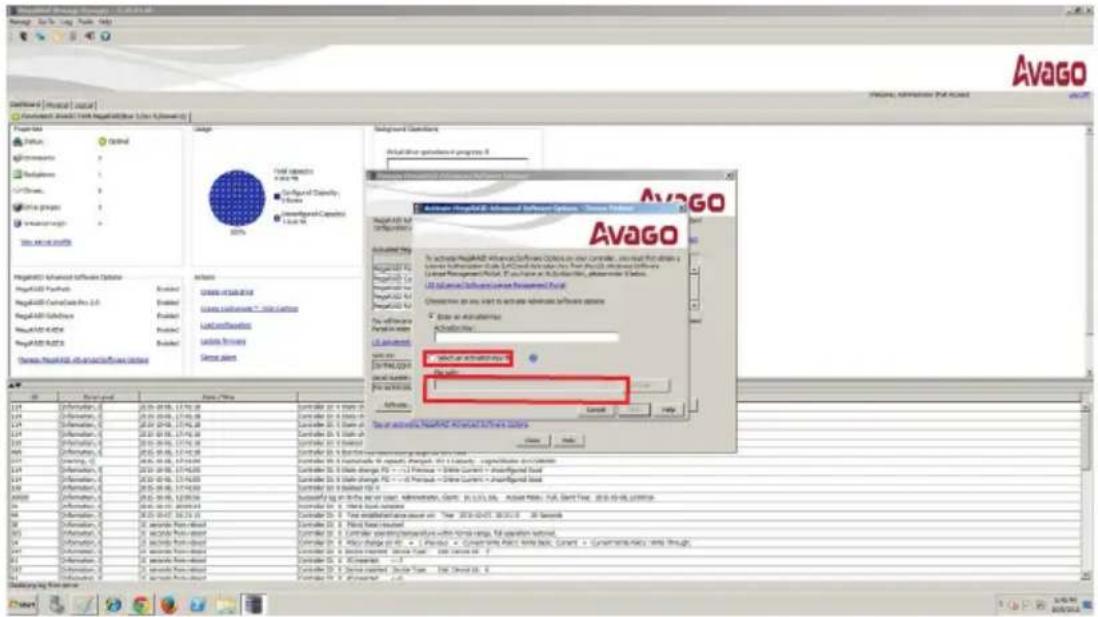
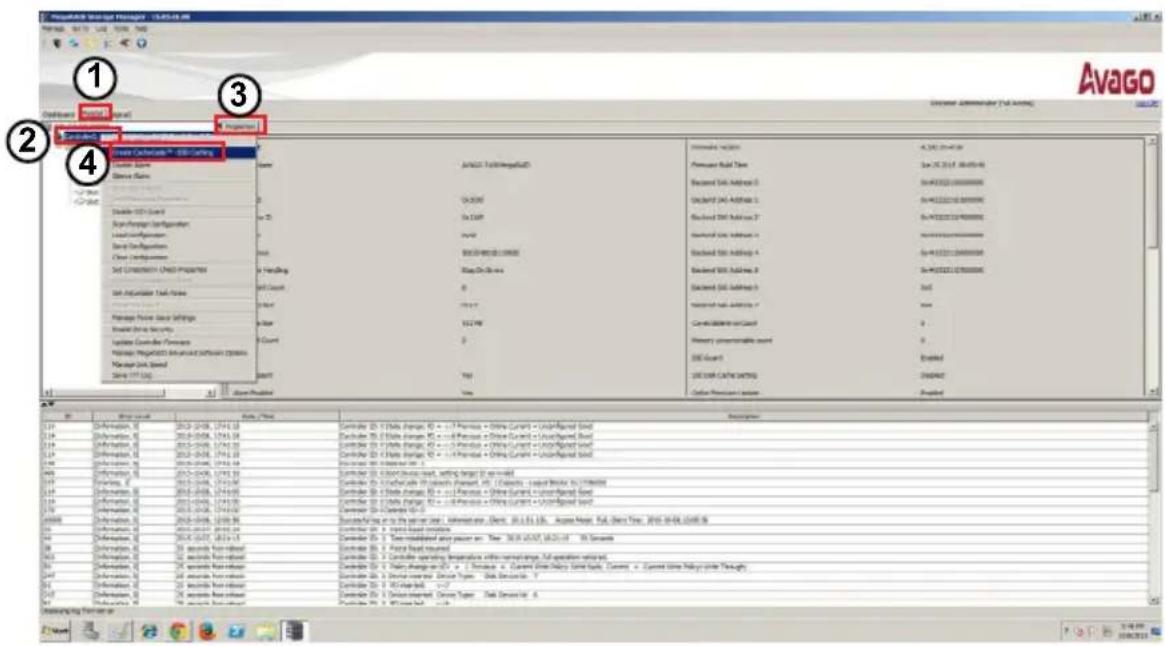
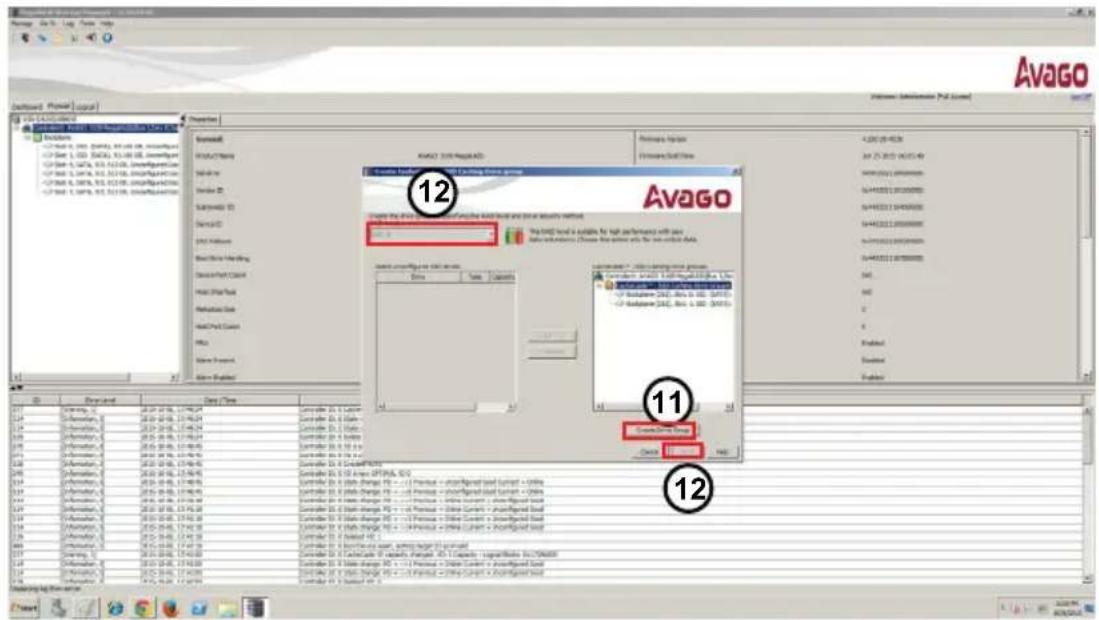
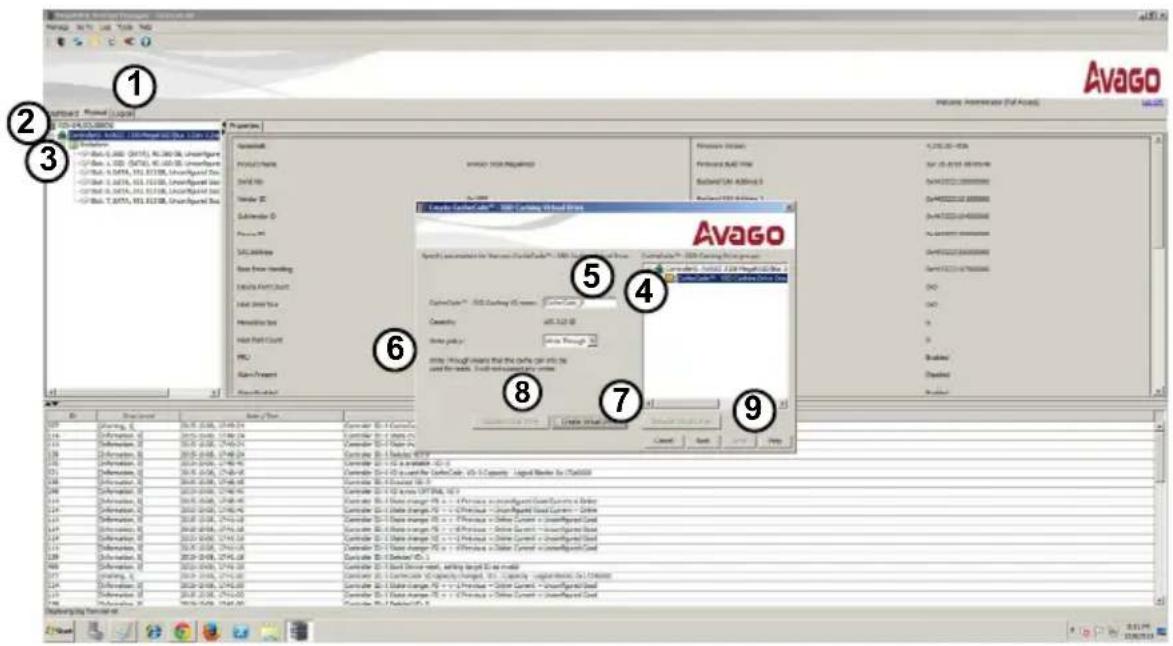
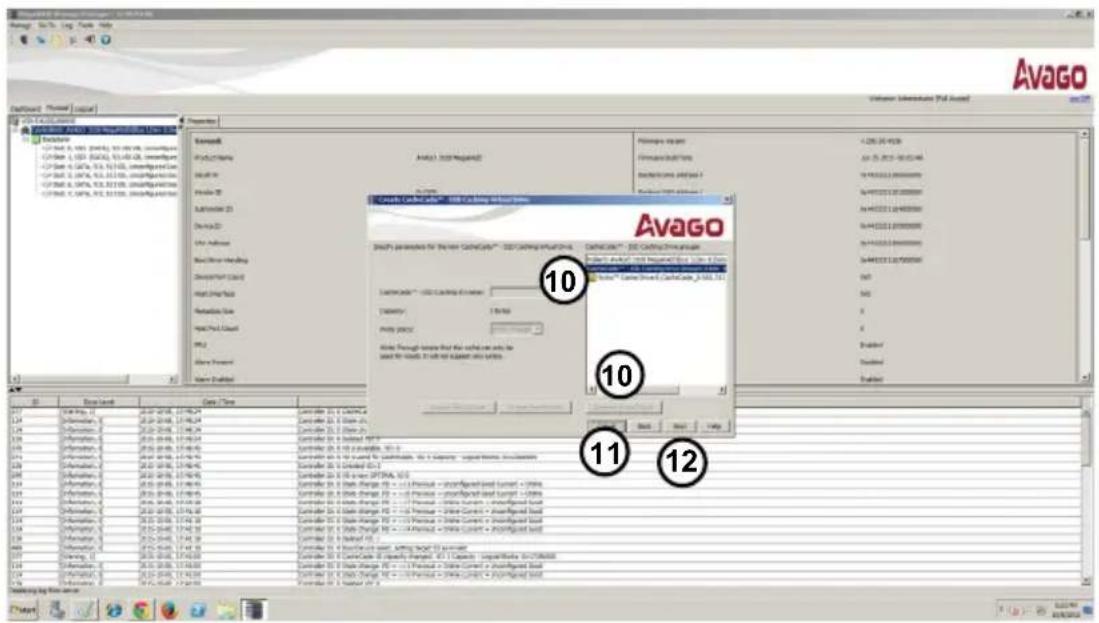
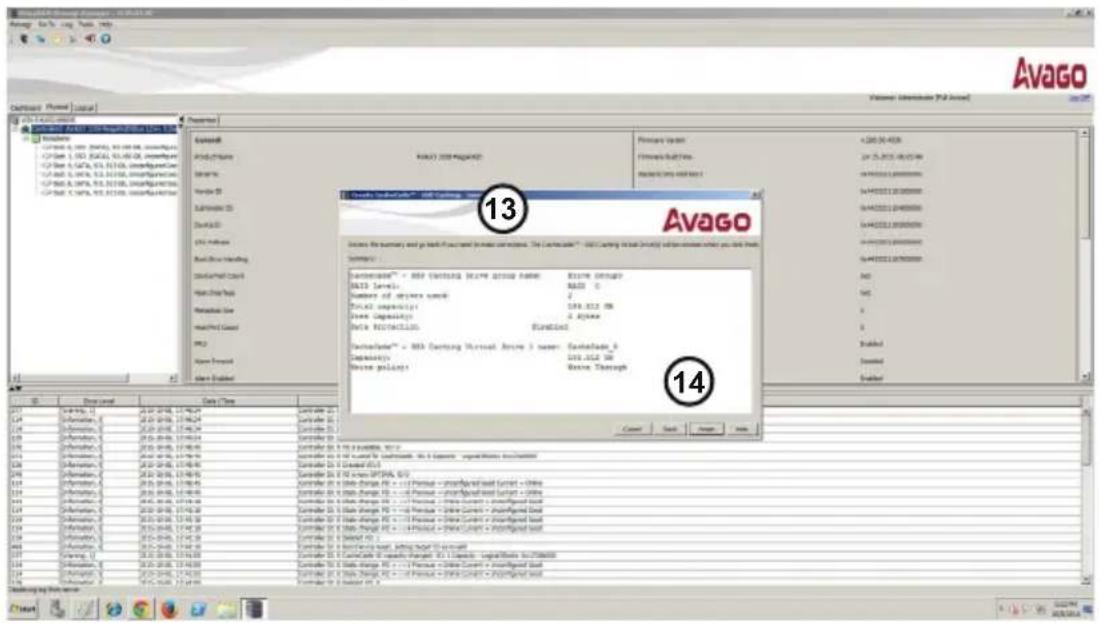
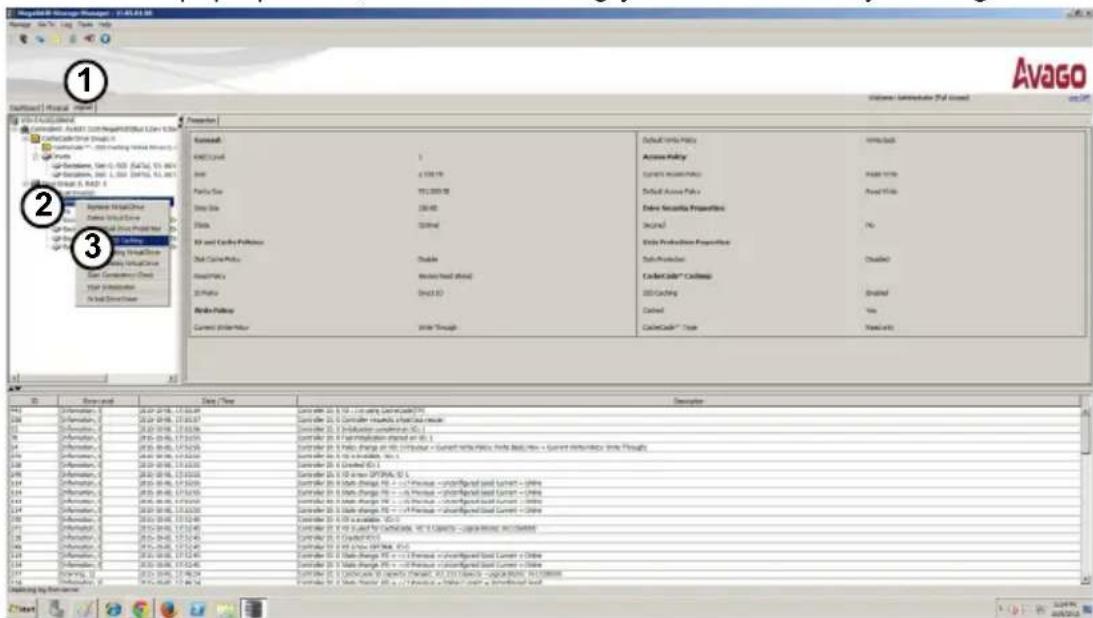
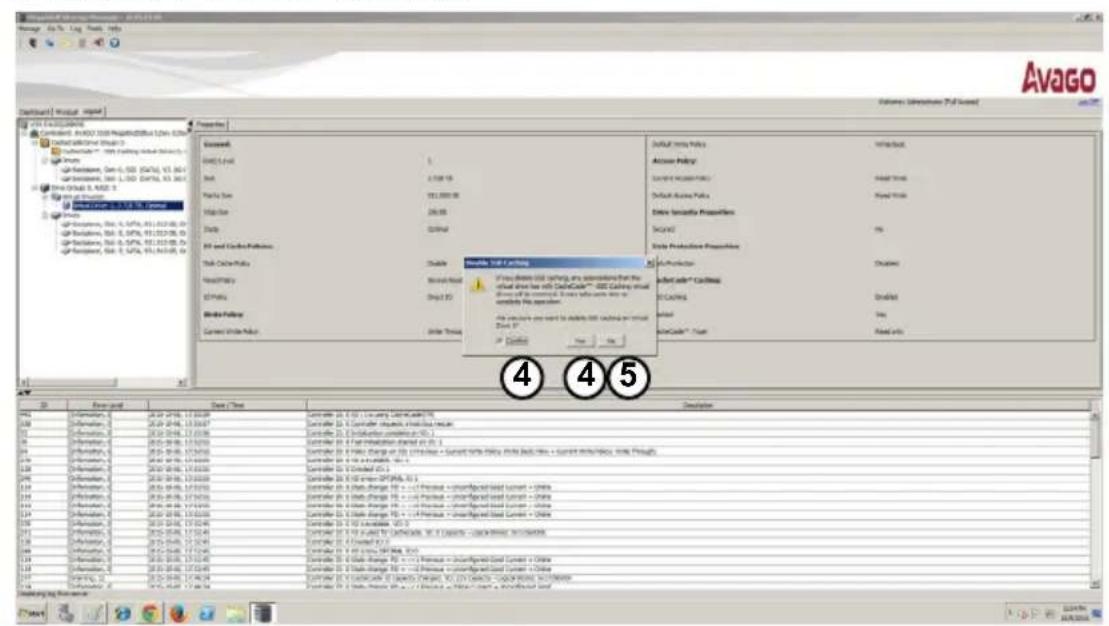
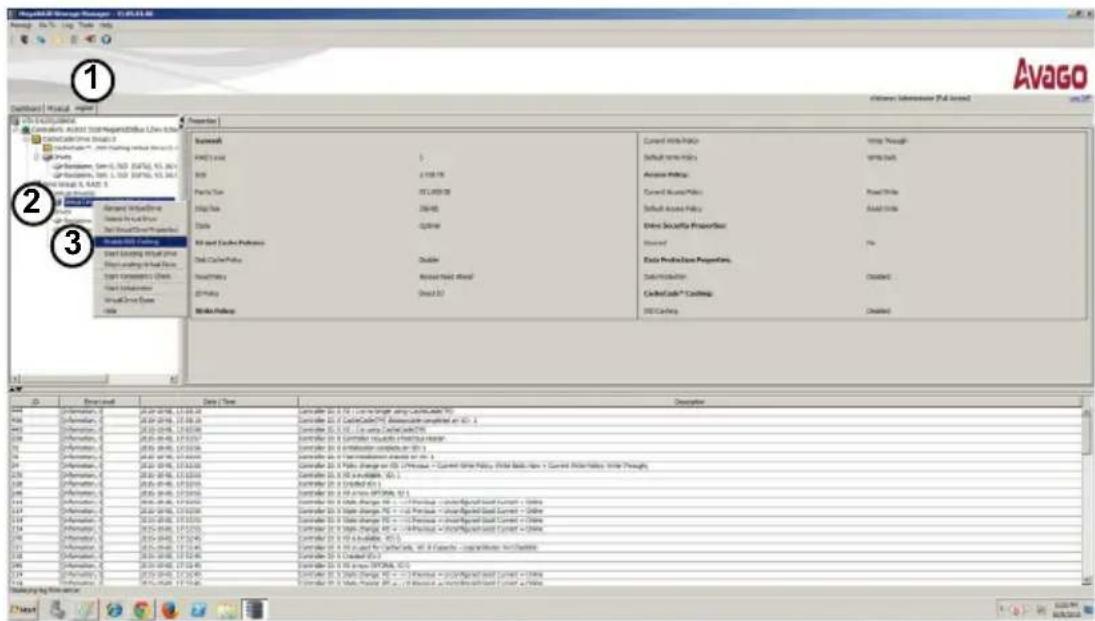
On the top of the Avago MegaRAID main screen is a list of configurable menus. Press to select the menu. The main screen includes the following menus: • VD Mgmt (Virtual Drive Management) Avago MegaRAID Configuration Utility Main Screen When you enter the MegaRAID Configuration Utility, the VD Mgmt is the first menu screen that displays, as shown below. This screen provides information about the configuration of controllers, drive groups, and virtual drives. The right panel of the screen displays the information about the selected device. To select a submenu item, use the up arrow and down arrow keys. Use the right arrow to open a submenu, and the left arrow to close a submenu. VD Mgmt (Virtual Management) Menu Screen Move the cursor to select the controller and press Note You can use the up arrow and down Arrow keys here to select enabled commands, which are highlighted in white, such as "Create Virtual Drive" or "Clear Configuration". Press Use the up arrow and down arrow keys to select the RAID level, as shown below, and press Note The corresponding RAID level(s) will display based on the number of hard drives connected to the selected controller. Press to select the PD Mgmt menu, as shown below. This screen provides information about hard drives connected to the selected controller. The right panel of the screen shows the information about the selected device. PD Mgmt (Physical Management) Menu Screen To select a device, use the up arrow, down arrow or Press to select the Ctrl Mgmt menu, as shown below. This menu provides information about the settings of the selected controller. On this screen, use the up arrow, down arrow or Navigate to Next and press Press to select the Properties menu, as shown below. This menu provides read-only information about the properties of the selected controller. Navigate to Next and press Press to select the Foreign View menu, as shown below. This menu provides information about the foreign configurations, such as drive groups, virtual drives, physical drives, and hot spare drives. Also, this menu allows you to import or clear the foreign configurations. Please note that the Foreign View menu displays only when a foreign configuration has been connected to the controller. Foreign View Menu Screen This chapter provides instructions on how to flash MegaRAID controller firmware. Please visit our website at www.supermicro.com for more information about firmware/utilities downloads. You need the MegaCLI utility and ROM file (smc3108.rom) to flash the Mega-RAID firmware. Boot from the USB key and use the following command syntax as shown below, or run the batch file. megacli -adpfwflash -f You need the MegaRAID Storage Manager software and ROM file (smc3108.rom) to flash the MegaRAID firmware. Follow the steps below to use the MegaRAID Storage Manager software on the following platforms: Micorsoft Windows operating system and Linux operating system. Open the MegaRAID Storage Manager application. Right-click on the Avago 3108 controller to be updated, and select the Update Controller Firmware menu option as shown below. MegaRAID Storage Manager Screen on a Microsoft Windows Operating System MegaRAID Storage Manager Screen on a Linux Operating System MegaRAID Storage Manager Screen on a Microsoft Windows Operating System MegaRAID Storage Manager Screen on a Linux Operating System MegaRAID Storage Manager Screen on a Microsoft Windows Operating System MegaRAID Storage Manager Screen on a Linux Operating System Do not reboot the system until the following screen displays. Click OK once the firmware update is completed as shown below. MegaRAID Storage Manager Screen on a Microsoft Windows Operating System MegaRAID Storage Manager Screen on a Linux Operating System MegaRAID Storage Manager Screen on a Microsoft Windows Operating System MegaRAID Storage Manager Screen on a Linux Operating System This chapter provides instructions on how to configure MegaRAID CacheCade settings in the Windows environment. Please refer to our website at www.supermicro.com for information on firmware/utilities downloads. You will need to have the following items pre-installed in your system before configuring MegaRAID CacheCade settings. The following section provides instructions on how to activate your CacheCade key for proper MegaRAID CacheCade support. From the MegaRAID Storage Manager menu, select Dashboard by clicking on it. Double-click on Manage MegaRAID Advanced Software Options as shown below. To configure MegaCacheCade settings, please follow the instructions below. From the Properties pull-down submenu, select Create CacheCade™ - SSD Caching by clicking on it. When the following screen displays, click on Select to select the RAID setting to configure for your HDDs. Select your desired RAID setting to the hard drive you want to configure. Click on Drive to invoke the pull-down submenu. From the pull-down submenu, select the hard drives you want to configure the RAID setting. With the desired hard drive selected, click on the Add button to add the selected hard drive to your drive group list. With all hard drives selected, click Next to create a CacheCade drive group. To remove a hard drive from the selected drive group, select the drive you want to remove and click on Remove to remove it from the list as shown below. To create a SSD caching virtual drive, please follow the instructions below. From the MegaRAID Storage Manager menu, select Physical by clicking on it. From the pull-down menu, select AVAGO 3108 MegaRAID by clicking on it. From the available drive list on the left, select the drive to create a virtual drive by double-clicking on it. Double-click on Create CacheCade™ - SSD Caching Drive Group. Enter an SSD Caching VD (Virtual Drive) name in the field. Select the desired Write Policy from the pop-up menu. Click Create Virtual Drive to create a virtual drive. Repeat the steps 4-6 and click Update Virtual Drive to create multiple virtual drives to form a drive group. Once you have created desired virtual drives, click Next. To configure the settings for a virtual drive, please follow the instructions below. From the Virtual Drive(s) pull-down menu, select the Virtual Drive you want to configure by clicking on it. From the pop-up menu, select the setting you want to use by clicking on it. A dialogue box will display to warn you that a setting of the selected virtual drive will be changed. Click Confirm and Yes for the virtual drive to use the new setting(s). Click No to use the old setting. To enable SSD Caching support for a virtual drive, please follow the instructions below. The products sold by Supermicro are not intended for and will not be used in life support systems, medical equipment, nuclear facilities or systems, aircraft, aircraft devices, aircraft/emergency communication devices or other critical systems whose failure to perform be reasonably expected to result in significant injury or loss of life or catastrophic property damage. Accordingly, Supermicro disclaims any and all liability, and should buyer use or sell such products for use in such ultra-hazardous applications, it does so entirely at its own risk. Furthermore, buyer agrees to fully indemnify, defend and hold Supermicro harmless for and against any and all claims, demands, actions, litigation, and proceedings of any kind arising out of or related to such ultra-hazardous use or sale.
• PD Mgmt (Physical Management)
• Ctrl Mgmt (Controller Management)
- Properties
- Foreign View![AVAGO 3108 MegaRAID BIOS Configuration Utility 5.18-0700 VD Mgmt PD Mgmt Ctrl Mgmt Properties Virtual Drive Management [-] AVAGO 3108 MegaRAID(Bus 0x03, Dev 0x00) [-] Drive Group: 0, RAID 1 [+] Virtual Drives [+] Drives [+] Available size: 0.000 KB Hot spare drives Controller: Drive Groups: 1 Virtual Drives: 1 Drives: 2 F1-Help FZ-Operations F5-Refresh Ctrl-N-Next Page Ctrl-P-Prev Page F12-Ctrl](/content/2026/05/785311/images/d2300a161a3b84a06f886c046622d4c6e8a028017173d226d38b6472ec269444.jpg)
4-4 VD Mgmt (Virtual Drive Management)
![AVAGD 3108 MegaRAID BIOS Configuration Utility 5.10-0700 UD Mgmt PD Mgmt Ctrl Mgmt Properties Virtual Drive Management [-] AVAGD 3108 MegaRAID(Bus 0x03, Dev 0x00) [-] Drive Group: 0, RAID 1 [+] Virtual Drives [+] Drives [+] Available size: 0.000 KB Hot spare drives Controller: Drive Groups: 1 Virtual Drives: 1 Drives: 2 F1-Help FZ-Operations F5-Refresh Ctrl-N-Next Page Ctrl-P-Prev Page F1Z-Ctrl](/content/2026/05/785311/images/c976c8bf45b8f7ed68ba812b11918e7aae87ce5230795cdc7628a3be207eb301.jpg)
![AVAGD 3108 MegaRAID BIOS Configuration Utility 5.10-0700 VD Mgmt PD Mgmt Ctrl Mgmt Properties Virtual Drive Management [-] AVAGD 3108 MegaRAID(Bus 0x03, Dev 0x00) No Configuration Present ! [-] Unconfigured Drives ---:---:00: Ready: 278.937 GB ---:---:01: Ready: 278.937 GB Create Virtual Drive Clear Configuration Foreign Config Manage Preserved Cache Drive Security Disable Data Protection Make Unconfigured Good Make JBOO Advanced Software Options F1-Help F2-Operations F5-Refresh Ctrl-N-Next Page Ctrl-P-Prev Page F12-Ctrl](/content/2026/05/785311/images/a856de2da669bb0347b7c6a10ae8f3be11d30333e7bd8cdcac86a78971dbf45b.jpg)
![AVAGO 3108 MegaRAID BIOS Configuration Utility 5.10-0700 UD Mgmt PD Mgmt Ctrl Mgmt Properties Create New UD RAID RAID-0 Data Disable Level: Protection: PD per Span : N/A Drives ID Type Size # Capable [ ]--:--:00 SAS 276.937 GB -- -- [ ]--:--:01 SAS 276.937 GB -- -- Basic Settings Size: Name: Advanced OK CANCEL F1-Help F1Z-Ctrl](/content/2026/05/785311/images/986b8d3473e6029fac3ea1f87eeef9b5681cfd19aeeae912594f6be8c2845ff5.jpg)
![AVAGO 3188 MegaRAID BIOS Configuration Utility 5.10-0700 UD Mgmt PD Mgmt Ctrl Mgmt Properties Create New UD RAID RAID-0 Data Level: RAID-1 Protection: Disable PD per Span : N/A Drives ID Type Size # Capable [ ]---:---:00 SAS 278.937 GB -- -- [ ]---:---:01 SAS 278.937 GB -- -- Basic Settings Size: Name: Advanced OK CANCEL F1-Help F1Z-Ctrlr](/content/2026/05/785311/images/7cbb6aedced7a447c5a87ae34fcf0252726fd2e0dc987f8eab5830d1733faac2.jpg)
4-5 PD Mgmt (Physical Drive Management)
4-6 Ctrl Mgmt (Control Management)
![AVAGO 3180 MegaRAID BIOS Configuration Utility 5.18-8780 UD Mgmt PD Mgmt Ctrl Mgmt Properties Controller Settings Alarm Control Enable Silence None Stop On Er VD @ 278.937 GB Rebuild Rate: 30 Patrol Rate : 30 [X] Maintain PD Fail History BG1 Rate : 30 Cache flush interval: 4 [X] Enable controller BIOS CC Rate : 30 Spinup delay : 12 [ ] Enable Stop CC on Error Recon. Rate : 30 Spinup drive : 2 [ ] Auto Enhanced Import Device Exposure : 0 [X] Enable JBOD Set Factory Defaults APPLY CANCEL < Next > F1-Help F5-Refresh Ctrl-N-Next Page Ctrl-P-Prev Page F1Z-Ctrl Ctrl-S-Save](/content/2026/05/785311/images/0a476280508bb0d81514a542ab767e5669818885e59dc1e3603a9416b8b4b50c.jpg)
![AVAGO 3180 MegaRAID BIOS Configuration Utility 5.18-0700 VD Mgmt PD Mgmt Ctrl Mgmt Properties Controller Settings Manage Link Speed Manage Power Save Emergency Spare: UG & GHS [ ] Enable Emergency for SMARTer < Prev > APPLY CANCEL F1-Help F5-Refresh Ctrl-N-Next Page Ctrl-P-Prev Page F1Z-Ctrl Ctrl-S-Save](/content/2026/05/785311/images/5fedf37fd3bd447f62776b2334cad7c00735d1ac6ccc6f3e09c93078216792a9.jpg)
4-7 Properties
![AVAGO 3108 MegaRAID BIOS Configuration Utility 5.10-0700 UD Mgmt PD Mgmt Ctrl Mgmt Properties Product Name : AVAGO 3108 MegaRAID Controller Status : Optimal Serial No : ROC Temperature : 61 Celsius Package : 24.9.0-0022 FU Version : 4.290.00-4536 BIOS Version : 6.25.03.0_4.17.08.00_0x060E0300 Boot Block Version : 3.07.00.00-0002 Battery status : Missing Security Capable : No Controller ID : 0 PCI Bus : 0x03 PCI Device : 0x00 PCI Function : 0x00 PCI Slot ID : 0x00 Metadata Size : 512 MB Data Protection Support : Yes Data Protection Enabled : Yes Emergency Spare : Unconfigured Good & Global Hot Spare [ Page:01 ] < Next > F1-Help F5-Refresh Ctrl-N-Next Page Ctrl-P-Prev Page F1Z-Ctrl](/content/2026/05/785311/images/f0e0d89b74cdf3d13f2973d7643be56a3d9abff06da709d64b2014b2d2937056.jpg)
![AVAGO 3108 MegaRAID BIOS Configuration Utility 5.10-0700 VD Mgmt PD Mgmt Ctrl Mgmt Properties Properties Emergency For SMARTer : Disabled Power Saving on Unconfigured Drives : Enabled Power Saving on Hot Spare : Enabled Drive Standby Time : 30 min Copyback SSD on Smart Error: Yes Memory Size : 2048 MB < Prev > [ Page:02 ] F1-Help F5-Refresh Ctrl-N-Next Page Ctrl-P-Prev Page F1Z-Ctrl](/content/2026/05/785311/images/cf55250370983ced21a38f0fd0b91d082996b3f1213f1cc1717badc26aa894a3.jpg)
4-8 Foreign View
![AVAGO 3188 MegaRAID BIOS Configuration Utility 5.10-0780 VD Mgmt PD Mgmt Ctrl Mgmt Properties Foreign View Foreign Config View [-] AVAGO 3188 MegaRAID (Bus 3, Dev 0) [-] Drive Group: 0, Raid 0 (Foreign) [-] Virtual Drives ID: 0, 557.875 GB [-] Drives --:--:00: Online: 278.937 GB(Foreign) --:--:01: Online: 278.937 GB(Foreign) Hot spare Drives Foreign Config Preview Drive Group 0: Virtual Drives: 1 Drives: 2 F1-Help FZ-Operations F5-Refresh Ctrl-N-Next Page Ctrl-P-Prev Page F12-Ctrl](/content/2026/05/785311/images/d70629d64ba5f855fe846321317c12740649b7d577a13b22bc7ee0ba54e15dda.jpg)
Chapter 5
MegaRAID Controller Firmware Update Procedures
5-1 Flashing Firmware Using MegaCLI under DOS
C:\AVAG0\3108\FU\4290~1.00->megacli -adpfuflash -f smc3108.com -a0
DOS/32A -- Protected Mode Run-time Version 7.2
Copyright (C) Supernar Systems, Ltd. 1996-2002
DOS/32A warning (9004): mouse initialization failed

Adapter 0: LSI 3108 MegaRAID
Vendor ID: 0x1000, Device ID: 0x005D

Package version on the controller: 24.6.0-0023
Package version of the image file: 24.9.0-0022
Download Completed.
Flashing image to adapter...
Adapter 0: Flash Completed.
Please reboot the system for the changes to take effect

Exit Code: 0x00

C:\AVAG0\3108\FU\4290~1.00->
C:\AVAGO\3108\FW\4290~1.00->snc3108.bat
*** LSI SAS3108-MR controller FW Flash ***
*
*
*    *    *
*
*    *    *
*    *    *
*    *    *
**************************
DOS/3ZA -- Protected Mode Run-time Version 7.2
Copyright (C) Supernar Systems, Ltd. 1996-2002
DOS/3ZA warning (9004): mouse initialization failed

Adapter 0: LSI 3108 MegaRAID
Vendor ID: 0x1000, Device ID: 0x005D

Package version on the controller: 24.6.0-0023
Package version of the image file: 24.9.0-0022
Download Completed.
Flashing image to adapter...
Adapter 0: Flash Completed.
Please reboot the system for the changes to take effect

Exit Code: 0x00

C:\AVAGO\3108\FW\4290~1.00->
AVAGO MegaRAID SAS-MFI BIOS
Version 6.25.03.0 (Build April 10, 2015)
Copyright(c) 2015 AVAGO Technologies
HA -8 (Bus 3 Dev 8) AVAGO 3108 MegaRAID
FU package: 24.9.0-0022

Battery Status: Missing
PCI Slot Number: 0

ID LUN VENDOR PRODUCT REVISION CAPACITY
AVAGO AVAGO 3108 MegaRAID 4.290.00-4536 2040MB
AVAGO HITACHI HUC103030CSS600 A540 286168MB
AVAGO HITACHI HUC103030CSS600 A540 286168MB
AVAGO Virtual Drive RAID1 285632MB
5-2 Flashing Firmware Using MegaRAID Storage Manager
![MegaRAID Storage Manager - 15.05.01.00 Manage Go To Log Tools Help Dashboard Physical Logical Welcome: Administrator [Full Access] Log Off Administrator Properties Controller: AVAGO 3108 MegaRAID(bus 3.0) Drive Group: 0, RAID 1 Virtual Drive(s): Virtual Drive: 0, 278.937 GB, Op Drives Backplane, Slot: 0, SAS, 279.46 Backplane, Slot: 1, SAS, 279.46 Disable Alarm Silence Alarm Start Patrol Read Set Patrol Read Properties Disable SSD Guard Scan Foreign Configuration Save Configuration Clear Configuration Set Consistency Check Properties Schedule Consistency Check Set Adjustable Task Rates Preserved Cache Manage Power Save Settings Update Controller Firmware Manage MegaRAID Advanced Software Options Manage Link Speed Save TTY Log AGO 3108 MegaRAID 1000 15d9 5d 03D4801981A301 Up On Errors Dat Data Firm Firm Firm Back Back P](/content/2026/05/785311/images/a359d29a5b21c50201cf150a3f3b971e080e2adafbc98b008dfc5a52b9678f81.jpg)
![MegaRAID Storage Manager - 15.05.01.00 Manage Go To Log Tools Help Dashboard Physical Logical Welcome: Administrator [Full Access] Log Off Administrator Controller: AVAGO 3108 MegaRAIDBus 3.Dev 0.Don Drive Group: 0, RAID 1 Virtual Drive(s): Virtual Drive: 0, 278.937 GB, Optimal Drives Backplane, Slot: 0, SAS, 279.461 GB, Only Backplane, Slot: 1, SAS, 279.461 GB, Only Properties Data Protection Properties: Data Protection Enabled Firmware Properties: Firmware Package Version 24.9.0-0022 Firmware Version 4.290.00-4536 Firmware Build Time Jun 25 2015 06:05:49 Backend SAS Address 0 0x500CCA00A6D8121 Backend SAS Address 1 0x500CCA00A6C753D B : 1012.11.2 2.2 III](/content/2026/05/785311/images/e6a61ffeaf6e82fdb1246fda58dd1efc5d35a40b9bef4d0da9612be2193fbe7a.jpg)
Chapter 6
MegaRAID CacheCade Configuration
6-1 Enabling MegaRAID CacheCade Support
Minimum System Configuration Requirements
CacheCade Key Activation
6-2 Configuring the CacheCade RAID Settings and Creating a Drive Group
![Avago Options: Product > [SAR] or [SAR] (10.0) Accessories: - Use X, Y, Z, AA, AB, AC, AD, AE, AF, AG, AH, AI, AJ, AK, AL, AM, AN, AO, AP, AR, AS, AT, AU, AV, AW, AX, AY, AZ, BA, CA, CB, CC, CD, ED, EF, GF, GH, AH, AI, AJ, AK, AL, AM, AN, AO, AP, AH, AI, AJ, AK, AL, AM, AN, AO, AP, AH, AI, AJ, AK, AL, AM, AN, AO, AP, AH, AI, AJ, AK, AL, AM, AN, AO, AP, AH, AI, AJ, AK, AL, AM, AN, AO, AP, AH, AI, AJ, AK, AL, AM, AN, AO, AP, AH, AI, AJ, AK, Al, AM, AN, AO, AP, AH, AI, AJ, AK, AL, AM, AN, AO, AP, AH, AI, AJ, AK, AL, AM, AN, AO, AP, AH, AI, AJ, AK, AL, AM, AN, AO, AP, AH, AI, AJ, AK, AL, AM, AN, AO, AP, AH, AI, AJ, AK, AL, AM, AN, AO, AP, AI, AJ, AK, AL, AM](/content/2026/05/785311/images/13e66bb1e239fe1d3e137cbe09da84435390d6149e1c9490845c30cac632cb93.jpg)
6-3 Creating a CacheCade - SSD Caching Virtual Drive
6-4 Configuring Virtual Drive Settings
6-5 Enabling SSD Caching Support on a Virtual Drive
(Disclaimer Continued)

- Preface
- About this User's Guide
- An Important Note to the User
- Returning Merchandise for Service
- Conventions Used in the User's Guide
- Important Links
- Contacting Supermicro
- Headquarters
- Europe
- Asia-Pacific
- Table of Contents
- Chapter 1 Introduction
- Chapter 2 Hardware Components
- Chapter 3 Installation
- Chapter 4 Configuring the Avago MegaRAID Setting
- Chapter 5 MegaRAID Controller Firmware Update Procedures
- Chapter 6 MegaRAID CacheCade Configuration
- Notes
- Chapter 1
- Introduction
- 1-1 Overview
- 1-2 About this Add-on Card
- 1-3 Key Features
- 1-4 Supermicro Motherboard Support
- 2-2 Major Onboard Components
- 2-3 SAS 3.0 Ports and CPLD JTAG Header
- SAS Ports
- CPLD JTAG Header
- SAS Fault LED
- System Heartbeat LED
- Chapter 3
- Installation
- 3-1 Static-Sensitive Devices
- Precautions
- 3-2 Before Installation
- 3-3 Installing the Add-on Card
- Chapter 4
- Configuring the Avago MegaRAID Setting
- 4-1 RAID Minimum Drive Requirements
- 4-2 Using the Avagp MegaRAID Configuration Utility
- 4-3 The Avago MegaRAID Main Screen
- 4-4 VD Mgmt (Virtual Drive Management)
- 4-5 PD Mgmt (Physical Drive Management)
- 4-6 Ctrl Mgmt (Control Management)
- 4-7 Properties
- 4-8 Foreign View
- Chapter 5
- MegaRAID Controller Firmware Update Procedures
- 5-1 Flashing Firmware Using MegaCLI under DOS
- 5-2 Flashing Firmware Using MegaRAID Storage Manager
- Chapter 6
- MegaRAID CacheCade Configuration
- 6-1 Enabling MegaRAID CacheCade Support
- Minimum System Configuration Requirements
- CacheCade Key Activation
- 6-2 Configuring the CacheCade RAID Settings and Creating a Drive Group
- 6-3 Creating a CacheCade - SSD Caching Virtual Drive
- 6-4 Configuring Virtual Drive Settings
- 6-5 Enabling SSD Caching Support on a Virtual Drive
- (Disclaimer Continued)
Brand : Supermicro
Model : AOC-S3108L-H8IR
Category : Régulateur