
DiVA CD82 - CD Player ARCAM - Free user manual and instructions
Find the device manual for free DiVA CD82 ARCAM in PDF.


| Product Type | CD Player |
| Model | DiVA CD82 |
| Brand | Arcam |
| Digital-to-Analogue Conversion | Dual mono 24-bit Wolfson DAC (192kHz capable) |
| Laser Pick-up | 3 beam, wavelength 780nm |
| Dynamic Range | 106dB |
| Signal-to-Noise Ratio (CCIR) | >100dB |
| Harmonic Distortion (0dB, 1kHz) | <0.005% |
| Frequency Response (±0.5dB) | 5Hz-20kHz |
| Output Level (0dB) | 2.3Vrms |
| Output Impedance | 50Ω |
| Minimum Recommended Load | 5kΩ |
| Digital Outputs | Coaxial (75Ω) and Optical (TOSLINK) |
| Audio Outputs | Two pairs of stereo RCA (for main and multi-room use) |
| Remote Input | 3.5mm jack for IR control systems |
| Power Consumption | 32VA maximum |
| Dimensions (W x D x H) | 430 x 290 x 84mm |
| Weight (nett) | 5.5kg |
| Supplied Accessories | Mains lead, CR-314 remote control, 2 x AAA batteries |
| Compatible Discs | 12cm and 8cm CDs (including CD Text) |
Frequently Asked Questions - DiVA CD82 ARCAM
User questions about DiVA CD82 ARCAM
0 question about this device. Answer the ones you know or ask your own.
Ask a new question about this device
Download the instructions for your CD Player in PDF format for free! Find your manual DiVA CD82 - ARCAM and take your electronic device back in hand. On this page are published all the documents necessary for the use of your device. DiVA CD82 by ARCAM.
USER MANUAL DiVA CD82 ARCAM
Arcam Compact Disc players
Safety guidelines
Safety instructions
This product is designed and manufactured to meet strict quality and safety standards. However, you should be aware of the following installation and operation precautions:
1. Take heed of warnings and instructions
You should read all the safety and operating instructions before operating this appliance. Retain this handbook for future reference and adhere to all warnings in the handbook or on the appliance.
2. Water and moisture
The presence of electricity near water can be dangerous. Do not use the appliance near water – for example next to a bathtub, washbowl, kitchen sink, in a wet basement or near a swimming pool, etc..
3. Object or liquid entry
Take care that objects do not fall and liquids are not spilled into the enclosure through any openings. Liquid filled objects such as vases should not be placed on the equipment.
4. Ventilation
Do not place the equipment on a bed, sofa, rug or similar soft surface, or in an enclosed bookcase or cabinet, since ventilation may be impeded. We recommend a minimum distance of 50mm (2 inches) around the sides and top of the appliance to provide adequate ventilation.
5. Heat
Locate the appliance away from naked flames or heat producing equipment such as radiators, stoves or other appliances (including other amplifiers) that produce heat.
6. Climate
The appliance has been designed for use in moderate climates.
7. Racks and stands
Only use a rack or stand that is recommended for use with audio equipment. If the equipment is on a portable rack it should be moved with great care, to avoid overturning the combination.
8. Cleaning
Unplug the unit from the mains supply before cleaning.
The case should normally only require a wipe with a soft, damp, lint-free cloth. Do not use paint thinners or other chemical solvents for cleaning.
We do not advise the use of furniture cleaning sprays or polishes as they can cause indelible white marks if the unit is subsequently wiped with a damp cloth.
9. Power sources
Only connect the appliance to a power supply of the type described in the operating instructions or as marked on the appliance.
10. Power-cord protection
Power supply cords should be routed so that they are not likely to be walked on or pinched by items placed upon or against them, paying particular attention to cords and plugs, and the point where they exit from the appliance.
11. Grounding
Ensure that the grounding means of the appliance is not defeated.
12. Power lines
Locate any outdoor antenna/aerial away from power lines.
13. Non-use periods
If the unit has a standby function, a small amount of current will continue to flow into the equipment in this mode. Unplug the power cord of the appliance from the outlet if left unused for a long period of time.
14. Abnormal smell
If an abnormal smell or smoke is detected from the appliance, turn the power off immediately and unplug the unit from the wall outlet. Contact your dealer immediately.
15. Servicing
You should not attempt to service the appliance beyond that described in this handbook. All other servicing should be referred to qualified service personnel.
16. Damage requiring service
The appliance should be serviced by qualified service personnel when:
A. the power-supply cord or the plug has been damaged, or
B. objects have fallen, or liquid has spilled into the appliance, or
C. the appliance has been exposed to rain, or
D. the appliance does not appear to operate normally or exhibits a marked change in performance, or
E. the appliance has been dropped or the enclosure damaged.
Safety compliance
This product has been designed to meet the EN60065 international electrical safety standard.
Using this handbook
This handbook has been designed to give you all the information you need to install, connect, set up and use the Arcam CD72 or CD82 compact disc players. The CR-314 remote control handset supplied with this equipment is also described, as it applies to operating the CD players.
Safety
Safety guidelines are set out on the inside front cover of this handbook.
Many of these items are common sense precautions, but for your own safety, and to ensure that you do not damage the unit, we strongly recommend that you read them.
Models covered
This handbook covers two CD players:
CD72
CD82
These use the same basic chassis and mechanics and the controls are identical. They differ in the audio path electronics used.
These CD players have been designed to be upgradeable to a higher specification player in the Arcam range. For example, the CD72 can be upgraded to CD82; the CD82 can be upgraded to CD92. Your Arcam dealer can give you more information on this upgrade path.
CD72 player
This has a Delta-Sigma DAC (Digital to Analogue Converter) with 24-bit filtering.
CD82 player
The CD82 uses two 24-bit 192kHz capable Wolfson DACs in a dual-mode configuration with one DAC chip used for the left channel and one DAC chip used for the right channel.
The player uses high quality Burr Brown op-amps in the output stage and the DAC module includes a high stability Class 1 crystal oscillator.
Contents
Safety guidelines 2
Safety instructions 2
Safety compliance 2
Using this handbook 3
Safety 3
Models covered 3
Installation 4
Positioning the unit 4
Connecting to other equipment 4
Connecting to a power supply 4
CD72 rear panel 4
CD82 rear panel 4
Using your CD player 5
CDs with text 5
Using the remote control 6
CR-314 remote control 6
Technical specification 7
Guarantee 8
On-line registration 8
Positioning the unit
Always place the CD player on a level, firm surface. Placing your player on a set of dedicated sorbothane isolation feet will isolate the unit from its surroundings as well as absorbing the vibrations created within the player itself. You will generally hear some sonic improvements, which makes this an extremely cost-effective upgrade. Your Arcam dealer can demonstrate this to ou.
Connecting to other equipment
Interconnect cables
Interconnecting cables are not supplied with this CD player. We recommend high quality cables as inferior quality cables will degrade the sound quality of your system. Please contact your Arcam dealer for details of suitable cables.
Audio outputs
Connect these to your amplifier's CD or any other line-level input using suitable high quality interconnect cables. Ensure that the left and right audio outputs from the CD player are connected to the same left and right inputs on your amplifier.
CD82 only: The second set of sockets can be used to connect to a second amplifier set up for multi-room use.
Coaxial digital output
Use this socket if you are using a separate digital to analogue converter (DAC) or digital recorder. Connect to the DAC or recorder's digital input using a suitable 75Ω screened cable.
CAUTION: Never connect the digital output socket to a conventional audio input.
Optical digital output
Use this socket if you are using a separate DAC or digital recorder with an optical connection. Connect using a suitable optical cable.
Remote input connection
It is not necessary to make any connection to this socket in normal use. This connection is for ease of installation to multi-room remote control systems and is suitable for modulated IR commands. Contact your multi-room installer for more information.
Connecting to a power supply
Wrong plug?
Check that the plug supplied with the unit fits your supply and that your mains supply voltage agrees with the voltage setting (120V or 230V) indicated on the rear panel of the unit.
If your mains supply voltage or mains plug is different, consult your Arcam dealer or Arcam Customer Support on +44 (0)1223 203203.
Mains lead
The appliance is normally supplied with a moulded mains plug already fitted to the lead. If for any reason the plug needs to be removed, it must be disposed of immediately and securely, as it is a potential shock hazard when inserted into the mains socket. Should you require a new mains lead, contact your Arcam dealer.
Plugging in
Push the plug (IEC line socket) of the power cable supplied with the unit into the socket (POWER INLET) in the back of the unit. Make sure it is pushed in firmly.
Put the plug on the other end of the cable into your power supply socket and switch the socket on.
CD72 rear panel (part) CD82 rear panel (part)
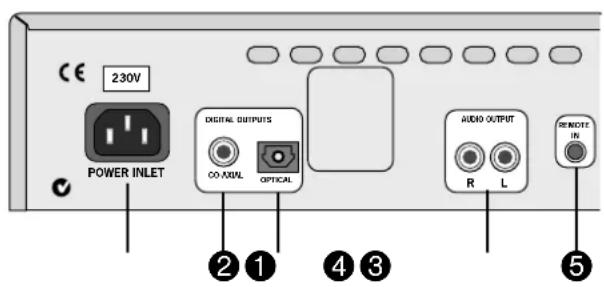
① Power inlet, with voltage indicator
② Coaxial digital output
③ Optical digital output
4 Single audio output
⑤ Remote input
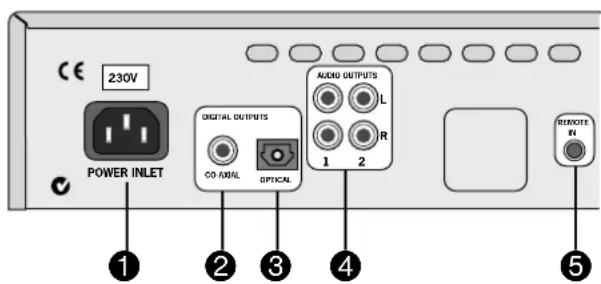
① Power inlet, with voltage indicator
② Coaxial digital output
③ Optical digital output
4 Twin audio outputs
⑤ Remote input
Using your CD player
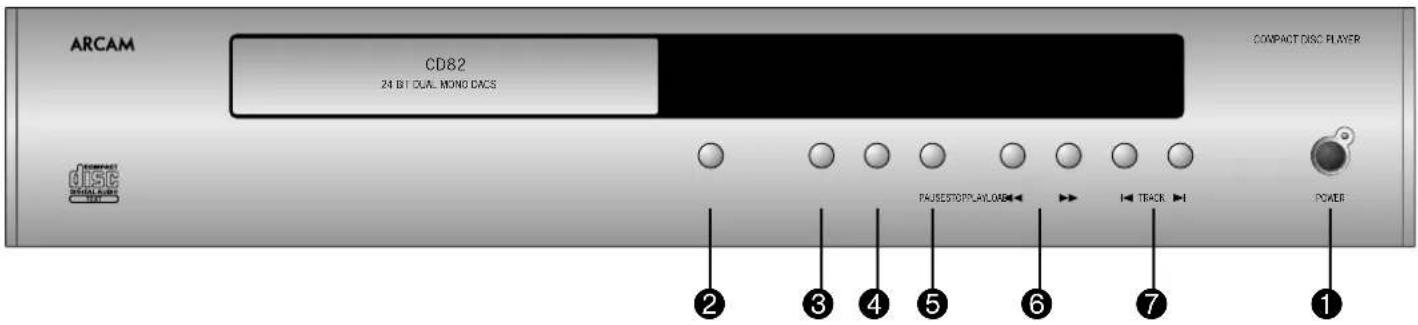
POWER 1
Press this button to switch the CD player on and off. When first powered up with no CD installed the display shows:
--NO DISC--

LOAD ②
To install a CD, press LOAD (or OPEN on the remote control). The CD tray opens – it accepts 12cm and 8cm discs. Place the CD in the tray with the label facing uppermost. Press LOAD again (or press PLAY, or gently push the tray in 5mm) to close the tray. You will see the total number of tracks and total disc time, for example...
TRACK INDEX MIN SEC
852.19

The display returns to '0' after a few seconds. The disc is now ready to play.
PLAY ③
Press to play the CD. To restart from track 1, press STOP and then PLAY.
Make sure your amplifier's input source selector is set to the correct input.
STOP 4
Press to stop the CD playing. The display shows '0' and the number of tracks.
PAUSE 5
Press to pause the disc (interrupt play).
Press PAUSE again, or PLAY to resume play from the same point.
SEARCH 6
Press to search backwards, or to search forwards for a particular passage within the currently playing track. If the player is in 'PAUSE' mode the search is made at high speed with the sound muted.
SKIP TRACK ⑦
To start a CD with a track other than the first, press ▶ or ▶ to locate the desired track.
To select another track during play, press I or . The track is played automatically after selection. Pressing I once returns to the start of the current track. To select the previous track, press I twice quickly. To go back two tracks, press I three times, and so on.
CDs with text
Load
You will see the total number of tracks and the total disc time with 'CD TEXT' illuminated in the display. The artist and album title scrolls across the display before returning to show the artist and total number of tracks.

Play
The track number is briefly displayed, followed by the track title scrolling across the display. The display returns to showing the track number and time.
Track selection
When a new track is selected, the track number is briefly displayed, followed by the track title scrolling across the display. The display returns to showing the track number and time.
NOTE: The track title is always displayed when a track is selected, either for playing or programming.
The artist is always displayed when the disc is stopped.
The TITLE button turns the text display off.
The text display supports English only.
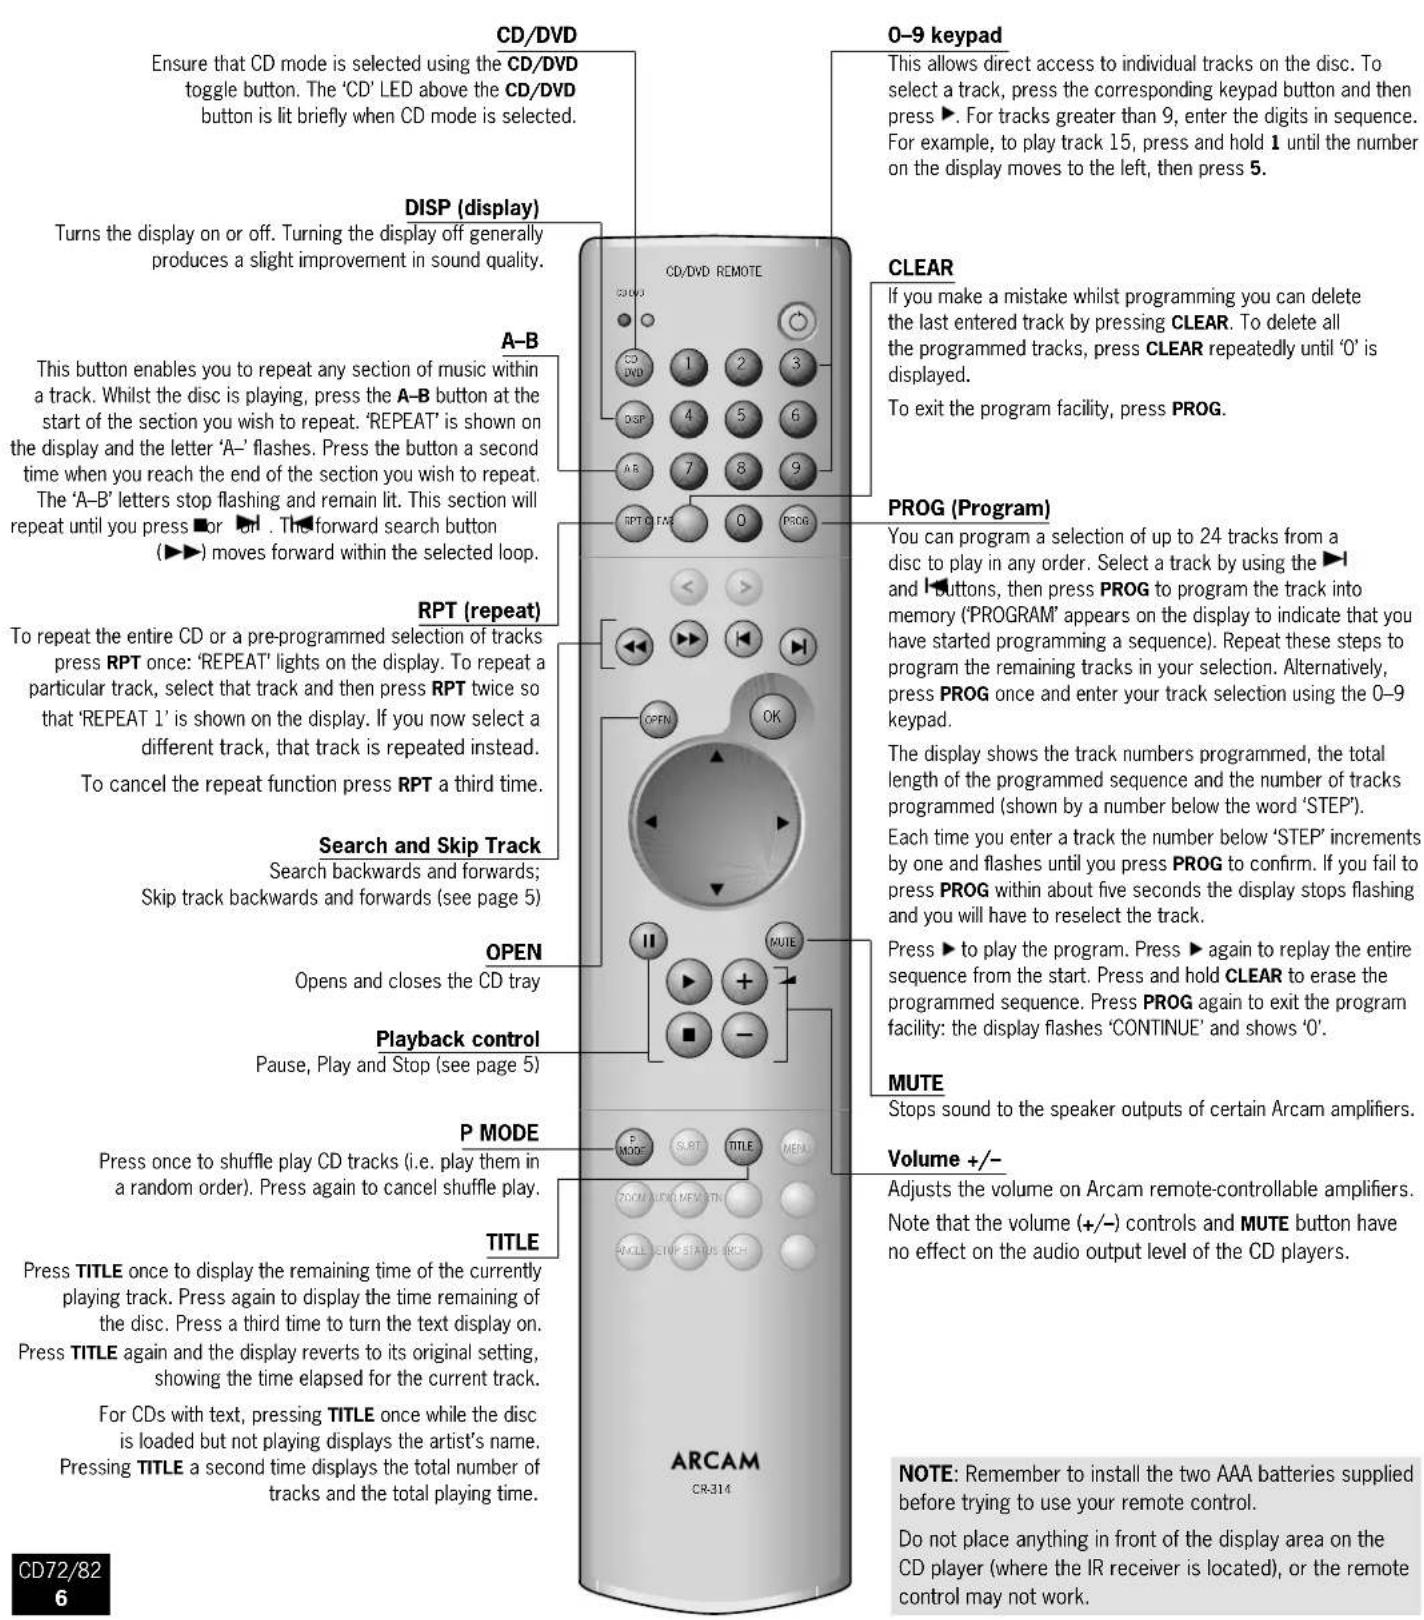
Using the remote control
CR-314 Remote Control
Note that greyed-out buttons on the remote control are DVD-specific and are not used with the CD player.
Technical specification
Digital to Analogue conversion
| CD72: 24-bit multilevel Delta-Sigma DAC |
| CD82: Dual mono 24-bit Wolfson DAC |
| Laser pick-up 3 beam |
| Laser wavelength 780nm |
| Numerical aperture 0.45 |
| Dynamic range 106dB |
| Signal to noise ratio (CCIR) >100dB |
| Harmonic distortion (0dB, 1kHz) <0.005% |
| Frequency response (±0.5dB) 5Hz-20kHz |
| Output level (0dB) 2.3Vrms |
| Output impedance |
| CD72 120Ω |
| CD82 50Ω |
| Minimum recommended load 5kΩ |
Physical
| Dimensions W430 x D290 x H84mm | |
| Weight | |
| CD72 | 4.6kg nett/6.1kg packed |
| CD82 | 5.5kg nett/7.0kg packed |
| Power consumption | 32VA maximum |
Digital output connection
75Ω co-axial optical TOSLINK
Supplied accessories
| Mains lead | |
| CR-314 remote control | |
| 2 x AAA batteries |
E&OE
NOTE: All specification values are typical unless otherwise stated.
Continual improvement policy
Arcam has a policy of continual improvement for its products. This means that designs and specifications are subject to change without notice.
Radio interference
The CD72 and CD82 players are digital audio devices which have been designed to very high standards of electromagnetic compatibility.
Both CD players and DACs generate, and can radiate RF (radio frequency) energy. In some cases this can cause interference with FM and AM radio reception. If this is the case, keep the CD player and its connecting cables as far from the tuner and its aerials as possible. Connecting the CD player and the tuner to different mains sockets can also help to reduce interference.
EC COUNTRIES — These products have been designed to comply with directive 89/336/EEC.
USA – These products comply with FCC requirements.
Laser radiation
If an Arcam CD player is operated whilst the outer casing is removed, invisible laser radiation could cause eye damage.
CLASS I LASER PRODUCT
Worldwide Guarantee
This entitles you to have the unit repaired free of charge, during the first two years after purchase, at any authorised Arcam distributor provided that it was originally purchased from an authorised Arcam dealer or distributor. The manufacturer can take no responsibility for defects arising from accident, misuse, abuse, wear and tear, neglect or through unauthorised adjustment and/or repair, neither can they accept responsibility for damage or loss occurring during transit to or from the person claiming under the guarantee.
The warranty covers:
Parts and labour costs for two years from the purchase date. After two years you must pay for both parts and labour costs. The warranty does not cover transportation costs at any time.
Claims under guarantee
This equipment should be packed in the original packing and returned to the dealer from whom it was purchased, or failing this, directly to the Arcam distributor in the country of residence.
It should be sent carriage prepaid by a reputable carrier — NOT by post. No responsibility can be accepted for the unit whilst in transit to the dealer or distributor and customers are therefore advised to insure the unit against loss or damage whilst in transit.
For further details contact Arcam at:
Arcam Customer Support Department, Pembroke Avenue, Waterbeach, CAMBRIDGE CB5 9PB, England.
Telephone: +44 (0)1223 203203
Fax: +44 (0)1223 863384
Email: support@arcam.co.uk
Problems?
Always contact your dealer in the first instance.
If your dealer is unable to answer any query regarding this or any other Arcam product please contact Arcam Customer Support on +44 (0) 1223 203203 or write to us at the above address and we will do our best to help you.
On-line registration
You can register your Arcam product on line at:
www.arcam.co.uk/reg
ARCAM
PEMBROKE AVENUE, WATERBEACH, CAMBRIDGE CB5 9PB, ENGLAND
telephone +44 (0)1223 203203 fax +44 (0)1223 863384 email support@arcam.co.uk website www.arcam.co.uk
- Arcam Compact Disc players
- Safety guidelines
- Safety instructions
- Take heed of warnings and instructions
- Water and moisture
- Object or liquid entry
- Ventilation
- Heat
- Climate
- Racks and stands
- Cleaning
- Power sources
- Power-cord protection
- Grounding
- Power lines
- Non-use periods
- Abnormal smell
- Servicing
- Damage requiring service
- Safety compliance
- Using this handbook
- Safety
- Models covered
- CD72
- CD82
- CD72 player
- CD82 player
- Contents
- Safety guidelines 2
- Using this handbook 3
- Installation 4
- Using your CD player 5
- Using the remote control 6
- Technical specification 7
- Guarantee 8
- On-line registration 8
- Positioning the unit
- Connecting to other equipment
- Interconnect cables
- Audio outputs
- Coaxial digital output
- Optical digital output
- Remote input connection
- Connecting to a power supply
- Wrong plug?
- Mains lead
- Plugging in
- Using your CD player
- POWER 1
- LOAD ②
- PLAY ③
- STOP 4
- PAUSE 5
- SEARCH 6
- SKIP TRACK ⑦
- CDs with text
- Load
- Play
- Track selection
- Using the remote control
- CR-314 Remote Control
- Technical specification
- Continual improvement policy
- Radio interference
- Laser radiation
- Worldwide Guarantee
- The warranty covers:
- Claims under guarantee
- For further details contact Arcam at:
- Problems?
- On-line registration
- ARCAM
Brand : ARCAM
Model : DiVA CD82
Category : CD Player