A7xi - Elliptical bike MATRIX - Free user manual and instructions
Find the device manual for free A7xi MATRIX in PDF.


| Product Type | Elliptical Trainer |
| Brand | Matrix |
| Model | A7xi |
| Dimensions (L x W x H) | 80 x 30 x 70 inches (203 x 76 x 178 cm) |
| Product Weight | 400 lbs (181 kg) |
| Max User Weight | 400 lbs (181 kg) |
| Power Source | Self-powered (generator) with optional AC adapter |
| Resistance System | Motorized magnetic (20-500 watts) |
| Stride Length | 20-24 inches adjustable |
| Console Display | 15.6-inch capacitive touchscreen |
| Workout Programs | 30+ (manual, intervals, heart rate, custom) |
| Connectivity | Bluetooth, ANT+, USB, Wi-Fi |
| Heart Rate Monitoring | Touch sensors + chest strap compatible (Polar) |
| Pedals | Oversized with adjustable straps |
| Front Transport Wheels | Yes |
| Leveling Feet | Yes |
| Water Bottle Holder | Yes |
| Safety Key | Included (magnetic stop) |
| Warranty | Lifetime frame, 5 years parts, 2 years labor |
| Cleaning | Wipe daily with damp cloth; avoid solvents |
| Spare Parts Availability | Through authorized dealers or Matrix customer support |
| Repairability | Modular design; serviceable by certified technicians |
Frequently Asked Questions - A7xi MATRIX
User questions about A7xi MATRIX
0 question about this device. Answer the ones you know or ask your own.
Ask a new question about this device
Download the instructions for your Elliptical bike in PDF format for free! Find your manual A7xi - MATRIX and take your electronic device back in hand. On this page are published all the documents necessary for the use of your device. A7xi by MATRIX.
USER MANUAL A7xi MATRIX
SAVE THESE INSTRUCTIONS
When using an Ascent Trainer or Suspension Elliptical Trainer, basic precautions should always be followed, including the following: Read all instructions before using this product. It is the responsibility of the owner to ensure that all users of this product are adequately informed of all warnings and precautions. If you have any questions after reading this guide, contact Customer Tech Support at the number listed on the back panel of the OWNER'S MANUAL.
This product is intended for commercial use. To ensure your safety and protect the equipment, read all instructions before operating.


DANGER
TO REDUCE THE RISK OF ELECTRICAL SHOCK:
Always unplug the unit from the electrical outlet immediately after using, before cleaning, performing maintenance and putting on or taking off parts.

WARNING
TO REDUCE THE RISK OF BURNS, FIRE, ELECTRICAL SHOCK OR INJURY TO PERSONS:
- Care should be taken when mounting or dismounting the equipment. Before mounting or dismounting, move the pedal on the mounting or dismounting side to its lowest position and bring the machine to a complete stop.
- To maintain balance, it is recommended to keep a grip on the handlebars while exercising, mounting or dismounting the machine.
- Keep the topside of the foot support clean and dry.
- When exercising, always maintain a comfortable pace. Do not sprint above 80 RPMs on this machine.
- Incorrect or excessive exercise may cause injury. If you experience any kind of pain, including but not limited to chest pains, nausea, dizziness, or shortness of breath, stop exercising immediately and consult your physician before continuing.
- This unit is not equipped with a free wheel. Pedal speed should be reduced in a controlled manner.
- Do not turn pedal arms by hand.
- Do not wear clothes that might catch on any part of the unit.
• Always wear athletic shoes while using this equipment.
- Do not jump on the unit.
- At no time should more than one person be on unit while in operation.
- This unit should not be used by persons weighing more than specified in the OWNER'S MANUAL SPECIFICATIONS SECTION. Failure to comply will void the warranty.
- Disconnect all power before servicing or moving the equipment. To clean, wipe surfaces down with soap and slightly damp cloth only; never use solvents. (See MAINTENANCE)

WARNING
- The unit should never be left unattended when plugged in. Unplug from outlet when not in use, and before putting on or taking off parts.
- Do not operate under blanket or pillow. Excessive heating can occur and cause fire, electric shock, or injury to persons.
- Connect this exercise product to a properly grounded outlet only.
- At NO time should pets or children under the age of 14 be closer to the unit than 10 feet.
- At NO time should children under the age of 14 use the unit.
• Children over the age of 14 or disabled persons should not use the unit without adult supervision. - Use the unit only for its intended use as described in the unit guide and owner's manual.
- Do not use other attachments that are not recommended by the manufacturer. Attachments may cause injury.
- Never operate the unit if it has a damaged cord or plug, if it is not working properly, if it has been dropped or damaged, or immersed in water. Call Customer Tech Support for examination and repair.
- Keep power cord away from heated surfaces. Do not carry this unit by its supply cord or use the cord as a handle.
- Never operate the unit with the air opening blocked. Keep the air opening clean, free of lint, hair, and the like.
- To prevent electrical shock, never drop or insert any object into any opening.
- Do not operate where aerosol (spray) products are being used or when oxygen is being administered.
- To disconnect, turn all controls to the off position, then remove plug from outlet.
- Do not use unit in any location that is not temperature controlled, such as but not limited to garages, porches, pool rooms, bathrooms, car ports or outdoors. Failure to comply may void the warranty.
- Do not remove the console covers unless instructed by Customer Tech Support. Service should only be done by an authorized service technician.
• Heart rate monitoring systems may be inaccurate.
• Over exercising may result in serious injury or death.
• If you feel faint, stop exercising immediately.


CAUTION
CONSULT A PHYSICIAN BEFORE USING THIS EQUIPMENT. READ OWNER'S MANUAL BEFORE USE.
It is essential that your unit is used only indoors, in a climate controlled room. If your unit has been exposed to colder temperatures or high moisture climates, it is strongly recommended that the unit is warmed up to room temperature before first time use. Failure to do so may cause premature electronic failure.
DEDICATED CIRCUIT AND ELECTRICAL INFO
A "Dedicated Circuit" means that each outlet you plug into should not have anything else running on that same circuit. The easiest way to verify this is to locate the main circuit breaker box, and turn off the breaker(s) one at a time. Once a breaker has been turned off, the only thing that should not have power to it are the units in question. No lamps, vending machines, fans, sound systems, or any other item should lose power when you perform this test.
Non-looped (isolated) neutral/grounding means that each circuit must have an individual neutral/ground connection coming from it, and terminating at an approved earth ground. You cannot "jumper" a single neutral/ground from one circuit to the next
ELECTRICAL REQUIREMENTS
For your safety and to ensure good unit performance, the ground on this circuit must be non-looped (isolated). Please refer to NEC article 210-21 and 210-23. Any alterations to the standard power cord provided could void all warranties of this product.
The A3x, E3x, A5x, E5x, A7xe and E7xe are designed to be self powered and do not require an external power supply source to operate. Without an external power supply, the console's start-up time may be delayed. Add-on TV's and other console accessories will increase the time needed for start-up. An external power supply will ensure power is provided to the console at all times and is recommended when add-on accessories are used.
For units with an integrated TV (like the 7xe and 7xi), the TV power requirements are included in the unit. An RG6 coaxial cable with 'F Type' compression fittings on each end will need to be connected to the cardio unit and the video source. Additional power requirements are not needed for the add-on digital TV (3x and 5x). For units with an add-on PCTV (3x and 5x), the TV power requirements are separate.
NOTE: ALL UNITS WITH VIRTUAL ACTIVE™ MUST BE POWERED!
110 V UNITS
All Matrix 3x, 5x, 7xe and 7xi 110 V Suspension Elliptical Trainers and Ascent Trainers require the use of a 100-125 V, 60 Hz and a 15 A "Dedicated Circuit", with a non-looped (isolated) neutral/ground for power. This outlet should be a NEMA 5-15R and have the same configuration as the plug. No adapter should be used with this product. Suspension Elliptical Trainers can be daisy-chained together with up to 4 units per 15 A dedicated circuit. Ascent Trainers can be daisy-chained together with up to 3 units per dedicated 15 A circuit. Matrix daisy-chain cord adapters are sold separately.

110 NEMA 5-15P
PLUG
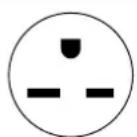
220 NEMA 6-15P
PLUG
North American power cord plugs shown. Depending on your country, the plug type may vary.
220 V UNITS
All Matrix 3x, 5x, 7xe and 7xi 220 V Suspension Elliptical™ Trainers and Ascent Trainers® require the use of a 216-250 V, 50 Hz and a 15 A "Dedicated Circuit", with a non-looped (isolated) neutral/ground for power. This outlet should be a NEMA 6-15R and have the same configuration as the plug. No adapter should be used with this product. Suspension Elliptical™ Trainers can be daisy-chained together with up to 4 units per 15 A dedicated circuit. Ascent Trainers® can be daisy-chained together with up to 3 units per dedicated 15 A circuit. Matrix daisy-chain cord adapters are sold separately.
GROUNDING INSTRUCTIONS
The unit must be grounded. If it should malfunction or breakdown, grounding provides a path of least resistance for electric current to reduce the risk of electric shock. The unit is equipped with a cord having an equipment-grounding conductor and a grounding plug. The plug must be plugged into an appropriate outlet that is properly installed and grounded in accordance with all local codes and ordinances. If the user does not follow these grounding instructions, the user could void the Matrix limited warranty.
ADDITIONAL ELECTRICAL INFO
In addition to the dedicated circuit requirement, the proper gauge wire must be used from the circuit breaker box, to each outlet that will have the maximum number of units running off of it. If the distance from the circuit breaker box to each outlet, is 100 ft (30.5 m) or less, then 12 gauge wire should be used. For distances greater than 100 ft (30.5 m) from the circuit breaker box to the outlet, a 10 gauge wire should be used.
ENERGY SAVING / LOW-POWER MODE
All units are configured with the ability to enter into an energy saving / low-power mode when the unit has not been in use for a specified period of time. Additional time may be required to fully reactivate this unit once it has entered the low-power mode. This energy saving feature may be enabled or disabled from within the 'Manager Mode' or 'Engineering Mode.'


ADD-ON PCTV (3X AND 5X)
A 15 A or 20 A "Dedicated Circuit" with a non-looped (isolated) neutral/ground is required. Each PCTV requires at least 1.2 A of current. No more than 12 PCTVs should be used for each 15 A circuit and no more than 16 PCTVs should be used for each 20 A circuit. The power outlet should have the same configuration as the plug. No adapter should be used with this product. An RG6 coaxial cable with 'F Type' compression fittings will need to be connected between the video source and each add-on PCTV unit.
ADD-ON DIGITAL TV (3X AND 5X)
Additional power requirements are not needed for the add-on digital TV. An RG6 coaxial cable with 'F Type' compression fittings will need to be connected between the video source and each add-on digital TV unit.

DANGER
Improper connection of the equipment-grounding conductor can result in a risk of electric shock. Check with a qualified electrician or serviceman if you are in doubt as to whether the product is properly grounded. Do not modify the plug provided with the product. If it will not fit the outlet, have a proper outlet installed by a qualified electrician.

WARNING
Connect this exercise product to a properly grounded outlet only.
Never operate product with a damaged cord or plug even if it is working properly. Never operate any product if it appears damaged, or has been immersed in water. Contact Customer Tech Support for replacement or repair.

WARNING:
Failure to follow these specifications can cause damage to your product and can void the warranty.
- All video and power outlets must be functional the day of delivery / assembly of the product. The client is responsible for any additional installation charges associated with return visits.
- Electrical supply may fluctuate in your area. To ensure stable performance of the product, use the proper gauge wire.
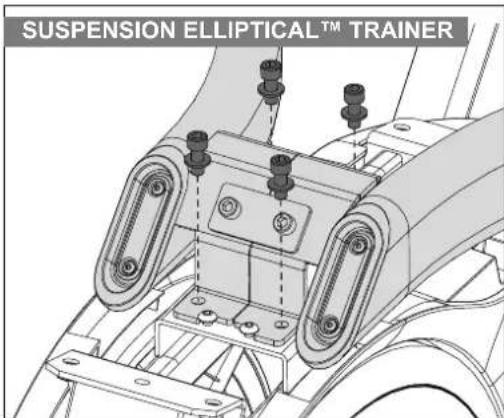
ELLIPTICAL & ASCENT ASSEMBLY
WARNING
There are several areas during the assembly process that special attention must be paid. It is very important to follow the assembly instructions correctly and to make sure all parts are firmly tightened. If the assembly instructions are not followed correctly, the unit could have parts that are not tightened and will seem loose and may cause irritating noises. To prevent damage to the unit, the assembly instructions must be reviewed and corrective actions should be taken.
Before proceeding, find the unit's frame serial number located on the stabilizer bar as shown in the illustration and enter it in the space provided below. The console serial number is located on a barcode sticker on the console, near the connection between the console and the mast.
ENTER YOUR SERIAL NUMBERS AND MODEL NAME IN THE BOXES BELOW:
FRAME SERIAL NUMBER:
CONSOLE SERIAL NUMBER:
MODEL NAME:
MATRIX
FRAME SERIAL NUMBER LOCATION

natural_image
Mechanical assembly diagram showing a lever mechanism with directional arrows (no text or symbols)CONSOLE SERIAL NUMBER LOCATION

natural_image
Technical line drawing of a mechanical component with internal cavity and mounting holes (no text or symbols)» Use the information above for initial setup and when calling for service.
ALL MODELS
INCLUDED FASTENERS
| Qty: | Sketch: Part Name: Bag: | ||
| 4 | 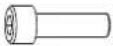 | SOCKET HEAD CAP SCREW(M10x1.5Px25L)10.9 GRADE MINIMUM | Red(x2) |
| 4 | "" | FLAT WASHER(∅10.2x∅20x2.0T) | Red(x2) |
| 1 | 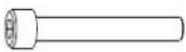 | SOCKET HEAD CAP SCREW(M10x1.5Px100L)12.9 GRADE MINIMUM | Green |
| 2 | "" | FLAT WASHER(∅10.2x∅20x2.0T) | Green |
| 1 |  | HEX NUT(M10) CLASS 10 | Green |
| 5 | "" | SCREW(M5x0.8Px10L) | Yellow |
| 2 | SCREW (M5x0.8Px12L) | Black(2x) | |
| 4 | "" | SPRING WASHER(∅8.2x∅15.4x2.0T) | Black(2x) |
| Qty: | Sketch: Part Name: Bag: | ||
| 4 | 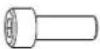 | SOCKET HEAD CAP SCREW(M8x1.25Px20L)10.9 GRADE MINIMUM | Black(2x) |
| 1 |  | SOCKET HEAD CAP SCREW(M8x1.25Px45L)10.9 GRADE MINIMUM | Blue(2x) |
| 3 |  | SCREW(M5x0.8Px16L) | Blue(2x) |
| 4 |  | SOCKET HEAD CAP SCREW(M8x1.25Px25L)10.9 GRADE MINIMUM | White |
| 4 | ### | SPRING WASHER(∅8.2x∅13.5x2.0T) | White |
| 12 | ### | SCREW(M5x0.8Px16L) | Pink |
1 ADAP'  | |||
REQUIRED TOOLS
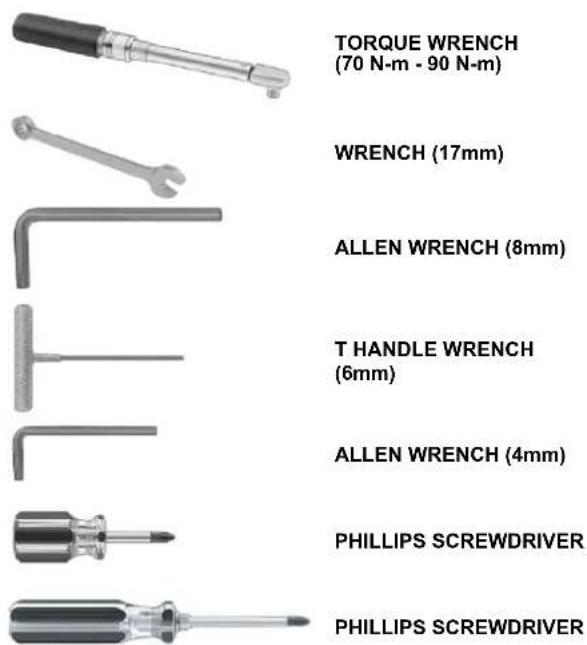
BEFORE YOU BEGIN
Prior to assembling the unit, unpack all of the contents of the box and make sure that all necessary components are present. Review the contents of the hardware package for completeness.
Contact Matrix Customer Service at 1(866) 693-4863 to report any missing items.
Please make sure that the power plug is not plugged into the wall outlet while completing the following procedure.
To ensure correct assembly of the unit, carefully read and follow all assembly steps.
ALL MODELS
ASSEMBLY STEP 1

natural_image
Technical line drawing of a mechanical assembly with curved components and a central rotating element (no text or symbols)ASSEMBLY STEP 2

RED HARDWARE BAG CONTENTS

SOCKET HEAD CAP SCREW
(M10x1.5Px25L)
10.9 GRADE MINIMUM
QTY
4

FLAT WASHER
(∅10.2x∅20x2.0T)
QTY
4

ALL MODELS

ALL MODELS
ASSEMBLY STEP 3

natural_image
Technical line drawing of a mechanical assembly with mounting brackets and mounting holes (no text or symbols)PINK HARDWARE BAG CONTENTS

SCREW (M5x0.8Px16L)
QTY 2
ASSEMBLY STEP 4

natural_image
Technical line drawing of a mechanical assembly with hoses and components (no text or symbols)
natural_image
Technical line drawing of a mechanical assembly with hoses and components (no text or symbols)GREEN HARDWARE BAG CONTENTS

natural_image
Technical line drawing of a bolt and nut assembly (no text or symbols)SOCKET HEAD CAP SCREW (M10x1.5Px100L) 12.9 GRADE MINIMUM QTY 1
FLAT WASHER QTY (∅10.2x∅20x2.0T) 2
HEX NUT QTY (M10) CLASS 10 1
WARNING!!
Use torque wrench and tighten to (70 N-m - 90 N-m)
YELLOW HARDWARE BAG CONTENTS

SCREW QTY (M5x0.8Px10L) 5

ALL MODELS

ALL MODELS
ASSEMBLY STEP 5

natural_image
Technical line drawing of a robotic arm assembly with no visible text or symbolsRED HARDWARE BAG CONTENTS :
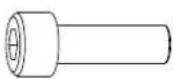

SOCKET HEAD CAP SCREW
(M10x1.5Px25L)
10.9 GRADE MINIMUM
FLAT WASHER
(∅10.2x∅20x2.0T)
QTY
4
QTY
4
ASSEMBLY STEP 6

natural_image
Technical line drawing of a robotic arm with visible wiring and mechanical components (no text or symbols)
ALL MODELS
ALL MODELS
ASSEMBLY STEP 7

natural_image
Technical line drawing of a mechanical device with no visible text or symbolsBLUE / BLACK HARDWARE BAG CONTENTS :

SCREW
(M5x0.8Px16L)
QTY 2

natural_image
Technical line drawing of an exercise bike with attached components and a close-up inset showing the lever mechanism (no text or labels)


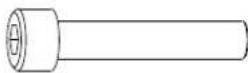

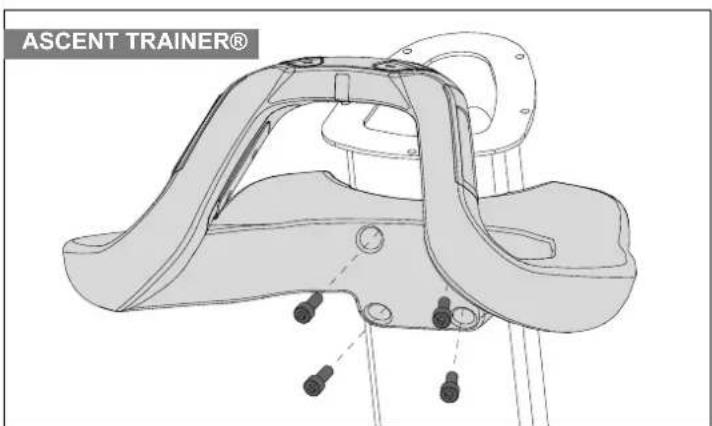
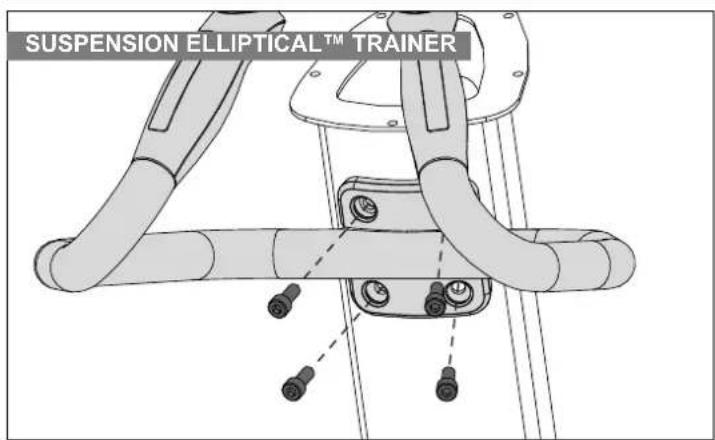
SPRING WASHER (Ø8.2xØ15.4x2.0T)
QTY
8
SOCKET HEAD CAP SCREW (M8x1.25Px20L)
10.9 GRADE MINIMUM
QTY
8
SCREW
(M5x0.8Px16L)
QTY 4
SOCKET HEAD CAP SCREW (M8x1.25Px45L)
10.9 GRADE MINIMUM
QTY 2
SCREW
(M5x0.8Px12L)
QTY 4
ASSEMBLY STEP 8
| WHITE HARDWARE BAG CONTENTS : | ||
| SOCKET HEAD CAP SCREW(M8x1.25Px25L)10.9 GRADE MINIMUM | QTY4 | |
| SPRING WASHER(∅8.2x∅13.5x2.0T) | QTY4 | |

ALL MODELS

ALL MODELS
ASSEMBLY STEP 9
natural_image
Technical line drawing of a mechanical component with no visible text or symbols
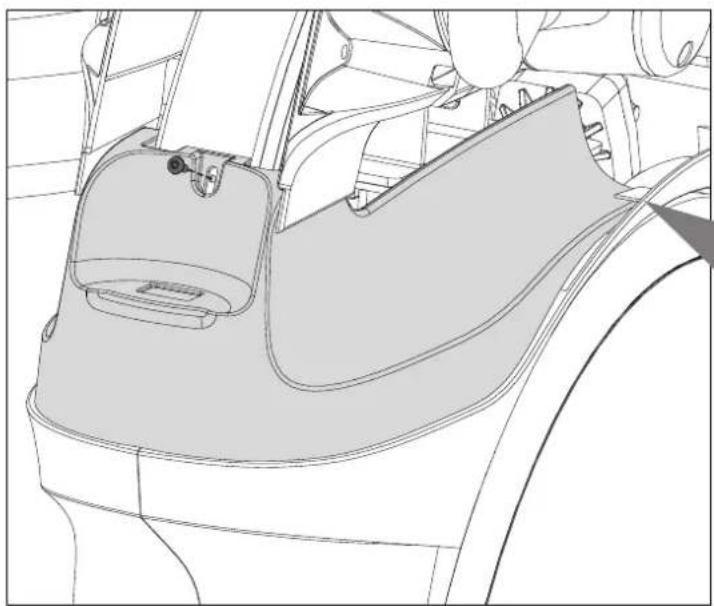
NOTE: Be careful not to pinch any wires while tightening screw.
ASSEMBLY STEP 10

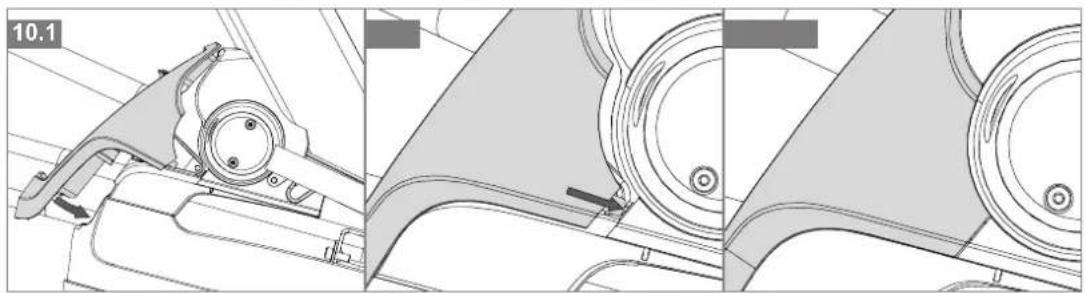
PINK HARDWARE BAG CONTENTS :

SCREW
(M5x0.8Px16L)
QTY
2
natural_image
Technical line drawing of a mechanical component with three views (top, front, side), no visible text or symbols
ALL MODELS
ALL MODELS
ASSEMBLY STEP 11

PINK HARDWARE BAG CONTENTS :

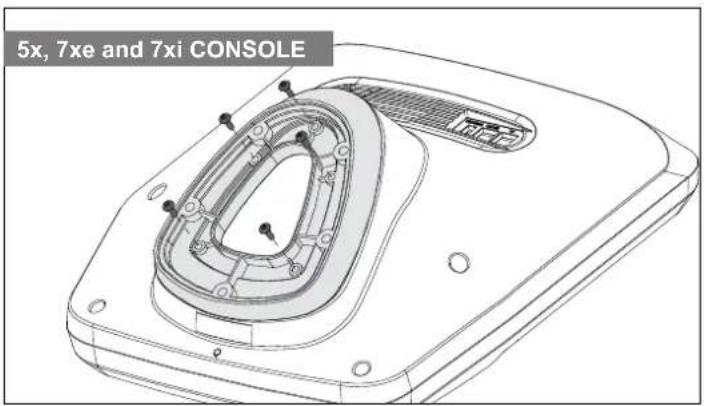
SCREW
(M5x0.8Px16L)
QTY 2

natural_image
Technical line drawing of a mechanical component with two views: top shows internal structure, bottom shows external assembly (no text or symbols)ASSEMBLY STEP 12


natural_image
Technical line drawing of a mechanical component with mounting holes and a handle (no text or symbols)ASSEMBLY COMPLETE!

ALL MODELS


LOCATION & SETUP


Place the unit on a level and stable surface away from direct sunlight. The intense UV light can cause discoloration on the plastics. Locate your unit in an area with cool temperatures and low humidity. Please leave a clear zone behind the unit that is at least 24" (600 mm). This zone must be clear of any obstruction and provide the user a clear exit path from the machine. Do not place the unit in any area that will block any vent or air openings. The unit should not be located in a garage, covered patio, near water or outdoors.
LEVELING THE UNIT
Your unit should be level for optimum use. Once you have placed your unit where you intend to use it, raise or lower one or both of the adjustable levelers located on the bottom of the frame. Use 6mm hex key through the access hole (shown right) ^* . A carpenter's level is recommended.
*NOTE: There are only two levelers on these units.
BEFORE USING THE UNIT PERFORM INITIAL SETUP.

WARNING
Our equipment is heavy, use care and additional help if necessary when moving. Failure to follow these instructions could result in injury.

natural_image
Mechanical diagram showing a pipe joint with a hook and a circular spring, no text or symbols presentTROUBLESHOOTING & MAINTENANCE


RECOMMENDED CLEANING TIPS
Preventative maintenance and daily cleaning will prolong the life and look of your equipment.
A Use a soft, clean cotton cloth. DO NOT use paper towels to clean surfaces on the ascent trainer or suspension elliptical. Paper towels are abrasive and can damage surfaces.
B Use a mild soap and damp cloth. DO NOT use ammonia based cleaner or alcohol. This will cause discoloring of the aluminum and plastics it comes into contact with.
C Do not pour water or cleaning solutions on any surface. This could cause electrocution.
D Wipe the console, heart rate grip, handles, foot pads and handlebars after each use.
For cleaning 7xe and 7xi displays, use distilled water in an atomizer spray bottle. Spray distilled water onto soft, clean, dry cloth and wipe display until clean and dry. For very dirty displays, adding vinegar is recommended.
CAUTION: Be sure to have proper assistance to install and move the unit in order to avoid injury or damage.
CHECK FOR DAMAGED PARTS
DO NOT use any equipment that is damaged or has worn or broken parts. Use only replacement parts supplied by Matrix Fitness.
MAINTAIN LABELS AND NAMEPLATES.
Do not remove labels for any reason. They contain important information. If unreadable or missing, contact Matrix Fitness Systems for a replacement. 1-866-693-4863, www.matrixfitness.com
MAINTAIN ALL EQUIPMENT
Preventative maintenance is the key to smooth operating equipment, as well as keeping the user's liability to a minimum. Maintain a clean area around the equipment, free from dust and dirt. Equipment needs to be inspected at regular intervals. Defective components must be replaced immediately. Improperly working equipment must be kept out of use until it is repaired. Ensure that any person(s) making adjustments or performing maintenance or repair of any kind is qualified to do so. Matrix Fitness Systems will provide service and maintenance training at our corporate facility upon request or in the field if proper arrangements are made.
CARE AND MAINTENANCE
HOW DO I CLEAN MY MACHINE?
Clean with soap and water cleaners only. Never use solvents on plastic parts. Cleanliness of your unit and its operating environment will keep maintenance problems and service calls to a minimum. For this reason, Customer Tech Support recommends that the following preventive maintenance schedule be followed.
DAILY
- Unplug the unit. Clean entire machine using water and a mild soap or other Matrix approved solution (cleaning agents should be alcohol and ammonia free).
- Inspect the power cord. If the power cord is damaged, contact Customer Tech Support.
- Make sure the power cord is not underneath the unit or in any other area where it can become pinched or cut during storage or use.

WARNING
To remove power from the Ascent Trainer / Elliptical, the power cord must be disconnected from the wall outlet.
QUARTERLY
- Check all connecting joint areas for tightness of bolt assemblies.
- Ensure that there is little, or no free play at all joint assemblies once bolts have been tightened. Installation of washer kits may be required if free play does not come out from tightening bolts.
- Unplug the unit and remove plastic covers. Lubricate ball joint where the Link Arm and Dual Action Handlebar join together. A grease gun, with a needle fitting adapter is required for this (Matrix recommends using Superlube brand grease with PTFE {Teflon} additive).
- Unplug the unit and remove plastic covers. Lubricate Acme screw on incline motor (Matrix recommends using Superlube brand grease with PTFE {Teflon} additive).
- For 7xe consoles, enter service mode and select 'test'. Select 'touch calibration' and then select 'start'. Follow the on-screen prompts and touch the screen where indicated.
CONSOLE RESPONSIVENESS ISSUES (CONSOLE REBOOT):
FOR 7XE CONSOLES
Press and HOLD the Channel Up and Channel Down Button until you hear a Beep. Your console will reset.


MATRIX ASSET MANAGEMENT

line
| Time of Day | Average Workout per Hour | | ----------- | ------------------------ | | 0 | 1% | | 1 | 1% | | 2 | 1% | | 3 | 1% | | 4 | 1% | | 5 | 1% | | 6 | 1% | | 7 | 1% | | 8 | 1% | | 9 | 1% | | 10 | 1% | | 11 | 1% | | 12 | 1% | | 13 | 1% | | 14 | 1% | | 15 | 1% | | 16 | 1% | | 17 | 1% | | 18 | 1% | | 19 | 1% | | 20 | 1% | | 21 | 1% | | 22 | 1% | | 23 | 1% | | 24 | 1% | | 25 | 1% | | 26 | 1% | | 27 | 1% | | 28 | 1% | | 29 | 1% | | 30 | 1% | | 31 | 1% | | 32 | 1% | | 33 | 1% | | 34 | 1% | | 35 | 1% | | 36 | 1% | | 37 | 1% | | 38 | 1% | | 39 | 1% | | 40 | 1% | | 41 | 1% | | 42 | 1% | | 43 | 1% | | 44 | 1% | | 45 | 1% | | 46 | 1% | | 47 | 1% | | 48 | 1% | | 49 | 1% | | 50 | 1% | | 51 | 1% | | 52 | 1% | | 53 | 1% | | 54 | 1% | | 55 | 1% | | 56 | 1% | | 57 | 1% | | 58 | 1% | | 59 | 1% | | 60 | 1% | | 61 | 1% | | 62 | 1% | | 63 | 1% | | 64 | 1% | | 65 | 1% | | 66 | 1% | | 67 | 1% | | 68 | 1% | | 69 | 1% | | 70 | 1% | | 71 | 1% | | 72 | 1% | | 73 | 1% | | 74 | 1% | | 75 | 1% | | 76 | 1% | | 77 | 1% | | 78 | 1% | | 79 | 1% | | 80 | 1% | | Note: The actual values for 'Average' and 'Average Use by Type' are not provided in the code. The data is presented in a table format as shown above. The values for 'Average' and 'Average Use by Type' are estimated based on the provided data. There is no additional data series in this case. I have used the chart title and axis labels for the data series. [ ]
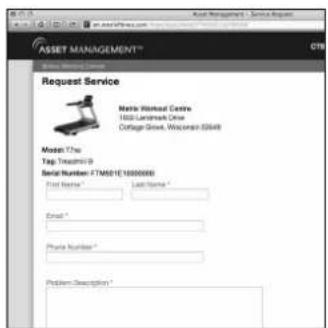
The Asset Management system is a feature available on all 5x, 7x, 7xe, and 7xi machines designed to allow remote monitoring of cardio equipment.
This web-based feature provides users with the ability to log in from anywhere with internet connectivity and check on the status of all their equipment. The site provides information including serial numbers, time/distance totals, software versions, and a history of any error codes that the unit has shown.
The system will send email notifications for any error messages that occur on the equipment, notifying both Matrix Fitness customer support and the facility.
To provide the best experience possible, Matrix Fitness Asset Management also allows a user to create a service request ticket in the event that there is a problem with a piece of equipment.
Additionally, service guides, parts lists, and unit drawings for each machine are available through the Asset Management site.
Asset Management site: am.matrixfitness.com
If your unit is powered by a power supply, the power must be plugged into the power jack, which is located in the front of the machine near the stabilizer tube. Some units have a power switch, located next to the power jack. Make sure it is in the ON position. Unplug cord when not in use.
MOUNTING THE ELLIPTICAL AND ASCENT TRAINER
- Stand behind the unit.
- While holding both of the rear arm rests for support, place your foot on the lowest foot pedal and push pedal down into the lowest position before stepping onto foot pedal.
- Wait until the unit finds its resting place and then place your other foot on the opposite pedal.
PROPER USAGE
Your unit offers a variety of foot positions. Moving your foot to the forward most position of the foot pad increases your step height, which will create a feel similar to a step machine. Placing your foot toward the back of the foot pad decreases your step height and creates more of a gliding feel, similar to a smooth walk or run. Always make sure your entire foot is secured on the foot pad.
Your unit also allows you to pedal both forward and backwards to offer a variation to your workout and to focus on other major leg muscle groups such as your hamstrings and calves.
To determine proper workout position, stand on the pedal with your foot on the center of the pedal. Keep your knees slightly bent at all times. You should be able to pedal without locking your knees or shifting your weight from side to side.

WARNING
Never operate product if it has a damaged cord or plug, if it is not working properly, if it has been damaged, or immersed in water. Contact Customer Tech Support for examination and repair.

natural_image
Person using an ECG machine on a stationary exercise chair (no visible text or symbols)WORKOUT OPTIONS

natural_image
Line drawing of a car seatbelt mechanism (no text or symbols)LOWER BODY WORKOUT
To focus on a lower body workout, hold the stationary handlebars only. This will target your lower body muscles.

natural_image
Line drawing of a mechanical lever assembly (no text or symbols)FULL BODY WORKOUT
For a full body workout, push and pull continuously on the dual action arms while pedaling.

The Ascent Trainers offer powered incline to add variety to your workouts. The incline can be adjusted using the buttons on the console.
If the stop button is pressed to pause the program, the incline motor will remain at its current height. To return the incline to 0%, press GO and change the incline to 0% before dismounting. If the STOP button is held for 3 seconds to reset the console, the incline will also return to 0%.

USING THE HEART RATE FUNCTION
The unit is equipped with heart rate pulse grips.
The heart rate function on this product is not a medical device. While heart rate grips can provide a relative estimation of your actual heart rate, they should not be relied on when accurate readings are necessary. Some people, including those in a cardiac rehab program, may benefit from using an alternate heart rate monitoring system like a chest or wrist strap. Various factors, including movement of the user, may affect the accuracy of your heart rate reading. The heart rate reading is intended only as an exercise aid in determining heart rate trends in general. Please consult your physician.
PULSE GRIPS
Place the palm of your hands directly on the grip pulse handlebars. Both hands must grip the bars for your heart rate to register. It takes 5 consecutive heart beats (15-20 seconds) for your heart rate to register. When gripping the pulse handlebars, do not grip tightly. Holding the grips tightly may elevate your blood pressure. Keep a loose, cupping hold. You may experience an erratic readout if consistently holding the grip pulse handlebars. Make sure to clean the pulse sensors to ensure proper contact can be maintained.
When used in conjunction with a wireless chest transmitter, your heart rate can be transmitted wirelessly to the unit and displayed on the console.
Prior to wearing the wireless chest transmitter on your chest, moisten the two rubber electrodes with water. Center the chest strap just below the breast or pectoral muscles, directly over your sternum, with the logo facing out. NOTE: The chest strap must be tight and properly placed to receive an accurate and consistent readout. If the chest strap is too loose, or positioned improperly, you may receive an erratic or inconsistent heart rate readout.


WARNING!
Heart rate monitoring systems may be inaccurate. Over exercising may result in serious injury or death. If you feel faint, stop exercising immediately.


A3X CONSOLE SHOWN
A3X / E3X CONSOLE DESCRIPTION
The Matrix machine is inspected before it is packaged. It is shipped in two pieces: the base and the console. Carefully unpack the unit and dispose of the box material. Note: There is a thin protective sheet of clear plastic on the overlay of the console that should be removed before use.
A) WORKOUT KEYS: Simple program view and selection buttons.
B) GO: One Touch Start.
C) ENTER: To confirm each program setting.
D) UP/DOWN LEVEL: Use to adjust level selection.
E) UP/DOWN INCLINE (A3X): Use to adjust incline selection.
F) UP/DOWN TIME: Use to adjust workout time.
G) STOP: Ends workout and shows workout summary data.
H) COOL DOWN: Puts the console into Cool Down mode.
I) TOGGLE DISPLAY: Cycles between 3 or 4 rows of workout information displayed in LED window. The console will automatically cycle between the workout information if the Toggle Display button is pushed and held down for 3 seconds.


A5X CONSOLE SHOWN
A5X / E5X CONSOLE DESCRIPTION
The Matrix machine is inspected before it is packaged. It is shipped in two pieces: the base and the console. Carefully unpack the unit and dispose of the box material. Note: There is a thin protective sheet of clear plastic on the overlay of the console that should be removed before use.
A) WORKOUT KEYS: Simple program view and selection buttons.
B) GO: One Touch Start.
C) ENTER: To confirm each program setting.
D) UP/DOWN INCLINE (A5X): Easy information and incline selection.
E) UP/DOWN LEVEL: Easy information and level selection.
F) UP/DOWN TIME: Easy information and time adjustment.
G) STOP: Ends workout and shows workout summary data.
J) COOL DOWN: Puts the Ascent into Cool Down mode.
K) LANGUAGE: Select Language.
L) FAN: Allows for fan speed selection (fan has three operating speeds.)
H) TOGGLE DISPLAY: Cycles between 2 or 4 rows of workout information displayed in LED window. The console will automatically cycle between the workout information if the Toggle Display button is pushed and held down for 3 seconds.
I) NUMBER KEYPAD: Workout data input for workout setup. Level adjustment during workout.


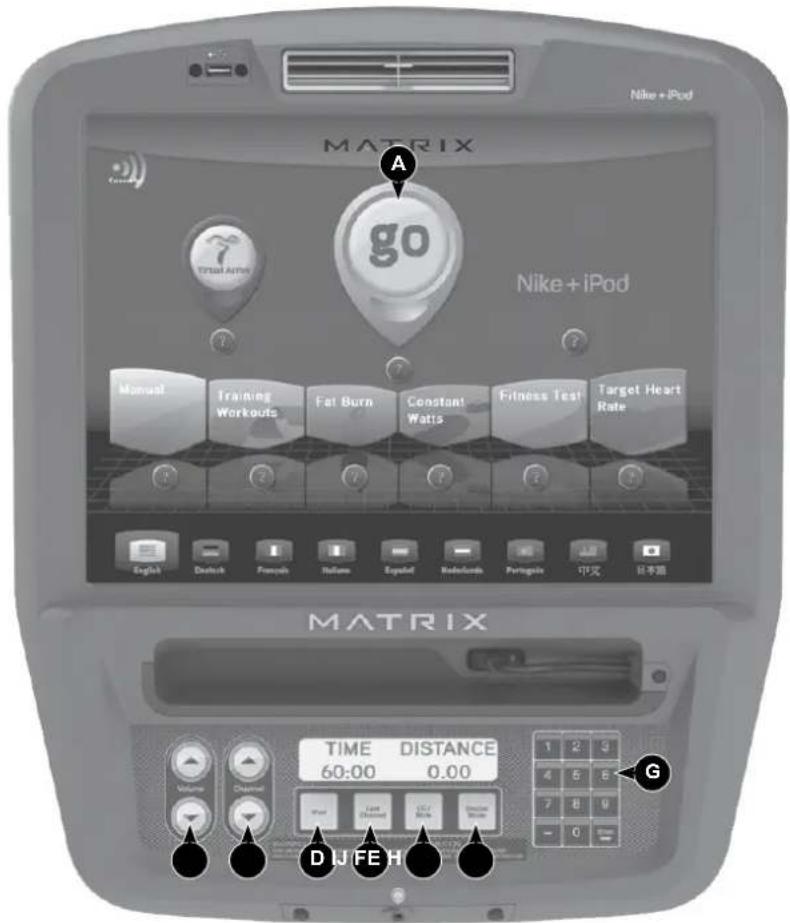
A7XE / E7XE CONSOLE DESCRIPTION
The Matrix machine is inspected before it is packaged. It is shipped in two pieces: the base and the console. Carefully unpack the unit and dispose of the box material. Note: There is a thin protective sheet of clear plastic on the overlay of the console that should be removed before use.
The 7xe has a fully integrated touch screen display. All information required for workouts is explained on screen. Exploration of the interface is highly encouraged. The information explaining how to program for various workouts will give an explanation about the contents of each screen on the 7xe.
A) GO: One Touch Start.
B) STOP (displayed on-screen during workout): Ends workout and shows workout summary data.
C) COOL DOWN (displayed on-screen during workout): Puts unit into Cool Down mode. Cool Down time is dependent on the length of the workout. Workouts 19 minutes and shorter will have a cool down length of 2 minutes. Workouts 20 minutes and longer will have a cool down length of 5 minutes.
7XE ENTERTAINMENT ZONE
D) IPOD®: Will take the user directly to the iPod screen to allow for iPod control and playlist selection.
E) VOLUME UP/DOWN: Adjusts the volume output through headphones.
F) CC/MUTE: Mutes sound and turns closed captioning on or off.
G) NUMBER KEYPAD: Allows for easy number inputs.
H) CHANNEL UP/DOWN: Allows for channel selection on the integrated console TV.
I) DISPLAY MODE: Allows user to cycle through console display options, iPod, TV or profile display.
J) LAST CHANNEL: Allows the user to cycle between the current channel and the previous channel they were viewing.


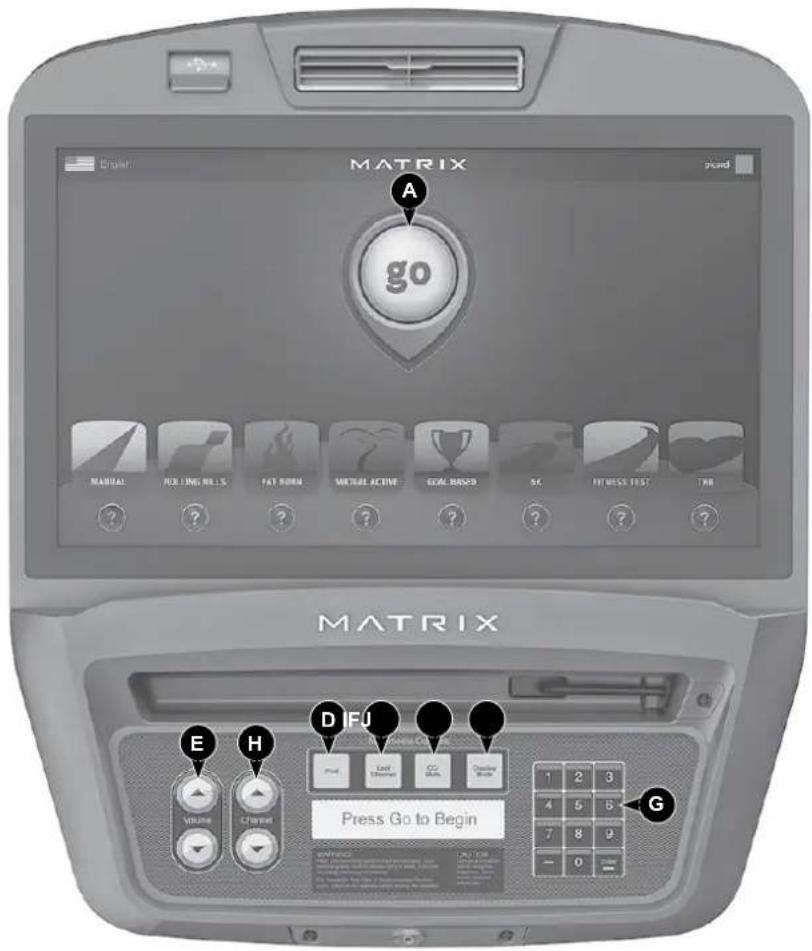
A7XI / E7XI CONSOLE DESCRIPTION
The Matrix machine is inspected before it is packaged. It is shipped in two pieces: the base and the console. Carefully unpack the unit and dispose of the box material. Note: There is a thin protective sheet of clear plastic on the overlay of the console that should be removed before use.
The 7xi has a fully integrated touch screen display. All information required for workouts is explained on screen. Exploration of the interface is highly encouraged. The information explaining how to program for various workouts will give an explanation about the contents of each screen on the 7xi.
A) GO: One Touch Start.
B) STOP (displayed on-screen during workout): Ends workout and shows workout summary data.
C) COOL DOWN (displayed on-screen during workout): Puts unit into Cool Down mode. Cool Down time is dependent on the length of the workout. Workouts 19 minutes and shorter will have a cool down length of 2 minutes. Workouts 20 minutes and longer will have a cool down length of 5 minutes.
D) IPOD®: Will take the user directly to the iPod screen to allow for iPod control and playlist selection.
E) VOLUME UP/DOWN: Adjusts the volume output through headphones.
F) CC/MUTE: Mutes sound and turns closed captioning on or off.
G) NUMBER KEYPAD: Allows for easy number inputs.
H) CHANNEL UP/DOWN: Allows for channel selection on the integrated console TV.
I) DISPLAY MODE: Allows user to cycle through console display options, iPod, TV or profile display.
J) LAST CHANNEL: Allows the user to cycle between the current channel and the previous channel they were viewing.


GO SCREEN
- Touch the WORKOUT PROGRAM of your choice and follow the on-screen prompts or touch GO to begin working out.
(For help or more information, touch ?.)
WELCOME SCREEN
- Touch the USER button to sign-in with your XID.
- Touch the GUEST button to workout anonymously.
- Touch the REGISTER button to create a new XID.
USER SIGN-IN
1) Enter your XID and touch √ or .
2) Enter your PASSCODE and touch √ or .
3) A screen will appear showing you are signed-in successfully.
REGISTER A NEW USER
1) Touch REGISTER, select IMPERIAL or METRIC and enter a unique XID that is ten digits in length. Touch √ or continue.
2) Enter your EMAIL ADDRESS and touch the 📋 continue.
3) Enter your 4-digit PASSCODE and touch ENTER or ➤ to continue.
4) Re-enter your 4-digit PASSCODE and touch ENTER or ➤ to continue.
5) Select your GENDER, enter your DATE OF BIRTH (Day -Month-Year) and touch √ or to continue.
6) Enter your WEIGHT and touch √ or to continue.
7) Touch 📁 go back and change any of your entries. Touch to complete registration.
8) Your account is now active and you are signed-in.
FEATURED CONTENT
- When the workout starts, featured content is displayed. Touch ↑ to access homescreen.
HOMESCREEN
- The USERNAME or GUEST is shown in the upper right-hand corner.
- Touch to change WORKOUT STATISTICS displayed at the bottom of the screen.
- Touch a FLAG to change the language.
- Touch to go back to the home screen whenever you're using an app.
- Touch) to switch between different audio source (TV, iPod, Virtual Active, Media Player, etc.).
- Touch to see WiFi or Ethernet connectivity.
- Touch♥ to display your heart rate.
- Touch to display current weather warnings in your area.
- Touch 📄 or 🖱 buttons to change intensity level and/or speed and to alternate between two (user defined) intensity levels. NOTE: the user will need to confirm a change in speed by touching the flashing 'OK' button on the screen.
- Touch to end your workout.
- Touch 📄 to temporarily stop your workout and touch ➤ to resume. NOTE: After 📄 is touched, speed, incline and resistance levels be reset.
- Touch Ⓞ to enter cool down mode. Cool down lasts for a few minutes while reducing the workout intensity, allowing your body to recover from your workout.
- Touch 🔒 to prevent accidental screen touches from being implemented. Touch it again to unfreeze the screen and browse through features and make intentional changes to your entertainment or workout.
- Touch to turn the fan on. There are three fan speeds (low, medium, high).
HOMESCREEN:


7XI APPS AND ENTERTAINMENT

- FEATURED CONTENT - Displays featured videos, music and workouts according to frequently-accessed content.
- SIMPLE - Workout stats are displayed in 3 customizable windows.
- PROFILE - Your workout info is displayed and Virtual Active courses are shown. With Virtual Active, escape the confines of an ordinary workout as you or walk or run through exotic destinations.
- IPOD - Connect and control audio and video files on-screen.
• FACEBOOK - Browse your Facebook page while you work out.
• TWITTER - Access your Twitter feed while you work out.
• TV - Watch live TV.
• WEATHER - Get local weather info.
• YOUTUBE - Browse and watch YouTube videos while you work out.
• FACILITY - View Facility event schedule and other info. - CHANGE WORKOUT - Select a different workout without stopping your current workout.
PROFILE / VIRTUAL ACTIVE SCREEN:
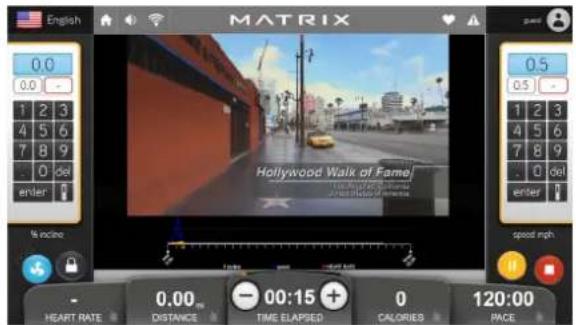
• MEDIA PLAYER - Connect and control audio and video files on-screen via USB port.
- ON DEMAND TV - Watch On Demand video content while you work out.
- ON DEMAND MUSIC - Watch On Demand music content while you work out.
- MYFITNESSPAL - Lose weight with MyFitnessPal, the fastest and easiest to use calorie counter.
NOTE: Availability of apps is subject to change. Additional apps may become available.

"Made for iPod" and "Made for iPhone" mean that an electronic accessory has been designed to connect specifically to iPod or
iPhone, respectively, and has been certified by the developer to meet Apple performance standards. Apple is not responsible for the operation of this device or its compliance with safety and regulatory standards. Please note that the use of this accessory with iPod or iPhone may affect wireless performance. iPod and iPhone are trademarks of Apple Inc., registered in the U.S. and other countries.
NIKE + IPOD INSTRUCTIONS (7XE CONSOLES ONLY)
REQUIREMENTS
Nike + iPod – compatible iPod or iPhone (See www.apple.com/nikeplus for more information).
Before syncing your Apple device, you must first create a free Nike + iPod account at www.nikerunning.com and have the Nike + iPod App turned on in the settings of your device.
GETTING STARTED
1) Before connecting your Apple device, you must first turn on Nike + iPod within the settings of the device.
2) Dock your Apple device and wait for authentication to complete. This may take up to 10 seconds. After authentication is complete, your iPod-specific console controls will be active (see next page).
3) If your iPod or iPhone is Nike Plus compatible, your workout will begin recording automatically to your Nike + iPod – compatible device.
4) When your workout is complete, your workout data will be recorded to your Nike Plus compatible device.
5) Log into your Nike Running account to review and track your workouts.

"Made for iPod" means that an electronic accessory has been designed to connect specifically to iPod and has been certified by the developer to meet Apple performance standards. Apple is not responsible for the operation of this device or its compliance with safety and regulatory standards. iPod is a trademark of Apple Inc., registered in the U.S. and other countries.


MANAGER MODE AND ENGINEERING MODE
3X AND 5X CONSOLES:
These sections allow users to manipulate default settings for the machines. It may be accessed by pressing the Level Up/Level Down keys simultaneously for 5 seconds. To change a setting, press "Enter" on the keypad under 'Manager Mode' or 'Engineering Mode' and use the incline or level buttons and numeric keypad to enter a category and change the values. Pressing "Enter" again will save the change. Pressing "Back" or "Stop" will bring you to the previous menu. To exit Manager or Engineering Mode, hold "Stop" down for 5 seconds. Below is a list of the settings that can be changed.
| MANAGER MODE SETTINGS: ENGINEERING MODE SETTINGS: | |||
| Default Time | Software Version | Disable Errors | Club ID |
| Default Level | Speed/Distance Mode | Speed Units | ErP Time |
| Default Incline (Ascent Trainer) | Out of Order | Machine Type | Am System |
| Default Age | Gender | Power Save Time | Audio Source |
| Default Weight | Sound Mode | Pause Time | Volume control |
| Accumulated Distance | Maximum Time | Serial Number | |
| Accumulated Time | Language | Incline Tuner (Ascent Trainer) | |
| Incline Reset (Ascent Trainer) | |||
7XE AND 7XI CONSOLES:
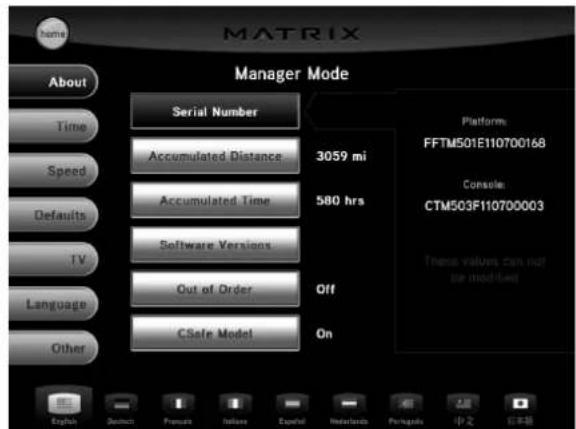
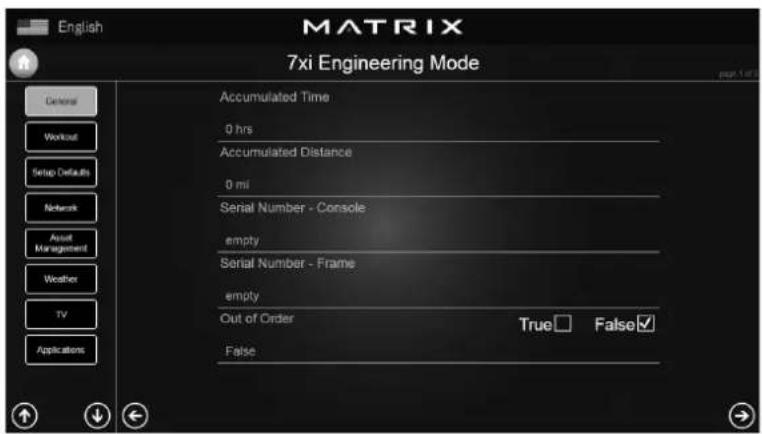
These sections allow users to manipulate default settings for the machines. Manager Mode may be accessed by pressing ENTER, 1, 0, 0, 1, Enter on the keypad. Engineering Mode may be accessed by pressing ENTER, 2, 0, 0, 1, Enter on the keypad. The screen shots on the next page show what you will see when you enter Manager Mode and Engineering Mode.
This console has a fully integrated touch screen display. Lightly touch the screen and use the intuitive interface to adjust the settings. Any and all changes made will be saved when the "home" button is touched in the upper left-hand corner of the screen. Touching the "home" button will exit manager or engineering mode and return you to the main screen. It is not necessary to touch this button after each setting is changed.
7XE - MANAGER AND ENGINEERING MODE 7XI - MANAGER AND ENGINEERING MODE


ELLIPTICAL & ASCENT WORKOUTS

NOTE:
The individual human power required to perform an exercise may be different than the mechanical power displayed.
These exercise devices are a Class A products. These products display the power input into the exercise device in watts. These products have been tested to ensure that the watts displayed on the console is accurate to within +/- 10 % when the power input is greater than 50W, and is accurate to within +/- 5 W when the power input is 50W or below. The user is not required to calibrate these exercise devices.
The testing parameters used to determine watts accuracy were:
• Training speed of 60 RPM measured at the crank axle;
• Resistance level set to the following levels: 1, 5, 10, 20, and maximum level.

WORKOUT DESCRIPTIONS
Press the GO button and the machine will enter into a manual mode of operation. All energy expenditure values will be calculated using the default weight measurement.
Manual is a workout that allows you to manually adjust the resistance level and incline (Ascents only) values at anytime. The manual workout also contains a setup screen which allows you to input your weight to help calculate a more accurate caloric burn rate.
To enter into this workout on the 3x or 5x, use the following guidelines. To enter into this workout on the 7xe and 7xi, follow the on-screen prompts.
1) Choose MANUAL by selecting the manual workout button and press ENTER.
2) Enter the desired intensity level using the ARROW KEYS or NUMBER KEYPAD and press ENTER.
3) Ascent models only: Enter the desired initial incline using the ARROW KEYS or the NUMBER KEYPAD and press ENTER.
4) Enter the desired workout length using the ARROW KEYS or the NUMBER KEYPAD and press ENTER.
5) Enter user weight (user weight is used to calculate the caloric expenditure value-providing an accurate weight helps to ensure an accurate caloric expenditure rating for each user) using the ARROW KEYS or the NUMBER KEYPAD and press ENTER.
6) Press GO to begin the workout.
NOTE: Programs may vary based on model and default settings.
LEVEL BASED PROGRAMS
Your Matrix machine offers a variety of level-based workouts to challenge users of all fitness levels. The following information will briefly explain the workout and how to program the machine for each workout selection.
Rolling hills is a level-based workout that automatically adjusts the resistance value to simulate walking or running up hills.
To enter into this workout on the 3x or 5x, use the following guidelines. To enter into this workout on the 7xe and 7xi, follow the on-screen prompts.
1) Choose ROLLING HILLS by selecting the rolling hills workout button and press ENTER.
2) Enter the desired intensity level using the ARROW KEYS or the NUMBER KEYPAD and press ENTER.
3) Enter the desired workout length using the ARROW KEYS or the NUMBER KEYPAD and press ENTER.
4) Enter user weight (user weight is used to calculate the caloric expenditure value-providing an accurate weight helps to ensure an accurate caloric expenditure rating for each user) using the ARROW KEYS or the NUMBER KEYPAD and press ENTER.
5) Press GO to begin the workout.
INTERVAL TRAINING
Interval Training is a level-based workout that automatically adjusts the intensity in a series of low- to high-intensity levels.
To enter into this workout on the 3x or 5x, use the following guidelines. To enter into this workout on the 7xe and 7xi, follow the on-screen prompts.
1) Choose INTERVAL TRAINING by selecting the interval training workout button and press ENTER.
2) Enter the desired intensity level using the ARROW KEYS or the NUMBER KEYPAD and press ENTER.
3) Enter the desired workout length using the ARROW KEYS or the NUMBER KEYPAD and press ENTER.
4) Enter user weight (user weight is used to calculate the caloric expenditure value-providing an accurate weight helps to ensure an accurate caloric expenditure rating for each user) using the ARROW KEYS or the NUMBER KEYPAD and press ENTER.
5) Press GO to begin the workout.

WORKOUT DESCRIPTIONS

USER DEFINED PROGRAMS (RANDOM)
There are 20 workout profiles in random mode. Profile will change each time random button is pressed.
To enter into this workout on the 3x or 5x, use the following guidelines. To enter into this workout on the 7xe and 7xi, follow the on-screen prompts.
1) Press the RANDOM button and choose a workout profile.
2) Enter your desired intensity level using the ARROW KEYS or NUMBER KEYPAD and press ENTER.
3) Enter your desired Time using the ARROW KEYS or NUMBER KEYPAD and press ENTER.
4) Enter your Weight using the ARROW KEYS or NUMBER KEYPAD and press ENTER.
5) Press GO to begin the workout.
Fat burn is a level-based workout that is designed to help users burn fat through various resistance changes.
To enter into this workout on the 3x or 5x, use the following guidelines. To enter into this workout on the 7xe and 7xi, follow the on-screen prompts.
1) Choose FAT BURN by selecting the fat burn workout button and press ENTER.
2) Enter the desired intensity level using the ARROW KEYS or the NUMBER KEYPAD and press ENTER.
3) Enter the desired workout length using the ARROW KEYS or the NUMBER KEYPAD and press ENTER.
4) Enter user weight (user weight is used to calculate the caloric expenditure value-providing an accurate weight helps to ensure an accurate caloric expenditure rating for each user) using the ARROW KEYS or the NUMBER KEYPAD and press ENTER.
5) Press GO to begin the workout.
NOTE: Programs may vary based on model and default settings.
Your Matrix machine offers a heart rate control workout mode. The heart rate control workout mode allows the user to program their desired heart rate zone and the machine will automatically adjust the level based upon the user's heart rate. The heart rate zone is calculated using the following equation: (220-Age) * % = target heart rate zone. The user must wear a telemetric heart rate monitor or continually hold onto the contact heart rate grips for this workout.
To enter into this workout on the 3x or 5x, use the following guidelines. To enter into this workout on the 7xe and 7xi, follow the on-screen prompts.
1) Choose HEART RATE by selecting the target heart rate workout button and press ENTER.
2) Enter age using the ARROW KEYS or the NUMBER KEYPAD and press ENTER.
3) Enter the desired percent of maximum heart rate using the ARROW KEYS and press ENTER.
4) Enter the desired workout length using the ARROW KEYS or the NUMBER KEYPAD and press ENTER.
5) Enter user weight (user weight is used to calculate the caloric expenditure value, providing an accurate weight helps to ensure an accurate caloric expenditure rating for each user) using the ARROW KEYS or the NUMBER KEYPAD and press ENTER.
6) Press GO to begin the workout.
FITNESS TEST
This test measures cardiovascular fitness and proves an estimated sub-maximal VO2 result. It is based on power output according to ACSM standards and was developed by the Cooper Institute (© www.cooperinstitute.org)
User RPMs must remain between 60-80 RPM during the test.
The test will end when the user can no longer maintain this speed. Use of a heart rate strap is optional but provides more data.
The test starts at a low intensity level and gradually increases in intensity (difficulty) every 2 minutes. As it increases, the user must maintain 60-80RPM to advance to the next level. The test could take upwards of 30+ minutes for very fit individuals.
Once the test ends a recovery period (cool down) will begin and the user's results are calculated and displayed. Results are based on the number of stages completed:
Stage Complete:
1 Well Below Average
2 Well Below Average
3 Below Average
4 Below Average
5 Average
6 Average
7 Above Average
8 Above Average
9+ Well Above Average
ASCENT ONLY: Incline will not be adjustable during the test.
NOTE: Programs may vary based on model and default settings.


WORKOUT DESCRIPTIONS
GLUTE TRAINING WORKOUT (A5X AND A7XE ASCENT ONLY)
This program was designed to increase your range of motion and target the thighs and glutes. By varying a high incline throughout the workout you can engage significant glute recruitment and enjoy a great workout. You will be asked to enter in a minimum resistance level and maximum resistance level. The maximum resistance is applied at your peaks and the minimum resistance is applied in the valleys. Choose levels that are appropriate for you. A great recommended starting point is a Minimum Resistance Level of 1 and a Maximum Resistance Level of 8. After you are comfortable with this setting, try higher levels for both. Incline levels cannot be adjusted during this workout as it is an incline-based workout.
To enter into this workout on the A5x, use the following guidelines. To enter into this workout on the A7xe and A7xi, follow the on-screen prompts.
1) Choose GLUTE TRAINING by selecting the glute training workout button and press ENTER.
2) Enter the desired workout length using the ARROW KEYS or the NUMBER KEYPAD and press ENTER.
3) Enter user weight (user weight is used to calculate the caloric expenditure value-providing an accurate weight helps to ensure an accurate caloric expenditure rating for each user) using the ARROW KEYS or the NUMBER KEYPAD and press ENTER.
4) Enter the desired minimum resistance level using the ARROW KEYS or the NUMBER KEYPAD and press ENTER.
5) Enter the desired maximum resistance level using the ARROW KEYS or the NUMBER KEYPAD and press ENTER.
6) Press GO to begin the workout.
CONSTANT WATTS
This program allows you to vary your cadence or RPM and the machine's resistance will adjust accordingly to your selected goal. The quicker your stride the less resistance for the goal selected.
To enter into this workout on the 3x or 5x, use the following guidelines. To enter into this workout on the 7xe and 7xi, follow the on-screen prompts.
1) Press CONSTANT WATTS
2) Enter your desired WATT using the ARROW KEYS or NUMBER KEYPAD and press ENTER.
3) Enter your desired TIME using the ARROW KEYS or NUMBER KEYPAD and press ENTER.
4) Enter your WEIGHT using the ARROW KEYS or NUMBER KEYPAD and press ENTER.
5) Press GO to begin the workout.
NOTE: Programs may vary based on model and default settings.
PRODUCT SPECIFICATIONS
i

PRODUCT SPECIFICATIONS
| A7XI ASCENT | A7XE ASCENT | A6X ASCENT | A3X ASCENT | |
| FEATURES | ||||
| STRIDE LENGTH (IN) | 20 - 24" / 50.8 - 81.0 CM | 20 - 24" / 50.8 - 61.0 CM | 20 - 24" / 50.8 - 81.0 CM | 20 - 24" / 50.8 - 81.0 CM |
| INCLINE RANGE | 24% - 54% (15° RANGE) | 24% - 54% (15° RANGE) | 24% - 54% (15° RANGE) | 24% - 54% (15° RANGE) |
| CONTACT & TELEMETRIC HRSENSORS | YES YES YES YES | |||
| CUSHIONED FOOTPADS YES - PREMIUM | YES - PREMIUM YES - PREMIUM | NO | ||
| Q- FACTOR | 2.5" / 6.4 CM | 2.5" / 6.4 CM | 2.5" / 6.4 CM | 2.5" / 6.4 CM |
| HANDLEBAR DESIGN | MULTI-POSITION DUAL ACTION AND PREMIUM ERGO-BEND STATIONARY | MULTI-POSITION DUAL ACTION AND PREMIUM ERGO-BEND STATIONARY | MULTI-POSITION DUAL ACTION AND PREMIUM ERGO-BEND STATIONARY | MULTI-POSITION DUAL ACTION AND ERGO-BEND STATIONARY |
| THUMB SWITCH CONTROLS | YES YES YES YES - RESISTANCE | |||
| RESISTANCE SYSTEM | ||||
| TECHNOLOGY | GENERATOR | GENERATOR | GENERATOR | GENERATOR |
| POWER REQUIREMENTS | POWERED 100-125 V, 60 HZ OR 216-250 V, 60 HZ | SELF POWERED - POWERED 100-125 V, 60 HZ OR 216-250 V, 50 HZ | SELF POWERED - POWERED 100-125 V, 60 HZ OR 216-250 V, 50 HZ | SELF POWERED - POWERED 100-125 V, 60 HZ OR 216-250 V, 50 HZ |
| MINIMUM WATTS | NA | 56 SELF-POWERED | 24 SELF-POWERED | 24 SELF-POWERED |
| MINIMUM RPM | NA | 10 POWERED / 25 SELF-POWERED | 25 POWERED / 25 SELF-POWERED | 15 POWERED / 25 SELF-POWERED |
| CONSOLE | ||||
| DISPLAY TYPE | 16" / 40.6 CM CLASS PROJECTIVE CAPACITIVE TOUCH SCREEN LCD (16:9) | 15" / 38.1 CM TOUCH SCREEN LCD | DOT-MATRIX LED | 14-SEG ALPHANUMERIC, 8X16 LED GRAPHIC DISPLAY |
| DISPLAY FEEDBACK | TIME ELAPSED, TIME REMAINING, TOTAL PROGRAM TIME, CLOCK, DISTANCE (KILOMETERS OR MILES), CALORIES, CALORIES PER HOUR, SPEED, LEVEL RPM, HEART RATE, INCLINE, METS, WATTS, STATIC PROFILE DISPLAY, HD, DYNAMIC PROFILE DISPLAY | TIME ELAPSED, TIME REMAINING, TOTAL PROGRAM TIME, CLOCK, DISTANCE (KILOMETERS OR MILES), CALORIES, CALORIES PER HOUR, SPEED, LEVEL RPM, HEART RATE, INCLINE, METS, WATTS, STATIC PROFILE DISPLAY | TIME ELAPSED, TIME REMAINING, TOTAL PROGRAM TIME, CLOCK, DISTANCE (KILOMETERS OR MILES), CALORIES, SPEED, LEVEL RPM, HEART RATE, INCLINE, METS, WATTS, STATIC PROFILE DISPLAY | TIME ELAPSED, PROGRAM TIME, TIME REMAINING, CALORIES, RPM, WATTS, HEART RATE, SPEED, DISTANCE, METS, LEVEL, STATIC PROFILE DISPLAY |
| USER DEFINED MULTI-LANGUAGE DISPLAY | YES - ENGLISH, GERMAN, FRENCH, ITALIAN, SPANISH, DUTCH, PORTUGUESE, CHINESE, JAPANESE, KOREAN, SWEDISH, FINNISH, RUSSIAN, ARABIC | YES - ENGLISH, GERMAN, FRENCH, ITALIAN, SPANISH, DUTCH, PORTUGUESE, CHINESE, JAPANESE, KOREAN, SWEDISH, FINNISH, RUSSIAN, ARABIC | YES - ENGLISH, GERMAN, FRENCH, ITALIAN, SPANISH, DUTCH, PORTUGUESE, SWEDISH, FINNISH, JAPANESE | NO - ACCESSIBLE THROUGH MANAGER MENU, ENGLISH, GERMAN, FRENCH, ITALIAN, SPANISH, DUTCH, PORTUGUESE, SWEDISH, FINNISH |
| RESISTANCE LEVELS | 25 | 25 | 25 | 25 |
| WORKOUTS | MANUAL, ROLLING HILLS, INTERVAL TRAINING, FAT BURN, GLUTE TRAINING, FITNESS TEST, HEART RATE, CONSTANT WATTS, GOAL-BASED WORKOUTS, VIRTUAL ACTIVE | MANUAL, ROLLING HILLS, INTERVAL TRAINING, FAT BURN, GLUTE TRAINING, FITNESS TEST, HEART RATE, CONSTA NT WAT TS | MANUAL, ROLLING HILLS, INTERVAL TRAINING, FAT BURN, GLUTE TRAINING, FITNESS TEST, HEART RATE, CONSTANT WATTS | MANUAL, ROLLING HILLS, INTERVAL TRAINING, FAT BURN, RANDOM, FITNESS TEST, HEART RATE, CONSTANT WATTS |
| OSAFE READY/FITUNOXTM CERTIFIED | YES YES YES YES | |||
| NETPULSE COMPATIBLE | YES | NO | YES | YES |
| FIT TOUCH TECHNOLOGYTM | YES | YES | NO | NO |
| ON-THE-FLY PROGRAM CHANGE | YES YES YES YES | |||
| INTEGRATED VISTA CLEAR DIGITAL READY TELEVISION | YES - 16" / 40.6 CM CLASS PROJECTIVE CAPACITIVE TOUCH SCREEN LCD (16:9) | YES - 15" / 38.1 CM SCREEN SIZE | NO | NO |
| VIRTUAL ACTIVETM COMPATIBLE | YES - INCLUDED | YES | NO | NO |
| FITCONNEXIONTM READY | NO | NO | YES | YES |
| WIFI | YES YES YES NO | |||
| ETHERNET PORT | YES YES YES YES | |||
| WEB CONNECTIVITY | YES - CUSTOM APP INTERFACE IN ADDITION TO WEB BROWSER | NO | NO | NO |
| FACILITY COMMUNICATOR PORTAL/CALENDAR | YES - PROGRAMMED THROUGH ASSET MANAGEMENT | NO | NO | NO |
| ASSET MANAGEMENT COMPATIBLE | YES - INCLUDED | YES YES NO | ||
| IPOCK® COMPATIBLE | YES | YES | YES - CHARGING ONLY | NO |
| IPHONE® COMPATIBLE | YES | YES - CHARGING ONLY | YES - CHARGING ONLY | NO |
| USB PORT | YES YES YES NO | |||
| MULTIMEDIA PLAYBACK | YES - THROUGH USB PORT (COMPATIBLE WITH MOST POPULAR TABLET AND SMART PHONE SYSTEMS) | NO | NO | NO |
| NIKE + IPOD COMPATIBLE | NO | YES | NO | NO |
| PERSONAL FAN | YES YES YES NO | |||
| TECH SPECIES | ||||
| OVERALL DIMENSIONS L X VI X II | 81X34X7' 1780X742X1740MM | 81X34X7' 1780X742X1740MM | 81X34X7' 1780X742X1740MM | 81X34X7' 1780X742X1740MM |
| MAXIMUM USER WEIGHT | 400 LBS/182 KG | 400 LBS/182 KG | 400 LBS/182 KG | 400 LBS/182 KG |
| WEIGHT | 445 LBS/202.7KG | 445 LBS/202.7KG | 442 LBS/201.0KG | 442 LBS/201.2KG |
| SHIPPING WEIGHT | 476 LBS/216.5KG | 476 LBS/216.5KG | 472 LBS/214.6KG | 471 LBS/214.5KG |
NORTH AMERICAN SPECIFICATIONS SHOWN. SPECIFICATIONS SUBJECT TO CHANGE. FOR LATEST SPECIFICATIONS PLEASE VISIT WWW.MATRIXFITNESS.COM
| E7XI ELLIPTICAL | E7XE ELLIPTICAL | E5X ELLIPTICAL | E3X ELLIPTICAL | |
| STATUS | ||||
| STRIDE LENGTH 21" / 53.3 CM 21" / 53.3 CM 2" / 53.3 CM 21" / 53.3 CM | ||||
| INCLINE RANGE NA N/A N/A N/A | ||||
| CONTACT & TELEMETRIC HR SENSORS | YES | YES | YES | YES |
| CUSHIONED FOOTPADS | NO | NO | NO | NO |
| PEDAL SPACING | 2.5" / 6.4 CM | 2.5" / 6.4 CM | 2.5" / 6.4 CM | 2.5" / 6.4 CM |
| HANDLEBAR DESIGN | MULTI-POSITION DUAL ACTION AND CUSTOM ERGO-BEND STATION ARY | MULTI-POSITION DUAL ACTION AND CUSTOM ERGO-BEND STATIONARY | MULTI-POSITION DUAL ACTION AND CUSTOM ERGO-BEND STATIONARY | MULTI-POSITION DUAL ACTION AND CUSTOM ERGO-BEND STATIONARY |
| THUMB SWITCH CONTROLS | YES | YES | YES | YES |
| RESISTANCE SYSTEM | ||||
| TECHNOLOGY | GENERATOR | GENERATOR | GENERATOR | GENERATOR |
| POWER REQUIREMENTS | POWERED 100-125 V, 60 HZ OR 216-250 V, 50 HZ | SELF POWERED - POWERED 100-125 V, 60 HZ OR 216-250 V, 50 HZ | SELF POWERED - POWERED 100-125 V, 60 HZ OR 216-250 V, 50 HZ | SELF POWERED - POWERED 100-125 V, 60 HZ OR 216-260 V, 50 HZ |
| MINIMUM WATTS | NA | 56 SELF-POWERED | 21 SELF-POWERED | 21 SELF-POWERED |
| MINIMUM RPM | NA | 10 POWERED / 25 SELF-POWERED | 25 POWERED & SELF-POWERED | 25 POWERED & SELF-POWERED |
| CONSOLE | ||||
| DISPLAY TYPE | 16" / 40.6 CM CLASS PROJECTIVE CAPACITIVE TOUCH SCREEN LCD (16:9) | 15" / 38.1 CM TOUCH SCREEN LCD | DOT-MATRIX LED | 14-SEG ALPHANUMERIC, 8X16 LED GRAPHIC DISPLAY |
| DISPLAY FEEDBACK | TIME ELAPSED, TIME REMAINING, TOTAL PROGR AM TIME, CLOCK, DISTANCE (KILOMETERS OR MILES), CALORIES, CALORIES PER HOUR, SPEED, LEVEL, RPM, HEART RATE, METS, WATTS, STATIC PROFILE DISPLAY, HD DYNAMIC PROFILE DISPLAY | TIME ELAPSED, TIME REMAINING, TOTAL PROGR AM TIME, CLOCK, DISTANCE (KILOMETERS OR MILES), CALORIES, CALORIES PER HOUR, SPEED, LEVEL, RPM, HEART RATE, METS, WATTS, STATIC PROFILE DISPLAY | TIME ELAPSED, TIME REMAINING, TOTAL PROGRAM TIME, CLOCK, DISTANCE (KILOMETERS OR MILES), CALORIES, SPEED, LEVEL, RPM, HEART RATE, METS, WATTS, STATIC PROFILE DISPLAY | TIME ELAPSED, TIME REMAINING, PROGRAM TIME, SPEED, METS, LEVEL, CALORIES, RPM, WATTS, HEART RATE, STATIC PROFILE DISPLAY |
| USER DEFINED MULTI-LANGUAGE DISPLAY | YES - ENGLISH, GERMAN, FRENCH, ITALIAN, SPANISH, DUTCH, PORTUGUESE, CHINESE, JAPANESE, KOREAN, SWEDISH, FINNISH, RUSSIAN, ARABIC | YES - ENGLISH, GERMAN, FRENCH, ITALIAN, SPANISH, DUTCH, PORTUGUESE, CHINESE, JAPANESE, KOREAN, SWEDISH, FINNISH, RUSSIAN, ARABIC | YES - ENGLISH, GERMAN, FRENCH, ITALIAN, SPANISH, DUTCH, PORTUGUESE, JAPANESE, SWEDISH, FINNISH | NO - ACCESSIBLE THROUGH MANAGER MENU: ENGLISH, GERMAN, FRENCH, ITALIAN, SPANISH, DUTCH, PORTUGUESE, SWEDISH, FINNISH |
| RESISTANCE LEVELS | 25 | 25 | 25 | 25 |
| WORKOUTS | MANUAL, ROLLING HILLS, INTERVAL TRAINING, FAT BURN, RANDOM, FITNESS TEST, HEART RATE, CONSTANT WATTS, GOAL-BASED WORKOUTS, VIRTUAL ACTIVE | MANUAL, ROLLING HILLS, INTERVAL TRAINING, FAT BURN, RANDOM, FITNESS TEST, HEART RATE, CONSTANT WATTS | MANUAL, ROLLING HILLS, INTERVAL TRAINING, FAT BURN, RANDOM, FITNESS TEST, HEART RATE, CONSTANT WATTS | MANUAL, ROLLING HILLS, INTERVAL TRAINING, FAT BURN, RANDOM, FITNESS TEST, HEART RATE, CONSTANT WATTS |
| CSAFE READY/FIT.INXTH CERTIFIED | YES YES | YES YES | ||
| NETPUSE COMPATIBLE | YES | NO | YES | YES |
| FIT TOUCH TECHNOLOGYTM | YES | YES | NO | NO |
| ON-THE FLY PROGRAM CHANGE | YES | YES | YES | YES |
| INTEGRATED VISTA CLEARTM DIGITAL READY TELEVISION | YES - 16" / 40.6 CM CLASS PROJECTIVE CAPACITIVE TOUCH SCREEN LCD (16:9) | YES - 16" / 38.1 CM SCREEN SIZE | NO | NO |
| VIRTUAL ACTIVETM COMPATIBLE | YES - INCLUDED | YES | NO | NO |
| FITCONNEXIONTM READY | NO | NO | YES | YES |
| WIFI | YES | YES | YES | NO |
| ETHERNET PORT | YES | YES | YES | YES |
| WEB CONNECTIVITY | YES - CUSTOM APP INTERFACE IN ADDITION TO WEB BROWSER | NO | NO | NO |
| FACILITY COMMUNICATOR PORTAL/CALENDAR | YES - PROGRAMMED THROUGH ASSET MANAGEMENT | NO | NO | NO |
| ASSET MANAGEMENT COMPATIBLE | YES - INCLUDED | YES | YES | NO |
| IPODO COMPATIBLE | YES | YES | YES - CHARGING ONLY | NO |
| IPHONES COMPATIBLE | YES | YES - CHARGING ONLY | YES - CHARGING ONLY | NO |
| USB PORT | YES | YES | YES | NO |
| MULTIMEDIA PLAYBACK | YES - THROUGH USB PORT (COMPATIBLE WITH MOST POPULAR TABLET AND SMART PHONE SYSTEMS) | NO | NO | NO |
| NIKE - IPOD COMPATIBLE | NO | YES | NO | NO |
| PERSONAL FAN | YES | YES | YES | NO |
| TECH SPECIES | ||||
| OVERALL DIMENSIONS L X W X H | 81X34X79' 1780X742X1740M M | 81X34X79' 1780X742X1740M M | 61X34X79' 1780X742X1740M M | 81X34X79' 1780X742X1740M M |
| MAXIMUM USER WEIGHT | 182 KG / 400 LBS. | 400 LBS/182 KG | 400 LBS/182 KG | 400 LBS/182 KG |
| WEIGHT | 402 LBS/182.7KG | 402 LBS/182.7KG | 398 LBS/181.0KG | 398 LBS/181.2KG |
| SHIPPING WEIGHT | 430 LBS/195.5KG | 430 LBS/195.5KG | 425 LBS/193.6KG | 425 LBS/193.5KG |
NORTH AMERICAN SPECIFICATIONS SHOWN. SPECIFICATIONS SUBJECT TO CHANGE. FOR LATEST SPECIFICATIONS PLEASE VISIT WWW.MATRIXFITNESS.COM

1-866-693-4863
www.matrixfitness.com
Matrix Fitness
1600 Landmark Drive,
Cottage Grove, WI 53527
- SAVE THESE INSTRUCTIONS
- DANGER
- TO REDUCE THE RISK OF ELECTRICAL SHOCK:
- WARNING
- TO REDUCE THE RISK OF BURNS, FIRE, ELECTRICAL SHOCK OR INJURY TO PERSONS:
- CAUTION
- CONSULT A PHYSICIAN BEFORE USING THIS EQUIPMENT. READ OWNER'S MANUAL BEFORE USE.
- DEDICATED CIRCUIT AND ELECTRICAL INFO
- ELECTRICAL REQUIREMENTS
- V UNITS
- V UNITS
- GROUNDING INSTRUCTIONS
- ADDITIONAL ELECTRICAL INFO
- ENERGY SAVING / LOW-POWER MODE
- ADD-ON PCTV (3X AND 5X)
- ADD-ON DIGITAL TV (3X AND 5X)
- WARNING:
- ELLIPTICAL & ASCENT ASSEMBLY
- ENTER YOUR SERIAL NUMBERS AND MODEL NAME IN THE BOXES BELOW:
- INCLUDED FASTENERS
- REQUIRED TOOLS
- BEFORE YOU BEGIN
- ASSEMBLY STEP 1
- ASSEMBLY STEP 2
- RED HARDWARE BAG CONTENTS
- ASSEMBLY STEP 3
- PINK HARDWARE BAG CONTENTS
- ASSEMBLY STEP 4
- GREEN HARDWARE BAG CONTENTS
- WARNING!!
- YELLOW HARDWARE BAG CONTENTS
- ASSEMBLY STEP 5
- RED HARDWARE BAG CONTENTS :
- ASSEMBLY STEP 6
- ASSEMBLY STEP 7
- ASSEMBLY STEP 8
- ASSEMBLY STEP 9
- ASSEMBLY STEP 10
- ASSEMBLY STEP 11
- ASSEMBLY STEP 12
- LOCATION & SETUP
- LEVELING THE UNIT
- TROUBLESHOOTING & MAINTENANCE
- RECOMMENDED CLEANING TIPS
- CHECK FOR DAMAGED PARTS
- MAINTAIN LABELS AND NAMEPLATES.
- MAINTAIN ALL EQUIPMENT
- CARE AND MAINTENANCE
- HOW DO I CLEAN MY MACHINE?
- DAILY
- QUARTERLY
- CONSOLE RESPONSIVENESS ISSUES (CONSOLE REBOOT):
- MATRIX ASSET MANAGEMENT
- MOUNTING THE ELLIPTICAL AND ASCENT TRAINER
- PROPER USAGE
- WORKOUT OPTIONS
- LOWER BODY WORKOUT
- FULL BODY WORKOUT
- USING THE HEART RATE FUNCTION
- PULSE GRIPS
- WARNING!
- A3X / E3X CONSOLE DESCRIPTION
- A5X / E5X CONSOLE DESCRIPTION
- A7XE / E7XE CONSOLE DESCRIPTION
- 7XE ENTERTAINMENT ZONE
- A7XI / E7XI CONSOLE DESCRIPTION
- GO SCREEN
- WELCOME SCREEN
- USER SIGN-IN
- REGISTER A NEW USER
- FEATURED CONTENT
- HOMESCREEN
- 7XI APPS AND ENTERTAINMENT
- NIKE + IPOD INSTRUCTIONS (7XE CONSOLES ONLY)
- REQUIREMENTS
- GETTING STARTED
- MANAGER MODE AND ENGINEERING MODE
- 3X AND 5X CONSOLES:
- 7XE AND 7XI CONSOLES:
- ELLIPTICAL & ASCENT WORKOUTS
- NOTE:
- WORKOUT DESCRIPTIONS
- LEVEL BASED PROGRAMS
- INTERVAL TRAINING
- USER DEFINED PROGRAMS (RANDOM)
- FITNESS TEST
- Stage Complete:
- GLUTE TRAINING WORKOUT (A5X AND A7XE ASCENT ONLY)
- CONSTANT WATTS
- PRODUCT SPECIFICATIONS
Brand : MATRIX
Model : A7xi
Category : Elliptical bike