
ViewPad E100 - Tablet VIEWSONIC - Free user manual and instructions
Find the device manual for free ViewPad E100 VIEWSONIC in PDF.


| Product Type | Tablet |
| Brand | ViewSonic |
| Model | ViewPad E100 |
| Model Number | VS14445 / VS14445G |
| Operating System | Android |
| Display | Touchscreen LCD |
| Storage Expansion | microSD up to 32 GB |
| Camera | Built-in webcam (front) |
| Wi-Fi | 802.11 b/g/n |
| Bluetooth | Yes |
| 3G Connectivity | Optional (SIM card slot) |
| Ports | Mini-HDMI, Micro-USB, 3.5mm audio, Power jack |
| Battery Type | Rechargeable Li-ion |
| Charging Time | Approximately 3 hours |
| Power Input Rating | Refer to rating label on device |
| Accessories Included | Power adapter, USB cable, Quick Start Guide |
| Safety Features | Overheat protection, battery safety, ventilation |
| Certifications | FCC, CE, RoHS |
| Warranty | 1 year labor |
Frequently Asked Questions - ViewPad E100 VIEWSONIC
User questions about ViewPad E100 VIEWSONIC
0 question about this device. Answer the ones you know or ask your own.
Ask a new question about this device
Download the instructions for your Tablet in PDF format for free! Find your manual ViewPad E100 - VIEWSONIC and take your electronic device back in hand. On this page are published all the documents necessary for the use of your device. ViewPad E100 by VIEWSONIC.
USER MANUAL ViewPad E100 VIEWSONIC
Model No. VS14445/VS14445G
Compliance Information
FCC Statement
The following statement applies to all products that have received FCC approval. Applicable products bear the FCC logo, and/or an FCC ID in the format FCC ID: GSS-VS14445G on the product label. This device complies with part 15 of the FCC Rules. Operation is subject to the following two conditions: (1) This device may not cause harmful interference, and (2) This device must accept any interference received, including interference that may cause undesired operation. This mobiledevice has been tested and found to comply with the limits for a Class B digital device, pursuant to Part 15 of the FCC Rules. These limits are designed to provide reasonable protection against harmful interference in a residential installation. This equipment generates, uses and can radiate radio frequencyenergy and, if not installed and used in accordance with the instructions, may cause harmful interferenceto radio communications. However, there is no guarantee that interference will not occur in a particular installation. If this equipment does cause harmful interference to radio or television reception, which can be determined by turning the equipment off and on, the user is encouraged to try to correct the interference by one or more of the following measures.
- Reorient or relocate the receiving antenna.
- Increase the separation between the equipment and receiver.
- Connect the equipment into an outlet on a circuit different from that to which the receiver is connected.
- Consult the dealer or an experienced radio/TV technician for help.
Changes or modifications not expressly approved by the party responsible for compliance couldvoid theuser's authority to operate the equipment. The antenna(s) used for this transmitter must not be colocated or operating in conjunction with any otherantenna or transmitter.
FCC SAR information
FCC Radiation Exposure Statement This equipment complies with FCC RF radiation exposure limits set forth an uncontrolled environment. This transmitter must not be co-located or operating in conjunction with any other antenna or transmitter. The device was tested and complies to measurement standards and procedures specified in FCC OE Bulletin 65, Supplement C.
Canada Statement
This device complies with Industry Canada licence-exempt RSS standard(s). Operation is subject to the following two conditions: (1) this device may not cause interference, and (2) this device must accept any interference, including interference that may cause undesired operation of the device.
CE Conformity for European Countries

€ The device complies with the EMC Directive 2004/108/EC and Low Voltage Directive 2006/95/EC, R&TTE Directive 1999/5/EC.
Following information is only for EU-member states:
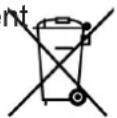
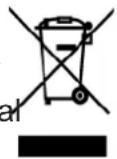
The mark is in compliance with the Waste Electrical and Electronic Equipment Directive 2002/96/EC (WEEE).
The mark indicates the requirement NOT to dispose the equipment including any spent or discarded batteries or accumulators as unsorted municipal waste, but use the return and collection systems available.
If the batteries, accumulators and button cells included with this equipment, display the chemical symbol Hg, Cd, or Pb, then it means that the battery has a heavy metal content of more than 0.0005% Mercury or more than, 0.002% Cadmium, or more than 0.004% Lead.
European Union Regulatory Conformance
The equipment complies with the RF Exposure Requirement 1999/519/EC, Council Recommendation of 12 July 1999 on the limitation of exposure of the general public to electromagnetic fields (0-300 GHz). This equipment meets the following conformance standards: EN 301 489-1, EN 301 489-3, EN 301 489-7, EN 301 489-17, EN 301 489-24, EN 55022, EN 55024, EN 60950-1, EN 50332-1, EN 50332-2, EN 300 328, EN 62209-2 EN 300 440, EN 301 511, EN 301 908-1, EN 301 908-2.
The conformity assessment procedure has been followed with the involvement of the following Notified Body: PHOENIX TESTLAB GmbH (EU Identification Number 0700)
Identification Mark: C€0700 Ⓙ
| This equipment may be operated in: | |||||||
| AT BE | BG CH CY | CZ DE DK | |||||
| EE ES | FI FR GB | GR | HU | IE | |||
| IT | IS | LI | LT | LU | LV | MT | NL |
| NO PL | PT | RO SE SI | SK TR | ||||
We, hereby, declare that this cellular, Wi-Fi, & Bluetooth radio is in compliance with the essential requirements and other relevant provisions of Directive 1999/5/EC.
Products with 2.4-GHz Wireless LAN Devices France
For 2.4-GHz wireless LAN operation of this product, certain restrictions apply. This equipment may use the entire-2400-MHz to 2483.5-MHz frequency band (channels 1 through 13) for indoor applications. For outdoor use, only 2400-2454 MHz frequency band (channels 1-9) may be used. For the latest requirements, see http://www.art-telecom.fr.
Manufacturer's Declaration of Conformity
The ViewSonic brand Product VS14445 (Model name:E100) has been designed and manufactured in accordance with the Directive 1999/5/EC of European Parliament and the Council on Radio equipment and Telecommunication Terminal equipment. The product is in conformity with the following standards and/or other normative documents:
- EMC
| Standard Title Testing Body Report No. | |||
| EN55022: 2010 Limits | and methods of measurement of radio interference characteristics of information technology equipment | Attestation of Global Compliance CO., Ltd. | AGC07Z120101E1B |
| EN55024:2010 Information Technology Immunity standard | |||
| EN61000-3-2: 2009 Disturbances to residential supply system Part 2 : Harmonics | |||
| EN61000-3-3: 2008 Disturbances in supply systems caused by household appliances and similar electrical equipment.Part 3: Voltage fluctuationsPart 1: Common technical requirements | |||
- HEALTH & SAFETY
| Standard Title Testing | Body Report No. | ||
| EN60950-1: 2010 | Information technology equipment – Safety - Part 1: General requirements | Attestation of Global Compliance CO., Ltd. | AGC07Z120101E3 |
| EN50332-1:2000 EN50332-2:2003 | Sound system equipment: Headphones and earphones associated with portable audio equipment-Maximum sound pressure level measurement methodology and limit considerations. Part 1: General method for “one package equipment”. Part 2: Matching of set with headphones if either or both are offered separately. | Attestation of Global Compliance CO., Ltd. | AGC07Z120101E3 |
| EN62311:2008 | Assessment of electronic and electrical equipment related to human exposure restrictions for electromagnetic fields (0 Hz - 300 GHz) | QuieTeck Corp. | 122S010R-HP-CE-P05V02 |
| EN62209-1:2006 | Procedure to determine the specific absorption rate (SAR) for hand-held devices used in close proximity to the ear (frequency range of 300 MHz to 3GHz | N/A | N/A |
| EN62209-2:2010 | Human exposure to radio frequency fields from hand-held and body-mounted wireless communication devices. Human models, instrumentation, and procedures. Procedure to determine the specific absorption rate (SAR) for wireless communication devices used in close proximity to the human body (frequency range of 30MHz to 6GHz) | QuieTeck Corp. | 122S010R-HP-CE-P05V02 |
- SPECTRUM
| Standard Title Testing Body Report No. | |||
| EN301489-1 V1.9.2EN301489-17 V2.1.1EN301489-24 V1.5.1EN301489-3 V1.4.1EN301489-7 V1.3.1 | Electromagnetic compatibility and Radio spectrum Matters (ERM); Electromagnetic Co mp at ib il it y (E MC) st an da rd f or rad equipment and services. Part 1: Common technical requirements. Part 17: Specific conditions for Wideband data and HIPERLAN equipment. Part 24: Specific conditions for IMT-2000 CDMA Direct Spread(UTRA) for Mobile and portable(UE) radio and ancillary equipment. Part 3: Specific conditions of Short-Range Devices(SRD) operating on frequencies between 9kHz and 40GHz.Part 7: Specific conditions for mobile and portable radio and ancillary equipment of digital cellular radio telecommunications systems(GSM and DCS). | Attestation of Global Com plian ce C O., Ltd. | AGC07Z120101E1A |
| EN300328 V1.7.1 Electromagnetic compatibility and Radio spectrum Matters (ERM) - Wide transmission systems - Data transmission equipment operating in the 2,4 GHz ISM band and using wide band modulation techniques - Harmonized EN covering essential requirements under article 3.2 of the R&TTE Directive | Attestation of Global Com plian ce C O., Ltd. | AGC07Z120101E2C | |
| EN301511 V9.0.2EN301908-2 V4.2.1 | Global System for Mobile communication(GSM) Harmonized EN for mobile stations in the GS M90 0 and GS M1 800 band s cov er ing essential requirements of article 3.2 of the R&TTE directive(1999/5/EC)Eletromagnetic compatibility and Radio spetrum Matters(ERM); Base Stations(BS) and User Equipment(UE) for IMT-2000 Third-Generation cellular networks;Part 2: Harmonized standard for IMT-2000, CDMA Direct Spread(UTRA FDD) (UE) covering essential requirement of article 3.2 of the R&TTE Directive | Attestation of Global Com plian ce C O., Ltd. | AGC07Z120101E2A; AGC07Z120101E2E |
| EN301908-1 V4.2.1 Eletromagnetic compatibility and Radio spetrum Matters(ERM); Base Stations(BS) and User Equipment(UE) for IMT-2000 Third-Generation cellular networks;Part 1: Harmonized EN for IMT-2000 introduction and common requirements, covering the essential requirements of article 3.2 of the R&TTE Directive | Attestation of Global Com plian ce C O., Ltd. | AGC07Z120101E2D | |
| EN300440-1 V1.6.1EN300440-2 V1.4.1 | Electromagnetic compatibility and Radio spectrum Matters (ERM); Short r devices;Radop equipment to be used in the 1GHz to 40GHz frequency range;Part 1: Technical characteristics and test methods. Part 2:Harmonized EN covering essential requirements of article 3.2 of the R&TTE Directive | Attestation of Global Com plian ce C O., Ltd. | AGC07Z120101E2F |
- ErP Directive : 2009/125/EC
| Standard Title Testing | Body Report No. | ||
| (EC) 1275/2008 Eco | design requirements for standby and off mode electric power consumption of electrical and electronic household and office equipment | ShebZhen ChuangZhiCheng Technology Co., Ltd. | ERP_Z97T_20111116 |
| (EC) 278/2009 Eco-d | design requirements for no-load condition electric power consumption and average active efficiency of external power suppliers | ASIAN POWER DEVICES INC. | N/A |
Sophia Wu / Compliance Manager ViewSonic Corporation
March 20, 2012
Date
Declaration of RoHS Compliance
This product has been designed and manufactured in compliance with Directive 2002/95/EC of the European Parliament and the Council on restriction of the use of certain hazardous substances in electrical and electronic equipment (RoHS Directive) and is deemed to comply with the maximum concentration values issued by the European Technical Adaptation Committee (TAC) as shown below:
| Substance | Proposed Maximum Concentration | Actual Concentration |
| Lead (Pb) 0.1% < 0.1% | ||
| Mercury (Hg) 0.1% < 0.1% | ||
| Cadmium (Cd) 0.01% < 0.01% | ||
| Hexavalent Chromium ( Cr^6+ ) 0.1% < 0.1% | ||
| Polybrominated biphenyls (PBB) 0.1% < 0.1% | ||
| Polybrominated diphenyl ethers (PBDE) 0.1% < 0.1% |
Certain components of products as stated above are exempted under the Annex of the RoHS Directives as noted below:
Examples of exempted components are:
- Mercury in compact fluorescent lamps not exceeding 5 mg per lamp and in other lamps not specifically mentioned in the Annex of RoHS Directive.
- Lead in glass of cathode ray tubes, electronic components, fluorescent tubes, and electronic ceramic parts (e.g. piezoelectronic devices).
- Lead in high temperature type solders (i.e. lead-based alloys containing 85% by weight or more lead).
- Lead as an allotting element in steel containing up to 0.35% lead by weight, aluminium containing up to 0.4% lead by weight and as a cooper alloy containing up to 4% lead by weight.
Important Safety Instructions
- DO NOT place objects on top of the device, as objects may scratch the screen.
- DO NOT expose the device to dirty or dusty environments.
- DO NOT place the device on an uneven or unstable surface.
- DO NOT insert any foreign objects into the device.
- DO NOT expose the device to strong magnetic or electrical field.
- DO NOT expose the device to direct sunlight as it can damage the LCD Screen. Keep it away from heat sources.
- Do not store your device in temperatures higher than 60^ C ( 140^ F). The operating temperature for this device is from -20^ C ( -68^ F) to 40^ C ( 104^ F).
- DO NOT use the device in the rain.
- Please check with your Local Authority or retailer for proper disposal of electronic products.
- The device and the adapter may produce some heat during normal operation or charging. To prevent discomfort or injury from heat exposure, DO NOT leave the device on your lap.
- POWER INPUT RATING: Refer to the rating label on the device and be sure that the power adapter complies with the rating. Only use accessories specified by the manufacturer.
- DO NOT use a pen or any sharp object to tap the screen.
- Clean the touch screen with a soft cloth. If needed, dampen the cloth slightly before cleaning. Never use abrasives or cleaning solutions.
- Always power off the device to install or remove external devices that do not support hot-plug.
- Disconnect the device from an electrical outlet and power off before cleaning the device.
- DO NOT disassemble the device. Only a certified service technician should perform repair.
- The device has apertures to disperse heat. DO NOT block the device ventilation, the device may become hot and malfunction as a result.
- Risk of explosion if battery replaced by an incorrect type. Dispose of used batteries according to the instructions.
- Users have to use the connection to USB interfaces with USB 2.0 version or higher.
- PLUGGABLE EQUIPMENT: the socket-outlet shall be installed near the equipment and shall be easily accessible.
Copyright Information
Copyright © ViewSonic® Corporation, 2012. All rights reserved.
Android ^™ is a trademark of Google Inc. Use of this trademark is subject to Google Permissions.
This product has an Android ^™ platform based on Linux, which can be expanded by a variety of JME-based application SW.
All products used in this device and trademarks mentioned herein are trademarks or registered trademarks of their respective owners.
Google™, the Google logo, Android™, the Android logo and Gmail™ are trademarks of Google Inc. Use of this trademark is subject to Google Permissions.
Wi-Fi and the Wi-Fi CERTIFIED logo are registered trademarks of the Wireless Fidelity Alliance.
microSD ^™ is a trademark of SD Card Association.
Bluetooth and the Bluetooth logo are trademarks owned by Bluetooth SIG, Inc. Java, JME and all other Java-based marks are trademarks or registered trademarks of Sun Microsystems, Inc. in the United States and other countries.
The prediction engine of the input method is TOUCHPAL, provided by COOTEK.DataViz and RoadSync are registered trademarks of DataViz, Inc. All rights reserved.DataViz and Documents To Go are trademarks or registered trademarks of DataViz, Inc. All rights reserved.
Word To Go ^™ , Sheet To Go ^® , Slideshow To Go ^® , PDF To Go ^® and icons are trademarks or registered trademarks of DataViz, Inc. All rights reserved.
The actual included applications (apps) may differ from the illustrated screen shots.
Disclaimer: ViewSonic Corporation shall not be liable for technical or editorial errors or omissions contained herein; nor for incidental or consequential damages resulting from furnishing this material, or the performance or use of this product. In the interest of continuing product improvement, ViewSonic Corporation reserves the right to change product specifications without notice. Information in this document may change without notice.
No part of this document may be copied, reproduced, or transmitted by any means, for any purpose without prior written permission from ViewSonic Corporation.
Intellectual Property Right Information
Right to all technologies and products that comprise this device are the property of their respective owners:
This product has an Android platform based on Linux, which can be expanded by a variety of Java-Script-based application SW.
Google, the Google logo, Android, the Android logo, Gmail, and YouTube are trademarks of Google Inc. Bluetooth and the Bluetooth logo are trademarks owned by Bluetooth SIG, Inc. Java, JME and all other Java-based marks are trademarks or registered trademarks of Sun Microsystems, Inc. in the United States and other countries. microSD is a trademark of SD Card Association. The prediction engine of the input method is TOUCHPAL, provided by COOTEK.
Product Registration
To meet your future needs, and to receive any additional product information as it becomes available, please register your product on the Internet at: www.viewsonic.com.
For Your Records
Product Name: ViewPad E100
Model Number: VS14445/VS14445G
Document Number: ViewPad E100_UG_ENG Rev. 1a 04-25-12
Serial Number:
Purchase Date: ____
Product disposal at end of product life
ViewSonic respects the environment and is committed to working and living green. Thank you for being part of Smarter, Greener Computing. Please visit ViewSonic website to learn more.
USA & Canada: http://www.viewsonic.com/company/green/recycle-program/
Europe: http://www.viewsoniceurope.com/uk/kbase/article.php?id=639
Taiwan: http://recycle.epa.gov.tw/recycle/index2.aspx
Chapter 1: Getting Started .... 1
1.1 Your Device ....1
Front ....1
Rear ....1
Side 2
Indicator 3
1.2 Accessories ....3
1.3 Installing microSD/SIM Card ....4
To install the microSD card ....4
To remove the microSD card ....4
To install the SIM card ( select model ) ....4
To remove the SIM card ....4
1.4 Charging Battery ....4
1.5 Using Headsets ....5
1.6 Turning the Device On or Off ....5
To turn on your device ....5
To turn off your device ....5
To set your device to Sleep mode ....5
1.7 Unlocking the Screen ....6
To unlock the screen ....6
Chapter 2: Start Using Your Device .... 7
2.1 Home Screen 7
Set screen mode ....7
Extended Home screen ....7
2.2 Shortcut Menu 9
Customizing shortcut menu ....9
Using widgets ....10
To remove widgets ....10
Application drawer 11
2.3 Setting Wallpaper ...... 11
2.4 Configuring a 3G Network (3G Model) ......12
Chapter 3: Settings ...... 13
3.1 Install and Remove an Application ....13
Remove an application ....13
3.2 Setting Date & Time ....14
3.3 Set the System Language ......14
3.4 Setting up Wi-Fi ....15
To turn Wi-Fi on or off 15
To connect to a Wi-Fi network ....15
3.5 Configuring a Bluetooth Connection ....16
3.6 Browsing Web Pages ......16
To scroll the page ....17
To set home page 17
Managing web pages ....17
Chapter 4: Using Applications ...... 18
4.1 HDMI Output ....18
4.2 Play Music ....18
4.3 Gallery ....18
4.4 Firmware Update ....19
Chapter 5: Other Information .... 21
Troubleshooting ....21
Customer Support 22
Limited Warranty 23
Chapter 1: Getting Started
1.1 Your Device
Front
Rear
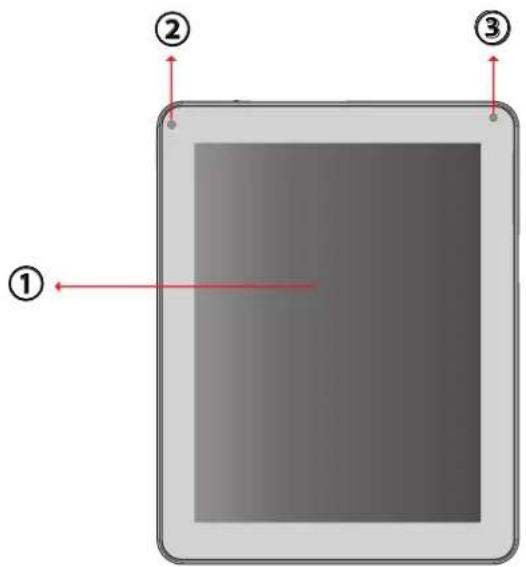
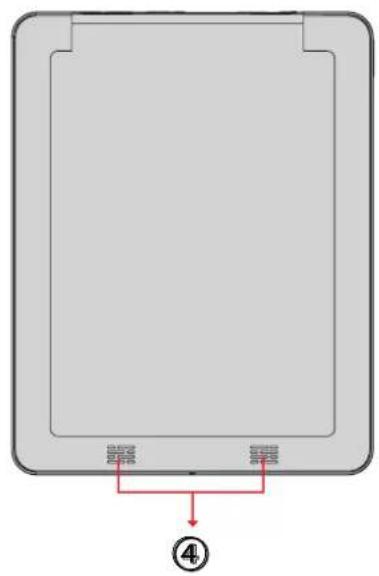
| Part Name Description | |
| 1 Touch screen Use finger to control system and application. | |
| 2 Indicator Refer to "Indicators" on page 3 for details. | |
| 3 Camera A built-in webcam that allows you to capture still images, record videos, and chat online. | |
| 4 Speaker Produces sounds from multimedia content files or system notifications. | |
To "Turn off ViewScene 3D" please go to Manage Applications - ViewScene 3D - Clear defaults and then after pushing Home button you can select as Default "Launcher"
Side
Left RightTop
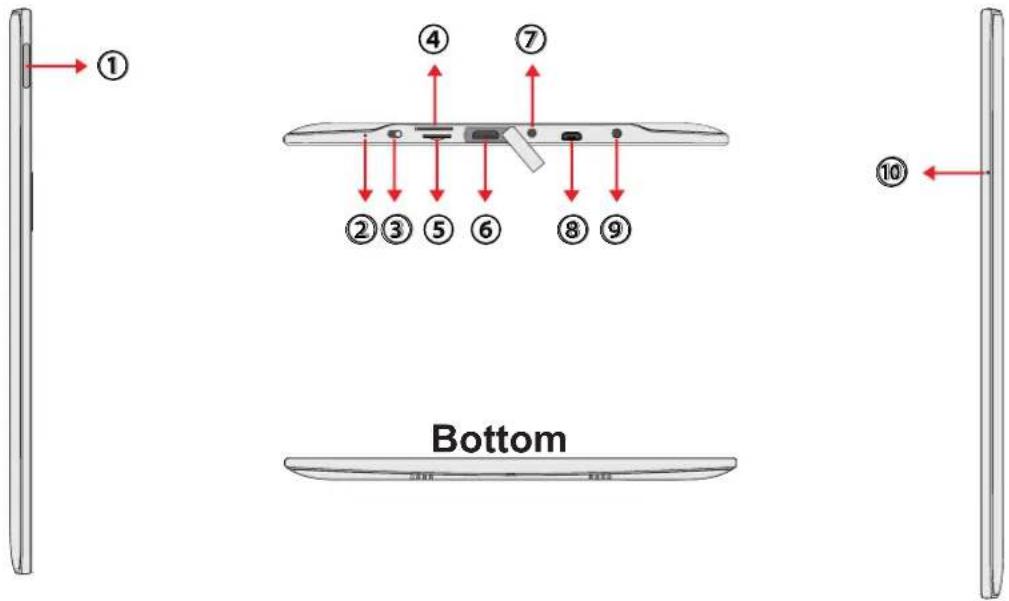
| Part Name Description | |
| 1 Volume button Press | to adjust the volume (+Volume up/-Volume down). |
| 2 Reset When system | abnormal or inoperative, insert a thin, straight object (such as a paper clip) in the manual reset hole to perform a soft reset on your device. |
| 3 Power button Press | and hold the power button for 2-3 seconds to power on your device.Press and hold the power button for >3 seconds to force shut down. |
| 4 3G SIM card slot (Optional) | Insert a 3G SIM card (can not support hot plug ), then you can connect to 3G network. (For more information, please contact local Telecom Operators.) |
| 5 Micro-SD Card slot | Micro-SD memory card slot compatible up to 32GB SD and SDHC. |
| 6 Mini-HDMI port With | a Mini HDMI to HDMI cable (Not included) connects to video and audio devices, such as television, or any compatible digital or audio component that uses a HDMI connection. |
| 7 Audio output jack For external headphone connection | |
| 8 Micro-USB port Connects peripherals such as mice, digital cameras and MP3 players that use the USB 2.0Interface. A male Micro USB to female USB adaptor may be required (Not included). | |
| 9 Power jack | Connects AC power supply to power the device and charge the battery. |
| 10 Microphone | Receives sounds and voice for recording. |
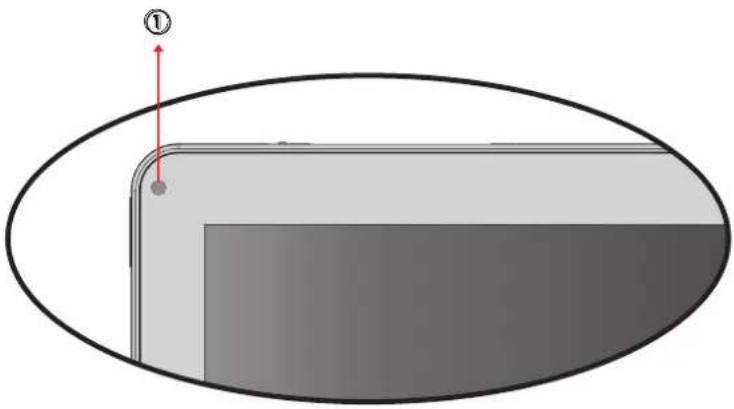
Indicator
natural_image
Diagram of a layered object with an arrow and label (①), no readable text or symbols present.| Part Name Description | |
| 1 Battery status indicator | When the battery is charging, it lights up in solid red.When the battery is fully charged, it will be blank.When the main unit is changed from operating mode to standby mode, it lights up around 30 second in solid red. |
1.2 Accessories
After opening the package, carefully inspect the contents. If any of the items are missing or appear damaged, contact your dealer. The shipping carton should contain the following:
- ViewPad E100
- Changeable Power Plug
- Power Adaptor
- Quick Start Guide
- USB Cable
• Compliance Information
1.3 Installing microSD/SIM Card
You need a microSD ^® card to store photos, music, videos, and other data.
To install the microSD card
Insert the microSD card as shown. Make sure the gold contacts are facing down.
To remove the microSD card
- For safe removal, tap > Settings > Storage > Unmount microSD card.
- Push to eject the microSD card from the slot.
Note: Do not remove the microSD card while the device is turned on. Sudden removal of the microSD card may cause data loss or unpredictable system hang up.
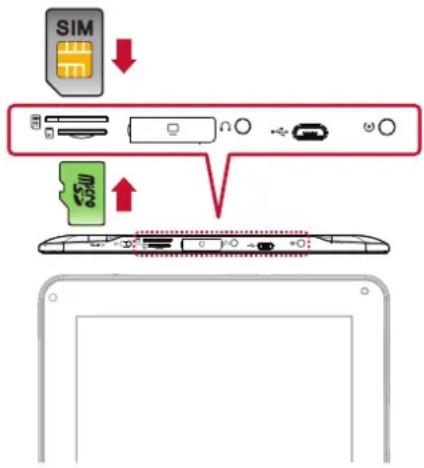
To install the SIM card (select model)
Insert the SIM card as shown. Make sure the gold contacts are facing up.
To remove the SIM card
Push to eject the SIM card from the slot.
Note: Do not remove the SIM card while the device is turned on. Sudden removal of the SIM card may cause data loss or unpredictable system hang up.
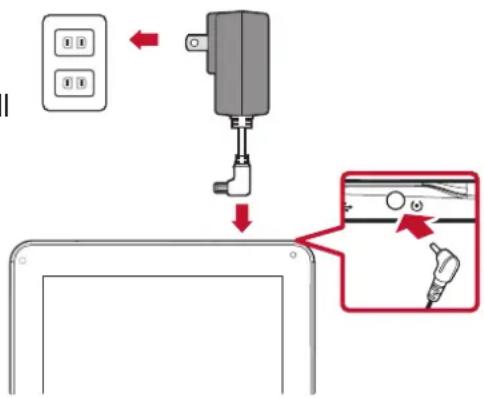
1.4 Charging Battery
The battery is only partially charged. To fully charge the battery, charge it for 3 hours.
- Connect one end of the AC adaptor to the charging port of the device.
- Plug the other end of the AC adaptor to the wall outlet to start charging.
When the battery is charging and the device is turned on, the 📁 icon is displayed on the status bar. When the battery is fully charged, the 🔔 icon is displayed on the status bar.
Note: The LED indicator will turn off when fully power charged.
1.5 Using Headsets
For listening to music, plug a headset to the headset jack.
Note:
- When using a headset, your ability to hear outside sounds may be limited. Do not use headset if it will endanger you.
- When using a headset, do not set the volume to its maximum as it may damage your hearing.
1.6 Turning the Device On or Off
After installing the memory card and charging the battery, the device is ready to be turned on.
To turn on your device
Press and hold the Power button for 4 seconds.
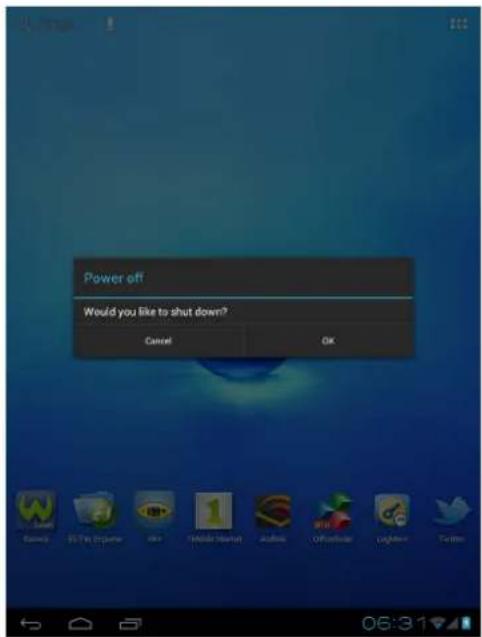
To turn off your device
- Press and hold the Power button for 3 seconds.
- A pop-up window appears, tap OK to confirm.
To set your device to Sleep mode
To set the device to sleep mode, press the Power button. This will turn the display off.
To turn the display on, press the Power button again.
1.7 Unlocking the Screen
By default, the screen automatically locks after a period of inactivity. You can set the length of time until the screen locks.
To unlock the screen
- Press the Power button to turn on the display from Sleep mode.
- Tap 🔒 and drag the middle circle ( 🔒 to unlock the screen.
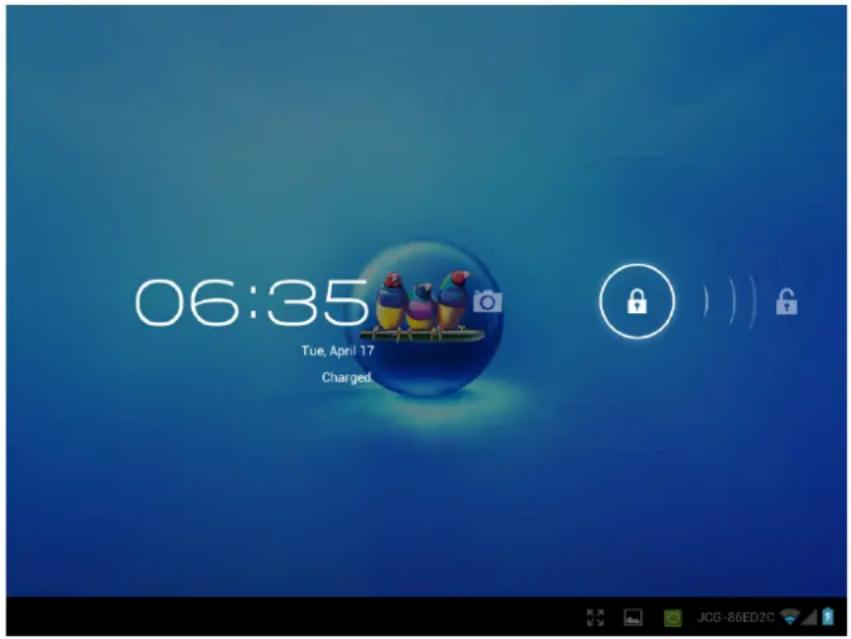
Note: When booting or waking the device, avoid touching the screen until the Unlock screen briefly shows animated ripples. This is less than one second after the Unlock screen is displayed upon waking, but allows time for the auto calibration to take place.
Chapter 2: Start Using Your Device
2.1 Home Screen
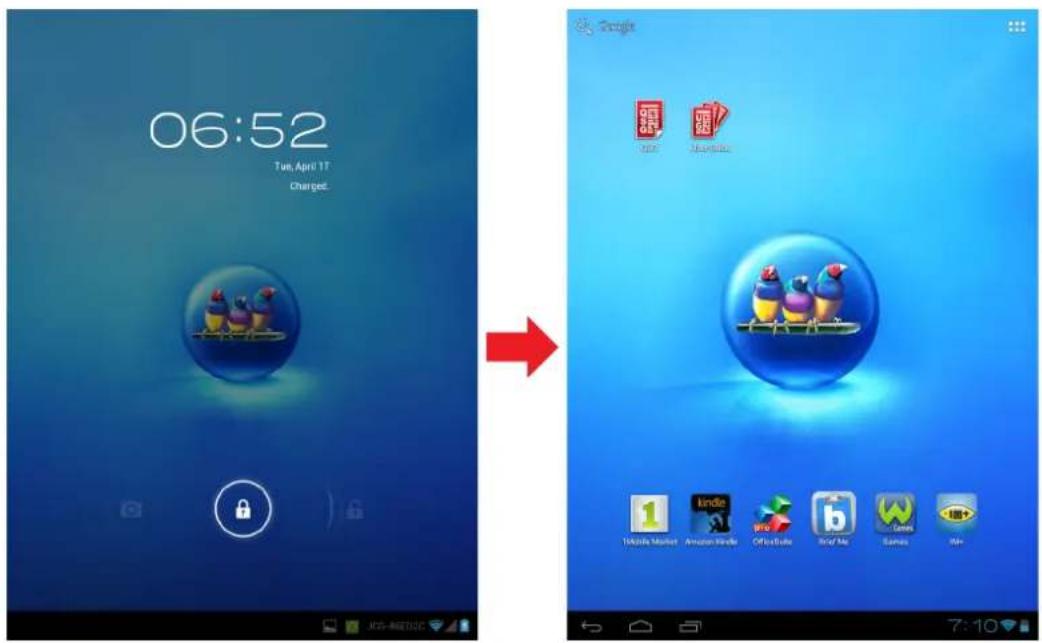
From the Home screen, you can quickly access common features and view battery and connection status.
Set screen mode
Press and hold the power button for 2-3 seconds to power on your device. And then follow the on-screen instructions to complete the initial Operating system setup.
The system home (desktop) screen will appear as follows (The device's built-in G-sensor movement changes screen angle/orientation).
Extended Home screen
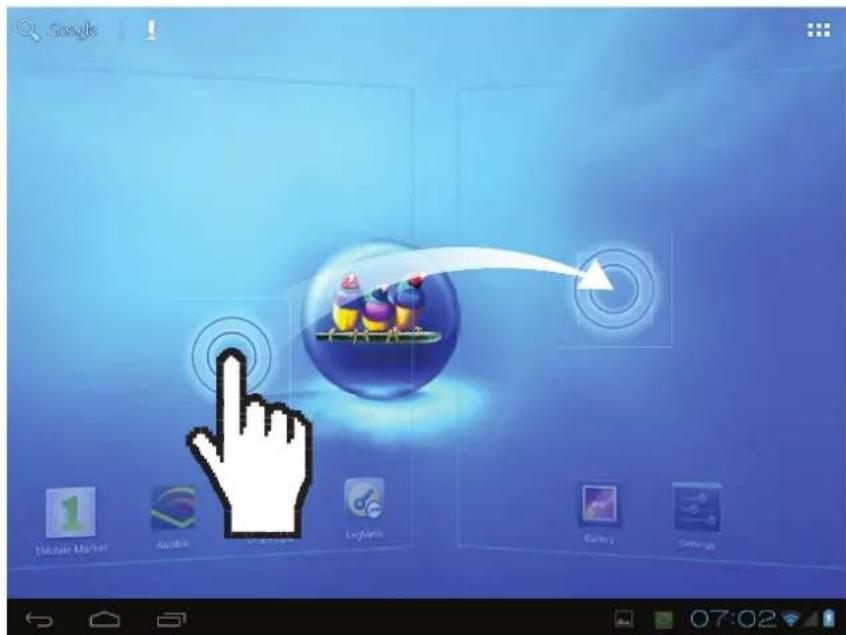
Swipe your finger to the left or right across the Home screen.
The two extensions to the left and to the right of the Home screen provide more space for icons, widgets, shortcuts, and other items.
2.2 Shortcut Menu
The shortcut menu allows you to easily access an application from the Home screen. To open an application, tap an icon.
Customizing shortcut menu
- Home screen: Tap - you can add apps and widgets to your Home screen.
- Touch and hold to move icon.
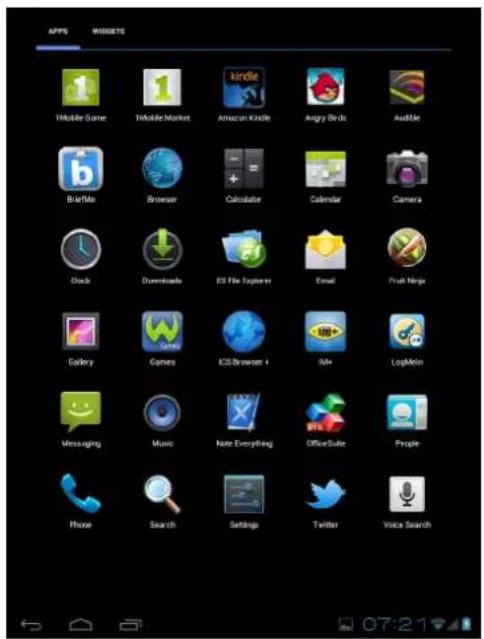
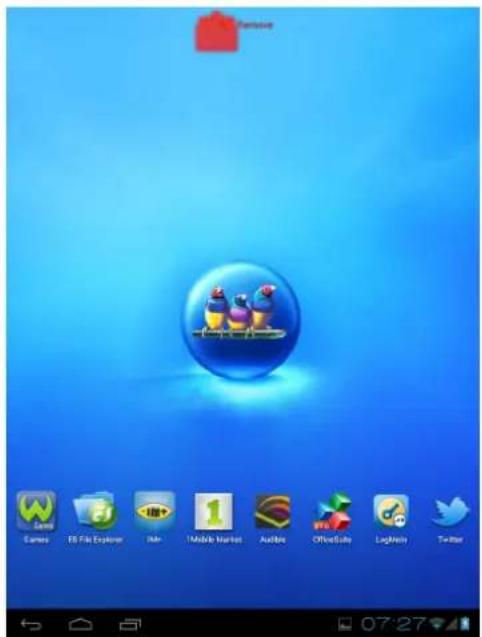
To move or delete something, touch and hold on the icon, then drag it to another panel or to the trash at remove of the screen.
Using widgets
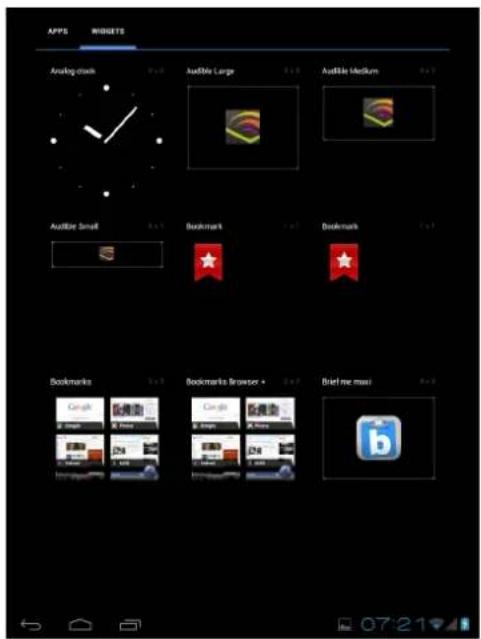
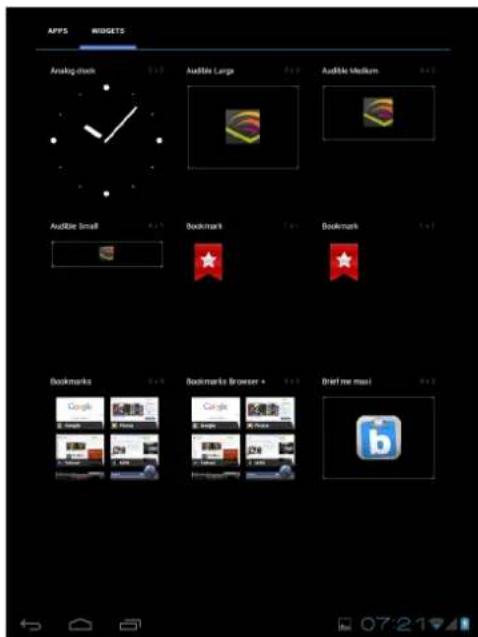
Save time with live updates right on the Home screen and get all your personalized updates in one place.
You may add and customize the Widgets on the Home screen as you like.
- From the Home screen, tap 📄. All available widgets are displayed.
- To add widget, drag the widget icon to the specific Home screen.
To remove widgets
- From the Home screen, tap and hold the desired widget. The icon appears on the top right of the Home screen.
- Drag the widget to ✗ Remove icon to delete it from the Home screen.
Application drawer
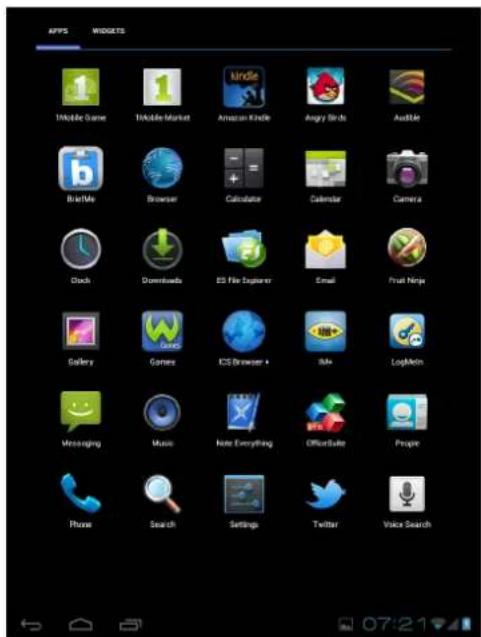
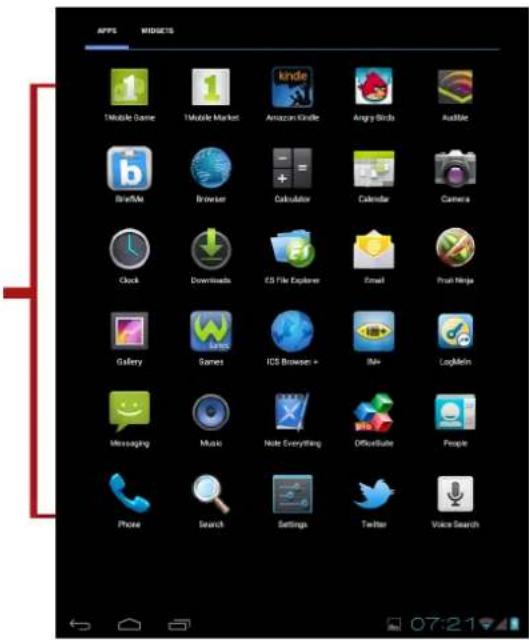
The Application Drawer contains all applications and settings. Tap to open the menu.
Tap an icon to access the application.
2.3 Setting Wallpaper
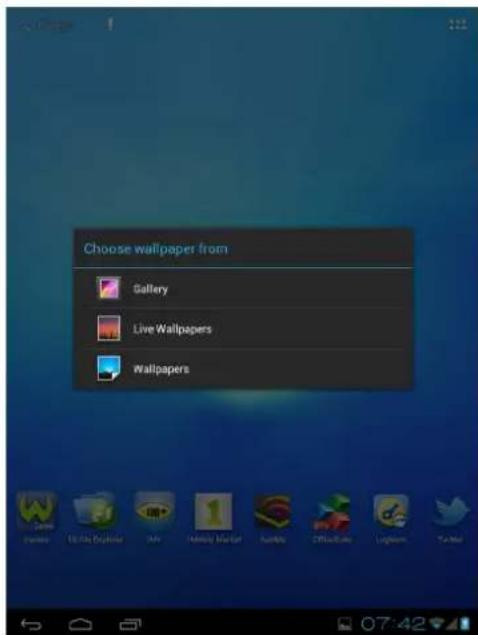
Long press on empty space on desktop to change your wallpaper.
2.4 Configuring a 3G Network (3G Model)
Make sure the device is powered off before you install/uninstall an SIM card.
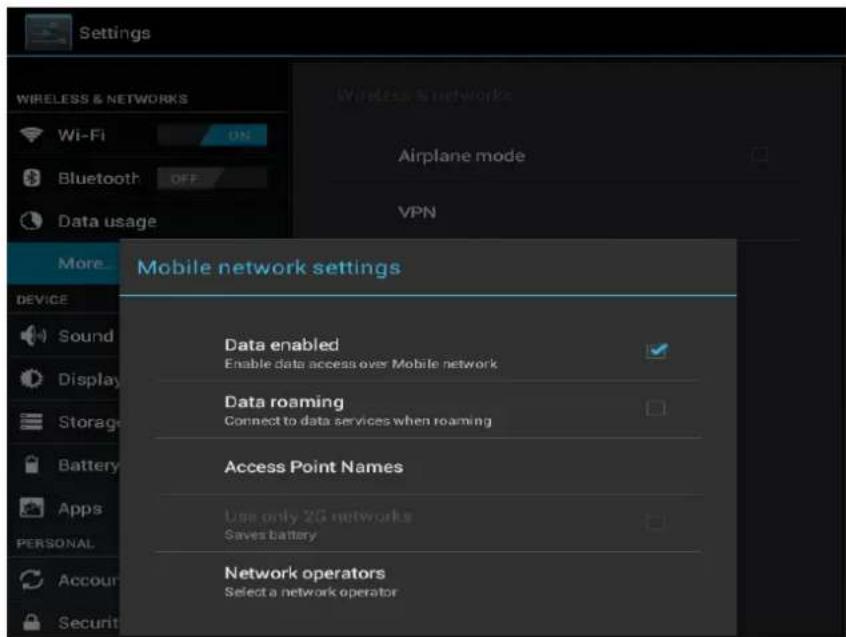
From the application menu, tap Settings > Wireless Networks > More > Mobile Networks.
- Data enabled: Select the check box to turn 3G on (enabled by default), then you can use 3G network.
- Data roaming: If you are in Roaming (out of the covered zone), please select the Data roaming check box to build the data connect services.
- ACCESS Point Names: shows useful APN in your local area.
- Use only 2G networks: Please select the check box as using 2G network only
• Network operators: shows useful network operator list. - If the device is connected to a 3G network, the 3G icon appears in the status bar.
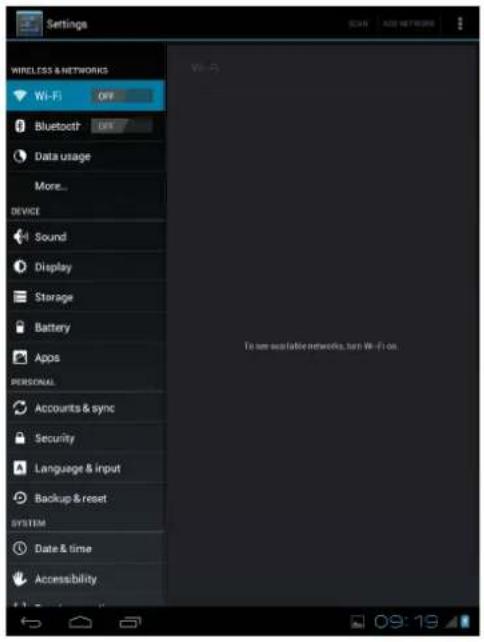
Chapter 3: Settings
Touch the "Settings" icon to open the settings configuration from applications menu, you can use it to setup your Wi-Fi Connection, adjust time, display settings and so on.
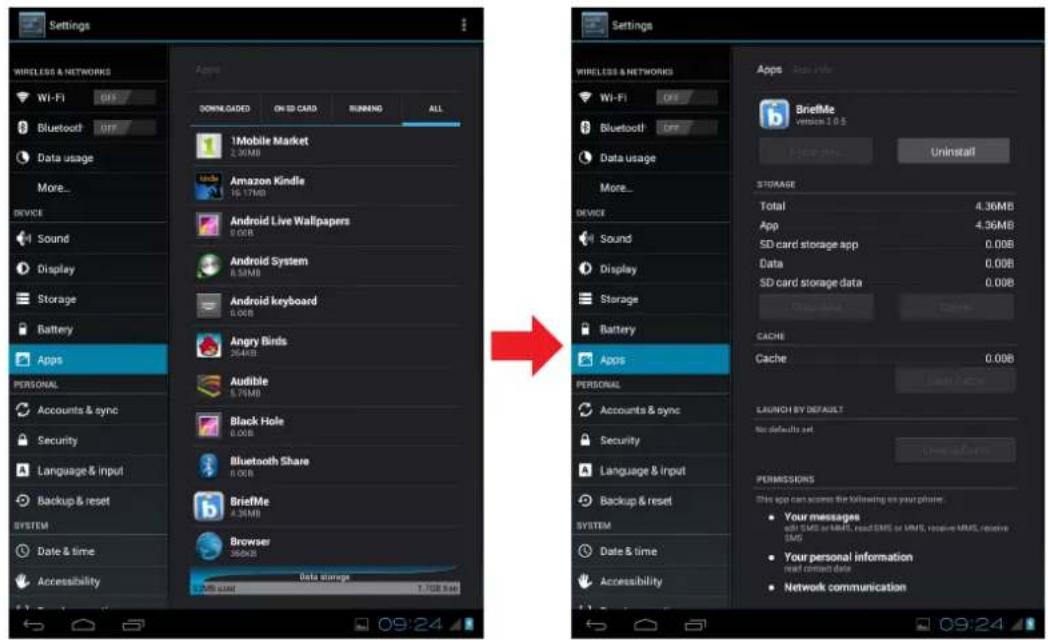
3.1 Install and Remove an Application
Use the 1 Mobile market application to install popular applications to your device.
Remove an application
Touch to enter applications menu > Settings > Apps > All. You will see a list of applications installed in the device. Select the application you want to uninstall, and click the Uninstall button.
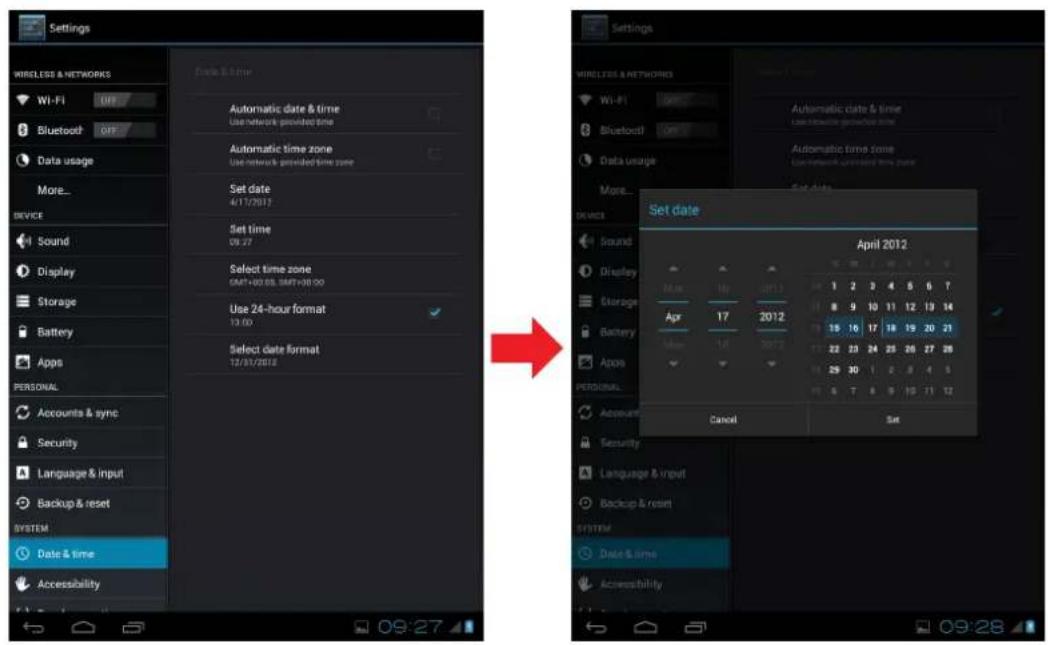
3.2 Setting Date & Time
Touch the "Settings" icon from the applications menu, select "Date & time settings" and click to change date & time setting, You can set date, time zone, time, and so on.
3.3 Set the System Language
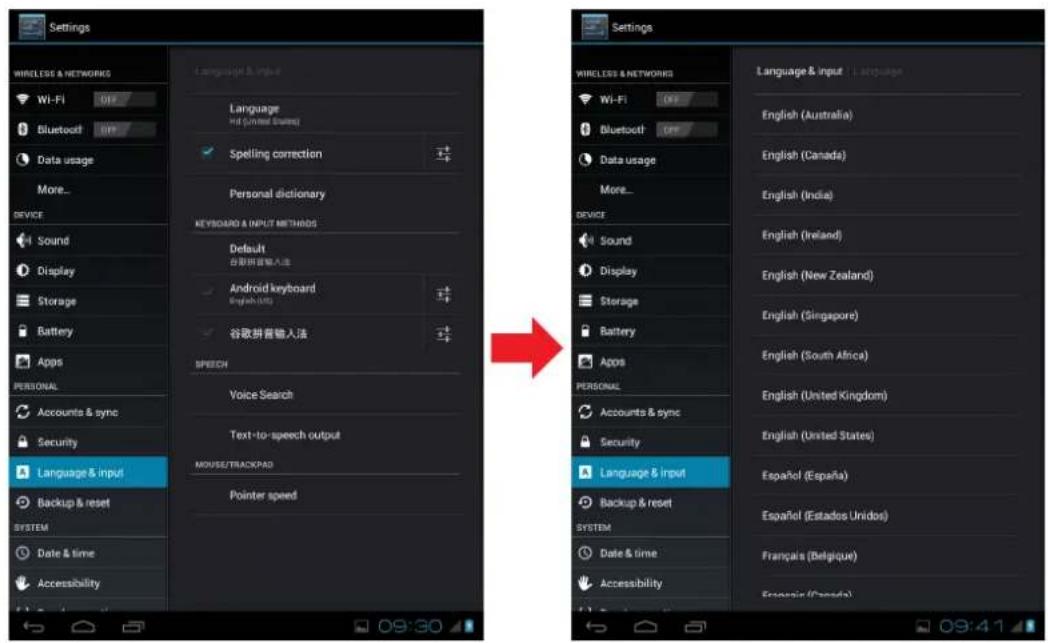
Touch applications menu icon > Settings > Language & input > Language. Choose language from language list showing on screen. Scroll up/down to select the desired language from the list.
3.4 Setting up Wi-Fi
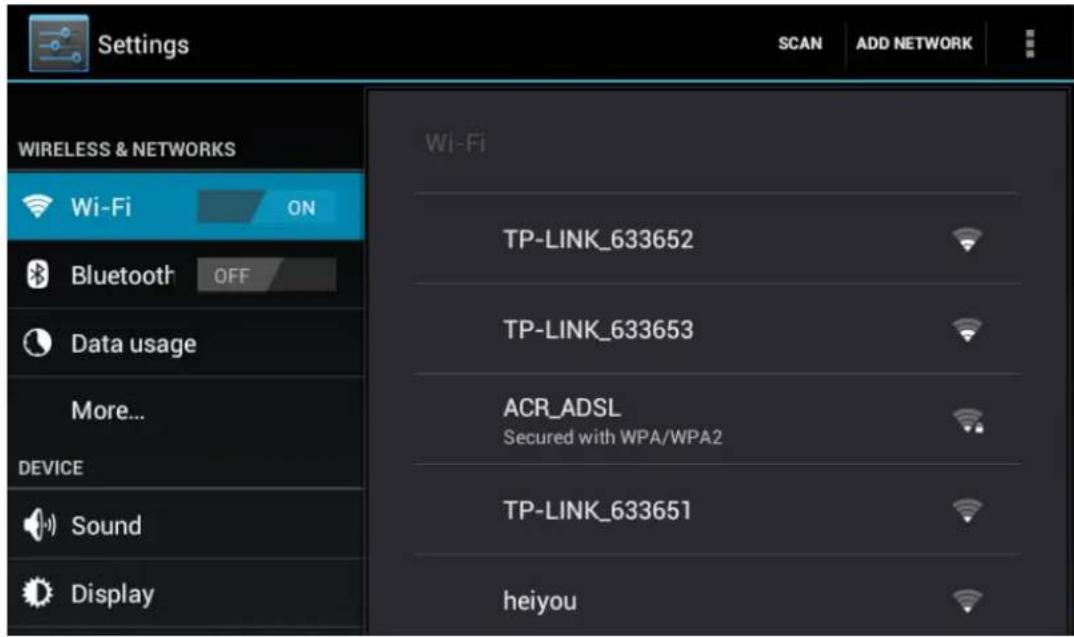
You need to connect to a wireless network before surfing the Internet or using the related applications that require internet connection.
To turn Wi-Fi on or off
- From the Home screen, tap > Settings > Wi-Fi.
- Tap Wi-Fi to turn Wi-Fi function on or off.
To connect to a Wi-Fi network
- Turn Wi-Fi on.
- Tap Wi-Fi to start detecting networks.
- The available networks are listed. Tap a network to connect to or tap ADD NETWORK to manually add a connection.
- If you select an unsecured network, the connection is automatically established. Otherwise, proceed to the next step.
- When connecting to a secured network, you will be prompted for the password. Enter the password then tap Connect.
3.5 Configuring a Bluetooth Connection
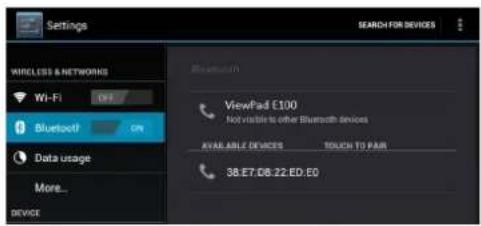
From the applications menu press 📄, and tap Settings > Wireless & networks.
- Select the Bluetooth check box to activate the Bluetooth.
- A list of Bluetooth devices will appear. To pair with a device, tap the device name in the discovered Bluetooth list.
3.6 Browsing Web Pages
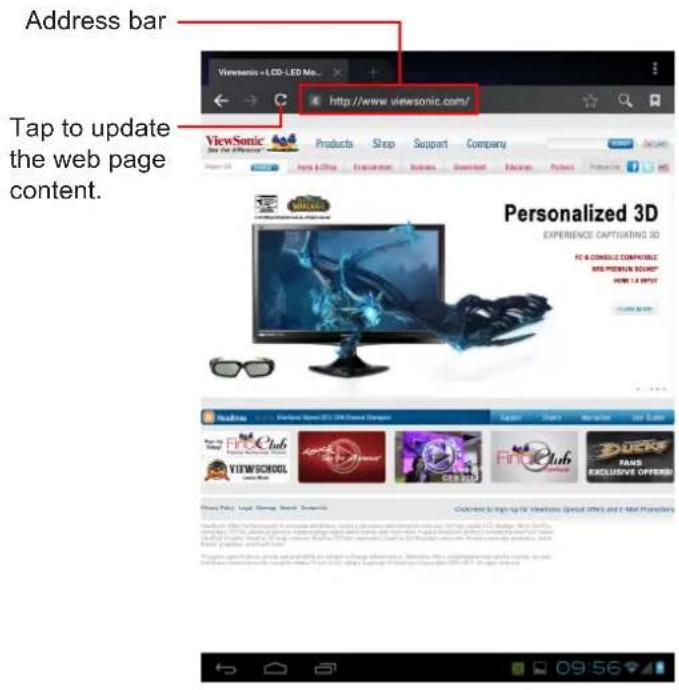
- From the Home screen, tap > Browser.
- Tap the address bar.
- Type the URL. As you type, a list of URL suggestions appears on the screen.
- Tap a match item in the list.
To scroll the page
To scroll up or down, swipe your finger down or up. To scroll left or right, tap and swipe your finger to the right or left.
To set home page
- While viewing a web page, tap > Settings > General > Set home page.
- Enter the URL of the page that you want to set as home page.
- Select Current page or Default page.
- Tap OK to save your settings.
Managing web pages
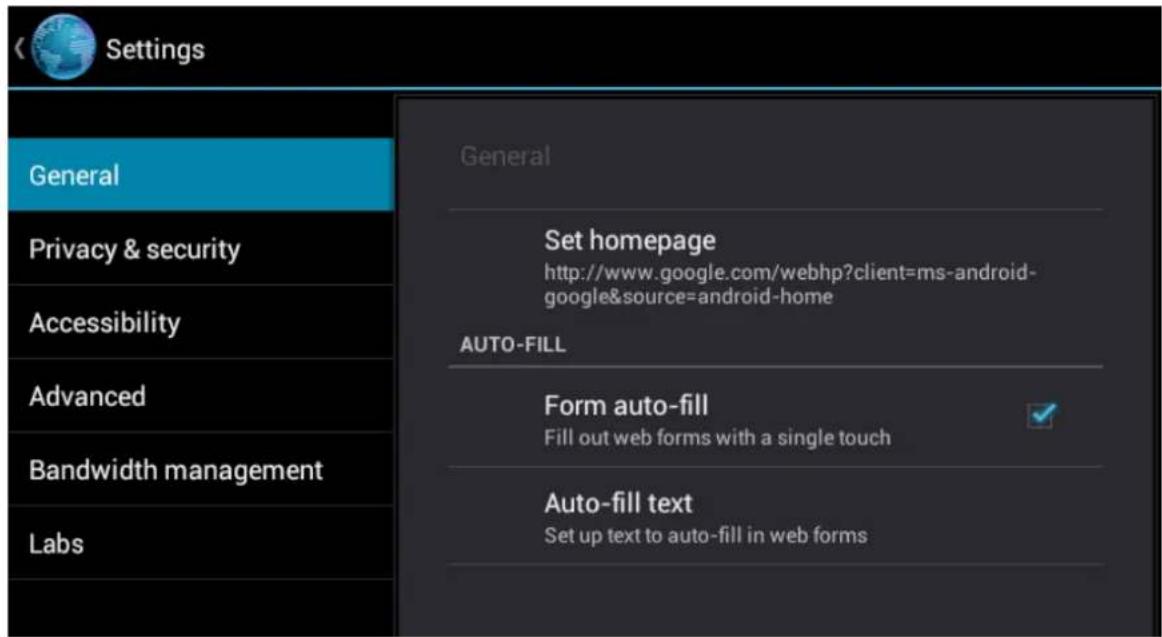
While viewing a web page, tap → configure the browser settings:
- General: Select to set home page, and configure sync data and autofill settings.
- Privacy & Security: Select to configure privacy and security settings including cache, history, cookies, form data, location, and etc.
- Advanced: Select to set search engine, open in background, enable JavaScript, enable plug-ins, advanced settings for individual website, page content settings, and reset all settings to the factory default.
Chapter 4: Using Applications
4.1 HDMI Output
Tap the setting > Display > Switch display panel > HDMI
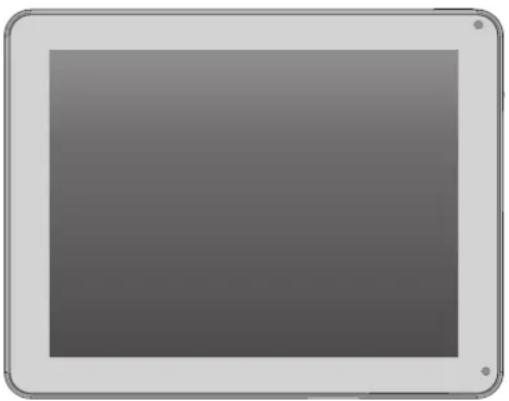
For correct HDMI orientation output, please set the tablet to the native position as illustrated in below figure.
natural_image
Front view of a rectangular electronic device with rounded corners and a central screen (no text or symbols visible)Note:
- The tablet display will go blank when switching to the HDMI output.
- To use the tablet touch screen as a "touchpad" the "Show touches" option under Developer options is automatically activated when HDMI output is selected. It will be necessary to become familiar with the operation which may take a few minutes.
4.2 Play Music
Touch the “Music” icon from the applications menu. You can search music by Artists, Albums, Playlists, or by All songs to start playing music in your device.
4.3 Gallery
Gallery application provides a viewing space for your pictures and videos. Before using Gallery application, remember to install the Micro SD Card.
Touch the Gallery icon from applications menu to enter the Gallery application. On the Gallery screen, the default folders are the All pictures and All videos. You also can create personal folders in the micro SD Card to manage your files.
4.4 Firmware Update
Ensure wireless is connected and functioning. From the application menu, tap on Updates to check if a firmware update is available. If an update version is available, you will see following message.
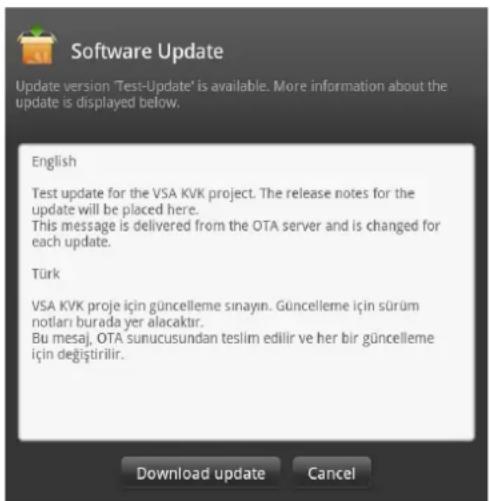
Tap on Download Update to start downloading. The image file is over 300MB and it can take quite some time to complete the process, depending upon your connection speed.
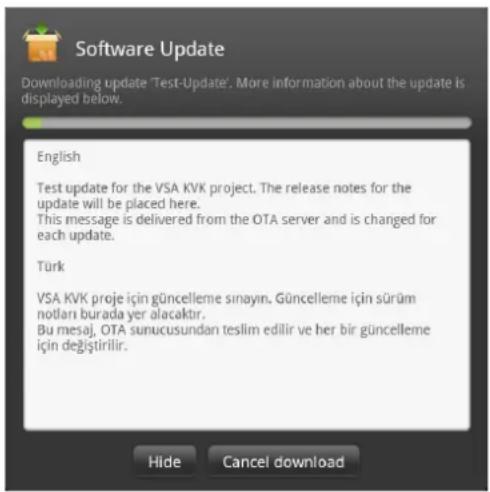
After download success, tap on Accept > Apply Update to install the new version on your tablet. Your device will restart automatically to apply the new software.
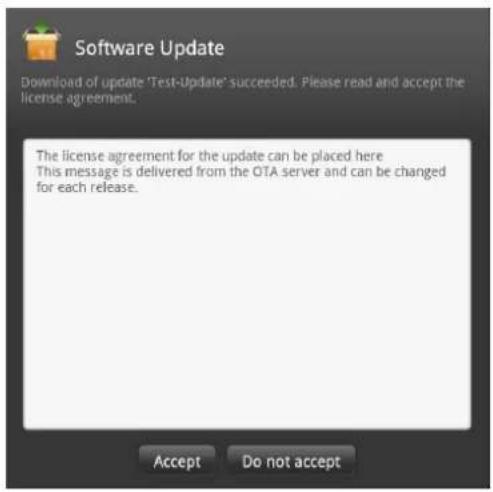
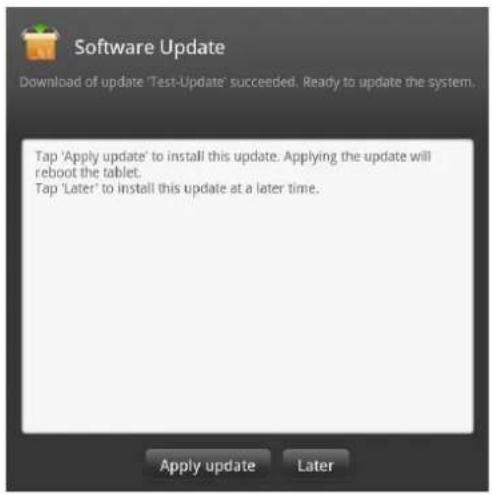
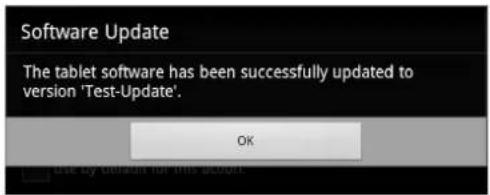
Once the software has been successfully updated to new version, tap on OK to close the program.
Chapter 5: Other Information
Troubleshooting
1. Unable to power on the device.
a> Ensure the device had been charged sufficiently
b> To avoid pressing the "power" button and "Volume + / -" key together
c> Please insert a thin, straight object (such as a paper clip) in the manual reset hole to perform a soft reset on your device.
2. System force closes, crashes or fails to operate and is not recoverable or able to start after a full charge.
Please insert a clip into the reset hole with a gentle amount of pressure before release.
3. Device cannot power down.
Hold down the power button > 3 seconds, until the system shuts down.
4. Measures to Extend Battery Life?
Adjust the screen brightness to the minimum possible level.
Reduce the Screen Timeout time within the Settings > Display Settings
Turn off the device's Bluetooth function.
Turn off the device's wireless network function when not required.
5. Device cannot find a wireless network.
Internet service providers (ISP) account is not setup or distance from the wireless router is too far; please contact your network service company for assistance.
6. Wi-Fi shows good Signal Strength, but cannot connect to the Network.
Please check any security password has been input correctly.
Customer Support
For technical support or product service, see the table below or contact your reseller.
NOTE: You will need the product serial number.
| Country/Region Website | T = TelephoneF = FAX | ||
| Australia/New Zealand www.viewsonic.com.au | AUS= 1800 880 818NZ= 0800 008 822 | service@au.viewsonic.com | |
| Canada www.viewsonic.com | T (Toll-Free)= 1-866-463-4775T (Toll)= 1-424-233-2533F= 1-909-468-3757 | service.ca@viewsonic.com | |
| Europe | www.viewsoniceurope.com | www.viewsoniceurope.com/uk/support/call-desk/ | |
| Hong Kong www.hk.viewsonic.com T= 852 3102 2900 service@hk.viewsonic.com | |||
| India www.in.viewsonic.com T= 1800 266 0101 service@in.viewsonic.com | |||
| Ireland (Eire) | www.viewsoniceurope.com/uk/ | www.viewsoniceurope.com/uk/support/call-desk/ | service_ie@viewsoniceurope.com |
| Korea www.kr.viewsonic.com T= 080 333 2131 service@kr.viewsonic.com | |||
| Latin America(Argentina) | www.viewsonic.com/la/ T= | 0800-4441185 soporte@viewsonic.com | |
| Latin America (Chile) www.viewsonic.com/la/ T= 1230-020-7975 soporte@viewsonic.com | |||
| Latin America(Columbia) | www.viewsonic.com/la/ T= | 01800-9-157235 soporte@viewsonic.com | |
| Latin America (Mexico) | www.viewsonic.com/la/ | T= 001-8882328722 | soporte@viewsonic.com |
| Renta y Datos, 29 SUR 721, COL. LA PAZ, 72160 PUEBLA, PUE. Tel: 01.222.891.55.77 CON 10 LINEASElectroser, Av Reforma No. 403Gx39 y 41, 97000 Mérida, Yucatán. Tel: 01.999.925.19.16Other places please refer to http://www.viewsonic.com/la/soporte/index.htm#Mexico | |||
| Latin America (Peru) | www.viewsonic.com/la/ T= | 0800-54565 soporte@viewsonic.com | |
| Macau | www.hk.viewsonic.com T= | 853 2870 0303 service@hk.viewsonic.com | |
| Middle East | ap.viewsonic.com/me/ | Contact your reseller | service@ap.viewsonic.com |
| Puerto Rico & Virgin Islands | www.viewsonic.com | T= 1-800-688-6688 (English)T= 1-866-379-1304 (Spanish)F= 1-909-468-3757 | service.us@viewsonic.comsoporte@viewsonic.com |
| Singapore/Malaysia/Thailand | www.ap.viewsonic.com | T= 65 6461 6044 service@sg.viewsonic.com | |
| South Africa | ap.viewsonic.com/za/ | Contact your reseller | service@ap.viewsonic.com |
| United Kingdom | www.viewsoniceurope.com/uk/ | www.viewsoniceurope.com/uk/support/call-desk/ | service_gb@viewsoniceurope.com |
| United States | www.viewsonic.com | T (Toll-Free)= 1-800-688-6688T (Toll)= 1-424-233-2530F= 1-909-468-3757 | service.us@viewsonic.com |
Limited Warranty ViewSonic® ViewPad
What the warranty covers:
ViewSonic warrants its products to be free from defects in material and workmanship, under normal use, during the warranty period. If a product proves to be defective in material or workmanship during the warranty period, ViewSonic will, at its sole option, repair or replace the product with a like product. Replacement product or parts may include remanufactured or refurbished parts or components. The replacement unit will be covered by the balance of the time remaining on the customer's original limited warranty. ViewSonic provides no warranty for the third-party software included with the product or installed by the customer.
How long the warranty is effective:
ViewSonic ViewPad are warranted for at least 1 year for labor from the date of the first customer purchase.
User is responsible for the back up of any data before returning the unit for service.
ViewSonic is not responsible for any data lost.
Who the warranty protects:
This warranty is valid only for the first consumer purchaser.
What the warranty does not cover:
- Any product on which the serial number has been defaced, modified or removed.
-
Damage, deterioration or malfunction resulting from:
a. Accident, misuse, neglect, fire, water, lightning, or other acts of nature, unauthorized product modification, or failure to follow instructions supplied with the product.
b. Repair or attempted repair by anyone not authorized by ViewSonic.
c. Causes external to the product, such as electric power fluctuations or failure.
d. Use of supplies or parts not meeting ViewSonic's specifications.
e. Normal wear and tear.
f. Any other cause which does not relate to a product defect. -
Any product exhibiting a condition commonly known as "image burn-in" which results when a static image is displayed on the product for an extended period of time.
-
Removal, installation, insurance, and set-up service charges.
How to get service:
- For information about receiving service under warranty, contact ViewSonic Customer Support (Please refer to the web site and Customer Support pages). You will need to provide your product's serial number.
- To obtain warranty service, you will be required to provide (a) the original dated sales slip, (b) your name, (c) your address, (d) a description of the problem, and (e) the serial number of the product.
- Take or ship the product freight prepaid in the original container to an authorized ViewSonic service center or ViewSonic.
- For additional information or the name of the nearest ViewSonic service center, contact ViewSonic.
Limitation of implied warranties:
There are no warranties, express or implied, which extend beyond the description contained herein including the implied warranty of merchantability and fitness for a particular purpose.
Exclusion of damages:
ViewSonic's liability is limited to the cost of repair or replacement of the product. ViewSonic shall not be liable for:
- Damage to other property caused by any defects in the product, damages based upon inconvenience, loss of use of the product, loss of time, loss of profits, loss of business opportunity, loss of goodwill, interference with business relationships, or other commercial loss, even if advised of the possibility of such damages.
- Any other damages, whether incidental, consequential or otherwise.
- Any claim against the customer by any other party.
- Repair or attempted repair by anyone not authorized by ViewSonic.

natural_image
Three colorful bird illustrations perched on a green branch against a red background (no text or symbols)ViewSonic®
- Compliance Information
- FCC Statement
- FCC SAR information
- Canada Statement
- CE Conformity for European Countries
- Following information is only for EU-member states:
- European Union Regulatory Conformance
- Products with 2.4-GHz Wireless LAN Devices France
- Manufacturer's Declaration of Conformity
- Declaration of RoHS Compliance
- Important Safety Instructions
- Copyright Information
- Intellectual Property Right Information
- Product Registration
- For Your Records
- Product disposal at end of product life
- Chapter 1: Getting Started .... 1
- Your Device ....1
- Accessories ....3
- Installing microSD/SIM Card ....4
- Charging Battery ....4
- Using Headsets ....5
- Turning the Device On or Off ....5
- Unlocking the Screen ....6
- Chapter 2: Start Using Your Device .... 7
- Home Screen 7
- Shortcut Menu 9
- Setting Wallpaper ...... 11
- Configuring a 3G Network (3G Model) ......12
- Chapter 3: Settings ...... 13
- Chapter 4: Using Applications ...... 18
- Chapter 5: Other Information .... 21
- Chapter 1: Getting Started
- Your Device
- Side
- Indicator
- Accessories
- Installing microSD/SIM Card
- To install the microSD card
- To remove the microSD card
- To install the SIM card (select model)
- To remove the SIM card
- Charging Battery
- Using Headsets
- Note:
- Turning the Device On or Off
- To turn on your device
- To turn off your device
- To set your device to Sleep mode
- Unlocking the Screen
- To unlock the screen
- Chapter 2: Start Using Your Device
- Home Screen
- Set screen mode
- Extended Home screen
- Shortcut Menu
- Customizing shortcut menu
- Using widgets
- To remove widgets
- Application drawer
- Setting Wallpaper
- Configuring a 3G Network (3G Model)
- Chapter 3: Settings
- Install and Remove an Application
- Remove an application
- Setting Date & Time
- Set the System Language
- Setting up Wi-Fi
- To turn Wi-Fi on or off
- To connect to a Wi-Fi network
- Configuring a Bluetooth Connection
- Browsing Web Pages
- To scroll the page
- To set home page
- Managing web pages
- Chapter 4: Using Applications
- HDMI Output
- Play Music
- Gallery
- Firmware Update
- Chapter 5: Other Information
- Troubleshooting
- Unable to power on the device.
- System force closes, crashes or fails to operate and is not recoverable or able to start after a full charge.
- Device cannot power down.
- Measures to Extend Battery Life?
- Device cannot find a wireless network.
- Wi-Fi shows good Signal Strength, but cannot connect to the Network.
- Customer Support
- Limited Warranty ViewSonic® ViewPad
- What the warranty covers:
- How long the warranty is effective:
- Who the warranty protects:
- What the warranty does not cover:
- How to get service:
- Limitation of implied warranties:
- Exclusion of damages:
Brand : VIEWSONIC
Model : ViewPad E100
Category : Tablet