
COMBO - CB - Dive computer SUUNTO - Free user manual and instructions
Find the device manual for free COMBO - CB SUUNTO in PDF.


| Product Type | Dive Computer |
| Brand | Suunto |
| Model | COMBO - CB |
| Category | Dive Computer |
| Dimensions | Approximately 50 mm diameter, 15 mm thickness |
| Weight | Approximately 60 g |
| Battery Type | CR2032 lithium coin cell |
| Battery Life | Up to 1 year under normal use |
| Max Depth Rating | 80 meters (262 feet) |
| Display Type | LCD matrix display with backlight |
| Dive Modes | Air, Nitrox, Gauge, Free (depending on model) |
| Key Features | Dive time, depth, ascent rate, stopwatch, compass, logbook |
| Water Resistance | 100 meters (meets ISO 6425 standards for dive watches) |
| Operating Temperature | 0°C to 40°C (32°F to 104°F) |
| Storage Temperature | -20°C to 50°C (-4°F to 122°F) |
| Warranty | 2 years limited warranty |
| Package Contents | Dive computer, user manual, battery (installed), quick start guide |
Frequently Asked Questions - COMBO - CB SUUNTO
User questions about COMBO - CB SUUNTO
0 question about this device. Answer the ones you know or ask your own.
Ask a new question about this device
Download the instructions for your Dive computer in PDF format for free! Find your manual COMBO - CB - SUUNTO and take your electronic device back in hand. On this page are published all the documents necessary for the use of your device. COMBO - CB by SUUNTO.
USER MANUAL COMBO - CB SUUNTO
SUUNTO COMBOS AND MECHANICAL INSTRUMENTS
INSTRUCTION MANUAL
Combo Consoles I Console Compasses CB-71/STD and CB-71/DS
Depth Gauge SM-16 I Pressure Gauge SM-36
SUUNTO Combo Consoles
Introduction
The Suunto combo consoles for recreational use, allow you to create a personal combo according to your own specific needs. Analog gauges, dive computers and compasses fit together like building blocks.
The combos consist of four main modules: the pressure gauge module, the instrument module and two different compass modules.
The pressure gauge module is designed for the Suunto pressure gauges and it can also be used with the new Suunto Quick Release (QR). The basic combinations are displayed below:
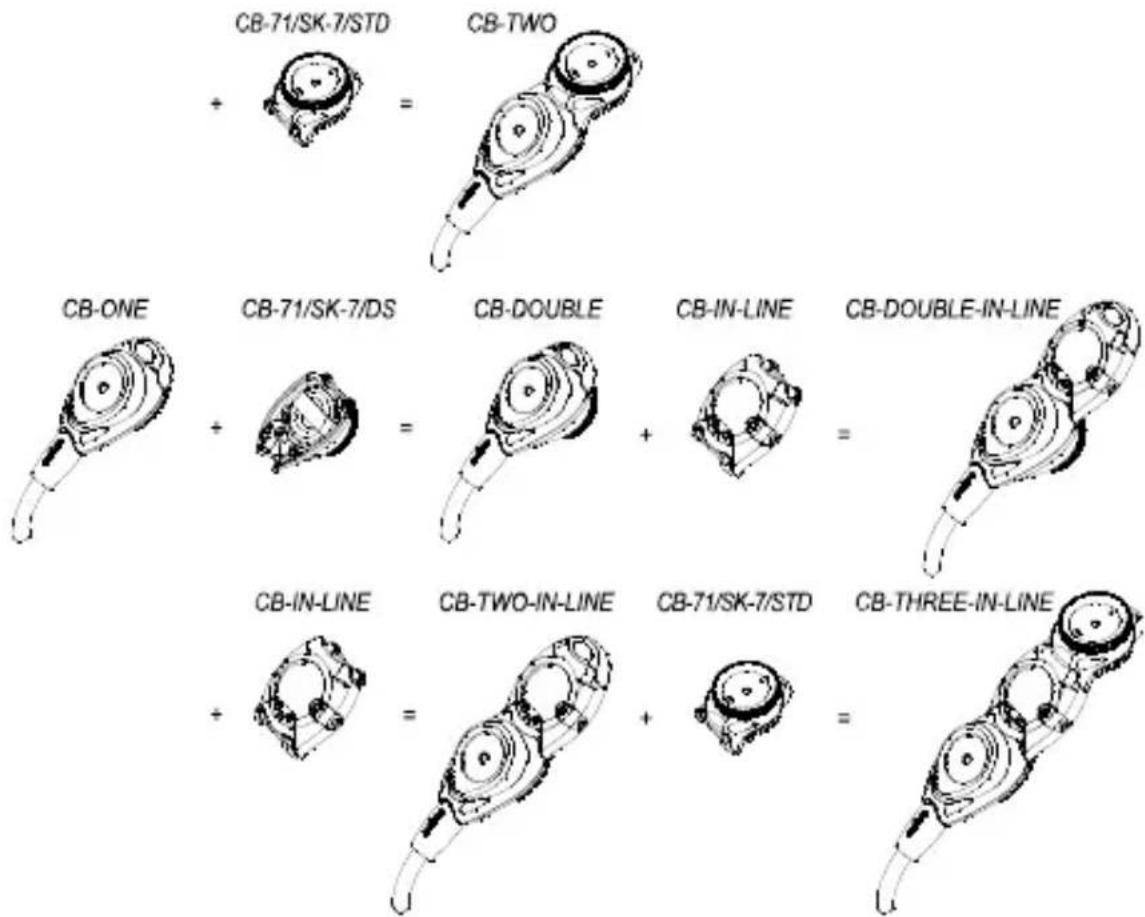
Assembling the Combo Modules
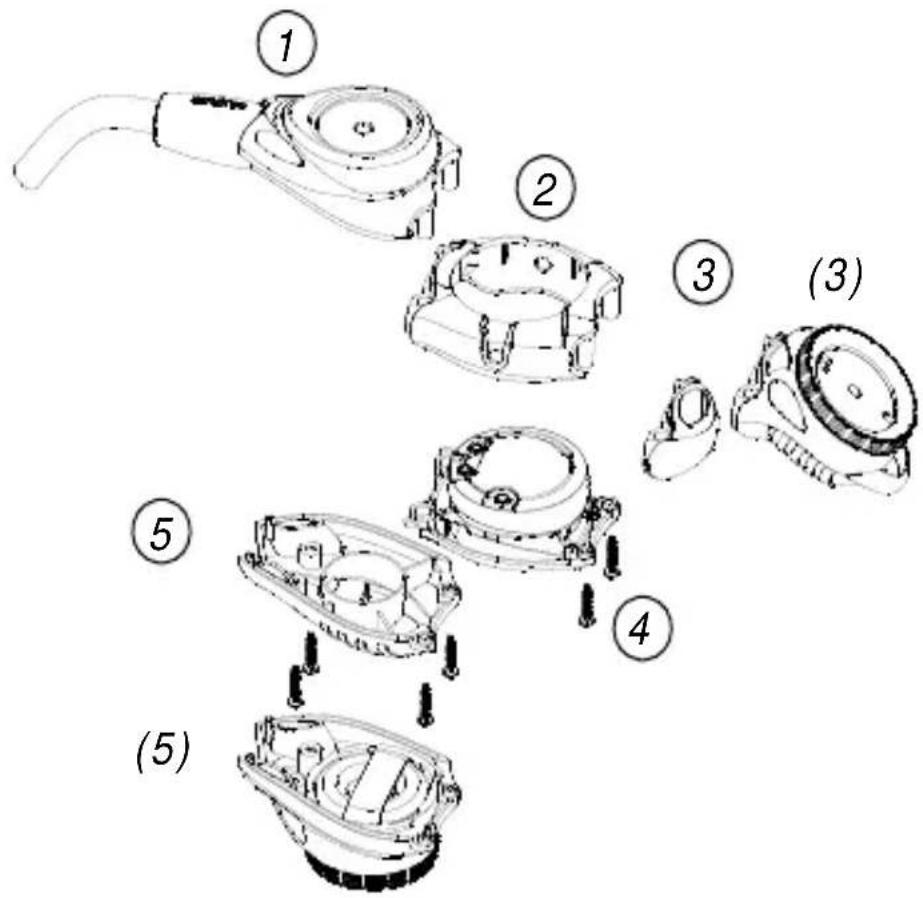
- CB-ONE module front cover with SM-36 pressure gauge in place (see section CB-ONE Module assembly)
- CB-IN-LINE module front cover
- CB-end piece or CB-71/STD compass (optional)
- CB-IN-LINE module back cover with instrument
- CB-ONE module back cover or CB-71/DS compass (optional)
CB-ONE Module Assembly
The CB-ONE Module is designed to fit the Suunto SM-36 analog pressure gauges.
Before assembling the CB-ONE module the hose cover needs to be fitted on the pressure hose. The hose cover ensures that the SM-36 pressure gauge fits properly on the CB-ONE module.
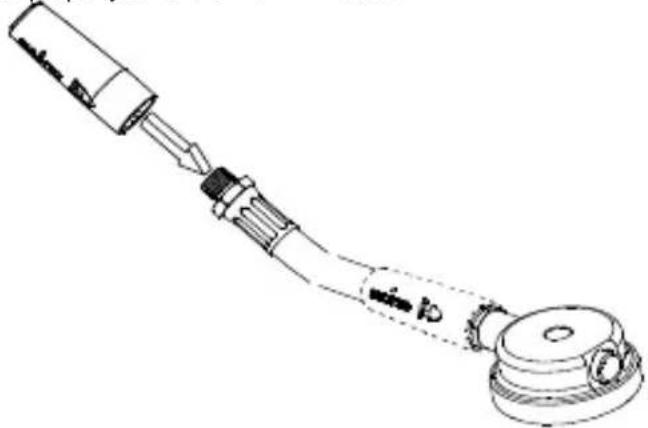
natural_image
Technical line drawing of a mechanical assembly with no visible text or symbolsIf the Suunto Quick Release is used, the hose cover is not to be used (See section CB-ONE module assembly using the SUUNTO Quick Release).
After attaching the hose cover the pressure hose and gauge are assembled on the CB-ONE front cover according to the picture.
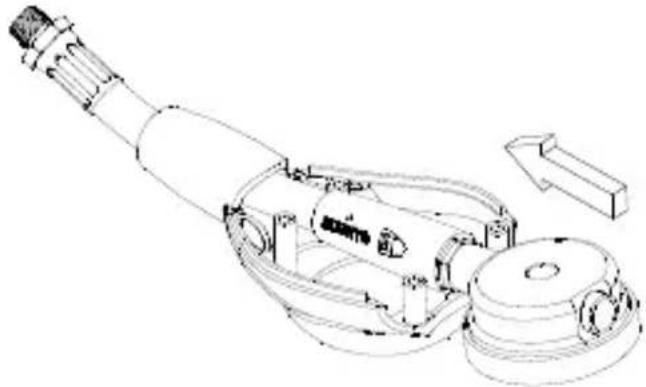
natural_image
Technical line drawing of a mechanical device with no visible text or symbolsAfter the pressure gauge is in place the CB-ONE back cover (or alternatively the CB-71/SK-7/DS compass) is attached with four screws.
CB-ONE Module Assembly when using the SUUNTO Quick Release
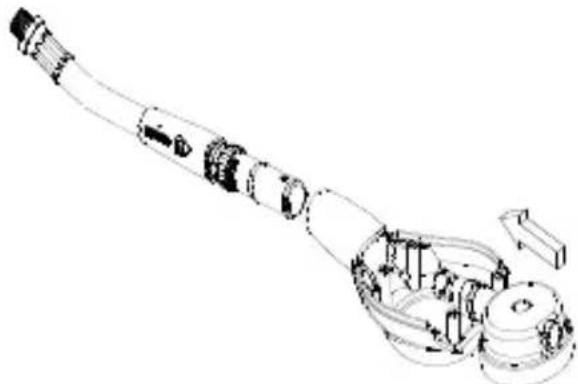
If the SUUNTO Quick Release (QR) is used the hose cover should be attached on the high pressure hose below the female end of the QR. The male part is attached to the pressure gauge which is then fitted onto the CB-ONE front cover according to the picture below.
natural_image
Technical line drawing of a mechanical assembly with no visible text or symbolsCB-IN-LINE Module Assembly
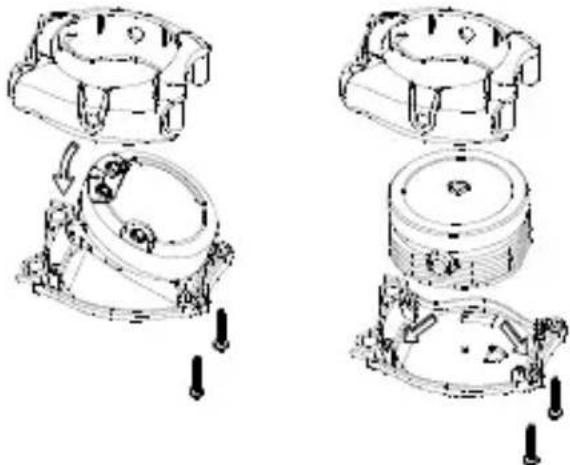
The CB-IN-LINE module fits the Suunto Vyper and Zoop dive computers or the SM-16 round depth gauge.
The Vyper locks in place on the IN-LINE module back cover. For the other instruments there are lugs on the back cover aiding the orientation.
natural_image
Technical line drawings of mechanical components with no visible text or symbolsThe Suunto Vyper and Zoop are delivered with a display shield.
SUUNTO Console Compasses CB-71/SK-7/STD and CB-71/SK-7/DS
The CB-71/SK-7 is available in two versions: the CB-71/SK-7/STD for attachment on top of the combo modules or the Cobra dive computer, and the CB-71/SK-7/DS for attachment on the back side of the CB-ONE module.
Compass use for divers
General instructions
Usually a compass must be held precisely in a horizontal position, otherwise the needle will sting. The SK-7 compass may however be inclined about ±30 degrees.
Sighting a compass bearing
Hold the compass so that the compass is in a horizontal position and the direction line points away from you. Turn with the compass until the direction line points at your destination, then turn the direction ring until the magnetic North needle is aligned between the slit marks. The front end of the direction line on the SK-7 shows your compass bearing, and as long as the North needle is aligned between the slit marks, the direction points toward your destination. The SK-7 compasses also have a side reading window, which also enables you to take a bearing by directing the compass towards the destination and by reading the compass bearing from the side window. This bearing can be memorized by turning the direction ring to that bearing.
Setting a given bearing or direction
The scale division on the SK-7 is 360 degrees clockwise from 0 degrees at North. Turn the direction ring until the front end of the direction line is at the desired direction. Turn the compass until the needle falls between the slit marks. The direction line now points in the desired direction.
Magnetic declination
Maps and marine charts are drawn in correlation to the geographic poles, while the magnetic compass needle is subject to magnetic declination which varies according to the location.
General orientation on the diving site
Before diving, check the main compass bearings at the dive site, paying special attention to memorizing the direction of the shoreline and bearings of landmarks that may be of importance.
Natural aids to underwater navigation
-
The underwater extension of the shore's inclination tells the diver if he is following the shoreline. Be careful however as underwater ridges may lead you astray. Surface occasionally to check your position.
• The dip and stratification of rocks on the shore can often be followed over large areas under water. -
Sand ripples usually form long lines parallel to the shore.
- The direction of currents should be noted by their effect on algae or drifting particles. Use the compass to check the bearing of the current.
- In shallow water, the sun's direction can be seen from shadows on the bottom, or by looking towards the surface.
- Swimming in a straight line along the bottom is greatly facilitated if you can line up three distinctive objects in your line of vision. As you reach the first one, line up a new one farther away, so that you again have three points determining your course. This way you can counteract the effects of side current.
Compass Balancing
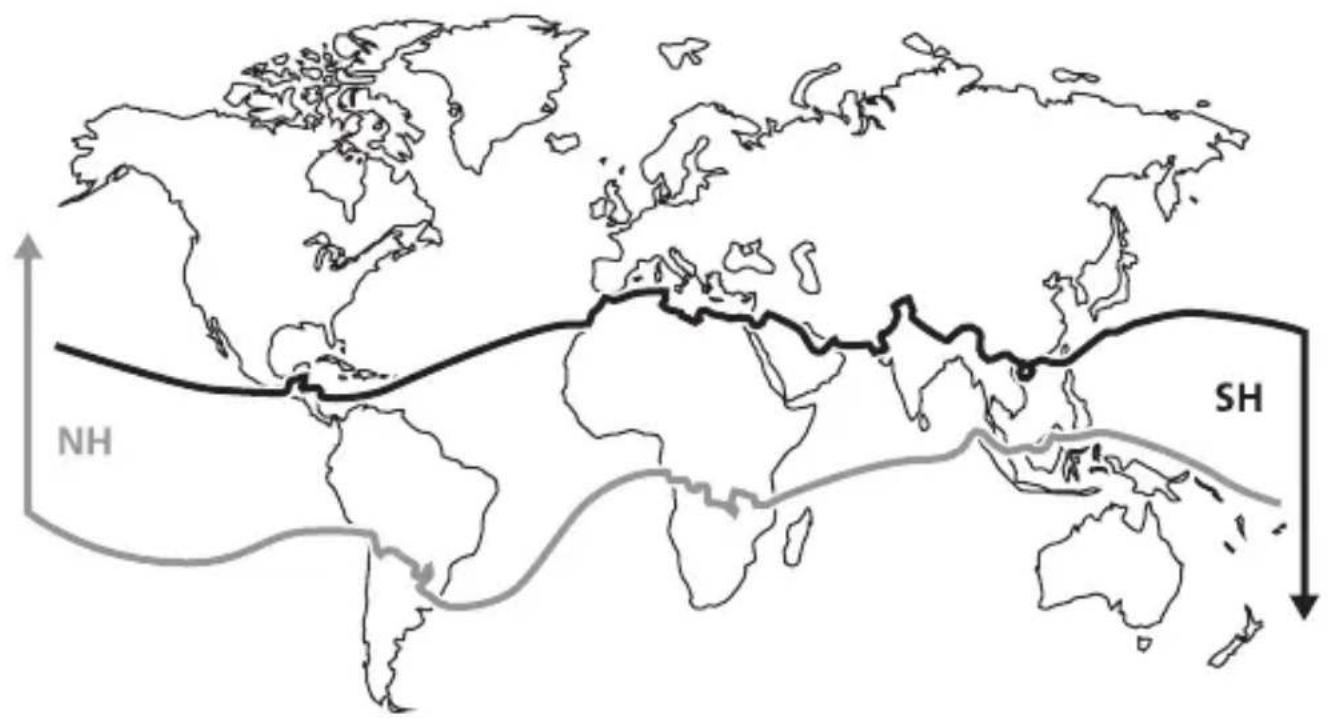
The horizontal and vertical components of earth's magnetic field vary in different locations. For this reason Suunto compasses are balanced for 2 different zones. If the compass is used in an adjacent balancing zone the compass needle will tilt only slightly. However, the farther the compass is used from it's intended zone, the more the needle will tilt. In extreme situations the needle might stick. For this reason it is very important to know in which country the compass will be used.
Compass zone map
SUUNTO Mechanical Gauges
Suunto depth gauge SM-16
Models available: 45 m, 70 m, 150 ft, 230 ft
Suunto pressure gauge SM-36
Models available: 300 bar and 4000 psi
Before usage
Depth gauge:
Before diving, check the position of the depth indicating pointer. Atmospheric conditions (altitude, temperature) may cause the point to not indicate zero. If this is the case, turn the adjusting screw located at the right side of the gauge to align the pointer to zero. The adjustment is to be made at the temperature of usage. Repeated unnecessary adjustments may cause excessive wear to the seals and eventual leakage.
CAUTION!
Do not attempt to adjust the water entry port located at the left side of gauge. Tampering with the port can cause damage to internal components. Do not pressure test gauge in air. Always immerse the gauge in water while pressure testing it.
Pressure gauge:
The hose has an end fitting with 7/16" 20 UNF-thread. If your regulator has a different thread size in the high pressure (HP-output) port, ask your dealer for the correct adapter. Always inspect the o-ring at the male thread to be sure it is clean and undamaged before connecting it to the regulator.
Always turn your air supply on slowly. Always turn the pressure gauge dial face away from your face when turning on the air supply.
Do not overtighten the hose at the gauge, the fitting is pressure proof even when tightened with fingers.
Service
Avoid subjecting the gauges to excessive shock loads such as those that might occur from being dropped or hit against an
immovable object. Do not subject the gauges to pressures beyond their maximum range. Temperature extremes can be damaging. In general, the gauges should not be exposed to temperatures to which you would not expose yourself.
CAUTION!
After use, rinse the gauges or the console with fresh water and store them out of direct sunlight, in a dry place at room temperature.
CAUTION!
Do not attempt to clean the gauges with anything other than water. Use of cleaning agents or compressed air can cause permanent damage. The introduction of any probe into the water entry port of the depth gauge or the pressure relief valve opening of the pressure gauge can also damage internal components.
Before prolonged storage the instruments should be removed from the console, rinsed with fresh water and stored separately.
CAUTION!
Do not attempt to disassemble the gauges. Special tools and training are required to perform the adequate service.
The instruments must be serviced by an authorized dealer every second year or after 200 dives (whichever comes first).
Operating and Storage Temperatures
SM-16 Operating temperature 0°C to 40°C [32°F to 104°F]
Storage temperature -20^ C to 50^ C [-4^ F to 122^ F]
SM-36 Operating and storage temperature 0^ C to 40^ C [ 32^ F to 104^ F]
Technical Specifications
The Suunto depth gauge SM-16 complies with the prEN 13319 standard.
The tolerances for depth gauges are:
At 3m +0.8 / -0.4 m
At 6m +0.8 / -0.4 m
At 9m ±0.8 m
At 15m +1/-1.2 m
At 30m +1/-1.2 m
At 45m +1/-1.5 m
At 60m +1 / -1.5 m
The SM-36 pressure gauges comply with the EN 250 standard.
The tolerances for pressure gauges, measured at decreasing pressure are:
At 40 bar ± 5 bar
At 100 bar ± 10 bar
At 200 bar ± 10 bar
At 300 bar ± 10 bar
Suunto Limited Warranty
Suunto warrants that during the Warranty Period Suunto or a Suunto Authorized Service Center (hereinafter Service Center) will, at its sole discretion, remedy defects in materials or workmanship free of charge either by a) repairing, or b) replacing, or c) refunding, subject to the terms and conditions of this Limited Warranty. This Limited Warranty is only valid and enforceable in the country of purchase, unless local law stipulates otherwise.
Warranty Period
The Limited Warranty Period starts at the date of original retail purchase. The Warranty Period is two (2) years for display devices. The Warranty Period is one (1) year for accessories and consumable parts, including but not limited to chargeable batteries, chargers, docking stations, straps, cables and hoses.
Exclusions and Limitations
This Limited Warranty does not cover: 1. a) normal wear and tear, b) defects caused by rough handling,
or c) defects or damage caused by misuse contrary to intended or recommended use; 2. user manuals or any third-party items; 3. defects or alleged defects caused by the use with any product, accessory, software and/or service not manufactured or supplied by Suunto; 4. replaceable batteries.
This Limited Warranty is not enforceable if item: 1. has been opened beyond intended use; 2. has been repaired using unauthorized spare parts; modified or repaired by unauthorized Service Center; 3. serial number has been removed, altered or made illegible in any way, as determined at the sole discretion of Suunto; 4. has been exposed to chemicals including but not limited to mosquito repellents.
Suunto does not warrant that the operation of the Product will be uninterrupted or error free, or that the Product will work with any hardware or software provided by a third party.
Access to Suunto warranty service
You must have proof of purchase to access Suunto warranty service. For instructions how to obtain warranty service, visit www.suunto.com/warranty, contact your local authorized Suunto retailer, or call Suunto Help Desk +358 2 2841160 (national or premium rates may apply).
Limitation of Liability
To the maximum extent permitted by applicable mandatory laws, this Limited Warranty is your sole and exclusive remedy and is in lieu of all other warranties, expressed or implied. Suunto shall not be liable for special, incidental, punitive or consequential damages, including but not limited to loss of anticipated benefits, loss of data, loss of use, cost of capital, cost of any substitute equipment or facilities, claims of third parties, damage to property resulting from the purchase or use of the item or arising from breach of the warranty, breach of contract, negligence strict tort, or any legal or equitable theory, even if Suunto knew of the likelihood of such damages. Suunto shall not be liable for delay in rendering warranty service.

SUUNTO HELP DESK
GLOBAL
+358-2-284-1160
USA (toll-free) +1-800-543-9124
CANADA (toll-free) +1-800-267-7506
www.suunto.com
SUUNTO
© Suunto Oy 11/2005, 09/2006, 11/2011. All rights reserved.
Suunto is a registered trademark of Suunto Oy.
- SUUNTO COMBOS AND MECHANICAL INSTRUMENTS
- SUUNTO Combo Consoles
- Introduction
- CB-ONE Module Assembly
- CB-ONE Module Assembly when using the SUUNTO Quick Release
- CB-IN-LINE Module Assembly
- SUUNTO Console Compasses CB-71/SK-7/STD and CB-71/SK-7/DS
- Compass use for divers
- General instructions
- Sighting a compass bearing
- Setting a given bearing or direction
- Magnetic declination
- General orientation on the diving site
- Natural aids to underwater navigation
- Compass Balancing
- SUUNTO Mechanical Gauges
- Before usage
- CAUTION!
- Pressure gauge:
- Service
- Operating and Storage Temperatures
- Technical Specifications
- Suunto Limited Warranty
- Warranty Period
- Exclusions and Limitations
- Access to Suunto warranty service
- Limitation of Liability
- SUUNTO HELP DESK
- SUUNTO
Brand : SUUNTO
Model : COMBO - CB
Category : Dive computer