
GK45TEPS - Oven V-ZUG - Free user manual and instructions
Find the device manual for free GK45TEPS V-ZUG in PDF.


| Product Type | Induction hob |
| Model | GK45TEPS |
| Number of Cooking Zones | 4 |
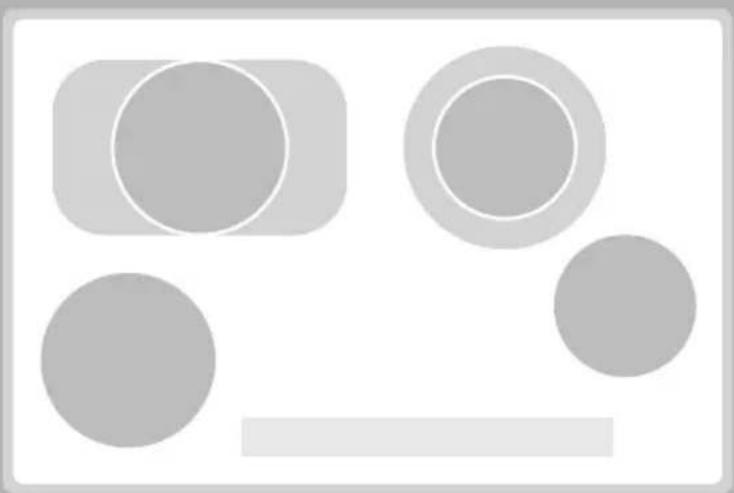
| Cooking Zone Sizes | 1 × frying zone (ø 170/290 mm), 1 × dual ring cooking zone (ø 140/210 mm), 1 × cooking zone (ø 180 mm), 1 × cooking zone (ø 140 mm) |
| Control Type | Touch buttons and sliders |
| Childproof Lock | Yes, with override function |
| Wipe Protection | Yes, 30 seconds automatic |
| Pause Cooking | Yes, up to 10 minutes |
| Restore Function | Yes, within 6 seconds after switch-off |
| Automatic Boost | Yes, selectable per zone (P3 setting) |
| Timer | Yes, 1–99 minutes (egg timer) |
| Operating Time | Yes, 1–99 minutes per zone |
| Residual Heat Indicator | Yes |
| Safety Shut-off | Automatic (times vary per power level) |
| Cleaning | Glass ceramic hob; use soft cloth and suitable detergent; scraper for burnt-on residues |
| Power Supply | 230 V / 400 V, 50/60 Hz (typical) |
| Dimensions (Width × Depth × Height) | Approx. 60 × 52 × 5 cm |
| Weight | Approx. 12 kg |
| Model Number | 976 (GK45TEPS/C/F) |
Frequently Asked Questions - GK45TEPS V-ZUG
User questions about GK45TEPS V-ZUG
0 question about this device. Answer the ones you know or ask your own.
Ask a new question about this device
Download the instructions for your Oven in PDF format for free! Find your manual GK45TEPS - V-ZUG and take your electronic device back in hand. On this page are published all the documents necessary for the use of your device. GK45TEPS by V-ZUG.
USER MANUAL GK45TEPS V-ZUG
Induction with multi-slider
natural_image
Abstract geometric composition of overlapping gray circles and rectangles on white background (no text or symbols)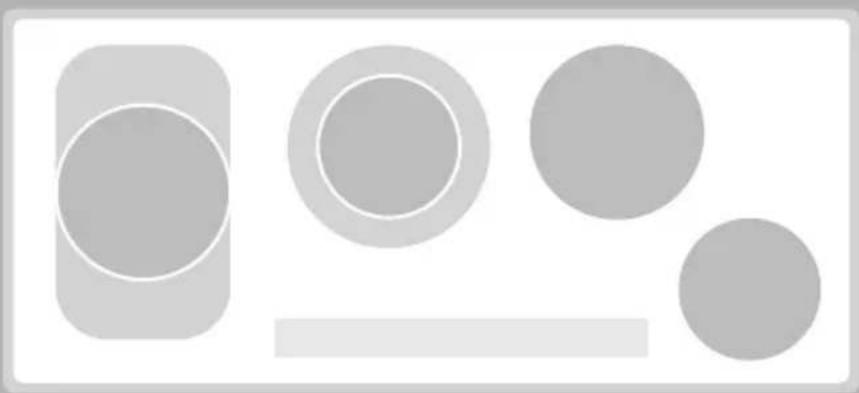
natural_image
Abstract geometric shapes including rounded rectangles, circles, and a rectangle (no text or symbols)Operating instructions
Thank you for choosing to buy one of our products. Your appliance is made to high standards and is easy to use. Nevertheless, please take the time to read these operating instructions in order to familiarize yourself with the appliance and get the best use out of it.
Please follow the safety precautions.
Modifications
Text, diagrams and data correspond to the technical standard of the appliance at the time these operating instructions went to press. The right to make technical modifications for the purpose of the further development of the appliance is reserved.
Validity
The model number corresponds to the first 3 digits on the identification plate. These operating instructions apply to the models:
| Type Model no. |
| GK45TEPS/C/F 976 |
| GK45TEAS/C/F/U 977 |
Deviations depending on the model are noted in the text.
Contents
1 Safety precautions 4
1.1 Symbols used 4
1.2 General safety precautions .... 5
1.3 Appliance-specific safety precautions 6
1.4 Disclaimer 8
1.5 Instructions for use 8
1.6 Disposal 10
2 Using for the first time 11
2.1 Where is the identification plate? 11
3 Your appliance 12
3.1 Appliance overview 12
3.2 Operating and display elements 13
3.3 Cookware 14
4 Operating the appliance 15
4.1 Switching the appliance on and off 15
4.2 Selecting a cooking zone 15
4.3 Overview of power levels 16
4.4 Switching a cooking zone off 16
4.5 Switching the dual ring cooking/frying zone on and off . . . . . . . . . . . 17
4.6 Automatic boost 18
4.7 Operating time 19
4.8 Timer 21
4.9 Childproof lock 22
4.10 Restore function 23
4.11 Pause cooking 23
4.12 Wipe protection 24
5 User settings 25
5.1 Changing user settings 26
5.2 Cancelling user settings 26
6 Care and maintenance 27
6.1 Cleaning 27
7 Trouble-shooting and error messages 28
7.1 What to do if ... 28
8 Notes 31
9 Index 33
10 Repair service 35
1 Safety precautions
1.1 Symbols used

Denotes important safety precautions. Failure to observe said precautions can result in injury or damage to the appliance or fittings!

Information and precautions to observe.
Information and precautions to observe.
Tips for ease of use.

Read the operating instructions before using the appliance for the first time!
▶Indicates step-by-step instructions.
- Describes how the appliance reacts to the steps taken.
- Indicates a list.
1.2 General safety precautions

- Read the operating instructions before using the appliance for the first time!

- This appliance is not intended for use by persons (including children) with reduced physical, sensory or mental capabilities, or lack of experience and/or knowledge, unless they are supervised or have been given instruction concerning use of the appliance by a person responsible for their safety.
• Children should be supervised to ensure that they do not play with the appliance.
- WARNING: If the mains cable of this appliance is damaged, it must be replaced by the manufacturer or its Customer Services or a similarly qualified person in order to avoid hazard.
1.3 Appliance-specific safety precautions

- WARNING: If the surface is cracked, switch the appliance off and disconnect it from the mains to avoid possible electric shock.
- WARNING: The appliance and its accessible parts get hot during use. Be careful not to touch the heating elements. Children under 8 must be kept away unless constantly supervised.
- Do not use a steam cleaner.
-
Do not place metal objects such as knives, forks, spoons, lids and aluminium foil on the hob as they can get hot.
-
WARNING: It can be dangerous to leave the hob unattended when cooking with fat or oil, as this can lead to fires. NEVER attempt to extinguish a fire with water. Instead, switch the appliance off and then carefully smother the flames with a lid or a fire blanket.
- WARNING: Never store objects on top of the hob because of fire hazard.
- Do not operate the appliance using an external time switch or a separate remote control system.
1.4 Disclaimer
- Any repairs, modifications or manipulations to the appliance, especially any live parts, may only be carried out by the manufacturer, its Customer Services or similarly qualified persons. Repairs if carried out incorrectly may cause serious injury, damage to the appliance and fittings, as well as affect the functioning of the appliance. If the appliance is not working properly or in case of a repair order, follow the instructions given in the REPAIR SERVICE section. If necessary, please contact Customer Services.
- Make sure no water gets inside the appliance: Do not spray the appliance with water. If water gets inside it can damage the appliance.
- Retain these operating instructions for future reference. If you sell or pass the appliance on to a third party, please ensure these operating instructions accompany the appliance, together with the instructions on installation.
- The appliance is designed for use in the home for preparing food. No liability is assumed for any damage caused by improper or incorrect use.
1.5 Instructions for use
- The appliance corresponds to recognised technology standards and the relevant safety regulations. Proper use of the appliance is however essential to avoid damage and accidents. Please therefore follow the precautions given in these operating instructions.
- The heated surface remains hot for some time after it is switched off and cools down only slowly to room temperature. Please allow sufficient time for the appliance to cool down before, for instance, cleaning it.
- In case of overheating, switch the appliance off and allow it to cool down completely. Under no circumstances use cold water to cool it down quickly!
-
If the appliance can no longer be operated, remove the fuse or switch the circuit breaker off.
-
Do not climb onto the appliance.
- Do not put hot cookware on the hob frame in order not to damage the silicon joints.
- Always ensure that the base of the cookware and the surface of the hob are clean and dry before use.
- Do not cut or prepare food on the surface. Avoid impact with hard objects. Do not drag cookware across the surface.
- Take particular care that sugary foods or juices do not get onto the hot cooking zones as they can damage the surface. If sugary foods or juices do get onto hot cooking zones, clean away immediately (while still hot) with a scraper for glass ceramic hobs.
- Do not leave the appliance unattended when in use.
- Keep animals away from the appliance.
1.6 Disposal
Packaging

Danger of suffocation! Packaging materials (e.g. plastic, polystyrene) can be dangerous for children. Keep packaging materials away from children.

All packaging material is marked and should be collected for recycling and disposed of in an environmentally friendly way.
Disconnection
▶Pull the plug out of the mains socket or have the appliance disconnected from the mains supply by an electrician. Then cut off the mains cable.
▶Disable the appliance after disconnecting it.
Appliance disposal
- The symbol on the identification plate warns that the appliance may not be disposed of in normal household waste.
- The appliance must be disposed of in accordance with local regulations on waste disposal. For more information on the handling, disposal and recycling of the product, please contact the local authorities, the local recycling facilities for household waste or the retailer from whom you purchased the appliance.
2 Using for the first time
- The appliance must be installed and connected to the mains supply in accordance with the separate installation instructions. Have a qualified fitter/electrician carry out the necessary work.
- A cooking zone can give off an unpleasant smell during the first few hours of use. This is normal for brand new appliances. Ensure that the room is well ventilated.
2.1 Where is the identification plate?
The identification plate and the connection plate are located on the underside of the hob element.
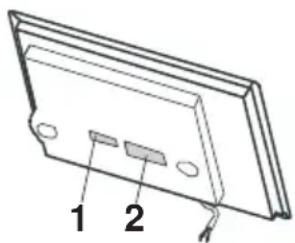
natural_image
Technical line drawing of a mechanical component with labeled parts (no text or symbols present)1 Identification plate with serial number (FN)
2 Connection plate
A second identification plate is supplied and should be affixed in the fitted unit underneath the hob.
Note down the serial number (FN) of your appliance on the back page of these operating instructions.
3 Your appliance
3.1 Appliance overview
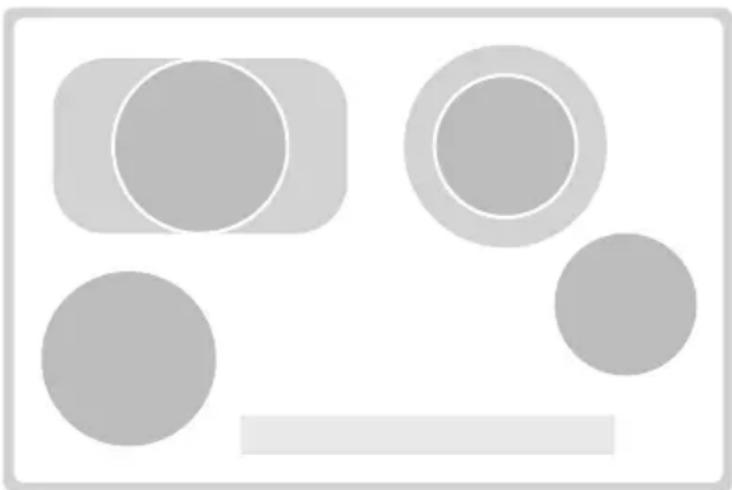
GK45TEAS, GK45TEASC, GK45TEASF, GK45TEASU
• 1 frying zone ø 170/290 mm
• 1 dual ring cooking zone ø 140/210 mm
• 1 cooking zone ø 180 mm
• 1 cooking zone ø 140 mm
natural_image
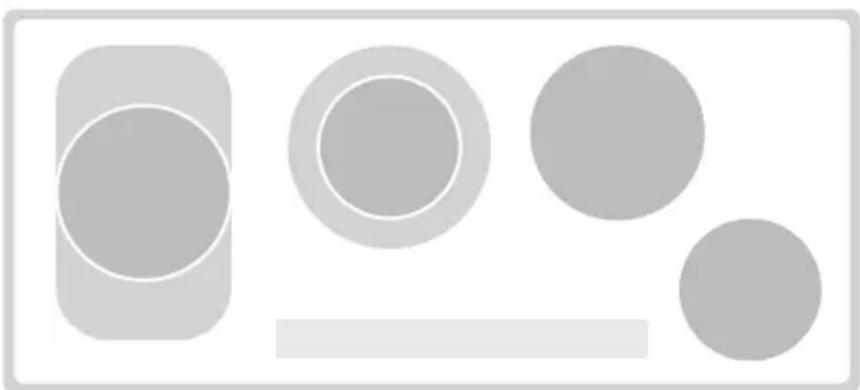
Abstract geometric composition of gray circles and rectangles on white background (no text or symbols)GK45TEPS, GK45TEPSC, GK45TEPSF
• 1 frying zone ø 170/290 mm
• 1 dual ring cooking zone ø 140/210 mm
• 1 cooking zone ∅ 180 mm
• 1 cooking zone ø 140 mm
natural_image
Abstract geometric shapes including circles and rectangles, no text or symbols present3.2 Operating and display elements

Touch buttons

Appliance ON/OFF
0 Slider (for setting the power levels)

Dual ring cooking zone ON/OFF and frying zone ON/OFF

Pause cooking ON/OFF and restore function

Operating time/timer

Wipe protection ON/OFF
Displays
1 Cooking zone power level
2 Operating time activated
3 Frying zone/dual ring cooking zone activated
4 Pause activated/possibility for restoring saved settings
5 Cooking zone indicator lights for the operating time
6 Operating time/timer
7 Wipe protection activated
3.3 Cookware
Suitable cookware
Cookware should have a stable base. When heated, the base of the cookware must lie flat on the surface of the cooking zone.
Cookware made of metal is more suitable than that made of glass or ceramic as with metal the heat is distributed evenly quicker.
Cookware bases made of aluminium or aluminium alloys can leave stubborn abrasion marks on the glass ceramic surface that are very difficult to remove.
Energy-efficient cooking
For maximum energy efficiency and even heat distribution note the following:
- The base of the cookware must be clean, dry and smooth.
- The diameter of the base of the cookware should as far as possible correspond to the diameter of the cooking zone.
- Centre the cookware in the middle of the cooking zone.
- Use a well-fitting lid.
- Match the diameter of the cookware to the quantity of food to be cooked.
4 Operating the appliance
The individual cooking zones are all operated in the same way. When the appliance is switched off, all the displays are dark (stand-by mode), except for the residual heat indicator should any cooking zone still be hot.
4.1 Switching the appliance on and off
▶Switch the appliance on: Press and hold the touch button for about 1 second.
- flashes in all the power level displays.
- If no other entry is made, the appliance switches off after about 10 seconds for safety reasons.
▶Switch the appliance off: Press the touch button.
4.2 Selecting a cooking zone
▶ Press the slider for the required cooking zone or slide your finger along it to set the power level.
4.3 Overview of power levels
| Power level Cooking method Use | ||
| 1 | Melting, gentle warming Butter, chocolate, gelatine, sauces | |
| 2 | ||
| 3 Swelling Rice | ||
| 4 | Simmering, reducing, stewing Vegetables, potatoes, sauces, fruit, fish | |
| 5 | ||
| 6 Simmering, braising Pasta, soup, braised meat | ||
| 7 Gentle frying | Rösti (hash browns), omelettes, breaded food, sausages | |
| 8 | Frying, deep frying | Meat, chips |
| 9 | Flash frying, fast heating | Steak, boiling water |
4.4 Switching a cooking zone off
▶Press on the slider.
- If no other entry is made and none of the other cooking zones are in use, the appliance switches off automatically after 10 seconds.
Residual heat indicator
After the cooking zone is switched off, remains illuminated in the display as long as a burn hazard exists.
4.5 Switching the dual ring cooking/frying zone on and off
When the dual ring cooking/frying zone is switched on, only the inner cooking zone A or C comes on. The outer cooking ring B or the additional heating element D can be switched on if required.
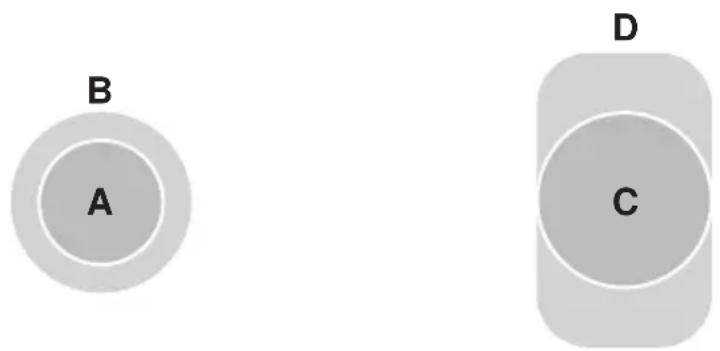
Switching the outer cooking ring/additional heating element on
▶Press the slider for the required dual ring cooking/frying zone or slide your finger along it to set the power level.
▶Press on the slider.
- The symbol next to the corresponding power level illuminates.
Switching the outer cooking ring/additional heating element off
▶Press on the slider.
- The outer cooking ring B or additional heating element D switches off and the inner cooking zone A or C remains switched on.
- The Ⓞ symbol next to the cooking zone goes out.
4.6 Automatic boost

Do not leave the hob unattended while using the automatic boost. Risk of boiling over, burning on and igniting!
All the cooking zones are equipped with a selectable automatic boost. With this function, a cooking zone works at power level 9 for a certain length of time (see table). Then it automatically goes back to the power level set.

Whenever a cooking zone is switched on, the automatic boost must be activated anew.
When the appliance is delivered from the factory, the automatic boost is switched off. If required, the P3 user setting must be changed from 0 to 1, see the USER SETTINGS section.
| Power level | 1 | 2 | 3 | 4 | 5 | 6 | 7 | 8 | |||
| Boost in mins:secs | 1:00 | 3:00 | 4:45 | 6:30 | 8:30 | 2:30 | 3:30 | 4:30 | |||
If during the automatic boost a higher power level is selected, the duration of the boost will change automatically.
Switching the automatic boost on
▶Press and hold the required power level on the slider for 3 seconds.
- and the power level illuminate alternately in the display while the automatic boost is activated.
- After the automatic boost, the power level is reduced back to the level selected.
Switching the automatic boost off before time
▶Using the slider, set a lower power level.
4.7 Operating time

Do not leave the hob unattended during use. Risk of boiling over, burning on and igniting!
With the operating time function, a cooking zone switches off automatically after a set time (between 1–99 minutes).
Setting the operating time
▶Select the required cooking zone.
▶Press the touch button.
- flashes in the display.
- The cooking zone indicator lights flash.
▶Press the slider for the required cooking zone and slide your finger along it to set the operating time.
- The symbol illuminates.
- The cooking zone indicator light illuminates.
To change the operating time, press and hold

Changing the operating time
▶Press the touch button.
- flashes in the display.
▶Press the slider for the required cooking zone.
- The remaining operating time for the cooking zone selected is displayed.
- The indicator light for the cooking zone flashes.
▶Using the slider, change the operating time.
Switching the operating time function off before time
▶Press the touch button.
▶Press on the slider for the required cooking zone.
- Illuminates in the display for the operating time/timer.
- The cooking zone continues to run.
End of the operating time
When the operating time is up
- the relevant cooking zone switches off
- an acoustic signal is emitted
- and the power level flash.
While the power level flashes, a new operating time can be set and the cooking zone resumes operation using the previous settings.
▶Press any touch button to switch off the acoustic signal and the displays.
Several operating times
If operating times are set for several cooking zones,
– the shortest operating time illuminates in the display
– the corresponding cooking zone indicator light illuminates
- the 1-symbol illuminates with a set operating time for each cooking zone.
To display another operating time:
▶Press the touch button.
▶Press the slider for the required cooking zone.
- The operating time is displayed and can be changed.
4.8 Timer
The timer functions like an egg timer (1–99 minutes). It can be used at any time and independently of all other functions.
Setting the timer
▶Switch the appliance on.
▶Press the touch button 2×.
- flashes in the display.
▶Using any slider, set the required duration of the timer.
To change the duration of the timer, press and hold As soon as the operating time/timer display illuminates, the power level can be set again using the sliders. If the hob is switched off an active timer is retained.
Changing the timer
If no cooking zone is in use, first switch the appliance on.
▶Press the touch button 2×.
- The time left on the timer flashes.
The duration of the timer can be changed using any slider.
Switching the timer off before time
If no cooking zone is in use, first switch the appliance on.
- Press the touch button 2×. - Press on any slider.
- flashes in the display.
4.9 Childproof lock
The childproof lock is to prevent the appliance from being accidentally switched on.
Switching the childproof lock on
▶Switch the appliance on.
Ensure all cooking zones are switched off.
▶Press the and touch buttons at the same time.
- An acoustic signal is emitted.
▶Press the touch button again.
- An acoustic signal is emitted.
- illuminates in all the power level displays for 10 seconds.
Operating the appliance with the childproof lock activated
▶Switch the appliance on.
▶Press the and touch buttons at the same time.
- An acoustic signal is emitted.
- The childproof lock is overridden. The appliance can now be used as normal.
The childproof lock is automatically reactivated 10 minutes after the hob has been switched off.
Switching the childproof lock off
▶Switch the appliance on.
Ensure all cooking zones are switched off.
▶Press the and touch buttons at the same time.
- An acoustic signal is emitted.
▶Press the touch button again.
- A double acoustic signal is emitted.
- flashes in all the power level displays for 10 seconds.
4.10 Restore function
If the appliance has been inadvertently switched off, the settings can be restored within 6 seconds.
▶Switch the appliance on.
- The indicator light at the touch button flashes.
▶Press the touch button.
4.11 Pause cooking
With this function, the power level of all cooking zones that are switched on can be temporarily reduced to for a maximum of 10 minutes. Thereafter, the appliance can continue to be operated using the previous settings.
▶Press the touch button.
- The indicator light for the touch button illuminates.
- The power levels of the cooking zones that are switched on change to 1.
- The operating time is interrupted.
- The timer continues to run.
- All touch buttons are inactive except for Ⓓ and ⏱
If the pause cooking function is not turned off within 10 minutes, the appliance switches off completely.
▶To resume cooking, press the touch button again.
- The cooking zones resume operation using the previous settings.
4.12 Wipe protection
This function prevents inadvertently changing the power level, e.g. when wiping the control panel with a cloth.
▶Press the touch button.
- The indicator light for the touch button illuminates.
▶Wipe protection is switched off by pressing the touch button again or automatically after 30 seconds.
Press the touch button to switch the appliance off at any time.
5 User settings
The following user settings can be set and stored individually.
| User setting Setting value Factory setting | |||
| P0 | Loudness of acoustic signal | 0 No | acoustic signal |
| 1-8 A | adjustable in steps (1 = low, 8 = high) | ||
| P1 | Acoustic signal at end of operating time/timer | 0 No | acoustic signal |
| 2 Off | automatically after 1 min. | ||
| P3 | Automatic boost | 0 Automatic boost off | |
| 1 Automatic boost on | |||
| P4 | Default operating time/ timer | 0 | D e f a u l t d |
| 1-9 A | adjustable in steps from 10-90 mins. | ||
| P6 | Acoustic signal when touch button is pressed | 0 Acoustic signal off | |
| 1 Acoustic signal on | |||
| P7 | Restore factory settings | 0 | To restore factory settings:Press the touch button 2×. |
5.1 Changing user settings
- With the hob switched off, hold the ⏻ touch button depressed and touch 3 slider fields from left to right within 1 second.
- An acoustic signal is emitted each time a slider field is touched.
A double acoustic signal is emitted in the case of an erroneous entry.
- flashes alternately with in display 2.
- The current setting value for the user settings appears in display 4.

▶ Use slider 1 to select a user setting.
▶ Use slider 3 to change the setting value.

Press immediately to the left of ☐ to select the next user setting or a higher setting value.
Press to select the previous user setting or a lower setting value.
To save the entries: Hold the ⏻ touch button depressed for 2 seconds.
- An acoustic signal is emitted.
- The «User settings» mode is ended.
5.2 Cancelling user settings
▶Press the touch button.
- Any changes made to setting values are not saved.
- The «User settings mode is ended».
6 Care and maintenance

Clean the appliance when it has cooled down, as otherwise it could be a burn hazard.
6.1 Cleaning
Always clean the hob after use. This prevents food residues from burning on. Dried-on or burned-on food residue is harder to clean off.
Use of improper cleaning techniques can result in damage to the markings or surface.

Avoid cleaning the surface of the glass ceramic hob with abrasive cleaning agents, scouring pads, wire wool, etc. which can damage the surface.
▶Use only a soft cloth or sponge with water and a suitable detergent for cleaning everyday soiling. Always follow the detergent manufacturer's instructions for use. Using a detergent with a protective additive is recommended.
- Remove stubborn soiling, e.g. boiled-over milk, while still warm using a glass ceramic hob scraper.
Always follow the scraper manufacturer's instructions for use.
▶ Foods with a high sugar content, e.g. marmalade, that boil over should be removed while still hot using a glass ceramic hob scraper. The surface of the glass ceramic hob could otherwise become damaged.
- Remove melted plastic while still warm using a glass ceramic hob scraper. The surface of the glass ceramic hob could otherwise become damaged.
▶Remove limescale stains when cool with a small amount of limescale remover (e.g. vinegar, lemon juice, descaler). Then wipe clean with a damp cloth.
7 Trouble-shooting and error messages
7.1 What to do if ...
... the appliance is not working and the displays are not illuminated
| Possible cause Solution | |
| The fuse or circuit breaker for electrical installations in the home is defective. | ▶Change the fuse.▶Reset the circuit breaker. |
| The fuse or circuit breaker keeps blowing. | ▶Call Customer Services. |
| An interruption in the power supply. | ▶Check the power supply. |
... iHuminates in the displays
| Possible cause Solution | |
| • The childproof lock is activated. | ➢For operating the appliance with the child-proof lock activated, see the section on OPERATING THE APPLIANCE.➢Switch the childproof lock off. |
... a continuous acoustic signal is emitted, flashes in a display and the appliance switches off
Possible cause Solution
- A touch button or slider was touched for longer than 10 seconds.
- Object (e.g. pan, dish) on the control panel.
- Food boiled over onto the control panel.
▶Remove object or food that has boiled over.
▶The appliance can be used again as normal.
... and flash alternately in the display
Possible cause Solution
• The automatic safety shut-off was triggered.
▶Switch the cooking zone back on again if required.

If a cooking zone has been running for longer without any settings being changed, the appliance switches the cooking zone off automatically. It is switched off irrespective of the power level set.
| Power level 1 | 2 | 3 | 4 | 5 | 6 | 7 | 8 | 9 | |||
| Safety shut-off after hrs:mins | 8:30 | 6:30 | 5:30 | 4:30 | 3:30 | 3:00 | 2:30 | 2:00 | 1:30 | ||
... flashes in the display
Possible cause Solution
- The excess temperature protection of a cooking zone was triggered.
▶Allow the cooking zone to cool down.
▶Resume cooking on a different cooking zone.
▶Check the cookware.
... flashes in the display
Possible cause Solution
- An interruption in the power supply.
▶Press any touch button to cancel the error message.
▶The appliance can be used again as normal.
... or and a number illuminate in the display
Possible cause Solution
- Internal error occurred.
▶ Note down the error number.
▶Note down the serial number (FN) of the appliance. See the identification plate for this.
▶Call Customer Services.
8 N o t e s
9 l n d e x
A
Accessories Ordering 35
Additional heating element ..... 17
Appliance Switching off .... 15, 36 Switching on .... 15, 36
Appliance overview ..... 12 Automatic boost ..... 18
C
Care. 27
Childproof lock 22
Cleaning 27
Cooking zone 15,36
Cookware 14
D
Disclaimer 8
Displays 13
Disposal
Appliance disposal ..... 10
Disconnection 10
Packaging 10
Dual ring cooking zone ..... 17
E
Energy-efficient cooking. 14
Error messages 28
F
Frying zone 17
|
Identification plate ..... 11, 35 Instructions for use ..... 8
M
Maintenance 27 Model no. 2
0
Operating elements ..... 13
Operating the appliance ..... 15
Operating time.... 19
Orders 35
Outer cooking ring.... 17
P
Pause cooking. 23 Power levels Overview 16
Q
Queries.... 35 Quick instructions.... 36
R
Repair service 35
Residual heat indicator ..... 15, 16
Restore function 23
s
Safety precautions. 4
Appliance-specific. 6
General 5
Safety shut-off
Overview 29
Serial number (FN) ..... 11, 35
Service agreement 35
Service Centre. 35
Spare parts
Ordering 35
Symbols 4
T
Timer....21
Touch buttons 13
Trouble-shooting 28
Type 2
U
User settings. 25
Using for the first time. . . . . . . . . . 11
V
Validity 2
W
Wipe protection. 24
10 Repair service

The TROUBLE-SHOOTING AND ERROR MESSAGES section will help you to carry out small repairs yourself, saving you the time and trouble of calling out a service technician and the cost that goes along with it.
Whether you contact us about a malfunction or an order, please always state the serial number (FN) and the model type of your appliance. Enter these details below and also on the service sticker which comes with the appliance. Stick it in a conspicuous place or in your telephone or address book.
FN
Appliance
You will also find the same details on the certificate of guarantee, the original sales invoice and the identification plate of the appliance.
If the appliance is not working properly, contact your nearest V-ZUG Ltd Service Centre using freephone 0800 850 850 and stand in close proximity to the appliance.
Queries, orders, service agreement
For administrative and technical queries or problems, as well as for ordering spare parts and accessories, please contact our head office in Zug on telephone number +41 (0)41 767 67 67.
As regards the maintenance of all our products, when the warranty expires you have the option of taking out a service agreement. We will be happy to send you the necessary forms.
Quick instructions
Please first read the safety precautions in the operating instructions!
To switch appliance on
▶Hold the touch button depressed for about 1 second.
To select cooking zone
▶Press the slider for the required cooking zone or slide your finger along it to set the power level.
To switch cooking zone off
▶Press on the slider.
To switch appliance off
▶Press the touch button.

- Induction with multi-slider
- Operating instructions
- Please follow the safety precautions.
- Modifications
- Validity
- Contents
- Safety precautions 4
- Using for the first time 11
- Your appliance 12
- Operating the appliance 15
- User settings 25
- Care and maintenance 27
- Trouble-shooting and error messages 28
- Safety precautions
- Symbols used
- General safety precautions
- Appliance-specific safety precautions
- Disclaimer
- Instructions for use
- Disposal
- Packaging
- Disconnection
- Appliance disposal
- Using for the first time
- Where is the identification plate?
- Your appliance
- Appliance overview
- GK45TEAS, GK45TEASC, GK45TEASF, GK45TEASU
- GK45TEPS, GK45TEPSC, GK45TEPSF
- Operating and display elements
- Touch buttons
- Displays
- Cookware
- Suitable cookware
- Energy-efficient cooking
- Operating the appliance
- Switching the appliance on and off
- Selecting a cooking zone
- Overview of power levels
- Switching a cooking zone off
- Residual heat indicator
- Switching the dual ring cooking/frying zone on and off
- Switching the outer cooking ring/additional heating element on
- Switching the outer cooking ring/additional heating element off
- Automatic boost
- Do not leave the hob unattended while using the automatic boost. Risk of boiling over, burning on and igniting!
- Switching the automatic boost on
- Switching the automatic boost off before time
- Operating time
- Do not leave the hob unattended during use. Risk of boiling over, burning on and igniting!
- Setting the operating time
- Changing the operating time
- Switching the operating time function off before time
- End of the operating time
- Several operating times
- Timer
- Setting the timer
- Changing the timer
- Switching the timer off before time
- Childproof lock
- Switching the childproof lock on
- Operating the appliance with the childproof lock activated
- Switching the childproof lock off
- Restore function
- Pause cooking
- Wipe protection
- User settings
- Changing user settings
- Cancelling user settings
- Care and maintenance
- Cleaning
- Trouble-shooting and error messages
- What to do if ...
- ... a continuous acoustic signal is emitted, flashes in a display and the appliance switches off
- Possible cause Solution
- ... and flash alternately in the display
- ... flashes in the display
- ... or and a number illuminate in the display
- N o t e s
- l n d e x
- A
- C
- D
- E
- F
- |
- M
- 0
- P
- Q
- R
- s
- T
- U
- V
- W
- Repair service
- Queries, orders, service agreement
- Quick instructions
- To switch appliance on
- To select cooking zone
- To switch cooking zone off
- To switch appliance off
Brand : V-ZUG
Model : GK45TEPS
Category : Oven