
TelePAD 730 - Tablet XORO - Free user manual and instructions
Find the device manual for free TelePAD 730 XORO in PDF.


| Product Type | Tablet |
| Brand | Xoro |
| Model | TelePAD 730 |
| Display Size | 7 inches |
| Resolution | 1024 x 600 pixels |
| Processor | Quad-core 1.3 GHz |
| RAM | 1 GB |
| Internal Storage | 16 GB |
| Expandable Storage | MicroSD up to 32 GB |
| Operating System | Android 4.4 KitKat |
| Battery Capacity | 3000 mAh |
| Dimensions (W x H x D) | 191 x 109 x 10 mm |
| Weight | 320 g |
| Power Supply | 5V DC, 2A via Micro USB |
| Camera (Rear) | 2 MP |
| Camera (Front) | 0.3 MP |
| Connectivity | Wi-Fi 802.11 b/g/n, Bluetooth 4.0 |
| Sensors | G-Sensor |
| Audio | 3.5mm headphone jack, built-in speaker |
| Care and Cleaning | Wipe with a soft, dry cloth; avoid liquids |
| Safety | Do not expose to moisture or extreme temperatures; use only supplied charger |
| Spare Parts and Repairability | Battery and screen replaceable by qualified service center |
| General Information | User manual available in PDF; supports multiple languages |
Frequently Asked Questions - TelePAD 730 XORO
User questions about TelePAD 730 XORO
0 question about this device. Answer the ones you know or ask your own.
Ask a new question about this device
Download the instructions for your Tablet in PDF format for free! Find your manual TelePAD 730 - XORO and take your electronic device back in hand. On this page are published all the documents necessary for the use of your device. TelePAD 730 by XORO.
USER MANUAL TelePAD 730 XORO
FREE TO CHOOSE INNOVATIONS
XORO®
TelePAD 730
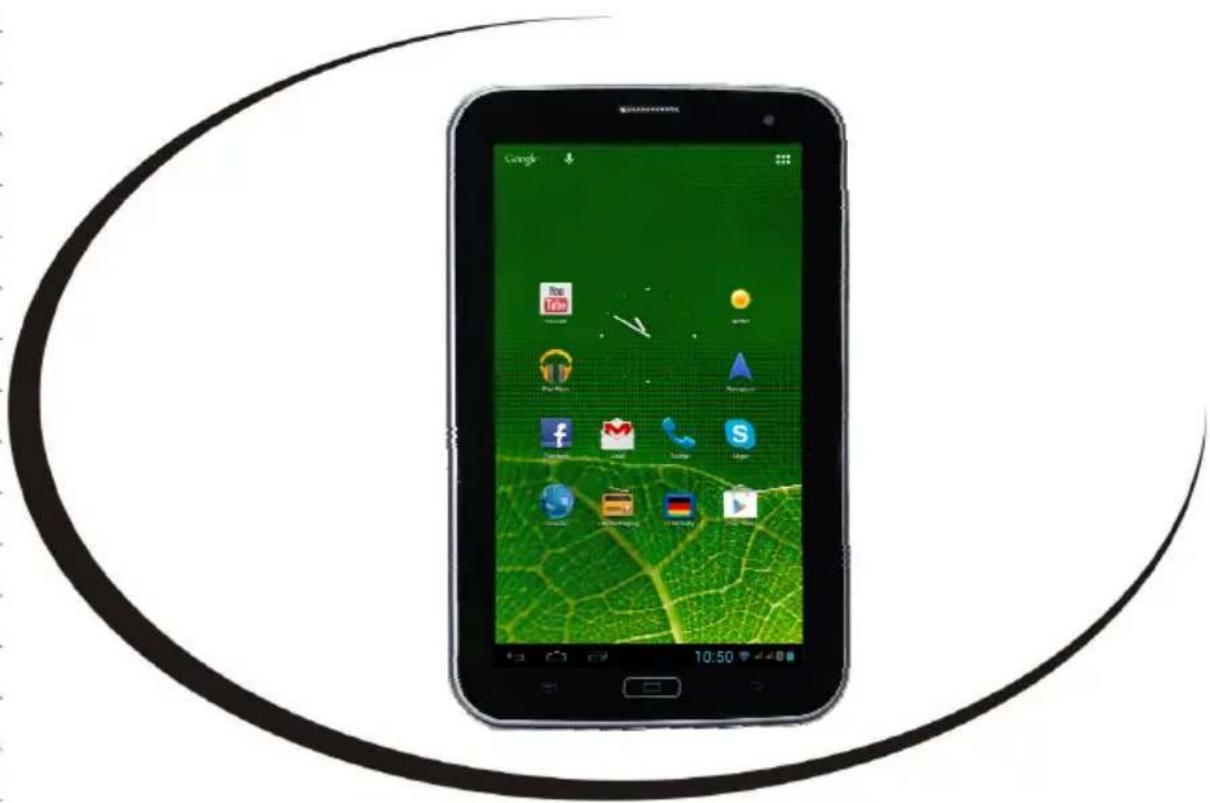
natural_image
Black-and-white photo of a smartphone displaying its green home screen with app icons, set against a curved black border (no readable text or symbols)Compatibility of Card Reader 7
Recycling 7
Accessories 8
Using this Guide 9
Specification 10
Know your device 11
Anniouncements 12
Quick Guides
Keys Function 13
Startup and Shutdown 13
Open and Close of the Screen 13
Rear Side 14
Usage of Touch Screen.... 14
Home Page 15
Application Procedures 18
USB Connection 18
Typing words 19
Basic Setting
Operation Technique 20
Wireless and Internet 20
Network Notice 22
Bluetooth 22
Data Usage 25
More 26
Mobile Networks 28
Network Operator 30
Contextual Model 30
Display 33
Storage 36
Battery 37
Application program 38
Account and Sync 39
Location service 41
Location and Google search 42
Safety setting 43
Language and input method.... 45
Backup and reset 47
Date and Time 47
Assistance Function 48
Multi Media
Music 50
Video 51
Photo Gallery 51
Camera 52
FM Radio 53
Communication Function
Phone 54
Text Message 55
Contact List.... 55
Internet
Browser 56
Email 56
GPS Function
GPS Navigation 58
Other Application Procedures
Clock 59
Calculator 60
File manager....60
Record 63
FAQ 63
Limited Warranty 65
Operate Safely:
- Make sure to charge the battery to full for first time usage.
- Please do not use Tablet PC while charging. Disconnect the charger before use.
- Do not use the Device if the screen is cracked or broken. Cracked and / or broken screens could cause injury.
To reduce the risk of motion injuries:
- While using your TELEPAD730, hold it with a relaxed grip and hold with two hands.
- Do not handle the TELEPAD730 with wet hands.
- Use hands-free accessories.
- Switch off the TELEPAD730 before cleaning it.
- Keep your TELEPAD730 and all accessories out of reach of small children and animals.
Careful handling:
Avoid potential damage to your TELEPAD730 as under:
- Keep away from liquids.
- Avoid using and / or storing in dusty and / or dirty places / environments.
- Do not drop, knock, throw or otherwise handle the TELEPAD730 roughly.
- Avoid exposing your TELEPAD730 to extreme temperatures. Extreme temperatures reduce the charging capacity and life of batteries and TELEPAD730.
- Never use damaged chargers. Use only approved chargers.
- Do not use chemicals or other cleaning solutions to clean the TELEPAD730.
- Use Fiber cloth which is provided with TELEPAD730.
Turn Off In Restricted Areas:
Use of TELEPAD730 in certain areas / places / conditions can be hazardous.
Switch off your TELEPAD730:
- Inside aircrafts;
- Areas where chemicals are used and / or stored;
• In and around areas having electrical / electronic equipments; - Areas where any kind of blasting activity is being carried out.
Drive Safety:
Avoid using your TELEPAD730 while driving and respect and obey all regulations that restrict the use of devices while Driving. Primary consideration while driving should be safety.
Power Supply
- Never touch the plug with wet hands.
- If you want to pull the plug out of the plug socket, always pull directly on the plug. Never pull on the cable as it could tear.
- Make sure that the power cable is not bent, caught or run over and that it does not come into contact with heat sources.
- Make sure that the power cable is not wound around the device while in operation.
- Never place the machine on the power cable while it is being operated.
- Only use extension cables that are designed for the power consumption level of the machine.
- Keep the appliance away from rain and any moisture.
- Only operate the machine if the electrical voltage stated on the type plate beneath the machine agrees with the voltage on your plug socket. The wrong voltage can destroy the machine.
- Do not stand vases etc. on the appliance.
- Water could seep into the appliance.
- Do not open the appliance.
- Pull out the mains plug if the appliance is not to be used over a longer period of time.
- Take care that nobody can trip over the power supply cable.
Operation and Position
- Do not connect accessories on the device which are not defined by the manufacture.
- Do not place this product on an unstable cart, stand, tripod, bracket, or table. The product may fall, causing serious injury to a child or adult, and serious damage to the product. Use only with a cart, stand, tripod, bracket, or table recommended by the manufacturer, or sold with the product.
- Any mounting of the product should follow the manufacturer's instructions, and should use a mounting accessory recommended by the manufacturer.
- A product and cart combination should be moved with care. Quick stops, excessive force, and uneven surfaces may cause the product and cart combination to overturn.
- Do not increase the volume when the device is just playing very quiet sections. This cold damage the speaker if very loud passages starts all of a sudden after the quiet section.
- Switch the device off by the Off/On switch if it is not going to used for a longer period of time.
- Disconnect the main plug during thunderstorms.
- Slots and openings in the cabinet are provided for ventilation and to ensure reliable operation of the product and to protect it from overheating, and these openings must not be blocked or covered.
-
The openings should never be blocked by placing the product on a bed, sofa, rug, or other similar surface.
-
This product should not be placed in a built-in installation such as a bookcase or rack unless proper ventilation is provided or the manufacturer's instructions have been adhered to.
- Protect the device against weather influences, moistures and high temperature.
- Never spill liquid of any kind on the product.
- Do not expose the device and the remote control to direct sunlight.
- If an outside antenna or cable system is connected to the product, be sure the antenna or cable system is grounded so as to provide some protection against voltage surges and built-up static charges.
Compatibility of the integrated Card Reader
SDHC cards are supported up to 32 GB. Unfortunately, there are a variety of different SDHC cards and not all can be supported.
Recycling of electronic devices
This product is designed and manufactured with high quality materials and components which can be recycled and reused.
This symbol means that electrical and electronic equipment, at their end-of-life, should be disposed of separately from your household waste.

Please, dispose of this equipment at your local community waste collection/recycling centre. In the European Union there are separate collection systems for used electrical and electronic product. Please, help us to conserve the environment we live in!
Recycling of paper and carton
The material recycling symbol on the carton and user manual denotes that they are recyclable. Dispose them not with the normal household waste.

Recycling of plastic parts
The material recycling symbol on the plastic parts denotes that they are recyclable. Do not dispose them in household waste.

Green Dot
The “Grüne Punkt” denotes that the MAS Elektronik AG pays a duty to the “Society for Waste Prevention and Secondary Resource Generation”.

Defect
- Servicing - Do not attempt to service this product yourself as opening or removing covers may expose you to dangerous voltage or other hazards. Refer all servicing to qualified service personnel.
- Damage Requiring Service - Unplug this product from the wall outlet and refer servicing to qualified service personnel under the following conditions:
a. When the power-supply cord or plug is damaged.
b. If liquid has been spilled, or objects have fallen into the product.
c. If the product has been exposed to rain or water.
d. If the product does not operate normally by following the operating instructions. Adjust only those controls that are covered by the operating instructions as an improper adjustment of other controls may result in damage and will often require extensive work by a qualified technician to restore the product to its normal operation.
e. If the product has been dropped or damaged in any way, and
- When the product exhibits a distinct change in performance this indicates a need for service.
- When replacement parts are required, be sure the service technician has used replacement parts specified by the manufacturer or have the same characteristics as the original part. Unauthorized substitutions may result in fire, electric shock, or other hazards.
- Please read in the section Troubleshooting our service address and phone number.
- Nicotine can be destroyed the electronically components and can pollute the LCD TFT panel.
Accessories
Following accessories should be in the box:
• Xoro TelePAD 730
- Power Supply
- USB cable
- Manual
If any of the accessories are missing, then contact your dealer as soon as possible. Keep all the original packaging in case you need to return the set to the dealer.
This guide has been specially designed to guide you through the basics of your device, such as getting started with the device. Please read this guide carefully before using your device to ensure safe and correct use.
The descriptions in this guide are based on the default settings of your device.
Please keep this guide for future reference.
Pixel error
The terms defined in the specifications of defective pixels (bright and dark pixels, line defects and differences in brightness) describe the maximum allowed amount and type of defects, which are excluded from the guarantee.
Congratulations on your purchase of the Xoro TelePAD730. . It is 7" high definition tablet PC. Its CPU is MT8377, which apply 2*Cortex-A9, dominant frequency is 1GHz, it is based on Android 4.1 operation system, and easy to expand the third application procedure.
The product is designed with various functions, including 2 G, 3G, WIFI, BT, GPS, FM, voice call and so on. It is easy to achieve wireless communication and internet, you have access to surf the internet anytime and anywhere; it is also built with high accuracy GPS module, so that it can be used for navigating through installing map software. There are many sensors which offer you brand-new operation and entertainment; besides, it has mobile analog TV, camera shooting, which leads electronic consumption to enter into a fresh palm internet entertainment time.
The manual systemically introduces the functions, use techniques and announcements, please read this manual carefully before your operation.
Specification
| Screen 7" high definition, Resolution 1024X 600 (16:9)5 points multitouch capative panel | |
| CPU | Dual Core ARMv7 up to 1.0GHz.With PowerVR SGX531 Graphic, Open GL ES 2.0 |
| RAM DDRIII 1GB | |
| Storage Nand Flash : 8GB ( available 6GB ) | |
| System Android 4.1 | |
| Network | Wi-Fi: Built-in Wi-Fi Module. IEEE 802.11b/g/n.2G / 3G, (WCDMA:2100 ), GPS |
| Applications APK format applications | |
| Camera | Rear 2.0 MP Auto Focus/ Front 0,3 MP |
| Video | RM, RMVB, AVI, MOV, WMV, MP4, 3GP, TS, MKV, MPEG, etc.All videos support HD 1080P |
| Music | MP3, WMA, WAV, APE, FLAC, AAC, OGG, etc. |
| Pictures | JPG, BMP, PNG ,GIF etc. |
| EBooks'Email POP3/SMTP/IMAP4 | Support TXT、LRC、PDF、Html、Htm、EPUB |
| Office Files Supported files: Word, Excel, PDF, etc. | |
| Micro USB port | Micro USB 2.0 OTG port. |
| Battery | Built-in Lithium Battery: 3100mAh |
Rear Side
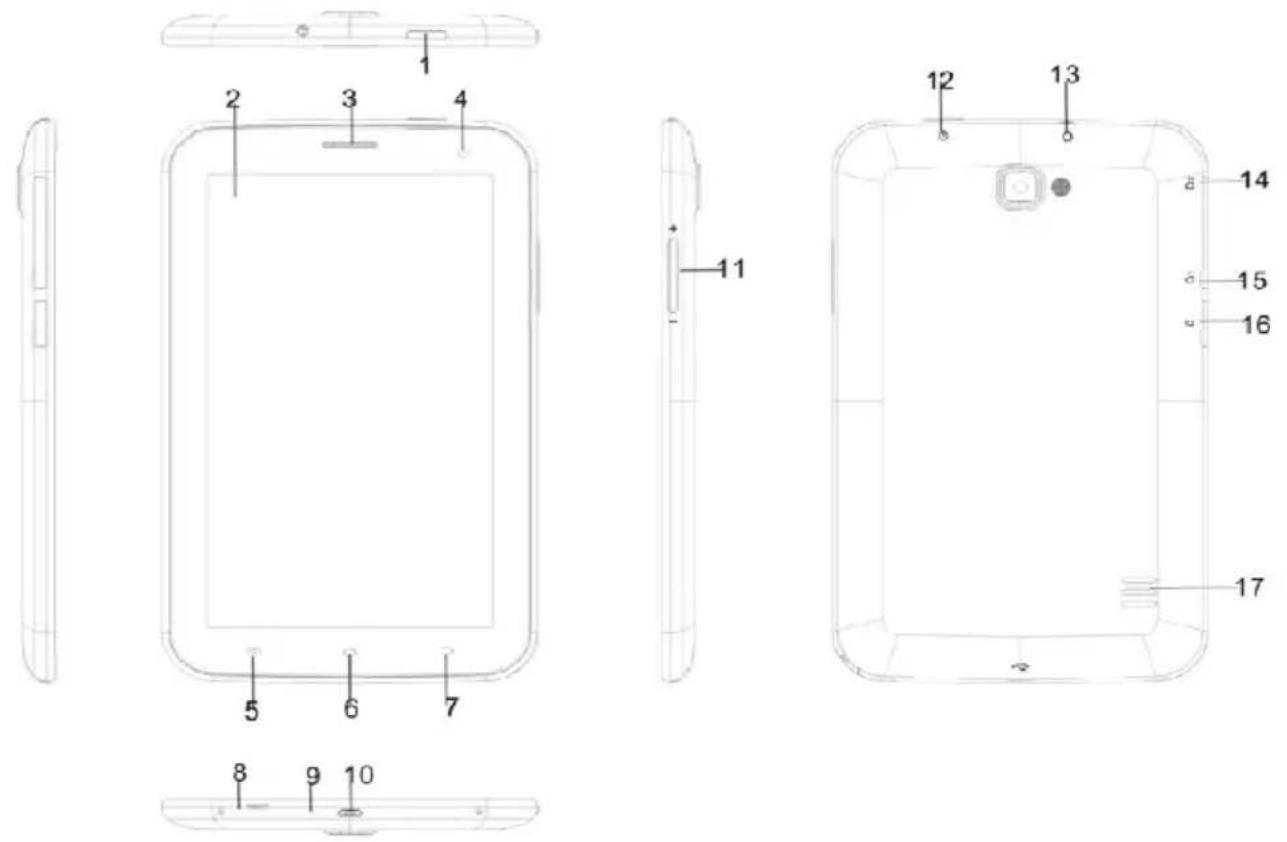
- 1 & 12. Power Switch
- Display
- telephone receiver
- Front camera
- Menu button
- Return to the main interface
- Return to the previous interface
- Reset
- Mic
- USB interface
- Volume adjust
- Earphone Jack
- SIM card slot 1
- SIM card slot 2
- Micro SD card slot
-
Loudspeaker
-
Please keep the device away from moist and dust.
- Do not put the device in high-temperature environment, especially closed car in hot weather.
- Do not drop or strike the device.
- Do not shake the device violently, especially the LCD Screen part.
- Please choose proper volume when using the earphone which will be good for your ear.
- Please charge the device when
• The power icon shows lowest power.
- The device is turned off automatically, and when you turn on it, it is turned off automatically again.
- No response when operating the buttons.
Attention: Please use the charger offered by manufacturer to charge, other charges may cause damage to the device.
Input: 100-240V \~ 50/60 Hz
Output: 5V dc 2000 mA
- Do not disconnect the device from PC when downloading, uploading or formatting, or it will cause programming errors of the device.
- Do not dismounting the device privately without professional guidance.
- Do not use alcohol, thinner or benzene-chemical to clean the surface of the device.
-
Do not use the device in forbidden place, like airplane.
-
Please back-up your files in device's memory always. The manufacturer is not responsible for the clear of files after damage or repair of the device.
-
The manufacture reserves all right of device's technology and design, and will have no obligation to inform the user if there are new versions or designs been developed. The device is NOT water-proof; please keep it away from water. The turn on time of this device is about 20 seconds; please don't operate the device when it is turned on in 20 seconds Long Press: Press the item for more than 1--2 seconds
Keys Function
Keys Function Description :
| Power button | Short press to sleep/wake up, long press to startup and shutdown. |
| Volume + (up) | increase the volume |
| Volume - (down) | decrease the volume |
 HOME button (home) HOME button (home) | Click it in any interface will return to main inter-face. |
 Back button (back) Back button (back) | click it in any interface will return to previous menu |
 Menu button Menu button | This button will display in menu interface. |
display recently-used application | display recently browsed history |
Startup and Shutdown
Startup
Long press POWER key for three seconds, you can enter into startup picture. The system enters into screen lock status, please unlock it.
Shutdown
- Long press POWER, it will popup shutdown window.
- Shutdown window contains mute mode, airplane mode and shutdown three options/
- Click Shutdown is the last step.
Open and Close of the Screen
Screen will be closed on its own when no operation happens.
- Screen will be closed on its own if no operation happens for some time to save battery power
- When screen is open, press POWER key, the screen will be closed immediately.
Rear Side
Open the screen when it is closed.
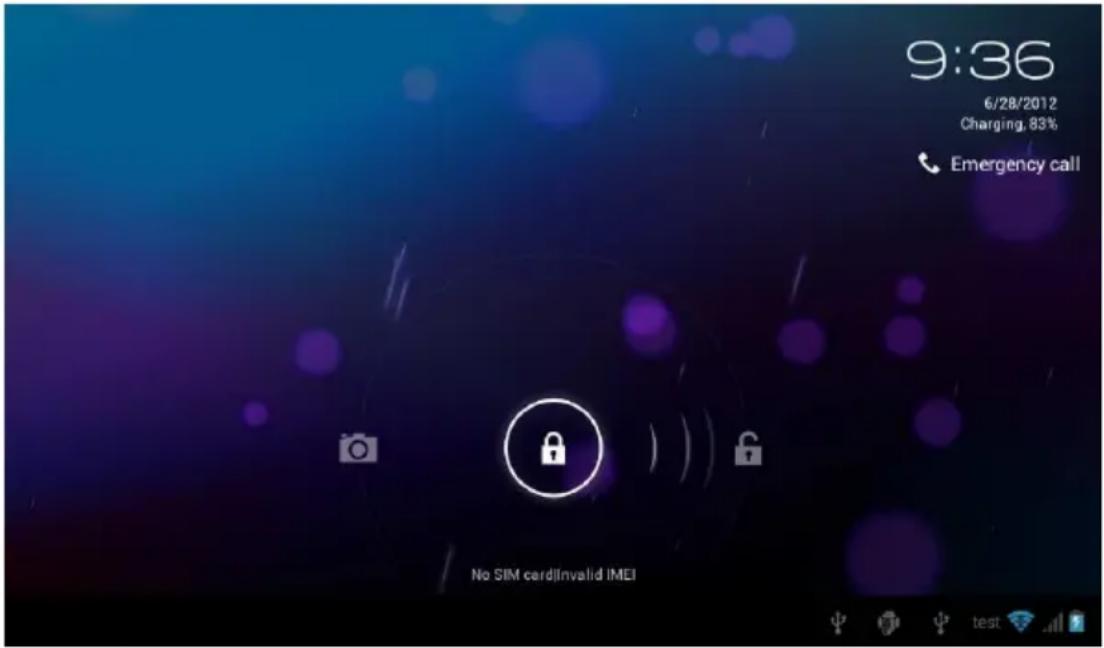
If the screen is closed, short press POWER to open the screen. The screen will be locked open it, it will show the picture as below picture 3.1, left slide to unlock and enter into camera, right slide the unlock icon to unlock the screen.
Usage of Touch Screen
TELEPAD730 operating methods
There are below methods to view the main screen, menu and application procedure in your TELEPAD730.
Click
When you want to use the screen keyboard typing or choose application in the main interface, you only need to touch it by your finger.
Press on
If you want to open some item(textbox or the link in the webpage), or shortcut and main procedure move, you can press on this item.
Quickly slide or slide
Quickly slide or slide indicates make quick vertical or horizontal movement by finger.
Pull
Before you pull, you need to hold the it with strength until you pull it into the position you want.
Rotate
For most pictures, you only need to rotate the TELEPAD730 sidewise to change the screen direction from horizontal to vertical. For instance, when you are typing wods, and watching movies.
| Icon Function instruction Icon Function instruction | |||
 | Back to Desktop |  | Note when the system finds new devices. |
 | Show current power status | Set the alert time | |
 | The current system time |  | Reduce the volume |
 low back low back |  | Louder the volume | |
 | Operation key |  | Menu for Function Block. |
 | Apps (programs) from the Android Market to download |  | Adjust screen brightness |
 | System clock |  | WIFI on/off |
 | New mail |  | USB Connection |
 | Status Bar | ||
Home Page
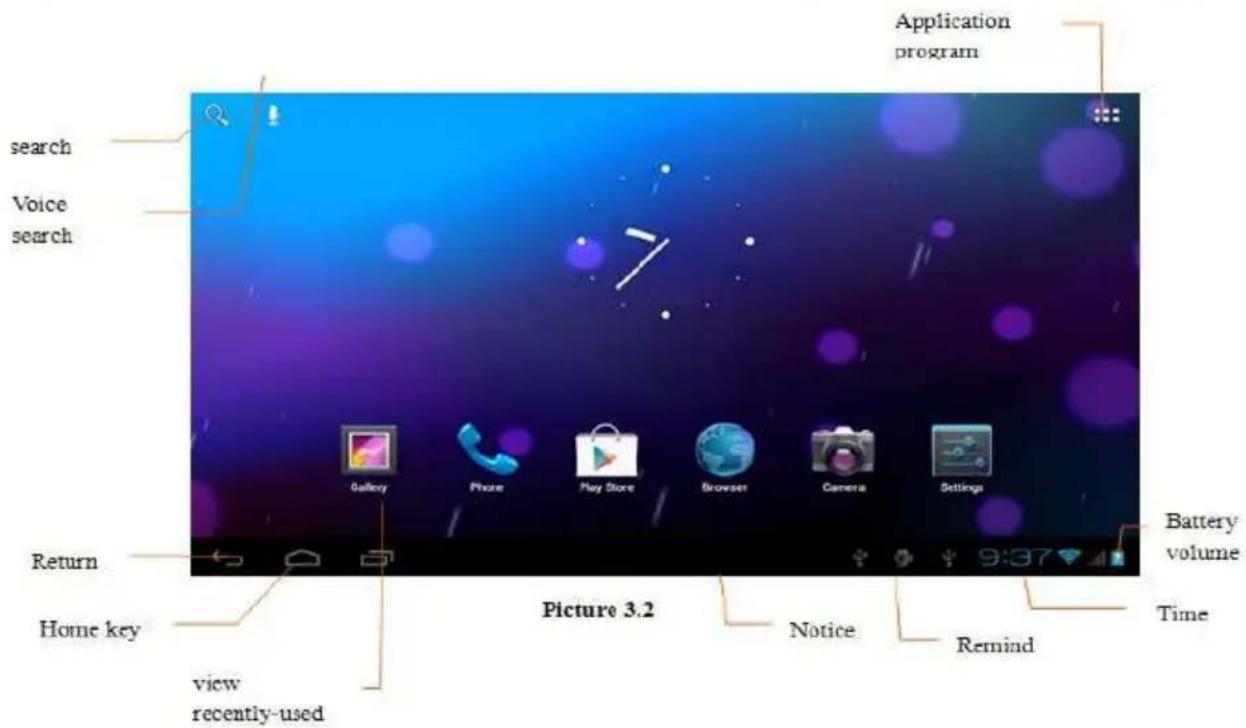
Main interface as below picture 3.2, long press the blank and it will popup windows to set wallpaper, folder, widgets, and shortcut.
The extended home page
The home page can be extended beyond the wideness of screen to provide more space, which you can put new-added shortcuts and widgets. Click the blank space in home page then slide right or left to extend to the right or left of the screen. In the home page, there are two extended pictures,

Shortcut icon management
Create folder icon in desktop
- Drag the icons need to be put together on one icon(can also overlay several icons) as following
Picture

2.
Then click the overlayed icons, the applications can be folded, as following Picture .Click the unnamed folder in the black box, it will popup the hidden keyboard, the folder name can be renamed (this is similar with Apple IOS system), the icons position can be changed through long press.
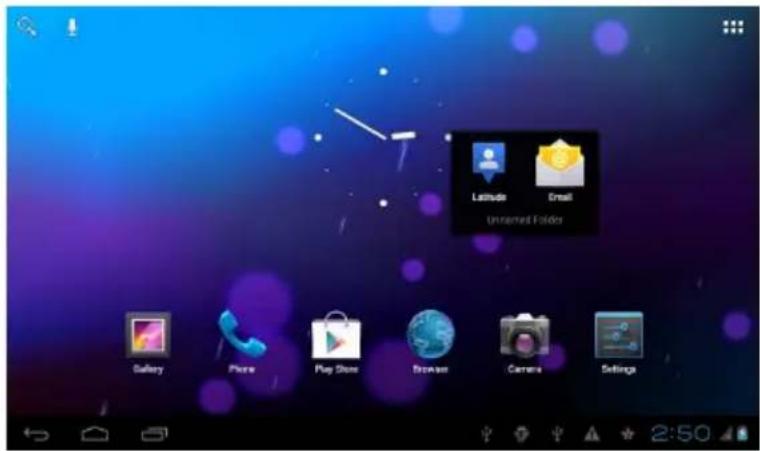
Remove the icons in desktop
- Long press the icons need to be remove, then on the right above of the screen, it will appear

icons.
- Drag the icon to the above of the remove icon, till the icon become red, then move your finger to delete the icon.
Change the wallpaper of desktop
- In home page, long press any blank space in main screen, it will popup a window to change the wallpaper.
- Click the gallery or wallpaper gallery to select the wallpaper.
Voice search

- Touch microphone icon .
- Choose in the Google selection according to your own need.
- Set the langhage you need in voice search window, and click confirm
- Speak to the micro you need to search, the browser will open the search result list.
Note: before voice searching, please make sure your internet is well connected.
Visit Application Procedures

Click button in the right top of Picture 3.2, enter into main interface as following Picture, choose the application procedure you want to visit.

USB Connection
TelePAD370 storage configuration
Before transmitting documents, you have to conduct storage configuration for your TelePAD370:
- Connect the TelePAD370 and computer by USB cable, the reminder column will show the remind information.
- Open the reminder board; please view the TelePAD370 status and reminder to learn how to open the board.
- In the reminder board, click the "USB Connected", it will as below then click "open USB storage configuration".
- Now the USB is connected successfully.
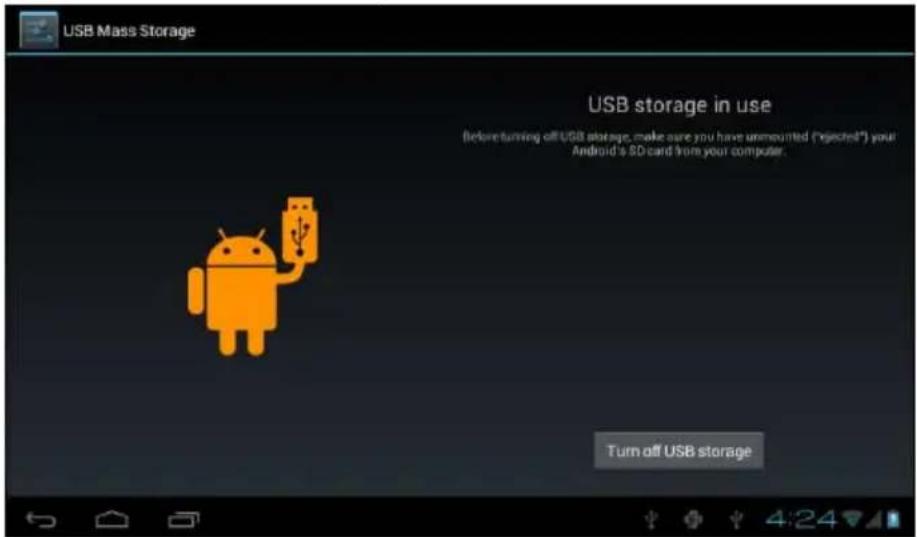
Copy the document into memory card
Connect the TELEPAD730 to computer with USB cable.
As TELEPAD730 storage configuration, it is connected with computer successfully.
Open the "My computer" in your computer, check the items in "removable disc".
Copy the documents you need into "removable disc".
After copying finishes, click "shutdown the USB storage configuration" to uninstall.
Notice: When the TELEPAD730 is connected with USB cable, and you open the USB storage configuration, you can't view the memory card through the TELEPAD730. Only after you detach the USB cable, you can view the memory card in the TELEPAD730.
Typing words
Use the screen keyboard
When you start the procedure or choose the words or numbers edition, it will show the screen keyboard. The keyboard contains Android keyboard.
Choose the typing method you want
- Click Setting procedure application.
- Click Language and Keyboard.
- In the text setting area will reveal all the installed words-typing methods in your TelePAD730.
- Tick the typing method you want.
Use and switch of input method

| 1 | switch the capital and small letter |
| 2 | switch the mode of words input |
| 3 | click to insert the space |
| 4 | click input to execute |
| 5 | delete the character in the left of cursor, click and hold to delete all the characters in the left og the cursor. |
Operation Technique
Enter widgets interface
In the application interface, click widgets on the above of screen, or slide the screen, it will switch into widgets interface. Long press any widget to create its shortcut, then you can enter into the application through the shortcut icon.
Create application shortcut icons in the desktop
In the application interface or widgets interface, long press any icon to switch into desktop automatically, drag and hold the icon, you can move to any position in the desktop.
Remind: If the target position has no space, the widget won't be added in the main screen.
Wireless and Internet
1. Connect Wi-Fi
- In the main menu or interface, choose setting application procedure.
- Click WLAN, open wifi, TELEPAD730 will automatically search the available Wifi wireless internet. As Picture 4.1
- Choose the Wi-Fi internet you want to connect, if it has password, it will popup the password window, enter password, click connect.
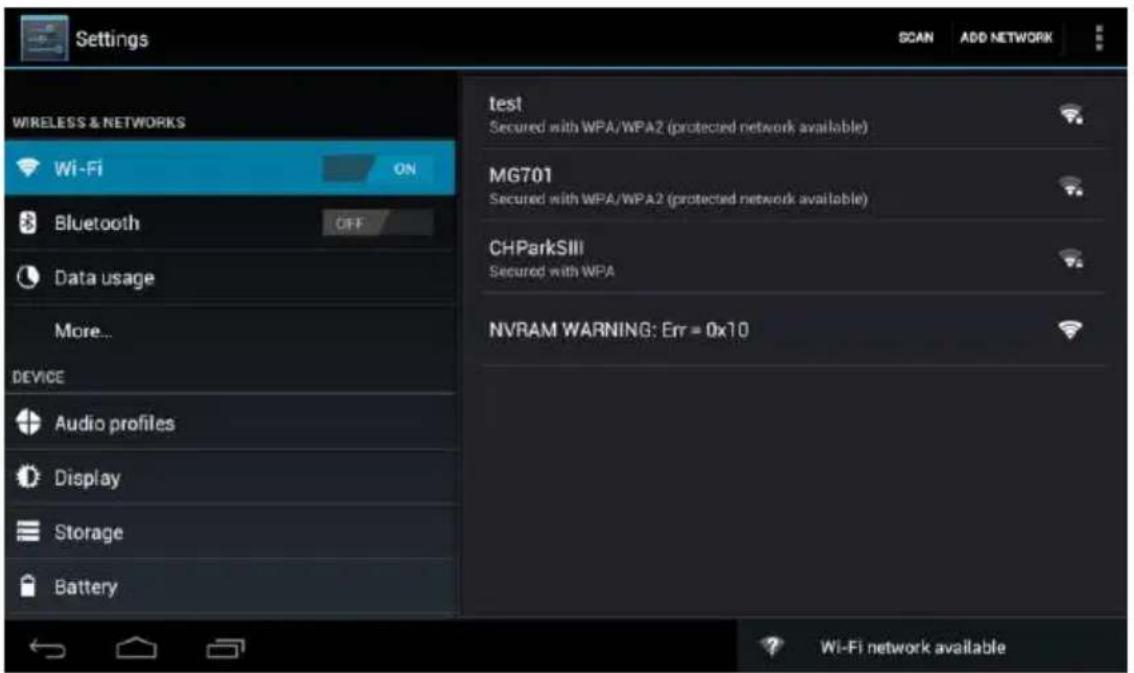
Picture 4.1
Add Network
Click ADD NETWORK icon in right top, as Picture 4.2

- Input network SSID, the wireless network name, click save.
- Click user name already saved, click connect to use network, as Picture 4.3
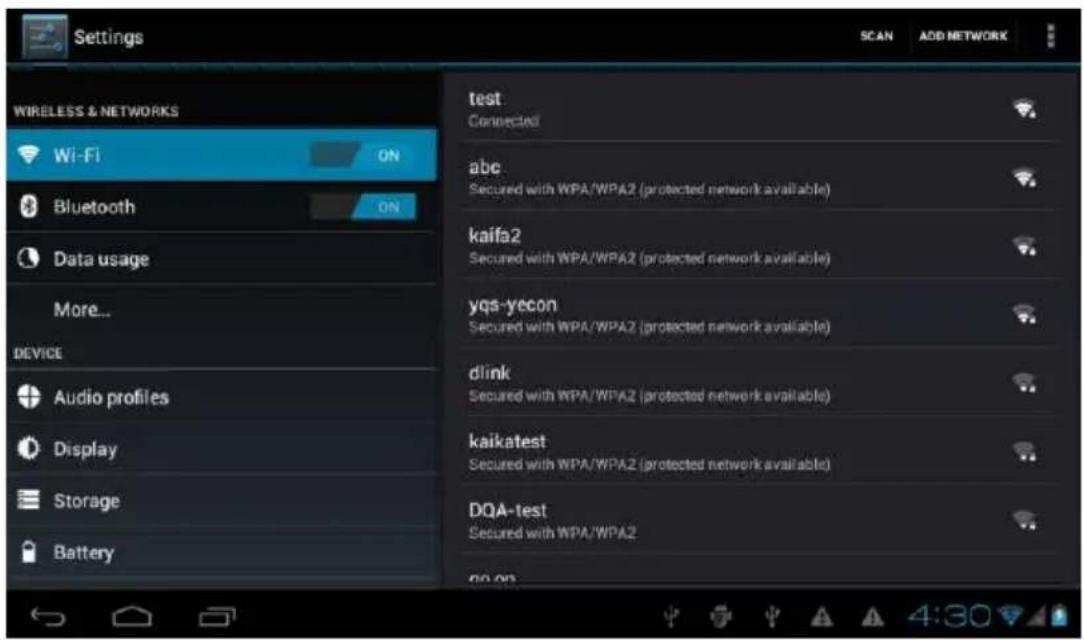
Picture 4.3
Network Notice
If you open Network Notice, when WIFI signal appears, the right bottom will remind you available WLAN network, as Picture 4.1
Keep WI-FI on during sleep..

-
Click icon in right top of Picture 4.3, select advanced.
-
Click Keep WI-FI on during sleep, as Picture 4.4

Picture 4.4
Bluetooth
Bluetooth function operation
- Click setting application in main menu interface
- Click bluetooth and open it.
- If somebody open bluetooth in your surroundings, click search device in right above, then TELEPAD730 will automatically search the bluetooth device nearby. As picture 4.5
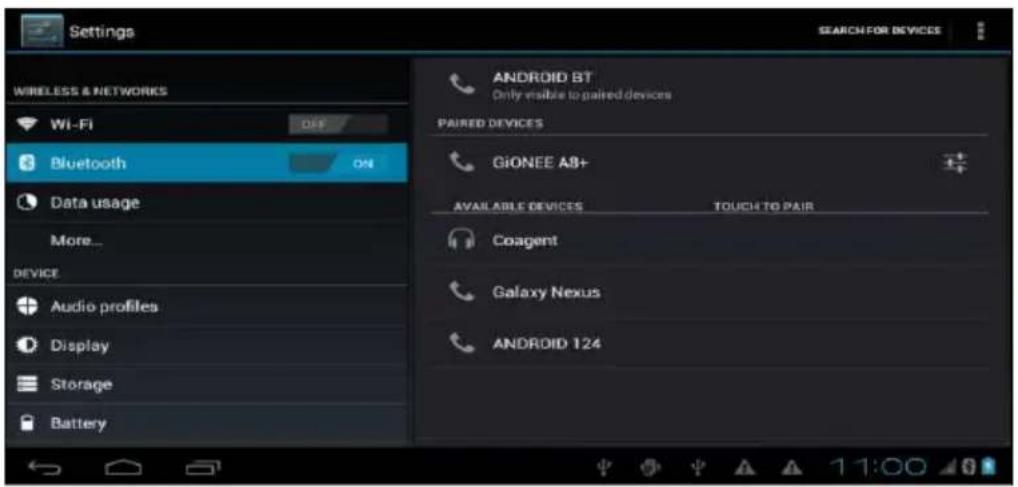
4 4 Click search to get Bluetooth device, it will popup match request window, enter into correct password, and your friend allows your request. It will match successfully.

5 5. After match successfully, find the device name you want to operate, click icon, enter into interface, as Picture 4.5, you can operate as below:

Bluetooth Setting
1 Rename tablet

Click Icon In right top of Picture 4.5, as Picture 4.7, select rename tablet, you can rename it as you want
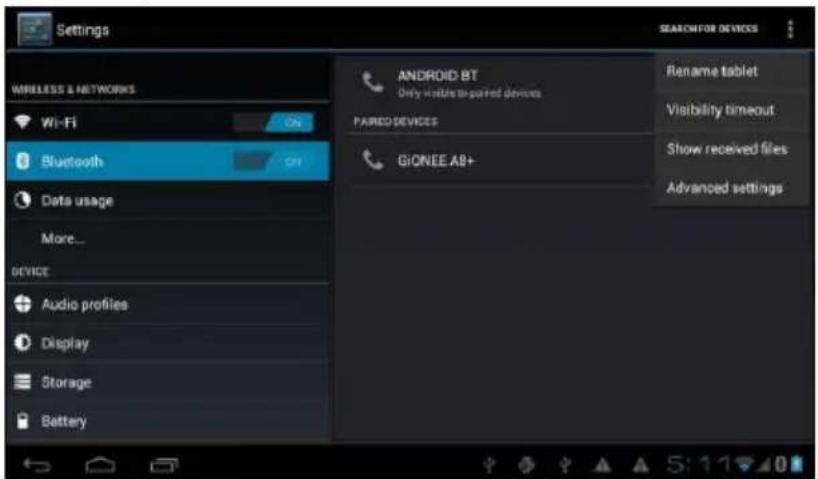
Picture 4.7
2 Check visibility timeout
Select visibility timeout setting in Picture 4.7, choose the time you want to set, as Picture 4.8 (Note: check overtime setting is the time setting when Bluetooth is checked)

3 Display the file you received
Choose display the file you received in Picture 4.7, you can view download and upload files.
4 Bluetooth advanced setting
Choose Bluetooth advanced setting in Picture 4.7, enter into Picture 4.9

- File transmission,
Open file transmission service, Connect Bluetooth FTP and customer device to visit and operate the file.
- Bluetooth distance induction device
Open Bluetooth distance induction device, when two Bluetooth devices distance is quite far or connection is cut off, the Bluetooth will remind you with sound
Data Usage
Check SIM card data usage, as Picture 4.10

Check WIFI data usage
Click

icon in right top of Picture 4.4, click Data Usage, as Picture 4.11

More
Airplane Mode
Airplane Mode can turn off WIFI and GSM card function quickly, when airplane mode is turned on, WIFI and GSM will can't get any signal, then airplane mode is turned off, WIFI and GSM module will recover to previous state.
VPN
Open VPN, click add VPN network, as Picture 4.12. Input name and server address, then save.

Click VPN, as Picture 4.13, input VPN user name and password, click connect.

.Network sharing and portable hotspots
Portable WI-FI hotspots
- Click setting application in main menu.
- Click more when wifi is well connected, open network share and portable hotspot


- Click keep WI-FI hotspots on, choose open time.
- Return to previous menu, open portable WLAN hotspots, click configure WI-FI hotspots.

- Set passwords you want to, password should be more than 8 numbers.
Mobile Networks
- Data usage When open data usage, you can visit 2G/3G through SIM card.
- Data roam When open data roam, you can surf internet through SIM card. Network mode Choose 2G or 3G band.( GSM is 2G network, WCDMA is 3G network.) As Picture 4.17
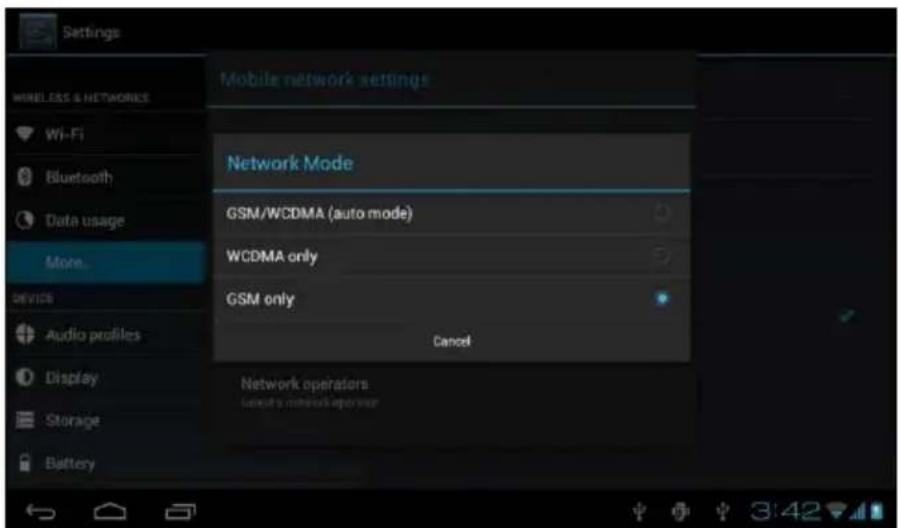
Picture 4.17
4. Access Point Name(APN)
Click mobile network, as Picture 4.18

Picture 4.18'
Choose access points name (APN)
Choose connect type, as Picture 4.19

Picture 4.19
Remark: (CMWAP transmitters data through GPRS, the webpage it visit belongs to wap webpage, and CMNET support www browse mobile phone network, it can also log in webpage in computer. And the charges are also different.)
Network Operator
Click network operator, system will search available GSM and WCDMA network, as Picture 4.20

GPRS data prior mode
After Open GPRS data prior mode, systems will priority choose your network
Contextual Model
- pen settings, click contextual model, as Picture 4.21,

Network Operator
2. Click standard to enter into Picture 4.22

Picture 4.22
- Vibrate
In picture 4.22, click vibrate, MID will vibrate when someone calls you.
- Volume
In picture 4.22, click volume, you can set ringtone, notice, and alarm volume, as Picture 4.23
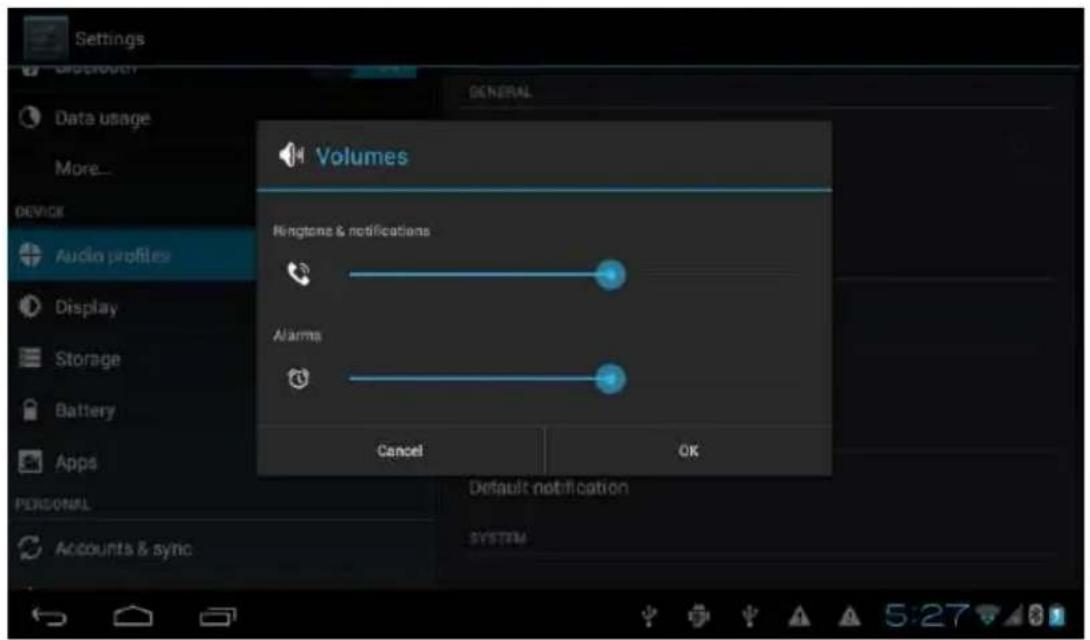
Picture 4.23
- Voice call Ringtone
In picture 4.22, click voice call ringtone to choose voice call ringtone, as Picture 4.24
4. Video call ringtone
In picture 4.22, click video call ringtone to chose video call ringtone, as Picture 4.25

Picture 4.25
(Note: Except standard, silent, meet, outdoor are only for selection, they can't be set.)
Display
Adjust the screen brightness
- Click Setting application procedure.
- Click display, choose brightness,
- Drag the portlito to adjust the brightness volume. As Picture 4.26

Picture 4.26
- Click OK after brightness is adjusted.
Scenes
- Click setting application.
- Click display, then click scenes.
- System will appear many different scenes for your selection, as Picture 4.27

natural_image
Smartphone home screen displaying a landscape with sky, distant hills, and UI icons (no readable text or symbols)Picture 4.27
Display
Wallpapers
- Click setting application.
- Click display, click wallpaper.
- You can choose different wallpapers as you like—live wallpapers---gallery(user defined)---wallpapers (system defect)---video wallpaper, as Picture 4.28

Picture 4.28
Theme
- Click setting application
- Click display, click theme, you can choose four styles, as following Picture

Auto rotation
System is defaulted as open auto rotation, when it is turned off, system won't rotate MID screen by G-sensor
Sleep
- Click setting application.
- Click display.
- Click sleep.
- Set the sleep time as you want, as Picture 4.30

Font size
Click font size to adjust the font size

Storage
Open setting function, click memory, click preferred install location, you can choose isntall new application to choose preferred install location.
Check SD card and MID storage space.
- Enter into setting application.
- Click storage, check storage space. Internal storage
1) System storage
System storage is the spcae MID leave for system file, as Picture 4.35. it can't be viewed.
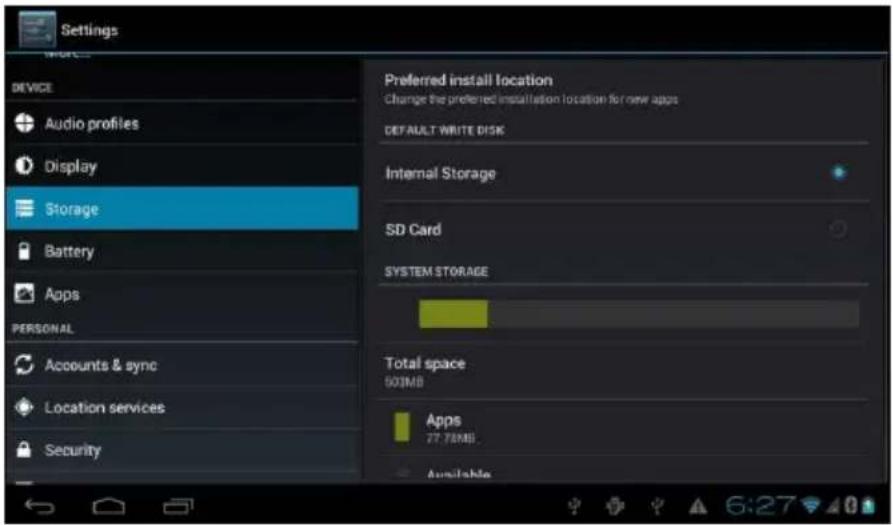
2) Internal storage
Internal storage is MID local NAND storage, as Picture 4.36, if you need to check the storage content, you can check it in main menu.

2 SD card
You can check storage space, SD card available space, unmount SD card and erase SD card, as Picture 4.37

Safely remove SD card
1 Click setting application.
2 Click memory.
3 Click uninstall SD card.
4 Now you can remove SD card safely.
Note: Removing SD card safely can protect SD card and increase its lifetime.
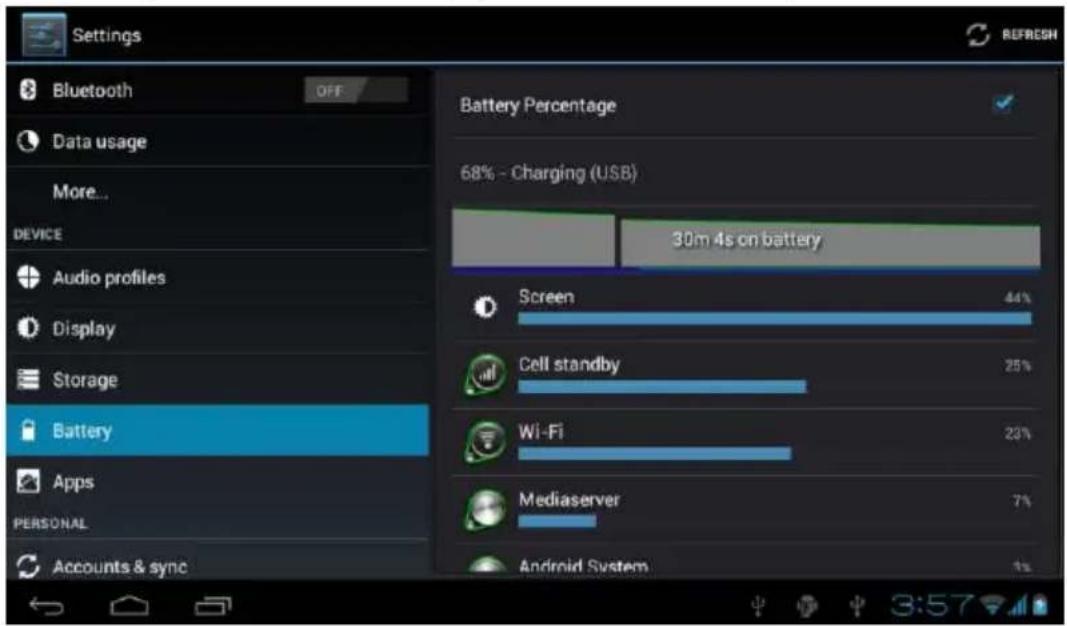
Battery
Click setting function, select battery, you can view the battery situation, as Picture 4.38
Application program
1 Click setting application in Apps.
2 Select application, after enter, you can manage and delete installed application and check system used storage space and left space. (As Picture 4.39)

3 View internal storage used space and left space, as Picture 4.40

4 View the working device, used space and available space, as Picture 4.41

Account and Sync
1 Select setting application
2 Open account and sync, as Picture 4.42

3 Click add an account, as Picture 4.43
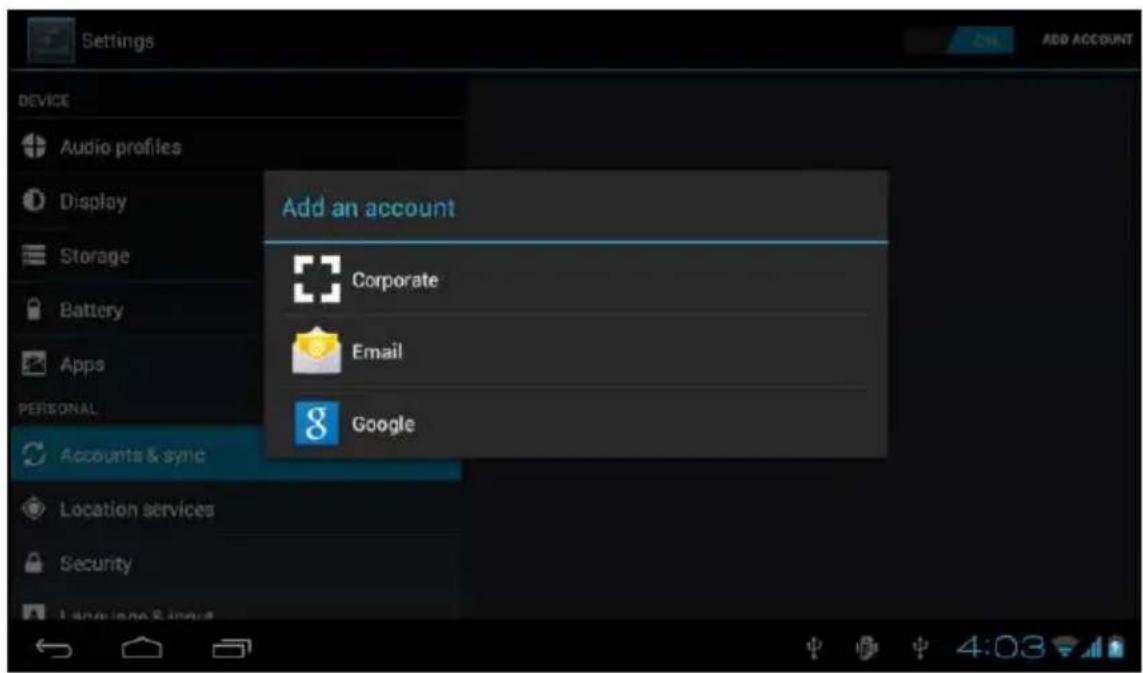
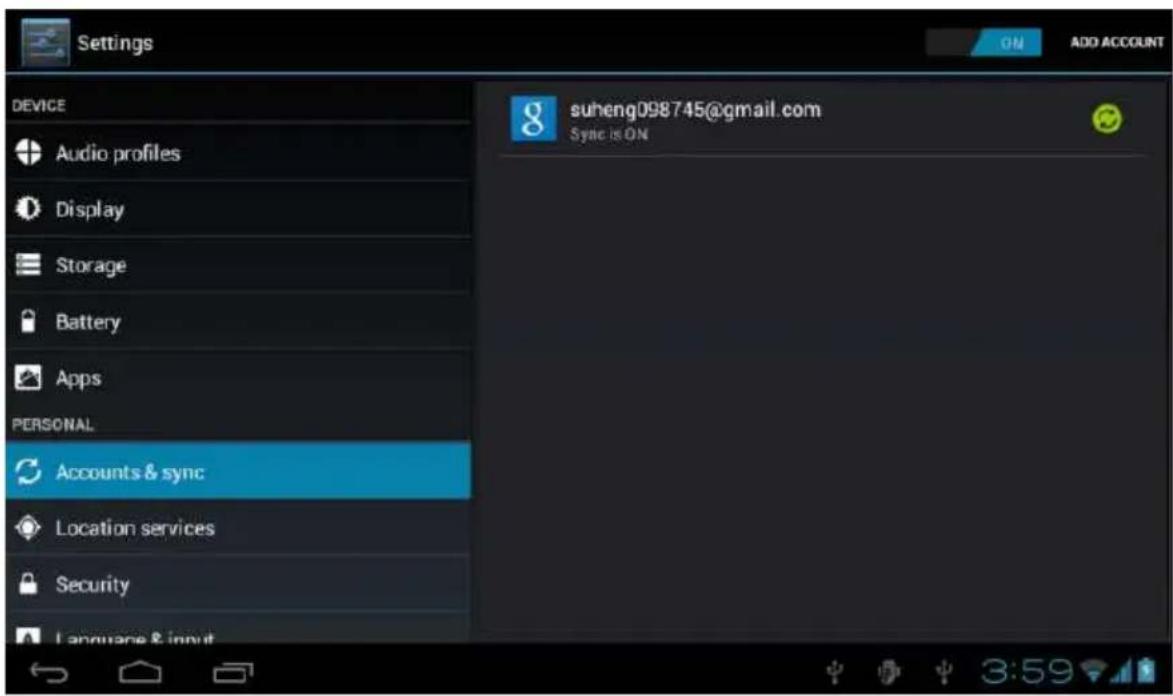
4 After successfully load, it will open the sync function, as Picture 4.44
Location service
Click setting, select location service,

1 Google's location service
Open Google location service, you can use WIFI to positioning TelePAD730
2 GPS satellites
Open GPS satellite, you can use GPS to positioning TelePAD730.
3 GPS Assistance
Open GPS Assistance, it can increase the speed of GPS positioning, but you need to insert SIM card and use data transmission.
4 EPO setting
Click EPO setting, enter into Picture 4.46, then check if EPO positioning information and EPO has turned on auto download
5 A-GPS
After opening A-GPS, you can inscease positioning speed through network.
6 A-GPS settings
Click A-GPS setting, enter into

1 Disable after reboot
Click disable after reboot, when you reboot your MID, A-GPS will auto turn off.
2 Network Request
Click network request, MID can get your location through network.
3 Network used
Open network used, you can choose network type,
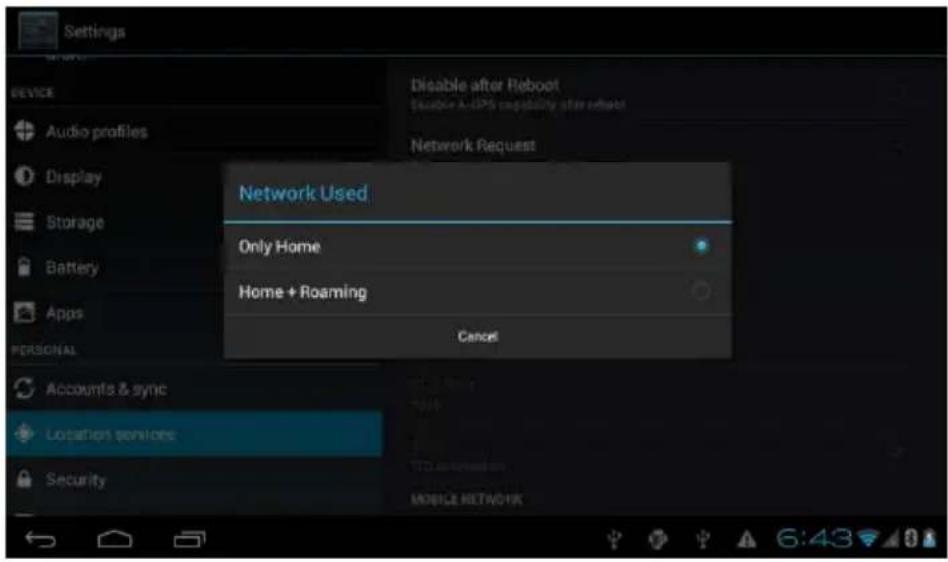
4 Server
Click server, it can switch location service,

Location and Google search
Open location and allow google search, you can use your location information to improve search result and other services.
Safety setting
Set locked screen
Lock the touch screen by unlock icon or password to protect your MID.
Note: After setting screen locked, you should enter the passcode each time when you startup or screen is locked
Set unlocked picture
1 Click setting application in main interface.
2 Click safe.
3 Click locked the screen.
4 Choose picture in text setting area.
5 Click next following the remind message.
6 The unlocked pattern board pop up, there are nine touch spots, connect 4 points from vertical, horizontal or diagonal direction. As Picture 4.10, move your finger from the screen when finish. The system will record you new unlock pattern.
7 Click continue.
8 When you see the reminder, enter the unlock pattern, then click confirm.
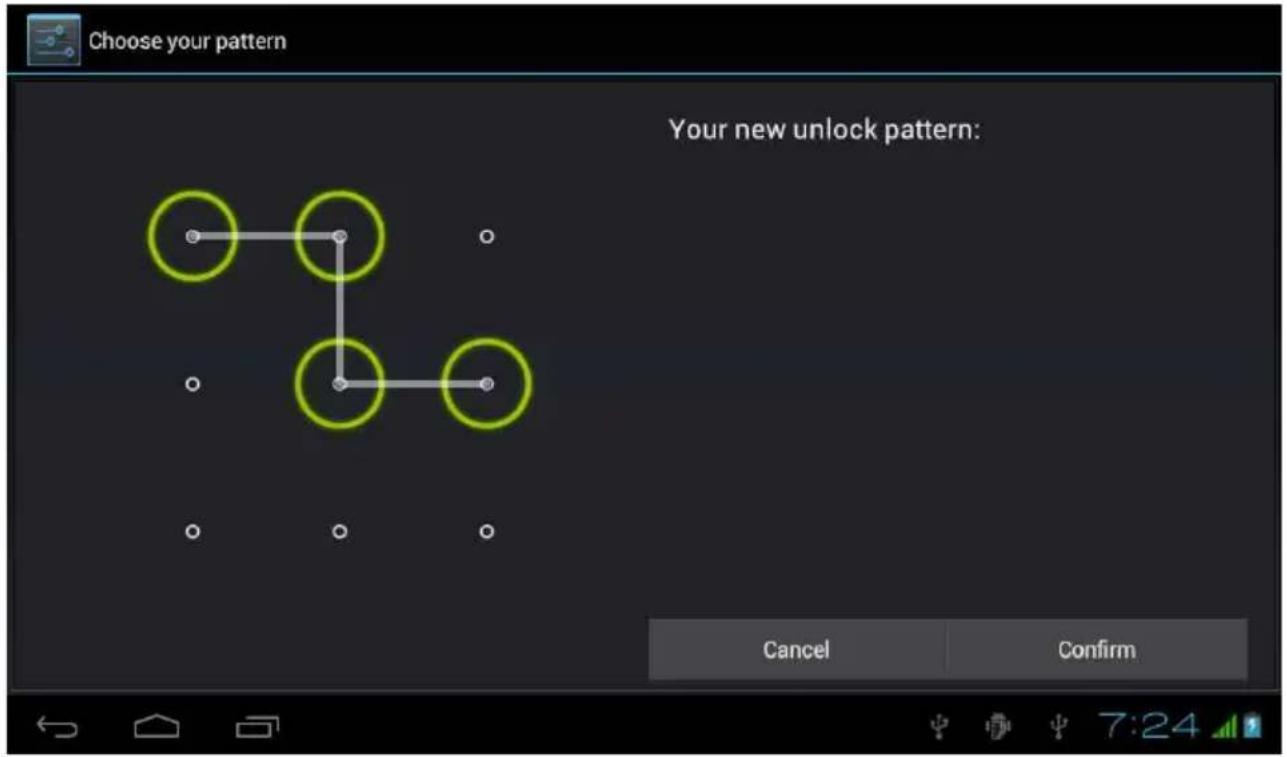
Safety setting
Set unlock PIN code
1 Click setting application in main interface.
2 Click safe.
3 Click screen locked.
4 Choose PIN in text setting area.
5 Enter new PIN code(numbers) and click continue.
6 Ener new PIN code again and click confirm.
Set unlock password
Click setting application in main interface.
1 Click safe.
2 Click screen locked.
3 Set password in text setting area.
4 Set new password(letters and numbers) and then click continue.
5 Enter the password again and the click confirm.
Unknown source
1 In main interface, click setting.
2 Click safety.
3 Click unknown source

Note: Manual installing APK files needs to turn on unknown source.
Language and Input Method
Click setting, select language and input method, choose language to switch language
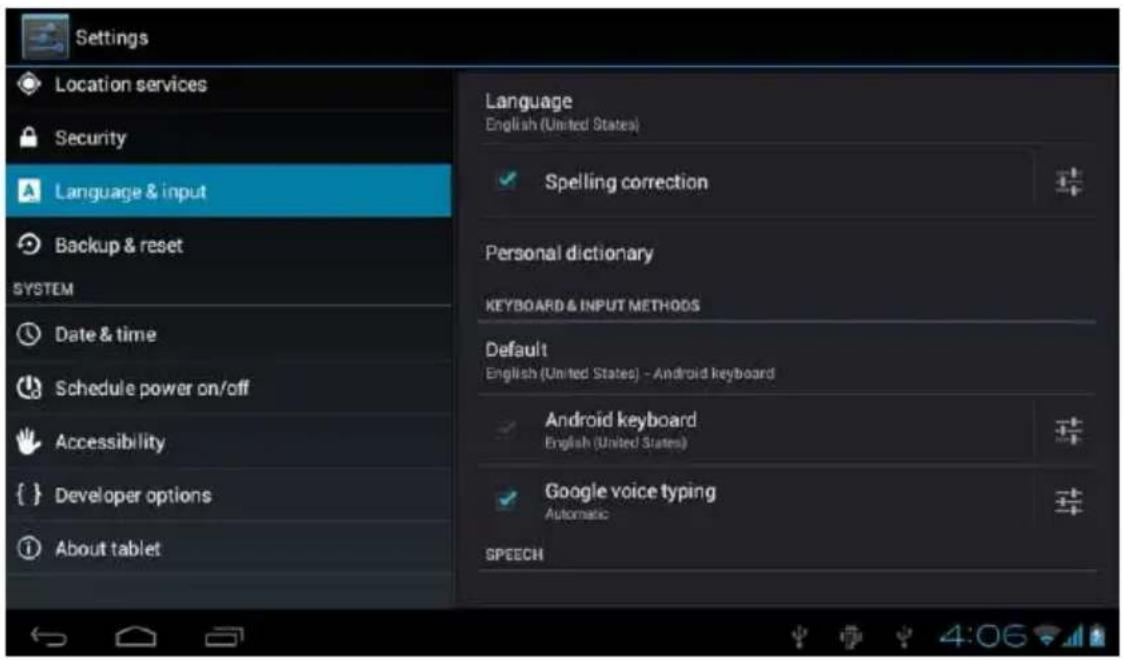
Click setting, choose language and input, choose Android keyboard setting, click input language

Language and Input Method
Choose the language you want to change in the language list

Return to langauge and input method, click default, select input method you want to use

Backup and Reset
Connect WIFI and login your google account, choose backup my data, system will backup your data into google server.
If you need to recovery factory reset, please click reset, if you need to formulate NAND, please click reset tablet
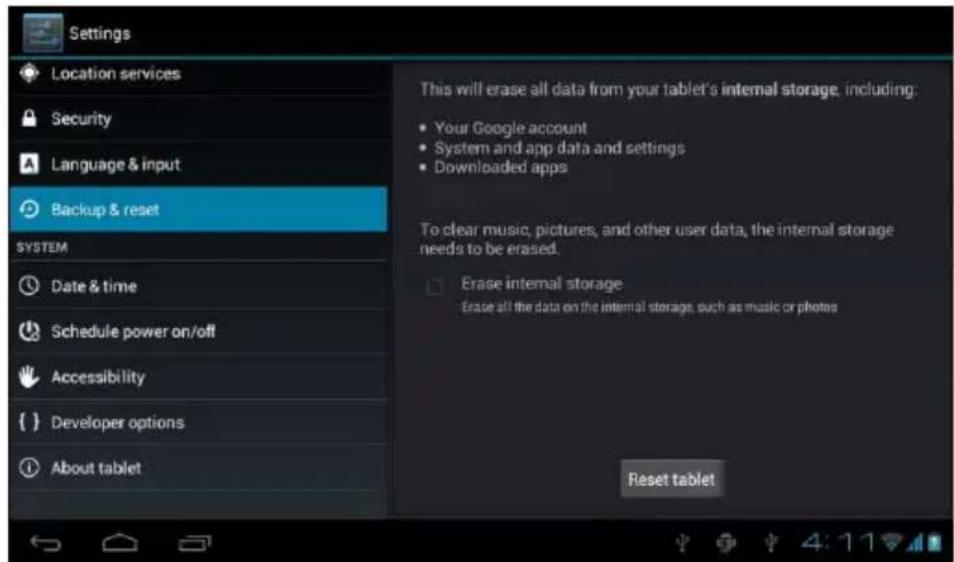
Date and Time
According to the preset, system will voluntarily apply the date, zone, and time provided by internet.
Manual set date, time and zone
1 Click Setting application procedure.
2 Slide down the screen, then click date and time.
3 Turn off "auto setting of date and time".
4 Turn off "auto setting zone".
5 Click Zone Selecting, then choose the zone lists. Slide down the list to view more zones.
6 Click Date setting, then click upper or down buton to adjust date, month, and year, click setting when you finish selection.
7 Click Time setting, then click upper or down button to adjust hour and minute, click AM or PM to change morning or afternoon (there is no such selection when you see 24-hour format). Click Setting to finish.
8 Click 24-hour format, switch between 12-hour or 24-hour formay, the time format you choose will be used on the alarm clock.
9 Click date format setting, then choose the time format you want to show on TelePAD730.
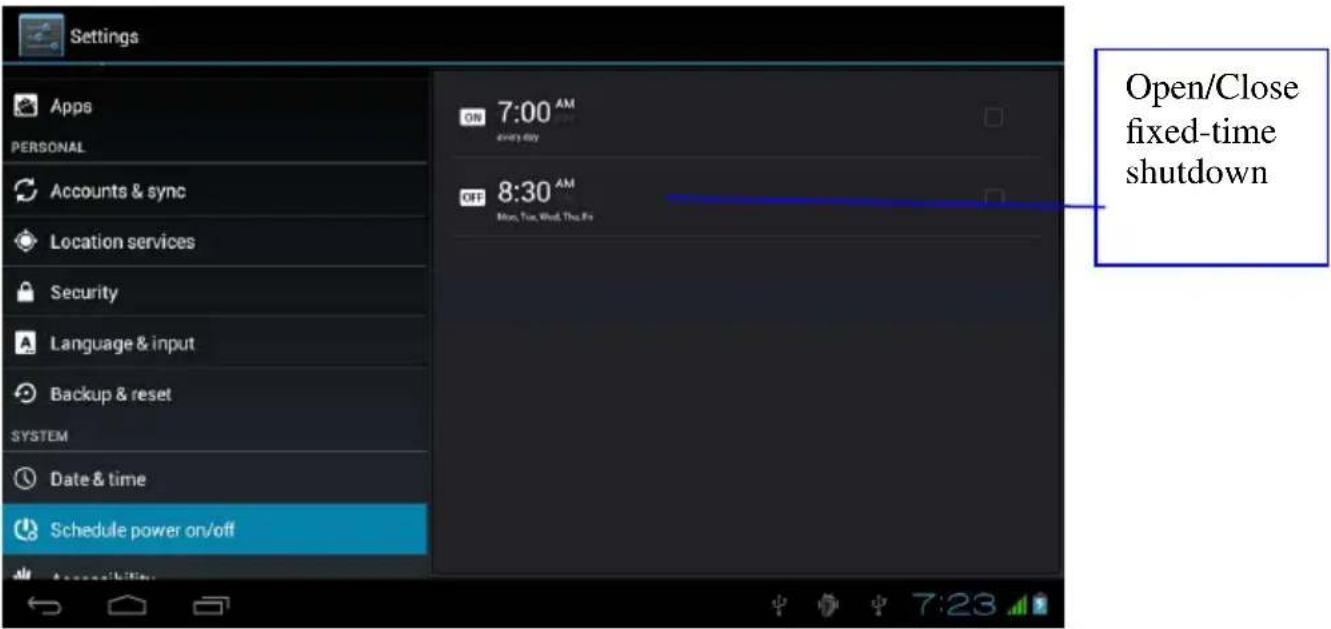
Note: If you use the time internet provided, you will not able to set the date, time and time zone
Assistance Function
- Large size
Click it to make system font large size
- Click power button to end calls
When Click call, press "power" button, call will end but not hold.
- Touch and hold delay
Click touch and hold delay to increase time,

Install webpage script
it will allow you install webpage scrip when you open system,, but it will increase the risk when you are browsing webpage.
Engineer Selection
- USB adjustment
After opening USB adjustment, you can use some software to read telePAD730 software, but when USB adjustment is turned on, USB storage needs to manual adjust.
- Keep awaken state
If you open keep awaken state, it will never auto sleep when your telePAD730 is charging.
- Pointer Location
If you open pointer location, it will display touch vertical and horizontal direction.
- Show touches
If you open display touch screen operation, it will display touch operation on the screen. It is suggested to use with same direction as pointer location.
• Show screen update
If you open screen refresh, it will display related area when the area is refreshing.
• Show CPU usage
After open CUP usage, in the right top of telePAD730 will show CPU usage situation.

Music

Enter into music player: in menu or desktop click music icon to enter into music player, click the music you want to play
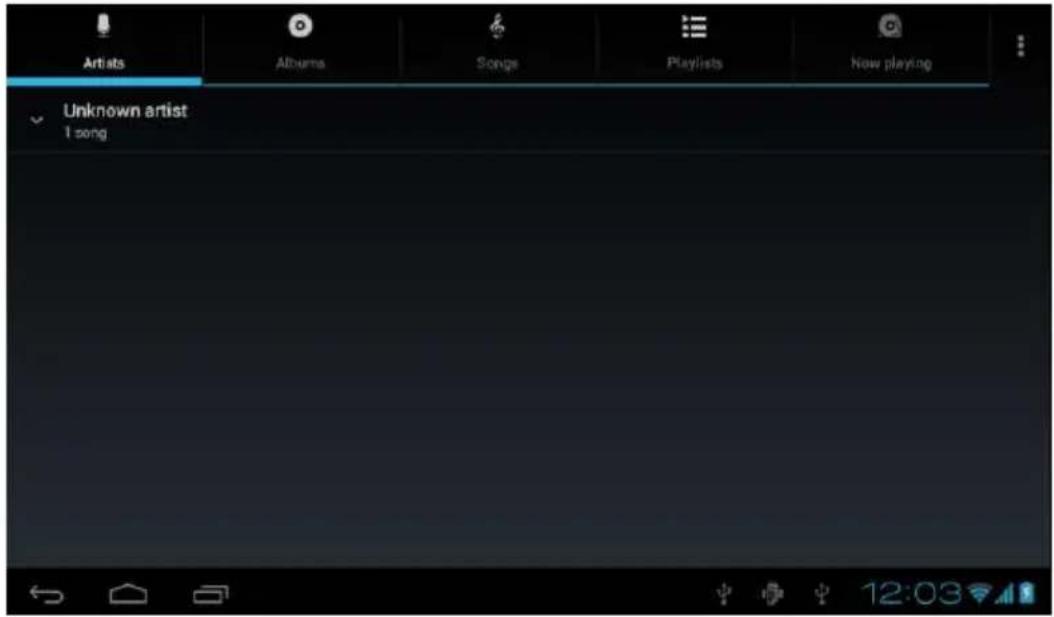
1 Drag the progress bar to adjust play progress.
2 Operation of music player button

Video

1 Enter video player: choose application in main menu, choose the video you want to play.
2 Operation of video player button

Photo Gallery
Photo gallery application can auto search photos and video files in SD card, and photo gallery will classify these photos and videos in folder. You can apply photo gallery to view and edit photos, set the photos as wallpaper and watch the video.
View pictures
1 Click gallery application in main interface.
2 Enter into gallery, click the folder you want to view.
3 Click the picture you want to view, the system will play it in full screen mode automatically.
4 The pictures can be zoom in and zoom out, put two fingers on the screen, the separate the fingers (gather up the fingers, the picture will be zoom in) or double click the screen.
Note: when you browse the pictures, slide left or right to view more pictures.
Edit and set pictures
When check the pictures in full screen mode, click menu key to display menu selection, you can choose the selection you need to edit and setting pictures.
Slide Show
a) Open a picture, use virtual key to click menu key, display menu selection.
b) Click slide show, it will auto loop play(or choose

button in picture folder)
Crop
1 Click menu key to display menu selection.
2 Then click crop, click and drag related area to adjust the cropper.
3 Click cropper and drag it inside and outside to adjust the image.
4 After adjust the size you want, click crop.
5 If you wish to give up to crop, click cancel to return to picture browse.
Edit
1 Click menu key, display the menu selection.
2 Click edit.
3 Adjust teh brightness, style, color, antialias setting in selection.
4 Click save.
5 If you want to give up edit, click return key, click not to return to picture browse.
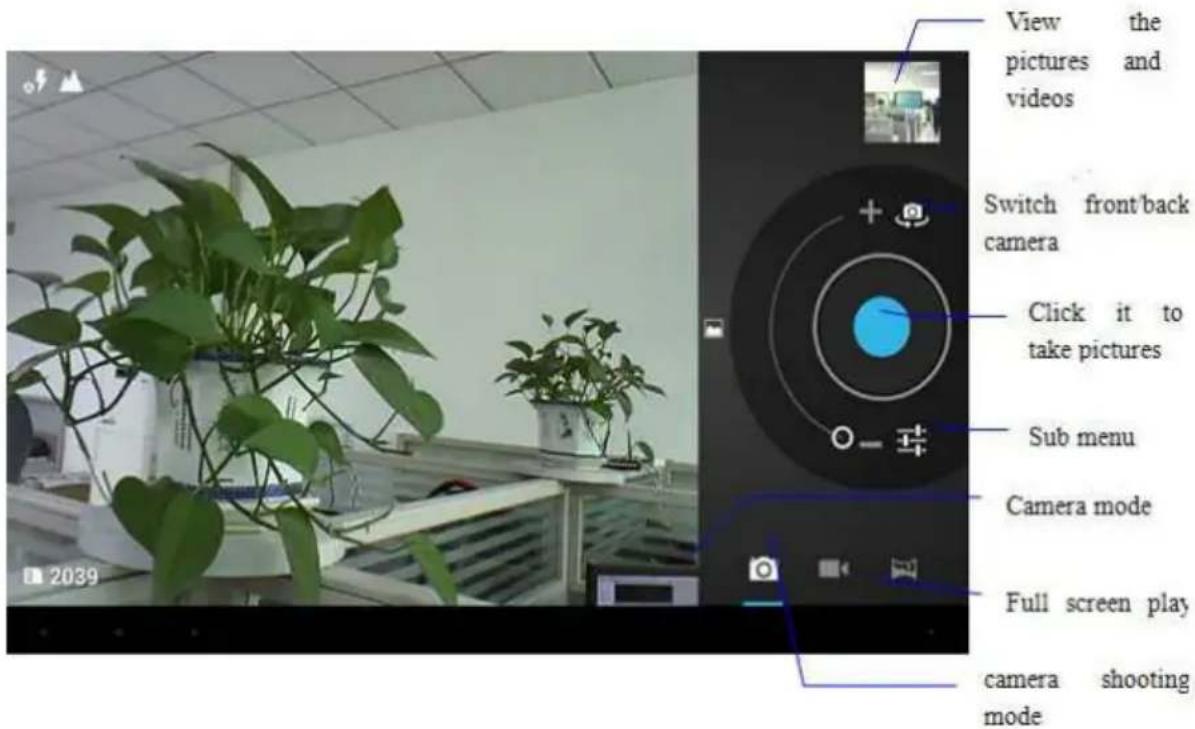
Camera
In the main interface or desktop, click camera application proce- dure enter into camera
• Operation of camera button as Picture 5.4
- Switch camera: choose Menu key, click switch front/back camera
FM Radio

Click in the main interface or desktop to enter into FM radio interface:
Radio button operation instruction

- RDS setting: click Menu key in interface, click button, enter into RDS setting, and choose the selection you want to add

- Search channel: Click "Menu" in the main interface, click search button, it will start to auto search channels, the searched channels will be saved in the channels list
Communication Function


- Save channels: Click button in the main interface to save the channel, and the channel will be saved in channels list.
Note: You need to insert earphone as antenna when using FM radio, If no antenna, your telePAD730 can't search any frequency band.
Phone
Click Phone application procedure

Text Message
Enter into main menu, choose Click "Edit new message"

application procedure.

Contact List
- Click Contact

list in the main interface, enter into the contact list

Search contact: click button, enter into search function
Add contact: click button, enter into add contact interface


Browser
In case of Wi-Fi or mobile internet is connected well (Please refer to Chapter 4.1 for wireless and

internet setting), click IE browser in the main menu or desktop to enter the IE interface

Email application procedure contains email setting guide, you can add the external POP3 OR IMAP email account of normal web email service provider (For instance, Yahoo, Gmail, Hotmail and 163)

a. Email Setting

1 After you click the sending email icon, you can see the email setting guide, which can help you to set.
2 Input your email address and password.
3 Click "Next step" button, choose your email type is POP3 or IMAP.
4 Click "Next Step" button to check whether the email box servicer can receive or send emails
5 Input the email account and display the email subject, and click finish.
6 If the email box is available, you will enter into your mail box automatically.
b. Delete the email account
You can delete setted POP3 or IMAP email account from your MID.
Click

1 Enter into your mail box.
2 Press Menu key.
3 Click Account
4 Press the account you want to delete.
5 Click confirm to remove.
c. Send E-mail

1 Click to display your mail box.
2 Click the inbox, it will refresh the new emails automatically; click it to read new email.
3 Press Menu key. Menus will popup.

4 Click Edit to enter into new email editing interface.
5 Input the receiver's email address.
6 Input the subject and email content.
7 If you want to add attachment, click menu key, the menu popup.
8 Click "Add attachment" (pictures, video).
9 Click "send" to send the email out.
GPS Navigation
1 Map of the third parties is required for MID internal GPS satellite signal receiver positioning, after installation the device can accurately implement traffic real-time navigation, meet the needs of outdoor navigation.

2 Enter into setting interface, click icon, enter into below picture

When positioning successfully, the blue parts will turn to green color, and it shows the latitude, longitude, height, speed, and the time of your location
The value means the strengthness of signal, the time is related to the time zone, if time is not correct, please check the time zone is correct or not.

bar
| Time (s) | Value | |---|---| | 17 | 48 | | 4 | 41 | | 8 | 41 | | 12 | 43 | | 16 | 39 | | 20 | 38 | | 24 | 27 | | 28 | 26 | | 32 | 0 | | 36 | 0 | | 40 | 0 | | 44 | 0 | | 48 | 0 |Clock
Click Clock procedure, enter into below interface as Picture 9.1. There are clock, picture, music and homepage buttons.
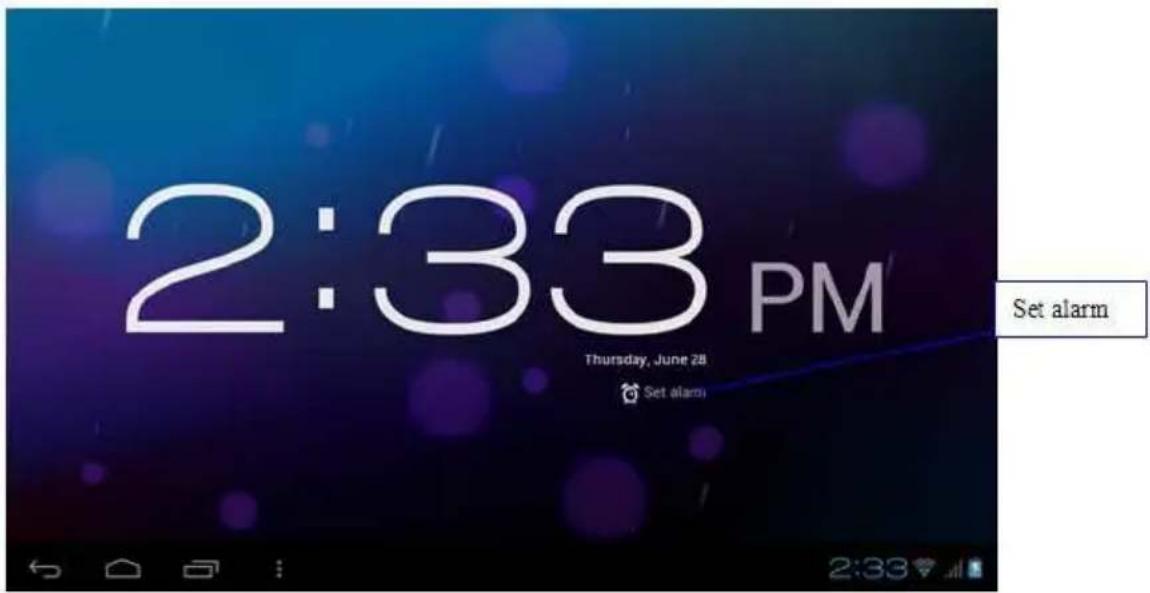
Calculation

1 Click。
2 Enter into the basic board of calculator.
3 Soft touch the numbers or operator in calculator to calculate.

File Manager
File manager will copy, cut, delete, rename the documents or the folder in the TF card, it also will share the files, install apk etc.

In the main menu or desktop, click the document manager icon to enter into documents manager.
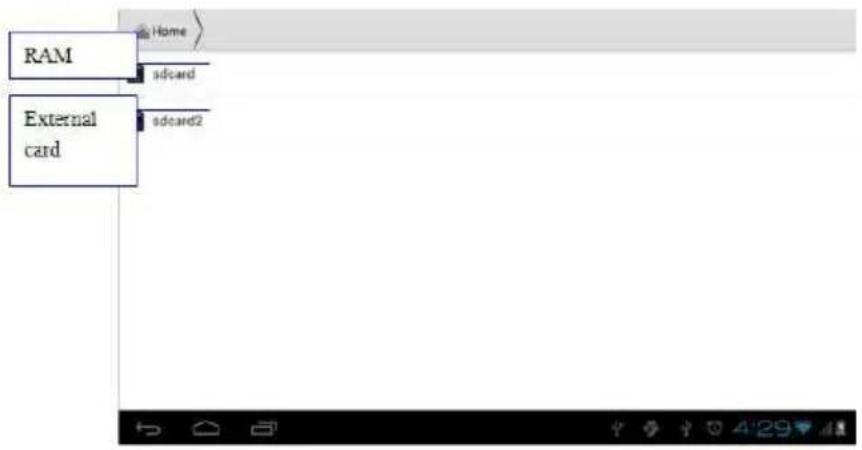
a、Copy, cut, delete, rename the files and folder: choose the file or folder, long pressthe file or folder to enter into the interface as Picture 8.4, you can operate the file or folder.

b) Paste the copy or cut file: choose the file you want to paste, choose right top icon to
enter into Picture 9.5, choose right top icon to enter into Picture 9.6


c) Share file: choose any file, long press it, it will popup "share", choose the share way you want in the list

d) Install apk file : Choose the file suffixed .apk in the file manager, you can install the third part software as reminder.
e) Build new folder: Choose the menu you want to build the file, click icon in right top, choose new folder, you can build new folder as reminder.

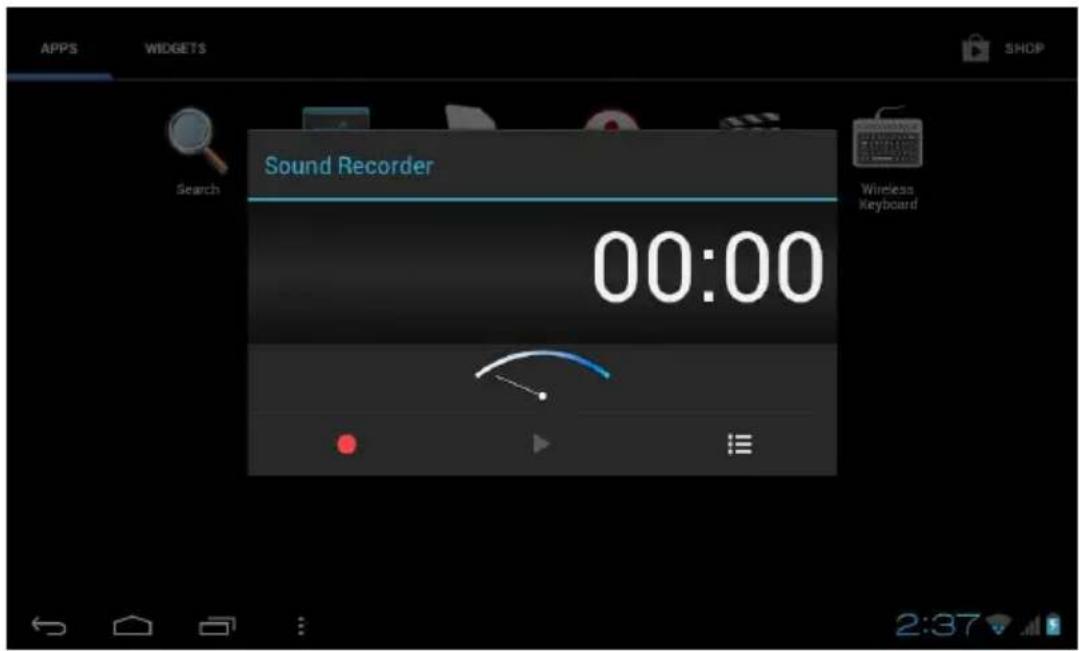
Recorder

In the main interface or desktop, click recorder icon to enter into record interface, click re-


cord key to start record. Click Stop key to stop recording. Click Play key
to play the recorded sound. The system will auto remind you to use or abandon this record, please choose it manually.
Play the record: choose the video player to play the recorded sound, choose the recorded sound in the source manager, and click it to play.
FAQ
What type of photo files can I view on my device?
JPG, JPEG, BMP, JPG and PNG. Video
What type of video files can I play on my device?
AVI, 3GP, MP4, MPG, RM, RMVB, MOV, FLV, WMV, MKV (max 1080p full HD video)
Can I play YouTube videos on my device?
Yes, you can. Tap the YouTube application icon to quick access videos.
Do I need a Wi-Fi adapter to connect to the Internet?
No. The Wi-Fi adapter is built-in to the device.
FAQ
How can I change languages if I mistakenly choose an unknown language?
- Find setting icon in Menu Page to enter Settings.
- Then, choose icon to enter language & keyboard setting, the first option is language setting.
How can I change input when I am typing?
- Long Press the blank where you are typing, there will be popup to choose inputs.
I already installed some applications, but I cannot find them now, why?
- By default, some applications are installed in external TF card, so if you fetched out the TF card from the device, you will not see these applications.
The PAD9178DR cannot be turned on.
- Check the battery and charge it if there is no power.
- Connect the PAD9178DR to AC Adapter.
- Contact the seller if the PAD9178DR still cannot be turned on after charged.
here is no voice in the earphone.
- Check if the device is in Mute mode.
- Check the volume setting in case it is 0.
- Check the connection of earphone.
Why I cannot install applications?
- Please check Settings – Applications, make sure Unknown sources is chosen.
There is Error Codes on the screen.
System error, restart the device.
The language you are browsing is not supported by built-in languages, please contact the original manufacturer to debug.
What Android OS version is on my Device?
4.1. 4
What is APK?
APK is Android Package acronym that Android installation package.
How to obtain the APK?
You can download via PC-side installation, you can also "Android market" online to download and in stall.
Can I use any of my personal email addresses to send/receive email?
The device supports POP3 and SMTP accounts. Some free email accounts are not supported on mobile devices. Check with your email provider to see if you account is supported.
Which media cards are compatible with my Device?
micro SD cards or TF cards.
What type of music files can I play on my device?
MP3, WMA, MP2, OGG, AAC, M4A, FLAC, APE, WA Photos
In case the products delivered are not free from defects in material or workmanship, MAS Elektronik AG has the right to either repair or replace the defective product at its choice. MAS Elektronik AG manufactures and repairs goods using components which are new or equivalent to new in accordance with industry standards and practice. The warranty for wearing parts (e.g. rechargeable batteries) is limited to 6 months.

Technically unlimited
MAS
Elektronik AG
In case the device is equipped with internal data storage (e.g. hard disc drive, Flash drive), the customer is responsible to backup his data before sending the device. MAS Elektronik AG is not liable for any data loss on returned devices. MAS Elektronik AG reserves the right to reset returned devices to factory defaults. Please note your personal settings for this reason.
MAS Elektronik AG is not liable for any accessories not belonging to original package content such as DVDs, hard disc drives, Flash storage devices, batteries, etc.
This limited warranty covers the warranty requirements set by authorities in your country.
This limited warranty only is valid in the co This limited warranty does not cover finishes, accessories or batteries, nor does it cover damage resulting from accident, misuse, abuse, dirt, water, battery leakage, tampering, servicing performed or attempted by unauthorized service agencies. This limited warranty does not cover damages resulting from firmware upgrades. Only in case of firmware upgrades needed to add functions promised at time of purchase, such damages are covered by this limited warranty. For a correct and frictionless completion of warranty or repairs you need a RMA No. You may obtain a RMA on the internet at www.mas.de/FAQ or by telephone. Please send the device in its original packing material, all standard accessories and a copy of the invoice, a description of defect and the RMA No. to following address. Please note the RMA number clear and in large numbers on the outer package.
MAS Elektronik AG
Weidegrund 3
21614 Buxtehude
Kundendienst


- XORO®
- TelePAD 730
- Using this Guide 9
- Specification 10
- Know your device 11
- Anniouncements 12
- Quick Guides
- Basic Setting
- Multi Media
- Communication Function
- Internet
- GPS Function
- Other Application Procedures
- Operate Safely:
- Careful handling:
- Turn Off In Restricted Areas:
- Switch off your TELEPAD730:
- Drive Safety:
- Power Supply
- Operation and Position
- Compatibility of the integrated Card Reader
- Recycling of electronic devices
- Recycling of paper and carton
- Recycling of plastic parts
- Green Dot
- Defect
- Accessories
- Pixel error
- Specification
- Rear Side
- Keys Function
- Startup and Shutdown
- Startup
- Shutdown
- Open and Close of the Screen
- Open the screen when it is closed.
- Usage of Touch Screen
- TELEPAD730 operating methods
- Click
- Press on
- Quickly slide or slide
- Pull
- Rotate
- The extended home page
- Shortcut icon management
- Create folder icon in desktop
- Remove the icons in desktop
- Change the wallpaper of desktop
- Voice search
- Visit Application Procedures
- USB Connection
- TelePAD370 storage configuration
- Copy the document into memory card
- Typing words
- Use the screen keyboard
- Choose the typing method you want
- Operation Technique
- Enter widgets interface
- Create application shortcut icons in the desktop
- Wireless and Internet
- Connect Wi-Fi
- Add Network
- Network Notice
- Bluetooth
- Bluetooth Setting
- Rename tablet
- Check visibility timeout
- Data Usage
- More
- Airplane Mode
- VPN
- .Network sharing and portable hotspots
- Portable WI-FI hotspots
- Mobile Networks
- Access Point Name(APN)
- Click mobile network, as Picture 4.18
- Network Operator
- GPRS data prior mode
- Contextual Model
- Click standard to enter into Picture 4.22
- Video call ringtone
- Display
- Adjust the screen brightness
- Scenes
- Wallpapers
- Theme
- Auto rotation
- Sleep
- Font size
- Storage
- 2) Internal storage
- SD card
- Battery
- Application program
- Account and Sync
- Click add an account, as Picture 4.43
- After successfully load, it will open the sync function, as Picture 4.44
- Location service
- Disable after reboot
- Network Request
- Network used
- Server
- Location and Google search
- Safety setting
- Set locked screen
- Set unlocked picture
- Set unlock PIN code
- Set unlock password
- Unknown source
- Language and Input Method
- Backup and Reset
- Date and Time
- Assistance Function
- Install webpage script
- Engineer Selection
- - USB adjustment
- - Keep awaken state
- - Pointer Location
- - Show touches
- • Show screen update
- • Show CPU usage
- Music
- Video
- Photo Gallery
- View pictures
- Edit and set pictures
- Slide Show
- Crop
- Edit
- Camera
- FM Radio
- Phone
- Text Message
- Contact List
- Browser
- a. Email Setting
- b. Delete the email account
- c. Send E-mail
- GPS Navigation
- Clock
- Calculation
- File Manager
- Recorder
- FAQ
Brand : XORO
Model : TelePAD 730
Category : Tablet