Forest Narrow - Véhicule pour personnes handicapées Vermeiren - Free user manual and instructions
Find the device manual for free Forest Narrow Vermeiren in PDF.


| Product Type | Electric wheelchair, Class B |
| Brand | Vermeiren |
| Model | Forest Narrow |
| Maximum Occupant Mass | 130 kg |
| Overall Width (depending on seat width) | 590 mm |
| Overall Length with Footrest | 1120 - 1160 mm |
| Overall Height (backrest included) | 970 mm |
| Folded / Dismantled Length (without footrest) | 840 - 880 mm |
| Folded / Dismantled Height (backrest folded, without armrests) | 800 mm |
| Total Mass | From 115 kg |
| Max Speed | 6 km/h or 10 km/h |
| Continuous Driving Range (approx) | 34 km (6 km/h) / 26 km (10 km/h) |
| Batteries | 2 x 12V AGM, 70 Ah / 20 hr |
| Battery Charger | Exendis Impulse S (8A), IP21, Insulation class II |
| Driving Motors | 2 x 220W or 2 x 350W |
| Control Unit | Shark or DX2 / Electromagnetic braking system |
| Degree of Protection (Electronics) | IPX4 |
| Maximum Safe Slope | 9° |
| Obstacle Climbing | 70 mm |
| Ground Clearance | 60 mm |
| Seat Width Adjustment | 390 mm or 450 mm (adjustable 0-100 mm) |
| Seat Depth | 430 - 490 mm |
| Backrest Height | 510 - 560 mm |
| Noise Level | < 65 dB (A) |
| Key Safety Features | Electromagnetic brakes, anti-tipping, freewheel mode, thermal fuse |
Frequently Asked Questions - Forest Narrow Vermeiren
User questions about Forest Narrow Vermeiren
0 question about this device. Answer the ones you know or ask your own.
Ask a new question about this device
Download the instructions for your Véhicule pour personnes handicapées in PDF format for free! Find your manual Forest Narrow - Vermeiren and take your electronic device back in hand. On this page are published all the documents necessary for the use of your device. Forest Narrow by Vermeiren.
USER MANUAL Forest Narrow Vermeiren
natural_image
Black electric wheelchair with visible wheels and headrest, no text or symbols on the device itself
Instructions to the specialist dealer
This instruction manual is part and parcel of the product and must accompany every product sold.
Version: C, December 2012
All rights reserved, including translation.
No part of this manual may be reproduced in any form what so ever (print, photocopy, microfilm or any other process) without written permission of the publisher, or processed, duplicated or distributed by using electronic systems.
© N.V. Vermeiren N.V. 2012
Contents
1 Productdescription....3
1.1 Intended Use 3
1.2 Technical specifications....4
1.3 Components 8
1.4 Accessories 8
1.5 Explanation of symbols 8
1.6 Safety instructions 9
2 Use....10
2.1 Remarks on electromagnetic compatibility (EMC) 10
2.2 Carrying the electric wheelchair 11
2.3 Assembly and disassembly of the electric wheelchair 11
2.4 Mounting or removing armrest 12
2.5 Mounting or removing of the footrests 13
2.6 Suspension....13
2.7 Folding the backrest of the wheelchair 14
2.8 Backrest inclination (mechanical) 14
2.9 Adjusting handgrips.... 15
2.10 Transfer in and out the electric wheelchair 16
2.11 Correct position in the electric wheelchair 16
2.12 Driving the electric wheelchair 16
2.13 Operating the brakes.... 17
2.14 Driving the electric wheelchair on stairs 20
2.15 Driving the electric wheelchair on ramps 20
2.16 Pushing the wheelchair 21
2.17 Transport in the car 21
2.18 Use of the wheelchair as seat in a motor vehicle 22
2.19 Transport in an airplane 24
2.20 Batteries 25
2.21 Battery charger.... 25
2.22 Charging the batteries.... 25
2.23 Thermal fuse 26
2.24 Anti-tipping (B78) 26
3 Installation and adjustment....26
3.1 Tools 26
3.2 Manner of delivery 26
3.3 Possible adjustments.... 27
3.4 Battery connections 31
3.5 Tyre changing 31
3.6 Changing the battery.... 32
4 Maintenance ....32
Preface
First of all we want to thank you for putting your trust in us by selecting one of our products.
The expected lifetime of your electric wheelchair is strongly influenced by the care and maintenance of the wheelchair.
This manual will help you get acquainted with the operation of your electric wheelchair.
Following of the user instructions and the maintenance instructions are an essential part of the warranty.
This manual reflects the latest product developments. Vermeiren has the right to introduce changes without the obligation to adapt or replace previously delivered models.
For any further questions, please consult your specialist dealer.
1 Productdescription
1.1 Intended Use
The electric wheelchair Forest is equipped with two motors, of 220W or 350W.
The electric wheelchair Forest is intended to comfortably transport persons with walking difficulties or no walking abilities. This electric wheelchair is designed to transport 1 person.
The electric wheelchair is designed to transport persons only, no goods.
Neither should it be used by persons obviously suffering from physical or mental limitations (e.g. visual impairment, ...) that render them incapable of safely handling the electric wheelchair.
The different types of fittings and accessories, and the modular construction allow full use by persons disabled by:
- paralysis
- loss of limbs (leg amputation)
- limb defects or deformations
- stiff or damaged joints
• heart insufficiencies and poor blood circulation
• balance disturbances
• cachexia (decrease in muscle)
The electric wheelchair is classified as class B.
The electric wheelchair is suited for indoor and outdoor use by the occupant.
When providing for individual requirements:
• body size and weight (max. 130 kg)
• physical and psychological condition
• residential circumstances
- environment
should be taken into consideration.
Your electric wheelchair should be used on flat surfaces where all four wheels are touching the ground and where there is sufficient contact to operate the wheelchair safely.
You should practice for use on uneven surfaces (cobblestones, etc.), slopes, curves and to get past obstacles (curbs, etc.). A particular risk is involved when crossing surfaces such as ice, grass, rubble, foliage, etc.
The electric wheelchair should not be used as a ladder, nor is it a transport for heavy or hot objects.
When using your electric wheelchair on streets or footpaths, local laws and regulations apply.
The electric wheelchair can be used on sidewalks, urban road. Under no circumstances the electric wheelchair may be used for driving on larger roads or expressways.
Use only Vermeiren approved accessories.
The manufacturer is not liable for damage caused by the lack of improper service or as a result of not following instructions from this manual.
Visually impaired people can contact the dealer for the instructions for use.
For Germany: You may not drive at above 6 kph on public highways. By the 6 km/h limited versions of Forest, you do not require a driving licence and neither is vehicle insurance necessary. However, we recommend that you take out voluntary third-party insurance. However, for the 10 km/h versions you must have an insurance.
The electronics must be switched off immediately after use of the wheelchair. Use only the supplied battery charger and no other charging equipment. We wish to point out that electromagnetic sources (e.g. mobile phones, etc.) can cause interference and that the wheelchair's electronics can also affect other electric appliances.
The electric wheelchair is suitable for re-use.
1.2 Technical specifications
Technical terms below are valid for the electric wheelchair in standard settings without seat cushion and optimum environmental conditions. If accessories are used, the tabulated values will change. Changes in outdoor temperatures, humidity, uphill's, downhill's, soils and battery levels can reduce output.
| Brand | Vermeiren | ||
| Address Type Model | Vermeirenplein 1/15, B-2920 Kalmthoul Electric wheelchair, Class B Forest | ||
| Maximum occupant mass | 130 kg | ||
| Description | Dimensions | ||
| Effective seat width 390 mm | (Adjustable 0 - 100 mm) | 450 mm (Adjustable 0 - 100 mm) | 500 mm (Adjustable 0 - 100 mm) |
| Overall width (depends on the seat width) | 650 mm | ||
| Description | Dimensions Minimum | Dimensions Maximum | |
| Max. speed 6 km/h | 10 km/h | ||
| Continuous driving distance range* | Approx. 34 km | Approx. 26 km | |
| Overall length with footrest | 1160 mm | 1200 mm | |
| Overall height (backrest included) | 970 mm | ||
| Folded / dismantled length (without footrest) | 840 mm | 880 mm | |
| Folded / dismantled width | Not applicable | ||
| Folded / dismantled height (backrest folded, without armrests) | 800 mm | ||
| Total mass | From 115 kg (depends on seat width and any accessories) | ||
| Mass of heaviest part (that can be dismantled or removed) | Frame + armrest + joystick: 109 kg | ||
| Masses of parts that can be dismantled or removed. | Armrest without joystick: 2,25 kg; Footrests: 1,95 kg; Seat cushion: 1,35 kg; Batteries: 27,15 kg | ||
| Maximum safe slope | 9° | ||
| Obstacle climbing | 70 mm | ||
| Ground clearance | 60 mm | ||
| Seat plane angle | 0° | 11° | |
| Effective seat depth | 430 mm | 490 mm | |
| Thickness seat cushion | 50 mm | ||
| Seat surface height at front edge (without seat cushion) | 420 mm | 480 mm | |
| Brand | Vermeiren | |
| Address | Vermeirenplein 1/15, B-2920 Kalmthoul | |
| Type | Electric wheelchair, Class B | |
| Model | Forest | |
| Maximum occupant mass | 130 kg | |
| Description | Dimensions Minimum | Dimensions Maximum |
| Backrest angle +2° - +54° +7° - +59° | ||
| Backrest height 510 mm 610 mm | ||
| Distance between footrest and seat | 360 mm 510 mm | |
| Angle footplate and seat 0° 99° | ||
| Angle seat and footrest 107° | ||
| Distance between armpad and seat | 200 mm 250 mm | |
| Front location of armrest structure 4 | 17 mm | |
| Driving motors 2 x 220W 2 x 350W | ||
| Batteries | 2 x 12V --- AGM / 70 Ah / 20 hr | |
| Battery charger Exendis Impulse S (8A); IP21; Insulation class II | ||
| Thermal fuse | 50 AMP | |
| Control unit | Shark or DX2 / Electromagnetic braking system | |
| Degree of protection | IPX4 | |
| Minimum turning diameter | Approx. 1400 mm | |
| Reversing width | Approx. 1300 mm | |
| Diameter Rear wheels (number) | 350 x 70 mm air (2) | |
| Tyre pressure, rear wheels ** | Max. 3,5 bar | |
| Diameter front wheels (number) | 250 x 90 mm air (2) | |
| Tyre pressure, front wheels ** | Max. 3,5 bar | |
| Noise level | < 65 dB (A) | |
| Storage and use temperature | +5 °C to +41 °C | |
| Operating temperature of the electronics | -10°C to +40°C | |
| Storage and use humidity | 30% | 70% |
| We reserve the right to introduce technical changes. Measurement tolerance ± 15 mm / 1,5 kg / °.* The theoretical driving distance will be reduced if the wheelchair is used frequently on slopes, rough ground or to climb curbs.**Since different tyres may be used, please note the correct operating pressure of the tyres you use. | ||
| Model | Forest Narrow | |
| Maximum occupant mass | 130 kg | |
| Description | Dimensions | |
| Effective seat width 390 mm | (Adjustable0 - 100 mm) | 450 mm(Adjustable0 - 100 mm) |
| Overall width (depends on the seat width) | 590 mm | |
| Description | Dimensions Minimum | Dimensions Maximum |
| Max. speed 6 km/h 10 km/h (not for Germany) | ||
| Continuous driving distance range* | Approx. 34 km Approx. 26 km | |
| Overall length with footrest 1120 mm | 1160 mm | |
| Overall height (backrest included) 970 mm | ||
| Folded / dismantled length (without footrest) | 840 mm 880 mm | |
| Folded / dismantled width Not applicable | ||
| Folded / dismantled height(backrest folded, without armrests) | 800 mm | |
| Total mass | From 115 kg (depends on seat width and any accessories) | |
| Mass of heaviest part (that can be dismantled or removed) | Frame + armrest + joystick: 109 kg | |
| Masses of parts that can be dismantled or removed. | Armrest without joystick: 2,25 kg; Footrests: 1,95 kg;Seat cushion: 1,35 kg; Batteries: 27,15 kg | |
| Maximum safe slope | 9° | |
| Obstacle climbing | 70 mm | |
| Ground clearance | 60 mm | |
| Seat plane angle | 0° | 11° |
| Effective seat depth | 430 mm 490 mm | |
| Thickness seat cushion | 50 mm | |
| Seat surface height at front edge(without seat cushion) | 420 mm 480 mm | |
| Backrest angle | +2°- +54° | +7°- +59° |
| Backrest height | 510 mm 560 mm | |
| Distance between footrest and seat | 360 mm 510 mm | |
| Angle footplate and seat | 0° | 99° |
| Angle seat and footrest | 107° | |
| Distance between armpad and seat | 200 mm 250 mm | |
| Front location of armrest structure | 417 mm | |
| Driving motors | 2 x 220W | 2 x 350W |
| Batteries | 2 x 12V--- AGM / 70 Ah / 20 hr | |
| Battery charger | Exendis Impulse S (8A); IP21; Insulation class II | |
| Thermal fuse | 50 AMP | |
| Control unit | Shark or DX2 / Electromagnetic braking system | |
| Degree of protection | IPX4 | |
| Minimum turning diameter | Approx. 1400 mm | |
| Description | Dimensions Minimum | Dimensions Maximum |
| Reversing width Approx. 1300 mm | ||
| Diameter Rear wheels (number) 350 x 70 mm air (2) | ||
| Tyre pressure, rear wheels ** Max. 3,5 bar | ||
| Diameter front wheels (number) 250 x 90 mm air (2) | ||
| Tyre pressure, front wheels ** Max. 3,5 bar | ||
| Noise level < 65 dB (A) | ||
| Storage and use temperature +5 °C to +41 °C | ||
| Operating temperature of the electronics | -10°C to +40°C | |
| Storage and use humidity 30% 70% | ||
| We reserve the right to introduce technical changes. Measurement tolerance ± 15 mm / 1,5 kg / °.* The theoretical driving distance will be reduced if the wheelchair is used frequently on slopes, rough ground or to climb curbs.**Since different tyres may be used, please note the correct operating pressure of the tyres you use. | ||
Table 1: Technical specifications Forest
Table 2: Technical specifications Forest Narrow
The wheelchair complies to the requirements set up in:
ISO 7176-8: Requirements and test methods for static, impact and fatigue strengths.
ISO 7176-14: Wheelchairs - Part 14: Power and control systems for electrically powered wheelchairs and scooters -- Requirements and test methods
ISO 7176-21: Wheelchairs - Part 21: Requirements and test methods for electromagnetic compatibility of electrically powered wheelchairs and motorized scooters.
ISO 7176-16: Wheelchairs - Part 16: Resistance to ignition of upholstered parts -- Requirements and test methods
1.3 Components
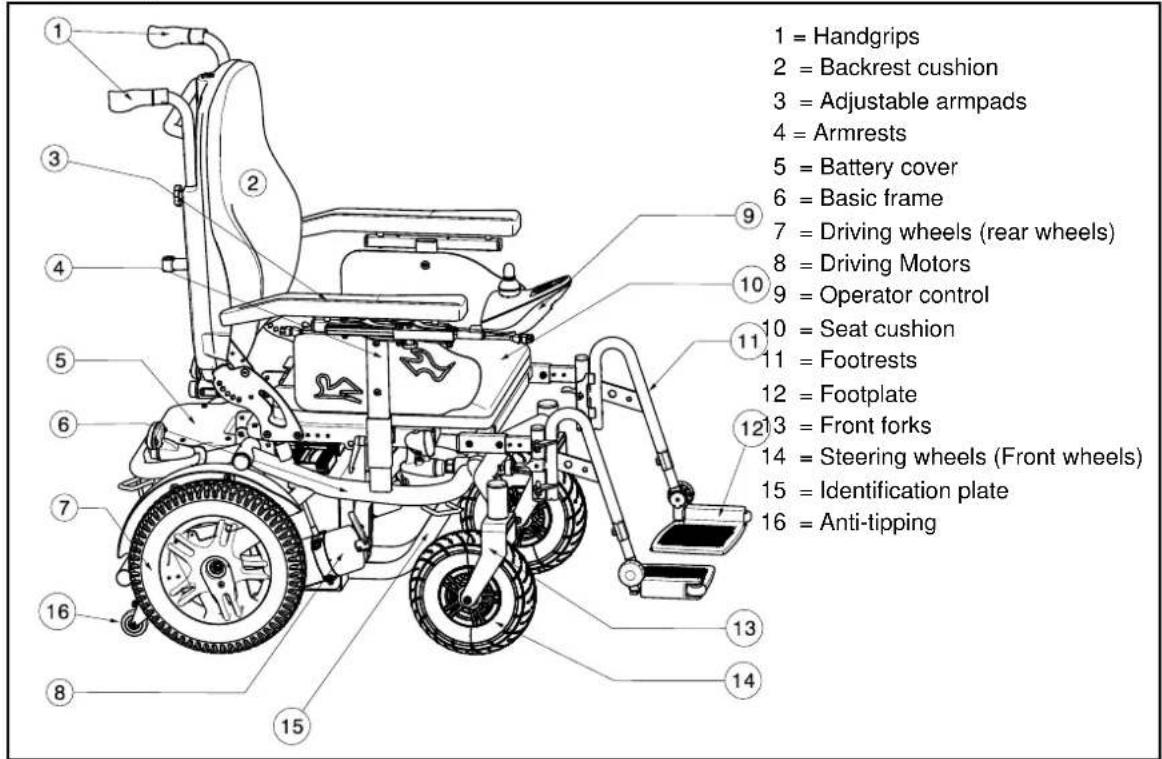
1.4 Accessories
The following accessories are available for the electric wheelchair Forest:
- Table (B13, B15)
- Manual adjustable leg-rest (BZ8 / BZ7)
• Electric adjustable leg-rest (BZ8-E / BZ7-E) - Head rest (L55 / L58) only available with fixed backrest
- Pelots (side supports) for stability (L04) only available with fixed backrest
• Pelvic safety belt (B58)
• Electric backrest inclination, seat inclination, lift
1.5 Explanation of symbols

Maximum mass

Indoor and outdoor use

Indoor use (Only for battery charger)

Separate recovery and recycling of electric and electronic devices (Only for Battery charger)

Protection class II

Maximum safe slope

CE conformity

Maximum speed

Position: Parking brakes activated (electric driving possible)

Position: Parking brakes deactivated (free running and pushing possible, no electric driving)

During free running, be careful with slopes and inclinations
1.6 Safety instructions
To prevent injury and/or damage to your wheelchair, make sure that no objects and/or body parts are caught in the rims of the driving wheels.
⚠️ Follow the instructions for using your wheelchair. For example, avoid driving without brakes against an obstacle (step, edge of the curb) or dropping down from steps.
When getting into and out of the wheelchair, do not stand on the footplates. The footplates should be folded up beforehand or the footrests should be swung completely outwards out of the way.
Investigate the effects of shifting the centre of gravity on the behavior of the wheelchair, for example on up or down gradients, on laterally sloping ground, or when overcoming obstacles. Obtain support from an attendant.
⚠️ If you want to pick up something (lying in front of, on the side, or to the rear of the wheelchair), you should not lean too far out to avoid tipping over.
When moving through doors, arches, etc. ensure that there is enough room at the sides so that you do not get your hands or arms caught or crushed and that there is no damage to the wheelchair.
Avoid uncontrolled rolling against obstacles (steps, curbs, doorframes, etc) or dropping down from ledges. The manufacturer cannot assume liability for damage caused by overloading, collision or other improper use.
When moving in public places, you are subject to local regulations.
⚠ Influence of medicine or alcohol reduces your driving capabilities.
When travelling outdoors, adapt your driving to weather and traffic conditions.
Do not use your electric wheelchair in extremely bad weather conditions.
Do not put your electric wheelchair into the free-wheeling position on slopes.
⚠️ Never reverse uphill.
⚠️ Reduce speed when you go round corners.
To be better visible when driving in the dark, wear the brightest possible clothing or clothes with reflectors and make sure that the reflectors of the wheelchair are clearly visible and drive with lightning on.
⚠️ Make sure that the lights and reflectors of your electric wheelchair are free from dirt and/or other objects that could hide them.
When transporting the wheelchair, never pick it up by grasping movable parts (wheels, seat cushion, etc.)
When transporting the electric wheelchair, no persons may be transferred along with it.
⚠️ No additional passengers may be taken.
When storing or parking your electric wheelchair outside, protect it with a shrouding cover against humidity.
High levels of humidity or very cold conditions can reduce the performance of your electric wheelchair.
⚠️ Never exceed the maximum load of 130 kg.
⚠️ Use only Vermeiren approved accessories.
Before getting on or off, taking apart or transporting your electric wheelchair, put your wheelchair off with the "ON/OFF" button.
⚠️ Check that the profile depth of the tyres is adequate.
⚠️ If your electric wheelchair has pneumatic tyres, be careful to inflate them to the correct pressure (see pressure indication on the tyres).
If devices and furnishings like ramps or lifts are available, use them.
Risk of injury in case of a sudden stop - Always use the safety belt.
Risk of burns – Be careful when driving in hot or cold environments (sunshine, extreme cold, etc.) for a sufficient amount of time and when touching - Surfaces can assume the environment temperatures.
Changing the software is only allowed by Vermeiren. For changes in the software contact Vermeiren.
2 Use
This chapter describes the everyday use. These instructions are for the user and the specialist dealer.
To find a service facility or specialist dealer near you, contact the nearest Vermeiren facility. A list of Vermeiren facilities can be found on the last page.
The electric wheelchair is delivered fully assembled by your specialist dealer. The instructions intended for the specialist dealer on how to set up the electric wheelchair are given in § 3.
2.1 Remarks on electromagnetic compatibility (EMC)
Your electric wheelchair has been tested according ISO 7176-21 for EMC-compliance. We wish to point out that sources of electromagnetic waves are liable to create interferences. The electronics of the wheelchair itself could affect other electric appliances too.
To reduce the effect of electromagnetic sources of interference, please read the following warnings:
⚠ WARNING: The wheelchair might disturb the operation of devices in its environment that emit electromagnetic field.
⚠ WARNING: The driving performance of the wheelchair can be influenced by electromagnetic fields (e.g. electricity generators or high power sources).
⚠ WARNING: Avoid using any portable TV or radio in the immediate environment of your wheelchair for as long as it is turned on.
⚠ WARNING: Avoid using any transmitter-receiver in the immediate environment of your wheelchair for as long as it is turned on.
⚠ WARNING: Check the area for transmitter masts and avoid using the wheelchair close to them.
WARNING: If involuntary movements or braking occur, turn off the wheelchair as soon as it is safe to do so.
Interfering electromagnetic fields may have a negative effect on the wheelchair's electronic systems. These can include:
• Disengagement of the engine brake
• Uncontrollable behavior by the wheelchair
• Unintentional steering movements
In the presence of very strong or enduring interfering fields, the electronic systems could even break down entirely or suffer permanent damage.
Possible sources of radiation include:
- Portable receiver and transmitter installations (receiver and transmitter with fixed antenna)
- Transmitting and receiving sets
- Portable TV, radio and navigation devices
- Other personal transmitting devices
- Mobile medium-range transmitting and receiving devices (e.g. car antennas)
- Fixed transmitting and receiving sets
- Fixed mobile transmitting and receiving devices
- Fixed radio, TV and navigation systems
- Long-range transmitting and receiving devices
- Radio and television towers
- Amateur radio sets
- Other home devices
- CD player
- Notebook
- Microwave oven
- Cassette recorder
- etc.
Devices like electric shavers and hair dryers will have no influence provided that they function perfectly and their cabling be in an excellent condition. Please conform to the operating instructions accompanying such electric instruments to ensure trouble free operating of your wheelchair.
2.2 Carrying the electric wheelchair
The best way to carry the electric wheelchair is to make use of free-wheel mode of the electric wheelchair. Place the wheelchair in free-wheel mode and roll the wheelchair with the push bar to the desired place.
When the wheelchair must be taken up or down stairs, do this with the wheelchair ramps or lift systems. At least two persons are required to move the wheelchair up or down stairs or over single steps.
Another way to carry the electric wheelchair is to dismantle the electric wheelchair. Carry the separate parts (frame, armrests, footrests, batteries) to the desired place.
2.3 Assembly and disassembly of the electric wheelchair
The electric wheelchair is delivered fully assembled. Your dealer delivers the wheelchair fully assembled and explains the various operating elements and their use. However, for your own safety we provide a further, detailed explanation of the different parts.
2.3.1 Assembly of the electric wheelchair
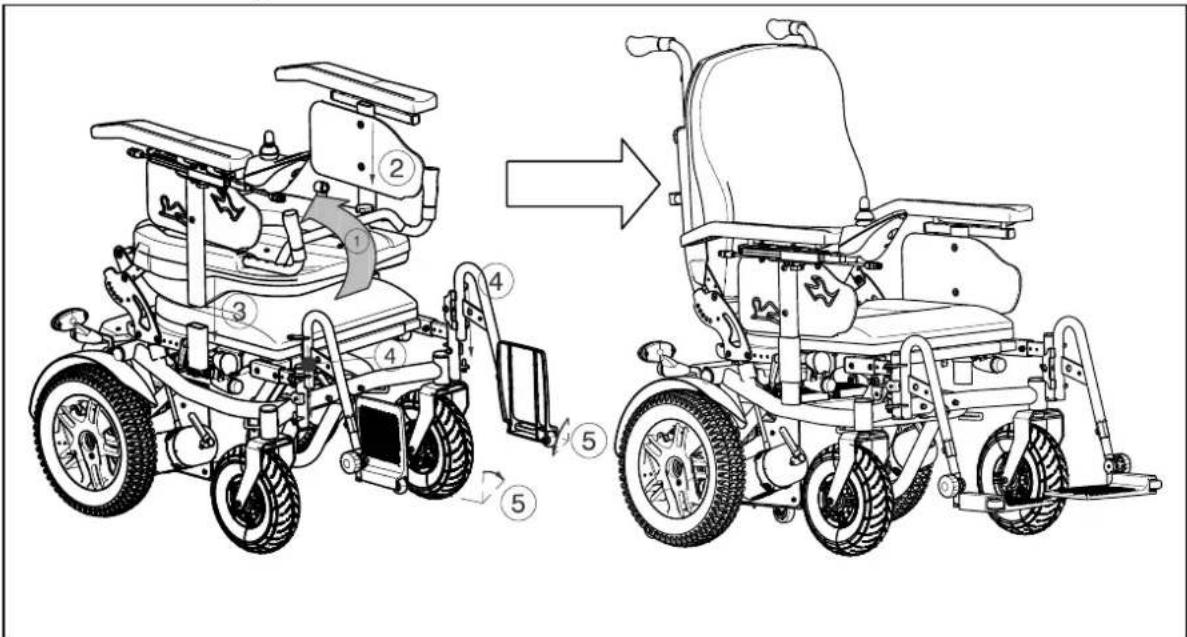
To assembly the electric wheelchair:
-
Unfold the backrest (paragraph 2.7).
-
Mount the armrest without operator control (paragraph 2.4).
-
Mount the armrest with operator control (paragraph 2.4).
-
Mount the footrests (paragraph 2.5).
-
Fold the footplates of the footrests down.
To disassembly the electric wheelchair do the reverse of the instructions above.
2.4 Mounting or removing armrest
⚠ WARNING: Risk of injury and/or damage - Make sure that the levers ① are properly tightened before using the wheelchair.
⚠ WARNING: Risk of tipping over - Check that the armrests are at the same height on each side.
CAUTION: Risk of clamping – Keep fingers, buckles and clothes away from the attachment points of the armrest.
The armrests can be removed so the patient can be moved sideways. The armrests can also be removed for therapeutic purposes and to move the patient from the wheelchair.
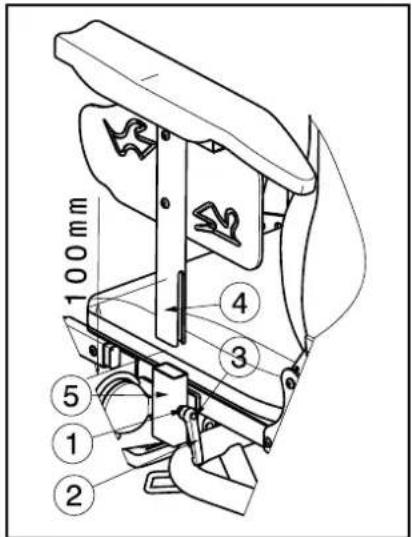
To mount the armrests on the electric wheelchair:
- Mount the armrest ④ in the square tube ⑤.
- Retighten the handle ① properly. (If the lever of handle ② is not in a good position, press on button ③ on the handle and place the lever ② in a good position that no risk of injury to the hands can appear.)
To remove the armrests from the electric wheelchair:
-
Turn on the handle ① until it come loose. (If the lever of handle ② is not in a good position, press on button ③ on the handle and place the lever ② in a good position that no risk of injury to the hands can appear.)
-
Remove the armrest ④ out the square tube ⑤.
The armrests are adjustable in different heights over a range of 100 mm (stepless).
- Loosen the lever ① a little.
- Move the square tubes ④ and ⑤ over each other until the desired armrest height.
- Retighten the lever ① hand-tightened.
- Check that the lever ① is securely fixed.
- Adjust the other armrest with the same instructions.
2.5 Mounting or removing of the footrests
CAUTION: Risk of injury – Make sure that you hold on the upper curve to prevent your fingers from getting caught and hurt.
CAUTION: Risk of injury – Make sure that the footrests are firmly fixated.
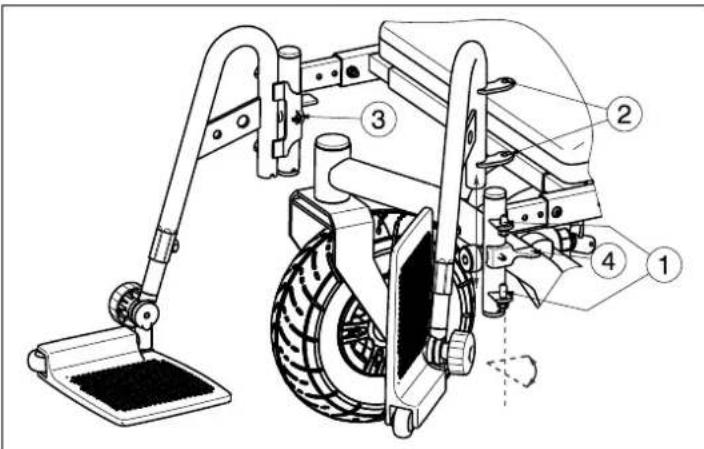
The mounting of the footrests is done as follows:
- Hold the footrest sideways at the outside of the wheelchairs frame and mount the pins ① into the holes ②.
- Turn the footrest inwards till the pin click in the hole of the attachment point ③. The lever ④ must point backwards. If the footrest does not engage immediately, push them lightly inwards.
- Turn the foot plates downwards.
To take off the footrests:
- Fold the foot plates upwards.
- Pull or push on lever ④.
- Turn the footrest to the outside of the wheelchair until the hole comes loose of the pin from attachment point ③.
- Pull the footrest upwards until the pins ① come out of the holes ②.
2.6 Suspension
CAUTION: Risk of injury – Set the range of both springs identically.
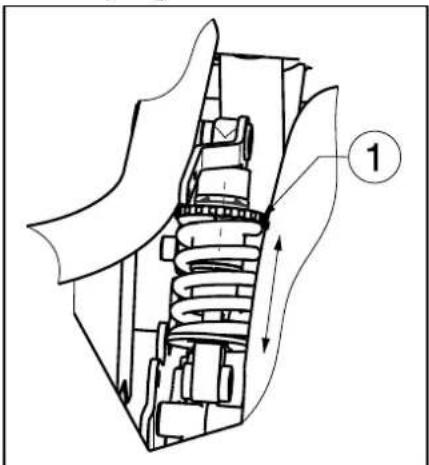
The strength of the springs above the drive motors can be adjusted to enhance your comfort. These springs are located on the back of the electrical wheelchair, next to the battery cover.
natural_image
Technical diagram of a mechanical assembly with labeled component (1), showing internal components and motion arrows (no text or symbols beyond label)If you turn the adjuster ① to the left, the range of the spring lengthens and the suspension becomes softer.
If you turn the adjuster ① to the right, the range of the spring shortens and the suspension becomes firmer.
2.7 Folding the backrest of the wheelchair
⚠ WARNING: Risk of injury – Make sure that both safety pins are engaged.
CAUTION: Chance of pinching – Do not place fingers between the components of the wheelchair.
For transport the backrest of the wheelchair can be completely folded to the seat.
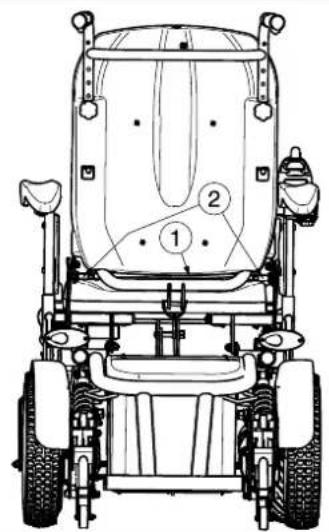
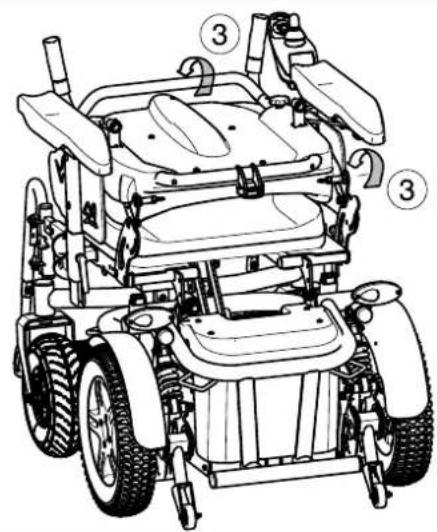
- Pull gently on the back strap ①.
- The safety pins of the back come loose ②.
- Fold the backrest forward ③.
To unfold the backrest:
- Pull gently on the back strap ①.
- Pull to the backrest until it clicks into position.
- Be sure that both safety pins ② click in the holes of the backrest adjustment plate.
2.8 Backrest inclination (mechanical)
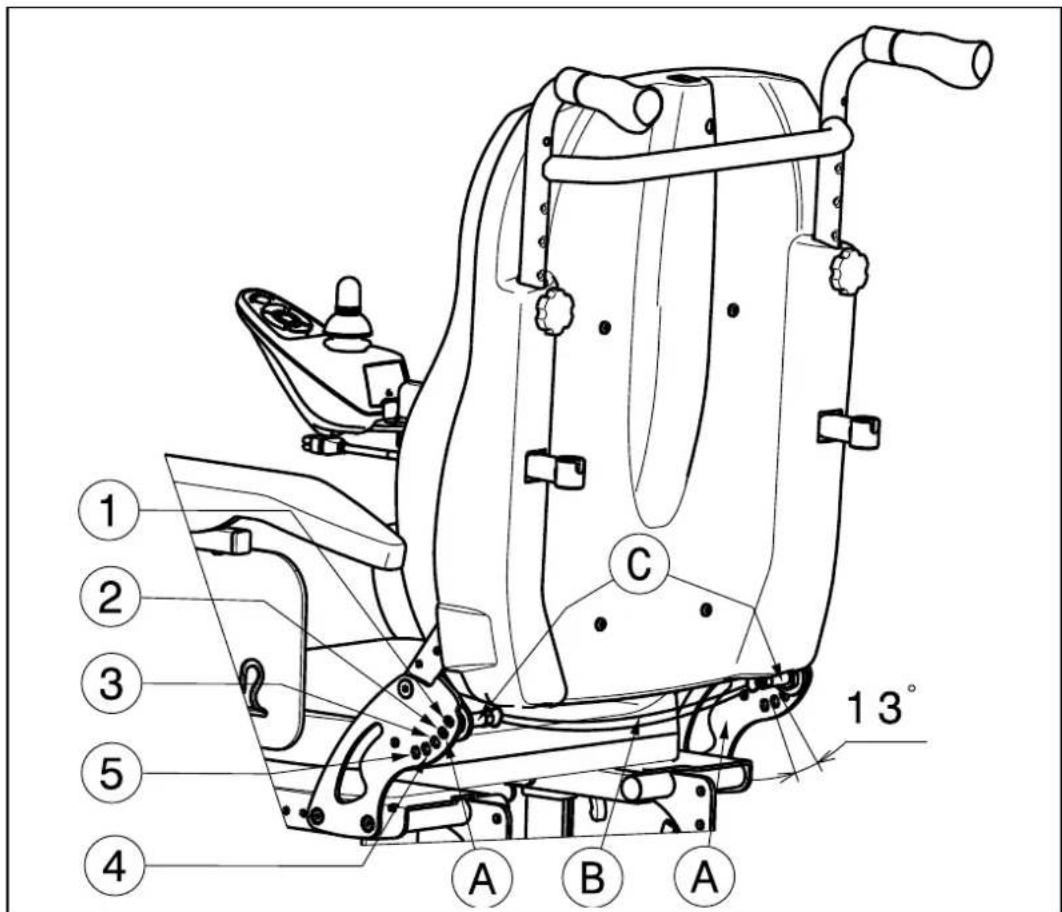
CAUTION: Risk of injury – Make sure that both locking mechanisms ① are properly engaged before using the wheelchair.
Make sure that the backrest is on both sides placed in the same position for the comfort of the patient.
The angle of the backrest can be adjusted in 5 different positions from +2° - +54° (steps 13°), for seat angle 2°.
| Angle of backrest | Position on backrest plate A |
| 2° Hole 1 | |
| 15° Hole 2 | |
| 28° Hole 3 | |
| 41° Hole 4 | |
| 54° Hole 5 |
Table 3: Angle of backrest for seat angle 2°
- Pull on the back strap Ⓑ until the locking pins Ⓒ on both sides come out the hole of the backrest plate Ⓓ.
- Push or pull the backrest forward or backwards until the desired angle (refer table 3).
- Check that the locking pins © are securely fixed.
Where an electrical back incliner is fitted, no manual adjustment is possible.
2.9 Adjusting handgrips
CAUTION: Risk of injury – Make sure that both star knobs ① are properly tightened before using the wheelchair.
⚠️ CAUTION: Risk of tipping over – Hang no other loads (e.g. rucksack, etc.) on the handgrips.
CAUTION: Risk of tipping over – Use only the last indentation of the handgrip tube for the maximum height adjustment.
The height of the handgrips can be adjusted in six different positions (steps: 30 mm).
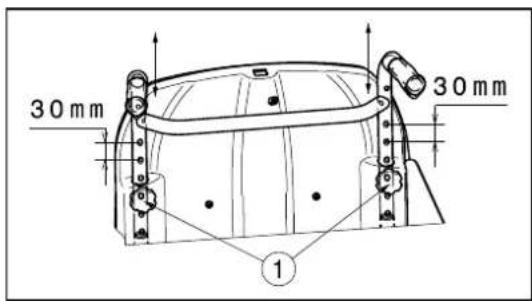
The handgrips can be adjusted in height depending on the size of the attendant.
- Loosen the star knobs ① located on the back of the backrest.
- Pull the handgrips into the desired position (6 positions). Indentions (steps 30 mm) have been placed into the tubing of the handgrips.
- Retighten the star knobs ① firmly by hand.
2.10 Transfer in and out the electric wheelchair
⚠ WARNING: Power down the wheelchair before getting in or out the wheelchair.
⚠️ CAUTION: In case you cannot perform the transfer in a safe manner, ask someone to assist you.
CAUTION: Risk of injury – Do not use the joystick, footplates, armrests as support.
CAUTION: Risk of tipping over of the wheelchair – Do not stand on the footplates.
natural_image
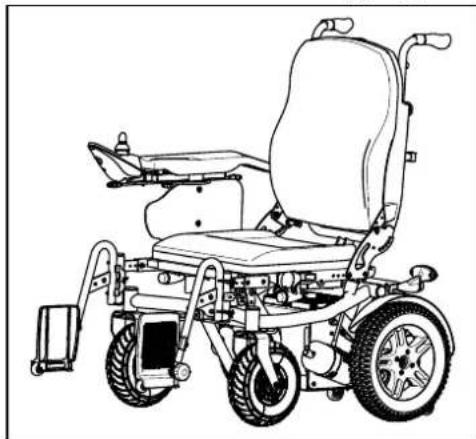
Line drawing of a modern electric wheelchair with visible wheels and seat (no text or symbols)- Park the electric wheelchair as close as possible to the place where you want to transfer.
- Check that the operator unit is switched off. Make sure that the wheelchair is NOT in freewheel mode.
- Fold the footplates upwards to prevent standing on them.
- If the transfer is on the side of the wheelchair, remove the armrest on that side.
- Transfer to / from the electric wheelchair.
2.11 Correct position in the electric wheelchair
Some recommendations for a comfortable use of the electric wheelchair:
- Position your backside as close as possible to the backrest.
- Make sure your upper legs are horizontal – If needed adjust the length of the footrests.
2.12 Driving the electric wheelchair
⚠ WARNING: Risk of burns – Be careful when driving in hot or cold environments (sunshine, extreme cold, etc.) for a sufficient amount of time and when touching - Surfaces can assume the environment temperatures.
⚠ WARNING: Risk of unsafe settings - Use only the driving characteristics described in this manual.
2.12.1 Preparing the electric wheelchair for use
When you start using your electric wheelchair, make sure that it is standing on level ground. All wheels must be in contact with the ground.
- Make sure that the freewheel mode is OFF and the operator control is switched off.
- Adjust the wheelchair best suited for yourself.
- Set the operator control in the most comfortable position.
- Sit down on the seat and verify that both armrests have been adjusted so your forearms are folded down.
- Put your wheelchair on with the "ON/OFF" button from the operator control.
Now put the speed control on the operator control to the minimum position. Your electric wheelchair is now ready for use.
2.12.2 Handling after usage
Before getting off from your electric wheelchair, make sure that all four wheels touch the ground simultaneously.
Push on the "ON/OFF" button from the operator control, to switch off the wheelchair. The display of the operator control goes out.
2.13 Operating the brakes
Let go of the joystick to stop the electric wheelchair.
2.13.1 Parking the electric wheelchair
Once your electric wheelchair has been turned off, no command can be sent to the driving system. Always park your electric wheelchair on sites that are easy accessible and on horizontal surfaces that the four wheels are touching the ground.
2.13.2 Operator controls
\* DX2 controller or Shark controller
The instructions for use from the operator controls you can find in the separate user manals of the operator controls that is included with your wheelchair.
Changing the software is only allowed by Vermeiren. For changes in the software contact Vermeiren.
2.13.3 Adjusting operator control
CAUTION: Risk of pinching - Do not put your fingers between the operator control and the other parts when positioning the operator control.
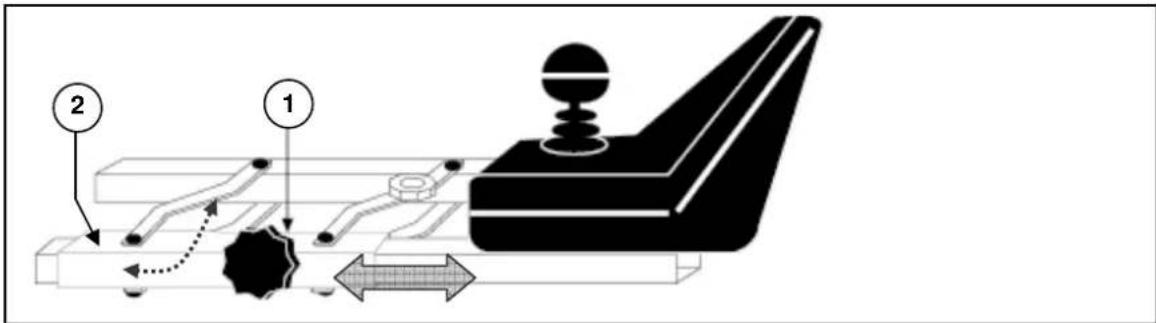
The operator controls horizontal position can be changed:
- Loosen screw ① just under the armpad a little bit.
- Move the operator control to the desired position or remove the operator control.
- Retighten screw ① properly.
If you pull screw ① to the side, the operator control can be turned to the side.
NOTE: Depending on the features of your wheelchair, screw ① could also be located beneath the guide tube ②.
2.13.4 Connections for charger / program unit
⚠ WARNING: Risk of injury - Check that all plugs (battery charger and programming unit) are removed before setting the wheelchair in motion.
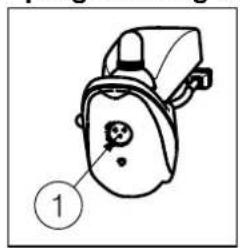
The socket ① for connecting the charger supplied is located on the front of the operator control. Here, too, is the connection for the programming unit, which should only be connected and used by authorised persons who have been trained to program it (Vermeiren personnel).
Make sure that the joystick is in the neutral (central) position when pressing the on/off button, otherwise the electronics will be blocked. This block can be lifted by switching the operator control off and then on again.
2.13.5 Your first trip
⚠ WARNING: Control your electric wheelchair - Accustom yourself with the driving behavior of your electric wheelchair.
- Driving
Once you are seated on your electric wheelchair and have started it as described above, take the joystick with your hand and push this in the required direction i.e.:
PUSH ACTION FORWARD = FORWARD MOVEMENT PUSH ACTION BACKWARD = BACKWARD MOVEMENT
- Braking
To brake, let go of the joystick, which will let it return to the zero position and slow down your electric wheelchair to a gentle stop. Practice pulling away and braking to get accustomed to the electric wheelchair. You need to be able to estimate how your electric wheelchair will react when you drive or brake.
- Driving in corners and bends
⚠ WARNING: Risk of tipping over - Reduce your speed before you enter a curve or corner.
⚠ WARNING: Risk of clamping - Always maintain an adequate distance from corners and obstacles.
Move the joystick into the position you wish to turn. The front wheels will turn accordingly and steer the electric wheelchair into a new direction. It is very important that you ensure that there is enough space allowing you to go around bends and corners. Narrow passages must preferably be approached in a large curve so as to allow you to enter the narrowest part as straight from the front as possible.
Take care not to enter curves and corners diagonally. By ‘cutting the corner’, chances are that your rear wheels, back of wheelchair will run into obstacles and destabilize your electric wheelchair.
2.13.6 Backward movement
⚠ WARNING: Control your electric wheelchair - Accustom yourself with the driving behavior of your electric wheelchair.
⚠ WARNING: Control your speed - Always go backward in the lowest speed possible.
⚠ WARNING: Risk of collision - Always look to the back when you go backward.
Rearward driving requires increased concentration and care. This explains why we have greatly reduced the speed of rearward movement in comparison with forward driving. But we still recommend that you put the speed on minimum when you drive backward. Left and right controls act inverse when driving backwards.
2.13.7 Going uphill
⚠ WARNING: Control your electric wheelchair - Accustom yourself with the driving behavior of your electric wheelchair.
⚠ WARNING: Control your electric wheelchair - Never put your electric wheelchair in neutral on slopes.
⚠ WARNING: Control your speed - Move on slopes as slow as possible.
⚠ WARNING: Risk of tipping over - Do not exceed the maximum gradient of static and dynamic stability uphill (see paragraph "Technical specifications").
⚠ WARNING: Never reverse going uphill.
Always approach slopes directly from the front and, to avoid tipping over, see that all four wheels stay in contact with the ground at all times (ramps, driveways, etc.).
If you come to a stop on a slope by letting go of the joystick, the engine break will prevent your electric wheelchair from rolling backward. As soon as the joystick returns to zero position, the engine break is activated.
To resume your uphill drive, push the joystick as much as possible to the front to ensure the release of a sufficient amount of power. This will allow your electric wheelchair to slowly ascend the slope.
If your wheelchair is unable to drive up, turn the speed control up and try again.
2.13.8 Going downhill
⚠ WARNING: Control your electric wheelchair - Accustom yourself with the driving behavior of your wheelchair.
⚠ WARNING: Control your wheelchair - Never put your electric wheelchair in neutral on slopes.
⚠ WARNING: Control your speed - Move on slopes as slow as possible.
⚠ WARNING: Risk of tipping over - Avoid sharp bends.
⚠ WARNING: Risk of tipping over - Do not exceed the maximum gradient of static and dynamic stability downhill (see paragraph "Technical specifications").
Always approach downhill slopes directly from the front. Slantwise approaches can lead to some of the wheels no longer staying in contact with the ground (danger of tipping over).
The weight of the electric wheelchair will increase your downhill speed. Lower the speed on the operator control.
Avoid sharp bends on downhill slopes. The weight of your electric wheelchair could cause your electric wheelchair to lift up on one side or even fall over around bends.
2.14 Driving the electric wheelchair on stairs
If you want to be taken up or down stairs with the wheelchair, you will need a wheelchair ramp or wheelchair lift system.
2.15 Driving the electric wheelchair on ramps
⚠ WARNING: Risk of injury - Do not exceed the maximum load of the ramps.
⚠ WARNING: Risk of injury - Choose the correct ramps to prevent injury or damage.
⚠ WARNING: Risk of injury - Be sure that the wheel height is high enough to get over the free height of the ramps. The electric wheelchair frame may not touch the ramps.
⚠ WARNING: Risk of injury - Use a restraining safety belt to secure yourself in your wheelchair.
⚠ WARNING: Risk of tipping over - Put the adjustment functions (seat, backrest, footrests, ...) so that the wheelchair has the best stability.
Should you wish to use ramps to drive over an obstacle, please note the following:
- Find out from the manufacturer what the maximum load is for the ramps.
- Drive on the ramps at the lowest speed as possible.
- See the instructions in the chapter "your first trip".
If the wheelchair has adjustment functions, ensure that (because these has influence on the stability of the electric wheelchair):
- The seat is in the lowest position as possible and in the horizontal position.
- The backrest is in the upright position.
- The footrests have been set so that no collision can occur while passing the obstacle.
If another person is pushing you, note that the large weight of the electric wheelchair exerts appreciable reverse forces.
2.16 Pushing the wheelchair
⚠ WARNING: Control your electric wheelchair - Never put your electric wheelchair in neutral on slopes. It may accidentally roll away.
The wheelchair is fitted with a freewheel device that is accessible and operable only by the attendant.
2.16.1 220W motors - 6km/h / 350W motors - 10km/h
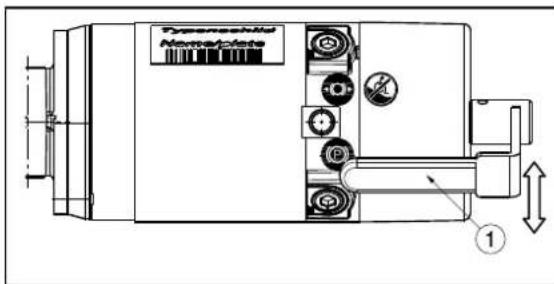
Put the chair in neutral with the adjusting levers ① on both motors.
Clutch or declutch the motor by following the instructions below:

DRIVING
Push the adjusting levers ① of both motors in the position of the symbol for driving. Switch the operator control out and in. Electronically controlled driving is now possible.

TRAL
Pull the adjusting levers ① of both motors in the position of the symbol for neutral and you will activate the wheelchair's free-running mode. The wheelchair can now be pushed without electronic drive.

In free wheel mode, the electronic brake is deactivated and the wheelchair will no longer be held back. Do not activate free wheel mode on slopes.
⚠️ You should only use free-running to transport the wheelchair or to move it out of a danger zone.
When free-running is activated, the electromagnetic braking system is deactivated, so the wheelchair is no longer secured against rolling away. Take care not to set the wheelchair down on slopes or uneven terrain, or it may accidentally roll away.
The electronic system will indicate, through the lock symbol flashing, that electronic driving is not possible.
2.17 Transport in the car
⚠ WARNING: Risk of injury - No people or objects should be under the electric wheelchair, during transportation.
⚠ WARNING: Risk of injury - See that the wheelchair is attached properly. So you can avoid injury from the passengers during collision or sudden braking. Make sure that they are only attached to solid parts of the frame.
⚠ WARNING: Risk of injury- Use for attaching the wheelchair and passenger NEVER the same seatbelt.
To transport the wheelchair in the car use following steps:
The best way to transport your electric wheelchair in the car is to drive the electric wheelchair in the car by using ramps.
When you are not experienced to drive the electric wheelchair by using of ramps you can also put the wheelchair in neutral mode and push the wheelchair in the car by using ramps.
When the wheelchair does not fit in the car it is also possible to transport the wheelchair by the following steps:
- Remove all moveable parts prior to transporting (footrests, armrests, etc.).
- Store moveable parts safely.
- Place the electric wheelchair in the car with 2 persons by grasping to the fixed parts of the frames.
- Attach the solid parts of the frame securely to the vehicle.
- Place the wheelchair in drive mode (engage the parking brakes) and check that the operator control is switched off.
2.18 Use of the wheelchair as seat in a motor vehicle
WARNING: The wheelchair has passed the crash of ISO 7176-19: 2008 and, as such, has been designed and tested for use only as forward-facing seat in a motor vehicle.
WARNING: The wheelchair's pelvic belt alone is not suited as an occupant restraint belt.
The wheelchair is tested using the four-point strap-tie system and a 3-point occupant-restraint system.
Whenever feasible, use the seat of the vehicle and store the wheelchair in the cargo area.
Steps to secure the wheelchair in a motor vehicle:
- Check that the vehicle is equipped with a suitable wheelchair tie down and occupant-restraint system, conform ISO 10542.
- Check that the components of the wheelchair tie down and occupant restraint system are not frayed, contaminated, damaged or broken.
- If equipped with an adjustable seat and/or back tilt, make sure that the wheelchair user is sitting as upright as possible. If the user's condition prevents this, a risk assessment should be done to evaluate the user's safety during transit.
- Remove all mounted accessories such as trays and respiratory equipment, and secure them in a safe place.
- Position the wheelchair facing forward in the travelling direction, centrally between the tie-down rails mounted in the floor of the vehicle.
- Make sure that the indicated zones around the wheelchair user are clear from rigid vehicle parts.
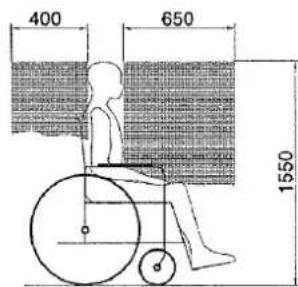
figure 1
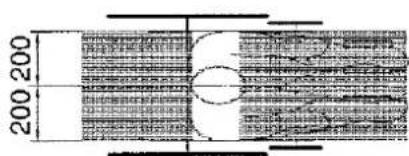
figure 2
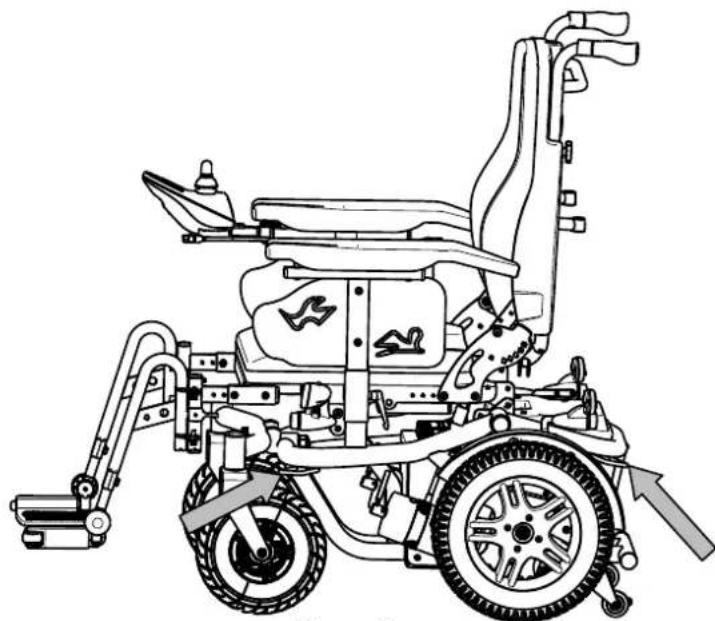
- Mount the front securement straps according to the instructions of the strap-system manufacturer at the indicated place. (figure 3)
This place is marked on the wheelchair with a symbol. (figure 4)
-
Roll back the wheelchair until the front straps are tight.
-
Apply the wheelchair brake (loosen the joystick and shut down the operator control).
-
Mount the back securement straps according to the instructions of the strap-system manufacturer at the indicated place. (figure 3)
-
This place is marked on the wheelchair with a symbol. (figure 4)
natural_image
Line drawing of a small electric wheelchair with visible mechanical components and wheels (no text or symbols)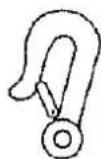
figure 4
Figure 3
Steps to secure the wheelchair user:
-
Remove both armrests.
-
If present, attach the wheelchair's pelvic belt.
-
Attach the occupant restraint belts according to the instructions of the strap-system manufacturer.
-
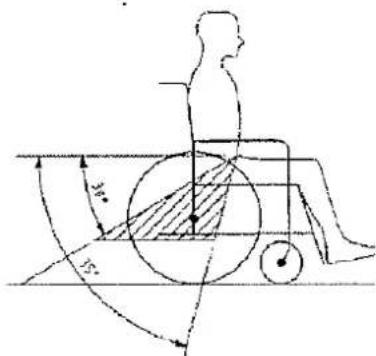
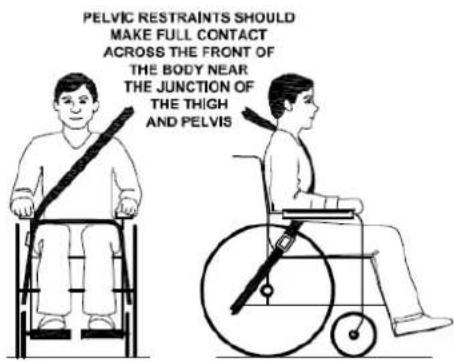
Wear the pelvic belt low across the front of the pelvis, so that the angle of the pelvic belt is within the preferred zone of 30^ to 75^ to the horizontal, similar to that shown below.
-
A steeper (greater) angle within the preferred zone is desirable.
-
Adjust the belt tightly according to the instructions of the strap-system manufacturer, consistent with the user's comfort.
-
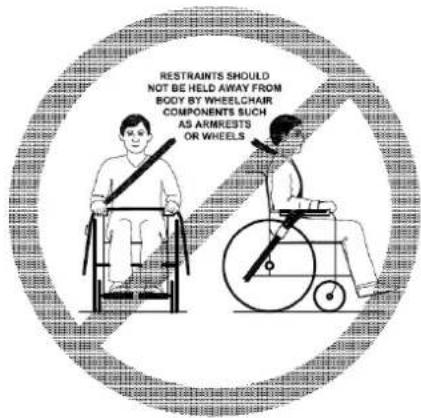
Ensure that the restraint belt connects in a straight line to the anchor point in the vehicle and that no bends in the belt are visible, for instance at the axle of the rear wheel.
-
Install the armrests, if desired, make sure that belts are not twisted or held away from the body by wheelchair components such as armrests or wheels.
2.19 Transport in an airplane
The electric wheelchair can be transported in an airplane. Electric wheelchairs shall be checked at the desk. Announce the wheelchair on time by the concern airline before departure. Do not use the electric wheelchair as a seat in an airplane, the wheelchair must be stored in the cargo room.
To transport the wheelchair in an airplane note the following requirements:
1. Type and properties of wheelchair (joystick, batteries)
The wheelchairs shall be foreseen of dry or gel batteries. Mostly these batteries must not be removed out the wheelchair. Only disconnect and insulate the electrical connections on the battery.
2. Dimensions and weight of the wheelchair
The allowable weight and dimensions of the wheelchair depends on the type of the airplane.
3. Damage on the wheelchair
It is possible that the wheelchair could be damaged because the wheelchair will be stored in a narrow area with the suitcases and other goods.
To prevent damage on the wheelchair:
- Put the electrical adjustments in standard position (lift column as low as possible, seat inclination horizontal, back inclination the most foreward).
- Fold the footplates upwards, place the armrests in the most inward position.
- Check that the adjustment levers shall positioned inwards.
- Cover the operator control with an soft material that can withstand shocks.
Before travelling contact the concerned airline about the requirements for transporting the wheelchair in an airplane.
2.20 Batteries
The standard for your electric wheelchair is two closed, 12 V/70 Ah AGM batteries. The batteries used with your electric wheelchair are drive batteries which only attain full capacity after a few charging and use cycles.
If the batteries loose their power after long usage, or if they are damaged, get them both replaced by a specialist dealer only.
We accept no liability for damage caused through using other types of batteries. If the batteries are opened, all manufacturer liability and all claims will become void. Do not use the batteries at temperatures below +5°C or above +50°C (the ideal is: +20°C).
2.21 Battery charger
To charge the batteries, only use the battery charger supplied - IMPULSE S (8 A). For the user instructions of the battery charger you can refer to the manual of the Impulse S that is delivered with your battery charger.
2.22 Charging the batteries
CAUTION: Risk of injury - Only use the battery charger supplied to charge batteries.
As the IMPULSE S (8 A) charger aligns the charge curve with the AGM batteries' charge level, you can recharge your wheelchair after each use. This avoids any aggressive battery charging and the "memory effect".
Recharge the wheelchair, at the latest, when the charge indicator on the operator control goes into the red zone. If, despite this, you continue driving, eventually only the last red diode lights up and flashes continually, indicating that the batteries are nearly flat. If you disregard this warning signal, too, an error message will shortly appear indicating that the batteries can no longer provide power for driving. The batteries should therefore be charged before these error messages appear, using the supplied battery charger IMPULSE S (8 A). Avoid the batteries becoming drained, in any case.
- FIRST USE
First put the plug of the battery charger into the wall socket. After an LED combination has lit up, the charger switches to STANDBY. Both LEDs (green and yellow) are active.
Next, connect the charger cable with the three-pin plug to the loader socket on the electric wheelchair's operator control. Once connected to the batteries, the charger automatically begins charging. Now only the yellow LED is active.
When charging is complete, the yellow LED goes out and the green LED comes on. Now remove the charger cable from the operator control. The charger switches back to STAND-BY mode (yellow and green LEDs active).
If the charger cable is not removed, a tiny current will keep the batteries topped up (trickle charging).
If you decide not to use your electric wheelchair for an appreciable period, you must nevertheless recharge it regularly to keep it in a running condition ready for immediate use.
The manufacturer accepts no liability for damage caused by improper charging.
For further information, please refer to the user instructions provided with the charger.
2.23 Thermal fuse
natural_image
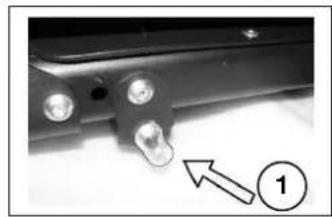
Close-up of a mechanical component with two metallic pins and a numbered arrow pointing to a specific part (no text or symbols visible)To protect the motor against overload, on the right side of the seat frame there is a thermal safety mechanism ① that will automatically cut off the motor to prevent overheating and thus rapid wear and tear or breakdowns. This can occur if you go up or down slopes that exceed the maximum gradient indicated. Nominal loads exceeding the maximum could also trigger the safety mechanism.
To be able to use the electric wheelchair again, remove the overload and wait till the motor has cooled down. Then gently press the thermal safety mechanism back in. Your wheelchair is now ready for use again.
2.24 Anti-tipping (B78)
⚠️ CAUTION: Risk of injury - Check that the anti-tipping is working before driving with the electric wheelchair.
natural_image
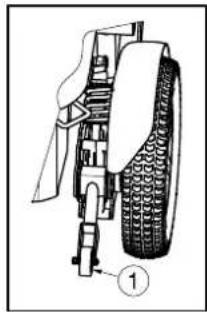
Technical diagram of a mechanical assembly with labeled parts (no readable text or symbols)For your safety your electric wheelchair is equipped with an anti-tipping ① that works with a suspension system, and when crossing small obstacles (no higher than 70 mm) tips back a little, yet overtipping is prevented by a stopping mechanism. Do not remove the anti-tipping device as your wheelchair will no longer be secured against accidentally tipping over.
3 Installation and adjustment
The instructions in this chapter are for the specialist dealer only.
The Forest has been designed as a rear wheel drive electric wheelchair.
⚠ WARNING: Risk of unsafe settings - Use only the settings described in this manual.
⚠ WARNING: Risk of tipping over - Variation allowed adjustments can still change the stability of your wheelchair (tilt back or sideways).
3.1 Tools
The Vermeiren Forest shall need following tools:
• Wrench set n°10 to n°24
• Allen keyset n°3 to n°4
- Screwdriver Phillips head
3.2 Manner of delivery
The electric wheelchair shall be delivered with:
- Framework with armrests, operator control, rear and front wheels, seat and backrest (optional: electrically adjustable seat/back unit, lift system)
• 1 pair of footrests (standard: B06; removable, can be turned outwards)
• 2 x drive batteries, 2 x drive motors
• Impulse S charger (8A) + manual of Impulse S charger - Electronics
- Tools
• Operator control + manual operator control - Accessories
- Back strap
Before use, check that everything is included and that no products are damaged (example by transport, ...). Please note that the basic configuration may differ in different European countries. Contact your specialist dealer.
3.3 Possible adjustments
⚠ WARNING: Risk of injury - Turn the electric wheelchair off before you perform any adjustments.
WARNING: Risk of injury - Never perform any adjustments while you are driving.
⚠ WARNING: Risk of injury - Adjustments may only performed by your specialist dealer.
⚠ WARNING: Risk of injury - Make sure all screws, levers are firmly secured before driving with your electric wheelchair.
CAUTION: Risk of clamping – Keep fingers, buckles and clothes away from the attachment points or any moving parts.
3.3.1 Adjusting the seat height and seat angle
⚠ WARNING: Risk of injury - Never change the seat height or seat angle when the user is sitting in the wheelchair.
⚠ WARNING: Risk of injury - Be careful when adjusting the seat height or seat angle that the seat frame cannot fall down.
The Forest is adjustable in 3 different seat heights (range 60 mm: 420 mm, 450 mm and 480 mm) by changing the position of the seat frame (method 1).
The Forest is adjustable in 4 different seat angles ( 0^-4^-7^-11^ ) by changing the position of the plates ③.
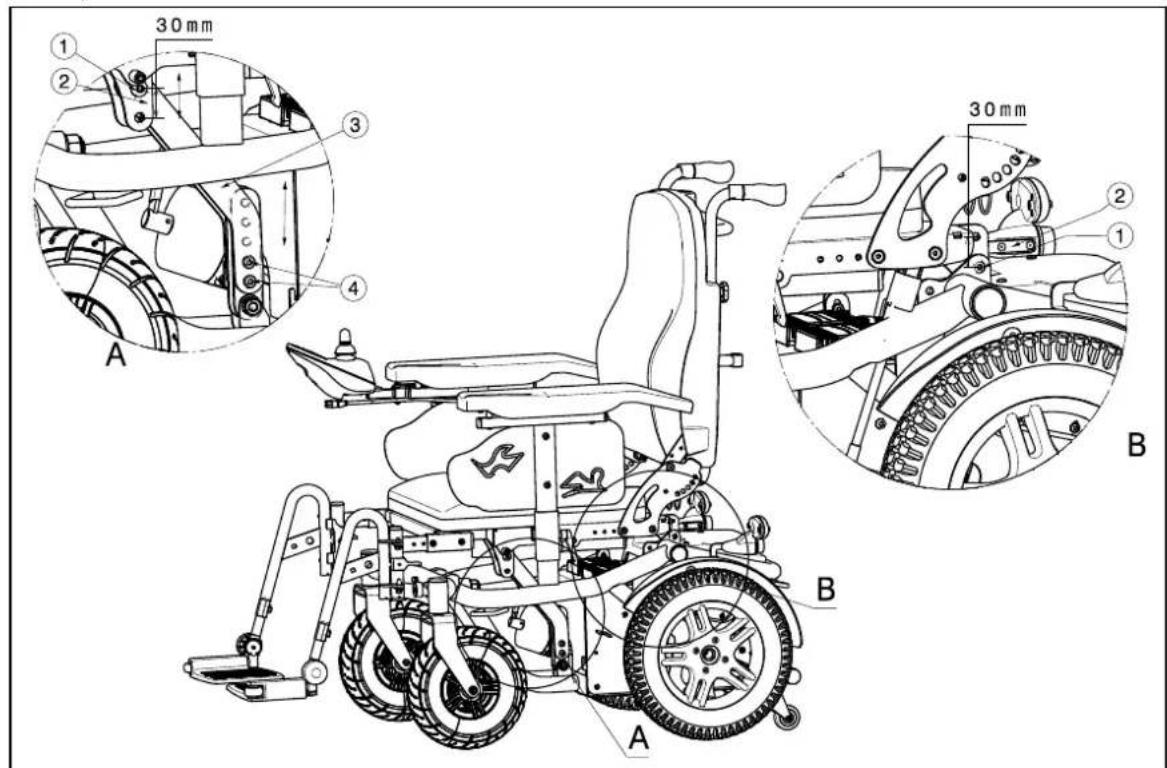
Adjusting seat height (not for adjusting seat inclination)
- Remove footrests, armrests and fold down backrest.
- Remove the screws ① from the connection plates ② just below the seat frame.
- Place the seat height in the desired position by mounting the connection plate ③ in the right hole of the plates ② mounted on the seat frame. Place the holes of connection plate ② in detail A in the same position as the holes of connection plate ② in detail B.
- Retighten the screws ① properly.
- Check that the seat frame is firmly fixated.
Adjusting seat angle
- Remove footrest, armrests and fold down backrest.
- Place something between the seat frame and lower frame, or let someone lift the seat frame.
- Remove the screws ④ from the plates ③ just below the seat frame.
- Place the seat angle in the desired position.
- Retighten the screws ④ properly.
- Check that the seat frame is firmly fixated.
3.3.2 Adjusting the seat depth
⚠ WARNING: Risk of injury - Never change the seat depth when the user is sitting in the wheelchair.
⚠ WARNING: Risk of injury - Check that the backrest plates ② on both sides are always set in the same seat depth position.
The Vermeiren Forest is adjustable in different seat depths over a range of 430 mm to 490 mm.
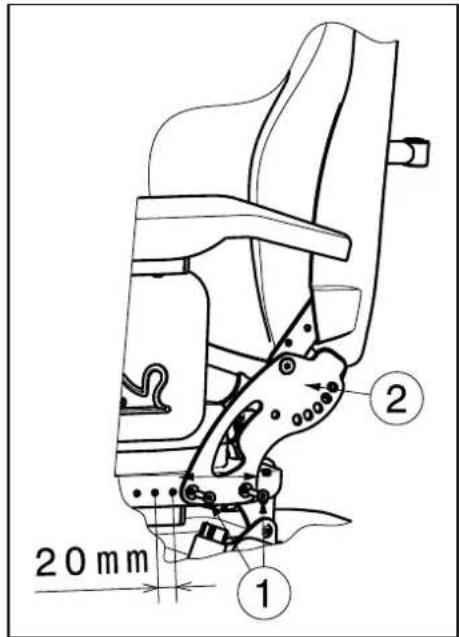
The seat depth is adjusted in 4 positions (steps of 20 mm) by moving the backrest into different positions.
- Loosen the two screws ① on either side of the frame.
- Pull the backrest plates ② more backwards or frontwards until the desired position and until the relevant holes lie above one another so that the fixing screws ① can be inserted through the frame.
- Hand-tighten the screws ① back up with the nuts you previously loosened.
3.3.3 Adjusting the seat width
⚠ WARNING: Risk of tipping over - Check that the armrests and footrests are positioned identically on each side.
The seat width can be adjusted by moving the armrests and footrests in horizontal direction.
* Adjusting armrests:
⚠ WARNING: Risk of injury - Keep a safe distance of 25 mm of the armrest tube ② in the tube of the seat frame ③ ③.
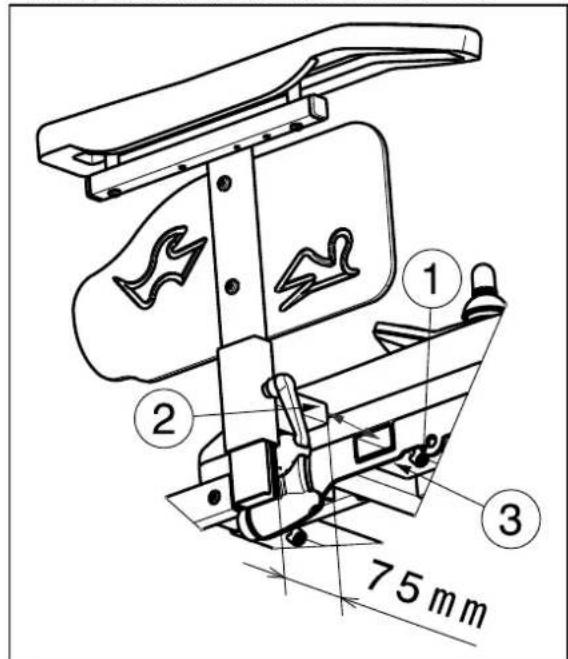
-
Loosen the screws ① just under the seat frame on each side.
-
Move the armrest in an horizontal direction until the correct seat with, by moving the square tubes ② and ③ over each other. (Range 50 mm on each side: stepless)
-
Retighten the screws ① properly.
-
Repeat instructions above for the other armrest.
* Adjusting footrests:
⚠ WARNING: Risk of injury - Keep a safe distance of 25 mm of the footrest tube ② in the tube of the seat frame ③ ④.
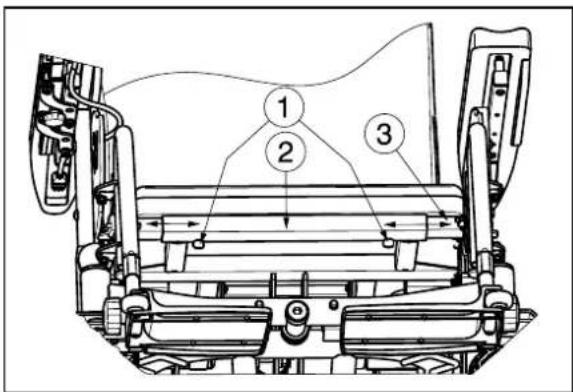
-
Loosen the hexagon socket set screws ① on the front just below the seat frame on each side.
-
Move the footrest in an horizontal direction until the correct seat width. (range 100 mm on each side: stepless)
-
Retighten the hexagon socket set screws ① properly.
3.3.4 Adjusting of the footrests
* Adjusting length:
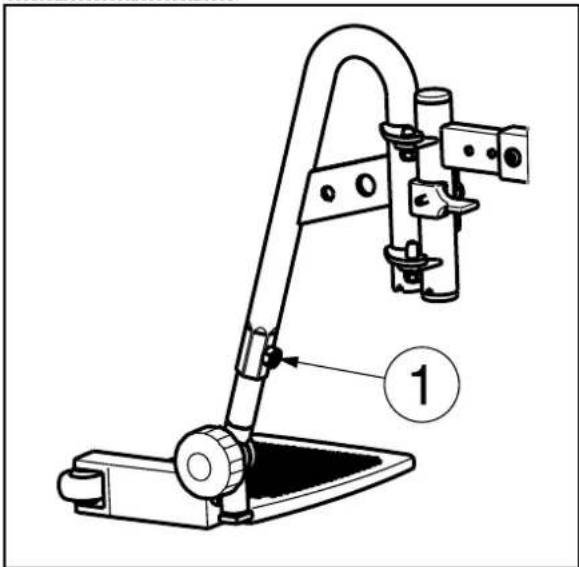
Adjust the length of the footrests as follow:
- Loosen the screw ①.
- Adjust the length of the footrest to a comfortable length.
- Tighten the screw ① properly.
Check that the footrests are positioned identically on both sides.
* Adjusting thigh length:
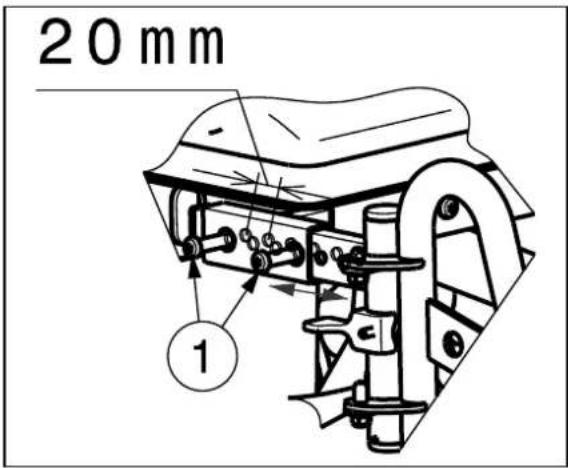
- Loosen the screws ① on the front of the seat frame on each side.
- Move the footrest backwards or forewards until the desired thigh length. (3 positions possible: steps 20 mm)
- Retighten the screws ① properly.
- Repeat instructions above for the other footrest.
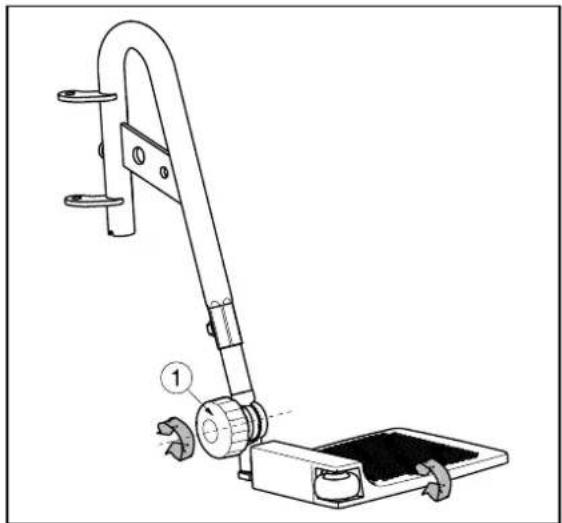
* Adjusting angle of the footplates:
The angle of the footplates can be adjusted according following instructions:
natural_image
Technical line drawing of a mechanical device with a curved arm and base plate (no text or symbols)- Loosen the star knob ① a little bit.
- Turn the footplate upwards or downwards until the desired angle. (range 99°: steps 11°)
- Retighten the star knob ① properly.
3.4 Battery connections
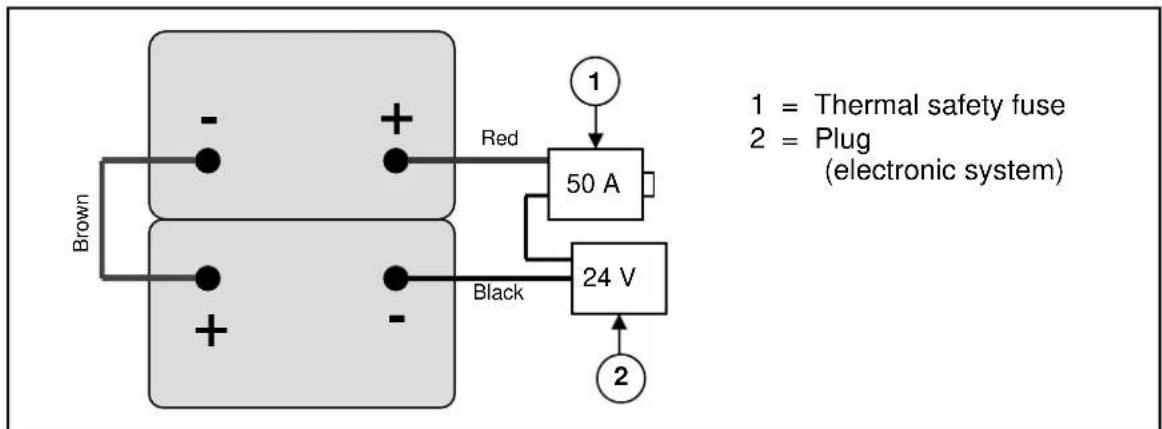
flowchart
graph TD
    A["1 = Thermal safety fuse"] --> B["50 A"]
    C["2 = Plug (electronic system)"] --> D["24 V"]
    B --> E["Black"]
    D --> F["Red"]
    G["Brown"] --> H["-"]
    I["+"] --> J["+"]
    K["+"] --> L["-"]
    M["+"] --> N["-"]
3.5 Tyre changing
CAUTION: There must be no air in the tube before the tyre can be removed.
CAUTION: Risk of damage - If handled improperly, the rim might become damaged.
Only an expert can guarantee correct assembly. Work not done by your specialist dealer, would void any warranty claims.
Use only inflating equipment which complies to regulations and indicates the pressure in bar. We do not accept any liability for damage caused by using inflation equipment or wheels not supplied by the manufacturer.
⚠ WARNING: Risk of injury - Check that the pressure is correct.
CAUTION: Risk of injury - Make sure that no objects, body parts or inner tubes are pinched between the tyre and the rim when mounting a tyre.
• Steering wheels (front wheels)
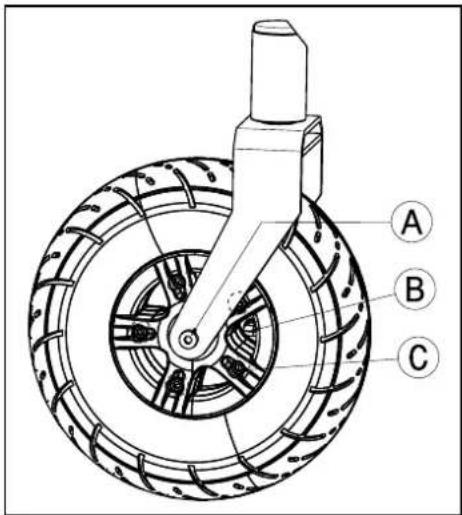
DISMANTLING
A. Loosen the screw on the steering wheel axle and remove it from the steering wheel fork.
B. Let the air out of the steering wheel by lightly pressing the pressure pin on the valve.
C. Loosen the 5 screws that hold the split rim together. Now separate the rim sides.
ASSEMBLY
Insert the partly-filled inner tube into the tyre.
C. Connect the two sides of the rim through the tyres and use the 5 connecting screws to screw the rim together.
B. Make sure that the valve juts out of the valve opening in the rim.
A. Put the wheel back into the front wheel fork and inflate the wheel.
- Driving wheels (rear wheels)
⚠ WARNING: Risk of injury - Make sure all screws are firmly secured by hand before driving with your electric wheelchair. Screw adhesive (ex. Loctite) should be applied to the screws on the flange. Screw adhesive will only work if the thread is free of grease and particles.
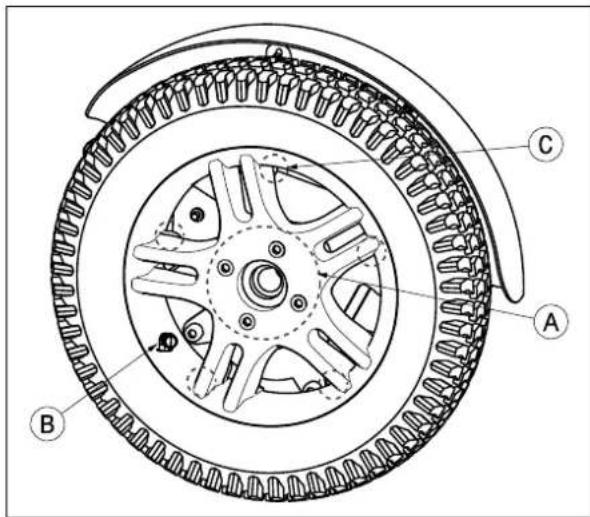
DISMANTLING
A. Unscrew and remove the axle nut on the drive wheel and the 4 screws that attach the wheel to the flange.
B. Let the air out of the wheel by lightly pressing the pressure pin on the valve.
C. Unscrew the 5 screws on the inside of the rim. Separate the rim sides.
ASSEMBLY
Insert the partly-filled inner tube into the tyre.
C. Connect the two sides of the rim through the tyres and screw them back again.
B. Put the valve through the hole for it in the rim.
A. Put the wheel back on the flange and secure these connection with the 4 screws.
Afterwards secure the wheel by hand-tightening the axle nut. Inflate the wheel to the recommended tyre pressure.
3.6 Changing the battery
⚠️ CAUTION: Risk of burns - Do not come in contact with the acid from the batteries. See for a good ventilation of the battery compartment.
The battery shall be changed by trained personnel. To change the batteries, send your electric wheelchair to the specialist dealer.
4 Maintenance
For the maintenance manual of the electric wheelchairs refer to the Vermeiren website: www.vermeiren.be.
VERMEIREN
GARANZIA CONTRATTUALE
natural_image
Empty white rectangle with a thin black border (no text or symbols)Stempel verkoper/Timbre du vendeur
Dealer stamp/Händlerstempel
natural_image
Empty white rectangle with a thin border (no text or symbols)NEDERLANDS
CONTRACTUELE GARANTIE
- please return within 8 days of date of purchase or register your product at
our website, http://www.vermeiren.be/registration
The electric wheelchair was serviced:
Dealer's stamp:
Date:
Dealer's stamp:
Date:
Dealer's stamp:
Date:
Dealer's stamp:
Date:
Dealer's stamp:
Date:
Dealer's stamp:
Date:
Dealer's stamp:
Date:
Dealer's stamp:
Date:
Dealer's stamp:
Date:
Dealer's stamp:
Date:
- For service checklists an additional technical information, please see our specialist dealers nearest to you. More information on our website at: www.vermeiren.com.
Notes
Belgium
N.V. Vermeiren N.V.
Vermeirenplein 1 / 15
B-2920 Kalmthout
Tel: +32(0)3 620 20 20
Fax: +32(0)3 666 48 94
website: www.vermeiren.be
e-mail: info@vermeiren.be
Germany
Tel: +43(0)732 37 13 66
Fax: +43(0)732 37 13 69
website: www.vermeiren.at
e-mail: info@vermeiren.at
Italy Switzerland
Realtime S.R.L. Vermeiren Suisse S.A.
website: www.realtime.it
e-mail: info@reatime.it
Poland The Netherlands
Vermeiren Polska Sp. z o.o Vermeiren Nederland B.V.
ul. Łączna 1
PL-55-100 Trzebnica
Tel: +48(0)71 387 42 00
Fax: +48(0)71 387 05 74
website: www.vermeiren.pl
e-mail: info@vermeiren.pl
Domstraat 50
Spain Czech Republic
Vermeiren Iberica, S.L. Vermeiren ČR S.R.O.
Trens Petits, 6. - Pol. Ind. Mas Xirgu.
17005 Girona
Tel: +34 902 48 72 72
Fax: +34 972 40 50 54
website: www.vermeiren.es
e-mail: info@vermeiren.es
- Instructions to the specialist dealer
- Contents
- Productdescription....3
- Use....10
- Installation and adjustment....26
- Maintenance ....32
- Preface
- Productdescription
- Intended Use
- Technical specifications
- Components
- Accessories
- Explanation of symbols
- Safety instructions
- Use
- Remarks on electromagnetic compatibility (EMC)
- Carrying the electric wheelchair
- Assembly and disassembly of the electric wheelchair
- Assembly of the electric wheelchair
- Mounting or removing armrest
- Mounting or removing of the footrests
- Suspension
- Folding the backrest of the wheelchair
- Backrest inclination (mechanical)
- Adjusting handgrips
- Transfer in and out the electric wheelchair
- Correct position in the electric wheelchair
- Driving the electric wheelchair
- Preparing the electric wheelchair for use
- Handling after usage
- Operating the brakes
- Parking the electric wheelchair
- Operator controls
- \* DX2 controller or Shark controller
- Adjusting operator control
- Connections for charger / program unit
- Your first trip
- Backward movement
- Going uphill
- Going downhill
- Driving the electric wheelchair on stairs
- Driving the electric wheelchair on ramps
- Pushing the wheelchair
- 220W motors - 6km/h / 350W motors - 10km/h
- DRIVING
- TRAL
- Transport in the car
- Use of the wheelchair as seat in a motor vehicle
- Transport in an airplane
- Type and properties of wheelchair (joystick, batteries)
- Dimensions and weight of the wheelchair
- Damage on the wheelchair
- Batteries
- Battery charger
- Charging the batteries
- - FIRST USE
- Thermal fuse
- Anti-tipping (B78)
- ⚠️ CAUTION: Risk of injury - Check that the anti-tipping is working before driving with the electric wheelchair.
- Installation and adjustment
- Tools
- Manner of delivery
- Possible adjustments
- Adjusting the seat height and seat angle
- Adjusting seat height (not for adjusting seat inclination)
- Adjusting seat angle
- Adjusting the seat depth
- Adjusting the seat width
- Adjusting of the footrests
- Battery connections
- Tyre changing
- DISMANTLING
- ASSEMBLY
- Changing the battery
- Maintenance
- VERMEIREN
- GARANZIA CONTRATTUALE
- NEDERLANDS
- CONTRACTUELE GARANTIE
- Notes
- Belgium
- Germany
- Italy Switzerland
- Poland The Netherlands
- Spain Czech Republic
Brand : Vermeiren
Model : Forest Narrow
Category : Véhicule pour personnes handicapées