
IP Touch 310 WLAN Handset - Desk Phone ALCATEL - Free user manual and instructions
Find the device manual for free IP Touch 310 WLAN Handset ALCATEL in PDF.


| Product Type | DECT Wireless Desk Phone |
| Model | IP Touch 310 WLAN Handset |
| Brand | Alcatel-Lucent |
| Battery Standard | 4 hours talk time / 80 hours standby |
| Battery Extended | 6 hours talk time / 120 hours standby |
| Battery Ultra Extended | 8 hours talk time / 160 hours standby |
| Charging Time (Standard Battery) | 2 hours |
| Charging Time (Extended Battery) | 3 hours |
| Charging Time (Ultra Extended Battery) | 4 hours |
| Display | Backlit alphanumeric display |
| Keypad | Alphanumeric with navigation keys |
| Headset Jack | Yes, 2.5mm |
| Wireless Technology | DECT WLAN |
| Frequency | 1.88 to 1.90 GHz (EU) / 1.92 to 1.93 GHz (US) |
| Range | Up to 50 m indoors, 300 m outdoors (depending on environment) |
| Voicemail | Integrated voice mailbox with personal greeting |
| Call Features | Call hold, transfer, conference, call diversion, do not disturb, call pick-up |
| Phonebook | Personal directory (up to 200 entries) and corporate directory |
| Security | Keypad lock, personal code for voicemail and phone lock |
| Cleaning | Wipe with damp cloth; do not immerse; clean contacts with isopropyl alcohol |
| Compliance | FCC Part 15, EU R&TTE Directive 1999/5/EC, SAR < 1.6 W/kg |
Frequently Asked Questions - IP Touch 310 WLAN Handset ALCATEL
User questions about IP Touch 310 WLAN Handset ALCATEL
0 question about this device. Answer the ones you know or ask your own.
Ask a new question about this device
Download the instructions for your Desk Phone in PDF format for free! Find your manual IP Touch 310 WLAN Handset - ALCATEL and take your electronic device back in hand. On this page are published all the documents necessary for the use of your device. IP Touch 310 WLAN Handset by ALCATEL.
USER MANUAL IP Touch 310 WLAN Handset ALCATEL
Alcatel·Lucent

Alcatel-Lucent
IP Touch 610 WLAN Handset
IP Touch 310 WLAN Handset
OmniPCX Office Communication Server
User manual
Introduction
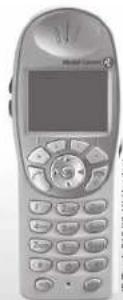
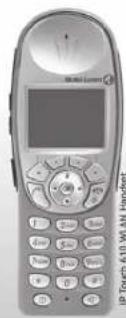
Thank you for choosing a telephone from the mobile IP Touch range manufactured by Alcatel-Lucent. Your telephone has a new ergonomic layout for more effective communication.
(1) AD = BD = 1
- 2017年1月1日
How to use this guide

Lift the receiver.

Hang up.

Alphanumeric keypad.

Up-down navigation keys: used to navigate within the menus or in a text zone when entering characters.

Means that the function is subject to programming. If necessary, contact your installer.
These symbols can be supplemented by small icons or text.
Contents
1.
Getting to know your telephone.... p.6
Using your telephone.... p.7
1.1 Switch on your telephone p.7
1.2 Switch off your telephone p.7 1.3 Making a call p.7
1.3 Making a call p.7 1.4 Receiving a call p.7
1.5 Calling your correspondent by name (company directory) p.7
1.6 Make a call using the personal phone book.... p.7 1.7 Radelling.... p.7
1.7 Reclaiming.... p.7 1.8 Make a call-back request to a busy number.... p.8
1.9 Sending DTMF signals p.8
1.10 Mute, so that your correspondent cannot hear you.... p.8
2.
During a conversation p.9
2.1 Making a second call during a conversation.... p.9 2.2 Answering a shared call during a conversation.... p.8
2.2 Answering a second call during a conversation.... p.9 2.3 Switching between calls (Broker call).... p.9
2.4 Transferring a call p.9
2.5 Transfer a call to the voice mailbox of an absent party p.10
2.6 Three-way conference with internal and/or external correspondents (conference).... p.10
2.7 Placing a call on hold (hold).... p.10 2.8 Placing an outside call on hold (parking).... p.10
2.9 Store a number p.11
2.10 Adjust audio volume.... p. 11
3.
Sharing.... p.12
3.1 Answering the general bell p.12
3.2 Call pick-up.... p.12 3.2 Using group.... p.12
3.5 Hunting groups p.12 3.4 Calling a correspondent on his/her loudspeaker p.12
3.5 Sending a written message to an internal correspondent.... p.12
3.6 Send a voice message copy.... p.13
3.7 Sending a recorded message to a number / a distribution list.... p.14 3.8 Broadcasting a message on the loudness of a section group.... p.14
3.8 Broadcasting a message on the loudspeakers of a station group.... p.14 3.9 Modify the automated attendant welcome message remotely.... p.14
4.
Keep in touch p.15
4.1 Selecting calls to be diverted p.15
4.2 Diverging calls to another number (immediate diversion).... p.15 4.3 Diverging your calls to your voice message service.... p.15
4.3 Divering your calls to your voice message service.... p.15 4.4 When you return, consult recorded messages.... p.15
4.5 Activate/disable the personal assistant.... p.16
4.6 Personal assistant: reaching you with one number only.... p.16
4.7 Diverging calls to your pager p.16 4.8 Forwarding your calls from the receiving terminal ("Follow me") p.16
4.8 For waiting your calls from the receiving terminal ( Follow the ). p.16 4.9 Cancelling all diversions . . . . . . . . . . . . . . . . . . . . . . . . . . . . . . . . . . . . . . . . . . . . . . . . . p.16
4.10 Divorting calls when your line is busy (divert if busy).... p.17
4.11 Do not disturb p.17
4.12 Leaving a recorded message for internal callers p.17 4.13 Consulting written messages p.18
4.14 Message notification p.18
5.
Programming your telephone.... p.19
5.1 Initializing your voice mailbox.... p.19
5.2 Customising your voice greeting p.19
5.3 Modifying your personal code.... p.19 5.4 Configuring the telephone singer.... p.19
5.1 Cutting screen and telephone ring p.19 5.5 Adjusting screen brightness p.20
5.6 Selecting language p.20
5.7 Programming your personal directory.... p.20 5.8 Programming an appointment reminder.... p.21
5.8 Programming an appointment reminder p.21 5.9 Lock / unlock your telephone p.21
5.10 Configure the set according to the background noise (Noise mode). p.21
5.11 Activate/deactivate the Key tones p.22
5.12 Activate/deactivate the Warning tones p.22
6.
Batteries and chargers p.23
6.1 Batteries p.23
6.2 Desktop Charger p.23 6.3 Dual Chargers p.24
6.4 The Game Charger - only on Mobile IPTouch 610. p.24
6.5 Cleaning the Chargers p.24
7.
Push to Talk (IPTouch 610) p.25
7.1 Start the call p.25
7.2 Adjusting the volume level of the tones.... p.25
7.3 Subscribing to channels.... p.25 7.4 Making a roll on another channel.... p.25
7.5 Receiving a call p.25
7.6 Selecting a channel p.25
7.7 Adjusting the volume level of the tones.... p.26 7.8 Change PTT volume.... p.26
7.6 Change: 1 + Volume 0
Guarantee and clauses p.27
Getting to know your telephone
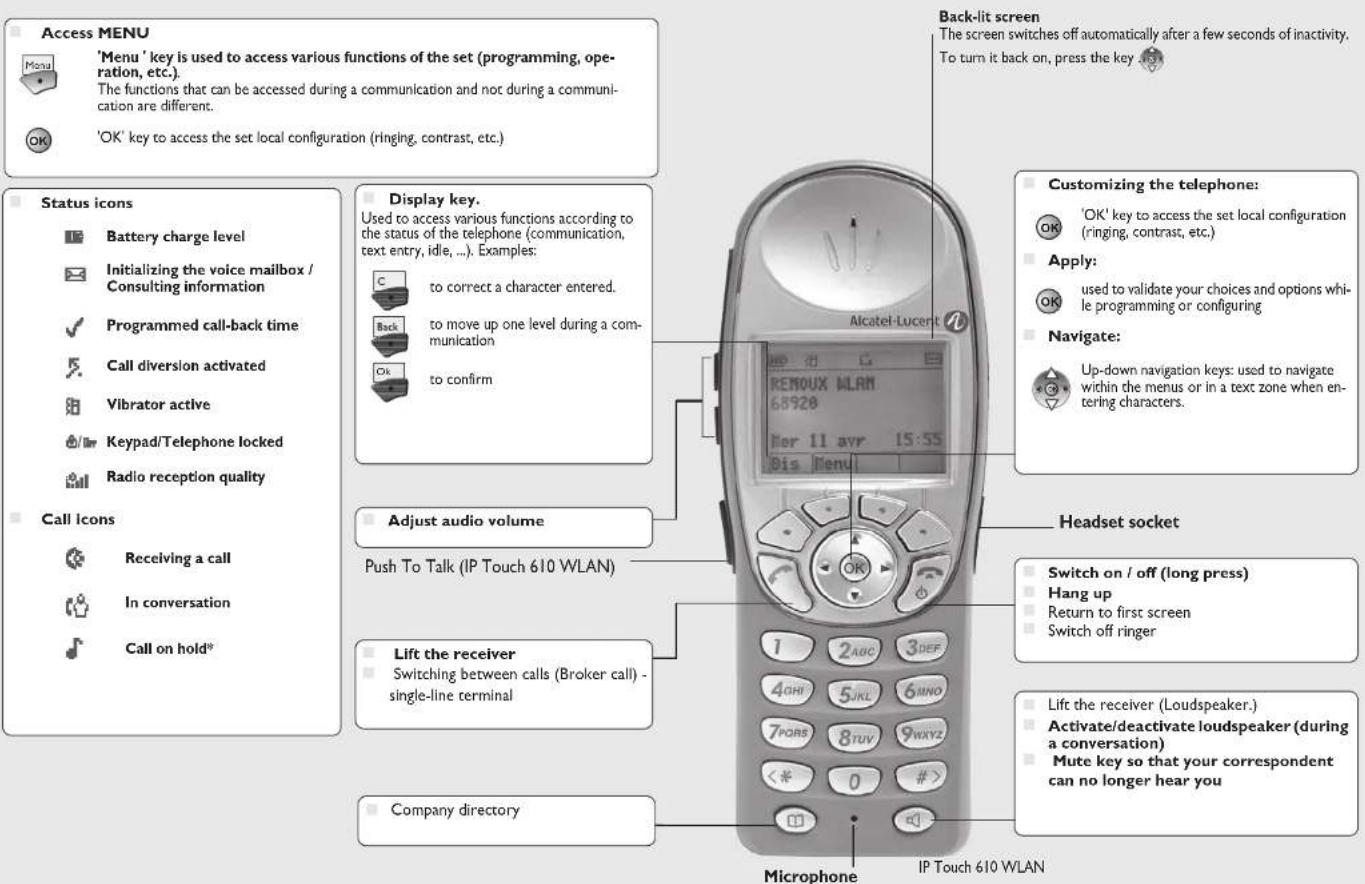
1 Using your telephone
1.1 Switch on your telephone

Press the on/off-hook key until you hear two beeps.
1.2 Switch off your telephone

Press the off/on-hook key until you hear a beep (the telephone must not be in communication).
1.3 Making a call


dial directly the number for your call
number required
-
number
required

To make an external call, dial the outside line access code before dialling your correspondent's number. 9 is the default code for an outside line.

For the operator, dial '0' (by default).
1.4 Receiving a call


(loudspeaker.)
1.5 Calling your correspondent by name (company directory)


press the 'call by name' key
first letters of your correspondent's name*


select the name from the displayed list

* You enter your contact's name in predictive text mode. In this mode, enter each letter of the name by pressing only once on the key with this letter.
1.6 Make a call using the personal phone book




select the contact to call start the call
1.7 Redialling
Call back on the last 10 number dialled


select the no. in the last ten issued
start the call
Using your telephone
1.8 Make a call-back request to a busy number

1.9 Sending DTMF signals
During a conversation you sometimes have to send DTMF signals, such as with a voice server, an automated attendant or a remotely consulted answering machine.

to activate

The function is automatically cancelled when you hang up.
1.10 Mute, so that your correspondent cannot hear you
You can hear your correspondent but he/she cannot hear you:
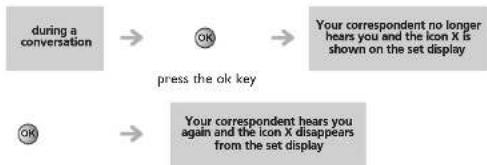
flowchart
graph LR
    A["during a conversation"] --> B["OK"]
    B --> C["Your correspondent no longer hears you and the icon X is shown on the set display"]
    D["OK"] --> E["Your correspondent hears you again and the icon X disappears from the set display"]
    style A fill:#f9f,stroke:#333
    style D fill:#f9f,stroke:#333
    style B fill:#ccf,stroke:#333
    style C fill:#ccf,stroke:#333
    style E fill:#ccf,stroke:#333
press the ok key again
2 During a conversation
2.1 Making a second call during a conversation

number of
second
correspondent
Other methods for calling a second correspondent:
1) Press the 'Call by name' key directly
2) Menu Neutral Ok Menu Serialist OK

To cancel your second call and recover the first:

take the call
2.2 Answering a second call during a conversation;
A second correspondent is trying to call you:

Answer the second call:

to take the
call
To return to your first caller and end the conversation in progress

take the call
2.3 Switching between calls (Broker call)
During a conversation, a second call is on hold. To accept the second call:

take the call on hold
2.4 Transferring a call
To transfer your call to another number:

no. of the 2nd terminal
If the number receiving the transfer answers:

You can also transfer your call immediately, without waiting for your correspondent to answer.

Transfer between two outside calls is not generally possible (depends on country concerned and system configuration).
During a conversation
2.5 Transfer a call to the voice mailbox of an absent party
During the call, you want to transfer your correspondent to the voice mailbox of another correspondent.

enter the voicemail number
Three-way conference with internal and/or external correspondents (conference)
During a conversation, a second call is on hold:

Cancel the conference and remain with your second correspondent (your first call is placed on hold):

Hang up on all correspondent

After the conference, to leave your two correspondents talking together.

2.7 Placing a call on hold (hold)

Exclusive hold:
During a conversation, you wish to place the call on hold and recover it later, on the same telephone.

flowchart
graph LR
    A["during a conversation your call is placed on hold"] --> B["Hold"]
    B --> C["O1"]
Recover the call on hold:

to take the call take the call
2.8 Placing an outside call on hold (parking)

You can place an outside call on hold and recover the call on another telephone:

To recover the parked call:

number of telephone from which call was parked
If the parked call is not recovered within a preset time (default value 1 min 30), it is transferred to the operator.
During a conversation
2.9 Store a number
During a call, to save the number onto a call key:
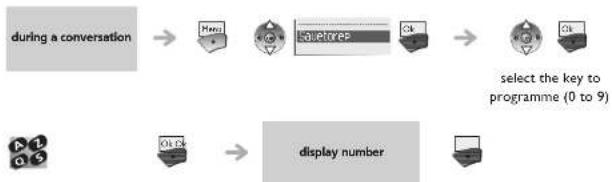
flowchart
graph LR
    A["during a conversation"] --> B["Menu"]
    B --> C["Squeeze"]
    C --> D["OK"]
    D --> E["select the key to programme (0 to 9)"]
    F["OK OK"] --> G["display number"]
enter the name of apply apply
your
correspondent*
* Enter the name of your correspondent:

enter the text: the number pad keys have letters that you can display by successive presses,

position the cursor in the entry field.

erase last character entered.
2.10 Adjust audio volume
During a call, to adjust the volume level of the loudspeaker or receiver;
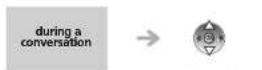
adjust audio volume
Sharing
3.1 Answering the general bell

When the operator is absent, outside calls to the operator are indicated by a general bell. To answer:

3.2 Call pick-up

You hear a telephone ringing in an office where no-one can answer. If authorised, you can answer the call on your own telephone. If the telephone ringing is not in your pick-up group:
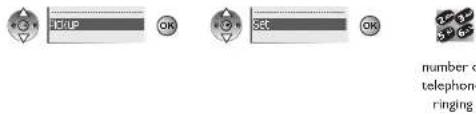

The system can be configured to prevent call pick-up on certain telephones.
3.3 Hunting groups

Hunting group call:
Certain numbers can form a hunting group and can be called by dialling the group number.


no. of group to be called
Temporary exit from your hunting group:/Return into your group:


'leave group'
programmed key
your group number

Belonging to a group does not affect the management of direct calls. A specific telephone within a group can always be called by using its own number.
3.4 Calling a correspondent on his/her loudspeaker

Your internal correspondent does not answer. If authorised, you can remotely activate your correspondent's phone.
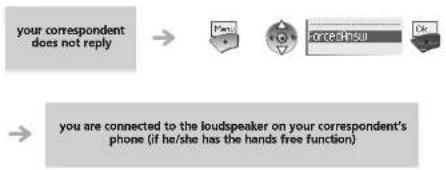
flowchart
graph LR
    A["your correspondent does not reply"] --> B["Man"]
    B --> C["Force@Insu"]
    C --> D["Do"]
    E["you are connected to the loudspeaker on your correspondent's phone (if he/she has the hands free function)"]
3.5 Sending a written message to an internal correspondent
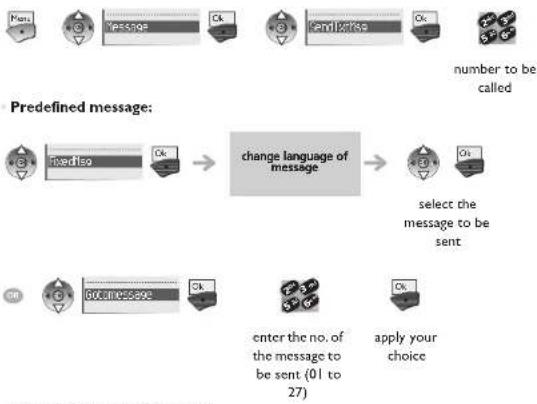
flowchart
graph TD
    A["Predefined message:"] --> B{change language of message}
    B -->|number to be called| C["OK"]
    B -->|select the message to be sent| D["OK"]
    E["Start"] --> F["Business Message"]
    F --> G["enter the no. of the message to be sent (01 to 27)"]
    G --> H["Apply your choice"]
Change language of message:

change language of message
Sharing
Personal message:


create a temporary personal message*

send message
* Create a temporary personal message :

enter the text: the number pad keys have letters that you can display by successive presses,

position the cursor in the entry field.

erase last character entered,

enter a digit (keys 0 to 9): Select a digit (keys 0 to 9): the digit can be accessed after all the characters of the key pressed have been displayed on the screen.
The 27 standard messages are shown below:
| 1 Call me back 15 Meeting on __ (°) | ||
| 2 Call me back tomorrow 16 Meeting on __ at : (°) | ||
| 3 Call me back at __ (°) 17 Out for a while | ||
| 4 Call back __ (°) 18 Absent for the rest of the day | ||
| 5 Call the attendant 19 Absent, back at __ (°) | ||
| 6 Call the secretary 20 Absent, back on __ at : (°) | ||
| 7 I will call back at __ (°) 21 On vacation, back on __ (°) | ||
| 8 Use paging 22 External meeting | ||
| 9 Please fetch your fax 23 External meeting, back on __ (°) | ||
| 10 Please fetch your mail 24 I am in room nr (°) | ||
| 11 Please cancel your forwarding 25 In a meeting - do not disturb | ||
| 12 Visitors are waiting 26 At lunch | ||
| 13 You are expected at reception 27 Indisposed | ||
| 14 Meeting at __ (°) (°) Messages to be completed using numeric keypad | ||

Send a voice message copy






display number of new and old messages




select message to copy by consecutive presses


number to be called


record a comment*
send message
* To record a comment:



Recording in progress





pausing in the recording






replay comment
re-record a comment
confirm the recording and send the message
Sharing
3.7 Sending a recorded message to a number / a distribution list
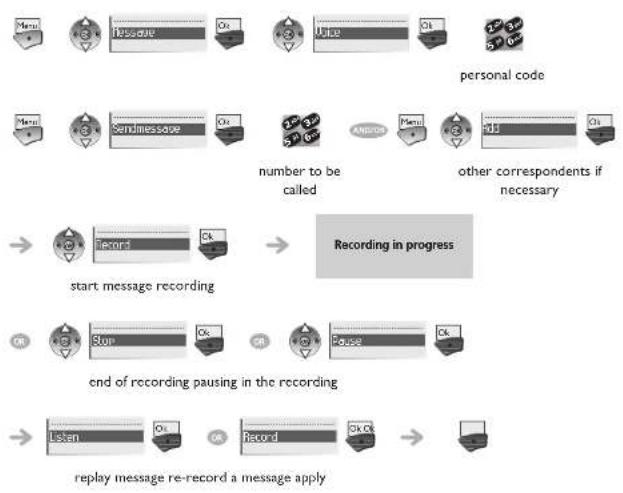
flowchart
graph TD
    A["Personal Code"] --> B["Textual Audio"]
    B --> C["User"]
    C --> D["OK"]
    D --> E["Replinker"]
    E --> F["serpithi message"]
    F --> G{number to be called}
    G -->|Yes| H["AND/OR"]
    H --> I["Textual Audio"]
    I --> J["OK"]
    J --> K["other correspondents if necessary"]
    K --> L["record in progress"]
    L --> M["start message recording"]
    M --> N["Stop"]
    N --> O{end of recording pausing in the recording}
    O -->|Yes| P["Pause"]
    P --> Q["Record"]
    Q --> R["Replay message re-record a message apply"]
3.8 Broadcasting a message on the loudspeakers of a station group
A message not requiring an answer can be broadcast on the loudspeakers within your broadcast group:
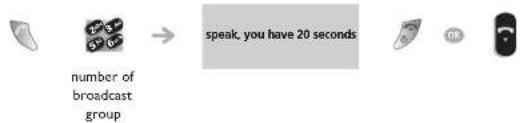
flowchart
graph LR
    A["number of broadcast group"] --> B["speak, you have 20 seconds"]
    B --> C["OK"]

3.9 Modify the automated attendant welcome message remotely
This feature enables a user with the appropriate rights to modify the automated attendant night or day-time message.
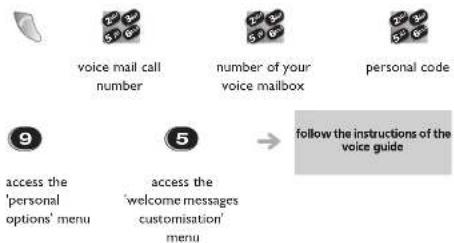
flowchart
graph TD
    A["voice mail call number"] --> B["number of your voice mailbox"]
    B --> C["personal code"]
    D["access the 'personal options' menu"] --> E["access the 'welcome messages customisation' menu"]
    E --> F["follow the instructions of the voice guide"]
Keep in touch
4.1 Selecting calls to be diverted
When a diversion is applied, you can select the types of call to be diverted: outside, internal, all.
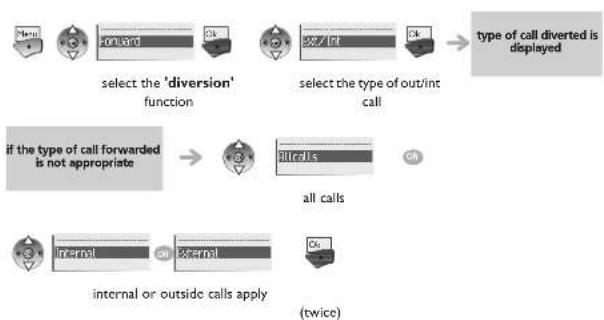
flowchart
graph TD
    A["select the 'diversion' function"] --> B["select the type of out/int call"]
    B --> C["type of call diverted is displayed"]
    D["if the type of call forwarded is not appropriate"] --> E["all calls"]
    E --> F["internal or outside calls apply (twice)"]
4.2 Diverting calls to another number (immediate diversion)
The number can be your home, portable or car phone, voice message or an internal extension (operator, etc.).
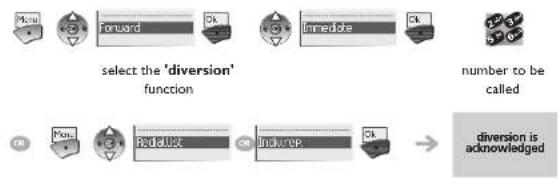
flowchart
graph TD
    A["Move"] --> B["Forward"]
    B --> C["OK"]
    C --> D["Immediate"]
    D --> E["OK"]
    F["OK"] --> G["Next Step"]
    G --> H["Redjust"]
    H --> I["Indurep"]
    I --> J["→"]
    K["num"] --> L["num to be called"]

You can make calls, but only the destination number can call you.
4.3 Diverting your calls to your voice message service

flowchart
graph LR
    A["Forward"] --> B["Select the 'diversion' function"]
    B --> C["Unrevised result"]
    C --> D["Diversion is acknowledged"]
4.4 When you return, consult recorded messages
The display of the 'envelope' icon indicates that there is a message present.
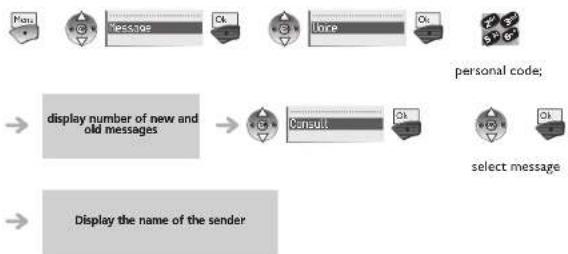
flowchart
graph TD
    A["Message"] --> B["Check"]
    B --> C["Receive"]
    C --> D["OK"]
    E["personal code;"] --> F["display number of new and old messages"]
    F --> G["Consult"]
    G --> H["OK"]
    I["select message"] --> J["Display the name of the sender"]
Listen to message
The sign ^10 indicates a message not consulted.


call back sender of message send a copy of a message
Keep in touch
4.5 Activate/disable the personal assistant
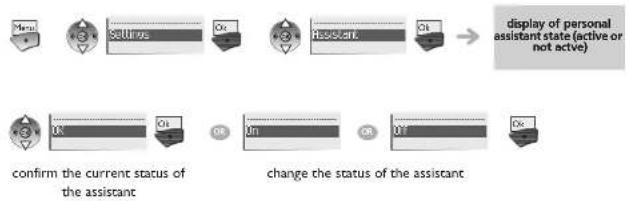
flowchart
graph LR
    A["Current Status"] --> B["Solutions"]
    B --> C["Resistant"]
    C --> D["Display of personal assistant state (active or not active)"]
    E["Confirm the current status of the assistant"] --> F["Change the status of the assistant"]
    F --> G["Final State"]
4.6 Personal assistant : reaching you with one number only
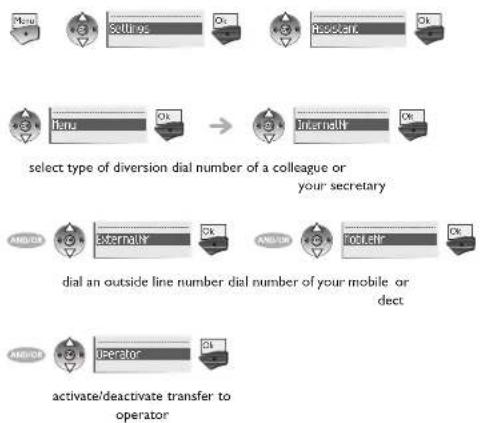
flowchart
graph TD
    A["Settling"] --> B["Resistant"]
    C["Items"] --> D["Internality"]
    E["Externality"] --> F["Internality"]
    G["Operator"] --> H["Activate/deactivate transfer to operator"]
    I["Select type of diversion dial number of a colleague or your secretary"] --> J["AMOUNT"]
    K["dial an outside line number dial number of your mobile or decept"] --> L["AMOUNT"]
    M["Activate/deactivate transfer to operator"] --> N["Operator"]
4.7 Diverting calls to your pager
Callers will thus be able to contact you while you are moving around the company:

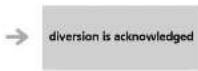
4.8 Forwarding your calls from the receiving terminal ("Follow me")
You wish to receive your calls in your present location: Use the "Follow me" function.
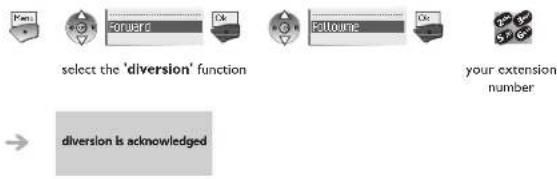
4.9 Cancelling all diversions

Keep in touch
4.10 Diverting calls when your line is busy (divert if busy)
Callers can be diverted to another telephone if you are already on the line.
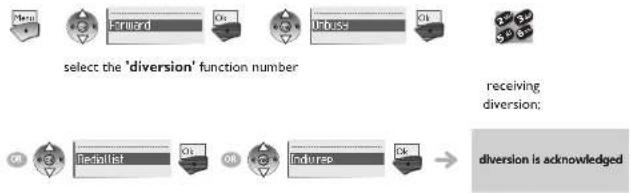
flowchart
graph LR
    A["Forward"] --> B["Select the 'diversion' function number"]
    B --> C["Receiving: diversion;"]
    C --> D["End-Repeat"]
    D --> E["Diversion is acknowledged"]
4.11 Do not disturb
You can make your terminal temporarily unavailable for all calls.

select the 'diversion' function

4.12 Leaving a recorded message for internal callers
You can leave a message on your terminal which will be displayed on the screen of the terminal calling you.

select the 'diversion' function
Predefined message:
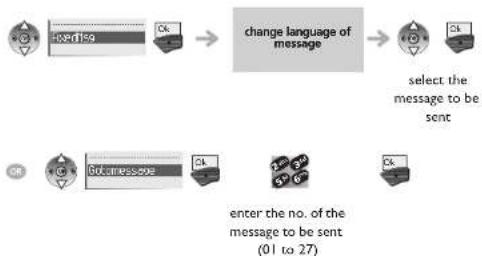
flowchart
graph LR
    A["credit"] --> B["change language of message"]
    B --> C["select the message to be sent"]
    D["Submessage"] --> E["enter the no. of the message to be sent (01 to 27)"]
Change language of message:

change language of message
Personal message:

* Create a temporary personal message.
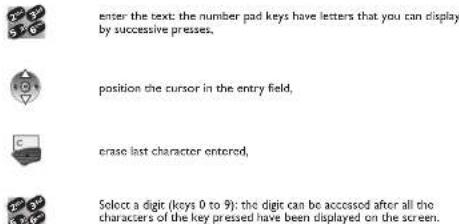
Keep in touch
The 27 standard messages are shown below:
| 1 Ca | I me back 15 Meeting on __ (°) | ||
| 2 Ca | I mo back tomorrow 16 Meeting on __ at __ (°) | ||
| 3 Ca | I me back at __ (°); 17 Out for a while | ||
| 4 Ca | I back __ (°) 18 Absent for the rest of the day | ||
| 5 Ca | I the attendant 19 Absent, back at: __ (°) | ||
| 6 Ca | I the secretary 20 Absent, back on __ at __ (°) | ||
| 7 I will call back at: __ (°) 21 On vacation, back on __ (°) | |||
| 8 Use | paging 22 External meeting | ||
| 9 Please fetch your fax 23 External meeting, back on __ (°) | |||
| 10 Please fetch your mail 24 I am in room nr __ (°) | |||
| 11 Please cancel your forwarding 25 In a meeting - do not disturb | |||
| 12 Visitors are waiting 26 At lunch | |||
| 13 You are expected at reception 27 Indisposed | |||
| 14 Meeting at: __ (°) | (°) | Messages to be completed using numeric keypad | |
4.13 Consulting written messages
The light indicates that messages have been received.
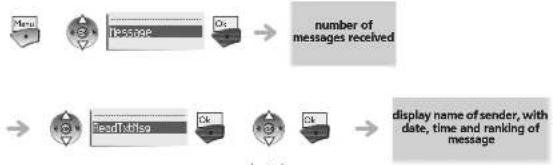
flowchart
graph LR
    A["Message"] --> B["numer of messages received"]
    B --> C["readTabliso"]
    C --> D["display name of sender, with date, time and ranking of message"]
select the message
to consult
During the display of the information:

call back the message sender (the message is erased automatically after the call).

next message,

previous message.
During message consultation, press the 'menu' key to access the following functions: ( [Image] )

read the rest of the message,

crase message,

call back sender of message.
Sending a written message to an internal correspondent.
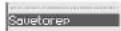
save the sender's number in your directory,

terminate consultation.
4.14 Message notification
A message is left in your mailbox but you are not at your desk. You can configure your telephone so that you receive notification of the message on another telephone.




Activate/deactivate message notification:




Enter the number of the set where the notification is to be received:




enter the number
apply
Change the time slot: The time slot during which notification is activated can be changed.




change times
apply
5 Programming your telephone
5.1 Initializing your voice mailbox


or your personal code then record our name according to voice guide instructions

Your personal code is used to access your voice mailbox and to lock your telephone.

Your password has 6 digits
A weak personal code with 6 identical digits (000000, 111111, etc.) or a simple
sequence of 6 digits (012345, 123456, etc.) will be rejected by the system.
After a system upgrade, the password may still have only 4 digits. For security
reasons, we recommend you use a password with 6 digits. Contact your installer for more information.
5.2 Customising your voice greeting
You can replace the greeting message by a personal message


recording
During the recording of a message, it is possible to access the following functions: ( )
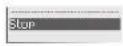
To stop the recording.

To pause recording,
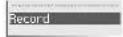
To record the message again.
5.3 Modifying your personal code
Your personal code is used to access your voice mailbox and to lock your telephone.


old code
(6 digits)

new code
(6 digits)

display requests
confirmation of new
password

As long as your voice mailbox has not been initialized, personal code is 151515.

Your password has 6 digits.
A weak personal code with 6 identical digits (000000, 111111, etc.) or a simple
sequence of 6 digits (012345, 123456, etc.) will be rejected by the system.
After a system upgrade, the password may still have only 4 digits. For security
reasons, we recommend you use a password with 6 digits. Contact your installer for more information.
5.4 Configuring the telephone ringer


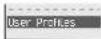




select the profile (silent, vibrating ringer, low,
loud or customized)







Programming your telephone
Choose the tune:




select the melody of your choice to listen to apply your choice the ringing
Adjusting the ringer volume:

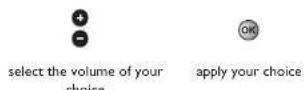
Activate/deactivate the vibrator:

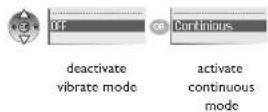


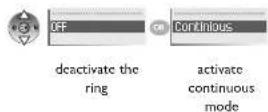

activate intermittent mode
5.5 Adjusting screen brightness


adjusting screen brightness
5.6 Selecting language





select the language of your choice
apply your choice
5.7 Programming your personal directory


select an entry in the phone book


enter the name*
enter the number
Programming your telephone
* Enter the name :

enter the text: the number pad keys have letters that you can display by successive presses,

position the cursor in the entry field.

erase last character entered.

enter a digit (keys 0 to 9).
5.8 Programming an appointment reminder
You can define the time of a temporary reminder (one in 24 hours) or a permanent reminder (every day at the same time). Programming an appointment reminder:




select the type of appointment (temporary or permanent)
enter time of appointment
At the programmed time, your telephone rings:


To cancel your appointment call-back request:





select the type of appointment (temporary or permanent)
enter the reminder time
5.9 Lock / unlock your telephone
Lock / unlock your telephone:




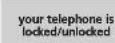
Locking the keypad:



Lock the keypad automatically:
you can configure your set so that the keypad is blocked automatically after 5, 10 or 20 seconds.


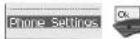


select the time period before the automatic locking
Unlocking the keypad:


5.10 Configure the set according to the background noise (Noise mode)
This function is used to configure the set to obtain optimal listening conditions depending on the background noise.







• Normal: corresponds to most office environments.
• High: corresponds to an average level of background noise.
• Severe: corresponds to an extremely high level of background noise.
Programming your telephone
5.11 Activate/deactivate the Key tones
By default the set omits a tone each time a key is pressed. To deactivate these tones:
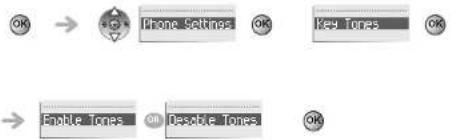
5.12 Activate/deactivate the Warning tones
The warning tones inform the user of an abnormal operation (out of range, system activated or halted, etc.). To deactivate these tones:
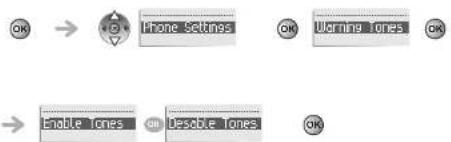
Batteries and chargers
6.1 Batteries
Utilization precautions
Take care not to short the battery contacts on the Battery Pack with metal objects such as coins, keys or paper clips. Shorting the contacts can cause permanent damage.
The MIPT will need to have its Battery Pack recharged periodically.
Autonomy
There are different battery models for your set, each with different capacities.
| Type In conversation in standby | ||
| Standard 4 80 | ||
| Extended 6 120 | ||
| Ultra Extended 8 160 | ||
Battery charging level.
In communication: when the battery level is low, the MIPT informs you of this via the battery low icon. A beep indicates that you have 2 minutes conversation time left.
Not in call: The battery icon is displayed whenever the battery pack charge level is low. The Low Battery message and a loud beep indicate that the charge level is extremely low. This happens when the user is not in communication. To be able to use your wireless telephone again, you must recharge the battery pack.
| Type charging times | |
| Standard 4 | |
| Extended 6 | |
| Ultra Extended 8 |
Removing and replacing the battery in IP Touch 310 WLAN models
Press the battery latch on the rear of the wireless telephone set. The battery detaches from the telephone. To replace the battery, insert the battery catch into the bottom of the battery compartment. Press the top of the battery so that it clicks into position. You should not exert any undue pressure to assemble the battery and telephone.
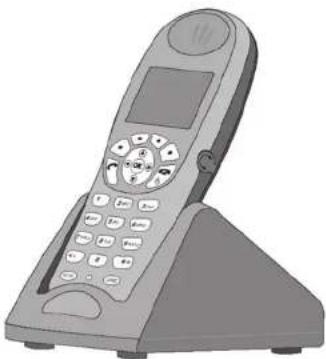
6.2 Desktop Charger
natural_image
Illustration of a classic mobile phone with keypad and screen (no text or symbols visible)During the charging, you can use your telephone as usual to make or take calls.
Utilization precautions
The desktop charger is designed to charge your IP Touch 310 or 610 WLAN set. A complete charge takes 2, 3 or 4 hours depending on your battery model.
Do not place anything in the charger other than the MIPT. You might damage the contacts. Bent contacts may hinder correct MIPT charging.
Charging indicator
If the MIPT is turned off, only Charging... will be displayed. The dots will be racing during the charging cycle. It is normal for the Battery Pack to become warm when charging.
Charge Complete
When the MIPT is fully charged, Charge Complete will display.
Batteries and chargers
6.3 Dual Chargers
The Dual Charger is a two-slot desktop charger. The Dual chargers are designed to charge the MIPT and a spare Battery Pack. Place the handset face forward into the Dual Charger front slot. Place a spare Battery Pack in the rear slot, charging contacts down. The front slot takes charging precedence. The Battery Pack in the rear slot will begin charging when the handset in the front slot is fully charged or when the front slot is empty.
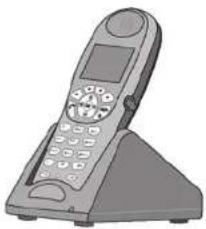
natural_image
Illustration of a mobile phone with keypad and screen (no text or symbols visible)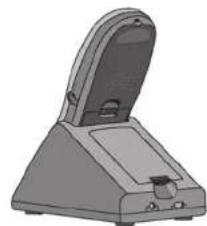
natural_image
Illustration of a handheld electronic device with a lid and base (no text or symbols visible)Indicator light
An LED on steady indicates that the spare battery is charging. A flashing LED indicates spare battery charging malfunction (insert the spare battery again or change it). When the LED is off, this means that the charging of the spare battery has terminated, that the compartment is empty or that the charger is not connected to the mains.
Charge Complete
When the MIPT is fully charged, Charge Complete will display.
6.4 The Gang Charger - only on Mobile IP Touch 610 WLAN
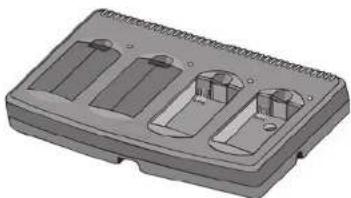
The Gang Charger is designed to charge four Battery Packs simultaneously. Chargers operate in a 50° to 85° F (10° to 30° C) environment. Do not expose them to freezing temperatures or direct sunlight.
The Gang Charger is shipped with the appropriate power supply for the site's location. Place the Gang Charger on a flat horizontal surface. Plug the power supply into the Gang Charger and into an appropriate wall outlet.
natural_image
3D rendering of a gray plastic electronic device casing with three internal slots and mounting holes (no text or symbols visible)Using the GC
Insert the Battery Pack into one of the four charging bays so that the Battery Pack contacts meet the charging bay contacts. The LED above the charging bay will turn on to indicate that charging is in progress. When charging is complete the LED will turn off. Lift the Battery Pack out of the charging bay.
Blinking LED
If the LED starts blinking as soon as the Battery Pack is inserted, the Battery Pack may be improperly seated. Lift it out and reinsert. If the LED continues to blink or starts blinking at any time during the charging process, it indicates that there is a problem with the Battery Pack that makes it unusable. Do not continue to charge the Battery Pack. Dispose of it properly and do not attempt to use it in the MIPT. Do not attempt to open or repair a defective Battery Pack. Contact your service representative for assistance. If the LED is on steady, this means the charger is defective. Contact your administrator.
6.5 Cleaning the Chargers
Clean the Chargers by wiping the surface with a clean, water-dampened cloth or paper towel. A mild detergent solution may be used. Be sure to wipe away any detergent residue with a plain water dampened cloth. DO NOT IMMERSE THE CHARGER IN WATER OR OTHER LIQUID. DO NOT POUR LIQUIDS INTO THE SLOT.
The Battery Pack contacts on the MIPT may be cleaned with isopropyl (rubbing) alcohol applied with a Q-tip, cloth, or paper towel. Do not push or pull the exposed Battery Pack contacts.
Important information
- Never use non-MIPT charging units as they could damage the Battery Pack.
• Only use the original plug-in power adapter for the Chargers. - Do not immerse the Battery Pack in water or throw into the fire.
- Do not throw away the Battery Pack with your domestic waste. Take used Battery Packs to an appropriate collection point for recycling or send them back to your supplier or servicing agent.
- Replacement Battery Packs are available from your supplier or servicing agent.
7 Push to Talk (IP Touch 610 WLAN)
The Push-to-talk feature allows the IP Touch 610 WLAN to operate in a push-to-talk (PTT) group broadcast mode in addition to the standard telephone operation.
The IP Touch 610 WLAN telephone supports 8 multicast channels. The channel used is saved in the telephone memory. A PTT call is initiated by pressing the Talk button located on the right side of the handset. All IP Touch 610 WLAN monitoring that channel and that have enabled the PTT feature in the user preferences menu will hear the transmission through group listening. PTT dialogue is interrupted when you answer a PBX call. When the PBX call is ended, PTT dialogue resumes if in an active call. The 'Push-to-talk' function, activated by the system administrator can be configured by the user via the set local menu (OK key, 'Push-to-Talk' function).
7.1 Start the call
The call period. The two-way radio operates on the concept of a push-to-talk session or call period. The push-to-talk call period begins with the first transmission and ends when there has been no traffic on the channel for 10 seconds. The keypad cannot be used for any other function. However, it is possible to place a PBX call.
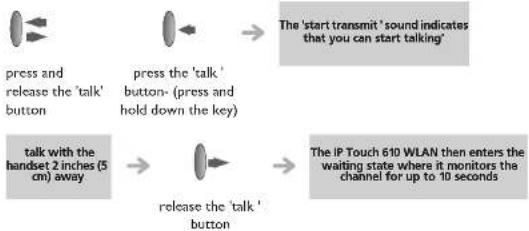
flowchart
graph LR
    A["press and release the 'talk' button"] --> B["press the 'talk' button- (press and hold down the key)"]
    B --> C["talk with the handset 2 inches (5 cm) away"]
    C --> D["release the 'talk' button"]
    D --> E["The 'start transmit 'sound indicates that you can start talking'"]
    E --> F["The IP Touch 610 WLAN then enters the waiting state where it monitors the channel for up to 10 seconds"]
7.2 Adjusting the volume level of the tones

flowchart
graph LR
    A["OK"] --> B["Push to talk"]
    B --> C["OK"]
    C --> D["Tone Volume"]
    D --> E["OK"]
    E --> F["adjust audio volume"]
7.3 Subscribing to channels
Once they are subscribed, the channels automatically appear in the list of default channels.

flowchart
graph LR
    A["OK"] --> B["Push to talk"]
    B --> C["OK"]
    C --> D["Subscribed chrs"]
    D --> E["OK"]
    E --> F["go to the channel and select it"]
7.4 Making a call on another channel
You may need to make a call on another channel than the one defined by default. You must first subscribe to new channels.
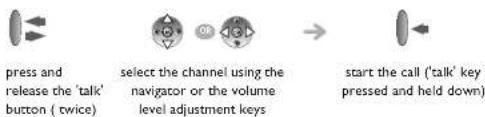
flowchart
graph LR
    A["press and release the 'talk' button (twice)"] --> B["select the channel using the navigator or the volume level adjustment keys"]
    B --> C["start the call ('talk' key pressed and held down)"]
7.5 Receiving a call
Upon receiving a PTT transmission, the phone plays the 'receiving alert' sound and enters the receive state. In this state the phone receives all conversations on the selected channel. The phone will ignore the Talk key while in the receive state. The screen shows the current active channel, the caller ID information of the current transmitter, and an indication that the phone is receiving a broadcast transmission. During a "PBX" conversation, the IP Touch 610 WLAN is not able to receive a PTT transmission. At the end of a transmission, the phone enters the waiting state where it monitors the channel for up to 10 seconds and displays "Waiting" on the screen. If no other transmission occurs within 10 seconds the phone plays the 'end call' sound and reverts to idle state.
7.6 Selecting a channel
To add channels to the default list of channels, see the channels subscription function.
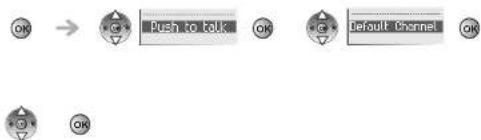
flowchart
graph LR
    A["OK"] --> B["Push to talk"]
    B --> C["OK"]
    C --> D["Default Channel"]
    D --> E["OK"]
go to the channel and select it
Push to Talk (IP Touch 610 WLAN)
7.7 Adjusting the volume level of the tones

flowchart
graph LR
    A["OK"] --> B["Bush to talk"]
    B --> C["Tone Volume"]
    C --> D["adjust audio volume"]
7.8 Change PTT volume
Use the Up and Down buttons to raise or lower PTT volume.
Guarantee and clauses
■ Precautions for use
- To limit the risk of interference, people with pacemakers must keep the wireless telephone away from their equipment.
- The headset may include magnetic elements.
- Operation of the wireless telephone may be accompanied by a faint noise that may be detected by persons wearing a hearing aid. These persons should use a headset that is compatible with their hearing aid device.
- This apparatus complies with part 15 of the FCC rules. Its use is subject to the following two conditions: (1) The device must not cause any interference and (2) the device must accept all external interference likely to entail abnormal operation.
- EC countries: We, Alcatel Business Systems, declare that the product Alcatel-Lucent IP Touch 310 or 610 WLAN is deemed compliant with the essential demands of Directive 1999/5/CE of the European Parliament and Council. A copy of the original of this declaration can be obtained from your installer.
- This device uses a radio frequency spectrum whose use has not been harmonized in all countries. We recommend you follow the standard acceptance procedures before using this equipment near EC respiratory assistance equipment.
■ Declaration of compliance
- Any modification made to the equipment without the express approval by Alcatel-Lucent may result in the cancellation of the utilization authorization granted to the user of the equipment.
- THIS TELEPHONE MODEL COMPLIES WITH GOVERNMENT REQUIREMENTS FOR EXPOSURE TO RADIO WAVES. This wireless telephone is a radio receiver and transmitter. It is designed and manufactured so as not to exceed the emission limits set by the United States FCC (Federal Communications Commission) regarding exposure to radio frequency emissions. The exposure standard for mobile phones uses the SAR - Specific Absorption Rate as measurement unit. Refer to the mobile phone and desktop charger User's guide for more information regarding the SAR. SAR controls are carried out using the standard operating positions specified by the FCC. The telephone is tested in transmission at its highest certified level in all the studied radio frequency bands. The standard foresees a significant safety margin to provide additional protection to consumers and to take account of any variations in the measurement. The FCC has attributed an "Equipment Authorization" certificate to this telephone model. This document presents all the SAR values noted, all compliant to FCC instructions in matters of RF emissions. The SAR values relative to this telephone model are available from the FCC, in particular in the Display Grant section of the Web site http://www.fcc.gov/oet/fccid after a search on the FCC identifier ID OLIPT310 (for the IP Touch 310 WLAN wireless telephones) or FCC ID OLIPT610 (for the IP Touch 610 WLAN wireless telephone).
- Only headsets supplied by Alcatel-Lucent or its partner vendors are authorized for use with the MIPT wireless telephones.
• SAR - DAS (IP Touch 310 WLAN) < EC limit value: 1.6W/kG.
• SAR - DAS (IP Touch 610 WLAN) < EC limit value: 1.6W/kG.
- The labels and icons described on this document are not contractual and may be subject to change.
- The labels and icons displayed on your set are depending on the system which you are connected and can be different from those specified on this document.
- A copy of the original of this declaration of compliance can be obtained by post from : Alcatel-Lucent Enterprise Technical Services - Approvals Manager I, route du Dr. Albert Schweitzer - F 67408 Illkirch Cedex France
Information relative to the environment

This symbol indicates that at the end of its life, this product should be subject to special collection and disposal in member countries of the European Union, as well as in Norway and Switzerland. By ensuring this product is disposed of correctly, you will help to conserve natural resources and help prevent potential negative consequences to the environment and human health which could otherwise be caused by inappropriate disposal of
this product. For further details about recycling this product, please contact the supplier who sold you the product.
Alcatel, Lucent, Alcatel-Lucent and the Alcatel-Lucent logo are trademarks of Alcatel-Lucent. All other trademarks are the property of their respective owners.
The information presented is subject to change without notice.
Alcatel-Lucent assumes no responsibility for inaccuracies contained herein. Copyright © 2012 Alcatel-Lucent. All rights reserved.
MU90800AAAB-O820ed02-1219
- Alcatel-Lucent
- IP Touch 610 WLAN Handset
- IP Touch 310 WLAN Handset
- User manual
- Introduction
- How to use this guide
- Contents
- 1.
- 2.
- 3.
- 4.
- 5.
- 6.
- 7.
- Getting to know your telephone
- Using your telephone
- Switch on your telephone
- Switch off your telephone
- Making a call
- Receiving a call
- Calling your correspondent by name (company directory)
- Make a call using the personal phone book
- Redialling
- Using your telephone
- Make a call-back request to a busy number
- Sending DTMF signals
- Mute, so that your correspondent cannot hear you
- During a conversation
- Switching between calls (Broker call)
- During a conversation
- Transfer a call to the voice mailbox of an absent party
- Three-way conference with internal and/or external correspondents (conference)
- Placing a call on hold (hold)
- Placing an outside call on hold (parking)
- Store a number
- Adjust audio volume
- Sharing
- Answering the general bell
- Call pick-up
- Hunting groups
- Calling a correspondent on his/her loudspeaker
- Sending a written message to an internal correspondent
- Personal message:
- Send a voice message copy
- Keep in touch
- Selecting calls to be diverted
- Diverting calls to another number (immediate diversion)
- Diverting your calls to your voice message service
- When you return, consult recorded messages
- Activate/disable the personal assistant
- Personal assistant : reaching you with one number only
- Diverting calls to your pager
- Forwarding your calls from the receiving terminal ("Follow me")
- Cancelling all diversions
- Diverting calls when your line is busy (divert if busy)
- Do not disturb
- Leaving a recorded message for internal callers
- Consulting written messages
- Message notification
- Programming your telephone
- Initializing your voice mailbox
- Customising your voice greeting
- Modifying your personal code
- Configuring the telephone ringer
- Programming your telephone
- Adjusting screen brightness
- Selecting language
- Programming your personal directory
- Programming an appointment reminder
- Lock / unlock your telephone
- Configure the set according to the background noise (Noise mode)
- Activate/deactivate the Key tones
- Activate/deactivate the Warning tones
- Batteries and chargers
- Batteries
- Desktop Charger
- Dual Chargers
- The Gang Charger - only on Mobile IP Touch 610 WLAN
- Cleaning the Chargers
- Important information
- Push to Talk (IP Touch 610 WLAN)
- Start the call
- Adjusting the volume level of the tones
- Subscribing to channels
- Making a call on another channel
- Receiving a call
- Selecting a channel
- Push to Talk (IP Touch 610 WLAN)
- Adjusting the volume level of the tones
- Change PTT volume
- Guarantee and clauses
- ■ Precautions for use
- ■ Declaration of compliance
- Information relative to the environment
Brand : ALCATEL
Model : IP Touch 310 WLAN Handset
Category : Desk Phone