
MP122 - Mp3 player MPMAN - Free user manual and instructions
Find the device manual for free MP122 MPMAN in PDF.


| Brand | MPMan |
| Model | MP122 |
| Product Type | MP3 Player |
| Supported Audio Formats | WMA, WAV |
| Supported Video Formats | AMV, AVI (requires converter) |
| Supported Image Formats | JPEG, BMP, GIF |
| Display | LCD with backlight |
| Memory Expansion | Micro SD card slot |
| Radio | FM radio (87-108 MHz, 76-90 MHz for Japan) |
| Recording | FM and MIC recording in WAV format |
| E-Book Reader | Text file reading |
| Battery | Built-in rechargeable battery, charge with 5V 400mA charger |
| Connectivity | USB 2.0 for data transfer and charging |
| Supported Languages | 24 languages including English, French, German, etc. |
| Operating System Compatibility | Windows 7, XP, Vista, 2000, 98 (driver needed), Mac OS 10 |
| Equalizer Presets | Natural, Rock, Pop, Classic, Soft, Jazz, Heavy Bass |
| Playback Features | Breakpoint resume, repeat modes, A-B repeat, voice recording during repeat |
| Power-Off Modes | Power saving (0-200 sec), sleep timer (0-120 min) |
| Screen Saver | Adjustable idle time for backlight off and screen saver |
| Firmware Upgrade | Via USB with provided tool |
Frequently Asked Questions - MP122 MPMAN
User questions about MP122 MPMAN
0 question about this device. Answer the ones you know or ask your own.
Ask a new question about this device
Download the instructions for your Mp3 player in PDF format for free! Find your manual MP122 - MPMAN and take your electronic device back in hand. On this page are published all the documents necessary for the use of your device. MP122 by MPMAN.
USER MANUAL MP122 MPMAN
Thank you for your purchase.
Please read this manual carefully before using the new player
MP3 PLAYER
Contents
CONTENTS ....1
UPDATE HISTORY 3
ANNOUNCEMENT ....3
NOTES....4
BASIC FUNCTIONS....5
PREPARATION BEFORE USE....6
EXTERIOR VIEW 6
KEY FUNCTION....7
KEY ACTION DEFINITION....7
POWER ON/OFF 7
LOW BATTERY 8
MICRO SD CARD 8
CONNECTED TO PC 8
CONNECTED TO PC....9
MUSIC 9
MP3 PLAYER
MUSIC PLAYER INTERFACE......ERREUR ! SIGNET NON DEFINI.
MENU OPTIONS 11
Submenu 1 13
Submenu 2 14
MOVIE 17
MENU OPTIONS 18
RECORDING....19
RECORDING INTERFACE RECORDING INTERFACE INSTRUCTION 19
MENU OPTIONS 20
RADIO MODE....21
RADIO INTERFACE MAIN MENU INSTRUCTION 22
MENU OPTIONS 22
PICTURE VIEWING 24
MENU OPTIONS 24
SYSTEM SETUP 25
E-BOOK 27
MENU OPTIONS INTRODUCTION 28
OTHER SETUPS....28
PLAYER FORMAT....28
MP3 PLAYER
TROUBLESHOOTING....28
Update History
| Date | Version | Description |
May 19,2011 | 1.0 | New Version Release; |
Announcement
-
Reproduction, transfer, distribution or storage of any of the contents in this manual in any form without the prior written permission of the Company is prohibited.
-
During the preparation of the manual, due care has been taken to ensure the correctness and integrity, but there is no guarantee that this manual is free of any error or omission. The Company will not be responsible for any possible error or omission in the manual.
-
As the products may upgrade from time to time, the manual and products described herein are subject to change without prior notice.
-
Under no circumstance shall we be responsible for any loss of data or income or any special, incident, consequential or indirect damages howsoever caused. You are recommended to backup the data in other medium.
Notes
This part contains correct operational information. For better performance, please read all the information carefully before you use the player.
- Do not impact the machine severely.
- Do not come into contact with chemicals such as benzene or thinner.
- Please keep away from strong magnetic field and electric field.
- Please keep away from direct light or heating appliances.
- Do not dismantle, repair or transform the player personally.
- Do not use the player and the earphone when riding a bike, driving a car or a motorcar in order to avoid traffic accidents.
- Select suitable volume in order to avoid bad influence to your ears.
- Please classify the discarded packages, battery and old electronic products properly.
Basic Functions
- Music Play: support WMA, WAV, etc.
- Recording: support FM and MIC recording. Support WAV format.
- Picture Browse: support formats of JPEG, BMP and GIF.
- Video Play: support formats of AMV and AVI (A video converter is needed, but it can be played on PC by an ordinary .avi player).
- Support FM Radio.
- Support text document reading.
- Setup Function: support the display and setup of various functional attributes.
- Support USB upgrade.
- Support Micro SD card.
- Support 24 languages.
MP3 PLAYER
Preparation Before Use
Exterior View

Earphone Interface USB
Key Function
Volume/Back
- M: menu key, long press: to return to the main interface; short press: to enter the secondary menu.
- Key: to choose the last option or document.
- ▶Key: to choose the next option or document.
- ▶Key: play key for Play/Pause/Enter.
- VOL Key: for Volume/Back
Key Action Definition
| Action | Basic Operation |
| Short Press | Press a key and hold it no more than 1.2s. |
| Long Press | Press a key and hold it for more than 1.2s. |
| Press & Hold | Press a key and keep holding it. |
Note: "Press" in this manual shall mean "Short Press", unless otherwise specified.
Power On/Off
Push the power switch on the player to the top position, and the player will be powered on; push the power switch to the bottom position, and the player will be powered off.
The player will power off automatically when the idle time of the system reaches the off time set by the user.
MP3 PLAYER
Low Battery
When the battery is low, the player will show a tip screen and it will turn from automatic shutdown into standby. At this time, please do not restart the player but charge in time. The charger with the current specification of 5V 400MA is suggested.
Micro SD Card
Micro SD card can be inserted into the card slot on the player.
Connected to PC
System Configuration
Operating system: Win7/Windows XP&Vista/2K/98 (driver installation is needed.)/Mac OS 10 CPU: at least Pentium-133MHz RAM: at least 32MB Hard Disk Idle Time: at least 100MB Video Card: 640*480 mode or above, at least the enhanced color(16 bits). USB Port CD-ROM Driver
MP3 PLAYER
Connected to PC
When the player is on/off, use the USB cable provided by random to connect PC with the player, and the PC will indicate a select window of "Removable Disk". Select corresponding folders to copy. When charging the player, the switch shall be turned at the "ON" position.
Music
For music application, press ▶ to enter the music player interface.
Support the breakpoint play, for which the system will enter the play interface where you previously exited.

MP3 PLAYER
Music Player Interface

MP3 PLAYER
Press to switch between music playing and stopping. Press or to choose the last document or the next document. Press long to power off. Press or long to fast forward or fast backward. Press VOL long to enter the volume control interface. Press and to adjust the volume from 0 to 31.
Menu Options
- When the music is in a stopped state, press "M" to enter the submenu 1 for which options include Local Folder, Delete, Delete All and Exit.
MP3 PLAYER
Music
» Local folder
» Delete
» Delete all
Exit
- When the music is in a playing state, press "M" to enter the submenu 2 for which options include Cycle Mode, Sound Effect Mode, Replay Setup and Exit.
Press "M" long to enter the lyric display interface. As shown below:
MP3 PLAYER
1.mp3
It was songs of
love that I wou-
ldsing to them
And I memorize
eachworld
- Press ◀ and ▶ to navigate through the menu. Press ▶ to confirm your selection, (ditto for other applications).
- If there is no operation for more than 8 seconds under the submenu, the system will enter the corresponding music player interface automatically (ditto for other applications).
- If the card is inserted when the music is paused, the secondary menu will display the documents in the card (ditto for other applications).
- Support the breakpoint play, for which the system will enter the play interface where you previously exited..
Submenu 1
Local Folder: display all documents on the local disk. Press ▶ to enter the sub-directory of the main disk directory to select. Main disk root directory documents are stored in Root. Recording files default is stored in
the folder of record.
Delete File: Delete the current directory files, press ▶ to enter the file list, press it short to enter the delete interface, choose Cancel or OK, press ▶ to confirm your selection and then return to the previous menu.
Delete All: Delete all of the current directory files. Ditto for the operation.
Exit: exit from the submenu 1.
Submenu 2
Cycle Mode: Press ▶ to confirm the selection and exit.
| Cycle Mode | Icon | Instruction |
| Common Mode | Play all in order. | |
| Single Cycle | Play the current music repeatedly. | |
| Directory Play | Play the current directory files in order. | |
| Directory Cycle | Play the current directory files repeatedly. | |
| All Cycle | Play all files repeatedly. | |
| Random Play | Play files in the directory at random. | |
| Browse Play | Browse the play files, each for 10 seconds of preview. |
Sound Effect Mode: Choose the desired sound effect modes such as Natural, Rock, Pop, Classic, Soft, Jazz and Heavy Bass.
Replay Setup
1. Replay Mode
①. After choosing the Replay Mode, the system will return to the music player interface. Then the top left corner of the LCD will be added with 📋 to show that the Replay Mode is entered. Meanwhile, A (the starting point of replay) is blinking. Press ▶ to confirm that after the current time is the starting point of replay, B (the ending point of replay) begins to blink. Then press ▶ again to confirm the ending timetable replay setup is then finished.
②. The system will start to replay according to the set replay times and the replay interval.
③. When the system replays, press ▶ to enter the follow-and-read function. The previous replay icon turns to the follow-and-read recording icon 🎨 to show that the follow-and-read function is entered and the recording may be started. The recording time will be 10% longer than the set replay time. When the recording is over, the icon will turn to 🎨 again. Then, the system will begin to repeat the process from the follow-and-read and replay to the follow-and-read recording according to the set replay times. During the process, press 🔊 to return to the replay mode.
④. When the system removes the follow-and-read and replay function, the icon 📂 will appear by pressing ▶ to show that the contrast replay mode is entered. When the replay is finished, the icon 📂 will appear again to show that what is playing is the just-recorded follow-and-read recording. Then the system begins to repeat the process from the contrast replay to the follow-and-read recording. During the process, press 📂 to return to the follow-and-read replay mode and press ▶ to begin another replay mode setup.
⑤. Press "M" to exit from the replay interface and return to the music player interface.
MP3 PLAYER
-
Replay Times: Press ◀◀ and ▶▶ to set the replay times from 1 to 10. Press ▶▶ to confirm to return to the music player interface.
-
Replay Interval: Set the minimum time interval between two replays, which is optional from 1 second to 10 seconds. Dillu for the operation.
Exit: Exit from the submenu 2.
MP3 PLAYER
Movie

- Press ▶ to enter the following interface. Refer to the music player interface for the interface instruction. Press ▶ again to enter the video play.
- Support the breakpoint play.
MP3 PLAYER

Menu Options
Press "M" to enter the menu options when it is in a stopped state. Menu options include: Local folder, Delete, Delete All, Cycle Mode and Exit The functions and operating methods are the same as the music application.
MP3 PLAYER
Recording

As shown in the picture above, press ▶ to enter the menu options of Recording, Reproducing and Text Reading, choose the option of Recording and then press ▶ to enter the following interface.
Recording Interface Recording Interface Instruction

flowchart
graph TD
    A["Current Recording Time"] --> B["MIC"]
    C["Current Folder"] --> D["19"]
    E["Record/Stop Recording"] --> F["Current File Name"]
    style A fill:#f9f,stroke:#333
    style C fill:#f9f,stroke:#333
    style E fill:#f9f,stroke:#333
    style B fill:#ccf,stroke:#333
    style D fill:#ccf,stroke:#333
    style F fill:#ccf,stroke:#333
MP3 PLAYER
Press ▶ to start/pause/resume the recording. Press ▶ long to save the current recording and prepare for new recording. Press “M” long, and the system will save the current recording automatically and then return to the main interface.
Menu Options
During the pause, if the battery power is low, the system will save the recording automatically and return to the recording interface.
When the disk is fully stored, the system will remind with "Disk Full!".
Press “M” to enter the menu options. The menu options include: Local folder, Card directory (when the card is inserted) and Exit.
MP3 PLAYER
Radio Mode

MP3 PLAYER
Radio Interface Main Menu Instruction
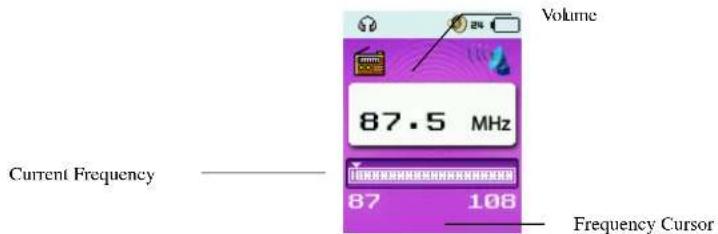
Manual Tuning: Press ◀ and ▶ to tune the radio stations. Press ◀ or ▶ long to search the last or the next radio station automatically. Press ◀ or ▶ again to stop automatic searching.
Menu Options
Save: Save the current radio station.
Delete: Delete the current radio station from the saved radio stations.
Delete All: Delete all saved radio stations.
Auto Tuning: After choosing the option, press ▶ to return to the radio interface to start the auto tuning of
MP3 PLAYER
radio stations. When a program is searched, the system will save the radio station automatically and the interface will show 01 and so on. Press ▶ to switch among the saved radio stations.
Common Frequency Band: Frequency band ranges from 87MHz to 108MHz.
Japanese Frequency Band: Frequency band ranges from 76MHz to 90MHz
Radio Recording: After choosing the option, press ▶ to enter the recording interface and start to record, press ▶ again to make a soft recording, and then press “M” long to save the current recording.
Exit: Ditto for the operation.
MP3 PLAYER
Picture Viewing
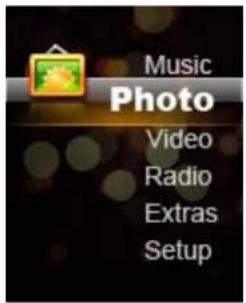
Press ▶ to browse the chosen pictures and press ▶ again to Exit. Press ◀/▶ to browse the pictures backwards and forwards.
Menu Options
Submenu options: Local folder, Card directory, Play Setup, Delete, Delete All and Exit. Except for the Play Setup, the functions and operation methods of other menu options are the same as the previous applications.
Play Setup
Manual Play: All pictures will be played manually. Press ◀ or ▶ to view the last picture or the next
MP3 PLAYER
picture.
Auto Play: The time interval may be adjusted from 1 second to 10 seconds when entering the Auto Play. Press ▶ to confirm.
System Setup

1. Screen Setup
Light-off Mode: If there is no key operation within the time, turn off the backlight. Setup Range: 0\~50 seconds. Setup Step: 5 seconds. The Light-off Mode will be invalid in the following four interfaces: Video Player Interface, E-book Reader Interface, USB Connecting Interface, and Lyrics Display Interface.
Screen Saver Mode: If there is no key operation, enter the Screen Saver Mode, with the setup range of 0-50 seconds and the setup step of 5 seconds. The Light-off Mode will be invalid in the following four interfaces: Video Player Interface, E-book Reader Interface, USB Connecting Interface, and Lyrics Display Interface.
- Language Selection: The player supports the following languages: Simplified Chinese, Traditional Chinese, English, Japanese, Korean, French, Germany, Italian, Dutch, Portuguese, Spanish, Swedish, Czech, Danish, Polish, Russian, Turkish, Hungarian, Romanian, Arabic, Hebrew, Thai, Indonesian, and Greek.
3. Power off Setup
Power Saving Mode: The player will turn off automatically without any operation within the time. Setup Range: 0\~200 seconds. Setup Step: 10 seconds. The Power Saving Mode will be invalid in the following modes: USB Connecting, Audio and Video Display, Recording, FM connecting, Picture and E-book Display.
Sleep Auto off Mode: The user can set a countdown (minute), allowing the player shut down automatically when the time is up. Setup Range: 0–120 minutes. Setup Step: 10 minutes. The Sleep Auto off Mode will be valid in other modes than the USB Connecting.
-
Memory Status: Show the percentage of the total memory space and the used space of the main disk of the player or the SD card. Press ◀◀ or ▶▶to switch between the two disks' memory information.
-
Firmware Version: Show the information of firmware version.
6. Firmware Upgrade
The player is provided with the firmware upgrade tool to upgrade or repair its firmware.
[Download the latest firmware version.
MP3 PLAYER
Connect the player with the USB port of PC and make sure that the connection is correct and there is no any other removable disks which are connected to the PC.
[Run the tool.
If the internal firmware of the player is in good condition, the tool will be switched to the firmware upgrade mode and show the version of the internal firmware of the player and some other information in the top left corner of the tool interface. Press the button "Select New Version Firmware Files" to choose the firmware file that needs to be upgraded.
- Exit: return to the main interface of the system setup.
E-Book

Press ▶ to enter the menu options of Recording, Reproduction and Text Reading, choose the option of E-Book, and then press ▶ to enter E-Book interface.
Press ▶ to enter the text file list to select, press ◀◀ or ▶◀ to turn pages backwards and forwards, and then press ▶◀ to Exit.
Menu Options Introduction
On the interface of text file list, press "M" to enter the submenu 1 for which options include Local Folder, Card Directory, Play Setup, Delete, Delete All and Exit. The functions and operation methods are the same as the picture viewing application.
Other Setups
Player Format
Format by connecting to PC.(The file system is FAT32)
Troubleshooting
The media player fails to work or LCD fails to display contents.
MP3 PLAYER
Check the battery power.
The "On" key fails to work.
There is no battery or the battery power is used up.
Can not download documents.
Check the connection between the USB port and the USB cable.
Format the media player.

- Contents
- MP3 PLAYER
- Update History
- Announcement
- Notes
- Basic Functions
- Preparation Before Use
- Key Function
- Power On/Off
- Low Battery
- Micro SD Card
- Connected to PC
- System Configuration
- Music
- Menu Options
- Submenu 1
- Submenu 2
- Replay Setup
- Replay Mode
- Movie
- Recording
- Recording Interface Recording Interface Instruction
- Radio Mode
- Radio Interface Main Menu Instruction
- Picture Viewing
- Play Setup
- System Setup
- Screen Setup
- Power off Setup
- Firmware Upgrade
- E-Book
- Menu Options Introduction
- Other Setups
- Player Format
- Troubleshooting
- The "On" key fails to work.
- Can not download documents.
Brand : MPMAN
Model : MP122
Category : Mp3 player