
drDock - Computer Accessories ARCAM - Free user manual and instructions
Find the device manual for free drDock ARCAM in PDF.


| Brand | Arcam |
| Model | drDock |
| Product Type | iPod/iPhone/iPad Dock |
| Compatibility | iPod (30-pin connector), iPhone, iPad |
| Power Supply | External AC adaptor (EU/UK/US plugs, 100-240V, 50/60Hz) |
| Audio Output | Stereo RCA (L/R) |
| Video Output | HDMI (optional) |
| Remote Control | Included CR1 remote; compatible with Arcam system remotes (CR90, CR102, etc.) |
| Standalone Operation | Yes, with any amplifier via audio interconnects |
| Computer Sync | USB connection for iTunes synchronization |
| Supported Arcam Products | Solo Mini, Solo Neo, T32, AVR360, AVR400, AVR600, AV888 |
| On-Screen Display | Available with compatible Arcam receivers (AVR360/400/600/888) |
| Charging | Charges connected iPod/iPhone/iPad while docked |
| Functions | Play, pause, skip, shuffle, repeat, menu navigation |
| Connections | Power, HDMI, Audio L/R, USB |
Frequently Asked Questions - drDock ARCAM
User questions about drDock ARCAM
0 question about this device. Answer the ones you know or ask your own.
Ask a new question about this device
Download the instructions for your Computer Accessories in PDF format for free! Find your manual drDock - ARCAM and take your electronic device back in hand. On this page are published all the documents necessary for the use of your device. drDock by ARCAM.
USER MANUAL drDock ARCAM
Connections and Quickstart Guide
Contents
Power Adaptor Setup 4
Docking your iPod ....5
Standalone operation 6
Connections for any amplifier ....6
Remote control (CR1) 7
Arcam Solo Mini 8
Connections 8
Remote control 9
Arcam Solo Neo ....10
Connections....10
Setup....11
Remote control 12
Arcam T32....14
Connections 14
Remote control....15
Arcam AVR360, AVR400, AVR600, AV888 16
AVR Connection Example 16
Setup — On Screen Display ....17
Remote control....18
Navigation from the Front Panel 20
Song Selection....20
Changing Selection 21
Navigation from the On Screen Display
(AVR360, AVR400, AVR600 & AV888 only) 22
Song Selection....22
Changing Selection 23
Power Adaptor Setup
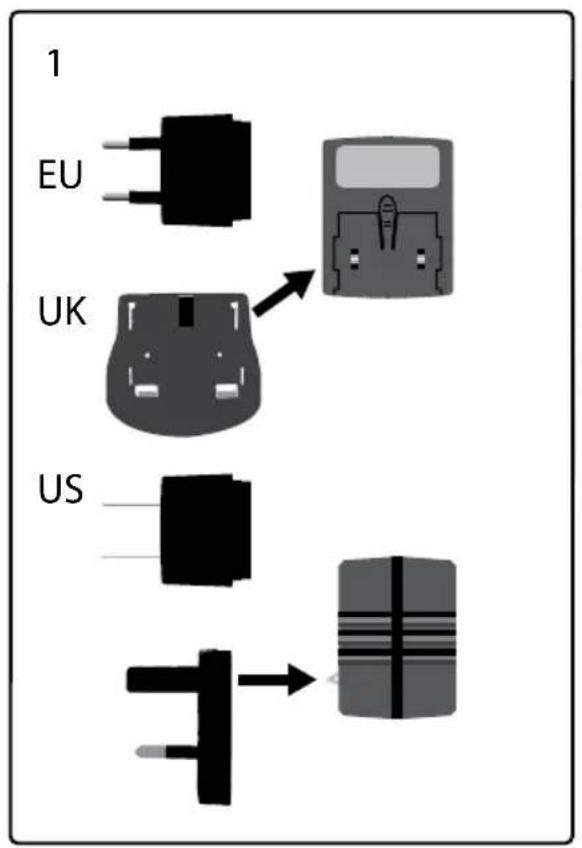
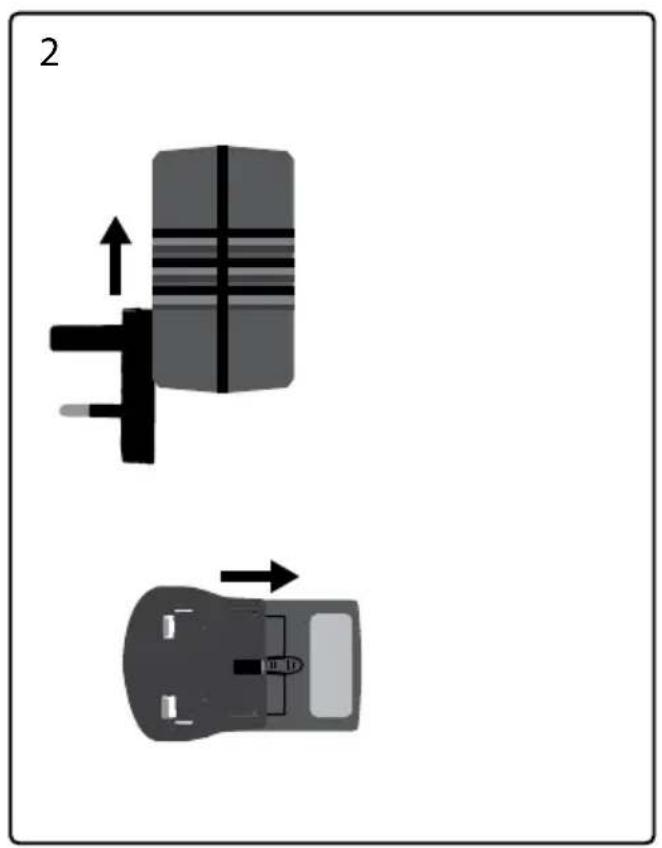
natural_image
Diagram showing two vehicle components with directional arrows indicating movement or force (no text or symbols)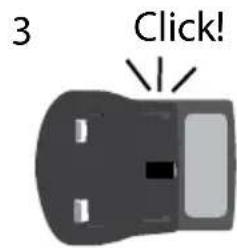
Docking your iPod
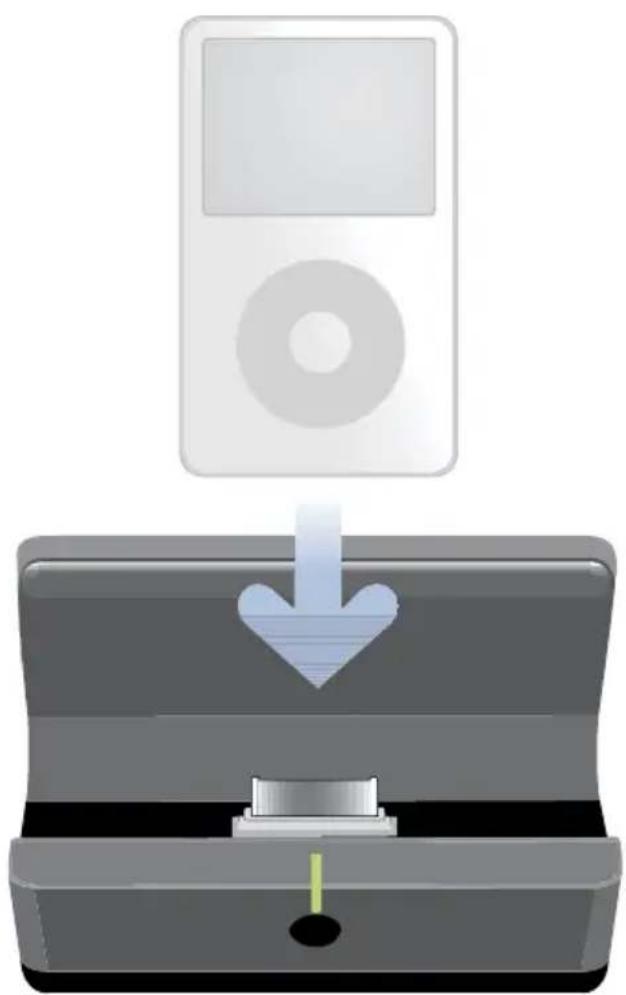
natural_image
Illustration of a music player with an iPod icon and a download arrow emerging from a computer case (no text or symbols)Standalone operation
Connections for any amplifier
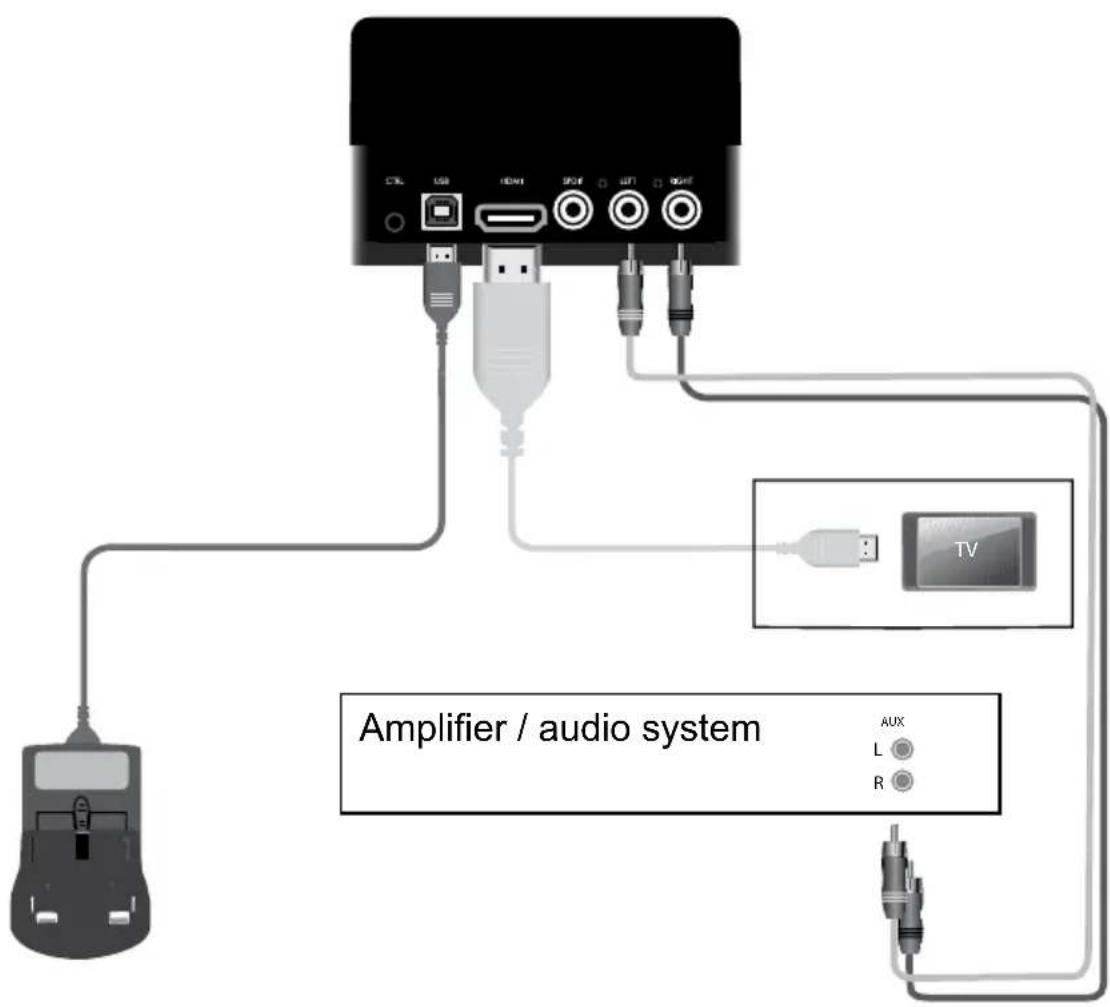
Connect power adaptor, video cable (HDMI, optional) and audio interconnects.
Remote control (CR1)
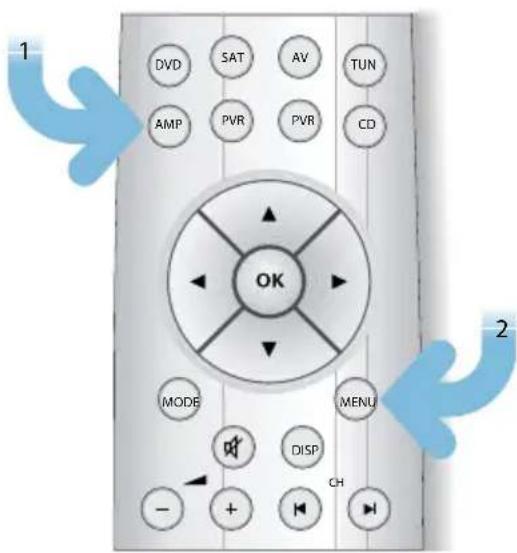
The supplied remote control can be used to control your iPod when the drDock is not connected to a supported Arcam product. If you are using the drDock with a supported Arcam product, use the Arcam system remote instead.
Please remove the plastic tab to connect the supplied batteries before use.
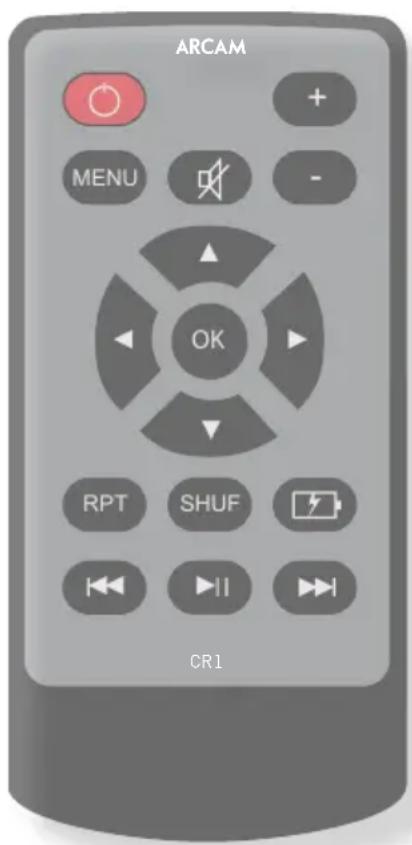

Turn the dock on/off, activate USB sync mode (iTunes connection).

Go to previous menu (Albums, Artists, Playlists etc.).

Mute.

Increase volume.

Decrease volume.
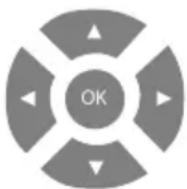
Select music by playlist, artist etc.

Activate iPod repeat mode.

Activate iPod shuffle mode.

No function on drDock.

Start or pause playback.

Jump to the next track, track start or previous track in the current selection.

Arcam Solo Mini
Connections
Remote control — Solo Mini
INFO Track name
Artist name
Album name
Track no.
Volume
MODE Repeat track
Repeat all
Shuffle songs
Shuffle albums
Shuffle songs repeat all
Shuffle albums repeat all
Play
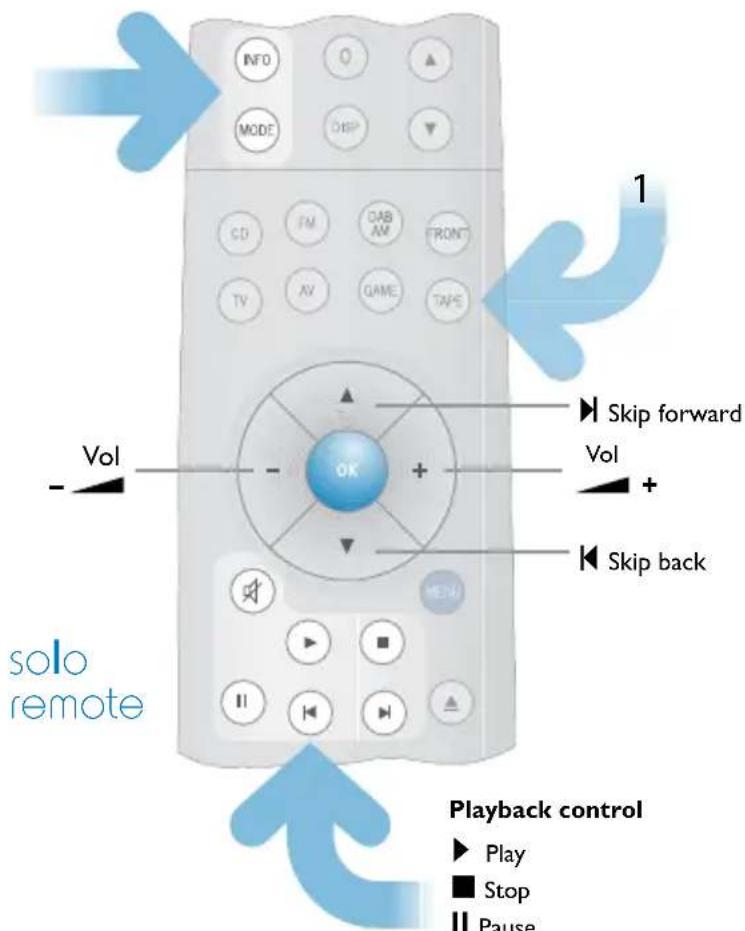
Playback control
▶ Play
■ Stop
II Pause
Skip back
Skip forward
Mute
Arcam Solo Neo
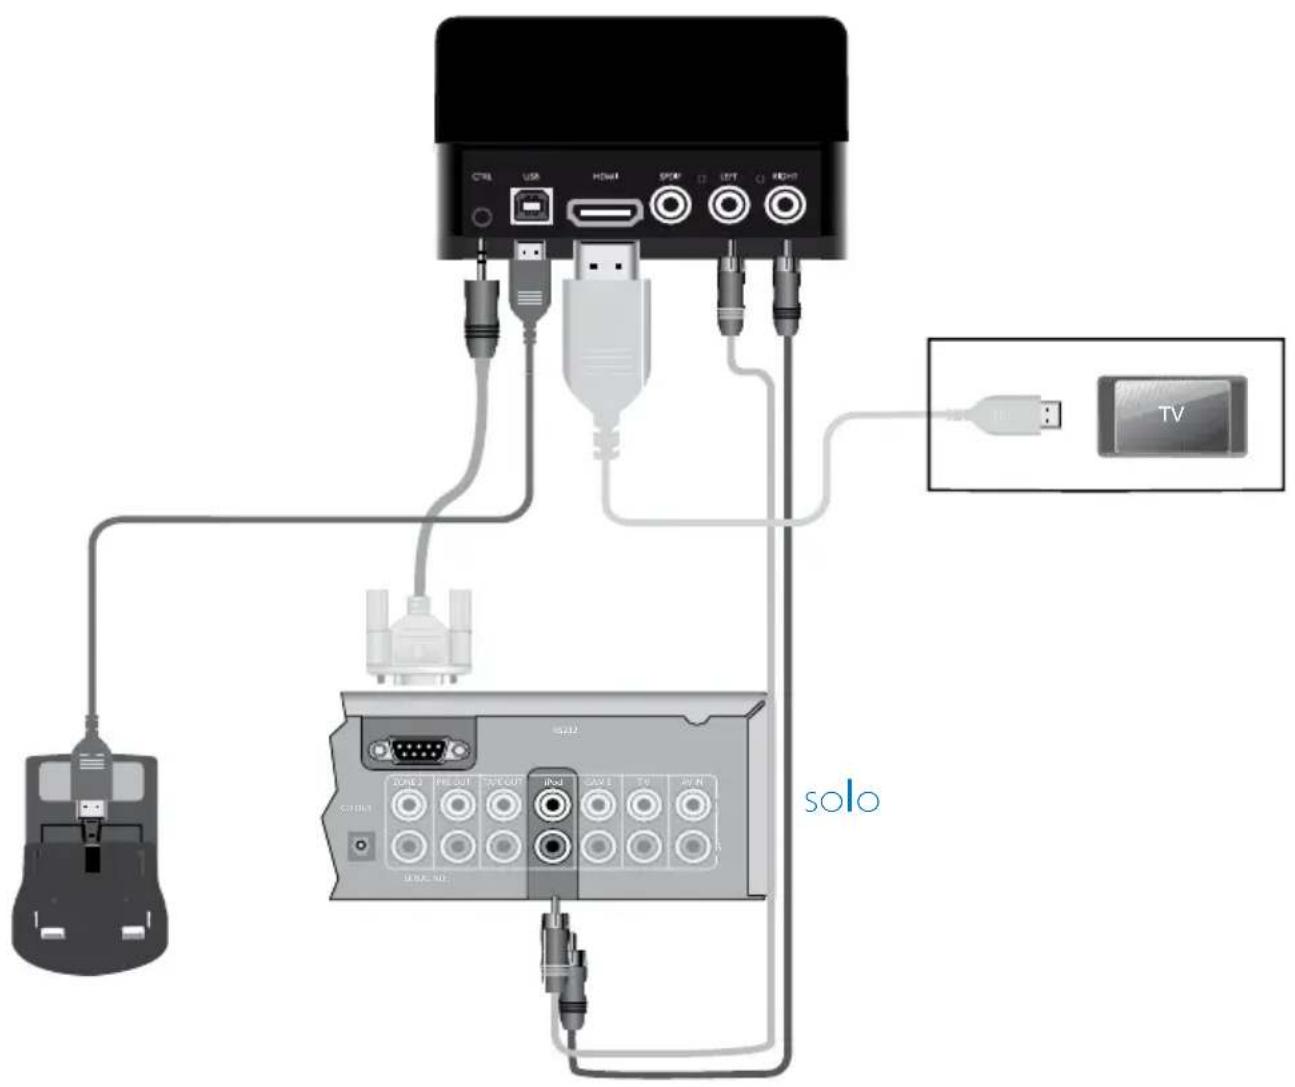
Connections
Setup — Solo Neo
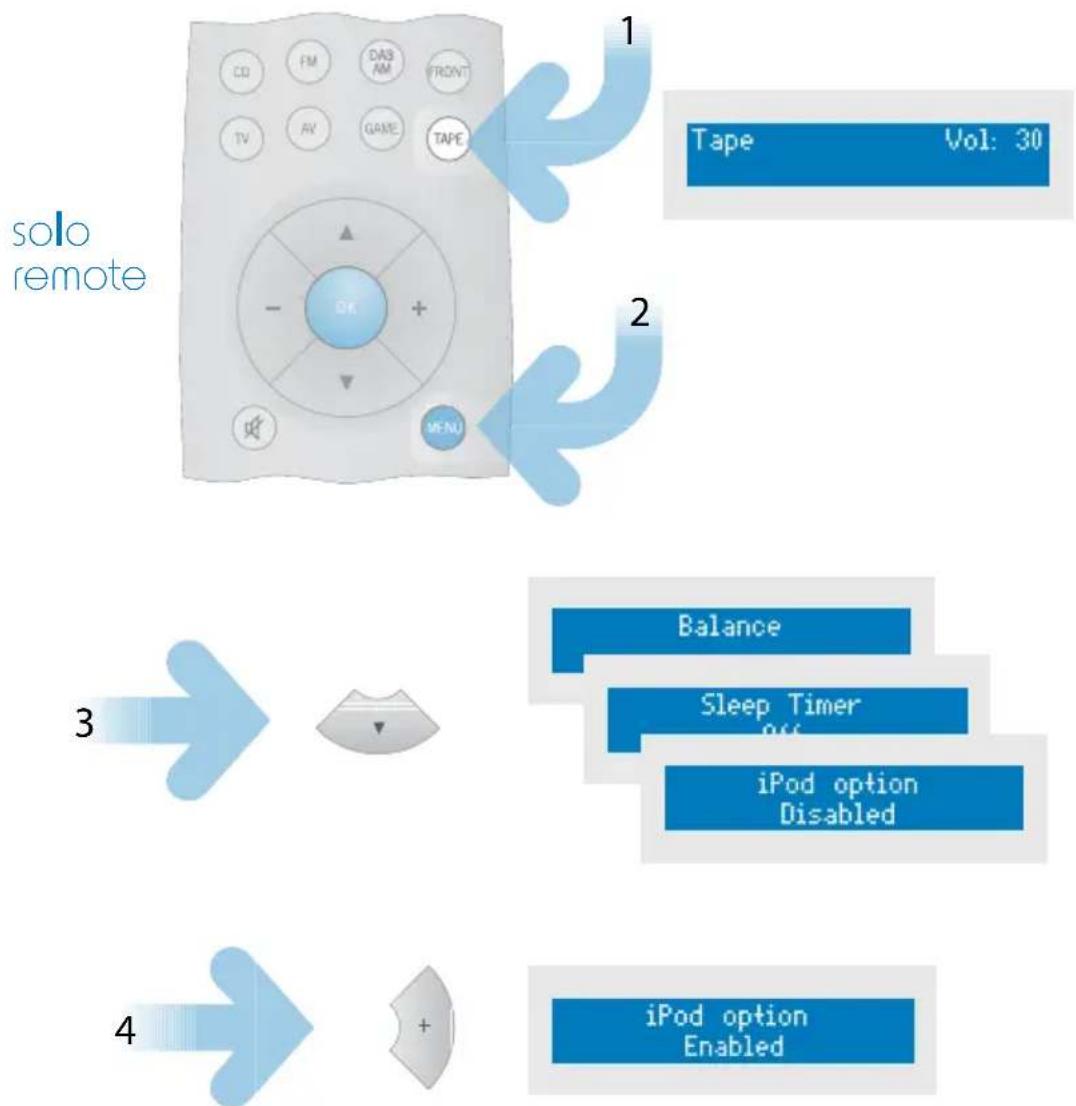
flowchart
graph TD
    A["solo remote"] --> B["1 Tape Vol: 30"]
    A --> C["2"]
    A --> D["3"]
    D --> E["4 iPod option Enabled"]
    A --> F["5"]
    style A fill:#f9f,stroke:#333
    style B fill:#bbf,stroke:#333
    style C fill:#bbf,stroke:#333
    style D fill:#bfb,stroke:#333
    style E fill:#bfb,stroke:#333
    style F fill:#bfb,stroke:#333
Remote control — Solo Neo
INFO Track name
Artist name
Album name
Track no.
Volume
MODE Repeat track
Repeat all
Shuffle songs
Shuffle albums
Shuffle songs repeat all
Shuffle albums repeat all
Play
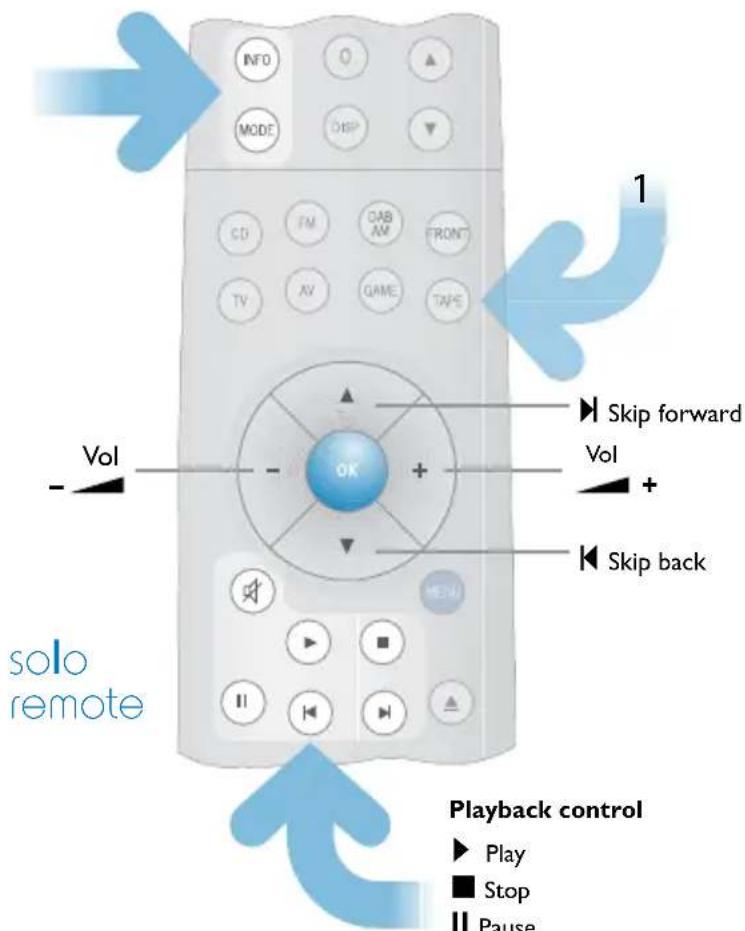
Playback control
▶ Play
■ Stop
II Pause
Skip back
Skip forward
Mute
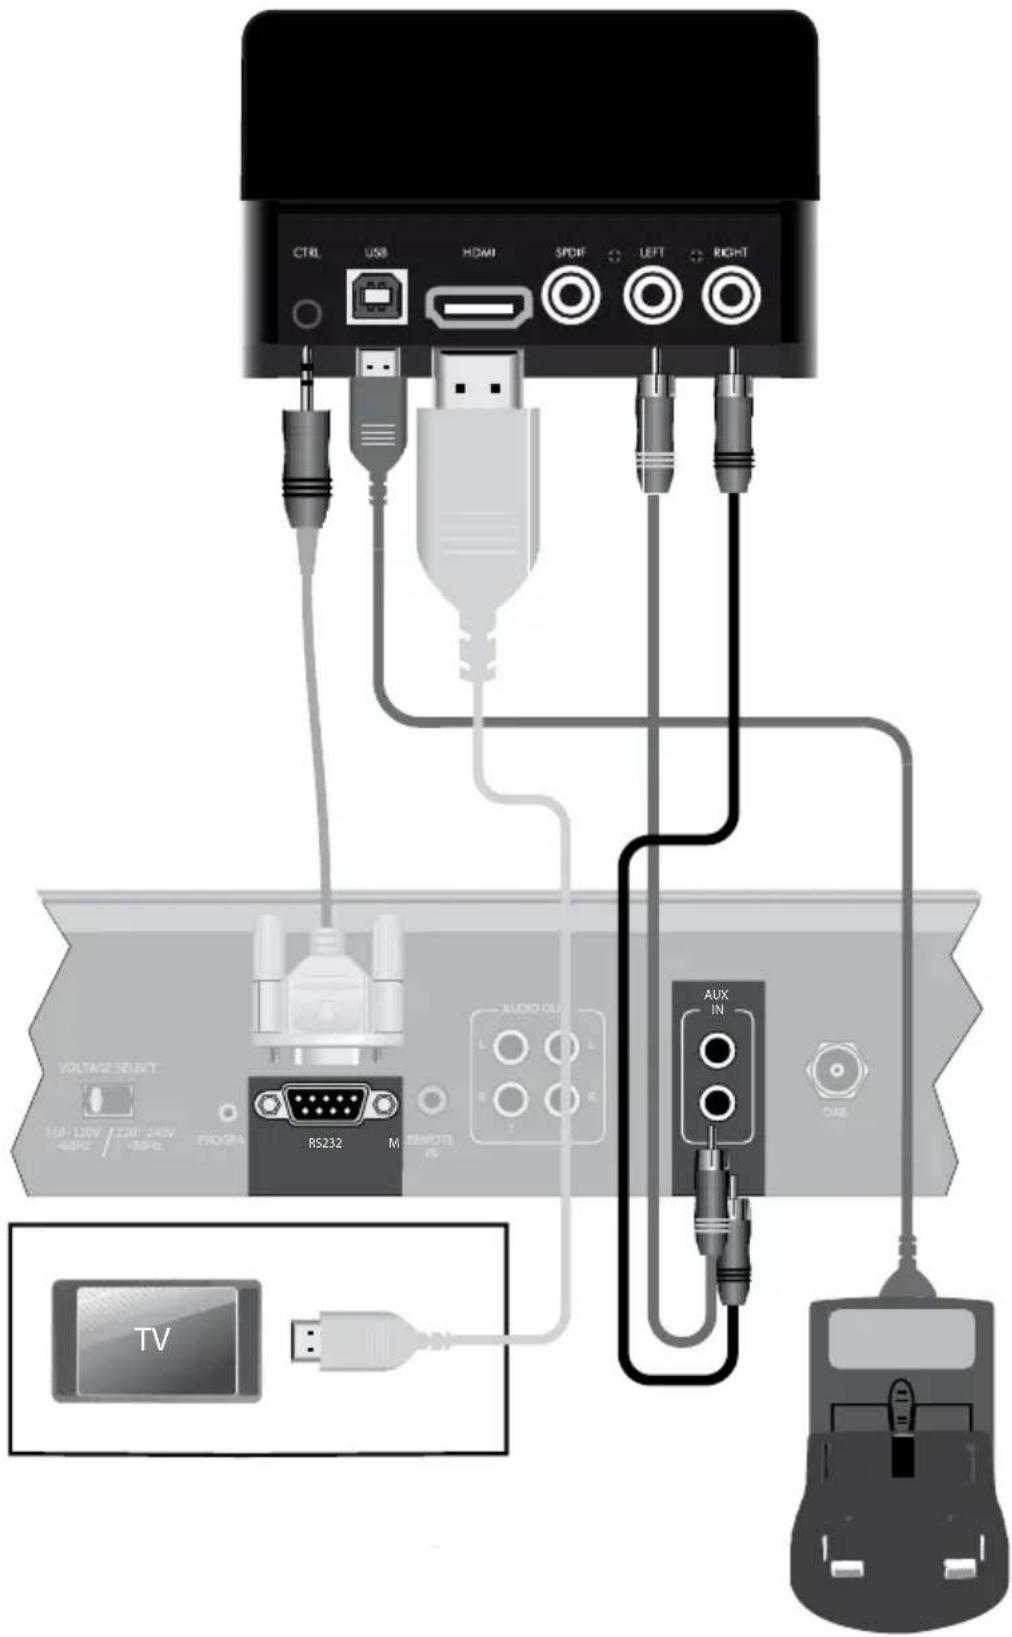
Arcam T32
Connections
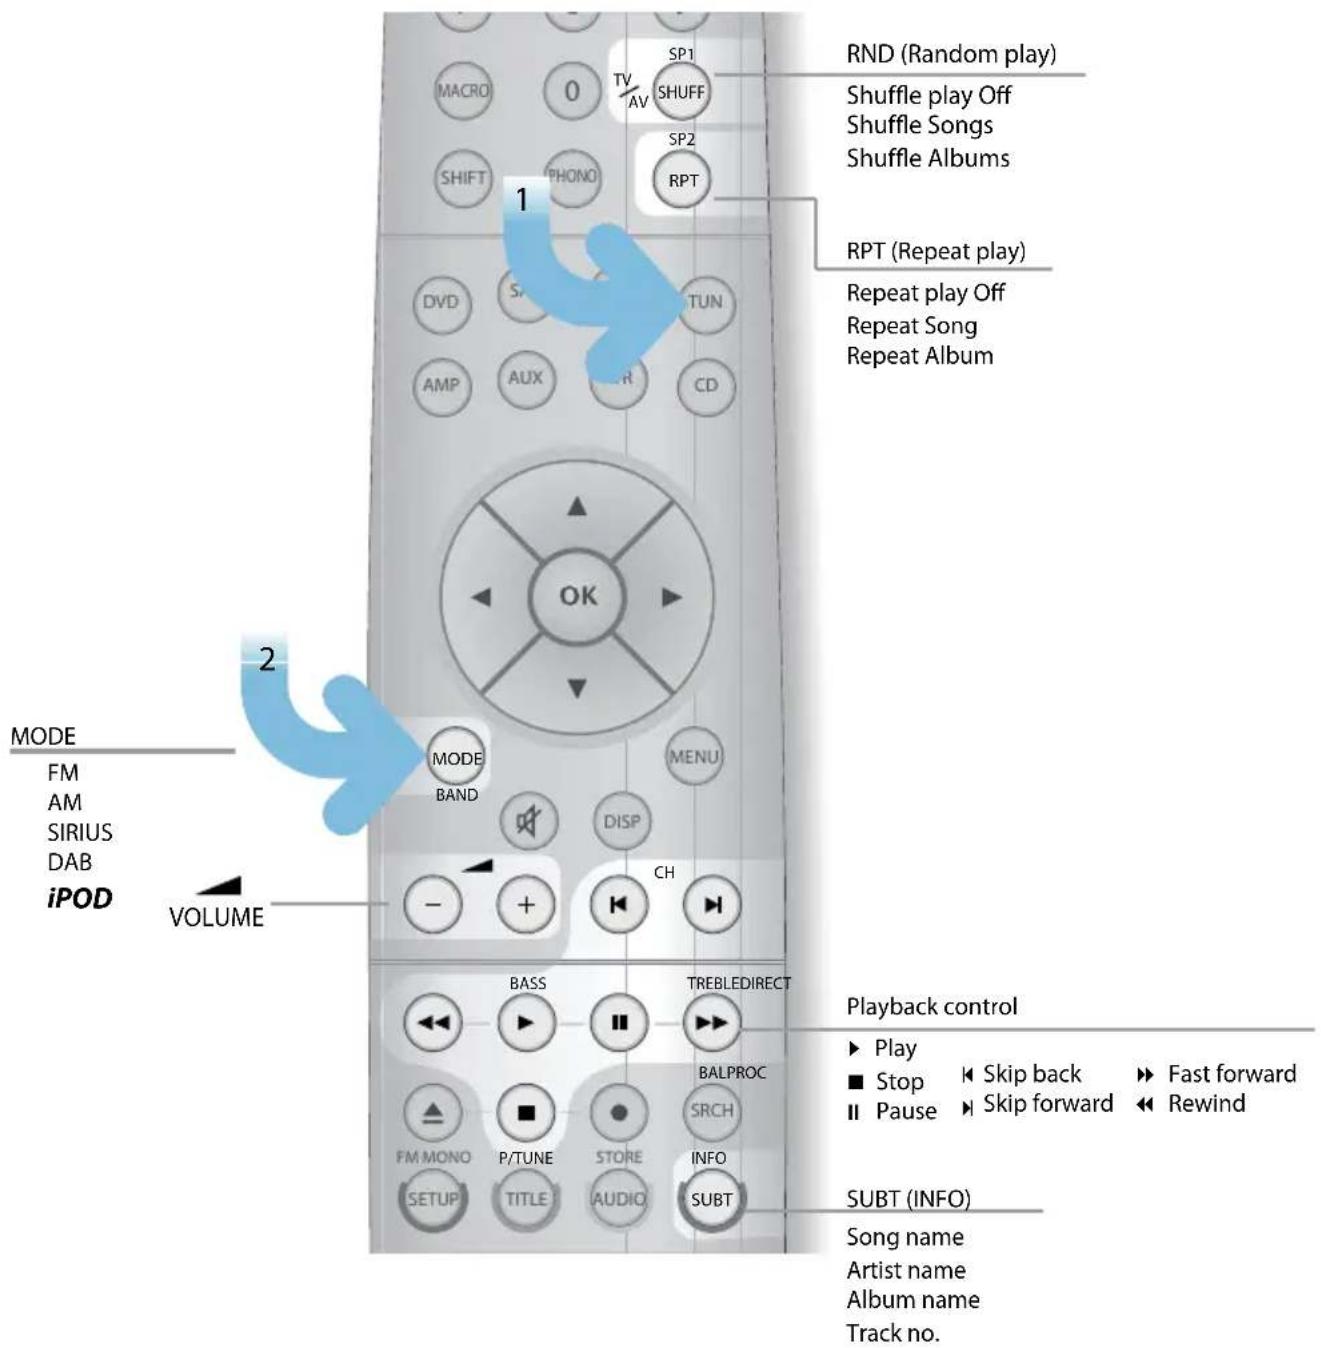
Remote control — T32 (CR90)
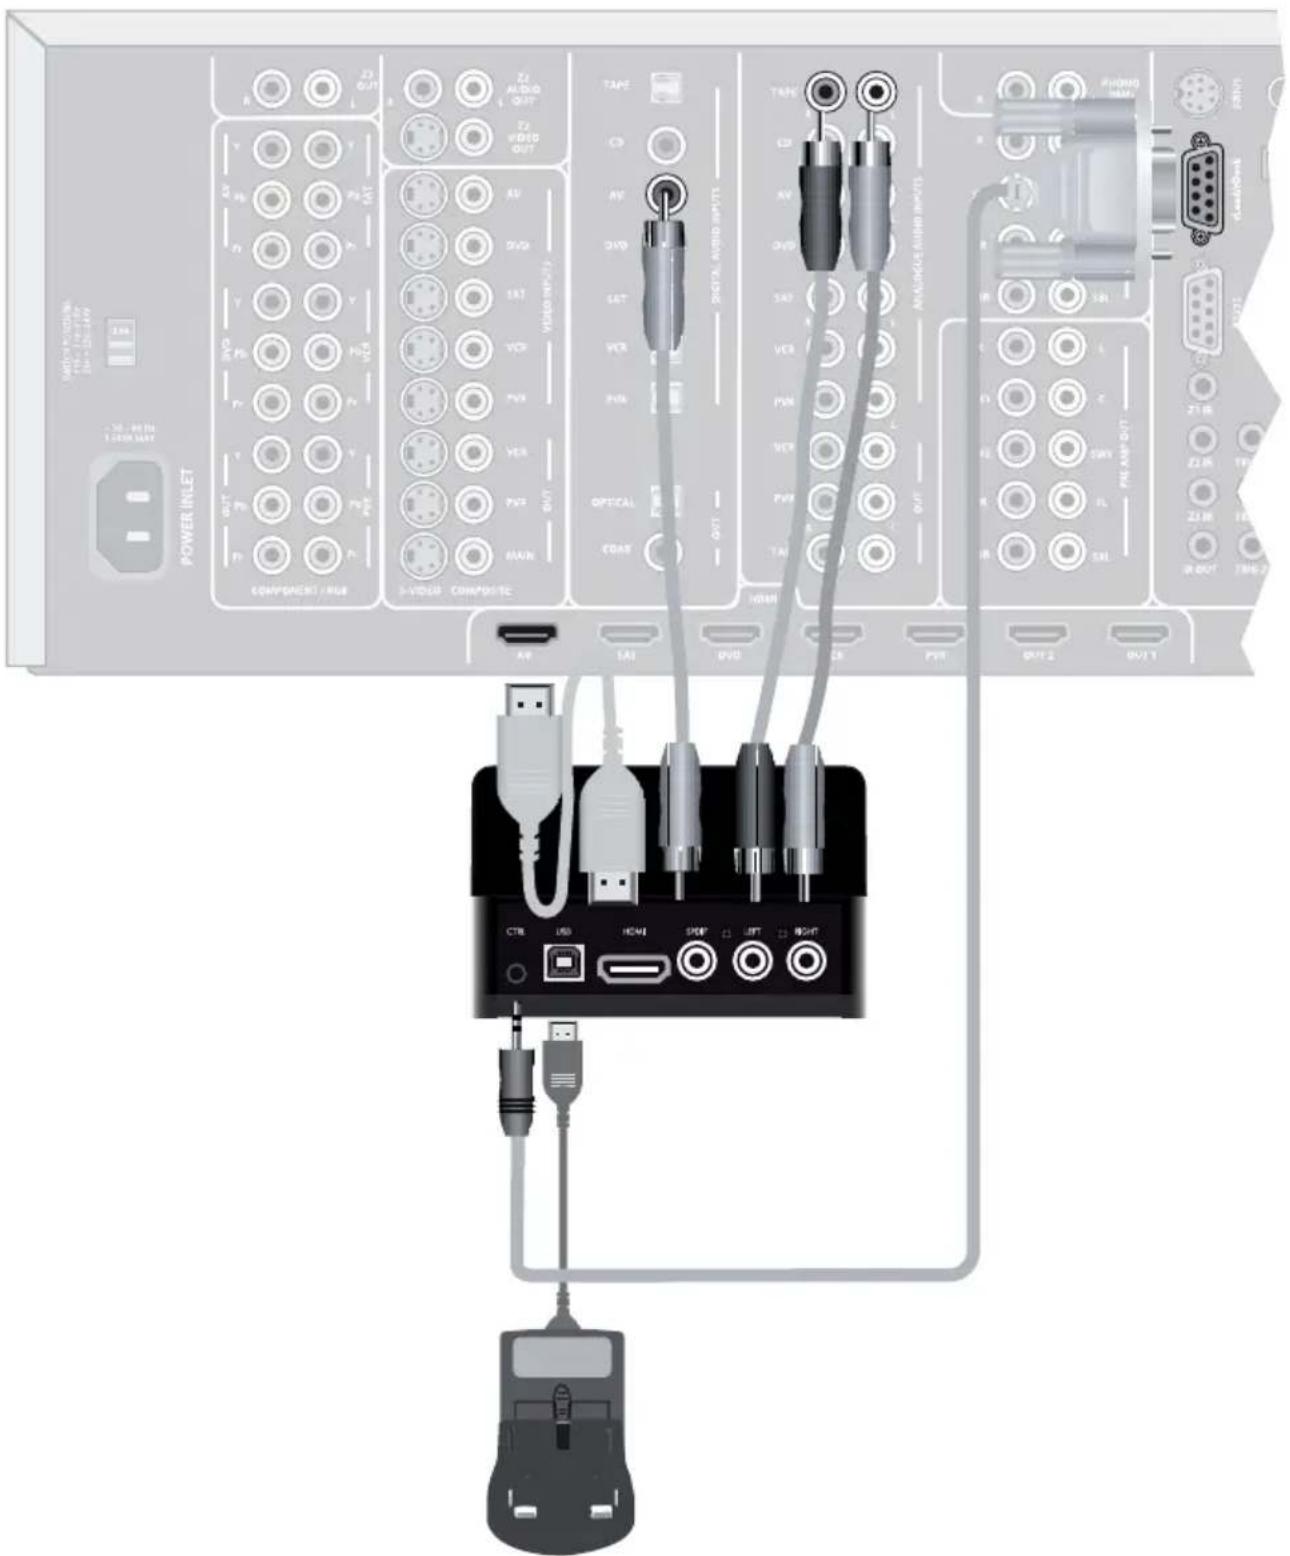
Arcam AVR360, AVR400, AVR600, AV888
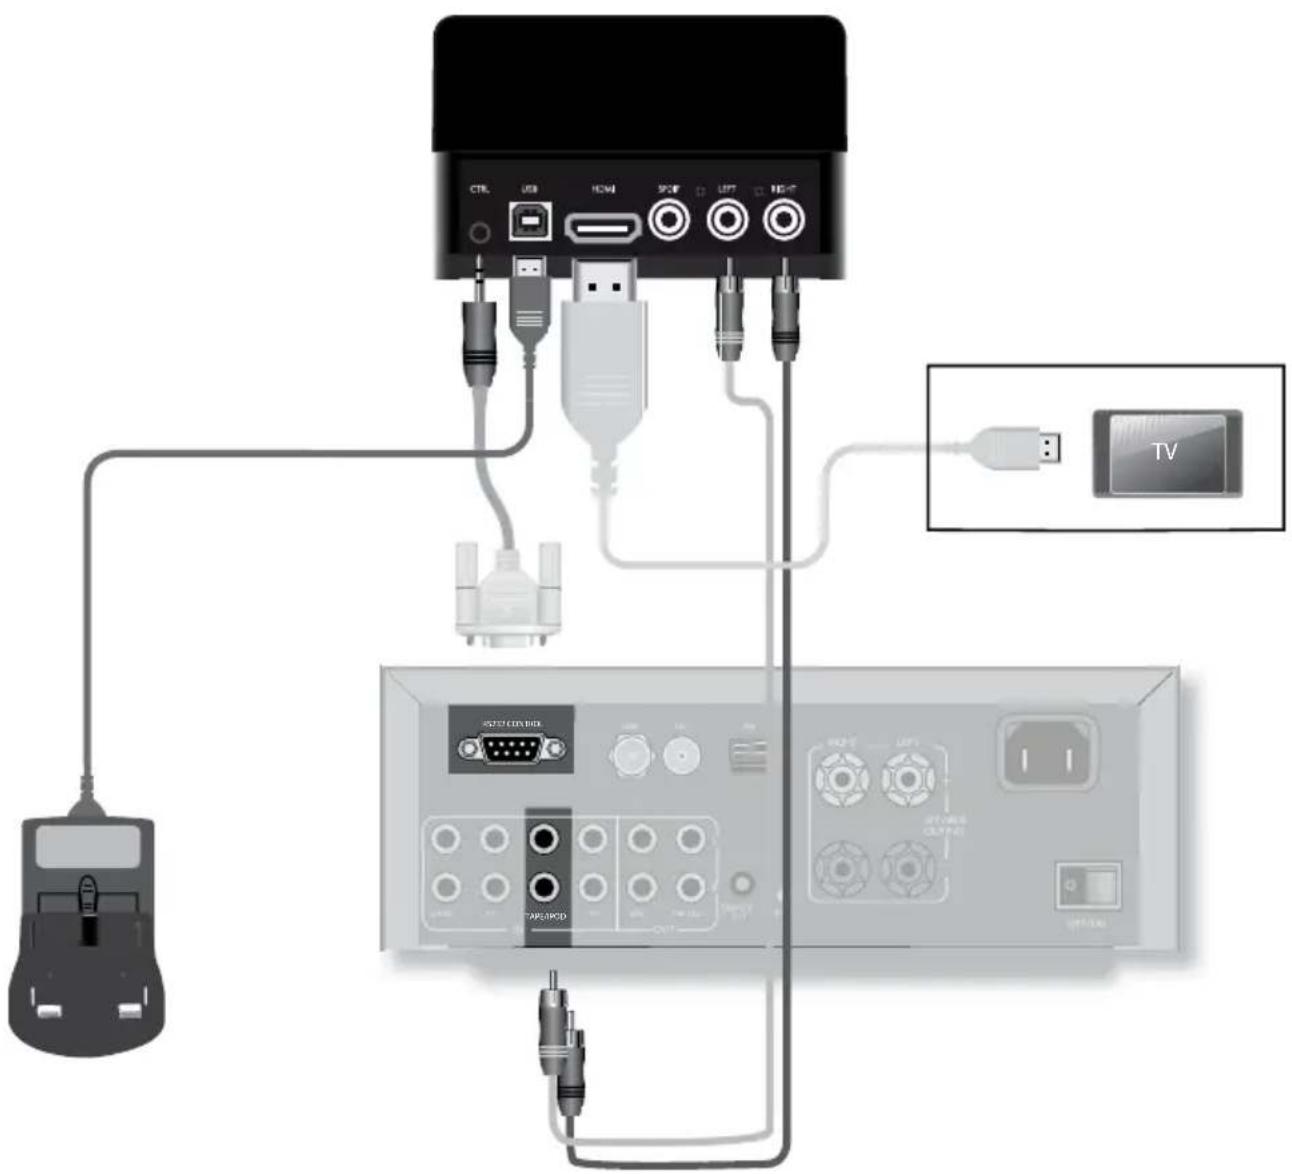
AVR Connection Example
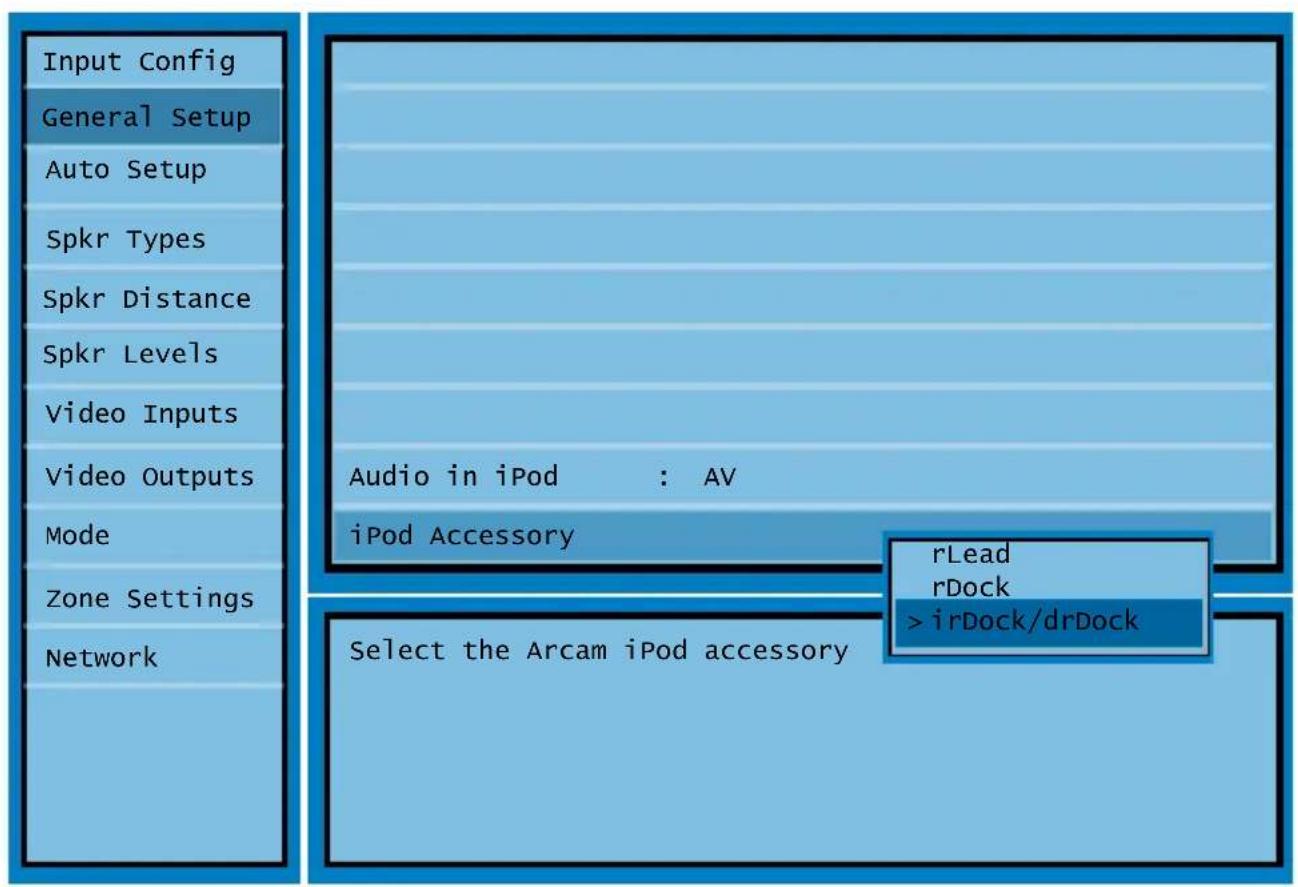
Setup — On Screen Display (not required for AVR360 & AVR400)
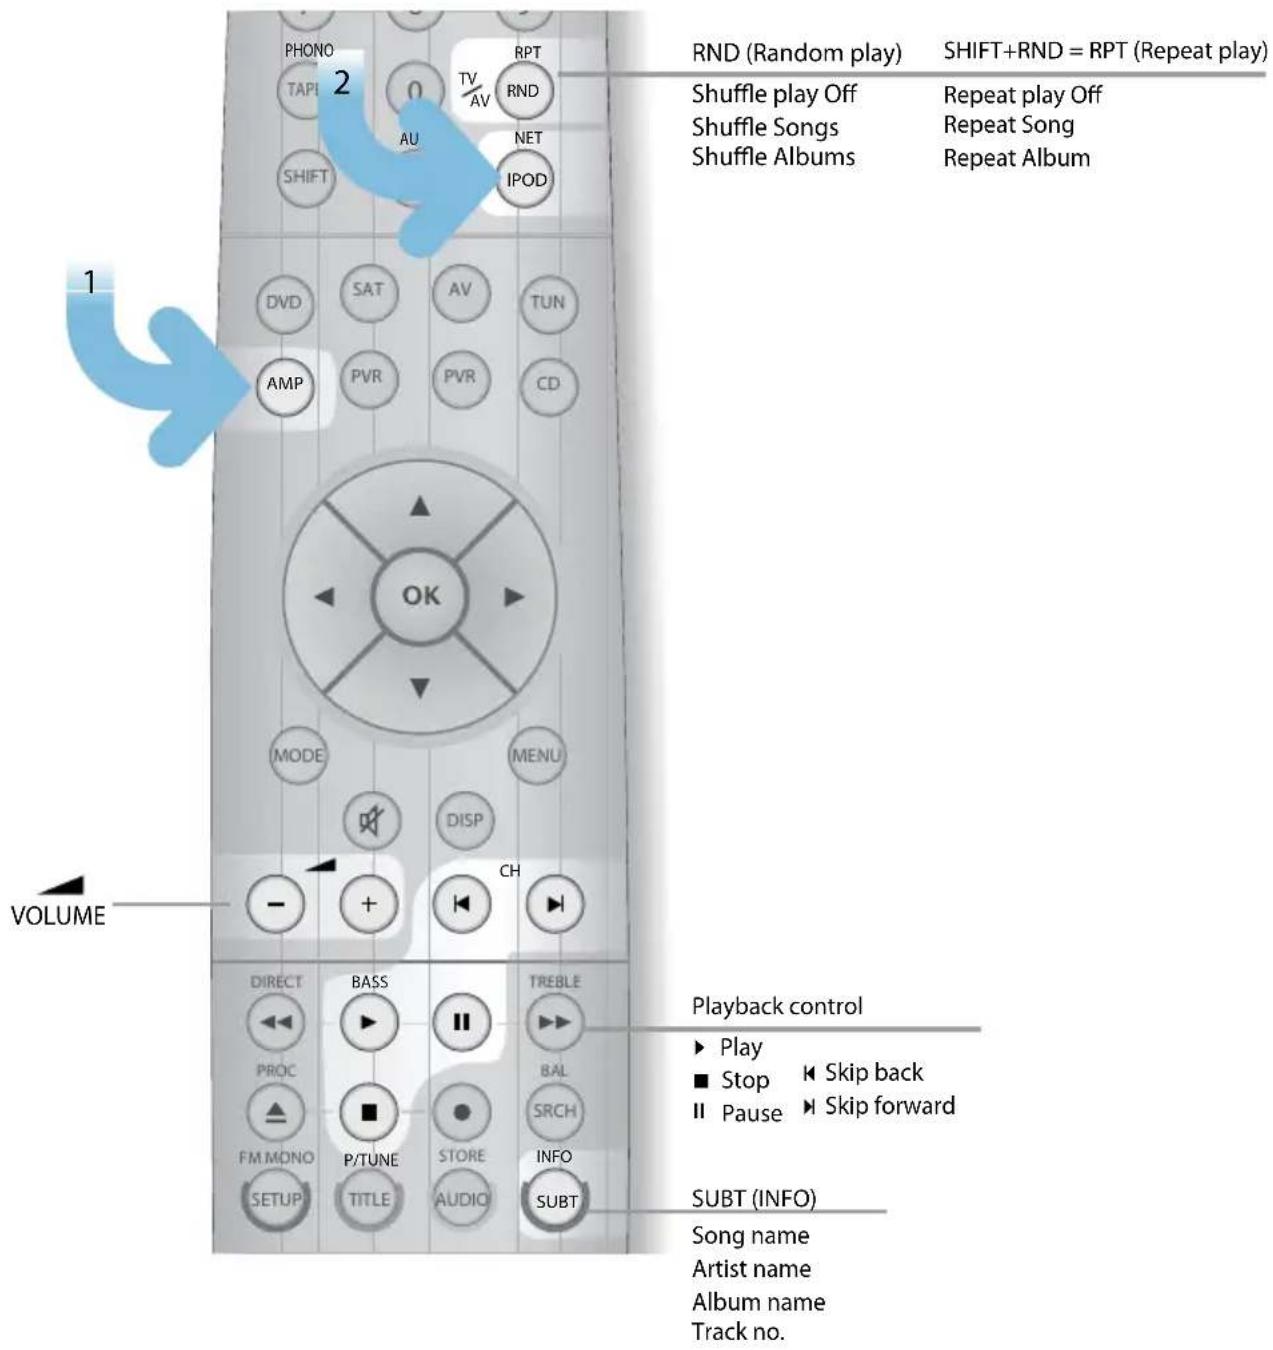
Remote control — AVR360, AVR400, AVR600, AV888 (CR102)
Navigation from the Front Panel
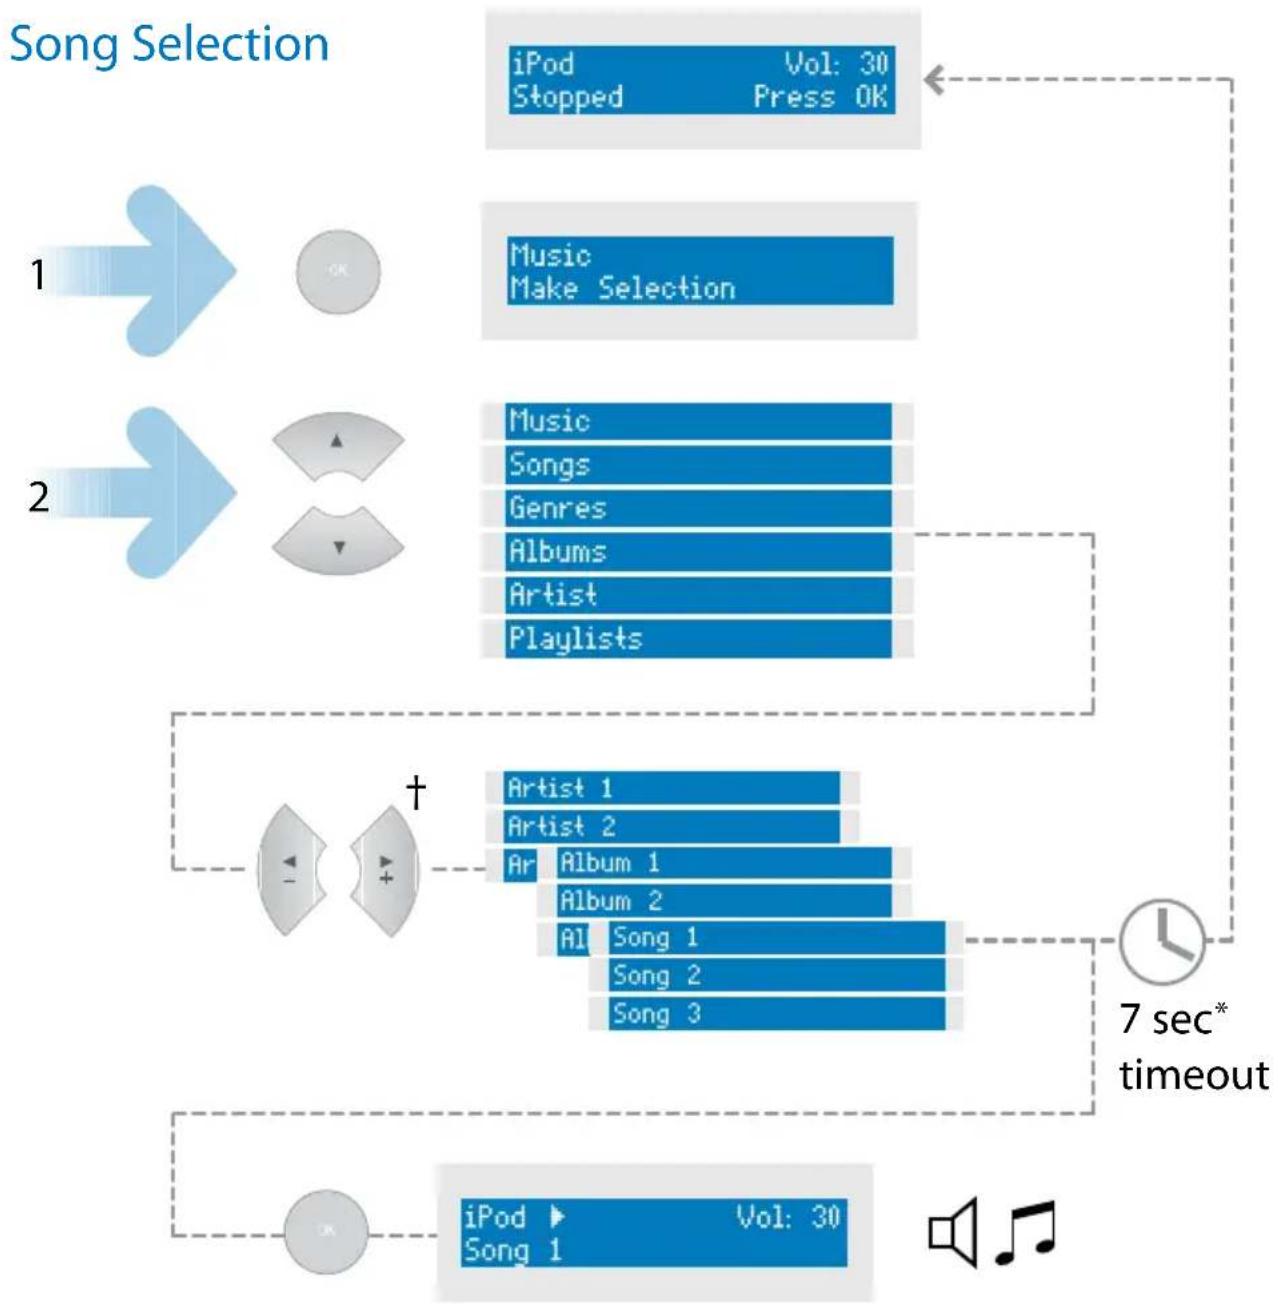
flowchart
graph TD
    A["iPod Vol: 30\nStopped Press OK"] --> B["Music\nMake Selection"]
    B --> C["Music\nSongs\nGenres\nAlbums\nArtist\nPlaylists"]
    C --> D["Artist 1\nArtist 2\nAr Album 1\nAlbum 2\nAI Song 1\nSong 2\nSong 3"]
    D --> E["iPod Vol: 30\nSong 1"]
    style A fill:#cce5ff,stroke:#333
    style B fill:#66ccff,stroke:#333
    style C fill:#66ccff,stroke:#333
    style D fill:#66ccff,stroke:#333
    style E fill:#cce5ff,stroke:#333
◀/▶ =CR50/CR90/CR100/CR102
* Solo Neo, Solo Mini & T32 only
Changing Selection
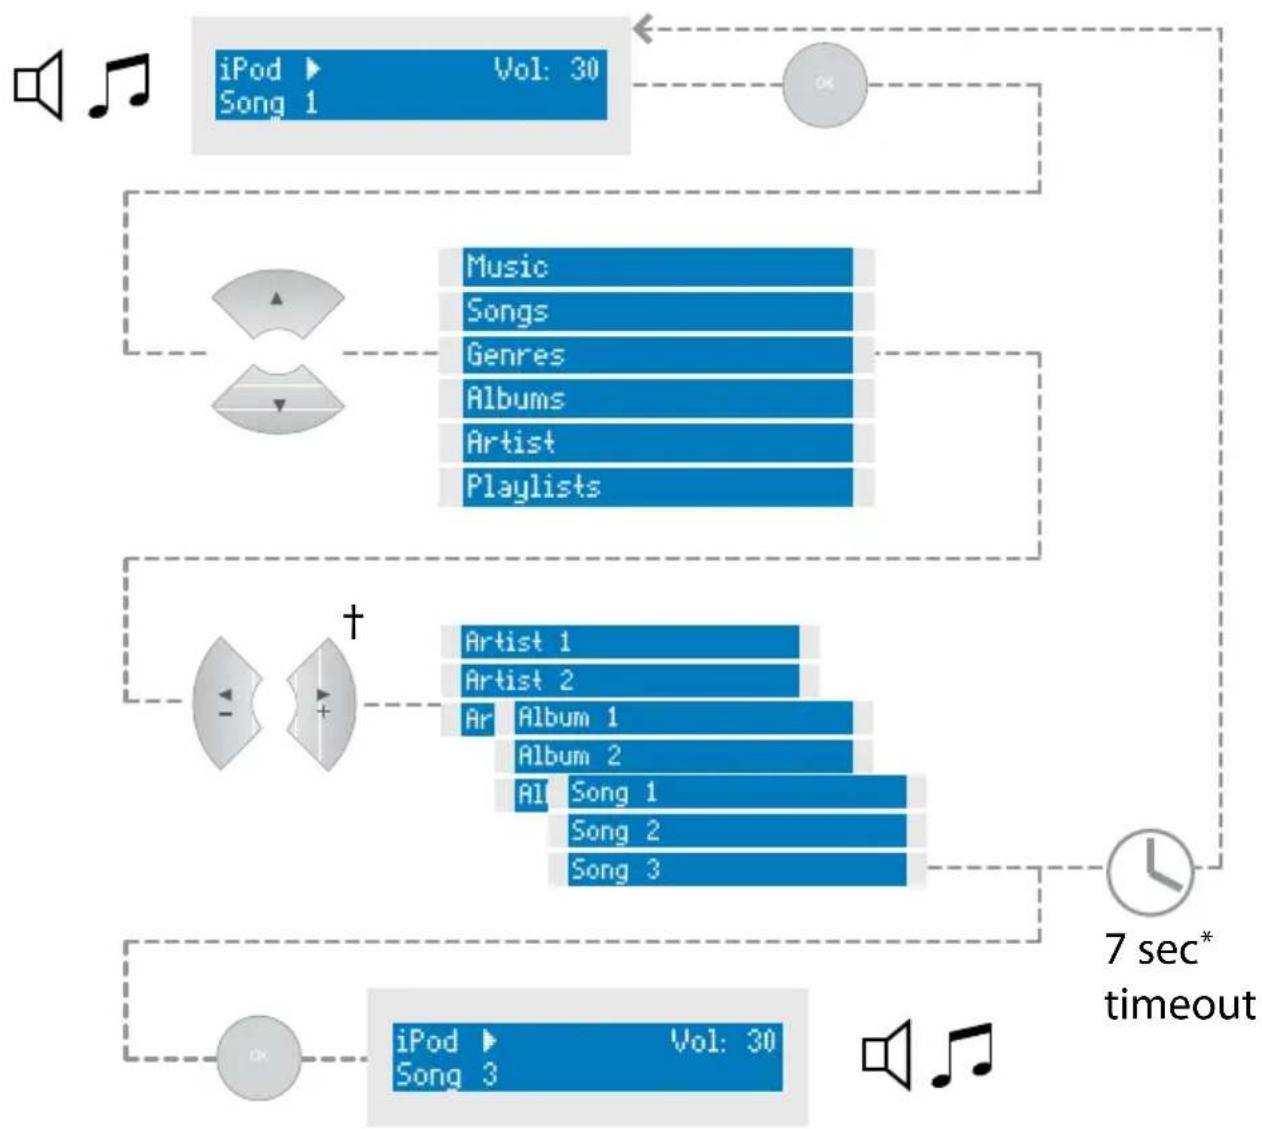
flowchart
graph TD
    A["iPod"] --> B["Pop 1"]
    B --> C["Vol: 30"]
    D["Music"] --> E["Pop 1"]
    F["Songs"] --> G["Pop 1"]
    H["Genres"] --> I["Pop 1"]
    J["Albums"] --> K["Pop 1"]
    L["Artist"] --> M["Pop 1"]
    N["Playlists"] --> O["Pop 1"]
    P["Artist 1"] --> Q["Pop 2"]
    R["Artist 2"] --> S["Pop 2"]
    T["Ar"] --> U["Pop 2"]
    V["Album 1"] --> W["Pop 2"]
    X["Album 2"] --> Y["Pop 2"]
    Z["All"] --> AA["Pop 1"]
    AB["Song 1"] --> AC["Pop 2"]
    AD["Song 2"] --> AE["Pop 2"]
    AF["Song 3"] --> AG["Pop 3"]
    AH["iPod"] --> AI["Pop 1"]
    AI --> AJ["Vol: 30"]
    AK["7 sec* timeout"] --> AL["Clock with Time"]
◀/▶ =CR50/CR90/CR100/CR102
* Solo Neo, Solo Mini & T32 only
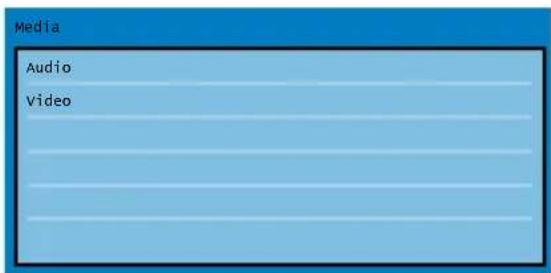
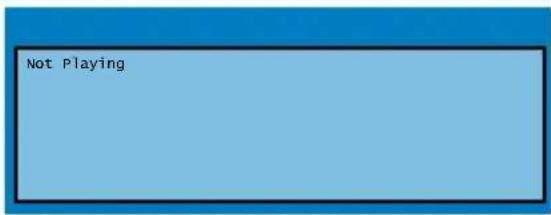
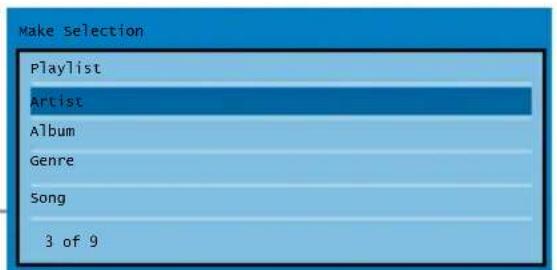
Navigation from the On Screen Display
(AVR360, AVR400, AVR600 & AV888 only)
Song Selection
natural_image
Simple diagram showing a blue arrow pointing right next to two curved shapes with arrows, no text or symbols present.
natural_image
Simple graphic with a blue arrow pointing right and a gray circle (no text or symbols)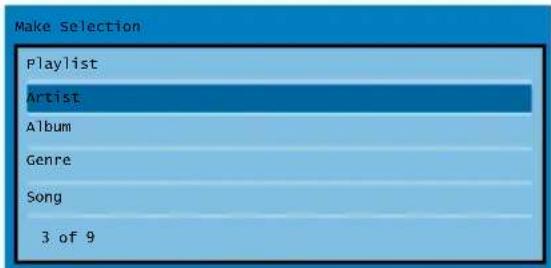
natural_image
Simple diagram showing a blue arrow pointing right and two curved shapes with arrows, no text or symbols present.
natural_image
Simple graphic with a blue arrow pointing right and a gray circle (no text or symbols)![Track All Eleanor Rigby/Julia [Transition] Blackbird/yesterday Lady Madonna All You Need Is Love](/content/2026/05/773867/images/a9609c68671e2bde947eacbb33b377915dad4120d261926f0f5fb712f469aea6.jpg)
![Track : Eleanor Rigby/Julia [Transition] Artist : The Beatles 00:07 Album : Love](/content/2026/05/773867/images/a40911bb5e9b301c51652ec25f1352f0669612886fa7db924abddbfe53460735.jpg)
Changing Selection
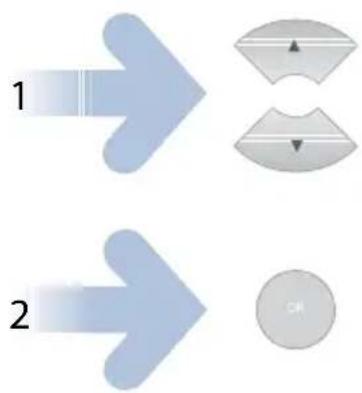
flowchart
graph TD
    A["1"] --> B["2"]
    B --> C["OK"]
![Track All Eleanor Rigby/Julia [Transition] Blackbird/Yesterday Lady Madonna All You Need Is Love](/content/2026/05/773867/images/8950a6b449c53dee28560d7aaa2cba08fe5522325ba3f02ef8644a3b00e3a86d.jpg)
![Track : Eleanor Rigby/Julia [Transition] Artist : The Beatles 00:07 Album : Love](/content/2026/05/773867/images/98cc84e8cce125ae5ddb816db65e500749c8231ba63cc3d545e439e6cb33c2e7.jpg)
![Track : Eleanor Rigby/Julia [Transition] Artist : The Beatles 00:07 Album : Love](/content/2026/05/773867/images/303665cb2e81ee93dabaed30da0706eae4fe2fa75410ad79a8a1c6e7c127e378.jpg)
Legal Information
FCC INFORMATION (FOR US CUSTOMERS)
1. PRODUCT
This product complies with Part 15 of the FCC Rules. Operation is subject to the following two conditions: (1) This device may not cause harmful interference, and (2) this device must accept any interference received, including interference that may cause undesired operation.
2. IMPORTANT NOTICE:
DO NOT MODIFY THIS PRODUCT
This product, when installed as indicated in the instructions contained in this manual, meets FCC requirements. Modification not expressly approved by ARCAM may void your authority, granted by the FCC, to use the product.
3. NOTE
This product has been tested and found to comply with the limits for a Class B digital device, pursuant to Part 15 of the FCC Rules. These limits are designed to provide reasonable protection against harmful interference in a residential installation.
This product generates, uses and can radiate radio frequency energy and, if not installed and used in accordance with the instructions, may cause harmful interference to radio communications. However, there is no guarantee that interference will not occur in a particular installation. If this product does cause harmful interference to radio or television reception, which can be determined by turning the product OFF and ON, the user is encouraged to try to correct the interference by one or more of the following measures:
- Reorient or relocate the receiving antenna.
- Increase the separation between the equipment and receiver.
- Connect the product into an outlet on a circuit different from that to which the receiver is connected.
- Consult the local retailer authorized to distribute this type of product or an experienced radio/TV technician for help.
Apple, Mac, Mac OS, iTunes, iPhone, iPod, iPod classic, iPod nano, iPod shuffle, and iPod touch are trademarks of Apple Inc., registered in the U.S. and other countries. iPad is a trademark of Apple Inc.
"Made for iPod," "Made for iPhone," and "Made for iPad" mean that an electronic accessory has been designed to connect specifically to iPod, iPhone, or iPad, respectively, and has been certified by the developer to meet Apple performance standards. Apple is not responsible for the operation of this device or its compliance with safety and regulatory standards. Please note that the use of this accessory with iPod, iPhone, or iPad may affect wireless performance.
ARCAM
http://www.arcam.co.uk
Pembroke Avenue, Waterbeach, CAMBRIDGE, CB25 9QR, England

- Contents
- Power Adaptor Setup
- Docking your iPod
- Standalone operation
- Connections for any amplifier
- Remote control (CR1)
- Arcam Solo Mini
- Connections
- Remote control — Solo Mini
- Arcam Solo Neo
- Setup — Solo Neo
- Remote control — Solo Neo
- Arcam T32
- Arcam AVR360, AVR400, AVR600, AV888
- AVR Connection Example
- Setup — On Screen Display (not required for AVR360 & AVR400)
- Remote control — AVR360, AVR400, AVR600, AV888 (CR102)
- Navigation from the Front Panel
- Changing Selection
- Navigation from the On Screen Display
- Legal Information
- FCC INFORMATION (FOR US CUSTOMERS)
- PRODUCT
- IMPORTANT NOTICE:
- DO NOT MODIFY THIS PRODUCT
- NOTE
Brand : ARCAM
Model : drDock
Category : Computer Accessories