
PA070 - Computer Accessories TARGUS - Free user manual and instructions
Find the device manual for free PA070 TARGUS in PDF.


| Product Type | USB Mobile Port Replicator |
| Brand | Targus |
| Model | PA070 |
| Connectivity | USB 1.1 (to computer) |
| Ports | 1x RS232 Serial, 1x Parallel, 2x PS/2, 2x USB |
| Power Supply | AC Adapter (included) |
| System Requirements | Pentium-class CPU, USB port, Windows 98/2000 |
| Compatibility | Windows 98, Windows 2000 |
| LED Indicators | Hub Link, USB (x2), Serial, PS/2 (x2) - green when active |
| Special Features | Reset button for serial port, Global suspend mode |
| Included Accessories | 3-ft USB cable (A/B), AC adapter, driver diskette |
| Dimensions | Not specified |
| Weight | Not specified |
Frequently Asked Questions - PA070 TARGUS
User questions about PA070 TARGUS
0 question about this device. Answer the ones you know or ask your own.
Ask a new question about this device
Download the instructions for your Computer Accessories in PDF format for free! Find your manual PA070 - TARGUS and take your electronic device back in hand. On this page are published all the documents necessary for the use of your device. PA070 by TARGUS.
USER MANUAL PA070 TARGUS
USB Mobile Port Replicator
NOTEBOOK COMPUTER
MOBILE PORT REPLICATOR
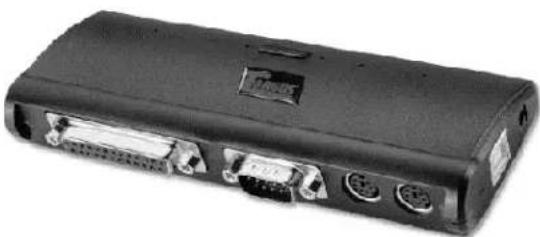
natural_image
Black electronic device with multiple ports and connectors (no visible text or symbols)
User's Guide
INTRODUCTION
Congratulations on your purchase of the Targus USB Mobile Port Replicator! It is an intelligent expansion module that easily connects to a PC or notebook via a USB port.
This user's guide provides descriptions of the Targus USB Mobile Port Replicator's features, and gives instructions for connecting various devices and installing the software.
System Requirements
◆ Pentium-class CPU with USB port
One USB V.1.1 compliant port
◆ Operating system: Windows 98 or Windows 2000
Contents
◆ Targus USB Mobile Port Replicator
This user's guide
◆ One 3-foot USB cable (A/B type)
One AC adapter
◆ One software driver diskette
CONNECTING THE USB PORT REPLICATOR
The USB Mobile Port Replicator provides one RS232 serial port, one parallel port, two PS/2 ports, and two USB ports. This port replicator provides easy connectivity for serial, PS/2, and other USB devices.
To get started, plug one end of the power adapter into the port replicator and the other end into the wall outlet. Do not connect any devices at this time. Once the port replicator is connected and the software installation is complete, you can connect your devices and install any supporting software drivers.
Plug the USB connector into the USB port of your computer, and plug the other end into the USB port of the port replicator.
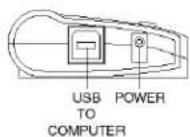
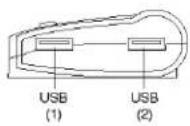
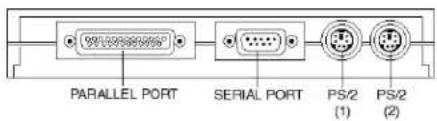
Figure 1. USB Mobile Port Replicator Ports
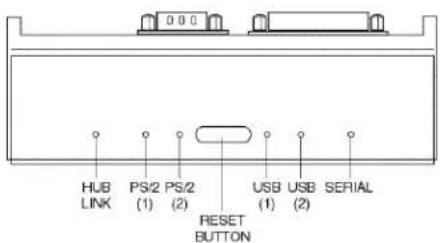
Figure 2. USB Mobile Port Replicator LED Lights
LED Status Indicators
Once the USB Mobile Port Replicator is connected, all of the following LED lights glow green: the Hub Link, both USBs, and the serial (RS232). The PS/2 lights glow green after a PS/2 device is connected.
SOFTWARE INSTALLATION
Now you will install the drivers to support each port on the port replicator.
For the initial installation, you must complete each of the following three steps to configure your USB Port Replicator ports and enable them for use.
The configuration will occur in the following sequence: the serial (RS232) port first, then the parallel port, followed by the PS/2 ports.
If you are running Windows 98, you may need your Windows 98 CD to complete the installation. During the installation, you may be prompted to insert the CD. If you are running Windows 2000, you will only need the included USB Port Replicator diskette.
Note: This procedure is divided into three steps and must be performed in sequence, from Step 1 through Step 3. Do not skip any steps.
Step 1. Setting Up the Serial Port
When first connected, the New Hardware Detected dialog box will appear, indicating that the Targus Serial Interface Controller is found. The Add New Hardware Wizard window will then appear. Click Next to continue.
When prompted by the next screen, What would you like Windows to do?, select Search for the best driver for your device, and click Next.
When prompted to initiate a search for the best driver for your serial device, insert the Targus USB Mobile Port Replicator disk. Then select Floppy disk drives, and click Next to initiate the search.
When the software driver is located, and Windows is ready to install it, click Next to continue with the installation.
When you see a message that Windows has finished installing the software driver for the serial port, click Finish.
Step 2: Installing the Parallel Port Drivers
Next, the New Hardware Detected dialog box will appear, indicating that the Targus Parallel Interface Controller is found. The Add New Hardware Wizard window will then appear. Click Next to continue.
Insert the Targus USB Mobile Port Replicator disk (if not already inserted) and select Floppy disk drives. Click Next to initiate the search.
When the software driver is located, and Windows is ready to install it, click Next to continue with the installation.
When Windows has finished installing the software for your parallel port, click Finish.
Step 3: Installing the PS/2 Port Drivers
Each PS/2 port will install separately and the steps below will repeat.
Then, the New Hardware Detected dialog box will appear, indicating that the USB-PS/2 Converter is found. The Add New Hardware Wizard will then install the native supporting drivers as a USB Human Interface Device.
When prompted by the next screen, What would you like Windows to do?, select Search for the best driver for your device, and click Next.
When prompted to initiate a search, click Next.
When the software driver is located, and Windows is ready to install it, click Next to continue with the installation.
Click Finish when Windows has finished installing the software for your new device. Step 3 will repeat and install the second USB-PS/2 port driver.
Note: Before connecting a printer to the parallel port of the USB Mobile Port Replicator, the printer driver must be installed. Otherwise, the printer might print unknown formats or characters.
Congratulations! You have installed the Targus USB Mobile Port Replicator. The new ports available to you are: one serial, one parallel, two USB, and two PS/2. They are numbered sequentially following the existing ports in your computer.
CONNECTING DEVICES TO THE PORT REPLICATOR
When connecting a new device to any port on the port replicator, the corresponding software drivers must be installed. Consider the following guidelines when preparing to connect new devices:
If your operating system is Windows 98, you will be prompted by a series of screens beginning with Add New Hardware Wizard. You may need your Windows 98 CD to complete the installation.
If your operating system is Windows 2000, the operating system drivers will install automatically.
With either operating system, you must run the Setup or Install that was included with your device.
To load any device-specific software, assign the device to a port as follows:
parallel printer PB1284-1 (USB port)
serial mouse or modem serial USB (COMx) where x is the number of the COM port
PS/2 mouse or keyboard no port name required; the device will be converted to emulate a USB mouse or keyboard.
Installing a Serial Mouse
After connecting a standard serial mouse to the serial port on the port replicator, press the Reset button until the Link LED flashes (about 5 seconds). Pressing the Reset button resets the serial port. Do this each time you restart your notebook computer and whenever connecting a serial device. Click Next to continue.
Installing a Serial Modem
Follow your modem installation instructions to add this device to your port replicator. When prompted to select the port, choose the Serial USB (COMx), where x is the COM port number assigned by your operating system.
Installing a Parallel Printer - First-Time Installation
Follow the installation instructions that come with your printer. When prompted to select a port, choose PB1284-1 (USB port). If this port does not appear in the list, choose the LPT1 port, complete the manufacturer's setup for your printer, and follow the instructions below for Printer Reconfiguration.
Printer Reconfiguration
Follow these instructions only if you are reconfiguring your printer from the LPT1 port to the USB Port Replicator's parallel port. Unplug the printer cable from your notebook, and plug it into the port replicator parallel port. Select Start, Settings, Printers Right-click the printer device you are reassigning, and select Properties. In the Printer Properties window, select Details or Connection for the Printer. (Section titles vary, so check your printer's user manual for specific instructions.) Change the setting to PB1284-1 (USB port) to redirect printing to the port replicator.
Installing a PS/2 Mouse or Keyboard
Simply plug the PS/2 mouse or keyboard into a PS/2 port on the port replicator. Once the device is connected, it will be detected automatically as a USB mouse or keyboard.
Installing additional USB Devices
To install any USB device, simply plug it into a USB port on the port replicator. Follow the installation instructions provided with your USB device.
SPECIAL NOTES
Global suspend the notebook computer
When your notebook computer is in suspend mode, the USB Mobile Port Replicator will also enter suspend mode to avoid power consumption. When your notebook computer wakes up, the port replicator will wake up automatically.
Using the Reset button
The Reset button is used in conjunction with the serial port on the port replicator. Whenever changing the serial devices connected to the serial port, press and hold the Reset button until the Hub Link LED light blinks so that the new device will be detected. Every time your notebook computer is powered on, press and hold the Reset button until the Hub Link LED light blinks (about 5 seconds).
PRODUCT LIMITATIONS
Your port replicator is splitting a single connection among a variety of devices and connections. Because of this, some devices that need a large amount of bandwidth will consume all of the available resources and can cause performance issues with the other devices attached.
We recommend the following guidelines:
Do not run multiple high speed devices at the same time, such as a digital camera and scanner.
If speed degradation does occur, close one or more USB applications to improve device performance.
There may be some temporary halting of some devices when a high data transfer is occurring. For example, the USB or PS/2 mouse may respond slowly while a graphic print job is printing.
The printer port is only compatible with printers and will only support enhanced bi-directional printer features, such as your paper status.
An older mouse may not work with the port replicator because the software driver cannot find the serial port without a direct connection to the computer.
A PS/2 mouse attached to the port replicator is configured by the operating system as a USB HID mouse. If the software driver continues to look for the mouse on the PS/2 port, enhanced features may not be available and your mouse will function as a standard, two-button mouse.
TROUBLESHOOTING
Perform these self-tests before calling technical support.
Device not recognized
Step 1 If a device attached to the port replicator is not recognized, press and hold the Reset button until the lights flash. Verify that the device is now recognized. If not, proceed to step 2.
Step 2 Detach all cables from the port replicator. Plug in the AC Adapter. Connect the power cable to the power input jack. Plug in each device, one at a time. Verify that each device is recognized before plugging in the next one.
Step 3 If a device is not recognized, plug it into a different port on the port replicator. If the device is still not recognized, try plugging it into the USB port on your notebook computer.
Verifying devices are installed correctly
Step 1 Move the cursor to My computer and click the right mouse button. Click Properties to display the System Properties window. Next, click Device Manager and select ports COM and LPT. The new path. Serial on USB [COM 2], appears in the window.
![Material Properties Source: [Material Properties] Material Name: [Material Properties] Material Type: [Material Properties] Material Description: [Material Description] Material Description: [Material Description] Material Description: [Material Description] Material Description: [Material Description] Material Description: [Material Description] Material Description: [Material Description] Material Description: [Material Description] Material Description: [Material Description] Material Description: [Material Description] Material Description: [Material Description] Material Description: [Material Description] Material Description: [Material Description] Material Description: [Material Description] Material Description: [Material Description] Material Description: [Material Description] Materials Properties Properties Details Functions Help OK Cancel](/content/2026/05/773854/images/a0b72720f1b53223a5a443827e282d20fc90bad066d250f1d640766f43a1e5c6.jpg)
Figure 1. Serial on USB [COM2]
Step 2 Within that same window, you will have a PA070 Parallel Interface device. Look under Universal Serial Bus controllers to see the other devices now installed for the port replicator.
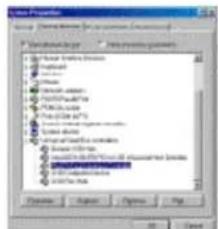
Figure 2. Serial Interface Controller
Modem connection
Step 1 When attaching a modem to the serial (RS232) port, verify that the port assigned to your modem is Serial USB (COMx), where x is the number of the COM port.
Step 2 If Windows does not Autodetect your modem on Serial USB (COMx), rerun the Hardware Wizard. Choose Select from a list instead of Autodetect, then select Serial USB (COMx) as the COM port.
Printer
Step 1 The parallel port is designed to support parallel printers. Data storage devices must be connected directly to the parallel port on your notebook computer.
Step 2 If your printer is not recognized, click on Start, select Settings, then select Printers. Highlight your printer, right-click the mouse button, and select Properties If the assigned port is LPT1, change it to PB1284-1 (USB port).
Step 3 For a first-time printer installation, select the port PB1284-1 (USB port). If this port does not appear in the list, choose LPT1 and proceed with your installation. Once completed, follow step 2 above to set your printer port to PB1284-1 (USB port).
Mouse
Step 1 If your mouse is attached to the serial port, the enhanced features (e.g., screen scrolling) may not be available. The mouse will function as a standard, two-button serial mouse.
Step 2 If your mouse is attached to the PS/2 port, and the enhanced features are not working, you may need to disable the built-in mouse drivers on your computer. Please refer to the user manual provided with your device for instructions.
FEDERAL COMMUNICATIONS COMMISSION (FCC) STATEMENT
This device complies with Part 15 of the FCC rules. Operation is subject to the following two conditions: (1) this device may not cause harmful interference, and (2) this device must accept any interference received, including interference that may cause undesired operation.
TECHNICAL SUPPORT
In the unlikely event that you encounter problems with your Targus USB Mobile Port Replicator, please use our Web site to contact our support group through email. Or, call Technical Support. Our knowledgeable staff is available to answer your technical questions Monday through Friday, 8:00 A.M. until 8:00 P.M. Eastern time.
Telephone: 800-283-6325 (Toll Free) Email: TechSupport@targus.com Web site: www.targus.com
WARRANTY
Targus warrants this product to be free from defects in material and workmanship for one year. If your Targus accessory is found to be defective within that time, Targus will repair or replace it. This warranty does not cover damage from everyday wear and tear, or from transportation by a common carrier.
Under no conditions is Targus liable for loss of, or damage to, a computer; nor loss of, or damage to, programs, records, or data; nor any consequential or incidental damages, even if Targus has been informed of their possibility.
Warranty registration at: http://www.targus.com/product_registration.asp
Microsoft, Windows 98, and Windows 2000 are registered trademarks of Microsoft Corporation. PS/2 is a trademark of International Business Machines Corporation.

The Leading Global Supplier of Portable Solutions
Visit our Web site at www.targus.com
NEW YORK • LOS ANGELES • TORONTO • TOKYO • HONG KONG
SINGAPORE • SYDNEY • LONDON • PARIS • BRUSSELS • HANNOVER
Features and specifications are subject to change without notice. ©2000 Targus Corp.
400-0012-001B

- USB Mobile Port Replicator
- INTRODUCTION
- System Requirements
- Contents
- CONNECTING THE USB PORT REPLICATOR
- LED Status Indicators
- SOFTWARE INSTALLATION
- Step 1. Setting Up the Serial Port
- Step 2: Installing the Parallel Port Drivers
- Step 3: Installing the PS/2 Port Drivers
- CONNECTING DEVICES TO THE PORT REPLICATOR
- Installing a Serial Mouse
- Installing a Serial Modem
- Installing a Parallel Printer - First-Time Installation
- Printer Reconfiguration
- Installing a PS/2 Mouse or Keyboard
- Installing additional USB Devices
- SPECIAL NOTES
- Global suspend the notebook computer
- Using the Reset button
- PRODUCT LIMITATIONS
- TROUBLESHOOTING
- Device not recognized
- Verifying devices are installed correctly
- Modem connection
- Printer
- Mouse
- FEDERAL COMMUNICATIONS COMMISSION (FCC) STATEMENT
- TECHNICAL SUPPORT
- WARRANTY
Brand : TARGUS
Model : PA070
Category : Computer Accessories