
Dock Box - Computer Accessories PRO-JECT - Free user manual and instructions
Find the device manual for free Dock Box PRO-JECT in PDF.


| Product Type | USB Audio Dock Station |
| Brand | Pro-Ject Audio Systems |
| Model | Dock Box |
| Primary Function | Converts analog turntable signal to digital USB output for computer |
| Input | RCA phono (MM) and 3.5mm AUX |
| Output | USB 2.0 type B for computer, 3.5mm headphone jack |
| Power Supply | USB bus-powered (5V, 500mA) or external 5V DC adapter (optional) |
| Dimensions (W x D x H) | 150 x 80 x 30 mm (5.9 x 3.1 x 1.2 in) |
| Weight | 200 g (7.0 oz) |
| Supported Sample Rates | 16-bit / 44.1 kHz and 48 kHz |
| Operating Systems | Windows, macOS, Linux (USB audio class compliant) |
| Headphone Amplifier | Integrated, max 30mW into 32 ohms |
| Volume Control | Analog rotary on front panel |
| Chassis Material | Aluminum with brushed finish |
| Included Accessories | USB cable, RCA cable, power adapter (region specific), quick start guide |
| Cleaning Instructions | Wipe with soft, dry cloth; do not use solvents or abrasive cleaners |
| Safety Warnings | Keep away from moisture, heat sources; use only supplied power adapter |
| Repairability | No user-serviceable parts; contact Pro-Ject service for repairs |
| Spare Parts Availability | Power adapter and USB cable available from authorized dealers |
| Warranty | 2 years (depending on region) |
Frequently Asked Questions - Dock Box PRO-JECT
User questions about Dock Box PRO-JECT
0 question about this device. Answer the ones you know or ask your own.
Ask a new question about this device
Download the instructions for your Computer Accessories in PDF format for free! Find your manual Dock Box - PRO-JECT and take your electronic device back in hand. On this page are published all the documents necessary for the use of your device. Dock Box by PRO-JECT.
USER MANUAL Dock Box PRO-JECT
Pro-Ject AUDIO SYSTEMS
INSTRUCTIONS FOR USE Pro-Ject Dock Box
Dear music lover,
thank you for purchasing a PRO-JECT AUDIO Dock Box.
In order to achieve maximum performance and reliability you should study these instructions for use carefully.

Warning of a hazard for the user, the unit or possible misuse.

Important notice.
Connectors
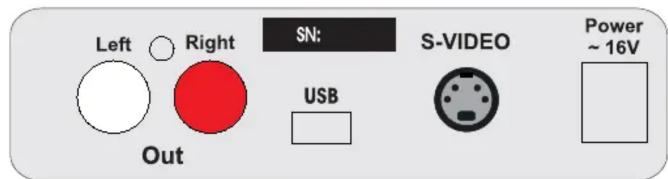

Make all connections whilst the Dock Box is disconnected from the power supply.

Take care to connect the left and right channels correctly. The right channel is usually marked red, the left channel black or white.
Connection to the amplifier
Connect the Out socket to a line input (such as AUX) on your amplifier.
Connecting to a computer
Connect the USB-output of the Dock Box to a free USB-socket on your computer and turn it on/make sure it is powered on.
Connection to a TV-set or a beamer
Connect the S-VIDEO socket to a s-video input of your TV-set or beamer.

S-VIDEO output not compatible with iPod ^® nano 3. Generation, iPhone ^® and iTouch ^®
Fitting and adjustment of the iPod® cradle
Use the knurled screw supplied to fix the cradle to the Dock Box chassis. Do not fully tighten the screw yet. Now place your iPod ^® on the Dock Box contacts. Move the cradle so that it supports the iPod ^® and tighten the screw.

Suitable for iPods ^® with 30-pole connector only (iPod ^® nano third generation only)
Loading the battery
When the Dock Box is connected to the mains power supply, the iPod ^® will start recharging as soon as it is placed on the contacts. Recharging will continue even if the Dock Box is on standby.
Mains power connection
The unit is supplied with a power supply suitable for your country's mains supply. Check the label before connecting to ensure compliance with the mains rating in your house. Connect the low voltage plug from the power supply to the Power \~16V socket before connecting the power supply to the mains.
Using the remote control
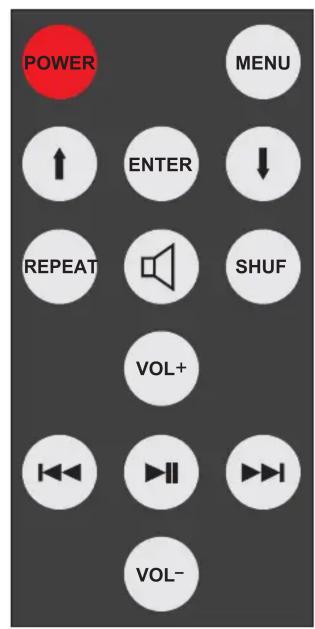
Standby

turn the unit on or back into standby. The blue LED on the front panel shows that the unit is powered on.
Volume control (earphone output)


adjusts the sound volume
Mute

activates and deactivates mute
Start / Pause

starts and pauses play back. Press and hold the button stops play back
Stepping between tracks, reverse and forward scanning

skips to the previous track.

skips to the next track

restarts the current track in play back mode
Press and hold the button for reverse scanning, or the button to start forward scanning.
Repeat play

starts repeat replay for the current track. Pressing the button again starts repeat play for all tracks.
To deactivate repeat play press REPEAT once more.
Shuffle play

activates and deactivates shuffle play
Navigating the menu

shows the menu. Returns to the previous step in the menu

and moves the curser up and down, to highlight the requested option.

selects or deselects the highlighted option. Shows the next step in the menu
Technical specifications Pro-Ject Dock Box
Frequency response: 20Hz - 20kHz
Line-level output: 1 pair RCA/Phono sockets
Output impedance: 15 ohms
Output voltage: 0,775Veff
USB-output: digital serial data protocol USB 1.1
Operating systems: Windows
^® and MacOS ^®
Video output: S-video socket
Outboard power supply: 16V/500mA AC, suitable for your country's mains supply
Power consumption: 16V/200mA AC. Power consumption is not constant.
It depends on charging needs of the iPod
® battery
Replacement battery remote control: 1 x CR2025 / 3V
Dimensions (W x H x D): 103 x 38 x 141 mm
Weight: 585g without power supply
Service
Should you encounter a problem which you are not able to alleviate or identify, please contact your dealer for further advice. Only when the problem cannot be resolved there should the unit be sent to the responsible distributor in your country.
Warranty

The manufacturer accepts no responsibility for damage caused by not adhering to these instructions for use. Modification or change to any part of the product by unauthorized persons release the manufacturer from any liability over and above the lawful rights of the customer.
PRO-JECT is a Registered Trademark of H. Lichtenegger.
This guide was produced by: Audio Trade GmbH Copyright © 2008. All rights reserved.
The information was correct at the time of going to press. The manufacturer reserves the right to make changes to the technical specification without prior notice as deemed necessary to uphold the ongoing process of technical development.
- Pro-Ject AUDIO SYSTEMS
- INSTRUCTIONS FOR USE Pro-Ject Dock Box
- Connectors
- Connection to the amplifier
- Connecting to a computer
- Connection to a TV-set or a beamer
- Fitting and adjustment of the iPod® cradle
- Loading the battery
- Mains power connection
- Using the remote control
- Standby
- Volume control (earphone output)
- Mute
- Start / Pause
- Stepping between tracks, reverse and forward scanning
- Repeat play
- Shuffle play
- Navigating the menu
- Technical specifications Pro-Ject Dock Box
- Service
- Warranty
Brand : PRO-JECT
Model : Dock Box
Category : Computer Accessories