
GPS-500 - Browser HARMAN KARDON - Free user manual and instructions
Find the device manual for free GPS-500 HARMAN KARDON in PDF.


| Product Type | Portable Touchscreen Navigation System and A/V Media Player |
| Brand | Harman Kardon |
| Model | GPS-500 |
| Screen Size | 4.0 inches (diagonal) |
| Screen Resolution | 480 x 272 pixels (WQVGA) |
| Display Type | TFT LCD touchscreen, 65,536 colors |
| GPS Receiver | High-sensitivity Atlas™ II |
| CPU | 324MHz ARM9 core |
| Memory | 128 MB |
| Internal Maps | Preloaded maps of United States and Canada |
| Audio Formats Supported | MP3, WMA, AAC |
| Video Formats Supported | MPEG-4, WMV9 |
| Battery Type | Rechargeable lithium-polymer |
| Battery Life | Up to 4 hours (typical use) |
| Charging Time | Minimum 6 hours for full charge |
| Power Input | 12V car charger or 5V wall charger via USB (both included) |
| Connectivity | Mini USB (data and charging), 3.5mm headphone jack |
| Storage Expansion | SD memory card slot (card not included) |
| Built-in Speaker | Yes |
| Dimensions (H x W x D) | 75 mm x 118 mm x 20 mm (3.0 x 4.6 x 0.8 in) |
| Mounting Options | Windshield or dashboard using included fold-flat bracket |
| Safety Warning | Do not operate or view video while driving |
Frequently Asked Questions - GPS-500 HARMAN KARDON
User questions about GPS-500 HARMAN KARDON
0 question about this device. Answer the ones you know or ask your own.
Ask a new question about this device
Download the instructions for your Browser in PDF format for free! Find your manual GPS-500 - HARMAN KARDON and take your electronic device back in hand. On this page are published all the documents necessary for the use of your device. GPS-500 by HARMAN KARDON.
USER MANUAL GPS-500 HARMAN KARDON
ediug y™
005-SP
Portable Touchscreen Navigation System and A/V Media Player
User Manual
Contents
Introduction 3
Unpacking 3
Controls and Features 4-5
Before You Begin 6
Initial Setup 7
Navigation 8-16
Planning a Trip 8
Navigating to Your Destination 13
Navigation Options 15
Changing Navigation Settings 16
The SOURCE Screen 17
Playing Music and Video Files 17 – 21
Loading Media on Your SD Card 17
Listening to Music 20
Watching Videos 21
Changing Settings 22
Installation and Use in a Vehicle 23 - 25
Troubleshooting 26
Specifications 27
Battery Notes:
The Harman Kardon ^® GPS-500 uses a lithium-polymer battery. Under normal operating conditions, this battery will provide superior service with a lifespan that is superior to those of other battery types.
To protect the performance of your GPS-500 and its battery, please observe the following guidelines:
- Do not operate the GPS-500 in ambient temperatures outside of the following range: 14^ (-10^) to 131^ (55^) .
- Do not store the GPS-500 even for short periods in ambient temperatures outside of the following range: -4^ (-20^) to 140^ (60^) .
- Do not store the GPS-500 for long periods in ambient temperatures outside of the following range: 32^ (0^) to 77^ (25^) .
The GPS-500 will not charge the battery at temperatures above 122°F (50°C).
Introduction
Your new GPS-500 is a powerful portable touchscreen navigation system and audio/video media player. The GPS-500's GPS-powered navigation features will make it easy for you to travel to almost anywhere in North America with remarkable accuracy. Its A/V media player lets you listen to your favorite music, and you can even watch videos on its high-resolution 480 x 272 pixel screen.
We know you're eager to start using your GPS-500, so we've included a Quick-Start Guide that will help you use its basic features right away. This User Manual contains detailed information about all of the GPS-500's features and functions. To get the most out of your GPS-500, please read it thoroughly.
Unpacking
Your GPS-500 box should contain these items:
• GPS-500 Unit
- Wall Charger
- Car Charger
- USB Cable
- Fold-Flat Mounting Bracket
- Mounting Base Disc for Dash-Mounting
- Adhesive Pad for Mounting Base Disc
• Alcohol Cleaning Pad for Dash Surface
- Carrying Case
- Quick-Start Guide
If anything is missing, notify the dealer where you purchased your GPS-500 right away.
Unpack your GPS-500 carefully and save the box and packing materials so you can safely ship the unit in the future.

WARNING: Operation of any feature of this device while driving is dangerous. Do not operate this device while driving. Do not view or operate audio or video modes while driving.
For safety reasons, this device will cease navigation functions when the video mode is enabled. Do not attempt to disable any safety function incorporated in this device. Any alteration of this device may cause serious injury and shall void the warranty.
Controls and Features
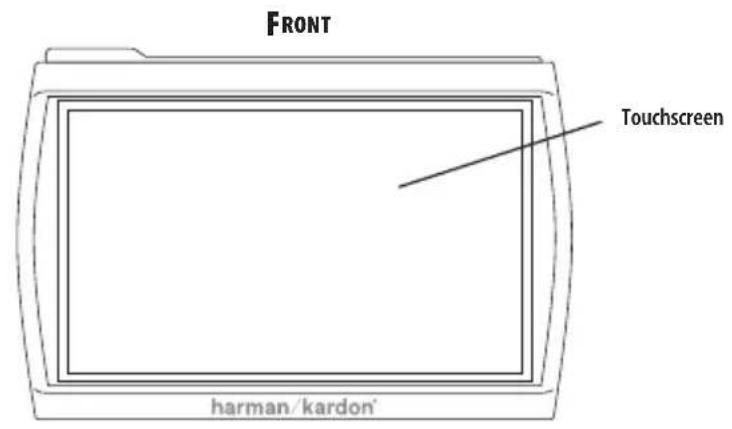
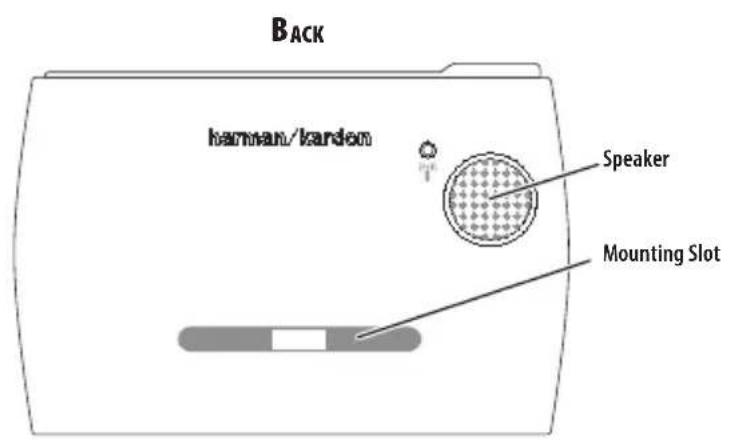
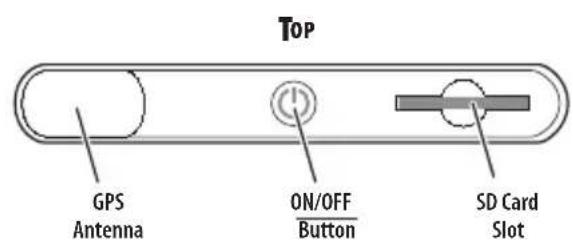
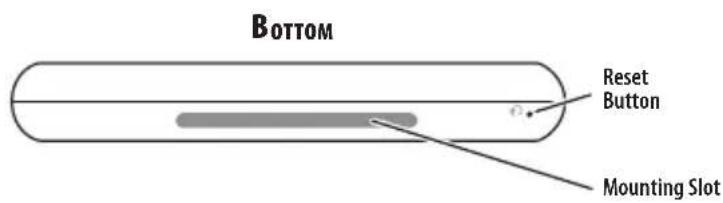
Controls and Features
Front:
TOUCHSCREEN: 480 x 272 pixel WQVGA LCD touchscreen.
Back:
SPEAKER: Built-in speaker plays navigation voice guidance commands and audio/video files that are stored on an SD memory card (see below).
MOUNTING SLOT: Lets you lock the GPS-500 onto the included fold-flat mounting bracket for use in a vehicle.
Top:
GPS ANTENNA: Must have a clear "view" of the sky to receive signals from GPS satellites.
ON/OFF BUTTON: Hold down to turn the unit on; hold down again to turn the unit off.
SD CARD SLOT: Accepts an SD memory card (not included). The SD card is required to store audio and video media to be played on your GPS-500.
Bottom:
RESET BUTTON: Lets you reset the unit if it becomes unresponsive or won't power-off. Insert a paper clip or similar item into the small hole to press the switch. (Resetting the unit does not erase information that you have entered, such as your home location, etc.)
MOUNTING SLOT: Lets you lock the GPS-500 onto the included fold-flat mounting bracket for use in a vehicle.
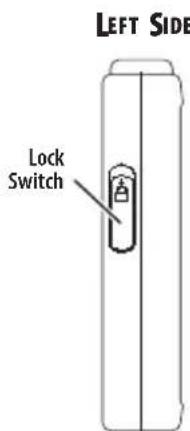
Left Side:
Lock Switch: Locks the GPS-500's touchscreen and all of its controls. This prevents accidental operation without your having to turn the unit's power off, so you can carry it in your pocket or purse.
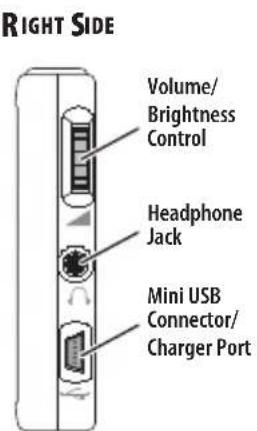
Right Side:
VOLUME/BRIGHTNESS CONTROL: Adjusts the volume of the GPS-500's built-in speaker. The volume control will also adjust the volume of headphones or an audio system that you have connected to the GPS-500's headphone jack (see below).
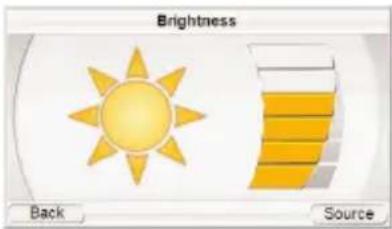
To adjust the brightness, press the volume control knob in. The Brightness indicator will be superimposed on the screen and you can change the screen's brightness by rotating the volume knob.
HEADPHONE JACK: Lets you connect headphones for personal listening. You can also connect the headphone jack to an auxiliary input on your vehicle's audio system.
MINI USB CONNECTOR/CHARGER PORT: Connects to your computer and to the included wall charger using the included USB cable. Connects to your vehicle's cigarette lighter or accessory power port using the included car charger.
Before You Begin
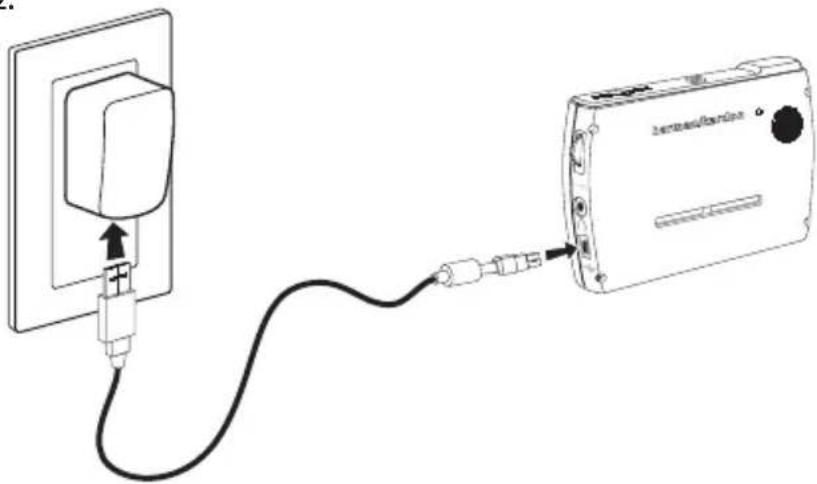
Before you begin using your GPS-500, you will need to charge its battery for a minimum of 6 hours.
- Plug the included wall charger into a wall outlet.
- Use the included USB cable to connect the GPS-500's Mini USB Connector/Charger port to the wall charger.
1.2.
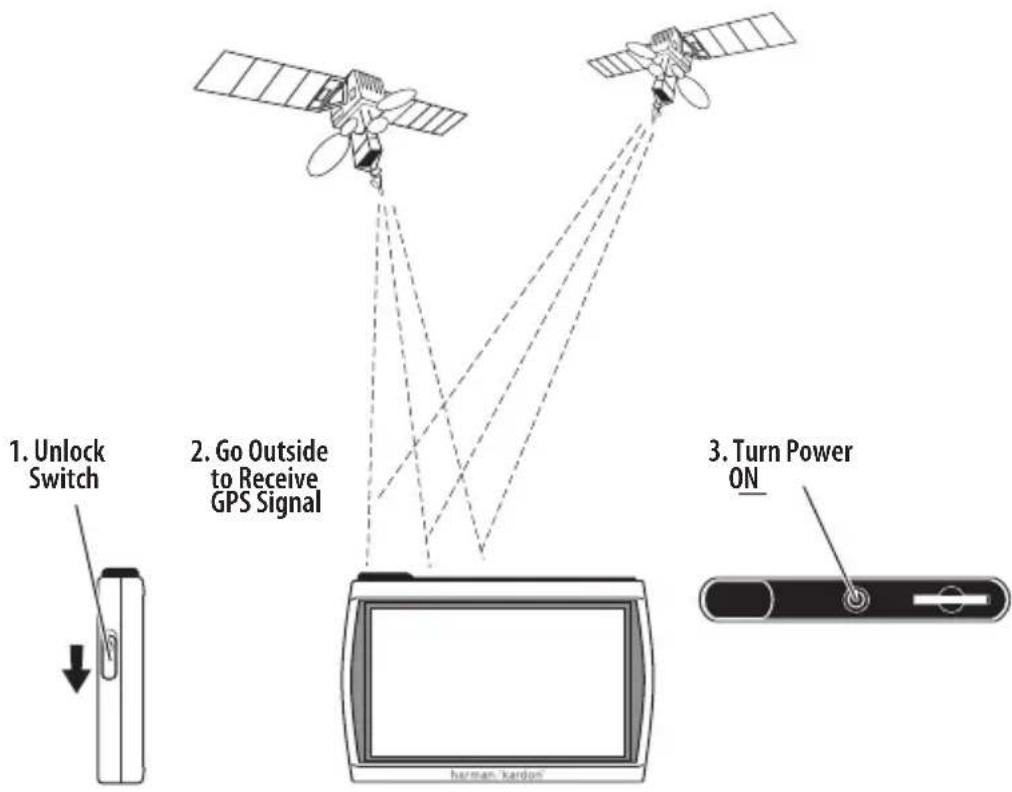
After the battery has charged for at least 6 hours:
- Make sure the Lock switch is in the DOWN (unlocked) position.
- Go outdoors to obtain GPS reception.
- Hold down the ON/OFF button until the unit turns on.
flowchart
graph TD
    A["1. Unlock Switch"] --> B["2. Go Outside to Receive GPS Signal"]
    B --> C["3. Turn Power ON"]
    C --> D["End"]
Initial Setup
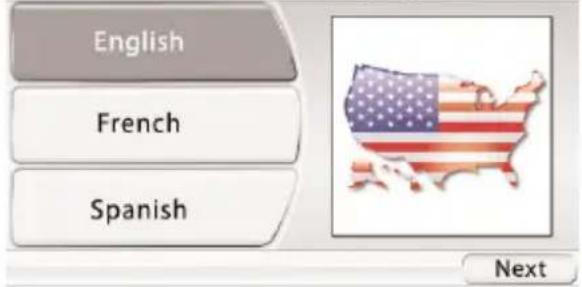
When you turn your GPS-500 on for the first time, the Setup Wizard will appear. The Wizard will guide you through the GPS-500's initial setup steps:
- Touch the button for the screen language you want to use (English, French or Spanish).
Touch the Next button.
Please select language
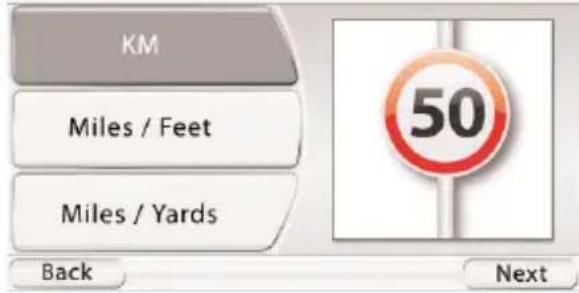
- Touch the button for the distance units you want to use (kilometers/meters, miles/feet or miles/yards).
Touch the Next button.
Please select distance units
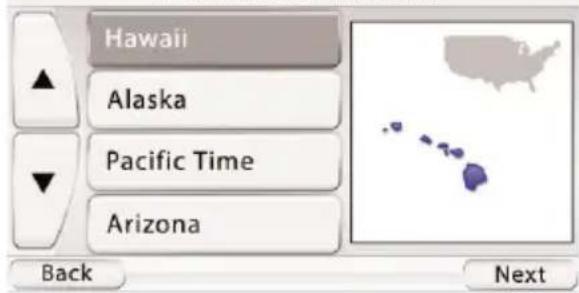
- Touch the button for the time zone where you are located.
Touch the Next button.
Please select time zone
- Set the current local time. You can also set the clock to display either 12-hour or 24-hour time.
Please set the time
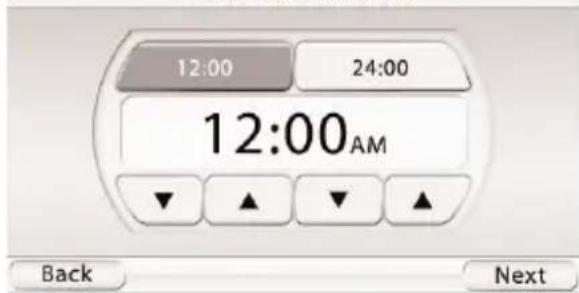
When you touch the NEXT button on the PLEASE SET THE TIME screen, the GPS-500 will display the NAVIGATION MENU screen (see page 8).
NOTE: Once you complete these initial setup steps, the Setup Wizard will not reappear. To change any of these settings, see CHANGING NAVIGATION SETTINGS, on page 16.

The geographic information provided by this device serves as a navigational aid only and does not include information pertaining to construction, road closures, speed restrictions, road or traffic conditions, or other circumstances relevant to public safety. The driver must always be aware of the actual road conditions and surroundings, and decide whether or not to follow the information provided by this device. Obey all traffic laws and observe safe driving practices. The manufacturer does not accept responsibility for any inaccurate or incomplete information provided by this device.
Navigation
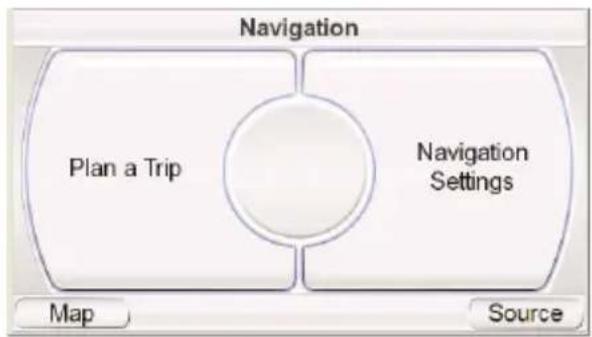
After you complete the initial setup steps, the NAVIGATION screen (right) appears.
Planning a Trip
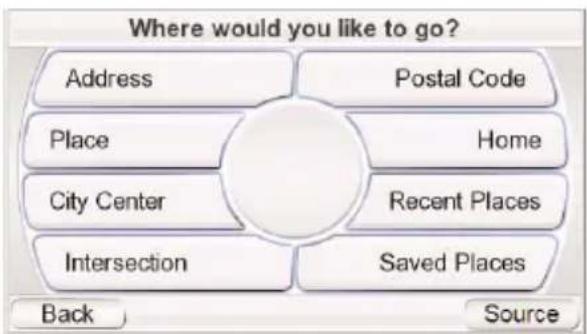
To begin navigation, touch the PLAN A TRIP button. The WHERE WOULD YOU LIKE TO Go? screen (right) appears.
The WHERE WOULD YOU LIKE TO Go? screen gives you several ways to plan your trip. You can enter a specific street address, choose a place from the GPS-500's extensive point-of-interest database, enter a city center, intersection or postal code, or navigate to locations you have recently visited or saved. The GPS-500 also lets you store your home address so you can quickly enter it as your destination from wherever you happen to be.
flowchart
graph TD
    A["Plan a Trip"] --> C((Center))
    B["Navigation Settings"] --> C
    C --> D["Map"]
    C --> E["Source"]
flowchart
graph TD
    A["Address"] --> B["Place"]
    B --> C["City Center"]
    C --> D["Intersection"]
    E["Postal Code"] --> F["Home"]
    F --> G["Recent Places"]
    G --> H["Saved Places"]
    I["Back"] --> J["Source"]
ENTERING A STREET ADDRESS
-
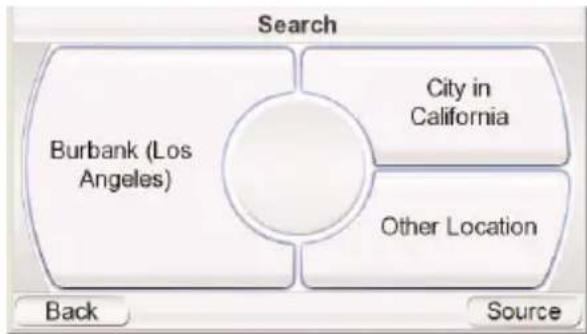
Touch the ADDRESS button on the WHERE WOULD YOU LIKE TO Go? screen. The SEARCH screen appears (right).
-
Touch the appropriate button for the city you want to travel to.
- If you select one of the city buttons, the ENTER CITY NAME screen (below) appears.
- If you select OTHER LOCATION, the SELECT COUNTRY and SELECT STATE screens will appear. Select the desired country (the U.S. or Canada) and then the desired state. The ENTER CITY NAME screen (right) appears.
flowchart
graph TD
    A["Burbank (Los Angeles)"] --> B["Search"]
    C["City in California"] --> B
    D["Other Location"] --> B
    E["Back"] --> F["Source"]
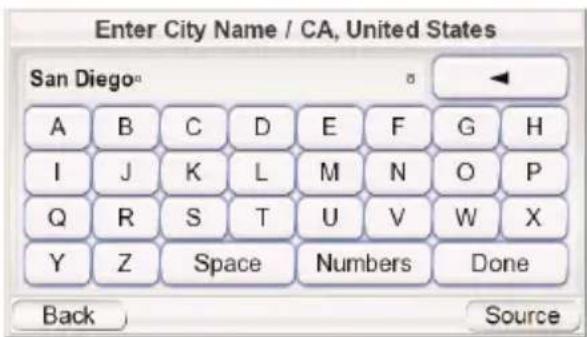
- Spell the name of the desired city. When you have finished, touch the DONE button. The ENTER STREET NAME screen (right) appears.
- In most cases, once you've entered some letters, the screen will display all of the cities that fit. Select the desired city from the list.
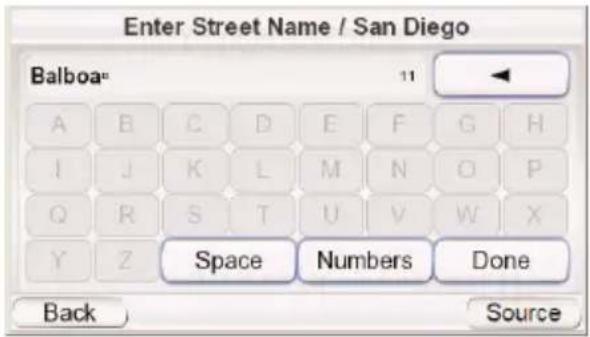
- Spell the name of the street. When you are finished, touch the DONE button. The ENTER HOUSE NUMBER screen appears.
- In many cases, once you've entered some letters, the screen will display all of the streets that fit. Select the desired street from the list.
-
Enter the desired address number. When you touch the DONE button, the CONFIRM ADDRESS screen (right) appears.
-
Touch Go to begin navigation. The map screen will appear. Once you start driving, the GPS-500 will guide you to
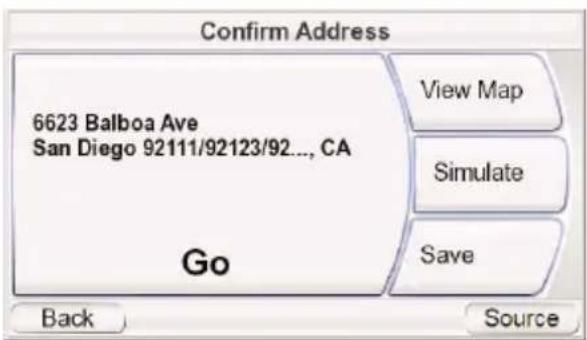
your destination. (See Navigating To Your Destination, on page 13.)
CHOOSING A PLACE (FROM THE GPS-500'S DATABASE)
The GPS-500 has a built-in point-of-interest database with millions of entries in many different categories:
• SERVICES: Gas stations, car dealers and rentals, post offices, banks and ATMs
• TRANSPORTATION: Airports, railroads, ferries, bus stations, parking areas, rest areas
• SHOPPING: Shopping centers, independent stores
- ENTERTAINMENT: Amusement parks, zoos, movie theaters, casinos, nightclubs and bars, tourist attractions
• CULTURE: Museums, libraries, live theater, concert halls, exhibition and convention centers, schools, colleges and universities
- SPORTS/RECREATION: Golf courses, ice skating rinks, swimming pools, tennis courts, fitness and sports centers, stadiums, beaches, yacht basins, parks & recreation centers
• EMERGENCY/GOVERNMENT: Hospitals and clinics, emergency care centers, dentists, first-aid centers
• Food & Drink: Restaurants, wineries
• LODGING: Hotels and motels, campgrounds and RV parks
• ARTIFICIAL LANDMARKS: Cemeteries
To Navigate to a PLACE:
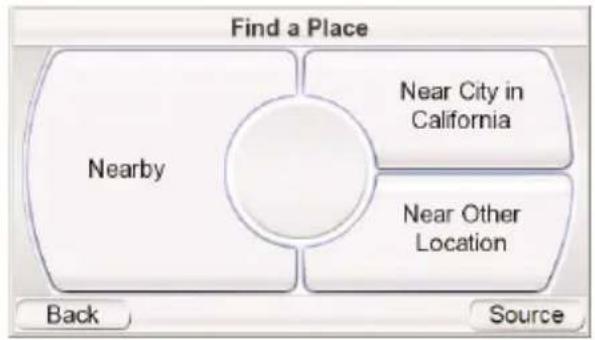
- Touch the PLACE button on the WHERE WOULD YOU LIKE TO Go? screen (see page 8). The FIND A PLACE screen (right) appears.
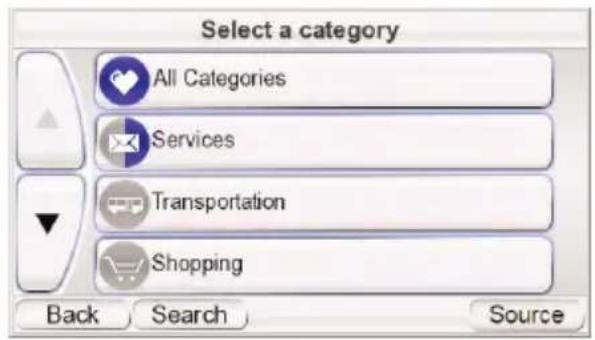
- Select the desired area. The SELECT A CATEGORY screen (right) appears. (If you know the name of the place, you can enter it instead of searching by category.)
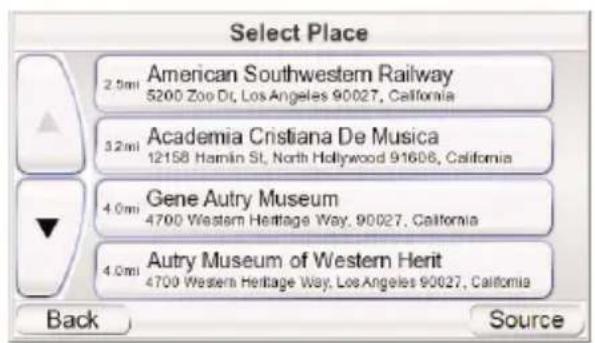
- Use the up/down arrow buttons to find the desired category, then touch it. The SELECT PLACE screen (right) appears.
- Use the up/down arrow buttons to scroll through the list of places, then touch the button for the place you want to go. The CONFIRM ADDRESS screen (right) appears.
- Touch Go to begin navigation. The map screen will appear. Once you start driving, the GPS-500 will guide you to your destination. (See Navigating to Your Destination, on page 13.)
SELECTING A CITY CENTER, INTERSECTION OR POSTAL CODE
flowchart
graph TD
    A["Nearby"] --> B["Near City in California"]
    A --> C["Near Other Location"]
    A --> D["Back"]
    style A fill:#fff,stroke:#000
    style B fill:#fff,stroke:#000
    style C fill:#fff,stroke:#000
    style D fill:#fff,stroke:#000
The GPS-500 can guide you to a city center, to the intersection of two streets or to a specific postal code.
NAVIGATING TO A CITY CENTER:
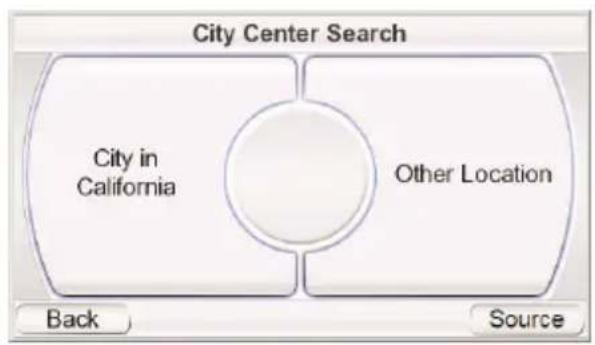
- Touch the CITY CENTER button on the WHERE WOULD YOU LIKE To Go? screen (see page 8). The CITY CENTER SEARCH screen (right) appears.
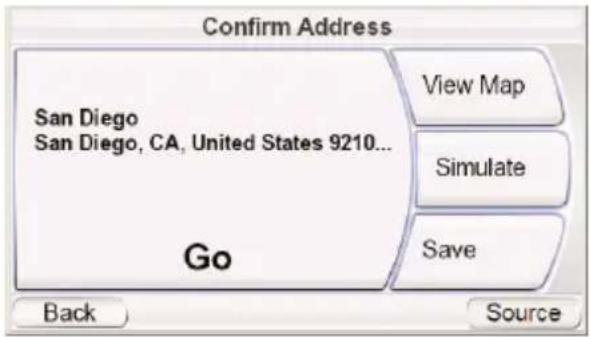
- Touch the appropriate button and enter the city's name. When you're finished, the CONFIRM ADDRESS screen appears (see next page).
flowchart
graph LR
    A["City in California"] --> B["Back"]
    C["Other Location"] --> D["Source"]
- Touch the Go button to begin navigation. The map screen will appear. Once you start driving, the GPS-500 will guide you to the center of the city you selected. (See Navigating to Your Destination, on page 13.)
NAVIGATING TO AN INTERSECTION:
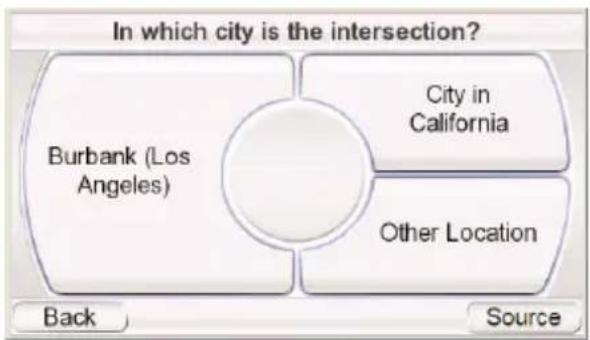
- Touch the INTERSECTION button on the WHERE WOULD YOU LIKE To Go? screen (see page 8). The IN WHICH CITY IS THE INTERSECTION? screen (right) appears.
- Select the city. The ENTER STREET NAME screen appears.
- Enter the name of the first street. When you are finished the ENTER SECOND STREET NAME screen appears.
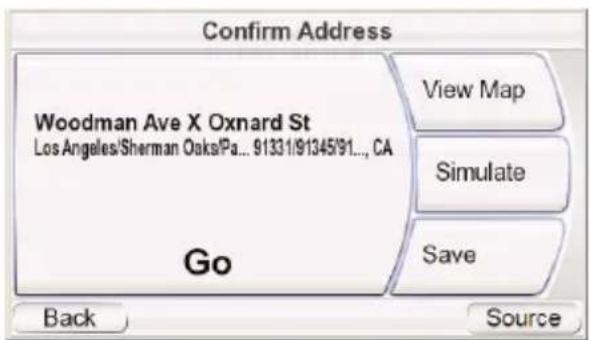
- Enter the name of the second street. The CONFIRM ADDRESS screen (right) appears.
- Touch the G o button to begin navigation. The map screen will appear. Once you
start driving, the GPS-500 will guide you to the intersection you selected. (See Navigating to Your Destination, on page 13.)
flowchart
graph TD
    A["Burbank (Los Angeles)"] --> B["Back"]
    A --> C["Source"]
    D["City in California"] --> E["Inner Circle"]
    F["Other Location"] --> E
    style A fill:#f9f,stroke:#333
    style B fill:#ccf,stroke:#333
    style C fill:#cfc,stroke:#333
    style D fill:#fcc,stroke:#333
    style E fill:#cff,stroke:#333
    style F fill:#ffc,stroke:#333
NAVIGATING TO A POSTAL CODE:
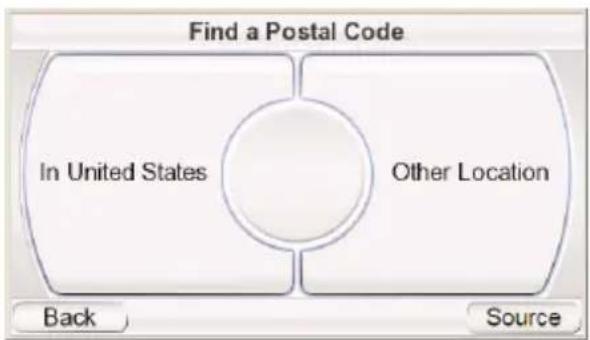
- Touch the POSTAL CODE button on the WHERE WOULD YOU LIKE TO Go? screen. The FIND A POSTAL CODE screen (right) appears.
- Select the country and enter the postal code. The ENTER STREET NAME screen appears.
- Spell the name of the street. When you are finished, touch the DONE button. The ENTER HOUSE NUMBER screen appears.
- Enter the desired address number. When you touch the DONE button, the CONFIRM ADDRESS screen (right) appears.
flowchart
graph TD
    A["In United States"] --> B["Back"]
    C["Other Location"] --> D["Source"]
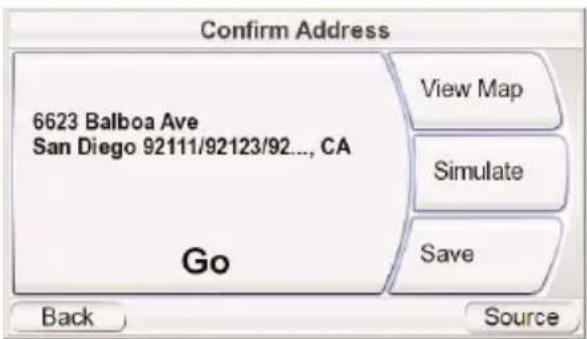
- Touch Go to begin navigation. The map screen will appear. Once you start driving, the GPS-500 will guide you to the address you've entered. (See Navigating to Your Destination, on page 13.)
NAVIGATING TO YOUR HOME
The GPS-500 stores your home address so you can easily select it as a destination, no matter where you are in North America.
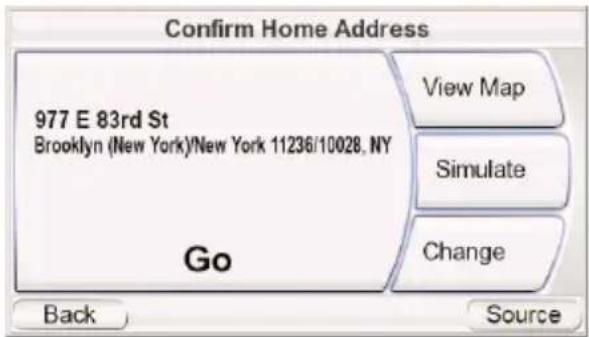
- Touch the HOME button on the WHERE WOULD YOU LIKE TO Go? screen (see page 8). The CONFIRM HOME ADDRESS screen (right) will appear.
- Touch Go to begin navigation. The map screen will appear. Once you start driving the GPS-500 will guide
you to your destination. (See Navigating to Your Destination, on page 13.) NOTE: If you have not yet set your home address, the GPS-500 will have you do so.
NAVIGATING TO RECENTLY VISITED OR SAVED LOCATIONS
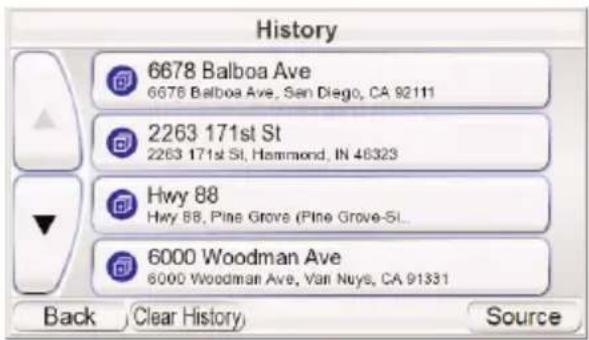
The GPS-500 stores a list of your recently visited locations in a HISTORY page and also lets you save locations to a special list. You can easily select your destination from either of these lists.
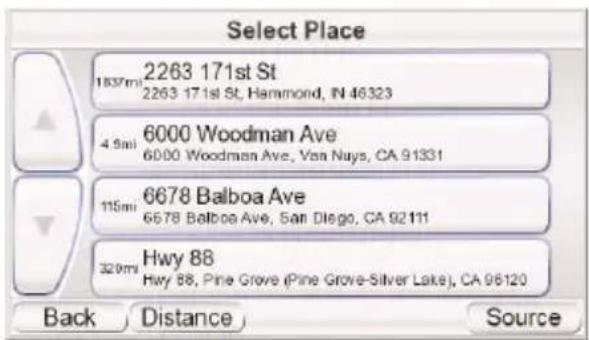
- Touch the RECENT PLACES or SAVED PLACES button on the WHERE WOULD YOU LIKE TO Go? screen (see page 8). The HISTORY page (right) or the SELECT PLACE list (right) will appear.
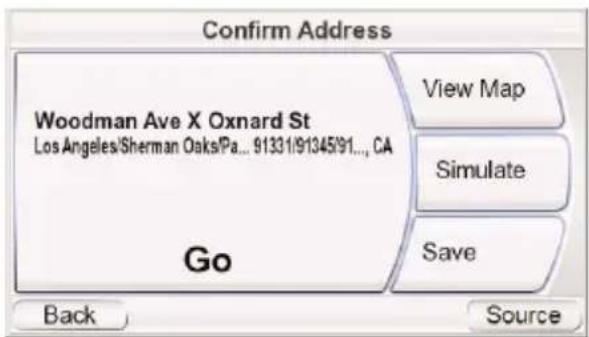
- Use the up/down arrow buttons to scroll through the list of places, then touch the button for the place you want to go. The CONFIRM ADDRESS screen (right) will appear.
- Touch Go to begin navigation. The map screen will appear. Once you start driving, the GPS-500 will guide you to your destination. (See Navigating to Your Destination, on page 13.)
CONFIRM ADDRESS SCREEN OPTIONS
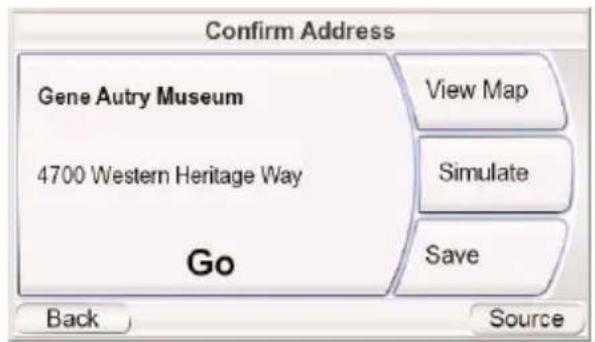
Besides touching the Go button to begin navigation, the CONFIRM ADDRESS screen (see page 12) also gives you these options:
VIEW MAP: Touch to see a map showing your destination. You can change the map view and zoom the view in and out (see Map Screen Options, on page 14).
NOTE: Touching the VIEW MAP button does not begin nagivation.
SIMULATE: Touch to have the GPS-500 simulate the trip. The simulation includes all map movements and voice-guidance turn prompts, and takes place at high speed. To abort the simulation, touch anywhere on the screen.
SAVE: Touch to save the address in the GPS-500's address book. If you want-to, you can add a name to the address.
Navigating to Your Destination
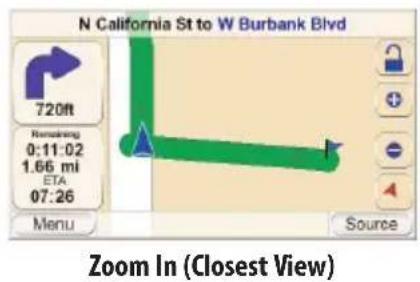
Once you have entered your destination, touching the Go button on any of the GPS-500's CONFIRM ADDRESS screens will begin navigation. The Map screen (below) will appear. The blue arrowhead indicates your present location and your direction of travel. The route that the GPS-500 has calculated is indicated by the green line.
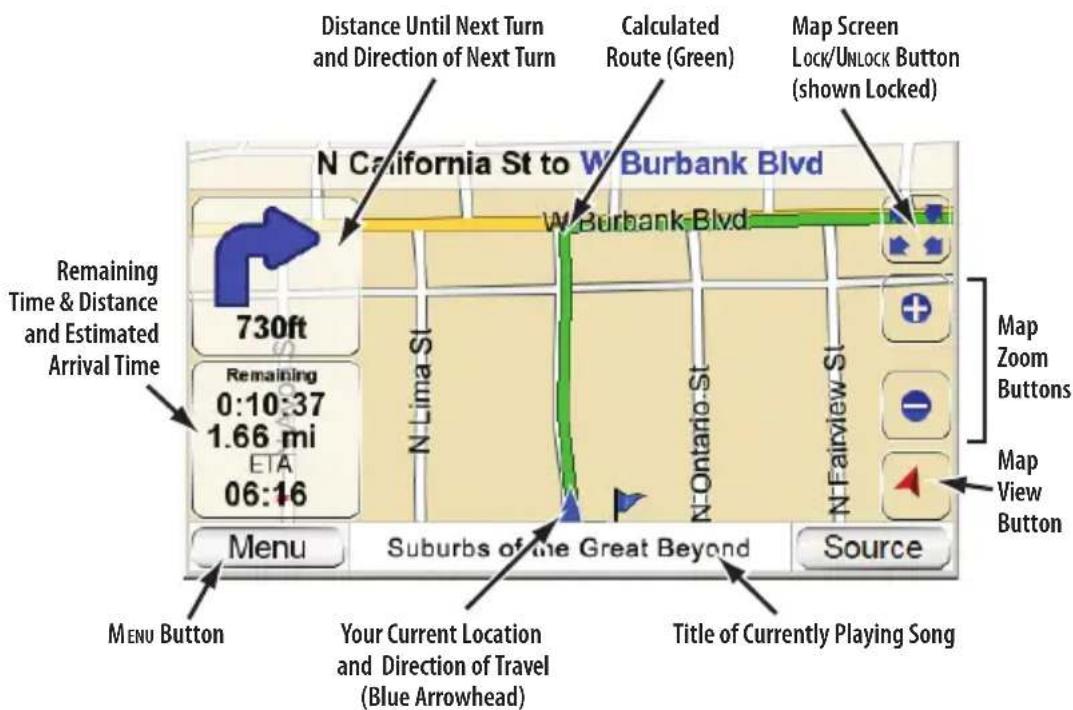
The map shows the distance to and direction of your next turn, and also shows the remaining time and distance of your trip and your estimated arrival time.
NOTE: If you are playing music on the GPS-500's Music Player (see page 20), the MAP screen will also display the title of the currently playing song.
As you drive, the GPS-500 keeps track of your position via GPS, will issue voice-guidance commands through the built-in speaker, telling you when and where to turn, and the map will continually update your position along your route. If you make a wrong turn, the GPS-500 will automatically calculate a new route and will continue to guide you to your destination.
MAP SCREEN OPTIONS
MAP SCREEN LOCK/UNLOCK BUTTON: Touching this button locks and unlocks the map screen. When the screen is locked, the MAP VIEW and MAP ZOOM buttons do not function.
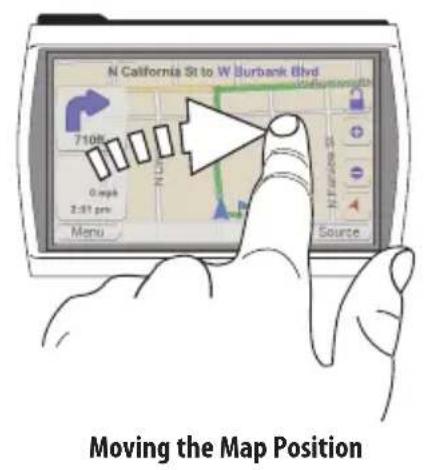
When the map screen is unlocked, you can move the map position by moving your finger on the touchscreen in the direction you want the map to move. (See illustration, below, left.)
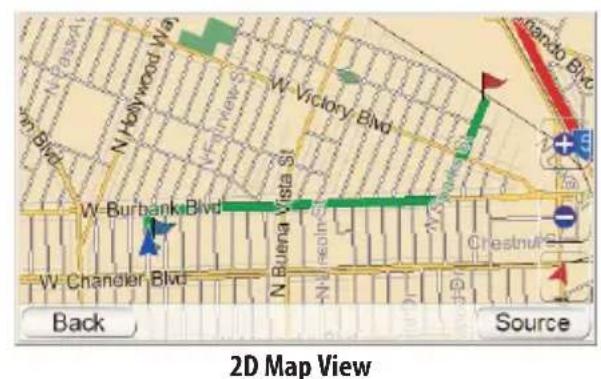
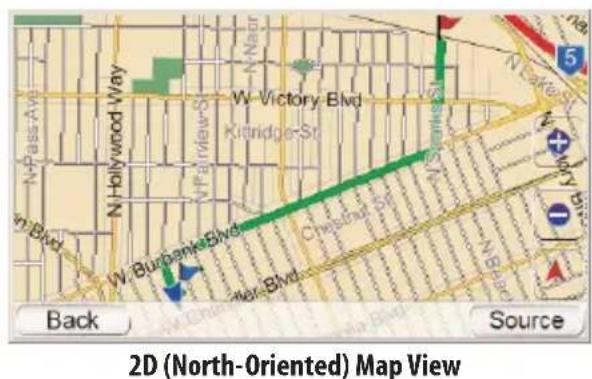
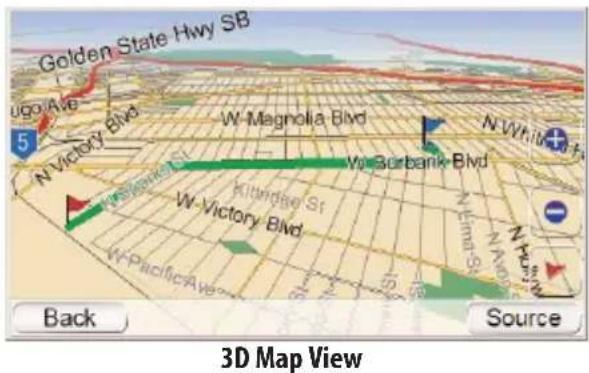
MAP VIEW BUTTON: Touching this button cycles the map view between 2D, 2D north-oriented and 3D. (See illustrations, below, right.)
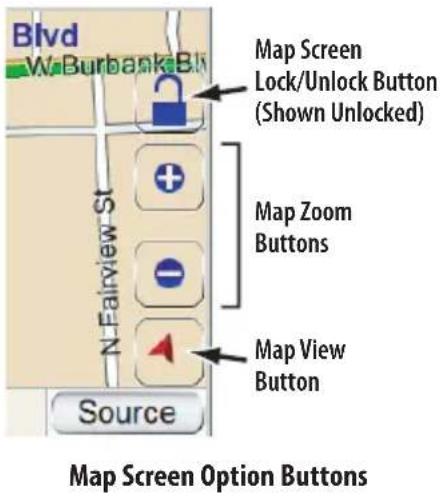
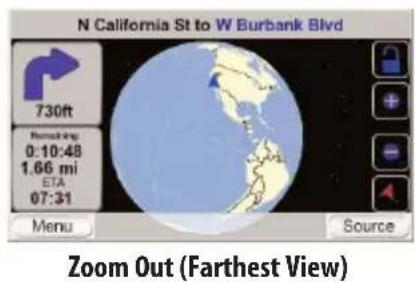
MAP ZOOM BUTTONS: Repeatedly touching the "+" and "-" MAP ZOOM buttons zooms your view from a distance of just a few yards off the ground all the way to a view from thousands of miles in space. (See illustrations, below, left.)
Navigation Options
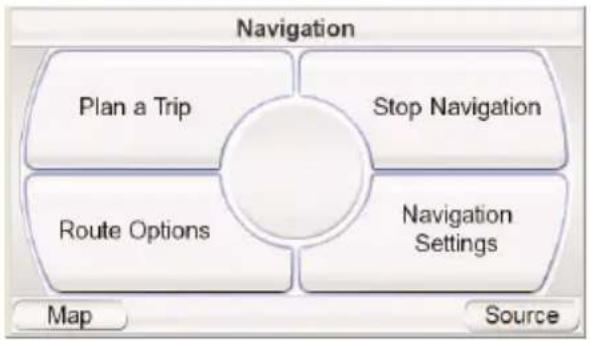
Touching the MENU button on the MAP screen (see page 13) displays the NAVIGATION screen (below, right).
MAP BUTTON: Takes you back to the MAP screen.
PLAN A TRIP BUTTON: Lets you select a navigation destination. (See Planning a Trip, on page 8.)
STOP NAVIGATION BUTTON: Stops the current GPS-500 navigation session.
flowchart
graph TD
    A["Plan a Trip"] --> B["Stop Navigation"]
    C["Route Options"] --> B
    D["Navigation Settings"] --> B
    E["Map"] --> F["Source"]
NAVIGATION SETTINGS BUTTON: Lets you change the GPS-500's navigation settings. (See Changing Navigation Settings, on page 16.)
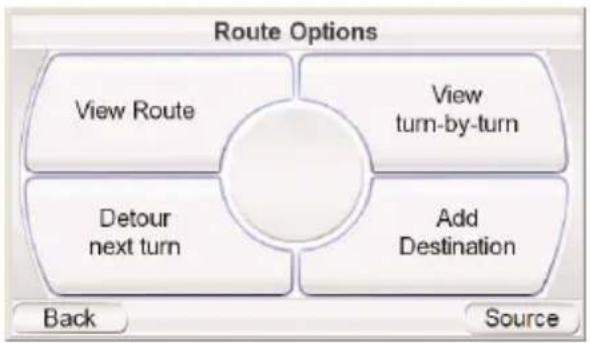
ROUTE OPTIONS BUTTON: Displays the ROUTE OPTIONS screen (right).
ROUTE OPTIONS SCREEN
VIEW ROUTE BUTTON: Shows a map view of the entire navigation route. (See 2D Map View illustration on page 14.)
flowchart
graph TD
    A["View Route"] --> B["View turn-by-turn"]
    C["Detour next turn"] --> B
    D["Add Destination"] --> B
    E["Back"] --> F["Source"]
VIEW TURN-BY-TURN BUTTON: Displays a detailed list of each turn for the entire trip (right). The list shows the direction of each turn and how far to drive on each leg of the journey. Touching the button for one leg of the journey and then touching the SHOW button
![Detailed Instructions 72mi Ontario Hwy NB (15) 397mi [15 Las Vegas] 0.65mi [132] n 170 Richfield 501mi [70 EB (70) Back Show Avoid... Somcue](/content/2026/05/773471/images/02c113463a0df6d626013d79810aae4559122a660cbc9f22d823457bca6902e1.jpg)
will display a map showing that particular leg of the trip.
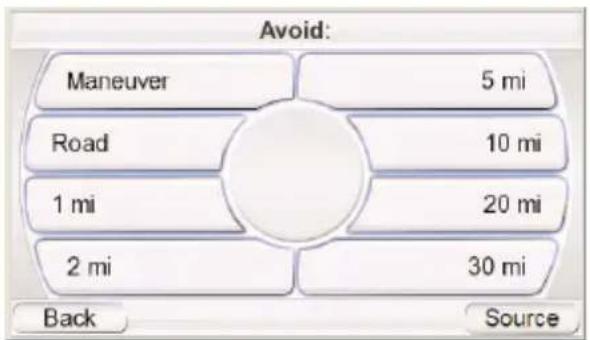
Touching the button for a particular turn or leg on the detailed list screen
and then touching the AVOID button will display the AVOID screen (right). This screen lets the GPS-500 recalculate a new route that avoids a particular maneuver or road, or recalculate a certain distance on the road that you selected.
NOTE: Voice guidance continues
when the GPS-500's screen is in the Turn-By-Turn view.
DETOUR NEXT TURN BUTTON: Recalculates your route, avoiding the next turn. Use this to avoid construction sites, traffic jams, etc.
ADD DESTINATION BUTTON: Lets you add another destination at the end of your trip. See Planning a Trip, on page 8.
Changing Navigation Settings
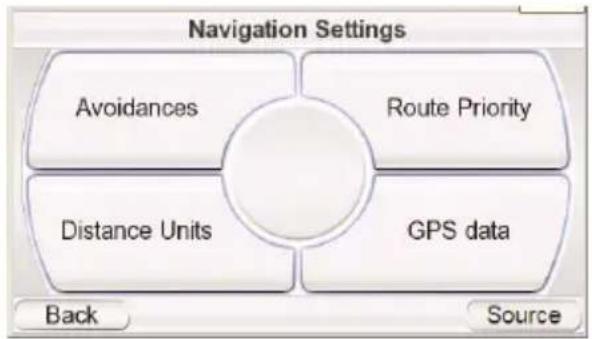
Touching the NAVIGATION SETTINGS button displays the NAVIGATION SETTINGS screen (right).
AVOIDANCES: When the GPS-500 calculates navigation routes, you can set it to always avoid the following:
• U-turns
- Unpaved roads
- Toll roads
- Roads requiring permits
• Highways
- Border crossings
- Ferries
flowchart
graph TD
    A["Avoidances"] --> B["Route Priority"]
    C["Distance Units"] --> B
    D["GPS data"] --> B
    E["Back"] --> F["Source"]
NOTE: The GPS-500 comes from the factory with the UNPAVED ROADS avoidance set to ON.
DISTANCE UNITS: You can set the GPS-500's distance units to kilometers/meters, miles/feet or miles/yards. This affects the units shown on the screen, and the units given during voice navigation prompts.
ROUTE PRIORITY: When the GPS-500 calculates navigation routes, you can set it to give priority to either the SHORTEST DISTANCE or the SHORTEST TIME (top speed limits).
GPS DATA: This screen displays the following information:
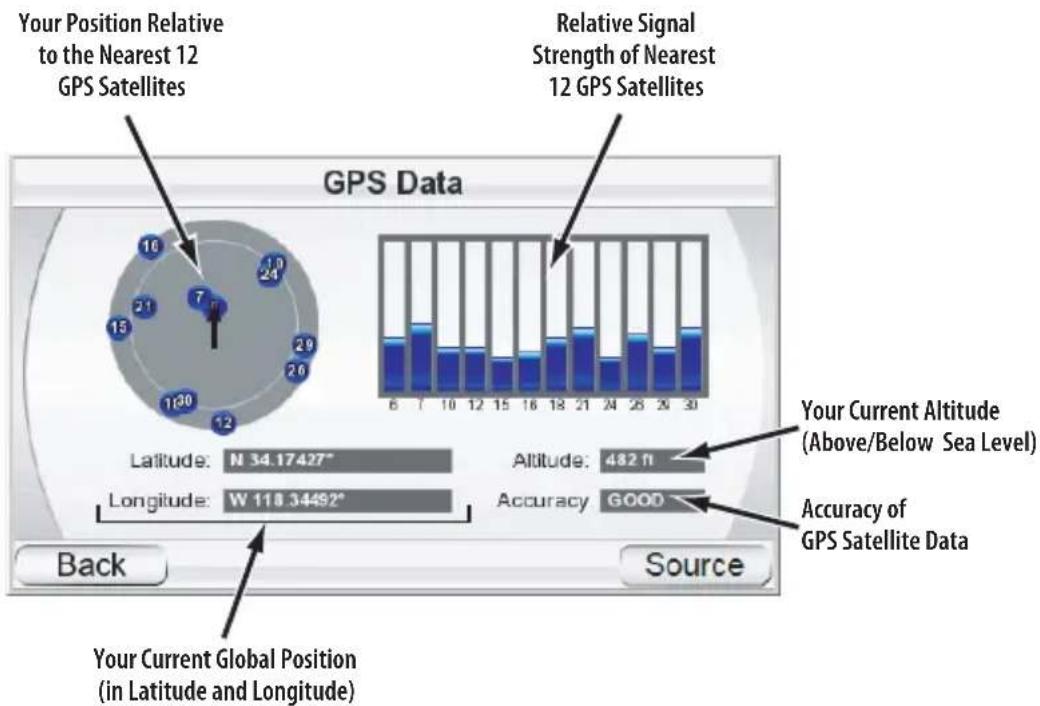
NOTE: Your GPS-500 will lose contact with the GPS satellites whenever you turn its power off. After turning the power back on, you will need to go outside to receive the GPS signal again before the navigation functions will operate.
The SOURCE Screen
Touching the SOURCE button on any of the GPS-500's screens displays the SOURCE screen (right).
The SOURCE screen lets you select the GPS-500's navigation, music player or video player functions. The SOURCE screen lets you change the GPS-500's settings, as well. (See Changing Settings, on page 22.)
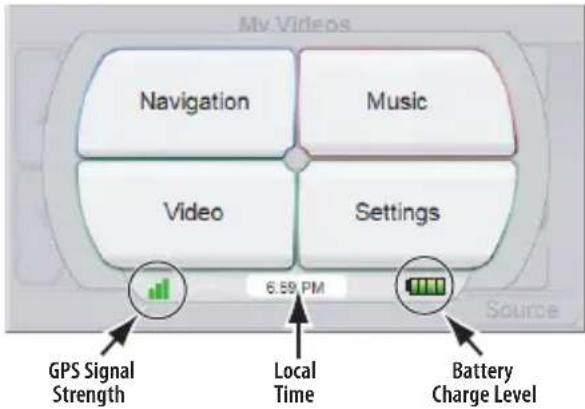
The SOURCE screen also displays the strength of the GPS signal the GPS-500 is receiving, the local time and the GPS-500 battery's charge level.
Playing Music and Video Files
In addition to its navigation functions, your GPS-500 can play your music and video files. These files must be loaded onto an SD media card (not included). SD memory cards are available that can hold up to 4GB of audio/video media.
Compatible A/V File Types
In order to play on your GPS-500, audio and video files must be in one of the following formats:
AUDIO (SUPPORTS ID3 TAGS V1 AND V2.1 - 2.3)
MP3: 16-bit (VBR/CBR), 44kHz, 64kbps up to 320kbps, 2-channel
WMA: 16-bit, 44kHz, stereo, 32kbps up to 160kbps (VBR) and 32kbps up to 256kbps (CBR, 2-channel)
VIDEO
MPEG-4: ASP up to 624x352 @ 24fps (does not support GMC or Opel) with MP3 audio VBR/CBR to 192kbps, 16-bit, 48kHz, 2-channel
WMV9: Up to 320x240 @ 24fps SP @ ML
Loading Media on Your SD Card
There are two ways to transfer media from your computer to an SD card inserted into your GPS-500: via USB Mass Storage or via MTP (Media Transfer
Protocol). Touch the SETTINGS button on the SOURCE screen, then touch the USB button. The USB screen (right) will appear, with buttons for MTP and USB MASS STORAGE modes.
MTP (MEDIA TRANSFER PROTOCOL)
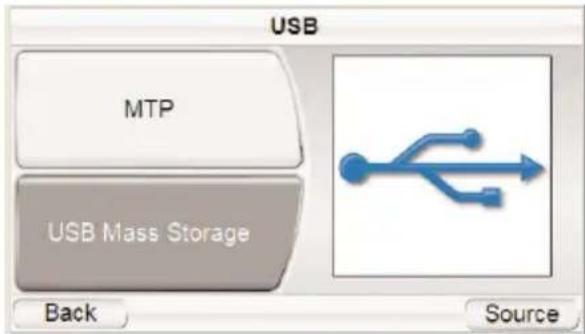
MTP mode transfers files using
the SYNC mode of Windows Media® Player (ver. 10 or higher). If necessary, Windows Media Player will automatically transcode video files to a format supported by GPS-500.
To use the MTP mode, you must have a PC that is running the Windows® XP operating system (Service Pack 2 or higher) and has Windows Media Player 10 or higher installed.
To Transfer Files to the GPS-500 in MTP Mode:
-
Insert an SD card into the GPS-500's SD card slot (see page 4).
-
Make sure the USB cable is disconnected from the GPS-500.
-
Set the GPS-500's USB mode to MTP (see page 17).
-
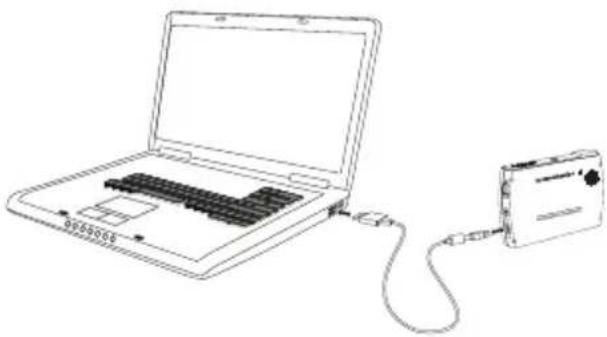
Connect the GPS-500 to your computer's USB hub (right).
-
Launch Windows Media Player.
-
Locate the files you want to transfer.
-
Select Windows Media Player's Sync mode (see below).
-
Drag the files you want to transfer into the Windows Media Player SYNC LIST (see below).
-
Select START SYNC and wait for the process to finish (see below).
natural_image
Line drawing of a laptop connected to a digital camera via cable (no text or symbols)- Select Sync Mode
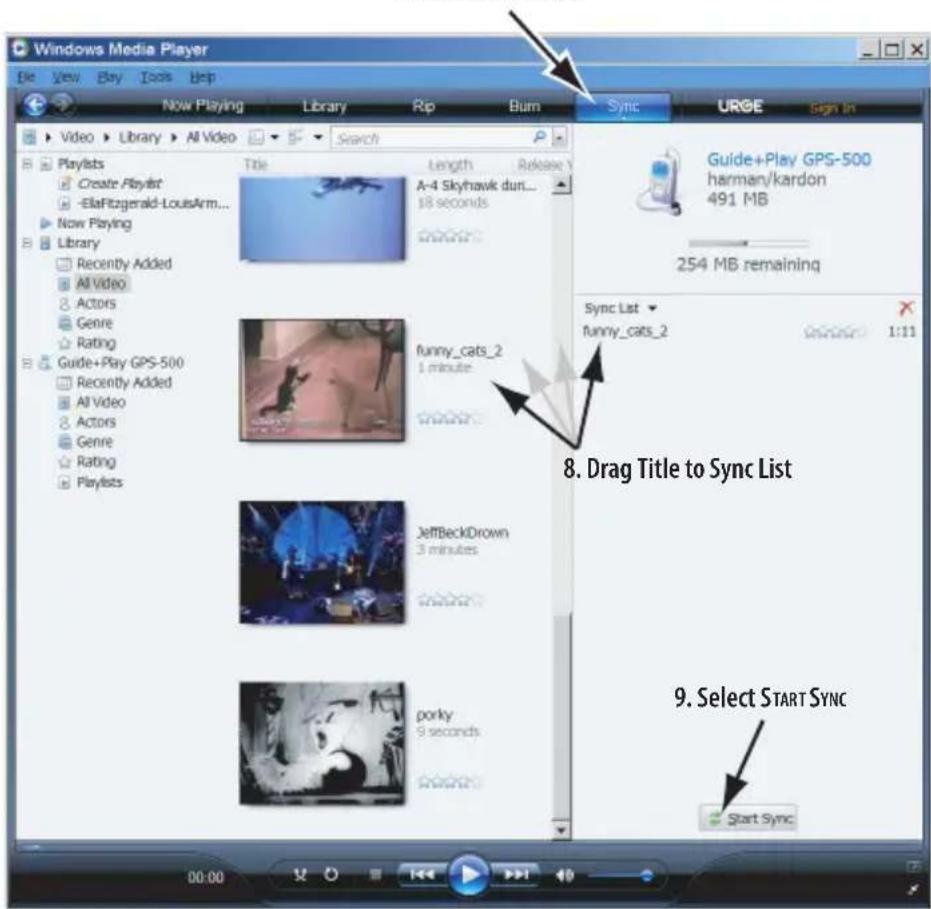
NOTE: Your Windows Media Player screen may look different from the example.
Once the Sync is finished, you can unplug the GPS-500 from your computer and watch or listen to the files on it. (See Listening to Music, on page 20, and Watching Videos, on page 21).
USB MASS STORAGE
The USB Mass Storage mode lets you transfer files the using drag-and-drop method on your computer – the same method you use to transfer files from one folder or drive to another. However, when transferring files in the USB Mass Storage mode, video files that are in formats not supported by GPS-500 will be transferred without transcoding. These files won't be playable on your GPS-500 but will take up space on your SD card.
TO TRANSFER TILES TO THE GPS-500 IN THE USB MASS STORAGE MODE:
- Insert an SD card into the GPS-500's SD card slot (see page 4).
- Make sure the USB cable is disconnected from the GPS-500.
- Set the GPS-500's USB mode to USB MASS STORAGE (see page 17).
- Connect the GPS-500 to your computer's USB hub (see page 18).
-
Launch Windows Explorer (not Internet Explorer) on your computer.
• Find it at Start > Programs > Accessories > Windows Explorer -
Find the folder with your media in Windows Explorer's left-hand window.
-
Double-click the folder. Its contents will appear in the right-hand window.
-
Drag the files you want to transfer from the right-hand window into the SD card icon in the left-hand window. (The SD card will appear in the left-hand window as one of your computer drives.)
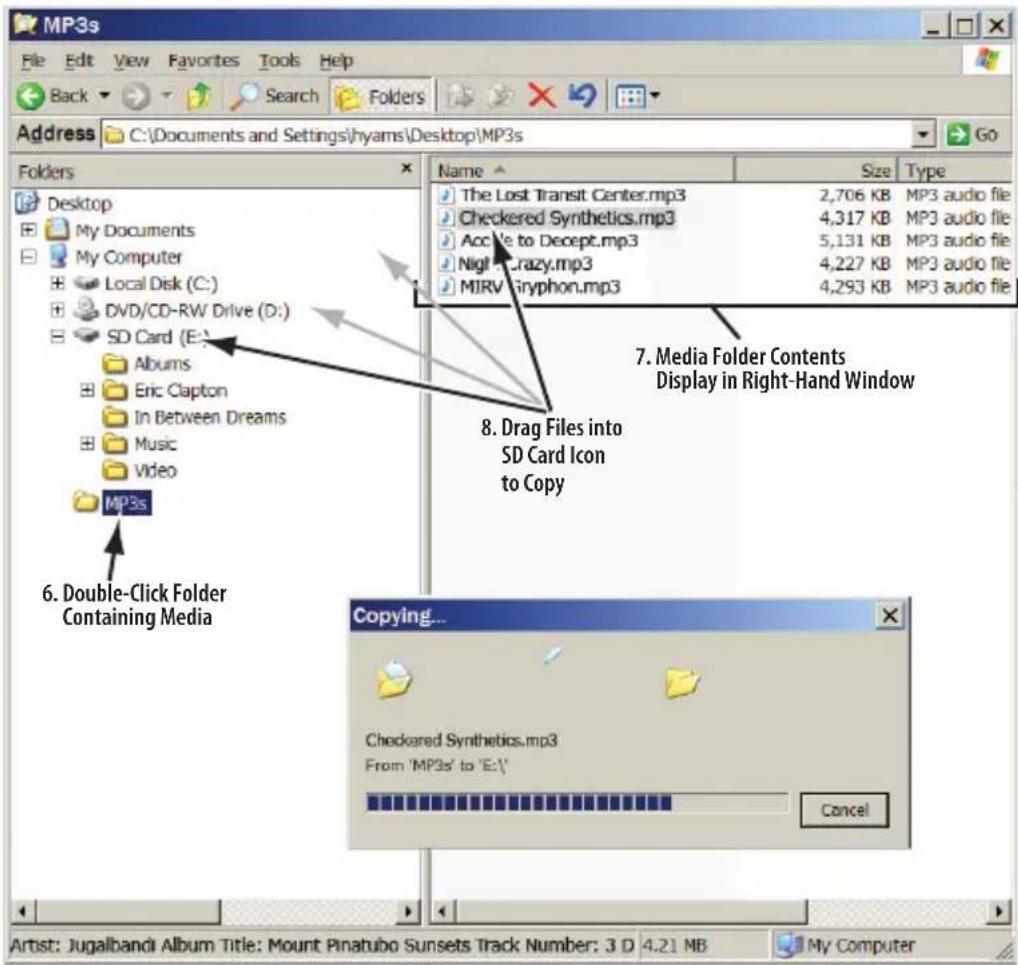
NOTE: Your Windows Explorer screen may look different from the example.
When you're finished, you can unplug the GPS-500 from your computer and watch or listen to the files on it. (See Listening to Music, on page 20 and Watching Videos, on page 21).
Listening to Music
Touch the Music button on the SOURCE screen. The Music menu (below) will appear.
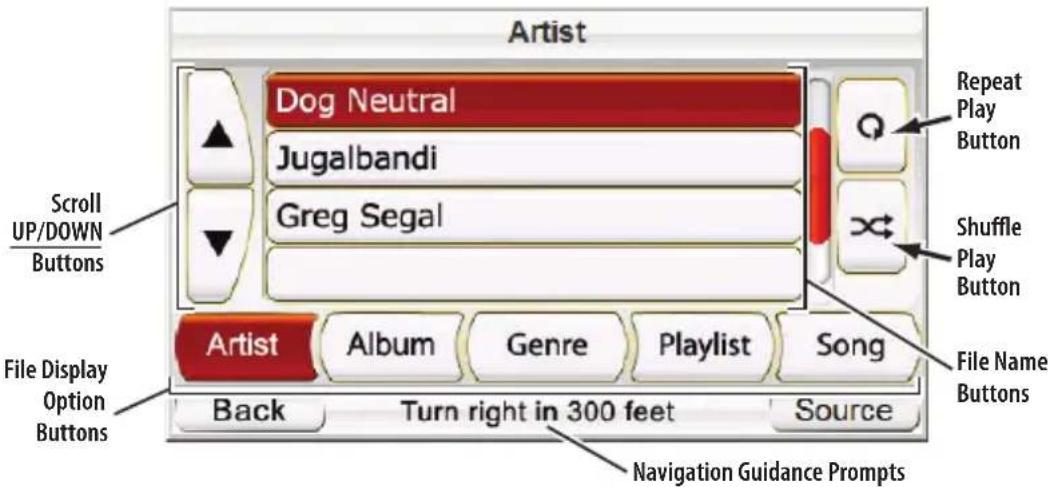
You can sort and display your music by touching the ARTIST, ALBUM, GENRE, PLAYLIST or SONG File Display Option buttons.
SELECTING MUSIC
By ARTIST: Touching the ARTIST button displays an alphabetical list of all of the artists with songs stored on the SD card. Touch the button for the artist you want, then touch the button for the song you want to hear. The GPS-500 will play the song, then play through the rest of the songs by that artist.
By ALBUM: Touching the ALBUM button displays an alphabetical list of all of the albums with songs stored on the SD card. Touch the button for the album you want, then touch the button for the song you want to hear. The GPS-500 will play the song, then play through the rest of the songs on the album.
By GENRE: Touching the GENRE button displays an alphabetical list of all the music genres stored on the SD card. Touch the button for the genre you want, then touch the button for the song you want to hear. The GPS-500 will play the song, then play through the rest of the songs in that genre.
NOTE: Genre classifications are predetermined and cannot be changed by the GPS-500.
By PLAYLIST:Touching the PLAYLIST button displays an alphabetical list of all the playlists stored on the SD card. Touch the button for the playlist you want, then touch the button for the song you want to hear. The GPS-500 will play the song, then play through the rest of the songs in that playlist.
NOTE: Playlist contents are predetermined and cannot be changed by the GPS-500.
By SONG: Touching the SONG button displays all of the songs stored on the SD card, in alphabetical order. Touch the button for the song you want to hear and the GPS-500 will play it. When that song is finished, the GPS-500 will play the next song on the alphabetical song list.
REPEAT PLAY
Touching the REPEAT PLAY button cycles the music player between the following repeat modes: OFF, TRACK (repeats the song), ALL (repeats all songs in the current category).
SHUFFLE PLAY
Touching the SHUFFLE PLAY button plays all the songs currently displayed in random order.
THE NOW PLAYING SCREEN The GPS-500 will display the Now PLAYING screen (right) while songs are playing. This screen shows the elapsed time of the song, and provides buttons for skipping to the next or previous song, and for pausing the song.
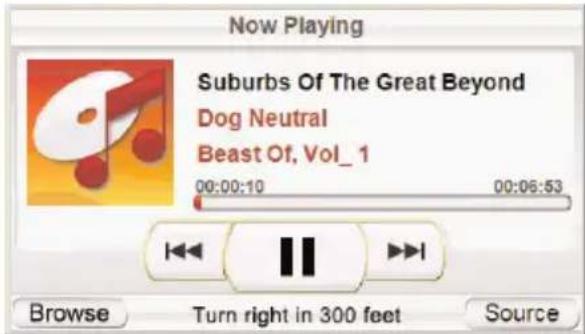
NOTE: During navigation, guidance prompts appear at the bottom of the NOW PLAYING screen (above) and the Music menu screen (see page 20).
Watching Videos

For safety reasons, this device will cease navigation functions when the video mode is enabled. Do not attempt to disable any safety function incorporated in this device. Any alteration of this device may cause serious injury and shall void the warranty.
Touch the VIDEO button on the SOURCE screen. The MY VIDEOS screen (below) will appear. All of the videos stored on your SD card will be displayed, in the order in which they were put on the SD card, with the first one at the top.
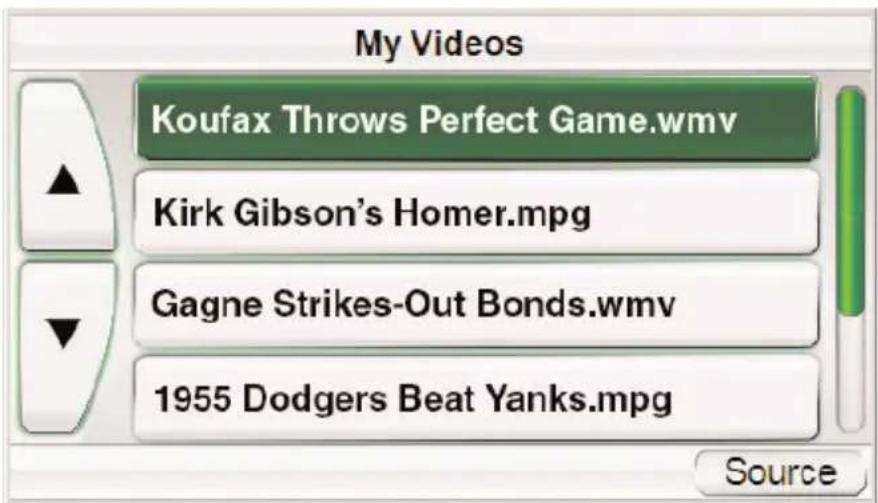
To view a video, use the SCROLL UP/DOWN buttons to find it, then touch its button. When the video is finished playing, the MY VIDEOS screen will reappear.
Changing Settings
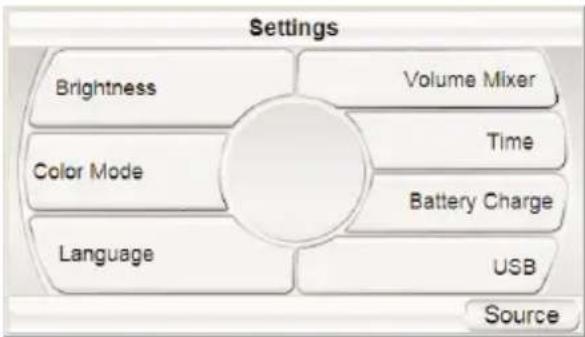
Touching the SETTINGS button on the SOURCE screen displays the SETTINGS screen (right). This lets you change any of these GPS-500 settings:
Brightness
The BRIGHTNESS button lets you adjust the GPS-500's screen brightness so you can clearly see it in various lighting conditions.
NOTE: You can adjust the screen brightness at any time by pressing the Volume Control knob in. The BRIGHTNESS indicator will be superimposed on the screen and you can change the screen's brightness by rotating the volume knob.
flowchart
graph TD
    A["Brightness"] --> B["Volume Mixer"]
    C["Color Mode"] --> D["Time"]
    E["Language"] --> F["Battery Charge"]
    G["Source"] --> H["USB"]
Color Mode
The GPS-500 has two color modes: DAY (optimized for viewing in brighter light)
and NIGHT (optimized for viewing in lower light). There is also an AUTO button, which automatically
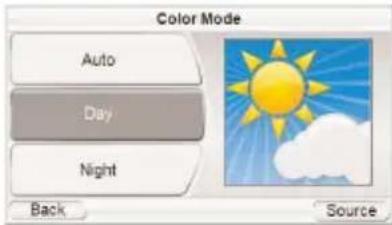
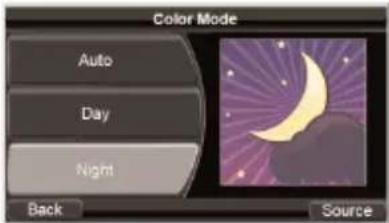
changes the color mode according to the time of day.
Language
The LANGUAGE button lets you set the GPS-500's screen and voice-guidance languages to English, French or Spanish.
Volume Mixer
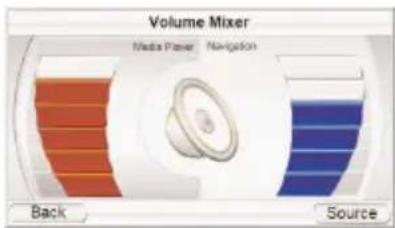
The Volume Mixer lets you adjust the relative volume levels of the music and the navigation voice guidance. Touch the shaded volume bars on the screen to adjust the volume levels up and down.
Time
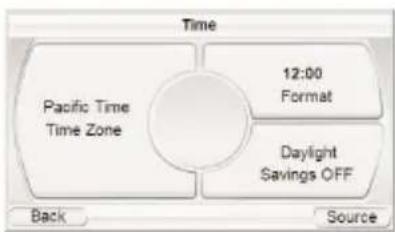
The TIME button lets you adjust the GPS-500's time settings:
TIME ZONE: The TIME ZONE button lets you reset the GPS-500's time zone to match the local time. This is especially useful if you are traveling through different time zones.
flowchart
graph TD
    A["Pacific Time Time Zone"] --> B["12:00 Format"]
    A --> C["Daylight Savings OFF"]
    B --> D["Back"]
    C --> E["Source"]
FORMAT: Switches between 12-hour and 24-hour (military) time formats.
DAYLIGHT SAVINGS: Selecting ON adds an hour to the current time.
Battery Charge
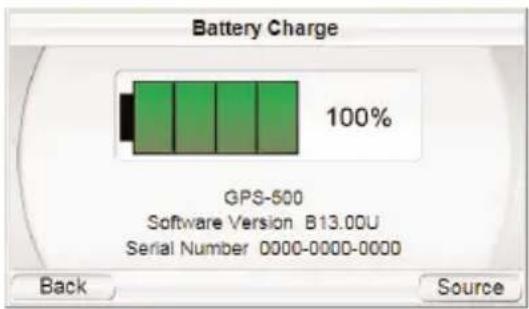
The BATTERY CHARGE screen shows the GPS-500 battery's charge level. It also lists your unit's current software version and serial number.
Note: The orange battery/lightning bolt symbol indicates that the GPS-500 is being powered through its charger port.
USB
Lets you switch the GPS-500 between the MTP and USB Mass Storage modes. See Loading Media on Your SD Card, on page 17, for details.
Installation and Use in a Vehicle

Do not install this device in any manner that impairs the safe operation of the vehicle. Do not install this device on any airbag panels or in the deployment field of any airbags. Do not place the device on the vehicle's dashboard unsecured. Failure to observe the installation or usage instructions may result in traffic accidents or personal injury.

The installation of this device on the windshield, between the driver and the windshield, or otherwise in any manner that obstructs the driver's clear view of the road or traffic conditions is dangerous and may be prohibited by law. State laws in California and Minnesota (and possibly other states) prohibit the mounting of this device on the windshield in which case other mounting methods should be used. Check your state and local laws before mounting.
Select a Mounting Location
Find a suitable mounting location for the Fold-Flat Mounting Bracket:
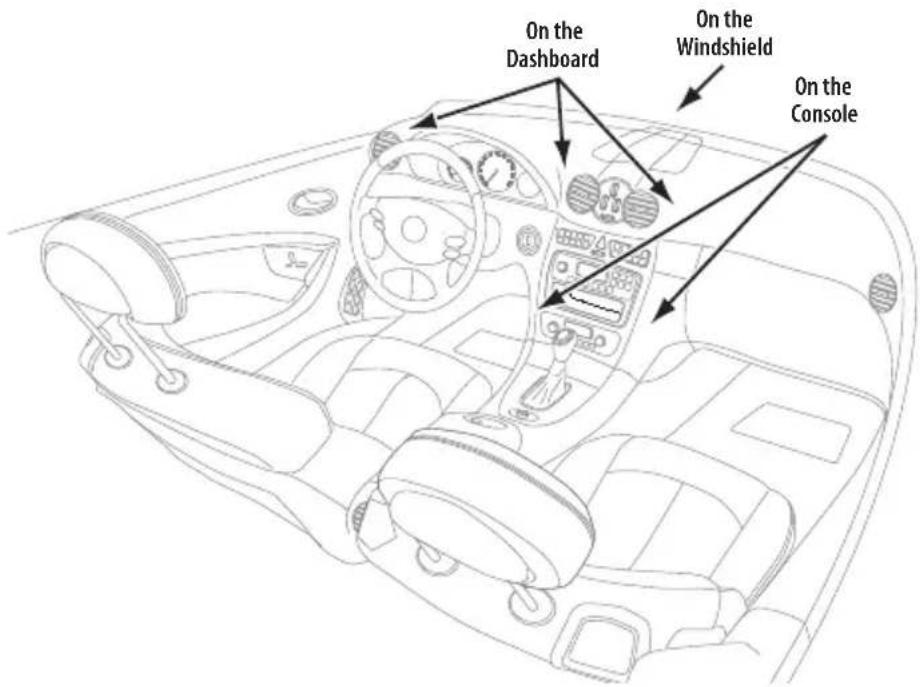
NOTE: Check your state and local laws before mounting the bracket. Some mounting locations are prohibited in some areas. Do not mount the bracket in such a way that the GPS-500 will interfere with your driving or your view of the road.
Install the Mounting Bracket
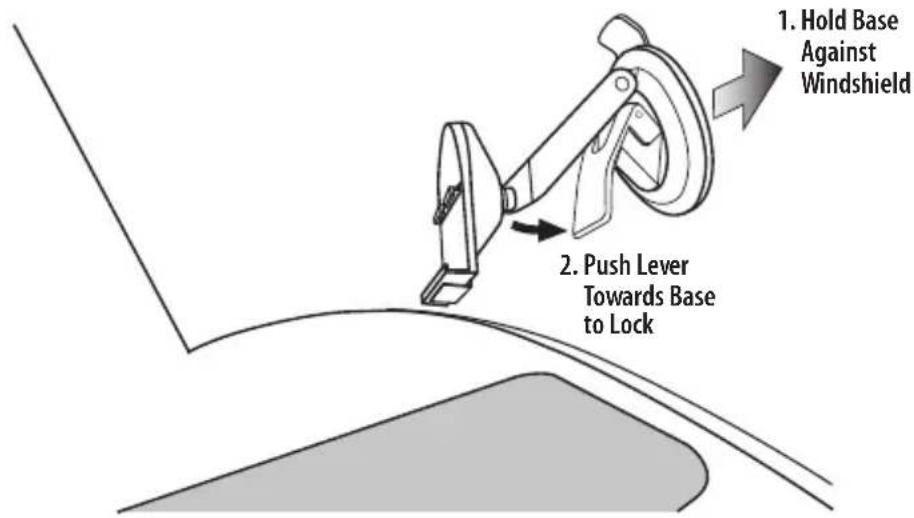
FOR WINDSHIELD-MOUNTING:
- Hold the mounting bracket's base against the windshield.
- Push the mounting bracket lever towards the base to lock the bracket to the windshield.
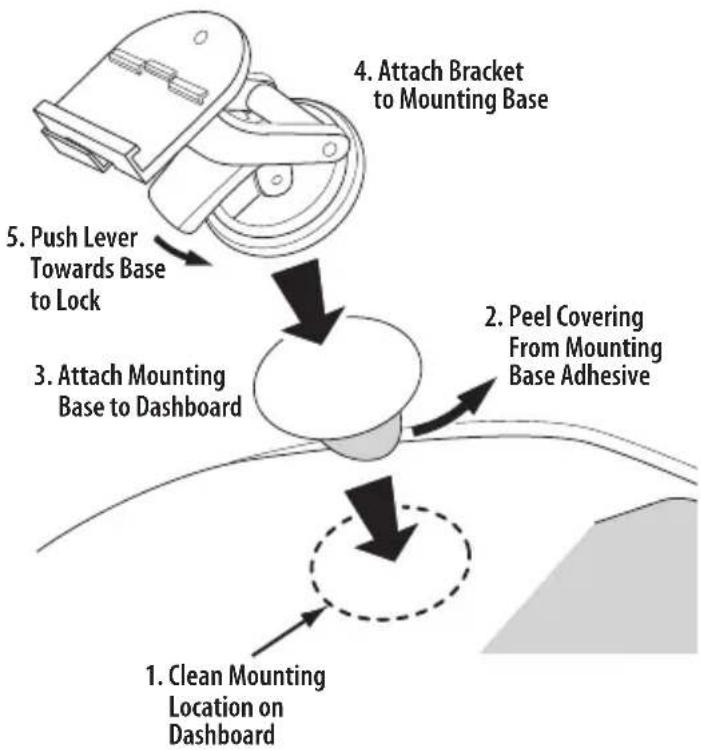
FOR DASHBOARD-MOUNTING:
- Clean the dashboard mounting location with the supplied alcohol pad.
- Peel the mounting base adhesive covering.
- Attach the mounting base to the mounting location.
- Hold the mounting bracket's base against the mounting base.
- Push the mounting bracket lever towards the base to lock the bracket to the dashboard.
flowchart
graph TD
    A["1. Clean Mounting Location on Dashboard"] --> B["2. Peel Covering From Mounting Base Adhesive"]
    B --> C["3. Attach Mounting Base to Dashboard"]
    C --> D["4. Attach Bracket to Mounting Base"]
    D --> E["5. Push Lever Towards Base to Lock"]
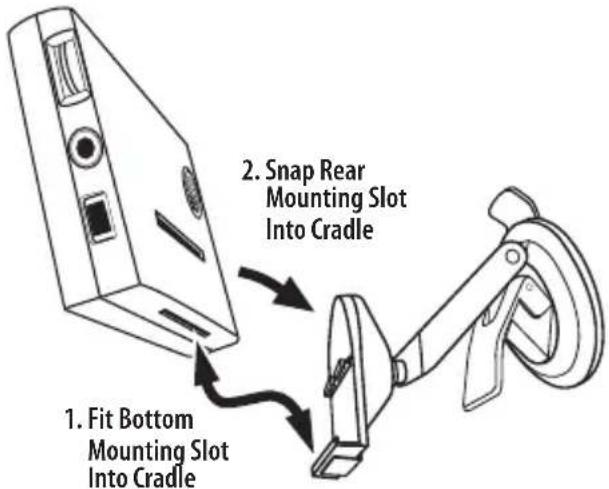
ATTACHING THE GPS-500 TO THE BRACKET
- Fit the bottom mounting slot into the bracket cradle.
- Snap the rear mounting slot into the bracket cradle.
To unlock and remove the unit, press the lever on the botton of the cradle up.
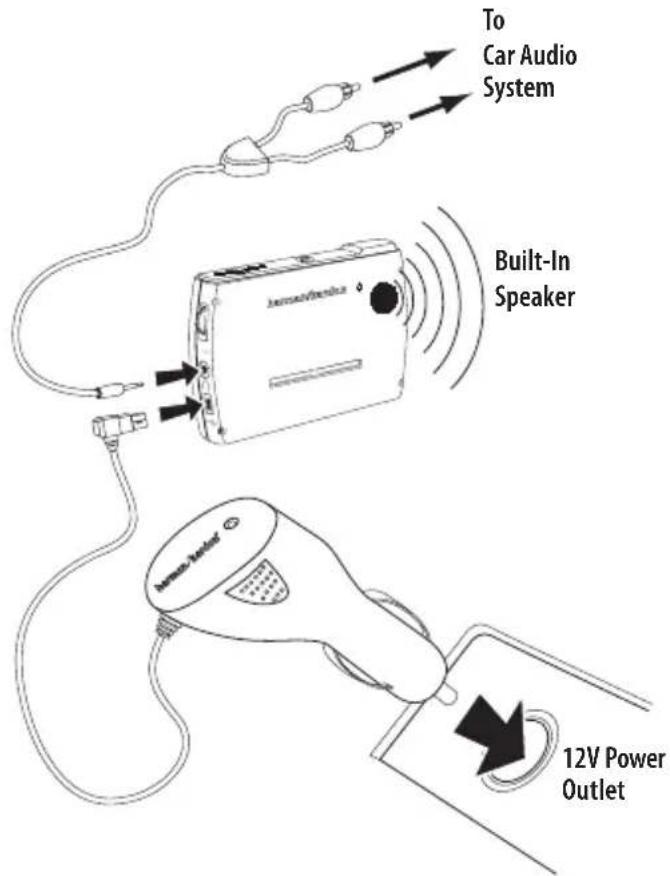
LISTENING TO AUDIO IN YOUR VEHICLE
- Plug the supplied car charger into your vehicle's 12V power outlet and into the GPS-500's mini USB
connector. This will charge your GPS-500's battery while you drive.
- Use the GPS-500's built-in speaker or connect its headphone jack to your vehicle's audio system (connecting cable not supplied).

The installation and use suggestions provided by the manufacturer may be subject to restrictions or limitations by federal, state or local laws. The user should determine whether the installation and use of this device is governed by any law, prior to installation or use.
Troubleshooting
| Problem Solution | |
| GPS-500 does not turn on at all | Check the Lock switch (see Controls and Features, on pages 4 – 5);charge the battery for 6 hours(see Before You Begin, on page 6) |
| GPS-500 does not have a good GPS signal | Make sure GPS-500 has a clear, unobstructed “view” of sky(see Before You Begin, on page 6) |
| GPS-500 will not play music or videos | Insert an SD card that has media loaded on it (see Loading Media on Your SD Card, on pages 17 – 19) |
| Unable to load media onto SD card | Make sure GPS-500 is set in the desired USB mode (see Loading Media on Your SD Card, on pages 17 – 19) |
| Screen is too bright or too dim | Adjust the screen brightness using the volume control(see Volume/Brightness Control, on page 5), or adjust the screen brightness in the SETTINGS menu(see Changing Settings, on page 22) |
| Volume is too low for navigation voice-guidance prompts | Adjust the volume control(see Volume/Brightness Control, on page 5); adjust the VOLUME MIXER(see Changing Settings, on page 22) |
| Suction cup mount is loose | Reposition the mounting bracket, using moderate force |
| GPS-500 is loose on the bracket mount | Make sure the GPS-500 is securely attached to the mounting bracket(see Attaching the GPS-500 to the Bracket, on page 25) |
| GPS-500 is unresponsive to the touchscreen or won’t power off | Reset the GPS-500 using a paper clip or similar item (see Reset Button, on page 5) |
Troubleshooting (continued)
| Problem | Solution |
| Screen color unexpectedly changes mode (DAY > NIGHT or NIGHT > DAY) | Color Mode is set to AUTO. Change the Color Mode to desired mode in the SETTINGS menu (see Color Mode, on page 22) |
| No sound from built-in speaker | Unplug headphones (speaker mutes when headphones are connected); turn volume control up (see Volume/Brightness control, on page 5) |
| Navigation map view and map zoom cannot be changed | Unlock Map Screen (see Map Screen Lock/Unlock Button, on page 14) |
Specifications
GPS: High-sensitivity Atlas™ II receiver
CPU: 324MHz ARM9 core
Memory: 128MB
Maps: U.S. and Canada, preloaded in internal memory (no need for external SD card)
Screen: 4.0"(diagonal) WQVGA screen, 65k colors, 480 x 272 pixels
Media Player (Audio): Plays MP3, WMA and AAC audio formats
Media Player (Video): Plays MPEG-4 and WMV9 video formats
Battery: Rechargeable internal lithium-polymer battery (allows up to 4 hours of use without recharging)
Dimensions (HxWxD): 3" x 4 58 " x 2532 " (75mm x 118mm x 20mm)
Harman Kardon is a trademark of Harman International Industries, Incorporated, registered in the United States and/or other countries. Guide + Play and Atlas are trademarks of Harman International Industries, Incorporated.
Windows and Windows Media are registered trademarks of Microsoft Corporation in the United States and other countries.
Due to continuous product improvement, all features and specifications are subject to change without notice.
Declaration of Conformity

We, Harman Consumer Group International
2, route de Tours
declare in own responsibility that the product described in this manual is in compliance with technical standards:
EN 60950-1:2001+A11
EN 55022:1998+A1:2000+A2:2003
EN 55024:1998+A1:2001+A2:2003
EN 61000-3-2:2000
EN 61000-3-3:1995+A1:2001

Klaus Lebherz
Harman Consumer Group International
©2007 Harman International Industries, Incorporated. All rights reserved.

- ediug y™
- 005-SP
- Contents
- Battery Notes:
- Introduction
- Unpacking
- Controls and Features
- Front:
- Back:
- Top:
- Bottom:
- Left Side:
- Right Side:
- Before You Begin
- Initial Setup
- Navigation
- Planning a Trip
- ENTERING A STREET ADDRESS
- CHOOSING A PLACE (FROM THE GPS-500'S DATABASE)
- To Navigate to a PLACE:
- NAVIGATING TO A CITY CENTER:
- NAVIGATING TO AN INTERSECTION:
- NAVIGATING TO A POSTAL CODE:
- NAVIGATING TO YOUR HOME
- NAVIGATING TO RECENTLY VISITED OR SAVED LOCATIONS
- CONFIRM ADDRESS SCREEN OPTIONS
- Navigating to Your Destination
- MAP SCREEN OPTIONS
- Navigation Options
- Changing Navigation Settings
- The SOURCE Screen
- Playing Music and Video Files
- Compatible A/V File Types
- Loading Media on Your SD Card
- MTP (MEDIA TRANSFER PROTOCOL)
- To Transfer Files to the GPS-500 in MTP Mode:
- USB MASS STORAGE
- TO TRANSFER TILES TO THE GPS-500 IN THE USB MASS STORAGE MODE:
- Listening to Music
- SELECTING MUSIC
- REPEAT PLAY
- SHUFFLE PLAY
- Watching Videos
- Changing Settings
- Brightness
- Color Mode
- Language
- Volume Mixer
- Time
- Battery Charge
- USB
- Installation and Use in a Vehicle
- Select a Mounting Location
- Install the Mounting Bracket
- FOR WINDSHIELD-MOUNTING:
- FOR DASHBOARD-MOUNTING:
- ATTACHING THE GPS-500 TO THE BRACKET
- LISTENING TO AUDIO IN YOUR VEHICLE
- Troubleshooting
- Troubleshooting (continued)
- Specifications
- Declaration of Conformity
Brand : HARMAN KARDON
Model : GPS-500
Category : Browser