
LT 1509 - TV OPPO - Free user manual and instructions
Find the device manual for free LT 1509 OPPO in PDF.


| Product Type | LCD TV with integrated DVD player and radio |
| Screen Size | 15.0 inches (diagonal) |
| Display Type | TFT color LCD |
| Pixel Pitch | 0.297 mm (H) x 0.297 mm (V) |
| Viewing Angle | 60°(L)/60°(R)/40°(T)/60°(B) |
| Horizontal Scan Frequency | 30 kHz to 75 kHz |
| Vertical Scan Frequency | 50 Hz to 75 Hz |
| Display Colors | 16.7 million |
| Recommended Resolution | 1024 x 768 @ 75 Hz |
| TV System | PAL / SECAM / NTSC (video mode) |
| Audio System | DK / I / BG / L |
| Power Supply | AC 100-240V, 50/60 Hz (adapter output: DC 12V, 4.5A) |
| Power Consumption (Normal) | 43 W |
| Power Consumption (Standby) | Less than 3 W |
| Dimensions (W x H x D) | 438.7 mm x 295.7 mm x 163.1 mm |
| Net Weight | 7.4 kg |
| Operating Temperature | 5°C to 40°C |
| Storage Temperature | -20°C to 45°C |
| Operating Humidity | 10% to 80% |
| Storage Humidity | 5% to 95% |
| Panel Life | 50,000 hours |
| Input Connections | RF, SCART, S-Video, Composite AV, YPbPr, VGA, PC audio, Coaxial digital audio, Headphone, USB, Media card (SD/MMC/MS) |
| Remote Control | Infrared, requires 2 x AAA batteries (not included) |
| Accessories Included | User manual, remote control, batteries, power adapter, kickstand kit, audio/video cables, FM antenna, AM antenna |
Frequently Asked Questions - LT 1509 OPPO
User questions about LT 1509 OPPO
0 question about this device. Answer the ones you know or ask your own.
Ask a new question about this device
Download the instructions for your TV in PDF format for free! Find your manual LT 1509 - OPPO and take your electronic device back in hand. On this page are published all the documents necessary for the use of your device. LT 1509 by OPPO.
USER MANUAL LT 1509 OPPO
natural_image
Close-up of a white flower with yellow seed pods and green center, displayed within a digital camera interface (no text or symbols on the flower itself)
TO PREVENT ELECTRICAL SHOCK. DO NOT REMOVE THIS COVER. NO USER- SERVICEABLE PARTS INSIDE. REFER SERVICING TO QUALIFIED SERVICE PERSONNEL.
Please read this manual carefully before using this product.
- Before connecting the AC power cord to the DC adapter outlet, make sure the voltage designation of the LCD TV corresponds to the local electrical supply. If you are unsure of your power supply, ask your local power company.
● Never insert anything metallic into the cabinet openings of the liquid crystal display (LCD)TV/monitor; otherwise it may create the danger of electric shock. - To avoid electric shock, Never touch the inside of the LCD TV/monitor and adapter. Only a qualified technician should open the case of the LCD TV/monitor/adapter.
- Never use your LCD TV/monitor/adapter if the power cord has been damaged. Do not allow anything to rest on the power cord, and keep the cord away from place where people can trip over it.
- Be sure to hold the plug, not the cord, when disconnecting the adapter from an electric socket.
-
Openings in the LCD TV/monitor/adapter cabinet are provided for ventilation. To prevent overheating, these openings should not be blocked or covered. Also, avoid using the LCD TV/monitor on a bed ,sofa ,rug, or other soft surface. Doing so may block the ventilation openings in the bottom of the cabinet. If you put the LCD TV/monitor in a bookcase or some other enclosed space, be sure to provide adequate ventilation.
-
Do not expose the LCD TV/monitor to extreme temperature conditions or to extreme humidity conditions.
● The apparatus shall not be exposed to dripping or splashing and that no objects filled with liquids, such as vases, shall be placed on the apparatus. - Do not place the LCD TV/monitor on an unstable cart, stand, tripod, bracket, table, or floor where it can fall. It is damaged if dropped, hit or scratched. Do not clean the front with keton-type materials (e.g. Acetone), ethyl alcohol, toluene, ethyl lacid, methyl, or chloride-these may damage the panel.
- Locate your DC adapter near an easily accessible AC outlet.
- If your LCD TV/monitor does not operate normally in particular, if there are any unusual sounds or smells coming from it unplug it immediately and contact an authorized dealer or service center.
- High temperature can cause problems. Don't use your LCD TV/monitor in direct sunlight, and keep it away from heaters, stoves, fireplaces, and other sources of heat.
● Unplug the DC adapter when it is going to be left unused for an extended period of time. - To reduce the risk of fire or electric shock, and annoying interference, use the recommended accessories only.
- If the LCD TV/monitor is broken, do not try to repair it yourself. Contact qualified service personnel.
● Unplug your DC adapter from the AC outlet before any service. - Be sure the service technician uses authorized replacement parts or their equivalents. Unauthorized parts may cause fire, electrical shook, or other hazards.
- Following any service or repair, be sure the service technician performs safety checks to certify that your TFT-LCD TV/monitor is in safe operating order.
● The apparatus with CLASS I construction shall be connected to a MAINS socket outlet with a protective earthing connection.
CONTENT
INSTALLATION
Normal installation 1
PANEL BUTTON FUNCTIONS
Front panel 2 Left panel 2
Right panel 3 Rear panel 3
EXTERNAL EQUIPMENT
Connecting diagram 4
REMOTE CONTROL HANDSET
Remote buttons 5 Battery installation 7
LET'S START
Changing the operation modes 8
TV MENU SETUP
Picture 9 Sound 10
TV setting System setting 11 13
Nicam/stereo operation 14
TELETEXT FUNCTION
Teletext display....15 Page selection....15
Mix mode 15 Lock 15
Index 15 Zoom in teletext 16
Display mode 16 Subpage 16
Colorized buttons 16
AV, S-VIDEO, SCART AND YPbPr SETUP
Video setting menu 17
VGA SETUP
Picture 18 Sound 19
Monitor setting 20 Function 21
DVD OPERATION
Brief introduction 22 Comparison between DVD
Function introduction 22 and other discs 22
Compatible disc types 24 Features 23
Playback 25 Select TV system 25
CONTENT
DVD OPERATION
Pause/step playback 26
Volume control 27
VCD, SVCD menu playback 27
Change Power-on Logo Freely 29
Select track to play directly by number button 30
Repeat playback 31
Select subtitle 32
Play from the desired position 32
MPEG4 and JPEG file playback....35
OSD 26
DVD menu playback 27
Direct play 28
Memory 29
Select language/audio 30
Repeat playback of selected segment…31
Fast playback 32
Zooming the displayed frame 34
DVD FUNCTION SETUP
General setup 38
Audio setup 38
Initial setup 39
Speaker setup 38
Video setup 39
Usage of USB equipment and 3-IN-1card reader 41
RADIO OPERATION
Radio 43
Function 45
Sound 45
TIME SETTINGS
Time setting 46
TROUBLE SHOOTING
Display troubleshooting 48
DVD troubleshooting 49
Sound and TV troubleshooting 48
SPECIFICATIONS
Specifications 50
DISPLAY MODE
Display mode 51
NORMAL INSTALLATION
natural_image
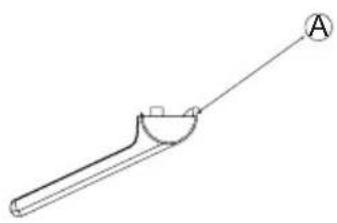
Simple line drawing of a tool with a curved handle and circular base, labeled with point A (no text or symbols on the object itself)Kickstand
M5×28 Screw 1pcs
natural_image
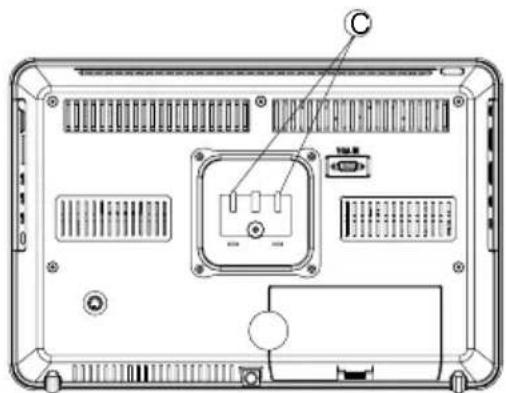
Back view of a computer monitor chassis showing internal components and ventilation slots (no text or labels)Rear viewing of LCD TV
1, Hook the tache (labeled A) of the kickstand on to the slot (labeled C)
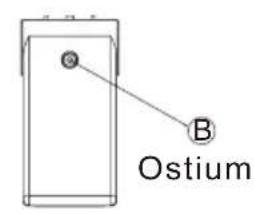
2, Tighten the screws (M5× 28) through the ostium (labeled B).
3, Figure① shows the finished installation.
natural_image
Line drawing of a device casing with control panel and buttons (no text or symbols)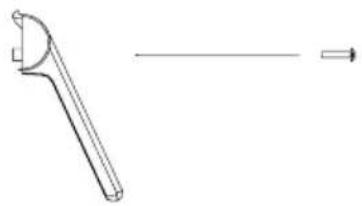
natural_image
Simple line drawing of a tool with a curved handle and a horizontal arrow (no text or symbols)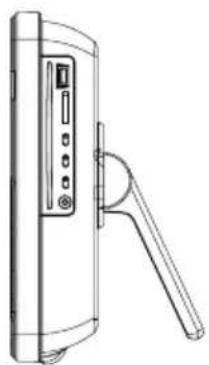
natural_image
Line drawing of a door handle with control panel and handle (no text or symbols)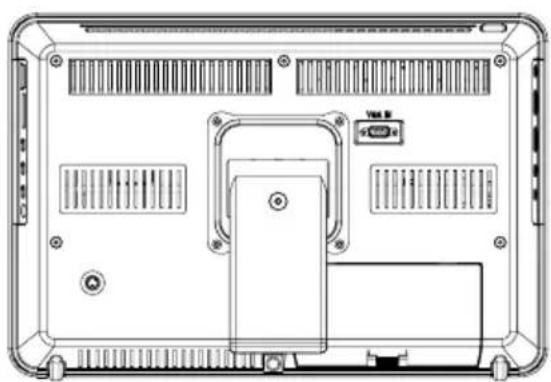
natural_image
Top-down schematic of a computer monitor rear panel showing ventilation grilles, drive bays, and cable connections (no text or labels)1
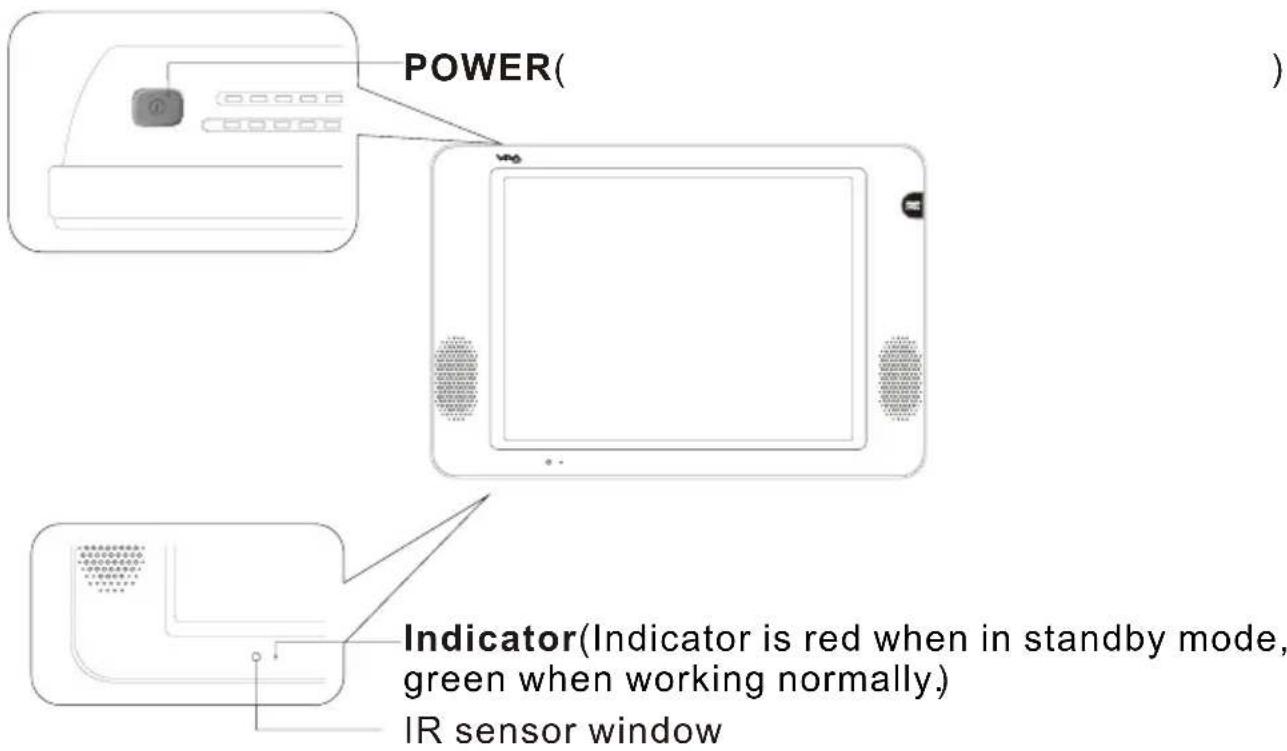
FRONT PANEL
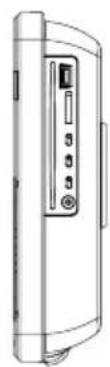
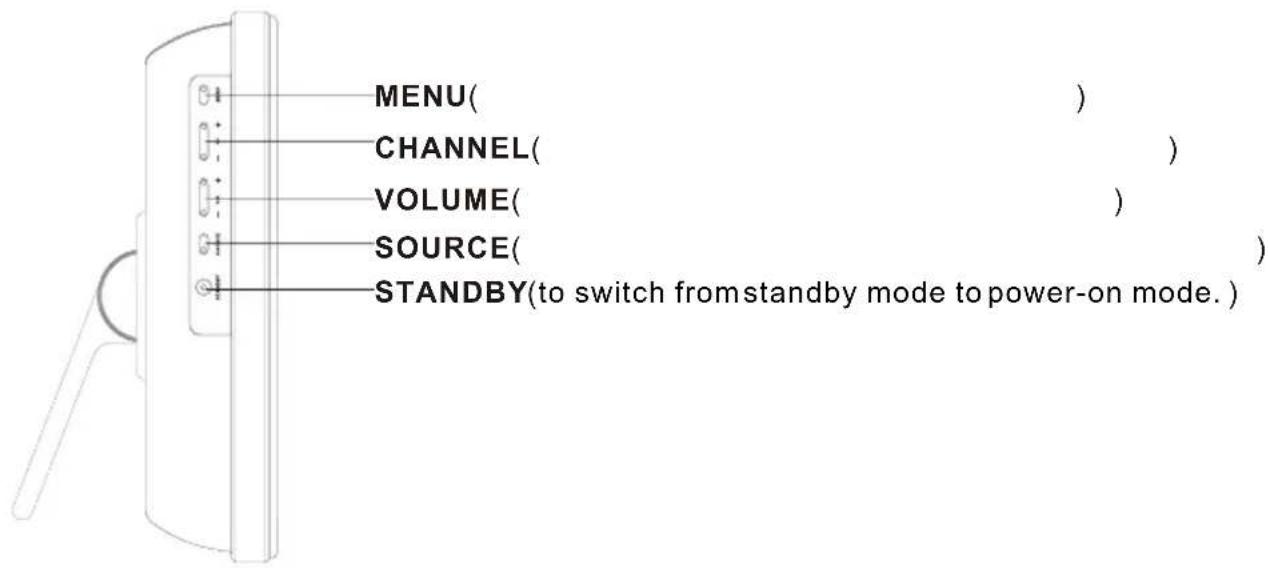
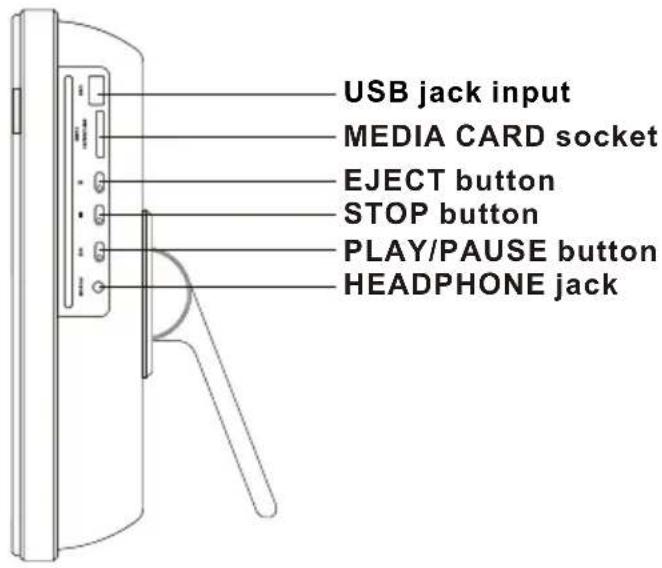
LEFT PANEL
RIGHT PANEL
REAR PANEL
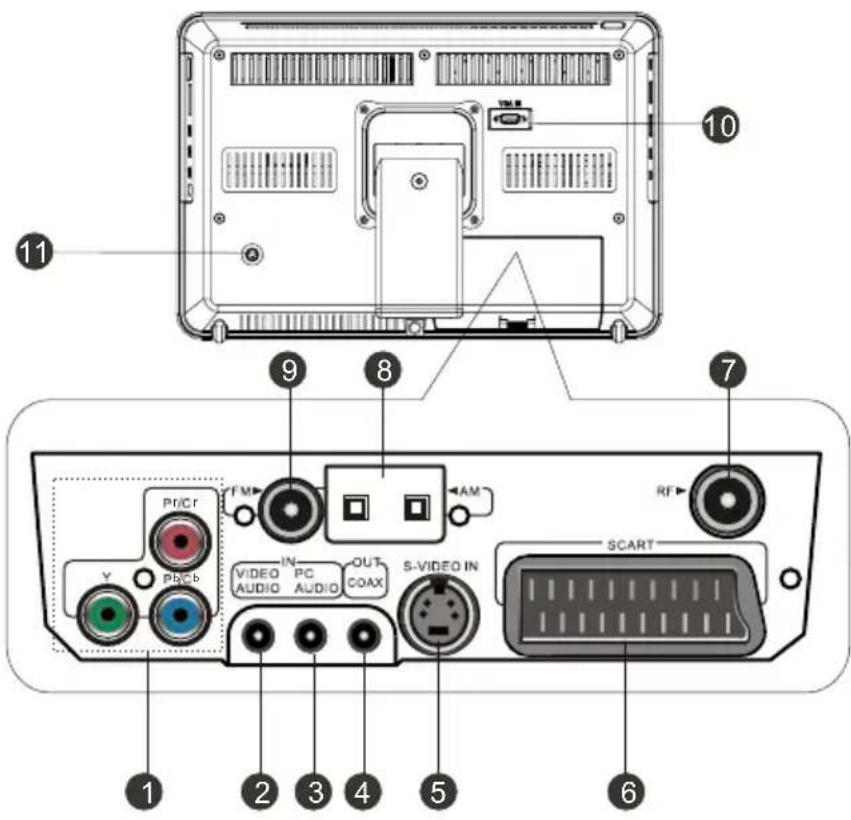
1 YPbPr or YCbCr input terminal
2 Composite video/audio and S-VIDEO audio input
3 PC audio and YPbPr audio input
4 Coaxial digital audio output
5 S-VHS VIDEO input
6 SCART connecting socket
7 RF input terminal
8 AM antenna input
9 FM antenna input
10 VGA input terminal
11 12Volt DC power input socket
CONNECTING DIAGRAM
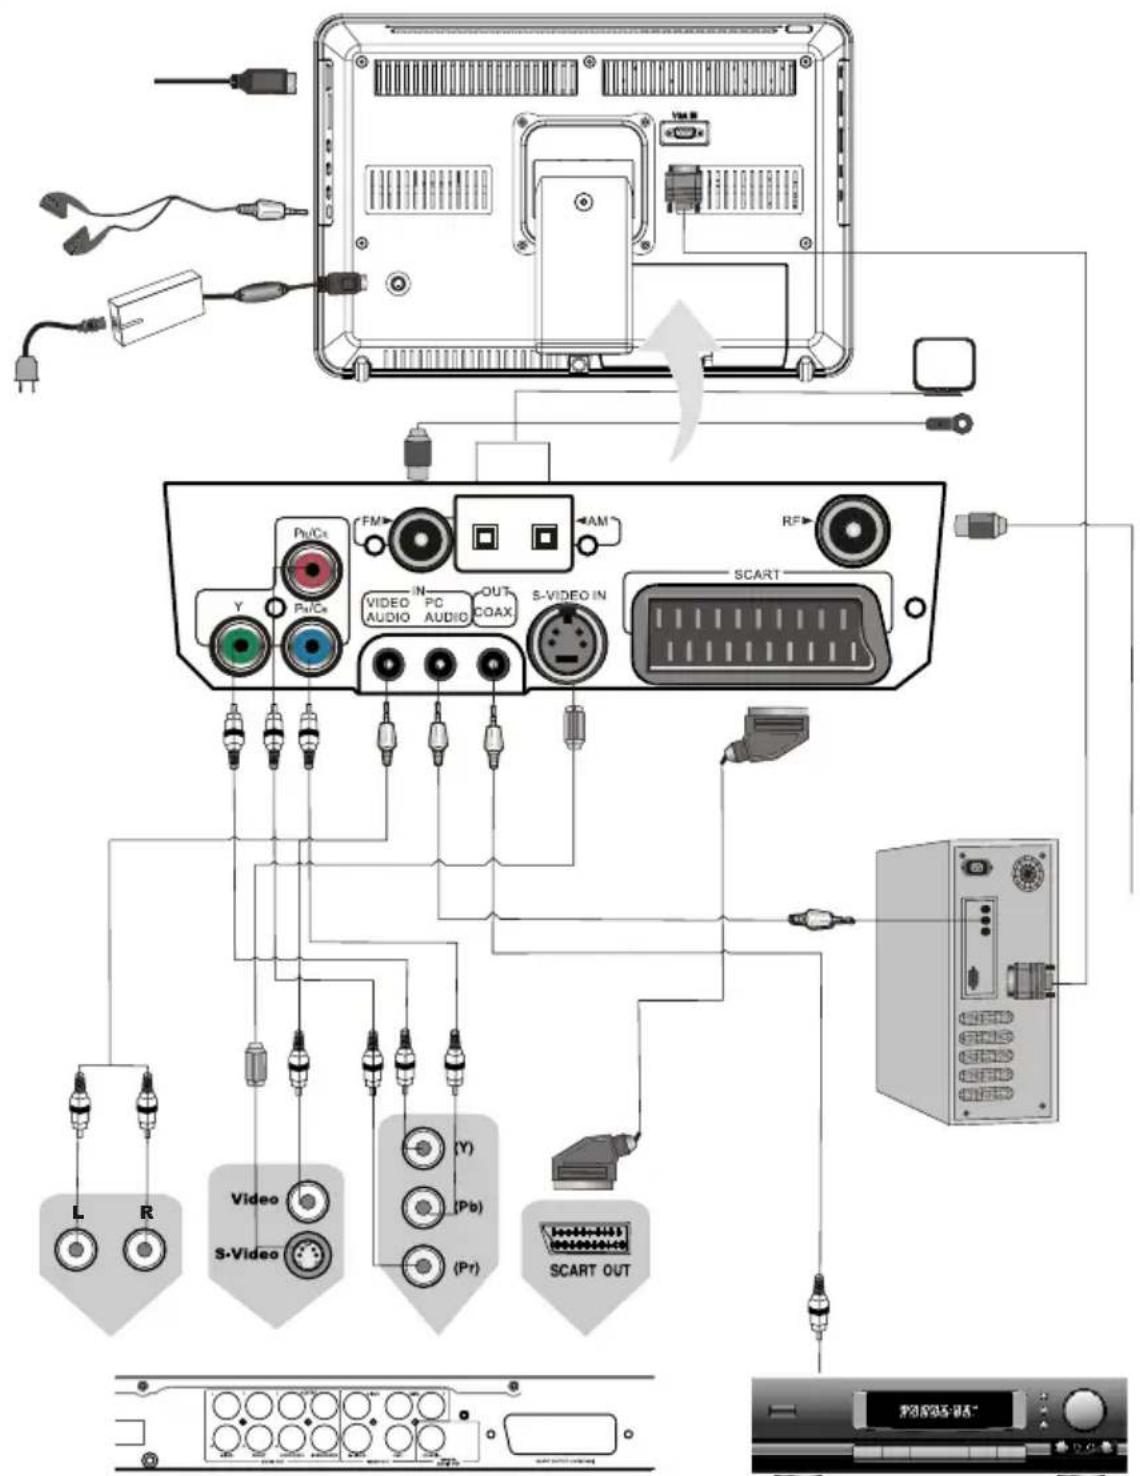
DVD or VCR player
Power amplifier (with coaxial digital audio in)
NOTE
You should insert all interconnecting cables BEFORE plugging in the power cord.
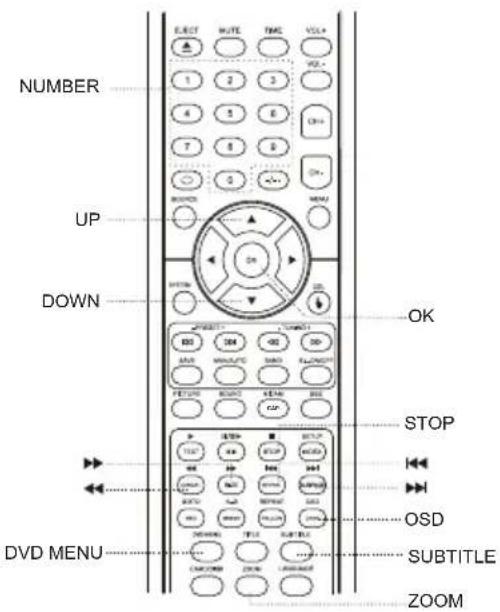
REMOTE BUTTONS
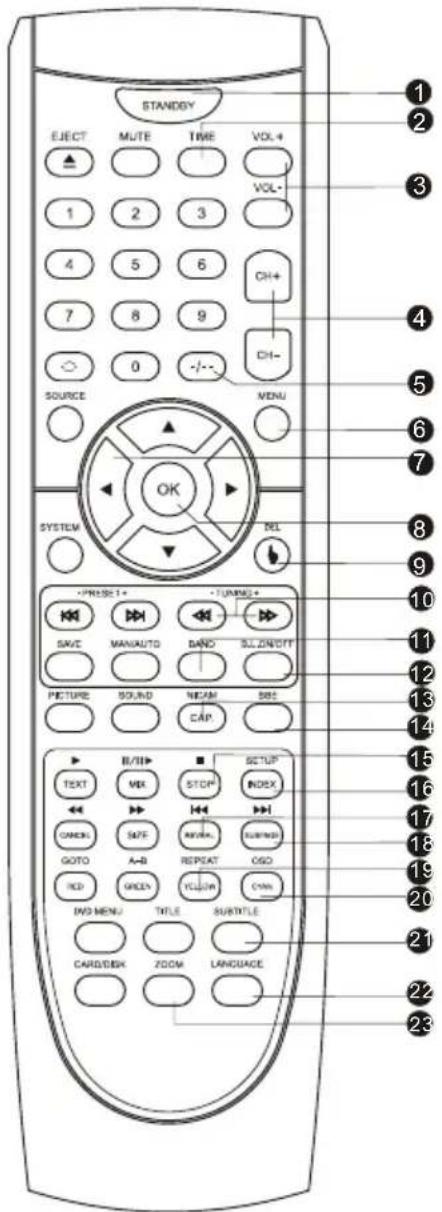
20 OSD/CYAN
Displays information on-screen / CYAN button for fastext operation.
21 SUBTITLE
Selects the subtitle language or switches to JPEG display mode ( only valid in DVD mode.)
22 LANGUAGE
Switches the output language ( only valid in DVD mode.)
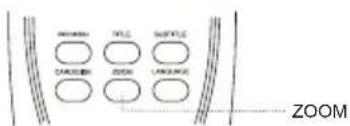
23 ZOOM
Zooms picture in and out ( only valid in DVD mode.)
1 STANDBY
Switches between standby mode and power-on mode.
2 TIME
Displays the calendar and settings for power on/off timer.
3 VOLUME+/-
Increases or decreases sound amplitude
4 CHANNEL+/-
Steps up/down program numbers. (only valid in TV mode.)
5 TWO-DIGIT BUTTON
Switches between one or two-digit program numbers.
6 MENU
Brings up the main on-screen menu ( press again to remove menu)
7 Left/Right cursor
To move left/right or adjust a selected item in menu, or adjust sound volume ( NO FUNCTION IN DVD MODE.)
8 OK button
To confirm a selection / item in menu.
9 DEL/DIRECT PLAY
To delete a radio program in radio mode or play a DVD directly ( whilst in DVD mode.)
10 TUNING+/-
To fine tune radio station (only valid in radio mode.)
11 BAND
To switch between AM and FM (only valid in radio mode.)
12 B.LON/OFF
To switch the screen on/off ( only valid in radio mode.)
13 NICAM/ CAPTURE button
Switches in NICAM, A2 or mono channel( only effective in TV mode) / Captures the currently playing image and set it as the power-on logo in DVD mode.
14 BBE
To switch between BBE mode and BBE off.
15 STOP
To stop playing a DVD ( only valid in DVD mode ) or to stop teletext on current page.
16 SETUP/INDEX
Brings up DVD function setup menu / Displays main content page when in teletext mode.
17 PREV/REVEAL
Selects the previous chapter or track on DVD / Displays any 'hidden' teletext information.
18 NEXT/SUBPAGE
Selects the next chapter or track on a DVD/Teletext:select the information of subpage.
19 REPEAT/YELLOW
To repeat playback ( only valid in DVD mode )/ YELLOW button for Fastext selection.
24 EJECT
Loads a DVD Disc in/out ( only valid in DVD mode.)
25 MUTE
Sound mute button.
26 Number buttons
To select a program number.
27 RETURN
To swap between a previous program and the current program (only valid in TV mode.)
28 UP/DOWN cursor
To navigate upward/downward in the menu, or changes TV channel.
29 SOURCE
Selects input source: TV, DVD, FM/AM, AV, S-VIDEO, SCART, YPbPr and PC-RGB.
30 SYSTEM
Selects color transmission system or sound transmission ( [◀▶ ] buttons/Change DVD output picture system directly.
31 PRESET+/-
Selects a saved program (AM/FM) whilst in radio mode.
32 MAN/AUTO
Selects the sound mode such as mono or stereo in FM.
33 SAVE
Saves current frequency for AM/FM whilst in radio mode.
34 SOUND
Selects sound field modes: Standard, Music, Film, News and User, all these modes are valid if BBE is OFF. If BBE is ON, the mode will be set to standard automatically.
35 PICTURE
To select different picture modes: Standard, Dynamic, Soft, User( only active in TV, VIDEO, S-VIDEO, SCART mode.)
36 PAUSE/STEP/MIX
Pauses playing/steps playback in pause mode (only valid whilst in DVD mode) /Displays TV and teletext at the same time.
37 PLAY/TEXT
To play a DVD normally ( only valid in DVD mode ) / enables or disables teletext function.
38 ▶/SIZE
Fast-forwards DVD playback (only valid in DVD mode) / To magnify current teletext page.
39 /CANCEL
Fast-backwards DVD playback (only valid in DVD mode) / To cancel teletext.
40 A-B/GREEN
To repeat play a DVD segment ( only valid in DVD mode ) / Green button for Fastext functions.
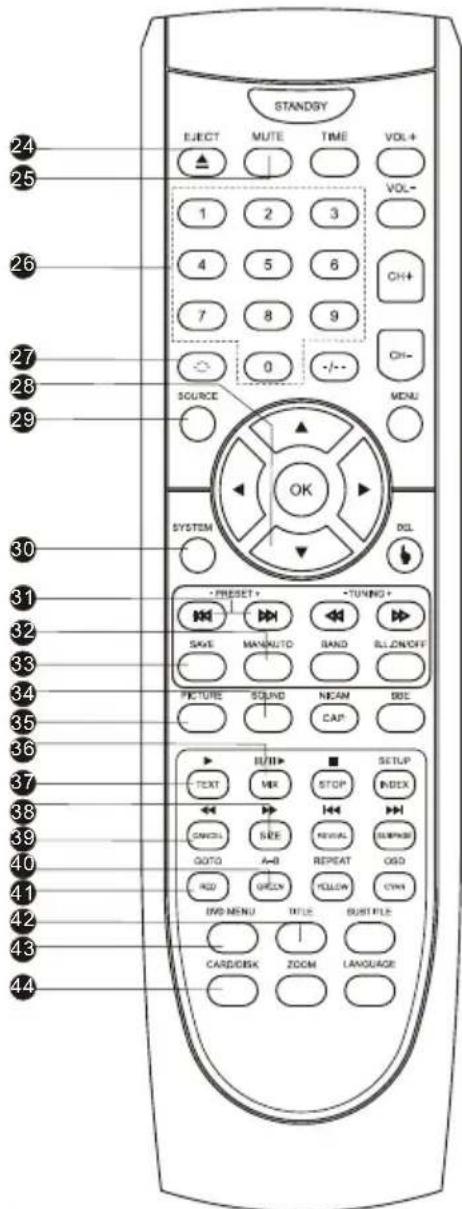
41 GOTO/RED
To play a DVD from a certain time-point ( only valid in DVD mode/RED button for Fastext functions.
42 TITLE
To go directly to DVD titles on a disc ( only valid in DVD mode.)
43 DVD MENU
Brings up main menu for DVD operations ( only valid in DVD mode.)
44 CARD/DISK
Switches between the card-reader, DVD, or USB modes (only valid whilst in DVD mode.)
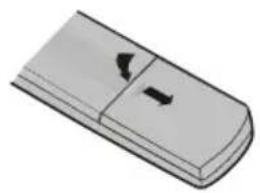
BATTERY INSTALLATION
Remove the battery cover. Insert two AAA batteries matching the -/+ polarities of the battery to the -/+ marks inside the battery compartment, as follows:
natural_image
Simple 3D illustration of a rectangular device with two curved slots and a handle (no text or symbols)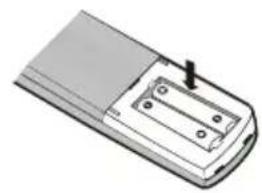
natural_image
Illustration of a mobile phone casing with a button and mounting holes (no text or symbols)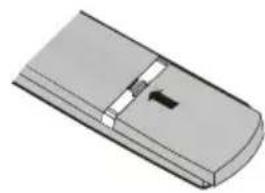
natural_image
3D illustration of a rectangular electronic component with a black arrow indicating a specific section (no text or symbols)BATTERY LIFE
● Generally speaking, the batteries should last for one approximately year, but the battery life is also obviously related to the amount of usage of the remote control.
- If the remote controller is inoperative when close to the remote sensor window, please replace the battery.
NOTES
● Never use rechargeable battery.
● Never charge, short-circuit, disassemble / heat the battery, or throw into fire.
- Pay attention not to fall or knock the remote controller, which will cause damage or function failure to it.
- Do not use new and old batteries together.
- If the remote control is not going to be used for a long time, please take the batteries out. Before replacing new battery, please clean the electrolyte in the remote controller.
- If electrolyte splashes into body, please clean it with water.
CAUTION:
Please put battery in the place children cannot touch. If swallow by accident, please contact with the local doctor immediately.
After the unit has been suitably placed / fixed, on the desk or on the wall, and all leads are connected for power, input and output etc, what you should do next is:
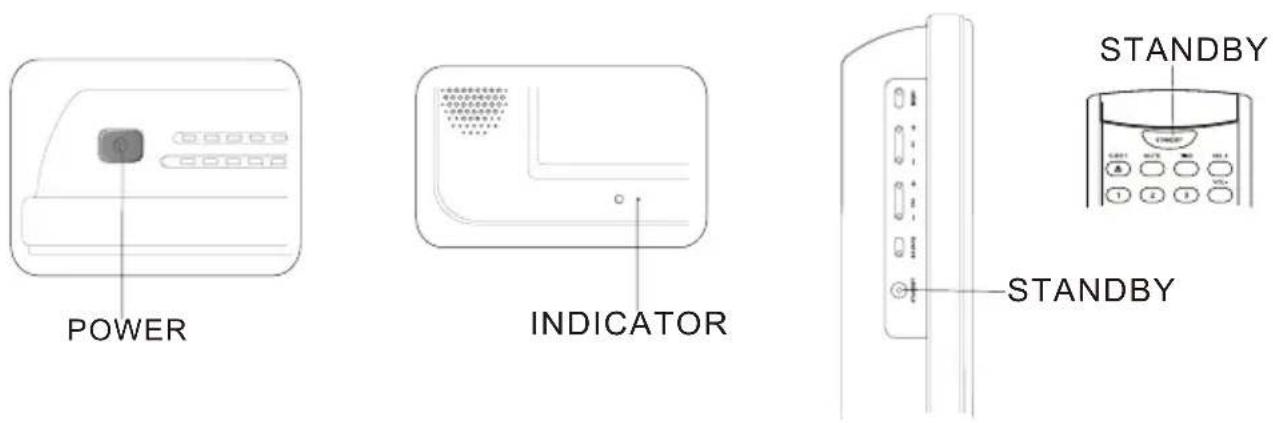
- Press the power switch on the top left corner. The unit will go into standby mode - you will see the LED indicator turn red.
- Press the STANDBY key on the left side of the TV, or [STANDBY] button on the remote control to make the unit switch to power-on mode - you will see the LED indicator turn green. Now you can enjoy the many features of your new product.
You can change the input source from the Source Menu. Press [SOURCE] button on unit or [SOURCE] key on remote control to display the menu on-screen.
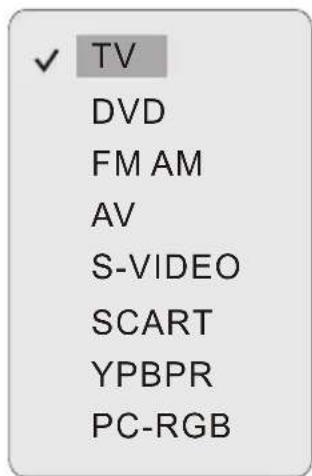
The current source item is highlighted. Press [▲/▼] buttons on the remote control, or [CH] key on the left side of LCD TV to select your desired mode. Press the [VOL] key or [OK] button to confirm your choice.
This product can store up to 100-channel programs (0-99). You can select your favorite channel through [CH+/-] or number buttons, and you can scan and store all of the channels through manual or automatic mode.
In TV mode, press [MENU] button on the remote control and menu shows as follows:
- Through pressing [▲/▼] button on the remote control, you can select main menu sections(main menu sections consist of "PICTURE", "SOUND", "TV SETTING", "SYSTEM SETTING") Press [▶] or [OK] button to enter this menu section.
- Press [▲/▼] button on the remote control to select the item, and then press [◀/▶] button to adjust parameter value. Press [MENU] button to return to main menu sections.
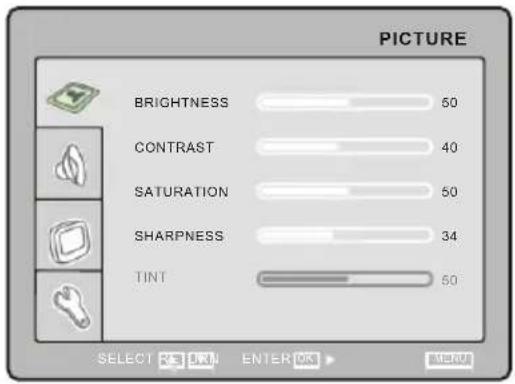
PICTURE
Select "◀" and menu will show as follows: Press [▲/▼] button to select items and [◀/▶] button to adjust.
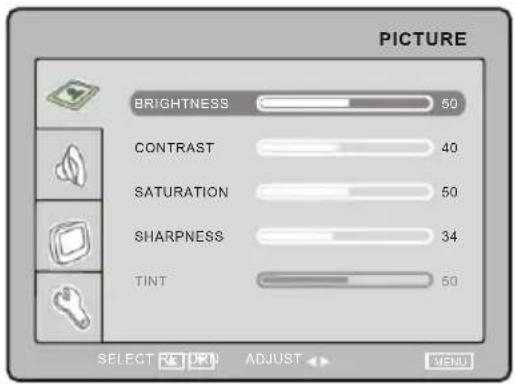
| Item | Description |
| BRIGHTNESS | To adjust brightness |
| CONTRAST | To adjust contrast |
| SATURATION | To adjust color saturation |
| SHARPNESS | To adjust picture sharpness |
| TINT | To adjust picture tint, only valid in N 3.58/N 4.43/PAL60 and display mode with V-scanning frequency equal 59.94 (please refer to P52) |
- There are four modes in picture mode: User, Standard, Dynamic and Soft. You can press [PICTURE] button to select any one of these modes.
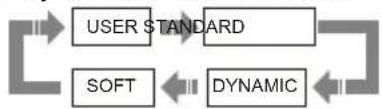
flowchart
graph LR
    A["USER STANDARD"] --> B["DYNAMIC"]
    C["SOFT"] --> B["DYNAMIC"]
    B --> A
SOUND
Select " and menu will show as follows:
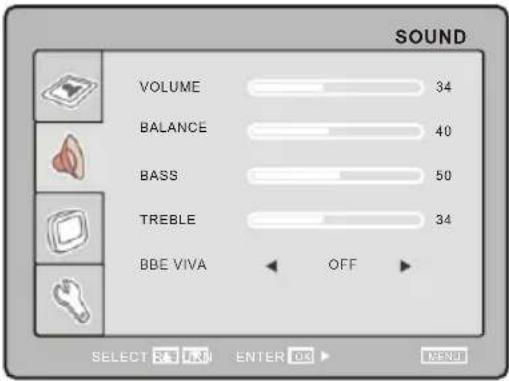
- Press [▲/▼] button to select item and press [▶] button to adjust. The following is sound item description.
| Item | Description |
| VOLUME | To adjust volume |
| BALANCE | To adjust balance of left and right channels |
| BASS | To adjust bass(valid when BBE is set off) |
| TREBLE | To adjust treble(valid when BBE is set off) |
| BBE VIVA | To adjust BBE mode (with bass and treble invalid) |
- Press [BBE]button or [◀/▶]in BBE item to set BBE "ON "or "OFF".
- There are five modes in sound mode: User, Standard, Music, Film, News. User may press [SOUND] button to select any one of these modes, the adjusted value is saved in User mode. When BBE mode is adjusted, the sound mode will go back to standard mode.
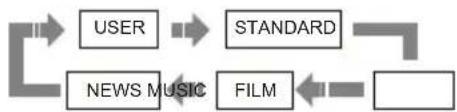
flowchart
graph LR
    A["USER"] --> B["STANDARD"]
    B --> C["FILM"]
    C --> D["NEWS MUSIC"]
    D --> A
TV SETTING
Select "☐" and tuning menu will show as follows:
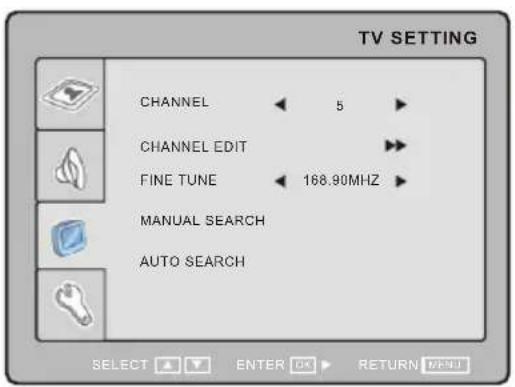
- Press [▲/▼] button to select item and press [-/▶] button to adjust or activate.
| Item | Description |
| CHANNEL | To change the channel number. |
| CHANNEL EDIT | To enter a submenu to set channel skip and channel swap.Please refer the next page. |
| FINE TUNE | To adjust the channel frequency accurately to make the sound and picture effect better. |
| MANUAL SEARCH | To scan programs by manual. |
| AUTO SEARCH | To scan programs and store all of them automatically. |
NOTE
During the searching, you can press [MENU] button to stop.
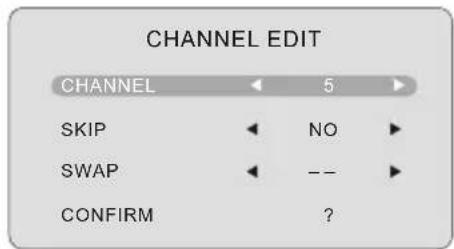
| Item | Description |
| CHANNEL | To select current channel here. |
| SKIP | To select "Yes" or "No", you can select "Yes" to make current channel unaccessible while using [CH+/-] button to browse channels. |
| SWAP | Select or enter the channel number directly to swap with current channel. |
| CONFIRM | Highlight this option and press the [OK] button to confirm the swap function. |
SYSTEM SETTING
You can setup some system configuration here.
Press [▲/▼] to select " 🔍" item and press [▶] button to enter the following section:
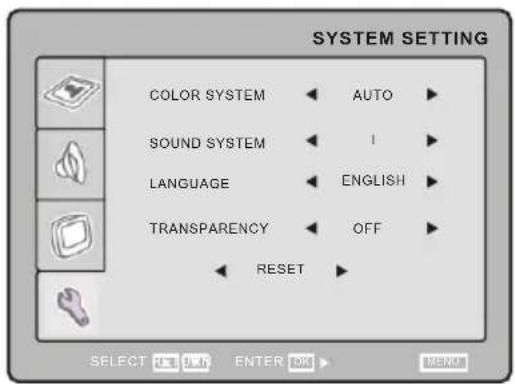
- Press [▲/▼] button to select item and press [-/▶] button to adjust or activate.
| Item | Description |
| COLOR SYSTEM | Can be changed between: "Auto", "PAL" and "SECAM". |
| SOUND SYSTEM | Can be changed between:"BG", "DK", "I" and "L". |
| LANGUAGE | Select OSD language. |
| TRANSPARENCY | To change transparency of OSD. |
| RESET | To reset all value to default. |
NOTES
- Which 'COLOR SYSTEM mode and SOUND' SYSTEM mode to use is related to your local TV broadcasting system.
- SECAM system is only used by some European countries and districts, such as France.
- If the local system is SECAM L, the color system must be selected as "SECAM" and sound system must be selected as "L".
If you can receive a Nicam signal, you can operate the unit as follows :
- You can select Nicam stereo, mono channel or bilingual through the NICAM button on the remote control. If the stereo signal is too weak, the unit will switch into mono mode automatically.
- When selecting mono channel, "MONO" will show on screen; when selecting bilingual, "DUAL1" will show on screen; when selecting bilingual II, "DUAL 2" will show on screen and when selecting stereo, "STEREO" will be shown on screen.
NOTE
Nicam/bilingual function is only effective in TV mode while program coming with Nicam/bilingual.
Most TV stations provide cost-free teletext information, including the latest news, weather information, TV program list and stock information, etc. You just input the needed teletext page according to the teletext content.
TELETEXT DISPLAY
◆ Select the channel with teletext signal;
◆ Press [TEXT] button;
◆ Select the corresponding page according to the colorized buttons on the remote control;
◆ Press [TEXT] again and TV screen will display.
PAGE SELECTION
◆ You can input 3 digital numbers to enter the page you want to watch through number buttons. If the inputted number is invalid, you need to input correct 3 digital numbers again after you finished inputting this 3 digital numbers.
◆ You can select to turn pages forward or backward through [CH+/-] button.
MIX MODE
This function may let you enjoy TV and teletext information at the same time.
When a certain teletext page displays, press [MIX] button, TV and teletext information will display on screen at the same time.
◆ Press [MIX] button again and only teletext image displays.
◆ In mix mode, the disturbance lines on teletext characters are easy to appear, so you are not recommended to select this mode.
NOTE
Press [CANCEL] button to exit teletext.
LOCK
You can press [STOP] button to lock teletext page. Press this button again to cancel locking.
INDEX
Pressing [INDEX] button to display content page. Enter a certain teletext page through inputting number buttons.
ZOOM IN TELETEXT
When teletext page shows, you may double zoom in to display this teletext page;
◆ Press [SIZE] button to zoom in the upper half part of teletext page;
◆ Press [SIZE] button again to enter the under half part of teletext page;
◆ Press this button for the third time to return to original display mode.
DISPLAY MODE
Press [REVEAL] button to display the hidden teletext information. Press this button again to cancel teletext information displaying.
SUBPAGE
User could press [SUBPAGE] button to select the subpage of teletext.
COLORIZED BUTTONS (RED, YELLOW, GREEN, CYAN)
Select the corresponding teletext page through colorized buttons.
VIDEO SETTING MENU
When in AV/ S-VIDEO/SCART input mode, there are 6 color system modes for selection: "Auto", "PAL", "N 3.58", "N 4.43", "PAL60" and "SECAM". Select the right system for your video program. If you do not know which mode your video playback devices and video media is using, you should select the auto mode or you should check and confirm this with your supplier.
The menu setup of AV/S-VIDEO/SCART modes is much the same as that of TV mode, except the "section is invalid and a little difference in color and sound modes. In order to make this manual pithy and concise, it is not repeated here. You can find it in preceding pages.
And the menu setup of YPbPr is the same as that of VGA menu, except "section. Please refer to posterior pages. The "section YPbPr used is the same as that of TV mode. Please refer to P10 for it.
NOTE
If no signal input in TV, AV, S-VIDEO, SCART, YPbPr, the screen will show like the following figure.
This unit will go into standby mode automatically with no signal input for more than 5 minutes.
AV NO SIGNAL 4:50
- If the input channel is SCART, this unit will automatically recognise RGB or CVBS signal of SCART; when normal RGB signal appears, this unit will automatically switch into RGB display mode. For this unit is combined by multiple functions, when inserting into SCART socket, it will not automatically switch into SCART mode. You have to select SCART channel through [SOURCE] menu, that is a little different with that of others TV set.
With the VGA mode supported up to 1024*768@75Hz, and speakers built in, you can use this unit as a multimedia PC monitor. When this unit works in VGA mode, the following setup can be done.
Press [MENU] button to enter main section. Press [▲/▼] button to select sections and then press [▶] button or [OK] button to enter. If all is done, please press [MENU] button twice to exit and your setup data will be saved automatically.
PICTURE
Press [▲/▼] button to select "", and press [▶] or [OK] button to enter.
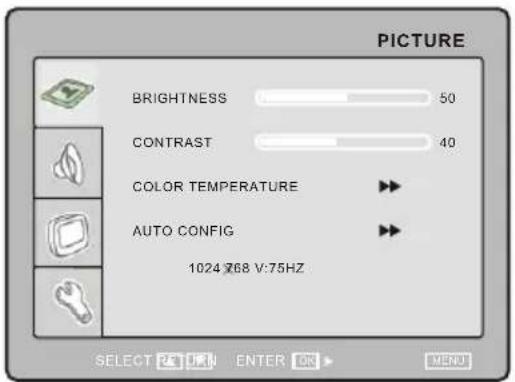
Press [◀/▶] button to adjust value of item.
| Item | Description |
| BRIGHTNESS | To adjust brightness of picture. |
| CONTRAST | To adjust contrast of picture. |
| COLOR TEMPERATURE | Enter sub menu to adjust color temperature of picture. Press [◀/▶ /OK] button to enter. |
| AUTO CONFIG | Auto config horizontal/vertical position, phase and frequency. Press [◀/▶ /OK] button to activate. |
| STATUS | You can see some information about the input video here. |
Here shows the color temperature sub menu.
COLOR TEMPERATURE
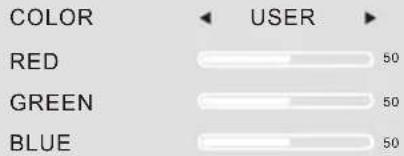
Press [▲/▼] button to select item and press [◄/►] button to change and adjust value of item.
| Item | Description |
| COLOR | Select color temperature mode : "User", "C6500", "C8700", "C9300". |
| RED | Adjust red value of color temperature |
| GREEN | Adjust green value of color temperature |
| BLUE | Adjust blue value of color temperature |
SOUND
Press [▲/▼]button to select" " and press [▶] or [OK] button to enter.
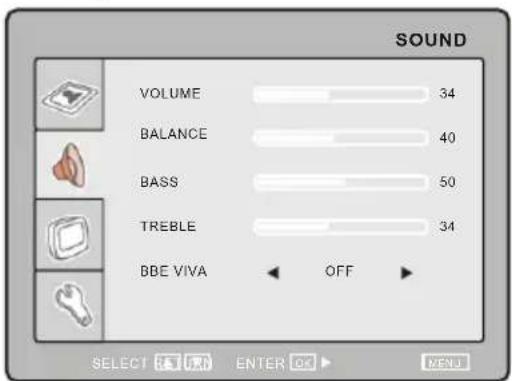
The operation of SOUND section here is the same as that in TV mode. Please refer to P10.
MONITOR SETTING
Press [▲/▼] button to select " □" and press [▶] or [OK] button to enter.
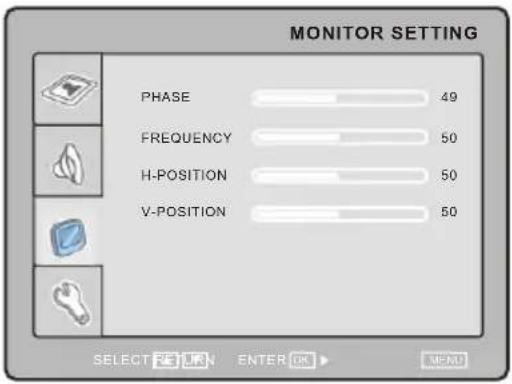
Press [▲/▼] button to select item and press◄/► ] button to adjust value of item.
| Item | Description |
| PHASE | To adjust phase. |
| FREQUENCY | To adjust frequency |
| H-POSITION | To adjust screen horizontal position |
| V-POSITION | To adjust screen vertical position |
NOTE
- If you use this unit as a PC-monitor, and when your PC goes into standby mode, the screen will show as dexter. This unit will go into sleep mode with no signal inputted in 2 minutes. In this mode, the indicator will remains green, and the screen is turned off. You can wake it up by waking up your PC or pressing [MENU] or [SOURCE] button in the remote control.
- If this product is not connected to any input devices, the screen will show as dexter. This unit will go into sleep mode in 2 minutes.
PC-RGB
NO SIGNAL
1:50
PC-RGB
CABLE NOT
CONNECTED
1:50
FUNCTION
Press [▲/▼]button to select" ", and press [▶] or [OK] button to enter.
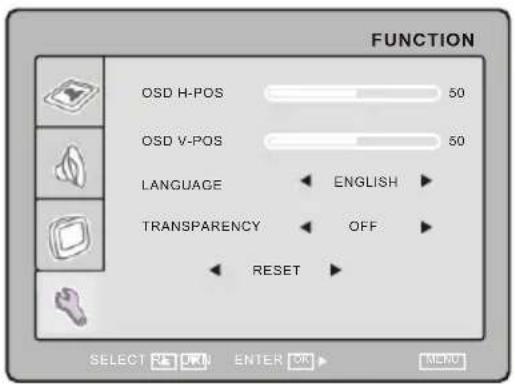
Press [◀/▶] button to adjust value of item.
| Item | Description |
| OSD H-POS | To adjust the horizontal position of OSD. |
| OSD V-POS | To adjust the vertical position of OSD. |
| LANGUAGE | Select OSD language . |
| TRANSPARENCY | To adjust transparency of OSD. it can be change from OFF to LEVEL6, 7 levels in total. |
| RESET | Reset all value that related to picture and sound to default . |
DVD OPERATION
Brief Introduction
DVD provides brand-new AV effect for consumers with its extraordinarily large capacity and outstanding audio-video effects. Its capacity is as high as 4.7-17 GB (approximately 7-26 times the CD capacity) and horizontal resolution of picture is above 500-line.
Comparison Between DVD and Other Discs
| DVD | LD | SVCD | VCD | CD | CDROM | ||||
| Recording Method | Digital/MPEG2 | Analog | Digital/MPEG2 | Digital/MPEG1 | Digital | Digital | |||
| Capacity | Single-sided 1 l a y e 4.7G | Single-sided 2 l a y e 8.5G | Double-sided r s l a y e 9.4G | Double-sided 2 l a y e 17G | 650MB | 650MB | 650MB | 650MB | |
| Playback Time | 133min | 242min | 266min | 484min | 1 side 60min.2 sides 120min. | 45min | 74min | 74min | |
| Disc Diameter | 12CM/8CM | 30CM/20CM | 12CM/8CM | 12CM/8CM | 12CM/8CM | 12CM/8CM | |||
| Horizontal Resolution | 500 lines or more | 430 lines or more | 350 lines or more | 250 lines or more | |||||
| Aspect Ratio | Multiple | One | |||||||
| Subtitle | 32 types | Max. 16 types | |||||||
| Audio | Linear PCM | Linear PCMFM modulation | Linear PCM | ||||||
| Sound Quality | 48kHz 96kHz/16 20 24bit | 44.1kHz/16bit | 44.1kHz | 44.1kHz/16bit | |||||
Function Introduction
● Multiple languages and subtitles
DVD disc can support as many as 8 dubbing languages and 32 subtitle languages.
● Multiple story plots
User can select to play the desired plots (the beginning, development or ending) of the same disc.
● Multiple aspect ratios
Multiple aspect ratios support various TV screens.
| Disc Pictures | TV Screen | ||
| 4:3 | 16:9 | ||
| Pan-Scan | Letterbox | ||
4:3 | 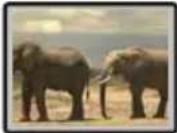 | 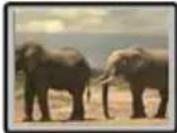 | 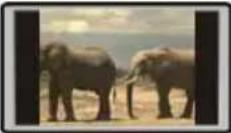 |
| 16:9 | |||
Features
This machine employs the latest generation MTK decode chip for more convenient system compatibility, and more stable operation. Super error correction slot-in loader with twin-laser and good shockproof performance.
Brand-new AV Effects
1 Compatible with MPEG 4 format discs to produce wonderful pictures.
② 108MHz/12bit video DAC for more vivid and brilliant images.
3 Progressive-scan video outputs to eliminate the flicker not overcome by interlaced scan. At the same time, picture definition is sharply enhanced and the images will be finer, smoother and stabler.
4 Coaxial digital output terminal.
■ High Quality Digital Audio
① Coaxial digital audio output for connection to power amplifiers with DOLBY DIGITAL/DTS decoder.
② PCM Digital audio outputs.
■ Convenient Functions
① Direct entry into desired scenes (title/chapter/time/track search).
② Multi-level zoom in/out playback function.
③ Multiple aspect ratios ensure full screen compatibility.
④ Parental lock function to prevent children from watching unsuitable discs.
5 Multiple dubbing languages and subtitle.
■ Compatible with VCD, SVCD, CD, HDCD, KODAK PICTURE-CD etc.
NOTE: *Some discs on the market are labelled as MPEG4, and are actually *.rm/*.ra/*.ram/*.rmm and others, which are not compatible. Please take care when buying discs.
Compatible Disc Types
| Types | Sizes | Recorded Contents |
 | 12cm | DVD: Compressed digital audio + compressed digital video (dynamic picture) |
 | 12cm | SVCD: Compressed digital audio + compressed digital video (dynamic picture) |
| MPEG4 | 12cm | MPEG4: Compressed digital audio + compressed digital video (dynamic picture) |
 | 12cm | VIDEO CD: Compressed digital audio + compressed digital video (dynamic picture) |
 | 12cm | CD-DA: Digital audio |
NOTES
- Issues related to

These icons on the top banner indicate the disc types that the function described in the section applies to.

Applies to DVD disc

Applies to VCD disc

Applies to MPEG4 disc

Applies to CD disc

Applies to SVCD disc
- This model do not support the 8cm disc. Do not insert that type of disc into this device to prevent disc jam.
PLAYBACK

-
Power on and switch signal source to DVD mode and the unit begins to work.
-
Place the disc (with label side facing users) to the door and the unit will draw in the disc automatically.
• The unit begins to read disc information.
-
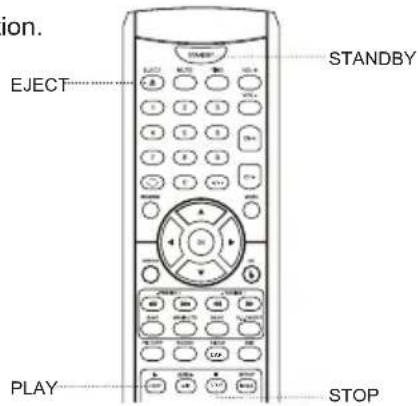
Press [PLAY] button to begin playing disc.
-
Press [STOP] button to stop playing.
-
When the unit is playing a disc, press [STOP] button the first time and the unit enters pre-stop state, while press [STOP] button again and the unit enters stop state.
- At the pre-stop state, if you press [PLAY] or [OK] button, the unit will continue to play from the stopped point.
- At the stop state, if you press [PLAY] or [OK] button, the unit will play from the beginning point of the disc.
-
Press [STOP] button when playing MPEG4 discs and the unit enters stop state directly.
-
Press [EJECT] button to take out disc.
-
When finishing playing, switch signal source to other working state and press [STANDBY] button to make the unit enter standby state. Please pull out the power plug from power socket when not using the unit for a long time.
SELECT TV SYSTEM

- According the connected TV set's color system, set the system of this unit to match to the TV set.
- If the TV system is PAL, press [SYSTEM] button to select "PAL" system and TV screen displays:

- If the TV system is NTSC, press [SYSTEM] button to select "NTSC"s ystem and TV screen displays:

- When using a multi-system TV set, press [SYSTEM] button to select "Auto" system and TV screen displays:

NOTES
- The system cannot be switched when playing a disc but it can be switched in stop mode or with no disc inside.
● Part of functions of some discs cannot be well performed in a certain system when playing in different systems. - It is recommended that you set the system of this unit to "PAL".
- EJECT button is only effective when DVD is selected as the source. For other signal sources, such as TV, AV, etc, this button is invalid.
PAUSE/STEP PLAYBACK

- Press [PAUSE/STEP] button in playing state.
- Pause and TV screen displays:
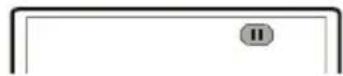
- Press [PAUSE/STEP] button in pause mode to enter step playback function. Each press moves one frame forward and TV screen displays:
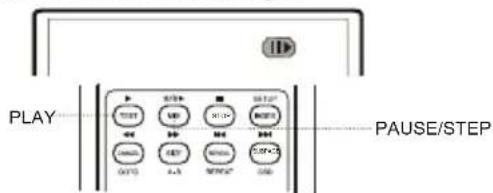
- No step playback function when playing CD disc.
- Press [PLAY] button to resume playback.
NOTE
When you set the screen saver mode to ON (See Page 38 for details), the display on TV screen turns to screen saver status after the picture on TV screen keep still for about 2 minutes (in mode such as pause mode, stop mode, menu select, set up menu, no disc mode and so on).
OSD

-
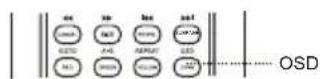
Press [OSD] button.
-
When operating this unit, disc information and function operation hint will display on TV screen.
- Press [OSD] button and the related disc circularly changes as the following:
DVD disc:
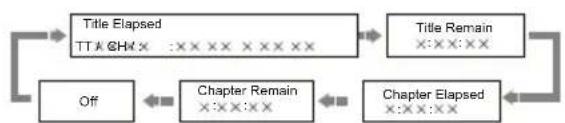
flowchart
graph LR
    A["Title Elapsed"] --> B["Title Remain"]
    B --> C["Chapter Remain"]
    C --> D["Chapter Elapsed"]
    D --> E["Off"]
    E --> A
SVCD, VCD and CD discs:
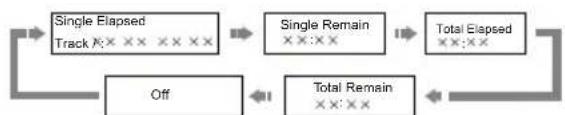
flowchart
graph TD
    A["Single Elapsed Track X:XX XX XXX"] --> B["Single Remain XX:XX"]
    B --> C["Total Elapsed XX:XX"]
    C --> D["Total Remain XX:XX"]
    D --> E["Off"]
    E --> A
VOLUME CONTROL

- Press [VOL+/VOL-] buttons to adjust volume.
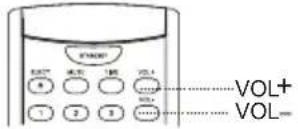
- Press [VOL+/VOL-] buttons on the remote control of this unit.
- Press [VOL+] button to increase volume; press [VOL-] button to decrease volume; the maximum volume is 100.
DVD MENU PLAYBACK

- Some DVD discs are made with title menu or chapter menu.
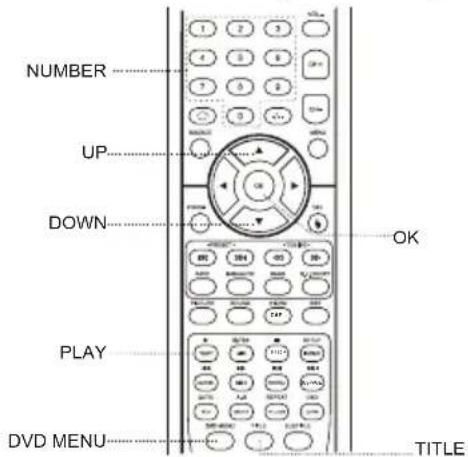
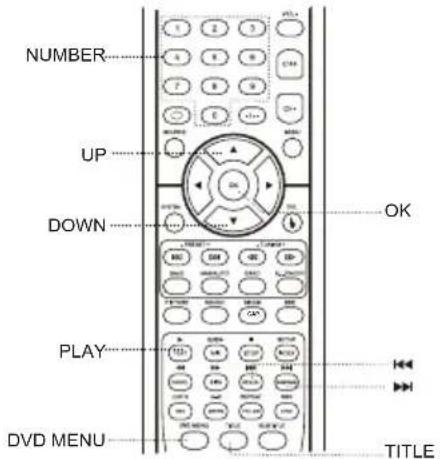
- After pressing [DVD MENU] button, TV screen displays menu for selection. Operate according to menu indication and press number buttons to select.
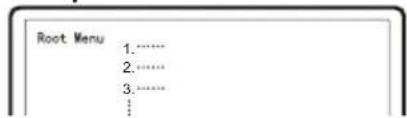
- Or press [▲/▼] button to select the desired track, and then press [PLAY] or [OK] button.
NOTE
- Press [TITLE] button once to return to title menu; press [DVD MENU] button once to return to main menu; the return location varies with discs.
VCD, SVCD MENU PLAYBACK
- When playing SVCD, VCD2.0 discs with menu playback function, you may enjoy simple menu playback alternation function. You may set menu playback state in the setup menu and select menu playback or sequence playback.
For instance, VCD 2.0 disc menu playback.
- TV screen displays main menu.
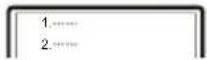
- Press number buttons to select. For instance, press number button 1 to select main menu 1.
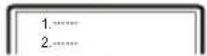
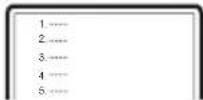
- After entering main menu 1, TV screen displays submenu.
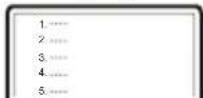
-
Press [ ] buttons to turn pages.
-
Press number buttons to select submenu content. For instance, press number button 5 and the unit begins to play the fifth track.
-
When in menu playback, press [TITLE] button to return to main menu.
-
When in menu playback, pressing [DVD MENU] button may realize sequence playback function; when in sequence playback function, pressing [DVD MENU] button may realize menu playback function.
DIRECT PLAY
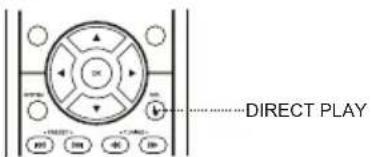
Direct play is a creative function that very helpful for users to enjoy DVDs. With direct play function, you can play DVD directly, skipping the legal warning, advertisements, chapter selection and other thing that come before the movies start. You can enjoy pure movies without bothering.
When the disc is loaded and the legal warning, advertisements, chapter selection message shows, just press [▶] button to activate direct play function and start
a pure movies playback.
NOTE
When you are enjoying VCD with PBC function, direct play can disable the PBC and VCD will be played in sequence.
CHANGE POWER-ON LOGO FREELY
In normal playback, press the CAPTURE button to set the currently played image as the power-on logo.
NOTE
When playing some discs, the power-on logo caused by pressing the CAPTURE button probably has blurred images.
Please be more patient in the operation of changing the screen logo. The operation of changing the screen logo is invalid when the image is in zoom in/out status.
MEMORY

-
This player can save the currently played time point automatically when you leave the current DVD disc playback (switch from DVD to card read state, switch from DVD signal source to other signal source, enter standby state in DVD mode).
-
When switching to DVD playback state again, this player can automatically search the time point saved last time to continue playing. If you want to play from the beginning, please press [STOP] button twice and then press [PLAY] button.
NOTE
- This player may save one DVD disc for one time.
- The DVD disc played the last time will be saved, and the former saved contents will be cleared by new saved contents.
- If power is cut off unexpectedly, the DVD disc played currently will not be saved.
SELECT TRACK TO PLAY DIRECTLY BY NUMBER BUTTONS

-
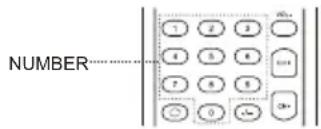
Insert disc, after disc reading and normal playback, press number buttons to select track to play directly.
-
If track number is less than 10, press number buttons 1 to 9 to directly select. For instance, select the seventh track: ⑦
- If track number is more than or equal to 10, press [-/- -] button and then number buttons 0 to 9. For instance, select the 16th track 1- + 66
- If track number is more than or equal to 20, press [-/- -] button twice and then number buttons
0 to 9. The rest can be performed by analog.
SELECT LANGUAGE/AUDIO

- Press [LANGUAGE] button.
- As for DVD and SVCD discs with multiple languages, you may select the desired language when playing.
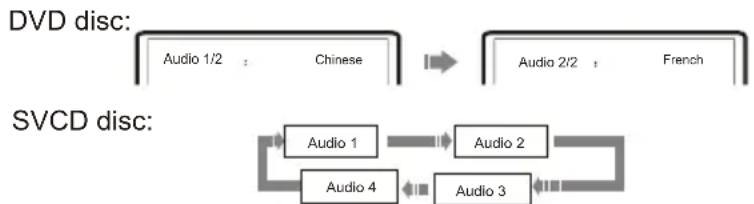
flowchart
graph LR
    A["DV D disc: Audio 1/2 : Chinese"] --> B["DV D disc: Audio 2/2 : French"]
    C["SVCD disc: Audio 1"] --> D["SVCD disc: Audio 2"]
    E["SVCD disc: Audio 3"] --> F["SVCD disc: Audio 4"]
- As for VCD or CD disc with multiple channels, you may select audio output from left or right channel or select stereo audio output. For VCD disc, left channel records dubbing and right channel records singing, and you may select left channel for dubbing.
VCD, CD disc:
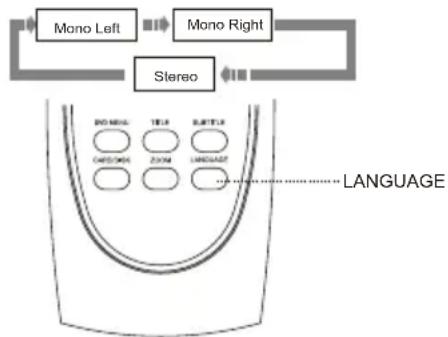
flowchart
graph TD
    A["Mono Left"] --> B["Stereo"]
    C["Mono Right"] --> B
    B --> D["Speaker"]
    style D fill:#f9f,stroke:#333
    note right of D: Language
NOTE
Language type varies with disc recording.
- For VCD story disc with double languages, you may press [LANGUAGE] button to select the desired language.
- When playing some DVD discs, pressing [LANGUAGE] button to switch language may result in playing the track from its beginning.
REPEAT PLAYBACK

- The repeat playback function enables a certain title/chapter/track/disc repeated.
1. Press [REPEAT] button. Each press of REPEAT button may realize different repeat functions.
■ DVD DISC:

■ SVCD, VCD, CD discs:
- To SVCD, VCD2.0 discs, the repeat function is effective in sequence playback mode; to VCD1.1, CD discs, the repeat function may be directly operated.

- To SVCD, VCD2.0 discs, the repeat function cannot be operated in menu playback mode.
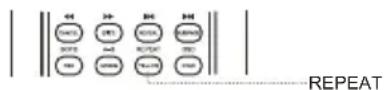
REPEAT PLAYBACK OF SELECTED SEGMENT

- When playing disc, you may press [A-B] button to play your desired segment content repeatedly.
1. In normal playback, press [A-B] button at the beginning point (point A) of the segment that you desire to play repeatedly.
TV screen displays:
![OPPO LT 1509 - In normal playback, press [A-B] button at the beginning point (point A) of the segment that you desire to play repeatedly. - 1](/content/2026/05/772425/images/f062395aa1f2ebda30202f18c0e3b98a47dbc610d392001f8b95654bc393bce1.jpg)
2. In normal playback, press [A-B] button at the ending point (point B) of the segment that you desire to play repeatedly.
TV screen displays:
![OPPO LT 1509 - In normal playback, press [A-B] button at the ending point (point B) of the segment that you desire to play repeatedly. - 1](/content/2026/05/772425/images/96817cf27adaf591776a675ef9f4daa756e1cb08e92099ab97ed1ccfde08953a.jpg)
- The unit automatically returns to point A and begins to play the selected segment (A-B).
3. Press [A-B] button for the third time.
- The unit restores to normal playback.
![OPPO LT 1509 - Press [A-B] button for the third time. - 1](/content/2026/05/772425/images/c8f68b8497cff29c9676433e20c4d50b25d0d6ac3ff21885342590096df3f9ae.jpg)
NOTE
- The A-B repeat function may be invalid to some discs. In menu playback mode, the segment can only be selected in the track.
SELECT SUBTITLE

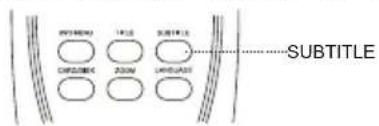
1. Press [SUBTITLE] button.
- When playing DVD discs recorded with subtitles of several languages, you may select subtitle of different languages. Each press of [SUBTITLE] button switches one subtitle language, and TV
screen displays:
![OPPO LT 1509 - Press [SUBTITLE] button. - 1](/content/2026/05/772425/images/7e3b1b40d73451c1252b2230818841d7f34226000047a28ffd2a12394e17ba07.jpg)
flowchart
graph TD
    A["Subtitle 01/03"] --> B["Subtitle 02/03"]
    B --> C["Subtitle off"]
    C --> A
    C --> D["Subtitle 03/03"]
- The number of switchable subtitle language depends on discs. DVD disc may select 32 kinds of
subtitle at most.
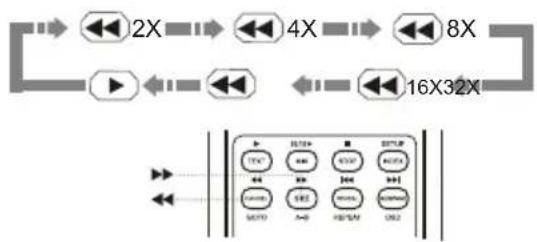
FAST PLAYBACK

- When playing discs, you may select fast forward or fast backward playback to search a certain point.
1. Press [→button and the unit begins fast forward playback.
- Press [▶button each time and the disc playback speed switches in the following sequence
circularly:

flowchart
graph LR
    A["Input"] --> B["2X"]
    B --> C["4X"]
    C --> D["8X"]
    D --> E["Output"]
    B <--> C
    C <--> D
    E <--> F["Output 16X32X"]
2. Press [◀button and the unit begins fast backward playback.
- Press [ ] button each time and the disc playback speed switches in the following sequence
circularly:
flowchart
graph LR
    A["2X"] --> B["4X"]
    B --> C["8X"]
    D["16X32X"] --> E["16X32X"]
    F["16X32X"] --> G["16X32X"]
    H["16X32X"] --> I["16X32X"]
    J["16X32X"] --> K["16X32X"]
    L["16X32X"] --> M["16X32X"]
    N["16X32X"] --> O["16X32X"]
    P["16X32X"] --> Q["16X32X"]
    R["16X32X"] --> S["16X32X"]
    T["16X32X"] --> U["16X32X"]
    V["16X32X"] --> W["16X32X"]
    X["16X32X"] --> Y["16X32X"]
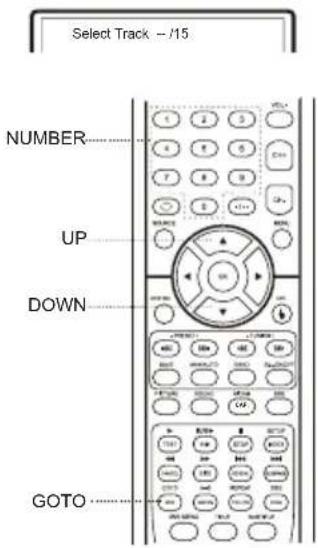
PLAY FROM THE DESIRED POSITION

■ Play DVD disc
- Inputting a certain time, title number or chapter number directly may search in the disc fast and then play forward from this position.
1. Search title and chapter. For instance, search the 2nd chapter in title 6.
- Press [GOTO] button and TV screen displays:

- Press [◀/▶] button to move cursor and lighten the title number, shown in the figure:

- Then press number button 6 to select Title 6, shown in the figure:

- Finally press number button 2 to select Chapter 2, shown in the figure:

2. Search title time
- Press [GOTO] button until TV screen displays the following figure. Then press number buttons to input hour, minute and second.

3. Search chapter time
- Press [GOTO] button until TV screen displays the following figure. Then press number buttons to input hour, minute and second.

■ Play MPEG4 disc
1. Select track
- Press [GOTO] button until TV screen displays the following figure. Then press number buttons to input the track.

2. Search track time
- Press [GOTO] button until TV screen displays the following figure. Then press number buttons to input hour, minute and second.

■ Play SVCD, VCD and CD discs
1. Search disc time
- Press [GOTO] button until TV screen displays the following figure. Then press number buttons to input minute and second.

2. Search track time
- Press [GOTO] button until TV screen displays the following figure. Then press number buttons to input minute and second.

3. Select the track
- Press [GOTO] button until TV screen displays the following figure. Press number buttons to input track.
ZOOMING THE DISPLAYED FRAME

- Zoom in/out the player frame.
- When playing a disc, press the [ZOOM] button can open the zoom in/out function, and the TV screen displays( take X2 mode as an example):
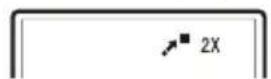
- The frame is magnified to 2 times of the normal size.
- Press the [ZOOM] button continually, all the magnified/ minified modes display on the screen in turn. The magnified/ minified modes includes: X2, X3, X4, X1/2, X1/3, X1/4.
- When the mode is on X1/4, press [ZOOM] button to close the zoom in/out function, and the frame restores normal size.
- When the fame is magnified, press the [▲/▼ ◀/▶] buttons to move the frame.
MPEG4 AND JPEG FILE PLAYING
MPEG4 is the audio standard published by MPEG(Moving Pictures Experts Group) in November, 1998. As the discrepant parts between frames of picture are only processed and the same parts are deleted, the data number are greatly decreased. The most distinct feature of MPEG4 is the high compression and clear imaging. Furthermore, MPEG4 provides elastic specifications to adjust the stream according to the used requirements. The larger stream can be used when collecting private films; and the small stream can be used in network transferring, which make MPEG4 use widely.
JPEG(Joint Photographic Experts Group) is the most widely used picture compression and storage format today. Utilizing high efficiency compression algorithm, JPEG compresses the original picture 15 to 20 times with excellent picture quality. JPEG is featuring small size data, convenient application and supported by most picture processing software, so it is very fit to store photos.
The strong decoding capability of this unit can decode and play the files with the above formats. In the course of playing, an operation menu will appear and its construction is shown as follows.
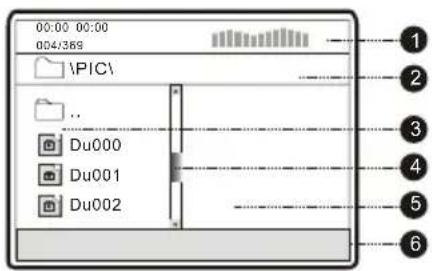
① State window Display the current state information.
② DIR window Display the current path.
③ File window Display the current path's file.
4 Scroll bar window Indicate the current file's position.
5 Preview window JPEG image preview.
⑥ Information window Display the current operation prompts.
The state information in state window is as follows:
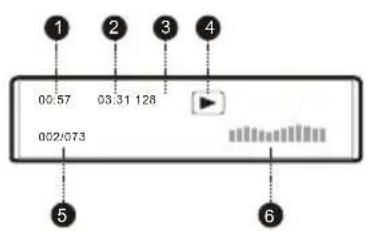
① Elapsed playback time
② Total playback time
③ The audio bit rate (generally the bit rate is 128kbps, sometimes it is VBR.)
4 Current playback mode indicator
⑤ Track indicator
⑥ Dynamic frequency spectrum indicator
1. Play MPEG4 file
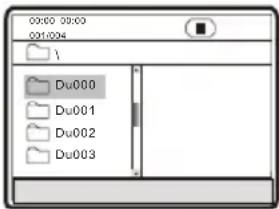
After you put an MPEG4 format file into the unit, it will search disc information and display the operation menu as figure A (The displayed content varies with disc.).
A:
B:
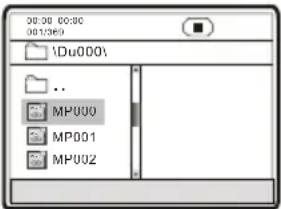
- Press [▲/▼] button to select the directory you desired and press [OK] button to confirm.
For instance, you select the directory Du000 in Figure A, press [OK] button and TV screen displays as in Figure B. The window returns to the previous directory when you select [☐....] or press [◀] button.
- In Figure B, press [▲/▼] button to select the MPEG4 format file you desired and press [OK] button to confirm. The unit begins to play MPEG4 format movie.
2. Play JPEG file
After you put an JPEG format file into the unit, it will search disc information and display the operation menu as in the following figure. After selecting JPEG file, the preview window will appear this file's preview image to facilitate you to select. After you select the JPEG file you desired and press [OK] button to confirm, the picture will display in full screen.
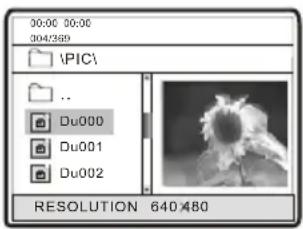
■ Other basic operation methods
1. Press [◀], [▶] button may turn to the next or last page.
■ Other functions of JPEG file
-
When playing JPEG file, pressing [SUBTITLE] button may switch different JPEG display modes which have 16 kinds for selection.
-
When playing JPEG file, press [ZOOM] button to enter zoom in/out, and press it again to stop this function.
-
When in zoom in/out, pressing [▶] button may magnify the picture and it can magnify the frame twice at most as the original one. Pressing [◀] button may minify the picture and it can minify the frame half at most as the original one.
- When playing JPEG file, pressing [STOP] button may realize preview playback function. At the same time, all JPEG files are displayed on TV screen. One frame can display up to 12 pictures at most. The rest ones are shown on the next frame. Pressing [▶] button may enter the next frame and [◀] button may enter the previous frame. You may press number buttons or [▲/▼] button to select the picture you desired and press [OK] button to confirm.
- When in preview playback, pressing [DVD MENU] button may exit preview playback function.
- When playing JPEG file, pressing [▲/▼] button may realize picture rotation button.
NOTE
When buttons are invalid, TV screen displays:
- Please press effective button again.
GENERAL SETUP
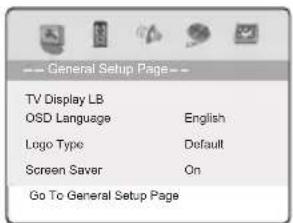
- TV display: this item is used to set the output picture ratio of this unit.
- Optional settings: Normal/Pan-Scan, Normal/Letterbox, Wide Screen; Default: Normal/Letterbox
- OSD language: this item is used to set the information language displayed in the course of playback.
- Optional settings: English, Swdeish; Default: English.
- Logo Type: This item is used to setup the sort of power-on logo.
- Optional settings: Captured, Default; Default: Default.
- Screen Saver: Open or close the screen saver.
- Optional settings: Off, On; Default: On.
NOTE
The screen logo refers that use the image selected by pressing the CAPTURE button as the power-on logo. In the operation of changing screen, if the power-on logo has not set in Screen Logo, the unit will automatically set the power-on logo as screen logo.
SPEAKER SETUP
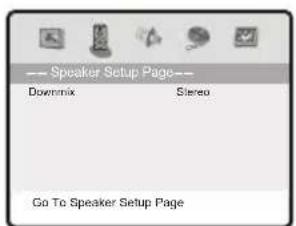
Downmix mode: this item is used to set this unit's DOWNMIX mode to change multi-channel audio into 2-channel audio output.
- Optional settings: Dolby Stereo, Stereo Default: Stereo
AUDIO SETUP
When adjusting some audio setup items, some other audio setup items may be caused to change. This is because these audio setup items cannot be adjusted at the same time, but not the unit trouble.
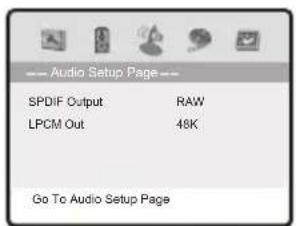
- SPDIF output: this item is used to set the bit stream type of the digital output.
Optional settings: RAW, PCM; Default: RAW
- LPCM output: this item is used to set the output frequency of LPCM audio data to fit for different power amplifiers.
- Optional settings: 48K, 96K, 192K Default: 48K The output frequency is related to the actual signal frequency. The signal of 48K cannot output that of 96K.
VIDEO SETUP
-
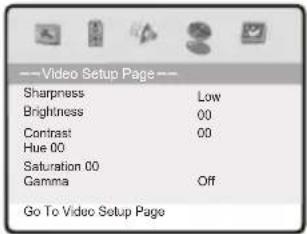
Sharpness: this item is used to set the sharpness of video outputs.
-
Optional settings: High, Medium, Low; Default: Low
- Brightness: this item is used to set the brightness of video outputs.
- Contrast: this item is used to set the contrast of video outputs.
- Hue: this item is used to set the hue of video outputs.
- Saturation: this item is used to set the saturation of video outputs.
● How to adjust brightness, contrast, hue and saturation:
A. In picture setup page, press [▲/▼] button to select the item to be adjusted and press [OK] button to enter the corresponding item adjustment.
B. Press [◀]/button to adjust the setup item.
C. After adjustment finishes, press [OK] button to return to picture setup page.
- Gamma correction: this item is used to set the Gamma value of video output.
- Optional settings: High, Medium, Low, Off; Default: Off
INITIAL SETUP
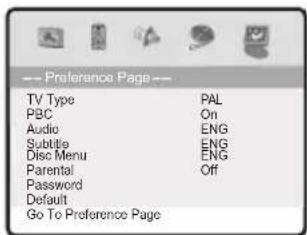
- TV system: this item is used to set the unit's video output system.
- Optional settings: Auto, PAL, NTSC; Default: PAL
-
PBC: this item is used to set PBC state.
-
When playing SVCD, VCD2.0 discs, if PBC is set On, this unit enters PBC playback mode; if PBC is set Off, the unit plays the disc according to track sequence.
-
Optional settings: On, Off; Default: On
-
Audio: this item is used to set the preference audio language when playing.
-
Subtitle: this item is used to set the preference subtitle language when playing.
-
Disc menu language: this item is used to set the preference disc menu language when playing.
-
Default of disc menu language: English
- Default of subtitle: English
NOTE
• Audio, subtitle and disc menu language are only effective to DVD disc.
- If the disc is not recorded with the language you appointed, the unit will apply the language that the disc appointed to play.
- Select other languages: press [▲/▼] button to move cursor to "OTHER" item, press [OK] button and then number buttons to input the language code you desired. After input finishes, press [OK] button again.
- Parental: this item is used to set the parental control ratings to prevent children from watching the restricted contents. (In case the disc supports this function)
- Optional settings: KID SAFE, G, PG, PG 13, PGR, R, NC17, ADULT, Off; Default: Off
NOTE
- When changing the parental control ratings, a password is needed. Please refer to the following password item for details.
- Password: this item is used to set a four digital password to enable you to change the parental control ratings.
Default: 7890
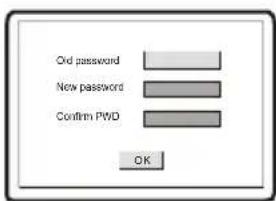
- Default: this item is used to restore all settings to the default value except "Parental control" and Password" in the setup menu."
USAGE OF USB EQUIPMENT AND 3 -IN-1 CARD READER
USB refers to Universal Serial Bus. Most of USB devices on the market are USB1.1 or USB2.0.
Here are some common types of USB 1.1 devices:
Monitors, Communication devices, Audio Human Input Device(HID), Mass storage drives etc.
Most flash memory, USB HDD etc. belongs to Mass Storage Class. Mass Storage Class includes 2 transport manners:
- USB 1.1 Mass Storage Class Control/Bulk/Interrupt (CBI) Transport
- USB 1.1 Mass Storage Class Bulk-Only Transport
This unit supports USB 1.1 Mass Storage Class Bulk-Only Transport.
When using USB 1.1 Mass Storage Class Bulk-Only Transport devices, please notice that the file operation system supports Windows FAT ,not support FAT32 and NTFS etc file system.
The 3-in-1 card reader of this player can read SD Card (Secure Digital Card), MMC Card (Multi Media Card) MS Card (Memory Stick Card).
Important: Before you use the USB or card reader function, you should change the input source of the set to DVD.
1. Using USB Equipment:
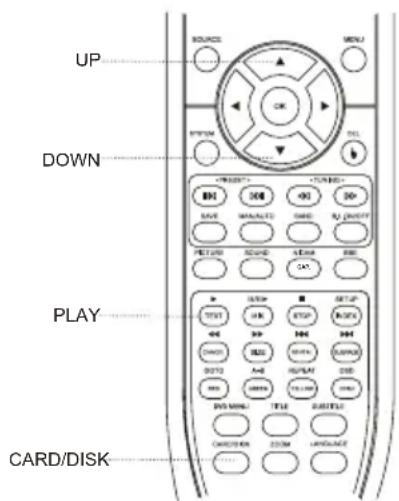
Please insert USB equipment into the USB jack of this unit then press[CARD/DISK] button and a selection menu appears on screen. You may press [CARD/DISK] or [\/▼ ] button to select. If the cursor stops in "USB" item, you may press [OK] or [PLAY] button to confirm selection. After correctly reading USB equipment data, the screen will display an operation menu.
Please refer to the part of "MPEG4 and JPEG FILE PLAYBACK" in page 35 for details.
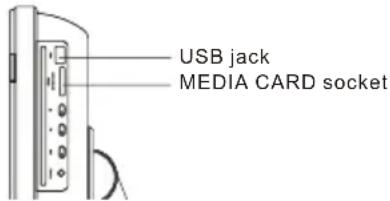
2. Play 3-in-1 CARD READER
Please insert any FLASH card supported by this player into the port of card reader, then press [CARD/DISK] button and a selection menu appears on screen. You may press [CARD/DISK] or [▲/▼] button to select.
If the cursor stops in "CARD READER" item, you may Press [OK] or [PLAY] button to confirm. After correctly Reading card data, the screen will display an operation Menu. Please refer to the part of "MPEG4, and JPEG FILE PLAYBACK" in page 35 for details.
After pressing [CARD/DISK] button to display the selection menu, if you do not want to switch equipment, please move cursor to the original one, and then press [OK], [PLAY] or [CARD/DISK] button, or wait until the menu disappears automatically.
If you want to use the DVD function, please select "DVD" through the above-mentioned procedure steps to exit USB and card reader functions.
NOTE
- This unit can connect with USB equipment and MPEG4 and JPEG files in SD, MMC and MS cards.
- When reading MPEG files with large size via USB equipment and media card, pause may appear briefly.
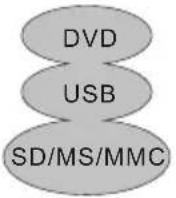
- If USB equipment or media card have no files, on-screen appears "Empty Device", and does not display operation menu. If USB equipment and media card have a problem, or the operation is incorrect, the screen appears "Device Error". Please check USB equipment and media card, or else unplug them then re-insert.
- If a USB device or media card which are unsupported by the machine have been connected, the unit may 'lock-up' and not respond to commands. In this event please switch off the power, take out USB equipment or media card, and then switch the power back on to reset the machine.
N.B This unit does not support USB On The Go (OTG) technology, so any devices using OTG data exchange may not work correctly. Check this out before operation.
- When inserting a media card, you should insert it in the right direction: If you are facing the TV screen, make sure you plug-in the card with its connector facing away from you.
- When the media is invalid, the TV screen displays:
natural_image
Simple geometric diagram with a circle and diagonal line, no text or symbols presentPress the effective button again.
With radio and RDS decoder built in, you can enjoy radio programs using this unit.
RADIO
When in radio mode, press [MENU] button and a menu will show as follows:
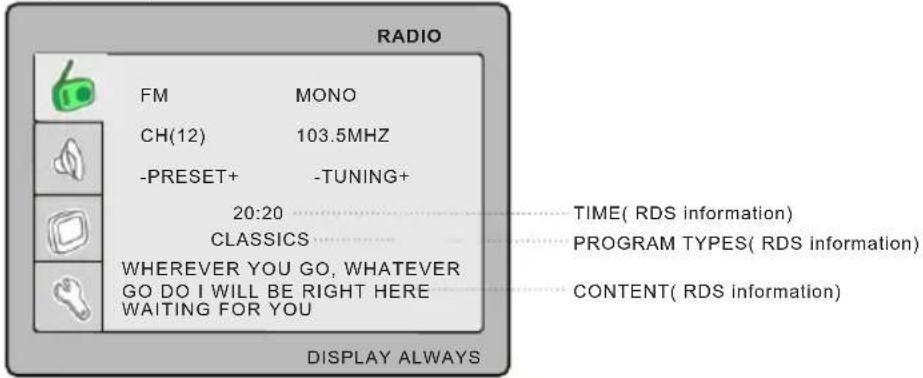
| Item Description | |
| FM/AM | Here shows the program information .You can switch between AM and FM by pressing [ BAND] button . |
| CH | Here shows the channel and the frequency of it. Channels can be changed by pressing [ PRESET+/PRESET-] buttons. |
| -PRESET+ | Press [PRESET+/PRESET-] buttons to recall saved program |
| -TUNING+ | Short press [TUNING+/TUNING-] buttons once to fine tune frequency, and long press to start scanning . |
NOTES
- If the program you are listening to is in FM with stereo, by pressing [MAN/AUTO] button, you can switch between mono and stereo.
● You can store up to 20 programs in AM and in FM.
● The RDS information will display automatically in the section like above picture if there are RDS information in the radio program. You do not need to do any operation, and it will show always.
● Auto scanning function:
When in AM/FM mode, press "SAVE" button, then long press "TUNING-" or "TUNING+" buttons immediately, the backward or forward scanning will start automatically and roll back to the point where the auto scanning starts. The programs found will be saved as the preset programs.
● Manual scanning function:
When in AM/FM mode, long press "TUNING-" or "TUNING+" buttons, the backward or forward scanning will start and will stop when there are program found. You can save this program to current channel by pressing "SAVE" button.
Note: When you just saved a program to current channel, long press "TUNING-" or "TUNING+" buttons immediately will start auto scanning.
- Up to 20 programs can be preset/stored, and you can recall them in 2 ways:
Method 1.
For programs 1 \~ 9, press the number buttons on remote control to access them.
For programs 10 \~19, press "-/--" first, then press "0 \~ 9" to access to them;
For channel 20, just press "-/--" twice to access to it.
Method 2.
You can press "preset-/preset+" to access the preset programs one by one.
During scanning, you can press [MENU] button to stop it.
- Program delete function:
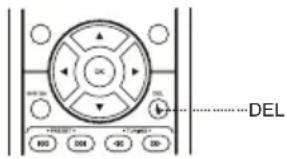
With this function, you can choose any unwanted program (for example: signal is weak) to delete. If you don't like the program you are listening to, you can delete it by pressing [DEL] button. After you delete a program, the program after the deleted one will fill it in. For example: The program in channel 3 is one that you don't like, but the preset channel 4 is one that you do, You can delete the channel 3 by press [DEL] button when tuned to channel 3. When the channel 3 is deleted, the program of channel 4 will fill in channel 3, and the program of channel 5 will fill in channel 4, etc, the channel 20 will fill in channel 19.
SCREEN ON /OFF
If you are using the radio function, you can turn off the screen/panel by pressing [B.L.ON/OFF]button, so as to save power. Press [B.L.ON/OFF] button again to turn on the screen back on.
SOUND
In main section press [▲/▼] button to select", press [▶/OK] button to enter.
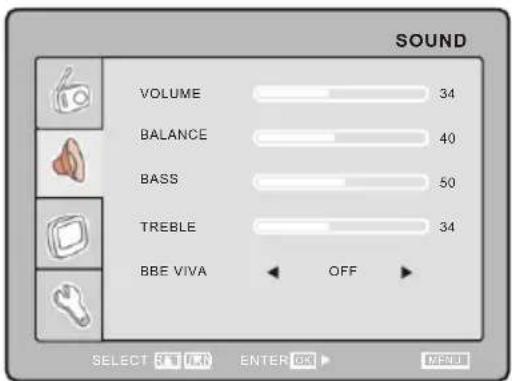
The operation of sound options here is the same as that in TV mode. Please refer to P10.
FUNCTION
Press [▲/▼] button to select " 🔍" and press [▶] or [OK] button to enter.
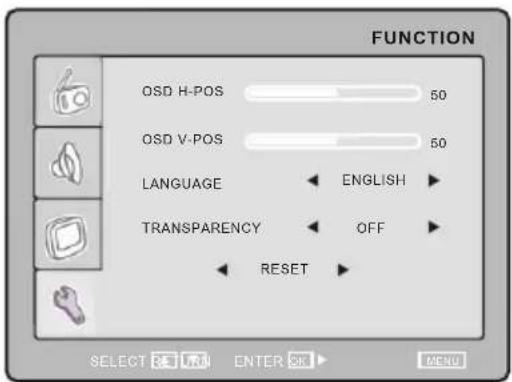
The operation of function options here is the same as that in VGA mode. Please refer to P21.
TIME SETTING
At any display mode you press [TIME] button, calendar will show on the screen,
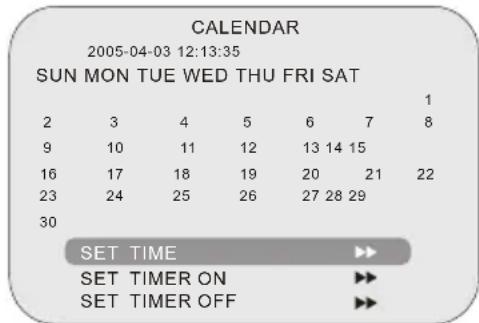
BOX WITH SET TIME ETC.
| Item | Description |
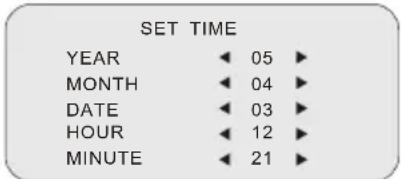
| SET TIME | Press [OK] button to go to the set time sub menu. |
| SET TIMER ON | Press [▶/OK] button to go to the set timer on sub menu. |
| SET TIMER OFF | Press [▶/OK] button to go to the set timer off sub menu. |
Use [▲/▼] button to choose which value to change and use [◀/▶] button to change it. When new value is set, press [TIME] or [OK] button to exit and the value will be saved immediately.
With it's "TIMER ON" function, you can set this unit to come on at a certain time from standby mode. You can access the "SET TIMER ON" sub-menu by pressing [▶ /OK] button whilst cursor is pointing at "SET TIMER ON". There are 3 items in this sub-section.
You can set two separate timers for automatic power on, which means you can power on your LCD TV twice a day automatically.
You can set the hour and minute for auto power on here.
- HOUR 1 and MINUTE 1 set for the TIMER 1 for auto power on, ACTIVATE 1 can be set for activate setting for TIMER 1.
- You can choose ON/OFF and ONCE on ACTIVATE 1. When ON is selected, timer 1 will always enable auto powering on . When you select OFF ,timer function will be disable .If you select "ONCE", timer 1 will enable auto powering on and, after it powers on automatically for the first time, the setting will go to "OFF" autom
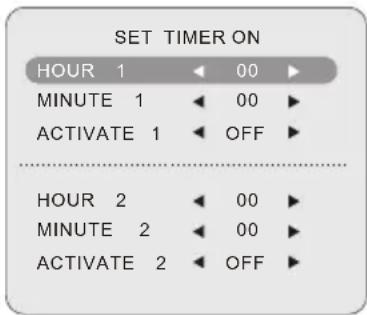
HOUR 2 and MINUTE 2 set for the TIMER 2 for auto power on ,ACTIVATE 2 can be set for activate setting for TIMER 2.
● You can choose ON/OFF and ONCE on ACTIVATE 2.
- When ON is selected, timer 2 will always enable auto powering on. When you select OFF, timer function will be disable. If you select "ONCE", timer 2 will enable auto powering on and, after it powers on automatically for the first time, the setting will go to "OFF" automatically.
With TIMER OFF function, this unit can power off by itself at a certain time from working mode. You can go into "SET TIMER OFF" sub menu by pressing [ ◀/ ▶/OK] buttons when cursor
pointing at "SET TIMER OFF". There are 3 items in it.
● You can set the hour and minute for auto powering on here
● And you can set the TIMER OFF function activate option here. You can choose "ON/OFF" and ONCE here."
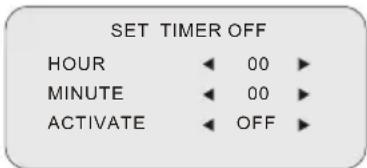
When ON 's selected', timer will always enable auto powering off. When users select OFF, timer will disable powering off.
If you select "ONCE", timer will enable auto powering off and, after it powers off automatically for the first time, the setting will go to "OFF" automatically.
NOTE
- When you have set the "TIMER OFF" activated, a message will show when it is 1 minute left for powering off like:" STANDBY : 59S". If you press [TIME] button during this status, you can cancel the power off this time. When the number is decreased to 0, this unit will go to standby mode automatically.
- When you set the ACTIVATE ON or ONCE, and the calendar's time comes to the timer's value, power on and power off event will occur; For example: If you set the POWER ON TIMER to 9:00, ACTIVATE ON, then when time in calendar goes to 9:00, this unit will power on from standby mode automatically.
Please check for causes of problems in accordance with the following chart before contacting any maintenance personnel.
DISPLAY TROUBLESHOOTING
| Symptom | Causes and Correction |
| Black screen, power indicator light off | ◆ Check whether power cord is well connected, and whether this unit is power on |
| ◆ Check whether the signal cord of input device is well connected◆ Check whether input device is power on | |
| Image display flicker, unstable | ◆ Check whether the input device signal is in this unit's specification |
| ◆ Check computer output mode: control panel-display-setup◆ If the setup does not accord with this unit's specification, please change the display setup | |
| ◆ Hor scanning frequency: 30kHz~75kHz◆ Ver scanning frequency: 50 Hz~ 75Hz◆ Max display mode: 15":1024X768 75 Hz@ |
SOUND AND TV TROUBLESHOOTING
| Symptom | Causes and Correction |
| Cannot power on | ◆ Please make sure the well connecting of power cord |
| No sound | ◆ Please make sure the well connecting of audio cord |
| ◆ Check volume | |
| ◆ Make sure there is nothing plugged in the headphone jack | |
| Volume too low | ◆ Check volume |
| ◆ If volume is still too low when adjusting volume to maximum, please check whether the input device is well set | |
| Snowy picture | ◆ Input antenna damaged or not well connected |
| Remote control failure | ◆ Check whether remote control battery used up ◆ Whether battery installation is correct ◆ Whether obstacles exists between remote control and the unit's receiving window ◆ Check whether receiving window has strong light |
DVD TROUBLESHOOTING
| Symptom | Causes | Correction |
| Not play | 1. Condensation on laser head2. Disc not properly loaded3. Disc not compatible with the unit | 1. Switch on power and wait for 1 to 2 hours2. Make sure label side of the disc facing up3. Confirm whether this unit compatible with the placed disc |
| Sound distortion | 1. Too large volume of connected device2. Sound field mode not suitable for disc | 1. Adjust the device volume2. Adjust appropriate sound field |
| No sound | 1. Disc warped or dirty2. The unit in mute state | 1. Clean the disc2. Press MUTE button to cancel it. |
| No image | 1. TV not set for proper system | 1. Reset AV/TV state of TV |
| No color | 1. TV system not right2. TV color not well adjusted | 1. Press P/N button on remote control to set2. Reset the TV color |
| No disc reading | 1. Disc warped or dirty2. Disc not correctly placed3. Condensation on laser head | 1. Clean the disc2. Reload a disc with label side facing up3. Witch on power, unload disc and leave it for about 1 hour |
| Temporary function failure | 1. Mal-fabricated disc used2. Wrong buttons pressed3. Static leakage into the unit from outside | 1. Wait for 5 to 10 seconds to restore to normality automatically2. Operate again3. Power off for 1 to 2 minutes to power on again |
| No subtitle | 1. No subtitle made in disc2. The unit subtitle is turned off | 1. Disc problem2. Press SUBTITLE button to select it |
| Image rolling | 1. System setup not suitable for disc | 1. Adjust system mode |
- If the above methods still cannot solve the problems or the troubles are special, please contact the local maintenance personnel.
| ◆LCD screen | SizeDisplay proportionTypePixel distanceView angle | 15.0"(diagonal)304.1 mm(H)X228.0 mm(V)TFT color0.297 mm(H)X0.297mm( V)60(L)/60(R)/40(T)/60(B) |
| ◆Frequency | Hor scanning frequencyVer scanning frequencyDisplay color | 30kHz~75kHz50 Hz~75 Hz16.7M (color) |
| ◆Display mode | Recommended modeMax mode | 1024X768@75 Hz |
| Panel Life | Hours | 50,000 |
| Input signal | Synchronous signalVideo signal | H/V separation, TTL positive/negativeH/V composite, TTL positive/negativeGreen synchronous, 0.3Vp p,negative0.7 Vp_p@75ohm |
| TV/Video | Image systemAudio systemVideo form | PAL/SECAM/NTSC(In video mode)DK/I/BG/LCVBS、S-VHS, RGB, YPbPr, VGA |
| Power Supply | Adapter inputAdapter output | ~ 100V-240V (50/60 Hz)= 12V/4.5A |
| Power | NormalStandby mode | 43WLess than 3W |
| Unit/net weight LXWXH ) | 438.7mmX163.1mmX295.7mm/7.4kg | |
| Environmental factor | Working temperatureWorking humidityStoring temperatureStoring humidity | 5°C5 ~ °C10% 80%~-20°C45~ °C5% 95%~ |
| Audio parameter | Audio inputFrequency response | Φ3.5 jack(L,R), 0.5±0.3 VrmsTV signal: 100 Hz 12 kHz(-3dB)~AV: 100 Hz 15 kHz (-3dB)~ |
| DVD | Disc type | DVD VIDEOMPEG4*; SVCD**VCD1.0, 1.1, 2.0 version; CD-DA |
| Output | Analog audio output, coaxial digital audio Output, composite video output | |
| Radio | AM frequency range | 530kHz~1710kHz |
| FM frequency range | 87.5MHz~108MHz | |
Hint: the items with "◆" symbol are related to LCD screen. Specifications and design are subject to change without notice.
* Some discs labelled with MPEG 4 on the market actually are *.rm/*.ram/*.rmm and others which are not compatible. Please take care when buying discs.
** This unit cannot play some SVCD discs with VCD format.
- Because of disc quality and format difference, we cannot make sure smoothly read all discs; some functions cannot be fulfilled for the disc speciality, but not machine trouble.
● As for weight and size, please take actual object as standard.
| SUPPORTED PC INPUT MODE | ||||
| Resolution | Hor scanning frequency (KHz) | Ver scanning frequency (Hz) | Pixel frequency (MHz) | Format |
| 640×350 | 31.5 | 70.0 | 25.17 | DOS |
| 720×400 | 31.5 70.0 | 28.32 | DOS | |
| 640×480 | 31.5 60.0 | 25.18 | DOS | |
| 640×480 | 37.9 72.0 | 31.50 | VESA | |
| 640×480 | 37.5 75.0 | 31.50 | VESA | |
| 800×600 | 35.1 56.2 | 36.00 | VESA | |
| 800×600 | 37.9 60.0 | 40.00 | VESA | |
| 800×600 | 48.1 72.0 | 50.00 | VESA | |
| 800×600 | 46.9 75.0 | 49.50 | VESA | |
| 1024×768 | 48.4 60.0 | 65.00 | VESA | |
| 1024×768 | 56.5 | 70.11 | 75.00 | VESA |
| 1024×768 60.0 | 75.0 | 78.75 | VESA | |
NOTES
- This product does not support the display mode not listed above. In order to achieve the best display effect, please select the above-listed 12 display modes input signal.
- Because of the difference of display card output signal (especially non-standard signal output), the display image may appear little disturbance which can be adjusted through "AUTO CONFIG" in the "PICTURE" menu by users.
- To prolong this unit's service life, you are suggested to use power management function of computer.
| SUPPORTED VIDEO INPUT MODE | |||
| Format | Ver scanning frequency | Ver scanning frequency | |
| 720X480 31.47 | 59.94 480P | ||
| 720X480 | 15.734 | 59.94 480i | |
| 720X576 | 31.25 | 50 576P | |
| 720X576 15.625 | 50 576i | ||
NOTE
Specifications and design are subject to change without notice.
Please check the following accessories.
 | 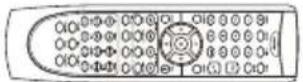  |
| User manual | Remote control and battery |
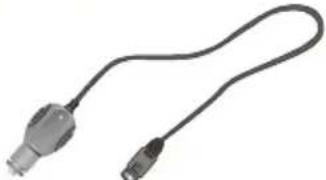 | 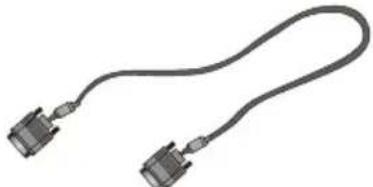 |
| Automotive Power socket adapter | VGA cord(optional) |
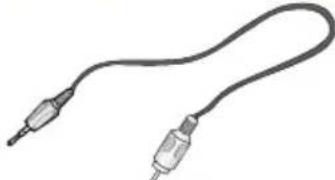 |  |
| Coaxial digital audio cord | Power adapter |
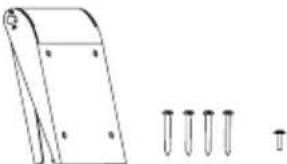 | 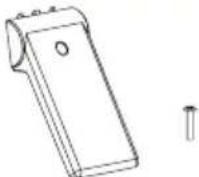 |
| Wall Mount Holder Kit(optional) | Kickstand Kit |
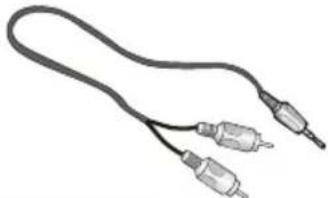 | 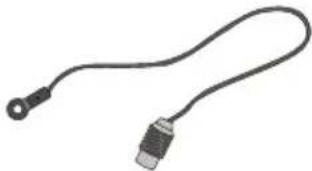 |
| Audio cord | FM antenna |
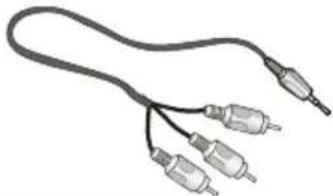 | 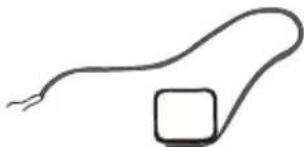 |
| AV cord | AM antenna |
- CONTENT
- INSTALLATION
- PANEL BUTTON FUNCTIONS
- EXTERNAL EQUIPMENT
- REMOTE CONTROL HANDSET
- LET'S START
- TV MENU SETUP
- TELETEXT FUNCTION
- AV, S-VIDEO, SCART AND YPbPr SETUP
- VGA SETUP
- DVD OPERATION
- DVD FUNCTION SETUP
- RADIO OPERATION
- TIME SETTINGS
- TROUBLE SHOOTING
- SPECIFICATIONS
- DISPLAY MODE
- NORMAL INSTALLATION
- FRONT PANEL
- LEFT PANEL
- RIGHT PANEL
- REAR PANEL
- CONNECTING DIAGRAM
- NOTE
- REMOTE BUTTONS
- BATTERY INSTALLATION
- BATTERY LIFE
- NOTES
- CAUTION:
- PICTURE
- SOUND
- TV SETTING
- SYSTEM SETTING
- TELETEXT DISPLAY
- PAGE SELECTION
- MIX MODE
- LOCK
- INDEX
- ZOOM IN TELETEXT
- SUBPAGE
- VIDEO SETTING MENU
- MONITOR SETTING
- FUNCTION
- Brief Introduction
- Function Introduction
- Features
- Brand-new AV Effects
- ■ High Quality Digital Audio
- ■ Convenient Functions
- PLAYBACK
- SELECT TV SYSTEM
- PAUSE/STEP PLAYBACK
- OSD
- VOLUME CONTROL
- DVD MENU PLAYBACK
- VCD, SVCD MENU PLAYBACK
- DIRECT PLAY
- CHANGE POWER-ON LOGO FREELY
- MEMORY
- SELECT TRACK TO PLAY DIRECTLY BY NUMBER BUTTONS
- SELECT LANGUAGE/AUDIO
- REPEAT PLAYBACK
- Press [REPEAT] button. Each press of REPEAT button may realize different repeat functions.
- ■ DVD DISC:
- ■ SVCD, VCD, CD discs:
- REPEAT PLAYBACK OF SELECTED SEGMENT
- In normal playback, press [A-B] button at the beginning point (point A) of the segment that you desire to play repeatedly.
- In normal playback, press [A-B] button at the ending point (point B) of the segment that you desire to play repeatedly.
- Press [A-B] button for the third time.
- SELECT SUBTITLE
- Press [SUBTITLE] button.
- FAST PLAYBACK
- Press [→button and the unit begins fast forward playback.
- Press [◀button and the unit begins fast backward playback.
- PLAY FROM THE DESIRED POSITION
- ■ Play DVD disc
- Search title and chapter. For instance, search the 2nd chapter in title 6.
- Search title time
- Search chapter time
- Select track
- Search track time
- Search disc time
- Select the track
- ZOOMING THE DISPLAYED FRAME
- MPEG4 AND JPEG FILE PLAYING
- Play MPEG4 file
- Play JPEG file
- GENERAL SETUP
- SPEAKER SETUP
- AUDIO SETUP
- VIDEO SETUP
- INITIAL SETUP
- USAGE OF USB EQUIPMENT AND 3 -IN-1 CARD READER
- Using USB Equipment:
- Play 3-in-1 CARD READER
- RADIO
- SCREEN ON /OFF
- TIME SETTING
Brand : OPPO
Model : LT 1509
Category : TV