
Cosmopolit 3F plus WEB - Radio GRUNDIG - Free user manual and instructions
Find the device manual for free Cosmopolit 3F plus WEB GRUNDIG in PDF.


| Product Type | Radio with Internet Connectivity |
| Brand | Grundig |
| Model | Cosmopolit 3F plus WEB |
| Dimensions (W x H x D) | 250 x 150 x 100 mm |
| Weight | 1.2 kg |
| Power Supply | AC 230V, 50Hz or 6 x AA batteries (not included) |
| Power Consumption | 15 W (max) |
| Frequency Bands | FM (87.5-108 MHz), AM/MW (520-1710 kHz), DAB+ (174-240 MHz) |
| Internet Radio | Yes (via Wi-Fi, IEEE 802.11 b/g/n) |
| Preset Stations | 30 (FM/AM/DAB+), 15 (Internet radio) |
| Alarm Clock | Yes, dual alarm with snooze |
| Sleep Timer | Yes, adjustable 15-120 minutes |
| Display | LCD with backlight, 2 lines |
| Audio Output | Built-in stereo speaker, 3W RMS |
| Headphone Jack | 3.5 mm stereo |
| USB Port | USB-A for media playback (MP3/WMA) |
| Antenna | Telescopic (FM/DAB+), internal ferrite (AM) |
| Maintenance and Cleaning | Wipe with a soft, dry cloth. Avoid solvents and water ingress. |
| Safety Precautions | Operate only in dry indoor environments. Do not expose to rain or moisture. Unplug during thunderstorms. |
| Spare Parts and Repairability | Spare parts available through Grundig service centers. Repairs should be carried out by qualified personnel. |
Frequently Asked Questions - Cosmopolit 3F plus WEB GRUNDIG
User questions about Cosmopolit 3F plus WEB GRUNDIG
0 question about this device. Answer the ones you know or ask your own.
Ask a new question about this device
Download the instructions for your Radio in PDF format for free! Find your manual Cosmopolit 3F plus WEB - GRUNDIG and take your electronic device back in hand. On this page are published all the documents necessary for the use of your device. Cosmopolit 3F plus WEB by GRUNDIG.
USER MANUAL Cosmopolit 3F plus WEB GRUNDIG
6 The device controls
9 The remote control
11 The display
12 CONNECTION AND PREPARATION
12 Connecting external devices
12 Connecting an MP3 player or a USB memory stick
12 Connecting the headphones
13 LAN connection to the internet
13 WLAN connection to the internet
14 Connecting to the mains supply
14 Putting battery in the remote control
15 JOG-SHUTTLE
15 Functions and operation using the Jog-Shuttle on the device
15 The functions
15 Example - Setting the time and date automatically
16 SETTINGS
16 Menu navigation
16 First Installation using the installation assistant "Wizard"
18 Searching for and saving DAB stations
20 Searching for and saving FM stations
20 Setting the sound effect "My EQ"
22 GENERAL FUNCTIONS
22 Switching on and off
22 Selecting the input source
22 Adjusting the volume
22 Selecting sound settings
22 Muting
22 Setting stereo or mono reception (only in FM radio mode)
23 INTERNET RADIO MODE
23 Listening to an Internet radio station
23 Selecting the internet radio stations' input source
23 Selecting Internet radio stations according to search criteria
25 Storing Internet radio stations on presets
25 Opening preset Internet stations
26 Opening the most recently selected Internet stations
26 Displaying information about Internet radio stations
26 Listening to a Podcast
27 INTERNET RADIO TUNING SERVICE
27 Registering on the GRUNDIG homepage
27 Creating lists of favourites
30 SHARED MEDIA MODE
30 Shared media server (audio streaming)
30 Selecting the shared media input source
30 Other playback functions
30 Playlist
31 Playback of media and "remote control" of Cosmopolit via the PC
33 USB MODE
33 Playing the contents of a USB memory stick
33 Pausing and resuming playback
33 Selecting another track
33 Searching for a passage within a file or track
34 Repeating all files or tracks (Repeat All)
34 Playing tracks in random order
35 DAB MODE
35 Selecting the DAB input source
35 Selecting a DAB station - from the station list
35 Selecting a DAB station - from presets
35 Selecting a DAB station – from the favourites list
35 Displaying DAB station information
36 FM MODE
36 Selecting the tuner input source
36 Selecting stations - from presets
36 Selecting stations - from the list Recall Preset
36 Stereo and mono reception
36 Displaying RDS station information
37 AUX MODE
37 Listening to an external source
38 TIMER MODE
38 Switch-on timer
39 Sleep timer
40 SPECIAL SETTINGS
40 Displaying Software and ID information
40 Displaying information and network status
40 Installing an additional network
41 Setting the WLAN region
41 Deleting servers which cannot be accessed
42 Registering the device with the WLAN router with individual network settings
44 Setting the time, time zone and date manually
44 Updating the device software
45 Changing the menu language
45 Restoring the default settings (reset)
46 INFORMATION
46 Glossary
48 Licence conditions
48 "Real enabled" licence conditions for end users
48 Venice 6.2 licence conditions for end users
49 USBware from Jungo Ltd.
52 Cleaning the device
52 Environmental note
52 Technical data
53 Troubleshooting
53 General Faults
54 Internet faults
54 Messages from the device
Packing contents
Cosmopolit 3F+ WEB
Remote control
2 batteries (Micro, R 03 /UM 4/AAA, 2x1,5V)
Operating manual
Mains adapter 6 V, 1800 mA
Special features
Your device provides access to numerous internet radio stations via a router. You can connect the device to the internet using a LAN cable or WLAN.
For Internet operation, a DSL connection and DSL flat rate are recommended.
Music titles archived on a PC or hard drive (NAS - Network Attached Storage) can be played on the device using a UPnP server or enabled folders via LAN or WLAN (audio streaming).
The cosmopolit supports the industry standard DLNA (Digital Living Network Alliance) 1.5 digital media renderer.
This allows you to "Play To" other devices around your home and combine media streaming with controlling a connected media receiver while streaming content to it from another Windows 7 PC on a home network.
In addition to the Internet radio stations the device receives also DAB and FM radio stations.
The MP3 and WMA music data formats can also be played back via the USB input using a USB memory stick or an MP3 player.
Use the Aux input to connect any other audio sources.
Please note the following instructions when setting up the system:
7 The device is designed for the playback of audio signals. Any other use is expressly prohibited.
7 If you want to set up the device on wall shelves or in cupboards, please ensure that it is adequately ventilated. There must be at least 10 cm of space at the side, above and behind the device.
7 Do not cover the device with newspapers, table cloths, curtains, etc.
When setting up the device, remember that furniture is often coated with various types of varnish and plastic, which often contain chemical additives. These additives may cause corrosion to the feet of the unit. This may leave stains on the surface of the furniture which can be difficult or impossible to remove.
7 If the device is exposed to sudden changes in temperature, for example when taken from the cold into a warm room, wait at least two hours before using it.
7 The device is designed for use in dry rooms. If you do use it outdoors, make sure it is protected from moisture such as dripping or splashing water.
7 Only use the device in a moderate climate.
Do not place the device close to heating units or in direct sunlight, as this will impair cooling.
Do not place any vessels containing liquids, such as vases, on the device.
7 Do not place any objects such as burning candles on the device.
7 Thunderstorms are a danger to all electrical devices. Even if the device is switched off, it can be damaged by a lightning strike to the mains or the antenna cable. Always disconnect the mains during a storm.
Continuous use at high volume level can cause damage to the user's hearing.
If malfunctions occur due to static electricity charges or brief mains voltage surges, reset the device. To do this, pull out the mains adapter and connect it again after a few seconds.
Do not open the device casing under any circumstances. Warranty claims are excluded for damage resulting from improper handling.
When the main plug or an appliance coupler is used as the disconnect device, the disconnect device shall remain readily operable.
Note:
7 Do not connect any other equipment while the device is switched on.
7 Switch off the other devices as well before connecting them.
7 Only plug the device into the mains socket after you have connected the external devices.
7 Make sure the power plug is freely accessible.
The device controls
The front of the device
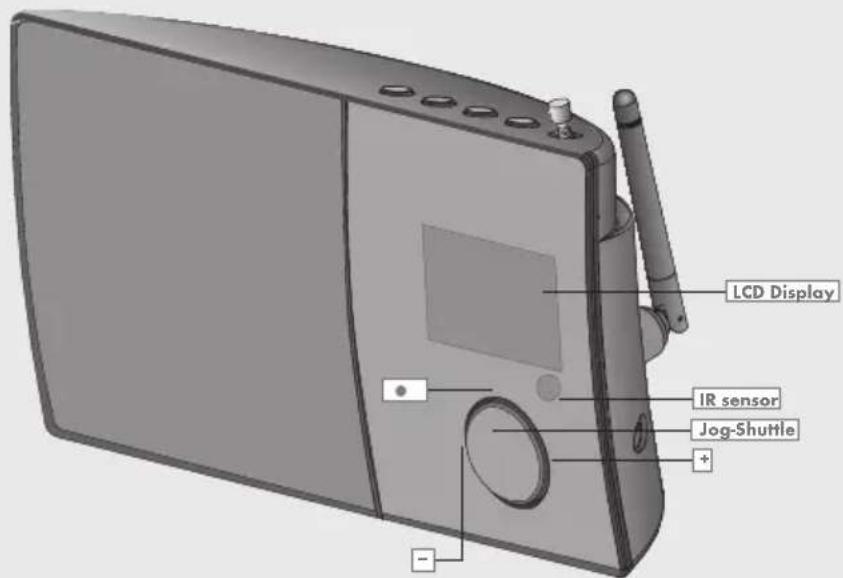
Jog-Shuttle
Rotate the Jog-Shuttle to set and to confirm the preferred options.
Press to activate and confirm the functions and the menus. For more details, please see "Jog-Shuttle" section.
- + Turn left or right to select
menu options or to adjust the volume.
- Press for confirming the selected option.

Display of the device, for
more details, please see "The device displays" section.

Infrared sensor for remote
control signals.
The top of the device
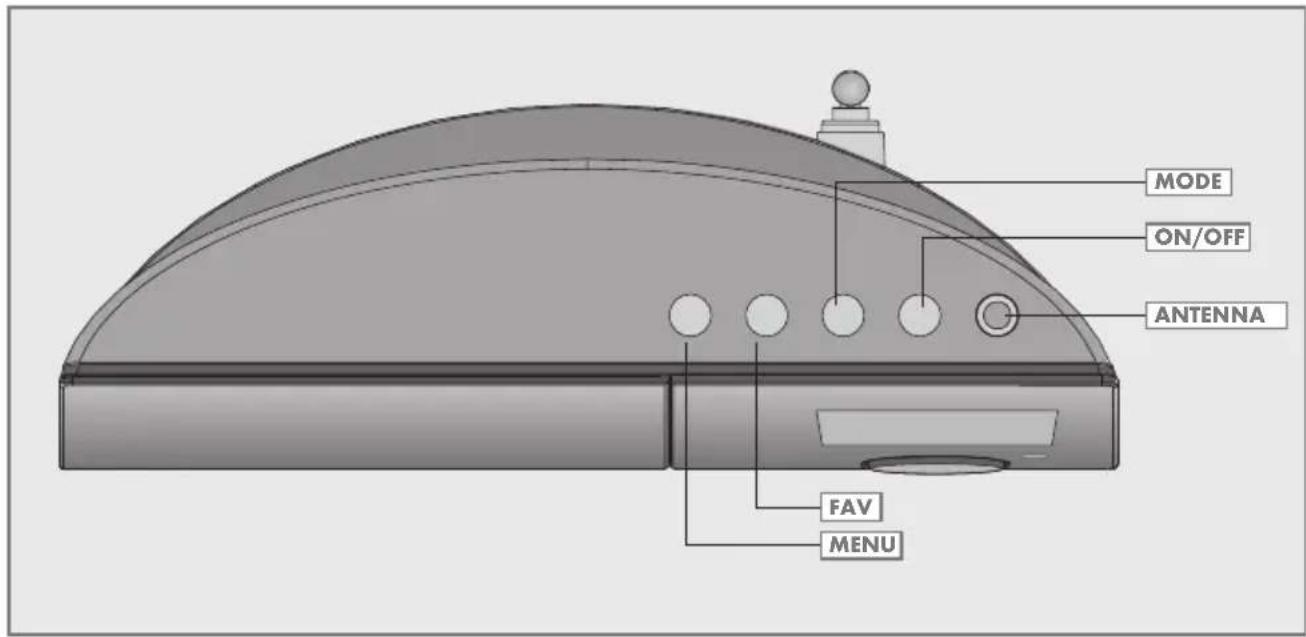
MENU Opens the main menu and main screen which shows time, date and information line. Switches back to the previous menu option in the menu.
FAV Stores a station as a preset and opens the preset menu.
MODE Selects the different audio sources for Internet radio, Music player, DAB radio, FM radio and Aux In modes.
ON/OFF Switches the device to and from standby mode.
ANTENNA Telescopic antenna for DAB and FM reception.
The back of the device
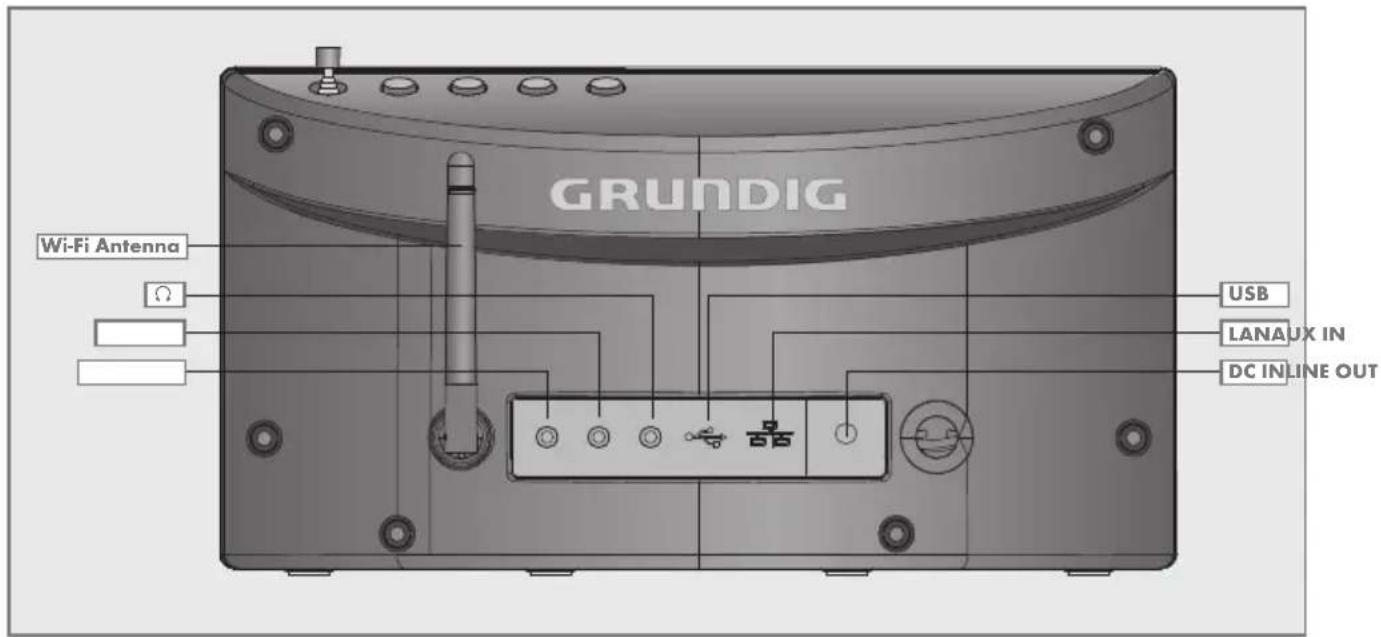
Wi-Fi Antenna for wireless internet
ANTENNA reception.
LINE OUT Audio signal output for connecting to an external source.
AUX IN Audio signal input for connecting an external source.
Headphone socket for connecting a stereo headphone set with a jack plug (ø 3.5 mm). This automatically switches off the loudspeakers.
USB USB port type A. For connecting MP3 player, a USB memory stick or a card-reading device.
LAN LAN socket for connecting to internet.
LED Network status display.
Green/Yellow
DC IN For connecting the power supply unit.
Note
■ The only way to fully disconnect the device from the mains is to pull out the plug.
The remote control
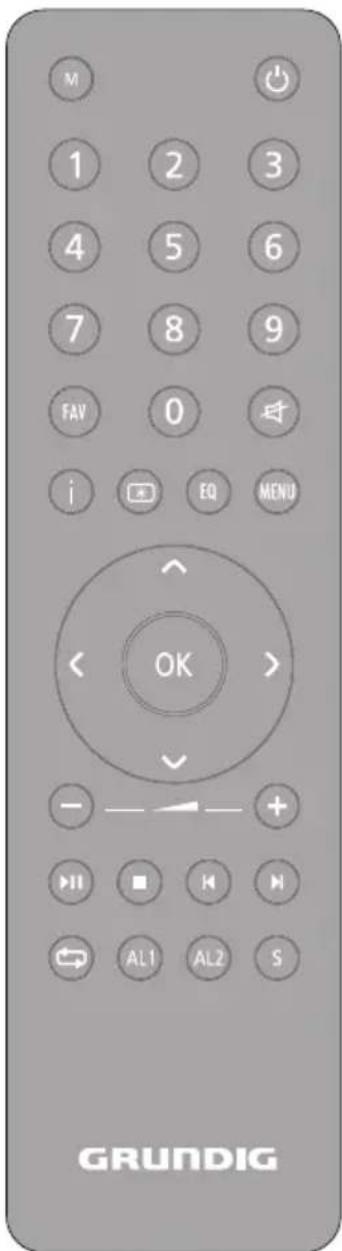
Switches the device to standby mode and from standby mode to the last input source selected.
M Selects the audio sources for Internet radio, Music player, DAB radio, FM radio and Aux In modes.
1-0 Number buttons, stores and selects presets for Internet, DAB and FM stations (in Internet and tuner mode).
FAV Stores a station as a preset and opens the preset menu.
Switches the loudspeaker of the device to mute and back on again.
i Displays information on the Internet, DAB and FM radio stations as well as when using the music archive.
Changes the brightness of display to one of the three levels (bright, medium, dim).
MENU Opens the main menu (depending on the operating mode selected) and switches back to the display for the time, date and other information.
√ / ^ Moves the cursor in the menu up or down. In radio mode: Switches the frequency backwards or forwards in 50 kHz steps.
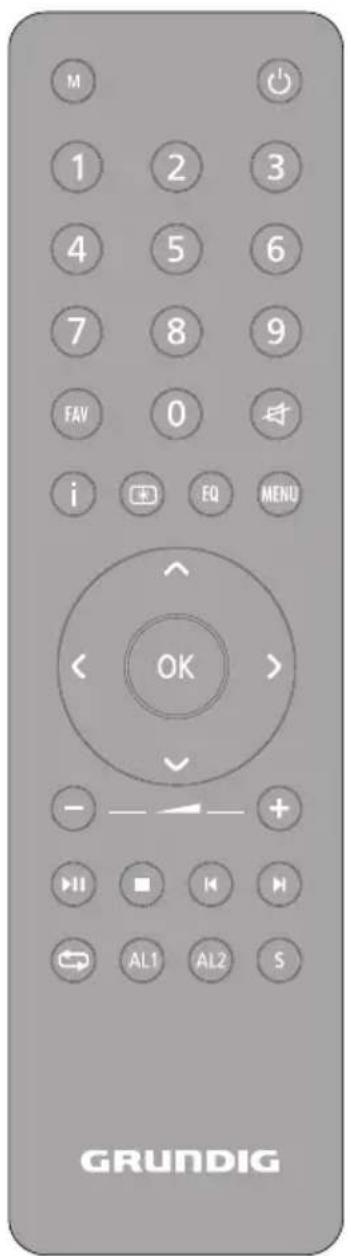
Switches in the menu one step forwards.
< Switches in the menu one step backwards.
OK Confirms selected option.
- + Sets the volume.
▶ II Starts and pauses playback.
Interrupts the playback (in USB mode).
In FM radio mode: Press to start the station search, it stops when a station is found. In USB mode: Briefly press to search backwards or forwards for files or tracks; press and hold to search backwards and forwards for a certain passage of a track.
In USB mode: Repeats all files or tracks in the current list.
AL1 AL2 Opens Alarm 1 or Alarm 2 menu. When the timer is sounding, stops the timer signal.
S Sets and deactivates the sleep timer.
The display
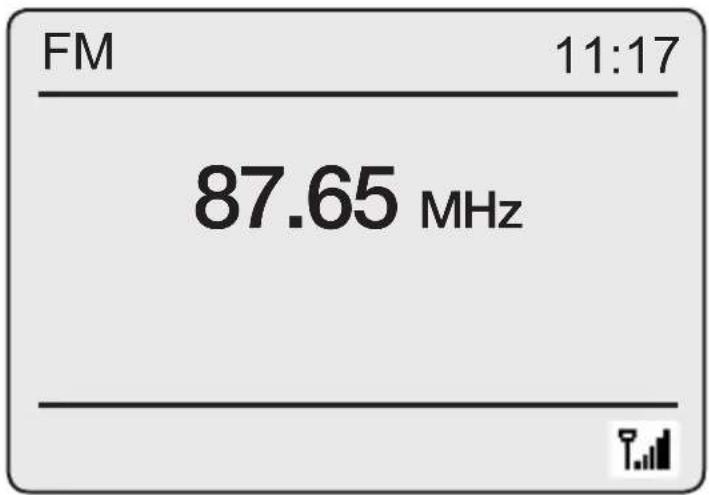
The dot-matrix display provides information required during operation.
In standby: 87.65 MHz
Displays the time.
Displays the source (e.g. FM radio), the current time and date.
Displays the volume setting, pre-set sound settings, total playing time, elapsed playing time.
Displays other performing functions of the device.
In tuner mode: Displays the frequency band and frequency, the station name and the station type, provided RDS information is being received, the preset for a saved radio station.
USB mode: Displays elapsed playing time, total playing time and information in the file.

Pause.

The switch-on timer is active.

The sleep timer is active.

Mute function is active.

In USB mode: All files in the current album are repeated.

In Internet mode: Wi-Fi signal strength.
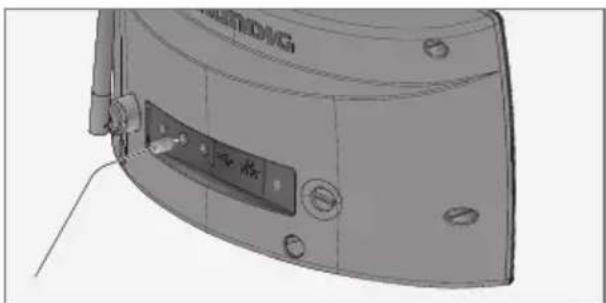
Connecting external devices
natural_image
Technical line drawing of a device component with no visible text or symbolsNotes:
■ Switch the device off before you connect external devices.
1 Use a standard audio cable to connect the audio output of the external device to the socket »AUX IN« on the back of the device.
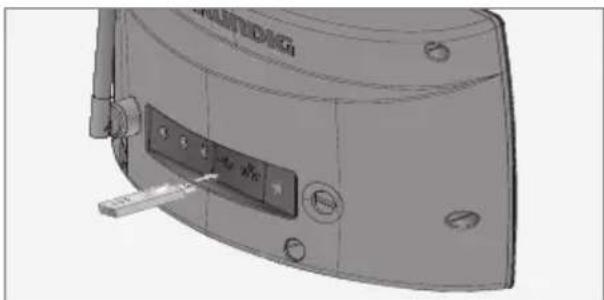
Connecting an MP3 player or a USB memory stick
The device supports most MP3 Players or USB memory sticks.
natural_image
3D rendering of a mechanical device with mounting holes and a central control panel (no visible text or symbols)Note:
■ The device must be switched off while the USB connection is being made. If it is not switched off, data could be lost.
1 Connect the USB interface of the MP3 player to the »USB« socket on the device (on the back) using a standard USB cable; or insert the USB plug of the USB memory stick in the »USB« socket on the device (on the back).
Notes:
■ To remove the MP3 player or the USB memory stick, switch off the device and pull out the cable for the data medium.
■ The USB socket on the device does not support a connection for a USB extension cable and is not designed for directly connecting to a computer.
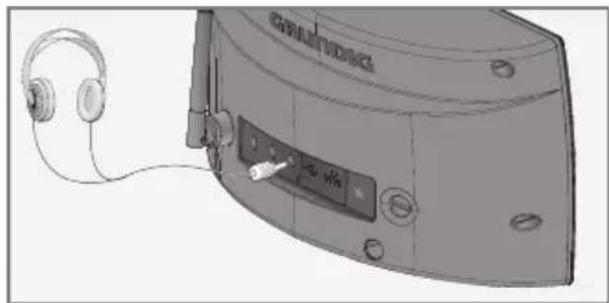
Connecting the headphones
natural_image
Illustration of a CD-ROM device with headphones attached to its side panel (no text or symbols visible)1 Insert the headphone plug (ø 3.5 mm) into the »Ω« socket on the back of the device.
- The loudspeakers of the device are switched off.
Note:
■ Excessive sound pressure from the earphones or headphones can cause hearing loss.
LAN connection to the internet
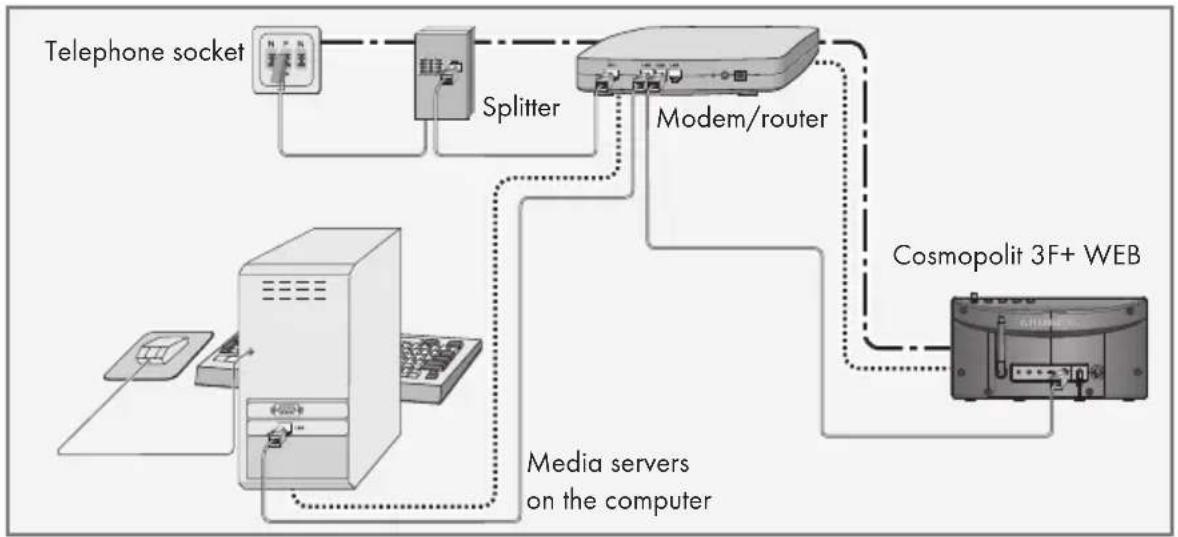
flowchart
graph TD
    A["Telephone socket"] --> B["Splitter"]
    B --> C["Modem/router"]
    C --> D["Cosmopolit 3F+ WEB"]
    D --> E["Media servers on the computer"]
    E --> F["Computer"]
    style A fill:#f9f,stroke:#333
    style B fill:#ccf,stroke:#333
    style C fill:#cfc,stroke:#333
    style D fill:#fcc,stroke:#333
    style E fill:#cff,stroke:#333
Note:
■ Switch the device off before you connect it to the internet.
1 Connect the Ethernet socket of the modem/router to the »LAN« socket of the device using a standard network cable (Twisted pair, RJ45 plug).
- The data throughput level is 10/100 Mbit.
Note:
The lines represent the function.
- - - - - - Internet radio
Media servers (audio streaming)
WLAN connection to the internet
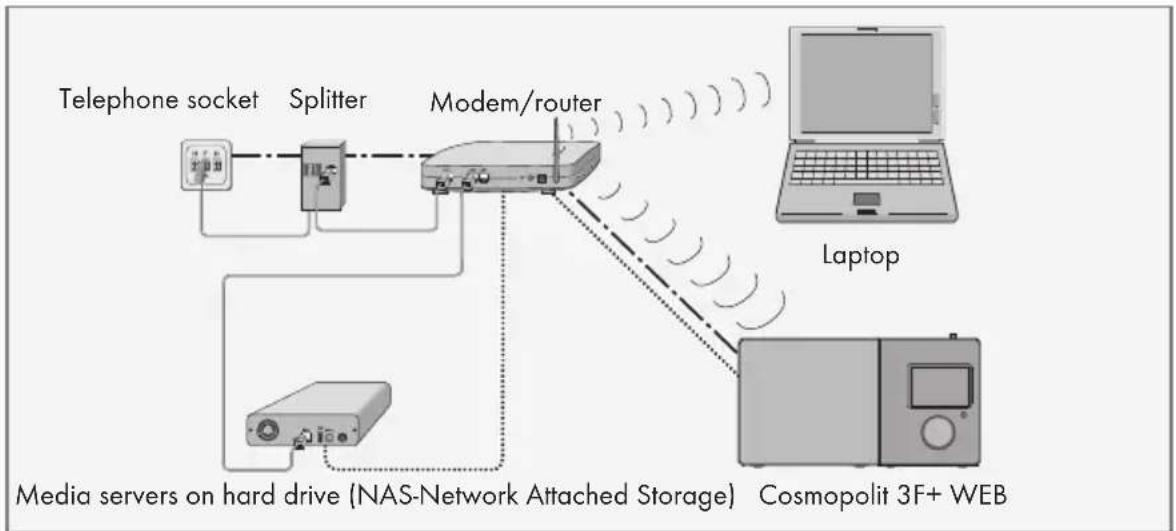
flowchart
graph TD
    A["Telephone socket"] --> B["Splitter"]
    B --> C["Modem/router"]
    C --> D["Laptop"]
    C --> E["Cosmopolitan 3F+ WEB"]
    F["Media servers on hard drive (NAS-Network Attached Storage)"] --> C
    style A fill:#f9f,stroke:#333
    style B fill:#ccf,stroke:#333
    style C fill:#cfc,stroke:#333
    style D fill:#fcc,stroke:#333
    style E fill:#cff,stroke:#333
Note:
■ The quality of the radio signal depends on the distance between the device and your modem/router.
■ The substance of the building at the installation site can also affect this.
Note:
The lines represent the function.
- - - - - - Internet radio
Music archive (audio streaming)
WLAN
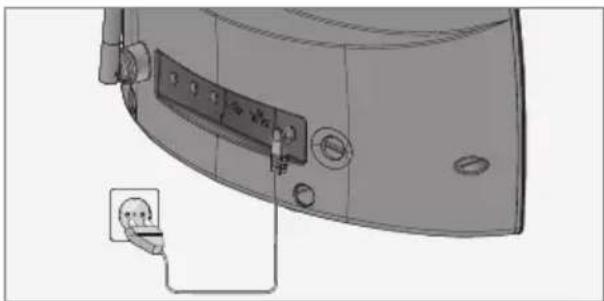
Connecting to the mains supply
Notes:
- Check that the mains voltage on the type plate (on the back of the power adapter) corresponds to your local mains supply. If this is not the case, contact your specialist dealer.
■ Before connecting the power adapter plug to the wall socket, ensure that all other connections have been made.
natural_image
Diagram of a device's rear panel with mounting holes and a separate plug inserted (no text or symbols)1 Insert the plug of the supplied power adapter cable into the »DC IN« socket on the back of the device.
2 Plug the power adapter into the wall socket.
Caution:
■ The device is connected to the mains with the power adapter. Pull out the power adapter plug if you want to completely disconnect the device from the mains.
■ Make sure that the power adapter plug is easily accessible during operation and not hindered by other objects.
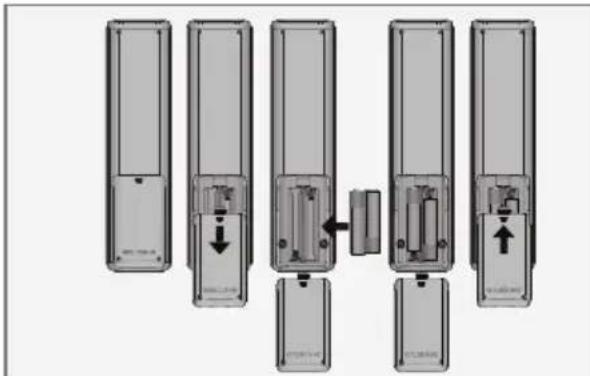
Putting battery in the remote control
natural_image
Diagram of six remote control switches arranged in a row, showing internal components and directional arrows (no text or labels)1 Open the battery lid by pressing on the arrow and sliding the lid out.
2 Insert two batteries (2 x 1.5 V, R 03 /UM 4/AAA) into the battery compartment with the correct polarity.
3 Close the lid of the battery compartment.
Notes:
- Do not expose the batteries to extreme heat, caused for example by direct sunlight, heaters or fire.
■ Remove the batteries when they are flat or when you know that the device will not be used for a long period of time.
Environmental note:
■ Batteries, including those which do not contain heavy metal, should not be disposed of with household waste. Always dispose of used batteries in accordance with local environmental regulations.
Functions and operation using the Jog-Shuttle on the device
As an alternative to using the remote control, you can also select and confirm the selected operations and functions using the Jog-Shuttle.
The functions
If no menu is selected, you can adjust the volume with the Jog-Shuttle.
If a menu is activated, by turning the Jog-Shuttle you can select several menu options or enter digits/characters.
Confirm the selection by pressing the Jog-Shuttle.
You can activate the main menu by pressing the »MENU« button, after finishing the settings, switch back to the previous menu by pressing the »MENU« button again.
Switch back from the respective submenu to the main menu by pressing the »MENU« button.
Example – Setting the time and date automatically
1 Press »MENU« to open the menu.
- The menu appears; the content depends on the the current operating mode.
2 Select »Main menu« by turning the Jog-Shuttle and confirm by pressing the Jog-Shuttle.
- The »Main menu« appears.
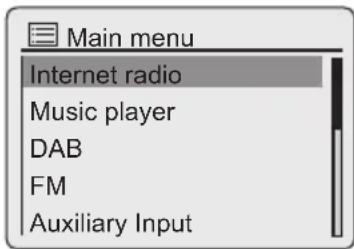
3 Select the option »System settings« by turning the Jog-Shuttle.
4 Confirm the option »System settings« by pressing the Jog-Shuttle.
5 Select the option »Time/Date« by turning the Jog-Shuttle.
6 Confirm the option »Time/Date« by pressing the Jog-Shuttle.
7 In the »Time/Date« menu, select »Auto update« by turning the Jog-Shuttle and confirm by pressing the Jog-Shuttle.
8 In the »Auto update« menu, select »Update from DAB«, »Update from FM« or »Update from Network« by turning the Jog-Shuttle and confirm by pressing the Jog-Shuttle.
9 Press »MENU« to end the setting.
Menu navigation
Press »MENU« on the device or on the remote control, select »Main menu« using »« or »« or by turning the Jog-Shuttle, and confirm by pressing the Jog-Shuttle or »OK« on the remote control.
In the main menu, you can select several sources Internet radio, Music player, DAB radio, FM radio, Auxiliary Input and the »Sleep«, »Alarms« and »System settings« menus.
Select the sources or submenus by pressing »« or » « or by turning the Jog-Shuttle and confirm by pressing the Jog-Shuttle or »OK« on the remote control.
If you wish to view the previous menu, press »« on the remote control.
The menus Internet radio, Music player, FM radio, Auxiliary Input, Sleep, Alarms and System settings have their own submenus which you can open by pressing the Jog-Shuttle or »OK« on the remote control.
First Installation using the installation assistant "Wizard"
When you connect the device to the mains, or after factory reset, the display will show the Grundig logo. The Wizard installation assistant then appears, which guides you through the installation step by step.
Notes:
■ For Wi-Fi connection, please make sure, that the Wi-Fi router is switched on.
■ The network name (SSID) must be visible and the MAC address of the device may be entered in the Wi-Fi router.
■ Perform the registration process in the proximity of the router in order to avoid problems with the Wi-Fi range.
If you wish to use a LAN cable for internet access, the device has to be connected to the router via LAN cable (see "Connection and Preparation" section).
Start First Installation
1 First switch on the device by pressing »◀« on the remote control or »ON/OFF« on the device.
- Display: »Setup wizard« menu opens.
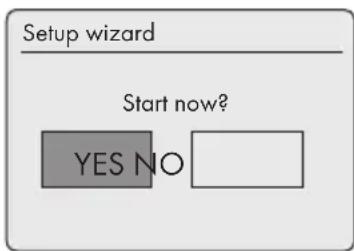
2 Select the push button »YES« by pressing »« or »» or by turning the Jog-Shuttle and confirm by pressing »OK«.
- Display: »Date/Time« menu opens.
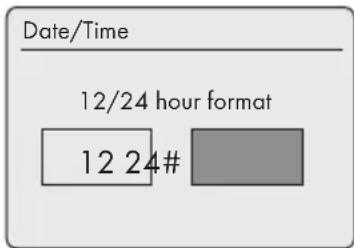
3 Select the hour format »12« or »24« by pressing »« or »« or by turning the Jog-Shuttle and confirm by pressing »OK«.
- Display: »Auto update« menu opens.
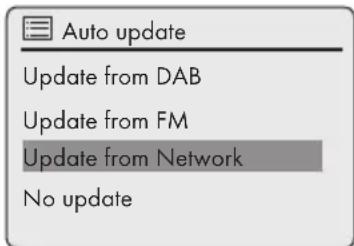
4 Select the input source from which the automatic time synchronisation should be performed.
Selection options:
- »Update from DAB« (Time synchronisation from a DAB station),
or
- »Update from FM« (Time synchronisation from an FM station);
or
- »Update from Network« (Time synchronisation from an Internet station),
or
- »No update« (No automatic time synchronisation).
Select one of the options by pressing » or » or by turning the Jog-Shuttle and confirm by pressing on the Jog-Shuttle or »OK« on the remote control.
- The menu »Set timezone« appears (only if »Update from Network« was selected).
Note:
If »Update from FM« was selected, continue from point 7.
5 Select the time zone (ex. »UTC +00:00 Dublin, London«) by pressing » « or » « or by turning the Jog-Shuttle and confirm by pressing »OK«.
- Display: »Daylight savings« menu opens.
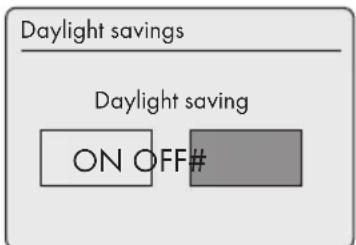
6 Select Daylight savings (for Central Europe) by pressing »« or »« or by turning the Jog-Shuttle to select »ON«, and confirm by pressing »OK«.
Winter time is set using »OFF«.
- The menu »Wlan region« appears.
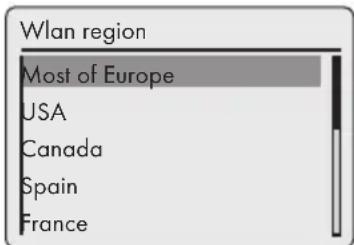
7 Select one of the WLAN regions by pressing »√ or » « or by turning the Jog-Shuttle and confirm by pressing »OK«.
(This setting depends on the location where you are operating your Cosmopolit 3.)
- The »SSID« menu appears, and the available networks (access points) are displayed.
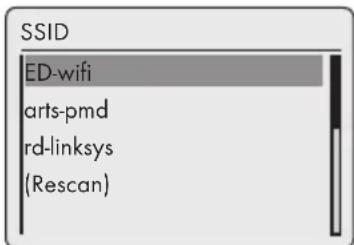
Note:
If the network name (SSID) is suppressed on the WLAN router for security reasons, the network cannot be found. It must then be entered manually. Cancel the setting using »« and continue with the chapter "Special Settings" - "Manual Configuration".
Note:
If you wish to connect via a LAN cable, select the option »Wired« using »« or »« or by turning the Jog-Shuttle, and confirm by pressing »OK«. The initial set-up is then finished.
8 Select your wireless network (SSID) by pressing » or » or by turning the Jog-Shuttle and confirm by pressing »OK«.
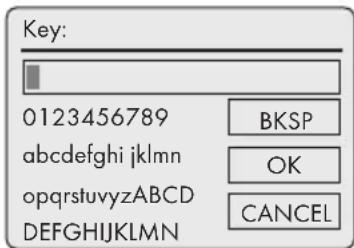
- WEP or WPA Key menu opens, the cursor is positioned in the first input position.
Note:
If the network is encrypted, the network key (security code WEP or WPA) must be entered.
9 Enter your wireless security code:
Select the first character (capital and small letters, numbers, symbols) by pressing »«, »«, »« or »« or by turning the Jog-Shuttle and confirm by pressing »OK«.
Repeat the procedure for all characters.
After you finish entering all characters, select the push button »OK« by pressing »«, »«, »« or »« or by turning the Jog-Shuttle and confirm by pressing »OK«.
- The menu »Internet Setup« appears, the network registration is processed.
Notes:
■ You can choose between numbers, lower and upper case letters, and special characters.
■ Press » «, » « to scroll through the menu pages (numbers, letters, special characters, etc.).
If you make a mistake during entry, press »«, »«, »« or »« to select the push button »BKSP« and press »OK« to confirm. The last character is deleted.
If you wish to exit the menu prematurely, press »«, »«, »« or »« to select the push button »CANCEL« and press »OK« to confirm.
- After successful registration, the message »Setup wizard completed« appears.
10 Press »OK« to end the setting.
Selecting the menu language
After the first installation, you can choose your preferred menu languages. The preset setting is »English«.
1 Press »MENU« to open the menu.
2 Select the option »Main menu« by pressing » or » or by turning the Jog-Shuttle and confirm by pressing »OK«.
- The »Main menu« menu opens.
3 Select the option »System settings« by pressing »√ or » « or by turning the Jog-Shuttle and confirm by pressing »OK«.
4 Select the option »Language« by pressing »√ or »« or by turning the Jog-Shuttle and confirm by pressing »OK«.
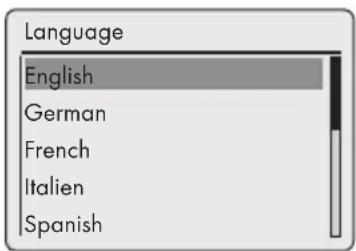
5 Select your preferred language by pressing » or » or by turning the Jog-Shuttle and confirm by pressing » OK«.
6 Press »MENU« to end the setting.
Searching for and saving DAB stations
Your device has a DAB/ DAB+ (Digital Audio Broadcasting) receiver unit which enables crystal-clear radio reception in CD quality, i.e. without hissing or crackling.
DAB stations are combined into ensembles (multiplexes) at regional and national levels. An ensemble contains several stations broadcast on the same frequency. One individual station can combine other secondary service components such as live broadcasts or foreign language news.
The device can receive DAB stations on Band III (174.928 - 239.200 MHz, 5A - 13F).
Automatic station search
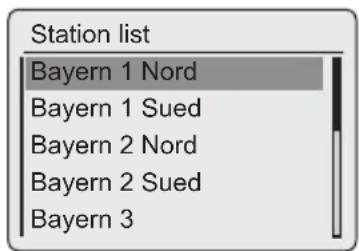
If you first switch on the device in DAB mode, the automatic station search starts (Display: »Scanning«). During the search, the first line shows the number of stations found, and the second shows the search scale. After the end of the search, an alphanumeric arrangement of stations (A...Z, 0...9) appears. If no stations are found, the DAB menu appears in the display.
1 Press »M« repeatedly on the remote control or »MODE« on the device until »DAB radio« appears on display.
- The device searches for DAB stations.
Note:
In the »DAB Radio« - »Full scan« menu, you can restart a new "Automatic station search". This may be necessary when the location of the device is changed.
Manual station search
If you know the frequencies or the transmission channels of the ensembles (multiplexes), you can also search for DAB stations manually.
1 Press »MENU« to open the DAB menu.
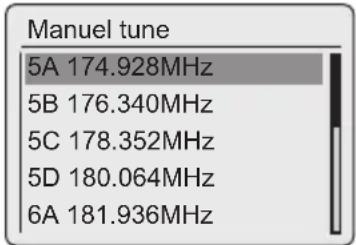
2 Select the option »Manual tune« by pressing »« or »« or by turning the Jog-Shuttle and confirm by pressing »OK«.
- Display: »5A 174.928MHz«.
bar
Manuel tune | Category | Frequency (MHz) | |---|---| | 5A | 174.928 | | 5B | 176.340 | | 5C | 178.352 | | 5D | 180.064 | | 6A | 181.936 |3 Select your frequency by pressing »« or »« or turning the Jog-Shuttle and confirm by pressing »OK«.
- Display: e.g. »5D 180.064MHz« and the search scale.
- New stations are added to the list.
Sorting channels
You can sort the station list stored during the station search in three different ways.
- »Alphanumeric«: all stations are sorted alpha-numerically (default setting).
- Ensemble«: all stations are sorted by ensemble.
- Valid«: active stations are listed first, stations that are not active are shown with a question mark.
1 Press »MENU« to open the DAB menu.
2 Select the option »Station order« by pressing »√ or » « or by turning the Jog-Shuttle and confirm by pressing »OK«.
3 Select your settings by pressing »« or »« ^ or by turning the Jog-Shuttle and confirm by pressing »OK«.
Deleting a station list
The names of the DAB stations remain in the station list even after a new automatic search. However, these DAB stations can no longer be received and the names can be deleted from the station list.
1 Press »MENU« to open the DAB menu.
2 Select the option »Prune invalid« by pressing »« or » « or by turning the Jog-Shuttle and confirm by pressing »OK«.
3 Select the push button »YES« by pressing »« or »« or by turning the Jog-Shuttle and confirm by pressing »OK«.
- The names of the DAB stations which are now invalid are deleted.
Saving DAB radio stations on presets
You can use the remote control to fill 10 presets with the DAB radio stations of your choice. If you assign the presets again, the previously saved stations are overwritten.
1 Search for the DAB station as described.
2 To save stations, keep pressing the number button »1...0« until »Preset stored« appears in the display.
- The station stored with a preset number then appears in the display.
3 To store more stations, repeat steps 1 and 2 as many times as necessary.
Setting Dynamic Range Control (DRC) for DAB stations
When you activate Dynamic Range Control (DRC), you can hear quiet sounds better in a loud environment.
1 Press »MENU« to open the DAB menu.
2 Select the option »DRC« by pressing »« or »« or by turning the Jog-Shuttle and confirm by pressing »OK«.
- Display: e.g. »DRC off« (no DRC).
3 Select the value (»DRC high« or »DRC low«) by pressing »« or » «or by turning the Jog-Shuttle and confirm by pressing »OK«.
Note:
■ The DAB station must support DRC.
Searching for and saving FM stations
Setting the search mode
There are two different automatic station search modes.
1 Press »M« repeatedly on the remote control or »MODE« on the device until »FM radio« appears on display.
3 Select the option »Scan setting« by pressing » or » or by turning the Jog-Shuttle and confirm by pressing »OK«.
- Display: »Strong stations only?«.
4 Select your setting (»Yes« or »No«) using »« or »» or by turning the Jog-Shuttle and confirm by pressing »OK«.
5 Press »MENU« to end the setting.
Automatic station search
1 Press and hold » « or » « or press the Jog-Shuttle. When you release the button, the automatic search stops at the next station.
- If RDS information is transmitted by the broadcaster, then the device saves the station name. If station and title information is transmitted, it will appear as ticker text after a short time.
Tuning stations manually
1 Move the frequency forward in brief steps by repeatedly pressing » or » «.
- The frequency goes up or down in 50 kHz steps.
Saving FM radio stations on presets
You can use the remote control to fill 10 presets with the FM radio stations of your choice. If you assign the presets again, the previously saved stations are overwritten.
1 Search for the FM station as described.
2 To save stations, keep pressing the number button »1...0« until »Preset stored« appears in the display.
- The stored station with a preset number then appears in the display.
Note:
■ Button »0« is used for preset 10.
3 To store more stations, repeat steps 1 and 2 as many times as necessary.
Setting the sound effect "My EQ"
1 Press »EQ« on the remote control to open the »Equaliser« menu.
2 Select the option »My EQ profile setup« by pressing »√ or »« or by turning the Jog-Shuttle and confirm by pressing »OK«.
3 Select the option »Bass« by pressing »√ or »∧ or by turning the Jog-Shuttle and confirm by pressing »OK«.
4 Select the preferred setting for the bass by pressing » or » or by turning the Jog-Shuttle, and confirm by pressing »OK«.
Note:
■ Repeat the setting for the treble.
5 Select the option »Loudness« by pressing »« or »« or by turning the Jog-Shuttle.
Switch the Loudness function on or off by pressing »OK«.
6 Switch off the menu by pressing »«.
7 Confirm the security query by selecting the push button »YES« using »« or »« or by turning the Jog-Shuttle and confirm by pressing »OK«.
Note:
If the »NO« button is selected, then the settings will not be saved.
8 Press »MENU« to end the setting.
Adjusting the brightness of the display
1 Press » « repeatedly on the remote control to change the brightness of the display in three levels (bright, medium, dim).
Note:
■ Minimum power consumption in standby mode is only achieved if the backlighting in the display is switched to minimum.
Switching on and off
1 Switch on the device from standby mode by pressing »◀« on the remote control or »ON/OFF« on the device.
- Display: The system switches to the last source selected.
2 Switch the device to standby mode by pressing »ON/OFF« on the remote control or »ON/OFF« on the device.
- Display: The current time and date.
Note:
■ The only way to disconnect the device from the mains supply is to pull out the plug from the wall socket.
Selecting the input source
1 Press »M« repeatedly on the remote control or »MODE« on the device to select »Internet Radio«, »Music player«, »DAB Radio«, »FM Radio« or »Aux In« on the display.
Note:
■ The input source can also be displayed using the »Main menu«.
Adjusting the volume
1 Adjust the volume by pressing »—« or »+« on the remote control;
or rotate the Jog-Shuttle on the device.
Selecting sound settings
You can choose between different preset sound settings.
By using »EQ« button on the remote control
1 Press »EQ« repeatedly on the remote control to select the menu »Equaliser«.
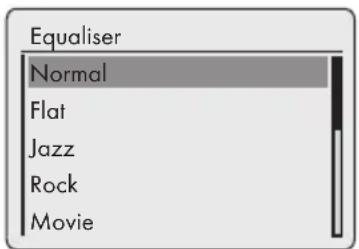
2 Select your required sound setting (»Normal«, »Flat«, »Jazz«, etc.) by pressing »« or »« or by turning the Jog-Shuttle and confirm by pressing »OK«.
By using the menu
1 Press »MENU« to open the menu.
2 Select the »Main menu« by pressing »« or »« or by turning the Jog-Shuttle and confirm by pressing »OK«.
3 Select the option »System settings« by pressing » or » or by turning the Jog-Shuttle and confirm by pressing »OK«.
4 Select the option »Equaliser« by pressing » or » or by turning the Jog-Shuttle and confirm by pressing »OK«.
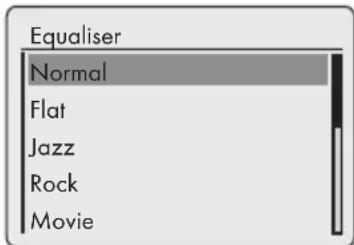
5 Select your required sound setting (»Normal«, »Flat«, »Jazz«, etc.) by pressing »« or »« or by turning the Jog-Shuttle and confirm by pressing »OK«.
6 Press »MENU« to end the setting.
Muting
You can switch the device speaker to and from mute mode using this function.
1 Activate mute with »« on the remote control.
- Display: » «
2 Deactivate mute with »« on the remote control.
- Display: » « disappears.
Setting stereo or mono reception (only in FM radio mode)
1 Press »MENU« to open the menu.
2 Select the option »Audio setting« by pressing » or » or by turning the Jog-Shuttle and confirm by pressing »OK«.
3 Switch to mono reception by selecting the »YES« button using »« or »« or by turning the Jog-Shuttle and confirm by pressing »OK«. Stereo reception is set using the »NO« button.
4 Press »MENU« to end the setting.
Listening to an Internet radio station
You can browse the catalogue of Internet radio stations and classify them by genre (style of music), by country or by popularity.
The stations are organized in a hierarchical menu in the same way files are organized in directories on a computer.
After successfully connecting to the Internet, select the »Internet radio« menu in the »Main menu« and then a category such as »Last listened«.
After successfully connecting to the Internet, open the option »Station list« and then »Stations« via the »Internet radio« menu, and select your preferred music style or a country from the list.
Note:
■ Some Internet radio stations do not broadcast 24 hours per day, and some are not always online.
Selecting the internet radio stations' input source
1 Press »M« repeatedly on the remote control or »MODE« on the device to select the »Internet radio« input source.
- Display: »Connecting« and then »Loading«.
Selecting Internet radio stations according to search criteria
Selecting the Internet radio menu
1 Press »MENU« to open the menu.
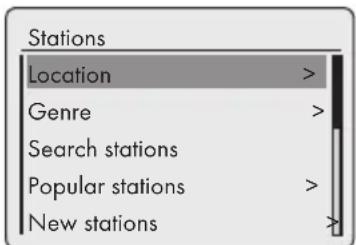
2 Select the option »Station list« by pressing »∨« or »∧« or by turning the Jog-Shuttle and confirm by pressing »OK«.
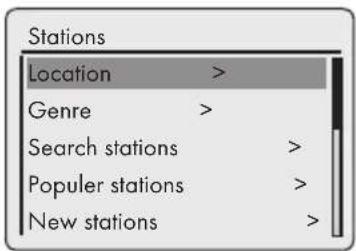
3 Select the option »Stations« by pressing »« or »^« or by turning the Jog-Shuttle and confirm by pressing »OK«.
Note:
■ Additional operations are explained in the following chapters.
Searching for Internet radio stations in »Location« category
1 In the »Stations« menu, select the option »Location« by pressing » or » or by turning the Jog-Shuttle and confirm by pressing »OK.
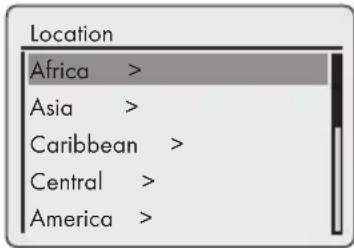
2 Press » « or » « or turn the Jog-Shuttle to select the search criteria (e.g. »Africa«, »Asia«, »Caribbean« etc.) and confirm by pressing »OK«.
- The submenu for the selected location opens.
3 Press »∨« or »^« or turn the Jog-Shuttle to select the country and confirm by pressing »OK«.
4 Press »∨« or »∧« or turn the Jog-Shuttle to select the search criteria (e.g. »All Stations«, »Highlighted stations«, »Alternative« etc.) and confirm by pressing »OK«.
Notes:
■ The subdivision by search criteria can differ depending on country group. For example, for the country group North America, you can choose between Canada, Mexico and the United States, and afterwards the different states can be selected.
■ There are no further search criteria for the different states.
5 Select the station using » or » or by turning the Jog-Shuttle and confirm by pressing »OK.
- »Connecting...« and then »Loading« appears in the display, after a short time the station is played.
Searching for Internet radio stations in the »Genre« category
1 In the »Stations« menu, select the »Genre« option by pressing »√ or » «or by turning the Jog-Shuttle and confirm by pressing »OK«.
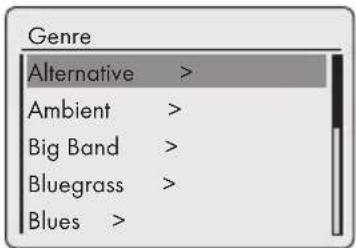
2 Press »« or »« or turn the Jog-Shuttle to select the search criteria (e.g. »Alternative«, »Ambient«) and confirm by pressing »OK«. - A country selection is displayed.
3 Select the country by pressing » « or » « or by turning the Jog-Shuttle and confirm by pressing »OK«. - The first radio stations for the country chosen are displayed.
4 Select the station by pressing »∨« or »∧« or by turning the Jog-Shuttle and confirm by pressing »OK«. - »Connecting...« and then »Loading« appears in the display, after a short time the station is played.
Searching for Internet radio stations by name
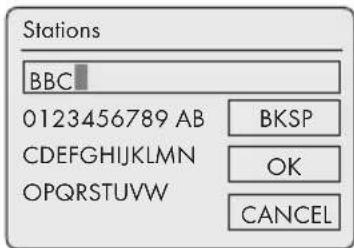
1 In the »Stations« menu, select »Search stations« option by pressing »∨« or »∧« or by turning the Jog-Shuttle and confirm by pressing »OK«.
Notes:
■ You can choose between numbers and upper case letters.
■ Press »«, »«, » « or » « to select letters and confirm by pressing »OK«. The cursor jumps to the next input position.
If you make a mistake during entry, press »«, »«, » « or » « or turn the Jog-Shuttle to select the push button »BKSP« and press »OK« to confirm. The last character is deleted.
If you want to exit the menu prematurely, press »«, »«, » « or » « or turn the Jog-Shuttle to select the push button »CANCEL« and press »OK« to confirm.
In many cases, you only need to enter an abbreviation of the station name (e.g. »FAN« instead of »FANTASY«).
If the station name is entered, press »«, »«, »« or »» or turn the Jog-Shuttle to select the push button »OK« and press »OK« to confirm. »Please wait Loading« then appears in the display.
A list of the station names is then displayed which match the search item.
2 Select the station by pressing »√« or »^« or by turning the Jog-Shuttle and confirm by pressing »OK«.
- »Connecting...« and then »Loading« appears in the display, after a short time the station is played.
Selecting the most popular Internet radio stations
You can use this function to select radio stations that are most frequently listened to.
In the »Stations« menu, select the »Popular stations« option by pressing »« or »« or by turning the Jog-Shuttle and confirm by pressing »OK«.
- Display: The list of popular stations appears in the display.
2 Select the radio station by pressing »« or »« or by turning the Jog-Shuttle and confirm by pressing »OK«.
- »Connecting...« and then »Loading« appears in the display, after a short time the station is played.
Selecting Internet radio stations which the Internet provider has added recently
1 In the »Stations« menu, select the »New stations« option by pressing »« or »« or by turning the Jog-Shuttle and confirm by pressing »OK«.
- Display: The list of the new stations appears in display.
2 Select the radio station by pressing »« or »« or by turning the Jog-Shuttle and confirm by pressing »OK«.
- »Connecting...« and then »Loading« appears in the display, after a short time the station is played.
Storing Internet radio stations on presets
You can use the remote control to fill 10 presets with the Internet radio stations of your choice. If you assign the presets again, the previously saved stations are overwritten.
1 Search for the Internet radio station as described.
2 To save stations, keep pressing the number button »1...0« until »Preset stored« appears in the display.
- The stored station with a preset number then appears in the display.
Note:
■ Button »0« is used for preset10.
3 To store more stations, repeat steps 1 and 2 as many times as necessary.
Opening preset Internet stations
Direct selection using a preset
1 Open the Internet radio station by pressing one of the number buttons »1...0« on the remote control.
- »Connecting...« and then »Loading« appears in the display, after a short time the station is played.
Selecting manually-added Internet radio stations
You can find out how you add these radio stations in the chapter "INTERNET RADIO TUNING SERVICE".
1 In the »Internet radio« menu, select »My Added Stations« option with »/« or »/« or by turning the Jog-Shuttle and confirm by pressing »OK«.
2 Select the radio station using »« or »« or turn the Jog-Shuttle and confirm by pressing »OK«.
- »Connecting...« and then »Loading« appears in the display, after a short time the station is played.
Opening the most recently selected Internet stations
The device saves the 10 most recently selected radio stations in a folder which you can open at the same time as the station list.
1 In the »Station list« menu, select the »Last listened« option by pressing »« or »« or by turning the Jog-Shuttle and confirm by pressing »OK«.
2 Select the radio station by pressing »« or »« or by turning the Jog-Shuttle and confirm by pressing »OK«.
- »Connecting...« and then »Loading« appears in the display, after a short time the station is played.
Displaying information about Internet radio stations
1 While an Internet radio station is playing, press »i« repeatedly.
- The information provided by the broadcaster is displayed.
Listening to a Podcast
Unlike a radio station that is broadcast live, a podcast can contain several programs which are updated regularly and automatically. The podcast and associated programs can be played at any time.
These programs may date back several weeks or they may have just appeared.
1 Press »MENU« to open the menu.
2 Select the »Main menu« by pressing »« or »« or by turning the Jog-Shuttle and confirm by pressing »OK«.
3 Select the input source »Internet radio« by pressing »« or »« or by turning the Jog-Shuttle and confirm by pressing »OK«.
- »Connecting...« and then »Loading« appears in the display.
4 Open the »Internet radio« menu using »MENU«.
5 Select the option »Station list« by pressing » or » or by turning the Jog-Shuttle and confirm by pressing »OK«.
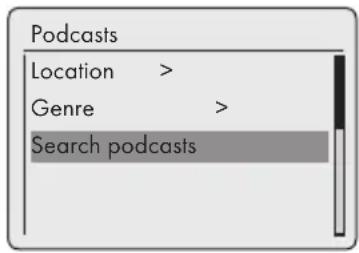
6 Select the option »Podcasts« by pressing »√ or »« or by turning the Jog-Shuttle and confirm by pressing »OK«.
- The submenu for the Podcast options opens.
Notes:
- You can now also search for, and play, Podcasts by country (Option »Location«), by genre (Option »Genre«) or by name (Option »Search podcasts«).
■ The structure and the content may differ.
Registering on the GRUNDIG homepage
You need to complete a one-time registration of your device on the GRUNDIG page "GRUNDIG INTERNET RADIO TUNING SERVICE" stating the MAC address of your device.
You can search for stations on this web page and listen to them. When logging on, the device must be connected to the Internet (see the section "Start First Installation").
If you wish to create a favourites list for your favourite radio stations, then you also need to register your e-mail address and the password of your choice. This takes you to the members' area.
1 Start the internet browser on your PC.
2 Enter the address "www.grundig.radiosetup.com".
- The "GRUNDIG INTERNET RADIO TUNING SERVICE" page appears.
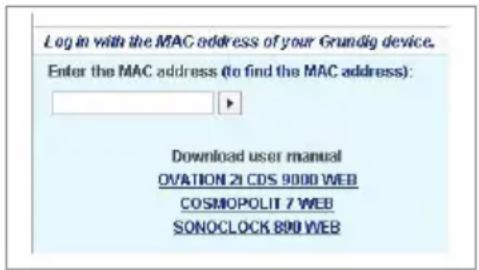
3 Enter the twelve-digit MAC address of your device and click on the push button ».
Note:
■ The MAC address (Radio ID) can be accessed, see »Main menu« and then select the options »System settings« and »Info«.
4 Enter your e-mail address and a password of your choice under »Member Login« and click on the push button »▶«.
- The e-mail address and the password are saved.
Creating lists of favourites
You can sort radio stations which the V-Tuner Internet service provides to GRUNDIG customers into a favourites list. This gives you swift access to your favourite radio stations.
You can only conduct this process on a PC.
The current list is loaded when the device is switched on.
Preparation
1 Start the Internet browser on your PC.
2 Enter the address "www.grundig.radiosetup.com".
- The "GRUNDIG INTERNET RADIO TUNING SERVICE" page appears.
3 Enter your e-mail address and password and click the push button »▶«.
If several devices are registered, click on the desired MAC address.
Notes:
■ Radio stations can only be played back in MP3, WMA or Real Audio format.
- You have several options for searching for radio stations for a favourites group.
In the "Search" search field you can search for radio stations by name or you can select radio stations using search criteria such as "Music," Location" and "Language".
Selecting radio stations using the search function
1 In the "Search" field, enter the name of the preferred provider (station name and radio programme) and then click the push button »«.
- The radio station is displayed if it is available.
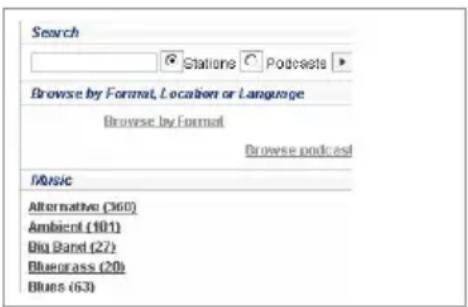
Note:
- You can start listening to the radio station by pressing the push button ▶. Prerequisite for this is that you have suitable software installed (e.g. Nero Media Home, Windows Media Player).
2 Highlight the radio station using the »♥+« button.
- The "Favourite Stations" menu is displayed.
Note:
■ You can now create a new favourites group or add the selected radio station to an existing favourites group.
3 Enter the name of a new favourites group in the entry field and confirm with the »« button; or
open the name field, select a favourites group and confirm by pressing the »« button.
- The radio station is stored in the favourites group.
4 Close the "Favourite Stations" menu.
5 Repeat the procedure for additional stations.
Note:
■ To check the radio stations, select the start page and click on the favourites group. You will see the new radio stations.
6 Exit the "GRUNDIG INTERNET RADIO TUNING SERVICE" Internet page using the »Logout« button.
Note:
■ Radio stations that are no longer required can be deleted from the favourites group. To do so, select the radio station and then click on the »♥—« button.
Selecting a radio station from the available genres
1 Select the preferred genre in the "Music" genre.
- A list of the radio stations featuring the selected style is displayed.
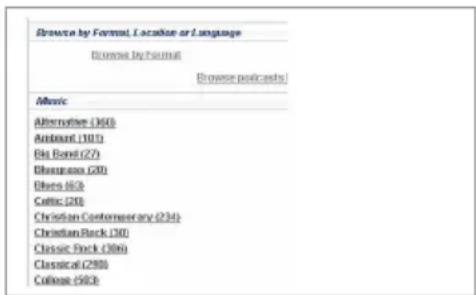
Note:
■ Instead of the search criterion "Music", you can also click "Location" or "Language" and search for radio stations. Several search criteria can be combined.
2 Select the preferred radio station from the list and highlight it using the »♥+« button.
- The "Favourite Stations" menu is displayed.
Note:
- You can now create a new favourites group or add the selected radio station to an existing favourites group.
3 Enter the name of a new favourites group in the entry field and confirm by pressing the ➤« button;
or open the name field, select a favourites group and confirm by pressing the »▶« button.
- The radio station is stored in the favourites group.
4 Close the "Favourite Stations" menu.
5 Repeat the procedure for additional stations.
Note:
■ To check the radio stations, select the start page and click on the favourites group. You will see the new radio stations.
6 Exit the "GRUNDIG INTERNET RADIO TUNING SERVICE" Internet page using the »Logout« button.
Note:
■ Radio stations that are no longer required can be deleted from the favourites group. To do so, select the radio station and then click on the »♥—« button.
Searching for radio stations that are not provided by V-Tuner
You can also add radio stations to your favourites list that are not provided by the V-Tuner Internet service.
You can find information about this on the Internet. In Windows Media Player, you can view the parameters for these (for example, the URL) in the "Properties" submenu.
You can only conduct this process on a computer.
You cannot play back every radio station on your device that you can listen to on your computer. These radio stations require a special media player that can only be installed on a PC.
1 Start the Internet browser on your PC.
2 Enter the address "www.grundig.radiosetup.com".
- The "GRUNDIG INTERNET RADIO TUNING SERVICE" page appears.
3 Enter your e-mail address and password and confirm.
4 Click the "My added radio stations" line; or
if radio stations are already available, click the »▶« button after the line "Add Another Station".
- The "My Added Stations" menu is displayed.
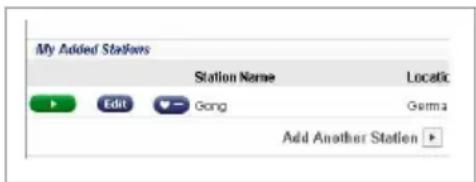
5 Enter the station name, URL of the radio station, location and music genre and confirm by pressing the »▶« button.
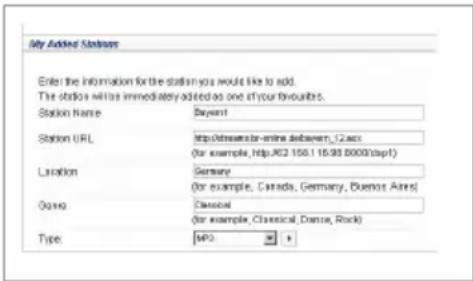
- The new radio station is displayed in the overview under "My Added Stations".
Notes:
If details of the radio station need to be changed, click »Edit« and make the changes in the "My Added Stations" menu.
To open these radio stations on the device, go to the Internet menu and press »Station list«, »My Added Stations«.
Shared media server (audio streaming)
This function allows you to make a selection by artist and track, as well as by album, genre, etc.; this selection depends on the structure of the music archive and on the UPnP server software in use (e.g. Nero Media Home, Windows Media Player 12). Access times may be prolonged depending on the size of the music archive, and this make usage inconvenient. While the UPnP server is importing the complete music archive, only limited operation of the device is possible, if at all.
You can select a track based on the ID3 tag information (track, artists, album, genre etc.). This information is displayed during playback.
It is recommended that you maintain this ID3 tag information.
Your device must be authorised on the UPnP server of the computer or hard drive. The UPnP server must be enabled in any firewalls that may be installed. Several UPnP servers can be used in parallel.
Selecting the shared media input source
1 Press »M« repeatedly on the remote control or »MODE« on the device until »Music player« appears on display.
- The »Music player« menu appears.
- The display shows the list of servers, media and media titles or the list of approved networks, clients, paths and folders.
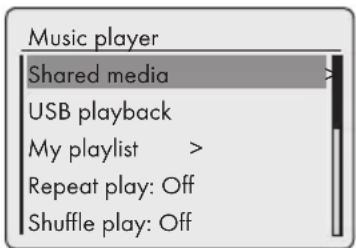
2 Select the option »Shared media« by pressing » or » or by turning the Jog-Shuttle and confirm by pressing »OK«.
- The display shows the list of servers, media and media titles or the list of approved networks, clients, paths and folders.
3 Select the required option by pressing »« or »« or by turning the Jog-Shuttle and confirm by pressing »OK«.
- The selection list appears in the display.
4 Select the required track by pressing »« or »« or by turning the Jog-Shuttle and confirm by pressing »OK«.
- If a title is selected, playback of the track starts.
Other playback functions
1 Press »« Ito pause playback.
2 Press »« to resume normal playback.
3 Press »« or » « repeatedly until the desired track or file is reached.
4 To search for a passage within a file or track, press and hold »« or » «.!Stop pressing » «| or »«| when the passage has been found.
- Playback continues.
You can copy up to 500 files or tracks into the playlist. These files or tracks can be obtained from both the music archive as well as a USB data medium. Please note that no data is copied, only the "Contents".
Adding tracks or files
In the »Music player« menu, select the option »Shared media« or »USB playback«.
2 Select a file/track.
3 Add the file/track to the playlist by pressing and holding »OK«.
Notes:
■ The input source from which the file or tracks are copied must be active, or connected.
The files/tracks also remain in the playlist in standby mode or when the input sources »Shared media« or »USB playback« are used.
Playing playlists
1 Select the input source »Music player« by pressing »M« on the remote control or using »MODE« on the device.
2 Select the option »My playlist« by pressing »√ or » « or by turning the Jog-Shuttle on the device, and confirm by pressing »OK«.
- The selection list appears in the display.
3 Select a file/track by pressing » « or » « or by turning the Jog-Shuttle on the device, and confirm by pressing » OK«.
- When a track has been selected, playback of the track begins automatically.
Deleting one or all tracks/files from the playlist
1 Select the input source »Music player« by pressing »M« on the remote control or using »MODE« on the device.
2 Select the option »My playlist« by pressing »« or »« or by turning the Jog-Shuttle on the device and confirm by pressing »OK«.
- The selection list appears in the display.
3 Select a file/track by pressing » « or » « or by turning the Jog-Shuttle on the device.
4 Delete the selected file/track by pressing and holding »OK«.
5 Select the push button »YES« by pressing »« or »» or by turning the Jog-Shuttle on the device and confirm by pressing »OK«.
Note:
■ The entire content of »My playlist« can be deleted using the option »Empty playlist« by selecting the option and the push button »YES« by pressing »« or »« or by turning the Jog-Shuttle on the device, and confirm by pressing »OK«.
Playback of media and "remote control" of Cosmopolit via the PC
With a PC running on Windows 7 operating system and the DLNA 1.5 industry standard (Digital Living Network Alliance), you can play back media stored on the PC using the Cosmopolit. Windows 7 provides the function "Play to..." for this purpose.
At the same time, you can remotely control several Cosmopolit functions such as adjusting the volume, pause, continue and stop playing, select the next or previous title, and use the Repeat function.
To enable this, the Cosmopolit must be logged on to the same home network as the PC.
Only limited functions are currently possible on the Cosmopolit.
You can also use a DLNA-compatible mobile phone logged on to the same home network as a "remote control".
Note:
- Your Cosmopolit must be enabled on the UPnP server used for the PC. The UPnP server must be enabled in any existing firewalls.
Play using the "Play to ..." function in the Windows Media Player
With the Windows Media Player, you can manage your media data and quickly find the required album or song that you want to play.
1 Start the »Windows Media Player« on the PC.
Note:
■ If the Media Player is already open and you are in Play mode, click on the "Media Library" button.
2 If the playback list is closed or if the "Burn" or "Synchronize" function is active, click on the "Now playing" button.
3 Select the required album/song and drag to the "Playlist".
4 Click the »Play to...« button, then click on the name or symbol for Cosmopolit 3F.
- Playing starts
Note:
■ Operation via the Cosmopolit 3F is no longer possible.
5 The following functions are available in the Windows Media Player for operating the Cosmopolit 3F:
- Adjust volume;
- Pause, continue, and stop play;
- Select next or previous title;
- Select the Repeat function.
Play using the "Play to ..." function without the Windows Media Player
You can also play albums or songs from the PC on the Cosmopolit 3F without using the Windows Media Player.
1 Click on the required album/song.
2 Press the right mouse button and click on the "Play to..." menu option.
- Playing starts.
3 The following functions are available for operating the Cosmopolit 3F:
- Adjust volume;
- Pause, continue, and stop playing;
- Select next or previous title;
- Select the Repeat function.
Display information
1 During playback, the name of the song (UPnP), the total playing time, and the elapsed playing time are displayed.
2 Additional information can be displayed with »i«.
Playing the contents of a USB memory stick
1 Switch off the device from standby mode by pressing »◀« on the remote control or »ON/OFF« on the device.
2 Connect the USB interface of the MP3 player to the »USB« socket on the device (on the back side), using a standard USB cable; or
insert the USB plug of the USB memory stick in the »USB« socket (on the back side) on the device.
3 Switch on the device from standby mode by pressing »◀« on the remote control or »ON/OFF« on the device.
4 Press »MODE« repeatedly on the device or »M« on the remote control until »Music player« appears on the display.
- Display: »Music player« submenu opens.
5 Select the option »USB playback« by pressing »« or »« or by turning the Jog-Shuttle and confirm by pressing »OK«.
- The content of the USB appears in the display.
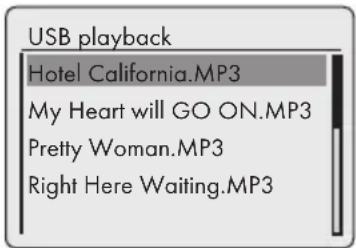
Note:
If no USB memory stick has been inserted, » No USB device found« appears in the display after a short time. Insert the USB by referring to the "Connecting an MP3 player or a USB memory stick" section.
6 Select the file or track by pressing »« or »« or by turning the Jog-Shuttle.
7 Press »OK« to start playback. - Display: Playback starts, elapsed playing time, total playing time and file information appears in the display.
8 Press » « on the remote control to stop play-back.
Pausing and resuming playback
1 Press » during playback to pause.
- Display: »II«, playing time stops, track or file information remains in the display.
2 Continue playback by pressing »«ll
Repeating the current track
1 During playback, press »« on the remote control.
- Display: »0:00«, the track is played again from the start.
Selecting another track
During playback
1 During playback, press »|« or »|« on the remote control repeatedly until the desired track or file is reached.
- Playback of the selected track starts automatically.
In stop mode
1 In stop mode, press » or » or turn the Jog-Shuttle until the desired track or file is reached.
2 Start playback of the track by pressing »OK« or using »▶on the remote control.
Searching for a passage within a file or track
1 During playback, press and hold »◀« or »▶I«.
2 Stop pressing »|« or »|« when the passage has been found.
- Playback continues.
Repeating all files or tracks (Repeat All)
1 During playback press » once on the remote control.
- Display: » ◄ «.
- All the tracks or files are played back repeatedly.
2 To quit this function, press » « on the remote control.
- Display: » ▲« disappears from the display.
Playing tracks in random order
1 Open the »Music player« menu by pressing »MENU«.
2 Select the option »Shuffle play« by pressing »« or »« or by turning the Jog-Shuttle on the device.
3 Switch on the shuffle function by pressing »OK«.
- Display: »
- All tracks in the file are played once in random order.
4 To end the option, switch off »Shuffle play« in the »Music player« menu by pressing »OK«.
- The display » disappears.
Notes:
■ The USB socket on the device does not support a connection for a USB extension cable and is not designed for direct connection to a computer.
■ The USB socket of this device is a standard socket. Due to rapid advances in technology and new manufacturers appearing every day, the compatibility of USB memory sticks can only be partially guaranteed.
If USB operation is impaired or is not possible, this does not indicate a device malfunction.
■ Bi-directional data transfer as defined for ITE devices in EN 55022/EN 555024 is not possible.
■ USB transfer is not in itself an operating mode. It is only an additional function.
■ Never remove USB devices during operation. This could damage the USB device and the device. Any such damage will invalidate your warranty.
Selecting the DAB input source
1 Press »M« repeatedly on the remote control or »MODE« on the device until »DAB radio« appears on display.
Selecting a DAB station – from the station list
The available DAB stations are stored in a »Station list«.
1 Open the DAB menu using »MENU«.
2 Select the option »Station list« by pressing »√ or » « or by turning the Jog-Shuttle, and open by pressing »OK«.
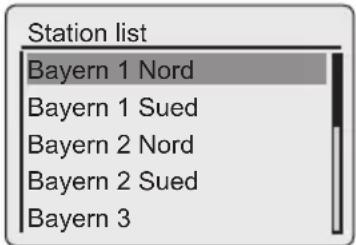
3 Select a DAB station by pressing »« or »« or by turning the Jog-Shuttle, and open by pressing »OK«.
- Display: »Playing«, the DAB station selected can be heard.
Selecting a DAB station – from presets
1 Open a DAB station by pressing »1« to »0«.
Selecting a DAB station – from the favourites list
1 Open the favourites list using »FAV«.
2 Select a DAB station by pressing »« or »« or by turning the Jog-Shuttle, and open by pressing »OK«.
- Display: »Playing«, the DAB station selected can be heard.
Displaying DAB station information
To display information on the current DAB station, press »i« repeatedly.
- The following displays appear in succession:
The location and the frequency;
reference to signal interference, e.g.
»Signal error 10« (at optimum signal
»Signal error 0«);
Bit rate, broadcasting format and the channel;
the current date;
radio text as ticker text
Note:
The information is displayed continuously until »i« is pressed again.
Selecting the tuner input source
1 Press »M« repeatedly on the remote control or »MODE« on the device until »FM radio« appears on the display.
Selecting stations – from presets
1 In the »FM radio« mode, press »1« to »0« on the remote control to select the presets from 1 to 10;
- The frequency of the station and the preset number appear in the display and the station is then played.
Selecting stations – from the list Recall Preset
1 Press »FAV«.
2 Select the presets from 1 to 10 by pressing » or » or by turning the Jog-Shuttle.
3 Confirm the preset by pressing »OK«.
- The preset number appears in the display and the station is then played.
Stereo and mono reception
The device has an auto mode, which switches automatically between stereo and mono depending on the strength of the reception signal.
1 Press »MENU« to open the FM menu.
2 Select the option »Audio setting« by pressing »× or » « or by turning the Jog-Shuttle and confirm by pressing »OK«.
3 Select the push button »No« by pressing »« or »« or by turning the Jog-Shuttle, and confirm by pressing »OK«.
- The auto mode is activated; or select the push button »YES« by pressing »« or »» or by turning the Jog-Shuttle, and confirm by pressing »OK«.
- The device is switched to mono reception; unwanted noise interference is suppressed.
Displaying RDS station information
If the device is receiving a RDS station, the station name and »R.D.S« appear in the display (if no information is available, the reception frequency appears in the display).
Station and track information appear as ticker text (radio text). If radio text is not available, other information can be displayed as an alternative.
To display information on the current RDS station, press »i« repeatedly.
- The following displays appear in succession: The current programme type (PTY), e.g. »Pop Music«. »[No PTY]« appears if no information is available; the frequency; the current date.
Note:
The information is displayed continuously until »i« is pressed again.
Listening to an external source
You can listen to the audio signal from the external device connected through your system's speakers.
1 Switch on the device from standby mode by pressing »-on the remote control or »ON/OFF on the device.
2 Use a standard audio cable (not supplied) to connect »AUX IN« on the back of the device to an AUDIO OUT socket on the external equipment.
3 Press »M« repeatedly on the remote control or »MODE« on the device until »Aux in« appears in the display.
4 Start playback on the external device.
Your device has 2 timer modes:
- The switch-on timer, which switches the device on at the set time and wakes you with the input source you selected.
- The sleep timer, which switches the device off at a preset time.
Switch-on timer
Setting the timer
1 Switch on the device from standby mode by pressing »-on the remote control or »ON/OFF on the device.
2 Press »MENU« to open the menu.
3 Select the »Main menu« by pressing »« or »« or by turning the Jog-Shuttle and confirm by pressing »OK«.
4 Select the option »Alarms« by pressing »√ or »√ or by turning the Jog-Shuttle and confirm by pressing »OK«.
5 Select the option »Alarm 1« by pressing »« or »« or by turning the Jog-Shuttle and confirm by pressing »OK«.
- »Alarm 1« submenu appears on display.
Alarm 1
Enable: Off
Time: 0:00
Mode: Internet radio
Preset: last listened
Volume: 24
6 Select the option »Enable« on the display by pressing »« or »« or by turning the Jog-Shuttle and confirm by pressing »OK«.
Select the preferred option (»Daily«, »Once«, »Weekends« or »Weekdays«,) by pressing »« or » «/or by turning the Jog-Shuttle and confirm by pressing »OK«.
- Display: The previous menu reappears automatically.
7 Select the option »Time« by pressing »« or »« or by turning the Jog-Shuttle and confirm by pressing »OK«.
- Display: The clock digits for the hours flash.
Press » « or » « or turn the Jog-Shuttle to set the alarm hour and confirm by pressing »OK«.
- Display: The clock digits for the minutes flash.
Press »√or »«/or turn the Jog-Shuttle to set the alarm minute and confirm by pressing »OK«.
- Display: The previous menu reappears automatically.
8 To set the timer source, select the option »Mode« by pressing »« or »« or by turning the Jog-Shuttle and confirm by pressing »OK«.
- Display: The previous menu reappears automatically.
Note:
If you select one of the »Internet radio«, »DAB« or »FM« options, »Alarm preset« submenu opens. Press »« or »« or turn the Jog-Shuttle to select »Last listened« or one of the presets and confirm by pressing »OK«.
9 Select the option »Volume« by pressing »« or »« or by turning the Jog-Shuttle and confirm by pressing »OK«.
Press »« or »« or turn the Jog-Shuttle to set the volume level and confirm by pressing »OK«.
10 Select the option »Save« by pressing »« or »« or by turning the Jog-Shuttle and confirm by pressing »OK«.
- »√Alarm saved« appears in the display.
Notes:
To set the second alarm time (»Alarm 2«) repeat steps 5 to 10.
■ The setting for the alarm times 1 and 2 can also be opened directly using the buttons »AL1« and »AL2« on the remote control.
If no button is pressed for 10 seconds while setting, the system will quit the process automatically, and you have to start again.
11 Switch the device to standby by pressing »On/OFF« on the remote control or »ON/OFF« on the device.
- Display: Date, time and » or » with the alarm time.
- The alarm sounds at the set time with the alarm signal selected.
Interrupting the timer
1 While the timer is sounding, press »AL1« or »AL2«.
- If the timer is set to »Once«, the timer signal stops and »ñ« or »ñ« disappears.
- If the timer is set to »Daily«, »Weekends« or »Weekdays«, the timer signal stops and »ñ« or »ñ« appear for the next day.
Activating and deactivating the timer
1 Open the option »Alarm« using »AL1« and »AL2« on the remote control.
- The »Alarm« menu appears.
2 Select the option »Enable« by pressing »√ or »√ or by turning the Jog-Shuttle and confirm by pressing »OK«.
3 To deactivate »Alarm 1« or »Alarm 2«, select »Off« by pressing »or» «or» by turning the Jog-Shuttle and confirm by pressing »OK«.
4 Select the option »Save« by pressing »« or »« or by turning the Jog-Shuttle and confirm by pressing »OK«.
- Display: » nor » disappears.
Note:
■ To activate the alarm time, reselect the alarm cycle in the »Cycle« menu and store it.
Sleep timer
Setting the sleep timer
By using the button »S«
1 Switch on the device by pressing »◀« on the remote control or »ON/OFF« on the device- and select the preferred sound source.
2 Open the sleep menu by pressing »S« on the remote control.
3 To set the switch-off time from »15«, »30«, »45«, »60«, press »S« repeatedly on the remote control or turn the Jog-Shuttle and confirm by pressing the Jog-Shuttle or »OK« on the remote control.
- Display: » ^2 and the switch-off time appears.
- After the selected time has elapsed » Going to sleep...« appears, and the device switches off, » disappears.
By using the Menu
1 Switch on the device by pressing »◀« on the remote control or »ON/OFF« on the device.
2 Press »MENU« and select the »Main menu« by pressing » or » or by turning the Jog-Shuttle and confirm by pressing »OK«.
3 Select the option »Sleep« by pressing »or »or by turning the Jog-Shuttle and confirm by pressing »OK«.
4 To set the switch-off time from »15«, »30«, »45«, »60«, press » or » or turn the Jog-Shuttle and confirm by pressing on the Jog-Shuttle or »OK« on the remote control.
- Display: ✗ and the switch-off time appear.
- After the selected time has elapsed »⚠️ Going to sleep...« appears, and the device switches off,» disappears.
Cancelling the sleep timer
To switch off the sleep timer before the set switch-off time, refer to previous section and select »Sleep off« at step 3;
or switch the device to standby mode by pressing »○« on the remote control or »ON/OFF« on the device.
Displaying Software and ID information
1 Press »MENU« to open the menu.
2 Select the option »System settings« by pressing » or » or by turning the Jog-Shuttle and confirm by pressing »OK«.
3 Select the option »Info« by pressing »« or »« or by turning the Jog-Shuttle and confirm by pressing »OK«.
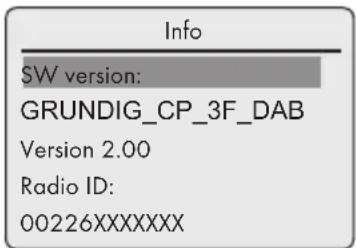
- The software version and the Radio ID (MAC address) are displayed.
4 Press »MENU« to end the display.
Displaying information and network status
You can display information about your device and the network used. Settings cannot be made in this menu.
1 Press »MENU« to open the menu.
2 Select the option »System settings« by pressing » or » or by turning the Jog-Shuttle and confirm by pressing »OK«.
3 Select the option »Network« by pressing »or »or by turning the Jog-Shuttle and confirm by pressing »OK«.
4 Select the option »View settings« by pressing »√ or » « or by turning the Jog-Shuttle and confirm by pressing »OK«.
5 Select the required information by pressing » or » or by turning the Jog-Shuttle.
- Display: »Active connection« e.g. WLAN is active; »WLAN region:« e.g. Most of Europe; »DHCP:« e.g. DHCP enabled; »SSID:« network name, e.g. »Netgear«; »IP address:« (e.g. 192.168.99.131);
»Subnet mask:« (e.g. 255.255.255.0); »Gateway address:« (e.g. 192.168.2.1); »Primary DNS:« (e.g. 192.168.2.1) »Secondary DNS:« (e.g. 0.0.0.0).
6 Press »MENU« to end the display.
Installing an additional network
Use this function when you wish to operate your device at a different location using a different network.
The first network (home network) is retained.
1 Press »MENU« to open the menu.
2 Select the option »System settings« by pressing » or » or by turning the Jog-Shuttle, and open using »OK«.
3 Select the option »Network« by pressing »√ or »◀ or by turning the Jog-Shuttle, and open using »OK«.
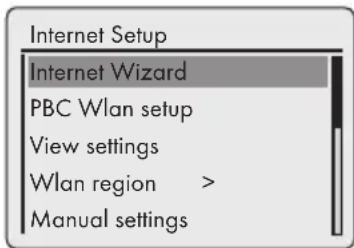
4 Select the option »Internet Wizard« (if a standard router is used) or the option »PBC Wlan setup« (if a router with WPS-PBC/Push-Button-Configuration is used) by pressing »« or »^« or by turning the Jog-Shuttle, and open using »OK«.
Note:
If the option »PBC Wlan setup« has been selected, press the WPS button on the router and then continue the registration using »OK«.
- Your device is registered on the router automatically. No further settings are required.
5 Select the network by pressing »« or »« or by turning the Jog-Shuttle, and confirm by pressing »OK«.
- The »Key« menu appears (if the network is encrypted), and the cursor is positioned at the first input field.
Note:
If the network is encrypted, the network key (security code WEP or WPA) must be entered.
6 Enter network key:
Enter the first character by pressing » «, » «, »« or »» or by turning the Jog-Shuttle and confirm by pressing »OK«.
Repeat entry for the remaining characters.
When the network key has been entered completely, select the push button »OK« by pressing »«, »«, »« or »« and confirm by pressing »OK«.
- The »Internet Setup« menu appears, the registration on the network is processed.
Notes:
■ Numbers, capital and lower case letters as well as special characters are available for input.
- Scroll through the menu pages by pressing » or » in order to select other characters.
If you make a mistake during entry, press »«, » «, » « or » « to select the push button »BKSP« and confirm by pressing »OK«. The last character is deleted.
If you wish to exit the menu prematurely, press »«, »«, »« or »« to select the push button »CANCEL« and confirm by pressing »OK«. The device switches back one menu level.
- After successful registration, the message »Setup wizard completed« appears.
7 End the setting by pressing »OK«.
Setting the WLAN region
You must set the WLAN region in accordance with the location of the device.
1 Press »MENU« to open the menu.
2 Select the option »System settings« by pressing » or » or by turning the Jog-Shuttle and open using »OK«.
3 Select the option »Network« by pressing »√ or »A« or by turning the Jog-Shuttle and open using »OK«.
4 Select the option »Wlan region« by pressing »« or »« or by turning the Jog-Shuttle and open using »OK«.
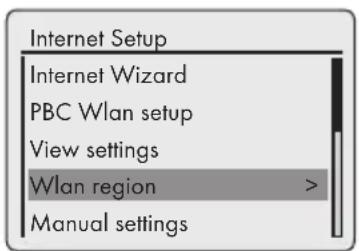
5 Select the appropriate WLAN region using » or » or by turning the Jog-Shuttle and confirm by pressing »OK«.
Deleting servers which cannot be accessed
This function allows you to delete servers for which access data is still stored in the device, although they are no longer available.
1 Select the input source »Music player« by pressing »M« on the remote control or by pressing »MODE« on the device.
2 Select the option »Prune servers« by pressing » or » or by turning the Jog-Shuttle on the device, and confirm by pressing »OK«.
3 Select the push button »YES« by pressing »« or »» or by turning the Jog-Shuttle and confirm by pressing »OK«.
Note:
If the push button »NO« is selected and confirmed, then the deletion process will be cancelled.
Registering the device with the WLAN router with individual network settings
These settings require advanced knowledge of network configuration.
1 Press »MENU« to open the menu.
2 Select the option »System settings« by pressing »« or »« or by turning the Jog-Shuttle and confirm by pressing »OK«.
3 Select the option »Network« by pressing »« or »« or by turning the Jog-Shuttle and confirm by pressing »OK«.
4 Select the option »Manual settings« by pressing » or » or by turning the Jog-Shuttle and confirm by pressing »OK«.
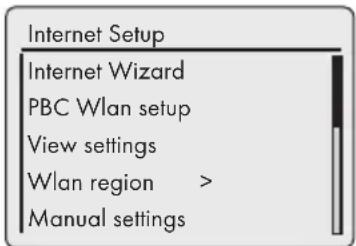
5 Select the option »Wired« or »Wireless« by pressing »« or »« or by turning the Jog-Shuttle and confirm by pressing »OK«.
6 Select the option »DHCP enable« or »DHCP disable« by pressing »« or » «or by turning the Jog-Shuttle and confirm by pressing »OK«.
Notes:
■ Setting »DHCP disable« means all addresses must be entered manually.
If »DHCP enable« is set, the addresses are automatically assigned by the router. If you have selected »DHCP enable«, continue with step 12.
7 Enter the IP address.
Select the first number by pressing » « or » « or by turning the Jog-Shuttle.
Select the next digit position by pressing » or by turning the Jog-Shuttle (you can switch back by pressing » on the remote control). Repeat the procedure for all characters.
Confirm the IP address by pressing »OK«.
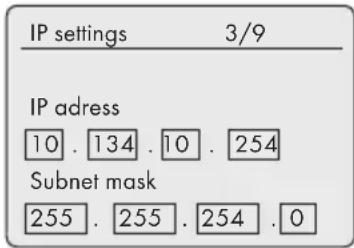
8 Enter the Subwork mask.
Select the first number by pressing » or » or by turning the Jog-Shuttle.
Select the next digit position by pressing » or by turning the Jog-Shuttle (you can switch back by pressing » on the remote control). Repeat the procedure for all characters. Confirm the number by pressing »OK«.
9 Enter the Gateway address.
Select the first number by pressing » « or » « or by turning the Jog-Shuttle.
Select the next digit position by pressing » or by turning the Jog-Shuttle (you can switch back by pressing » on the remote control). Repeat the procedure for all characters. Confirm the number by pressing »OK«.
Note:
■ The primary and secondary DNS (Domain Name System) are the network address of the server allocated by the provider.
10 Enter the Primary DNS.
Select the first number by pressing »« or »« or by turning the Jog-Shuttle. Select the next digit position by pressing »« or by turning the Jog-Shuttle (you can switch back by pressing »« on the remote control). Repeat the procedure for all characters. Confirm the number by pressing »OK«.
11 Enter the Secondary DNS.
Select the first number by pressing » or » or by turning the Jog-Shuttle.
Select the next digit position by pressing »« or by turning the Jog-Shuttle (you can switch back by pressing »« on the remote control). Repeat the procedure for all characters. Confirm the number by pressing »OK«.
Note:
■The SSID (Service Set Identifier) is the WLAN network code, and is used to identify this wireless network.
12 Enter the SSID:
Enter the first character by pressing »«, »«, »« or »» or by turning the Jog-Shuttle and confirm by pressing »OK«.
Repeat entry for all other characters.
Once the network key has been entered completely, press »«, »«, »« or »« to select the push button »OK« and confirm by pressing »OK«.
Notes:
■ Numbers, capital and lower case letters and special characters are available for input.
- Scroll through the menu pages by pressing » or » to select all other characters.
If you make a mistake during entry, press »«, » «, » « or » « to select the push button »BKSP« and confirm by pressing »OK«. The last character is deleted.
If you wish to exit the menu prematurely, press »«, »«, »« or »« to select the push button »CANCEL« and confirm by pressing »OK«. The device switches back one menu level.
Note:
■ The encryption settings of the device must match those of the router.
13 Select the encryption level by pressing » or » or by turning the Jog-Shuttle and confirm by pressing »OK«.
Note:
■ You can select different encryption levels: »Open« - Choose between »Disabled« and »WEP«. »Pre-Shared Key« - Choose between »Disabled« and »WEP«. »WPA« - Choose between »TKIP« and »AES«. »WPA2«: highest security level - Choose between »TKIP« and »AES«.
14 Enter encryption level.
Enter the first character by pressing »«, »«, »« or »« or by turning the Jog-Shuttle and confirm by pressing »OK«. Repeat entry for all other characters.
Once the network key has been entered completely, press »«, »«, »« or »« to select the push button »OK« and confirm by pressing »OK«.
Notes:
»Please wait, processing« now appears in the display. The connection to the WLAN router and therefore to the Internet is being established.
If connection is successful, » Connected« appears on the display.
If connection has failed, » Failed to connect« appears on the display.
Setting the time, time zone and date automatically
1 Press »MENU« to open the menu.
2 Select the option »System settings« by pressing »√ or » « or by turning the Jog-Shuttle and confirm by pressing »OK«.
3 Select the option »Time/Date« by pressing »√ or » « or by turning the Jog-Shuttle and confirm by pressing »OK«.
4 Select the option »Auto update« by pressing »√ or » «/or by turning the Jog-Shuttle and confirm by pressing »OK«.
5 Select the required option (»Update from DAB«, »Update from FM«, »Update from Network«) by pressing »« or »« or by turning the Jog-Shuttle and confirm by pressing »OK«. - Time and date are set automatically after a power failure.
6 Press »MENU« to end the setting.
Setting the time, time zone and date manually
1 Press »MENU« to open the menu.
2 Select the option »System settings« by pressing » or » or by turning the Jog-Shuttle and confirm by pressing »OK«.
3 Select the option »Time/Date« by pressing » or » or by turning the Jog-Shuttle and confirm by pressing »OK«.
4 Select the option »Set format« by pressing »« or »« or by turning the Jog-Shuttle and confirm by pressing on the Jog-Shuttle or »OK« on the remote control.
Select »12« or »24 #« by pressing »« or »« or by turning the Jog-Shuttle and confirm by pressing »OK«.
- Display: The previous menu reappears automatically.
5 Select the option »Set Time/Date« by pressing »√ or » « or by turning the Jog-Shuttle and confirm by pressing »OK«.
- Display: The menu »Set Time/Date« appears, the day flashes.
6 Set the day, the month, the year, the hour and the minutes by pressing » or » or by turning the Jog-Shuttle and confirm every input by pressing »OK«.
- The menu disappears, the time appears at the upper right of the display.
Updating the device software
This function enables you to use the device with the latest software.
1 Press »MENU« on the device or on the remote control, and select the »Main menu« by pressing »√or »« or by turning the Jog-Shuttle and confirm by pressing »OK«.
2 In the »Main menu«, select the option »System settings« by pressing » or » or by turning the Jog-Shuttle and confirm by pressing »OK«.
3 Select the option »Software update« by pressing » or » or by turning the Jog-Shuttle and confirm by pressing »OK.
- The »Software update« menu appears, two options are available for selection.
- If »Auto-check setting« is selected, the device checks in one cycle whether new software is available, and updates it.
- If »Check now« is selected, the device checks the software version. If a new version is available, this can be loaded by selecting the push button »YES«. Selecting the push button »NO« cancels the update.
Changing the menu language
1 Open the menu for the current input source by pressing »MENU«.
2 Select the option »System settings« by pressing »« or »« or by turning the Jog-Shuttle on the device and confirm by pressing »OK«.
3 Select the option »Language« by pressing »√ or » « or by turning the Jog-Shuttle on the device and confirm by pressing »OK«.
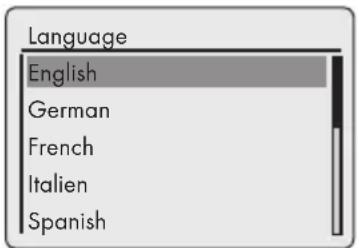
4 Select the preferred language by pressing » or » or by turning the Jog-Shuttle on the device and confirm by pressing »OK«.
5 End the setting by pressing »MENU«.
Restoring the default settings (reset)
This function enables you to reset all the custom settings back to the default settings (Internet and FM stations, time, alarm times and network access data are deleted).
1 Press »MENU« to open the menu.
2 Select the option »System settings« by pressing » or » or by turning the Jog-Shuttle and confirm by pressing »OK«.
3 Select the option »Factory Reset« by pressing » or » or by turning the Jog-Shuttle and confirm by pressing »OK«.
- Display: »Proceed? YES - NO«
4 Select »YES« by pressing »« or »« or by turning the Jog-Shuttle and confirm by pressing »OK«.
- If you confirm, »Restarting« appears on display and the device restarts to reset the settings.
Glossary
Boot loader version
Boot loader is a software application that is loaded by the device firmware from a boot-capable medium and then executed. The boot loader then loads further parts of the operating system.
Domain name system
The domain name system (DNS) is one of the most important services on the Internet. Its main function is to convert an Internet address into the corresponding IP address.
Firmware version
Firmware is the term used for software that is embedded in a programmed chip (microcontroller). It is mostly stored in a flash memory, an EPROM or an EEPROM.
The firmware contains functions for controlling the device.
Gateway IP
A gateway allows networks, which may be based on completely different protocols, to communicate with each other.
In the home area, a combination of the router and the DSL modem are used as an Internet gateway.
Hardware version
Hardware in this context means the device. This includes all components such as processor, display, etc.
IP address
An IP address (Internet protocol address) is used to uniquely identify the address of computers and other devices in an IP network. The most well-known network in which IP addresses are used is the Internet. Here, for example, web servers are addressed using the IP address.
The IP address can be provided automatically by the router (automatic address) or can be entered manually in the router (static address). If it is entered manually, this address must also be entered in the hi-fi system.
NAS (network access storage)
The abbreviation NAS is used for devices that provide data from a hard drive to a network.
Network name (SSID)
The network name (SSID - service set identifier) is the term used for the identification of a wireless network that is based on IEEE 802.11.
Every wireless LAN has a configurable SSID, which uniquely identifies the wireless network.
The character sequence of the network name can be up to 32 characters in length. It is configured in the base station (access point) of a wireless LAN and set on all clients which access it.
Network mask
The network mask or net mask, sometimes also referred to as a subnet mask, is a bit mask that separates an IP address into a network part and a device/host part. It is used in IP networks to make routing decisions.
Private IP address
Private IP addresses belong to particular IP address ranges that are not routed in the Internet. They can be used by anybody for private Networks, such as LANs.
Many computer networks require complete connectivity at IP level, but only limited access to the Internet. If such a computer network has a private IP address range, it forms an intranet which cannot be accessed from the Internet as the Internet routers ignore private address ranges. A gateway or router that is placed in this private network and which has a public address in the Internet as well as a private IP address makes the connection to the Internet. This can be performed by a proxy or using NAT/PAT/Masquerading.
As the address range used can only be viewed within the private network, the same range can also be used in other private networks. The unique nature of an IP address required by the Internet protocol is ensured by this restricted visibility.
Proxy server
A proxy or proxy server is a service program for computer networks that administers data transfer. It makes data transfer faster, and can also increase security by implementing access control mechanisms.
The transfer is conducted between computers or programs in computer networks. On the server side, the proxy acts as a client; on the client side, it acts as a server.
Router
A router is a network component that links several computer networks.
The router analyses (on the basis of layer 3 information) the network packages of a protocol it receives and forwards it to the intended destination network.
Conventional routers work on layer 3 of the application layer. A router has an interface for every network connected to it. When data is received, the router determines the correct path to the destination and thereby the suitable interface via which the data can be transferred. For this it uses a locally available routing table that specifies via which router connection a particular network can be reached.
Security (WEP/WPA)
WEP (wired equivalent privacy) is the standard encryption algorithm for WLAN. It controls both access to the network as well as ensuring the confidentiality and integrity of data. This procedure is considered insecure nowadays.
For this reason, more recent WLAN installations should use the more secure WPA encryption.
V-Tuner
Service provider that provides Internet radio stations.
Wi-Fi
The Wi-Fi Alliance is an organisation that has taken on the task of certifying products from different manufacturers on the basis of the IEEE-802.11 standard, thereby ensuring that different wireless devices can operate in parallel.
On 31 October 2002, the consortium announced a new encryption technology – Wi-Fi Protected Access (WPA) – a part of the (then) forthcoming IEEE standard 802.11i which would replace the WEP encryption procedure, which was already regarded as insecure before the new standard came into force. After 802.11i came into force, the Wi-Fi group coined the term WPA2.
IEEE 802.11e is an industrial standard issued by the Institute of Electrical and Electronics Engineers (IEEE) and a supplement to the wireless LAN standard IEEE 802.11 for supporting the quality of service.
802.11e works according to a similar principle as the QoS procedure DiffServ. Data packages in the WLAN are marked by the sender and the access point is stopped in order to handle packages with higher priority.
With the aid of 802.11e, real-time application such as Voice over IP are better supported as they require a certain bandwidth in the network to ensure the connection is not interrupted if other network traffic creates too great a burden on the available data transfer rate.
Licence conditions
This product is protected by the intellectual property rights of the Microsoft Corporation. The use or distribution of such technology outside of this product is prohibited unless under licence from Microsoft or an authorised subsidiary.
Content providers use the digital rights management technology for Windows Media contained in this device ("WM-DRM") to protect the integrity of their content ("Secure Content") so that their intellectual property, including copyright, in such content is not misappropriated. This device uses WM-DRM software to play Secure Content ("WM-DRM Software"). If the security of the WM-DRM Software in this device has been compromised, owners of Secure Content ("Secure Content Owners") may request that Microsoft revoke the WM-DRM Software's right to acquire new licenses to copy, display and/or play Secure Content. This revocation does not affect the ability of the WM-DRM software to playback unprotected content. A list of revoked WM-DRM Software is sent to your device whenever you download a license for Secure Content from the Internet or from a PC. Microsoft may, in conjunction with such license, also download revocation lists onto your device on behalf of Secure Content Owners.
"Real enabled" licence conditions for end users
End users
a. May not modify, technically reconstruct or take apart the device, or make any other attempts to decode the source code or imitate the functions of the customer code. This clause is only invalid if specifically prohibited by law.
b. Will resign all claims and conditions in the name of Real Networks Inc. that are not specified in these license conditions for end consumers; this explicitly includes claims or conditions for the purpose or marketing, and suitability for certain purposes. No liability will be accepted for indirect, specific, random and resulting damage, such as loss of value.
c. Have to confirm that "this product is protected for Microsoft by intellectual property rights. The use or distribution of this technology outside of this product is prohibited unless under licence from Microsoft or an authorised subsidiary".
Venice 6.2 licence conditions for end users
By using this product user agrees to the following End User License conditions:
1 Refrain from modifying, translating, reverse engineering, decompiling, disassembling or using other means to discover the Source Code or otherwise replicate the functionality of the Client Code, except to the extent that this restriction is expressly prohibited by applicable law.
2 This agreement disclaims on behalf of Real Networks Inc. all warranties and conditions other than those set forth in this End User License, express and implied, including implied warranties or conditions of merchantability and fitness for a particular purpose; and effectively exclude all liability for indirect, special, incidental and consequential damages, such as lost profits.
3 This product is protected by certain intellectual property rights of Microsoft. Use or distribution of such technology outside of this product is prohibited without a license from Microsoft.
3rd Party License Acknowledgements
Mp3 codec from Thomson Licensing
Notice required:
"Supply of this product does not convey a license under the relevant intellectual property of Thomson and/or Fraunhofer Gesellschaft nor imply any right to use this product in any finished end user or ready-to-use final product. An independent license for such use is required. For details, please visit http://www.mp3licensing.com."
USBware from Jungo Ltd.
Notice required:
"Copyright 1994-2005 The FreeBSD Project All rights reserved.
Redistribution and use in source and binary forms, with or without modification, are permitted provided that the following conditions are met:
-
Redistributions of source code must retain the above copyright notice, this list of conditions and the following disclaimer.
-
Redistributions in binary form must reproduce the above copyright notice, this list of conditions and the following disclaimer in the documentation and/or other materials provided with the distribution.
This software is provided by the freebsd project "as is" and any express or implied warranties, including, but not limited to, the implied warranties of merchantability and fitness for a particular purpose are dtsclaimed. In no event shall the freebsd project or contributors be liable for any direct, indirect, incidental, special, exemplary, or consequential damages (including, but not limited to, procurement of substitute goods or services; loss of use, data, or profits; or business interruption) however caused and on any theory of liability, whether in contract, strict liability, or tort (including negligence or otherwise) arising in any way out of the use of this software, even if advised of the possibility of such damage."
WPA Supplicant from Jouni Malinen
Notice required:
"Copyright (c) 2003-2008, Jouni Malinen j@w1.fi and contributors
All Rights Reserved.
Redistribution and use in source and binary forms, with or without modification, are permitted provided that the following conditions are met:
-
Redistributions of source code must retain the above copyright notice, this list of conditions and the following disclaimer.
-
Redistributions in binary form must reproduce the above copyright notice, this list of conditions and the following disclaimer in the documentation and/or other materials provided with the distribution.
-
Neither the name(s) of the above-listed copyright holder(s) nor the names of its contributors may be used to endorse or promote products derived from this software without specific prior written permission.
This software is provided by the copyright holders and contributors "as is" and any express or implied warranties, including, but not limited to, the implied warranties of merchantability and fitness for a particular purpose are disclaimed. In no event shall the copyright owner or contributors be liable for any direct, indirect, incidental, special, exemplary, or consequential damages (including, but not limited to, procurement of substitute goods or services; loss of use, data, or profits; or business interruption) however caused and on any theory of liability, whether in contract, strict liability, or tort (including negligence or otherwise) arising in any way out of the use of this software, even if advised of the possibility of such damage."
LWIP from LWIP Licensors
Notice required:
"Copyright (c) 2001-2004 Swedish Institute of Computer Science.
Copyright (c) 2001-2004 Leon Woestenberg leon.woestenberg@gmx.net
Copyright (c) 2001-2004 Axon Digital Design B.V., The Netherlands.
Copyright (c) 2007 Dominik Spies kontakt@dspies.de
Copyright (c) 2002 CITEL Technologies Ltd.
All rights reserved.
Redistribution and use in source and binary forms, with or without modification, are permitted provided that the following conditions are met:
-
Redistributions of source code must retain the above copyright notice, this list of conditions and the following disclaimer.
-
Redistributions in binary form must reproduce the above copyright notice, this list of conditions and the following disclaimer in the documentation and/or other materials provided with the distribution.
-
The name of the author may not be used to endorse or promote products derived from this software without specific prior written permission.
This software is provided by the author "as is" and any express or implied warranties, including, but not limited to, the implied warranties of merchantability and fitness for a particular purpose are disclaimed. In no event shall the author be liable for any direct, indirect, incidental, special, exemplary, or consequential damages (including, but not limited to, procurement of substitute goods or services; loss of use, data, or profits; or business interruption) however caused and on any theory of liability, whether in contract, strict liability, or tort (including negligence or otherwise) arising in any way out of the use of this software, even if advised of the possibility of such damage."
FLAC from Xiph.org Foundation
Notice required:
"Copyright (C) 2000,2001,2002,2003,2004, 2005,2006,2007,2008 Josh Coalson
Redistribution and use in source and binary forms, with or without modification, are permitted provided that the following conditions are met:
- Redistributions of source code must retain the above copyright notice, this list of conditions and the following disclaimer.
- Redistributions in binary form must reproduce the above copyright notice, this list of conditions and the following disclaimer in the documentation and/or other materials provided with the distribution.
- Neither the name of the Xiph.org Foundation nor the names of its contributors may
be used to endorse or promote products derived from this software without specific prior written permission.
This software is provided by the copyright holders and contributors ``as is'' and any express or implied warranties, including, but not limited to, the implied warranties of merchantability and fitness for a particular purpose are disclaimed. In no event shall the foundation or contributors be liable for any direct, indirect, incidental, special, exemplary, or consequential damages (including, but not limited to, procurement of substitute goods or services; loss of use, data, or profits; or business interruption) however caused and on any theory of
Liability, whether in contract, strict liability, or tort (including negligence or otherwise) arising in any way out of the use of this software, even if advised of the possibility of such damage."
OpenSSL from The OpenSSL Project
Notice required:
"Copyright (c) 1998-2007 The OpenSSL Project. All rights reserved.
Redistribution and use in source and binary forms, with or without modification, are permitted provided that the following conditions are met:
-
Redistributions of source code must retain the above copyright notice, this list of conditions and the following disclaimer.
-
Redistributions in binary form must reproduce the above copyright notice, this list of conditions and the following disclaimer in the documentation and/or other materials provided with the distribution.
-
All advertising materials mentioning features or use of this software must display the following acknowledgment:
"This product includes software developed by the OpenSSL Project for use in the OpenSSL Toolkit. (http://www.openssl.org/)"
-
The names "OpenSSL Toolkit" and "OpenSSL Project" must not be used to endorse or promote products derived from this software without prior written permission. For written permission, please contact openssl-core@openssl.org.
-
Products derived from this software may not be called "OpenSSL" nor may "OpenSSL" appear in their names without prior written permission of the OpenSSL Project.
-
Redistributions of any form whatsoever must retain the following acknowledgment: "This product includes software developed by the OpenSSL Project for use in the OpenSSL Toolkit (http://www.openssl.org/)"
This Software Is Provided By The Openssl Project “As Is” And Any Expressed Or Implied Warranties, Including, But Not Limited To, The Implied Warranties Of Merchantability And Fitness For A Particular Purpose Are Disclaimed. In No Event Shall The Openssl Project Or Its Contributors Be Liable For Any Direct, Indirect, Incidental, Special, Exemplary, Or Consequential Damages (Including, But Not Limited To, Procurement Of Substitute Goods Or Services; Loss Of Use, Data, Or Profits; Or Business Interruption) However Caused And On Any Theory Of Liability, Whether In Contract, Strict Liability, Or Tort (Including Negligence Or Otherwise) Arising In Any Way Out Of The Use Of This Software, Even If Advised Of The Possibility Of Such Damage.”
"Copyright (C) 1995-1998 Eric Young (eay@cryptsoft.com)
All rights reserved.
Redistribution and use in source and binary forms, with or without modification, are permitted provided that the following conditions are met:
-
Redistributions of source code must retain the copyright notice, this list of conditions and the following disclaimer.
-
Redistributions in binary form must reproduce the above copyright notice, this list of conditions and the following disclaimer in the documentation and/or other materials provided with the distribution.
-
All advertising materials mentioning features or use of this software must display the following acknowledgement: "This product includes cryptographic software written by Eric Young (eay@cryptsoft.com)" The word 'cryptographic' can be left out if the routines from the library being used are not cryptographic related.
-
If you include any Windows specific code (or a derivative thereof) from the apps directory (application code) you must include an acknowledgement: "This product includes software written by Tim Hudson (tjh@cryptsoft.com)"
This software is provided by eric young ``as is'' and any express or implied warranties, including, but not limited to, the implied warranties of merchantability and fitness for a particular purpose are disclaimed. In no event shall the author or contributors be liable for any direct, indirect, incidental, special, exemplary, or consequential damages (including, but not limited to, procurement of substitute goods or services; loss of use, data, or profits; or business interruption) however caused and on any theory of liability, whether in contract, strict liability, or tort (including negligence or otherwise) arising in any way out of the use of this software, even if advised of the possibility of such damage."
LPTT Software
The LPTT software is licensed on a non-exclusive, non-transferable/non-assignable basis with no right to sell, assign, loan, lease or otherwise transfer it. The licence comes with very limited warranties.
Cleaning the device
Pull out the power cord from the wall socket. Clean the device by using a soft cloth slightly moistened with a mild detergent solution. Do not use a solution containing alcohol, spirits, ammonia or abrasives.
Environmental note
This product has been manufactured with high quality parts and materials which can be reused and are suitable for recycling.
Therefore, do not dispose the product with normal domestic waste at the end of its service life. Take it to a collection point for the recycling of electrical and electronic equipment. This is indicated by this symbol on the product, in the operating manual and on the packaging.
Please consult your local authorities to learn the nearest collection point.
Help protect the environment by recycling used products.
Technical data
C€2150
This device is noise-suppressed according to the applicable EU directives.
This product fulfils the European directives 1999/5/EC and 2009/125/EC.
The type plate is located on the bottom of the device.
Do not open the device casing under any circumstances. No warranty claims are accepted for damage caused by incorrect handling.
System
Operating voltage: 100 - 240 V, 50/60 Hz with adapter
Input: 100 - 240V \~ 50/60Hz 650mA
Output: 6 V = 1800 mA-
Adapter model no: OH-1018A0601800U-VDE
Max. power
consumption: 20 W
Power consumption
in standby: ≤ 1.8 W
Amplifier unit Output
Sine wave power: 1 x 2 W
Audio power: 1 x 3 W
Receiver unit
Reception range FM: 87.5 ...108.0 MHz
Reception range DAB: 174.928-239.200 MHz, 5A-13F
File format
MP3, WMA, AAC, FLAC, WAV
WLAN
Network standard IEEE 802.11b IEEE 802.11g
Transfer rate 802.11b:11, 5.5, 2,1 Mbps
802.11g: 54, 48, 36, 24,
18, 12, 12, 9, 6 Mbps
Operating channels: 13 (based on the router)
Safety: Hardware-WEP-Engine (64/128Bit); WEP-Weak-Key-Avoidance (WEPplus), TKIP, Hardware-AES-Engine with support for CCM and OCB, 802.1x, SSN
USB
USB 2.0 compatible FAT 32/16
Dimensions and weight
Dimensions: W x H x D 275 x 147 x 86 mm
Weight: 0.92 kg
Technical and design modifications reserved.
Troubleshooting
Not every kind of sound interference is caused by a defect in your device. Cables that have accidentally been disconnected and flat batteries for the remote control will impair functioning. If the following measures do not resolve the problem satisfactorily, please visit www.grundig.com, product range:audio, internet radios or contact your specialist dealer.
General Faults
| Problem | Possible cause/remedy |
| No sound. | The volume setting is too low – increase the volume.The headphones are plugged in – disconnect the headphones.Power cable is not properly connected, connect the power cable properly.Mute is activated, deactivate mute. |
| The device does not react when the buttons are pressed. | Static electrical discharge. Switch off the device, disconnect the power cable and plug it in again after a few seconds.The remote control does not work.The batteries are flat. Replace the batteries.The remote control is out of range of the device. |
| Poor radio reception. | Weak antenna signal, check antenna.Interference from electrical devices such as televisions, video recorders, computers, neon lamps, thermostats or motors.Keep the device away from such equipment. |
Internet faults
| Problem | Possible cause/remedy |
| Desired WLAN network not found. | - WLAN network is deactivated, switch on the WLAN network.- SSID is suppressed on the router; display SSID on the router.- Distance to router is too large; reduce distance to router. |
| Connection to router not established. | - MAC address of the device is not enabled on the router; enable MAC address (see menu item »Info«) on the router.- Data transfer from the router is encrypted; Enter the network key (WEP or WPA) on the device.If this does not help, check the entire router configuration. |
| Music playback is briefly interrupted. | High network usage on the radio station server. |
Messages from the device
| Message | Possible cause/remedy |
| Connection failed | - WLAN network is deactivated; switch on the WLAN network- Range Problem: move the device closer to the router or install an external repeater.- Other networks are transmitting on the same channel; change channel settings on the router, then repeat the registration procedure |
| Please wait | - Indicates a search in the network for the selected radio station.When this is displayed, navigation in the menu is not possible. |
| Network error | - The selected radio station is currently not available. The broadcaster has ceased operation or only broadcasts at certain times or the maximum permitted numer of users has been reached.- The selected file is currently not available. The file has been deleted, moved ore renamed on the storage medium. |
| Insufficient power to USB | - The connected USB device is not supplied with sufficient power.Switch off the Cosmopolit, remove the USB device and charge. |
Streaming problems
| Problem | Possible cause/remedy |
| No UPnP server is displayed in the »Shared media« menu. | - Switch on the PC or external hard drive (NAS).- Start UPnP server. |
| The music archive (UPnP server) is displayed, however no connection is made. | - Check the setting of the firewall (if installed) for the UPnP server and correct if necessary.- Enable the device on the UPnP server in use. |
| The music archive is empty. | - Enable the folder on the UPnP server. |
| Display: »List not complete« | The list of the music archive (UPnP server) is not completely sorted.Please wait until the UPnP server software in use has completely sorted the music archive. |
- CONNECTION AND PREPARATION
- JOG-SHUTTLE
- SETTINGS
- GENERAL FUNCTIONS
- INTERNET RADIO MODE
- INTERNET RADIO TUNING SERVICE
- SHARED MEDIA MODE
- USB MODE
- DAB MODE
- FM MODE
- AUX MODE
- TIMER MODE
- SPECIAL SETTINGS
- INFORMATION
- Packing contents
- Special features
- Note:
- The device controls
- The front of the device
- Jog-Shuttle
- The back of the device
- Note
- The remote control
- The display
- Connecting external devices
- Notes:
- Connecting an MP3 player or a USB memory stick
- Connecting the headphones
- LAN connection to the internet
- WLAN connection to the internet
- Connecting to the mains supply
- Caution:
- Putting battery in the remote control
- Environmental note:
- Functions and operation using the Jog-Shuttle on the device
- The functions
- Example – Setting the time and date automatically
- Menu navigation
- First Installation using the installation assistant "Wizard"
- Start First Installation
- Selecting the menu language
- Searching for and saving DAB stations
- Automatic station search
- Manual station search
- Sorting channels
- Deleting a station list
- Saving DAB radio stations on presets
- Setting Dynamic Range Control (DRC) for DAB stations
- Searching for and saving FM stations
- Tuning stations manually
- Saving FM radio stations on presets
- Setting the sound effect "My EQ"
- Adjusting the brightness of the display
- Switching on and off
- Selecting the input source
- Adjusting the volume
- Selecting sound settings
- By using the menu
- Muting
- Setting stereo or mono reception (only in FM radio mode)
- Listening to an Internet radio station
- Selecting the internet radio stations' input source
- Selecting Internet radio stations according to search criteria
- Selecting the Internet radio menu
- Searching for Internet radio stations in »Location« category
- Searching for Internet radio stations in the »Genre« category
- Searching for Internet radio stations by name
- Selecting the most popular Internet radio stations
- Selecting Internet radio stations which the Internet provider has added recently
- Storing Internet radio stations on presets
- Opening preset Internet stations
- Direct selection using a preset
- Selecting manually-added Internet radio stations
- Opening the most recently selected Internet stations
- Displaying information about Internet radio stations
- Listening to a Podcast
- Registering on the GRUNDIG homepage
- Creating lists of favourites
- Preparation
- Selecting radio stations using the search function
- Selecting a radio station from the available genres
- Searching for radio stations that are not provided by V-Tuner
- Shared media server (audio streaming)
- Selecting the shared media input source
- Other playback functions
- Adding tracks or files
- Playing playlists
- Deleting one or all tracks/files from the playlist
- Playback of media and "remote control" of Cosmopolit via the PC
- Play using the "Play to ..." function in the Windows Media Player
- Play using the "Play to ..." function without the Windows Media Player
- Display information
- Playing the contents of a USB memory stick
- Pausing and resuming playback
- Repeating the current track
- Selecting another track
- During playback
- In stop mode
- Searching for a passage within a file or track
- Repeating all files or tracks (Repeat All)
- Playing tracks in random order
- Selecting the DAB input source
- Selecting a DAB station – from the station list
- Selecting a DAB station – from presets
- Selecting a DAB station – from the favourites list
- Displaying DAB station information
- Selecting the tuner input source
- Selecting stations – from presets
- Selecting stations – from the list Recall Preset
- Stereo and mono reception
- Displaying RDS station information
- Listening to an external source
- Switch-on timer
- Setting the timer
- Interrupting the timer
- Activating and deactivating the timer
- Sleep timer
- Setting the sleep timer
- Cancelling the sleep timer
- Displaying Software and ID information
- Displaying information and network status
- Installing an additional network
- Setting the WLAN region
- Deleting servers which cannot be accessed
- Registering the device with the WLAN router with individual network settings
- Enter the IP address.
- Enter the Subwork mask.
- Enter the Gateway address.
- Enter the Primary DNS.
- Setting the time, time zone and date automatically
- Setting the time, time zone and date manually
- Updating the device software
- Changing the menu language
- Restoring the default settings (reset)
- Glossary
- Boot loader version
- Domain name system
- Firmware version
- Gateway IP
- Hardware version
- IP address
- NAS (network access storage)
- Network name (SSID)
- Network mask
- Private IP address
- Proxy server
- Router
- Security (WEP/WPA)
- V-Tuner
- Wi-Fi
- Licence conditions
- "Real enabled" licence conditions for end users
- End users
- Venice 6.2 licence conditions for end users
- 3rd Party License Acknowledgements
- Mp3 codec from Thomson Licensing
- USBware from Jungo Ltd.
- WPA Supplicant from Jouni Malinen
- LWIP from LWIP Licensors
- FLAC from Xiph.org Foundation
- OpenSSL from The OpenSSL Project
- LPTT Software
- Cleaning the device
- Environmental note
- Technical data
- C€2150
- System
- Amplifier unit Output
- Receiver unit
- File format
- WLAN
- USB
- Dimensions and weight
- Troubleshooting
Brand : GRUNDIG
Model : Cosmopolit 3F plus WEB
Category : Radio