
Festival 80 - Hi-Fi System HARMAN KARDON - Free user manual and instructions
Find the device manual for free Festival 80 HARMAN KARDON in PDF.


| Product Type | Hi-Fi System with CD Changer, Tuner, and Surround Sound |
| Brand | Harman Kardon |
| Model | Festival 80 |
| Controller Dimensions (H x W x D) | 5-7/16 x 10-1/4 x 11-3/16 inches (138 x 260 x 284 mm) |
| Controller Weight | 7.3 lbs (3.3 kg) |
| CD Changer Dimensions (H x W x D) | 4 x 10⁻¹/4 x 11-3/16 inches (102 x 260 x 284 mm) |
| CD Changer Weight | 7.1 lbs (3.2 kg) |
| Subwoofer Dimensions (H x W x D) | 15-3/4 x 18 x 15-5/8 inches (400 x 457 x 397 mm) |
| Subwoofer Weight | 56 lbs (25.5 kg) |
| Satellite Speaker Dimensions (H x W x D) | 3-3/4 x 4-1/8 x 6 inches (95 x 105 x 152 mm) |
| Satellite Speaker Weight (each) | 0.5 lbs (0.23 kg) |
| Power Output (Stereo, 8 ohms) | 35 watts per channel (20 Hz - 20 kHz, <0.09% THD) |
| Subwoofer Amplifier Power | 95 watts (4 ohms, 20 - 120 Hz, <0.09% THD) |
| Power Supply | 120 V AC, 60 Hz |
| CD Capacity | 7 discs (including one 3-inch disc in slot 1) |
| FM Tuner Range | 87.5 - 108 MHz |
| AM Tuner Range | 530 - 1710 kHz |
| Surround Sound Modes | Dolby Pro Logic, Movie, Music, Hall |
| Maintenance | Clean with a soft dry cloth; mild soapy water if needed. Avoid solvents. |
| Safety Precautions | Do not open cabinet; no user-serviceable parts. Use only with polarized outlet. |
| Spare Parts | Contact authorized Harman Kardon service center for replacement parts. |
| General Information | Includes remote control, AM/FM antennas, speaker wires, and ribbon cable. |
Frequently Asked Questions - Festival 80 HARMAN KARDON
User questions about Festival 80 HARMAN KARDON
0 question about this device. Answer the ones you know or ask your own.
Ask a new question about this device
Download the instructions for your Hi-Fi System in PDF format for free! Find your manual Festival 80 - HARMAN KARDON and take your electronic device back in hand. On this page are published all the documents necessary for the use of your device. Festival 80 by HARMAN KARDON.
USER MANUAL Festival 80 HARMAN KARDON
For more information and your nearest
Harman Kardon dealer please call 800-422-8027.
Harman Kardon
250 Crossways Park Drive, Woodbury, NY 11797
8500 Balboa Boulevard, Northridge, CA 91329

A Harman International Company
* Manufactured under license from Dolby Laboratories Licensing Corporation. "Dolby," the double-D symbol ☐, and "Pro Logic" are trademarks of Dolby Laboratories Licensing Corporation. © 1998 Harman Kardon, Incorporated FEST60/80-OM-1
harman/kardon
Festival 60/80 Owner's Guide
Important Safeguards 2
Safety Information 3
Quickstart 4-7
Tuner 8-9
CD Changer 10-11
Aux 12
Clock 13
Speaker Placement 14-15
Bass Treble 15
Balance 15
Surround Setup 16-17
Surround Operation 18
Troubleshooting 19
Specifications 20
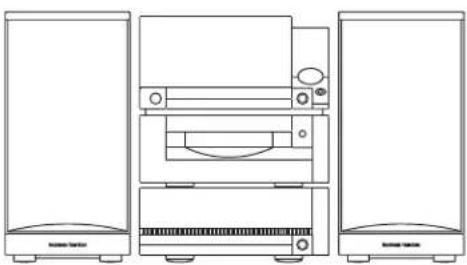
natural_image
Line drawing of a multi-tiered electronic device with front and back views (no text or symbols)festival 60 festival 80
natural_image
Line drawing of household appliances including a refrigerator, TV, and wall-mounted devices (no text or symbols)Important Safeguards
Read Instructions
All the safety and operating instructions should be read before the product is operated.
Follow Instructions
All operating and use instructions should be followed.
Retain Instructions
The safety and operating instructions should be retained for future reference.
Heed Warnings
All warnings on the appliance and in the operating instructions should be adhered to.
Water and Moisture
The appliance should not be used near water — for example, near a bathtub, washbowl, kitchen sink, laundry tub, in a wet basement, near a swimming pool, etc.
Carts and Stands
The appliance should be used only with a cart or stand that is recommended by the manufacturer. An appliance and cart combination should be moved with care. Quick stops, excessive force, and uneven surfaces may cause the appliance and cart combination to overturn.
Wall or Ceiling Mounting
The appliance should be mounted to a wall or ceiling only as recommended by the manufacturer.
Ventilation
The appliance should be situated so that its location or position does not interfere with its proper ventilation. For example, the appliance should not be situated on a bed, sofa, rug, or similar surface that may block the ventilation openings; or, placed in a built-in installation such as a bookcase or cabinet that may impede the flow of air through the ventilation openings.
Heat
The appliance should be situated away from heat sources such as radiators, heat registers, stoves, or other appliances (including amplifiers) that produce heat. Do not expose to direct sunlight.
Moving the Unit
Before moving the unit, be certain to disconnect any cords connected to other components, and make certain that you disconnect the unit from the AC outlet.
Grounding or Polarization
This appliance is equipped with a polarized plug and must be used with a polarized receptacle. The polarization or grounding of the plug should not be defeated. If the type of receptacle being used is not polarized, an electrician should be contacted.
Power-Cord Protection
Power-supply cords should be routed so that they are not likely to be walked on or pinched by items placed upon or against them, paying particular attention to cords at plugs, convenience receptacles, and the point where they exit from the appliance. We do not recommend the use of extension cords with this product.
Power Lines
An outdoor antenna should be located away from power lines.
Nonuse Periods
The power cord of the appliance should be unplugged from the outlet when left unused for a long period of time.
Object and Liquid Entry
Care should be taken so that objects do not fall and liquids are not spilled into the enclosure through openings.
Servicing
Do not attempt to service this product yourself as opening or removing covers may expose you to dangerous voltage or other hazards. Refer all servicing to qualified service personnel.
Overloading
Do not overload wall outlets and extension cords as this can result in a risk of fire or electric shock.
Damage Requiring Service
The appliance should be serviced by qualified service personnel when:
The power-supply cord of the plug has been damaged; or
Objects have fallen, or liquid has been spilled into the appliance; or
The appliance has been exposed to rain; or
The appliance does not appear to operate normally, or exhibits a marked change in performance; or
The appliance has been dropped, or the enclosure damaged.
Replacement Parts
When replacement parts are required, be sure the service technician has used replacement parts specified by the manufacturer or have the same characteristics as the original part. Unauthorized substitutions may result in fire, electric shock, or other hazards.
Safety Check
Upon completion of any service or repairs, ask the service technician to perform a safety check to determine that the product is in proper operating condition.
U.S. and Canadian customers should use 120 volts AC only. Other customers should use voltages appropriate to their area. Connecting the units to an outlet supplying a higher voltage may create a fire hazard.
Safety Information
Verify Line Voltage Before Use
Festival has been designed for use with 120 volt AC current. Connection to a line voltage other than 120 volts can create a safety and fire hazard, and may damage the unit.
If you have any questions about the voltage requirements for your specific model or about the line voltage in your area, consult your selling dealer before plugging the unit into a wall outlet.
Do Not Use Extension Cords
To avoid safety hazards, use only the power cord supplied with your unit. We do not recommend that extension cords be used with this product.
As with all electrical devices, do not run power cords under rugs or carpets or place heavy objects on them. Damaged power cords should be replaced immediately with cords meeting factory specifications.
Handle the AC Power Cord Gently
When disconnecting the power cord from an AC outlet, always pull the plug, never pull the cord. If you do not intend to use the unit for any considerable length of time, disconnect the plug from the AC outlet.
Do Not Open the Cabinet
There are no user serviceable components inside this product. Opening the cabinet may present a shock hazard, and any modification to the product will void your warranty. If water or any metal object such as a paper clip, a wire or a staple accidentally falls inside the unit, disconnect it from the AC power source immediately and consult an authorized service station.
CATV or Antenna Grounding
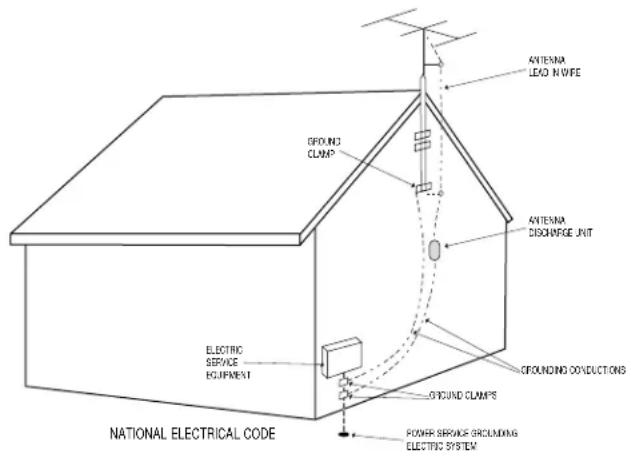
If an outside antenna or a cable system is connected to this product, be certain that it is grounded to provide some protection against voltage surges and static charges. Section 810 of the National Electrical Code, ANSI/NFPA No. 70-1984, provides information with respect to proper grounding of the mast and supporting structure, grounding of the lead-in wire to an antenna discharge unit, size of grounding conductors, location of antenna discharge unit, connection to grounding electrodes and requirements of the grounding electrode.
NOTE TO CATV SYSTEM INSTALLER
This reminder is provided to call the CATV (Cable TV) system installer's attention to article 820-40 of the NEC that provides guidelines for proper grounding and, in particular, specifies that the cable ground shall be connected to the grounding system of the building, as close to the point of cable entry as possible.
Installation Location
To assure proper operation and to avoid the potential for safety hazards, place the unit on a firm and level surface. When placing the unit on a shelf, be certain that the shelf and any mounting hardware can support the weight of the product.
Make certain that proper space is provided both above and below the unit for ventilation. If this product will be installed in a cabinet or other enclosed area, make certain that there is sufficient air movement within the cabinet. Under some circumstances a fan may be required.
Do not place the unit directly on a carpeted surface.
Avoid installation in extremely hot or cold locations, or an area that is exposed to direct sunlight or heating equipment.
Avoid moist or humid locations.
Do not obstruct the ventilation slots on the top of the unit, or place objects directly over them.
Cleaning
When the unit gets dirty, wipe it with a clean, soft, dry cloth. If necessary, wipe it with a soft cloth dampened with mild soapy water, and then a fresh cloth with clean water. Wipe dry immediately with a dry cloth. NEVER use benzene, aerosol cleaners, thinner, alcohol or any other volatile cleaning agent. Do not use abrasive cleaners, as they may damage the finish. Avoid spraying insecticide near the unit.
Moving the Unit
Before moving the unit, be certain to disconnect any interconnection cords with other components, and make certain that you disconnect the unit from the AC outlet.
Important Information for the User
NOTE: This equipment has been tested and found to comply with the limits for a Class B digital device, pursuant to Part 15 of the FCC Rules. The limits are designed to provide reasonable protection against harmful interference in a residential installation. This equipment generates, uses and can radiate radio frequency energy and, if installed and used in accordance with the instructions, may cause harmful interference to radio communication. However, there is no guarantee that harmful interference will not occur in a particular installation. If this equipment does cause harmful interference to radio or television reception, which can be determined by tuning the equipment off and on, the user is encouraged to try to correct the interference by one or more of the following measures:
Reorient or relocate the receiving antenna.
Increase the separation between the equipment and receiver.
Connect the equipment into an outlet on a circuit different from that to which the receiver is connected.
Consult the dealer or an experienced radio/TV technician for help.
This device complies with Part 15 of the FCC Rules. Operation is subject to the following two conditions: 1) this device may not cause harmful interference, and 2) this device must accept interference received, including interference that may cause undesired operation.
NOTE: Changes or modifications may cause this unit to fail to comply with Part 15 of the FCC Rules and may void the user's authority to operate the equipment.

CAUTION
RISK OF ELECTRIC SHOCK DO NOT OPEN

CAUTION: TO REDUCE THE RISK OF ELECTRIC SHOCK, DO NOT REMOVE COVER (OR BACK). NO USER-SERVICEABLE PARTS INSIDE. REFER SERVICING TO QUALIFIED SERVICE PERSONNEL.

The lightning flash with arrowhead symbol, within an equilateral triangle, is intended to alert the user to the presence of uninsulated "dangerous voltage" within the product's enclosure that may be of sufficient magnitude to constitute a risk of electric shock to persons.

The exclamation point within an equilateral triangle is intended to alert the user to the presence of tant operating and maintenance (servicing) instructions literature accompanying the appliance.
WARNING: TO REDUCE THE RISK OF FIRE OR ELECTRIC SHOCK, DO NOT EXPOSE THIS APPLIANCE TO RAIN OR MOISTURE.
CAUTION: TO PREVENT ELECTRIC SHOCK, MATCH WIDE BLADE OF PLUG TO WIDE SLOT. FULLY INSERT. ATTENTION: POUR EVITER LES CHOCS ELECTRIQUES, INRODUIRE LA LAME LA PLUS LARGE DE LA FICHE DANS LA BORNE CORRESPONDANTE DE LA PRISE ET POUSSER JUSQU'AU FOND.
Quickstart
1 Be Safe
Read the safety instructions on pages 2 and 3.
2 Unpack & Stack
Stack components as shown below.
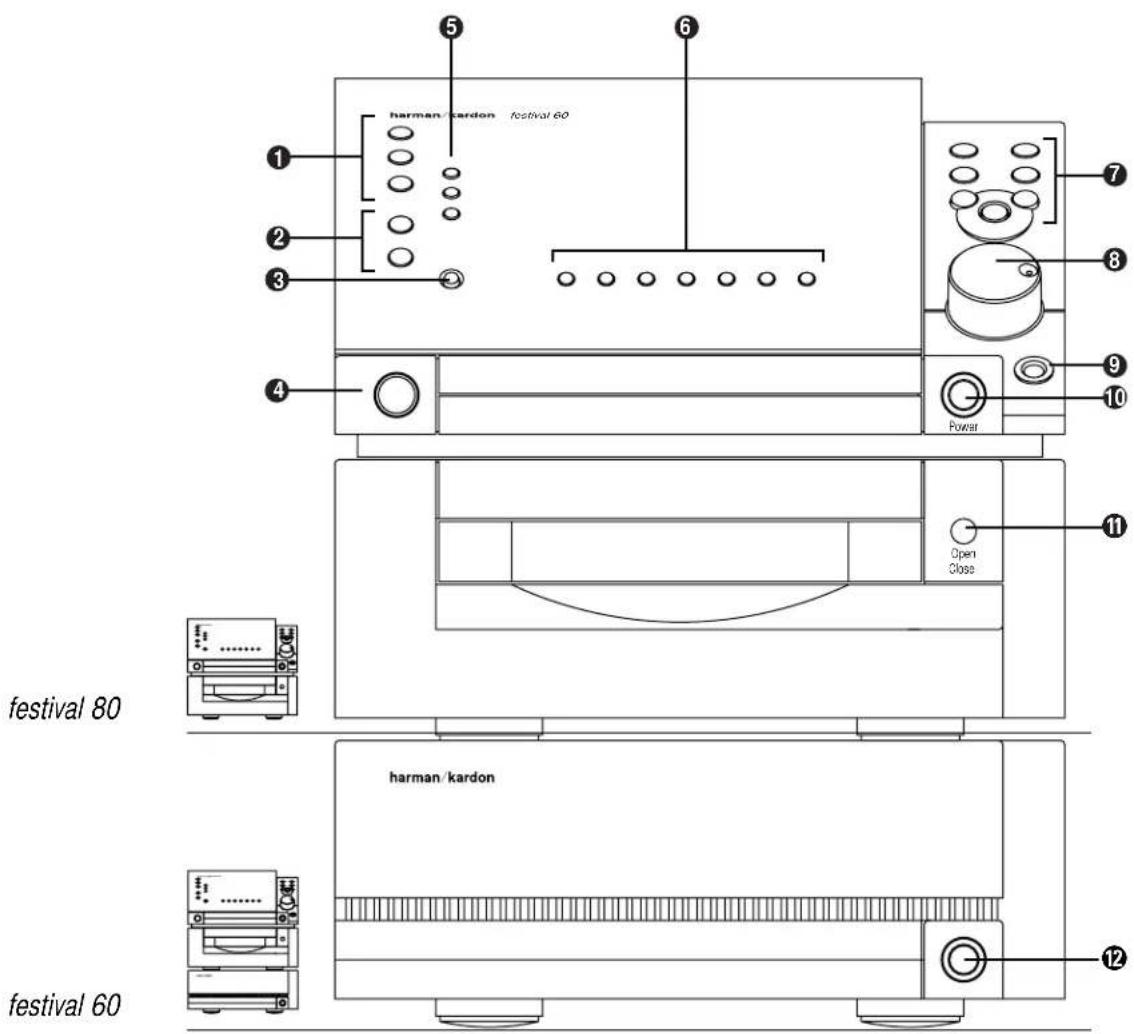
Product Overview Front
① Source Buttons
Press desired source button to select input source.
② Sound Keys
Press to access sound quality and tone control functions for all sources.
③ Clock
Press to access the clock, sleep and wake functions.
④ Remote Control Receiver
Point remote control at this area for optimum remote operation. (Remote range is 15 feet.)
⑤ Option Buttons
These buttons change function based on the source being used. Press to select functions specific to each source. Some functions require more than one press for adjustment or selection.
⑥ Selection Buttons
In the Tuner mode these buttons store or recall preset stations, in the CD mode they select discs, and in the Aux mode they select Aux inputs. In the Clock mode they adjust the time and the wake time setting.
⑦ Play Controls
Press to select, adjust and operate functions specific to each source. Some functions require more than one press for adjustment or selection.
⑧ Volume Knob
Rotate to adjust volume level.
⑨ Headphone Jack
Accepts 1/8" headphone connector.
⑩ Power
Press lightly to put the system into Standby (which saves all settings). Press firmly to turn unit completely Off. The power light is green when the system is On and orange when the system is in Standby.
⑪ Open/Close
Press to open and close the CD drawer.
⑫ Power Indicator (Festival 60 only)
This indicator is green when the system is On and orange when the system is in Standby.
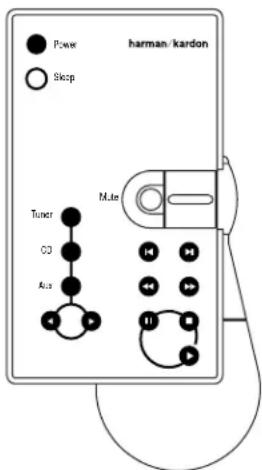
festival 60 remote
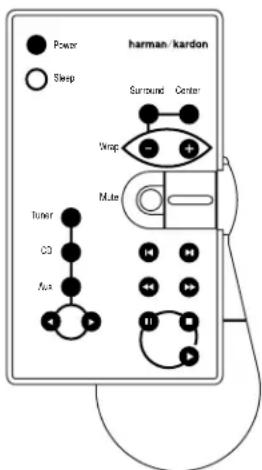
festival 80 remote
Remote
Place batteries (included) in the remote as shown below. Most of the buttons and controls on the remote have functions identical to the buttons and controls on the control unit. The remote control requires two AA batteries. The range is 15 feet.
Power
Press to put the unit in Standby.
Sleep
Press to put the system into the Sleep mode. (See clock section on page 13 for more information).
Source Buttons
Press desired source button to select an input source.
Selection Buttons
Press to scroll through and select functions specific to each source.
Volume Controls
Press Volume to adjust sound level.
Press Mute to temporarily silence speaker output.
Play Controls
Press to select, adjust and operate functions specific to each source.
Festival 80 only
Surround
Press to access surround sound control functions.
Center
Press to access center speaker control functions.
Wrap
Press to adjust surround sound effects.
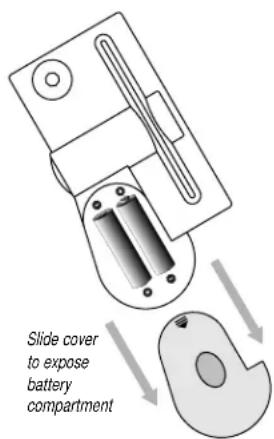
harman/kardon
Electronics
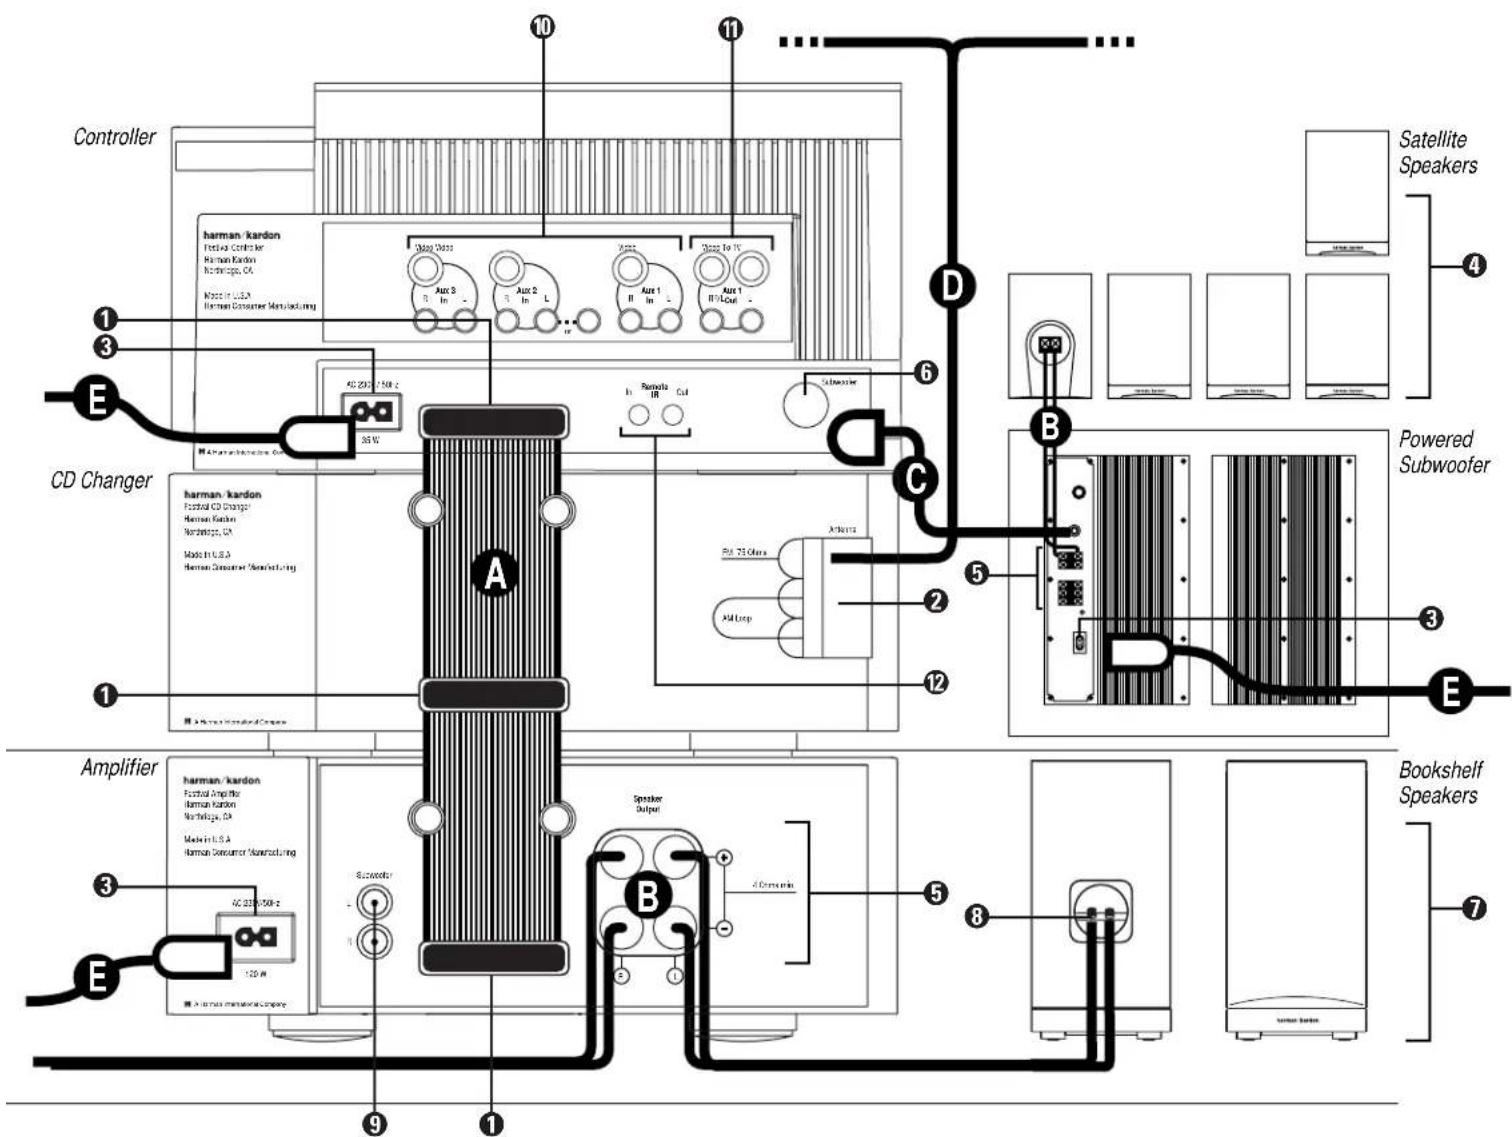
① Connect the Ribbon Wire
Push the plugs on the ribbon wire Ⓐmly into corresponding connectors on the Controller until they “click” into place. Slip the wire edges beneath cable management clips.
② Connect the Antenna
FM
Connect the included antenna or an external FM antenna to the FM (75 ohm) connector. The included 300 ohm to 75 ohm adapter is required for connections from twin lead or inside dipole antennas.
AM
Assemble the included AM Loop Antenna and connect it to the AM and GND connectors. If an external AM antenna is used, follow the instructions supplied with the antenna.
③ Connect the Power Cord
Plug the female end of the power cord (provided) into the AC power jack on the rear of the unit. Do not plug the male end into an AC outlet until all other connections have been made. In addition to the power connection to the controller, Festival 60 has a power connection to the Amplifier and Festival 80 has a power connection to the Powered Subwoofer.
Speakers
Festival 80
④ Position the Speakers
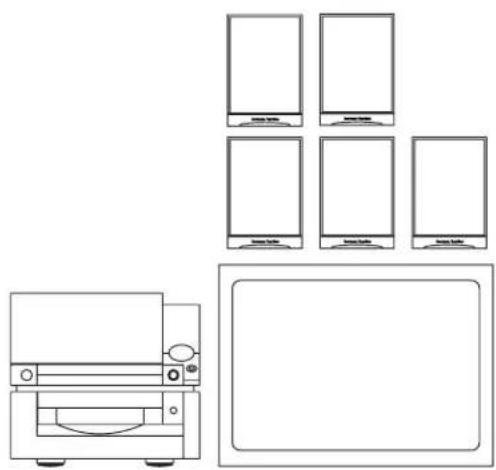
Festival 80 includes five 2-way satellite speakers and one powered subwoofer. The satellite speakers all connect to the subwoofer. The subwoofer connects directly to the controller. See page 14 for speaker placement recommendations.
⑤ Connect the Speakers
The five speakers each have a pair of spring-loaded wire clips. The subwoofer has five pairs of corresponding connectors. Run a length of the provided wire from each speaker to the subwoofer. Cut the wire and strip the two leads at each end. Attach the leads at the speaker to the red and black clips. To ensure proper polarity, attach the leads at the subwoofer to the corresponding colored spring clips. Repeat for all four remaining speakers.
⑥ Connect the Subwoofer
Connect the round multi-pin connector of the subwoofer cable Ⓐ the subwoofer jack on the Controller. Connect the other end to the jack on the back of the subwoofer as shown.
Festival 60
⑦ Position the Speakers
Festival 60 includes two 2-way “bookshelf” speakers that can be placed almost anywhere in a room and still provide superior sound quality. Both speakers connect directly to the controller. See page 14 for speaker placement recommendations.
⑧ Connect the Speakers
Both speakers have a pair of screw-type wire connectors. The amplifier has two pairs of similar connectors. Run a length of the provided wire from each speaker to the amplifier. Cut the wire and strip the two leads at each end. Unscrew the knobs on the back of the speaker to reveal a hole in each post. Insert one lead in the red post hole and the other in the black, then tighten. To ensure proper polarity, attach the leads at the amplifier to the two corresponding colored connectors.
⑨ Connect the Subwoofer (optional)
If you are adding an optional powered subwoofer to this system, connect the subwoofer to the jacks on the back of the amplifier.
Optional Connections
⑩ Aux 1, 2 & 3 Inputs
Connect the audio and video outputs of up to three external sources (DVD, VCR, cassette, etc.) to these jacks. Connect computers and portable audio products to the R/L jack linked to Aux 2. If the R/L jack is used, the Aux 2 input is disabled.
⑪ Aux 1 Output
Connect these jacks to the audio and video inputs of a VCR or cassette deck to record Festival's output. Connect the "To TV" output jack to the video input of your TV, projector or video monitor to view the video source selected by Festival.
⑫ Remote IR Extension
If the Festival's front panel remote control receiver is blocked, connect an external IR (InfraRed) sensor to this jack and place sensor in an unobstructed area.
Connectors
festival 80
A Ribbon wire
B Speaker wire
Subwoofer cable (Festival 80 only)
D Antenna
Power cord
festival 60
4 Press Power
The rest of this guide covers the features of the Festival system.

flowchart
graph TD
    A["Controller"] --> B["CD Changer"]
    B --> C["Amplifier"]
    C --> D["Speaker Output"]
    D --> E["Subwoofer"]
    E --> F["Satellite Speakers"]
    E --> G["Powered Subwoofer"]
    G --> H["Bookshelf Speakers"]

    subgraph Control
        I["Harman/Kardon<br>Radio Control<br>Harman Kardon<br>Radiocope, CA<br>Katz in USA<br>Harman Consumer Manufacturing"] --> J["DC 200-150V"]
        J --> K["Aux 3<br>B In"]
        J --> L["Aux 2<br>B In"]
        J --> M["Aux 1<br>B In"]
        J --> N["Aux 1<br>B/4 Out"]
    end

    subgraph CD Changer
        O["Harman/Kardon<br>Fuzzy CD Changer<br>Harman Kardon<br>Nordcope, CA<br>Mode in USA<br>Harman Consumer Manufacturing"] --> P["AUX 50V"]
        P --> Q["Aux 50V"]
        P --> R["Aux 50V"]
        P --> S["Aux 50V"]
        P --> T["Aux 50V"]
        P --> U["Aux 50V"]
        P --> V["Aux 50V"]
        P --> W["Aux 50V"]
        P --> X["Aux 50V"]
        P --> Y["Aux 50V"]
        P --> Z["Aux 50V"]
        P --> AA["Aux 50V"]
        P --> AB["Aux 50V"]
        P --> AC["Aux 50V"]
        P --> AD["Aux 50V"]
        P --> AE["Aux 50V"]
        P --> AF["Aux 50V"]
        P --> AG["Aux 50V"]
        P --> AH["Aux 50V"]
        P --> AI["Aux 50V"]
        P --> AJ["Aux 50V"]
        P --> AK["Aux 50V"]
        P --> AL["Aux 50V"]
        P --> AM["Aux 50V"]
        P --> AN["Aux 50V"]
        P --> AO["Aux 50V"]
        P --> AP["Aux 50V"]
        P --> AQ["Aux 50V"]
        P --> AR["Aux 50V"]
        P --> AS["Aux 50V"]
        P --> AT["Aux 50V"]
        P --> AU["Aux 50V"]
        P --> AV["Aux 50V"]
        P --> AW["Aux 50V"]
        P --> AX["Aux 50V"]
        P --> AY["Aux 50V"]
        P --> AZ["Aux 50V"]
        P --> BA["Aux 50V"]
        P --> BB["Aux 50V"]
        P --> BC["Aux 50V"]
        P --> BD["Aux 50V"]
        P --> BE["Aux 50V"]
        P --> BF["Aux 50V"]
        P --> BG["Aux 50V"]
        P --> BH["Aux 50V"]
        P --> BI["Aux 50V"]
        P --> BJ["Aux 50V"]
        P --> BK["Aux 50V"]
        P --> BL["Aux 50V"]
        P --> BM["Aux 50V"]
        P --> BN["Aux 50V"]
        P --> BO["Aux 50V"]
        P --> BP["Aux 50V"]
        P --> BQ["Aux 50V"]
        P --> BR["Aux 50V"]
        P --> BS["Aux 50V"]
        P --> BT["Aux 50V"]
        P --> BU["Aux 50V"]
        P --> BV["Aux 50V"]
        P --> BW["Aux 50V"]
        P --> BX["Aux 50V"]
        P --> BY["Aux 50V"]
        P --> BZ["Aux 50V"]
        P --> CA["Bux AUX AUX AUX AUX AUX AUX AUX AUX AUX AUX AUX AUX AUX AUX AUX AUX AUX AUX AUX AUX AUX AUX AUX AUX AUX AUX AUX AUX AUX AUX AUX AUX AUX AUX AUX AUX AUX AUX AUX AUX AUX AUX AUX AUX AUX AUX AUX AUX AUX AUX AUSTA<br>    end<br>    <br>    subgraph Powered Subwoofer<br>        D[Powered Subwoofer"] --> E["Subwoofer"]
        E --> F["Subwoofer"]
        F --> G["Subwoofer"]
        G --> H["Subwoofer"]
        H --> I["Subwoofer"]
        I --> J["Subwoofer"]
        J --> K["Subwoofer"]
        K --> L["Subwoofer"]
        L --> M["Subwoofer"]
        M --> N["Subwoofer"]
        N --> O["Subwoofer"]
        O --> P["Subwoofer"]
    end

    subgraph Bookshelf Speakers
        B["Satellite Speakers"] --> C
    end

    style Control fill:#f9f,stroke:#333
    style CD Changer fill:#ccf,stroke:#333
    style Amplifier fill:#cfc,stroke:#333
    style Bookshelf Speakers fill:#fcc,stroke:#333
: Tuner
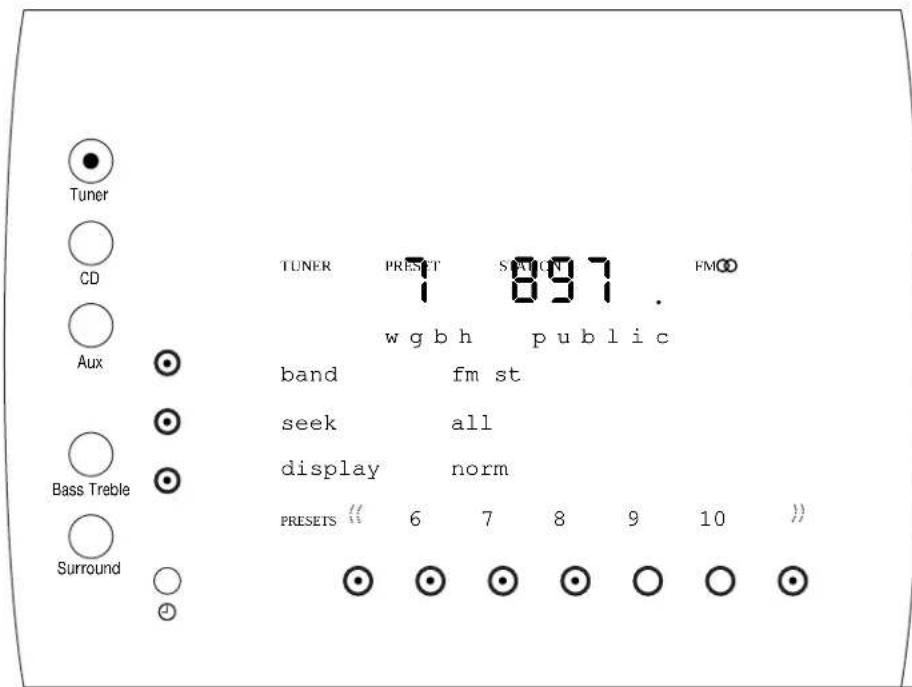
Festival features a highly precise radio tuner, including 20 presets and 2 different seek functions. Select Tuner to access all Tuner functions and controls.
Select a Source
Option Buttons
Selecting the frequency band
band
Press repeatedly for desired frequency band, AM or FM.
fm st Tunes all FM stations.
fm mo Tunes all FM stations and plays them in mono.
a m Tunes all AM stations.
Selecting the Seek mode
seek
Press repeatedly for desired Seek mode. (See Seek under Play Controls on opposite page.)
a11 Seeks all active stations in selected band.
rds Seeks only selected RDS type (FM only). See RDS on page 9 for more information.
Displaying RDS messages (FM only)
display
Press repeatedly for desired RDS display mode.
norm Displays station identification and RDS program type in message bar.
text Displays additional RDS information in message bar.
Selector Buttons
In Tuner mode, the Selector Buttons become station "presets." They instantly store or recall stations, including the band and mono/stereo mode selections.
Storing Presets
Tune to the station you want to store, then press and hold the unlit numbered button until preset done appears in the display. The selected button will light, indicating a stored preset. The system stores up to 20 presets. Storing a preset in a lit button automatically overrides the previously stored preset.
Recalling Presets
Press a lit numbered button.
Press or to access more available presets.
To clear all Presets
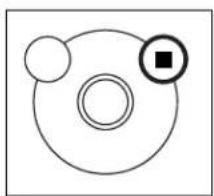
Turn the system completely off by firmly pressing the Power switch on the Control Unit so that no lights are illuminated. Then turn the system back on and immediately press the Stop button ☑ the Play controls (see below). The message bar in the Tuner screen should now read presets cleared.
Note: Depending upon the previous mode selected, the Stop button may not be illuminated.
natural_image
Simple diagram with three circles and a square, no text or symbols present
Seek


Tune

Play Controls
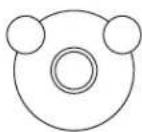
Seek

Seek

Press to skip back or forward to the next station depending on seek mode selected. (See SEEK in the Options section on page 8.)
Normal Mode
Seek will search for all stations.
RDS Mode
Seek will search for selected RDS type stations. (See RDS explanation on this page.)
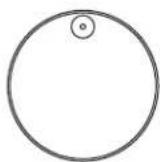
Tune

Tune

The seek mode, selected with the Options button (see page 8) affects the operation of the Tune buttons. You cannot tune in Seek RDS. If you want to tune, select Seek all.
Tuning Stations
When the Seek mode is a 11, press and release the Tune buttons to tune one frequency step at a time.
Press and hold Tune buttons for a quick scroll through all frequencies.
Selecting RDS type for Seek (FM only)
When the Seek mode is rds, the Tune buttons become Select buttons. Press and release them to scroll through and select RDS types.
Press and hold Select buttons for a quick scroll through RDS types.
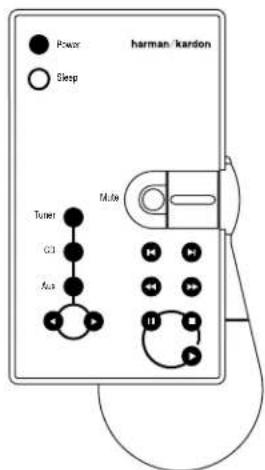
festival 60 remote
RDS
Festival displays text messages, including station identification and program type, from FM stations broadcasting RDS (Radio Data System) information.
When available, additional information may be displayed by selecting text with the display button.
Seek RDS
Seeks only stations of the selected RDS type. However, only stations broadcasting RDS information will be tuned.
Seeking for specific RDS signals
Select RDS with the seek Option Button.
Press repeatedly to select RDS type (displayed in message bar).
Press Ⓞ automatically find the next station of the selected RDS type.
Remote
Tuner functions
Many of the buttons and functions of the remote mimic the buttons and functions of the control unit in Tuner mode.
The Play Control buttons on the remote function identically to Play Controls on the control unit.
Selecting Presets using the remote
Press and releasethe Select buttons to choose programmed presets one at a time.
Press and holdSelect buttons for a fast scroll through programmed presets.
CD Changer
Festival features a programmable 7-disc CD Changer that accepts both standard-sized CD's and one 3-inch CD. Festival's sequencing feature allows you to play through loaded CDs in any order you choose. Press CD to access all CD functions and controls.
Select a Source
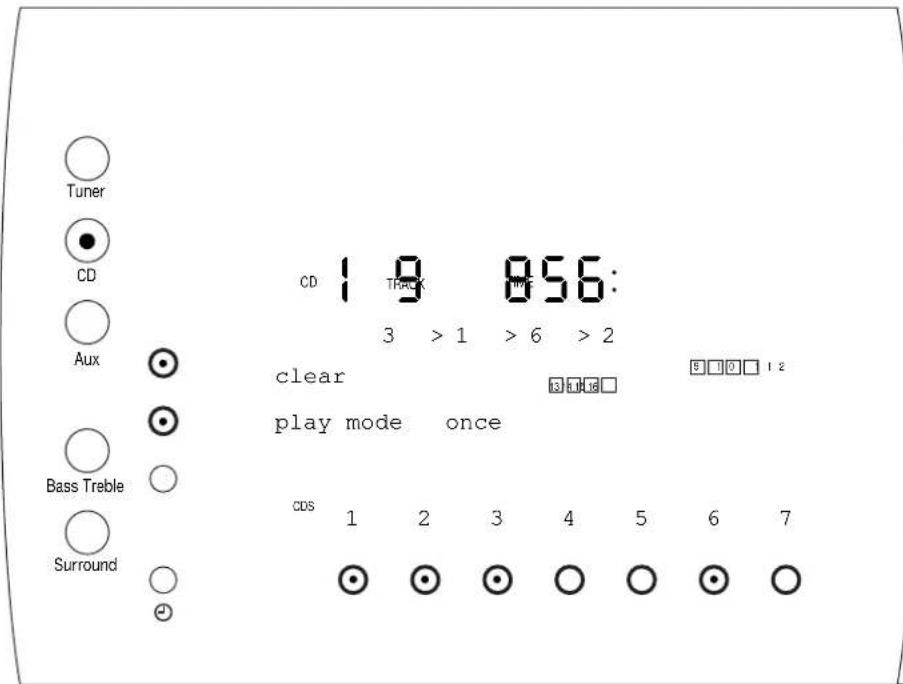
Option Buttons

Clearing a CD sequence
Press to erase the current sequence. Then select a new sequence or push Play to build and play a sequence of loaded disks. (The sequence is shown in the message area of the display.)

Selecting the play mode
play mode
Press repeatedly to select play option.
once Plays all sequenced CDs once.
rpeat Plays all sequenced CDs, then repeats sequence.
randm Randomly plays all songs from selected CDs.
Selector Buttons
In CD mode, the Selector Buttons allow you to load, select and sequence CDs.
To load CDs into empty "slots"
Press any unlit CD button (unlit = empty "slot"). The CD drawer will open automatically.
Place a CD in the CD drawer.
Note: Place 3-inch discs in slot 1 only. Placing 3-inch discs in any other slot will damage Festival and the disc.
Press OPEN/CLOSE or the button beneath the blinking disc number to close drawer.
Selecting a single CD to play
Press a lit CD button (lit = loaded CD).
Press to play CD.
Creating a sequence
Press CLEAR to erase previous sequence.
Press lit CD buttons in the order that you wish to listen.
Press to start playing sequence.
To eject a specific CD
Press lit button of CD you wish to unload.
Press OPEN/CLOSE to eject CD.
Remove CD.
Press OPEN/CLOSE to close drawer.
natural_image
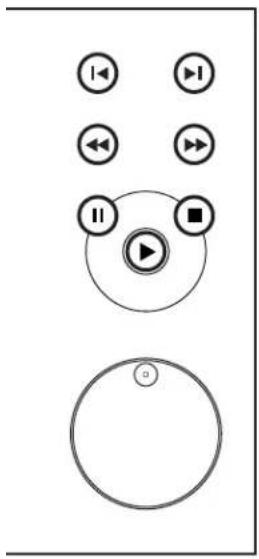
Pure electrical control panel icons without any text or symbolsPlay Controls
Skip


Press to skip back to the previous track or forward to the next track on the disk.
Press and release to skip one track at a time.
Press and hold to scroll quickly through the tracks.
Search


Press to audibly search back or forward through a track.
Press and release to search a few seconds at a time.
Press and hold for a continuous audible search through a track.
Pause

Press to pause current CD at the point of play. Press to resume play from point of pause.
Stop

Press to stop play of current CD.
Play

Press to begin play of selected CD or sequence.
Note: It may take a few moments for Festival to load CD before play begins.
Open/Close
Press to open or close CD drawer. The CD drawer can also be closed by gently pushing the drawer toward Festival.
Festival will eject the currently selected CD, which is displayed in the upper left corner of Display.
When closing, the CD drawer may appear to "stutter" or hesitate. This action actually ensures proper alignment of the discs and is part of Festival's normal operation.
Note: Place 3-inch discs in slot 1 only. Placing 3-inch discs in any other slot will damage Festival and the disc.
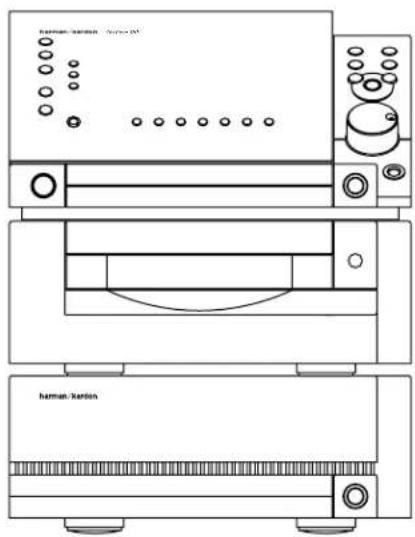
natural_image
Line drawing of a three-tier appliance with labeled parts, no text or symbols present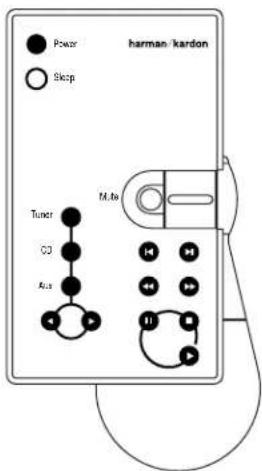
festival 60 remote
Remote CD Functions
Many of the buttons and functions of the remote mimic the buttons and functions of the control unit in CD mode.
Play Control buttons function identically to Play Controls on the control unit.
Selecting CDs using the remote
Press and release the Select buttons choose previous or next CD in sequence.
Press and hold the Select buttons for a fast scroll through CDs in sequence.
:Aux
Festival allows you to connect up to 3 external audio/video sources (DVD, VCR, cassette deck, etc.). Two of the sources (Aux 2 and Aux 3) can be recorded when they are in use. When video sources are connected, Festival also functions as a video switcher. For both audio and video, Festival does not control the external sources, but provides the ability to choose between them. Press Aux to select an external source.
Select a Source
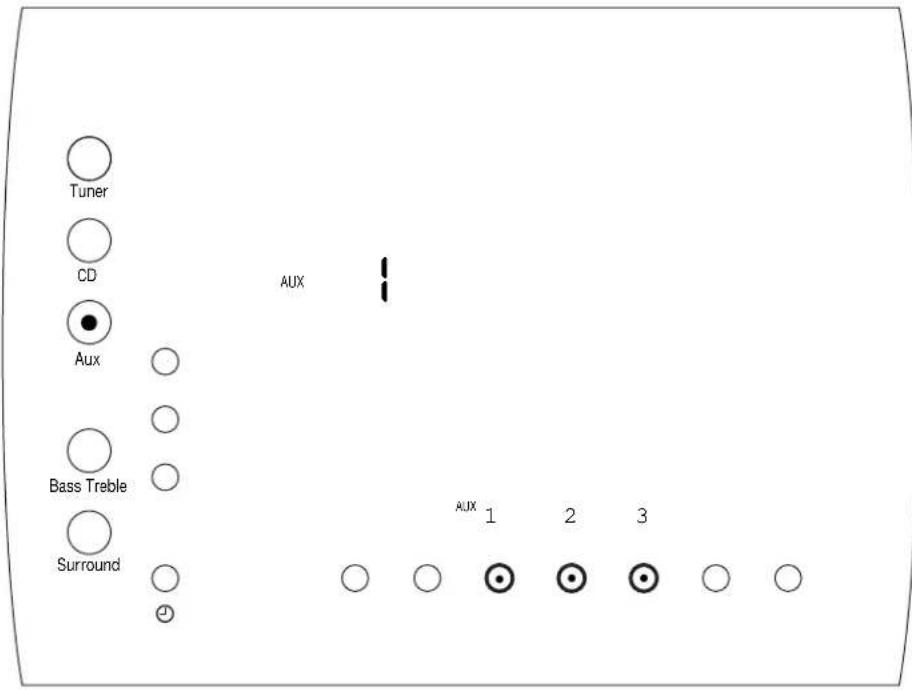
Selector Buttons
Aux 1, 2 & 3
Press to select an auxiliary input.
flowchart
graph TD
    subgraph Left_Circuit
        A["Video"] -->|Aux 3 In L| B["Video"]
        B -->|Aux 2 In L| C["Video"]
        C -->|Aux 1 In L| D["Video"]
        D -->|Aux 1 Out L| E["To TV"]
    end
    subgraph Right_Circuit
        F["Video"] -->|Aux 1 In L| G["Video"]
        G -->|Aux 1 In L| H["Video"]
        H -->|Aux 1 Out L| I["To TV"]
    end
    Left_Circuit -->|R/L| C
    Middle_Circuit -->|R/L| G
    Right_Circuit -->|R/L| H
    Left_Circuit -->|R/L| I
    Middle_Circuit -->|R/L| G
    Middle_Circuit -->|R/L| H
    Middle_Circuit -->|R/L| I
    Middle_Circuit -->|R/L| J["..."]
    Middle_Circuit -->|R/L| K["or"]
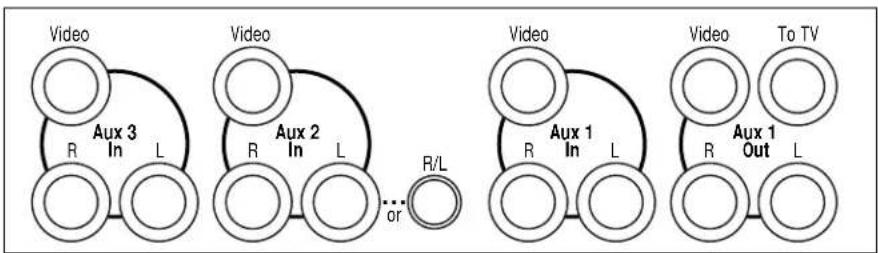
Aux Inputs & Outputs
Aux 1, 2 & 3 In
R in L
Connect these jacks to the audio PLAY/OUT jacks of an external audio source.
Video
Connect this jack to the composite video
PLAY/OUT jack of your VCR.
R/L (Aux 2 Only)
Note: The small 3.5 mm (1/8") stereo jack (R/L, above) may be used for computers or portable audio products. When this jack is used, it automatically overrides the product connected to the main Aux 2 audio inputs.
Use this jack when the external audio is delivered through a single cable or an adapter that combines separate stereo cables in one plug. With this jack, the source may be stereo or mono, but the plug must be a 3.5 mm (1/8") stereo mini-plug.
Aux 1 Out
R Out L
Connect these jacks to the RECORD/IN jacks of an external recorder (cassette recorder, VCR, etc.).
Video
Connect this jack to the composite video
RECORD/IN jack of your VCR.
To TV
Connect this jack to the composite VIDEO/IN jack of your TV.
Set The Time
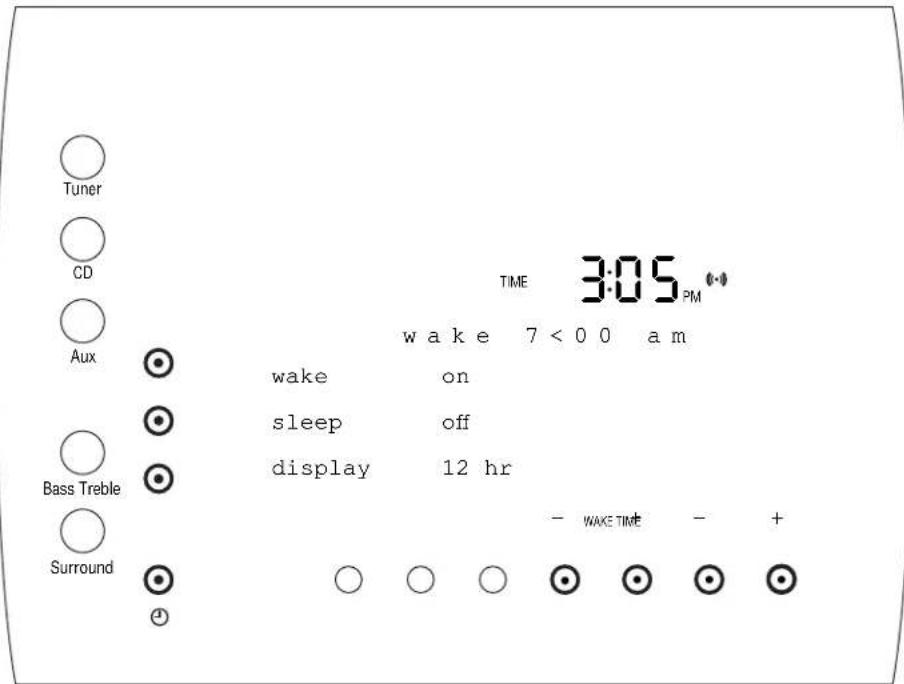
Clock

Festival features a multi-function, programmable clock. Before you can use any of Festival's clock functions, you must first set the correct time. Press the button to access all clock functions and controls.
Option Buttons
Note: Time of day must be set first using Selector buttons before setting wake times.
To wake up to music

wake
The Wake mode automatically turns Festival on and begins playing music at any time you choose.
Press wake button to on mode.
Press the _ or + wake/button until desired wake time is displayed in the message bar.
Select the music source you wish to wake to. If waking to the CD, make sure CDs are loaded and sequenced as desired. (See page 10.)
Lightly press POWER on the unit or the remote to place Festival in Standby mode.
Festival automatically turns itself on and begins playing the selected source at the set time each day until the wake function is turned off.
Press wake button to off mode.
To set Sleep timer

sleep
In Sleep mode, Festival dims its screen and plays music from the selected source for a designated amount of time, then turns itself off.
Press sleep button repeatedly until desired play time is displayed (60, 30, or 10 minutes).
When time has expired, Festival places itself in Standby, allowing Wake and Sleep functions to not interfere with each other.
To turn off Sleep function
Press sleep button repeatedly until off appears in the display.
To select a time standard

display
Press repeatedly until desired time display appears.
12 hr Shows time in 12 hour time. (with a.m. or p.m.)
24 hr Shows time in 24 hour("military") time. (no a.m. and p.m.)
off Turns Clock display off.
Selector Buttons
Setting the time of day
Press and release the _ or + Time button to adjust by one minute at a time.
Press and hold the _ or + Time button for a fast scroll through time.
Speaker Placement
For simple stereo or advanced home theater surround sound, speaker placement can greatly affect the quality of your listening experience. The following is a guide to help with proper positioning. However, you may need to experiment with speaker and subwoofer placement to achieve the best possible effect.
Note: When connecting speakers, be sure to connect the “negative” wire to the negative connectors (designated by the color black and/or a (−) symbol) on both the Festival amplifier or subwoofer amplifier and the speakers to assure proper speaker polarity. Connect the other wire to the positive terminals (designated by the color red and/or a (+) symbol).
Customizing the Surround Sound
natural_image
Line drawing of a TV setup with monitor, tower, and base (no text or symbols)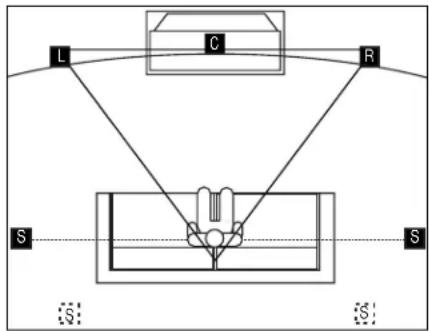
flowchart
graph TD
    S["Source S"] --> C["Object C"]
    C --> L["L"]
    C --> R["R"]
    R --> L["L"]
    style S fill:#f9f,stroke:#333
    style R fill:#ccf,stroke:#333
    style L fill:#cfc,stroke:#333
    style C fill:#fcc,stroke:#333
Festival 80 Surround Speaker Placement
Front Speakers: L, R, C
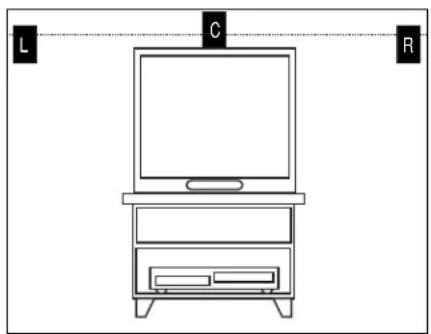
To optimize surround effect, place the center speaker on top of the TV or as close to the top of the screen as possible.
Place the front right and left speakers as close to the same height as the center speaker as possible (the tweeters of all front speakers should be within 2' (.6 m) of the same height). You may wish to place the left/right speakers slightly forward of the television, angled slightly and pointed toward the listening position.
Aim the front speakers at ear level when seated in the primary viewing/listening area.
Surround Speakers: S
Place the surround speakers on the side walls of the room, at or slightly behind the primary viewing/listening area. If side wall placement is not possible, place the surround speakers on a rear wall no more than 6' (2 m) behind the listening area.
Surround speakers should be placed at least 2' (.6 m) higher than ear level when seated.
Subwoofer
Subwoofers produce non-directional sound and may be placed almost anywhere. Experiment with location for the best results in your listening room.
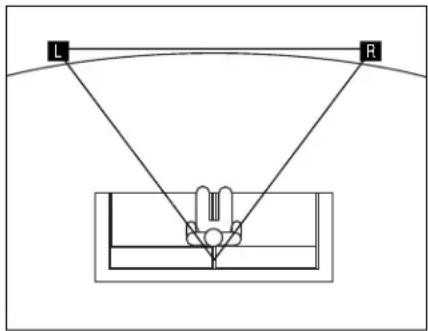
Festival 60 Stereo Speaker Placement
Position right and left speakers as far apart from each other as they are from the listening area.
Point speakers toward the listening area.
Please refer to additional instructions on page 16 for optimizing system performance.
Customizing the Sound
Option Buttons
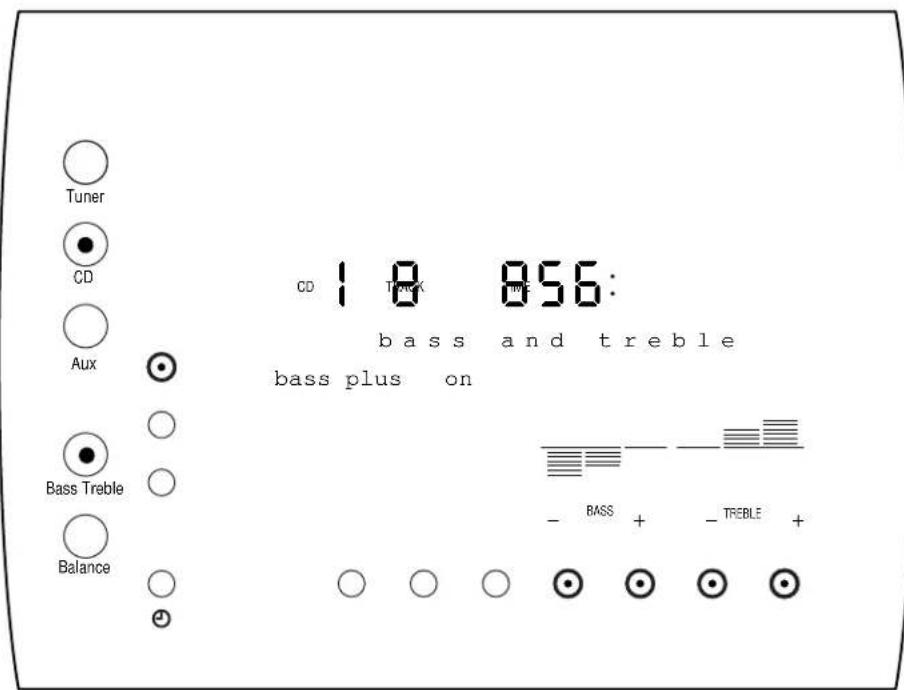
Increasing the bass output

bass plus
Bass Plus "boosts" the amount of bass, regardless of the current bass/treble setting. The effect is most noticeable at low volumes. Press to turn Bass Plus feature on or off.
on More bass.
off Less bass.
Selector Buttons
Adjusting the Bass
Press + to increase or press_ to decrease the amount of Bass.
Adjusting the Treble
Press + to increase or press_ to decrease the amount of Treble.
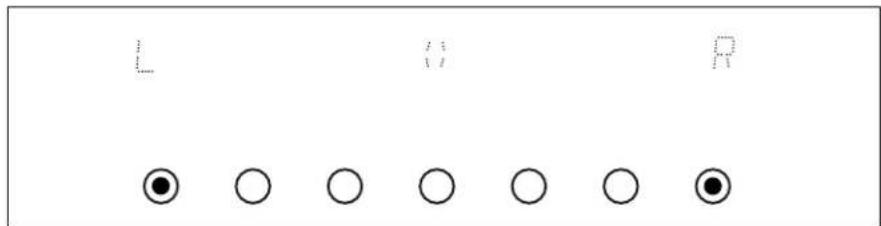
To move the sound to the left
Press the 1 button repeatedly until the desired effect is achieved.
To move the sound to the right
Press the r button repeatedly until the desired effect is achieved.
To return the sound to the center
Press the lit center selector button. It illuminates when the balance is shifted left or right.
Bass Treble:
Festival allows you to manipulate the quality and tone of the sound to match your individual preferences. The bass and treble controls affect the entire system, not just the current music source. Press the Bass Treble button to access sound equalization functions and controls.
Balance
Festival 60 Only
Press the Balance button to access speaker output controls.
Balance allows you to "move" the sound right or left until the volume level appears to sound the same from each speaker.
Customizing the Sound
Surround . Setup
Festival 80 Only
Festival allows you to customize the Surround Sound features to suit your personal needs.
Press the Surround button, then the setup button to access Surround Sound functions and controls.
Sit in the location where you will most often watch movies. Use the remote to adjust features.
Ideally, the sound from the speakers should appear to reach the listening area at the same time and at equal levels. You may need to adjust the Surround Setup and speaker placement to optimize your surround sound.
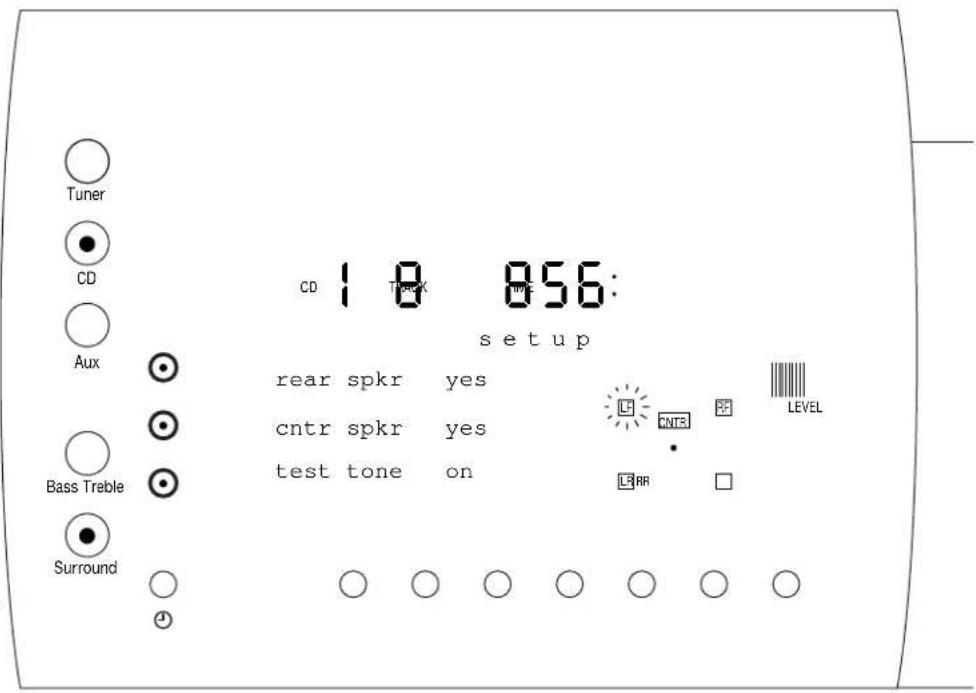
Option Buttons

To turn rear speakers on or off
rear spkr
Press to activate surround speakers (display says yes) or deactivate (display says no).
Note: If no surround speakers are connected, this setting should be NO. When they are connected, do not use this feature to mute their output.

To turn center speaker on or off
cntr spkr
Press to activate yes or deactivate no center speaker. When the center speaker is turned off, Festival automatically generates a "phantom center" from the right and left front speakers.
Note: If no center speaker is connected, this setting should be NO. When a center speaker is connected, do not use this feature to mute its output.

To turn test tone on or off
test tone
Press to turn test tone on or off.
Use the Play Control buttons to select and adjust the output of the speakers until the volume is equal from all speakers.
To adjust the output level of individual speakers in surround mode, press test tone to on. Press to select speaker to adjust.
Press to adjust speaker output.
Repeat until all output levels are equal from all speakers.
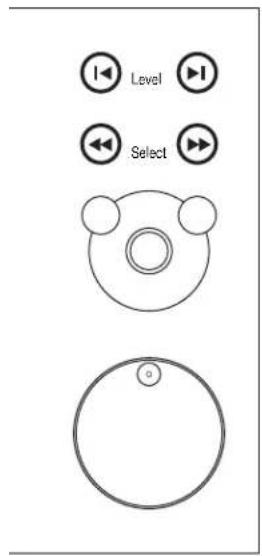
Play Controls
Adjusting the reference speaker level
When test tone is n , you should hear a static-like hiss from the left front speaker and the LF light on the display will blink. This is the reference speaker and can only be adjusted from the main volume control on the amplifier.
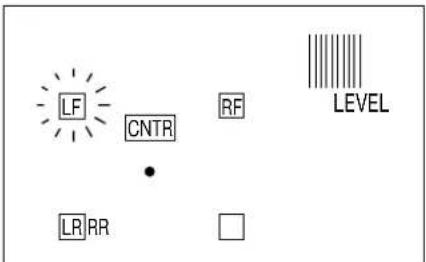
Selecting other speakers for level adjustment

Select

Press and release to select individual speakers for test tone adjustment. Press and hold to move continuously between speakers for easy comparison.
Adjusting other speaker levels

Level

Press and release to incrementally adjust the test tone level for the selected speaker. Press and hold for continuous adjustment.
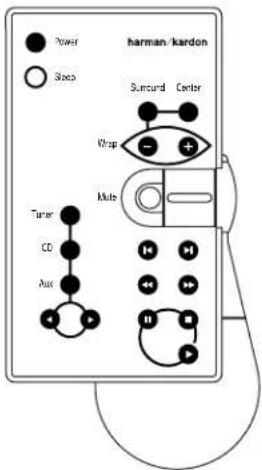
festival 80 remote
Remote Surround Sound Functions
The remote duplicates some of the Surround Sound buttons on the control unit. Use the remote to select and adjust some Surround Setup features while you are seated in the listening area for perfect customization.
Customizing the Sound
Surround Operation
Festival 80
Festival 80 is equipped to deliver superior home theater sound for movies and music. Festival 80 uses a 5-speaker system and a subwoofer to create realistic effects and surround imaging.
Press Surround to access all surround functions and controls.
Note: It is normal for the surround channels to operate only occasionally and often to be silent.
Movie directors typically use these channels exclusively to establish ambiance or create effects.
Turning the volume level up to "hear" more surround sound may actually distort the intended illusion and introduce unwanted system noise.
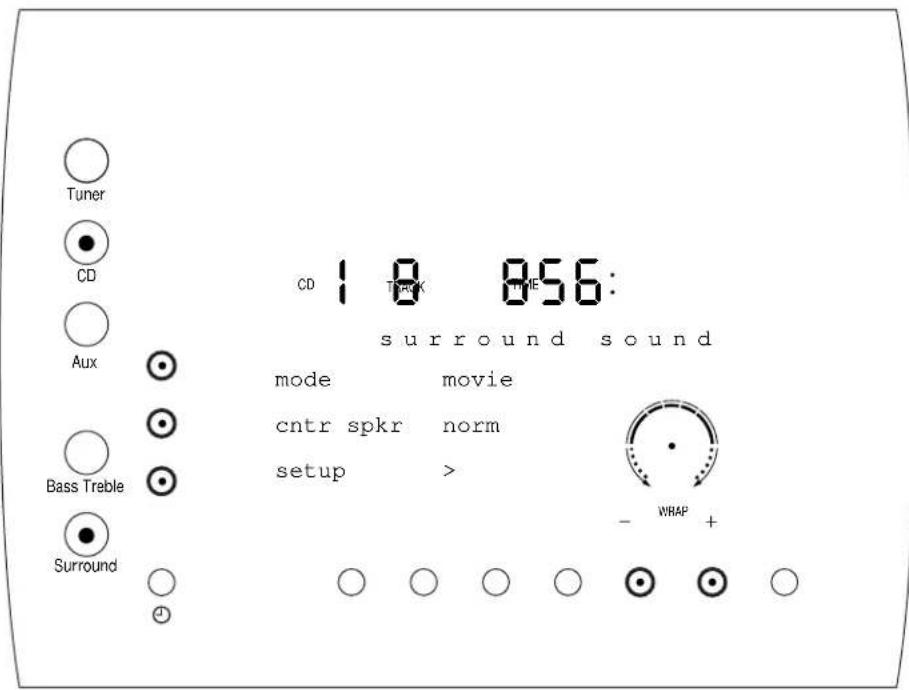
Option Buttons

Choosing a Surround mode
mode
Press repeatedly for desired Surround mode.
movie Duplicates the acoustics of a movie theater. This mode activates Festival's Dolby* Pro Logic* feature which reads the surround sound effects in movies.
music Creates optimal surround for music sources.
hall Hall simulator.
off Surround sound turned off.
Adjusting the output of your center speaker

cntr spkr
Press repeatedly for desired center speaker mode.
norm Center speaker loudness is equal to other speakers.
boost Increases center speaker loudness without affecting other speakers. This is a convenient way to selectively increase the center channel volume of movies or other video or Dolby Pro Logic sources.

Configuring your system for surround sound
setup
Press to access surround speaker setup functions. Pressing setup will change the function of some buttons and activate functions of others (see pages 16-17).
Selector Buttons
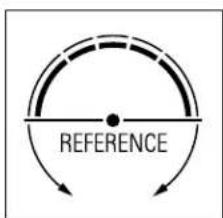
An innovative Festival feature called Wrap allows you to control the feeling of spaciousness in a listening area by creating the illusion of distance between the front and surround speakers.
Movie and Music surround modes begin with a factory default setting for the Wrap effect. The Movie and Music settings may be adjusted by using the selector buttons on the console. Press _ to decrease or + to increase how far the sound "wraps" around the listening area. Dots on the Wrap indicator will light to show changes to the Wrap setting.
The Movie mode is based on Dolby Pro Logic, a surround sound process that uses information encoded in two-channel stereo recordings to produce four distinct channels (left, center, right and surround). Dolby Pro Logic is used in movies, television programs and some music recordings. When the word REFERENCE appears in the Wrap Indicator, the Wrap circuits are turned off for standard Pro Logic operation. Increase or decrease the amounts of Wrap as shown above to suit your listening taste.
Troubleshooting
Festival is designed for trouble-free operation. So, if you have a problem, first check this list for a possible solution. If the problem persists, consult your authorized Harman Kardon Service Center.
| If the problem is... | Make sure that the... |
| No lights on when POWER button pressed: | Unit is plugged into a live outlet.Power switch was pressed all the way in and released. |
| No sound is heard: | Speakers are connected.Unit has not been muted.Correct input function selector button is pressed. |
| No sound is heard: (Festival 60 only) | Amplifier is plugged in.Ribbon cable is attached to amplifier. |
| No sound is heard: (Festival 80 only) | Subwoofer is plugged in.Subwoofer is connected to the Controller. |
| Dolby Surround does not work on center and surround channels: (Festival 80 only) | Correct surround mode is selected.Center and/or surround speakers are selected.Surround and center levels are turned up.You are using a surround encoded source. |
| Selecting a Video source produces sound but no picture: | “To TV” output is connected to the video input on your TVs. |
| The TV picture does not match the sound: | Video sources are properly connected to receiver.Video/antenna Switch on TV is set to Video. |
| No output from the left or right channels:(Festival 60 only) | Wires to that speaker are not disconnected/damaged.Balance is centered. |
| No output from one or more channels:(Festival 80 only) | Wires to that speaker are not disconnected/damaged.Test tone levels for that speaker are audible. |
| No center channel output: | Center channel speaker is selected.Phantom mode is not active.Unit is in the Pro Logic mode.Center channel level is properly adjusted.Center speaker is connected. |
| Tuner sound has a large amount of interference, or the “Stereo” display is not illuminated, or Tuner sound distorts and/or volume level is too low: | The antenna is properly connected.The antenna is properly located.The antenna is set in the proper direction.The antenna is adequate to receive the desired station. |
| Tuner is intermittent or continuously buzzing or hissing: | The unit is away from fluorescent lights, motors and other electrical appliances. |
| Festival does not respond to remote control: | Remote sensor on front of Festival is unobstructed.Remote is pointed directly at the remote sensor.Remote batteries are still good. |
Specifications
| Festival 60 | Festival 80 | |
| Power Amplifier | ||
| Power Output: Stereo: 8 ohms (20 - 20kHz, <0.09%THD) 35 watts 35 wattsSurround: Left/Right/Center @ 8 ohms (20 - 20kHz, <0.09%THD) N/A 35 wattsSurround: Rear Channels: 4 ohms (20 - 20kHz, <0.09%THD) N/A 20 watts | ||
| High-Current Capability: Stereo & Main Channel Amps +/-35 amps +/-35 amps | ||
| Power Bandwidth @ 8 Ohms 10Hz - 60kHz 10Hz - 60kHzFrequency Response (1W +0/-3dB) 0.2Hz - 140kHz 0.2Hz - 140kHz | ||
| Rise Time 0.8μSec 0.8μSecSlew Rate 105V/μSec 105V/μSec | ||
| S/N Ratio (Reference, Rated Power, A-Wtd.) 112dB | 112dB | |
| Subwoofer Output | 850mV | N/A |
| Subwoofer Amplifier Power @ 4 ohms (20 - 120Hz, <0.09%THD) | N/A 95 watts | |
| Subwoofer Amplifier High-Current Capability | N/A +/- 60 amps | |
| Dimensions (H x W x D) | 4 x 10⁻¹/4 x 11-3/16"/102 x 260 x 284mm | N/A |
| Weight | 11.9lbs/5.4kg | N/A |
| FM Tuner | ||
| Tuning Range (100kHz - step) | 87.5MHz - 108MHz | 87.5MHz - 108MHz |
| Usable Sensitivity, Stereo, A-Wtd. (S/N 30dB) | 18dBf | 18dBf |
| 50dB Quieting Sensitive, Stereo, A-Wtd. (97.9MHz) | 42dBf | 42dBf |
| S/N Ratio 65dBf, Mono/Stereo, A-Wtd. (97.9MHz) | 70dB/65dB | 70dB/65dB |
| Capture Ratio | 1.6dB | 1.6dB |
| Selectivity, Adjacent Channel, +/- 400kHz (97.9MHz) | 55dB | 55dB |
| IF Rejection (97.9MHz) | 120dB | 120dB |
| THD 1kHz, 65dBf | 0.30% | 0.30% |
| AM Tuner | ||
| Tuning Range (10kHz - step) | 530kHz - 1710kHz | 530kHz - 1710kHz |
| Sensitivity (S/N 20dB) 600kHz/1000kHz, 1400kHz | 900μV/m / 630μV/m | 900μV/m / 630μV/m |
| Alternate Channel Selectivity (6dB S/N Sensitivity), +/-10kHz | 45dB | 45dB |
| Image Rejection (6dB S/N Sensitivity) | 40dB | 40dB |
| IF Rejection (6dB S/N Sensitivity) | 60dB | 60dB |
| 7-Disc CD Changer | ||
| System | Compact Disc Digital Audio | |
| D/A Converter | 4X oversampling filter, 3D BitstreamTM, Secondary delta sigma noise shaper | |
| Error Correction | CIRC System | CIRC System |
| Frequency Response | 20Hz - 20kHz, +/-3dB | 20Hz - 20kHz, +/-3dB |
| THD | 0.03% | 0.03% |
| Dynamic Range | 90dB | 90dB |
| S/N Ratio | 82dB | 82dB |
| Channel Separation | 70dB | 70dB |
| Dimensions (H x W x D) | 4 x 10⁻¹/4 x 11-3/16"/102 x 260 x 284mm | 4 x 10⁻¹/4 x 11-3/16"/102 x 260 x 284mm |
| Weight | 7.1lbs/3.2kg | 7.1lbs/3.2kg |
| Controller | ||
| Input Sensitivity/Impedance | 150mV/100kohm | 150mV/100kohm |
| Frequency Response (1W +1/-3dB) 7Hz - 100kHz 7Hz - 100kHzS/N Ratio (Reference, Rated Power, A-Wtd.) 100dB | 100dB | |
| Tone Control Range (+/-) Bass 50Hz/Treble 10kHz | +/-10dB +/-10dB | |
| Surround Modes | N/A Pro Logic | ®, Movie, Music, Hall |
| Dimensions (H x W x D) | 5-7/16 x 10-1/4 x 11-3/16"/138 x 260 x 284mm | 5-7/16 x 10-1/4 x 11-3/16"/138 x 260 x 284mm |
| Weight | 7.3lbs/3.3kg | 7.3lbs/3.3kg |
| Subwoofer/Amplifier | ||
| Driver | N/A Dual 8" | |
| Frequency Response +/-3dB | N/A 32Hz - 150Hz | |
| Sensitivity 2.83VRMS @ 1m | N/A 87dB | |
| Impedance | N/A 4 ohms nominal | |
| Dimensions (H x W x D) | N/A 15-3/4 x 18 x 15-5/8"/400 x 457 x 397mm | |
| Weight | N/A 56lbs/25.5kg | |
| Speakers | ||
| High-Frequency Driver | 1" Flare-Dome Tweeter | 1" Flare-Dome Tweeter |
| Midrange/Bass Driver | 6" Co-polymer | 3-1/2" Laminated Fiber |
| Crossover 4kHz | 150Hz, 4kHz | |
| Frequency Response +/-3dB | 50Hz - 20kHz 150Hz - 20kHz | |
| Sensitivity 2.83VRMS @ 1m | 87dB | 87dB |
| Impedance | 8 ohms nominal | 8 ohms nominal |
| Dimensions (H x W x D) | 10-1/8 x 6-7/8 x 13-1/2"/257 x 175 x 343mm | 3-3/4 x 4-1/8 x 6"/95 x 105 x 152mm |
| Weight | 11lbs/5kg | 0.5lbs/0.23kg |
harman/kardon
- harman/kardon
- Festival 60/80 Owner's Guide
- Important Safeguards
- Read Instructions
- Follow Instructions
- Retain Instructions
- Heed Warnings
- Water and Moisture
- Carts and Stands
- Wall or Ceiling Mounting
- Ventilation
- Heat
- Moving the Unit
- Grounding or Polarization
- Power-Cord Protection
- Power Lines
- Nonuse Periods
- Object and Liquid Entry
- Servicing
- Overloading
- Damage Requiring Service
- Replacement Parts
- Safety Check
- Safety Information
- Verify Line Voltage Before Use
- Do Not Use Extension Cords
- Handle the AC Power Cord Gently
- Do Not Open the Cabinet
- CATV or Antenna Grounding
- NOTE TO CATV SYSTEM INSTALLER
- Installation Location
- Cleaning
- Important Information for the User
- CAUTION
- RISK OF ELECTRIC SHOCK DO NOT OPEN
- Quickstart
- Be Safe
- Unpack & Stack
- Product Overview Front
- ① Source Buttons
- ② Sound Keys
- ③ Clock
- ④ Remote Control Receiver
- ⑤ Option Buttons
- ⑥ Selection Buttons
- ⑦ Play Controls
- ⑧ Volume Knob
- ⑨ Headphone Jack
- ⑩ Power
- ⑪ Open/Close
- ⑫ Power Indicator (Festival 60 only)
- Remote
- Power
- Sleep
- Source Buttons
- Selection Buttons
- Volume Controls
- Play Controls
- Festival 80 only
- Surround
- Center
- Wrap
- Electronics
- ① Connect the Ribbon Wire
- ② Connect the Antenna
- ③ Connect the Power Cord
- Speakers
- ④ Position the Speakers
- ⑤ Connect the Speakers
- ⑥ Connect the Subwoofer
- ⑦ Position the Speakers
- ⑧ Connect the Speakers
- ⑨ Connect the Subwoofer (optional)
- Optional Connections
- ⑩ Aux 1, 2 & 3 Inputs
- ⑪ Aux 1 Output
- ⑫ Remote IR Extension
- Connectors
- festival 80
- Press Power
- : Tuner
- Option Buttons
- Selecting the frequency band
- Selecting the Seek mode
- Displaying RDS messages (FM only)
- Selector Buttons
- Storing Presets
- Recalling Presets
- To clear all Presets
- Seek
- Tune
- RDS
- Seek RDS
- Seeking for specific RDS signals
- Tuner functions
- Selecting Presets using the remote
- CD Changer
- Clearing a CD sequence
- Selecting the play mode
- To load CDs into empty "slots"
- Selecting a single CD to play
- Creating a sequence
- To eject a specific CD
- Skip
- Search
- Pause
- Stop
- Play
- Open/Close
- Remote CD Functions
- Selecting CDs using the remote
- :Aux
- Aux Inputs & Outputs
- Clock
- To wake up to music
- To set Sleep timer
- To turn off Sleep function
- To select a time standard
- Setting the time of day
- Speaker Placement
- Festival 80 Surround Speaker Placement
- Festival 60 Stereo Speaker Placement
- Increasing the bass output
- Adjusting the Bass
- Adjusting the Treble
- To move the sound to the left
- To move the sound to the right
- To return the sound to the center
- Bass Treble:
- Balance
- Festival 60 Only
- Surround . Setup
- To turn rear speakers on or off
- To turn center speaker on or off
- To turn test tone on or off
- Adjusting the reference speaker level
- Selecting other speakers for level adjustment
- Adjusting other speaker levels
- Remote Surround Sound Functions
- Surround Operation
- Choosing a Surround mode
- Adjusting the output of your center speaker
- Configuring your system for surround sound
- Troubleshooting
- Specifications
Brand : HARMAN KARDON
Model : Festival 80
Category : Hi-Fi System