
Horizon Trio XT - Hi-Fi BOSTON ACOUSTICS - Free user manual and instructions
Find the device manual for free Horizon Trio XT BOSTON ACOUSTICS in PDF.


| Product Type | Hi-Fi Shelf System |
| Brand | Boston Acoustics |
| Model | Horizon Trio XT |
| Dimensions (W x H x D) | Approximately 18.9 x 9.8 x 12.2 inches (main unit) |
| Weight | Approximately 15.4 lbs (main unit with speakers) |
| Power Supply | AC 120V / 60Hz |
| Power Consumption | 45W (operating), <1W (standby) |
| Supported Disc Formats | CD, CD-R, CD-RW, MP3 CD |
| Tuner Bands | FM (87.5-108 MHz) with RDS |
| Bluetooth Version | 4.2 with A2DP, AVRCP |
| Audio Inputs | AUX (3.5mm), USB (Type A) |
| Speaker Output | 2 x 20W RMS (stereo) |
| Frequency Response | 50 Hz - 20 kHz |
| Display | LCD with white backlight |
| Remote Control | Included (CR2032 battery) |
| Clock Function | Yes, with dual alarm and sleep timer |
| Equalizer Presets | Rock, Pop, Jazz, Classic, Flat |
| Maintenance | Clean with a soft, dry cloth. Avoid liquid cleaners. |
| Safety | Do not expose to rain or moisture. Keep ventilation slots clear. |
| Spare Parts and Repairability | Contact Boston Acoustics support or authorized service center for replacements. |
Frequently Asked Questions - Horizon Trio XT BOSTON ACOUSTICS
User questions about Horizon Trio XT BOSTON ACOUSTICS
0 question about this device. Answer the ones you know or ask your own.
Ask a new question about this device
Download the instructions for your Hi-Fi in PDF format for free! Find your manual Horizon Trio XT - BOSTON ACOUSTICS and take your electronic device back in hand. On this page are published all the documents necessary for the use of your device. Horizon Trio XT by BOSTON ACOUSTICS.
USER MANUAL Horizon Trio XT BOSTON ACOUSTICS
natural_image
Front view of a portable electronic device with front panel, control panel, and buttons (no text or symbols)Horizon Trio XT
High Performance Tabletop DAB/FM/CD Music System
Great, Room-Filling Sound From Any Source!
Español
High Performance Tabletop CD Music System
High Performance Tabletop CD Music System
IMPORTANT SAFETY INSTRUCTIONS

This symbol found on the apparatus indicates hazards arising from dangerous voltages.

This symbol found on the apparatus indicates the user should read all safety statements found in the user manual.

This symbol found on the apparatus indicates double insulation.

Warning! To reduce the risk of fire or electrical shock, do not expose this apparatus to rain or moisture.

This symbol found on the apparatus indicates that the apparatus must be placed in a separate collection facility for electronic waste and not disposed with household waste.
- Read these instructions.
- Keep these instructions.
- Heed all warnings.
- Follow all instructions.
- Do not use this apparatus near water.
- Clean only with dry cloth.
- Do not block any ventilation openings. Install in accordance with the manufacturer's instructions.
- Do not install near any heat sources such as radiators, heat registers, stoves, or other apparatus (including amplifiers) that produce heat.
- Do not defeat the safety purpose of the polarized or grounding type plug. A polarized plug has two blades with one wider than the other. A grounding-type plug has two blades and a third grounding prong. The wide blade or the third prong is provided for your safety. If the provided plug does not fit into your outlet, consult an electrician for replacement of the obsolete outlet.
- Protect the power cord from being walked on or pinched particularly at plugs, convenience receptacles, and the point where they exit from the apparatus.
- Only use attachments/accessories specified by the manufacturer.
- Unplug this apparatus during lightning storms or when unused for long periods of time.
- Refer all servicing to qualified service personnel. Servicing is required when the apparatus has been damaged in any way, such as power-supply cord or plug is damaged, liquid has been spilled or objects have fallen into the apparatus, the apparatus has been exposed to rain or moisture, does not operate normally, or has been dropped.
- Maintain a minimum distance of 2" (50mm) around the front, rear, and sides of the apparatus for sufficient ventilation. The ventilation should not be impeded by covering the ventilation openings or placing on or around the apparatus items such as newspapers, table cloths, curtains, etc.
- No open flame sources, such as lighted candles, should be placed on the apparatus.
- The apparatus shall not be exposed to dripping or splashing. No objects filled with liquids, such as vases, shall be placed on the apparatus.
- Either the power inlet connector on the rear of the apparatus or the power plug at the wall must remain accessible, to be able to disconnect power from the apparatus.
- To completely disconnect this apparatus from the AC Mains, disconnect the power supply cord plug from the AC receptacle.
- The mains plug of the power supply cord 'shall remain readily operable.
American Users

Note: This equipment has been tested and found to comply with the limits for a Class B digital device, pursuant to part 15 of the FCC Rules. These limits are designed to provide reasonable protection against harmful interference in a residential installation. This equipment generates, uses, and can radiate radio frequency energy and, if not installed and used in accordance with the instructions, may cause harmful interference to radio communications. However, there is no guarantee that interference will not occur in a particular installation. If this equipment does cause harmful interference to radio or television reception, which can be determined by turning the equipment off and on, the user is encouraged to try to correct the interference by one or more of the following measures:
• Reorient or relocate the receiving antenna.
- Increase the separation between the equipment and receiver.
- Connect the equipment into an outlet on a circuit different from that to which the receiver is connected.
- Consult the dealer or an experienced radio/TV technician for help.
Caution: Unauthorized changes or modifications to the receiver could void user's authority to operate the equipment.
Canadian Users

This class B digital apparatus complies with Canadian ICES-003.
CAUTION: This Compact Disc Player employs a Class 1 LASER system. To ensure proper use of this product, please read this user's guide carefully and retain for future reference. Should the unit require maintenance, contact a Boston Acoustics authorized service center. Use of controls, adjustments or the performance of procedures other than those specified herein may result in hazardous radiation exposure. To prevent direct exposure to laser beam, do not try to open the enclosure. Visible LASER radiation may be present when the enclosure is opened. Do not stare into beam.
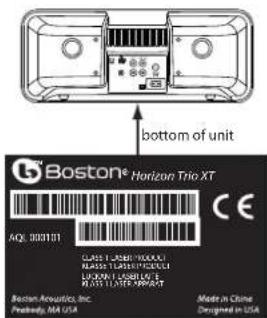
Location of Certification and Identification Label
Optional: Connecting to a cable TV signal
You may be able to obtain better reception if your cable company offers an FM radio signal on your TV cable. The Trio XT's FM antenna connector will accept the cable FM feed from most cable TV systems that provide FM programming. To connect your radio to the FM signal available from some cable TV providers, contact your cable TV company for assistance before making any connection.
Be sure that the installation includes a splitter that filters the signal to prevent any remission of the TV spectrum through the Trio XT, so only the FM band, not the cable TV signal, is transmitted to the Trio XT.
Notice for Cable TV System Installer
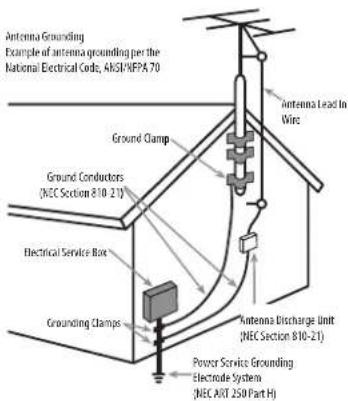
Please make note of Article 820-40 of the NEC (of USA) that provides guidelines for proper grounding. In particular, this standard specifies that the cable ground shall be connected to the grounding system of the building, as close to the point of cable entry as is practical. CAUTION: When making connections to the rear of the Trio XT, it is possible to experience an ESD (Electrostatic Discharge) event. If this happens, simply push the On/off button on the front and recheck the preset settings.
Optional: Connecting to an outdoor antenna
If you wish to use an outdoor antenna, we suggest that, for safety reasons, you have a professional installer connect it.
Complies with 21 CFR Chapter I, Subchapter J
Designed in USA
Made in China
Boston Acoustics, Inc.
Peabody, MA USA
Introduction
Thank you for choosing Boston Acoustics and congratulations on your purchase of the Horizon Trio XT DAB/FM/CD stereo music system. If you own other Boston products, the outstanding audio performance and ease-of-use of the Trio XT should come as no surprise. If you're new to Boston, welcome – we think you've made a great choice. The Trio XT is a sophisticated stereo radio, CD player and speaker system with dual alarms, auxiliary inputs and outputs, all in a high-style, soft-touch enclosure – all the things that "Play Smart." In addition, with the optional HRD-i docking adapter, you can play your iPod music and videos through the Trio XT. So check out all the features and functions of your new music system. We know you'll enjoy it for years to come.
Features
- Outstanding audio performance from dual 3^1 / 2 -inch speakers in separate acoustic chambers, vented for extended response
- BassTrac® audio processing for satisfying bass at any volume
• Three intuitive, easy to use controls operate all the Trio XT features
• Multi-function remote control
• Large, easy to read display with adjustable brightness that dims automatically in low light conditions
• Highly sensitive DAB/FM Stereo tuner
• 5 FM radio station presets; 5 DAB radio presets
• CD Player (plays MP3 discs)
• External antenna inputs for maximum reception
• Dual alarm functions each with wake-to-alarm and/or wake-to-music
• Easy to use, one-button alarm setting
• Alarms gradually increase in volume for a gentle wake up - S-n-o-o-o-o-o-z-e bar – the entire outer aluminum trim is a touch sensitive, can't-miss-it snooze bar
• Sleep function lets you listen to music up to 90 minutes before the Trio XT turns itself off
• Play in color! Customize your Trio XT with optional grilles available at bostonacoustics.com/POP
• Time setting, station presets, and alarms settings are remembered during power outages
• Headphone output on the front panel
• Dual auxiliary inputs – front and rear panel - Internal power supply – no bulky external adapter needed
With the optional HRD-i docking adapter:
• Play your iPod through the Trio XT speakers
• Use the Trio XT remote to control your iPod
• The composite video output lets you play iPod TV program through a television
- Your iPod is charged while placed in the HRD-i
Contents
| Introduction 3 | Front Panel CD Operation | 9 | |
| Features 4 | Remote Control CD Operation | 9 | |
| Unpacking and Setting Up Your Horizon Trio XT 4 | The HRD-i - iPod Docking Adapter | 9 | |
| Placement 4 | Playing Your iPod | 10 | |
| Power Connection 4 | Front Panel Control iPod Operation | 10 | |
| DAB and FM Antennas 4 | Remote Control iPod Operation | 11 | |
| About the Front Panel Controls 5 | Alarm Clock Features | 11 | |
| About the Remote Control 5 | Setting the Alarm Time | 11 | |
| Basic Control Operations 5 | Turning Alarms On or Off | 11 | |
| Turning the Horizon Trio XT On or Off 5 | How the Alarms Work | 12 | |
| Adjusting the Volume 5 | The Snooze Feature | 12 | |
| Setup Functions 6 | Sleep Function | 12 | |
| Setting the Time, Date and Related Functions | 6 | Audio Settings | 13 |
| Selecting a Source | 6 | Play Mode | 13 |
| DAB Radio | 7 | Adjusting Bass and Treble | 13 |
| The DAB Station List | 7 | Display Controls | 13 |
| Tuning in a DAB Station | 7 | Connecting Other Equipment | 14 |
| DAB Display | 7 | Connecting Headphones | 14 |
| DAB Station Setup | 7 | Using Aux Inputs | 14 |
| Radio Functions | 8 | About Clock Memory | 14 |
| Tuning In a Radio Station | 8 | Security Cable Connection | 14 |
| Station Seek | 8 | Service Port | 14 |
| Setting a Station Preset | 8 | Maintenance and Service | 14 |
| Selecting a Preset Station | 8 | Limited Warranty | 15 |
| Playing Compact Discs | 9 | If Service Seems Necessary | 15 |
Unpacking and Setting Up Your Horizon Trio XT
Carefully unpack the Horizon Trio XT. If there is any sign of damage from transit, report it immediately to your dealer and/or delivery service. Keep the shipping carton and packing materials for future use. Be sure to keep your purchase receipt in a safe place, as it may be required for warranty purposes.
In the box you should find the Horizon Trio XT, the remote control and the power cord.
Placement
Your Horizon Trio XT will sound great just about anywhere. But if you put it near a wall or corner the bass response will be enhanced. Don't block the bass port. Be sure the vents on the top of the cabinet are unobstructed to allow for ventilation.
Power Connection
Connect the power cord to the back of the Horizon Trio XT and plug it into the wall power outlet.
DAB and FM Antenna
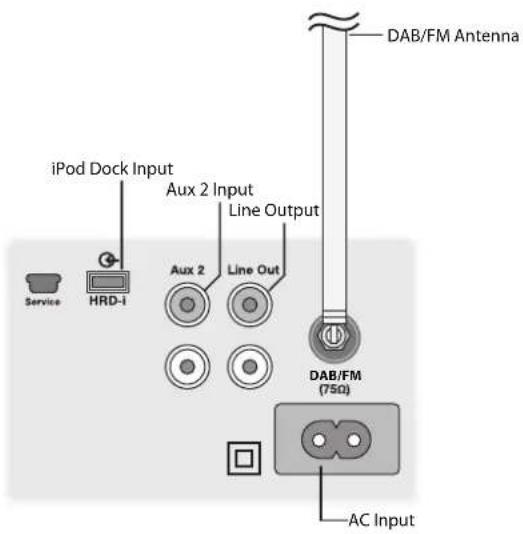
The Horizon Trio XT comes out of the box ready to use. Please fully extend the rear-mounted DAB antenna. Just extend the wire connected to the plug. With the standard antennas you'll probably pull in more stations than any other radio you own. But if you want to listen to stations that are very far away then external antenna can be connected to the antenna input.
Note: Boston Acoustics has found that in situations where the supplied antenna is not used with the product, strong signals can interfere with normal performance.
About the Front Panel Controls
Most of the Horizon Trio XT functions are operated by the three controls on the front panel.
Power/Volume – Is controlled by the large knob in the center of the panel.
Mode – Selects the input you want to use or the function you want to adjust.
Tune – Controls tuning the radio, changing CD tracks and various other functions depending on the operating mode.
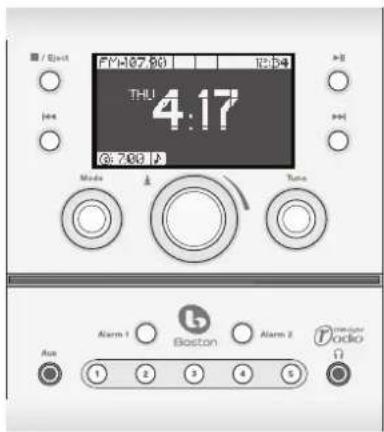
These logical, intuitive controls make it easy to operate the Horizon Trio XT. The way you use each control is the same for each feature. Once you
learn how to control one of the features the rest of them will be easy. You may not need to refer to this manual once you understand the way the controls work.
About the Remote Control
Most of the features of the Horizon Trio XT can be operated with the supplied remote control. When it's not being used, the remote control can be conveniently stored in the recess on top of the Horizon Trio XT. The remote also has a magnetic backing so it can be attached to many metal surfaces.
Note: When you unpack your remote control there will be a plastic insulation tab extending from the battery compartment. Pull out this tab before using the remote control.
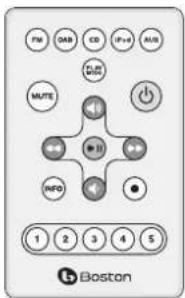
There must be an unobstructed line of sight to the front of the Horizon Trio XT when using the remote control. Point the remote control at the front panel of the Horizon Trio XT when pressing the buttons. For best results you should be within 20 feet of the unit and no more than 45° off axis.
Note: Eventually you'll need to replace the remote battery. If the remote doesn't reliably operate the Trio XT, put in a new CR2025 3V lithium coin type battery.
Basic Control Operations
Turning the Horizon Trio XT On or Off
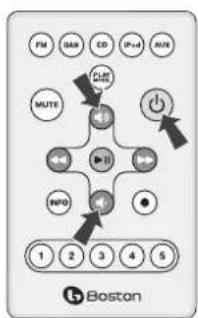
Press the POWER/VOLUME control on the center of the front panel or the green ⏻ button on the remote control.
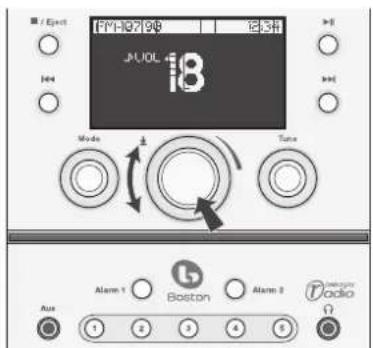
Adjusting the Volume
Turn the front panel POWER/VOLUME KNOB or press the VOLUME UP 🎨 or VOLUME DOWN 🔊 buttons on the remote control.
flowchart
graph TD
    A["FM"] --> B["BAR"]
    B --> C["CD"]
    C --> D["PCI"]
    D --> E["MUTE"]
    E --> F["+"]
    F --> G["Power"]
    G --> H["+"]
    H --> I["MI"]
    I --> J["+"]
    J --> K["INFO"]
    K --> L["1"]
    L --> M["2"]
    M --> N["3"]
    N --> O["4"]
    O --> P["5"]
    P --> Q["Boston"]
Note: On the control illustrations –
↑regular arrows indicate to press and release the button or control.
Double headed arrows indicate to press and hold the button or control.
This symbol indicates the control is turned then pressed.
Setup Functions
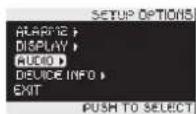
Turn or press the MODE control to display the "Mode" menu and move the highlight box down the list of sources until "Setup Options" is highlighted.
2 Press the MODE control to select "Setup Options".
Initially the display shown below on the left appears. Turn the MODE control to move the highlight box. If you turn the MODE control until the highlight box moves past the "Alarm2" menu item, more menu items appear, as shown in the display on the right.
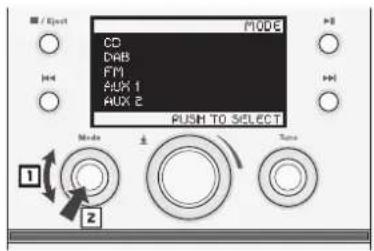
In this display the Alarm 1 function is highlighted for selection.
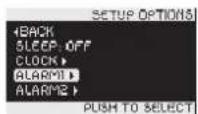
In this display the Audio control function is highlighted for selection.
In the next section the procedure for setting the clock is described. Other Setup function are described in later sections. Once you know how to set up one of the Mode functions the others will be easy.
Setting the Time, Date and Related Functions
Turn the MODE control to highlight "Setup Options" then press the control.
Turn the MODE control to highlight "Clock" then press the control. You'll see the menu screen shown at the right.
3 Turn the MODE control to move the highlight box to the function you want, then press the control to select it.
4 Once the function you want is selected, turn the MODE or TUNE control to change the setting, then press the control.
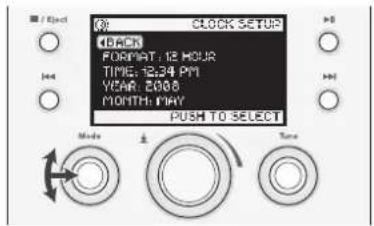
Note: Move the highlight box past the "Month" menu item to select the "Day" or "Exit" function.
The settings on the "Clock Setup" menu are:
Format: 12 Hour/24 Hour – Sets the clock display to 12 hour or 24 hour format.
Time: Sets the time.
Year: Sets the year.
Month: Jan-Dec – Sets the month.
Day: 1-31 – Sets the day of the month. The selection range depends on the month. The February 29 on leap years is programmed into the clock.
Exit: Returns to the default display.
Selecting a Source
Using the Front Panel Controls
Turn the MODE control to move the highlight box to the source you want.
2 Press the MODE control to select the source. The source name briefly appears in the display before the Trio XT begins playing the source selected.
Using the Remote Control
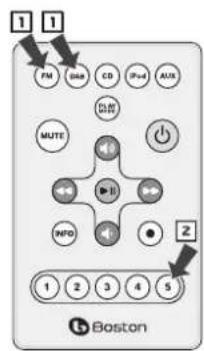
Press the button for the source you want to select. Press the FM or AUX buttons once for FM or AUX.
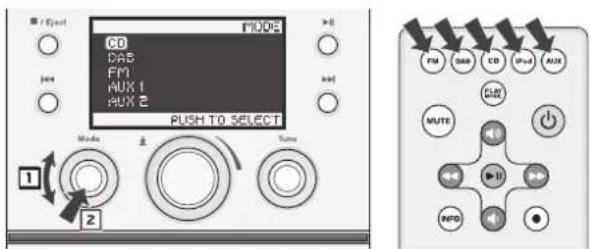
Notes:
- The iPod source is displayed in the Mode menu only when an iPod is connected to the Trio XT via the HRD-i docking adapter.
- Aux 1 is the front panel input. The Aux 2 input is on the rear panel.
DAB Radio
The DAB Station List
When you plug in the Trio XT for the first time it automatically searches the DAB radio bands for stations and puts the available stations in a list. If you move the Trio XT to a new location you can use the DAB Scan feature to reset the station list. You can also manually tune to the station list available on specific DAB multiplex bands. For more information see the "DAB Station Setup" on the following page.
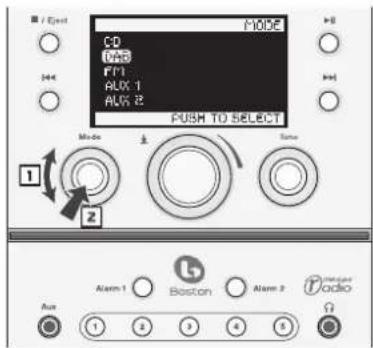
Tuning in a DAB Station
1 Turn the MODE control to highlight "DAB". Press the control
2 Turn the tune control to display the list of available stations.
3 Highlight the station you want and press the tune control to select it.
Notes:
Only stations that were put in your station list by the initial automatic station scan, a scan you perform with the DAB Scan function, or that you tune manually are displayed as you turn the tune control.
You can change the order in which the stations are displayed. See the "DAB Display" and "Display Menu" sections on the following pages.
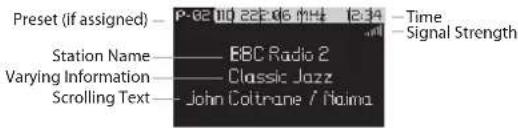
The DAB Display
When using the DAB radio the display shows a variety of information. In the main part of the display the first line is station name.
The second line of the display center shows one of the following:
Genre — Signal Quality (in %) — Compression — Network — Frequency — Date and Time.
You can set the default information you want to appear in this line. See the "Display Menu" section of this manual. In addition you can change the information in the second line by pressing the MODE control. Each press switches to the next information mode.
The final line will always be scrolling text information provided by broadcast station.
DAB Station Setup
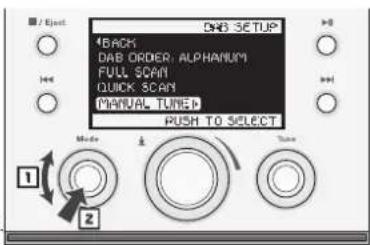
If you move the Trio XT to a new location you can use the DAB Scan feature to reset the station list. You can also manually select stations to add to the list.
1 Turn the MODE control to highlight "DAB Setup". Press the control.
Note: If the DAB radio source is selected you can simply press the tune control to access the "DAB Setup" menu.
2 Turn the MODE control to highlight "Full Scan", "Quick Scan" or "Manual Tune". Press the control.
DAB Order: Active/Alphanum/Favorite/Multiplex – Active - Displays active stations first. Alphanum(eric) - displays stations in alphanumeric order. Favorite - displays stations most listened to first. Multiplex - displays stations in Multiplex order.
Full Scan: Searches all 64 frequencies in the Band III and L Band groups.
Quick Scan: Searches only the most commonly used frequencies in Band III - from 10B (211.648 MHz) to 13B (232.496 MHz).
During the scanning processes the display shows the station multiplex as it is scanned.
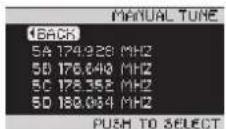
Manual Tune: This option displays a list of all the DAB multiplexes. Turn theMODE control to highlight the multiplex you want, then press the control.
Radio Functions
Tuning In a Radio Station
Using the Front Panel Controls
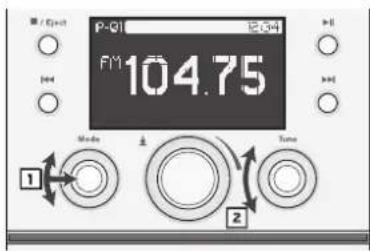
1 Turn the MODE control to highlight the DAB or FM source. Press the control to select the source.
2 Turn the TUNE control until the station frequency you want shows in the display.
Using the Remote Control
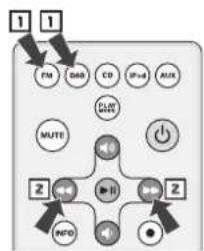
1 Press the DAB or FM radio source button.
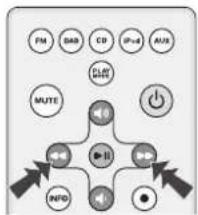
2 Press the ◀◀ or ▶▶ button once to step up or down the radio band to the next station frequency.
flowchart
graph TD
    A["FM"] --> B["BAR"]
    B --> C["CD"]
    C --> D["IP=4"]
    D --> E["AUX"]
    F["MUTE"] --> G["+"]
    H["⊕-II"] --> I["⊕"]
    J["⊕"] --> K["2"]
    L["INFO"] --> M["●"]
Note: If the station you select is assigned to a station preset, the preset indicator and number are displayed.
Station Seek
Using the Front Panel Controls
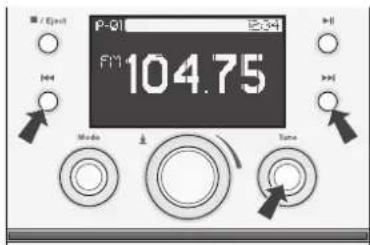
Press the TUNE control. The Trio XT will seek up the radio band for the next receivable station. Or press the ◀◀ or ▶▶ button. The Trio XT will seek up or down the radio band for the next receivable station.
Using the Remote Control
Press and hold the ◀ or ▶ button. The Trio XT will seek up or down the radio band for the next receivable station.
flowchart
graph TD
    A["PM"] --> B["CLAY"]
    C["DAB"] --> B
    D["CD"] --> B
    E["IP=4"] --> B
    F["AUX"] --> B
    G["MUTE"] --> H["Power"]
    I["I"] --> H
    J["NFD"] --> H
    K["●"] --> H
Setting a Station Preset
Use the MODE control or press the remote control DAB or FM button to select the radio band you want.
2 Use the front panel TUNE control, or the remote control ◀ and ▶ buttons to tune in the station you want to assign to a preset.
3 Press and hold the front panel or remote control PRESET BUTTON (1-5) you want to set up. A tone will sound and the preset number will light indicating the station has been assigned to the preset.
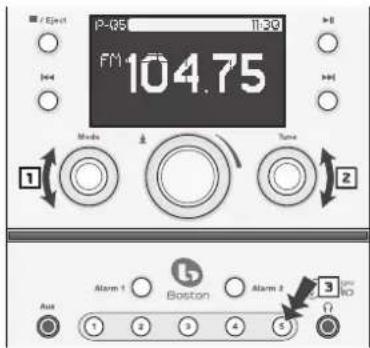
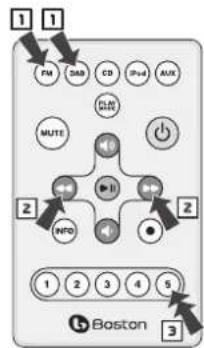
In this example FM station 104.75 has been assigned to preset 5.
Selecting a Preset Station
Use the MODE control, or press the remote control DAB or FM button to select the radio band you want to use.
2 Press and quickly release the PRESET BUTTON (1-5) you want to select. The preset indicator, number and the station frequency will light. In this example DAB preset 2, with BBC Radio 2 assigned to it, has been selected.
Note: Pressing a PRESET BUTTON more than once will switch to the other radio band or preset group. Using this example, if you press PRESET BUTTON 2
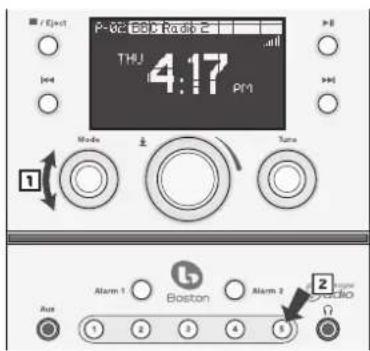
again, then preset 2 in the FM group is selected. Press the button one more time and DAB preset 2 is selected again.
Playing Compact Discs
The CD loading slot is below the three main controls. In addition to simply playing CDs you can select a CD track for a wake to music alarm. Both regular discs and MP3 encoded discs can be played.
To select the CD source use the MODE control or the cD button of the remote control as described in the "Selecting a Source" section earlier in this manual. If you are listening to another source, and a CD is not already loaded, the Trio XT automatically switches to CD mode when a disc is inserted.
Front Panel CD Operation
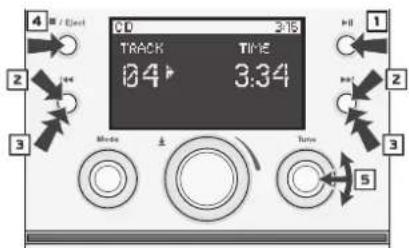
1 Press the ▶ button to start or pause playback.
2 Press the ▶ control to skip to the next track. Press the ◀ control once to skip to the beginning of the current track. Press the ◀ twice to skip to the previous track.
3 Press and hold the ▶▶ or ◀◀ button to start fast forward or rewind.
4 Press the ■/eJect button to stop disc play. Press and hold the button to eject the disc.
5 Turn the tune control to display a list of the tracks on the disc. Move the highlight box to the track you want and press the control to select the track.
Notes:
In addition to normal disc play you can select Shuffle Play, Repeat All track and Repeat One track. See the "Audio Settings" section for more information.
The illustration shows a typical display when the Display Preference is set to Source. See the "Display Controls" section of this manual. If the Display Preference is set to Time the day and time appear in the middle of the display. The source, track number, play/pause status and track elapsed time appear in the top bar. The Ⓞ symbol indicates that a CD is currently loaded.
Remote Control CD Operation
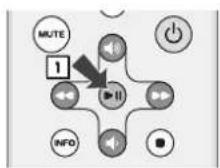
1 Press the ▶ button to play or pause the CD.
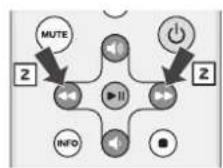
2 Press the ▶ button once to skip to the next track. Press the ◀ button once to return to the beginning of the current track or twice to go to the previous track.
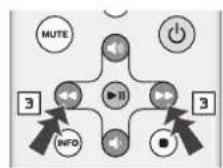
3 Press and hold the ◀ or ▶ button to start fast forward or rewind.
The HRD-i - iPod Docking Adapter
With the optional HRD-i docking adapter you can use your iPod as a music source for general playback or to wake to music when using the alarm clock function. If your iPod can store video tracks you can watch them on an external television when it is docked to the HRD-i.
To select the iPod source use the MODE control or the IpOD button of the remote control as described in the "Selecting a Source" section earlier in this manual. The iPod source can only be selected when the HRD-I is connected to the Trio XT and an iPod is placed in it.
Connecting the HRD-i
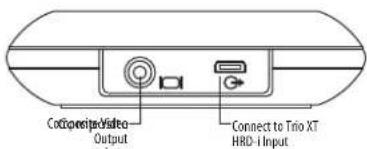
Connect one end of the supplied cable to the output connector beside the symbol on the rear of the HRD-i. Connect the other end to the input on the rear of the Trio XT below the symbol. To play video tracks stored on your iPod connect a standard RCA plug cable between the output on the back of the HRD-i beside the symbol and the composite input of your television. Typically the composite video input of a television is color coded yellow. Refer to the manual for your television for information on this input and how to use it.
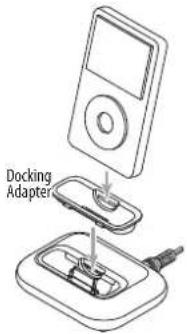
The HRD-i is supplied with seven docking adapters. These fit in the docking well of the HRD-i to support various iPod models. The table below lists the iPod models and the docking adapters to use with them. The number of the docking adapter is molded into the back of the part. Place the appropriate adapter in the docking well and plug your iPod into the dock.
iPod Model (Capacity) Adapter Number
| iPod photo (40 / 60GB), iPod with color display (60GB) | 7 |
| iPod nano (2 / 4GB) | 8 |
| 5G and U2 iPod (30 GB with video), iPod classic (80GB) | 9 |
| 5G iPod with video (60GB / 80GB), iPod classic (160GB) | 10 |
| iPod nano - 2nd generation (2 / 4 / 8GB) | 11 |
| iPod nano - 3rd generation (4 / 8GB) | 13 |
iPod touch 8GB & 16GB 14
Playing Your iPod
To select the iPod source use the MODE control or the IPOD button of the remote control as described in the "Selecting a Source" section earlier in this manual. Then use the iPod controls to select the track(s) you want to play.
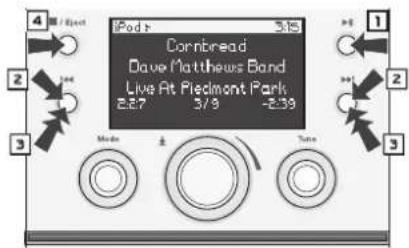
Front Panel Control iPod Operation
Press the ▶ button to start or pause playback.
2 Press the ▶▶I control to skip to the next track. Press the ◀◀ control once to skip to the beginning of the current track. Press the ◀◀ twice to skip to the previous track
3 Press and hold the ▶▶ or ◀◀ button to start fast forward or rewind.
4 Press the ■/EJECT button to stop disc play. Press and hold the button to eject the disc.
Notes:
In addition to normal disc play you can select Shuffle Play, Repeat All track and Repeat One track. See the "Audio Settings" section for more information.
The illustration shows a typical display when the Display Preference is set to Source. See the "Display Controls" section of this manual. If the Display Preference is set to Time the day and time appear in the middle of the display. The source, play/pause status, track number and total track, and the track elapsed time appear in the top bar.
Remote Control iPod Operation
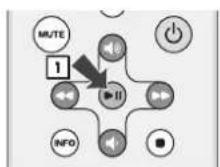
1 Press the ▶ button to play or pause your iPod.
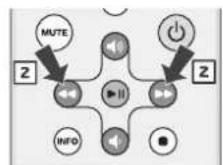
2 Press the ▶ button once to skip to the next track. Press the ◀ button once to return to the beginning of the current track or twice to go to the previous track.
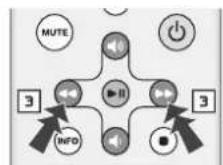
3 Press and hold the ◀ or ▶ button to start fast forward or rewind.
Alarm Clock Features
The Horizon Trio XT has two independent alarm settings. Each can have its own type of alarm — wake to tone, wake to music or both. Both types of alarms start at a low volume level that gently increases. In addition you can set the alarms to work every day, weekdays only or weekends only.
Setting the Alarm Time
1 Press and hold the ALARM 1 or ALARM 2 button for one second to access the "Alarm1 Setup" or "Alarm2 Setup" menu.
2 Turn the MODE control to highlight "Alarm Time", then press the control to select it. The time highlight box will flash.
3 Turn the MODE or TUNE control to adjust the Alarm Time, then press the control to set the Alarm Time.
Notes: The Alarm Setup menu can also be by accessed using the MODE control to select the Setup Options menu then selecting Alarm 1 or Alarm 2.
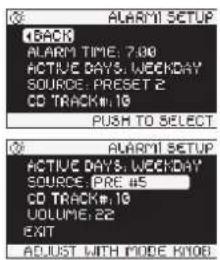
If an alarm source other than the CD player is selected, the CD Track # line of the display will show NA rather than a track number.
The other setting are adjusted the same way: access the "Alarm Setup" menu; turn the MODE control to select the item to adjust, then press the control; turn the MODE or TUNE to adjust the setting, then press the control.
Active Days: Weekdays/Weekends/7Days – Choose which days you want to use the alarm.
Source – Choose the wake to music source you want. You can select a station you have tuned in with the DAB or FM sources, any of the DAB or FM presets, a CD, or your iPod connected via the HRD-i docking adapter.
Note: If you select a source that is not available, for example if you select a CD source and there is no disc loaded, a wake to tone alarms sound instead.
CD Track# – If you select a CD for the wake to music source, use this setting to select the track to play.
Volume – Set the volume for wake to music.
After you have completed the alarm setup turn the MODE or TUNE control to highlight "Exit" (below Volume) and press the control. Or just wait a few seconds and the menu will "time out" and store the settings.
Turning Alarms On or Off
Press the Alarm 1 or Alarm 2 buttons to turn the alarm on or off and set the alarm type. One press selects wake to music X ♪. A second press selects wake to tone ⚡. A third press selects both. Press the button a fourth time to cancel the alarm. When an alarm is turned on you'll see one or both alarm indicators in the lower corners of the display showing the alarm time and type.
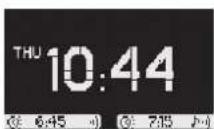
This example shows the display with the Trio XT turned off and both alarm on. The current time is displayed. Alarm 1 is set for wake to tone at 6:45 AM. Alarm 2 is set for wake to music and tone at 7:15 AM.
How the Alarms Work
Wake To Tone – The alarm tone sounds at a low volume then gradually increases to full volume.
Wake To Music – The radio station you selected is played at the volume level you selected with the Alarm Setup menu.
Wake To Music and Tone – First, the radio station is played. Then, after 5 minutes the alarm tone begins to sound.
To turn off the alarm press the POWER/VOLUME control.
The Snooze Feature
If you want to sleep a while longer after the alarm sounds you can use the Snooze feature. Simply touch the metal rim around the front of the Trio XT. This will delay the alarm for ten minutes. Each additional touch of the rim increases the length of the Snooze alarm delay by 5 minutes. The maximum delay is 60 minutes. The display initially shows the amount of "snooze time", then reverts to normal time display. The highlight box of the alarm that is "snoozing" flashes.
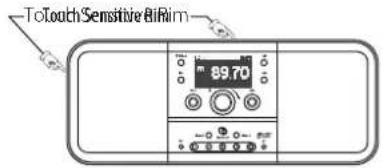
To the remaining snooze time, touch the metal trim ring. The display will show the amount of snooze time remaining. Touching the metal trim ring again while the snooze time is displayed increases the snooze time to the next higher step – 10 minutes, 15 minutes, 20 minutes, etc. Each additional touch increases the snooze time by 5 minutes.
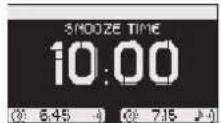
To cancel a "Snooze" time setting press the POWER/VOLUME control.
Sleep Function
You can set the Trio XT to play any source for up to 90 minutes. After the specified time the Trio XT shuts off.
Use the MODE control to select the source you want. Set the volume level where you want it.
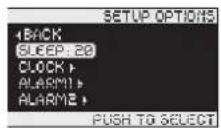
2 Turn the MODE control to highlight "Setup Options", then press the control. The "Setup Options" menu appears in the display.
3 Turn the MODE control to highlight "Sleep" then press the control. The highlight box around "Off" will flash.
4 Turn the MODE or TUNE control clockwise to set the amount of time delay you want. You can select from 5 to 90 minutes in 5 minute increments. Press the control.
The display example to the right shows the Sleep delay set for 20 minutes.
5 Turn the MODE control to highlight "Exit" and press the control. Or wait a few seconds and the display will "time out" automatically.
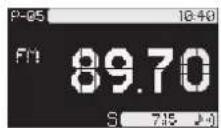
The display will go to its default mode – either source or time display, depending on what you have chosen. The "S" Sleep icon will appear at the bottom center of the display.
This display example shows the "S" Sleep icon. The radio is tuned to 89.70, which is Preset 5. The time is 10:40 PM and Alarm 2 is turned on.
Notes: To cancel the Sleep delay before it has finished press the POWER/VOLUME control to turn the Trio XT off.
Audio Settings
Play Mode
When playing a CD or your iPod you can select Normal play, Shuffle play, Repeat One or Repeat All. Shuffle randomly plays the available tracks. Repeat One repeats the current track. Repeat All repeats all the available tracks.
1 Turn the MODE control to move the highlight box to Setup Options. Press the control.
2 Turn the MODE control to move the highlight box to Audio. Press the control.
3 Turn the MODE control to move the highlight box to Play Mode. Press the control. The highlight box around the selected play mode will flash.
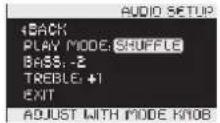
4 Turn the TUNE or MODE control to select play mode you want. Press the control to set it play mode If a play mode other than Normal is selected, one of the play mode symbols appears in the display.
Shuffle play symbol - 📄. Repeat One symbol - ✉. Repeat All symbol - ✉.
Adjusting Bass and Treble
Turn the MODE control to move the highlight box to Setup Options. Press the control.
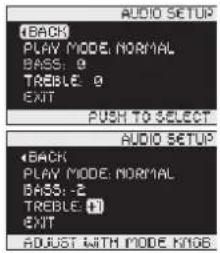
2 Turn the MODE control to move the highlight box to Audio. Press the control. The Audio Setup menu is displayed.
3 Turn the MODE control to move the highlight box to Bass or Treble.
4 Turn the TUNE or MODE control clockwise to increase, or counter-clockwise to decrease the Bass or Treble. Press the control to set the adjustment.
In these examples the Bass is set to -2 and the Treble is set to +1.
Display Controls
The "Display Setup" menu lets you control what information is shown in the display and how it looks.
To access the Display Setup menu:
1 Turn the MODE control to highlight "Setup Options". Press the control.
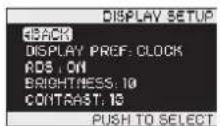
2 Turn the MODE control to highlight "Display". Press the control. (If the "Display" menu selection is not on the initial "Setup Options" menu, turn the MODE control until it appears.) You'll see the display shown here.
3 Turn the MODE control to highlight the display control you want to adjust then press the control.
4 Once the item you want to adjust is selected, turn the TUNE or MODE control to change the setting, then press the control.
The settings on the Display Setup menu are:
Display Pref: Source / Clock – When "Source" is selected the display defaults to the source information. When "Clock" is selected the display defaults to the time display. Note: You can also change "Display Pref" setting by pressing the INFO button on the remote control.
RDS: On/Off – Turns the FM radio RDS (Radio Data System) display on or off.
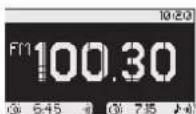
Brightness: 1-20 – Sets the overall brightness level of the display. Set this so the display is easy to read in a well lit room.
High Brightness (20)
Low Brightness (1)
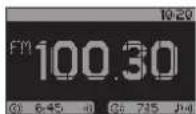
Note that the display brightness will always adjust automatically with changing light conditions. This adjustment just sets the overall range of the display brightness.
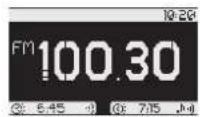
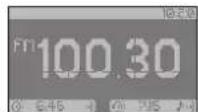
Contrast: 1-20 – Adjust the difference between the light and dark parts of the display. This should also be set in a well lit room in conjunction with the adjustments to the Brightness setting.
High Contrast (20)
Low Contrast (1)
Connecting Other Equipment
Connecting Headphones
Connect the headphone plug to the jack beside the 🔗 symbol. This turns off the Trio XT internal speakers. If your headphones have a 1/4-inch plug you will need an adapter.
Using Aux Inputs
Other audio equipment, such as a portable CD player, can be connected to the Trio XT through the Aux inputs. The Aux 1 input on the front panel has an 1/8-inch jack. The Aux 2 input on the rear panel uses two RCA jacks. The right and left channel jacks are color coded red and white respectively. Select the Aux 1 or Aux 2 input using the MODE control as described in the "Selecting a Source" section of this manual.
About Clock Memory
When power to the Trio XT is interrupted a special power component called a "super-cap" will keep the clock functions active for a period of 24-48 hours. If the Trio XT is without power for a longer period of time you may need to reset the clock when power is restored.
Security Cable Connection
There is a security cable connection point on the rear of the Trio XT. This is the same as the connection point found on most laptop computers. Connect a computer security cable between the Trio XT and a solid anchor point to help prevent theft of your Trio XT.
Service Port
The Service port on the rear panel is for use only qualified service technician.
Maintenance and Service
The Trio XT enclosure may be cleaned using a soft cloth to remove fingerprints or to wipe off dust. All wiring connections should be inspected and remade at least once a year.
In the event that your speakers ever need service, contact your local Boston Acoustics dealer or visit bostonacoustics.com/dealers for a list of dealers in your area.
Limited Warranty
Boston Acoustics warrants to the original purchaser of the Horizon Trio XT that it will be free of defects in materials and workmanship in its mechanical parts for a period of one year from the date of purchase.
Your responsibilities are to install and use the Trio XT according to the instructions supplied, to provide safe and secure transportation to an authorized Boston Acoustics service representative, and to present proof of purchase in the form of your sales slip when requesting service.
Excluded from this warranty is damage that results from abuse, misuse, improper installation, accidents, shipping, or repairs/modifications by anyone other than an authorized Boston Acoustics service representative.
This warranty is limited to the Boston Acoustics product and does not cover damage to any associated equipment. This warranty does not cover the cost of removal or reinstallation. This warranty is void if the serial number has been removed or defaced. This warranty gives you specific legal rights, and you may also have other rights which vary from state to state.
If Service Seems Necessary
First, contact the dealer from whom you purchased the product. If that is not possible, write to:
Boston Acoustics, Inc.
100 Corporate Drive
Mahwah, NJ 07430 USA
Or contact us via e-mail at:
US: support@bostona.com
Japan: ba_info@dm-holdings.com
Asia Pacific: service@dm-singapore.com
We will promptly advise you of what action to take. If it is necessary to return your Horizon Trio XT to the factory, please ship it prepaid. After it has been repaired, we will return it freight prepaid in the United States and Canada.
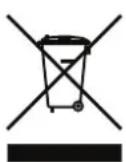
For EU Customers Only
This symbol found on the product indicates that the product must not be disposed of with household waste. Instead, it may be placed in a separate collection facility for electronic waste or returned to a retailer when purchasing similar product. The producer paid to recycle this product. Doing this contributes to reuse and recycling, minimizes adverse effects on the environment and human health and avoids any fines for incorrect disposal.
- Horizon Trio XT
- High Performance Tabletop DAB/FM/CD Music System
- Español
- IMPORTANT SAFETY INSTRUCTIONS
- American Users
- Canadian Users
- Optional: Connecting to a cable TV signal
- Notice for Cable TV System Installer
- Optional: Connecting to an outdoor antenna
- Introduction
- Features
- With the optional HRD-i docking adapter:
- Unpacking and Setting Up Your Horizon Trio XT
- Placement
- Power Connection
- DAB and FM Antenna
- About the Front Panel Controls
- About the Remote Control
- Basic Control Operations
- Turning the Horizon Trio XT On or Off
- Adjusting the Volume
- Setup Functions
- Setting the Time, Date and Related Functions
- Selecting a Source
- Using the Front Panel Controls
- Using the Remote Control
- Notes:
- DAB Radio
- The DAB Station List
- Tuning in a DAB Station
- The DAB Display
- DAB Station Setup
- Radio Functions
- Tuning In a Radio Station
- Station Seek
- Setting a Station Preset
- Selecting a Preset Station
- Playing Compact Discs
- Front Panel CD Operation
- Remote Control CD Operation
- The HRD-i - iPod Docking Adapter
- Connecting the HRD-i
- Playing Your iPod
- Front Panel Control iPod Operation
- Remote Control iPod Operation
- Alarm Clock Features
- Setting the Alarm Time
- Turning Alarms On or Off
- How the Alarms Work
- The Snooze Feature
- Sleep Function
- Audio Settings
- Play Mode
- Adjusting Bass and Treble
- Display Controls
- Connecting Other Equipment
- Connecting Headphones
- Using Aux Inputs
- About Clock Memory
- Security Cable Connection
- Service Port
- Maintenance and Service
- Limited Warranty
- If Service Seems Necessary
- For EU Customers Only
Brand : BOSTON ACOUSTICS
Model : Horizon Trio XT
Category : Hi-Fi