
DISC-3005 - Hi-Fi System Soundmaster - Free user manual and instructions
Find the device manual for free DISC-3005 Soundmaster in PDF.


| Product Type | Hi-Fi System with CD/MP3 player, FM/AM radio, and AUX input |
| Brand & Model | Soundmaster DISC-3005 |
| Dimensions (Main Unit) | 290 (W) x 84 (D) x 208 (H) mm |
| Dimensions (Speakers) | 160 (W) x 84 (D) x 208 (H) mm each |
| Power Supply | AC 230V ~50 Hz, 28W; Remote: DC 3V (1 x CR2025 lithium battery) |
| Power Output | 5 Watts RMS per channel (stereo) |
| Frequency Response | 100 – 18,000 Hz |
| Tuning Range | AM: 522 – 1629 kHz; FM: 87.5 – 108 MHz |
| Speaker Impedance | 4 ohms |
| Headphone Impedance | 8 – 32 ohms |
| AUX Input Sensitivity | 300 mV |
| Playback System | Ball clip CD mechanism; supports CD, CD-R/RW, MP3 discs |
| Equalizer Presets | FLAT, POP, ROCK, JAZZ, CLASSIC |
| Additional Functions | Clock, Sleep timer, Programmable tracks (up to 20), Radio presets (10 AM / 20 FM), Mute, Remote control |
| Connectivity | AUX input (RCA), Subwoofer output, Headphone jack (3.5mm), Speaker terminals |
| Accessories Included | Instruction manual, Remote control handset, Support brackets (3), Wall mounting template, Screws (4), Plastic anchors (4) |
| Care & Maintenance | Clean with a damp cloth; avoid solvents; keep away from direct sunlight, heat, and moisture |
| Safety Features | Class 1 laser product; automatic shut-off; ventilation slots; reset switch |
| Reparability / Spare Parts | No user-serviceable parts inside; refer servicing to qualified personnel |
Frequently Asked Questions - DISC-3005 Soundmaster
User questions about DISC-3005 Soundmaster
0 question about this device. Answer the ones you know or ask your own.
Ask a new question about this device
Download the instructions for your Hi-Fi System in PDF format for free! Find your manual DISC-3005 - Soundmaster and take your electronic device back in hand. On this page are published all the documents necessary for the use of your device. DISC-3005 by Soundmaster.
USER MANUAL DISC-3005 Soundmaster
natural_image
Exterior view of a modern office building (no signage)INSTRUCTION MANUAL
Please read and follow this instruction manual carefully before using the unit and retain it for future reference
SAFETY INSTRUCTIONS

The lightning flash and arrow head within the triangle is a warning sign alerting you of "dangerous voltage" inside the product
CAUTION
RISK OF ELECTRIC SHOCK DO NOT OPEN
CAUTION : TO REDUCE THE RISK OF ELECTRIC SHOCK DO NOT REMOVE COVER (OR BACK) NO USER SERVICEABLE PARTS INSIDE. REFER SERVICING TO QUALIFIED SERVICE PERSONNEL

The exclamation point within the triangle is a warning sign alerting you of Important Instructions accompanying the product
WARNING: TO PREVENT FIRE OR SHOCK HAZARD, DO NOT EXPOSE THIS APPLIANCE TO RAIN OR MOISTURE.
- Read instructions - All the safety and operating instructions should be read before the appliance is operated
- Retain instructions - The safety and operating instructions should be retained for future reference.
- cleaning – Unplug this product from the wall outlet before cleaning. Do not use liquid cleaners or aerosol cleaners. Use a damp cloth for cleaning.
- Attachment – do not use attachment not recommended by the product manufacturer as they may cause hazards.
- Water and Moisture - The appliance should not be used near water; or example, near a bathtub, washbowl, kitchen sink, laundry tub, in a wet basement, or near a swimming pool, and the like.
- Ventilation - The appliance should be situated so that its location or position does not interfere with its proper ventilation. For example, the appliance should not be situated on a bed, sofa, rug, or similar surface that may block the ventilation openings; or placed in a built-in installation, such as a bookcase or cabinet that may impede the flow of air through the ventilation openings.
- Power Sources - The appliance should be connected to a power supply only of the type described in the operating instructions or as marked on the appliance.
- Power-Cord Protection - Power supply cords should be routed so that they are not likely to be walked on or pinched by items placed upon or against them, paying particular attention to cords at plugs, convenience receptacles and the point where they exit from the appliance.
- Nonuse Periods - The power cord of the appliance should be unplugged from the outlet when left unused for a long period of time.
CLASS 1 LASER PRODUCT
CLASS 1 LASER PRODUCT APPAREIL LASER DE CLASSE 1 PRODUCTO LASER DE CLASE 1
CAUTION INVISIBLE LASER RADIATION WHEN OPEN AND INTERLOCKS DEFEATED. AVOID EXPOSURE TO BEAM

natural_image
Warning symbol with a black triangle containing a central sunburst pattern (no text or numbers)This product contains a low power laser device.
Follow the advice below for safe and appropriate operations.
ON PROTECTION AGAINST LASER ENERGY EXPOSURE
- As the laser beam used in this compact disc player is harmful to the eyes, do not attempt to disassemble the casing.
- Stop operation immediately if any liquid or solid object should fall into the cabinet.
- Do not touch the lens or poke at it. If you do, you may damage the lens and the player may not operate properly.
- Do not put anything in the safety slot. If you do, the laser diode will be ON when the CD door is still open.
- If the unit is not to be used for a long period of time, make sure that all power sources are disconnected from the unit. Make it a practice to remove the AC plug by grasping the main body and not by pulling the cord.
- This unit employs a laser. The use of controls or adjustment or performance of procedures other than those specified here may result in exposure to hazardous radiation.
ON PLACEMENT
- Do not use the unit in places, which are extremely hot, cold, dusty or humid.
- Place the unit on a flat and even surface.
- Do not restrict the airflow of the unit by placing it in a place with poor ventilation, by covering it with a cloth or by placing it on a carpet.
ON CONDENSATION
- When left in a heated room where it is warm and damp, water droplets or condensation may form inside the unit.
- When there is condensation inside the unit, the unit may not function normally.
- Let it stands for 1 to 2 hours before turning the power on, or gradually heat the room up and dry the unit before use.
Should any trouble occurs, remove the power source and refer servicing to qualified personnel.
TABLE OF CONTENT
WELCOME! 4
ABOUT THIS MANUAL 4
INDEX TO PARTS AND CONTROLS 4
FRONT VIEW 4
TOP VIEW 4
SIDE VIEW....5
REMOTE CONTROL SECTION 5
DISPLAY SECTION 5
INSTALLATION....6
FOR TABLE TOP 6
FOR WALL MOUNTING: 6
GETTING STARTED 7
SPEAKER CONNECTION 7
LINE IN (AUX IN) CONNECTION....7
SUBWOOFER CONNECTION....7
POWER SUPPLY 7
AC POWER CONNECTION....7
REPLACING BATTERY FOR THE REMOTE CONTROL....7
CLOCK SETTING 8
TO SET THE CURRENT TIME....8
COMPACT DISC OPERATION....9
PLAYING A CD 9
PROGRAMMING CD TRACKS....10
MP3 DISC OPERATION....11
PLAYING A MP3 CD....11
PROGRAMMING MP3 CD TRACKS 12
NOTE ON CD-R/RW DISCS 13
USING HEADPHONES (NOT INCLUDED).... 14
MISCELLANEOUS OPERATIONS 14
SLEEP OPERATION 14
DECREASING THE SLEEP PERIOD 15
CLEARING TIMER ON SETTING 15
CARE AND MAINTENANCE....15
TROUBLE SHOOTING GUIDE....16
SPECIFICATION 17
WELCOME!
Thank you for purchasing the Music System.
Before operating the unit, please read this manual thoroughly and retain it for future reference.
ABOUT THIS MANUAL
- Instructions in this manual describe the controls on the remote.
You can also use the controls on the unit if they have the same or similar names as those on the remote. - The icon ⚪ indicates the task can only be done on the unit.
INDEX TO PARTS AND CONTROLS
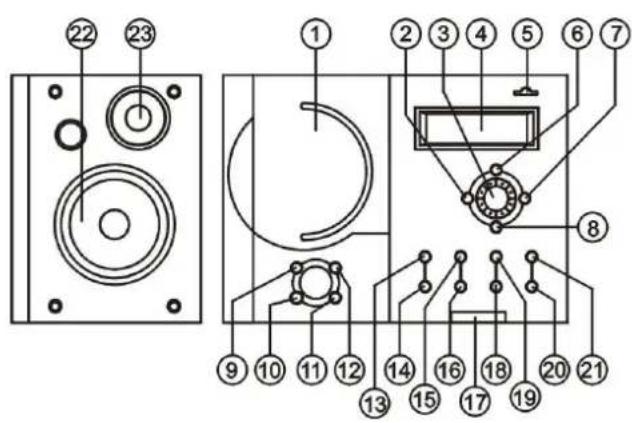
TOP VIEW

FRONT VIEW
- CD Door
- TUNER/FM/AM Function Button
- VOLUME
- Multi-Function Display
- STANDBY Indicator
- CD Function Button
- AUX Function Button
- EQ Button
- ALB-/MEMORY Button
- MODE Button
- SLEEP Button
- ALB + Button
- CD DOOR OPEN/CLOSE Button
- ⏻ ON/STANDBY Button
- ▶PLAY/PAUSE Button
- ■ STOP Button
- Remote Sensor
- /TUNING- Button
- ▶▶/▶▶/TUNING+ Button
- RANDOM Button
- PRESET/REPEAT Button
- Full Range Speaker
-
Tweeter Speaker
-
FM Antenna
- RESET Switch-Reset unit with a sharp pin
- AUX IN Socket
- Subwoofer Socket
- HEADPHONE Jack
- Left Speaker Terminal
- Right Speaker Terminal
- AC Cord

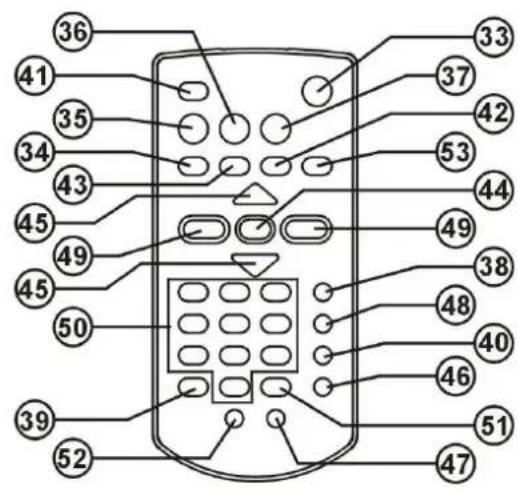

SIDE VIEW
-
Support Bracket
-
⏻ STANDBY Button
-
▶ PLAY/PAUSE Button
-
TUNER/BAND Button
-
CD Function Button
-
AUX Function Button
-
ST/MO Button
-
EQ Button
-
ALB UP Button
-
MUTE Button
-
Button
-
■ STOP Button
-
TIMER/PRESET/REPEAT Button
-
VOL + & VOL - Button
-
ALB DN/MEMORY Button
-
MODE Button
-
SLEEP Button
-
TUNING << >> Button
-
0-9 Button
-
INTRO Button
-
RANDOM Button
-
Baton
DISPLAY SECTION
D1. Timer on / off indicator
D2. Track / Preset station / frequency indicator
D3. Proceeding indicator
D4. Program (memory) indicator
D5. Sleep indicator
D6. Random indicator
D7. Intro indicator
D8. CD type indicator
D9. Stereo indicator
D10. Repeat indicator
D11. Album indicator
INSTALLATION
FOR TABLE TOP
- Lay the main unit and speakers face down on a soft surface to prevent scratching of the front panel.
- Insert the support bracket into the square holes at rear cabinet. Installing the support bracket into different square holes can adjust the unit angle to 45 or 20 degrees.
- Slide up the support plate until it is locked.
- This product is designed for placing vertically or horizontally. Remove the support plate for horizontal placement.

natural_image
Technical line drawing of a computer monitor with an inserted slot and screw base (no text or symbols)FOR WALL MOUNTING:
- Use the wall-mounting template supplied with the unit to make anchor hole marks on the wall. Make sure the marks are level.
- Drill 3/16" holes on the marks.
- Insert the plastic anchor supplied with unit until it is flush with the wall.
-
Hang the main unit and the speakers to the screw as indicated below.
-
Insert the screw and tighten the screw 4 mm away from the wall. (Approximately the width of 2 pennies)

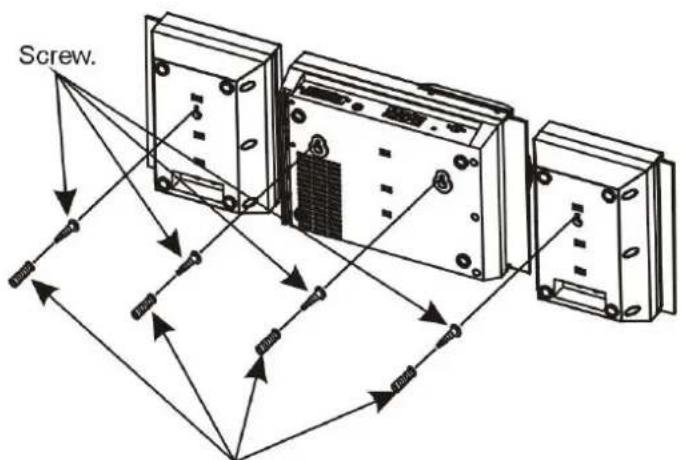
Plastic Anchor
GETTING STARTED
SPEAKER CONNECTION
- Insert the speaker cables by pushing down the terminal lever of the Left Speaker Terminal (#29) and the Right Speaker Terminal (#30).
- Connect the left speaker to Left Speaker Terminals (#29), with the white wire to R+ and the black wire to R-.
- Connect the right speaker to Right Speaker Terminals (#30), with the white wire to L+ and the black wire to L-.
LINE IN (AUX IN) CONNECTION
- Connect the left and right channel RCA plug (not included) into the Aux Input Socket (#26) and the other end to your home equipment. Make sure the polarity of the right and the left channel is correct.
- Press the ⏻ ON/STANDBY (#14, #33) to switch on the unit
- Press AUX (#7, #37) button. "AUX" (D3) will show in the display.
- Play the auxiliary input source.
SUBWOOFER CONNECTION
- Connect one end of a RCA plug (not included) into the Subwoofer Jack (#27) and the other end of wire to your subwoofer.
- Turn on the unit and your subwoofer.
POWER SUPPLY
This Vertical Music System operates from AC230V\~50Hz line power supply. The remote control unit operates from 1 "CR 2025" lithium battery. To power up the remote control, remove the insulation tab from the back of unit.
AC POWER CONNECTION
Connect the power cord to an AC230V\~50Hz power source.
REPLACING BATTERY FOR THE REMOTE CONTROL

- Turn over the remote control, and remove the battery door.
- Install 1 "CR2025" lithium battery according to the polarity diagram on the battery compartment.
- Close the battery door.
IMPORTANT: Be sure that the battery is installed correctly.
Wrong polarity may damage the unit.
NOTE: For better performance and longer operating time, we recommend the use of alkaline-type batteries.
(a) Do not mix old and new batteries.
(b) Do not mix alkaline, standard (carbon-zinc) or rechargeable (nickel-cadmium) batteries.
(c) If the unit is not to be used for an extended period of time, remove the battery. Old or leaking battery can cause damage to the unit and may void the warranty
CLOCK SETTING
The following procedures can be accomplished by using the remote or controls on the unit. Unless otherwise stated, the function numbers are for the remote The icon 📄 indicates the task can only be done on the unit.
NOTE: The clock has to be set the first time you use the unit. If the unit is disconnected from the mains for more than I minute, you will need to reset the clock.
TO SET THE CURRENT TIME
For example to set the clock at 7:30 AM
- In STANDBY Mode, press ALB UP (#40) once. Hour digital flashes to prompt for input.


- Press the TUNING << or TUNING >> button (#49) to adjust the hour.

- Press ALB UP (#40) to confirm the selection and the minute position flashes to prompt for input.

-
Press the TUNING << or TUNING >> button (#49) to adjust the minute.
-
Press ALB UP (#40) again to complete setting.

The following procedures can be accomplished by using the remote or controls on the unit. Unless otherwise stated, the function numbers are for the remote. The icon 📄 indicates the task can only be done on the unit.
NOTE: This player plays not only commercial CDs but also home-recorded CD-R/RW music discs.

PLAYING A CD
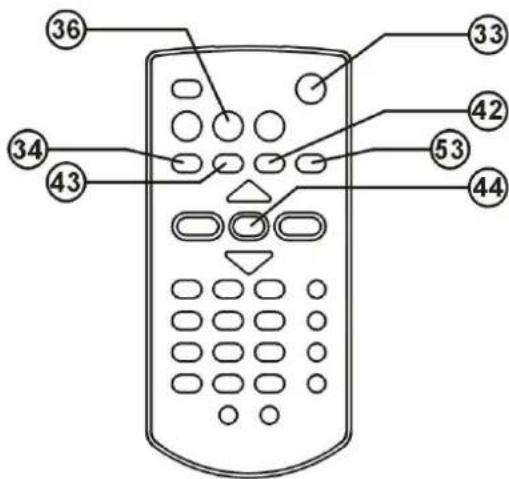
- Press the button (#33) to turn on the unit.
- Press the CD Button (#36) to operate the unit in CD mode.
- Press the OPEN/CLOSE button (#13) to open the CD door ☐.
- Place the CD, with label side outward, inside the CD compartment. Press the OPEN/CLOSE button (#13) again to close the CD door.
IMPORTANT: The CD door is a motorized door. DO NOT PUSH WITH HAND OR ANY OTHER MEANS TO OPEN OR CLOSE IT. - After reading the TOC in a few seconds, the unit will automatically start playing the CD
- Press ☐ STOP button (#43) to stop playing, the total number of tracks and total playing time will appear in the unit Multi function Display (#4).

- Press the ▶ button (#34) to start playing the CD again.
- You can key in directly the track number you wish to play by pressing the 0-9 buttons (#50).
For example to play track #12:
Press "1" Button followed by "2" Button, track #12 will start play back automatically.
| TO: PRESS: | |
| Stop play □ (#43) | |
| Pause play | ▶II (#34) once |
| Resume play after pause | ▶II (#34) again |
| Scan forward and backward | And hold ◀◀/▶◀ Skip(#42, #53) |
| Skip tracks | ◀◀/▶◀ Skip briefly (#42,# 53) |
| Repeat current track | REPEAT (#44) |
| Repeat all tracks | REPEAT twice (#44) |
| Random play | RANDOM (#52) |
| Intro play | INTRO (#51) |
| View current time | MODE Button (#47) |
| Control the volume | +/- Volume Control (#45) |
| Stop output from speakers | MUTE Button (#41) |
| Resume speaker output | MUTE Button (#41) again |
NOTE:
- Press the button (#34), the track number blinks to indicate the CD is in the pause mode.
- Press the REPEAT button once (#44), "RPT 1" (D10) indicates in the display.
- Press the REPEAT button (#44) twice, "RPT ALL" (D10) indicates in the display.
- Press the RANDOM button (#52), "RND" (D6) indicates in the display. Press again to resume to normal play.
- Press the INTRO button (#51), "INTRO" (#D7) indicates in the display. Press again to resume to normal play.
- "NO DISC" will be displayed when a CD is loaded incorrectly, or there is no CD inside.
PROGRAMMING CD TRACKS
With this function you can program up to 20 titles in the order you desire.
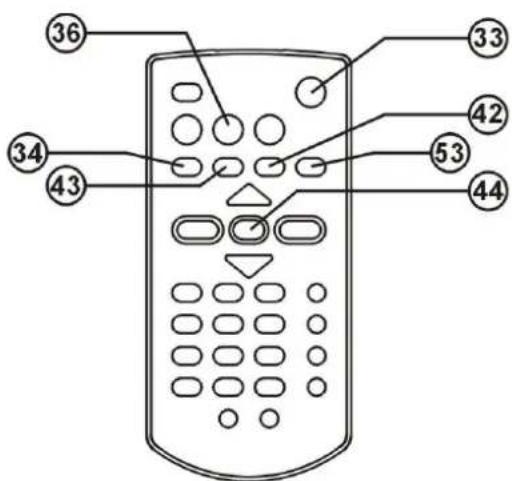
- Power on the unit and insert the CD.
- Press the CD button (#36) to operate the unit in the CD mode.
- Place the CD, with label side outward, inside the CD compartment. Press the OPEN/CLOSE button (#13) again to close the CD door. The unit will automatically start playing.
- Press □ STOP button (#43) to stop playing.
- Press PRESET Button (#44) to start programming the tracks. "PGM" (D4) appears in top left corner of the display.

Press PRESET button
- Search the desired track by pressing the CD skip buttons ◀◀/▶◀ (#42, #53) to select the track you want to program. The selected track blinks.

Press Skip buttons
- Press the PRESET Button (#44) again to complete and program another track.

Press PRESET button again
- Press button (#34) to start playing the tracks in your programmed order.
- To clear the programmed tracks, press □ STOP button (#43) twice.
MP3 DISC OPERATION
The following procedures can be accomplished by using the remote or controls on the unit. Unless otherwise stated, the function numbers are for the remote. The icon 📄 indicates the task can only be done on the unit.
NOTE: This player plays not only commercial CDs but also self-complied CD-R/RW discs.

PLAYING A MP3 CD
-
Press the button (#33) to turn on the unit.
-
Press the CD Button (#36) to operate the unit in CD mode.
-
Press the OPEN/CLOSE button (#13) to open the CD door ☐.
-
Place the CD, with label side outward, inside the CD compartment. Press the OPEN/CLOSE button (#13) again to close the CD door.
IMPORTANT: The CD door is a motorized door. DO NOT PUSH WITH HAND OR ANY OTHER MEANS TO OPEN OR CLOSE IT.
-
After reading the TOC in a few seconds, the unit will automatically start playing the CD. While the CD is playing, the track name, artist name, etc. is rolling out in the lower side of the display.
-
Press STOP button (#43) to stop playing, the total number of tracks and album will appear in the unit Multi function Display (#4).

-
Press the ▶■ button (#34) to start playing the CD again.
-
You can key in directly the track number you wish to play by pressing the 0-9 buttons (#50).
For example to play track #12:
Press "1" Button followed by "2" Button, track #12 will start play back automatically.
-
Press ALB UP button (#40) or ALB DN button (#46) skipping to the first track of next or previous album.
-
For using other CD control keys such as repeat, intro, random etc. Please reference to COMPACT DISC OPERATION section.
PROGRAMMING MP3 CD TRACKS
With this function you can program up to 20 titles in the order you desire.
- Power on the unit and insert the CD.
- Press the CD button (#36) to operate the unit in the CD mode.
-
Place the CD, with label side outward, inside the CD compartment. Press the OPEN/CLOSE button (#13) again to close the CD door. The unit will automatically start playing.
-
Press □ STOP button (#43) to stop playing.
-
Press the PRESET button (#44) to start programming the tracks. "PGM" (D4) appears in top left corner of the display and the album number blinks.

Press PRESET button
- Search the desired track by pressing the CD skip buttons ◀◀/▶▶ (#42, #53) to select the album you want to program. The selected album blinks.

Press Skip buttons
- Press the PRESET button (#44) again to select a desired track in the selected album. The track number blinks.

Press PRESET button again
- Press the Preset button (#44) again to complete and program another album and track.

-
Press button (#34) to start playing the tracks in your programmed order.
-
To clear the programmed tracks, press □ STOP button (#43) twice.
MPCD-9K1 INSTRUCTION MANUAL
NOTE ON CD-R/RW DISCS
● Because of non-standardized format definition / production of CD-R/RW, playback quality & performance are not guaranteed.
● Manufacture is not responsible for the playability of CD-R/RW due to recording conditions such as PC performance, writing software, media ability, etc.
- Do not attach a seal or label to either side of the CD-R/RW disc. It may cause a malfunction.
RADIO OPERATION
The following procedures can be accomplished by using the remote or controls on the unit. Unless otherwise stated, the function numbers are for the remote. The icon 📄 indicates the task can only be done on the unit.

RADIO TUNING
- Press the (#33) button to turn on the unit.
- Press the TUNER button (#35) to operate the unit in the radio mode.
| TO: PRESS: | |
| Switch between AM/FM band | TUNER (#35) repeatedly |
| Scan radio station automatically | <</>> (#49) Tuning for 1 second |
| Stop auto-tuning | <</>> (#49) Tuning again |
| Scan radio station manually | <</>> (#49) Tuning |
| Control the volume | +/- VOL (#45) |
| Stop output from speaker | MUTE (#41) once |
| Resume speaker output | MUTE (#41) again. |
NOTE:
- When listening to FM program, extend the antenna to insure maximum tuner sensitivity.
- As automatic tuning depends on the signal strength of the broadcasting station, week stations are sometimes skipped. Tune manually to find the week stations. On the other hand, with a strong signal, the tuner may stop before it reaches optimum setting. Tune manually for the best reception.
- For FM stereo reception, the unit provides FM MONO/STEREO selection. In stereo mode, the unit will automatically switch to stereo when a FM stereo broadcast is received and will indicate “((ST))” in the display.
- To receive a weak (noisy) FM station, press ST/MO Button (#38) to switch to MONO mode. The reception may be improved, but the sound is monaural (MONO).
TO PRESET CHANNELS
This unit is equipped with 10 preset memories for AM and 20 preset memories for FM. Once they are preset, they can be instantly accessed by pressing PRESET button (#44) repeatedly to select the preset station.
- Press button (#33) to turn on the unit.
- Press the TUNER button (#35) to operate the unit in the radio mode.
- Tune to a desired station.
- Press the MEMORY Button (#46). The indicator "PGM" (D4) blinks.
MPCD-9K1 INSTRUCTION MANUAL
- While the indicator “PGM” is blinking, press the TUNING << or >> button (#49) to select the desired preset channel.
- Press the MEMORY Button (#46) again to save the preset channel.
- Tune to another station and repeat steps 3 to 5 to store the station in another preset channel.
TO RECEIVE PRESET STATIONS
- Press button (#33) to turn on the unit.
- Press the TUNER button (#35) to operate the unit in the radio mode.
- Press PRESET button (#44) to select the preset channels.
AUX OPERATION
You can connect the TV or VCR audio left and right outputs to the AUX inputs (#26) at the rear of the system. To use this Vertical Hi-Fi System to amplify your TV or VCR audio signal,
- Press the AUX button (#37) to operate the unit in AUX mode. Indicator "AUX" (D3) appears in the display.
- Start playing your TV or VCR.
- Adjust the Volume Control to obtain the desired sound level.
PRESET EQ (PRESET EQUALIZATION SYSTEM)
The sound equalization can be adjusted for optimum sound reproduction depending on the style of music you are playing. By pressing the EQ button (#39), you can switch between FLAT, POP, ROCK, JAZZ or CLASSIC.
MODE FUNCTION
By pressing the MODE Button (#47) repeatedly, you can view the status of current function mode, current time, sleep time in the display.
USING HEADPHONES (NOT INCLUDED)
Inserting the plug of your headphones into the Headphone jack (#28) will enable you to listen in private. When using headphones, the speakers will be disconnected.
NOTE: READ THIS IMPORTANT INFORMATION BEFORE USING YOUR HEADPHONES
- Avoid extended play at very high volume as it may impair your hearing.
- If you experience ringing in your ears, reduce the volume or shut off your unit.
- Keep the volume at a reasonable level even if your headset is an open-air type designed to allow you to hear outside sounds. Please note that excessively high volume may still block outside sounds.
MISCELLANEOUS OPERATIONS
The following procedures can be accomplished by using the remote or controls on the unit. The icon 📄 indicates the task can only be done on the unit.
SLEEP OPERATION
When the unit is ON, press the SLEEP button (#11, #48). The display (#4) shows 120 minutes of playing time momentarily and then returns to the current function mode. The unit will automatically turn off after 120 minutes.

DECREASING THE SLEEP PERIOD
- When the unit is ON, press the sleep button repeatedly until the desired sleep period is reached. The time decreases to 90 60 45 30 20 10 0 minutes and can be set from 120 minutes down to 0 minutes.
- The unit will automatically turn off after the set time has elapsed.
- To cancel the Sleep operation, press the SLEEP button repeatedly and release when "0" is displayed or simply switch the unit to standby.
TIMER OPERATION
Your unit can be set to turn on at predetermined times in any function mode. To set the TIMER ON proceed as follows:
SETTING TIMER ON
The following procedure shows the setting of TIMER to on at 7:30 (in CD mode).
-
In STANDBY Mode, press TIMER Button (#44) once, “∅” (D1) indicates in the display top left corner.
-
Press and hole TIMER Button (#44) again over 1 second. Hour position flashes.

- Press the TUNING << or >> buttons (# 49) to adjust the hour.
- Press TIMER Button (#44) to confirm hour setting. Minute position flashes.
- Press the TUNING << or >> buttons (# 49) to adjust the minute.
- Press the TIMER Button (#44) to complete setting. TIMER ON time is displayed with icon “⊕” and the display would resume to indicate the current time.
CLEARING TIMER ON SETTING
When the timer on function is activated, “④” indicates in the display top left corner. You can press the TIMER button (#44) repeatedly to activate or disable the timer on function.
CARE AND MAINTENANCE
- Clean your unit with a damp (never wet) cloth. Solvent or detergent should never be used.
- Avoid leaving your unit in direct sunlight or in hot, humid or dusty places.
- Keep your unit away from heating appliances and sources of electrical noise such as fluorescent lamps or motors.
- If drop-outs or interruptions occur in the music during play, or if the disc fails to play at all, its bottom surface may require cleaning. Before playing, wipe the disc from the center outwards with a good soft cleaning cloth.

natural_image
Simple line drawing of two hands holding a pinwheel, with an arrow indicating direction (no text or symbols)If you experience difficulties in the use of this music system, please check the followings.
| Symptom | Possible Cause | Solution |
| Radio | ||
| Noise or sound distorted on AM or FM broadcasts. | Station not tuned properly for AM or FM | Retune the AM or FM broadcast station. |
| FM: Wire antenna is not extended. | Extend FM Wire antenna. | |
| AM: The bar antenna is not positioned correctly. | Reposition the unit until best reception is obtained. | |
| FM STEREO does not appear on display. | You have tuned to a mono station or station too weak. | Select another FM station. |
| AM or FM, no sound. | Unit not at Tuner function, AM or FM band. | Press Tuner Function button to select AM or FM. |
| Volume at minimum. | Increase Volume. | |
| Compact Disc Player | ||
| CD Player will not play. | Unit not in CD function mode. | Press CD Function button. |
| CD is not installed incorrectly. | Insert CD with label side up. | |
| CD skips while playing. | Disc is dirty or scratched. | Wipe disc with cloth or use another disc. |
| Function inoperative and jammed | Built-in microcomputer needs to be reset. | Use a sharp tip to press into the reset hole (#25) to reset the built-in microcomputer. |
| Display no indication or abnormal indication | Built-in microcomputer needs to be reset. | Use a sharp tip to press into the reset hole (#25) to reset the built-in microcomputer. |
| Intermittent sound | Dirty or defective discDirty Pick Up lensPlayer is subject to excessive shock or vibration | Clean or replace the defective discUse a CD-lens cleaning disc to clean the lensRelocate the player away from shock or vibration |
| No sound when played in the AUX Mode | Power to external source (CD, VCR etc) not switched on Connection to external source (CD, VCR etc) is incorrect: e.g. RCA plug may have been inserted to AUDIO IN of external source.Master Volume is at minimum. | Switch on the power of the external source.Reconnect the RCA Plug to the AUDIO OUT of the external source.Adjust the master volume |
| No sound from Subwoofer | Subwoofer not switched on Subwoofer input is not connected to RCA jack of System's Subwoofer OutMUTE function is activatedSystem volume is at minimum | Switched the Subwoofer on Connect System's Subwoofer Out to Subwoofer's input of external equipmentSwitch MUTE function offAdjust volume control |
SPECIFICATION
Power Source AC230V \~50 Hz
DC 3V, 1 x "CR2025" size lithium battery for Remote Control (included).
Power Consumption 28 Watts
Dimension Unit 290 (W) x 84 (D) x 208 (H) mm
Speaker 160 (W) x 84 (D) x 208 (H) mm
Tuning Range/Sensitivity ---- AM 522 \~ 1629 kHz/2000 μV/m
FM 87.5 - 108 MHz/18uV
Playback System ---- Ball clip CD mechanism
Frequency Response 100 - 18,000 Hz
Power Output ---- 5 Watts RMS per channel
Speaker Impedance 4 ohms
Headphone Impedance 8 - 32 ohms
AUX Input Sensitivity ---- 300 mV
ACCESSORIES:
Instruction Manual 1 set
Remote Control Handset 1 pc
Support Bracket 3 pcs
Wall Mounting Template 1 pc
Screw 4 pcs
Plastic Anchor 4 pcs
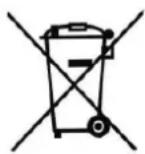
This symbol on the product or on its packaging means that your electrical and electronic equipment should be disposed of at the end of its useful life separately from your household wastes. There are separate collection systems for recycling in the EU.
For more information, please contact your local authority or the dealer from whom you purchased the product.


- INSTRUCTION MANUAL
- SAFETY INSTRUCTIONS
- CAUTION
- WARNING: TO PREVENT FIRE OR SHOCK HAZARD, DO NOT EXPOSE THIS APPLIANCE TO RAIN OR MOISTURE.
- CLASS 1 LASER PRODUCT
- ON PROTECTION AGAINST LASER ENERGY EXPOSURE
- ON PLACEMENT
- ON CONDENSATION
- TABLE OF CONTENT
- WELCOME!
- ABOUT THIS MANUAL
- INDEX TO PARTS AND CONTROLS
- FRONT VIEW
- SIDE VIEW
- DISPLAY SECTION
- INSTALLATION
- FOR TABLE TOP
- FOR WALL MOUNTING:
- GETTING STARTED
- SPEAKER CONNECTION
- LINE IN (AUX IN) CONNECTION
- SUBWOOFER CONNECTION
- POWER SUPPLY
- AC POWER CONNECTION
- REPLACING BATTERY FOR THE REMOTE CONTROL
- CLOCK SETTING
- TO SET THE CURRENT TIME
- PLAYING A CD
- NOTE:
- PROGRAMMING CD TRACKS
- MP3 DISC OPERATION
- PLAYING A MP3 CD
- PROGRAMMING MP3 CD TRACKS
- MPCD-9K1 INSTRUCTION MANUAL
- NOTE ON CD-R/RW DISCS
- RADIO OPERATION
- RADIO TUNING
- TO PRESET CHANNELS
- TO RECEIVE PRESET STATIONS
- AUX OPERATION
- PRESET EQ (PRESET EQUALIZATION SYSTEM)
- MODE FUNCTION
- USING HEADPHONES (NOT INCLUDED)
- MISCELLANEOUS OPERATIONS
- SLEEP OPERATION
- DECREASING THE SLEEP PERIOD
- TIMER OPERATION
- SETTING TIMER ON
- CLEARING TIMER ON SETTING
- CARE AND MAINTENANCE
- SPECIFICATION
- ACCESSORIES:
Brand : Soundmaster
Model : DISC-3005
Category : Hi-Fi System