
CA-CD700 - Car radio Fusion - Free user manual and instructions
Find the device manual for free CA-CD700 Fusion in PDF.


| Product Type | AM/FM/CD/MP3/WMA/SD/USB/iPod/iPhone Receiver |
| Brand | Fusion |
| Model | CA-CD700 |
| Power Supply | 12V DC (11-16V), Negative Ground |
| Fuse Rating | 15A |
| Max Power Output | 50W x 4 channels MOSFET |
| RMS Power Output | 22W x 4 at 10% THD |
| Pre-amp Output Voltage | 5.0V (USB play mode, 1kHz, 0dB, 10kΩ load) |
| Subwoofer Output Voltage | 5.0V |
| DAC Type | 1-Bit |
| iPod/iPhone Charging Current | 1A via USB |
| Radio Frequency Range (FM) | 87.5-108 MHz (varies by region: Oceania, USA, Europe, Russia) |
| Radio Frequency Range (AM) | 522-1710 kHz (varies by region) |
| Supported Audio Formats | MP3 (MPEG1/2/2.5 Layer 2/3), WMA (v7/8/9) |
| Display | 32K+ RGB variable colour LCD |
| RDS Functionality | Yes (PTY, AF, TA, REG, CT) |
| Equalizer Presets | Flat, Pop, User, Dance, Rock, Classic, Jazz, Vocal |
| Subwoofer Control | Dedicated DSLC buttons and low-pass filter (80/120/160 Hz) |
| Detachable Face | Yes |
| AUX Input | Yes (3.5mm stereo jack) |
| CD Playback | Yes (CD, CD-R, CD-RW, MP3/WMA CD) |
| USB Port | Front USB (USB 1.1 & 2.0 compatible) |
| SD Card Slot | Yes |
| Compatibility | Made for iPod (classic, nano 5th/6th, touch 2nd/3rd/4th) and iPhone (3GS, 4, 4S) |
| Warranty | 1-year limited |
Frequently Asked Questions - CA-CD700 Fusion
User questions about CA-CD700 Fusion
0 question about this device. Answer the ones you know or ask your own.
Ask a new question about this device
Download the instructions for your Car radio in PDF format for free! Find your manual CA-CD700 - Fusion and take your electronic device back in hand. On this page are published all the documents necessary for the use of your device. CA-CD700 by Fusion.
USER MANUAL CA-CD700 Fusion
MADE FOR:

iPhone 45 16GB 32GB 64GB

iPod touch 4th generation 8GB 32GB 64GB

iPod nano 6th generation 8GB 16GB

iPhone 4 16GB 32GB

iPod touch 3rd generation 32GB 64GB

IPoD nano 5th generation (video camera) 8GB 16GB

iPhone 3GS 8GB 16GB 32GB

iPod touch 2nd generation 8GB 16GB 32GB

iPod classic
For the latest news on supported iPod models visit: www.fusionelectronics.com
FCC COMPLIANCE STATEMENT
This device complies with part 15 of the FCC rules. Operation is subject to the following two conditions:
- This device may not cause harmful interference, AND
- This device must accept any interference received, including interference that may cause undesired operation.
CONTENTS
Precautions & Maintenance P3
Quick Start Guide P3
Dashboard Installation P4
Removal / Re-Attachment of the Face P5
Connecting the System P6
Basic Operations P7
Audio Functions P8
System Menu P9
Radio Operation P10
RDS Operation P11
iPod / iPhone Operation P12
Media Playback (CD/USB/SD/Aux In) P13
Additional Media Playback Options P15
Troubleshooting P17
How To Reset The Unit P17
RDS Program Types & Descriptions P18
Product Specifications P18
Supported File Types P19
Licensing P19
Warranty P20-27
PRECAUTIONS & MAINTENANCE
GENERAL
- When cleaning the vehicle, do not get water or cleaning fluids on the unit.
- Do not attempt to open the unit chassis. There are no user servicable parts or adjustments inside.
- This unit has been tested with all compatible authentic iPod/iPhone models under normal expected operating conditions, free from any pre-existing defects in either the unit or iPod/iPhone and with unmodified or "jailbroken" software.
- No Responsibility can be taken for use of the unit other than under normally expected operating conditions in conjunction with fully functional and undamaged iPod/iPhone units which have been manufactured and authorised by Apple Inc.
- Ensure that only a Genuine Apple Sync cable is used for connection to this unit.
- When the vehicle's air conditioner is in use, moisture may accumulate on the CD Laser lens. This may cause disc read errors. If this occurs, remove the disc and wait for the moisture to evaporate.
QUICK START GUIDE
When the unit is powered up for the first time (or the battery is disconnected or runs flat), you will need to set your tuner region.
- When you press the power button to turn on the unit ① [OCEANIA] will be displayed on the LCD screen as the default Tuner region.
- Rotate the Encoder Volume Control to select an option: OCEANIA (Australia / New Zealand), USA, EUROPE or RUSSIA.
- Press the Encoder Volume Control to store your selection and exit to the Tuner mode.
If you make the wrong selection, you may not be able to tune in to your desired stations. This setting can be easily changed from the SYSTEM MENU — see page 10
SELECTING THE MUSIC SOURCE
Press the source button Ⓗ to cycle through the following sources (if available) — Radio → CD → USB → SD → AUX
RGB 32K+ COLOUR SELECTION
The initial colour setting for this unit is Colour Scan. To quickly enter the 32K+ RGB colour menu, press and hold the ESC/RGB button ESC •RGB
You can then rotate the Encoder Volume Control to select from the following pre-set display colours:
WHITE: GREEN1: GREEN2: GREEN3: AMBER: PINK1: PINK2: PURPLE1: PURPLE2: BLUE1: BLUE2: USER COLOUR: ORANGE
Press the ESC/RGB button ESC to confirm your selection. See Page 10 for details on how to set the USER COLOUR
STORE DEMO MODE
When you connect the unit for the first time and press the Mute/Power button, the unit will operate in Demo Mode. To exit Demo Mode, press the Mute/Power Button again. See Page 10 to turn Demo Mode off.
DASHBOARD INSTALLATION
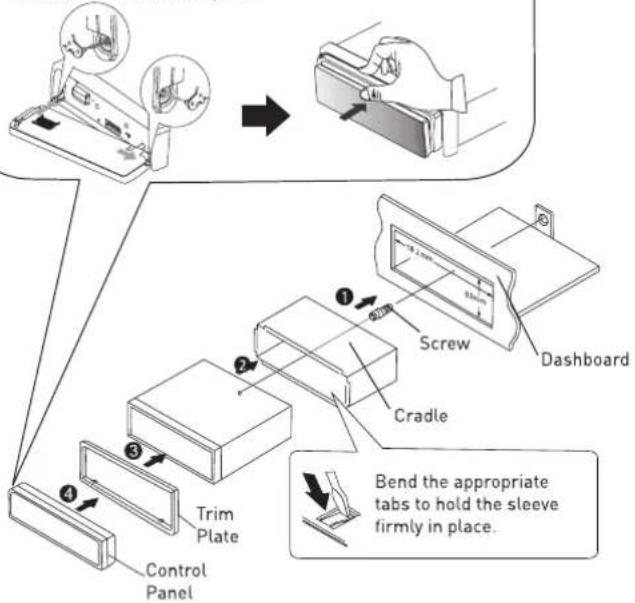
The following illustration shows a typical installation. If you have any questions or require information regarding installation kits, consult your car audio retailer.
If you are not sure how to install this unit correctly, have it installed by a qualified installer.
To attach the front panel back to the unit chassis, please insert the right side of the panel in the chassis until it is correctly engaged. Press the left side of the panel until the mechanism locks it into place.
REMOVAL/RE-ATTACHMENT OF THE FACE
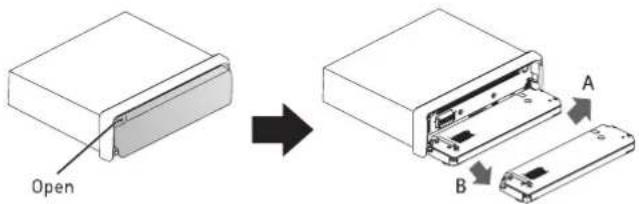
- Press the Panel OPEN button.
- After flipping down the front panel, push it to the right (A), then draw the left of the front panel outwards (B)
- To re-attach the face, please complete the above steps in reverse.
PLEASE NOTE
- If any function does not work, open the front panel & re-close.
- Do not touch the contact pins on the rear of the face as this could cause contact problems. If the contacts become dirty, please clean with a soft cloth.
- Petrol and other solvents must not come in contact with the front face
- Please use the supplied plastic case to store the front face when it is removed from the unit.
- For security purposes, please ensure that when removed, the face is stored out of sight if left in the vehicle.
CONNECTING THE SYSTEM
WIRING DIAGRAM
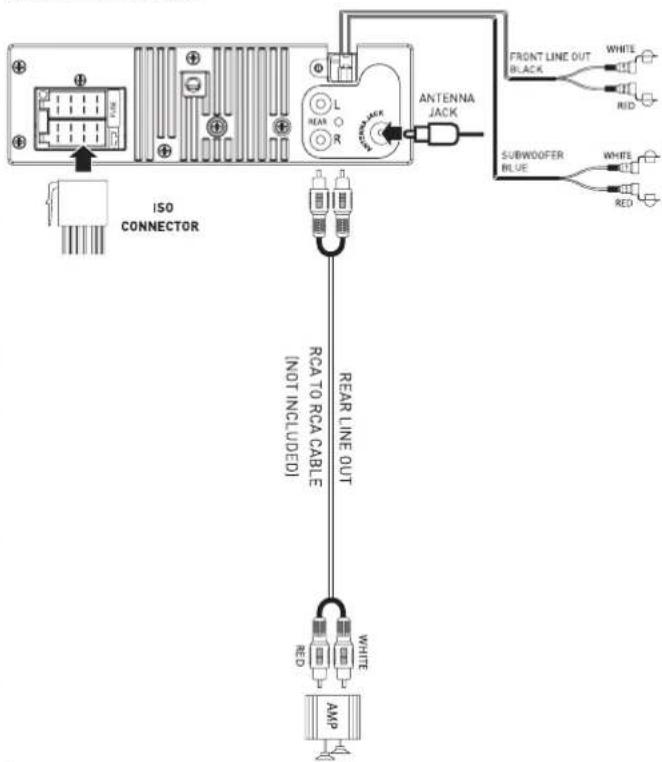
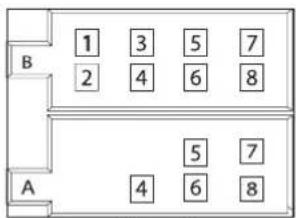
Figure2
ISO CONNECTOR WIRING DIAGRAM
| PIN | WIRE COLOUR | FUNCTION/LABEL |
| A4 | YELLOW | 12V CONSTANT[+] |
| A5 | BLUE | CONNECT TO SYSTEM CONTROL TERMINAL OF THE POWER AMP OR AUTO ANTENNA RELAY CONTROL TERMINAL [max 150mA 12VDC] |
| A6 | ORANGE/WHITE | DIMMER |
| A7 | RED | 12V ACCESSORIES [+] |
| A8 | BLACK | GROUND |
| B1 | VIOLET | RIGHT REAR SPEAKER[+] |
| B2 | VIOLET/BLACK | RIGHT REAR SPEAKER[-] |
| B3 | GREY | RIGHT FRONT SPEAKER[+] |
| B4 | GREY/BLACK | RIGHT FRONT SPEAKER[-] |
| B5 | WHITE | LEFT FRONT SPEAKER[+] |
| B6 | WHITE/BLACK | LEFT FRONT SPEAKER[-] |
| B7 | GREEN | LEFT REAR SPEAKER[+] |
| B8 | GREEN/BLACK | LEFT REAR SPEAKER[-] |
BASIC OPERATIONS
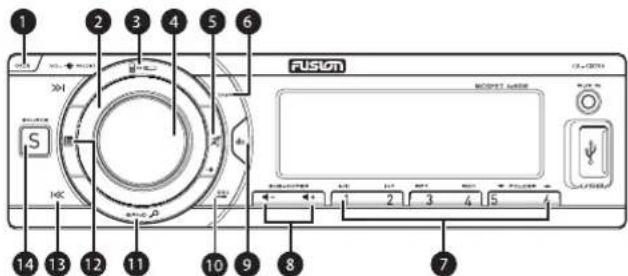
1. OPEN
Press this button to flip open and detach the control panel.
2. ENCODER VOLUME CONTROL
Rotate the encoder volume to increase and decrease the volume.
3. iPod/iPhone INTERNAL/EXTERNAL CONTROL
Press this button to switch between iPod/iPhone control from either the unit or from the device itself.
4. ENCODER VOLUME CONTROL AUDIO/ENTER FUNCTIONS
a) AUDIO. Press this button to enter the Audio Menu mode.
b) ENTER. In Media playback mode and Menu functions, press this button to confirm a selection (ENTER).
5. MUTE - POWER ON/OFF ⚫①
a) Press this button to turn Mute ON or OFF
b) Press this button to turn the unit on. Press and hold to turn the unit off.
6. DISP - DISPLAY
a) In MP3/WMA playback mode, press to display ID3 information: Track number and elapsed play Time - → File - → Album - → Title - → Artist.
b) In iPod/iPhone playback mode, press to display Album → Title → Artist
7. NUMERIC BUTTONS
a) In the Tuner mode, press the Numeric buttons to recall the preset stations. Press and hold these buttons for 2 seconds to store stations.
b) In Media playback mode, Press the Numeric buttons to perform the operations below:
| Number | 1 | 2 | 3 | 4 | 5 | 6 |
| Button | Pause/Play | Intro | Repeat | Random | Folder Up | Folder Down |
8. SUBWOOFER - DIRECT SUBWOOFER LEVEL CONTROL
When a subwoofer is connected; use the DSLC buttons to adjust the subwoofer level up or down.
9. EQ III
Press this button to select the preset equaliser settings:
FLAT - → POP - → USER - → DANCE - → ROCK - → CLASSIC - ; rightarrow JAZZ - → VOCAL
10. ESC/RGB ESC RGB
a) ESC - ESCAPE. Press to quick return previous menu or mode rather than having to cycle through all of the options in the menu.
b) RGB - 32K+ RGB COLOUR. Press and hold this button to
access the 32k+ variable colour setting mode. See Page 10 for more information
11. BAND/SEARCH
a) In Tuner mode, press this button to cycle through Bands: FM1, FM2, FM3, AM1 (MW1) or AM2 (MW2).
b) In Media playback mode, press to access the folder / file search mode.
c) In iPod/iPhone playback mode, press this button to access the iPod/iPhone search functions.
12. MENU
Press to access the system menu. See Page 8 for menu options.
13. TUNE UP/DOWN, FILE & TRACK UP/DOWN & FAST FORWARD/BACK
a) TUNE UP/DOWN. In tuner mode, press this button to Auto Seek to the next station or press and hold this button to manually tune in to your desired station.
b) FILE & TRACK UP/DOWN. In CD or USB/SD media playback mode, press these buttons to skip a chapter, track or file.
c) FAST FORWARD/BACK. In USB/SD media playback mode, press and hold momentarily to fast forward/rewind.
14. SOURCE
Press the SOURCE button to cycle through the following sources if available: Radio: CD: USB: SD: AUX
AUDIO FUNCTIONS
All Audio functions are easily accessible on the CA-CD700.
AUDIO MENU. Press the ENCODER VOLUME CONTROL to access the Audio Menu mode. Then press ENTER or TUNE UP >>1 to select the Audio Function to be adjusted, then rotate the ENCODER VOLUME CONTROL to select the desired setting. You can always return to the previous Audio Function by pressing the TUNE DOWN I<< button.
REMINDER
In the AUDIO MENU, or in any menu, you can quickly exit the menu by pressing the ESC/RGB button
QUASI-PARAMETRIC FUNCTION - CFQ ADJUSTMENT
As part of the available Audio Functions, you have the ability to adjust the Center Frequency of the Bass, Midrange or Treble controls. This gives you greater control of the adjustment of these functions by allowing you to select the preferred Center Frequency to adjust.
If you are unsure of which CFQ settings to use, please use the following Default settings: Bass CFQ 80Hz, Midrange CFQ 1.5K Hz & Treble CFQ 12.5K Hz
AUDIO FUNCTION ADJUSTMENT:
EBX ON/OFF: Turn ON or OFF the EBX (Encounter Bass Xtender) Bass Boost.
BAS Adjust the Bass level between -7 to +7.
BAS CFQ Select Bass centre frequency: 60/80/100/200Hz
MID Adjust the Midrange level between -7 to +7.
MID CFQ Select the Midrange centre frequency: 0.5K / 1.0K / 1.5K / 2.5KHz
TRE Adjust the Treble level between -7 to +7.
TRE CFQ Select the Treble centre frequency: 10.0K / 12.5K / 15.0K / 17.5KHz
BAL (Balance) Adjust the balance between the right and left speakers from 12R (full right) to 12L (full left).
FAD (Fader) Adjust the fader between the front and rear speakers from 12R (full rear) to 12L (full front).
(SUBWOOFER)
SW ON/OFF Turn On or Off the Subwoofer RCA output.
SW LPF Subwoofer low pass crossover: 80/120/160Hz
SWAM ON/OFF In AM mode, turn ON or OFF the Sub output.
NOTE
If the Subwoofer RCA output is set to "OFF", then the SW LPF & SWAM functions will not be displayed.
EQUALISER OPERATION
When you activate the Equaliser, the Pre-Set Equaliser settings override your existing Bass, Midrange & Treble Settings.
Press the Equaliser button repeatedly to cycle through the following pre-sets: FLAT-->POP-->USER-->DANCE-->ROCK-->CLASSIC-->JAZZ-->VOCAL
To return to the Bass/Midrange/Treble settings that were in use before the EQ was selected, please select the USER setting.
SYSTEM MENU
Press ☐(MENU) to access the System Menu and press again to select the item be adjusted, then rotate Encoder Volume Knob to select a value / option. To exit this menu at any time, press the ESC/RGB button ESC
STORE (Auto store)
While in Tuner mode, press the ENCODER VOLUME CONTROL to activate Auto Store. The six strongest stations of the selected band will be saved in the preset channels automatically
RDS ON/OFF
While in Tuner mode, this selection turns On or Off RDS. RDS Functions are explained in more detail on Page 11. If RDS is set to OFF, then the RDS Functions indicated below with an * will not appear in the System Menu
PTY* (Program Type)
Press the ENCODER VOLUME CONTROL to enter program type, then rotate the ENCODER VOLUME CONTROL to select the category.
AF* ON/OFF
Turn On or Off the Alternate Frequencies function.
TA* ON/OFF
Turn On or Off the Traffic Announcement function.
REG* ON/OFF
Turn On or Off the Set Region for Alternate Frequencies function
CT* ON/OFF
Turn On or Off the CT function.
LOC* ON/OFF
(Local/Distance). Use this setting to Auto Seek to strong local stations (Local) or all stations regardless of their strength (Distance).
AREA
Select your country/region for the tuner: OCEANIA (Australia/New Zealand); USA; EUROPE; RUSSIA & press ESC/RGB ESC to save.
CLK (Clock)
To set the clock, rotate the Encoder Volume Control to set the hours (Note "A" or "P" will be displayed in the top-right hand of the LCD display indicating AM or PM if the Clock is in 12H mode – see below). Press the Encoder Volume control to select "minutes" then rotate the control to set.
CLK 12H/24H (Clock Format)
Select the time format 12H or 24H
BEEP ON/OFF
Select On or Off to activate button confirmation beep tones.
DEMO ON/OFF
Demo mode is activated when the unit is first connected to the vehicle, but is de-activated when the Power Button is pressed. It can, however, be activated again by pressing the Power Button. To stop this feature, set Demo Mode to off.
COLOUR
This unit is equipped with a 32K+ RGB variable colour display. By rotating the Encoder Volume Control, you can select the system colour from the following options:
COLOUR SCAN (default setting); WHITE; GREEN 1; GREEN 2; GREEN 3; AMBER; PINK 1; PINK 2; PURPLE 1; PURPLE 2; BLUE 1; BLUE 2; USER; ORANGE
USER (USER SELECTED COLOUR):
This allows you to select your choice of display colour from over 32,000 combinations (32K+). When you select USER in the colour menu, press the Encoder Volume Control to then rotate to select the intensity or Red, Green & Blue (from between 0 and 32) to make your own custom colour.
To switch between R (Red), G (Green) and B (Blue) setting modes, push the TUNE UP button >>I
Press ESC/RGB ESC button once you have completed your selection.
RADIO OPERATION
TUNE INTO A RADIO STATION
-
Press the SOURCE button 📄 repeatedly until [RADIO] is displayed on the LCD screen.
-
Select your preferred listening Band (FM or AM) by pressing BAND. There are 3 FM Bands [FM1] [FM2] [FM3] and 2 AM Bands [AM1] [AM2]. These multiple Bands allow you to store up to 18 FM stations & 12 AM stations in memory (see below).
-
To search for a radio station, press either the TUNE UP or DOWN >>1/1<< buttons to search for the next station higher than the current station frequency or lower than the current frequency.
-
To Manually tune to a radio station, press and hold either the TUNE UP or DOWN >>1/1<< button until the tuner frequency on the LCD display starts flashing. You can then release the TUNE
UP or DOWN button, and press it again repeatedly until you select your desired frequency. After 5 seconds, the display will stop flashing and the unit will be tuned in to that station.
HOW TO STORE YOUR FAVOURITE STATIONS
- Select you preferred Band. Generally you would use FM1 or AM1 to save you favourite stations (6 stations per band). If you need to store more stations, you can use FM2/3 or AM2 for AM stations.
- Tune in to your preferred station as per the steps above
- Press and hold one of the Preset Station Buttons (1-6) for 2 seconds to store the station. The preset number and [SAVED] will be displayed on the LCD screen.
TUNE TO A SAVED or PRE-SET STATION
-
Select the relevant BAND
-
Press the Preset Station Number corresponding to your required Pre-Set station.
RDS OPERATION
The RDS (Radio Data System) function operates only in areas with FM stations broadcasting RDS signals. If you tune to an RDS station, an RDS icon and information about the presenter, station or program is displayed.
This unit supports the following RDS features:
(PTY) SELECT PROGRAM TYPE
Before tuning to RDS stations, you can select program type and let the unit search only for programs of the selected category.
Press the MENU button to enter the System Menu, press
ENTER again to confirm and select PTY type & search for that style station. Please see a list of PTY Types & descriptions on P14:
(AF) SELECT ALTERNATE FREQUENCIES
If the radio signal from the current station is poor, you can turn on the AF (Alternate Frequency) function to let the unit search automatically for another station with a stronger signal but with the same program identification as the current station.
(TA) RECEIVE TRAFFIC ANNOUNCEMENTS
If you do not want to miss a traffic announcement during music playback, you can turn on the TA (Traffic Announcement) function.
TA ON: When there is a traffic announcement; the unit switches to the tuner mode (regardless of the current mode) and begins to broadcast the announcement on traffic conditions. When the traffic announcement is over, the unit will return to the previous mode.
TA OFF Traffic announcement does not cut in.
(REG) REGION FOR AF TUNING
REG ON: Only stations in the current region will be tuned to automatically.
REG OFF: All stations can be tuned to automatically
(CT) CLOCK TIME
Turn CT on to set the clock time using RDS data. Turn CT off to set the clock time manually.
This unit is equipped with iPod/iPhone control which allows you to directly control and charge iPod/iPhones using the units controls - with display of iPod/iPhone track information appearing on the unit's LCD display.
Please read below for more detailed operation.
CONNECTING AN iPod OR iPhone
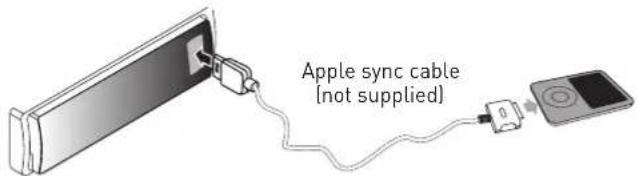
Insert the Apple Sync cable to the Front USB socket as shown and the unit will start playing the iPod/iPhone automatically
BASIC SEARCH - PLAYLIST/ARTIST/ALBUM/SONG on iPod/iPhone
Press BAND 🔔 to browse the iPod/iPhone menu.
Then rotate the Encoder Volume Control clockwise to and press ENTER to choose one of the following selections, then follow the steps below:
PLAYLIST Rotate the Encoder Volume control to select your desired Playlist and press ENTER to start play.
ARTIST Rotate the Encoder Volume Control to select your
desired Artist then press ENTER. Rotate the Encoder Volume Control to then select an Album & press ENTER. Rotate the Encoder Volume Control again to select a song within the selected Album.
ALBUM Rotate the Encoder Volume Control to select your desired Album and press ENTER to select it. Then rotate the Encoder Volume Control to select a specific song within the selected Album.
SEARCH FOR FURTHER CONTENT on iPod/iPhone
In addition to the PLAYLIST/ARTIST/ALBUM search functions, there are also additional fields you can search on your iPod or iPhone – the full list of fields is as follows:
PLAYLIST / ARTIST / ALBUM / SONG / GENRE / COMPOSER / AUDIOBOOK / PODCAST
- Rotate the Encoder Volume knob to select the desired search field, then press ENTER to confirm.
- Rotate the Encoder Volume knob to select the desired selection within the field then, press ENTER to confirm.
NOTE
When searching for Album, Artist, Song etc, rotate the Encoder Volume Control clockwise to search from A-Z or anti-clockwise for Z-A search.
RANDOM PLAY
Press RDM to cycle between the following modes:
RDM FLD - Plays the current album randomly.
RDM ALL – Plays the whole iPod/iPhone library randomly.
RDM OFF - Turns the Random function off.
iPod/iPhone MASTER CONTROL MODE
Press the button to switch between the two control options
- Unit control mode: Use the head unit controls to select Track/Artist/Album/Playlist etc. This is the Default setting.
- iPod/iPhone control mode: Use the iPod/iPhone to select the Artist/Album/Track etc.
This mode is useful if you need to sort through a large amount of Tracks/Albums etc.
NOTE
Please ensure the iPod/iPhone cable is connected correctly to the USB port and only use an original iPod / iPhone data sync cable.
MEDIA PLAYBACK (CD/USB/SD/AUX IN)
CD PLAYBACK
You can play the following format CD's
• Commercially Available pre-recorded CD's
- CD Recordable (CD-R)
• CD Re-writeable (CD-RW)
- MP3 CD's
• WMA CD's
NOTE: Please ensure that the disc contains these file types only.
-
Press OPEN on the front panel to open the flip down panel.
-
Insert a CD with the printed side facing up, then close the panel. The CD will start playing automatically.
-
Press▶/II to pause the music playback. Press this button again to resume music playback. NOTE the volume level can be adjusted while the unit is paused
- Press the >>I/I<<to skip forward to the beginning of the next or previous chapter/track.
-
Press and hold >>1/10 fast forward or fast rewind through the track.
-
Press ▲ to eject the CD.
USB OPERATION
Insert the USB Device
- Open the cover marked ✦ on the front panel.
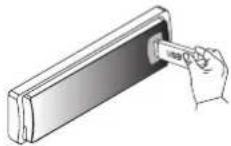
- Insert the USB device into the USB socket. The unit will start playing from the USB device automatically.
Removal of the USB Device
Before removing the USB device from the front panel, always remember to switch to another Source then remove the USB device.
SD CARD OPERATION
Insert the SD Card
- Press the OPEN button to remove the front panel.
- Hold the left hand side of the panel & pull forward to disengage it from the chassis.
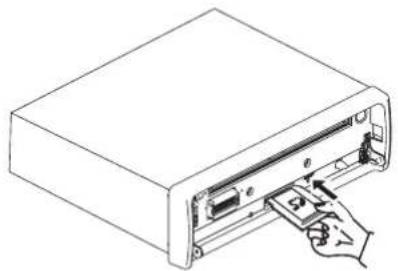
- Insert the SD card into the slot with label facing up until a "CLICK" sound is heard.
- Replace the front panel and the unit will start playing files from the card automatically.
Removal of the SD Card
Detach the face and press the card until you hear a click sound. The card is now disengaged. You can then remove the card.
NOTE
Please ensure that USB devices & SD cards contain WMA or MP3 files only.
USING AUX-IN
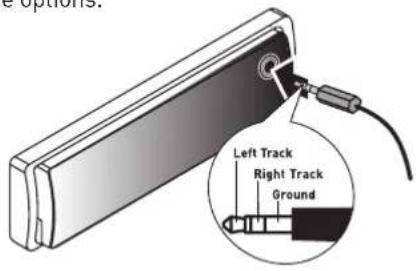
Connect the external device to AUX in jack using a 3.5mm stereo Aux In cable (not supplied) located on the face, then press the Source button to select AUX mode.
Press the Source Button again to select other source options.
ADDITIONAL MEDIA PLAYBACK FUNCTIONS (CD/USB/SD)
PLAY OPTIONS
MP3/WMA File or Folder Search
- Press the BAND 📞 button on front panel access the MP3/WMA file search mode.
- Rotate the Encoder Volume Control to search through all folders on the device then press ENTER to make your selection.
- Rotate the Encoder Volume control to select the desired track within the previously selected folder and press ENTER to start it playing
INTRO PLAY
- During playback, press the INT button (Preset button 2) to start intro mode. The first 10 seconds of all tracks on the storage media will be played.
- Once you have find a track you like, press INT again to resume normal playback.
- To perform Intro Play on files in the current folder only, press & hold the INT button while in Intro Mode. [INT] will be displayed on the LCD along with the folder number. When you find your desired, press INT Twice to play the track normally.
REPEAT PLAY
- During playback, press the RPT button (Preset button
3) to repeat all tracks on the storage media. [RPT ALL] is displayed.
- If you press RPT again, the current track will be repeated only [RPT TRK] will be displayed
- Pressing RPT again repeats all tracks in the current folder only [RPT FLD] is displayed
- Once a track is playing in repeat mode, or to check if Repeat is on, press the RPT button.
- To Cancel Repeat, press and hold the RPT button. The display will revert back to the standard track number & time elapsed display.
RANDOM PLAY
- During playback, press the RDM button (Preset button 4) to display the current Random Play Mode. If Random Play is off, [RDM OFF] will be displayed.
- Press RDM again to select Random Play for the current folder only [RDM FLD] is displayed.
- Pressing RDM again selects Random Play for all tracks on the storage media [RDM ALL] is displayed.
- To cancel Random Play, press RDM to display the current Random Play mode, then press RDM again to cancel Random Play
FOLDER SELECT

During music playback, use this button to jump to the previous/next folder on the storage device.
DISPLAY FUNCTION
During playback, pressing the DISP button will automatically cycle through the following information on the file being played on the LCD display:
FOLDER NAME→ FILE NAME→ ALBUM→ TITLE→ ARTIST
You can also keep pressing the DISP button to find the particular information you are after. Once you have cycled through all of the available track information by continuing to press the DISP button, the display will return to the standard Track Number & Time display. If you stop at this point, the Automatic Display function is cancelled.
TROUBLESHOOTING
Before going through the check list, please check the wiring connection diagram. If problems persist, please consult your Car Audio dealer.
No power or no sound
- Ignition is not on. Turn the Ignition to "accessories"
- Unit is off - press the power button to activate the unit.
- Fuse is blown. Please replace the fuse.
- If the speakers are connected to the speaker outputs, check the speaker connections.
- If the speakers are connected to amplifier/s only, check that they are operating correctly.
- If the above solutions do not help, please press the RESET button.
Noise in radio broadcasts
• Signals are too weak, turn LOC off.
- Check the antenna connection or replace the antenna if necessary.
Preset stations lost
- Yellow power cable is not correctly wired. Ensure it is connected to Constant 12V (+).
Unable to Eject Disc
- Press & hold the Eject button ▲.
Display shows ERR-1
- The USB or SD device cannot be read. Confirm the device is formatted to FAT32 (Windows) file system.
Display shows ERR-3
- USB/SD data error. Check to ensure only MP3 or WMA files are loaded on the storage devices.
Display shows ERR-5
- Communication error. The USB/SD device could be damaged or corrupted. Please re-format (Fat32 only) or try a different device.
HOW TO RESET THE UNIT
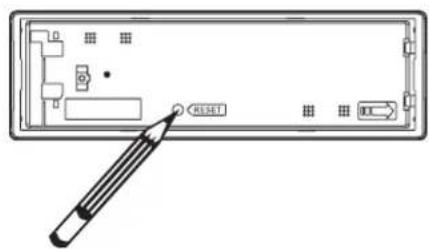
Using the Reset button, you can reset the unit to its default settings.
- The RESET button is located on the main unit (as shown on the diagram). Press it in with a ballpoint pen or metal object to activate it.
-
The reset button can be used under the following circumstances:
-
Initial installation of the unit when all wiring is completed.
- If the unit "freezes".
- To RESET the unit to the factory configuration
- Error indication on the LCD display.
RDS PROGRAM TYPES & DESCRIPTIONS
NEWS News services
AFFAIRS Politics & current affairs
INFO Special information programs
SPORT Sports
EDUCATE Education and advanced training
DRAMA Radio plays and literature
CULTURE Culture, religion and society.
SCIENCE Science programming
VARIED Entertainment programs
POP M Pop music
ROCK M Rock Music
EASY M Easy listening music
LIGHT M Light classical music
CLASSICS Calssical music
OTHER M Special music programs
WEATHER Weather information
FINANCE Finance programs
CHILDREN Children's programs
SOCIAL Social affairs
RELIGION Religion
PHONE IN Talkback
TRAVEL Travel programs
LEISURE Leisure
JAZZ M Jazz music
COUNTRY Country music
NATION M National music
OLDIES M Old time music
FOLK M Folk music
DOCUMENT Documentary
A-TEST Alarm Test
ALARM Alarm function
PRODUCT SPECIFICATIONS
Power Supply 12V DC (11-16V), Negative Ground
Fuse 15A
Suitable Speaker 4 - 8Ω
Impedance
Power output MOSFET 50W MAX x 4 channels
RMS output 22W x 4 @ 10% THD
Pre-AMP output 5.0 V (USB play mode; 1KHZ, 0dB, 10 k Ω load)
Aux-In level ≥300mV
Subwoofer output 5.0 V (USB play mode; 61KHZ, 0dB, 10 k Ω load)
DAC 1-Bit
iPod/iPhone
Charging USB, 1A
RADIO
-FM
Frequency Range 87.5 - 108MHz, 50kHz Step (Oceania)
87.5 - 107.9 MHz 200kHz Step (USA)
87.5 - 108.0 MHz 50kHz Step [Europe]
87.5 - 108 MHz (FM 1/2) (Russia)
+ 65MHz - 74MHz (FM3) (Russia)
Usable Sensitivity Better than 15dB at S/N 30dB
-AM(MW)
Frequency Range 522-1620KHz (Oceania)
530 - 1710 KHz (USA)
522 - 1620 KHz (Europe)
522 - 1620 KHz (Russia)
Usable Sensitivity Better than 45dB
USB DEVICES:
USB flash memory USB 1.1 & 2.0 compatible
SUPPORTED FILE FORMATS
MPEG1/2/2.5 Layer 2/3
WMA Version 7/8/9
Sampling frequency
MPEG1 32/44.1/48 kHz
MPEG2 16/22.05/24 kHz
MPEG2.5 8/11.025/12KHz
WMA 22/32/44/48KHz
Sampling Bit rate
MP3/WMA 32\~320Kbps & VBR
ISO9660 Level 1/2 & Joliet (unicode)
Max File/DIR. Count 999
Max DIR. Depth 255
Sorting Method Tree sorting
Max File/DIR. Name 64Byte
ID3 V1.0/1.1/2.0/2.3 [Max 32 Byte]
MP3 dir shown in manual as "Folder"
MP3 file referred to as "Track".
Maximum length of file name 28 characters.
Maximum length of directory 16 characters.
Supports Multi-Session recording.
NOTE: Product specifications are subject to change without prior notice.
LICENSING
Made for

iPod iPhone
"Made for iPod and "Made for iPhone" mean that an electronics accessory has been designed to connect specifically to iPod or iPhone respectively, and has been certified by the developer to meet Apple performance standards. Apple is not responsible the operation of this device or its compliance with safety and regulatory standards. Please note that the use of this accessory with iPod or iPhone may affect wireless performance. Apple is not responsible for the operation of the device or its compliance with safety and regulatory standards.
iPod and iPhone are trademarks of Apple inc., registered in the U.S. and other countries.
Windows Media and the windows logo are trademarks, or registered trademarks of Microsoft Corporation in the United States and/or other countries.
THE FUSION PROMISE OF QUALITY
LIMITED 1 YEAR CONSUMER WARRANTY
FUSION Electronics Limited 'FUSION' warrants this FUSION Speaker, Subwoofer, Amplifier Head Unit or genuine FUSION Accessory 'product' is free from defects in material and workmanship, according to the following terms and conditions:
• The limited warranty for the FUSION product purchased extends to the first twelve [12] months beginning on the date of purchase of the product.
• The limited warranty extends only to the original consumer purchaser (consumer) of the product and is not assignable or transferable to any subsequent purchaser/end user.
- The limited warranty extends only to consumers who purchase the product in one of the countries (or areas) set forth on www.fusionelectronics.com. The limited warranty is only valid in FUSION'S intended country (or area) of sale of the product.
- During the limited warranty period, FUSION or its authorised service network will repair or replace, at FUSION or FUSION'S authorised dealer, any defective product or parts thereof with new and return the product to the consumer in working condition. No charge will be made to the consumer for either parts or labour in repairing or replacing the product. All replaced parts and cosmetic parts should be free of defects at the time of shipment and, therefore shall not be covered under these limited warranty terms.
- Repaired product will be warranted for the balance of the original warranty period or for ninety (90) days from the date of repair, whichever is longer. - All warranty claims must be accompanied with a copy of this warranty card, and a copy of proof of purchase date.
The consumer shall have no coverage or benefits under this limited warranty if any of the following conditions are applicable:
- The product has been subject to: abnormal use, abnormal conditions, improper storage, exposure to excessive moisture or dampness, exposure to excessive temperature or other such environmental conditions, unauthorised modifications, unauthorised connections, unauthorised repair including but not limited to use of unauthorised spare parts in repairs, misuse, neglect, abuse, accident, alteration, improper installation, acts of God, spill of foods or liquids, maladjustment of customer controls or other acts which are beyond the reasonable control of FUSION, including deficiencies in consumable parts such as fuses, and breakage or damage to antennae unless caused directly by defects in materials or workmanship, and normal wear and tear of the product.
• FUSION was not notified by the consumer of the alleged defect or malfunction of the product during the applicable limited warranty period.
• The product serial number or the accessory date code has been removed, defaced or altered.
• The product was used with or connected to an accessory not supplied by FUSION or fit for use with FUSION product, or used in a manner other than its intended use.
If a problem develops during the limited warranty period, the consumer should take the following step-by-step procedure:
-
The consumer shall return the product to the place of purchase for repair or replacement processing.
-
The consumer shall also be charged for any parts or labour charges not covered by this limited warranty.
The consumer shall be responsible for expenses related to reinstallation of the product
- If the product is returned to FUSION after the expiration of the warranty period, FUSION's normal service policies shall apply and the consumer will be charged accordingly.
THE BENEFITS CONFERRED BY THIS LIMITED WARRANTY APPLY TO THE EXTENT THAT THEY ARE NOT SUPERCEDED BY ANY OTHER RIGHTS AND REMEDIES UNDER ANY APPLICABLE LEGISLATION THAT CANNOT BE EXCLUDED. OTHERWISE, TO THE EXTENT PERMITTED BY LAW, ANY IMPLIED WARRANTY IS EXCLUDED AND THE FOREGOING WARRANTY IS THE PURCHASER'S SOLE AND EXCLUSIVE REMEDY AND IS IN LIEU OF ALL OTHER WARRANTIES, EXPRESS OR IMPLIED. TO THE EXTENT PERMITTED BY LAW, FUSION SHALL NOT BE LIABLE FOR INCIDENTAL OR CONSEQUENTIAL DAMAGES OR A LOSS OF ANTICIPATED BENEFITS OR PROFITS, OUT OF USE OR INABILITY TO USE THE PRODUCT.
- Some states in America do not allow the exclusion or limitation of consequential damages, so the above limitation and exclusion may not apply to you. This warranty gives your specific legal rights which may vary from state to state.
- FUSION neither assumes nor authorises any authorised service centre or any person or entity to assume for it any other obligation or liability beyond that which is expressly provided for in this warranty.
- All warranty information, product features and specifications are subject to change without notice.
AUSTRALIAN CONSUMERS
FUSON®
LIMITED 1 YEAR CONSUMER WARRANTY
Fusion Electronics Pty Limited, Unit 21/130 Kingston Road, Underwood, Queensland, 4119, Australia. EMAIL: australia@fusionelectronics.com PHONE: 1300 736 012
THE FUSION PROMISE OF QUALITY LIMITED 1 YEAR CONSUMER WARRANTY
This warrant is given in addition to other rights and remedies available to the consumer under Australian Consumer Law. In addition to the Fusion Warranty our goods come with guarantees that cannot be excluded under the Australian Consumer Law. You are entitled to a replacement or refund for a major failure and for compensation for any others reasonably foreseeable loss or damage. You are also entitled to have the goods repaired or replaced if the goods fail to be of acceptable quality and the failure does not amount to a major failure.
FUSION Electronics Limited 'FUSION' warrants this FUSION Product including Speaker, Subwoofer, Amplifier Head Unit or genuine FUSION Accessory 'product' is free from defects in materials and workmanship, in accordance with the following terms and conditions:
- The limited warranty for the FUSION product purchased is only available for [12] months after the date of purchase.
- The limited warranty extends only to the original consumer of the product and may not be assigned or transferred to any other person or consumer without Fusion's prior written consent being provided.
- During the limited warranty period, FUSION or its authorised service network will repair or replace any defective or faulty product or parts at its own cost.
• Repaired or replaced product will be warranted for the balance of the original warranty period or for ninety (90) days after the date of repair, whichever is longer.
- All warranty claims must be notified to Fusion or its authorised Dealer in writing during the warranty period accompanied with a copy of this warranty card, proof of purchase date and the product with an intact and unaltered serial number or accessory date code.
This Warranty will not apply if:
The consumer causes the Product to be of unacceptable quality or fails to take steps to prevent the Product from becoming of unacceptable quality and/or it is damaged by abnormal use. Examples of goods becoming of unacceptable quality or of abnormal use by the consumer include;
• Storage of product under improper conditions.
- Exposure to excessive moisture or dampness
- Exposure to excessive temperature extremes or other adverse environmental conditions.
• Unauthorised modifications of product, connections or otherwise unauthorised repairs including, but not limited, to the use of unauthorised parts in the repair of products
- Improper use of or installation of, or interference with, product adjustments or controls and or including antenna breakage or damage due to misuse
- Damage caused by consumables or by electricity supply.
- Acts of god [force majeurel, exposure of product to food spills, or any other type of fluid ingress
• Using the product in a way for which was not intended to be used or connecting it to an accessory not supplied by, specified by, or authorised by Fusion
- Any other abnormal use of or conduct causing product to become of unacceptable quality
Other exclusions;
- This warranty extends to the repair or replacement of Fusion product only and the consumer is responsible for any expenses relating to the removal or installation of the product or related services including the cost of delivering the product to Fusion or its authorised dealer.
- Repair work conducted by Fusion after this warranty has expired or if this warranty for any other reason this Fusion warranty does not apply is subject to Fusion's normal service policies and Fusion charges for labour and material may apply.
- This is a manufacturer's warranty provided to consumers of Fusion products. Variations to this warranty may only be made by Fusion and will be notified to the customer in writing or issued on the Fusion website. Fusion Dealers, agents and authorised dealers are not authorised to make changes or vary this Fusion warranty.
- All warranty information, product features and specifications are subject to change without notice.
- Fusion is not responsible for replacing or the cost of replacing any consumer data lost occurring either due to equipment failure, or during the repair and replacement process.
FRANÇAIS
LA PROMESSE DE QUALITE FUSION
GARANTIE LIMITEE 1 AN
FUSION Electronics New Zealand
093692900
FUSION Electronics Australia
1300 736 012
FUSION Electronics Europe
+31 76 5723 632
FUSION Electronics USA
623 580 9000
FUSION Electronics Pacific
+64 9 369 2900
- MADE FOR
- FCC COMPLIANCE STATEMENT
- CONTENTS
- PRECAUTIONS & MAINTENANCE
- GENERAL
- QUICK START GUIDE
- SELECTING THE MUSIC SOURCE
- RGB 32K+ COLOUR SELECTION
- STORE DEMO MODE
- DASHBOARD INSTALLATION
- REMOVAL/RE-ATTACHMENT OF THE FACE
- PLEASE NOTE
- CONNECTING THE SYSTEM
- OPEN
- ENCODER VOLUME CONTROL
- IPOD/IPHONE INTERNAL/EXTERNAL CONTROL
- ENCODER VOLUME CONTROL AUDIO/ENTER FUNCTIONS
- MUTE - POWER ON/OFF ⚫①
- DISP - DISPLAY
- NUMERIC BUTTONS
- SUBWOOFER - DIRECT SUBWOOFER LEVEL CONTROL
- EQ III
- ESC/RGB ESC RGB
- BAND/SEARCH
- MENU
- TUNE UP/DOWN, FILE & TRACK UP/DOWN & FAST FORWARD/BACK
- SOURCE
- AUDIO FUNCTIONS
- REMINDER
- QUASI-PARAMETRIC FUNCTION - CFQ ADJUSTMENT
- AUDIO FUNCTION ADJUSTMENT
- (SUBWOOFER)
- NOTE
- EQUALISER OPERATION
- SYSTEM MENU
- STORE (AUTO STORE)
- RDS ON/OFF
- PTY* (PROGRAM TYPE)
- AF* ON/OFF
- TA* ON/OFF
- REG* ON/OFF
- CT* ON/OFF
- LOC* ON/OFF
- AREA
- CLK (CLOCK)
- CLK 12H/24H (CLOCK FORMAT)
- BEEP ON/OFF
- DEMO ON/OFF
- COLOUR
- USER (USER SELECTED COLOUR)
- RADIO OPERATION
- TUNE INTO A RADIO STATION
- HOW TO STORE YOUR FAVOURITE STATIONS
- TUNE TO A SAVED OR PRE-SET STATION
- RDS OPERATION
- (PTY) SELECT PROGRAM TYPE
- (AF) SELECT ALTERNATE FREQUENCIES
- (TA) RECEIVE TRAFFIC ANNOUNCEMENTS
- (REG) REGION FOR AF TUNING
- (CT) CLOCK TIME
- BASIC SEARCH - PLAYLIST/ARTIST/ALBUM/SONG ON IPOD/IPHONE
- SEARCH FOR FURTHER CONTENT ON IPOD/IPHONE
- PLAYLIST / ARTIST / ALBUM / SONG / GENRE / COMPOSER / AUDIOBOOK / PODCAST
- RANDOM PLAY
- IPOD/IPHONE MASTER CONTROL MODE
- MEDIA PLAYBACK (CD/USB/SD/AUX IN)
- CD PLAYBACK
- USB OPERATION
- INSERT THE USB DEVICE
- REMOVAL OF THE USB DEVICE
- SD CARD OPERATION
- INSERT THE SD CARD
- REMOVAL OF THE SD CARD
- USING AUX-IN
- ADDITIONAL MEDIA PLAYBACK FUNCTIONS (CD/USB/SD)
- MP3/WMA FILE OR FOLDER SEARCH
- INTRO PLAY
- REPEAT PLAY
- FOLDER SELECT
- DISPLAY FUNCTION
- TROUBLESHOOTING
- NO POWER OR NO SOUND
- NOISE IN RADIO BROADCASTS
- PRESET STATIONS LOST
- UNABLE TO EJECT DISC
- DISPLAY SHOWS ERR-1
- DISPLAY SHOWS ERR-3
- DISPLAY SHOWS ERR-5
- HOW TO RESET THE UNIT
- RDS PROGRAM TYPES & DESCRIPTIONS
- PRODUCT SPECIFICATIONS
- RADIO
- AM(MW)
- USB DEVICES
- SUPPORTED FILE FORMATS
- LICENSING
- THE FUSION PROMISE OF QUALITY
- LIMITED 1 YEAR CONSUMER WARRANTY
- AUSTRALIAN CONSUMERS
- FUSON®
- FRANÇAIS
- LA PROMESSE DE QUALITE FUSION
- GARANTIE LIMITEE 1 AN
Brand : Fusion
Model : CA-CD700
Category : Car radio