
RWX-3000 - Rowing Machine Toorx - Free user manual and instructions
Find the device manual for free RWX-3000 Toorx in PDF.


| Product Type | Rowing Machine |
| Brand | Toorx |
| Model | RWX-3000 |
| Dimensions (L x W x H) | 200 x 50 x 50 cm |
| Weight | 30 kg |
| Max User Weight | 120 kg |
| Resistance Type | Magnetic with adjustable levels |
| Display | LCD showing time, distance, strokes, calories |
| Power Supply | Batteries (2x AAA) |
| Frame Material | Steel with powder coating |
| Seat | Ergonomic, adjustable |
| Foot Pedals | Adjustable with straps |
| Transport Wheels | Yes |
| Foldable | No |
| Maintenance | Wipe clean after use; lubricate rail monthly |
| Safety Features | Non-slip pedals, emergency stop (if magnetic brake) |
| Warranty | 2 years limited |
| Spare Parts Available | Seat, handle, display, resistance band |
| Repairability | User-replaceable parts; technical support available |
| Included Accessories | Water bottle holder, exercise mat |
Frequently Asked Questions - RWX-3000 Toorx
User questions about RWX-3000 Toorx
0 question about this device. Answer the ones you know or ask your own.
Ask a new question about this device
Download the instructions for your Rowing Machine in PDF format for free! Find your manual RWX-3000 - Toorx and take your electronic device back in hand. On this page are published all the documents necessary for the use of your device. RWX-3000 by Toorx.
USER MANUAL RWX-3000 Toorx
RWX 3000
EXPLODED DRAWING

PARTS LIST
| No. | Description | Spec. | QTY | No. | Description | Spec. | QTY | |
| 1 | Main Frame | 1 | 50 | Fill Plug | Rubber, Black | 1 | ||
| 2 | Rear Stabilizer | 1 | 51 | Skid Pad | Rubber, Black | 2 | ||
| 3 | Slide Rail R/L | 2 | 52 | Funnel | 1 | |||
| 4 | Handlebar | 1 | 53 | Pumping Siphon | 1 | |||
| 5 | Spring Fixed Plate | 1 | 54 | Computer | 1 | |||
| 6 | Seat Carriage | SPHC,T=4.0 | 1 | 55 | Magnet | 10*5 | 2 | |
| 7 | Sensor Stand L | SPHC,T=2.0 | 1 | 56 | Sensor Wire | Square | 1 | |
| 8 | Sensor Stand R | SPHC,T=2.0 | 1 | 57 | Bolt | M10*55 | 2 | |
| 9 | Support for Computer | 1 | 58 | Flat head Screw | ST5.0*12 | 4 | ||
| 10 | Tank Plate | 1 | 59 | hexagon head Screw | M8*15 | 1 | ||
| 11 | Support Plate | 1 | 60 | Screw | ST3*6 | 4 | ||
| 12 | Impeller | 1 | 61 | Screw | ST4.2*19 | 4 | ||
| 13 | Impeller Shaft | 40Gr | 1 | 62 | Flat head Screw | M8*15 | 8 | |
| 14 | Mesh Belt Wheel Shaft | 10*64*M6 | 1 | 63 | Bolt | M8*45 | 8 | |
| 15 | Belt Wheel | POM, Black | 1 | 64 | Bolt | M10*50 | 2 | |
| 16 | Guide Roller | POM, Black | 2 | 65 | Screw | M6*15 | 30 | |
| 17 | Spacer for Guide Roller | 14*1.5*19 | 2 | 66 | Bolt | M8*65 | 2 | |
| 18 | Moving Wheel | PU, Black | 2 | 67 | Screw | M5*15 | 16 | |
| 19 | Adjustable Knob | PP, Black | 2 | 68 | Screw | M8*15 | 4 | |
| 20 | Aluminum Plate | 2 | 69 | Crosshead Screw | M6*15 | 6 | ||
| 21 | Oval Endcap | PP, Black | 6 | 70 | Screw | M6*10 | 4 | |
| 22 | Cover for Roller | PP,Black | 4 | 71 | Adjusting Screw | M6*30 | 2 | |
| 23 | Lower Roller for Rail | PU, Black | 2 | 72 | Screw | ST4*16 | 8 | |
| 24 | Upper Tank | PC | 1 | 73 | Washer | OD24*ID8.5*2.0 | 1 | |
| 25 | Lower Tank | PC | 1 | 74 | Washer | OD20*ID8.5*1.5 | 10 | |
| 26 | Decorate Cover F/R | HIPS,Black | 1 | 75 | Washer | OD18*ID6.5*T1.5 | 4 | |
| 27 | Handlebar Seat | TPR,Black | 1 | 76 | C Clip | 20 | 1 | |
| 28 | Lower Pedal | PP, Black | 2 | 77 | Carriage Bolts | M8*27 | 2 | |
| 29 | Upper Pedal | PP, Black | 2 | 78 | Washer | OD13*ID6.5*T1.5 | 2 | |
| 30 | Bearing Seat | POM, Black | 1 | 79 | Nylon Nut | M10 | 4 | |
| 31 | Mesh Belt Wheel | POM, Black | 1 | 80 | Aluminum Plate Cover | 4 | ||
| 32 | Axle for Volute Spring | POM, Black | 1 | 81 | Nylon Nut | M6 | 2 | |
| 33 | Base of Volute Spring | POM, Black | 1 | 82 | Nylon Nut | M5 | 4 | |
| 34 | PC Board | PC | 1 | 83 | Screw | M3*20 | 12 | |
| 35 | Outer PC Board | PC | 1 | 84 | Washer | OD7*ID3.2*1.0 | 24 | |
| 36 | Spacer for mesh belt wheel | 25* 20*13 | 1 | 85 | Nylon Nut | M3 | 12 | |
| 37 | Pedal Strap | Nylon, Black | 2 | 86 | Main Frame Plate | 1 | ||
| 38 | Seat | PU, Black | 1 | 87 | Foam Spacer | White | 1 | |
| 39 | Seat Roller | PU, Black | 4 | 88 | Plastic Bushing | PP, Black | 4 | |
| 40 | Stopper | PVC,Black | 4 | 89 | Bearing | 608ZZ | 4 | |
| 41 | Spacer for Roller | 14*1.5*14 | 4 | 90 | Spacer for Seat Roller | 16* 10.2*4 | 8 | |
| 42 | Bearing | 6000ZZ | 18 | 91 | Spacer for Belt Wheel | OD16*ID10.2*16 | 1 | |
| 43 | One-way Bearing | HF2016 | 1 | 92 | O Shape Ring | Rubber, Black | 1 | |
| 44 | Bushing for One-way Bearing | ¢ 35* ¢ 26*18 | 1 | 93 | Allen Wrench | S5 | 1 | |
| 45 | Bearing | 61904ZZ | 3 | 94 | Spanner | 13#-17# | 1 | |
| 46 | Bearing | 61905ZZ | 1 | 95 | Storage Pad | PVC, Black | 2 | |
| 47 | Volute Spring | 5M | 1 | 96 | Connection Wire | 2 | ||
| 48 | Rubber Sealing Ring | Rubber, Yellow | 1 | 97 | Spring Washer | OD12*ID8.5*T2.0 | 4 | |
| 49 | Impeller Shaft Seal | Rubber, Black | 1 | 98 | Acon Nut | M8 | 4 | |
| 99 | Carriage Bolts | M8*57 | 4 | |||||
| 100 | Washer | OD10*ID5.2*1.5 | 4 | |||||
| 101 | Nut | M6 | 2 |
PRE-ASSEMBLY LIST

| PART NO. | DESCRIPTION | Q'TY |
| 1 | Main Frame | 1 |
| 2 | Rear Stabilizer | 1 |
| 3 | Slide Rail | 2 |
| 38 | Seat Assembly | 1 |
| 54 | Computer Assembly | 1 |
| 52 | Funnel | 1 |
| 53 | Pumping Siphon | 1 |
HARDWARE PACKAGE

ASSEMBLY INSTRUCTIONS
NOTE: We recommend having 2 people to assemble the product.

STEP 1:
Turn over the Slide Rail (#3L/R) as above illustration, put the rail on the Roller (#39) then rotate as arrow direction, make sure the aluminum plate touch the roller.
Attach the Rear Stabilizer (#2) to the Slide Rail (#3L/R), Tighten with 4 Washers (#74) and 4 screws (#63).


STEP 2:
Attach the Slide Rail (#3L/R) to the Main Frame (#1), Tighten with 4 Screws (#99) and 2 Screws (#77) and 6 Screws (#65)

STEP3:
Connect the Connection wire (#96) to the Sensor wire (#56).
Plug the Decorate cover (#26) into the hole of Main Frame (#1).
Attach the computer assembly to Main Frame, Tighten with 4 Screws (#68).

STEP4:
- Apply a small amount of included lubricate oil to a paper towel or clean cloth. Spread a thin layer of the oil evenly along the 1 where the rollers move . Then, wipe off any excess oil.
- Apply oil every 1 month or as need
HOW TO FILL AND EMPTY THE TANK
-
Remove the Fill Plug (#50) from the Upper Tank (#24).
-
To fill tank with water, refer to Fig. A. Insert the Funnel (#52) into the tank, then use a cup or the Pumping siphon (#53) and a bucket to fill the tank. Use the water level gauge on the side of the tank to measure desired water level in the tank.
-
To empty the tank, refer to Fig. B. Place a bucket next to the rower, and use the Pumping siphon (#53) to pump out the water from the tank into the bucket.
-
Insert the Fill Plug (#50) into the Upper Tank. Wipe excess water off of the frame.
NOTE:
- Fill the tank only with tap water. Add 1 water-purification tablet. Never use pool chlorine or chlorine bleach. This will damage the tank and void the warranty.
- Add a water purification tablet every 6 months or as needed. If water remains cloudy, replace the water in the tank.
- Water from the tank is not suitable for consumption. Dispose the water after pumping it out from the tank.
WATER LEVEL
•See Fig. A. The water level gauge is on the side of the tank. The maximum fill level is 6. Never fill it over this limit. Filling the tank over this limit will void the warranty.
- The resistance depends on the water level in the tank. Water level 1 is the lowest resistance Level 6 is the highest resistance.


ADJUSTMENT GUIDE
PEDAL ADJUSTMENT

The pedal strap is adjustable and can be personalized to fit the user's foot size.
To adjust the pedal strap, remove the Velcro end of the strap from the mesh side by pulling it upward then to the left.
Once removed, you may increase the opening of the pedal strap by pulling the mesh end up and to the right.
To tighten, pull the Velcro end of the pedal strap upward then to the right and down to secure it to the mesh side of the strap.
MOVING THE MACHINE

Adjust the Adjustable Knob (#19) of the machine if the machine is unbalanced during use.

COMPUTER INSTRUCTIONS

Power on
The full LCD display will be shown 2 seconds after intensity of selection mode from L1 to L6 by pressing to confirm and enter the standby mode.
the installation of batteries. It will enter the workout
◀ ▶ to select ( the default is L6) then press Enter
Function buttons:
RECOVERY: Press this button to test the pulse recovery for 60 seconds, the computer need to have the pulse singal input.
RESET: 1、Press it to back the preset value during the parameter setting mode, Press again to back program selection.
2、Press it to back the standby mode during stop.
3、Hold it 2 seconds, the computer will reset.
START/STOP: START/ STOP training in.
ENTER: 1、Confirm the selection of program.
2、Confirm the setting of parameter and enter the next parameter setting.
3、Press it to switch the function value display during the training.

1、Increase the setting parameter
2、Select the PROGRAM(QUICK START、STANDARD、TARGET SINGLE、TARGET INTERVAL、CUSTOM、RACE)

1、Decrease the setting parameter.
2、Select the PROGRAM(QUICK START、STANDARDDE、
Remark: Press ◀▶ to display the function value in the large middle display window in turn.
| default | Increment Decrement | Setting Range | Display Range | |
| TIME | 0:00 | ±1 | 0:00~99:00 | 0:00~99:59 |
| DISTANCE | 0 | ±100 | 0~99900 | 0~99999 |
| STROKES | 0 | ±10 | 0~99990 | 0~99999 |
| CALORIES | 0 | ±10 | 0~9990 | 0~9999 |
Remark: TIME and DISTANCE can't be set together, just can choose TIME or DISTANCE to set.
DISPLAY FUNCITONS
TIME: Display the training time.
TIME/500M: The average 500 meter time will automatically displayed and continuously updated.
SPM: Strokes per minute.
DISTANCE: Display the training distance.
STROKES: Display the current strokes.
TOTAL STROKE: Accumulates total strokes.
CALORIES: Display the consumption calories.
PULSE: Display user's heart rate during the training.
DRAG FORCE: Display the current drag froce.
WATT: Display the current watt.
A+: Display the average function value of time, calories, watt and pulse.
Operation:
QUICK START: Press ←→ to choose Quick Start then press START/STOP to start the training.
1-1、Press ENTER to switch the function value to display in the large middle display during the training.
1-2、The program profile with 16 columns, each columns equal to 100 meter.
STANDARD: Press ▶ to choose STANDARD then press ENTER to confirm and enter five training mode selection of: 2000m、5000m、10000m、30:00、500m/1:00. After that press START/STOP to start the training. The preset function value will counts down, other function value will count up. Press RESET back to standby mode when the preset function value counts down to zero.
TARGET SINGLE: Press ▶ to choose TARGET SINGLE then press ENTER to confirm and enter four Single setting of Single Time、Single Distance、Single Calories、Single THR.
A Single Time: Only can preset the time, press START/STOP to start the training after setting finished.
B Single Distance: Only can preset the distance, press START/STOP to start the training after setting finished.
C Single Calories : Only can preset the calories ,press START/STOP to start the training after setting finished.
D Single T.H.R: Only can preset the Target Heart Rate from 90 to 200 Bpm, press START/STOP to start the training after setting finished.
It will have beep beep sound then the heart rate is higher than THR.
TARGET INTERVALS: Press ← to choose TARGET INTERVAL then press ENTER to confirm and enter to three Intervals setting mode of Intervals Time、Intervals Distance、Intervals Variable
A、Intervals Time: Press ▶ to set the training time then press ENTER to confirm and set the REST TIME. Press START/STOP to start the training after setting finished.
B、Intervals Distance: Press to set the training distance then press ENTER to confirm and set the REST TIME. Press START/STOP to start the training after setting finished.
C、Intervals Variable: Press to set the training time then press ENTER to confirm and set the training distance. Press ENTER to confirm and set the REST TIME then press START/STOP to start the training after setting finished.
CUSTOM: Press ▶ to choose CUSTOM then press ENTER to confirm and enter to four Custom mode of V :30/:30R、V1:00/1:00R…7、V2000m/3:00R…4、V1:40/:20R…9
A、V :30/:30R: Training 30 seconds, Rest 30 seconds.
B、V1:00/1:00R…7: Training one minute, Rest one minute, Repeat 7 times.
C、V2000m/3:00R…4: Training 2000m, Rest three minutes, Repeat 4 times.
D、V1:40/:20R…9: Training one minute forty seconds, Rest 20 seconds, Repeat 9 times.
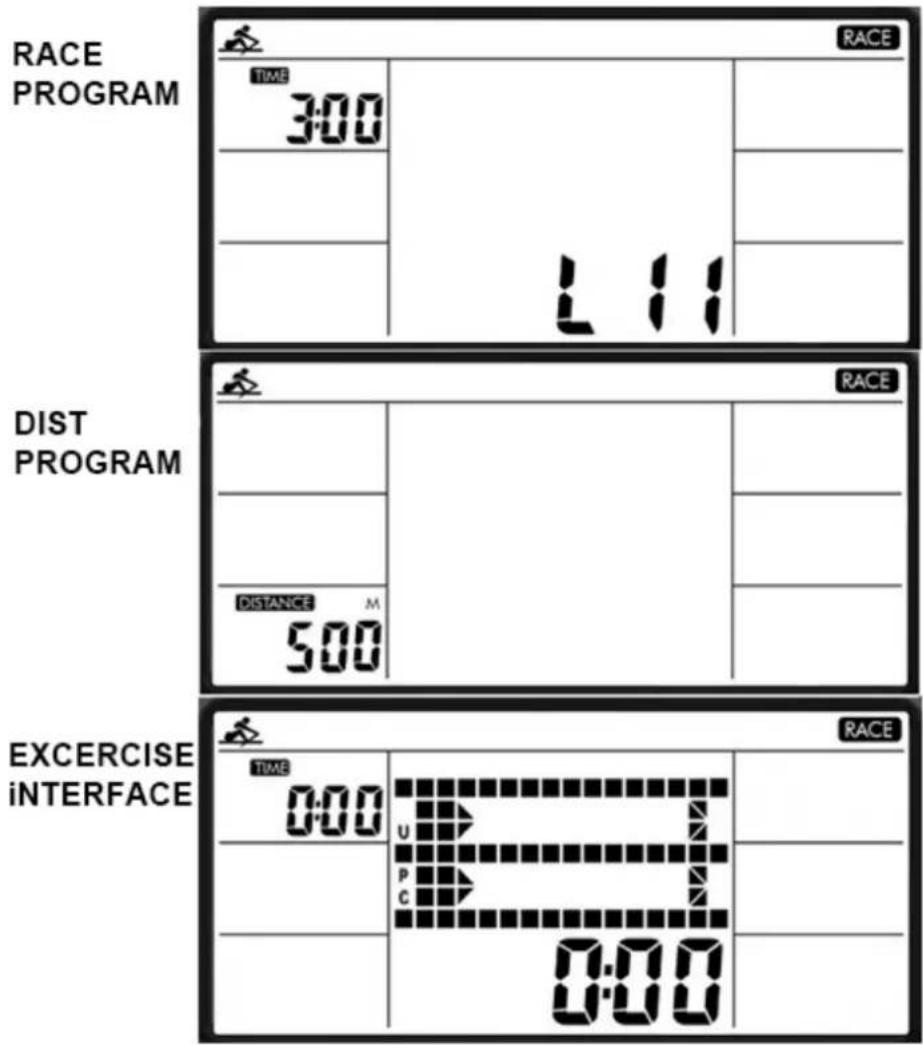
RACE: Press ◀ to choose RACE then press ENTER to confirm then press ◀ to
select L1\~L15. Press ENTER to confirm and enter DISTANCE setting, DISTANCE will blink then press UP or DOWN to adjust. Press ENTER to STOP mode then press START to train.
The dot-matrix will show U and PC graphic to race.
Once PC or User reach the end of training, the computer will stop.
TIME window can press ENTER to switch display TIME and TIME/500M A+、SPM window can press ENTER to switch display SPM and SPM A+、DISTANCE display training distance、TOTAL STROKES window press ENTER to switch display STROKES and TOTAL STRKOES、CALORIES window press ENTER to switch display CALORIES and WATT A+、PULSE window display PULSE A+, The dot-matrix will show PC WIN or USER WIN.
Remark: 1、RACE PROGRAM only can set DISTANCE, TIME/500M is Fixed, TIME/500M for L1-L15 is as below
| L1 | 8:00 | L6 | 5:30 | L11 | 3:00 | ||
| L2 | 7:30 | L7 | 5:00 | L12 | 2:30 | ||
| L3 | 7:00 | L8 | 4:30 | L13 | 2:00 | ||
| L4 | 6:30 | L9 | 4:00 | L14 | 1:30 | ||
| L5 | 6:00 | L10 | 3:30 | L15 | 1:00 |

Garlando
GARLANDO SPA
Via Regione Piemonte, 32 - Zona Industriale D1
15068 - Pozzolo Formigaro (AL) - Italy
www.toorx.it - info@toorx.it
- Rwx 3000
- Exploded drawing
- Pre-assembly list
- Hardware package
- Assembly instructions
- 63 M8*45 4pcs
- Step 1
- 99 M8*57 4pcs
- 77 M8*27 2pcs
- 65 M6*15 6pcs
- Step 2
- STEP3
- STEP4
- How to fill and empty the tank
- Note
- Water level
- Adjustment guide
- Pedal adjustment
- Moving the machine
- Computer instructions
- Power on
- Function buttons
- 2、Select the program(quick start、standardde、
- Display funcitons
- Operation
- Garlando
Brand : Toorx
Model : RWX-3000
Category : Rowing Machine