
CD-GT1MKII - CD Player TASCAM - Free user manual and instructions
Find the device manual for free CD-GT1MKII TASCAM in PDF.


| Product Type | Portable CD Guitar Trainer |
| Dimensions (W x D x H) | 232 x 138 x 40 mm (9.1 x 5.4 x 1.6 in) |
| Weight (without batteries) | 620 g (1 lb 6 oz) |
| Power Supply | DC 9V via TASCAM PS-PS5 AC adapter (sold separately) or 4 AA batteries (Ni-MH or alkaline) |
| Power Consumption | 4 W (with AC adapter) |
| Battery Life (approx.) | Ni-MH: 4.5 hours; Alkaline: 1.5 hours |
| Laser Type | Class 1 laser product; wavelength 775–816 nm; output <1 mW |
| CD Compatibility | Standard 12 cm and 8 cm CDs; cannot play unfinalized CD-R/RW |
| Audio Formats | CD audio (16-bit, 44.1 kHz) |
| CD Playback Features | Pitch control (±6 semitones), tempo control (-50% to +16% with VSA), fine tuning (±50 cents), guitar cancel, loop (track, disc, A-B), cue, variable speed audition |
| Built-in Effects | 57 presets (45 guitar, 12 vocal) in 4 categories; stored in 2 banks × 5 slots; components include distortion, overdrive, clean, modulation, delay, reverb, etc. |
| Guitar Tuner | Chromatic and guitar modes; calibration 435–445 Hz; built-in oscillator |
| Metronome | Tempo 40–220 BPM; beat settings 2–6 or off |
| Inputs | GUITAR/MIC IN (1/4" mono, unbalanced), LINE IN (3.5mm stereo) |
| Outputs | PHONES (3.5mm stereo), LINE OUT (stereo RCA/3.5mm? manual says "LINE OUT jack" but not specified; likely 3.5mm stereo) |
| Output Control | OUTPUT knob controls both PHONES and LINE OUT level |
| Footswitch Port | 1/4" TS jack for TASCAM RC-30P footswitch (sold separately) |
| Cleaning Instructions | Wipe discs with soft cloth from center to edge; do not use chemicals; clean exterior with dry cloth |
| Safety Certifications | FCC Class B, DHHS 21 CFR Chapter 1, Class 1 Laser |
| Spare Parts / Accessories | AC adapter PS-PS5, footswitch RC-30P (both sold separately); no user-serviceable parts inside |
| Repairability | Refer all servicing to qualified service personnel; do not open housing |
Frequently Asked Questions - CD-GT1MKII TASCAM
User questions about CD-GT1MKII TASCAM
0 question about this device. Answer the ones you know or ask your own.
Ask a new question about this device
Download the instructions for your CD Player in PDF format for free! Find your manual CD-GT1MKII - TASCAM and take your electronic device back in hand. On this page are published all the documents necessary for the use of your device. CD-GT1MKII by TASCAM.
USER MANUAL CD-GT1MKII TASCAM
TEAC Professional Division
CD-GT1 MKII
Portable CD Guitar Trainer
This appliance has a serial number located on the rear panel. Please record the model number and serial number and retain them for your records.
Model number ____
Serial number ____
OWNER'S MANUAL (EN / F / D / I / E)
D00851100A
Important safety precautions



CAUTION: TO REDUCE THE RISK OF ELECTRIC SHOCK, DO NOT REMOVE COVER (OR BACK). NO USER-SERVICABLE PARTS INSIDE. REFER SERVICING TO QUALIFIED SERVICE PERSONNEL.

The lightning flash with arrowhead symbol, within an equilateral trinagle, is intended to alert the user to the presence of uninsulated "dangerous voltage" within the product's enclosure that may be of sufficient magnitude to constitute a risk of electric shock to persons.

WARNING: TO PREVENT FIRE OR SHOCK HAZARD, DO NOT EXPOSE THIS APPLIANCE TO RAIN OR MOISTURE.
FOR U.S.A.
TO THE USER
This equipment has been tested and found to comply with the limits for a Class B digital device, pursuant to Part 15 of the FCC Rules. These limits are designed to provide reasonable protection against harmful interference when the equipment is operated in a commercial environment. This equipment generates, uses, and can radiate radio frequency energy and, if not installed and used in accordance with the instruction manual, may cause harmful interference to radio communications.. However, there is no guarantee that interference will not occur in a particular installation. If this equipment does cause harmful interference to radio or television reception, which can be determined by turning the equipment off and on, the user is encouraged to try to correct the interference by one or more of the following countermeasures.
a) Reorient or relocate the receiving antenna
b) Increase the separation between the equipment and receiver.
c) Connect the equipment into an outlet on a circuit other from that to which the receiver is connected.
d) Consult the dealer or an experienced radio/TV technician for help.
CAUTION
Changes or modifications to this equipment not expressly approved by TEAC CORPORATION for compliance could void the user's authority to operate this equipment.
Important Safety Instructions
1 Read these instructions.
2 Keep these instructions.
3 Heed all warnings.
4 Follow all instructions.
5 Do not use this apparatus near water.
6 Clean only with dry cloth.
7 Do not block any ventilation openings. Install in accordance with the manufacturer's instructions.
8 Do not install near any heat sources such as radiators, heat registers, stoves, or other apparatus (including amplifiers) that produce heat.
9 Do not defeat the safety purpose of the polarized or grounding-type plug. A polarized plug has two blades with one wider than the other. A grounding type plug has two blades and a third grounding prong. The wide blade or the third prong are provided for your safety. If the provided plug does not fit into your outlet, consult an electrician for replacement of the obsolete outlet.
10 Protect the power cord from being walked on or pinched particularly at plugs, convenience receptacles, and the point where they exit from the apparatus.
11 Only use attachments/accessories specified by the manufacturer.
12 Use only with the cart, stand, tripod, bracket, or table specified by the manufacturer, or sold with the apparatus. When a cart is used, use caution when moving the cart/apparatus combination to avoid injury from tip-over.

13 Unplug this apparatus during lightning storms or when unused for long periods of time.
14 Refer all servicing to qualified service personnel. Servicing is required when the apparatus has been damaged in any way, such as power-supply cord or plug is damaged, liquid has been spilled or objects have fallen into the apparatus, the apparatus has been exposed to rain or moisture, does not operate normally, or has been dropped.
- Do not expose this apparatus to drips or splashes.
- Do not place any objects filled with liquids, such as vases, on the apparatus.
- Do not install this apparatus in a confined space such as a book case or similar unit.
- The apparatus draws nominal non-operating power from the AC outlet with its POWER switch in the off position.
Important Safety Instructions
Safety Information
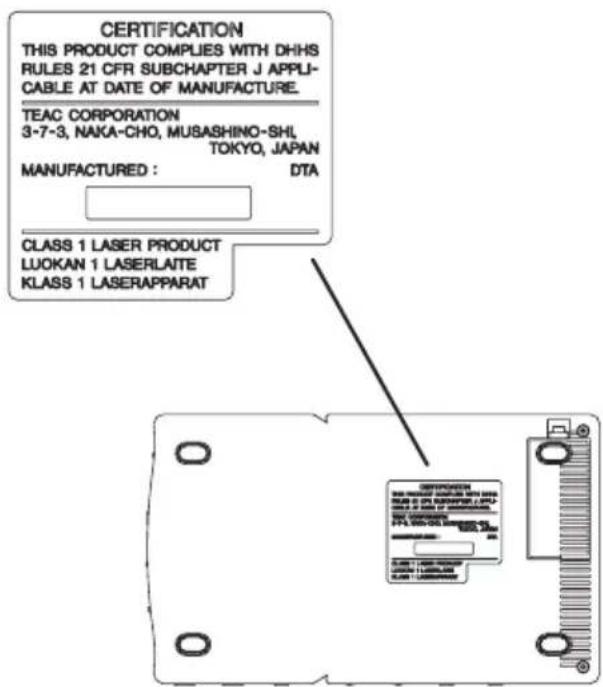
This product has been designed and manufactured according to FDA regulations "title 21, CFR, chapter1, subchapter J, based on the Radiation Control for Health and Safety Act of 1968", and is classified as a class 1 laser product. There is no hazardous invisible laser radiation during operation because invisible laser radiation emitted inside of this product is completely confined in the protective housings. The label required in this regulation is shown here.
CAUTION
- DO NOT REMOVE THE PROTECTIVE HOUSING USING A SCREWDRIVER.
- USE OF CONTROLS OR ADJUSTMENTS OR PERFORMANCE OF PROCEDURES OTHER THAN THOSE SPECIFIED HEREIN MAY RESULT IN HAZARDOUS RADIATION EXPOSURE.
- IF THIS PRODUCT DEVELOPS TROUBLE, CONTACT YOUR NEAREST QUALIFIED SERVICE PERSONNEL, AND DO NOT USE THE PRODUCT IN ITS DAMAGED STATE.
Optical pickup: Type KSM-900AAA
Manufacturer: SONY CORPORATION
Laser output: <1 mW play on the objective lens
Wavelength: 775—816 nm
4 — TASCAM CD-GT1MKII
Table of contents
Handling of compact discs ....6
About the power supply 7
Part names and functions ......9
Making connections ......12
Using the menu system 14
Using the CD player 16
Pitch and tempo changes 17
Using CD effects 18
Using built-in effects 19
Effect presets ......21
Using the metronome ....22
Using the tuner 23
Changing your preferences for the CD-GT1MKII .....24
Facts and figures (specifications) ......25
About this Manual:
When we refer to a key or connector or control on the CD-GT1MKII, the type-face looks like this: PLAY.
When we refer to items shown on the display, the typeface looks like this: MENU.
Handling of compact discs
Observe the following:
• Always place compact discs in the tray with their label facing upward (compact discs can only be played on one side).
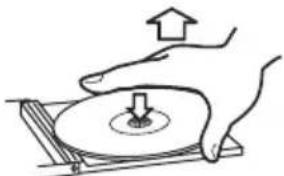
• To remove a disc from its storage case, press down on the center of the case, and lift the disc out, holding it carefully by the edges.
natural_image
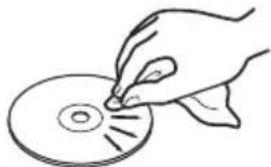
Illustration of hands pressing a circular object with an upward arrow (no text or symbols)- Finger marks and dust should be carefully wiped off the disc's recorded surface with a soft cloth. Unlike conventional records, the compact disc has no grooves to collect dust and microscopic debris, so gently wiping with a soft cloth should remove most particles.
- Wipe in a straight motion from the inside to the outside of the
6 — TASCAM CD-GT1MKII
disc. Small dust particles and light stains will have absolutely no effect on reproduction quality.
natural_image
Line drawing of a hand holding a CD to add a circular mark (no text or symbols)- Never use such chemicals as record sprays, antistatic sprays or fluid, benzine or thinner to clean compact discs. Such chemicals will do irreparable damage to the disc's plastic surface.
- Discs should be returned to their cases after use to avoid serious scratches that could cause the laser pickup to "skip".
- Don't expose discs to direct sunlight or high humidity and temperature for extended periods. Long exposure to high temperature can warp the disc.
- Only use circular compact discs. Avoid using noncircular promotional, etc. discs.
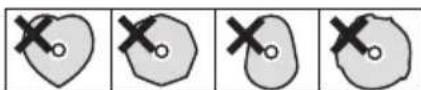
• To keep the laser pickups clean, do not touch them. For the same reason, do not leave the disc tray open unnecessarily.
- The CD-GT1MKII cannot play unfinalized CD-R/RW discs. In addition, some finalized CD-R/RW discs may be unplayable on the CD-GT1MKII.
About the power supply
Operation using batteries
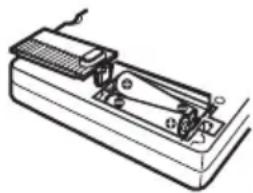
Take off the cover of the battery compartment at the back of the CD-GT1MKII and insert four AA (SUM-3) batteries (not supplied) following the + and - markings inside the battery compartment.
CAUTION
We strongly recommend the use of rechargeable Ni-MH batteries (alkaline batteries may also be used). Your CD-BT1MKII may not operate properly with batteries of other types.
natural_image
Simple line drawing of a battery with three terminals and internal circuit (no text or symbols)WARNING
Misuse of batteries may cause leaks and explosions. Please carefully read and follow the instructions below:
Notes on batteries
- When you are using the CD-GT1MKII with batteries, unplug the AC adapter.
- Make sure the batteries are inserted in the correct direction, according to the markings inside the battery compartment.
• Always use batteries of the same type, and replace all batteries together. - Do not attempt to recharge batteries that are not rechargeable.
- If you are not going to use the CD-GT1MKII for longer than one month, remove the batteries.
- Do not throw batteries into water or fire. Do not disassemble batteries.
- If a battery leaks in the compartment, wipe the liquid away completely with a disposable cloth. Make certain no residue remains before inserting new batteries.
Remaining battery charge level display
When the CD-GT1MKII is running on batteries, a rough indication of the remaining battery charge is displayed as as the battery symbol as follows:
3 parts are lit

There is plenty of battery charge left.
2 parts are lit

Battery charge is approximately half.
1 part is lit

Not much battery charge is left.
3 parts blink

Battery charge is nearly gone. Replace with fully charged batteries.
Auto power-save
While using battery power, the CD player and CD functions of the CD-GT1MKII shut down automatically if any of the following conditions lasts more than 5 minutes: (the CD part of the display shows CD OFF).
- Being in Stop mode
- CD drive cover is open
- No CD is loaded
To turn the CD player on, press the PLAY key.
About the power supply (Continued)
CAUTION
Because the CD-GT1MKII is equipped with special functions such as key change and effects, the battery life is shorter compared with standard portable CD players.
The length of battery life in CD-GT1MKII is affected by both the environment and the number of functions in use. Factors that affect battery life include temperature, humidity, the number of special functions used, and so on.
Under some circumstances, there may not be enough power in the batteries to power the CD-GT1MKII, despite the battery power indication on the display. If this happens, change the batteries, or use an AC adapter.
Always dispose of used batteries as recommended by your local authorities.
Length of battery life
• Ni-MH batteries: Approx. 4.5 hours
- Alkaline batteries: Approx. 1.5 hours
Operation using an AC adapter
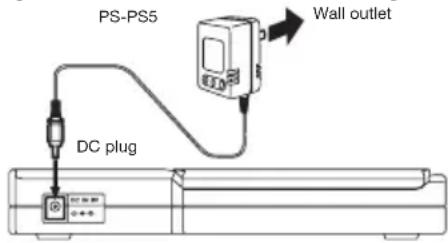
Connect a TASCAM PS-PS5 AC adapter (sold separately) to the DC IN jack at the back of the CD-GT1MKII.
Insert the plug of the AC adapter into a domestic AC power outlet. Make sure that the voltage of the outlet corresponds to that marked on the adapter.
WARNING
Use only a PS-PS5 AC adapter with your CD-GT1MKII. Using another type of AC adapter may damage your CD-GT1MKII.
CAUTION
Remove the batteries before operating the CD-GT1MKII with an AC adapter. There is a possibility of slight noise if you use the unit with an AC adapter while the batteries are
inside. If you plug in an AC adapter but have forgotten to take out the batteries, turn the power off using the POWER switch, and take out the batteries. Likewise, turn the power off before you change between using the batteries and using the AC adapter.
Unplug the AC adapter from the domestic AC power outlet when you are not using the CD-GT1MKII.
Settings may not be properly saved if you turn the power off immediately after inserting a CD or changing settings. If settings are not saved properly, the system may not start with the last settings and instead will start using the default values.
Switching the unit on and off
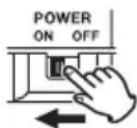
Use the POWER switch to turn the power to the whole unit on and off.
Part names and functions
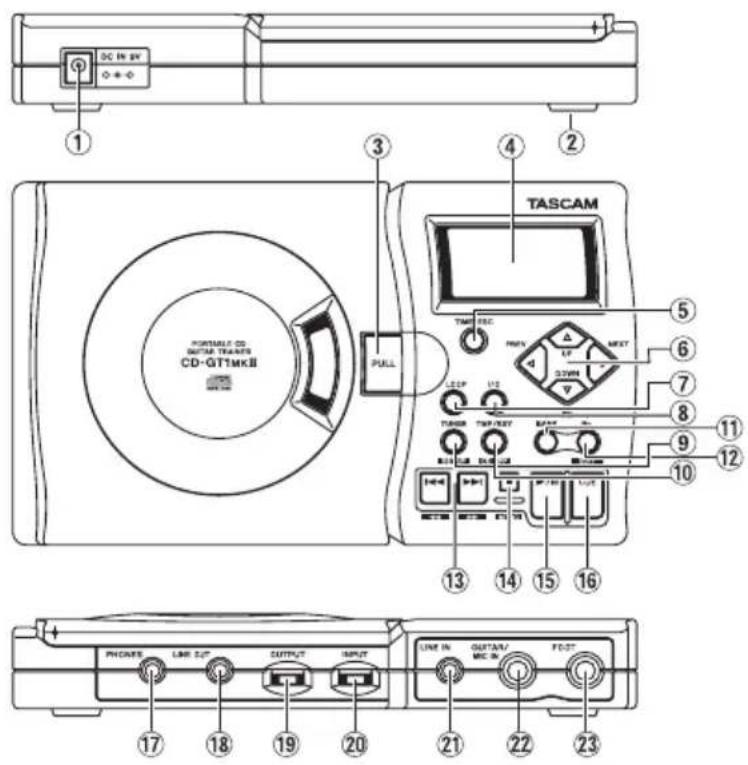
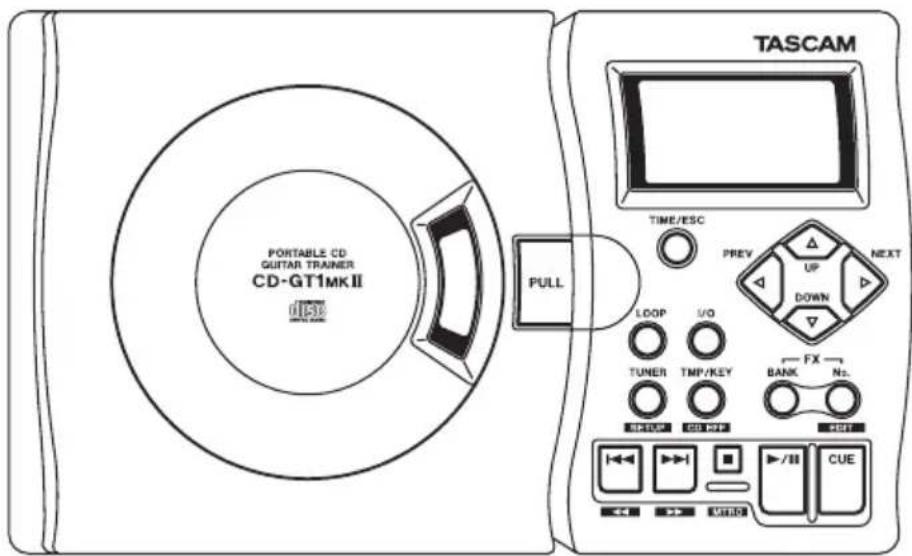
When there are two different words above and below the same key (e.g. TUNER and SETUP), you use the key like this:
• To activate the function written above the key: Tap the key once • To activate the function written below the key
Press down the key and hold it For example, in the case of the TUNER/ SETUP key, the Tuner menu is activated when you tap the key lightly, and if you press and hold it down the key activates the Setup menu.

Part names and functions (Continued)
1) DC IN Jack
Use this jack to connect the DC plug of a TASCAM PS-PS5 AC adapter (sold separately).
2) Battery Compartment
Remove the battery compartment cover at the back of the CD-GT1MKII in order to insert 4 AA (SUM-3) batteries.
3) CD Drive Cover
To open, pull up the unlocking lever. Push down the cover and it will latch automatically.
4) Display
The CD-GT1MKII status is seen here.
5) TIME/ESC Key
- Use this key in the home display mode to change the way CD and track time is displayed.
- Use this key when you are in a menu mode in order to escape and return to the home display mode.
6) PREV, NEXT, UP, DOWN Keys
Use these keys to select menu items or modify the setting values while in menu mode (See Using the menu system). You can also set the functions of these keys in the home display mode (See Changing your preferences).
7) LOOP Key
Use this key to start the repeat (loop) mode.
8) I/O Key
Use this key to set the “IN point” and “OUT point” of the section of music that you want repeated (See Using the CD player).
9) TUNER/SETUP Key
Use this key to enter the Tuner menu and the Setup menu (See Using the menu system).
Use this key to enter the Tempo/Key menu and the CD Effect menu (See Using the menu system).
11) FX BANK Key
Use this key to switch between Effect Bank A and Effect Bank B (See Using built-in effects).
12) FX No./EDIT Key
Use this key to move consecutively between effects slots (See Using built-in effects). Press and hold this key down to go to the Effect menu (See Using the menu system).
13) Track Skip/Search Keys

Track Skip:
Use these keys to skip to the previous track or the next track.
- Press these keys while playing a CD to skip to the previous track or the next track.
- Pressing these keys while the CD is not playing allows you to choose the track you want to start. (To play, press the PLAY key.)
Search: Fast forward/Fast rewind
- Keep one of these keys pressed down while playing a CD to fast forward or fast rewind.
Part names and functions (Continued)
- The speed of the search increases if you continue to hold the key pressed down.
14) STOP/MTRO Key [■]
Press this key to stop playback. Pressing and holding this key down activates metronome menu (See Using the metronome).
15) PLAY/PAUSE Key [▶/■]
Use this key to start playing a CD.
While a CD is playing, you can pause playback by pressing this key. Press again to resume playing.
16) CUE Key
Use this key to return to the cue point (the point where playback last started).
Use the Setup menu to choose a mode that the CUE key can perform (See Changing your preferences).
17) PHONES Jack
Connect your headphones here.
18) LINE OUT Jack
Use this port to connect the CD-
GT1MKII to devices such as speakers with a built-in amplifier, a stereo system AUX input jack, a cassette tape recorder, or a CD recorder. You can hear the results of the effects and key changes through devices connected here.
19) OUTPUT Control
Use this control to adjust the output level of the PHONES jack and the LINE OUT jack. This control adjusts the level of the two jacks together (the two jack levels cannot be adjusted separately).
20) INPUT Control
Use this control to change the input level of the GUITAR/MIC INjack.
21) LINE IN Jack
Use this stereo jack to connect external devices such as a synthesizer, guitar preamplifier, cassette tape recorder, rack-mount effects unit, etc., to the CD-GT1MKII. This jack has no level control, so you must adjust the output level at the source device.
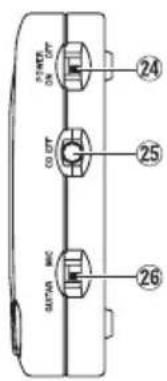
Connect a guitar or dynamic microphone to this jack. Set the GUITAR/MIC switch (See 26) according to the source of the input.
23) FOOT Jack
Connect a standard footswitch to this jack, such as the recommended TASCAM RC-30P (sold separately). You can choose from variety of functions to use with a footswitch. (See Changing your preferences).
24) POWER Switch
This switch turns the power to the whole unit on and off.
25) CD EFF Switch
This switch turns CD effects, such as the guitar canceller, on and off.
This switch changes the gain at the GUITAR/MIC IN jack. Set this switch to match the input source that you are using.
Making connections
Connecting a guitar or a microphone (GUITAR/MIC IN)
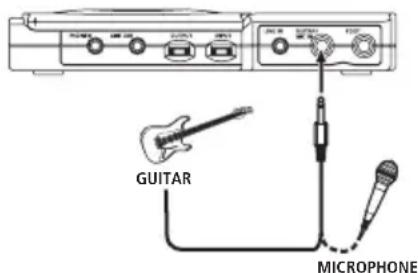
- Connect a guitar or a microphone to the GUITAR/MIC IN jack.
- When connecting a guitar, set the GUITAR/MIC switch to GUITAR.
- When connecting a microphone, set the GUITAR/MIC switch to MIC.
- The GUITAR/MIC IN jack of the CD-GT1MKII accepts unbalanced input signals. Use a 14 inch mono phone plug.
Adjusting the input level
Use the INPUT control to adjust the level of the input signal from the GUITAR/MIC IN jack.
Inputting signals from external devices (LINE IN)
- The LINE IN jack accepts a stereo mini-jack plug (3.5mm).
- The input level at the LINE IN jack cannot be adjusted on the CD-GT1MKII, so adjust the output level on the external device you have connected.
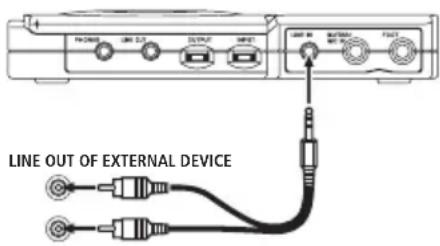
WARNING
NEVER connect a guitar amplifier to the GUITAR/MIC jack of the CD-GT1MKII, as you will damage your equipment if you do this.
Adjusting the output level after adding built-in effects
Press and hold down the FX No./EDIT key to open the Effect menu, and press the NEXT or PREV key to choose LVL and use the UP and DOWN keys to set the output level between 0 and 64.
Adjusting mix balance between guitar/microphone and CD
Press and hold down the TUNER/SETUP key to open the Setup menu, and press the NEXT or PREV key to choose MIX. You can set the mix balance using values between (Guitar) G10 - G1, 0, (CD) C1 - C10 (G10 is guitar only, 0 is an equal mix between CD and guitar, and C10 is CD only).
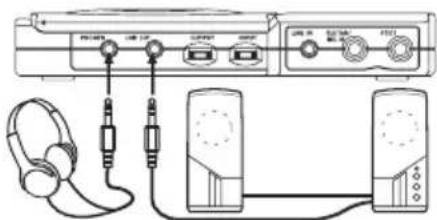
Output to headphones and external devices
- Connect headphones to the PHONES jack.
- Use the stereo LINE OUT jack to connect the CD-GT1MKII to external devices, such as speakers
12 — TASCAM CD-GT1MKII
Making connections (Continued)
with a built-in amplifier, AUX input jacks of a stereo system, cassette tape recorders, or CD recorders.
Adjusting the output level
You can adjust the output level of LINE OUT and PHONES by using the OUTPUT control.
NOTE
The levels from both the LINE OUT and PHONES jacks are controlled together by the OUTPUT control and cannot be adjusted independently.
When you have a recording device connected to the LINE OUT jack, remember that the OUTPUT control affects the recording level.
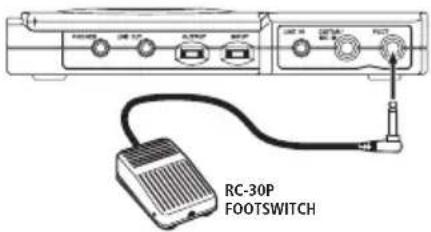
Connecting a footswitch
Connect a footswitch to the FOOT jack. You can set the polarity (push-to-make / push-to-break) of the footswitch using the POL item in the Setup menu.
CAUTION
To avoid problems with your CD-GT1MKII, use only a footswitch such as the TASCAM RC-30P (sold separately) that has a standard phone (tip and sleeve) plug.
Using the menu system
Entering the menu system
To enter the menu category of your choice, tap, or press and hold the appropriate key as listed below:
• Effect menu (guitar effects)
Press and hold the FX No. /EDIT key
- Tuner menu (guitar tuner)
Tap the TUNER/SETUP key
- Setup menu (system setup)
Press and hold down the TUNER/ SETUP key
- Tempo/Key menu (changing tempo and pitch of CD)
Tap the TMP/KEY/CD EFF key
- CD Effect menu (CD playback effects)
Press and hold down the TMP/KEY/CD EFF key
- Metronome menu
Press and hold down the STOP key.
The menu then shows the menu category you select, reversed and blinking.
| Menu Category | Menu Item | Values (default values are underlined) | Notes |
EFFECT EFF ON  | OFF turns effect on or off | ||
| LIB d01-15, b01-15, c01-15, v01-12 preset number | |||
| Parameter | – depends on effect type | ||
| LVL | 0 to 64 effect output level | ||
TUNER TUNE  | MODE=GTR: 6E, 5A, 4D, 3G, 2B, 1E sets string number in Guitar Mode | ||
| MODE | CHR/GTR | selects tuner mode | |
| OSC OFF, _C- _A, _B, C-B, ~C- ~B(3 octaves) | sets pitch of the oscillator | ||
| CAL | 435-440-445 | sets base frequency (A4, unit: Hz) | |
SETUP  | MIX | G10 – G1, 0, C1 – C10 | sets mix balance between CD and input |
| PLAY | ALL/SGL | selects all or single play | |
| CUE CUE/FLS | — | selects action of CUE | |
| UPDN | MIX, TMP, KEY, FIN | sets function of UP/DOWN key in the home display mode | |
| FOOT | FX+, FX-, CUE, FLS, REW, FF, BNK | sets function of the footswitch | |
| POL | NOR/INV | sets polarity of the footswitch | |
Using the menu system (Continued)
| Menu Category | Menu Item | Values (default values are underlined) | Notes |
TEMPO KEY | TMP VSA=0 | FF: -50 to +16VSA= ON: -50, -32, -16, -12,-8, -4, 0, +4, +8, +12, +16 | sets the speed of CD playback in % |
| VSA ON/OFF | turns VSA on or off | ||
| KEY | b6 - 0 - #6 | sets key control in semitones | |
| FINE -50 - 0 | - +50 sets fine tuning (cent) | ||
| CD EFF CNCL ON/DK34 | ON/OFF turns guitar cancel | function on or off | |
| PART | L10 - L1, C, R1 - R10 selects the stereo region reduced by the guitar cancel function | ||
| RNGE MID/AL | LL selects the range | reduced by the guitar cancel function | |
| MONO OFF | (stereo), L+R, L, R selects mono monitor | mode | |
| SPLT | OFF (mix), C-G, G-C selects split monitor mode | ||
METRONOME  MTRO MTRO | MTRO (OFF), 40 | - 120 - 220_ sets tempo of metronome in BPM (Beats Per Minute) | |
| BEAT | OFF, 2 - 6 | selects number of beats of the metronome | |
Choosing menu items
Choose menu items in the selected menu category using the PREV and NEXT keys.
Changing the setting values
Change the setting values using the UP and DOWN keys.
Exiting the menu system
Press the TIME/ESC key to exit the menu system and go back to the home display mode.
TIME/ESC

Using the CD player
The CD player in CD-GT1MKII works in much the same way as other CD players, with a few minor differences and special features.
Playback
Press the PLAY/PAUSE key (▶/■) to start playback and to pause playback. Press the STOP key (■) to stop playback.
Skipping between tracks and searching within tracks
Use the skip/search keys (◀◀ / |◀◀ and ▶▶▶ / ▶▶) to move back and forward one track at a time.
Use these keys to search within the CD by pressing and holding the key for the direction that you want to search. By continuing to press, the search will speed up.
Looping (track/disc)
Press the LOOP key to repeat a single track, or all tracks, according to the PLAY item in the Setup menu.
Setting Repeat Mode
SGL repeats a single current track. LOOP 1 appears on the display.
ALL repeats the whole disc. LOOP appears on the display.
Looping (In/Out points)
To repeat a particular section of a track, use the I/O key to set the start (IN) point of the loop, then use the I/O key to set the end (OUT) point.
- Pressing the I/O key during playback or paused playback sets the IN point. The I-0 symbol blinks on the display.
- Pressing the I/O key again during playback or paused playback sets the OUT point. LOOP and I-O appear on the display. The section between the two points repeats seamlessly.
- To cancel an I/O loop, press the LOOP key. LOOP disappears from the display and the loop mode is canceled. Pressing the LOOP key again will restart the previously determined loop.
- Pressing the I/O key again clears the loop points.
The CUE key
The CUE key has two functions that can be set in the Setup menu: Setting Function
CUE playback pauses at the point where playback last started.
FLS playback "flashes" automatically back to the last point-where playback started.
With a TASCAM RC-30P footswitch connected (sold separately), you can use it instead of the CUE key for hands-free operation. Set the FOOT item in the Setup menu to CUE or FLS (flash).
Display
In the home display mode press the TIME/ESC key to change the time display between track elapsed time, track remaining time, and total remaining time of the CD.
Pitch and tempo changes
There are four ways to change the way a CD is played back, using menu items in the Tempo Key menu: Tempo control (TMP), VSA (Variable Speed Audition) setup (VSA), Key control (KEY), and Fine tuning (FINE)
Tempo control
Tempo control allows you to change the tempo of a track.
Tap the TMP/KEY / CD EFF key to enter the Tempo Key menu, and select TMP by pressing either the PREV or NEXT key. TEMPO blinks on the display.
When VSA is ON (see below), the settings you can choose are: -50, -32, -16, -12, -8, -4, 0 (off), +4, +8, +12, and +16%. Press the UP or DOWN keys to set the value.
When VSA is OFF, you can change the setting between -50 and +16%, in 1% steps.
Press either the UP or DOWN key to set the tempo. When the tempo is set to a value other than zero, TEMPO shows in the home display mode.
VSA
When VSA is ON, you can change the tempo without changing the key.
Tap the TMP/KEY / CD EFFkey to enter the Tempo Key menu, select VSA by pressing the PREV or NEXT key. Press the UP or DOWN key to choose either ON or OFF. TEMPO blinks on the display. When the VSA is set to ON, the letters VSA are shown in the display.
NOTE
If the tempo control value is not set to 0 and you change VSA from OFF to ON, the tempo value will be automatically reset to a "VSA ON value." For example, if the value is [-33] when VSA is OFF, it will automatically be adjusted to [-50] when you turn VSA ON.
Key control
Key control changes the key of the music up or down by six semitones.
Tap the TMP/KEY / CD EFF key to enter the Tempo Key menu, and select KEY by pressing the PREV or NEXT key. KEY blinks on the display. Press the UP or DOWN key to set the value for the key. The range is ± 6 semitones ( 6 - 0 (off) - ^# 6). When the key is set to value other than zero, KEY shows in the home display mode.
Fine tuning
Fine tuning changes the key of the music by cents (100 cents = 1 semitone).
This allows you to make fine adjustments and allow for slight tuning differences between your instruments and the CD.
Tap the TMP/KEY / CD EFF key to enter the Tempo Key menu, and select FINE by pressing the PREV or NEXT key. KEY blinks on the display. Press the UP or DOWN key to set the fine tuning value.
The range for adjustment is ±50 cents (-50-0 (off)-+50) . If the key control is set to #6, however, the available range of fine tuning is between -50-0, and when it is set to b6, the fine tuning range is between 0-+50. When the fine tuning is set to a value other than zero, KEY shows in the home display mode.
(continued on the next page)
TASCAM CD-GT1MKII —
Using CD effects
(continued from the previous page)
CAUTION
If you set the key control to #6 while the fine tuning value is greater than 0, the fine tuning value is automatically reset to 0. Similarly, if you set the key control to b6 while the fine tuning value is less than 0, the fine tuning value is automatically reset to 0.
Also note that when key control or VSA is ON, you may find that the music played back has a "vibrato" feel. This is not a fault of the CD player – it is a natural result of the special effects.
Using CD effects
Turning CD effects on and off
Pressing the CD EFF switch at the side of the CD-GT1MKII turns on the pre-set CD effects: guitar cancel, mono monitor, split monitor. These three CD effect components can be used simultaneously. The CD EFF symbol is shown on the display. Press the CD EFF switch again to turn off the CD effects.
Guitar Cancel
The guitar cancel function reduces the volume of a chosen region of the ste-
18 — TASCAM CD-GT1MKII
reo image in a chosen frequency range. This allows you to reduce the sound of a guitar in the CD, so that you can play along with the backing of your favorite artists!
On / Off
Press and hold the TMP/KEY / CD EFF key to enter the CD Effect menu, and select CNCL by pressing either the PREV or NEXT key. Press either the UP or DOWN key to turn the guitar canceller on or off.
Setting the stereo region to be reduced
Press and hold down the TMP/KEY / CD EFF key to enter the CD Effect menu, and select PART by pressing either the PREV or NEXT key. Press either the UP or DOWN key to set the value of the localization to be reduced.
The localization reduction value can be selected from L10 - L1, C, R1 - R10.
Setting the frequency range to be reduced
Press and hold down TMP/KEY / CD EFF key to enter the CD Effect menu,
and select RNGE by pressing either the PREV or NEXT key. Press either the UP or DOWN key to select either MID (mid range) or ALL (all range).
Mono monitor
Setting the monitor mode allows you to control the output signal between mono and stereo with alternate options for both.
Press and hold the TMP/KEY / CD EFF key to enter the CD Effect menu, and select MONO by pressing either the PREV or NEXTkey. Press either the UP or DOWN key to select from the following four options:
- L+R: outputs a mono signal, mixing the L (left) and R (right) channels.
• L outputs the L channel signal only.
• R outputs the R channel signal only. - OFF : outputs normal stereo signal. (continued on the next page)
Using built-in effects
(continued from the previous page)
Split monitor
Setting the split monitor mode allows you to split the output of the CD and the guitar into left and right outputs.
Press and hold the TMP/KEY / CD EFF key to enter the CD Effect menu, and select SPLIT by pressing either the PREV or NEXT key. Press the UP or DOWN key to select from the following:
- C-G: outputs the sound of the CD from the left, and the sound of the guitar/microphone from the right.
- G-C outputs the sound of the guitar/microphone from the left, and the CD sound from the right.
- OFF: outputs stereo mixed sound of CD and guitar/microphone from left and right.
Using built-in effects
The top right of the display shows two effect “banks,” A and B. These two banks each have five “slots” numbered from 1 through 5 where you can store your own effect settings.
Effects are created from the 57 preset effects available (45 guitar and 12 vocal). Each of the 45 guitar effect presets has four components, while the vocal effect presets have only one.
When a bank and slot are selected, if a preset effect is recalled and edited, that bank slot is automatically filled with the edited effect.
Components
DIST Distortion gain
TONE Tone control
DRIV Overdrive gain
COMP Compressor gain
FLA Flanger setting
REV Reverb setting
DLY Delay setting
PHA Phaser setting
EXC Exciter setting
PIT Pitch shifter setting
CHO Chorus setting
TRM Tremolo setting
VIB Vibrato setting
WAH Auto-wah setting
Storing your own effect settings in a bank slot
- Starting in the home display mode, press the FX BANK key to select either the A or B bank.
- Press the FX No./EDIT key to select the bank slot.
- Press and hold the FX No./EDIT key to open the Effect menu.
- Select EFF by pressing either the PREV or NEXT key.
- Press either the UP or DOWN key to turn an effect ON or OFF.
- Press either the PREV or NEXT key to select LIB: (effect preset library). The display shows a letter (continued on the next page)
TASCAM CD-GT1MKII —
Using built-in effects (Continued)
(continued from the previous page)
and number (such as LIB:d10) that represents a set of effect presets. The effect presets appear in this order: distortion d01 - 15, overdrive o01 - 15, clean sound c01 - 15, Vocal v01 - 12. Select a library preset effect by pressing either the UP or DOWN key.
TIP
The Effect Preset Chart (See Effects presets) shows the 57 effect presets in the library. The 45 guitar effect presets contain four components, and you can mix the two shown in bold. The 12 vocal effect presets contain only one component. Use the chart to determine the content of a selected library number.
CAUTION
If there are any settings in the selected bank slot to start with, they will be overwritten when you recall a library entry.
- Use the PREV or NEXT key to move between the components of the effect preset. For example, if you choose "clean sound 12," shown as LIB:c12, the components
are: COMP, TONE, VIB, DLY. All four components can be adjusted by pressing either the UP or DOWN key. In the example of “clean sound 12,” each of the VIB and DLY components are followed in the display by their own mix parameter, with MIX 1 following VIB and MIX 2 following DLY. Press either the UP or DOWN key to mix the VIB and DLY components in the effect.
-
Continue to select the components to edit by pressing either the PREV or NEXT key, then select the value for the selected components by pressing either the UP or DOWN key.
-
The last parameter of the sequence for each library effect preset is LVL (the output level from the effect unit). Set the output level from 0 to 64 by pressing either the UP or DOWN key. Note that the output level is only available when the effect is turned on and is bypassed when the effect is off.
-
Press the TIME/ESC key to exit the effect settings. The effect settings you have made are automatically stored in the bank slot you first chose in steps 1 and 2.
Recalling an effect with your settings
When you have stored the effect settings in a bank slot as described above, you can recall them simply pressing the BANK key and No./EDIT key to select the appropriate bank slot. You should also make sure that effect (EFF) is switched ON.
TIP
If you have connected a footswitch such as TASCAM RC-30P (sold separately), you can step through the bank slots by pressing the footswitch. Make sure that FOOT in the Setup menu is set to either FX+, FX-, or BNK.
| DISTORTION (d01-15) OVERDRIVE (o01-15) CLEAN SOUND (c01-15) VOCAL (v01-12) | |||
| d01 DIS-TONE-FLA-REV | o01 DRIV-TONE-FLA-REV | c01 COMP-TONE-FLA-REV | v01 Chorister |
| d02 DIS-TONE-FLA-DLY | o02 DRIV-TONE-FLA-DLY | c02 COMP-TONE-FLA-DLY | v02 Emphasis |
| d03 DIS-TONE-PHA-REV | o03 DRIV-TONE-PHA-REV | c03 COMP-TONE-PHA-REV | v03 Shout |
| d04 DIS-TONE-PHA-DLY | o04 DRIV-TONE-PHA-DLY | c04 COMP-TONE-PHA-DLY | v04 Mood Vocal |
| d05 DIS-TONE-EXC-REV | o05 DRIV-TONE-EXC-REV | c05 COMP-TONE-EXC-REV | v05 Response |
| d06 DIS-TONE-EXC-DLY | o06 DRIV-TONE-EXC-DLY | c06 COMP-TONE-EXC-DLY | v06 Proclaim |
| d07 DIS-TONE-CHO-REV | o07 DRIV-TONE-CHO-REV | c07 COMP-TONE-CHO-REV | v07 Quivering Voice |
| d08 DIS-TONE-CHO-DLY | o08 DRIV-TONE-CHO-DLY | c08 COMP-TONE-CHO-DLY | v08 Duet |
| d09 DIS-TONE-TRM-REV | o09 DRIV-TONE-TRM-REV | c09 COMP-TONE-TRM-REV | v09 Lo-Fi Vocal |
| d10 DIS-TONE-TRM-DLY | o10 DRIV-TONE-TRM-DLY | c10 COMP-TONE-TRM-DLY | v10 Megaphone |
| d11 DIS-TONE-VIB-REV | o11 DRIV-TONE-VIB-REV | c11 COMP-TONE-VIB-REV | v11 Screaming |
| d12 DIS-TONE-VIB-DLY | o12 DRIV-TONE-VIB-DLY | c12 COMP-TONE-VIB-DLY | v12 Panning Vocal |
| d13 DIS-TONE-WAH-REV | o13 DRIV-TONE-WAH-REV | c13 COMP-TONE-WAH-REV | |
| d14 DIS-TONE-WAH-DLY | o14 DRIV-TONE-WAH-DLY | c14 COMP-TONE-WAH-DLY | |
| d15 DIS-TONE-PIT-DLY | o15 DRIV-TONE-PIT-DLY | c15 COMP-TONE-PIT-DLY | |
Effect presets in this library are divided into four categories, three for guitar and one for vocal.
Each of the guitar presets (distortion, overdrive, and clean sound) has four components whose settings you can adjust individually. The Mix level can be adjusted for any of the parameters in bold letters such as FLA, REV, DLY, and so on.
The vocal presets have one parameter each, shown on the display as PARM.
Using the metronome
The CD-GT1MKII has a built-in metronome.
To use the metronome, press and hold the STOP key to open the Metronome menu.
Choosing the metronome tempo
- Press the PREV key or the NEXT key to select MTRO.
- When the menu is first opened, the metronome sound is off. The metronome will begin generating the sound of beats at the previously set tempo when you press either the UP key or the DOWN key to set the tempo. Press once to change by one beat per minute; press and hold either the UP or DOWN key to fast forward or backward through the tempos. You can set the value between 40 and 220 BPM (beats per minute)
and you will hear the sound of metronome beats as soon as you set the value.
Choosing the beats
- Press either the PREV or NEXT key to select BEAT.
- Select the rhythm (2 through 6 or OFF) by pressing either the UP or DOWN key. When you choose a rhythm you will notice that the first beat is a higher pitch and volume than the other beats. In the OFF setting, all beats are the same pitch and volume.
NOTE
The metronome functions only when a CD is not being played back. If you start playing a CD while using the metronome, the metronome function stops automatically.
22 — TASCAM CD-GT1MKII
CD-GT1MKII includes a guitar tuner that operates in two modes, chromatic (CHR) and guitar (GTR).
Chromatic mode (CHR):
The pitch of the incoming signal is detected and displayed automatically.
Guitar mode (GTR):
You choose the string you want to tune before you start tuning.
To select the tuner mode:
- Tap the TUNER/SETUP key and enter the Tuner menu.

- Select MODE by pressing either the PREV or NEXT key.
- Set the mode to either GTR or CHR by pressing either the UP or DOWN key.
In chromatic mode, TUNE:--- is shown on the display. When you play a single note on your guitar when it is connected to the CD-GT1MKII, the tuner “guesses” the closest note, and the note name appears on the display. Tune the string so that it is close to the note you want, and so that the right note appears in the display, and then fine-tune the guitar until the display shows a large center “blob” and the string is tuned. Repeat for all strings.

If the tuner is in the guitar mode, use the TUNE: XX item in the Tuner menu to set the note on the display, and then tune as above.
You can choose the note from 6E, 5A, 4D, 3G, 2B, and 1E (the names of the guitar strings in standard tuning). The selected note is shown on the display as TUNE: XX.
Using the oscillator
The CD-GT1MKII can output notes (sine waves) in the standard Western musical scale between C and B in a three octave range. Standard tuning frequency in this case is determined by the setting in the CAL (calibration) function.
TIP
This is a convenient feature to use when tuning, as you can listen to both the sound of the oscillator and your instrument. It is also useful if you are tuning an acoustic instrument not connected to the CD-GT1MKII.
Tap the TUNER/SETUP key to enter the Tuner menu, and select the OSC (oscillator) by pressing either the PREV or NEXT key. Press either the UP or DOWN key to set the note tuning you want.
Calibration
Usually, A4 (A above Middle C = standard tuning frequency) is tuned to 440 Hz. The CD-GT1MKII allows you to set A4 between 435Hz and 445Hz.
Tap the TUNER/SETUP key to enter the Tuner menu, and select the CAL function by pressing either the PREV or NEXT key. Press either the UP or DOWN key to set a value between 435 and 445 (Hz).
Changing your preferences for the CD-GT1MKII
Use the Setup menu to make changes to the setup of the CD-GT1MKII.
To open the Setup menu, press and hold down the TUNER/SETUP key.

Press either the PREV or NEXT key to select between menu items, and press either the UP or DOWN key to select values.
Mix balance
This function allows you to adjust the mix balance between the guitar/micro-phone sound and the CD sound.
Select MIX in the Setup menu, and select a value between G10 and C10.
G10 (guitar only) through G1, 0 (equal mix), C1 through C10 (CD only).
CD playback mode
This function allows you to set the CD playback mode.
Select PLAY in the Setup menu, and set it to either ALL (plays all tracks) or SGL (plays a single track).
UP key and DOWN key function
The function of the UP or DOWN keys when you are in the home display mode can be set so that they change the value of the menu item that you select. This can be a useful shortcut.
Select UPDN in the Setup menu, and select one of the four functions by pressing either the UP or DOWN key. Choose from the following list:
MIX: mix balance (See Changing your preferences)
TMP: CD playback tempo (See Pitch and tempo changes)
KEY: key control (See Pitch and tempo changes)
FIN: fine tuning (See Pitch and tempo changes)
CUE key function
This function allows you to set the function of the CUE key.
Select CUE in the Setup menu, and set it to either CUE or FLS (FLASH).
CUE: playback is paused at the last point where playback started
FLS: playback starts automatically from the last point where playback started.
Footswitch function
This function allows you use a footswitch such as the recommended TASCAM RC-30P (sold separately), to change the effect bank, effect slot, cue, or CD rewind/fast forward.
Select FOOT in the Setup menu, and select the function from the following:
BNK: selects the effect bank
FX+, FX-: selects the effect slot
CUE, FLS: CUE function
REW, FF: selects CD rewind or fast forward of the CD
Once you select a function the foot-switch can be used to operate the function.
(continued on the next page)
Facts and figures (specifications)
(continued from the previous page)
Footswitch polarity
This function allows you to set the polarity suitable for the footswitch that you are using.
Select POL in the Setup menu, and set it to either NOR (NORMAL) or INV (INVERT) by pressing either the UP or DOWN key.
| Disc types 8 cm single, 1 | 2 cmCD |
| AD/DA 16-bit | |
| Nominal output level (LINE OUT) | -10 dBV |
| Maximum output level (LINE OUT) without distortion | 0 dBV (1Vrms) |
| Output impedance 1 kΩ | |
| Maximum output level (PHONES) | >18mW (into 32Ω) |
| Nominal input levels | |
| LINE IN | -10 dBV |
| MIC IN | -40 dBV |
| GUITAR IN | -15 dBV |
| Voltage requirements DC | 9V (PS-PS5 AC adapter) |
| AA batteries x 4(NiMH or alkaline) | |
| Power consumption 4 W | (PS-PS5 AC adapter) |
| Dimensions (w x d x h) including feet | 232 x 138 x 40(mm) / 9.1 x 5.4 x 1.6 (in) |
| Weight (excluding batteries) | 620g / 1 lb, 6 oz. |
| CD playback characteristics | |
| Frequency response 20 Hz to 20 kHz ±1.0 dB | |
| Dynamic range >88 dB | |
| S/N ratio >88 dB | |
| THD < 0.01% | |
| Digital signal processing | 32-bit |
- Specifications and the appearance of the CD-GT1MKII may change without notice for improvement reasons.
- The illustrations in this manual may differ slightly from the actual product.
TASCAM
TEAC Professional Division
CD-GT1MKII
TEAC CORPORATION
3-7-3 Nakacho Musashino-shi Tokyo 180-8550 JAPAN
+81-422-52-5082 www.tascam.com
TEAC AMERICA, INC
7733 Telegraph Road Montebello CA 90640 USA
+1-323-726-0303 www.tascam.com
TEAC CANADA LTD.
5939 Wallace Street Mississauga Ontario L4Z 1Z8 CANADA
+1-905-890-8008 www.tascam.com
TEAC MEXICO, S.A de C.V
Campesinos No. 184 Colonia Granjas Esmeralda, Delegacion Iztapalapa CP 09810 Mexico DF MEXICO
+52-555-581-5500 www.tascam.com
TEAC UK LIMITED
5 Marlin House, Croxley Business Park Watford Hertfordshire WD18 8TE UNITED KINGDOM
+44-1923-438880 www.tascam.co.uk
TEAC EUROPE GmbH
+39-02-66010500 www.teac.it
TEAC AUSTRALIA PTY., LTD.
280 William St Melbourne Victoria 3000 AUSTRALIA
+61-3-9672-2400
www.teac.com.au
Printed in China



- CD-GT1 MKII
- Portable CD Guitar Trainer
- OWNER'S MANUAL (EN / F / D / I / E)
- Important safety precautions
- FOR U.S.A.
- TO THE USER
- CAUTION
- Important Safety Instructions
- Safety Information
- — TASCAM CD-GT1MKII
- Table of contents
- About this Manual:
- Handling of compact discs
- About the power supply
- Operation using batteries
- WARNING
- Notes on batteries
- Remaining battery charge level display
- Auto power-save
- About the power supply (Continued)
- Length of battery life
- Operation using an AC adapter
- Switching the unit on and off
- Part names and functions
- Part names and functions (Continued)
- 1) DC IN Jack
- 2) Battery Compartment
- 3) CD Drive Cover
- 4) Display
- 5) TIME/ESC Key
- 6) PREV, NEXT, UP, DOWN Keys
- 7) LOOP Key
- 8) I/O Key
- 9) TUNER/SETUP Key
- 11) FX BANK Key
- 12) FX No./EDIT Key
- 13) Track Skip/Search Keys
- 14) STOP/MTRO Key [■]
- 15) PLAY/PAUSE Key [▶/■]
- 16) CUE Key
- 17) PHONES Jack
- 18) LINE OUT Jack
- 19) OUTPUT Control
- 20) INPUT Control
- 21) LINE IN Jack
- 23) FOOT Jack
- 24) POWER Switch
- 25) CD EFF Switch
- Making connections
- Connecting a guitar or a microphone (GUITAR/MIC IN)
- Adjusting the input level
- Inputting signals from external devices (LINE IN)
- Adjusting the output level after adding built-in effects
- Adjusting mix balance between guitar/microphone and CD
- Output to headphones and external devices
- Making connections (Continued)
- Adjusting the output level
- NOTE
- Connecting a footswitch
- Using the menu system
- Entering the menu system
- Using the menu system (Continued)
- Choosing menu items
- Changing the setting values
- Exiting the menu system
- Using the CD player
- Playback
- Skipping between tracks and searching within tracks
- Looping (track/disc)
- Looping (In/Out points)
- The CUE key
- Display
- Pitch and tempo changes
- Tempo control
- VSA
- Key control
- Fine tuning
- Using CD effects
- Turning CD effects on and off
- Guitar Cancel
- On / Off
- Setting the stereo region to be reduced
- Setting the frequency range to be reduced
- Mono monitor
- Using built-in effects
- (continued from the previous page)
- Split monitor
- Components
- Storing your own effect settings in a bank slot
- Using built-in effects (Continued)
- TIP
- Recalling an effect with your settings
- Using the metronome
- Choosing the metronome tempo
- Choosing the beats
- Chromatic mode (CHR):
- Guitar mode (GTR):
- Using the oscillator
- Calibration
- Changing your preferences for the CD-GT1MKII
- Mix balance
- CD playback mode
- UP key and DOWN key function
- CUE key function
- Footswitch function
- Facts and figures (specifications)
- Footswitch polarity
- TASCAM
- TEAC Professional Division
- CD-GT1MKII
Brand : TASCAM
Model : CD-GT1MKII
Category : CD Player