
X-PAD - DJ Mixer Citronic - Free user manual and instructions
Find the device manual for free X-PAD Citronic in PDF.


| Product Type | DJ Mixer |
| Brand | Citronic |
| Model | X-PAD |
| Channels | 2 |
| Dimensions (approx.) | 250 x 200 x 60 mm |
| Weight (approx.) | 1.2 kg |
| Power Supply | 12V DC, 500 mA (power adapter included) |
| Inputs | 2 x RCA (line), 1 x 3.5 mm stereo (aux) |
| Outputs | 2 x RCA (master), 1 x 3.5 mm headphone |
| Crossfader | Yes, adjustable curve |
| EQ | 2-band per channel (bass, treble) |
| Bluetooth | Built-in Bluetooth 5.0 for wireless audio |
| USB | USB port for MP3 playback and charging |
| Main Functions | Volume control, cue/PFL, master output, booth output |
| Maintenance & Cleaning | Wipe with a dry, lint-free cloth. Do not use chemicals. |
| Safety | Keep away from water and moisture. Do not disassemble. |
| Spare Parts & Repairability | Contact authorized service center. Check with retailer. |
| General Information | For professional and home DJ use. |
Frequently Asked Questions - X-PAD Citronic
User questions about X-PAD Citronic
0 question about this device. Answer the ones you know or ask your own.
Ask a new question about this device
Download the instructions for your DJ Mixer in PDF format for free! Find your manual X-PAD - Citronic and take your electronic device back in hand. On this page are published all the documents necessary for the use of your device. X-PAD by Citronic.
USER MANUAL X-PAD Citronic
Caution: Please read this manual carefully before operating Damage caused by misuse is not covered by the warranty
Introduction
Thank you for choosing a Citronic X-PAD for digital audio recording and playback with special effects processing. Suitable for operation with a PC or smart phone for music production, rehearsal and online media. Please read this manual in full and keep for future reference to get the best from your product and avoid damage through misuse.
SAFETY SYMBOL AND MESSAGE CONVENTIONS

CAUTION RISK OF ELECTRIC SHOCK DO NOT OPEN
AVIS RISQUE DE CHOC ELECTRIQUE NE PAS OUVRIR


This symbol indicates that dangerous voltage constituting a risk of electric shock is present within this unit

This symbol indicates that there are important operating and maintenance instructions in the literature accompanying this unit.
Warning
To prevent the risk of fire or electric shock, do not expose any components to rain or moisture. If liquids enter the housing, stop using immediately, allow the unit to dry out and have it checked by qualified personnel before further use. Avoid impact, extreme pressure or heavy vibration to the case.
No user serviceable parts inside – Do not open the case – refer all servicing to qualified service personnel.
Safety
- Charge the internal battery from a 5Vdc USB port or charger via the USB type-C Charge input. Avoid ingress of water or particles into any part of the housing. If liquids are spilled on the X-PAD, stop using immediately, allow the unit to dry out and have checked by qualified personnel before further use.
Placement
- Keep the console out of direct sunlight and away from heat sources.
- Do not place heavy objects on top of the control surface.
- Keep the control surface and connections free from damp or dust.
Cleaning
• Use a soft cloth with a neutral detergent to clean the housing as required.
• A soft brush can be used to clear debris from between controls without damaging them.
- Do not use solvents for cleaning the unit.
USB type-C connections
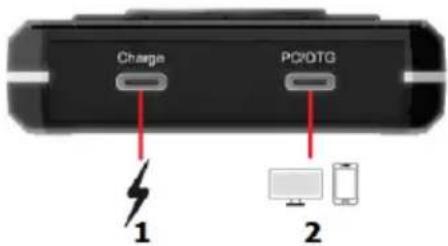
- USB type-C power only connection 5Vdc 2A
- USB type-C data connection PC and On-The-Go
The X-PAD can be used as a standalone audio processor or as a plug + play audio device when connected to a laptop or smart phone. When connecting the X-PAD to a laptop or smart phone, use the USB type-C PC/OTG data connection (2) on the bottom edge and connect to a USB port on the host device.
Alongside the PC/OTG data connection is another USB type-C connector (1), which is for charging the internal battery using a suitable USB power supply delivering 5Vdc 2A output (not supplied).
Audio connections
Audio connections to the X-PAD are on the top edge and all are 3.5mm jack type.
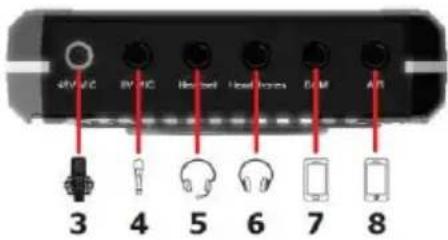
- Balanced 3.5mm mic input +48V phantom power
- 3.5mm mic input +5V phantom power
- 3.5mm headset with mic in/out connection
- 3.5mm stereo headphones output
- 3.5mm stereo BackGround Music input
- 3.5mm stereo on-AIR connection (smart phone in+out live)
Jack number 3 is a balanced (TRS) microphone input which has 5V phantom power but can provide 48V phantom power when switched in. This is most often a requirement for professional studio condenser microphones. An XLRF to 3.5mm TRS plug balanced lead is provided in the package for this purpose.
Jack number 4 is an additional microphone input, which has 5V phantom power and can accept dynamic or low voltage condenser microphones, such as some tie-clip and headset microphones.
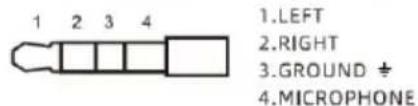
Jack number 5 is a 4-pole (TRRS) connector for a headset. This has connection for stereo headphones (output) and microphone (input) combined into a single jack.
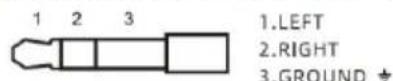
Jack number 6 is a stereo headphones jack, which can be used for monitoring recordings and playback of tracks through standard wired headphones or earbuds.
Jack number 7 is a stereo line input for BackGround Music (BGM) playback from a phone, mp3 player or other line level source.
Jack number 8 is a 4-pole (TRRS) connector for a smart phone providing on-AIR live recording with connections for left & right audio and microphone to record 2-way audio through the phone.
Balanced microphone input

Unbalanced microphone input

Headset or phone connection
Headphone or BGM connection
Control panel layout
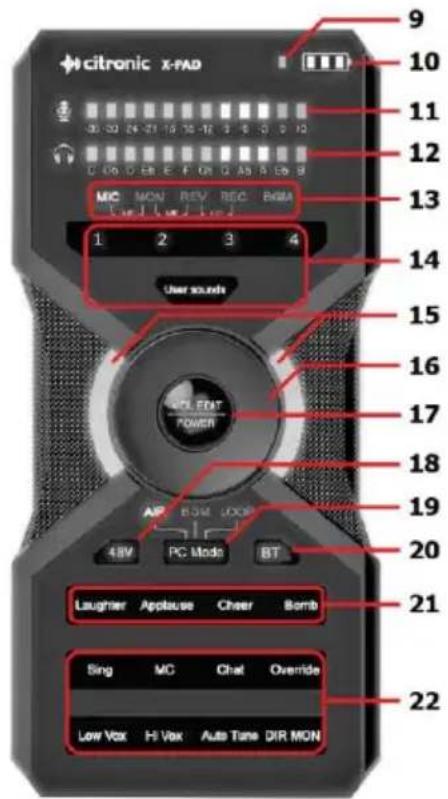
- Charging indicator
- Battery level meter
- Mic channel level meter
- Monitor output level meter
- Audio parameter editing indicators
- User sounds record/trigger keys
- Power on indicators
- Data entry dial
- Power and edit button
- +48V phantom power enable
- PC / OTG mode selector
- Bluetooth® pairing
- Pre-set sound effect playback keys
- Vocal processing function keys
Setting up
From new, it is advised to charge the internal battery for a minimum 2 hours before use by connecting a USB charger (5Vdc 2A min) to the USB-C Charge input (1). A charging indicator (9) shows when the X-PAD battery is being charged and a battery level meter (10) shows the charge status. When this 3-LED indicator has just 1 LED flashing, the X-PAD will need to be charged before operating. The Charge input is independent from the PC/OTG connector and can also provide power whilst in use.
Press and hold the VOL/EDIT/POWER button (17) to power up the X-PAD. Two indicators (15) will light.
The X-PAD acts as a plug-and-play USB sound card named "X-PAD" when connected to a host device via the PC/OTG connector, such as a PC, Mac, smart phone, or tablet computer. There are 3 modes for this connection, accessed by the PC Mode key (19)
AIR mode is for live broadcast and recording, with all microphones connected to the X-PAD and BGM/accompaniment routed to the host device. Output from the host device is then routed to the headphones output of the X-PAD.
BGM mode is for using the PC/OTG host device as a playback source through the BGM bus of the X-PAD. The microphone inputs from the X-PAD are not routed to the host device. In BGM mode, the host output will also be affected by the mic Override function (see on the following pages about "Override").
LOOP mode routes all microphones connected to the X-PAD and BGM/accompaniment routed to the host device. Output from the host device is then routed to the headphones output of the X-PAD, then further returned to the host device along with the other audio from the X-PAD, providing an overdub situation.
Audio connection
48V phantom power is required by some condenser microphones (e.g. studio microphones and large diaphragm models). If a condenser microphone that requires 48V phantom power is connected to Jack 3 (leftmost), enable the 48V phantom power by pressing the 48V key (18) so that it lights. If the 48V indicator is not lit, Jack 3 will still have 5V phantom power present, which can power headset or lavalier condenser microphones. For dynamic microphones, the 48V phantom power should be switched off.
The BT key (20) is for pairing Bluetooth to the X-PAD for audio playback from a sending device, such as a smart phone, tablet computer or an audio player with Bluetooth pairing capability. Briefly pressing this key will cause it to flash quickly, indicating that the X-PAD is in pairing mode.
Search for "X-PAD" on the sending device (smart phone, tablet etc.) and select to pair. When paired successfully, the BT key will flash more slowly to indicate a successful connection.
Playback of audio from the sending device will now be received wirelessly to the BGM channel of the X-PAD. Pressing the BT key again switches off the Bluetooth receiver and disconnects the wireless link from the sending device.
The VOL/EDIT/POWER button (17) - as well as being the power on/off button - enables access to the volume and other parameters for the audio and mic inputs to the X-PAD.
Pressing the VOL/EDIT/POWER button briefly steps through the edit functions, indicated by the MIC/MON/REV/REC/BGM labels (13) below the Mic and Monitor level meters.
When MIC is lit, turning the Data entry dial (16) will adjust the microphone level(s) up (clockwise) or down (anti-clockwise), the setting of which will be indicated by the Monitor level output meter (12).
When MON is lit, turning the Data entry dial (16) will adjust the monitor (headphone) level up or down, the setting of which will be indicated by the Monitor level output meter (12).
When REV is lit, turning the Data entry dial (16) will adjust the reverberation effect level on the microphone(s) up or down, the setting of which will be indicated by the Monitor level output meter (12).
When REC is lit, turning the Data entry dial (16) will adjust the audio output to PC/OTG and AIR recording level up or down, the setting of which will be indicated by the Monitor level output meter (12).
When BGM is lit, turning the Data entry dial (16) will adjust the BGM (background music) level up or down, including Bluetooth and BGM playback through the PC/OTG port. The setting of this will be indicated by the Monitor level output meter (12).
When MIC + MON are both lit, turning the Data entry dial (16) will adjust the HF (high frequency) or treble content of the microphone input(s) up or down. The HF level setting will be indicated by the Monitor level output meter (12).
When MON + REV are both lit, turning the Data entry dial (16) will adjust the MF (mid frequency) or middle content of the microphone input(s) up or down. The MF level setting will be indicated by the Monitor level output meter (12).
When REV + REC are both lit, turning the Data entry dial (16) will adjust the LF (low frequency) or bass content of the microphone input(s) up or down. The LF level setting will be indicated by the Monitor level output meter (12).
Operation
Once all connections and initial settings have been made, the X-PAD will be ready for use and any playback from BGM, Bluetooth or PC/OTG (depending upon the mode setting) will be heard through the headphones, headset or smart phone connected by the AIR jack. The output of audio playback can also be monitored on the Monitor level bar indicators (12). Any vocal or other sound picked up by connected microphones will also be routed to the headphones, headset or smart phone in the same way and can be monitored via the Mic channel level meter (11)
Vocals through the microphone(s) can be processed internally by the X-PAD by applying one of the Vocal processing function keys (22).
The Sing setting, as the name suggests, is for singing, and adds a reverberation (REV) effect to give sustain and ethereal space to a sung passage
The MC setting adds a short reverberation (REV) effect for a live vocal sound with an emphasis for spoken word performances.
Chat gives a dry vocal signal without reverberation, to provide better intelligibility for speech.
Override activates a "ducking" function for the BGM, BT and other music playback. When this is active, any sound on the microphone(s) causes the background music to reduce in volume or "duck" and when the microphone is silent, the music returns to full volume automatically.
Low vox is a pitch-shifted effect, producing a menacing multi-vocal sound, useful for dramatically changing spoken passages or even portraying a fictional character.
High vox is almost the opposite pitch shifted effect to Low vox, providing a higher vocal formant for cartoon character mimicking and comical effect.
Auto Tune is a very useful tool for singers. This effect shifts the pitch of the vocal to the nearest musical note in a chosen key. To activate this effect, press and hold the Auto Tune key until it lights. Pressing the Auto Tune key briefly will step through the musical keys that the effect is based on. Knowing the key that a piece of music is played in will help choose the correct key to set for Auto Tuning vocals. Pressing Sing, MC, Chat, Lo Vox or High Vox will deactivate the Auto-tune function.
DIR MON is an abbreviation for DIRect MONitoring and can be used when a smart phone is connected with the voice input returned to the earpiece to allow natural 2-way live conversation.
Pressing the User Sounds key (14) briefly causes it to light, indicating that the User Sounds recording mode is active. Pressing and holding any of the numbered keys 1/2/3/4 will begin a 10 second countdown, indicated by a progressively decreasing Monitor bar (12). During this 10 second record time, any microphone input or BGM accompaniment will be recorded to memory for playback on demand. Pressing the same number key stops the recording as required. Once recorded, pressing any of the 1/2/3/4 keys will play back its recorded User sound. To delete all recorded User sounds, press and hold the User sounds key until it blinks. When the key stops blinking, all User sounds will be wiped.
The X-PAD also has 4 pre-set recorded sound effects, triggered by the 4 buttons labelled
Laughter/Applause/Cheer/Bomb (21) When pressed, each of these plays back a soundbite as described by its name.
When not in use, turn the volume down on connected equipment to avoid damage and switch off the X-PAD by holding down the VOL/EDIT/POWER button until the power indicators are no longer lit.
Specifications
| Power source | 3000mAh Li-ion battery or USB 5Vdc 2A |
| USB | USB-C (PC/OTG - audio v.1.1) + USB-C (charge) |
| DSP sample rate | 48kHz, 16-bit (S/N 98dB) |
| Microphone: inputs | 3 x 3.5mm jack (Mic.1, Mic.2, headset) |
| Input impedance: mic | 2.2k Ohms (Mic.1), 10k Ohms (Mic.2 & headset mic) |
| Sensitivity: mic | -36dB (Mic.1), -26dB (Mic.2 & headset mic) |
| Sensitivity: line | -2dB |
| Phantom power | +48V (Mic.1), +5Vdc (Mic.2 & headset mic) |
| Frequency response | 100Hz-16kHz (mic), 20Hz-20kHz (line in) ±1dB |
| S/N ratio | ≥90dB (mic), ≥96dB (line in) |
| Dynamic range | ≥92dB (mic), ≥98dB (line in) |
| THD | ≤0.05% (mic), ≤0.02% (line in) @1kHz |
| Line input | 3.5mm stereo BGM input |
| Gain | Line in 12dB max. |
| Smart phone audio connection | 3.5mm TRRS jack (or via USB-C) |
| Headphone: connector | 3.5mm stereo jack |
| Headphone: impedance | 16-300Ω |
| Headphone: power | 100mW @16Ω (1kHz, ≤0.1% THD) |
| Dimensions | 162 x 78 x 21mm |
| Weight | 280g |



Disposal: The "Crossed Wheelie Bin" symbol on the product means that the product is classed as Electrical or Electronic equipment and should not be disposed with other household or commercial waste at the end of its useful life. The goods must be disposed of according to your local council guidelines.
Hereby, AVSL Group Ltd. declares that the radio equipment types 173.640UK is in compliance with Directive 2014/53/EU
The full text of the EU declaration of conformity is available at the following internet address: http://www.avsl.com/assets/exportdoc/1/7/173640UK%20CE.pdf
Errors and omissions excepted. Copyright© 2021.
AVSL Group Ltd. Unit 2-4 Bridgewater Park, Taylor Rd. Manchester. M41 7JQ
AVSL (EUROPE) Ltd, Unit 3D North Point House, North Point Business Park, New Mallow Road, Cork, Ireland
Brand : Citronic
Model : X-PAD
Category : DJ Mixer