
EX6200v2 - Network adapter NETGEAR - Free user manual and instructions
Find the device manual for free EX6200v2 NETGEAR in PDF.


| Product Type | AC1200 WiFi Range Extender |
| Model | EX6200v2 |
| Dimensions | 9.72 x 6.85 x 1.22 in (247 x 174 x 31 mm) |
| Weight | 0.67 lb (302 g) |
| Power Adapter | Input: 120V, 60Hz (North America); Output: 12V DC @ 1.5A, 18W max |
| WiFi Standard | IEEE 802.11ac, backward compatible with 802.11n/a/g/b |
| Data Rate (2.4 GHz) | Up to 400 Mbps |
| Data Rate (5 GHz) | Up to 867 Mbps |
| Ports | 5 Gigabit Ethernet LAN ports, 1 USB 3.0 port |
| Antennas | Two preinstalled 5 dBi antennas |
| Security | WPA2-PSK, WPA, WEP (WPS supported) |
| Operation Modes | Extender mode, Access Point mode |
| USB Storage | ReadySHARE: share USB drives across network (FAT16/32, NTFS, Ext2/3/4, HFS+) |
| USB Printer | ReadySHARE Printer: share USB printer via NETGEAR USB Control Center |
| Media Server | ReadyDLNA: stream media to DLNA/UPnP players, TiVo support |
| FastLane Technology | Dedicate one band for router-extender connection and the other for devices |
| WiFi Coverage Adjustment | Selectable output power (25% to 100%) |
| LED Indicators | 2.4GHz/5GHz Link Rate, Device to Extender, LAN, USB, NETGEAR logo |
| Access Schedule | Set time-based Internet access control |
| Package Contents | Extender, snap-on stand, power adapter, four rubber feet |
| Operating Temperature | 32 to 104°F (0 to 40°C) |
| Operating Humidity | 90% maximum relative humidity, noncondensing |
| Color | Black with red base |
Frequently Asked Questions - EX6200v2 NETGEAR
User questions about EX6200v2 NETGEAR
0 question about this device. Answer the ones you know or ask your own.
Ask a new question about this device
Download the instructions for your Network adapter in PDF format for free! Find your manual EX6200v2 - NETGEAR and take your electronic device back in hand. On this page are published all the documents necessary for the use of your device. EX6200v2 by NETGEAR.
USER MANUAL EX6200v2 NETGEAR
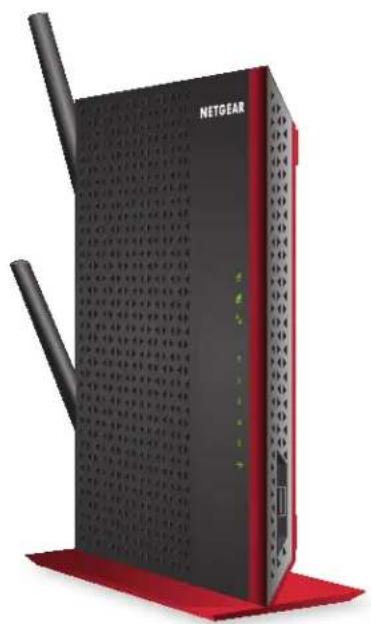
AC1200 WiFi Range Extender
Model EX6200v2
User Manual
natural_image
Exterior view of a black NETGEAR networking device with red base and antenna (no visible text or symbols on body)July 2018
202-11628-02
350 East Plumeria Drive
San Jose, CA 95134
USA

natural_image
Abstract geometric composition with overlapping colored triangles (no text or symbols)AC1200 WiFi Range Extender
Support
Thank you for purchasing this NETGEAR product. You can visit www.netgear.com/support to register your product, get help, access the latest downloads and user manuals, and join our community. We recommend that you use only official NETGEAR support resources.
Conformity
For the current EU Declaration of Conformity, visit http://kb.netgear.com/app/answers/detail/a_id/11621.
Compliance
For regulatory compliance information, visit http://www.netgear.com/about/regulatory.
See the regulatory compliance document before connecting the power supply.
Trademarks
© NETGEAR, Inc., NETGEAR and the NETGEAR Logo are trademarks of NETGEAR, Inc. Any non-NETGEAR trademarks are used for reference purposes only.
Table of Contents
Chapter 1 Get to Know Your Extender
Unpack Your Extender 7
Top and Front Panels....7
Rear Panel....9
Attach the Stand 10
Attach the Rubber Feet 10
Retrieve and Display the Product Label 11
When to Use Your Extender....12
How the Extender Works....12
Support for the 801.11ac Networking Standard....12
Chapter 2 Get Started
Use the Extender in Extender Mode....15
Set Up the Extender Hardware 15
Connect to an Existing WiFi Network 15
Connect Ethernet-Enabled Devices....20
Use the Extender in Access Point Mode....20
Access Extender Settings....22
Run Smart Setup 22
Chapter 3 Optimize Extender Performance
Boost Your Video Streaming With FastLane Technology 25
Adjust the WiFi Coverage....26
Chapter 4 Extender Network Settings
View Connected Devices 29
View WiFi Settings.... 29
Change the WiFi Network Name....30
Turn Off the SSID Broadcast to Create a Hidden Network .... 31
Disable or Enable the WiFi Radios 32
Change the WiFi Speed....33
Use WPS to Add a Computer to the Extender WiFi Network .... 34
Use WPS With the Push Button Method 34
Use WPS With the PIN Method. 35
Deny Access to a WiFi-Enabled Device 36
Set Up an Access Schedule....37
Change the Extender Device Name 38
Set Up the Extender to Use a Static IP Address 39
AC1200 WiFi Range Extender
Use the Extender With MAC Filtering or Access Control....40
Chapter 5 Maintain and Monitor the Extender
Change the Extender User Name and Password. 42
Turn Password Protection Off and On 42
Recover a Forgotten User Name or Password....43
Automatically Adjust for Daylight Saving Time....43
Manually Set the Extender Clock 44
Back Up and Manage the Extender Configuration 44
Back Up the Configuration Settings 45
Restore the Configuration Settings 46
Return the Extender to Its Factory Default Settings 47
Use the Reset Button 47
Log In and Reset the Extender to Factory Settings 48
Update the Firmware 49
Turn the LEDs On or Off....50
Restart the Extender Remotely....50
Chapter 6 Share a USB Storage Device
USB Storage Device Requirements 53
Share Files Across Your WiFi Network 53
Access a USB Storage Device Attached to the Extender....54
Turn the USB Port Off and On 55
Add a Network Folder on a USB Drive 56
Password-Protect a Folder on a USB Storage Device 57
Use the Extender USB Port to Share a Printer 58
Chapter 7 Use the Extender as a Media Server
Specify ReadyDLNA Media Server Settings 60
Play Media From a USB Drive on TiVo 61
Set Up the Extender to Work With TiVo 61
Play Videos on TiVo....62
Play Music or View Photos on TiVo 62
Chapter 8 Share a USB Printer
Install the Printer Driver and Cable the Printer....64
Download the ReadySHARE Printer Utility 64
Install the ReadySHARE Printer Utility 65
Print Using the NETGEAR USB Control Center 66
View or Change the Status of a Printer 66
Use the Scan Feature of a Multifunction USB Printer 67
Change NETGEAR USB Control Center Settings 67
Turn Off Automatic Startup for NETGEAR USB Control Center....68
Change the Language for the NETGEAR USB Control Center 68
Specify the USB Control Center Time-Out. 68
AC1200 WiFi Range Extender
Chapter 9 FAQs and Troubleshooting
FAQs....71
Cannot Connect to the Extender 72
Cannot Join a WiFi Network and Receive an Error Message 72
Appendix A Factory Settings and Technical Specifications
Factory Default Settings 75
Technical and Environmental Specifications 76
Get to Know Your Extender
1
Your extender boosts your existing network range and speed, delivering dual-band WiFi. The extender combines excellent range with maximum WiFi performance. You can also use the extender in access point mode as a WiFi access point and create a new WiFi hotspot by using a wired Ethernet connection.
This chapter covers the following topics:
- Unpack Your Extender
- Top and Front Panels
- Rear Panel
- Attach the Stand
- Attach the Rubber Feet
- When to Use Your Extender
- Retrieve and Display the Product Label
• Support for the 801.11ac Networking Standard
Note: For more information about the topics covered in this manual, visit the support website at support.netgear.com.
Note: Firmware updates with new features and bug fixes are made available from time to time on downloadcenter.netgear.com. Some products can regularly check the site and download new firmware, or you can check for and download new firmware manually.
Unpack Your Extender
Your box contains the following items.
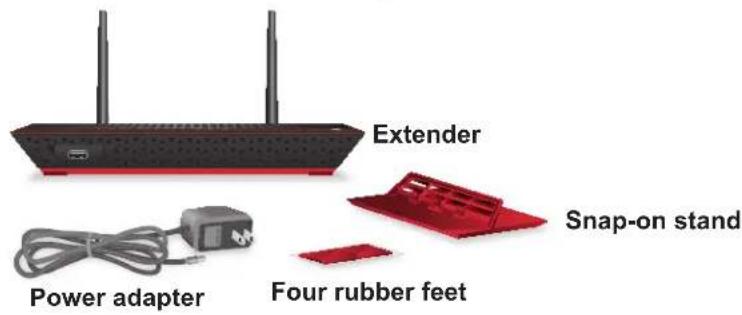
Figure 1. Package contents
Top and Front Panels
Use the LEDs during installation to find the best location for the extender or to monitor the extender performance. The following figure shows the extender in upright position, with the stand attached. (For information about attaching the stand, see Attach the Stand on page 10.)
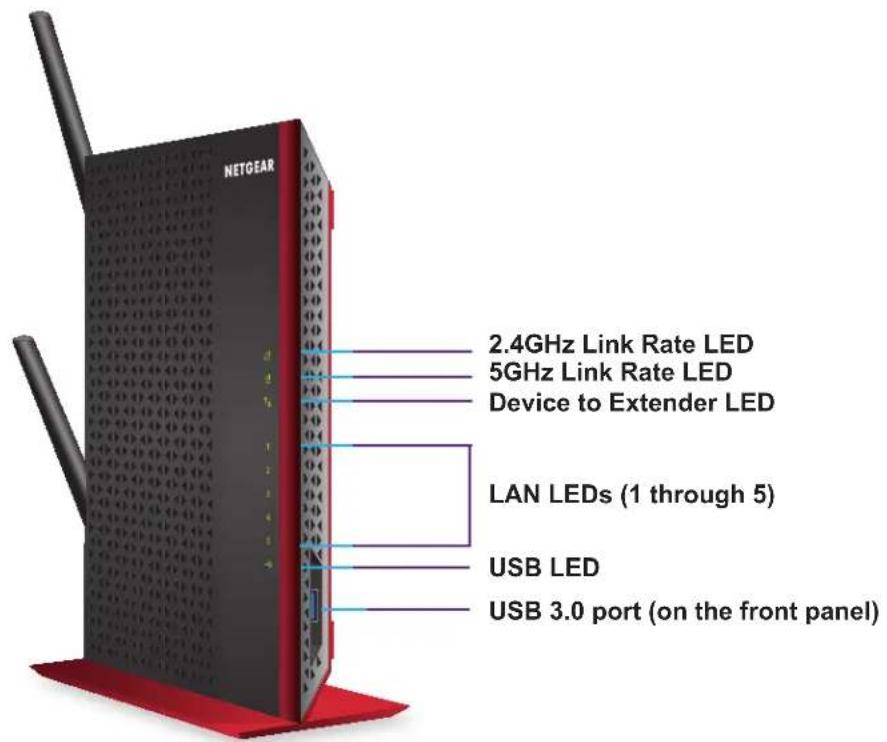
Figure 2. Top panel LEDs and front panel USB port
The following table describes the LEDs.
Table 1. Front panel LEDs
| LED Description | ||
| 2.4GHz Link Rate | [SH4Z] | Green. The 2.4 GHz WiFi connection between the extender and the WiFi router is optimum. |
 | Amber. The 2.4 GHz WiFi connection between the extender and the WiFi router is good. | |
 | Red. The 2.4 GHz WiFi connection between the extender and the WiFi router is poor. | |
| Off. | The extender and the WiFi router are not connected over the 2.4 GHz band. | |
| 5GHz Link Rate |  | Green. The 5 GHz WiFi connection between the extender and the WiFi router is optimum. |
 | Amber. The 5 GHz WiFi connection between the extender and the WiFi router is good. | |
| [2W0Y] | Red. The 5 GHz WiFi connection between the extender and the WiFi router is poor. | |
| Off. | The extender and the WiFi router are not connected over the 5 GHz band. | |
| LAN (1 through 5) |  | Green. An Ethernet device is connected to the LAN port. |
| Off. No | Ethernet device is connected to the LAN port. | |
| Device to Extender |  | Green. The extender is connected to a WiFi-enabled computer or mobile device. |
| Amber. | The extender firmware is updating. | |
| Off. | The extender is not connected to a WiFi-enabled computer or mobile device. | |
| USB |  | Solid green. A USB device is connected to the USB port. |
| Off. No | USB device is connected to the USB port. | |
Rear Panel
The following figure shows the ports, buttons, antennas, and connector on the rear panel of the extender.
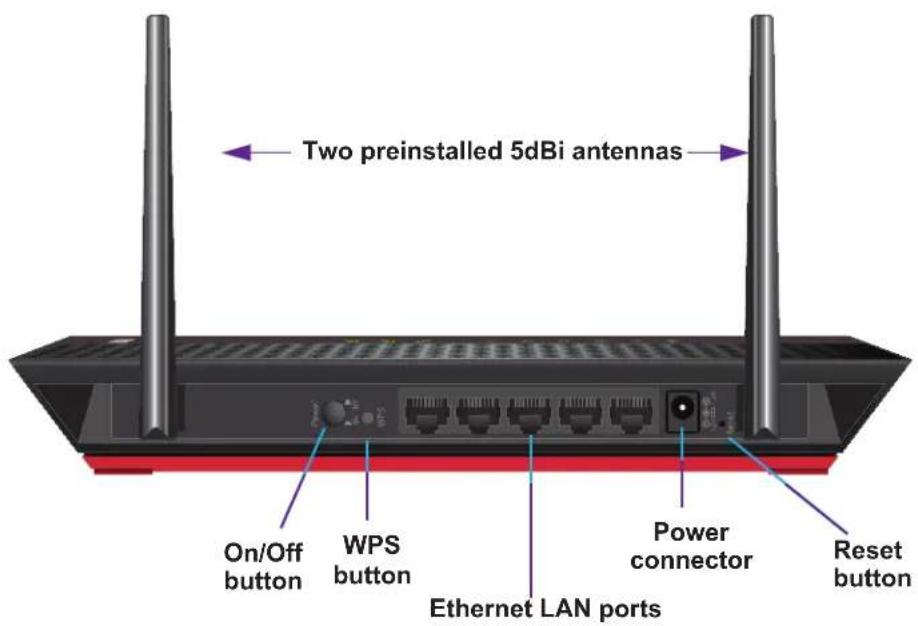
Figure 3. Rear panel
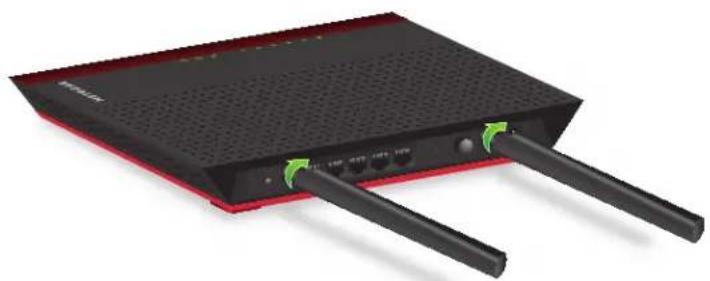
The antennas are preinstalled. In the unlikely situation that an antenna is loose, you must tighten it. (A loose antenna could affect the performance of the extender.)
To tighten an antenna:
- Straighten the antenna.
- Turn the antenna clockwise until tightened.
natural_image
Exterior view of a black wireless router with two black USB ports and red ventilation cover (no visible text or symbols)After you tighten the antenna, you can change its position.
Attach the Stand
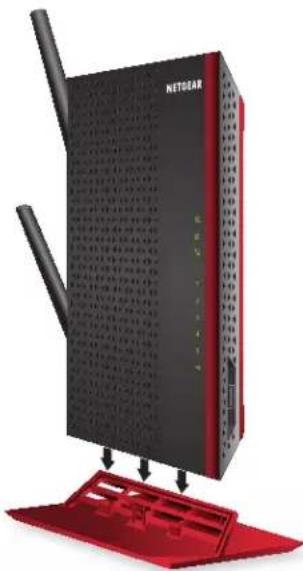
If you prefer to place the extender in an upright (vertical) position, attach the stand that comes with the extender. Although the extender functions well in either a horizontal or vertical position, a horizontal position might give a better performance.
To attach the stand:
- Place the stand on a flat surface.
- Hold the extender in an upright position with the left side of the extender pointing down. (Three rectangular openings are located on the left side.)
The top panel of the extender and the three vertical support posts of the stand must face the same direction. - Lower the extender onto the stand until the support posts of the stand snap into the rectangular openings of the extender.
natural_image
Black and red wireless router device with antenna and ventilation slots, no visible text or symbols on the device itself.Attach the Rubber Feet
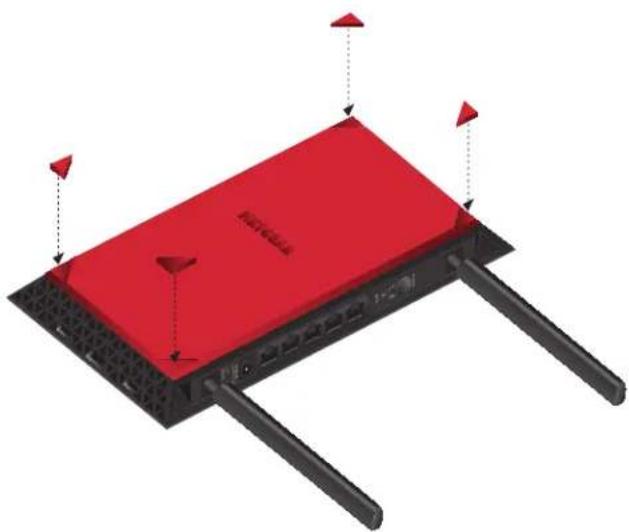
If you prefer to place the extender in a horizontal position, you can attach the rubber feet that come with the extender.
To attach the rubber feet:
- Place the extender upside down, with the red panel facing you. (The red panel is the bottom.)
- In each corner, attach a rubber foot in such a way that it covers the triangle.
natural_image
3D diagram of a red rectangular electronic device with four black legs and two red triangular elements, no text or symbols present.Retrieve and Display the Product Label
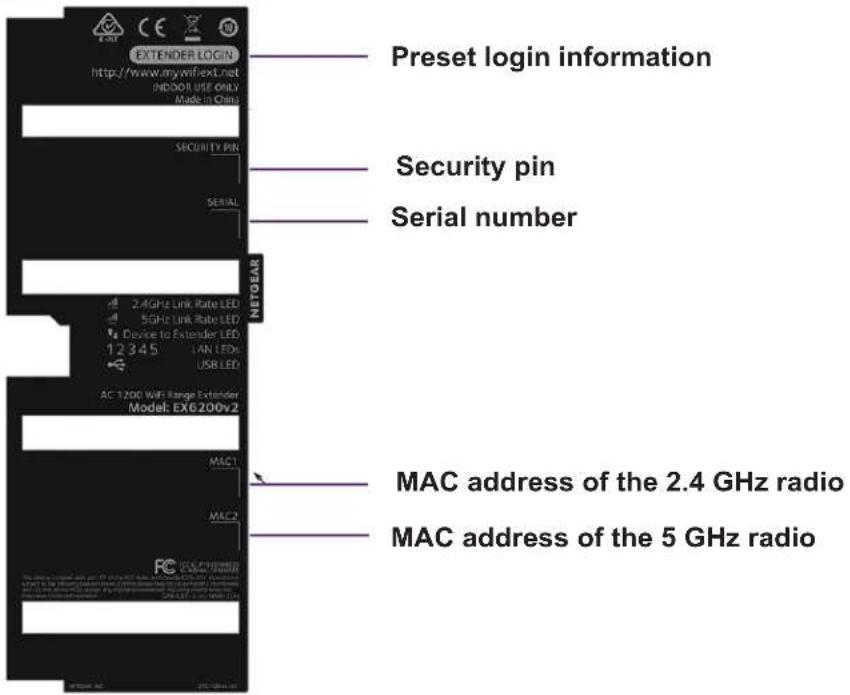
The product label that you can retrieve from the bottom panel of the extender contains the preset login information, serial number, security pin, MAC addresses of the radios, and other information.
To retrieve the product label from the extender:
- Place the extender upside down, with the red panel facing you.
The red panel is the bottom.
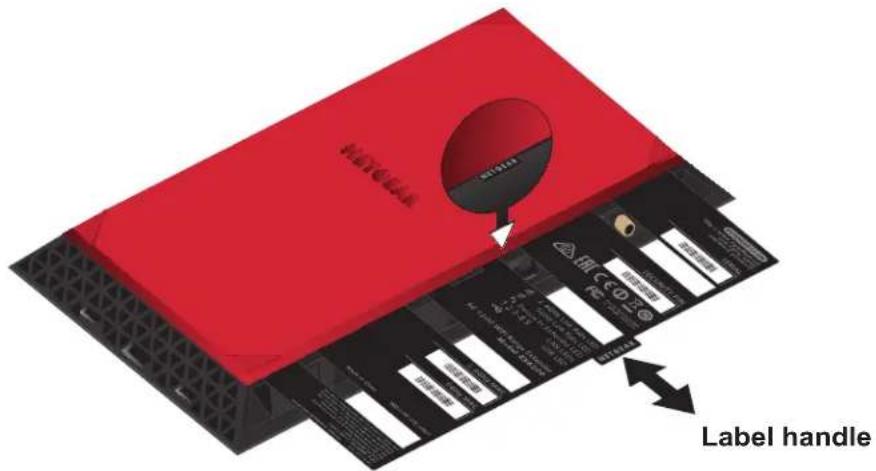
- Locate the label handle with NETGEAR printed on it, and pull out the product label.
When to Use Your Extender
We recommend that you connect to the extender only when your WiFi network connection is poor. Data traffic routed through the extender is inherently slower than traffic routed directly from the network.
How the Extender Works
The extender works like a bridge between a WiFi router (or a WiFi access point) and a WiFi-enabled computer or mobile device outside the range of the WiFi router. The extender performs two main jobs:
- The extender connects to a WiFi network that is up and running.
When the extender connects over WiFi to an existing network, it functions as a network client, similar to how a WiFi-enabled computer or mobile device connects to a network.
- The extender acts as an access point for WiFi-enabled computers and mobile devices.
The extender broadcasts its own WiFi network that WiFi-enabled computers or mobile devices can join. In its role as an access point, the extender performs tasks that WiFi routers do, such as broadcasting its network name (SSID).
The extender must do each of these jobs so that both ends of the bridge are in place.
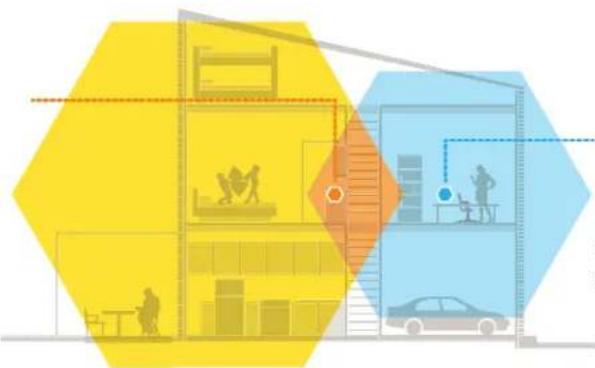
WiFi range extender Boosts the range of your existing WiFi and creates a stronger signal in hard-to-reach areas.
natural_image
Illustration of a modern building with silhouettes and two adjacent hexagonal shapes, no text or symbols present.Existing WiFi Sometimes your router does not provide the WiFi coverage that you need.
Figure 4. Range extender in a home
Support for the 801.11ac Networking Standard
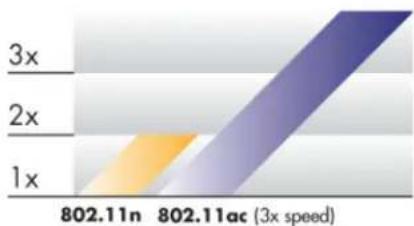
The extender supports the 802.11ac networking standard. This new standard offers better speed, improved reliability, and more range than older WiFi networking standards. The extender is backward compatible with earlier WiFi standards. However, to get the benefits of 802.11ac, your WiFi router must support the 802.11ac WiFi networking standard.
To learn more about the 802.11ac WiFi networking standard, visit netgear.com/landing/80211ac/.
3x Speed
bar
| Category | Value | |---|---| | 3x | | | 2x | | | 1x | | | 802.11n | 802.11ac (3x speed) | | 802.11ac (3x speed) | 3x |Figure 5. Speed comparison between the 802.11n and 802.11ac standards
Get Started
2
This chapter covers the following topics:
- Use the Extender in Extender Mode
- Use the Extender in Access Point Mode
- Access Extender Settings
- Run Smart Setup
Use the Extender in Extender Mode
The extender repeats signals from an existing WiFi router or access point. Place the extender, apply power, and connect the extender to your WiFi network.
Note: You can also use the extender as a WiFi access point and create a new WiFi hotspot by using a wired Ethernet connection. See Use the Extender in Access Point Mode on page 20.
Set Up the Extender Hardware
To set up the extender hardware:
- Attach the stand or the rubber feet.
For more information, see Attach the Stand on page 10 or Attach the Rubber Feet on page 10.
- Place your extender in the same room as your WiFi router.
Proximity to the WiFi router is required only during the initial setup process.
- Connect the power adapter to the extender and plug it into an electrical outlet.
The NETGEAR logo LED lights. The Link Rate LEDs and the Device to Extender LED light amber and then turn off.
If no LEDs light, press the Power On/Off button on the extender.
Connect to an Existing WiFi Network
To extend the range of your WiFi network, you must connect the extender to your existing WiFi network. You can do this in one of two ways:
- Connect with WPS. For more information, see Connect With WPS on page 15.
- Connect with web browser setup. For more information, see Connect With the NETGEAR Installation Assistant on page 17.
Connect With WPS
Wi-Fi Protected Setup (WPS) lets you join a secure WiFi network without selecting the network name and entering the password.
Note: WPS does not support WEP network security. If you are using WEP security, follow the instructions in Connect With the NETGEAR Installation Assistant on page 17.
To use WPS to connect the extender to your WiFi router:
- Make sure that the extender is powered on.
- Press the WPS button on the extender.
Both Link Rate LEDs 2.4GHz and the Device to Extender LED blink green for two minutes.
- Within two minutes, press the WPS button on your router or access point.
The WPS LED on the extender lights, the Link Rate LED lights, and the extender connects to your existing WiFi network.
If the Link Rate LED does not light, try again. If it still does not light, see Connect With the NETGEAR Installation Assistant on page 17.
- If your WiFi router supports the 5 GHz band, repeat Steps 2 and 3 to connect the extender to the 5 GHz band.
- Unplug the extender and move it to a new location that is about halfway between your router and the area with a poor router WiFi signal.

The location that you choose must be within the range of your existing WiFi router network.
- Plug the extender power adapter into an electrical outlet and wait for the extender LEDs to light.
- Use the Link Rate LEDs to help you choose a spot where the extender-to-router connection is optimal.
- If a Link Rate LED does not light amber or green, plug the extender power adapter into an outlet closer to the router and try again.
Keep moving the extender to outlets closer to the router until a Link Rate LED lights amber or green.
- On your WiFi-enabled computer or mobile device, open the WiFi connection manager and locate and connect to the new extender WiFi network.
The extender creates two new extender WiFi networks. The new WiFi network names are based on your existing WiFi network name, with _2GEXT and _5GEXT at the ends of the names.
For example:
- Existing W iFi network name. MyNetworkName
- New extender network names. MyNetworkName_2GEXT and MyNetworkName_5GEXT
Use the same WiFi password that you use for your WiFi router.
- Test the extender WiFi range by moving your WiFi-enabled computer or mobile device to the area with a poor router WiFi signal:
a. Leave your WiFi-enabled computer or mobile device in the area with a poor router WiFi signal.
b. Check the Device to Extender LED ↑↓ on the extender:
- If the Device to Extender LED is solid green or amber, your extender WiFi network reaches the area with a poor router WiFi signal and your network setup is complete.
- If the Device to Extender LED is red, your extender WiFi network does not reach the area with a poor router WiFi signal.
You must move the WiFi-enabled computer or mobile device closer to the extender until the Device to Extender LED turns solid green or amber.
Connect With the NETGEAR Installation Assistant
To connect with the NETGEAR installation assistant:
- Connect your device to the extender using a wired Ethernet or WiFi connection.
- T o connect with a wired Ethernet connection, use an Ethernet cable to connect the Ethernet port on the extender to an Ethernet port on your computer.
- T o connect with WiFi, on your WiFi-enabled computer or mobile device, open the WiFi connection manager and locate and connect to the extender network called NETGEAR_EXT.
After the connection with the WiFi-enabled computer or mobile device is established, the Device to Extender LED ↑↓ lights.
-
Launch a web browser.
-
Enter www .mywifiext.net in the address field of the browser.
The New Extender Setup page displays.
- Click the NEW EXTENDER SETUP button.
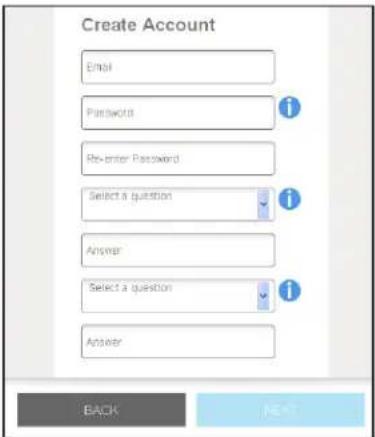
- Complete the fields on the Create Account page and click the NEXT button.
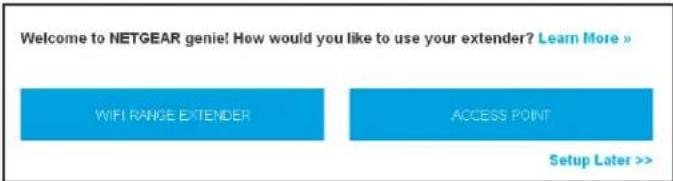
- Click the WIFI RANGE EXTENDER button.
The extender scans for WiFi networks in your area and displays a list.
- Select a WiFi network to extend and click the NEXT button.
If you do not want to extend both WiFi bands, clear the 2.4 GHz WiFi Networks or the 5 GHz WiFi Networks check box.
-
In the Password (network key) field, type the existing WiFi network password (also called passphrase or security key) and click the NEXT button.
-
Set the network name (SSID) and password for your extender and click the NEXT button.
Note: We recommend that you use an SSID for your extender that is different from the SSID that your router uses.
Wait for the page to display a list of new extender WiFi networks, which might take up to one minute.
-
Use the WiFi network manager on the WiFi-enabled computer or mobile device to connect to the new extender WiFi network.
-
Make sure that your WiFi-enabled computer or mobile device is connected before you click the CONTINUE button.
-
Click the CONTINUE button.
A message displays confirming that the extender is connected to the new extender WiFi network.
- Click the NEXT button.
The registration page displays.
- Complete the registration fields and click the FINISH button to complete the setup.
If you do not want to register your extender, click the Skip Registration link. Note that you must register your extender before you can use NETGEAR telephone support.
The Status page displays.
- Unplug the extender and move it to a new location that is about halfway between your router and the area with a poor router WiFi signal.

The location that you choose must be within the range of your existing WiFi router network.
-
Plug the extender power adapter into an electrical outlet and wait for the extender LEDs to light.
-
Use the Link Rate LEDs to help you choose a spot where the extender-to-router connection is optimal.
-
If the Link Rate LEDs do not light amber or green, plug the extender power adapter into an outlet closer to the router and try again.
Keep moving the extender to outlets closer to the router until a Link Rate LED lights amber or green.
-
Reconnect your WiFi-enabled computer or mobile device to the new extender WiFi network.
-
Test the extender WiFi range by moving your WiFi-enabled computer or mobile device to the area with a poor router WiFi signal:
a. Leave your WiFi-enabled computer or mobile device in the area with a poor router WiFi signal and return to the extender.
b. Check the Device to Extender LED ↑↓ on the extender:
- If the Device to Extender LED is solid green or amber, your extender WiFi network reaches the area with a poor router WiFi signal and your network setup is complete.
- If the Device to Extender LED is red, your extender WiFi network does not reach the area with a poor router WiFi signal.
You must move the WiFi-enabled computer or mobile device closer to the extender until the Device to Extender LED turns solid green or amber.
Connect Ethernet-Enabled Devices
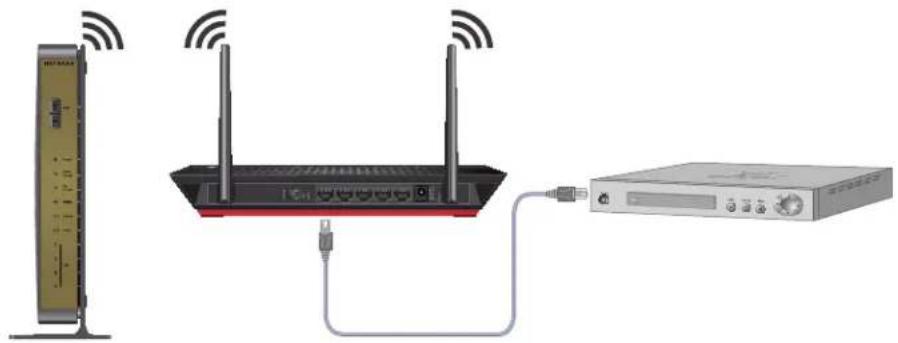
After the extender is connected to your existing WiFi network, you can connect wired devices to the extender using Ethernet cables. Those devices can then access your existing network through the extender WiFi connection.
natural_image
Diagram showing wireless network connection between a server and a router, with no visible text or symbols.Figure 6. Connect an Ethernet-enabled device to an Ethernet LAN port
Use the Extender in Access Point Mode
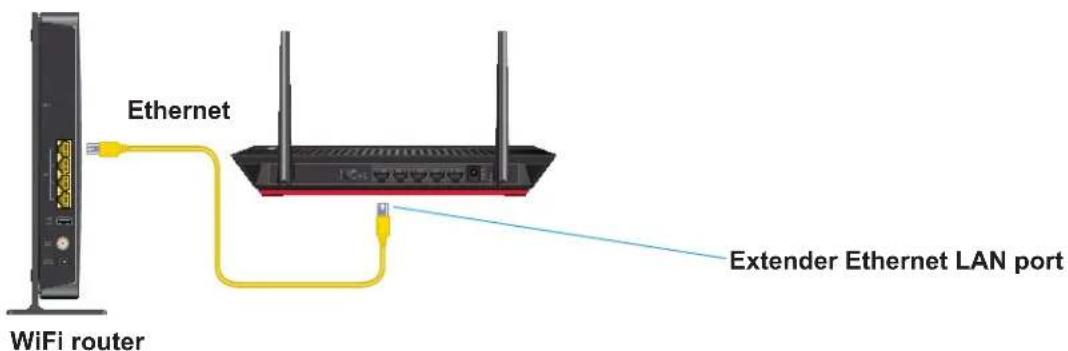
You can use the extender as a WiFi access point, which creates a new WiFi hotspot by using a wired Ethernet connection.
To install the extender as an access point:
- Attach the stand or the rubber feet.
For more information, see Attach the Stand on page 10 or Attach the Rubber Feet on page 10.
- Use an Ethernet cable to connect your router to the Ethernet port on the extender.
- Turn on your extender.
Plug the extender into an electrical outlet. Press the Power button if necessary.
The NETGEAR logo LED lights. The Link Rate LEDs and the Device to Extender LED light amber and then turn off.
- On your WiFi-enabled computer or mobile device, use the WiFi network manager to locate and connect to one of the following WiFi extender networks:
• 2.4 GHz network. NETGEAR EXT
- 5 GHz network. NETGEAR_5GEXT
When you join the network, the Device to Extender LED lights to show that you are connected.
Note: In access point mode, you can connect your computer or WiFi device to the extender only using a WiFi connection.
- Launch a web browser and enter www.mywifiext.net in the address field.
The New Extender Setup page displays.
- Click the NEW EXTENDER SETUP button.
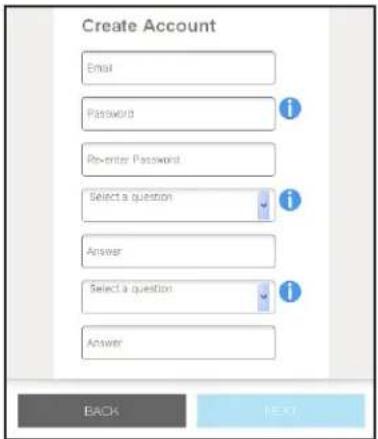
- Complete the fields on the Create Account page and click the NEXT button.
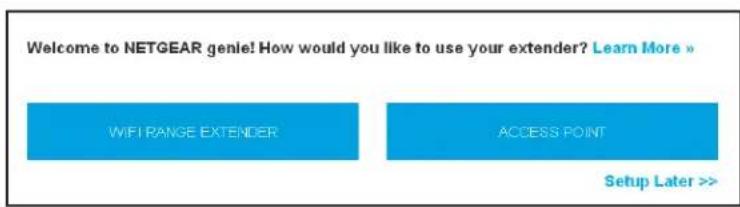
- Click the ACCESS POINT button.
The extender checks for an Internet connection through the router that you connected to the extender.
- When prompted, set the network name (SSID), security option, and password for each WiFi band, and click the NEXT button.
Your settings are applied and the extender is ready to be used as an access point.
- Connect your WiFi-enabled computer or mobile device to the new access point WiFi network using the SSID and password that you created in Step 9.
- Click the CONTINUE button.
A page displays that says you successfully created an access point. - Click the NEXT button.
The registration page displays. - Follow the onscreen instructions to register your extender.
Access Extender Settings
After installation, you can log in to the extender to view or change the extender settings.
To log in to the extender:
-
On your WiFi-enabled computer or mobile device, use the WiFi network manager to locate and connect to the new extender WiFi network.
After the connection with the WiFi-enabled computer or mobile device is established, the Device to Extender LED ↑ lights solid green. -
Launch a web browser.
-
Enter www .mywifiext.net in the address field of the browser.
A login window opens.
- Enter your email and password.
The Status page displays.
Run Smart Setup
You can use Smart Setup to change the extender settings. This is an easy way to connect the extender to a different router or to change the extender WiFi network name (SSID) or WiFi password.
To run Smart Setup:
- Use a WiFi network manager on a WiFi-enabled computer or mobile device to find and connect to the new extender WiFi network.
After the connection with the computer or mobile device is established, the Device to Extender LED lights solid green.
-
Launch a web browser.
-
Enter www .mywifiext.net in the address field of the browser.
A login window opens.
- Enter your user name and password.
The Status page displays.
- Click the SMART SETUP button.
The Welcome page displays.
- Click the WIFI RANGE EXTENDER button.
The extender scans for WiFi signals and finds the WiFi networks in your area and displays a list.
-
If you do not want to extend both WiFi bands, clear the 2.4 GHz WiFi Networks or the 5 GHz WiFi Networks check box.
-
Select your WiFi network and click the NEXT button.
-
When prompted, enter the password to connect to your WiFi network and click the NEXT button.
The extender connects to your existing router's WiFi network.
- When prompted, complete the fields to name your extender networks and click the NEXT button.
The extender applies your settings to its WiFi network names and WiFi passwords. During this change, the extender disconnects you from its WiFi network.
A message displays telling you to connect to the extender network.
- Use a WiFi network manager on the WiFi-enabled computer or mobile device to connect to the new extender WiFi network and click the CONTINUE button.
![Your extender has successfully connected to your existing WiFi network. Connect any WiFi enabled device like you would connect them to your main network, using the credentials below. Green indicates best connection 2.4GHz Green indicates best connection 2.4GHz Extended Network Network Name (SSID: NETGEAR15_2GEXT) Security: WPA2-PSK [AES] Password (network key): sillyskates915 5GHz Extended Network Network Name (SSID: NETGEAR15-5G_5GEXT) BACK NEXT](/content/2026/05/763601/images/6c1d2d3ee30183db3fadb4a25a7c859c0fcfbe5e2bde8308d0f9495aed57b14d.jpg)
- Click the NEXT button.
The Status page displays.
Optimize Extender Performance
3
This chapter covers the following topics:
- Boost Your Video Streaming With FastLane Technology
- Adjust the WiFi Coverage
Boost Your Video Streaming With FastLane Technology
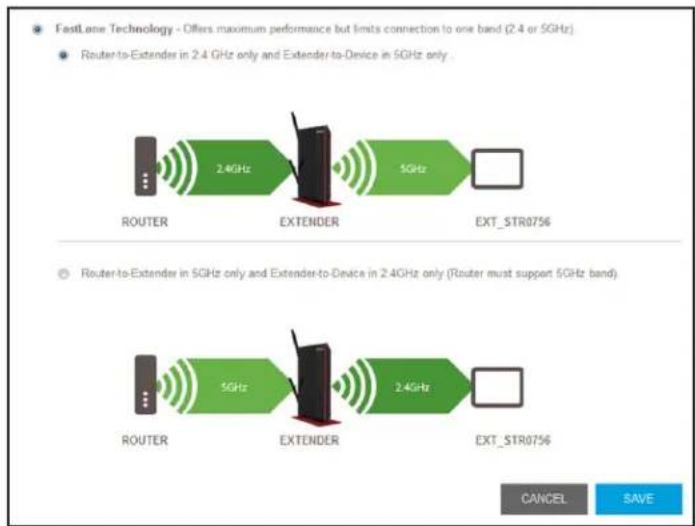
Get the most out of your HD entertainment with FastLane technology. With FastLane technology, the extender connects to your router using one band and connects to your devices using another band. Because a band is dedicated to each function, performance is enhanced.
If all your devices and your WiFi router support only the 2.4 GHz band, or all your devices and your WiFi router support only the 5 GHz band, do not enable FastLane Technology.
When you enable FastLane Technology, two options are available:
- Use the 2.4 GHz band to connect the extender to the WiFi-enabled devices and use the 5 GHz band to connect the extender to the WiFi router. Use this mode if your WiFi router supports the 5GHz band but the devices that you want to use for gaming and streaming support the 2.4 GHz band.
- Use the 5 GHz band to connect the extender to the WiFi-enabled devices and use the 2.4 GHz band to connect the extender to the WiFi router. Use this mode if the devices that you want to use for gaming and streaming support the 5 GHz band but your WiFi router supports same 2.4
To activate FastLane mode:
- On your WiFi-enabled computer or mobile device, open the WiFi connection manager and locate and connect to the extender WiFi network.
- Launch a web browser.
- Enter www.mywifiext.net in the address field of the browser.
A login window opens. - Enter your user name and password.
The Status page displays. -
Select Do More > FastLane.
The Fastlane Technology page displays -
Select the FastLane Technology radio button.
-
Select a radio button:
-
Router-to-Extender in 2.4 GHz only and Extender-to-Device in 5 GHz only
-
Router to Extender in 5 GHz only and Extender-to-Device in 2.4 GHz only
-
Click the SA VE button.
Your settings are saved.
Adjust the WiFi Coverage
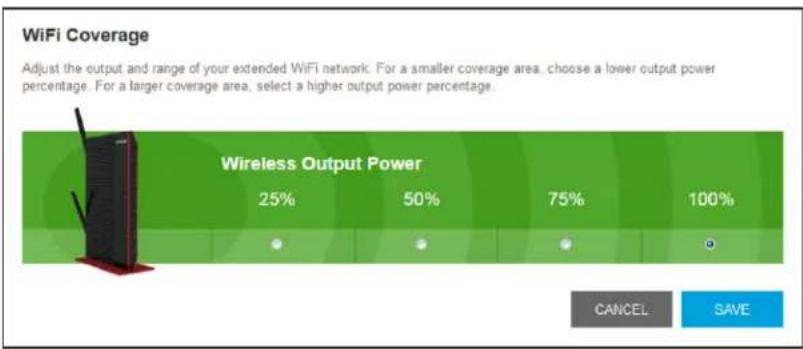
You can set the extender WiFi coverage depending on how large you want your coverage area to be.
To adjust the WiFi coverage:
- On your WiFi-enabled computer or mobile device, open the WiFi connection manager and locate and connect to the extender WiFi network.
- Launch a web browser.
- Enter www .mywifiext.net in the address field of the browser.
A login window opens. - Enter your user name and password.
The Status page displays.
5. Select Do More > WiFi Coverage.
bar
| Coverage Area | Wireless Output Power | | ------------- | --------------------- | | 25% | 25% | | 50% | 50% | | 75% | 75% | | 100% | 100% |6. Select a Wireless Output Power radio button.
If your extender is covering a small area, select a lower-output power percentage. If your extender is covering a large area, select a higher-output power percentage.
7. Click the SAVE button.
Your settings are saved.
Extender Network Settings
4
This chapter covers the following topics:
• View Connected Devices
• View WiFi Settings
- Change the WiFi Network Name
- Turn Off the SSID Broadcast to Create a Hidden Network
- Disable or Enable the WiFi Radios
- Change the WiFi Speed
- Use WPS to Add a Computer to the Extender WiFi Network
- Deny Access to a WiFi-Enabled Device
- Set Up an Access Schedule
- Change the Extender Device Name
- Set Up the Extender to Use a Static IP Address
- Use the Extender With MAC Filtering or Access Control
View Connected Devices
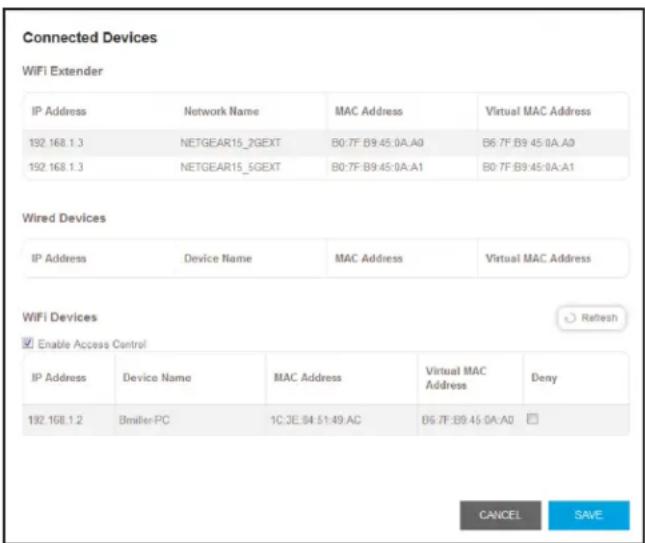
You can view a list of devices that are connected to the extender network.
To view connected devices:
- On your WiFi-enabled computer or mobile device, open the WiFi connection manager and locate and connect to the extender WiFi network.
- Launch a web browser.
- Enter www .mywifiext.net in the address field of the browser.
A login window opens. -
Enter your user name and password.
The Status page displays. -
Select Settings > Connected Devices.
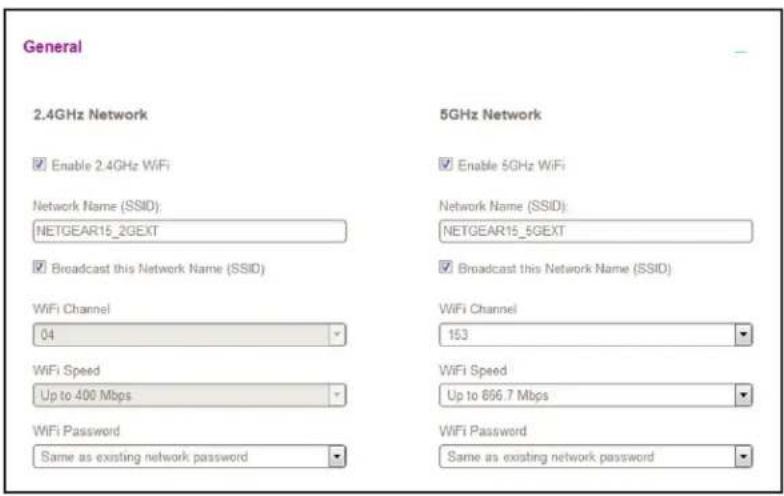
View WiFi Settings
To view the WiFi settings:
- On your WiFi-enabled computer or mobile device, open the WiFi connection manager and locate and connect to the extender WiFi network.
- Launch a web browser.
- Enter www .mywifiext.net in the address field of the browser.
A login window opens. - Enter your user name and password.
The Status page displays.
5. Select Settings > Wireless.
Change the WiFi Network Name
To change the WiFi network name:
- On your WiFi-enabled computer or mobile device, open the WiFi connection manager and locate and connect to the extender WiFi network.
- Launch a web browser.
- Enter www .mywifiext.net in the address field of the browser.
A login window opens. - Enter your user name and password.
The Status page displays.
5. Select Settings > W wireless.
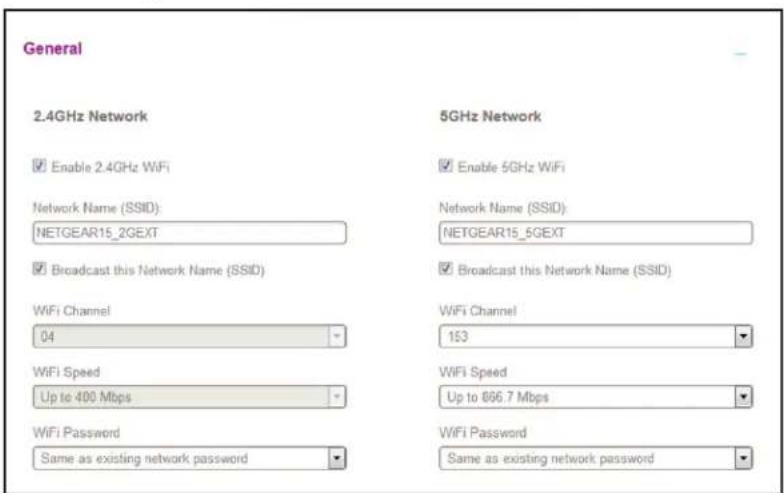
- In each Network Name (SSID) field, type a network name.
- Click the SA VE button.
Your settings are saved.
Turn Off the SSID Broadcast to Create a Hidden Network
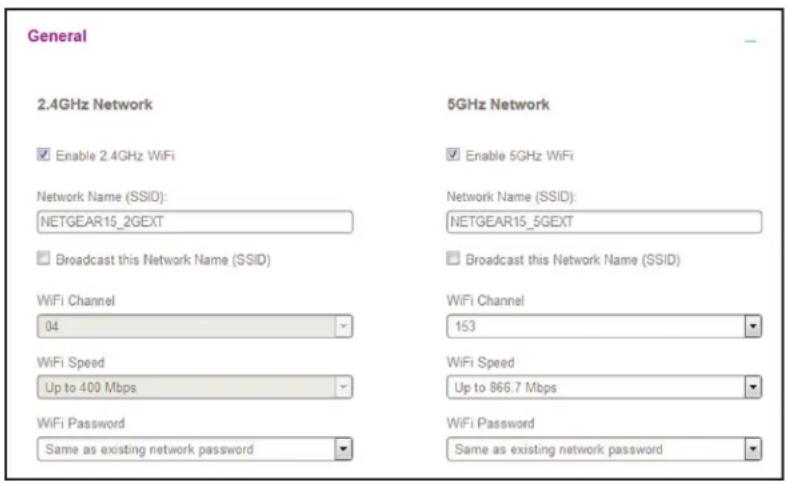
By default, the extender broadcasts its WiFi signal so that its wireless network names (SSIDs) are easy for you to find and connect to from your computer, tablet, or smartphone. You can turn off the SSID broadcast to create a hidden WiFi network. To connect to a hidden network you must know its SSID and password and manually enter them.
To turn off the SSID broadcast to create a hidden network:
- On your WiFi-enabled computer or mobile device, open the WiFi connection manager and locate and connect to the extender WiFi network.
- Launch a web browser.
- Enter www .mywifiext.net in the address field of the browser.
A login window opens.
- Enter your user name and password.
The Status page displays.
- Select Settings > W wireless.
The Wireless page displays.
- Clear the Broadcast the Network name (SSID) check box.
- Click the SAVE button.
Your settings are saved.
Disable or Enable the WiFi Radios
By default, the extender WiFi radios broadcast signals in the 2.4 GHz and 5 GHz bands. If you disable the WiFi radios, then no one can connect with WiFi to the extender.
To disable or enable the WiFi radios:
- On your WiFi-enabled computer or mobile device, open the WiFi connection manager and locate and connect to the extender WiFi network.
- Launch a web browser.
- Enter www .mywifiext.net in the address field of the browser.
A login window opens.
- Enter your user name and password.
The Status page displays.
- Select Settings > W wireless.
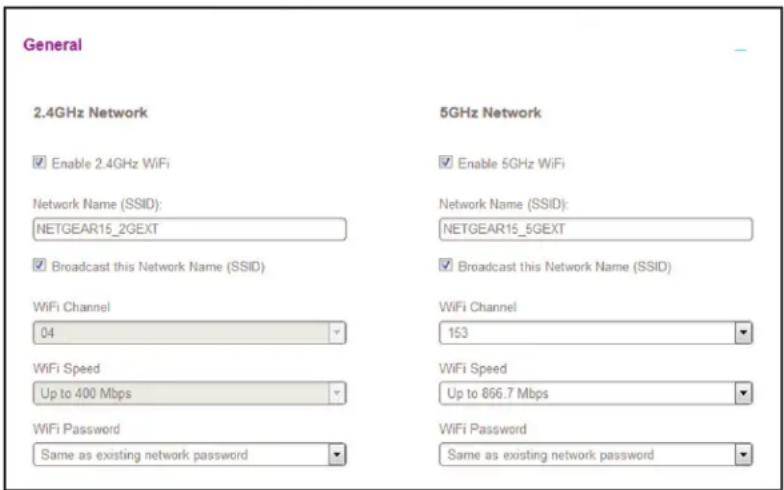
- Select or clear the Enable 2.4 GHz WiFi check box.
- Select or clear the Enable 5 GHz W iFi check box.
- Click the SAVE button.
Your settings are saved.
Change the WiFi Speed
When you use the extender in FastLane mode or in access point mode, you can change the WiFi speed setting.
Note: When the extender connects to a router in extender mode, the extender channel and speed follow the router settings. The WiFi speed settings are grayed out on the Wireless page and cannot be selected.
To change the WiFi speed:
- On your WiFi-enabled computer or mobile device, open the WiFi connection manager and locate and connect to the extender WiFi network.
- Launch a web browser.
- Enter www .mywifiext.net in the address field of the browser.
A login window opens.
- Enter your user name and password.
The Status page displays.
- Select Settings > W wireless.
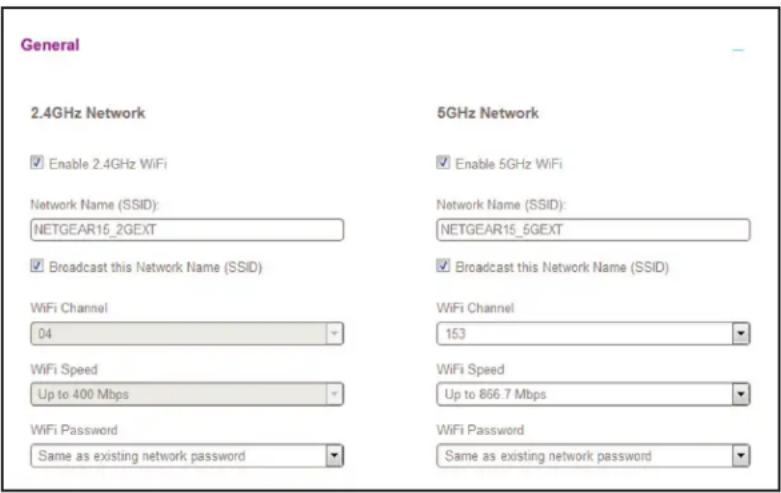
- In each WiFi Speed menu, select a speed.
- Click the SA VE button.
Your settings are saved.
Use WPS to Add a Computer to the Extender WiFi Network
WPS (WiFi Protected Setup) lets you connect a WiFi-enabled computer or mobile device to the extender's network without entering the WiFi network passphrase or key. Instead, you use a WPS button or enter a PIN to connect.
If you use the push button method, the WiFi-enabled computer or mobile device that you are trying to connect must provide a physical push button or a software button. If you use the PIN method, you must know the PIN of the WiFi-enabled computer or mobile device that you are trying to connect.
WPS supports WPA and WPA2 WiFi security. If your extender network is open (no WiFi security is set), connecting with WPS automatically sets WPA + WPA2 WiFi security on the extender network and generates a random passphrase. You can view this passphrase on the Wireless page (for more information, see View WiFi Settings on page 29).
For information about using WPS to connect the extender to a WiFi network during setup, see Use the Extender in Access Point Mode on page 20.
Use WPS With the Push Button Method
For you to use the push button method to connect a WiFi-enabled computer or mobile device to the extender's WiFi network, the WiFi-enabled computer or mobile device that you are trying to connect must provide a physical button or a software button.
To use WPS to connect to the extender's WiFi network:
- On your WiFi-enabled computer or mobile device, open the WiFi connection manager and locate and connect to the extender WiFi network.
- Launch a web browser.
- Enter www .mywifiext.net in the address field of the browser.
A login window opens.
- Enter your user name and password.
The Status page displays.
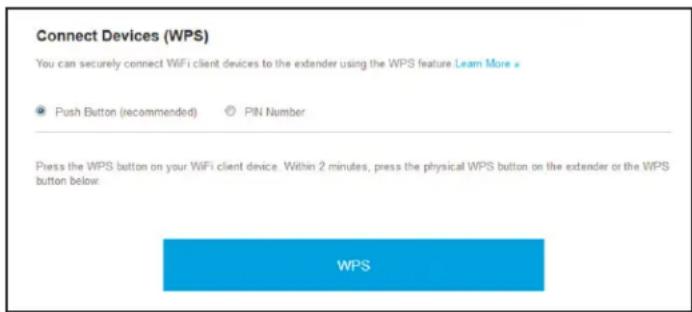
- Select Settings > Do More > Connect Devices (WPS).
-
Leave the Push Button (recommended) radio button selected.
-
Click the WIFI PROTECTED SETUP (WPS) button.
Both Link Rate LEDs 2.4GHz and the Device to Extender LED blink green for two minutes.
For two minutes, the extender attempts to add the WiFi-enabled computer or mobile device to its WiFi network.
- Within two minutes, go to the WiFi-enabled computer or mobile device and press or click its WPS button.
- To verify that the WiFi-enabled computer or mobile device is connected to the extender's WiFi network, select Settings > Connected Devices.
The computer or device displays onscreen.
Use WPS With the PIN Method
To use the PIN method to connect to the extender's WiFi network, you must know the PIN of the WiFi-enabled computer or mobile device that you are trying to connect.
To use a WPS PIN to connect to the extender WiFi network:
- On your WiFi-enabled computer or mobile device, open the WiFi connection manager and locate and connect to the extender WiFi network.
- Launch a web browser.
-
Enter www .mywifiext.net in the address field of the browser.
A login window opens. -
Enter your user name and password.
The Status page displays.
- Select Settings > Do More > Connect Devices (WPS).
The Connect Devices (WPS) page displays.
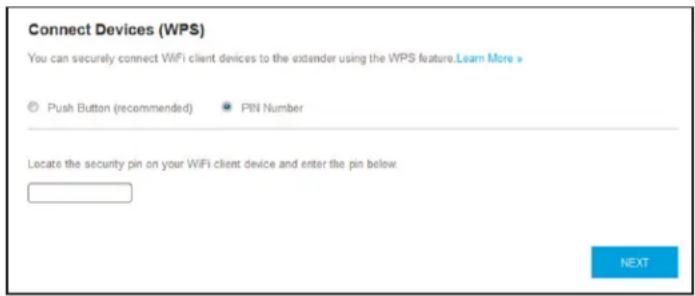
- Select the PIN Number radio button.
-
Type the PIN of the WiFi-enabled computer or mobile device in the field.
-
Click the NEXT button.
For four minutes, the extender attempts to find the computer or device.
- Within four minutes, go to the WiFi-enabled computer or mobile device and use its WPS software to join the WiFi network.
- To verify that the WiFi-enabled computer or mobile device is connected to the extender's WiFi network, select Settings > Connected Devices.
The computer or device displays onscreen.
Deny Access to a WiFi-Enabled Device
By default, access control is disabled so that it is easy for you to connect to the extender WiFi networks.
You can deny network access to specific WiFi-enabled devices based on their MAC addresses. Each network device is assigned a MAC address, which is a unique 12-character physical address, containing the hexadecimal characters 0–9, a–f, or A–F only, and separated by colons (for example, 00:09:AB:CD:EF:01). Typically, the MAC address is on the label of the WiFi-enabled device. If you cannot access the label, you can display the MAC address using the network configuration utilities of the computer. You might also find the MAC addresses on the Connected Devices page (see View Connected Devices on page 29).
To use WiFi access control to deny access:
- On your WiFi-enabled computer or mobile device, open the WiFi connection manager and locate and connect to the extender WiFi network.
- Launch a web browser.
- Enter www .mywifiext.net in the address field of the browser.
A login window opens. -
Enter your user name and password.
The Status page displays. -
Select Settings > Connected Devices.
The Connected Devices page displays.
- In the WiFi Devices section, select the Enable Access Control check box.
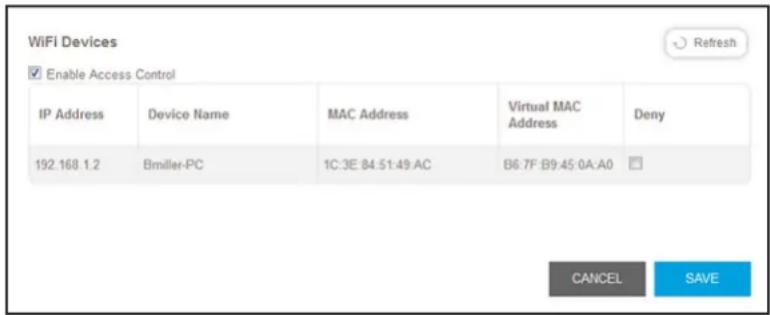
The WiFi devices table displays the name and MAC address of WiFi devices that are connected to the extender.
-
Select the Deny check box for the device.
-
Click the SAVE button.
Your settings are saved and that device cannot connect to the extender WiFi network.
Set Up an Access Schedule
You can control Internet access by all users during specific periods of the day. You can set up an access schedule that prevents Internet access through the extender network based on the times that you set.
To set up an access schedule:
- On your WiFi-enabled computer or mobile device, open the WiFi connection manager and locate and connect to the extender WiFi network.
- Launch a web browser.
- Enter www .mywifiext.net in the address field of the browser.
A login window opens.
- Enter your user name and password.
The Status page displays.
- Select Do More > Access Schedule.
The Access Schedule page displays.
- Select the Access Schedule On radio button.
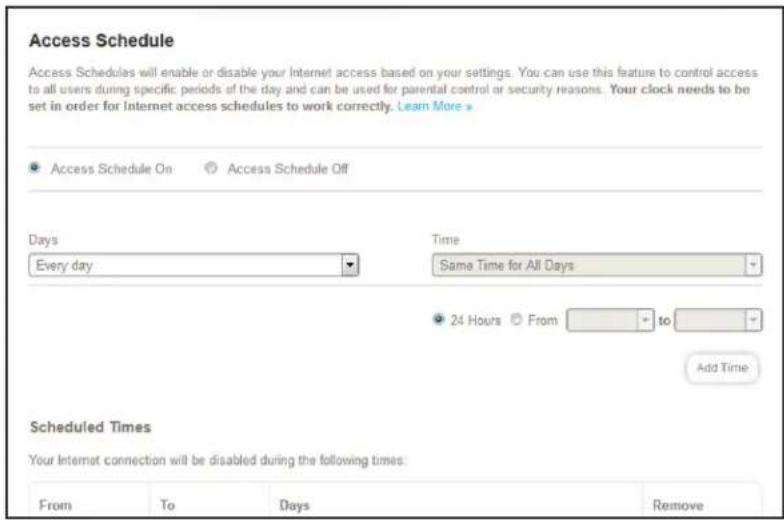
You can select this radio button only if access control is enabled and if the extender clock is set to an accurate time. For information about how to enable access control, see Deny Access to a WiFi-Enabled Device on page 36. For information about how to set the extender clock, see Manually Set the Extender Clock on page 44.
- In the Days menu and the Time menu, select the days and time when you want to disable Internet access.
- Click the Add Time button to add the time that you specified to the Scheduled Times table.
- Click the SA VE button.
Your settings are saved.
Change the Extender Device Name
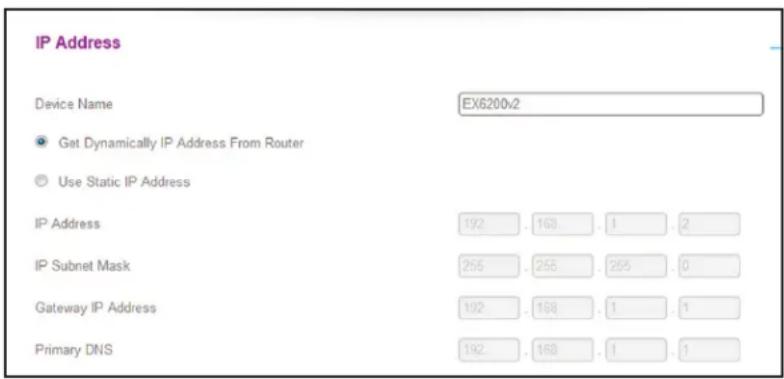
The default name is EX6200v2.
To change the extender device name:
- On your WiFi-enabled computer or mobile device, open the WiFi connection manager and locate and connect to the extender WiFi network.
- Launch a web browser.
-
Enter www .mywifiext.net in the address field of the browser.
A login window opens. -
Enter your user name and password.
The Status page displays.
- Select Settings > W wireless.
The Wireless page displays.
- Click the IP Address heading.
-
In the Device Name field, type a name.
-
Click the SA VE button.
Your settings are saved.
Set Up the Extender to Use a Static IP Address
The extender comes set up to use a dynamic IP address, which is the correct setting for most home networks.
To set up the extender to use a static IP address:
- On your WiFi-enabled computer or mobile device, open the WiFi connection manager and locate and connect to the extender WiFi network.
- Launch a web browser.
- Enter www .mywifiext.net in the address field of the browser.
A login window opens.
- Enter your user name and password.
The Status page displays.
- Select Settings > W iFi Settings.
The Wireless page displays.
- Scroll down and click the IP Address heading.
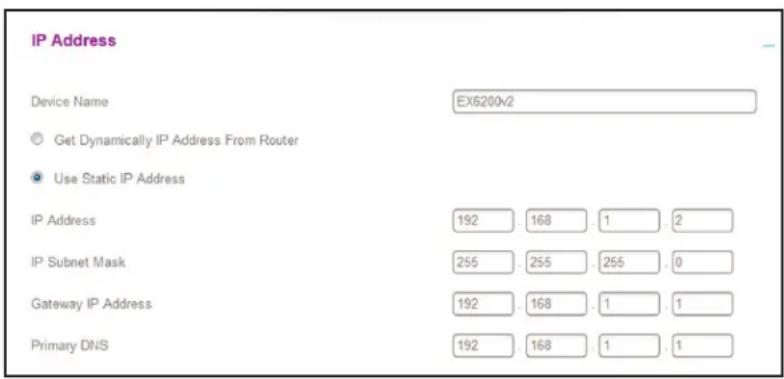
By default, the Get Dynamically IP Address From Router radio button is selected.
- Select the Use Static IP Address radio button.
- Complete the fields to specify the IP network IP addresses.
- Click the SA VE button.
Your settings are saved.
Use the Extender With MAC Filtering or Access Control
When the WiFi-enabled device connects through the extender to your router, the MAC address of the WiFi device that is shown on the router is translated to another MAC address. If your router's MAC filter, WiFi access control, or ACL is enabled, the WiFi-enabled device connects to the extender but cannot get an IP address from the extender and cannot access the Internet. To allow the WiFi device to receive an IP address from the extender and access the Internet, you must provide the translated MAC address to the router.
To add a translated MAC address to your router:
- Log in to your router and disable the MAC filter, WiFi access control, or ACL.
For more information about how to disable your router's MAC filter, WiFi access control, or ACL, see your router's documentation. - Power on the extender and connect all of your WiFi-enabled devices to the extender.
- Make sure that the Link Rate LED remains lit.
-
Log in to your extender:
a. Launch a web browser.
b. Enter www.mywifiext.net in the address field of the browser.
A login window opens.
c. Enter your user name and password.
The Status page displays. -
Select Settings > Connected Devices.
The Connected Devices section displays the MAC addresses and virtual MAC addresses for computers and WiFi devices that are connected to the extender network.
-
On the router, add the extender's virtual MAC address and all the virtual MAC addresses connected to the extender network to your router's MAC filter table.
-
Enable the router's MAC filter, WiFi access control, or ACL.
Maintain and Monitor the Extender
5
This chapter covers the following topics:
- Change the Extender User Name and Password
- Turn Password Protection Off and On
• Recover a Forgotten User Name or Password
• Automatically Adjust for Daylight Saving Time - Manually Set the Extender Clock
- Back Up and Manage the Extender Configuration
- Return the Extender to Its Factory Default Settings
- Update the Firmware
- Turn the LEDs On or Off
- Restart the Extender Remotely
Change the Extender User Name and Password
You can change the user name and password to log in to the extender.
To add an extender user:
- On your WiFi-enabled computer or mobile device, open the WiFi connection manager and locate and connect to the extender WiFi network.
- Launch a web browser.
- Enter www .mywifiext.net in the address field of the browser.
A login window opens.
- Enter your user name and password.
The Status page displays.
- Select Settings > Password.
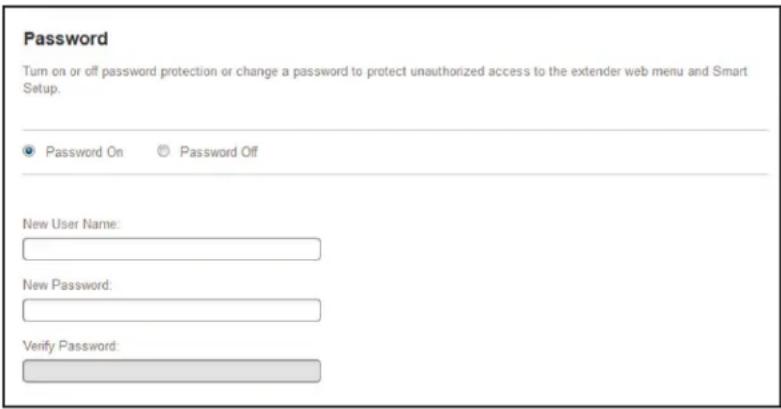
- In the New User Name field, type a user name.
- Type the password in the New Password field and the Verify Password field.
- Select questions and enter answers.
- Click the SA VE button.
Your settings are saved.
Turn Password Protection Off and On
We recommend that you leave password protection on to help keep your network secure. You can turn password protection off and on.
To turn password protection off and on:
-
On your WiFi-enabled computer or mobile device, open the WiFi connection manager and locate and connect to the extender WiFi network.
-
Launch a web browser.
- Enter www.mywifiext.net in the address field of the browser.
A login window opens. -
Enter your user name and password.
The Status page displays. -
Select Settings > Password.
The Password page displays.
-
Select the Password Off or Password On radio button.
-
Click the SAVE button.
Your settings are saved.
Recover a Forgotten User Name or Password
If you changed the password to access the extender and set up password recovery, you can recover your password if you lose it.
To recover your password to access the extender:
- On your WiFi-enabled computer or mobile device, open the WiFi connection manager and locate and connect to the extender WiFi network.
- Launch a web browser.
- Enter www.mywifiext.net in the address field of the browser.
A login window opens. - Click the Username & Password Help link.
A page displays requesting the answers to your security questions. - Enter the saved answers to your security questions.
- Click the NEXT button.
Your email and password are displayed. - Click the BACK button.
A login window opens. - Log in to the extender.
Automatically Adjust for Daylight Saving Time
To set up the extender to automatically adjust for daylight saving time:
-
On your WiFi-enabled computer or mobile device, open the WiFi connection manager and locate and connect to the extender WiFi network.
-
Launch a web browser.
- Enter www.mywifiext.net in the address field of the browser.
A login window opens. - Enter your user name and password.
The Status page displays. - Select Do More > Access Schedule.
The Access Schedule page displays. - Select the Automatically adjust for daylight savings time check box.
- click the SAVE button.
Your settings are saved.
Manually Set the Extender Clock
To manually set the extender clock:
- On your WiFi-enabled computer or mobile device, open the WiFi connection manager and locate and connect to the extender WiFi network.
- Launch a web browser.
- Enter www.mywifiext.net in the address field of the browser.
A login window opens. - Enter your user name and password.
The Status page displays. - Select Do More > Access Schedule.
The Access Schedule page displays. - In the Extender Clock section, select the Manual radio button.
- To specify the time, complete the fields or click the Sync Clock button to synchronize the extender time to the time on the computer or WiFi-enabled device that you are using.
- Click the SAVE button.
Your settings are saved.
Back Up and Manage the Extender Configuration
When the extender works correctly after initial setup, we recommend that you back up the extender configuration settings. After you back up the settings, if you change the extender configuration settings but are not content with the new settings, you can restore the extender configuration to the backed-up settings.
Back Up the Configuration Settings
You can back up the configuration file of the extender.
To back up the extender configuration settings:
- On your WiFi-enabled computer or mobile device, open the WiFi connection manager and locate and connect to the extender WiFi network.
- Launch a web browser.
-
Enter www .mywifiext.net in the address field of the browser.
A login window opens. -
Enter your user name and password.
The Status page displays.
- Select Settings > Other.
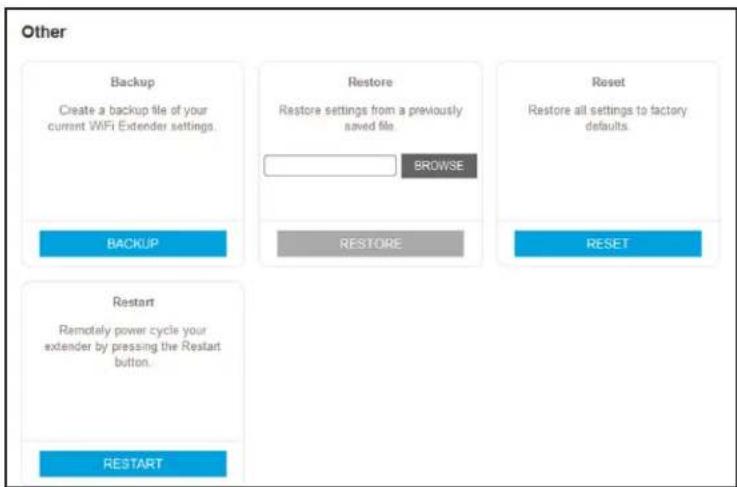
- Click the BACKUP button.
Your browser extracts the configuration file from the extender. By default, the name of the backup file is NETGEAR_EX6200.cfg.
- If your browser is not set up to save downloaded files automatically, locate where you want to save the file.
Restore the Configuration Settings
You can restore the configuration file of the extender to a previously saved configuration file.
To restore the extender configuration settings:
- On your WiFi-enabled computer or mobile device, open the WiFi connection manager and locate and connect to the extender WiFi network.
- Launch a web browser.
- Enter www .mywifiext.net in the address field of the browser.
A login window opens.
- Enter your user name and password.
The Status page displays.
- Select Settings > Other.
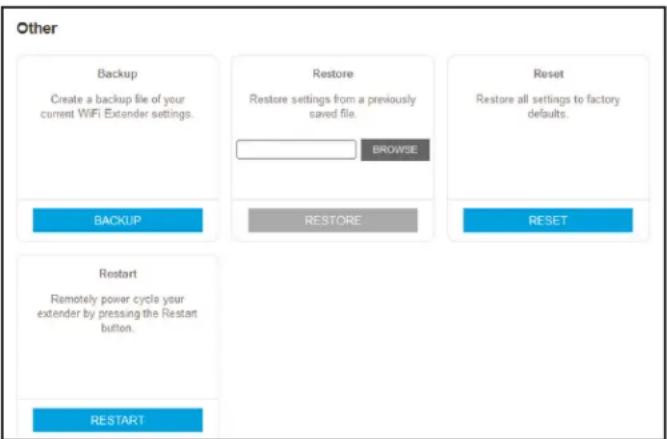
- Click the BROWSE button.
- Locate and select the previously saved backup file.
By default, the name of the backup file is NETGEAR_EX6200.cfg.

CAUTION:
After you click the RESTORE button, do not try to go online, turn off the extender, shut down the computer, or do anything else to the extender until it finishes restarting.
- Click the REST ORE button.
A confirmation pop-up window opens.
- Confirm your decision.
The extender configuration is restored and the extender restarts. This process takes about one minute.
Return the Extender to Its Factory Default Settings
Under some circumstances (for example, if you lose track of the changes that you made to the extender settings), you might want to erase the configuration and reset the extender to factory default settings.
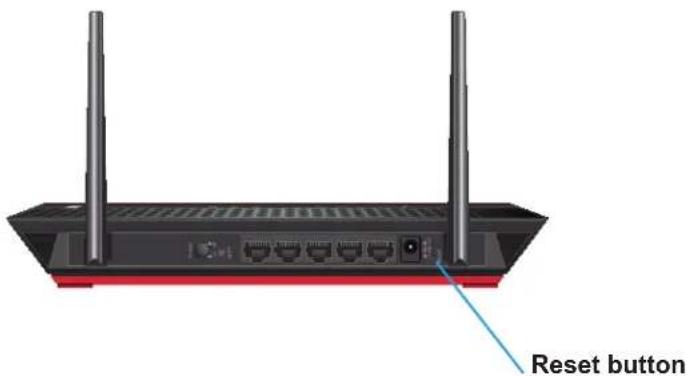
To reset the extender to factory default settings, you can either use the Reset button on the rear panel or log in to the extender and reset it.
For a list of factory default settings, see Factory Default Settings on page 75.
Use the Reset Button

CAUTION:
This process erases any settings that you configured in the extender.
To use the Reset button to return the extender to factory default settings:
- Insert a straightened paper clip into the hole of the Reset button and hold it for about seven seconds.
- Release the button.

CAUTION:
Do not try to go online, turn off the extender, shut down the computer, or do anything else to the extender until it finishes restarting.
The extender resets and restarts. This process takes about one minute.
Log In and Reset the Extender to Factory Settings

CAUTION:
This process erases any settings that you configured in the extender.
To log in to the extender and reset the extender's to factory settings:
- On your WiFi-enabled computer or mobile device, open the WiFi connection manager and locate and connect to the extender WiFi network.
- Launch a web browser.
- Enter www .mywifiext.net in the address field of the browser.
A login window opens.
- Enter your user name and password.
The Status page displays.
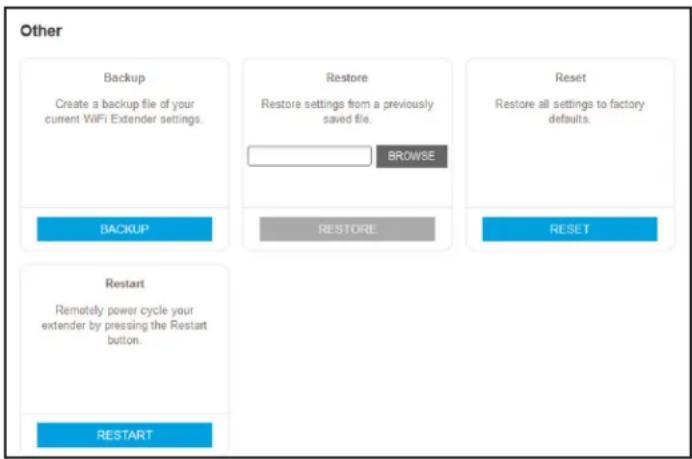
- Select Settings > Other.

CAUTION:
After you click the RESET button, do not try to go online, turn off the extender, shut down the computer, or do anything else to the extender until it finishes restarting.
- Click the RESET button.
A confirmation pop-up window opens.
- Confirm your decision.
The extender returns to its factory settings and restarts. This process takes about one minute.
Update the Firmware
Unless you changed the settings in the Firmware Update page previously, the extender is set up to check for new firmware automatically at login.
To check manually for new firmware and, if available, update the firmware:
- On your WiFi-enabled computer or mobile device, open the WiFi connection manager and locate and connect to the extender WiFi network.
- Launch a web browser.
-
Enter www .mywifiext.net in the address field of the browser.
A login window opens. -
Enter your user name and password.
The Status page displays.
- Select Settings > Firmware Update.
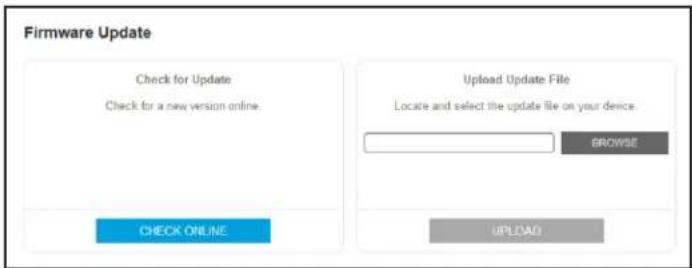
- Click the CHECK ONLINE button.
- If new firmware is available, follow the onscreen prompts to download it onto your computer.
Note: You might need to unzip the firmware file.
-
Click the BROWSE button.
-
Locate and select the new firmware file.
The firmware file name ends with a .chk extension.

CAUTION:
After you click the UPLOAD button, do not try to go online, turn off the extender, shut down the computer, or do anything else to the extender until it finishes restarting.
- Click the UPLOAD button.
The firmware update starts and the extender restarts. The firmware update process takes about two minutes.
Turn the LEDs On or Off
If you turn the LEDs off, the Power LED remains on.
To turn the NETGEAR logo LED on or off:
- On your WiFi-enabled computer or mobile device, open the WiFi connection manager and locate and connect to the extender WiFi network.
- Launch a web browser.
- Enter www.mywifiext.net in the address field of the browser.
A login window opens. -
Enter your user name and password.
The Status page displays. -
Select Settings > LED On/Off.
The LED On/Off page displays.
-
Select the OFF or ON radio button.
-
To turn the LEDs on, select the ON radio button.
-
To turn the LED off, select the OFF radio button.
-
Click the SAVE button.
Your settings are saved.
Restart the Extender Remotely
You can log in to the extender and restart it. When the extender restarts, all computers and WiFi-enabled devices that are connected to its WiFi network are automatically disconnected.
To restart the extender remotely:
- On your WiFi-enabled computer or mobile device, open the WiFi connection manager and locate and connect to the extender WiFi network.
- Launch a web browser.
- Enter www.mywifiext.net in the address field of the browser.
A login window opens. - Enter your user name and password.
The Status page displays. - Select Settings > Other.
The Other page displays. - Click the RESTART button and click the Yes button to confirm.
AC1200 WiFi Range Extender
The extender restarts, which takes about two minutes.
Share a USB Storage Device
6
This chapter describes how to access and configure a USB storage drive attached to your extender. The USB port on the extender can be to connect only USB storage devices such as flash drives or hard drives, or a printer. Do not connect computers, USB modems, CD drives, or DVD drives to the extender USB port.
This chapter contains the following sections:
• USB Storage Device Requirements
- Share Files Across Your WiFi Network
- Access a USB Storage Device Attached to the Extender
- Turn the USB Port Off and On
- Add a Network Folder on a USB Drive
- Password-Protect a Folder on a USB Storage Device
- Use the Extender USB Port to Share a Printer
USB Storage Device Requirements
The extender works with most USB-compliant external flash and hard drives. For the most up-to-date list of USB drives that the extender supports, visit https://kbserver.netgear.com/readyshare.
Some USB external hard drives and flash drives require you to load the drivers onto the computer before the computer can access the USB device. Such USB devices do not work with the extender.
The extender supports the following file system types for full read and write access:
• F AT16, FAT32
• NTFS
- NTFS with compression format enabled
- Ext2
- Ext3
- Ext4
• HFS
• HFS+
Note: Do not connect computers, USB modems, CD drives, or DVD drives to the extender USB port.
Share Files Across Your WiFi Network
You can share data that is stored on most common USB storage devices across your WiFi network with ReadySHARE® USB Storage Access.
To access your USB device from a Windows computer:
- Insert your USB device into the USB 3.0 port on the extender.
The USB LED lights.
- If your USB device includes a power supply, connect it.
You must use the power supply when you connect the USB device to the extender.
When you connect the USB device to the extender USB port, it might take up to two minutes before it is ready for sharing. By default, the USB device is available to all computers on your local area network (LAN).
-
Select Start > Run.
-
Enter \readyshare in the dialog box and click the OK button.
A page automatically opens and displays the files and folders on the device.
To access your USB device from a Mac:
- Insert your USB storage drive into the USB 3.0 port on the front of the extender.
The USB LED lights.
- If your USB device includes a power supply, connect it.
You must use the power supply when you connect the USB device to the extender.
When you connect the USB device to the extender USB port, it might take up to two minutes before it is ready for sharing. By default, the USB device is available to all computers on your local area network (LAN).
- On a Mac that is connected to the network, launch Finder and select Go > Connect to Server.
- In the Server Address field, enter smb://readyshare.
- When prompted, select the Guest radio button.
- Click the Connect button.
A window automatically opens and displays the files and folders on the device.
Access a USB Storage Device Attached to the Extender
ReadySHARE lets you access and share a USB drive connected to the extender USB port. (If your USB drive uses special drivers, it is not compatible.)
To connect a USB drive:
- Insert your USB storage drive into the USB 3.0 port on the front of the extender.
The USB LED lights.
- If your USB device includes a power supply, connect it.
You must use the power supply when you connect the USB device to the extender.
When you connect the USB drive to the extender USB port, it might take up to two minutes before it is ready for sharing. By default, the USB drive is available to all computers on your local area network (LAN).
To access the USB drive from a Mac:
- Select Go > Connect to Server.
- In the Server Address field, type smb://readyshare as the server address.
- Click the Connect button.
- When prompted to enter your name and password, select the Guest radio button.
- Click the Connect button.
To access the USB drive from a Windows computer:
-
Select Start > Run.
-
Enter \readyshare in the dialog box.
- Click the OK button.
To map the USB device to a Windows network drive:
- Insert your USB storage drive into the USB 3.0 port on the front of the extender.
The USB LED lights.
- If your USB device includes a power supply, connect it.
You must use the power supply when you connect the USB device to the extender.
When you connect the USB device to the extender's USB port, it might take up to two minutes before it is ready for sharing. By default, the USB drive is available to all computers on your local area network (LAN).
- Select Start > Run.
- Enter \readyshare in the dialog box.
- Click the OK button.
A window automatically opens and displays the USB Storage device.
- Right-click the USB storage device and select Map network drive.
The Map Network Drive page displays.
- Select the drive letter to map to the network folder.
- Click the Finish button.
The USB device is mapped to the drive letter that you specified.
- To connect to the USB storage device as a different user, select the Connect using different credentials check box, click the Finish button, and do the following:
a. T ype the user name and password.
b. Click the OK button.
The USB storage device is mapped to the drive letter that you specified.
Turn the USB Port Off and On
By default the USB port is on, but you can log in to the extender and turn it off and on.
To turn the USB port off and on:
- On your WiFi-enabled computer or mobile device, open the WiFi connection manager and locate and connect to the extender WiFi network.
- Launch a web browser.
- Enter www .mywifiext.net in the address field of the browser.
A login window opens.
- Enter your user name and password.
The Status page displays.
- Select Do More > USB Port.
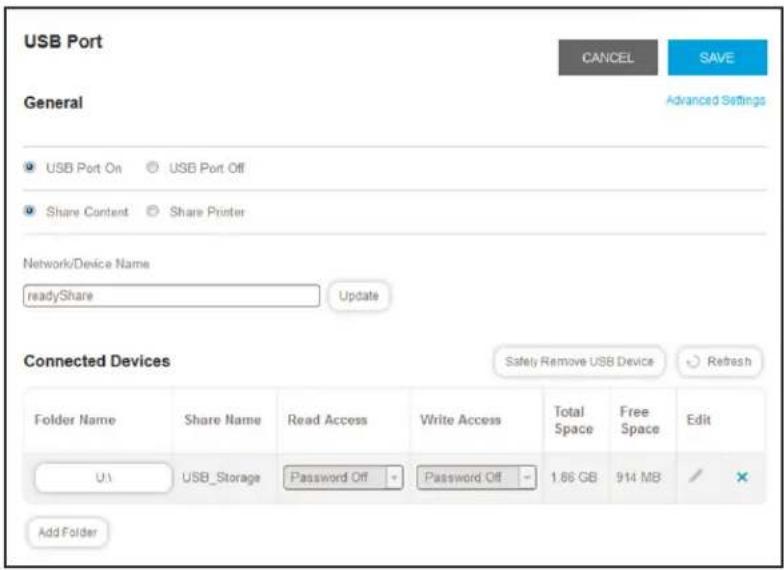
- Select the USB Port On or USB Port Off radio button.
- Click the SA VE button.
Your settings are saved.
Add a Network Folder on a USB Drive
You can add network folders on the USB storage device.
To add a network folder:
- On your WiFi-enabled computer or mobile device, open the WiFi connection manager and locate and connect to the extender WiFi network.
- Launch a web browser.
- Enter www .mywifiext.net in the address field of the browser.
A login window opens. - Enter your user name and password.
The Status page displays. -
Select Do More > USB Port.
The USB Port page displays. -
In the Connected Devices section, click the Add Folder button.
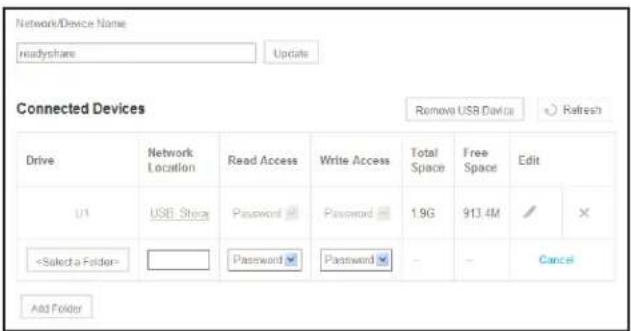
Use the Extender USB Port to Share a Printer
By default, the extender is set up to share content on the USB port so that you can connect a USB storage device. You can share a USB printer instead. 1. On your WiFi-enabled computer or mobile device, open the WiFi connection manager and locate and connect to the extender WiFi network. 2. Launch a web browser. 3. Enter www .mywifiext.net in the address field of the browser. A login window opens. 4. Enter your user name and password. The Status page displays. 5. Select Do More > USB Port.  6. Select the Share Printer radio button. 7. Follow the onscreen prompts to connect your printer to the USB port and share it. 8. Click the SA VE button. Your settings are saved.Use the Extender as a Media Server
7
This chapter contains the following sections: - Specify ReadyDLNA Media Server Settings - Play Media From a USB Drive on TiVo Note: For information about how to connect the USB drive and to specify its settings, see Chapter 6, Share a USB Storage Device.Specify ReadyDLNA Media Server Settings
By default, the extender functions as a ReadyDLNA media server, which lets you stream music and movies from an attached USB device to DLNA/UPnP AV-compliant media players, such as Xbox360, Playstation, and NETGEAR media players.To specify media server settings:
1. On your WiFi-enabled computer or mobile device, open the WiFi connection manager and locate and connect to the extender WiFi network. 2. Launch a web browser. 3. Enter www .mywifiext.net in the address field of the browser. A login window opens. 4. Enter your user name and password. The Status page displays. 5. Select Do More > USB Port.  By default, the Enable Media Server and Enable TiVo support check boxes are selected. This lets the extender function as a media server and play media on your TiVo. 6. To change the name of the media server device, type a new name in the Network/Device Name field and click the Update button. 7. Leave the Content scan check box selected. The extender automatically scans and detects media files that are added to the attached USB device. Note: The extender scans only shared folders that are set up with full read access without a password. 8. Click the SAVE button. Your settings are saved.Play Media From a USB Drive on TiVo
You can set up your TiVo to access media files stored on a USB device that is connected to your extender. The TiVo must be on the same network as the extender. This feature supports the following file formats: • V ideo. See and play MPEG1, and MPEG2 files. • Music. See and play MP3 files. - Pictures. V iew images in .jpg format. You can use the TiVo (Series 2 and up) Home Media Option to play photos and music on your Windows or Mac computer in your TiVo user interface.Set Up the Extender to Work With TiVo
To set up the extender to work with TiVo:
1. On your WiFi-enabled computer or mobile device, open the WiFi connection manager and locate and connect to the extender WiFi network. 2. Launch a web browser. 3. Enter www .mywifiext.net in the address field of the browser. A login window opens. 4. Enter your user name and password. The Status page displays. 5. Select Do More > USB Port.  6. If it is not yet selected, select the Enable TiVo support check box. 7. Click the SA VE button. Your settings are saved.Play Videos on TiVo
To play videos:
1. On the TiVo, select TiVo Central > My Shows.  2. Go to the bottom of the list and select the EX6200v2.Play Music or View Photos on TiVo
To play music or view photos:
1. On the TiVo, select TiVo Central > Music, Photos, & Showcases.  2. Select an item to play or watch. The ReadySHARE Printer utility lets you share a USB printer that is connected to a USB port on your extender. You can share this USB printer among the Windows and Mac computers on your network. For more information about features available in the NETGEAR USB Control Center, see the ReadySHARE Printer User Manual, which is available at downloadcenter.netgear.com. This chapter contains the following sections: • Install the Printer Driver and Cable the Printer - Download the ReadySHARE Printer Utility • Install the ReadySHARE Printer Utility • Print Using the NETGEAR USB Control Center • View or Change the Status of a Printer - Use the Scan Feature of a Multifunction USB Printer - Change NETGEAR USB Control Center SettingsInstall the Printer Driver and Cable the Printer
Some USB printer manufacturers (for example, HP and Lexmark) request that you do not connect the USB cable until the installation software prompts you to do so.To install the driver and cable the printer:
1. On each computer on your network that shares the USB printer, install the driver software for the USB printer. If you cannot find the printer driver, contact the printer manufacturer. 2. Use a USB printer cable to connect the USB printer to the extender USB port. Download the ReadySHARE Printer Utility
The utility works on Windows and Mac computers.To download the utility:
1. Visit netgear.com/readyshare. 2. Click one of the following links to download the ReadySHARE Printer utility setup file: - Download PC installer and get started. This is the utility for Windows computers. - Download Mac installer and get started. This is the utility for MAC computers. - Download the genie App and get started. This is the utility for smartphones and tablets. 3. Follow the onscreen instructions to download the ReadySHARE Printer utility.Install the ReadySHARE Printer Utility
You must install the ReadySHARE Printer utility on each computer that will share the printer. After you install it, the utility displays as NETGEAR USB Control Center on your computer.To install the utility:
1. If necessary, unzip the ReadySHARE Printer utility setup file. 2. Double-click the ReadySHARE Printer utility setup file that you downloaded.  3. Follow the wizard instructions to install the NETGEAR USB Control Center.  4. Select a language from the list and click the OK button.  The USB printer connected to the router displays in the NETGEAR USB Control Center window. Some firewall software, such as Comodo, blocks NETGEAR USB Control Center from accessing the USB printer. If you do not see the USB printer displayed, you can disable the firewall temporarily to allow the utility to work.Print Using the NETGEAR USB Control Center
For each computer, after you click the Connect and Disconnect buttons once, the utility automatically manages the printing queue and handling. By default, the utility starts automatically whenever you log on to Windows and runs in the background.To print a document using the NETGEAR USB Control Center:
1. Click the NETGEAR USB Control Center icon  The main page displays. 2. Select a printer and click the Connect button. The printer status changes to Manually connected by Mycomputer. Now only the computer that you are using can use this printer. 3. Use the print feature in your application to print your document. The NETGEAR USB Control Center automatically connects your computer to the USB printer and prints the document. If another computer is already connected to the printer, your print job goes into a queue to wait to be printed. 4. If your document does not print, use the NETGEAR USB Control Center to check the printer status. 5. To release the printer so that all computers on the network can use it, click the Disconnect button. The status changes to Available. Now any computers on the network can use the printer. 6. To exit the utility, select System > Exit.View or Change the Status of a Printer
To view or change the status:
1. Click the NETGEAR USB Control Center icon  The NETGEAR USB Control Center page displays. The Status column shows the status for each device: \- A vailable. No print jobs are in progress. You can use the USB printer from any computer in the network. - Connected. Your computer is connected to the printer and will be released when your print job is done. • Manually Connected by. Only the connected computer can use the printer. - W aiting to Connect. Your computer is not connected to the shared printer yet. 2. To print from your computer when the status shows Manually connected by another computer, do the following: a. Click the Connect button on your computer. On the other user's computer, a message displays that another user wants to connect to the printer. b. On the other user's computer, click the Accept button. The printer is released from the connection and the status changes to Available. 3. To print from your computer when the status shows Waiting to Connect, do the following: a. Click the Connect button. The printer status changes to Manually connected by Mycomputer. Now, only your computer can use the printer. b. To allow the printer to be shared, click the Disconnect button. The printer is released from the connection and the status changes to Available.Use the Scan Feature of a Multifunction USB Printer
If your USB printer supports scanning, you can also use the USB printer for scanning. To use the scan feature of a multifunction USB printer: 1. Click the NETGEAR USB Control Center icon The NETGEAR USB Control Center page displays. 2. Make sure that the printer status shows as Available. 3. C lick the Network Scanner button. 4. If a Select a Device window opens, select the scanner and click the OK button. The scanner page displays so that you can use the USB printer for scanning.Change NETGEAR USB Control Center Settings
You can stop the NETGEAR USB Control Center from starting automatically when you log in to Windows. You can also change the language and specify the time-out to release the printer connection.Turn Off Automatic Startup for NETGEAR USB Control Center
You can stop the NETGEAR USB Control Center from starting automatically when you log in to Windows.To turn off automatic NETGEAR USB Control Center startup:
1. Click the NETGEAR USB Control Center icon The NETGEAR USB Control Center page displays.  2. Select T ools > Configuration. The Control Center - Configuration page displays. 3. Clear the Automatically execute when logging on W indows check box. 4. Click the OK button. Your settings are saved.Change the Language for the NETGEAR USB Control Center
To change the language:
1. Click the NETGEAR USB Control Center icon 📄. The NETGEAR USB Control Center page displays. 2. Select T ools > Configuration. The Control Center - Configuration page displays. 3. From the Language menu, select a language. 4. Click the OK button. The next time NETGEAR USB Control Center starts, the language changes.Specify the USB Control Center Time-Out
Specify the time-out to release the printer connection.To specify the time-out:
1. Click the NETGEAR USB Control Center icon The NETGEAR USB Control Center page displays. 2. Select T ools > Configuration. The Control Center - Configuration page displays. 3. In the T imeout field, type the number of minutes.AC1200 WiFi Range Extender
The time-out is the number of minutes that a computer holds its connection to the printer when the connection isn't being used.4. Click the OK button.
Your settings are saved.FAQs and Troubleshooting
9
This chapter covers the following topics: - FAQs - Cannot Connect to the Extender - Cannot Join a WiFi Network and Receive an Error MessageFAQs
This section provides answers for difficulties you might experience with the extender. The web browser setup guide keeps asking me for my network password (passphrase) or security key, and I am sure that I entered the correct password. What can I do? The extender is probably placed at the borderline of the range covered by the router or access point. To improve your signal strength, move your extender closer to your router and make sure that the 2.4GHz or 5GHz Link Rate LED lights solid amber or green. Table 2. Link Rate LED colors| LED Color Performance | |
 | The extender provides the best performance. |
 | The extender provides a workable performance. |
 | The extender provides a poor performance. |
| Off The extender | cannot function. |
Cannot Connect to the Extender
If you cannot connect to the extender, determine what prevents you from connecting: \- If you forgot your user name or password, click the Username & Password Help link. For more information, see Recover a Forgotten User Name or Password on page 43. \- If your browser displays an error page, include http:// in the address field of your browser by typing http://www.mywifiext.net. \- If you already set up the extender but can no longer connect to it over WiFi, check to see if the Link Rate LED is off or red. \- If you cannot get a WiFi connection working, you can use an Ethernet cable to connect your computer to the extender.Cannot Join a WiFi Network and Receive an Error Message
To join a WiFi network, you must know its network name (also called the SSID) so that you can select it. If the network is secure, you must know the passphrase or key. If the extender does not connect to the network that you select, the cause might be one of the following: \- It is possible that you typed the network name, passphrase, or key incorrectly. Use Smart Setup (see Run Smart Setup on page 22) to select a WiFi network and retype the passphrase or key. The passphrase or key is case-sensitive. For example, PASSWORD25 is not the same as Password25 or password25. - If the extender cannot detect your WiFi network, check to see if your WiFi network is still working. Make sure that the WiFi router is turned on. If possible, move the extender closer to the WiFi router. - If the extender Link Rate LED is red, the WiFi connection between the WiFi router and the extender is poor. You can establish the best connection with a clear line of sight between the extender and the WiFi router. Make sure that no physical obstacles exist between the extender and the WiFi router, and try to move the extender closer to the WiFi router. If you use Smart Setup, and the extender does not connect to the WiFi router, does not connect to the Internet, or cannot get an IP address from the WiFi router, Smart Setup displays a message to notify you that the extender is not configured. To run Smart Setup again, click the YES button. To manually configure the extender, click the NO, CONFIGURE MANUALLY button.Factory Settings and Technical Specifications
 This appendix covers the following topics: • Factory Default Settings • Technical and Environmental SpecificationsFactory Default Settings
To reset the extender to factory default settings, you can use either the Reset button on the rear panel or log in to the extender and click a RESET button. For more information, see Return the Extender to Its Factory Default Settings on page 47. The following table shows the factory default settings. Table 3. Factory default settings| Factory Settings | ||
| Smart Setup Enabled | ||
| WiFi WiFi co | mmunication Enabled | |
| WiFi network name (SSID) NETGEAR_EXT | ||
| Security Disabled | ||
| Transmission speed Auto | 1 | |
| Country/region Varies by region | ||
| Operating mode 802.11ac, 802.11n, 802.11g, 802.11b | ||
| Data rate in the 2.4 GHz band Up to 400 Mbps | ||
| Data rate in the 5 GHz band | Up to 867 Mbps | |
| DHCP | Client enabled | |
Technical and Environmental Specifications
The following table shows the technical and environmental specifications. Table 4. Technical specifications| Technical Specifications | |
| Network protocol and standards compatibility | Data and routing protocols: TCP/IP, DHCP server and client, DNS relay, NAT (many-to-one), VPN pass-through (IPSec, PPTP) |
| Power adapter • North | America (input): 120V, 60 HzAll regions (output): 12 VDC @ 1.5A 18W maximum |
| Physical specifications | Dimensions: 9.72 x 6.85 x 1.22 in. (247 x 174 x 31 mm)W eight: 0.67 lb (302 g) |
| Environmental • Operating temperature: 32° to 104°F (0° to 40°C)Operating humidity: 90% maximum relative humidity , noncondensing | |
| Interface • Local: 10BASE-T | , 100BASE-TX, 1000BASE-TX, RJ-45USB 3.0802.1 1ac, 802.11n, 802.11a, 802.11g, 802.11b |
| Electromagnetic emissions Meets requirements of FCC Part 15 Class B. | |
- AC1200 WiFi Range Extender
- Support
- Conformity
- Compliance
- Trademarks
- Table of Contents
- Chapter 1 Get to Know Your Extender
- Chapter 2 Get Started
- Chapter 3 Optimize Extender Performance
- Chapter 4 Extender Network Settings
- Chapter 5 Maintain and Monitor the Extender
- Chapter 6 Share a USB Storage Device
- Chapter 7 Use the Extender as a Media Server
- Chapter 8 Share a USB Printer
- Chapter 9 FAQs and Troubleshooting
- Appendix A Factory Settings and Technical Specifications
- Get to Know Your Extender
- 1
- Unpack Your Extender
- Top and Front Panels
- Rear Panel
- To tighten an antenna:
- Attach the Stand
- To attach the stand:
- Attach the Rubber Feet
- To attach the rubber feet:
- Retrieve and Display the Product Label
- To retrieve the product label from the extender:
- When to Use Your Extender
- How the Extender Works
- Support for the 801.11ac Networking Standard
- Get Started
- 2
- Use the Extender in Extender Mode
- Set Up the Extender Hardware
- To set up the extender hardware:
- Connect to an Existing WiFi Network
- Connect With WPS
- To use WPS to connect the extender to your WiFi router:
- Connect With the NETGEAR Installation Assistant
- To connect with the NETGEAR installation assistant:
- Connect Ethernet-Enabled Devices
- Use the Extender in Access Point Mode
- To install the extender as an access point:
- Access Extender Settings
- To log in to the extender:
- Run Smart Setup
- To run Smart Setup:
- Optimize Extender Performance
- 3
- Boost Your Video Streaming With FastLane Technology
- To activate FastLane mode:
- Adjust the WiFi Coverage
- To adjust the WiFi coverage:
- Select Do More > WiFi Coverage.
- Select a Wireless Output Power radio button.
- Click the SAVE button.
- Extender Network Settings
- 4
- This chapter covers the following topics:
- View Connected Devices
- To view connected devices:
- View WiFi Settings
- To view the WiFi settings:
- Select Settings > Wireless.
- Change the WiFi Network Name
- To change the WiFi network name:
- Select Settings > W wireless.
- Turn Off the SSID Broadcast to Create a Hidden Network
- To turn off the SSID broadcast to create a hidden network:
- Disable or Enable the WiFi Radios
- To disable or enable the WiFi radios:
- Change the WiFi Speed
- To change the WiFi speed:
- Use WPS to Add a Computer to the Extender WiFi Network
- Use WPS With the Push Button Method
- To use WPS to connect to the extender's WiFi network:
- Use WPS With the PIN Method
- To use a WPS PIN to connect to the extender WiFi network:
- Deny Access to a WiFi-Enabled Device
- To use WiFi access control to deny access:
- Set Up an Access Schedule
- To set up an access schedule:
- Change the Extender Device Name
- To change the extender device name:
- Set Up the Extender to Use a Static IP Address
- To set up the extender to use a static IP address:
- Use the Extender With MAC Filtering or Access Control
- To add a translated MAC address to your router:
- Maintain and Monitor the Extender
- 5
- Change the Extender User Name and Password
- To add an extender user:
- Turn Password Protection Off and On
- To turn password protection off and on:
- Recover a Forgotten User Name or Password
- To recover your password to access the extender:
- Automatically Adjust for Daylight Saving Time
- To set up the extender to automatically adjust for daylight saving time:
- Manually Set the Extender Clock
- To manually set the extender clock:
- Back Up and Manage the Extender Configuration
- Back Up the Configuration Settings
- To back up the extender configuration settings:
- Restore the Configuration Settings
- To restore the extender configuration settings:
- CAUTION:
- Return the Extender to Its Factory Default Settings
- Use the Reset Button
- To use the Reset button to return the extender to factory default settings:
- Log In and Reset the Extender to Factory Settings
- To log in to the extender and reset the extender's to factory settings:
- Update the Firmware
- To check manually for new firmware and, if available, update the firmware:
- Turn the LEDs On or Off
- To turn the NETGEAR logo LED on or off:
- Restart the Extender Remotely
- To restart the extender remotely:
- Share a USB Storage Device
- 6
- USB Storage Device Requirements
- Share Files Across Your WiFi Network
- To access your USB device from a Windows computer:
- To access your USB device from a Mac:
- Access a USB Storage Device Attached to the Extender
- To connect a USB drive:
- To access the USB drive from a Mac:
- To access the USB drive from a Windows computer:
- To map the USB device to a Windows network drive:
- Turn the USB Port Off and On
- To turn the USB port off and on:
- Add a Network Folder on a USB Drive
- To add a network folder:
- Password-Protect a Folder on a USB Storage Device
- To password-protect a folder:
- Use the Extender USB Port to Share a Printer
- Use the Extender as a Media Server
- 7
- Specify ReadyDLNA Media Server Settings
- To specify media server settings:
- Play Media From a USB Drive on TiVo
- Set Up the Extender to Work With TiVo
- To set up the extender to work with TiVo:
- Play Videos on TiVo
- To play videos:
- Play Music or View Photos on TiVo
- To play music or view photos:
- Install the Printer Driver and Cable the Printer
- To install the driver and cable the printer:
- Download the ReadySHARE Printer Utility
- To download the utility:
- Install the ReadySHARE Printer Utility
- To install the utility:
- Print Using the NETGEAR USB Control Center
- To print a document using the NETGEAR USB Control Center:
- View or Change the Status of a Printer
- To view or change the status:
- Use the Scan Feature of a Multifunction USB Printer
- Change NETGEAR USB Control Center Settings
- Turn Off Automatic Startup for NETGEAR USB Control Center
- To turn off automatic NETGEAR USB Control Center startup:
- Change the Language for the NETGEAR USB Control Center
- To change the language:
- Specify the USB Control Center Time-Out
- To specify the time-out:
- Click the OK button.
- FAQs and Troubleshooting
- 9
- FAQs
- Cannot Connect to the Extender
- Cannot Join a WiFi Network and Receive an Error Message
- Factory Settings and Technical Specifications
- Factory Default Settings
- Technical and Environmental Specifications
Brand : NETGEAR
Model : EX6200v2
Category : Network adapter