
PA500 Musikant - Synthesizer KORG - Free user manual and instructions
Find the device manual for free PA500 Musikant KORG in PDF.


| Product Type | Professional Arranger Keyboard / Synthesizer |
| Brand | Korg |
| Model | PA500 Musikant |
| Dimensions (approx.) | 1030 x 380 x 140 mm (40.6 x 15.0 x 5.5 in) |
| Weight (approx.) | 11 kg (24.3 lbs) |
| Power Supply | DC 12 V (AC adapter included) |
| Power Consumption | 12 W |
| Keyboard | 61 keys (velocity sensitive) |
| Sound Engine | EDS (Enhanced Definition Synthesis) |
| Polyphony | 62 voices |
| Effects | Multiple effects including reverb, chorus, and insert effects |
| Styles | Over 300 preloaded styles, editable via SongBook Editor |
| SongBook | Built-in song library with style-based, MIDI, and MP3 entries |
| Connectivity | USB (Device), MIDI In/Out, Audio In/Out, Headphone out |
| Storage | Internal memory (SSD), SD card slot |
| Display | Backlit LCD screen |
| Software Compatibility | KORG SongBook Editor (Windows 7/8/8.1/10) |
| Maintenance | Clean with a soft dry cloth; avoid liquids and extreme temperatures |
| Safety | Use only the specified power adapter; keep away from moisture |
| Spare Parts & Repairability | Contact Korg service centers for replacement parts and repairs |
| General Information | Manufactured by KORG ITALY SpA; designed for professional and home use |
Frequently Asked Questions - PA500 Musikant KORG
User questions about PA500 Musikant KORG
0 question about this device. Answer the ones you know or ask your own.
Ask a new question about this device
Download the instructions for your Synthesizer in PDF format for free! Find your manual PA500 Musikant - KORG and take your electronic device back in hand. On this page are published all the documents necessary for the use of your device. PA500 Musikant by KORG.
USER MANUAL PA500 Musikant KORG
Your use of this software indicates your acceptance of this license agreement and warranty. Please carefully read these terms and conditions prior to the use of this software.
Copyright
All title and copyrights in and to this software are owned by KORG Italy SpA (hereafter simply indicated as "Korg"). This software is protected by copyright laws and international treaty provisions.
Freeware
Although this software is free, it is not "public domain". It is a copyrighted software program, and Korg reserves all rights. Therefore:
- This software cannot be sold, either by itself or in combination with any other product, without the express written permission of Korg.
- If you are a user group which is publishing a CD-ROM or floppy collection, you may include this software and all of its related files without restriction, save that the entire original package is included.
- If you are a hard disk vendor which distributes PD, shareware, and freeware on your disk drives, you are welcome to distribute this software. Contact Korg for up-to date versions and information.
- Commercial publishers and distributors of CD-ROM software collections, to include any and all software compilations provided as an adjunct to printed or online publications, may not distribute this software on CD-ROM without the express written permission of Korg.
- This software may be posted on an information service which charges its users for general connection time and downloading, but it may NOT be posted to an information service which will charge for the specific right to download it, without the express written permission of Korg.
- This software may be given away as a support utility for a package which is itself to be given away. People who need to distribute it as a support utility should contact Korg for up-to-date versions and information. Please address all correspondence to:
KORG Italy SpA
Via Cagiata, 85
60027 Osimo (AN) - Italy
www.korg.com
Please note that we cannot provide technical support for this software (or any of our other freeware products).
Disclaimer of Warranty
THIS SOFTWARE AND THE ACCOMPANYING FILES ARE DISTRIBUTED "AS IS" AND WITHOUT WARRANTIES AS TO PERFORMANCE OR MERCHANTABILITY OR ANY OTHER WARRANTIES WHETHER EXPRESSED OR IMPLIED. NO WARRANTY OF FITNESS FOR A PARTICULAR PURPOSE IS OFFERED.
Distribution
This software is freeware and may be freely copied and distributed as long as the entire unmodified program is copied and no fee is charged.
Support
This software is given "as is". No support is granted by Korg.
Liability
Korg shall not be liable for errors contained in information and software downloaded from the Korg Website, or otherwise obtained from the Korg Website in any manner. Korg will not in any event be liable for any direct, indirect, special, incidental or consequential damages whatsoever (including lost profits, lost data, or business interruption) related to any use, reproduction, modification, or distribution of the software, results, documentation or links provided by the Korg Website.
No Disassembly or Decryption
You may not disassemble or decompile the Software without prior written consent of Korg.
Transfer
Your license will automatically terminate upon any transfer of the Software. Upon transfer, you must deliver the Software, including any copies and related documentation, to the transferee. The transferee must accept these License Terms as a condition to the transfer.
Termination
Korg may terminate your license upon notice for failure to comply with any of these License Terms. Upon termination, you must immediately destroy the Software, together with all copies, adaptations and merged portions in any form.
Data Handling
Data may sometimes be lost due to incorrect user action. Be sure to backup important data. Korg will not be responsible for damages caused by data loss.
Disclaimer
The information contained in this manual have been carefully revised and checked through. Due to our constant efforts to improve our products, the specifications might differ to those in the manual. Korg is not responsible for any eventual differences found between the specifications and the contents of the instruction manual - the specifications being subject to change without prior notice.
Trademarks
Windows is a registered trademark of Microsoft Corporation. All other trademarks or registered trademarks are the property of their respective holders.
Contents
Introduction....5
Installing the software 6
PC system requirements....6
KORG instrument requirements 6
Installing the software....7
Getting help....7
SongBook and removable media ....7
Creating and editing the SongBook on the instrument 8
Creating the Style-based SongBook Entries 8
Creating the MID/KAR- and MP3 file-based entries 8
Saving the SongBook to the internal memory.... 8
Exporting custom Factory Style names 9
From here on - do not edit anything on the instrument!....9
Connecting the devices and running SongBook Editor 10
Connecting the instrument to a PC....10
Launching SongBook Editor ....10
Choosing the Target....12
Opening the SongBook with SongBook Editor....14
Opening the SongBook 14
Browsing the SongBook Entries in the Book panel....14
Customizing the list view....15
Showing/hiding columns....15
Resizing columns....15
Changing the sorting order 16
Changing the fonts and colors....17
Filtering the entries shown in the Book panel 18
Creating a new SongBook with SongBook Editor ....19
Creating new SongBook Entries 20
Creating a new SongBook Entry....20
Linking resources 21
Linking resources from an USB storage device....21
Importing data to SongBook Entries....22
Importing MID/KAR and/or MP3 files 22
Preparing the data.... 22
Importing the files....23
Editing the entries....23
Editing basics....24
How to access editing.... 24
Editing parameters 24
Editing multiple entries.... 25
How to edit the parameters 25
Editing text strings.... 25
Choosing parameters from a pop-up menu.... 25
Automatically updated pop-up menus 26
Cutting, copying and pasting the entries.... 26
Deleting entries 26
Selecting all entries....26
Editing the SongBook Entries 27
Editing Style-based entries....27
Editing MID/KAR-based entries 30
Editing MP3-based entries....32
Copying the Keyboard Sets/STSs from other entries.... 33
Copying a single Keyboard Set/STS 33
Copying all Keyboard Sets/STSs 33
Custom/Set Lists 34
Creating a new Custom/Set List.... 34
Adding entries to the selected Custom/Set List 34
Seeing the content of a Custom/Set List 35
Editing entries 35
Moving entries up/down. 35
Deleting a Custom/Set List 36
Remapping Style and Pads....37
The remapping table ....37
Remapping 39
Saving the SongBook and reloading it to the instrument 43
Saving the edited SongBook....43
Quitting SongBook Editor 43
Disconnecting the instrument from the PC 43
Loading the edited SongBook on the instrument 44
Frequent operations 45
Changing reference to a bank of Styles 45
Changing reference to individual Styles 48
Changing the device and path to your MID/KAR, MP3 and Lyrics text files 52
Merging entries from two SongBooks.... 53
Exporting a list of entries 54
Appendix 55
Keyboard shortcuts 55
Version History 56
Introduction
Thank you for using KORG's SongBook Editor for the Pa-Series Professional Arrangers and HAVIAN 30 Digital Ensemble Piano. All models featuring the SongBook function are supported. With SongBook Editor you can:
• Create new SongBook Entries.
- Import multiple MID/KAR and MP3 files and batch-convert them to entries.
- Edit most entry parameters in multiple entries at once.
- Rename entries and edit parameters faster, by using the PC's keyboard.
- Add Lyrics as TXT files linked to the entries.
- See all parameters in adjacent columns, and quickly sort the entries in the Book list.
- Create and edit Set Lists/Custom Lists, using multiple selection and drag&drop.
- Drag&drop entries between SongBooks, and between SongBooks and text documents or spreadsheets.
- Change the file path of MID/KAR, MP3 files and text files.
- Change reference to Style locations and banks.
- Remap all references to the Styles and Pads of a different instrument.
- Copy Keyboard Sets/STSs between entries.
- Export a list of songs as a text file, to print your playlist for a show.
Installing the software
PC system requirements
To use SongBook Editor, you need a PC running under Microsoft® Windows® 7/8/8.1/10™.
KORG instrument requirements
The following table shows the requirements to use SongBook Editor with your KORG instrument.
| OS MP3 HD/SSD SD Card | ||||
| Pa4X latest version standard standard - | ||||
| Pa3X latest version standard standard - | ||||
| Pa3XLe latest version standard standard - | ||||
| Pa2X latest version standard standard - | ||||
| Pa1X latest version optional required | - | |||
| Pa900 | latest version standard standard - | |||
| Pa800 | latest version optional | suggested | - | |
| Pa600 | latest version standard standard - | |||
| Pa500/Pa588 | latest version - | - | required | |
| Pa300 | latest version standard standard - | |||
| HAVIAN 30 | latest version standard standard - | |||
Note: You can find the latest OS in our web site (www.korg.com).
Note: MP3 entries will only work on models with an MP3 board installed, or with MP3 reading capabilities included as a standard feature.
Installing the software
After downloading the installer, follow these easy steps:
1 Double-click the installer's icon.
2 Follow the instructions appearing on screen.
Getting help
Whenever you need to access these instructions, choose the Help > SongBook Editor User Guide (F1) command from the application menu.
SongBook and removable media
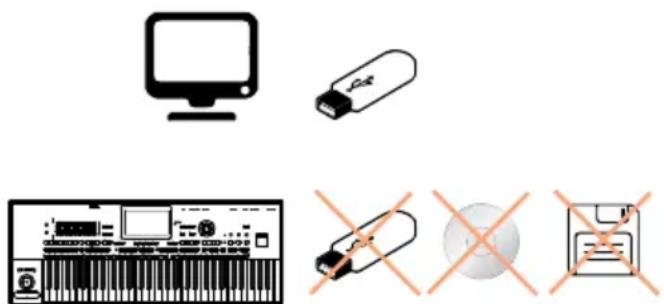
SongBook Editor cannot see any storage device connected to the instrument's USB HOST ports. However, it can read resources (MID/KAR, MP3, TXT files) from storage devices connected to the PC's USB port. You can therefore work with files on a storage device connected to your PC's USB port, then move the device to your instrument after editing.
Due to their low access speed, no floppy disks or CDs inserted in the PaIX's drives can be seen by SongBook Editor.
natural_image
Illustration of electronic devices including a monitor, USB flash unit, CD, and floppy disk with no visible text or symbolsCreating and editing the SongBook on the instrument
Before editing your SongBook with SongBook Editor, there are some operations you should carry on on your instrument to create your original SongBook.
Creating the Style-based SongBook Entries
It is advisable to create Style-based Entries on the instrument, since this will allow all the actual values of the Style Settings or Style Performance (including Sounds, EQ, FX, Keyboard Sets, STS, Pads, etc...) to be copied to the SongBook Entries. On the contrary, creating Style-based Entries with SongBook Editor would only assign them default values, and would therefore require some additional work.
1 On the instrument, create a new SongBook database, or edit an existing one. Please read the instrument's User Manual for the relevant instructions.
2 Still on the instrument, create all Style-based SongBook Entries, as described in the User Manual.
Creating the MID/KAR- and MP3 file-based entries
If you want, create the MID/KAR- and MP3-based entries on the instrument. However, please keep in mind that you can do it in an easier and quicker way, if there are many entries to create, by using SongBook Editor.
Saving the SongBook to the internal memory
Before editing the SongBook database with SongBook Editor, you must create the relevant files in the internal memory of your instrument.
1 On the instrument, save the SongBook to the internal memory, by using the Media (Disk) > Save All operation. A new SET folder will be created, containing the Book (SBD) and Custom/Set List (SBL) files, together with all the other User data (including the User/Favorite Styles).
2 For safety reasons, before any editing operation we suggest you make a backup of the instrument's memory content, by using the Media (Disk) > Utility > Full Resources Backup command.
Important: Always keep a backup copy of your original SongBook files before editing them! Saving an edited SongBook file over an existing one will permanently delete the older one.
Exporting custom Factory Style names
Standard Factory Style names are always shown in SongBook Editor. If you customized the Factory Style banks, you have to export their names before editing.
1 On the instrument, remove the write and save protection from the Factory Styles, by deselecting the Factory Protect or Factory Style and Pad Protect checkbox in the Global > Mode Preferences > Media, or the Media (Disk) > Preferences page.
2 Save the Factory Styles, as explained in the following table.
| Model Factory Style saving procedure | |
| Pa4X, Pa3XLe, Pa900, Pa600, Pa300, HAVIAN 30 | Save the Factory Styles together with the other data, by using the Media > Save All command. |
| Pa3X, Pa2X, Pa800, Pa1X, Pa500, Pa588 | Separately save each single Factory Style bank into the SET folder where you will save the SongBook files, by using the Media (Disk) > Save > Bank operation. Save all the Factory Style banks, or the missing names will be replaced by default names in SongBook Editor. |
From here on - do not edit anything on the instrument!
Starting from the following pages, all editing will be done on a PC and not on your instrument. Any further editing carried on on the instrument before reloading the modified SongBook files will be lost.
Connecting the devices and running SongBook Editor
Before editing the SongBook, you must connect your instrument to a PC, and run SongBook Editor.
Connecting the instrument to a PC
To make your instrument communicate with a PC running SongBook Editor, you must connect them by using an USB cable. When it is connected to a Pa-Series instrument, the PC can see the instrument's internal memory as if it was an ordinary storage device. At this point, you can directly work on the SongBook files, and the MID/KAR, MP3 and TXT files contained in the internal memory of the instrument.
1 Use a standard USB cable to connect the USB DEVICE port of the instrument to an USB port of the PC.
2 On the instrument, go to the Media (Disk) > USB page. On most instruments, choose the KORG DISK device (that is, the internal memory). Then press the Enable button. The icon of the instrument's internal memory will appear among those of all the devices connected to your PC.
3 If you moved the linked resources (MID/KAR, MP3, TXT files) to an external storage device (used as an external portable library), connect it to a different USB port on your PC.
Launching SongBook Editor
After having connected the instrument to a PC, run SongBook Editor. The main screen of the software will appear, with a standard menu and a single window split in three panels, as shown in the illustration below. (When first running the application, the panels are empty; we show them populated for ease of understanding).
The Book panel. This is where the full list of Songs included in the SongBook appears. It is the equivalent of the Book page of the instrument.
| KORG PA-Series SongBook Editor - [C:\Program Files\KORG\SB Editor\Paix Standard SongBook.set.] | |||||||||||||
| File Edit Help | |||||||||||||
| Book | Target: Par#o | ||||||||||||
| Sel. ... | Type | Name | Artist | Genre | Key | Tempo | Meter | M. Transp. | Synchro ... | Synchro ... | Memory | Keyboard... | Keyboard |
| - | sty | (Wanna c... | Pop | ---- | 64 | 4/4 | 0 | unchanged | unchanged | unchanged | Steel Guit... | Piano | |
| - | sty | 1 day my... | Swing W... | ---- | 160 | 3/4 | 0 | unchanged | unchanged | unchanged | Miles Tru... | Classic | |
| - | sty | 1 momen... | Ballad | ---- | 80 | 4/4 | 0 | unchanged | unchanged | unchanged | Piano | Piano P | |
| - | sty | 1/2 minute | Pop | ---- | 108 | 4/4 | 0 | unchanged | unchanged | unchanged | Nylon Gul... | Piano | |
| - | sty | 1000gior... | Ballad | ---- | 76 | 4/4 | 0 | unchanged | unchanged | unchanged | Piano | E.Flano | |
| - | sty | 3 times a... | Ballad | ---- | 78 | 3/4 | 0 | unchanged | unchanged | unchanged | ConcertG... | E.Guitar | |
| - | sty | 4 your love | Ballad | ---- | 67 | 4/4 | 0 | unchanged | unchanged | unchanged | Piano bell | Harmon | |
| - | sty | A believer | Pop Rock | ---- | 164 | 4/4 | 0 | unchanged | unchanged | unchanged | Organ | El. Gults | |
| - | sty | A blue vel... | Soundtrack | ---- | 80 | 4/4 | 0 | unchanged | unchanged | unchanged | Nylon Gtr ... | Cornet | |
| - | sty | A day in ... | Ballad | ---- | 103 | 4/4 | 0 | unchanged | unchanged | unchanged | Fantasy | Nylon G | |
| - | sty | A felicido... | Latin | ---- | 104 | 4/4 | 0 | unchanged | unchanged | unchanged | Real Nylon | Alto Sei | |
| - | sty | A gigolo | Pop | ---- | 123 | 4/4 | 0 | unchanged | unchanged | unchanged | Jimmy Or... | Piano | |
The Set Lists/Custom Lists panel. This is where you can see all the available Set Lists/Custom Lists associated to the selected Book. This panel is the equivalent of the Set List/Custom List pop-up menu of the instrument.
The Selected List panel. This is were you can see the content of the selected Set List/Custom List. It is the equivalent of the Set List/Custom List page of the instrument.
Choosing the Target
The first time you run SongBook Editor, use the Target parameter in the Preferences dialog to select your instrument as the “target” device. This will allow the software to use the correct file format for your instrument. You won’t have to select it again later, since this setting will remain memorized through all the subsequent editing sessions.
Please note that SongBook Entries created with more recent Pa-Series models could be removed from the SongBook, when choosing an older model as the target.
| Chosen Target | Entries preserved/removed |
| Pa4X All the entries from any Pa-Series instrument are always pre-served. | |
| Pa3X, Pa3XLe, Pa900, Pa600, Pa300, HAVIAN 30 | All the entries from any Pa-Series instrument are always pre-served (except for the entries from Pa4X, that are removed when choosing this target, or opening a SongBook file after having selected the target). |
| Other Pa-Series Models Entries created with Pa4X, Pa3X, Pa3XLe, Pa900, Pa600, Pa300, HAVIAN 30 are removed when choosing this target. These entries are also removed when opening a SongBook file after having selected the target. | |
1 Choose the File > Preferences... command to open the Preferences dialog. You will see the Target parameter on top of the dialog.
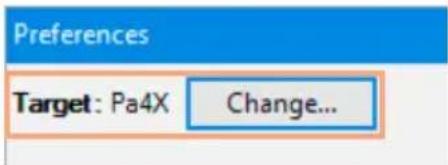
2 Click the Change... button to open the Target dialog.
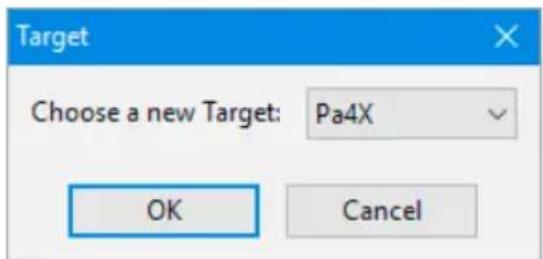
3 Choose from the list the Target corresponding to your instrument, then click the OK button to confirm.
4 Click the OK button to close the Preferences dialog.
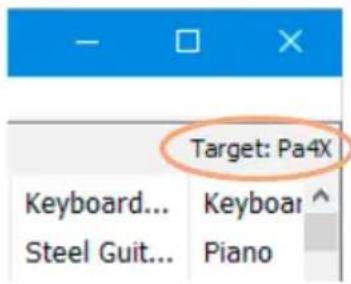
When done, the chosen Target will be shown in the top-right corner of the application window.
Opening the SongBook with SongBook Editor
The SongBook can be opened with SongBook Editor, where you can see its content in a database-like fashion.
Opening the SongBook
Before editing, open the SongBook files from the internal memory of the instrument. In SongBook Editor, choose the File > Open command, and browse the files in the internal memory of the instrument.
1 Find the SET folder containing the instrument's internal data (you previously saved), and click its name to highlight it.
2 Click the Select Folder button to load the SET folder.
Browsing the SongBook Entries in the Book panel
After opening the SongBook files, the list of SongBook Entries that it contains will appear in the Book panel (corresponding to the Book page on the instrument). The Book's content is shown in a database-like fashion, with each SongBook Entry corresponding to a row, and the various parameters of the entry shown in the adjacent columns.
| Book | Target: Pe4K | ||||||||||||
| Sel. ... | Type | Name | Artist | Genre | Key | Tempo | Meter | M.Transp. | Synchro ... | Synchro ... | Memory | Keyboard... | Keyboan |
| - | midi | LoveSong | Ballad | - - - - - | 240 | 1/4 | 0 | n/a | n/a | unchanged | Piano 1 | Piano 2 | |
| - | mp3 | A Better ... | Alternativ... | - - - - - | - - | - - - | 0 | n/a | n/a | unchanged | Piano 1 | Piano 2 | |
| - | sty | Long trail... | Pop | - - - - - | 120 | 4/4 | 0 | unchanged | unchanged | unchanged | Wurly | Organ | |
| - | sty | Black or b... | Pop | - - - - - | 115 | 4/4 | 0 | unchanged | unchanged | unchanged | Crunch Gtr | Steel gu | |
| - | sty | Morning | Pop | - - - - - | 92 | 4/4 | 0 | unchanged | unchanged | unchanged | Jazz Guitar | Suitecas | |
| - | sty | Laura no... | Pop | - - - - - | 128 | 4/4 | 0 | unchanged | unchanged | unchanged | Steel Guit... | Organ | |
| - | sty | This is life | Pop | - - - - - | 105 | 4/4 | 0 | unchanged | unchanged | unchanged | Studio St... | Piano & | |
| - | sty | Ballada A... | Ballad | - - - - - - | 70 | 4/4 | 0 | unchanged | unchanged | unchanged | Classic Gr... | Orchestra | |
| - | sty | Ⅱ mio sole | Pop | - - - - - - | 98 | 4/4 | 0 | unchanged | unchanged | unchanged | Classic Gr... | Tenor Si | |
| - | sty | All at one... | Ballad | - - - - - - | 65 | 4/4 | 0 | unchanged | unchanged | unchanged | Classic E..... . . . . . . . . . . . . . . . . . . . . . . . . . . . . . . . . . . . . . . . . . . . . . . . . . . . . . . . . . . . . . . . . . . . . . . . . . . . . . . . . . . . . . . . . . . . . . . . . . - sty All the time Ballad 88 4/4 0 unchanged unchanged unchanged unchanged Unchanged Studio St... Trumpet v Filter... Filtered: 670Songs Total: 670 Songs | ||
Customizing the list view
Showing/hiding columns
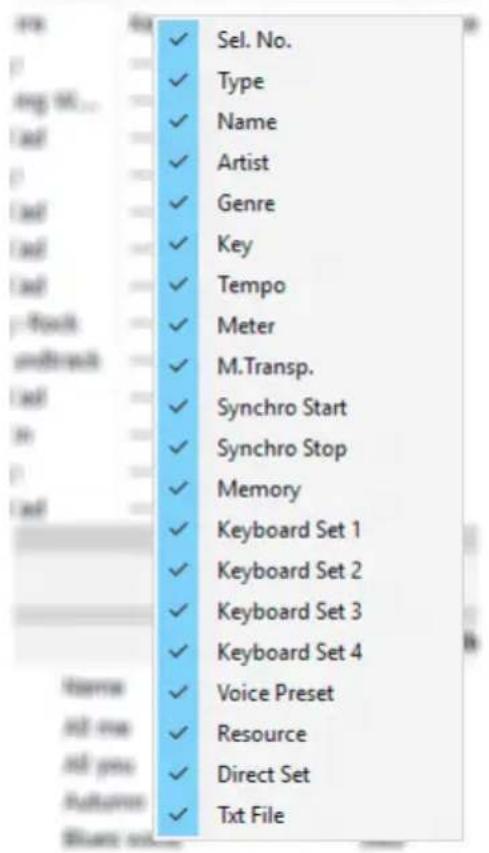
You can choose which columns to see in the panels.
1 Click a column header with the right mouse button.
2 When the list of available options appears, select/deselect the name of the column to be shown/hidden.
Resizing columns
You can change the width of each column to better fit the content.
When moving the mouse pointer over the line dividing two column headers, the pointer's shape changes to the resize tool. Grab the right margin of a column header, then drag it.
2 To set a column's width to the optimum size, double-click its right margin.
Changing the sorting order
You can change the order of the SongBook Entries shown in the list, by choosing a particular sorting criterion (by Name, Genre, Author, and so on).
1 Click a column header to select the corresponding sorting criterion.
2 Click a second column header to change the sorting.
Each time you choose a different sorting criterion, the previous criterion is considered as a "sub-criterion" for the new one. For example, you can alphabetically order your entries by Name:
| Name | Genre |
| (Wanna come) ... | Pop |
| 1 day my prince | Swing Waltz |
| 1 moment in time | Ballad |
| 1/2 minute | Pop |
| 1000giorni di noi | Ballad |
Then you change the order to Genre; inside the genre alphabetical ordering, entries are still alphabetically ordered by name:
| Name | Genre |
| 1 moment in time | Ballad |
| 1000giorni di noi | Ballad |
| 3 times a lady | Ballad |
| 4 your love | Ballad |
| A day in Paradise | Ballad |
3 Click the selected column header to change the sorting order from ascending to descending, or vice versa.
Changing the fonts and colors
Fonts and colors of the list items can be customized.
1 Choose the File > Preferences... command to open the Preferences dialog.
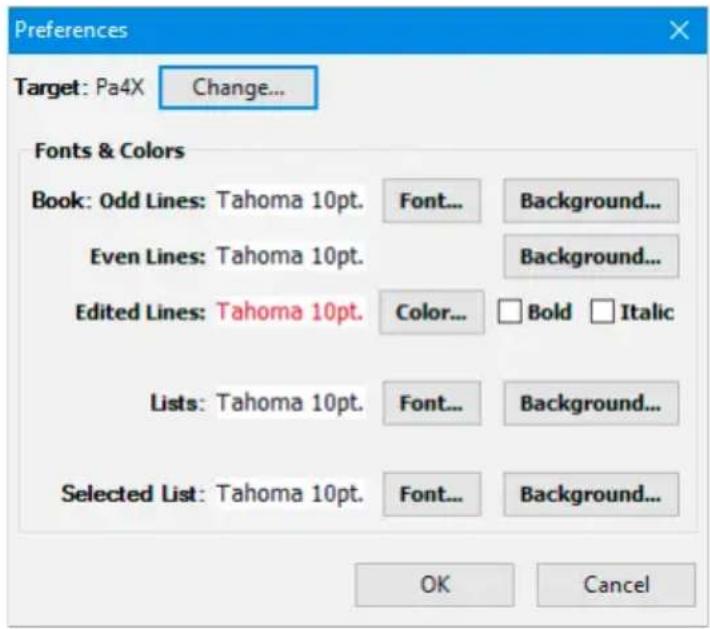
2 Use the options of the Fonts & Color section to change the fonts and assign a different background color to the various panels. You can also assign different background colors to the alternating odd and even rows. Entries edited but not yet saved can have their own color.
3 When done, click the OK button to close the dialog.
Filtering the entries shown in the Book panel
If you want to view only the SongBook Entries based on the songs of a single author, or the songs of a particular genre, or selected according to other criteria, you can apply a 'filter' to the current view.
1 To define the view criteria click the Filter... button on the lower left corner of the Book panel, or choose the Edit > Filter... (Ctrl+F) command to open the Filter dialog.
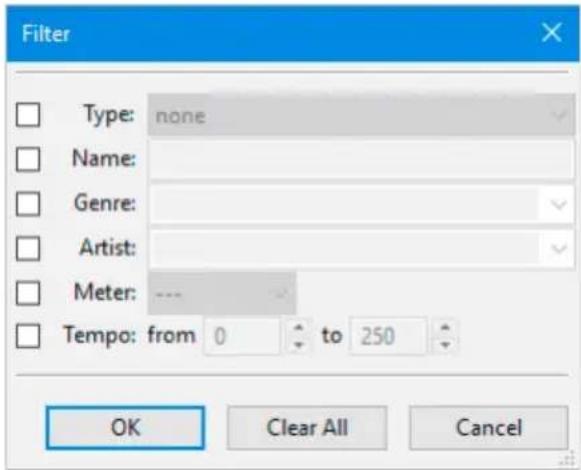
2 Edit the various filtering criteria (the available criteria are the same as on the Pa). When done, click the OK button to close the dialog.
3 Click the Filtered checkbox in the lower left corner of the Book panel to make the checkmark appear. The entries shown in the Book panel will change.

Filtered: 36 Songs
4 When you want to see all the entries again, remove the checkmark from the Filtered checkbox.
Creating a new SongBook with SongBook Editor
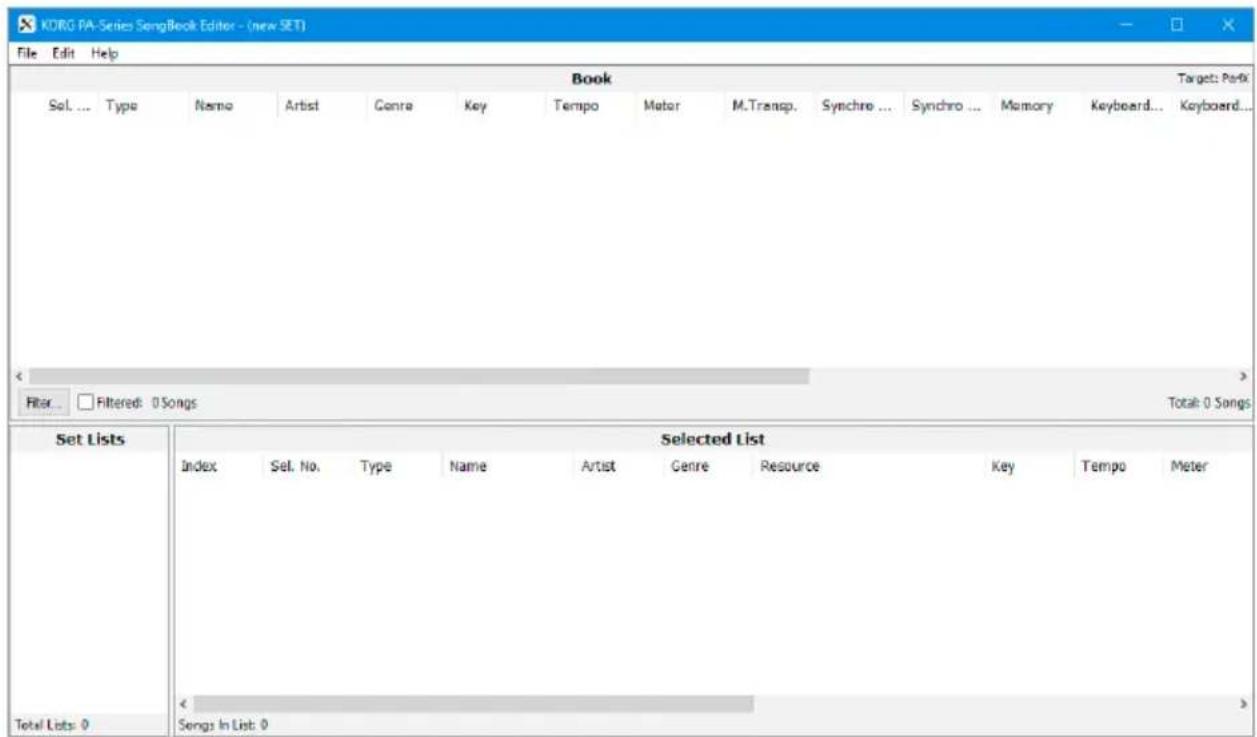
You can create a new, empty SongBook, where you can manually add new entries or import MID/KAR and MP3 files to automatically create new entries.
• To create a new SongBook, choose the File > New command from the menu.
Creating new SongBook Entries
You can create new entries, to be added to a new or existing SongBook.
Creating a new SongBook Entry
You can create three different types of SongBook Entry.
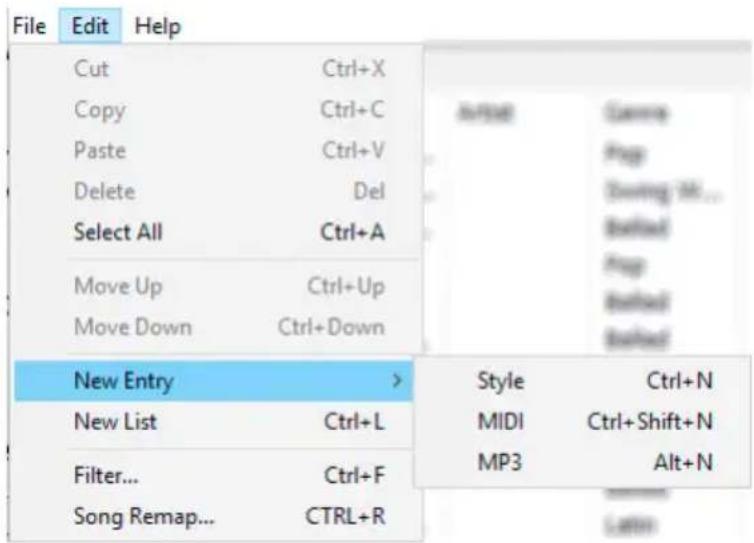
1 Use the Edit > New Entry commands to create new SongBook Entries with SongBook Editor.
- Choose the Edit > New Entry > Style (Ctrl+N) command to create a Style-based entry. As an alternative, right-click and choose the New Entry > Style command.
- Choose the Edit > New Entry > MIDI (Ctrl+Shift+N) command to create a MID/KAR-based entry. As an alternative, right-click and choose the New Entry > MIDI command.
- Choose the Edit > New Entry > MP3 (Alt+N) command to create an MP3-based entry. As an alternative, right-click and choose the New Entry > MP3 command.
2 Edit the various parameters in the Edit dialog (see "Editing the SongBook Entries" on page 27).
Linking resources
When you create a new entry, you can link any of the resources contained in your instrument's internal memory. You can also link some of the resources from an USB storage device, as described below.
| Resource Type Position | |
| Keyboard Sets/STSs System. Direct Keyboard Sets also on internal memory, internal HDD, USB storage device | |
| Style System. Direct Styles also on internal memory, internal HDD, USB storage device | |
| MID/KAR file Internal memory, internal HDD, USB storage device | |
| MP3 file Internal memory, internal HDD, USB storage device | |
| TXT file Internal memory, internal HDD, USB storage device | |
| Voice Preset System |
Please keep in mind that no resource is copied into the SongBook Entries, but they are only linked to them. If you move the SongBook files to a different instrument, or the resources to a different folder, links can be broken, unless you recreate exactly the same data structure (see "Frequent operations" on page 45).
Linking resources from an USB storage device
You might want to keep your MID/KAR, MP3 and TXT file collections on an USB storage device (memory stick, external HD drive...) instead of your instrument's internal memory. If your instrument supports Direct Keyboard Sets and Styles, you can also keep them in the same device.
Move all your resources to an external USB storage device. While editing a SongBook with SongBook Editor, connect the USB storage device to the PC. When finished editing, connect the USB device back to your instrument. When using the SongBook, your instrument will need this device to be connected to its USB HOST port.
Importing data to SongBook Entries
Instead of being individually created one by one, SongBook Entries can be created en masse by importing a series of MID/KAR or MP3 files.
Importing MID/KAR and/or MP3 files
You can import all the MID/KAR and MP3 files contained in a folder residing inside the internal memory of your instrument, or in an external USB storage device. These files will be automatically converted into SongBook Entries. The imported entries can be added to an existing SongBook, or to a new, empty SongBook.
In case there are ID3 data inside the imported MP3 files, these will be converted into SongBook data (Title, Author...). Basic data and some metadata contained inside MID/KAR files will also be converted into SongBook data (Key, Time Signature, Tempo...). With Pa4X, Pa3X, Pa3XLe, Pa900, Pa600, Pa300 and HAVIAN 30, the Master Transpose is also converted.
Preparing the data
It is advisable that all the files stay in the same place. Copy all your MID/KAR, MP3 and TXT files into the internal memory of the instrument, or into an external USB storage device to be used as your instrument's external library. The files have to be accessible from your instrument when you use the SongBook you are editing.
1 Connect any external storage device to your PC. If you intend to use an USB storage device as the instrument's external library, connect it to the PC.
2 Connect your instrument to the PC, and enable USB connection on the instrument.
3 Open the external devices and the instrument memory content into new windows of your PC's desktop.
4 Copy all the sparse MID/KAR, MP3 and TXT files from the external devices to the internal memory of the instrument, or to the USB storage device to be used as the instrument's external library. Collecting the different types of songs in
separate folders (for example, by name, music genre or type of file) will make retrieving them later easier.
Important: Do not copy files inside any of the SET folders! These folders are reserved to the instrument's internal data, and must be left untouched. Use generic folders instead.
Importing the files
After you have moved all the files into your instrument's internal memory or external USB storage device, start importing them.
In SongBook Editor, choose the File > Import Files... (Ctrl+I) command. A standard file selector will appear. You can then select files from the internal memory of your instrument or from the external library device.
2 Select the file(s) with the .mid, .kar and .mp3 extensions you want to import. Then click the Open command to import the selected MID/KAR and MP3 files, and convert them to SongBook Entries.
Hint: When in this file selector, you can use the Shift+click shortcut to select multiple contiguous files, or the Ctrl+click shortcut to select multiple non-contiguous files.
Editing the entries
After having imported the files, you can go on editing single or multiple entries. For example, you can copy the Keyboard Sets or Voice Presets from other entries, choose the Author and Genre, link a text file to be used as the Lyrics, and so on. Please refer to the relevant instructions later in this manual.
Editing basics
Before editing, please learn the basic editing operations. These operations affect the entries in all panels (Book, Set Lists/Custom Lists, Selected List).
How to access editing
Editing parameters
- Double-click the entry you want to edit to open the Edit dialog (see "Editing the SongBook Entries" on page 27).
• As an alternative, right-click it, and choose the Edit command.
Please note that not all parameters can be edited, and not all parameters may appear for the chosen target. The following table shows which parameters can or can't be edited. Please see the instrument's User Manual for more information on their meaning.
| Parameter Editable | |
| Index (only in Set List/Custom List entries) | |
| Sel.No. (Song Selection Number) √ | |
| Type (Resource Type) | |
| Name (SongBook Entry's Name) √ | |
| Artist^(*) | √ |
| Genre^(*) | √ |
| Key^(*) | √ |
| Tempo | |
| Meter^(*) | √ |
| Master Transpose | |
| Synchro Start (Synchro Start button) √ | |
| Synchro Stop (Synchro Stop button) √ | |
| Memory (Memory button) √ | |
| Harmony Track √ | |
| Keyboard Set #1...4 only on some models | |
| Voice Preset only on some models | |
| Global Voice Preset only on some models | |
| ResourceStyle based entry: Style bank and Style name. Song based entry: File path (including name) of the associated MID/KAR or MP3 file | √ |
| Direct SET (SET folder used as the Direct folder) only on some models | |
| Txt fileFile path (including name) of the text file associated to the SongBook Entry | √ |
| (*) Note: As in the instrument, these parameters are just indicators. They have no effect on the entry's playback. | |
Entries that have been edited, but not yet saved, are shown in red (by default). They will become black again once the SongBook has been saved. Please note that text colors can be customized in the Preferences dialog (see “Changing the fonts and colors” on page 17).
Editing multiple entries
You can select and edit more that a single entry at once. Please be advised that some parameters cannot be modified when editing multiple entries (for example, the entry's name, or parameters pertaining to different types of entries).
1 Click the entries to select.
- Select more consecutive entries by Shift-clicking.
• Select more non-consecutive entries by Control-clicking.
2 Right-click the selected entries and choose the Edit command.
How to edit the parameters
Editing text strings
Some parameters - for example, SongBook Entry names - require you enter a text string. Note that names are case-sensitive, i.e., "Name" is not the same as "name". Also, please note that duplicate entry names are not allowed.
Choosing parameters from a pop-up menu
Some parameters allow you to choose a value from a pop-up menu. Click the down-pointing arrow next to the option name and choose the desired value.
Automatically updated pop-up menus
Each time you create a new entry or edit an existing one, its data are added to the pop-up menus, so that you can choose them when entering/editing other entries. For example, if you enter "Rock" in the Genre field, and this genre is not yet included in the list, the "Rock" option will be automatically added to the Genre pop-up menu.
Cutting, copying and pasting the entries
You can use the standard Cut, Copy and Paste operations inside SongBook Editor, between different SongBook Editor instances, or between SongBook Editor and a text editor or spreadsheet. The clipboard's content is in the "text delimited by tabs" format.
- Choose the Edit > Cut (Ctrl+X) command to cut the selected item(s) and move it (them) to the clipboard. As an alternative, right-click the item(s) and choose the Cut command.
- Choose the Edit > Copy (Ctrl+C) command to copy the selected item(s) to the clipboard. As an alternative, right-click the item(s) and choose the Copy command.
- Choose the Edit > Paste (Ctrl+V) command to paste at the current position the item(s) contained in the clipboard. As an alternative, right-click and choose the Paste command.
Deleting entries
- Select the item(s) to be deleted, then choose the Edit > Delete (Del) command to delete. As an alternative, press the Delete key, or right-click and choose the Delete command.
Selecting all entries
- Choose the Edit > Select All (Ctrl+A) command to select all the entries.
• As an alternative, right-click and choose the Select All command.
Editing the SongBook Entries
By opening the Edit dialog, you can edit the fine details of each new or existing entry.
Editing Style-based entries
This type of entry will automatically select the Style Play mode and select a Style.
- Choose a Style-based entry, and double-click it to open the Edit Style Entry dialog.
With this type of entry, you can choose (respectively) the bank and position number of the assigned Style.
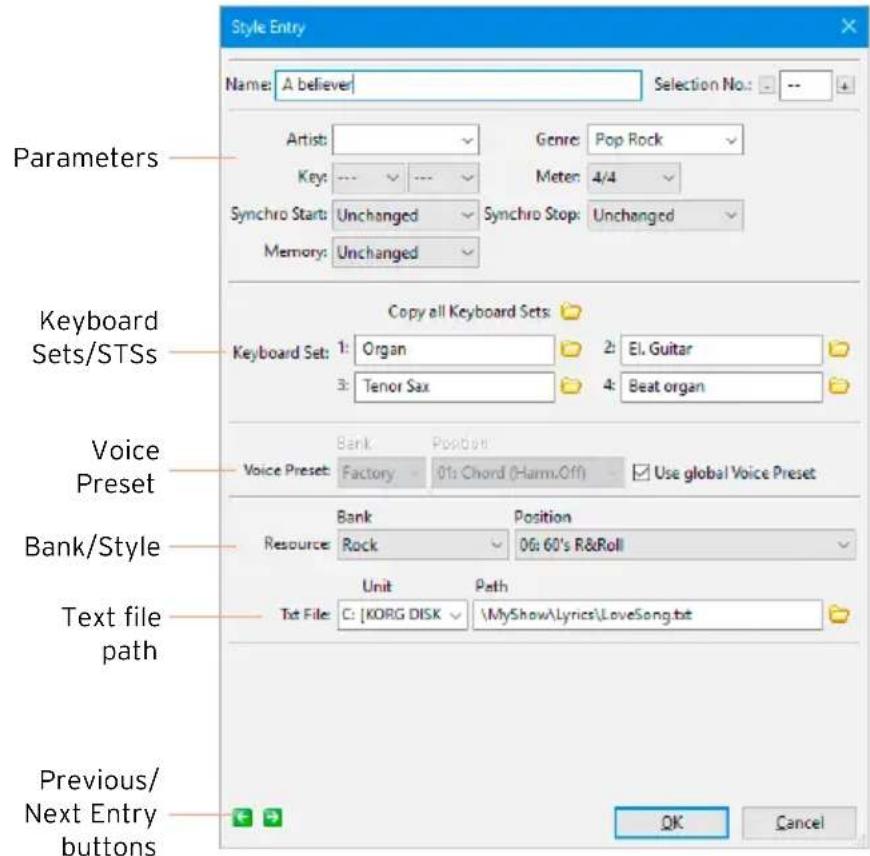
Parameters – These are the same parameters found in the Book pages of the instrument. The Tempo and Master Transpose values are those saved into the Style Settings (Style Performance).
Keyboard Sets/STSs – The four Keyboard Sets (STSs) contained in the SongBook Entry. You can edit their names, and copy them from a different entry by clicking the Browse icon (💡) next to the name.
Voice Preset – Voice Preset assigned to the entry. When the Use global Voice Preset checkbox is selected, the global Voice Preset will be used, and you can't choose a local Voice Preset.
Style Bank – Choose the Style Bank from the pop-up menu.
If you select a Direct bank, the Direct SET editable areas appear, to let you choose a SET folder to be used as the Direct SET folder. Click the Browse icon (💡) next to the path area to open a standard file selector, and choose a SET folder.
Style – This is the Style inside the selected Bank; both the Style number and name are shown.
Text drive unit and path – Click the Browse icon (💡) next to the path area to open a standard file selector, and choose the text file.
The text path is divided into the drive unit (on the left) and the actual path (on the right). This allows you to change the drive separately from the path, so that you can copy entire directories between drives, without having to re-edit long directory strings. You do not need to connect the external drives while editing.
The typical path format is the following:
[label]\foldername1\foldername2\filename.txt
In some cases, the label can be replaced by the unit ID:
c:\foldername1\foldername2\filename.txt
When editing multiple entries, you can only edit the path, but not the file name; this is useful if you renamed a folder, or have moved the text files to a different folder or directory level. Check the Text file path checkbox, and enter a string similar to the following one (without any final backslash):
[label]\newfoldername1\newfoldername2
Drive units, like hard drives and USB storage devices, are represented by their label. As an alternative, they can be represented by their ID, as indicated in the following table:
| ID/Label Storage device | |
| Pa4X | |
| C2: or [KORG DISK]* | Internal memory (SSD) |
| [KORG HD]* | Internal Hard Disk |
| [KORG SD]* | Internal memory (microSD) |
| [label]* | Storage device connected to one of the USB Host ports |
| Pa3X | |
| C2: or [label]* | Internal memory (Hard Disk/SSD) |
| [label]* | Storage device connected to one of the USB Host ports |
| Pa3XLe/Pa900 | |
| C2: or [KORG DISK]* | Internal memory (SSD) |
| [KORG SD]* | Internal memory (microSD) |
| [label]* | Storage device connected to the USB Host port |
| Pa600/Pa300/HAVIAN 30 | |
| C2: or [KORG DISK]* | Internal memory (SSD) |
| [label]* | Storage device connected to the USB Host port |
| Pa2X/Pa800 | |
| F2: or [label]* | Internal SSD-U memory |
| C: or [label]* | Internal Hard Disk |
| [label]* | Storage device connected to one of the USB Host ports. |
| Pa1X | |
| B: Floppy Disk | |
| C: or [label]* | Hard Disk |
| D: CD Drive | |
| Pa500/Pa588 | |
| E: or [label]* | SD Card |
| * The [label] is the name assigned to the storage device. When writing the label by hand, do not forget to also include the square brackets around the name (for example, “[KHD_USER]”). | |
Previous/Next Entry buttons – Click the Previous button to edit the previous entry of the list, or the Next button to edit the next entry of the list, without having to close the dialog.
OK/Cancel buttons – Click the OK button to confirm changes and close the dialog, or the Cancel button to abandon the changes and close the dialog.
Editing MID/KAR-based entries
This type of entry will automatically select the Song Play mode, and assign a Standard MIDI File (MID or KAR file) to the Player (or one of the Players).
- Choose a MID/KAR-based entry and double-click it to open the Edit MIDI Entry dialog.
With this type of entry, you can write the full path of the Standard MIDI File used as the resource.
![MIDI Entry Name: LoveSong Selection No: -- Artist: Genre: Ballad Key: Meter: 1/4 Synchro Start: Unchanged Synchro Stop: Unchanged Memory: Unchanged Parameters Keyboard Sets/STSs Copy all Keyboard Sets: Keyboard Set: 1: Piano 1 2: Piano 2 3: Piano 3 4: Piano 4 Voice Preset Bank Position Voice Preset: Factory 01: Chord (Harm,Off) Use global Voice Preset MID/KAR file path Unit Path Resource File: [KORG DISK] MyShow\Songs\LoveSong.mid Unit Path Text File: [KORG DISK] MyShow\Lyrics\LoveSong.txt Previous/ Next Entry buttons OK Cancel](/content/2026/05/763323/images/049493902c98c507ef72fe042cb4840f40b94d872f94cda0d1ae0f0308985e6c.jpg)
Parameters – These are the same parameters found in the Book Edit pages of the instrument. Entries created on the instrument or imported get the starting Tempo of the MID/KAR file. Entries created in SongBook Editor, or edited in order to change the referred MID/KAR file, get a default blank Tempo value (---) (not shown in this dialog).
Keyboard Sets/STSs – The four Keyboard Sets (STSs) contained in the SongBook Entry. You can edit their names, and copy them from a different entry by clicking the Browse icon (💡) next to the name.
Voice Preset – Voice Preset assigned to the entry. When the Use global Voice Preset checkbox is selected, the global Voice Preset will be used, and you can't choose a local Voice Preset.
Standard MIDI File and text paths – Click the Browse icon (💡) next to the path area to open a standard file selector, and choose the MID/KAR file or the text file. Click the Update icon (💡) to update the information contained in the MID/KAR file (in case the file contains any) (to be used when the linked file has been replaced).
The MID/KAR file and text paths are divided into the drive unit (on the left) and the actual path (on the right). This allows you to change the drive separately from the path, so that you can copy entire directories between drives, without having to re-edit long directory strings. You do not need to connect the external drives while editing.
The typical path format is the following:
[label]\foldername1\foldername2\filename.mid
In some cases, the label can be replaced by the unit ID:
c:\foldername1\foldername2\filename.mid
When editing multiple entries, you can only edit the path, but not the file name; this is useful if you renamed the folder, or have moved the songs to a different folder or directory level. Check the Resource file path checkbox, and enter a string similar to the following one (without any final backslash):
[label]\newfoldername1\newfoldername2
Drive units, like hard drives and USB storage devices, are represented by their label. As an alternative, they can be represented by their ID, as in the table seen above for the Styles.
Previous/Next Entry buttons – Click the Previous button to edit the previous entry of the list, or the Next button to edit the next entry of the list, without having to close the dialog.
OK/Cancel buttons – Click the OK button to confirm changes and close the dialog, or the Cancel button to abandon the changes and close the dialog.
Editing MP3-based entries
This type of entry will automatically select the Song Play mode, and assign an MP3 file to the Player (or one of the Players).
- Choose an MP3 file-based entry, and double-click it to open the Edit MP3 Entry dialog.
With this type of entry, you can write the full path of the MP3 file used as the resource.
![MP3 Entry Name: A Better Song Selection No: -- Artistic Genres: Alternative & Punk Key: Meter: Synchro Start: Unchanged Synchro Stop: Unchanged Memory: Unchanged Parameters Keyboard Sets/STSs Copy all Keyboard Sets: Keyboard Set: 1: Piano 1 2: Piano 2 3: Piano 3 4: Piano 4 Voice Preset Bank Position Voice Preset: Factory 01: Chord (Horm.Off) Use global Voice Preset MP3 file path Resource File: Unit Path [KORG DISK] MyShow\MP3\BetterSong.mp3 Text file path Unit Path [TAT File: KORG DISK] MyShow\Lynics\LoveSong.txt Previous/ Next Entry buttons OK Cancel](/content/2026/05/763323/images/3c69f74bd95f015f820f7cf0cb2ca751aa2c19e042743816a313b72e44be7a15.jpg)
Parameters – These are the same parameters found in the Book Edit pages of the instrument. Entries based on MP3 files get a default blank Tempo value (---) (not shown in this dialog). The Update icon ()updates ID3 tags (in case the MP3 file contains any of them).
Editing of the various parameters is the same seen above for MID/KAR file-based entries.
Copying the Keyboard Sets/STSs from other entries
While in the Edit dialogs, you can copy Keyboard Sets/STSs from other entries.
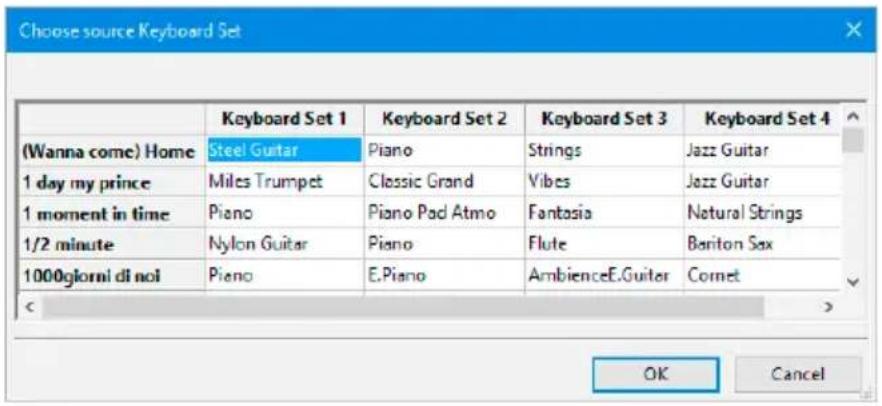
Copying a single Keyboard Set/STS
1 While in an Edit dialog, click the Browse icon (💡) next to the Keyboard Set/STS's name to be replaced.
2 When the Choose source Keyboard Set/STS dialog opens, choose an item from another entry.
Copying all Keyboard Sets/STSs
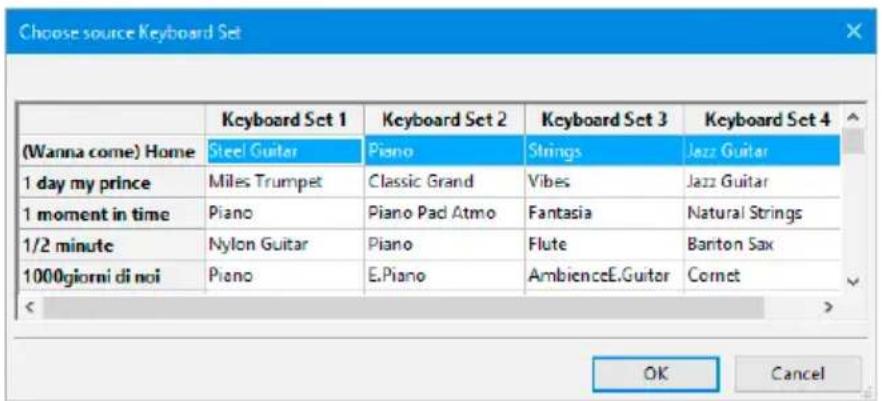
1 While in an Edit dialog, click the Copy all Keyboard Sets/STSs icon over the names of the Keyboard Sets/STSs to be replaced.
2 When the Choose source Keyboard Set/STS dialog opens, choose an entry from which to copy the Keyboard Sets/STSs from.
Custom/Set Lists
Custom/Set Lists are collections of SongBook Entries selected from the complete Book list. You can use them to create your own playlists. Up to 256 Custom/Set Lists can be contained into each SongBook database.
Creating a new Custom/Set List
- Choose the Edit > New List (Ctrl+L) command to create a new Custom/Set List. As an alternative, right-click anywhere in the Custom/Set Lists panel and choose the New List command. The new list will appear in the Custom/Set Lists panel.
Adding entries to the selected Custom/Set List
1 Select the Custom/Set List to which you want to add entries.
2 Grab entries from the Book panel, and drag them onto the Selected List panel.
| Custom Lists |
| Disco |
| Jazz |
| Pop |
| Rock |
| World |
| Ballad |
| Total Lists: 6 |
Hint: You can use the Shift+click shortcut to select multiple contiguous entries, or the Ctrl+click shortcut to select multiple non-contiguous entries.
Seeing the content of a Custom/Set List
- Click a Custom/Set List name in the Custom/Set Lists panel to see its content in the Selected List panel on its right.
The Custom/Set List's content is shown in a database-like fashion, with each entry in a row, and the various parameters of the entry in adjacent columns.
| Selected List | |||||||||||
| Index | Sel. No. | Type | Name | Artist | Genre | Key | Tempo | Meter | M.Transp. | Synchro ... | Synchro ... |
| 1 | -- | sty | All me | Jazz | ---- | 134 | 4/4 | 0 | unchanged | unchanged | |
| 2 | -- | sty | All you | Jazz | ---- | 140 | 4/4 | 0 | unchanged | unchanged | |
| 3 | -- | sty | Autumn I... | Jazz | ---- | 170 | 4/4 | 0 | unchanged | unchanged | |
| 4 | -- | sty | Blues waltz | Jazz | ---- | 148 | 3/4 | 0 | unchanged | unchanged | |
| 5 | -- | sty | Daylight ... | Jazz | ---- | 145 | 4/4 | 0 | unchanged | unchanged | |
| 6 | -- | sty | Favourite... | Jazz | ---- | 164 | 3/4 | 0 | unchanged | unchanged | |
| 7 | -- | sty | Four miles | Jazz | ---- | 220 | 4/4 | 0 | unchanged | unchanged | |
| 8 | -- | sty | Indian Lo... | Jazz | ---- | 175 | 4/4 | 0 | unchanged | unchanged | |
| 9 | -- | sty | I get misty | Jazz | ---- | 70 | 4/4 | 0 | unchanged | unchanged | |
Contrary to the Book list, this list cannot be ordered in a different way by clicking the various column headers. The only possible order is the one shown in the list, that is the order in which the entries will be played back.
Editing entries
You can apply to the entries shown in the Selected List panel the same editing operations already discussed for the entries shown in the Book panel. See "Editing the SongBook Entries" on page 27 for more information.
Moving entries up/down
You can reorganize the entries in the Custom/Set Lists or the Selected List panel by moving each of them to a different position.
- Simply drag&drop the entries to move them up or down the list.
- As an alternative, select the item to be moved, then choose the Edit > Move Up (Ctrl+Arrow Up) or Move Down (Ctrl+Arrow Down) command.
• You can right-click the entry and choose the Move Up or Move Down command.
Deleting a Custom/Set List
You can delete Custom/Set Lists you no longer need.
- Select the Custom/Set List to be deleted in the Custom/Set Lists panel, then press Delete.
- As an alternative, right-click the item to be deleted, then choose the Delete command.
Remapping Style and Pads
When switching to a new instrument, or customizing the Style banks in your instrument, you can automatically remap the Styles and Pads assigned to the SongBook Entries. (Pads are only available on some models).
The remapping table
To remap Styles and/or Pads, you need a dedicated remapping table matching the position of the source and destination Styles and/or Pads. A separate table is needed for the Styles, and one for the Pads. A remapping table can be either a tab-separated TXT file, or a comma-separated TXT file. We suggest you use the TXT format, much easier to read and edit.
To see how a table has to be made, you can use a text editor to examine the supplied remapping tables (found inside your default Documents folder). It is a plain text file (encoded as Unicode UTF-8), with a remapping operation per line. Each element of a line can be separated with any number of tabs. Comment lines start with a ‘#’ symbol. (To correctly align the elements, we suggest to use a non-proportional font).
| # | SOURCE | DESTINATION | EXTERNAL SET | ||
| # | Bank | Pos | Bank | Pos | |
| # | 1 | 1 | 2 | 1 | "[DriveName]/MyBook.set" |
| 1 | 2 | 2 | 2 | ||
| 1 | 3 | 2 | 3 | ||
| 1 | 4 | 2 | 4 | ||
| 1 | 5 | 2 | 5 | ||
| 1 | 6 | 2 | 6 | "[DriveName]/MyBook.set" | |
| 1 | 7 | ||||
| 3 | 22 | 18 | 1 | "[DriveName]/MyBook.set" | |
In general, this is a remapping table's structure:
| Source Destination Result after conversion | ||||
| Bnk Pos Bnk Pos | ||||
| 1111 Style/Pad 1 in Bank 1 will remain Style/Pad 1 in Bank 1 (never re-mapped) | ||||
| 140 Non remapped. If the "Delete > Song(s) based on non-remapped Styles" option is selected, all songs based on this Style will be deleted. | ||||
| 19129 Style/Pad 9 in Bank 1 will be moved to Style/Pad 29 in Bank 1 (different position inside the same bank) | ||||
| 1 | 37 | 5 | 37 | Style/Pad 37 in Bank 1 will be moved to Style/Pad 37 in Bank 5 (same position in a different bank) |
| 1541346 Style/Pad 4 in Bank 15 will be moved to Style/Pad 46 in Bank 13 (different position in a different bank) | ||||
| (Styles not included in the matching list) | Non remapped. If the "Delete > Song(s) based on non-included Styles" option is selected, all songs based on these Styles will be deleted. | |||
In case you are remapping to the Direct banks, please add the path of the Direct SET after the Destination columns (including the device label).
| Source Destination | Result after conversion | ||||
| Bnk | Pos | Bnk | Pos | Path | |
| 15 | 4 | 37 | 46 “[label]\foldername1\foldername2\name.set” | Style 4 in Bank 15 will be moved to Direct Style 46 in Bank 37, contained in the NAME.SET folder. | |
When converting Style-based SongBook Entries, MID/KAR-based Entries will be left untouched, and included in the destination SongBook as they were before remapping.
Please remap a SongBook only once, or entries will be remapped again to the wrong destination.
Remapping
Back up the current SongBook files
- On the instrument, save the SongBook into a new SET folder to keep a safety copy.
Edit the old SongBook on the PC
1 Use an USB memory device to copy the SET folder containing the SongBook files to be converted to your PC.
2 Run SongBook Editor and choose your new Pa-Series instrument as the Target.
3 Open the SET folder containing the SongBook files to be converted.
4 Choose the Edit > Song Remap... (Ctrl+R) command to open the Remap dialog.
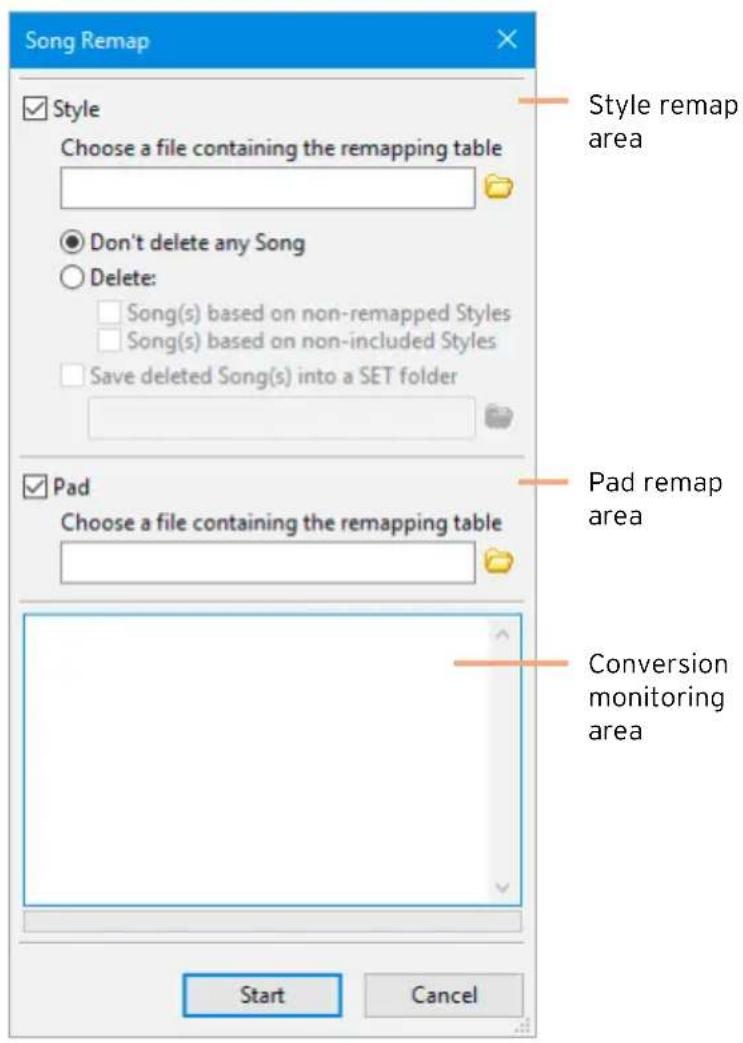
Remap the Styles
Style-based SongBook Entries include a link to a Style. If the Styles in your instrument have changed, you can remap these links.
1 Select the Style checkbox to remap the links to the Styles.
2 Click the Browse icon ( 🔍 ) next to the remapping table name field to open a standard file selector, and choose the Style's remapping table.
The following table shows the ID number corresponding to each bank of Styles. Each bank may contain the maximum number of Styles shown in the table. Each group of 8 consecutive Styles corresponds to one of the tabs shown in the bottom area of the Style Select window of the instrument.
| ID # Type Styles per Bank | ||
| Pa4X | ||
| 1-13 Factory 48 | ||
| 14-23 Favorite 48 | ||
| 24-26 User 48 | ||
| 27-36 Direct Favorite 48 | ||
| 37-39 | Direct User | 48 |
| Pa3X/Pa3XLe/Pa900/Pa600 | ||
| 1-15 | Factory 40 | |
| 18-20 User 40 | ||
| 21-32 | Favorite 40 | |
| Pa300/HAVIAN 30 | ||
| 1-15 | Factory 40 | |
| 18-20 User 40 | ||
| 21-28 | Favorite 40 | |
| Pa2X/Pa800 | ||
| 1-17 Factory | 32 | |
| 18-20 User | 32 | |
| 21-30 Favorite | 32 | |
| Pa1X | ||
| 1-16 | Factory | 32 |
| 18-20 User | 32 | |
| 21-23 | Direct FD (B:\DIRECTFD.SET) | 32 |
| 24-26 | Direct HD (C:\DIRECTHD\BANK123.SET) | 32 |
| ID # Type Styles per Bank | |
| 27-29 Direct HD (C:\DIRECTHD\BANK456.SET) 32 | |
| 30-32 Direct HD (C:\DIRECTHD\BANK789.SET) 32 | |
| 33 EXB01 64 | |
| 34 EXB02 64 | |
| Pa500/Pa588 | |
| 1-14 Factory 32 | |
| 15-16 User | 32 |
3 Choose whether you want to preserve or delete some entries. This is useful, for example, to delete all the entries based on older Styles you no longer want to use, or not available in a different instrument.
To preserve all the entries, select the Don't delete any Song option.
- To remove the entries based on Styles you no longer use or have been deleted, select the Delete > Song(s) based on non-remapped Styles checkbox. This will delete all the entries based on the Styles listed as the Source, but without a Destination. (If this checkbox is not selected, the entries will be left untouched.)
In the remapping table, include the Styles you no longer use, or have been deleted, in the Source column. The Destination column will be left empty.
- To remove a large batch of entries, select the Delete > Song(s) based on non-included Styles checkbox. This will delete all the entries based on Styles not included in the remapping table as the Source. (If this checkbox is not selected, the entries will be left untouched.)
In the remapping table, include all the Styles you want to preserve in the Source column, and remap them in the Destination column. Leave out of the Source column all the Styles you no longer use.
4 If you want to create a SongBook with all the deleted entries, to be later reviewed, select the Save deleted Song(s) into a SET folder checkbox. This will save all the deleted entries into a new SET folder. You can choose the SET folder where to save the list; if you type a new name, a new SET folder will be created.
Remap the Pads
Each SongBook Entry may include links to up to four Pads. If the Pads in your instrument have changed, you can remap these links.
1 Select the Pad checkbox if you want to remap the links to the Pads.
2 Click the Browse icon (💡) next to the remapping table name field to open a standard file selector, and choose the Pad's remapping table.
The following table shows the ID number corresponding to each bank of Pads. Each bank may contain the maximum number of Pads shown in the table below. Each group of 8 consecutive Pads corresponds to one of the tabs shown in the bottom area of the Pad Select window of the instrument.
| ID # Type Pads per Bank | ||
| Pa4X | ||
| 1-20 Factory 48 | ||
| 21-30 User 48 | ||
| 31-40 Local 48 | ||
| Pa3X/Pa3XLe/Pa900/Pa600 | ||
| 1-20 Factory 32 | ||
| 21-30 User 32 | ||
| 31-38 | Local | 32 |
| Pa300 | ||
| 1-20 Factory 32 | ||
| 21-28 | User 32 | |
| 31-38 | Local | 32 |
| Pa2X/Pa800/Pa500/Pa588 | ||
| 1-20 Factory 32 | ||
| 21-30 User 32 | ||
| 31-34 | Local | 32 |
| Pa1X | ||
| 1-20 Factory 32 | ||
| 21-30 User 32 | ||
Remap the entries
- Click the OK button to remap the SongBook Entries.
While the operation goes on, you can see information about the ongoing conversion in the lower area of the dialog.
Saving the SongBook and reloading it to the instrument
Once finished editing, save the SongBook and load it back to your instrument.
Saving the edited SongBook
After editing, save the edited SongBook.
- Choose the File > Save (Ctrl+S) command to save the file at the original position.
- Choose the Save As... (Ctrl+Shift+S) command to save a new file at the desired position. When choosing this command, first create a SET folder (for example "MySongBook.set"), then save into it.
Quitting SongBook Editor
When finished editing and saving your data, you can quit SongBook Editor.
- Choose the File > Quit (Ctrl+Q) command to quit from SongBook Editor.
Disconnecting the instrument from the PC
After having saved all the files, you can disconnect the instrument from the PC.
- On the PC, click the Window's Toolbar > Safe Hardware Removal icon ( ", and select the instrument's internal memory to disconnect it from the PC.
Loading the edited SongBook on the instrument
To make the edited SongBook active, you must reload it.
- On the instrument, use the relevant Media (Disk) > Load operation to load back the edited "SONGBOOK" folder from the SET folder. The active SongBook database will be updated.
- If you moved the linked resources (MID/KAR, MP3, TXT files) to an external storage device (used as an external portable library), connect it to your instrument's USB HOST port. Leave this device connected to the instrument each time you want to use the SongBook.
Frequent operations
There are some frequent operations that can be carried on, and that SongBook Editor makes easy to do on a PC.
Changing reference to a bank of Styles
Entire banks of Styles can be freely moved to different ones. This may be useful, for example, when moving a User bank to a Favorite or a Custom Factory one (or vice versa).
Create a new SET containing the SongBook and the Styles
1 On the instrument, be sure the SongBook to be edited is already loaded. If not, use the Load > [foldername.set] > Songbook operation.
2 Separately load each of the old banks of Styles into the new banks, by using the Load > Style > Bank operation.
3 Save a new SET folder into the internal memory by using the Save > All operation. This is the SET folder you will work on from SongBook Editor.
Open the SongBook from the PC
1 Connect your instrument to a PC by using a standard USB cable, and enable USB communication (see page 10).
2 From the PC, access the internal memory of the instrument.
3 Run SongBook Editor and choose your Pa-Series instrument as the Target.
4 Open the SET folder you just created. The old SongBook files and the names of the Styles will be loaded.
Edit the SongBook from the PC
1 In the Book panel, click the Resource column header to group all the entries by Style bank.
2 Select all the SongBook Entries that were linked to a particular Style bank (for example, all the entries linked to all the Styles in the Traditional bank).
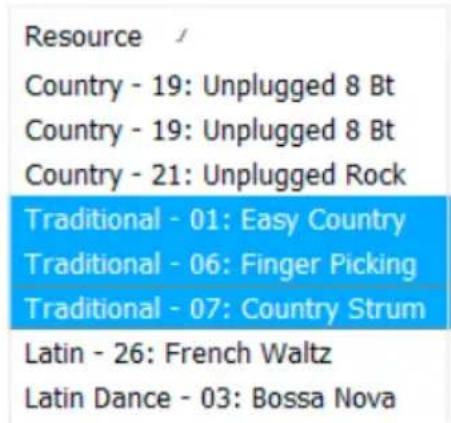
3 Right-click the selected entries and choose the Edit command to open the Edit Style Entry dialog for multiple entry editing.
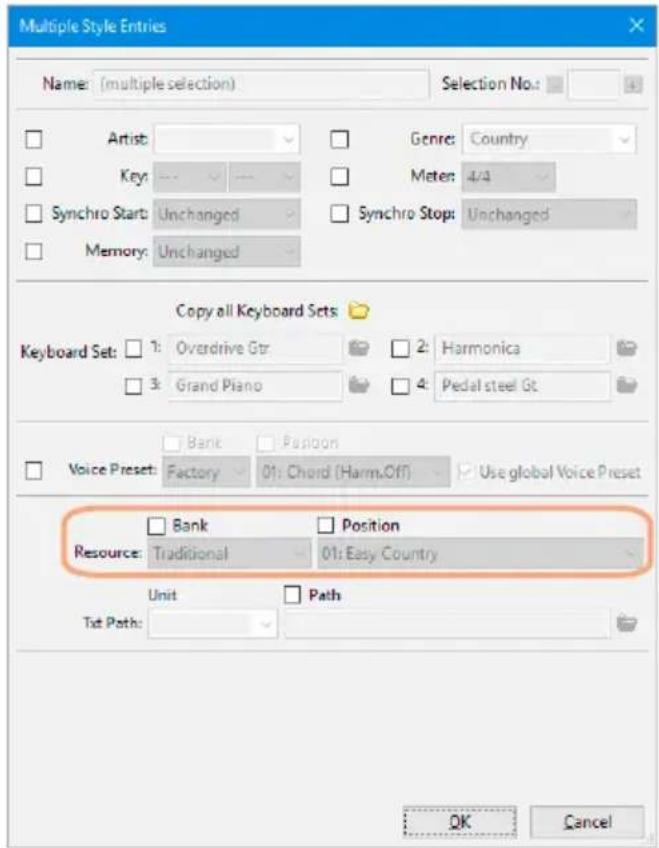
4 In the Edit Style Entry dialog, you can edit the Bank parameter, by checking the corresponding checkbox. Change the old bank to the bank where you loaded
your Styles (for example, change it from Traditional to User01). Confirm by clicking OK.

5 Notice how all the selected entries are now referenced to a different bank of Styles (for example, from [User01 - 01] to [User01 - 32]).
6 Save the SongBook and quit SongBook Editor.
7 Disable USB communication (see page 43) and load the SongBook back to your instrument (see page 43).
Changing reference to individual Styles
Multiple-entry editing allows for assigning a different musical resource to several SongBook Entries at once. This can be useful, for example, to point to a Style that you moved to a different position inside your instrument.
Hint: When you have to move several Styles, you could use the Song Remap command as a faster alternative.
Create a new SET containing the SongBook with the old Style names
1 On the instrument, be sure the SongBook to be edited is already loaded. If not, use the Load > [foldername.set] > Songbook operation.
2 Save a new SET folder into the internal memory by using the Save > All operation. This is the SET folder you will work on from SongBook Editor. It will contain the old Style names.
Open the SongBook from the PC
1 Connect your instrument to a PC by using a standard USB cable, and enable USB communication (see page 10).
2 From the PC, access the internal memory of the instrument.
3 Run SongBook Editor and choose your Pa-Series instrument as the Target.
4 Open the SET folder you just created. The old SongBook files and the names of the old Styles will be loaded.
Prepare the Custom/Set Lists
1 Create a new Custom/Set List corresponding to one of the Styles to be later moved in the instrument. Name it after the name of the Style. Select the new list to open it in the Selected List panel.
| Custom Lists |
| Disco |
| Jazz |
| Pop |
| Rock |
| World |
| Ballad |
| Guitar Bossa List |
2 In the Book panel, click the Resource column header to group all the entries by Style. Find all the entries based on the Style you want to move, and drag them onto the Selected List panel. The entries will be added to the new list.
| Book | Target: Pa-4K | |||||||||||
| ... | Synchro ... | Memory | Keyboard... | Keyboard... | Keyboard... | Keyboard... | Voice Pre... | Resource | ✓ | Direct Set | Txt File | ^ |
| ed | unchanged | unchanged | Violin | Elect Guitar | Piano | Organ | global | Traditional - 07: Country Strum | ||||
| ed | unchanged | unchanged | Bottle | Whistle | Harmonica | Musette | global | Latin - 26: French Waltz | ||||
| ed | unchanged | unchanged | Real Nylon | Alto Sax | Piano | Piano & S... | global | Latin Dance - 03: Bossa Nova | ||||
| ed | unchanged | unchanged | Nylon Gui... | Trumpet | Piano | Shake Br... | global | Latin Dance - 06: Classic Cha... | ||||
| ed | unchanged | unchanged | Alto Sax | El. Piano | Nylon Gui... | Jazz Flute | global | Latin Dance - 17: Guitar Bossa | ||||
| ed | unchanged | unchanged | Piano | Alto Sax | Nylon Gui... | Harmonic... | global | Latin Dance - 17: Guitar Bossa | ||||
| ed | unchanged | unchanged | Tenor Sax | El. Piano | Nylon Gui... | Harmonica | global | Latin Dance - 17: Guitar Bossa | ||||
| ed | unchanged | unchanged | Electric Pi... | Flute | Brass | Flute & M... | global | Latin Dance - 20: Pop Bosso | ||||
| ed | unchanged | unchanged | Electric Pi... | Jazz Guitar | Organ | Strings | global | Latin Dance - 20: Pop Bosso | ||||
| ed | unchanged | unchanged | El Piano | Alto Sax | Jazz Flute | Jazz Club... | global | Latin Dance - 21: Cool Bossa | ||||
| ed | unchanged | unchanged | E. Piano | Jazz Flute | Nylon Gui... | Flugel Horn | global | Latin Dance - 21: Cool Bosso | ||||
3 Repeat the above operations for all the Styles you will later move to a new position in the instrument.
4 When finished editing, save the SongBook, and close it.
5 Disable USB communication (see page 43) and load the SongBook back to your instrument (see page 43).
Create a new SET containing the SongBook with the new Style names
1 On the instrument, load the edited SongBook by using the Load > [foldername.set] > Songbook operation.
2 Rearrange the Styles.
3 Save a new SET folder into the internal memory by using the Save > All operation (you may want to overwrite the same SongBook). This is the SET folder you will work on from SongBook Editor. It will contain the new Style names.
Open the SongBook from the PC
1 Enable USB communication (see page 10).
2 From the PC, access the internal memory of the instrument.
3 Run SongBook Editor.
4 Open the SET folder you just created/edited. The SongBook files and the names of the new Styles will be loaded.
Edit the SongBook Entries
In the Custom/Set Lists panel, select one of the new Custom/Set Lists where you saved all the entries associated to one of the Styles you just moved.
2 In the Selected List panel, select all the entries of the selected list.
| Selected List | |||||||
| Index | Sel. No. | Type | Name | Artist | Genre | Resource | Key |
| 1 | -- | sty | Blue bossanova | Latin | Latin Dance - 17: Guitar Bossa | ---- | |
| 2 | -- | sty | Des a fin a doht | Latin | Latin Dance - 17: Guitar Bossa | ---- | |
| 3 | -- | sty | Ipanema girl walk | Latin | Latin Dance - 17: Guitar Bossa | ---- | |
3 Right-click the selected entries, and choose the Edit command to open the Edit Style Entry dialog for multiple entry editing.
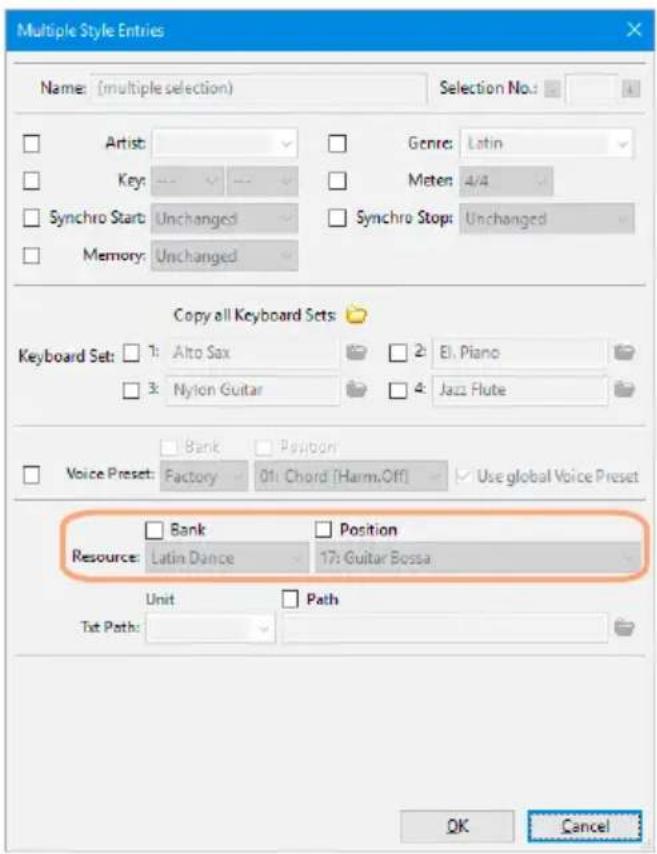
4 In the Edit Style Entry dialog, check the Bank and Position checkboxes of the Style line, choose the bank containing the Style and its new position, then click OK to close the dialog.

5 Notice how all selected entries are now referenced to the correct Style.
6 Repeat the above operations for all the Style you moved to a new position.
7 Save the SongBook and load it back to your instrument (see page 43).
Changing the device and path to your MID/KAR, MP3 and Lyrics text files
It is easy to reassign MID/KAR, MP3 or Lyrics text files to the SongBook Entries. This will prove very useful when you switch to a new instrument, and have to move your whole archive to the new location. Also, it will be useful when moving your files to a different device or folder, for example from the internal memory to an USB memory stick, or from the root of a disk to the "Standard MIDI File", "MP3" or "Lyrics" folder.
When editing a single entry, you can edit both the drive unit, the file path and the file name. When editing multiple entries, you can only edit the drive unit and the file path.
1 Select the entry(es) to be edited, right-click it (them) and choose the Edit command.
2 When the (multiple) entries open, locate the Resource file or Text file line (or check the Unit and/or Path checkboxes of the Resources File and/or Text Files Path parameters in case of multiple entries).
3 Choose (or write) the new device or path in the relevant boxes.
You can also click the Browse icon (💡) to browse and locate the new file (or folder, in case of multiple selection) in the connected devices.
Drive units, like hard drives and USB storage devices, are represented by their label. As an alternative, they can be represented by their ID (see table on page 29).
4 Save the SongBook and load it back to your instrument (see page 43).
Merging entries from two SongBooks
You can merge entries from different SongBooks, by opening two (or more) application sessions, each one with a different SongBook.
Note: When copying an entry to a different SongBook, the entry's Song Selection Number is removed.
Note: When using multiple application instances, choose the same Target on all instances (see "Choosing the Target" on page 12).
1 Run SongBook Editor and open the first SongBook.
2 Run a second session of SongBook Editor and open the second SongBook.
3 With the windows of both sessions on-screen, drag&drop entries from one window to the other one. You can also drag&drop entries between the Book and Selected List panels. When moving an entry from a source Selected List to a target one, the corresponding entry will be automatically created at the target Book panel.
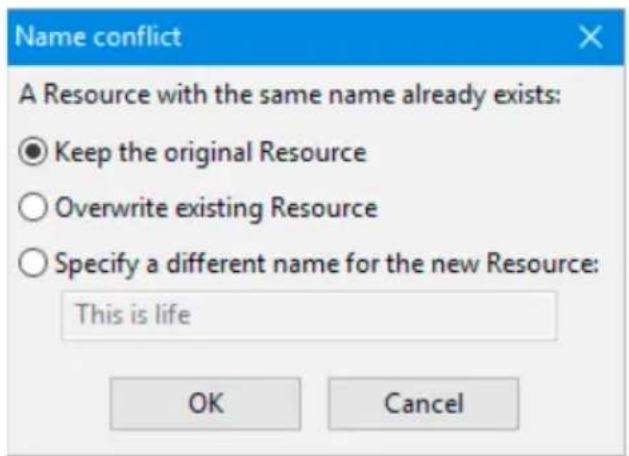
4 If duplicated entries are found, you are given a choice between keeping the original one, overwriting it, or specifying a different name for the new one.
5 Save the SongBook and load it back to your instrument (see page 43).
Exporting a list of entries
You can save the content of the Book list or the selected Custom/Set List as a text (TXT) file. This is the same type of file generated, for example, by the SongBook > Page Menu > Export As Text File command on the instrument.
Hint: To print a text file, use a non-proportional font (e.g., Courier) and the landscape page layout.
By using the Export command
- Choose the File > Export Book... (Ctrl+E) command to save the Book list as a text (TXT) file.
- Select a Custom/Set List in the Custom Lists panel, then choose the File > Export List '[name of the list]'... (Ctrl+Shift+E) to save the selected Custom/Set List as a text (TXT) file.
By using the Copy command
1 Select some entries in the Book or the Selected List panel.
2 Choose the Edit > Copy (Ctrl+C) command to copy the selected data.
3 Switch to a text editor or a spreadsheet, and paste the copied data in an open document.
By using drag&drop
1 Select some entries in the Book or the Selected List panel.
2 Drag the entries to the open document of a text editor or a spreadsheet, and drop the selected data at the target position.
Note: Drag&drop might not work with some software. Please refer to the software's manual for more information.
Appendix
Keyboard shortcuts
The following table shows the key combinations that can be used to choose menu commands.
| Command Shortcut Right-click | ||
| File menu | ||
| New | ||
| Open... Ctrl+O | ||
| Save Ctrl+S | ||
| Save As... Ctrl+Shift+S | ||
| Import Files... Ctrl+I | ||
| Export Book... Ctrl+E | ||
| Export Selected List... Ctrl+Shift+E | ||
| Preferences... | ||
| Quit Ctrl+Q | ||
| Edit menu | ||
| Cut Ctrl+X √ | ||
| Copy Ctrl+C √ | ||
| Paste Ctrl+V √ | ||
| Delete | Del | √ |
| Select All | Ctrl+A √ | |
| Move Up | Ctrl+Up | √ |
| Move Down | Ctrl+Down | √ |
| New Entry > Style | Ctrl+N √ | |
| New Entry > MIDI | Ctrl+Shift+N | √ |
| New Entry > MP3 | Alt+N | √ |
| New List | Ctrl+L | |
| Filter... | Ctrl+F | |
| Song Remap... | Ctrl+R | |
| Help menu | ||
| SongBook Editor User Guide | F1 | |
| About... | ||
Version History
Since its introduction, the SongBook Editor has been subject to improvements and addition of new parameters. Please find below the changes since version 1.0.
Version 2.0.0
- Now compatible with Pa4X, Pa3XLe and HAVIAN 30
- Now compatible with Microsoft Windows 10 ^TM
- Added the Song Remap feature (for Styles and Pads)
- Added the Copy Keyboard Set/STS features
- Keyboard Sets/STSs can now be renamed
- Direct SET folder support
- Redesigned Edit dialogs
Version 1.5.0
- Now compatible with Pa900, Pa600 (v1.1) and Pa300
- Now compatible with Microsoft Windows 8/8.1 ^TM
- Added Bank, Style and Voice Preset names in the Book and Selected List panels and Edit dialog
- SongBook files saved in the target format
Version 1.4.1
- Fixed a bug when exporting lists in TXT format
• Fixed a bug that prevented editing Song Numbers
Version 1.4.0
- Now compatible with Pa3X v1.1
- Now compatible with Microsoft Windows 7 ^TM
- Added support to Unicode characters
- Changed the procedure to select the target instrument
- Bank and Location numbers can be separately entered when editing a Style-based entry
- The Key value is correctly imported from a Standard MIDI File associated to a new SongBook Entry; with Pa3X, this is also true for Master Transpose
- Fixed a bug that caused major and minor keys to appear inverted in the Edit dialog
Version 1.3.0
- Now compatible with Pa2X and Pa500/Pa588
- Improved compatibility with Pa1X v3.01 and Pa800 v1.51
- Now compatible with Microsoft Windows Vista™
- Changed New Entry-MIDI shortcut
- Fixed a bug that caused major and minor keys to appear inverted in the Main screen
Version 1.2.0
- Now compatible with Pa800 and Pa1X (v3.0)
- Style position and Standard MIDI File/MP3/TXT file path editable
- File > Import command added
- Edit > New Entry menu revised
- Edited entries shown in red (or any custom color)
- Selectable file format (Pa1X or Pa800)
- Saved files are no longer compatible with Pa1X prior to v3.0
- New shortcuts
Version 1.1.0
- Now compatible with Pa1X OS (v2.5.x)
- Song Selection Number reset when copying a Entry from a SongBook to a different one
• Harmony Track parameter added
• Resource parameter added
KORG
Address
KORG ITALY SpA
Via Cagiata, 85
60027 Osimo (AN)
Italy
Web
www.korg.com
- Copyright
- Freeware
- Disclaimer of Warranty
- Distribution
- Support
- Liability
- No Disassembly or Decryption
- Transfer
- Termination
- Data Handling
- Disclaimer
- Trademarks
- Contents
- Introduction....5
- Installing the software 6
- SongBook and removable media ....7
- Creating and editing the SongBook on the instrument 8
- Connecting the devices and running SongBook Editor 10
- Opening the SongBook with SongBook Editor....14
- Creating a new SongBook with SongBook Editor ....19
- Creating new SongBook Entries 20
- Importing data to SongBook Entries....22
- Editing basics....24
- Editing the SongBook Entries 27
- Custom/Set Lists 34
- Remapping Style and Pads....37
- Saving the SongBook and reloading it to the instrument 43
- Frequent operations 45
- Appendix 55
- Introduction
- Installing the software
- PC system requirements
- KORG instrument requirements
- Getting help
- SongBook and removable media
- Creating and editing the SongBook on the instrument
- Creating the Style-based SongBook Entries
- Creating the MID/KAR- and MP3 file-based entries
- Saving the SongBook to the internal memory
- Exporting custom Factory Style names
- From here on - do not edit anything on the instrument!
- Connecting the devices and running SongBook Editor
- Connecting the instrument to a PC
- Launching SongBook Editor
- The Book panel. This is where the full list of Songs included in the SongBook appears. It is the equivalent of the Book page of the instrument.
- Choosing the Target
- Opening the SongBook with SongBook Editor
- Opening the SongBook
- Browsing the SongBook Entries in the Book panel
- Customizing the list view
- Showing/hiding columns
- Resizing columns
- Changing the sorting order
- Changing the fonts and colors
- Filtering the entries shown in the Book panel
- Creating a new SongBook with SongBook Editor
- Creating new SongBook Entries
- Creating a new SongBook Entry
- Linking resources
- Linking resources from an USB storage device
- Importing data to SongBook Entries
- Importing MID/KAR and/or MP3 files
- Preparing the data
- Importing the files
- Editing the entries
- Editing basics
- How to access editing
- Editing parameters
- Editing multiple entries
- How to edit the parameters
- Editing text strings
- Choosing parameters from a pop-up menu
- Automatically updated pop-up menus
- Cutting, copying and pasting the entries
- Deleting entries
- Selecting all entries
- Editing the SongBook Entries
- Editing Style-based entries
- Editing MID/KAR-based entries
- Editing MP3-based entries
- Copying the Keyboard Sets/STSs from other entries
- Copying a single Keyboard Set/STS
- Copying all Keyboard Sets/STSs
- Custom/Set Lists
- Creating a new Custom/Set List
- Adding entries to the selected Custom/Set List
- Seeing the content of a Custom/Set List
- Editing entries
- Moving entries up/down
- Deleting a Custom/Set List
- Remapping Style and Pads
- The remapping table
- Remapping
- Remap the Styles
- Remap the Pads
- Remap the entries
- Saving the SongBook and reloading it to the instrument
- Saving the edited SongBook
- Quitting SongBook Editor
- Disconnecting the instrument from the PC
- Loading the edited SongBook on the instrument
- Frequent operations
- Changing reference to a bank of Styles
- Changing reference to individual Styles
- Prepare the Custom/Set Lists
- Changing the device and path to your MID/KAR, MP3 and Lyrics text files
- Merging entries from two SongBooks
- Exporting a list of entries
- Appendix
- Keyboard shortcuts
- Version History
- Version 2.0.0
- Version 1.5.0
- Version 1.4.1
- Version 1.4.0
- Version 1.3.0
- Version 1.2.0
- Version 1.1.0
- KORG
Brand : KORG
Model : PA500 Musikant
Category : Synthesizer