
Guitar Kit P-Style - Guitar Harley Benton - Free user manual and instructions
Find the device manual for free Guitar Kit P-Style Harley Benton in PDF.


| Product Type | Electric Bass Guitar Kit (DIY Assembly) |
| Brand | Harley Benton |
| Model | Guitar Kit P-Style |
| Category | Guitar |
| Body Material | Solid Wood (sealed, ready for painting) |
| Neck Material | Wood with factory-applied matte lacquer |
| Fingerboard Material | Wood |
| Scale Length | Approx. 864 mm (34 inches, standard long scale) |
| Number of Frets | 20 (typical for P-style bass) |
| Pickups | 1 Split-coil P-style pickup (passive) |
| Controls | 1 Volume, 1 Tone (potentiometers, pre-wired) |
| Bridge | Standard 4-saddle bridge |
| Tuners | 4 sealed die-cast tuners |
| Strings | 4 strings (0.045-0.105 gauge typical) |
| Power Supply | None (passive electronics) |
| Dimensions (Assembled) | Approx. 120 cm x 35 cm x 5 cm (body) |
| Weight (Assembled) | Approx. 4 kg |
| Scope of Delivery | Body, neck, pickguard, hardware (tuners, bridge, pickups, potentiometers, jack, screws, springs, etc.), string retainer, neck plate, strap buttons, strings |
| Assembly Difficulty | Moderate (requires painting, cutting headstock, wiring, setup) |
| Tools Required | Saw, sandpaper, screwdrivers, rubber mallet, ring spanner, pliers, needle file, paint supplies |
| Safety Warnings | Choking hazard (small parts), sharp edges; keep away from children. |
| Care Instructions | Clean with soft cloth; avoid solvents; polish painted surfaces gently. |
| Spare Parts Availability | Standard P-style parts widely available from retailers. |
| Environmental Note | Dispose of packaging and old device according to local regulations (WEEE). |
Frequently Asked Questions - Guitar Kit P-Style Harley Benton
User questions about Guitar Kit P-Style Harley Benton
0 question about this device. Answer the ones you know or ask your own.
Ask a new question about this device
Download the instructions for your Guitar in PDF format for free! Find your manual Guitar Kit P-Style - Harley Benton and take your electronic device back in hand. On this page are published all the documents necessary for the use of your device. Guitar Kit P-Style by Harley Benton.
USER MANUAL Guitar Kit P-Style Harley Benton
Bass Guitar Kit P-Style
bass electric guitar kit
Musikhaus Thomann
Thomann GmbH
1 Safety instructions.... 4
2 Scope of delivery.... 5
3 Assembly instructions.... 6
3.1 Cut the headstock to size.... 6
3.2 Painting the body and neck.... 7
3.3 Mounting the tuners.... 8
3.4 Mounting the string retainer.... 9
3.5 Mounting the guitar neck.... 9
3.6 Wiring the potentiometers, pickups and switches.... 11
3.7 Mounting the pickguard.... 13
3.8 Mounting the bridge.... 14
3.9 Mounting the strap buttons.... 15
3.10 Strings, neck relief, string height and pickups.... 16
4 Protecting the environment.... 20
1 Safety instructions

DANGER!
Danger for children
Ensure that plastic bags, packaging, etc. are properly disposed of and are not in the reach of babies and young children. Choking hazard!
Ensure that children do not detach any small parts (e.g. knobs or the like) from the product. They could swallow the pieces and choke!
Never let children play unattended with the product.

CAUTION!
Danger of cuts on the hands
While assembling and joining individual parts together with screws pay attention to sharp edges on tools, screws and components.
2 Scope of delivery
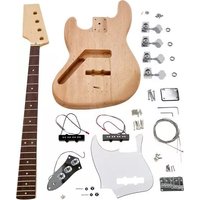
Thank you for buying this guitar kit. All the wood, hardware and electrical components of the guitar are contained in this package.
The picture below shows the individual items included in the delivery.

The assembly is described in detail in the following sections.
3 Assembly instructions
Useful tools and materials
Provide the following tools and materials for the assembly of the guitar:
Phillips screwdriver
Rubber mallet
Ring spanner
Pliers
■ Paint and accessories
Needle file
Sandpaper
It is important to paint the body and neck before assembly.
Always wear a dust mask when applying spray paint.
3.1 Cut the headstock to size
Cut the headstock to your desired shape using a suitable saw. Ensure you leave sufficient space between the cutting edge and the holes for the tuners to maintain stability. The tuners' retaining rings should be used as a reference here.
After cutting, smooth the cutting edge with sandpaper or a suitable file.
3.2 Painting the body and neck
Painting the body
The solid wood body of the guitar is sealed and prepared for various types of lacquer coating. A wide variety of finishes can be procured from DIY, timber and automotive outlets in aerosol cans making finishing straightforward without requiring specialist skills.
The first step is to check the fit of the body to the neck joint. These components are machined from high-grade tonewoods to ensure optimum alignment. Since wood is a natural material, however, its shape changes slightly over time. If the fit is too tight, you can adjust it using a sharp chisel or sandpaper. Please remember that the additional lacquer coat will make the neck fit a little more tightly into the cutout.
Before coating the body, ensure that all surfaces are clean and free of dirt and dust. Carry out all painting operations in a well-ventilated, dust-free environment. Considered and careful working are key factors for a qualitatively satisfactory result. We explicitly recommend that you first try out the colour and technique on another piece of wood.
Paint the body edges first and let them dry. If the edges are dry, go on with front and back side. By layered, successive application you can achieve a uniform coating structure. If you notice surface irregularities, wait until the paint has dried completely and correct them with fine sandpaper (e.g. 800+) before proceeding to paint. For full coverage apply three or more layers.
Insert a wire or hook into the cutout for the guitar neck and hang the painted guitar body to dry in a dry, dust-free area away from direct sunlight.
Wait another two to three days until the paint is fully cured. Polish or burnish the body until it meets your expectations. Take care not to buff too vigorously as this may remove the finish.
Neck finish
The neck of the guitar is sealed at the factory with a thin layer of matt lacquer and is already ready to use. However, if you would still like to treat the neck with paint or clear lacquer, follow the instructions below.
Carefully mask off the fingerboard and all frets before you start painting. Make sure that all surfaces are free of dust and dirt. Carry out all painting operations in a well-ventilated, dust-free environment.
Use a clear or lightly coloured wood lacquer of high quality for the neck. Start on the front and the edges of the headstock. Apply a thin layer evenly, allow it to dry and repeat this two or three times. If you notice surface irregularities, wait until the paint has dried completely and correct them with fine sandpaper (e.g. 800+) before proceeding to paint.
Once the headstock has dried, place the neck on the fingerboard and paint the back of the neck as described.
Wait another two to three days until the paint is fully cured. Polish or burnish the neck until it meets your expectations. Take care not to buff too vigorously as this may remove the finish.
3.3 Mounting the tuners
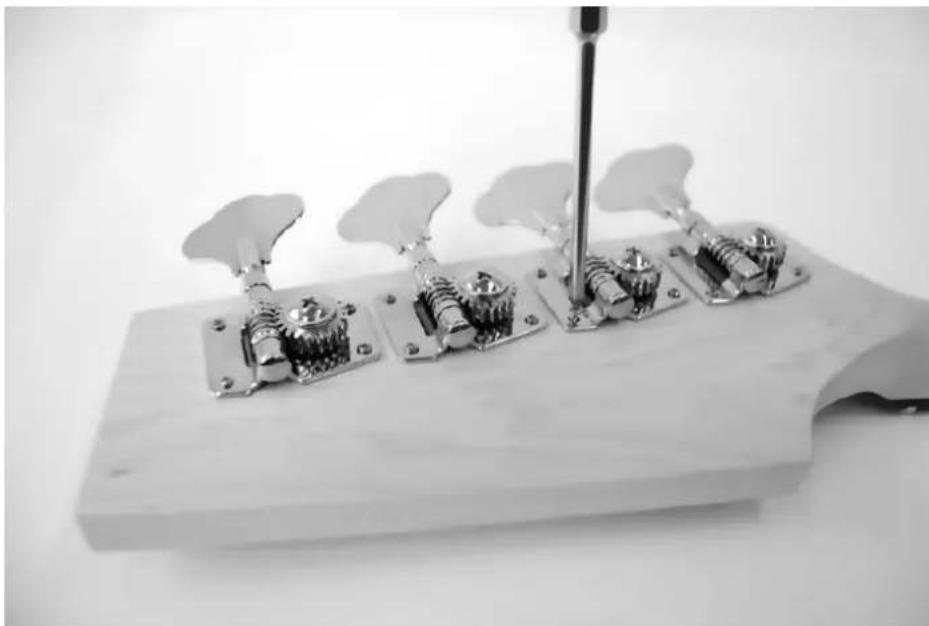
From the front side of the headstock, insert the four sleeves for the tuners into the holes provided.

From the rear side of the headstock, insert the tuners into the holes provided. Align the tuners so that the tuning pins are vertical to the upper edge of the headstock. As illustrated, fasten the tuners in this position with the screws provided.
3.4 Mounting the string retainer
Screw the string retainer to the front of the headstock in the holes provided next to the tuners.
Ensure the string retainer can still move freely. It will be secured by the tension of the strings.

3.5 Mounting the guitar neck
Place the body on a suitable working surface. Use a soft pad in order to avoid damage to the surface. Insert the neck into the neck cutout. If necessary, use a sharp chisel or sandpaper to adjust it. Be very careful when removing material. The neck should be firmly seated and under no circumstances should there be too much play in the cutout!

Turn the bass guitar over and position the neck plate over the four screw holes at the rear of the body, then screw the four wood screws provided through the neck plate, body and pilot holes in the neck until everything fits tightly.

3.6 Wiring the potentiometers, pickups and switches
The pickups, potentiometers and jack socket are wired using connectors. Push a spring onto each of the screws on the pickups.

Screw the pickups into the recess in the guitar body using the supplied screws.

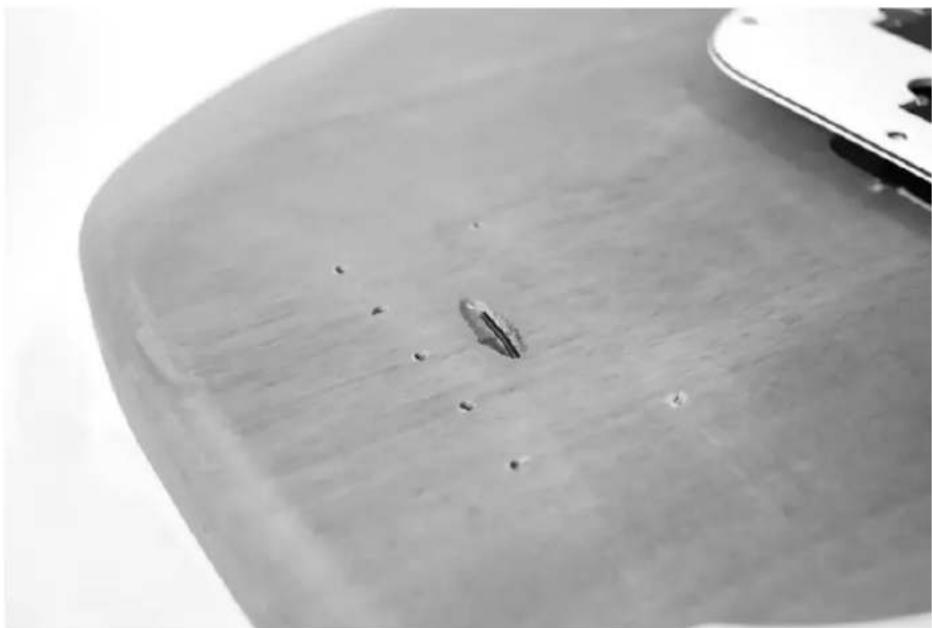
Run the cable for earthing the strings (stripped, without connectors) through the channel in the recess for the potentiometers and into the hole on the front.

Pull the cable out of the hole far enough to ensure sufficient contact with the metallic surface when the bridge is installed. Earthing the strings reduces noise (humming).
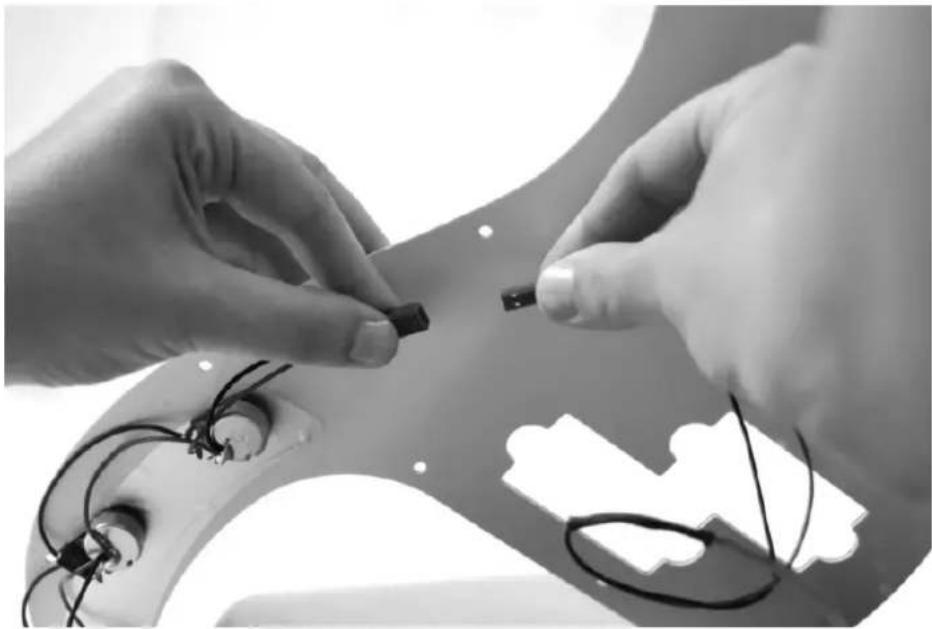
Connect the connector to the connector for the potentiometers and output jack which is mounted on the pickguard.
3.7 Mounting the pickguard
First, adjust the width of the recess for the guitar neck on the pickguard with a needle file and/or sandpaper. Then position the pickguard over the front of the body so that the pickups and all the wires are seated in the correct recesses. Screw the pickguard onto the body using the screws provided as shown in the picture below.

3.8 Mounting the bridge
Place the body on a suitable working surface. Use a soft pad in order to avoid damage to the surface.
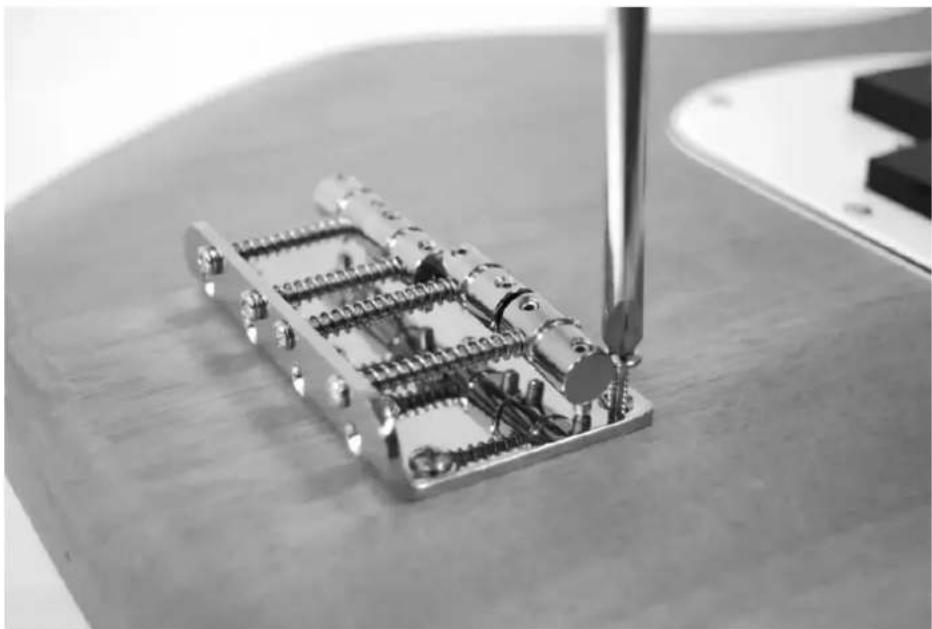
Ensure the bridge is aligned with the pre-drilled screw holes. Attach the bridge using the supplied screws.
3.9 Mounting the strap buttons
Screw the strap buttons into the pre-drilled holes in the body as shown.

3.10 Strings, neck relief, string height and pickups
Stringing the guitar
The strings are threaded from the bridge towards the neck over the corresponding saddle. Wrap the string end around the tuner several times and pull each string hand-tight at first. Be sure that each string is in the correct position on the saddle and in the correct string retainer.
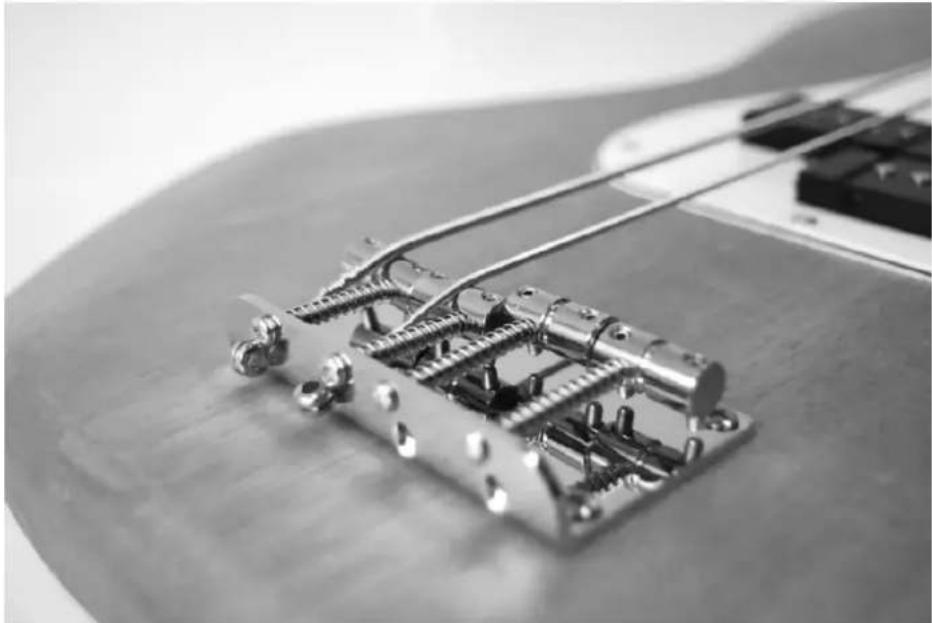

Then tune each string in turn to the correct pitch. You can using a tuner or a pitch pipe as a reference. Please note that the string tension will still drift and the guitar will need to be retuned a few times before the strings are played in.
Adjusting the neck relief
The neck is equipped with a steel truss rod that can be used to adjust the relief to your preferences.
After tuning the strings, check the relief by pressing on the low E string at the first and twelfth fret. The closer the string is to the fingerboard at the sixth fret, the more noise (buzz) will be audible when the guitar is played.
Adjust the neck relief using an appropriate Allen key as follows:
Turn the truss bar clockwise to increase tension. The neck will become straighter, even convex in extreme cases. The string will be closer to the fingerboard, is easier to fret, but will buzz more during playing.
Turn the truss bar counterclockwise to decrease tension. The neck will respond more to the string tension and become correspondingly more concave. The string will be farther from the fingerboard, be somewhat harder to fret, but will cause less or no noise during playing.
Adjust the truss bar only by about a quarter turn per setting, then retune all the strings to the correct pitch and check the neck relief again after a short time. Repeat this process until the desired neck relief is reached.

Adjusting the position of the strings
Once the neck has the desired relief, you can use the screws for each saddle to adjust the string position to suit your taste. Here, too, the lower the strings, the easier they are to fret, but they will buzz more easily when the guitar is played.

After adjusting string position, you can check the octaves of the guitar and readjust if necessary. Tune all the strings to the correct pitch, gently touch the first string right above the twelfth fret and then pick the string. The harmonic you hear (at the 12th fret) must be the same pitch as the picked string at the 12th fret). If the pitch of the two notes differs, adjust the saddle for this string back (tone too high) or forth (tone too low) on the bridge. Listen carefully and adjust gently until the two notes match. Alternatively, you can also adjust the octaves with a tuner. In this case, the pitch of the tone at the 12th fret must be the same as the unfretted string, but one octave higher.

Adjusting the pickups
The pickups should be set so that all the strings sound equally loud when played. Adjust the height of the pickups by using the lateral adjustment screws and listening to the sound. The minimum distance between each string and its pickup is two millimetres. The greater the distance between the string and pickup, the quieter the string will sound.
4 Protecting the environment
Disposal of the packaging material

For the transport and protective packaging, environmentally friendly materials have been chosen that can be supplied to normal recycling.
Ensure that plastic bags, packaging, etc. are properly disposed of.
Do not just dispose of these materials with your normal household waste, but make sure that they are collected for recycling. Please follow the notes and markings on the packaging.
Disposal of your old device

This product is subject to the European Waste Electrical and Electronic Equipment Directive (WEEE) in its currently valid version. Do not dispose with your normal household waste.
Dispose of this device through an approved waste disposal firm or through your local waste facility. When discarding the device, comply with the rules and regulations that apply in your country. If in doubt, consult your local waste disposal facility.
Bass Guitar Kit P-Style


- BASS GUITAR KIT P-STYLE
- BASS ELECTRIC GUITAR KIT
- 1 SAFETY INSTRUCTIONS
- DANGER
- DANGER FOR CHILDREN
- CAUTION
- DANGER OF CUTS ON THE HANDS
- 2 SCOPE OF DELIVERY
- 3 ASSEMBLY INSTRUCTIONS
- USEFUL TOOLS AND MATERIALS
- 3.1 CUT THE HEADSTOCK TO SIZE
- 3.2 PAINTING THE BODY AND NECK
- PAINTING THE BODY
- NECK FINISH
- 3.3 MOUNTING THE TUNERS
- 3.4 MOUNTING THE STRING RETAINER
- 3.5 MOUNTING THE GUITAR NECK
- 3.6 WIRING THE POTENTIOMETERS, PICKUPS AND SWITCHES
- 3.7 MOUNTING THE PICKGUARD
- 3.8 MOUNTING THE BRIDGE
- 3.9 MOUNTING THE STRAP BUTTONS
- 3.10 STRINGS, NECK RELIEF, STRING HEIGHT AND PICKUPS
- STRINGING THE GUITAR
- ADJUSTING THE NECK RELIEF
- ADJUSTING THE POSITION OF THE STRINGS
- ADJUSTING THE PICKUPS
- 4 PROTECTING THE ENVIRONMENT
- DISPOSAL OF THE PACKAGING MATERIAL
- DISPOSAL OF YOUR OLD DEVICE
Brand : Harley Benton
Model : Guitar Kit P-Style
Category : Guitar