
NUC7i5DNHE - Mini PC INTEL - Free user manual and instructions
Find the device manual for free NUC7i5DNHE INTEL in PDF.


| Product Type | Mini PC |
| Model | NUC7i5DNHE |
| Brand | Intel |
| Processor | 7th Gen Intel Core i5-7300U (2.6 GHz, up to 3.5 GHz) |
| Memory Support | 2x DDR4-2133 SO-DIMM slots, up to 32 GB |
| Storage Options | 1x M.2 22x42/80 Key M (SATA/PCIe), 1x 2.5" SATA drive bay |
| Dimensions (Height x Width x Depth) | 51 mm x 117 mm x 112 mm |
| Weight | Approximately 0.6 kg (without RAM/SSD) |
| Power Supply | External AC adapter (19 V, 65 W) |
| Operating System Compatibility | Windows 10/11, Linux (various distributions) |
| Wireless Connectivity | Intel Dual-Band Wireless-AC 8265 (802.11ac, Bluetooth 4.2) |
| Video Ports | 1x HDMI 2.0a, 1x DisplayPort 1.2 (USB-C), 1x Mini DisplayPort |
| USB Ports | 3x USB 3.0 (Type-A), 1x USB 3.0 (Type-C), 1x USB 2.0 (internal) |
| Audio | 3.5 mm headset jack, digital audio via HDMI |
| LAN | Intel I219-LM Gigabit Ethernet |
| Power Consumption (Typical) | 15 W (idle) to 65 W (max load) |
| Maintenance | Clean exterior with a soft, dry cloth. Avoid liquids inside chassis. |
| Safety Precautions | Keep ventilation free; use only provided power adapter; avoid moisture. |
| Spare Parts / Repairability | RAM and 2.5" SSD/HDD user-replaceable. M.2 SSD and wireless card accessible. Mainboard not intended for user repair. |
| Warranty | Typically 2-3 years (depending on region) |
Frequently Asked Questions - NUC7i5DNHE INTEL
User questions about NUC7i5DNHE INTEL
0 question about this device. Answer the ones you know or ask your own.
Ask a new question about this device
Download the instructions for your Mini PC in PDF format for free! Find your manual NUC7i5DNHE - INTEL and take your electronic device back in hand. On this page are published all the documents necessary for the use of your device. NUC7i5DNHE by INTEL.
USER MANUAL NUC7i5DNHE INTEL
The procedures in this user guide assume familiarity with the general terminology associated with personal computers and with the safety practices and regulatory compliance required for using and modifying electronic equipment.
Disconnect the computer from its power source and from any telecommunications link or network before performing any of the procedures described in this guide. Failure to disconnect power, telecommunications links, or networks before you open the computer or perform any procedures can result in personal injury or equipment damage. Some circuitry on the board can continue to operate even though the front panel power button is off.
Follow these guidelines before you begin:
• Always follow the steps in each procedure in the correct order.
- Set up a log to record information about your computer, such as model, serial numbers, installed options, and configuration information.
- Electrostatic discharge (ESD) can damage components. Perform the procedures described in this chapter only at an ESD workstation using an antistatic wrist strap and a conductive foam pad. If such a station is not available, you can provide some ESD protection by wearing an antistatic wrist strap and attaching it to a metal part of the computer chassis.
Installation Precautions
When you install and test the Intel NUC, observe all warnings and cautions in the installation instructions.
To avoid injury, be careful of:
- Sharp pins on connectors
- Sharp pins on circuit boards
- Rough edges and sharp corners on the chassis
• Hot components (such as SSDs, processors, voltage regulators, and heat sinks)
• Damage to wires that could cause a short circuit
Observe all warnings and cautions that instruct you to refer computer servicing to qualified technical personnel.
Observe Safety and Regulatory Requirements
If you do not follow these instructions, you increase your safety risk and the possibility of noncompliance with regional laws and regulations.
This guide tells you how to:
• Install and remove memory
• Install an M.2 SSD
• Install a 2.5" SSD or Hard Drive
• Install a VESA mount bracket
- Connect power
• Install an operating system
• Install the latest drivers
Open the Intel NUC Chassis
To open the Intel NUC chassis, follow these steps:
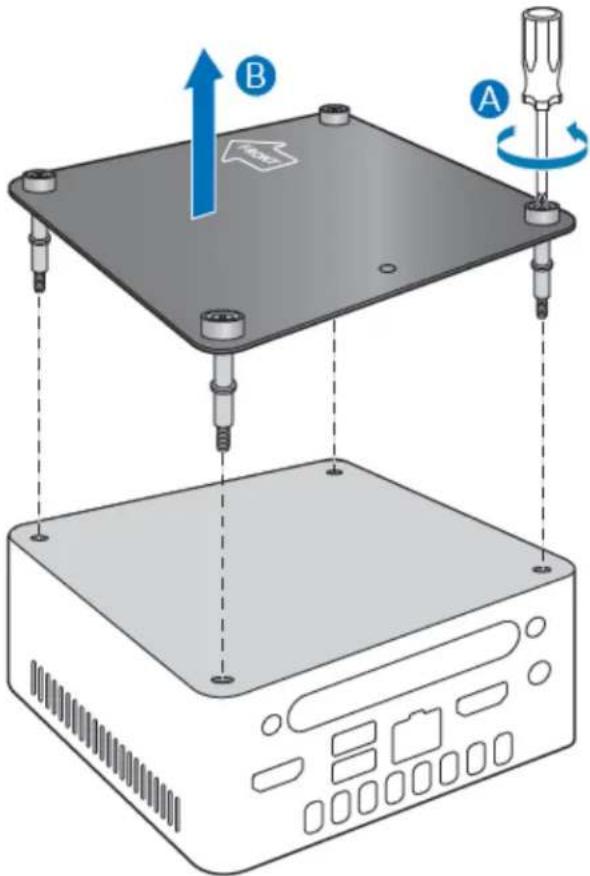
- Unscrew the four corner screws on the bottom cover of the chassis and lift the cover.
Installing and Removing Memory
Intel NUC Kits NUC7i3DNHE and NUC7i5DNHE have two 260-pin DDR4 SO-DIMM sockets. Memory requirements:
• 1.2V low voltage memory
• 1866 or 2133 MHz SO-DIMMs
- Non-ECC
For a list of tested memory, go to the System Memory page on the Support site.
Install SO-DIMMs
If you plan to install just one SO-DIMM, install it in the lower memory socket.
To install the SO-DIMMs, follow these steps:
-
Observe the precautions in "Before You Begin" on page 2.
-
Turn off all peripheral devices connected to the computer. Turn off the computer and disconnect the AC power cord.
-
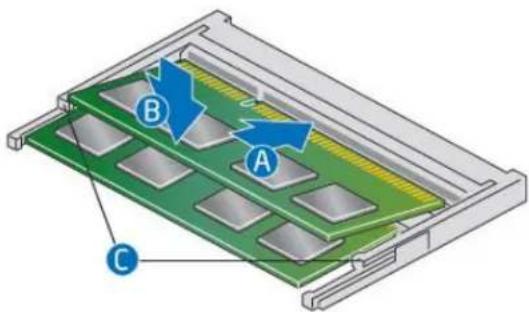
Align the small notch at the bottom edge of the SO-DIMM with the key in the socket.
-
Insert the bottom edge of the SO-DIMM into the socket.
-
When the SO-DIMM is inserted, push down on the outer edge of the SO-DIMM until the retaining clips snap into place. Make sure the clips are firmly in place.
Removing SO-DIMMs
To remove a SO-DIMM, follow these steps:
- Observe the precautions in "Before You Begin" on page 2.
- Turn off all peripheral devices connected to the computer. Turn off the computer.
- Remove the AC power cord from the computer.
- Remove the computer's cover.
- Gently spread the retaining clips at each end of the SO-DIMM socket. The SO-DIMM pops out of the socket.
- Hold the SO-DIMM by the edges, lift it away from the socket, and store it in an anti-static package.
- Reinstall and reconnect any parts you removed or disconnected to reach the SO-DIMM sockets.
- Replace the computer's cover and reconnect the AC power cord.
Install an M.2 SSD
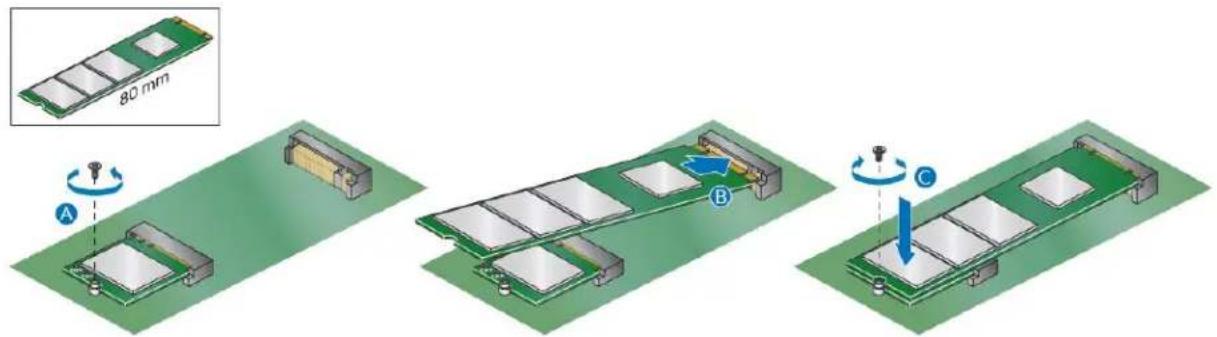
Intel NUC Kits NUC7i3DNHE and NUC7i5DNHE support 80mm. For a list of tested M.2 SSDs, go to the Tested Peripherals page on the Support site.
If you are installing an 80mm M.2 SSD:
- Remove the small silver screw from the 80mm metal standoff on the motherboard (A).
- Align the small notch at the bottom edge of the M.2 card with the key in the connector.
- Insert the bottom edge of the M.2 card into the connector (B).
- Secure the card to the standoff with the small silver screw (C).
Install a 2.5" SSD or Hard Drive
For a list of tested 2.5" hard drives, go to the Tested Peripherals page on the Support site.
Follow these instructions to install a 2.5" Solid State Drive (SSD) or Hard Disk Drive (HDD):
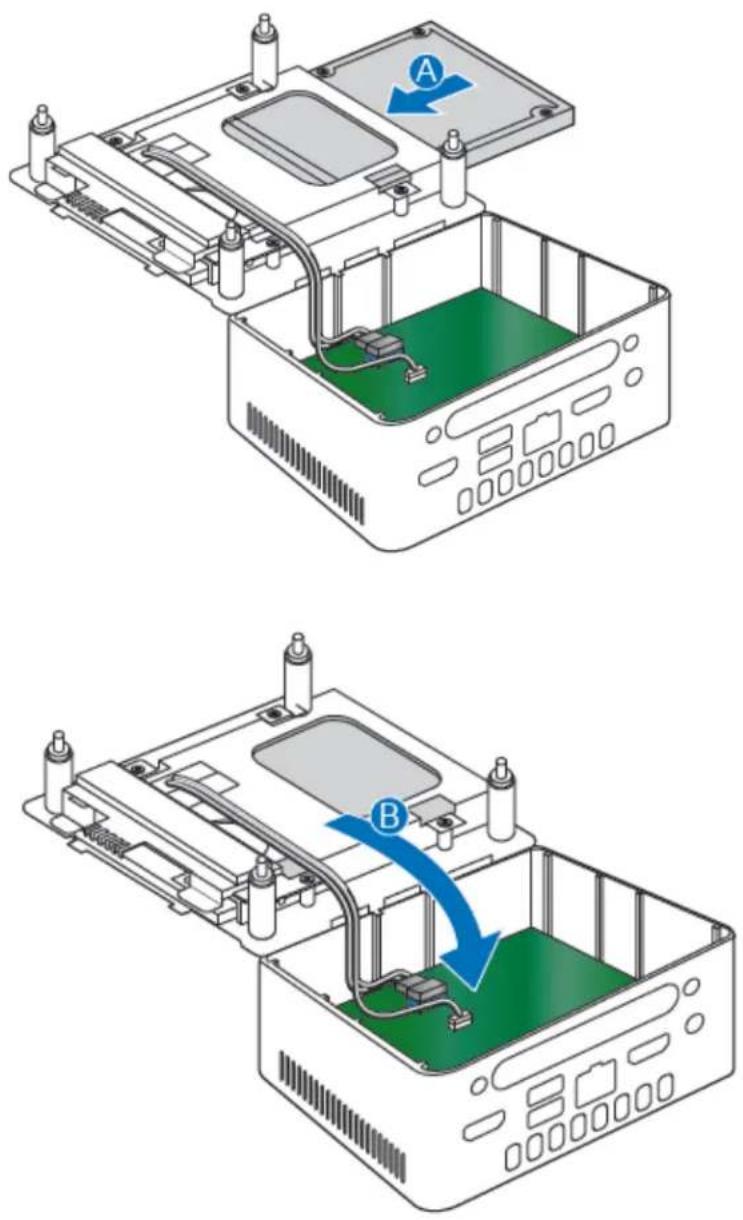
- Slide the 2.5" drive into the drive bay, ensuring the SATA connectors are fully seated into the connectors of the SATA daughter card (A).
- Secure the drive into the drive bay with the two small silver screws that were included in the box (B). Set the drive bay bracket down inside the chassis (C),
Close the Chassis
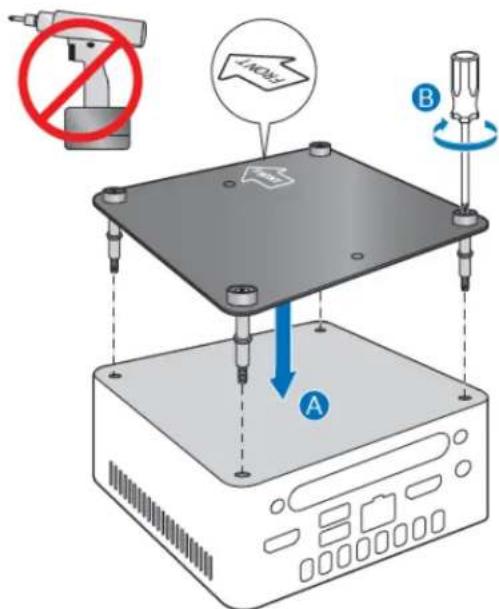
After all components have been installed, close the Intel NUC chassis. Intel recommends this be done by hand with a screwdriver to avoid over-tightening and possibly damaging the screws.
Attach and Use the VESA Bracket (Optional)
Follow these instructions to attach and use the VESA mount bracket:
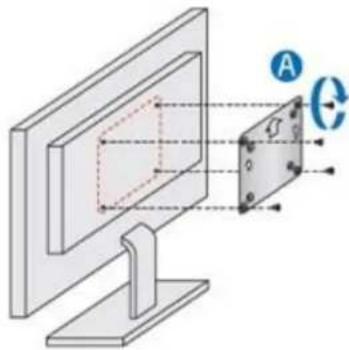
- Using the four small black screws that were included in the box, attach the VESA bracket to the back of the monitor or TV.
natural_image
Diagram of a screwdriver pressing down on a device with labeled component B (no text or symbols beyond label)Intel NUC Kit NUC7i3DNHE & NUC7i5DNHE User Guide
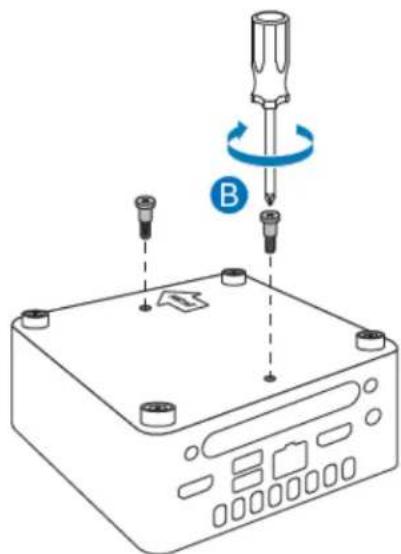
- Attach the two slightly larger black screws to the bottom chassis cover of the Intel NUC.
natural_image
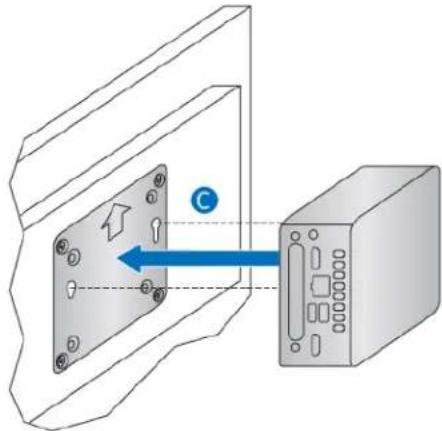
Diagram of a computer monitor with an attached rectangular device labeled A, showing alignment lines and rotation arrow (no text or symbols beyond labels)- Slide the Intel NUC onto the VESA mount bracket.
natural_image
Diagram showing a device with a panel inserted into a housing, connected to a server unit (no text or symbols present)Connect Power
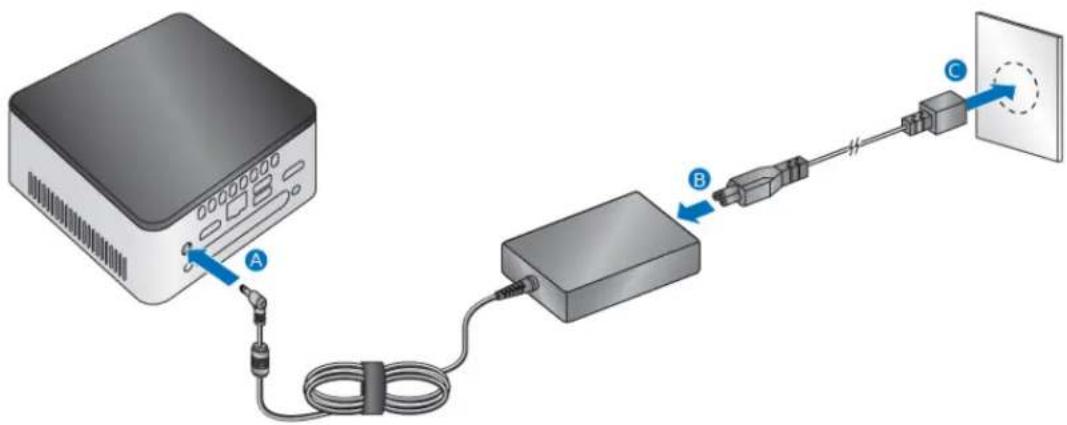
Country-specific power plug attachments are included in the Intel NUC Kit box.
1. Connect AC power.
Install an Operating System
Refer to Supported Operating Systems for a list of Intel-validated Windows* operating systems, as well as versions of Linux that have been reported as compatible by Intel NUC owners.
Refer to Operating System Installation for system requirements and installation steps.
Install Intel NUC Drivers
To download the latest Microsoft* Windows* drivers and BIOS updates, go to Download Center:
Links:
- Intel® NUC Kit NUC7i5DNHE
- Intel® NUC Kit NUC7i3DNHE
Drivers are available for the following features:
- Bluetooth
- Chipset
- Graphics
- Intel® ME
- Intel® Rapid Storage Technology
- Intel® Ready Mode Technology
• LAN (wired and wireless) - Intel® Software Guard Extensions (Intel® SGX)
- Installation Precautions
- Observe Safety and Regulatory Requirements
- This guide tells you how to:
- Open the Intel NUC Chassis
- Installing and Removing Memory
- Install SO-DIMMs
- Removing SO-DIMMs
- Install an M.2 SSD
- If you are installing an 80mm M.2 SSD:
- Install a 2.5" SSD or Hard Drive
- Close the Chassis
- Attach and Use the VESA Bracket (Optional)
- Connect Power
- Connect AC power.
- Install an Operating System
- Install Intel NUC Drivers
- Links:
- Drivers are available for the following features:
Brand : INTEL
Model : NUC7i5DNHE
Category : Mini PC