
Stereo Box RS - Receiver PRO-JECT - Free user manual and instructions
Find the device manual for free Stereo Box RS PRO-JECT in PDF.


| Brand | Pro-Ject |
| Model | Stereo Box RS |
| Product Type | Integrated Stereo Receiver |
| Tube Complement | 2 x ECC88 (6922) |
| Power Output | 2 x 80W (8 ohms) / 2 x 120W (4 ohms) |
| Frequency Response | 20 Hz - 50 kHz (-1.5 dB / -3 dB) |
| Noise Floor | 90 dB (A-weighted) |
| Total Harmonic Distortion | 0.1% at 100W |
| Gain | 31 dB |
| Input Impedance (RCA) | 50 kohms |
| Input Impedance (XLR) | 20 kohms |
| Number of Line-Level Inputs | 6 (5 RCA + 1 XLR) |
| Pre-Out Output | Variable (RCA), gain 12 dB |
| Subwoofer Output | RCA, gain 18 dB |
| Record Output | Fixed (RCA), gain 0 dB |
| Speaker Connections | Banana plugs, spades, bare wire (4mm) |
| Power Supply | Outboard ±48V DC, 2.5A |
| Power Consumption | <1W standby, 2.5A operating |
| Remote Control Battery | 1 x CR2032 or CR2025 (3V) |
| Dimensions (W x H x D) | 206 x 72 x 200 (210) mm |
| Weight | 2650 g (without power supply) |
| Cleaning | Wipe with a dry, soft cloth |
| Repair and Spare Parts | Contact dealer; tubes replaceable by qualified technician |
Frequently Asked Questions - Stereo Box RS PRO-JECT
User questions about Stereo Box RS PRO-JECT
0 question about this device. Answer the ones you know or ask your own.
Ask a new question about this device
Download the instructions for your Receiver in PDF format for free! Find your manual Stereo Box RS - PRO-JECT and take your electronic device back in hand. On this page are published all the documents necessary for the use of your device. Stereo Box RS by PRO-JECT.
USER MANUAL Stereo Box RS PRO-JECT
BY PRO-JECT AUDIO SYSTEMS
INSTRUCTIONS FOR USE Pro-Ject Stereo Box RS
Dear music lover,
thank you for purchasing a PRO-JECT AUDIO amplifier.
In order to achieve maximum performance and reliability you should study these instructions for use carefully.

Warning of a hazard for the user, the unit or possible misuse

Important notice
Safety instructions
AC outlet voltages vary from country to country. Before connecting to the mains, make sure that the voltage in your area meets the voltage requirements printed on the power supply.
The power supply is used to disconnect the unit from the mains. Make sure that the power supply is easier accessible at all times. Never handle the device, the power supply while your hands are wet or damp.

Avoid letting liquids enter the device or the power supply. Never place any item containing liquid, such as a flower vase on or near the device. Never spill any liquid on the device or the power supply. Never place any naked flame sources, such as lighted candles on or near the device. The product shall be used in damp or wet locations, next to a bathtub, sink, swimming pool or any other similar condition Tubes produce heat. Proper ventilation has to be guaranteed all the time. The unit must not be stacked.
Connectors
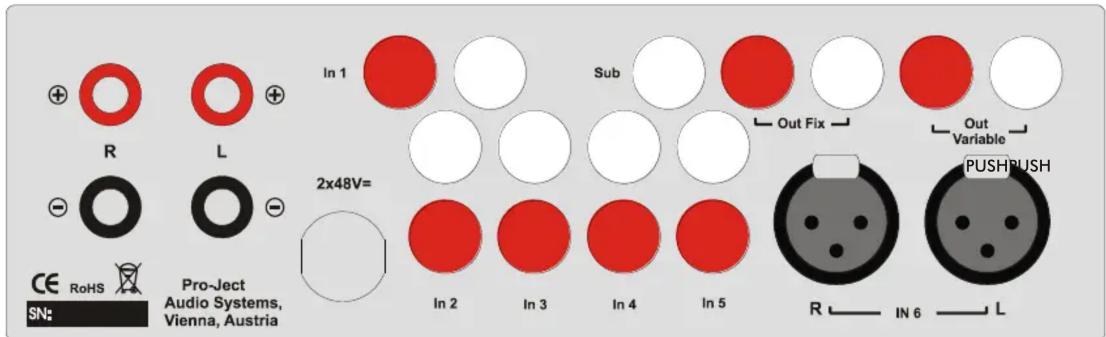
Make all connections whilst the amplifier is disconnected from the power supply.
Take care to connect the left and right channels correctly. The right channel is usually marked red, the left channel black or white.

The red speaker terminals carry the positive signal (+), the black speaker terminals the negative signal (−). Make sure the polarity of the connection is correct at each end of the cables.
Only connect one loudspeaker with an impedance not less than 4 ohms per channel.
Wiring XLR sockets: 1 ground, 2 "hot" and 3 "cold".
Never use any other power supply than the one supplied with the unit.
Inputs
Line level sources such as a CD player or a tuner can be connected to the input sockets marked IN 1 - IN 6.
Subwoofer output
An active subwoofer may be connected to the output sockets marked Sub.
Pre Out
A power amplifier or active loudspeakers can be connected to the output sockets marked Out Variable.
Record output, connecting a headphone amplifier
Out Fix connects an analogue record device ore a Pro-Ject Head Box headphone amplifier.

Out Fix provides a fixed output level.
Mains power connection
Connect the low voltage plug from the power supply to the 2x48V= socket of the amplifier before connecting the power supply to the mains.
Remote control
chemical
Diagram of a chemical reaction setup with CH+ and CH- groups, labeled with ON/OFF condition
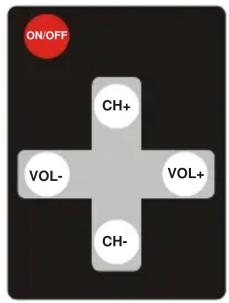
turns the unit on or back into standby

and

adjust the sound volume

and

select the inputs
Front panel controls
To switch on from standby or to standby
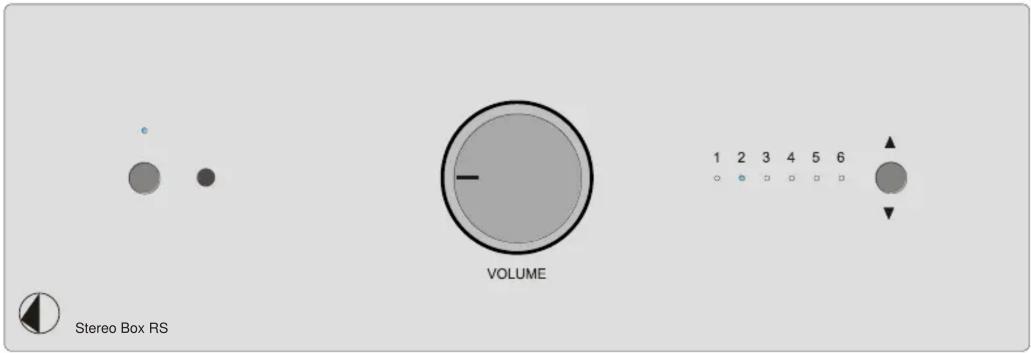
The switch on the left hand side of the front panel turns the unit on or back into standby. The blue LED above the stand-by switch shows that the unit is switched on.

After switching on, the tubes need a short time to reach the correct operating temperature. Du warm up the blue LED above the stand-by switch is blinking.
We recommend to set the volume control to 0, prior to switching on.
Input selector
After the unit is powered on, operating the switch next to the six LEDs selects the inputs. The selected input will be shown by the corresponding LED.
Volume
Adjust the volume to the desired level, using the large knob on the front panel.
Replacing batteries
Proceed as follows:
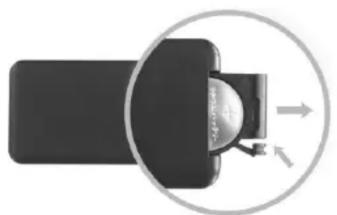
- Unlock and slide open the battery case cover
- Replace the battery.
Make sure the battery is the right way round! - Close the battery case cover
Battery type: 1 x CR2032 / 3V or 1 x CR2025 / 3V
natural_image
Diagram showing a device with a circular arrow indicating rotation or movement, no text or symbols present
Do not dispose the batteries as ordinary domestic refuse. Please dispose your exhausted batteries at the appropriate collection sites - usually located at supermarkets and drugstores.
Technical specifications Pro-Ject Stereo Box RS
Tubes: 2 x ECC88 (6922)
Power output: 2 x 80W/120W at 8 ohms/4 ohms (both channels driven)
Frequency response: 20Hz - 50kHz (-1,5dB/-3dB)
Noise floor: 90dB (A weighted)
THD: 0,1% (100W)
Gain: 31dB
Pre out (Out Variable): RCA/phono sockets, gain 12db
Subwoofer out (Sub): RCA/phono socket, gain 18dB
Record out (Out Fix): RCA/phono sockets, gain 0dB (Fixed output signal)
Line-level inputs: 4 pair RCA/phono sockets and 1 pair XLR sockets
Input impedance: 50kohms for RCA input In 1 - In 5 and 20kohms XLR input In 6
Wiring XLR sockets: 1 ground, 2 "hot" and 3 "cold"
Speaker connectors: 4mm ∅ banana plugs, spades connectors or naked wire
Outboard power supply: ±48V/2,5A DC, suitable for your country's mains supply
Power consumption: 2,5A DC, <1W in standby
Replacement battery remote control: 1 x CR2032 / 3V or 1 x CR2025 / 3V
Dimensions W x H x D (D with sockets): 206 x 72 x 200 (210)mm
Weight: 2650g without power supply
Service
Should you encounter a problem which you are not able to alleviate or identify, please contact your dealer for further advice. Only when the problem cannot be resolved there should the unit be sent to the responsible distributor in your country.
Warranty

The manufacturer accepts no responsibility for damage caused by not adhering to these instructions for use. Modification or change to any part of the product by unauthorized persons, release the manufacturer from any liability over and above the lawful rights of the customer.
Copyright
Pro-Ject Audio Systems is a Registered Trademark of H. Lichtenegger.
This guide was produced by: Pro-Ject Audio Systems Copyright © 2014. All rights reserved.
The information was correct at the time of going to press. The manufacturer reserves the right to make changes to the technical specification without prior notice as deemed necessary to uphold the ongoing process of technical development.

- INSTRUCTIONS FOR USE Pro-Ject Stereo Box RS
- Safety instructions
- Inputs
- Subwoofer output
- Pre Out
- Record output, connecting a headphone amplifier
- Mains power connection
- To switch on from standby or to standby
- Input selector
- Volume
- Replacing batteries
- Technical specifications Pro-Ject Stereo Box RS
- Service
- Warranty
- Copyright
Brand : PRO-JECT
Model : Stereo Box RS
Category : Receiver