
AK2000S - Tripod FeiyuTech - Free user manual and instructions
Find the device manual for free AK2000S FeiyuTech in PDF.


| Product Type | 3-axis handheld gimbal with detachable handle and tripod mount |
| Model | AK2000S |
| Dimensions (well balanced) | 151 x 203.5 x 372.8 mm |
| Weight (without camera) | Approximately 1100 g / 2.4 lb |
| Payload (well balanced) | 2200 g / 4.85 lb |
| Battery Type | Built-in 2200 mAh LiPo |
| Battery Life | Up to 14 hours (well balanced) |
| Charging Time | ≥ 1.5 hours, supports quick charge up to 18W (9V/2A, 12V/1.5A) |
| Tilt Range | 230° |
| Roll Range | 360° |
| Pan Range | 360° |
| Working Modes | Pan Mode, Follow Mode, All Follow Mode, Lock Mode, Inception Mode, Selfie Mode, Portrait Mode, Motion Timelapse |
| Control Methods | Touch screen, joystick, multifunction knob, trigger button, Feiyu ON App, Hyperlink Remote Controller (optional) |
| Camera Connection | USB 2.0 to Micro/Mini/Type-C cables, Type-C to Multi (Sony shutter), DC 2.5mm (Panasonic shutter), TRS 2.5 |
| Bluetooth | Yes, for remote control and app connection |
| Wi-Fi | Yes, for camera control via Feiyu ON App |
| Memory Card | Not included; camera must have its own memory card |
| Included Accessories | Anti-slip metal tripod, versatile arm, USB cables, shutter release cables |
| Optional Accessories | Brushless Follow Focus, Hyperlink Remote Controller, Extension Rod, Multifunctional Bracket, Wireless MIC Kit |
| Compatible Cameras | Canon, Sony, Panasonic, Nikon, Fujifilm (see manual for specific models and lenses) |
| Maintenance | Keep dry, avoid heat, do not disassemble, store in cool place |
| Warranty | Refer to FeiyuTech warranty policy |
Frequently Asked Questions - AK2000S FeiyuTech
User questions about AK2000S FeiyuTech
0 question about this device. Answer the ones you know or ask your own.
Ask a new question about this device
Download the instructions for your Tripod in PDF format for free! Find your manual AK2000S - FeiyuTech and take your electronic device back in hand. On this page are published all the documents necessary for the use of your device. AK2000S by FeiyuTech.
USER MANUAL AK2000S FeiyuTech
3-Axis Stabilized Handheld Gimbal for Camera
Instruction
EN V 2.0.1
Catalogue
1. Product Overview 2
2. Start to Use 4
2.1 Charging 4
2.2 Unlock and Lock 4
2.3 Camera Installation 6
2.4 Gimbal Balancing 7
2.5 Power ON/OFF 8
3. Function operation 9
3.1 Mode/Function Introduction 9
3.2 Button Operation 10
3.3 USB Port 13
3.4 Touch Screen 13
3.5 Modes Setting 15
3.6 Motion-timelapse Mode 17
3.7 Initialization 20
3.8 Manual Lock 20
4. Feiyu ON App 21
4.1 Download the Feiyu ON App 21
4.2 App Connecting 21
4.3 Firmware Upgrade 22
5.Accessories 24
5.1 Tripod 24
5.2 Versatile Arm 24
5.3 Brushless Follow Focus 25
5.4 Hyperlink Remote Controller 25
5.5 Extension Rod 26
5.6 Multifunctional Bracket 27
5.7 Wireless MIC Kit 27
6. Specifications 30
Compatible Cameras for Reference 31
Disclaimer 33
Introduction
AK2000S is a professional 3-axis stabilized handheld gimbal for DSLR and mirrorless camera. It is compatible with popular DSLR and mirrorless cameras on the market. Its detachable versatile arm handle, makes it available to be supporting by single hand and low angle shooting, and is allowed to mounted on tripod and other adaptor.
AK2000S is designed with function button and LCD touch screen, which can switch the gimbal working mode, control the rotation and the parameters setting by one hand. The camera shutter cable is equipped for controlling the photography, video recording and focus following directly at handle.
Suggestion
Feiyu AK2000S includes below information, please read the information before using the gimbal:
- Quick start guide
- Online instruction
- Tutorial
The tutorial videos can be watched at FeiyuTech official website or scan the QR code.

https://www.feiyu-tech.com/play/
Feiyu ON App
Feiyu ON App is needed while using the gimbal. Please download Feiyu ON at your smartphone App Store or scan the QR code as below. See P21 for more

1. Product Overview
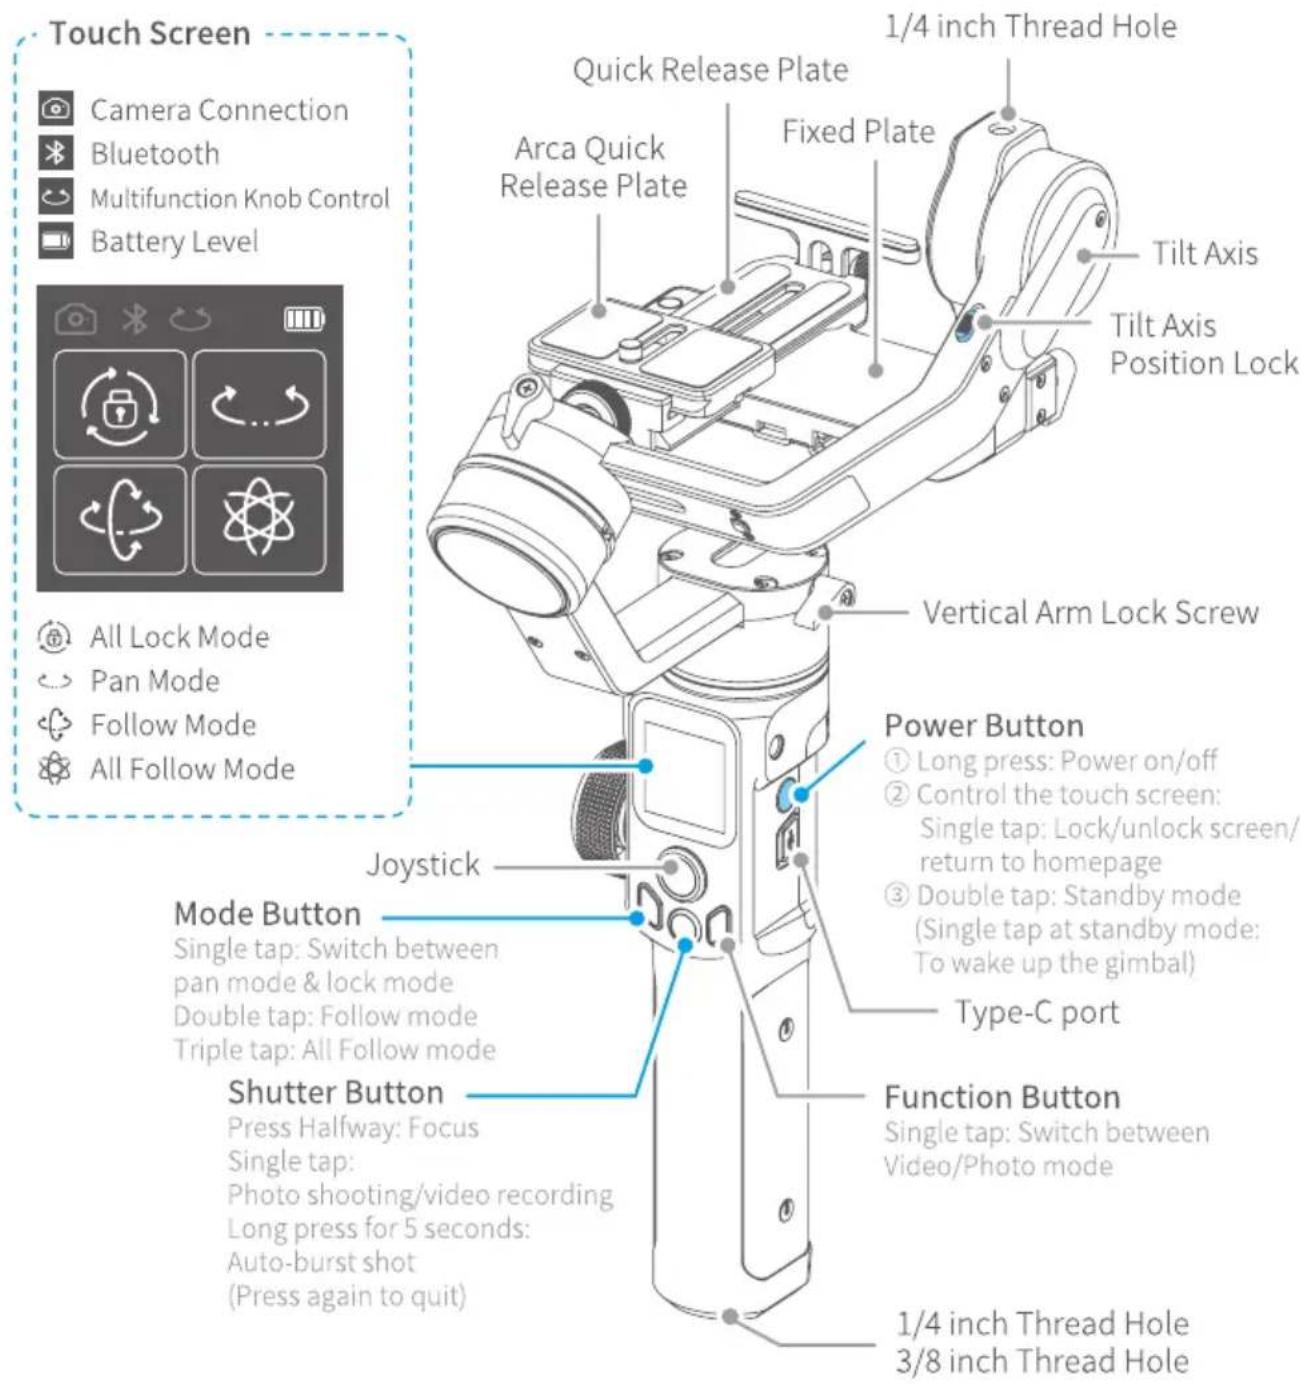
* This product does not include the camera.
Standard kit accessories
USB 2.0 to Micro (A01)×1

USB 3.0 to Micro 3.0 (A02)×1
USB 2.0 to Mini (B01)×1
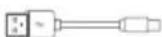
USB 2.0 to Type-C (C01)×1
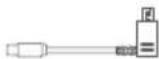
Type-C to Multi (Sony Shutter Cable) ×1
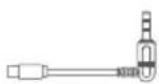
DC 2.5mm(Panasonic Shutter Cable)×1

Type-C to TRS 2.5 (T02)×1
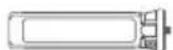
Anti-slip metal tripod×1
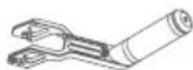
Versatile arm ×1
Advanced kit accessories
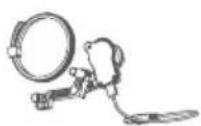
Brushless Follow Focus(AKF2) ×1
Advanced kit includes all the accessories which standard kit has, and added the accessories as below:
Optional accessories
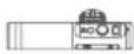
Hyperlink remote controller×1
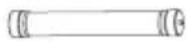
Extension rod×1
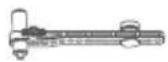
Multifunctional bracket for tilt axis×1
Wireless MIC Kit
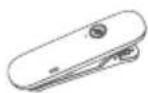
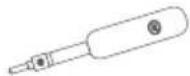
Wireless MIC×1 Wireless receiver×1
2. Start to Use

TIPS
1) Please mount the camera and balance it before Power ON.
2) When the battery is low, please charge the gimbal.
3) When not in use for a long time, power off the gimbal.
2.1 Charging

Please fully charge the battery before power on the gimbal for the first e.
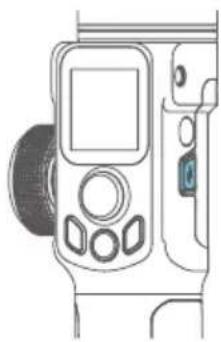
Open the USB rubber cover. Connect the USB 2.0 to Type-C (C01) cable to charge. Quick charge is available.
natural_image
Line drawing of a camera device with display, control panel, and lens (no text or symbols)
USB 2.0 to Type-C(C01)
2.2 Unlock and Lock
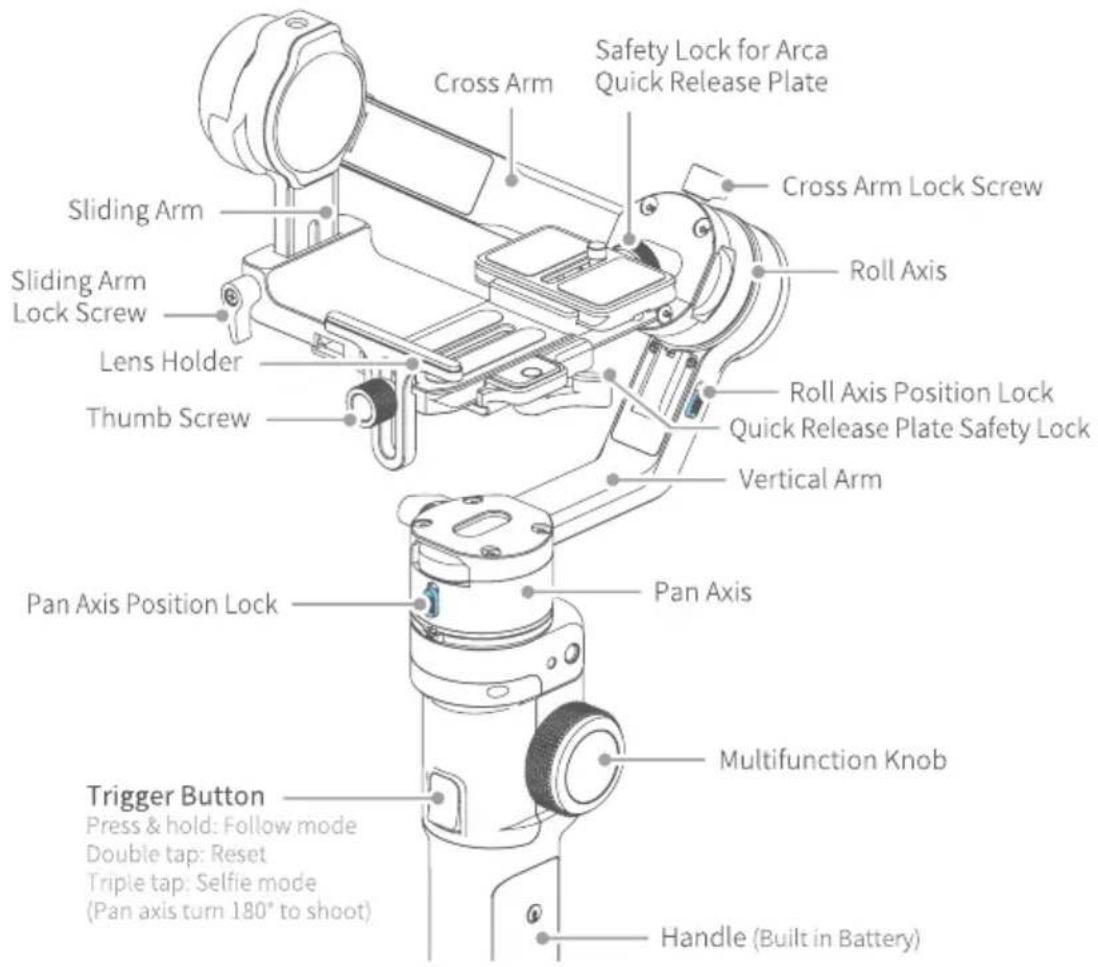
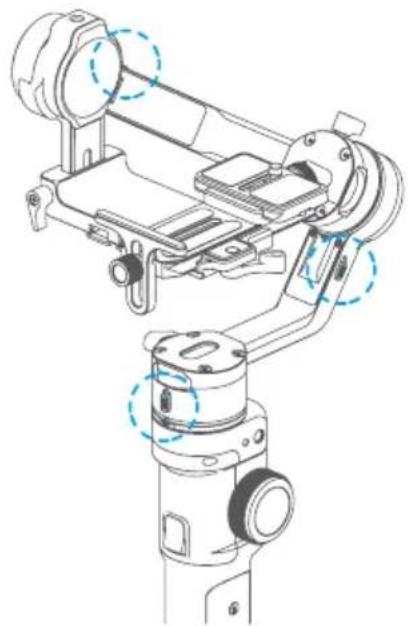
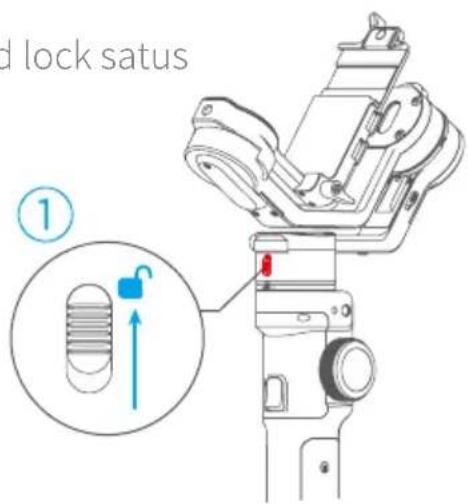
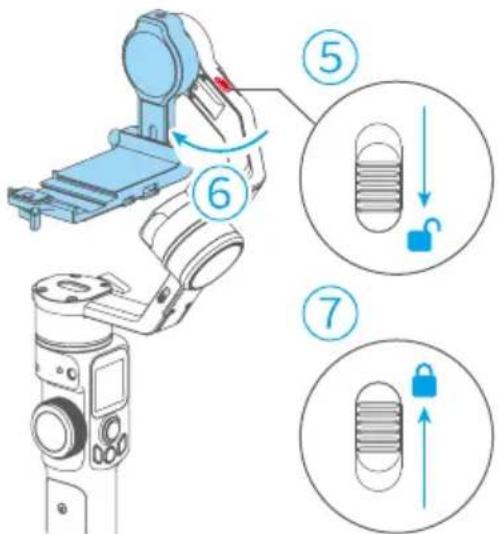
Each rotating axes has a position lock for convenient balancing and storage.
Be sure to unlock the position locks before using the gimbal.
natural_image
Technical line drawing of a robotic arm with no visible text or symbols
Lock

Unlock
Step:
Stored lock satus
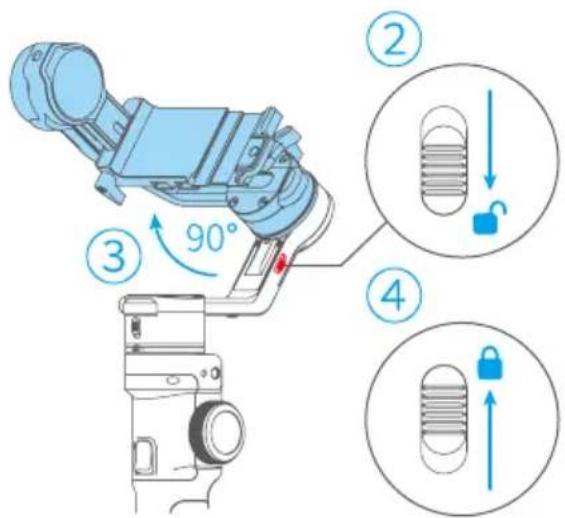
Balanced lock satus
2.3 Camera Installation
Camera is ready to shoot. (The lens cover should be removed from the camera and the memory card and battery needs to be inserted to the camera to complete all the connections.)
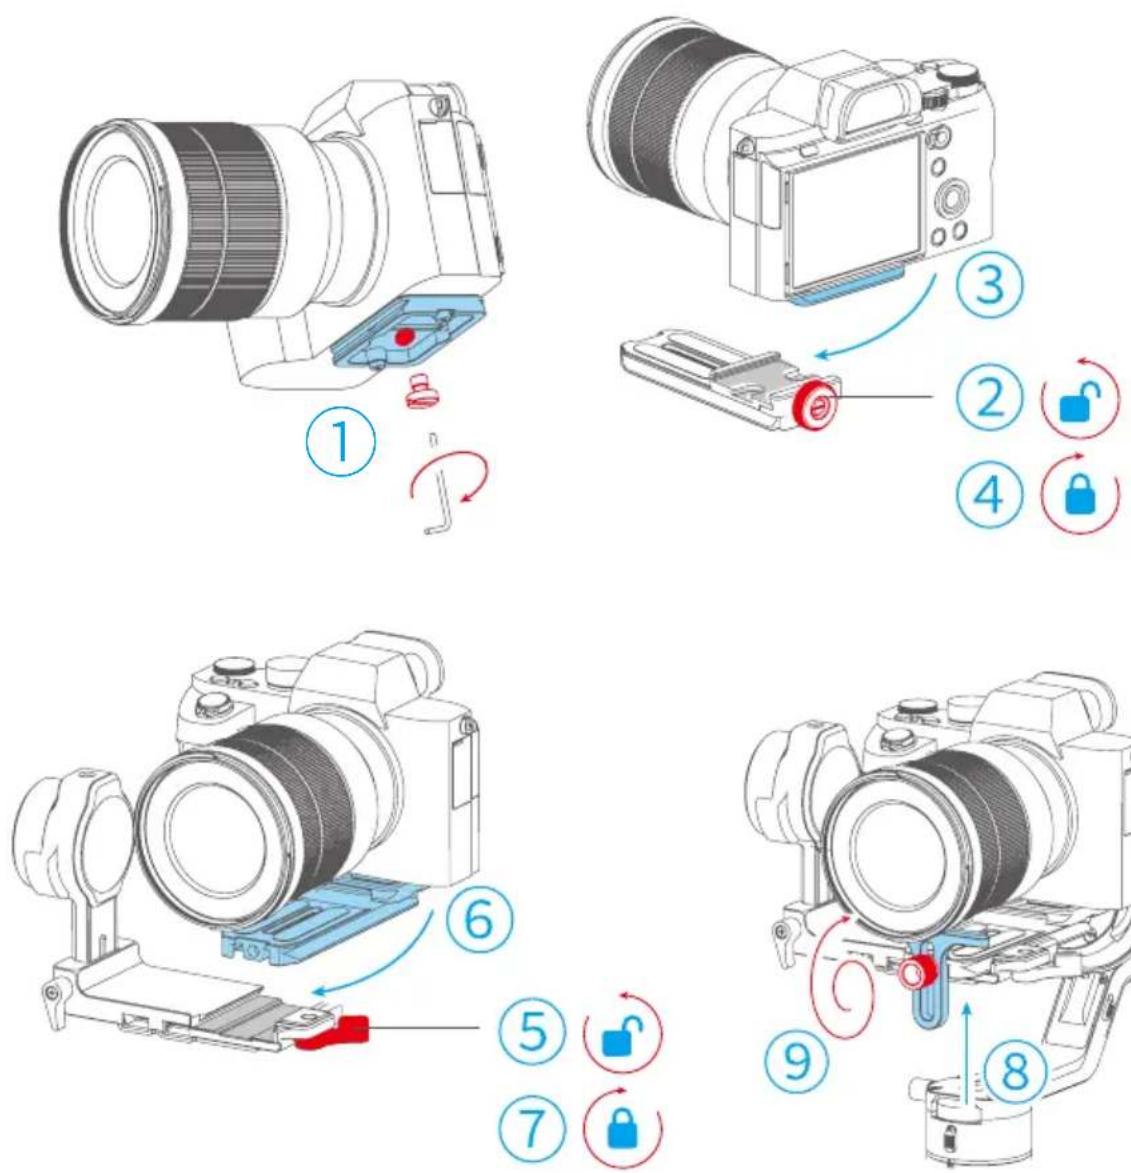
2.4 Gimbal Balancing
For ideal shooting effects, balancing the gimbal is necessary, and accurate balance will offer longer battery life.

TIPS
1) Before balancing the gimbal, please lock the gimbal at the balanced lock status, and the lens cover should be removed from the camera and the memory card needs to be inserted to the camera to complete all the connections to ensure that the camera is ready for shooting.
2) During balancing the gimbal, make sure the camera and gimbal are all powered off.
3) If it is needed to add accessories after the balance is completed, gimbal needs to be re-balanced again.
Balanced standard: the camera can stay stably at any angles.
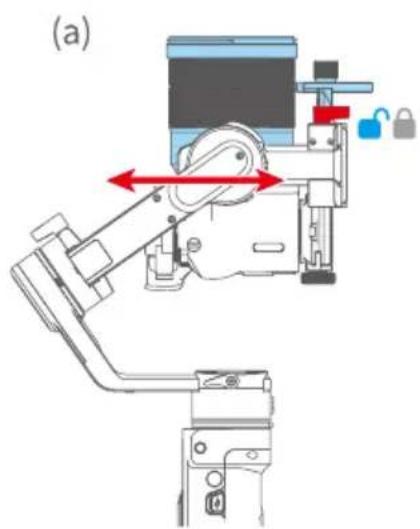
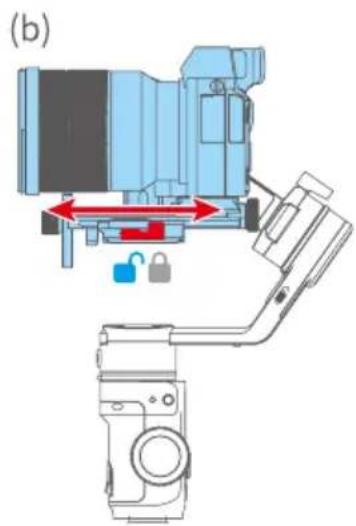
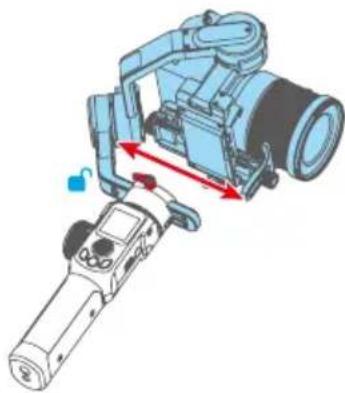
2.4.1 Balance tilt axis
Step (a)
· Turn the camera lens upwards.
- Let it go, observe the dropping direction of the camera.
- Loosen the lock screw(red).
- Move the camera.
Step (b)
· Turn the camera lens forward.
- Let it go, observe the dropping direction of the camera.
- Unlock the safety lock(red).
- Move the camera.
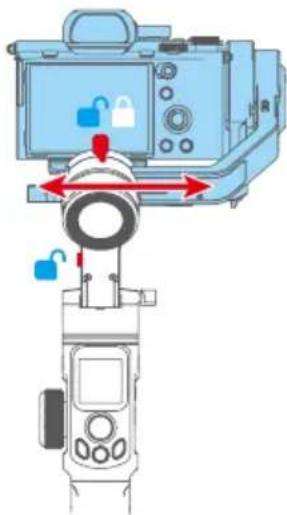
2.4.2 Balance roll axis
- Unlock the safety lock(red).
- Let it go, observe the dropping direction of the camera.
- Loosen the lock screw(red).
- Move the camera.
2.4.3 Balance pan axis
- Hold the handle and slant it ( >15^ ), put the vertical arm horizontally.
- Let it go, observe the dropping direction of the camera.
- Loosen the lock screw(red).
- Move the camera.
natural_image
Diagram of a DSLR camera assembly with directional arrows indicating motion (no text or symbols present)2.5 Power ON/OFF

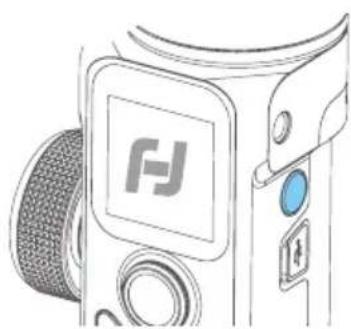
Be sure to unlock the position lock before using the gimbal.
Long press power button, release the button until it shows 📂 on display.
natural_image
Line drawing of a camera with a stylized 'H' logo and control buttons (no text or symbols)3. Function operation
3.1 Mode/Function Introduction
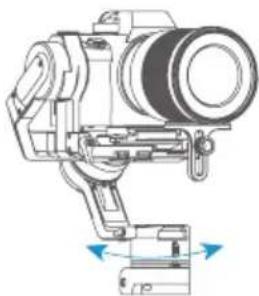
① Pan Mode (Default mode)
The roll and tilt direction are fixed, and the camera moves according to the left-right movements of the user's hand.
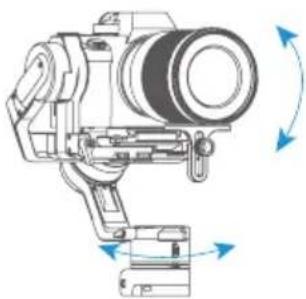
② Follow Mode
The roll direction is fixed, and the camera moves according to the left-right or up-down movements of the user's hand.
③ All follow Mode
The camera moves according to the user's hand.
④ Lock Mode
The orientation of the camera is fixed.
⑤ Reset
Return to Pan Mode, 3-axis return to initial position.
natural_image
Technical line drawing of a mechanical device with no visible text or symbolsDefault Mode (Pan Mode)
natural_image
Technical line drawing of a camera assembly with directional arrows indicating rotation (no text or symbols)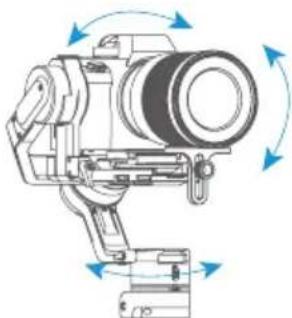
natural_image
Technical line drawing of a camera assembly with rotating components (no text or symbols)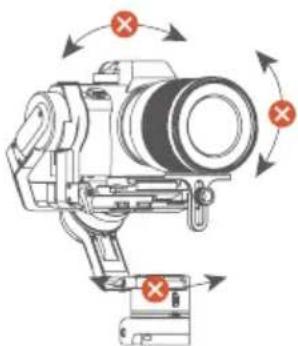
natural_image
Technical diagram of a camera with directional arrows indicating rotational motion (no text or symbols)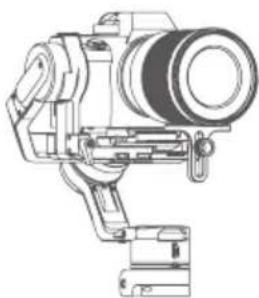
natural_image
Technical line drawing of a mechanical device with no visible text or symbols⑥ Manual Lock
Slide the tilt axis to a desired position, and hold on for 0.5 second. Set the camera position accurately and conveniently.
⑦ Auto-rotation mode
Auto-rotation mode helps user setup and automatically taketime-lapse photography. It can set rotation route and time.
⑧ Inception Mode
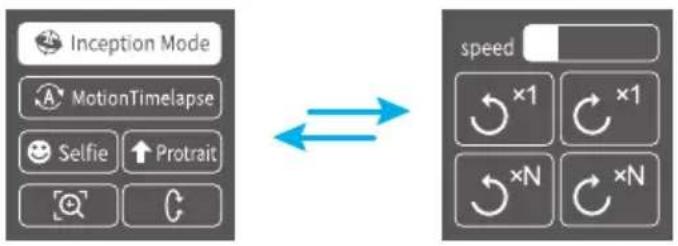
Single tap Inception menu on screen, setting rotate speed and direction on the screen directly.
⑨ Selfie Mode
The camera turns 180^ horizontally, selfie shooting is available.
⑩ Protrait Mode
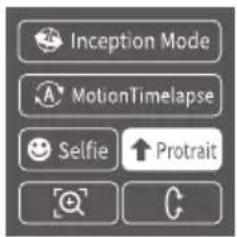
Single tap Portrait menu on screen to enter portrait mode for livestream/Tiktok.
To get more videography skills with gimbal and it's tutorial, please kindly visit our official or download Feiyu ON App.
http://www.feiyu-tech.com
3.2 Button Operation
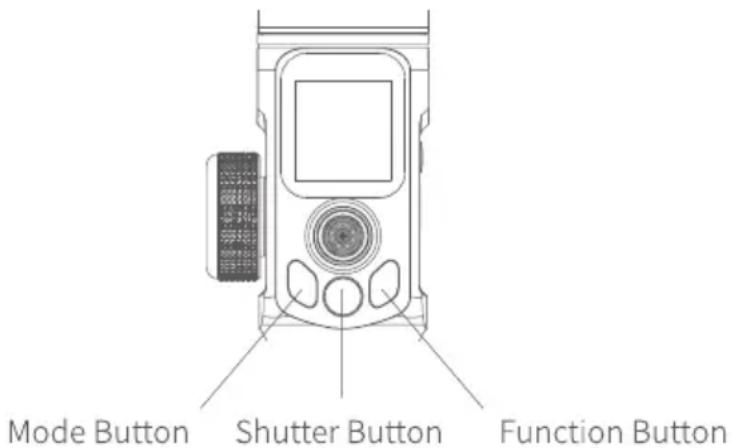
3.2.1 Mode operation
| Button Function Description | ||
| Mode Button | Single tap Pan/Lock mode (default mode) | |
| Double tap Pan mode | ||
| Triple tap All follow mode | ||
3.2.2 Shutter button
| Button Function Description | ||
| Shutter Button (2stages-way press: half-way press & full-way press) | 1. Focus Single tap (half-way press) | |
| 2. Photography Full-way press after focusing. | ||
| 3. Video recording Single tap(fully tap) start/stop | ||
| 4. Continuous shooting | Long press for 5 seconds, (fully press),after beep sound. Tap again to exit, default shoot 1 time every 5 seconds. | |
3.2.3 Function button operation
| Button Funct | on Description | |
| Function Button Ph | otography/video recording Single tap | |
3.2.4 Joystick
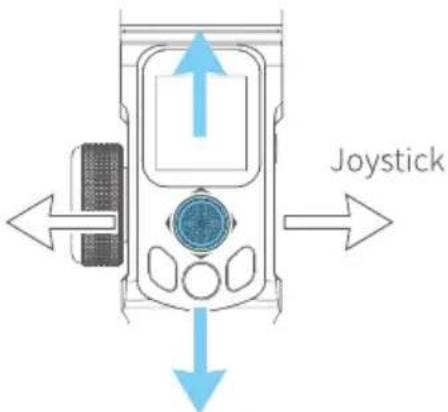
| Button Funct | on Description | |
| Joystick | 1. Camera lens move to upward, select the option above on display | Move to upward |
| 2. Camera lens move to downward, select the option below on display | Move to downward | |
| 3. Camera lens move to left, select the option on the left on display | Move to left | |
| 4. Camera lens move to right, select the option on the right on display | Move to right |
3.2.5 Power button
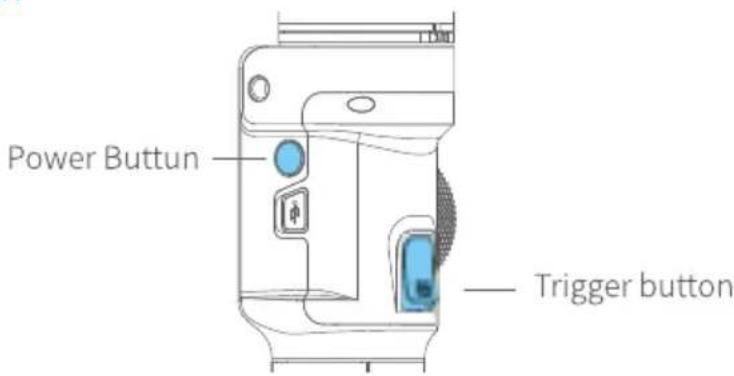
| Button Function Description | ||
| Power Button | 1. Power ON/OFF Long press | |
| 2. Lock/ unlock screen/ go back to home page | (Set up the display) Single tap | |
| 3. Standby mode Double tap | ||
| 4. Awaken the gimbal Single tap at standby mode | ||
3.2.6 Trigger button
| Button Function Description | ||
| Trigger Button | 1. Follow mode Press & hold | |
| 2. Reset Double tap | ||
| 3. Selfie shooting (Pan axis rotate 180° to shoot) | Triple tap | |
3.2.7 Multi-function knob
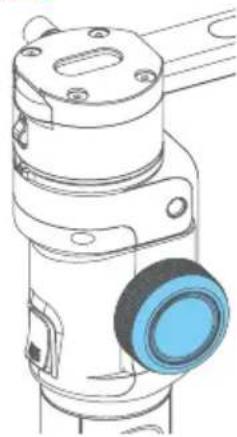
natural_image
Technical line drawing of a mechanical component with a blue circular button (no text or symbols)Multi-function Knob
| Button Function Description | ||
| Multi-function Knob | 1. Control the current axis rotate direction | Rotate knob (default pan rotation mode) |
| 2. Switch between follow Focus/Zoom | Long press to switch | |
| 3. Switch axis rotate among Tilt/Roll/Pan Axis | Single tap to switch (under the control of the axis direction mode) | |
| 4. Switch between Follow Focus/Zoom | Single tap to switch (under the control of the follow focus or zoom mode) | |
3.3 USB Port
There are USB2.0 and Type C port at the fixed plate, which enable to connect to camera/follow focus and other devices.
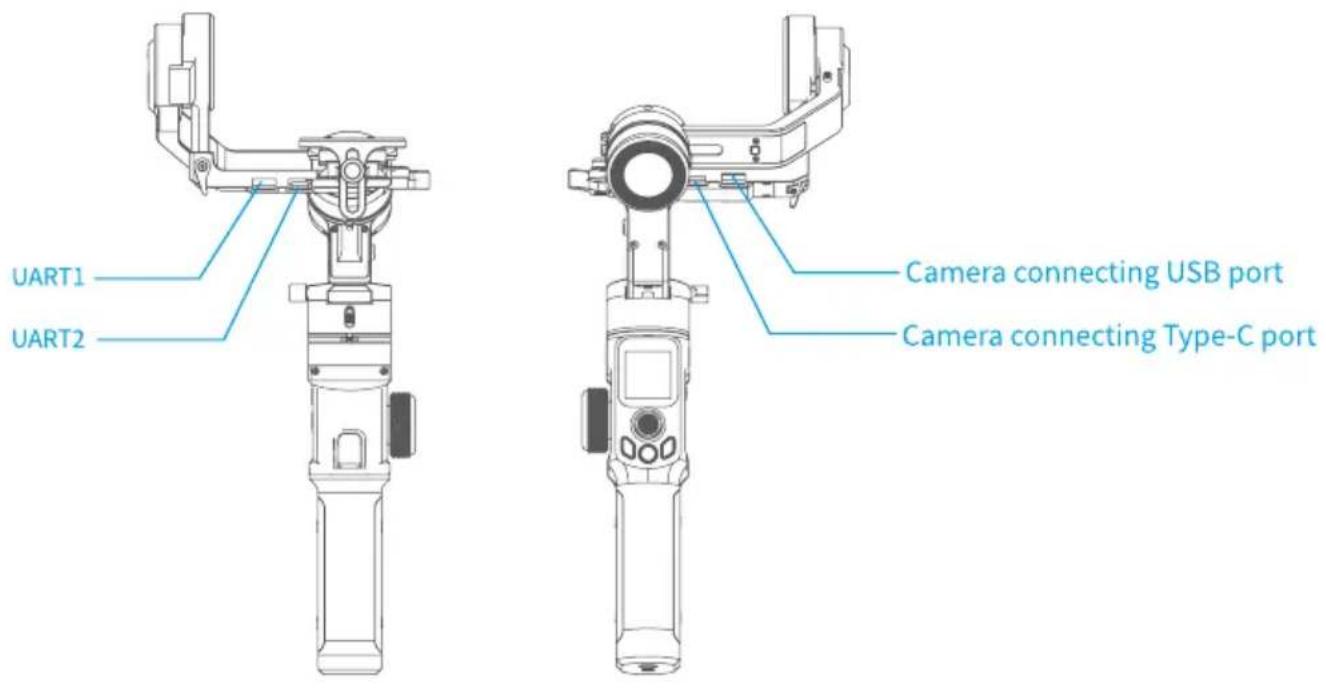
3.4 Touch Screen
3.4.1 Screen
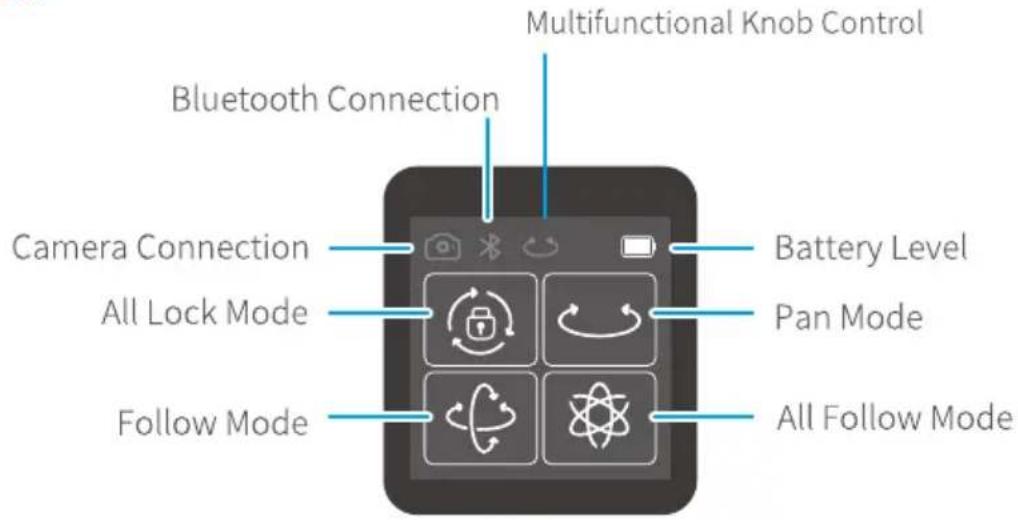
Icon Mode Icon Mode

Camera Connected/Photography All Lock Mode

Camera Unconnected Pan Mode
Icon Mode Icon Mode

Video Recording Mode Follow Mode

Bluetooth Connected All Follow Mode

Bluetooth Unconnected Tilt Axis Enabled

Multi-function Knob Dnaabled Roll Axis Enabled

Multi-function Knob Disabled Pan Axis Enabled

Zoom Status Battery Level

Follow Focus Status
3.4.2 Display screen switch
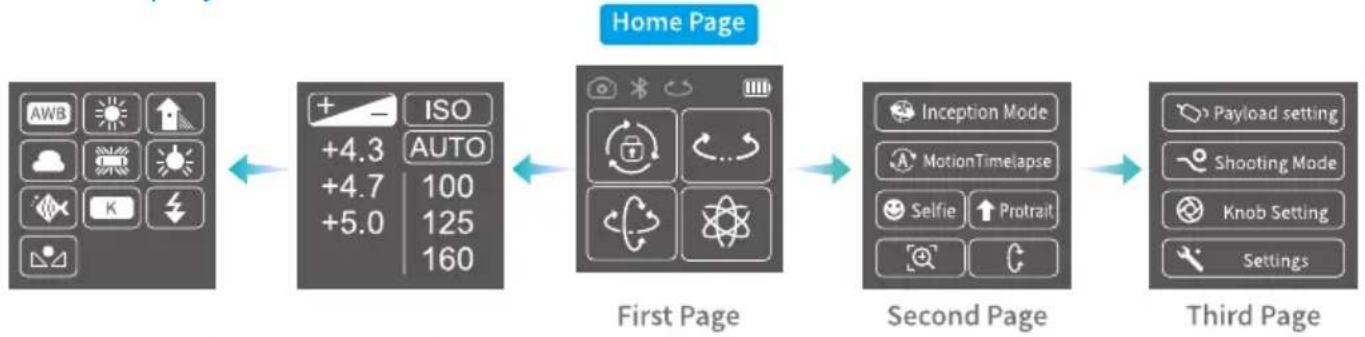
flowchart
graph LR
    A["Home Page"] --> B["First Page"]
    B --> C["Second Page"]
    C --> D["Third Page"]

    A -->|AWB, +4.3, +4.7, +5.0, ISO, AUTO, 100, 125, 160| A
    B -->|Inception Mode, MotionTimeline, Selfie, Protrait| B
    C -->|Payload setting, Shooting Mode, Knob Setting, Settings| C
3.4.3 Usage of touch screen
Slide right to left: Flip to the right sub page.
Slide left to right: Flip to the left sub page/return to previous option.
Tap: Select current option.
3.4.4 Lock/unlock screen
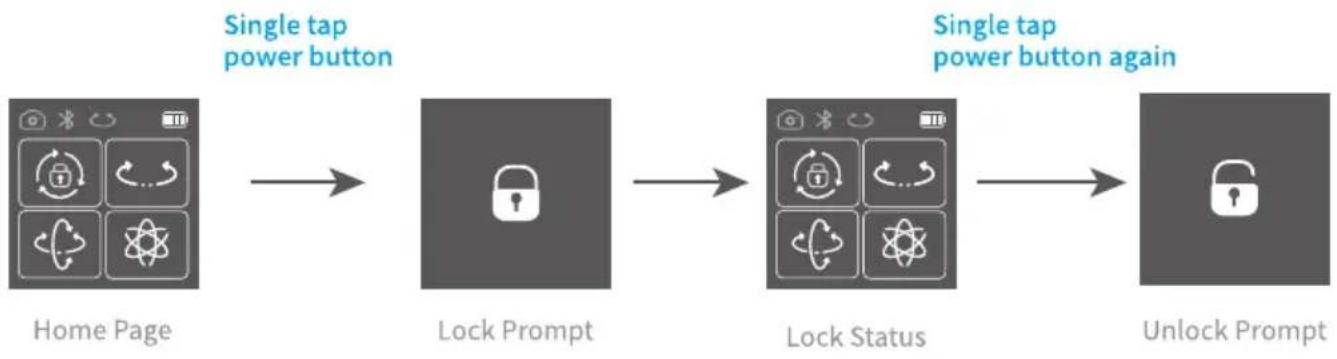
flowchart
graph LR
    A["Home Page"] --> B["Lock Prompt"]
    B --> C["Lock Status"]
    C --> D["Unlock Prompt"]
    style A fill:#f9f,stroke:#333
    style B fill:#ccf,stroke:#333
    style C fill:#cfc,stroke:#333
    style D fill:#fcc,stroke:#333
3.5 Modes Setting
Description:

Slide right to left

left to right
Tap to select current menu
3.5.1 Inception Mode setting
Single tap Inception Mode on screen, the camera lens will rotate to upward. Holding the gimbal horizontally, and set rotation direction/speed/one circle or continuous circle. The camera will automatically rotate 360 degree to take inception footage with pre-set speed and direction after setup.
flowchart
graph LR
    A["Inception Mode"] --> B["MotionTimelapse"]
    B --> C["Selfie ↑ Protrait"]
    C --> D["×N"]
    D --> E["speed ×1"]
    E --> F["×1"]
    F --> G["×N"]
    G --> H["×N"]
3.5.2 Motion-timelapse mode setting
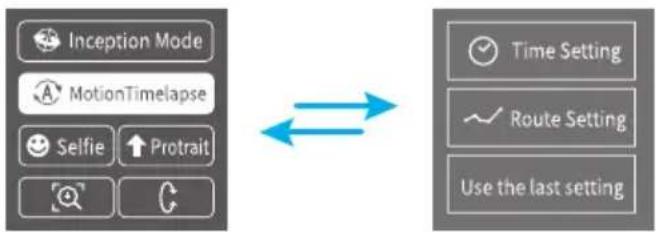
Please refer to the Motion Timelapse Mode chapter.
flowchart
graph LR
    A["Inception Mode"] --> B["MotionTimelapse"]
    B --> C["Selfie ↑ Protrait"]
    C --> D["Search Icon"]
    D --> E["Return Arrow"]
    E --> F["Time Setting"]
    E --> G["Route Setting"]
    E --> H["Use the last setting"]
flowchart
graph LR
    A["Time Setting"] --> B["Route Setting"]
    B --> C["Use the last setting"]
    D["Time setting"] --> E["Photos: 00000"]
    D --> F["PAN | 00:00:00"]
    D --> G["TILT | 00:00:00"]
    D --> H["INVL | 00:00:00"]
    D --> I["DWELL | 00:00:00"]
    J["Route setting"] --> K["Step 1"]
    K --> L["Start point setting"]
    L --> M["OK"]
    L --> N["ESC"]
3.5.3 Protrait setting
Holding the gimbal horizontally, tap Portrait on screen to enter protrait shooting.
3.5.4 Other setting
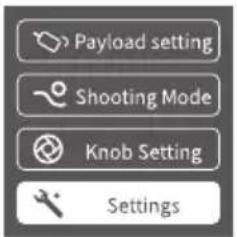
Set motor power according to camera weight.
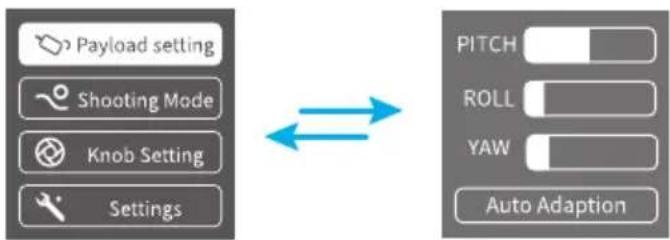
flowchart
graph LR
    A["Payload setting"] --> B["Shooting Mode"]
    B --> C["Knob Setting"]
    C --> D["Settings"]
    E["PITCH"] --> F["ROLL"]
    F --> G["YAW"]
    G --> H["Auto Adaption"]
Set scene modes according to camera function.
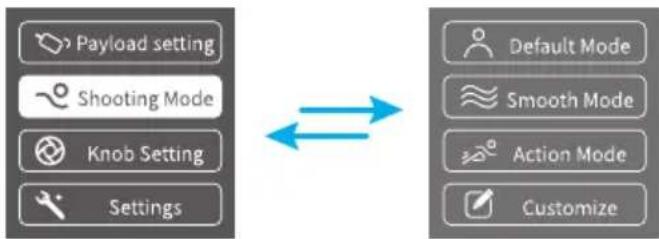
flowchart
graph LR
    A["Payload setting"] --> B["Shooting Mode"]
    B --> C["Knob Setting"]
    C --> D["Settings"]
    E["Default Mode"] --> F["Smooth Mode"]
    F --> G["Action Mode"]
    G --> H["Customize"]
Higher sensitivity gives faster reaction of gimbal/camera.
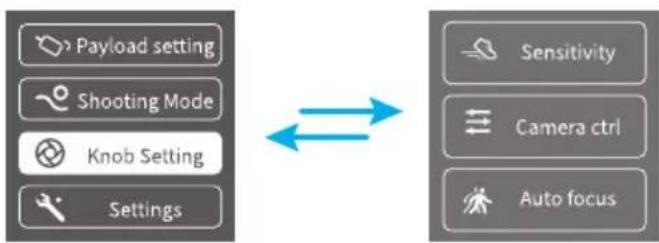
flowchart
graph LR
    A["Payload setting"] --> B["Shooting Mode"]
    B --> C["Knob Setting"]
    C --> D["Settings"]
    E["Sensitivity"] --> F["Camera ctrl"]
    F --> G["Auto focus"]
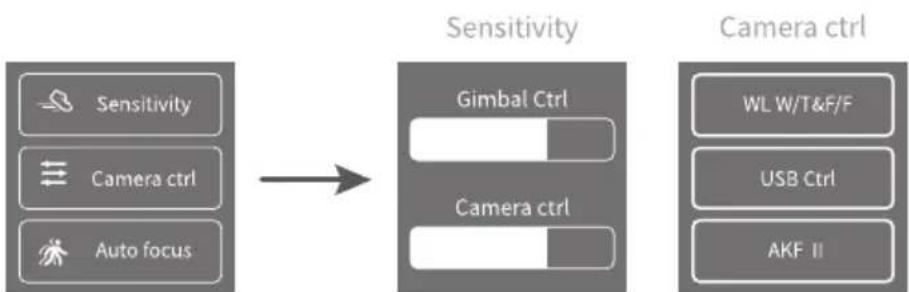
flowchart
graph LR
    A["Sensitivity"] --> B["Camera ctrl"]
    B --> C["Auto focus"]
    D["Gimbal Ctrl"] --> E["Camera ctrl"]
    E --> F["Camera ctrl"]
    G["WL W/T&F/F"] --> H["USB Ctrl"]
    I["AKF II"] --> J["Camera ctrl"]
System setting
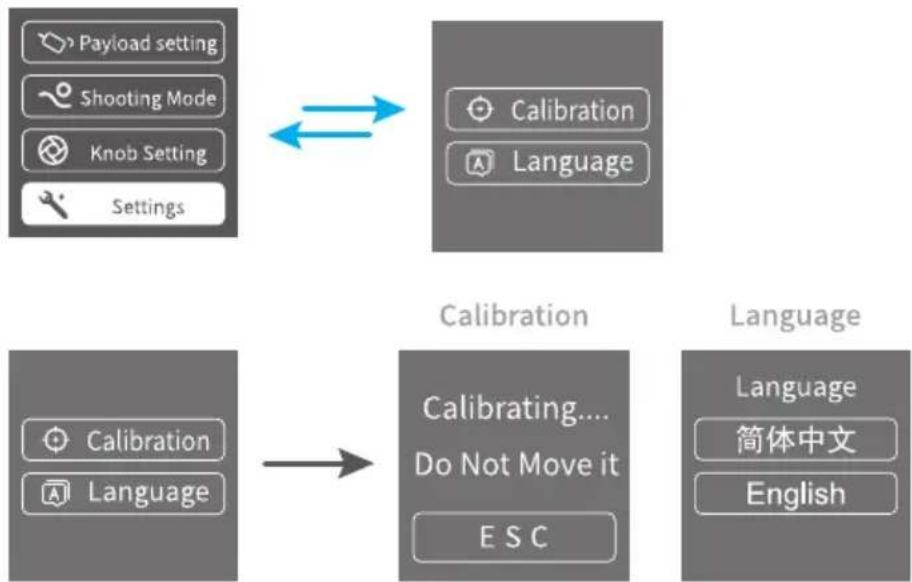
flowchart
graph TD
    A["Payload setting"] --> B["Calibration"]
    C["Shooting Mode"] --> B
    D["Knob Setting"] --> B
    E["Settings"] --> B
    B --> F["Language"]
    G["Calibration"] --> H["Calibrating... Do Not Move it ESC"]
    I["Language"] --> J["简体中文 English"]
3.6 Motion-timelapse Mode
3.6.1 Motion-timelapse setting
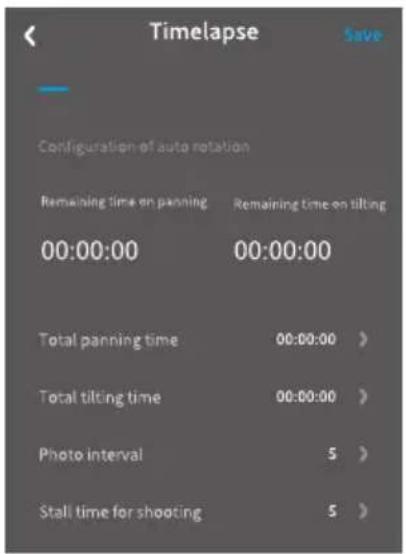
Method 1:
Set the Motion-timelapse mode parameters on Feiyu ON App.
Enter the parameter setting interface to select the Motion-timelapse mode for setting. The maximum interval time is 59 seconds, while maximum staying time for long exposure photography is 58 seconds.
Note: The photographing interval setting must be longer than the stop time and less than the panning or the tilting rotation time.
Method 2:
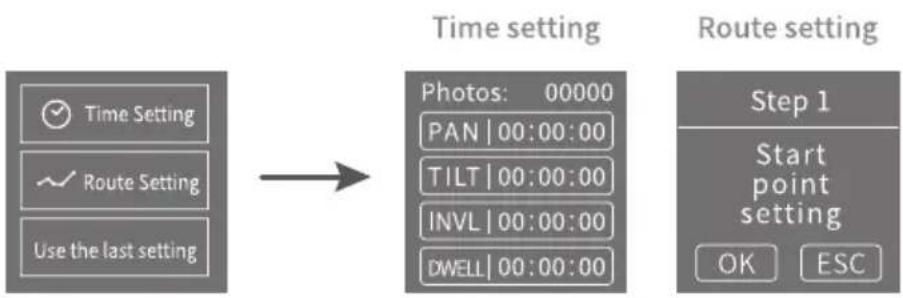
Set the Motion-timelapse mode parameters by entering the Motion Timelapse interface on screen. Operate with joystick to set up time setting parameter on touch screen.
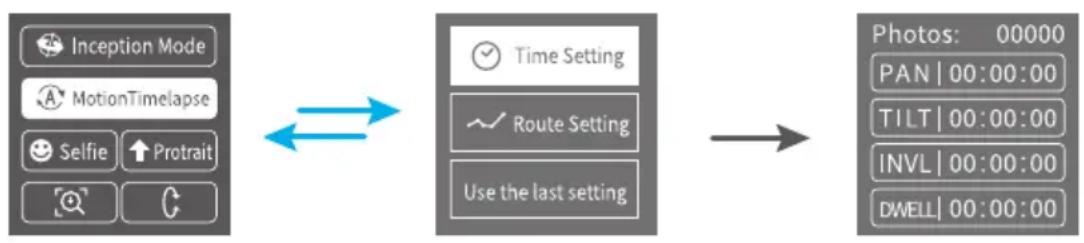
flowchart
graph LR
    A["Inception Mode"] --> B["Time Setting"]
    C["MotionTimeline"] --> B
    D["Selfie ↑Protrait"] --> B
    E["Search"] --> B
    B --> F["Route Setting"]
    F --> G["Use the last setting"]
    H["Photos: 00000"] --> I["PAN|00:00:00"]
    H --> J["TILT|00:00:00"]
    H --> K["INVL|00:00:00"]
    H --> L["DWELL|00:00:00"]
| Display icon Mode/Status | Minimum time setting | Maximum time setting |
| PAN (T1) Pan axis rotation period 00:00:00 07:59:59 | ||
| TILT (T2) Tilt axis rotation period 00:00:00 07:59:59 | ||
| INVL (t) Photographic interval 00:00:00 00:00:59 | ||
| DWELL (P) Photography waiting time 00:00:00 00:00:58 | ||
PAN: Time required for the pan axis to rotate from the start point to the end point.
TILT: Time required for the tilt axis to rotate from the start point to the end point.
INVL: The time between the end of the previous shooting and the end of the next shooting.
DWELL: Gimbal staying time after sending a photographing command for long exposure.
* T1 > t > P and T2 > t > P
3.6.2 Route setting
(1) Enter Route setting interface under Motion timelapse menu.
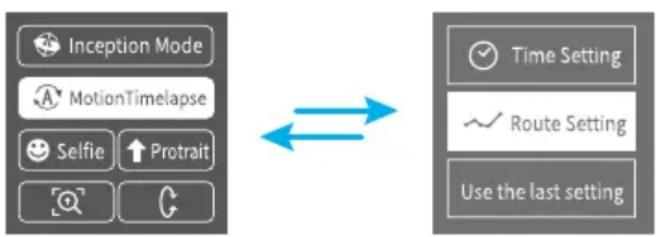
flowchart
graph LR
    A["Inception Mode"] --> B["MotionTimelapse"]
    B --> C["Selfie ↑ Protrait"]
    C --> D["Search Icon"]
    D --> E["Return Arrow"]
    E --> F["Time Setting"]
    E --> G["Route Setting"]
    E --> H["Use the last setting"]
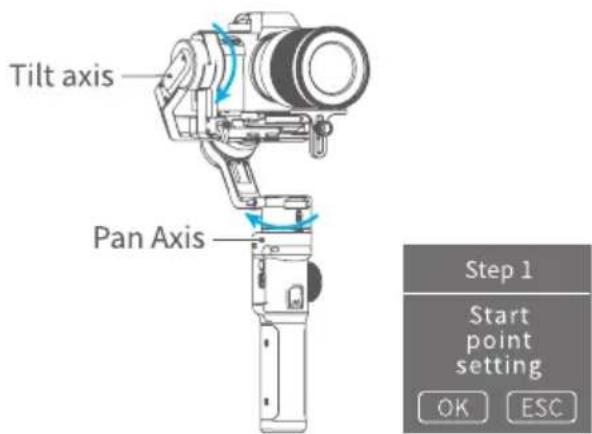
(2) Set the start position
Rotate the pan or tilt axis to a desired position, hold on for 0.5 seconds. Tap OK on screen to record a start position.
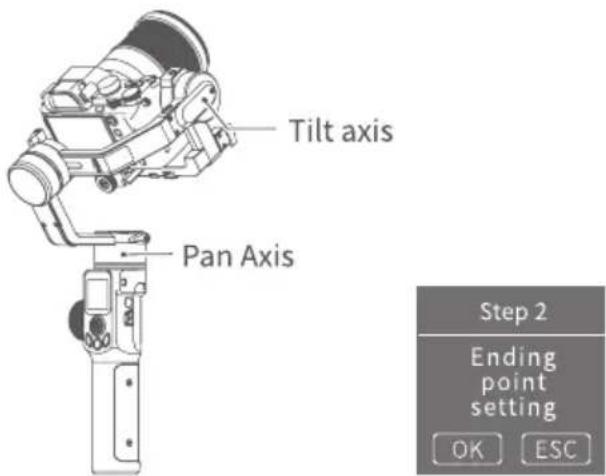
(3) Set the end position
Rotate the pan or tilt axis to a desired position, hold on for 0.5 seconds. Tap OK on screen to record an end position.
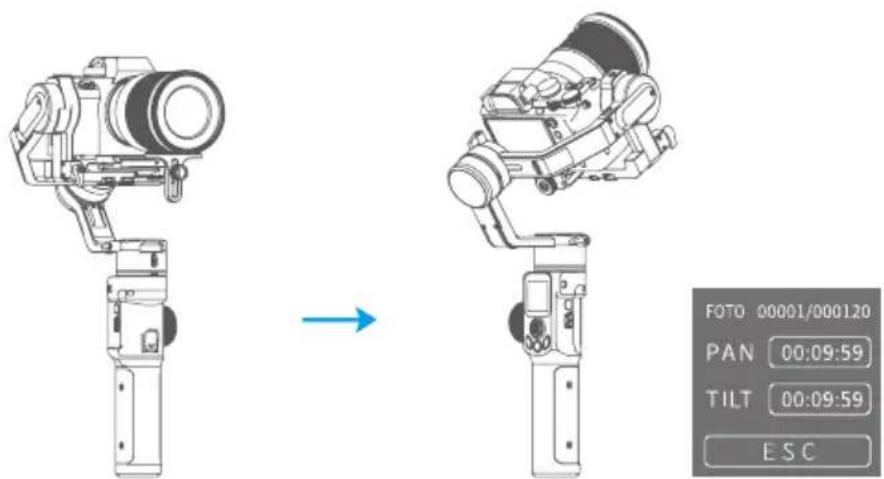
(4) Gimbal rotate automatically from the start position to the end position gimbal return the start initial position after setting, and then tilt and pan axis will start to rotate according to the parameter that has been set.

flowchart
graph LR
    A["Exit"] --> B["Double tap trigger button or the ESC icon on screen to exit"]
    B --> C["Exit motion timelapse mode and reset."]
To get more videography skills with gimbal and it's tutorial, please kindly visit our official or download Feiyu ON App.
http://www.feiyu-tech.com
3.7 Initialization
Initialization the gimbal when:
(1) The camera is not in balance.
(2) Not use for a long period of time.
(3) The surrounding temperature changes abruptly.
Steps:
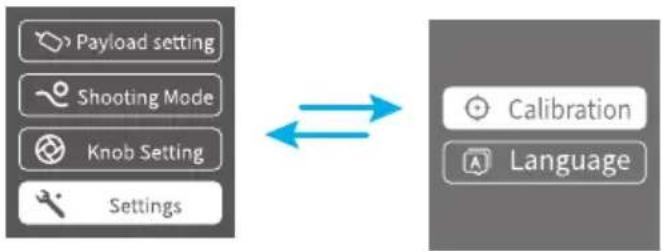
(1) Select Settings - Calibration on the display to enter the gimbal initialization.
flowchart
graph LR
    A["Payload setting"] --> B["Shooting Mode"]
    B --> C["Knob Setting"]
    C --> D["Settings"]
    E["Calibration"] --> F["Language"]
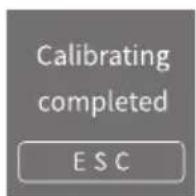
(2) Place the gimbal on the table, and the gimbal automatically initializes. If the touch screen prompts that the calibration is successful, the initialization ends, otherwise the initialization fails.
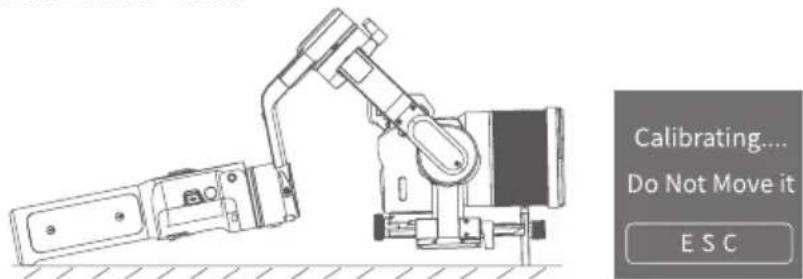
(3) After the initialization is successful, slide the touch screen interface to the left/right or click the ESC on the screen to wake up.
3.8 Manual Lock
Manually move camera to desired position, and hold for half a second. New tilt
and/or pan positions are automatically saved.

natural_image
Diagram of a hand operating a camera with a blue arrow indicating motion direction (no text or symbols present)4. Feiyu ON App
4.1 Download the Feiyu ON App
Scan the QR code to download the app, or search for "Feiyu ON" in the App Store or Google Play. Watch tutorials in video skill page on Feiyu ON.
* Requires iOS 9.0 or above, Android 6.0 or above.

iOS Version

Android Version
4.2 App Connecting
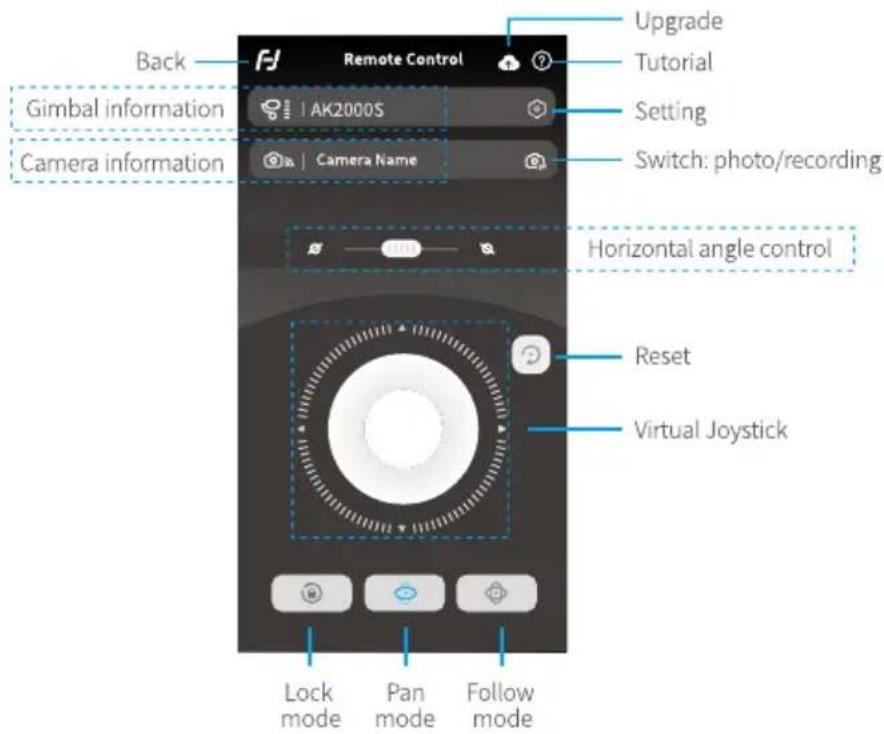
Steps:
(1) Power on the gimbal.
(2) Select Wi-Fi connection menu on camera (find in setting-network-Wi-Fi), keep this page which has Wi-Fi name and its password on.
(3) Login Feiyu ON App (or register).
(4) The App will search around the enable devices. It will show connect successful the connection is done, if not, please exit and reconnect again.
(5) Tap connect to camera on the App, select the right camera model in the list.
(6) Select Wi-Fi name which get on step (2) in the camera model list on App, input the password. Most of the function can be achieved on App, such orient control/ mode switch/parameter setting etc. If the connection failed, please confirm if the password is correct or exit and try to login Feiyu ON App again.
4.3 Firmware Upgrade
Upgrade firmware via App.
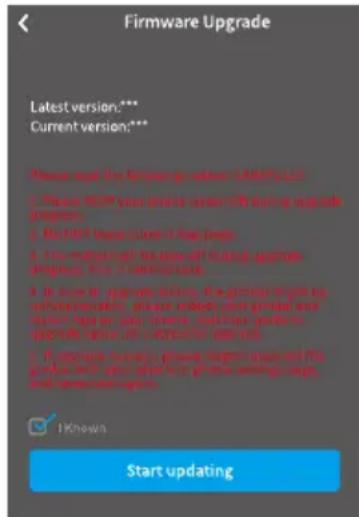
(1) Tap upgrade ICON 📋 on App. (2) Select upgrade type. (3) Follow the prompts to upgrade the firmware.

Feiyu ON
Upgrade type introductions
| Keyboard update | Repair/update or newly add button/touch screen/interaction functions, update more compatibility cameras which can be controlled through Wi-Fi. |
| Bluetooth firmware update | Repair/update or newly add Bluetooth functions, update more compatibility cameras, and etc. |
| Gimbal firmware update | Repair/update or newly add gimbal control/function/parameter and etc. |
| LED icons update | Repair or update the icons in the screen. (Support for AK series gimbal only) |
Noted: Gimbal has an update protection function. When the update fails, restart the gimbal, it will return to the previous firmware. Connect the app and update again to resolve the problem. In addition, parts of the new functions require updating two or more firmware to take effect. It is recommended to update regularly to keep the firmware of the gimbal as the latest version.
Please make sure disconnect Wi-Fi between camera and gimbal if Wi-Fi connection is for controlling camera.
How to disconnect Wi-Fi connection of camera?
When gimbal is on, slide touch screen to the left to find the settings. Press and hold trigger button, push up joystick, then click “Settings” to disconnect Wi-Fi connection.
5. Accessories
Noted: this chapter introduces the Optional accessories only, please refer to the manual instruction for more information of the specific accessory.
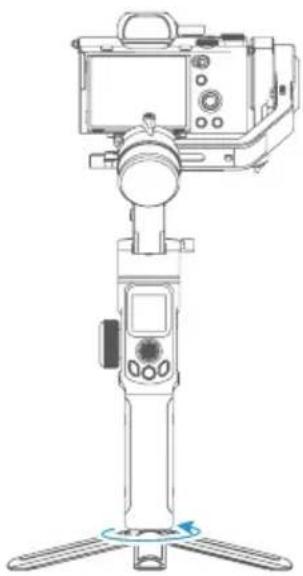
5.1 Tripod
AK2000S is equipped with 1/4 inch thread hole and 3/8 inch thread hole to mount all type of Tripod for standing shooting.
natural_image
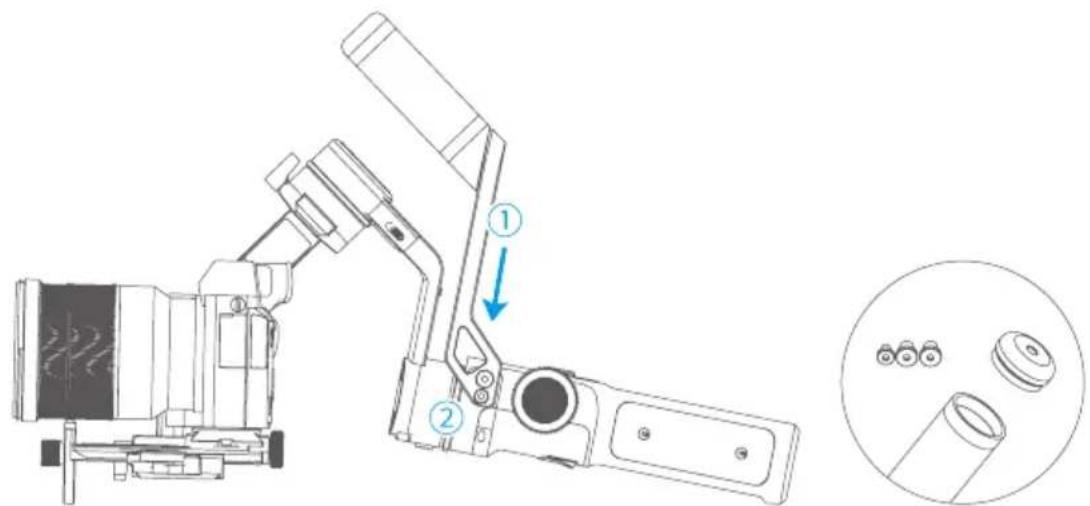
Line drawing of a mounted camera device with tripod base (no text or symbols)5.2 Versatile Arm
Installation: Install the versatile arm on the handle, align screw holes and tighten the screws by L shape wrench.(it is attached on versatile arm, the end cover of the versatile arm can be removed, and keeps 3 screws inside.)
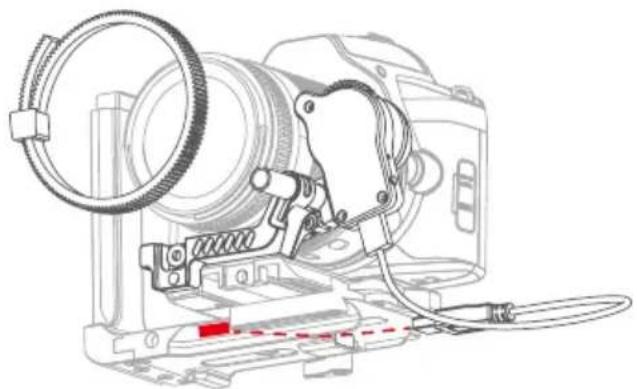
5.3 Brushless Follow Focus
Fix the lens gear on the camera's focus ring position. Fasten the fixed bracket to the quick release plate of the gimbal with a hexagonal screw, and insert the aluminum tube. Insert the AKF II into the aluminum tube, lock the fixed thumb screw on the AKF II, move the aluminum tube to adjust the front and rear position so as to make the AKF II fear and the lens gar engage, and lock the fixed thumb screw on the fixed bracket. Insert the USB cable into the USB port on the fixed plate, installation is completed.
natural_image
Technical line drawing of a camera assembly with lens, frame, and wiring (no text or symbols)5.4 Hyperlink Remote Controller
Steps to connect to gimbal:
(1) Powering on AK2000S and remote controller.
(2) Tap setting menu on remote controller screen, select bluetooth connection and connect it.
(3) After successful connection, the function of AK2000S enable to operate on remote controller, and the tilt/pan movement can follow the movement of the Hyperlink remote controller.
Please operate on hyperlink remote controller.
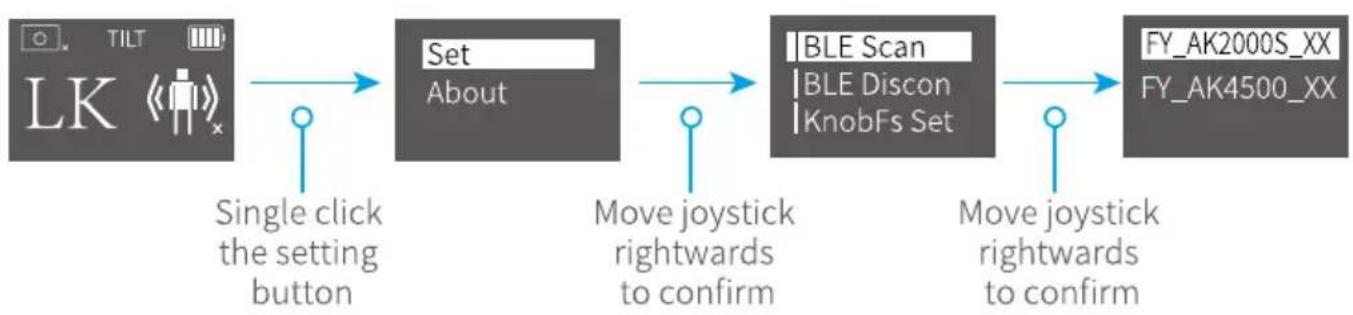
flowchart
graph LR
    A["Single click the setting button"] --> B["Set About"]
    B --> C["Move joystick rightwards to confirm"]
    C --> D["|BLE Scan | BLE Discon | KnobFs Set"]
    D --> E["Move joystick rightwards to confirm"]
    E --> F["FY_AK2000S_XX<br>FY_AK4500_XX"]
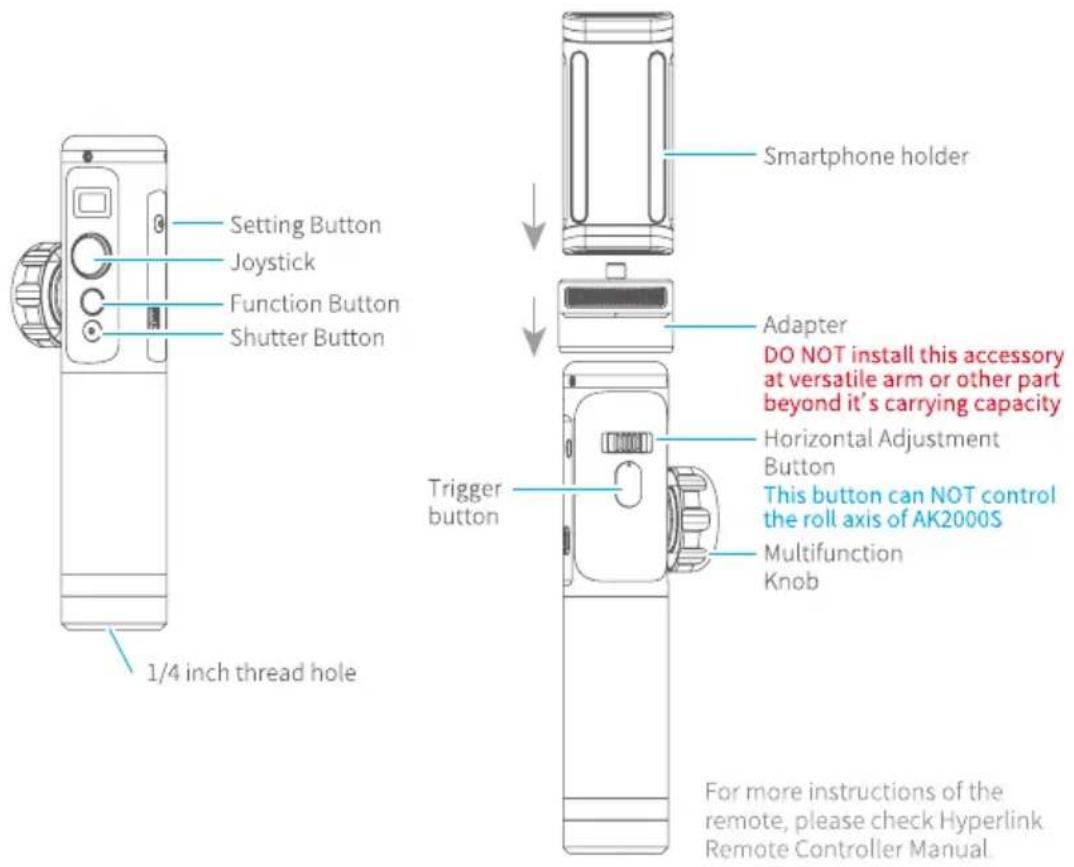

Notice: The function of horizontal adjustment button is disable for AK2000S.
5.5 Extension Rod
It can be used as a mini crane, or take the footage of emulating flying at a low altitude.
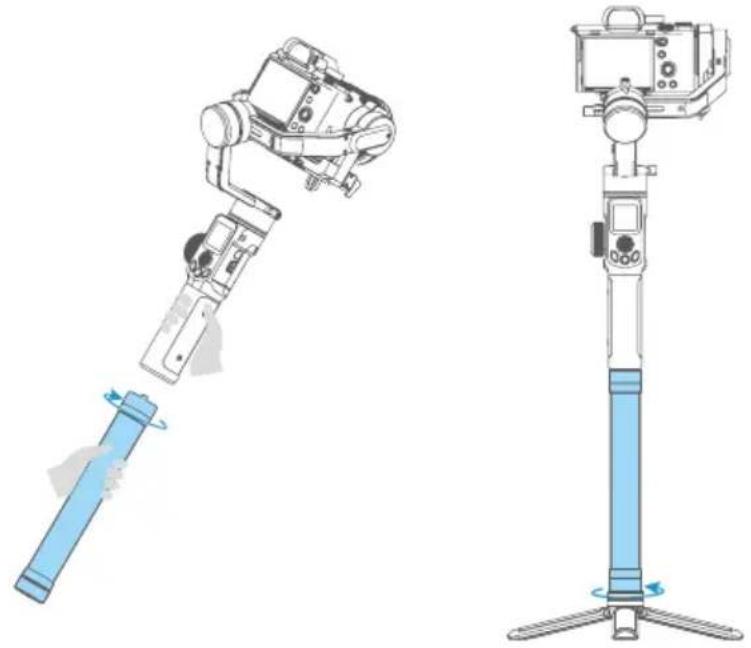
natural_image
Technical line drawing of a two-step robotic device with a blue cylindrical sensor and a camera mounted on a tripod (no text or symbols)5.6 Multifunctional Bracket
To extra stabilize the camera by mounting it on top of camera and tilt axis. The bracket can be used an extension plate for mounting other accessories on it.
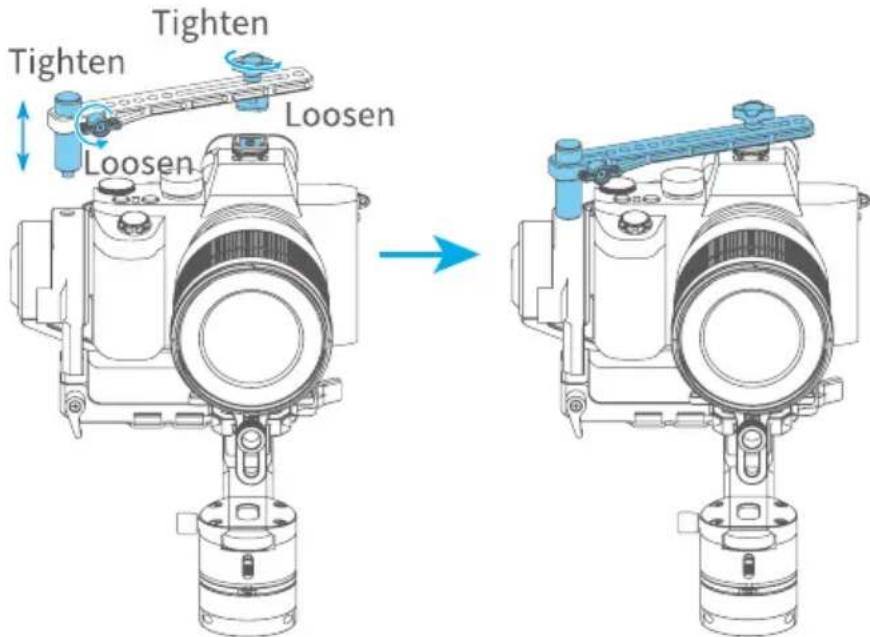
5.7 Wireless MIC Kit
The wireless receiver can collect the sound from the wireless microphone within 20m range.
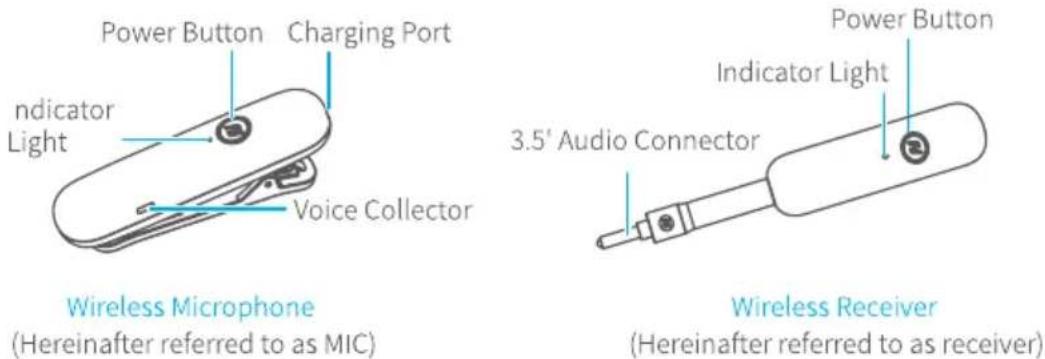
Accessories:
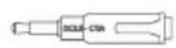
DC3.5-CTIA
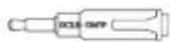
DC3.5-OMTP
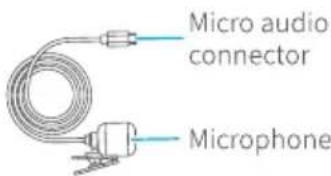
Wireless Clip-on Microphone
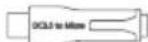
DC3.5 to Micro
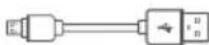
Micro USB Cable
How to connect and use it:
Usage scenario 1
Step 1: Two way to enter video recording mode:
(1) Manually set video mode on camera.
(2) Single tap function button to switch to video mode on gimbal, after it connected to camera via cable.
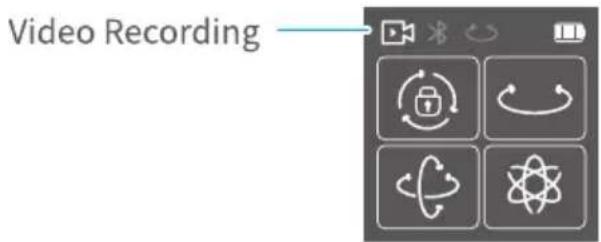
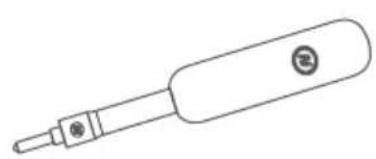
Step 2: Plug in the receiver to camera receiver jack and turn it on.
natural_image
Line drawing of a screwdriver with a handle and spout (no text or symbols)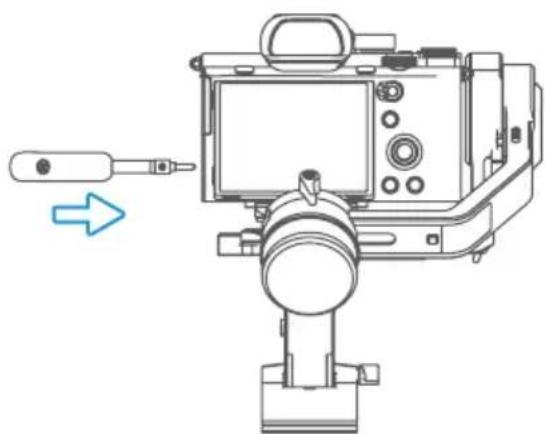
natural_image
Line drawing of a digital camera with a blue arrow pointing to the left side (no text or symbols present)Step 3: Turn on the MIC, and it is ready to be used. (Wireless communication distance ≤ 20mm , please put it close to sound source for ideal recording)
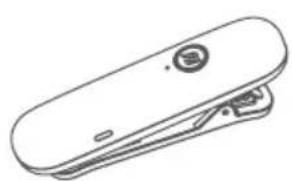
natural_image
Line drawing of a flat electronic device with a button and connector (no text or symbols)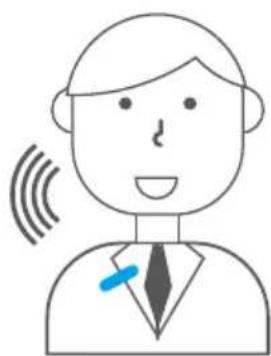
natural_image
Simple line drawing of a person with sound waves and a blue pen, no text or symbols presentStep 4: Plug the wireless clip-on microphone in the MIC.
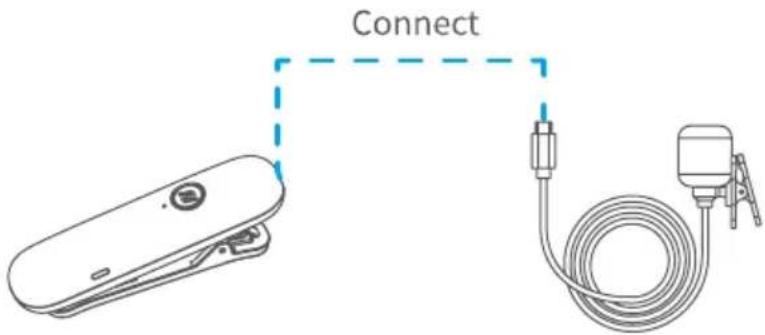
*Wireless microphone kit can be used without gimbal, and follow the step 2.3.4 to use it.
Usage scenario 2
Step 1: Connect with smartphone
Plug the wireless microphone (receiving terminal) in DC3.5 CTIA (American Standard)/ OMTP (GB), then plug it in 3.5mm earphone port adapter. And plug it in the MIC port on the smartphone first, then turn the receiver on. Set the smartphone to video mode.

flowchart
graph LR
    A["Receiver"] --> B["DC3.5 CTIA / OMTP"]
    B --> C["Lighting/Type-C (Equipped by user)"]
    C --> D["iPhone/Android"]
Step 2: Turn on the MIC, and it is ready to be used. (follow the step 1.3 to use it) (1) You can plug the wireless clip-on microphone in the MIC mount to use it. (2) You can plug the DC 3.5mm microphone in DC 3.5 to micro adaptor, then connect it to MIC for using.
Status Indicator ICON
Power ON Blue light stays on
Power OFF Red light stays on to off
Low battery Red light flashes regularly
Fully charged Green light stays on




6. Specifications
Product Size (well balanced) 151×203.5×372.8mm
Max. Tilting Range 230°
Max. Rolling Range 360°
Max. Panning Range 360°
Tilt Follow Speed 2°/s \~ 75°/s
Pan Follow Speed 3°/s \~ 150°/s
Payload Capability 2200g/4.85 lb (well balanced)
Weight About 1100g/2.4 lb (not included the shutter release cable, camera, lens and so forth)
Battery 2200mAh (built-in)
Theoretical Battery Life 14h (well balanced)
Charging Time ≥slant 1.5h, support all the normal charger and quick charger which charginf power ≤slant 18W (for example: 9V×2A=18W, 12V×1.5A=18W)
Compatible Cameras* Canon, SONY, Panasonic and etc.
* Please download the detailed manual for the specific compatible camera and lens.
Compatible Cameras for Reference
| AK2000S Lens Compatible List | ||||||
| Brand Can be equipped with a lens | ||||||
| Brand | Camera(H/W/D) Model | Lens size & weight (Φ×L) | Camera | Brushless follow focus + Camera | Remark | |
| Sony | Sony A7R3126.9×95.6×62.7mm 572gSony A7M3126.9×95.6×73.7mm 565gSony A9 126.9×95.6×63mm 588gSony A7S2126.9×95.7×60.3mm 584gSony A7R2126.9×95.7×60.3mm 582gSony A7M2126.9×95.7×59.7mm 556g | E 10-18mm F4 OSS Φ70mm×63.5mm 225g | 225g | √ | √ | |
| FE 12-24mm F4 G Φ87mm×117mm 565g | √ | √ | √ | |||
| FE 16-35mm F2.8 GM Φ89mm×122mm 680g | √ | √ | √ | |||
| FE16-35mm f/4 ZA OSS Φ78mm×99mm 518g | √ × | |||||
| Vario-Tessar FE 24-70mm F4 ZA OSS Φ73mm×94.5mm 426g | √ | √ | √ | |||
| FE 24-70 F2.8 GM Φ87.6mm×136mm 886g | × | × | √ | |||
| Zeiss E 16-70 F4 OSS Φ66.6mm×75mm 308g | √ | √ | √ | |||
| E PZ 18-105mm F4 G OSS Φ78mm×110mm 427g | √ | √ | √ | |||
| E PZ 18-200mm F3.5-6.3 OSS LE Φ93.2mm×99mm 649g | × | × | √ | |||
| FE 28mm F2 Φ64mm×60mm 200g | √ | √ | ||||
| Zeiss FE 35mm F2.8 ZA | Φ61.5mm×36.5mm 120g | √ | √ | |||
| Sigma 30mm f/1.4 DC DN | Φ64.8mm×73.3mm 265g | √ | √ | |||
| Sigma 35mm f1.4 DG HSM Art | Φ77mm×94mm 665g | √ | √ | |||
| FE 55mm F1.8 | Φ64mm×71mm 281g | √ | √ | |||
| FE 50mm F2.8 MACRO | Φ71mm×71mm 236g | √ | √ | |||
| FE 4/24-105 G OSS | Φ83.4mm×113.3 mm 663g | √ | √ | |||
| FE 28-70mm f/3.5-5.6 OSS | Φ72.5mm×83mm 295g | √ | √ | |||
| FE 85mm F1.4 GM | Φ89.5mm×107.5mm 820g | √ | √ | |||
| Sony A6400 120×67×60mm 359gSony A6300120×66.9×48.8mm 361gSonyA6500120×66.9×53.3mm 410g | E 10-18mm F4 OSS Φ70mm×63.5mm 225g | 225g | √ | √ | ||
| FE 12-24mm F4 G Φ87mm×117mm 565g | √ | √ | √ | |||
| FE 16-35mm F2.8 GM Φ89 mm×122mm 680g | √ | √ | √ | |||
| FE16-35mm f/4 ZA OSS Φ78mm×99mm 518g | √ | √ | √ | |||
| Vario-Tessar FE 24-70mm F4 ZA OSS Φ73mm×94.5mm 426g | √ | √ | √ | |||
| FE 24-70 F2.8 GM Φ87.6mm×136mm 886g | × | × | √ | |||
| Zeiss E 16 -70 F4 OSS Φ66.6mm×75mm 308g | √ | √ | √ | |||
| E PZ 18-105mm F4 G OSS Φ78mm×110mm 427g | √ | √ | √ | |||
| E PZ 18-200mm F3.5-6.3 OSS LE Φ9.2mm×99mm 649g | × | × | √ | |||
| FE 28mm F2 Φ64mm×60mm 200g | √ | √ | ||||
| Zeiss FE 35mm F2.8 ZA | Φ61.5mm×36.5mm 120g | √ | √ | |||
| Sigma 40mm f/1.4 DC DN | Φ64.8mm×73.3mm 265g | √ | √ | |||
| Sigma 35mm f1.4 DG HSM Art | Φ77mm×94mm 665g | √ | √ | |||
| FE 55mm F1.8 | Φ64mm×71mm 281g | √ | ||||
| FE 50mm F2.8 MACRO | Φ71mm×71mm 236g | √ | √ | |||
| FE 4/24-105 G OSS | Φ83.4mm×113.3 mm 663g | √ | √ | |||
| E 3.5-5.6/PZ 16-50 OSS | Φ64.7mm×29.9mm 116g | √ × | ||||
| FE 28-70mm f/3.5-5.6 OSS | Φ72.5mm×83mm 295g | √ | √ | |||
| FE 85mm F1.4 GM | Φ89.5mm×107.5mm 820g | √ | √ | |||
| Sony RX100 IV101.6×58.1×41.0 mm 298g | / | / | √ × | |||
| Sony RX100 V101.6×58.1×41mm 299g | / | / | √ × | |||
| Sony RX100 VI101.6x58.1x42.8mm 301g | / | / | √ × | |||
| Sony RX100 VII101.6×58×42.8mm 370g | / | / | √ × | |||
| Brand | Camera(H/W/D) Model | Lens size & weight (Φ×L) | Camera | Brushless follow focus + Camera | Remark | |
| Panasonic | GH5S 138.5×98.1×87.4mm 660gGH5 138.5×98.1×87.4mm 725gG9 136.9×97.3×91.6mm 658gGH4 93.4×83.9×132.9mm 560g | LEICA DG SUMMILUX 15mm f/1.7 ASPH | 115g | ✓ × | ||
| LEICA DG SUMMILUX 25mm f/1.4 ASPH | Φ77.7mm×75mm 510g | ✓ | ✓ | |||
| LEICA DG MACRO 45mm f/2.8 OIS Φ63mm×62.5mm 225g | mm×62.5mm 225g | ✓ | ✓ | |||
| LEICA DG Vario-Elmarit 8-18mm f/2.8-4.0 ASPH | Φ73.4mm×88mm 315g | ✓ | ✓ | |||
| LEICA DG Vario-Elmarit 12-60 f/2.8-4 Power OIS | Φ68mm×86mm 320g | ✓ | ✓ | |||
| LUMIX G X Vario 12-35mm f/2.8 II ASPH POWER OIS(H-HS12035GK I(代)) | Φ68mm×74mm 305g | ✓ | ✓ | |||
| M.ZUIKO DIGITAL ED 12mm f/2.0 Φ56mm×43mm 130g | mm×43mm 130g | ✓ | ✓ | |||
| LUMIX G 14-140mm f/4-5.8 OIS Φ70mm×84mm 460g | mm×84mm 460g | ✓ | ✓ | |||
| Nikon | Z6 134×100.5×67.5mm 675gZ7 134×100.5×67.5mm 675g | NIKKOR Z 35mm f/1.8 370g | ✓ | ✓ | ||
| 18-140mm f/3.5-5.6G ED VR Φ78mm×97mm 490g | 97mm 490g | ✓ | ✓ | |||
| NIKKOR Z 50mm f/1.8 S 415g | ✓ | ✓ | ||||
| NIKKOR Z 24-70mm f/4 S 500g | ✓ | ✓ | ||||
| NIKKOR Z 14-30mm f/4 S Φ85mm×89mm 485g | mm 485g | ✓ | ✓ | |||
| Canon | Canon EOS R 135.8×98.3×84.4mm 660gCanon EOS RP 132.5×85×70mm 485g | RF 35mm F1.8 MACRO IS STM Φ74.4mm×62.8mm 305g | mm×62.8mm 305g | ✓ | ✓ | |
| EF-S 18-200mm f/3.5-5.6 IS Φ78.6mm×102mm 595g | ×102mm 595g | ✓ × | ||||
| EF 24-70mm f/4L IS USM Φ83.4mm×93mm 600g | mm×600g | ✓ × | ||||
| EF 50mm f/1.4 DG HSM Art Φ85mm×100mm 815g | mm×100mm 815g | ✓ | ✓ | |||
| EF 17-40mm f/4L USM | Φ83.5mm×96.8mm 475g | ✓ | ✓ | |||
| RF 50mm F1.2L USM | Φ89.8mm×108mm 950g | ✓ | ✓ | |||
| RF 28-70mm F2L USM Φ103.8mm×139.8mm 1430g | mm×103.8mm 1430g | × | × | |||
| RF 24-105mm F4L IS USM | Φ83.5mm×107.3mm 670g | ✓ × | ||||
| Canon M50 116.3×88.1×58.7mm 390g | EF-M 15-45mm F3.5-6.3 IS | 130g | ✓ × | |||
| Fujifilm | X-T2 133×92×49mm 457gX-T3 132.5×92.8×58.8mm 539g | XF 16mm 1:1.4 R WR | Φ73mm×73mm 375g | ✓ | ✓ | |
| XF 23mm 1:1.4 R | Φ72mm×63mm 300g | ✓ | ✓ | |||
| XF 35mm 1:1.4 | Φ65mm×54.9mm 187g | ✓ | ✓ | |||
| XF 10-24mm f/4.0 R OIS | Φ78mm×87mm 410g | ✓ | ✓ | |||
| XF 16-55mm 1: 2.8 R LM WR | Φ83.3mm×106.0mm 655g | ✓ | ✓ | |||
| XF 18-55mm 1:2.8-4 R OIS | Φ65mm×70.4mm 310g | ✓ | ✓ | |||
| XF 18-135mm f/3.5-5.6 R LM OIS WR | Φ76mm×98mm 490g | ✓ | ✓ | |||
| X-H1 139.8×97.3×85.5mm 673g | XF 16mm 1:1.4 R WR | Φ73mm×73mm 375g | ✓ | ✓ | ||
| XF 23mm 1:1.4 R | Φ72mm×63mm 300g | ✓ | ✓ | |||
| XF 35mm 1:1.4 | Φ65mm×54.9mm 167g | ✓ | ✓ | |||
| XF 10-24mm f/4.0 R OIS | Φ78mm×87mm 410g | ✓ | ✓ | |||
| XF 16-55mm 1: 2.8 R LM WR | Φ83.3mm×106.0mm 655g | ✓ | ✓ | |||
| XB 18-55mm 1:2.8-4 R OIS | Φ65mm×70.4mm 310g | ✓ | ✓ | |||
| XF 18-135mm f/3.5-5.6 R LM OIS WR | Φ76mm×98mm 490g | ✓ | ✓ | |||
| X-T20 118.4×82.8×41.4mm 383gX-T30 118.4×82.8×46.8mm 383g | XF 16mm 1:1.4 R WR | Φ73mm×73mm 375g | ✓ | ✓ | ||
| XF 23mm 1:1.4 R | Φ72mm×63mm 300g | ✓ | ✓ | |||
| XF 35mm 1:1.4 | Φ65mm×54.9mm 410g | ✓ | ✓ | |||
| XF 10-24mm f/4.0 R OIS | Φ78mm×87mm 410g | ✓ | ✓ | |||
| XC 16-50mm f/3.5-5.6 OIS | Φ62.6mm×65.2mm 195g | ✓ | ✓ | |||
| XF 16-55mm 1: 2.8 R LM WR | Φ83.3mm×106.0mm 655g | ✓ × | ||||
| XF 18-55mm 1:2.8-4 R OIS | Φ65mm×70.4mm 310g | ✓ | ✓ | |||
| XF 18-135mm f/3.5-5.6 R LM OIS WR | Φ76mm×98mm 490g | ✓ × | ||||
| XC 15-45mm 1:3.5-5.6 OIS PZ | Φ62.6mm×65.2mm 135g | ✓ | ✓ | |||
Tips: The camera needs to be close to the tilt motor.
Disclaimer
Thanks for using FeiyuTech product. The information in this document affects your safety and your legal rights and responsibilities. Read the entire document carefully to ensure proper configuration before use, Failure to read and follow instructions and warnings in this document may result in serious injury to yourself or others, or damage to your products or damage to other objects in the vicinity.
By using this product, you hereby signify that you have read this disclaimer and warning carefully and that you understand and agree to abide by the terms and conditions herein. You agree that you are solely responsible for your own conduct while using this product, and for any consequences thereof. You agree to use this product only for purposes that are proper and in accordance with all applicable laws, rules, and regulations, and all terms, precautions, practices, policies and guideline FeiyuTech has made and may make available. FeiyuTech accepts no liability for damage, injury or any legal responsibility incurred directly or indirectly from the use of product.
FeiyuTech will not provide any service for any product obtained from abnormal channels.
Notice
- Make sure motor spinning is not blocked by external force when the product is power on.
- The product DO NOT contact water or other liquid if the product is not mark waterproof or splash-proof. Waterproof and splash-proof product DO NOT contact sea water or other corrosive liquid.
- DO NOT disassembly the product except marked detachable. It need send to FeiyuTech after-sales or authorized service center to fix it if you accidentally disassembly and cause abnormal work. The relevant costs are borne by user.
- Prolonged continuous operation may cause the product surface temperature to rise, please operate carefully.
- DO NOT drop or strike the product. If the product is abnormal, contact FeiyuTech after-sales support.
Storage and Maintenance
- Keep the product out of the reach of children and pets.
- DO NOT leave the product near heat sources such as a furnace or heater. DO NOT leave the product inside of a vehicle on hot days.
- Please storage the product in dry environment.
- DO NOT overcharge or overuse the battery, otherwise it will cause damage to the battery core.
- Never use the product when the temperature is too high or too low.
Official Social Media



Website Facebook Youtube


Twitter Instagram
Website: www.feiyu-tech.com
Facebook: www.facebook.com/feiyutech
YouTube Channel: www.youtube.com/c/Feiyu-tech
Twitter: www.twitter.com/feiyutech
Instagram: www.instagram.com/FeiyuTech
Guilin Feiyu Technology Incorporated Company
For more information, please visit our official website www.feiyu-tech.com
E-mail: service@feiyu-tech.com Tel: +86 773 2320865
Due to software and hardware improvements, your actual product might differ from the descriptions and pictures in this user manual. You can get the latest user manual from the official website.
- Catalogue
- Product Overview 2
- Start to Use 4
- Function operation 9
- Feiyu ON App 21
- 5.Accessories 24
- Specifications 30
- Compatible Cameras for Reference 31
- Disclaimer 33
- Introduction
- Suggestion
- Feiyu ON App
- Product Overview
- Standard kit accessories
- Advanced kit accessories
- Optional accessories
- Start to Use
- TIPS
- Charging
- Unlock and Lock
- Camera Installation
- Gimbal Balancing
- Balance tilt axis
- Step (a)
- Step (b)
- Balance roll axis
- Balance pan axis
- Power ON/OFF
- Function operation
- Mode/Function Introduction
- Button Operation
- Mode operation
- Shutter button
- Function button operation
- Joystick
- Power button
- Trigger button
- Multi-function knob
- USB Port
- Touch Screen
- Screen
- Display screen switch
- Usage of touch screen
- Lock/unlock screen
- Modes Setting
- Inception Mode setting
- Motion-timelapse mode setting
- Protrait setting
- Other setting
- Motion-timelapse Mode
- Motion-timelapse setting
- Method 1:
- Method 2:
- Route setting
- Initialization
- Steps:
- Manual Lock
- Feiyu ON App
- Download the Feiyu ON App
- App Connecting
- Firmware Upgrade
- How to disconnect Wi-Fi connection of camera?
- Accessories
- Tripod
- Versatile Arm
- Brushless Follow Focus
- Hyperlink Remote Controller
- Steps to connect to gimbal:
- Extension Rod
- Multifunctional Bracket
- Wireless MIC Kit
- How to connect and use it:
- Usage scenario 1
- Usage scenario 2
- Step 1: Connect with smartphone
- Status Indicator ICON
- Specifications
- Disclaimer
- Notice
- Storage and Maintenance
- Official Social Media
Brand : FeiyuTech
Model : AK2000S
Category : Tripod