
STRIKER Vivid 5cv - Fish Finder GARMIN - Free user manual and instructions
Find the device manual for free STRIKER Vivid 5cv GARMIN in PDF.


| Product Type | Fish Finder |
| Brand | Garmin |
| Model | STRIKER Vivid 5cv |
| Display Size | 5 in (12.7 cm) diagonal, color LCD |
| Dimensions (W x H x D) | Approximately 8.5 x 5.0 x 2.5 in (21.6 x 12.7 x 6.4 cm) |
| Weight | Approximately 1.1 lbs (0.5 kg) |
| Power Input | 12 to 20 Vdc |
| Rated Current | 1.5 A |
| Fuse | 3 A, 250 V fast-acting |
| Water Rating | IEC 60529 IPX7 (water resistant up to 1 m for 30 min) |
| Operating Temperature | From -15° to 55°C (5° to 131°F) |
| Sonar Technology | Traditional, Garmin ClearVü, SideVü, CHIRP (with compatible transducer) |
| Transducer Frequency (Default) | Dual Beam 200/77 kHz |
| GPS | Yes, high-sensitivity GPS |
| Wi-Fi | Not available on this model |
| Waypoints | Yes, unlimited |
| Routes | Yes, unlimited |
| Tracks | Yes, up to 1500 hours of recording |
| Alarms | Navigation, system, and sonar alarms |
| Garmin Quickdraw Contours | Yes, create and share custom maps |
| ActiveCaptain App | Not compatible (requires Wi-Fi) |
| User Data Sharing | Yes, via serial cable with compatible Garmin devices |
| Mounting | Gimbal bracket or flush mount |
Frequently Asked Questions - STRIKER Vivid 5cv GARMIN
User questions about STRIKER Vivid 5cv GARMIN
0 question about this device. Answer the ones you know or ask your own.
Ask a new question about this device
Download the instructions for your Fish Finder in PDF format for free! Find your manual STRIKER Vivid 5cv - GARMIN and take your electronic device back in hand. On this page are published all the documents necessary for the use of your device. STRIKER Vivid 5cv by GARMIN.
USER MANUAL STRIKER Vivid 5cv GARMIN
natural_image
Line drawing of a portable electronic device with control panel and display (no text or symbols)STRIKER™ VIVID
Owner's Manual
© 2020 Garmin Ltd. or its subsidiaries
All rights reserved. Under the copyright laws, this manual may not be copied, in whole or in part, without the written consent of Garmin. Garmin reserves the right to change or improve its products and to make changes in the content of this manual without obligation to notify any person or organization of such changes or improvements. Go to www.garmin.com for current updates and supplemental information concerning the use of this product.
Garmin ® , the Garmin logo, and Ultrascroll ® are trademarks of Garmin Ltd. or its subsidiaries, registered in the USA and other countries. ActiveCaptain ® , Garmin ClearVü ™ , Garmin Quickdraw ™ , and STRIKER ™ are trademarks of Garmin Ltd. or its subsidiaries. These trademarks may not be used without the express permission of Garmin.
Wi-Fi ® is a registered mark of Wi-Fi Alliance Corporation.
The BLUETOOTH ® word mark and logos are owned by the Bluetooth SIG, Inc. and any use of such marks by Garmin is under license.
Table of Contents
Introduction...... 1
Device Keys.... 1
Home Screen....2
Zooming on the STRIKER Vivid 4...... 2
Panning on the STRIKER Vivid 4...... 2
GPS Satellite Signal Acquisition...... 2
Customizing the Chartplotter...... 3
Customizing the Home Screen.... 3
Combination Pages.... 3
Creating a New Combination Page with the STRIKER Vivid 5/7/9....3
Creating a New Combination Page with the STRIKER Vivid 4.... 4
Customizing a Combination Page..... 4
Adjusting the Backlight.... 4
Adjusting the Color Mode......4
Setting the Beeper.... 4
ActiveCaptain® App...... 5
ActiveCaptain Roles...... 5
Getting Started with the ActiveCaptain App....5
Enabling Smart Notifications...... 5
Updating Software with the ActiveCaptain App.... 6
Sonar Fishfinder......6
Traditional Sonar View....7
Garmin ClearVü Sonar View...... 8
SideVü Sonar View....9
Split-Screen Frequency....9
Flasher.... 10
Split-Zoom View....11
Selecting the Transducer Type...... 11
Sonar Frequencies.... 12 Selecting the Transducer Frequency.... 12
Creating a Waypoint on the Sonar Screen Using the Device Keys.... 12
Pausing the Sonar.... 12
Adjusting the Zoom.... 13 Locking the Screen to the Water Bottom.... 13
Sonar Gain.... 13
Setting the Gain Automatically...... 13
Setting the Gain Manually.... 13
Adjusting the Range of the Depth Scale.... 14
Sonar Setup....14
Showing and Adjusting the Depth Line.... 14
Setting the Scroll Speed...... 14
Setting the Bottom Search Limit..... 14
Sonar Appearance Settings...... 15
Sonar Noise Rejection Settings..... 16
Overlay Number Settings......17
Garmin Quickdraw Contours Mapping....17
Mapping a Body of Water Using the Garmin Quickdraw Contours Feature.. 17
Adding a Label to a Garmin Quickdraw Contours Map.... 18
Deleting Garmin Quickdraw Contours.... 18
Garmin Quickdraw Community......18 Connecting to the Garmin Quickdraw Community with ActiveCaptain...... 18
Map Settings.... 19
Garmin Quickdraw Contours Settings.... 19
Depth Range Shading.... 20
Navigation with the STRIKER Vivid.... 20
Searching for a Destination by Name.... 20
Creating a Waypoint on the Map...... 21
Navigating to a Waypoint.... 21
Creating and Navigating a Route Using the Map.... 21
Stopping Navigation.... 21
Waypoints.... 21
Marking Your Present Location as a Waypoint....21
Creating a Waypoint at a Different Location.... 21
Marking and Navigating to a Man Overboard Location.... 21
Measuring Distance on the Map..... 22
Viewing a List of all Waypoints...... 22
Editing a Saved Waypoint...... 22
Deleting a Waypoint or an MOB...... 22
Deleting All Waypoints....22
Routes.... 22
Creating and Navigating a Route Using the Map.... 22
Creating and Saving a Route...... 23
Viewing a List of Routes...... 23
Editing a Saved Route.... 23
Browsing for and Navigating a Saved Route....23
Browsing for and Navigating Parallel to a Saved Route.... 24
Deleting a Saved Route.... 24
Deleting All Saved Routes...... 24
Tracks.... 24
Showing Tracks.... 24
Clearing the Active Track...... 24
Saving the Active Track...... 25
Viewing a List of Saved Tracks...... 25
Editing a Saved Track...... 25
Saving a Track as a Route.... 25
Browsing for and Navigating a Recorded Track.... 25
Deleting a Saved Track...... 25
Deleting All Saved Tracks....25
Retracing the Active Track...... 26
Setting the Color of the Active Track.... 26
Managing the Track Log Memory During Recording.... 26
Configuring the Recording Interval of the Track Log.... 26
Device Configuration...... 26
System Settings...... 26
System Information...... 27
My Vessel Settings...... 27
Setting the Keel Offset......28
Setting the Water Temperature Offset.... 28
Setting Alarms.... 29
Navigation Alarms.... 29
System Alarms 29
Sonar Alarms....29
Unit Settings.... 29
Navigation Settings.... 30
Restoring the Factory Default Settings.... 30
Sharing and Managing User Data... 30
Connecting to a Garmin Device to Share
User Data.... 30
User Data Sharing Cable Wiring Diagram.... 31
Clearing Saved Data.... 31
Appendix....32
Registering Your Device with the Serial Number.... 32
Specifications.... 32
Troubleshooting....32
My device will not turn on or keeps turning off.... 32
My device will not acquire GPS signals.... 33
My sonar does not work.... 33
My device is not creating waypoints in the correct location....33
My device does not display the correct time.... 33
Index....34
Introduction
WARNING
See the Important Safety and Product Information guide in the product box for product warnings and other important information.
Device Keys
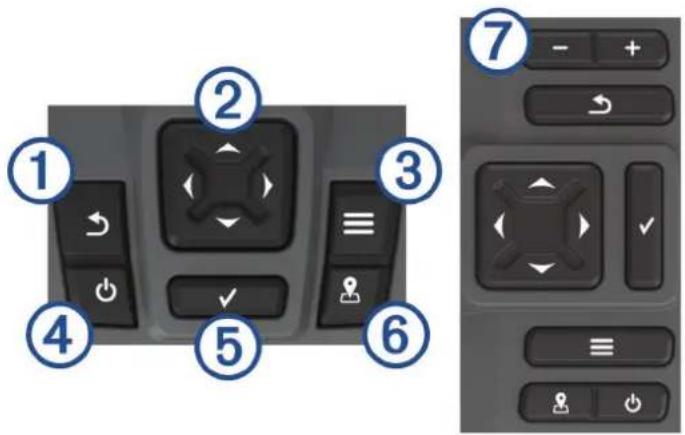
Item Icon Description
| 1 |  | Returns to the previous screen.Returns to the home screen when held. |
| 2 |   | Scrolls, highlights options, and moves the cursor.Zooms in and out of a view. |
| 3 |  | Closes a menu, when applicable.Open a menu of options for the page, when applicable. |
| 4 |  | Turns on and off the device when held.Performs one or more of these actions when quickly pressed:• Adjusts the backlight• Adjusts the color mode• Enables and disables sonar |
| 5 |  | Acknowledges messages and selects options. |
| 6 |  | Saves the present location as a waypoint. |
| 7 |   | Zooms out of a view. (Not available on all models.)Zooms in to a view. (Not available on all models.) |
NOTICE
Before turning on the device, you must firmly press the connectors into the appropriate holes in the device. If the cables are not pressed far enough into the device, the device appears to lose power or stop working.
Home Screen
The fishfinder home screen provides access to all of the features in the fishfinder. The features are dependant on the accessories you have connected to the fishfinder. You may not have all of the options and features discussed in this manual.
When viewing another screen, you can return to the home screen by holding .You can customize the layout of the screens.

Zooming on the STRIKER Vivid 4
You can zoom in and out of the map.
- Select to zoom in.
- Select to zoom out.
Panning on the STRIKER Vivid 4
You can move the sonar views and maps to view an area other than your present location.
1 Select or to start panning.
2 Use the arrow keys to pan.
TIP: You can select ↩ to stop panning.
GPS Satellite Signal Acquisition
When you turn on the fishfinder, the GPS receiver must collect satellite data and establish the current location. When the fishfinder acquires satellite signals, appears at the top of the Home screen. When the fishfinder loses satellite signals, disappears and a flashing question mark appears over on the screen.
For more information about GPS, go to www.garmin.com/aboutGPS.
Customizing the Chartplotter
Customizing the Home Screen
You can add items to and rearrange items on the Home screen.
1 From the Home screen, select Customize.
2 Select an option:
- To rearrange an item, select Rearrange, select the item to move, and select the new location.
• To add an item to the Home screen, select Add, and select the new item.
• To remove an item you have added to the Home screen, select Remove, and select the item. - To change the Home screen background image, select Background, and select an image.
Combination Pages
Some pages combine two or more functions on one page. The number of options available for combination pages depends on the optional devices you have connected to your STRIKER Vivid device. You can edit the combination pages and create new combination pages.
Creating a New Combination Page with the STRIKER Vivid 5/7/9
You can create a custom screen to suit your needs.
1 Select Customize > Add > Add Combo.
2 Select a layout.

natural_image
Abstract geometric composition with blue and white rectangles, a grid, and a dark water wave (no text or symbols)3 Select an area.
4 Select a screen.
5 Repeat these steps for each area of the page.
6 If necessary, select Data (Hidden), and select an option:
- To customize the data shown on the screen, select Overlay Numbers.
- To turn on and off the compass tape data bar, select Compass Tape.
7 Select Done when you are done customizing.
8 Select Next.
9 Enter a name for the page.
TIP: Select √ to select a letter.
10 Use the arrow keys to resize the windows.
11 Use the arrow keys to select a location on the home screen.
12 Select Done to exit.
Creating a New Combination Page with the STRIKER Vivid 4
You can create a custom page to suit your needs.
1 Select Customize > Add > Add Combo.
2 Select the first function.
3 Select the second function.
4 Select Split to choose the direction of the split screen (optional).
5 Select Next.
6 Enter a name for the page.
TIP: Select √ to select the letter.
7 Use the arrow keys to resize the windows.
8 Use the arrow keys to select a location on the home screen.
9 Select Done to exit.
Customizing a Combination Page
1 Open a combination page.
2 Select >Configure.
3 Select an option:
- To change the name, select Name, and enter a new name.
- To change the arrangement of the information on the screen, select Change Layout, and select a new layout.
• To change the information shown on the screen, select Change Function, and select new information. - To resize the information areas shown on the screen, select Resize Combination.
- To customize the data shown on the screen, select Overlay Numbers (Overlay Number Settings, page 17).
Adjusting the Backlight
1 Select Settings > System > Display > Backlight.
2 Adjust the backlight.
TIP: From any screen, press ⏻ repeatedly to scroll through the brightness levels. This can be helpful when the brightness is so low you cannot see the screen.
Adjusting the Color Mode
1 Select Settings > System > Display > Color Mode.
TIP: Select ⏻ > Color Mode from any screen to access the color settings.
2 Select an option.
Setting the Beeper
You can set when the device makes sounds.
1 Select Settings > System > Beeper.
2 Select an option:
- To have the device beep when you select an item and when an alarm is triggered, select On (Selections and Alarms).
• To have the device beep only when alarms are triggered, select Alarms Only.
ActiveCaptain® App
WARNING
This feature allows users to submit information. Garmin ® makes no representations about the accuracy, completeness, or timeliness of information submitted by users. Any use or reliance on the information submitted by users is at your own risk.
The ActiveCaptain app provides a connection to your STRIKER Vivid device and the community for a connected boating experience.
You can use the app to easily and quickly transfer user data, such as waypoints and routes, connect to the Garmin Quickdraw™ Contours Community, update device software, and plan your trip.
ActiveCaptain Roles
Your level of interaction with the STRIKER Vivid device using the ActiveCaptain app depends on your role.
Feature Owner Guest
Register device to account Yes No
Update software Yes Yes
Automatically transfer Garmin Quickdraw contours you have downloaded or created Yes No
Push smart notifications Yes Yes
Getting Started with the ActiveCaptain App
NOTE: The ActiveCaptain feature is only available on STRIKER Vivid 7 and STRIKER Vivid 9 models, which have Wi-Fi ® technology.
You can connect a mobile device to the STRIKER Vivid device using the ActiveCaptain app. The app provides a quick and easy way for you to interact with your chartplotter and complete such tasks as sharing data, registering, updating the device software, and receiving mobile device notifications.
1 From the STRIKER Vivid device, select ActiveCaptain.
2 From the ActiveCaptain page, select Wi-Fi Network > Wi-Fi > On.
3 Enter a name and password for this network.
4 From the application store on your mobile device, install and open the ActiveCaptain app.
5 Bring the mobile device within 24 m (80 ft.) of the STRIKER Vivid device.
6 From your mobile device settings, open the Wi-Fi connections page and connect to the Garmin device, using the name and password you entered in the Garmin device.
Enabling Smart Notifications
WARNING
Do not read or reply to notifications while operating the vessel. Failure to pay attention to the conditions on the water can result in vessel damage, personal injury, or death.
Before your STRIKER Vivid device can receive notifications, you must connect it to your mobile device and to the ActiveCaptain app.
1 From the STRIKER Vivid device, select ActiveCaptain > Smart Notifications > Enable Notifications.
2 Turn on Bluetooth 9 technology in the mobile device settings.
3 Bring the devices within 24 m (80 ft.) of each other.
4 From the ActiveCaptain app on the mobile device, select Smart Notifications > Pair with Chartplotter.
5 Follow the on-screen instructions to pair the app to the STRIKER Vivid device.
6 When prompted, enter the key on your mobile device.
7 If necessary, adjust which notifications you receive in your mobile device settings.
Updating Software with the ActiveCaptain App
If your device has Wi-Fi technology, you can use the ActiveCaptain app to download and install the latest software updates for your device.
NOTICE
Software updates may require the app to download large files. Regular data limits or charges from your Internet service provider apply. Contact your Internet service provider for more information about data limits or charges.
The installation process can take several minutes.
1 Connect the mobile device to the STRIKER Vivid device (Getting Started with the ActiveCaptain App, page 5).
2 When a software update is available and you have internet access on your mobile device, select Software Updates > Download.
The ActiveCaptain app downloads the update to the mobile device. When you reconnect the app to the STRIKER Vivid device, the update is transferred to the device. After the transfer is complete, you are prompted to install the update.
3 When you are prompted by the STRIKER Vivid device, select an option to install the update.
• To update the software immediately, select OK.
- To delay the update, select Cancel. When you are ready to install the update, select ActiveCaptain > Software Updates > Install Now.
Sonar Fishfinder
For more information about which transducer is best for your needs, go to garmin.com/transducers.
Different sonar views can help you view the fish in the area. The sonar views available vary depending on the type of transducer and sounder module connected to the chartplotter. For example, you can view certain Garmin ClearVü ™ sonar screens only if you have a compatible Garmin ClearVü transducer connected.
There are four basic styles of sonar views available: a full-screen view, a split-screen view that combines two or more views, a split-zoom view, and a split-frequency view that displays two different frequencies. You can customize the settings for each view in the screen. For example, if you are viewing the split-frequency view, you can separately adjust the gain for each frequency.
Traditional Sonar View
There are several full-screen views available, depending on the transducer that is connected.
The full-screen Traditional sonar view shows a large image of the sonar readings from a transducer. The range scale along the right side of the screen shows the depth of detected objects as the screen scrolls from the right to the left.

①
Depth information
②
Suspended targets or fish
③
Bottom of the body of water
Garmin ClearVü Sonar View
NOTE: To receive Garmin ClearVü scanning sonar, you need a compatible transducer. For information about compatible transducers, go to garmin.com/transducers.
Garmin ClearVü high-frequency sonar provides a detailed picture of the fishing environment around the boat in a detailed representation of structures the boat is passing over.

line
| Time (s) | Value | | -------- | ----- | | 0 | 25.4 | | 57.22 | 5 |Traditional transducers emit a conical beam. The Garmin ClearVü scanning sonar technology emits two narrow beams, similar to the shape of the beam in a copying machine. These beams provide a clearer, picture-like image of what is beneath the boat.

natural_image
3D diagram showing a cube with a curved surface and a rectangular base, no text or symbols presentSideVü Sonar View
SideVü scanning sonar technology shows you a picture of what lies to the sides of the boat. You can use this as a search tool to find structures and fish.

| 1 | Left side of the boat |
| 2 | Right side of the boat |
| 3 | The transducer on your vessel |
| 4 | Logs |
| 5 | Old tires |
| 6 | Trees |
| 7 | Water between the vessel and the bottom |
| 8 | Distance from the side of the boat |
Split-Screen Frequency
You can view two frequencies from the split frequency screen.

area
| Parameter | Value | | --------- | ----- | | Current | 37.1 | | Angle | 71.73° | | Angle | 12.8 | | Time | 02:35 |Flasher
The flasher shows sonar information on a circular depth scale, indicating what is beneath your boat. It is organized as a ring that starts at the top and progresses clockwise. Depth is indicated by the scale inside the ring. Sonar information flashes on the ring when it is received at the depth indicated. The colors indicate different strengths of the sonar return.
Select Flasher.

pie
| Segment | Value | |---|---| | ① | 23.6 | | ② | 18 | | ③ | 12 | | Other (Bottom Ring) | 0 | | Other (Top Ring) | 6 | | Other (Bottom Ring) | 18 | | Other (Top Ring) | 24 | | Other (Bottom Ring) | 0 |1
Depth at your present location
②
Depth scale
Split-Zoom View
On the split-zoom page, you can see a full-view graph of sonar readings on the right side of the screen, and a magnified portion of that graph on the left side of the screen.
From a sonar screen, select Zoom > Split Zoom.

line
| Time (h) | Value | | -------- | ----- | | 0 | 33.4 | | 1 | 1 | | 2 | 2 | | 3 | 3 | | 4 | 4 | | 5 | 5 | | 6 | 6 | | 7 | 7 | | 8 | 8 | | 9 | 9 | | 10 | 10 | | 11 | 11 | | 12 | 12 | | 13 | 13 | | 14 | 14 | | 15 | 15 | | 16 | 16 | | 17 | 17 | | 18 | 18 | | 19 | 19 | | 20 | 20 | | 21 | 21 | | 22 | 22 | | 23 | 23 | | 24 | 24 | | 25 | 25 | | 26 | 26 | | 27 | 27 | | 28 | 28 | | 29 | 29 | | 30 | 30 | | 31 | 31 | | 32 | 32 | | 33 | 33 | | 34 | 34 | | 35 | 35 | | 36 | 36 | | 37 | 37 | | 38 | 38 | | 39 | 39 | | 40 | 40 |①
Zoomed depth scale
②
Zoom window
③
Depth range
Selecting the Transducer Type
If you are connecting a transducer that was not included with the device, you may need to set the transducer type to make the sonar function properly. Before connecting the transducer, you should select the transducer type. The transducer name should be listed on the label on the transducer cable, near the connector.
This device is compatible with a range of accessory transducers, including Garmin ClearVü transducers, which are available at garmin.com/transducers.
1 Select Settings > My Vessel > Transducer Type.
2 Select an option:
- If you have a 200/77 kHz, dual-beam transducer, select Dual Beam (200/77 kHz).
- If you have a 200/50 kHz, dual-frequency transducer, select Dual Frequency (200/50 kHz).
- If you have another type of transducer, select it from the list.
Sonar Frequencies
NOTE: The frequencies available depend on the chartplotter, sounder modules, and transducer being used.
Adjusting the frequency helps adapt the sonar for your particular goals and the present depth of the water. Higher frequencies use narrow beam widths, and are better for high-speed operation and rough sea conditions. Bottom definition and thermocline definition can be better when using a higher frequency.
Lower frequencies use wider beam widths, which can let the fisherman see more targets, but could also generate more surface noise and reduce bottom signal continuity during rough sea conditions. Wider beam widths generate larger arches for fish target returns, making them ideal for locating fish. Wider beam widths also perform better in deep water, because the lower frequency has better deep water penetration.
CHIRP frequencies allow you to sweep each pulse through a range of frequencies, resulting in better target separation in deep water. CHIRP can be used to distinctly identify targets, like individual fish in a school, and for deep water applications. CHIRP generally performs better than single frequency applications. Because some fish targets may show up better using a fixed frequency, you should consider your goals and water conditions when using CHIRP frequencies.
Some sonar black boxes and transducers also provide the ability to customize preset frequencies for each transducer element, which enables you to change the frequency quickly using the presets as the water and your goals change.
Viewing two frequencies concurrently using the split-frequency view allows you to see deeper with the lower frequency return and, at the same time, see more detail from the higher frequency return.
Selecting the Transducer Frequency
NOTE: You cannot adjust the frequency for all sonar views and transducers.
You can select which frequencies appear on the sonar screen.
NOTICE
Always be aware of local regulations on sonar frequencies. For example, to protect orca whale pods, you might be prohibited from using frequencies between 50 to 80 khz with in 12 mile of an orca whale pod. It is your responsibility to use the device in compliance with all applicable laws and ordinances.
1 From a sonar view, select >Frequency.
2 Select a frequency suited to your needs and water depth.
For more information on frequencies, see Sonar Frequencies, page 12.
Creating a Waypoint on the Sonar Screen Using the Device Keys
1 From a sonar view, use the arrow keys to select a location to save.
2 Select .√
3 If necessary, edit the waypoint information.
Pausing the Sonar
Not all options are available on all models.
Select an option:
- From the Traditional or ClearVü sonar screen, select dr .
- From the SideVü sonar screen, select or.
Adjusting the Zoom
You can adjust the zoom manually by specifying the span and a fixed starting depth. For example, when the depth is 15 m and the starting depth is 5 m, the device displays a magnified area from 5 to 20 m deep.
You also can allow the device to adjust the zoom automatically by specifying a span. The device calculates the zoom area from the bottom of the water. For example, if you select a span of 10 m, the device displays an magnified area from the bottom of the water to 10 m above the bottom.
1 From a sonar screen, select >Zoom.
2 Select an option:
- Select Bottom Lock to lock the screen to the water bottom.
- Select Manual to manually set the zoom.
- Select Auto to automatically set the zoom.
- Select Split Zoom to turn on the split-zoom view.
Locking the Screen to the Water Bottom
You can lock the screen to the water bottom. For example, if you select a span of 20 meters, the device shows an area from the water bottom to 20 meters above the bottom. The span appears on the right side.
1 From a sonar view, select ≡ > Zoom > Bottom Lock.
2 Select a span.
Sonar Gain
The gain setting controls the sensitivity of the sonar receiver to compensate for water depth and water clarity. Increasing the gain shows more detail, and decreasing the gain reduces screen clutter.
NOTE: Setting the gain on one sonar view applies the setting to all the views.
Setting the Gain Automatically
NOTE: To set the gain on the split-frequency screen, you must set each frequency separately.
1 Select >Gain.
2 Select Enable Auto Gain, if applicable.
3 Select an option:
• To display higher-sensitivity, weaker sonar returns with more noise automatically, select Auto High.
• To display medium-sensitivity sonar returns with moderate noise automatically, select Auto Med.
- To display lower-sensitivity sonar returns with less noise automatically, select Auto Low.
Setting the Gain Manually
1 From a sonar screen, select >Gain.
2 Select or until you begin to see noise in the water portion of the screen.
3 Select or to decrease the gain.
Adjusting the Range of the Depth Scale
You can adjust the range of the depth scale that appears on the right side of the screen. Automatic ranging keeps the bottom within the lower third of the sonar screen, and can be useful for tracking the bottom where there are slow or moderate terrain changes.
When the depth changes dramatically, like a drop off or cliff, manually adjusting the range allows a view of a specified depth range. The bottom is shown on the screen as long as the bottom is anywhere within the manual range established.
1 From a sonar screen, select >Range.
2 Select an option:
- To allow the device to adjust the range automatically based on the depth, select Auto.
- To increase the range manually, select or. - To decrease the range manually, select or.
NOTE: From a sonar screen, select and to quickly manually adjust the range.
Setting the range on one screen applies that setting to all screens, except the SideVü screen.
Sonar Setup
Showing and Adjusting the Depth Line
You can show and adjust a horizontal line on a sonar screen. The depth of the line is indicated on the right side of the screen.
NOTE: Showing a depth line on one screen displays the depth line on all of the screens.
1 From a sonar screen, select ≡ > Sonar Setup > Depth Line.
2 Select .
3 To adjust the Depth Line, select or.
Setting the Scroll Speed
You can set the rate at which the sonar image moves across the screen. A higher scroll speed shows more detail, especially while moving or trolling. A lower scroll speed displays sonar information on the screen longer. Setting the scroll speed on one sonar view applies to all the sonar views.
1 From a sonar view, select ≡ > Sonar Setup > Scroll Speed.
2 Select an option:
- To adjust the scroll speed automatically using speed-over-ground, select Auto.
The Auto setting selects a scroll rate to match the boat speed, so targets in the water are drawn with the correct aspect ratio and appear less distorted. When viewing Garmin ClearVü or SideVü sonar views, it is recommend to use the Auto setting.
- To use a very fast scroll speed, select Ultrascroll ® .
The Ultrascroll option quickly scrolls new sonar data, but with a reduced image quality. For most situations, the Fast option provides a good balance between a quickly scrolling image and targets that are less distorted.
Setting the Bottom Search Limit
You can set a maximum depth at which the auto range feature searches for the bottom. A lower limit acquires data about the bottom faster than a higher limit.
1 From a sonar screen, select ≡ > Sonar Setup > Bottom Search Limit.
2 Select a range.
Sonar Appearance Settings
From a sonar view, select > Sonar Setup > Appearance.
Color Scheme: Sets the color scheme.
Edge: Highlights the strongest signal from the bottom to help define the hardness or softness of the signal.
A-Scope: Displays a vertical flasher along the right side of the screen that shows instantaneously the range to targets along a scale.
Fish Symbols: Sets how the sonar interprets suspended targets.
Turning on the A-Scope
The a-scope is a vertical flasher along the right side of the full-screen sonar view. This feature expands the most recently received sonar data so that it is easier to see. It can also be helpful for detecting fish that are close to the bottom.
NOTE: This feature is not available on all sonar screens.
From the full screen page, select ≡ > Sonar Setup > Appearance > A-Scope.

①
A-Scope
②
Diameter of the sonar cone at the present depth
Configuring the Appearance of Suspended Targets
NOTE: Configuring the appearance of suspended targets on one screen applies that setting to all screens.
NOTE: This feature is not available on all sonar views.

Shows suspended targets as symbols.

Shows suspended targets as symbols with target depth information.

Shows suspended targets as symbols with background sonar information.

Shows suspended targets as symbols with background sonar information and target depth information.
1 From a sonar screen, select ≡ > Sonar Setup > Appearance > Fish Symbols.
2 Select an option.
Sonar Noise Rejection Settings
From a sonar view, select Sonar Setup > Noise Reject.
Interference: Adjusts the sensitivity to reduce the effects of interference from nearby sources of noise.
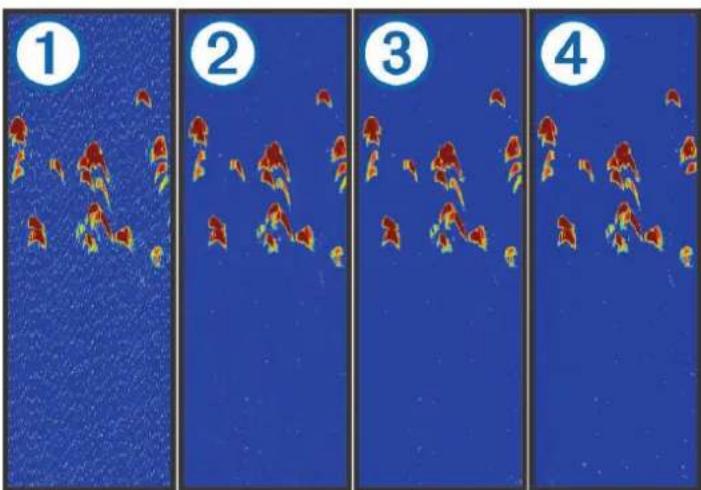
When you adjust the interference setting from off through low, medium, and high, noise is gradually removed, but there is little effect on the strong target returns. You should use the lowest interference setting that achieves the desired improvement to remove interference from the screen. Correcting installation issues that cause noise is the best way to eliminate interference.
Surface Noise: Hides sonar returns near the surface of the water. Hiding surface noise helps reduce screen clutter.
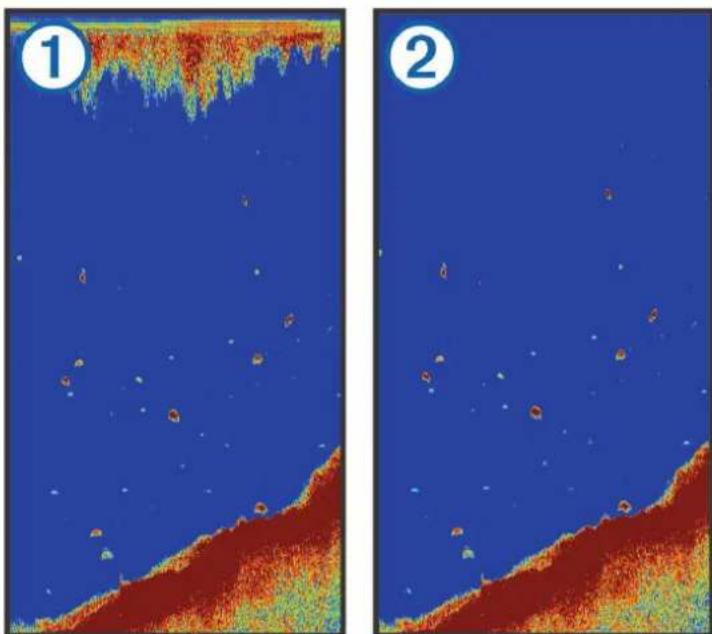
natural_image
Two-panel scientific image showing a topographic or topographic section with red and orange color gradients against a blue sky background, labeled ① and ② (no text or symbols in the main visual area)Surface noise ① caused by interference between the transducer and water. You can hide surface noise ② to help reduce clutter. Wider beam widths (lower frequencies) can show more targets, but can generate more surface noise.
TVG: Reduces surface noise.
This control is best used for situations when you want to control and suppress clutter or noise near the water surface. It also allows for the display of targets near the surface that are otherwise hidden or masked by surface noise.
Overlay Number Settings
You can customize the data shown on the sonar screen.
From a sonar screen, select >Overlay Numbers.
Navigation Inset: Shows the navigation inset when the vessel is navigating to a destination.
Compass Tape: Shows the compass tape data bar.
Device Voltage: Shows the voltage of the device.
Depth: Shows the transducer's current depth.
Speed: Shows the vessel's current speed.
Water Temp.: Shows the current water temperature.
Time of Day: Shows the current time of day.
Garmin Quickdraw Contours Mapping
WARNING
The Garmin Quickdraw Contours mapping feature allows users to generate maps. Garmin makes no representations about the accuracy, reliability, completeness or timeliness of the maps generated by third parties. Any use or reliance on the maps generated by third parties is at your own risk.
The Garmin Quickdraw Contours mapping feature allows you to instantly create maps with contours and depth labels for any body of water.
When Garmin Quickdraw Contours records data, a colored circle surrounds the vessel icon. This circle represents the approximate area of the map that is scanned by each pass.

natural_image
Topographic map section with contour lines and a small vehicle, scale bar indicates 80 meters (no text labels or annotations)A green circle indicates good depth and GPS position, and a speed under 16 km/h (10 mph). A yellow circle indicates good depth and GPS position, and a speed between 16 and 32 km/h (10 and 20 mph). A red circle indicates poor depth or GPS position, and a speed above 32 km/h (20 mph).
You can view Garmin Quickdraw Contours in a combination screen or as a single view on the map.
The amount of saved data depends on the memory available in the device, your sonar source, and the speed of your boat as you record data. You can record longer when you use a single-beam sonar. It is estimated that you might be able to record about 1,500 hours of data onto the device.
Mapping a Body of Water Using the Garmin Quickdraw Contours Feature
Before you can use the Garmin Quickdraw Contours feature, you must have sonar depth and your GPS position.
1 Select Quickdraw Map > ≡> Quickdraw Contours > Start Recording.
2 When recording is complete, select ≡> Quickdraw Contours > Stop Recording.
Adding a Label to a Garmin Quickdraw Contours Map
You can add labels to a Garmin Quickdraw Contours map to mark hazards or points of interest.
1 From the Quickdraw Map, select a location.
2 Select Add Quickdraw Label.
3 Enter text for the label, and select Done.
Deleting Garmin Quickdraw Contours
You can remove your Garmin Quickdraw Contours maps.
Select Quickdraw Map > ≡> Quickdraw Contours > Delete.
Garmin Quickdraw Community
The Garmin Quickdraw Community is a free, public, online community that enables you to share your Garmin Quickdraw Contours maps with others. You can also download maps other users have created.
If your device has Wi-Fi technology, you can use the ActiveCaptain app to access the Garmin Quickdraw Community (Connecting to the Garmin Quickdraw Community with ActiveCaptain, page 18).
NOTE: The Garmin device must have a memory card slot or Wi-Fi technology to participate in the Garmin Quickdraw Community.
Connecting to the Garmin Quickdraw Community with ActiveCaptain
1 From your mobile device, open the ActiveCaptain app and connect to the STRIKER Vivid device (Getting Started with the ActiveCaptain App, page 5).
2 From the app, select Quickdraw Community.
You can download contours from others in the community (Downloading Garmin Quickdraw Community Maps Using ActiveCaptain, page 18) and share the contours you have created (Sharing Your Garmin Quickdraw Contours Maps with the Garmin Quickdraw Community Using ActiveCaptain, page 18).
Downloading Garmin Quickdraw Community Maps Using ActiveCaptain
You can download Garmin Quickdraw Contours maps that other users have created and shared with the Garmin Quickdraw Community.
1 From the ActiveCaptain app on your mobile device, select Quickdraw Community > Search for Contours.
2 Use the map and search features to locate an area to download.
The red dots represent Garmin Quickdraw Contours maps that have been shared for that area.
3 Select Select Download Region.
4 Drag the box to select the area to download.
5 Drag the corners to change the download area.
6 Select Download Area.
The next time you connect the ActiveCaptain app to the STRIKER Vivid device, the downloaded contours are transferred to the device automatically.
Sharing Your Garmin Quickdraw Contours Maps with the Garmin Quickdraw Community Using ActiveCaptain
You can share Garmin Quickdraw Contours maps that you have created with others in the Garmin Quickdraw Community.
When you share a contour map, only the contour map is shared. Your waypoints are not shared.
When you set up your ActiveCaptain app, you may have selected to share your contours with the community automatically. If not, follow these steps to enable sharing.
From the ActiveCaptain app on your mobile device, select Sync with Plotter > Contribute to Community.
The next time you connect the ActiveCaptain app to the STRIKER Vivid device, your contour maps are transferred to the community automatically.
Map Settings
Select Quickdraw Map >
Waypoints: Shows the list of waypoints.
Waypoint Display: Sets how to display waypoints on the chart.
Quickdraw Contours: Turns on bottom contour drawing, and allows you to create fishing map labels.
Routes: Shows the list of routes.
Tracks: Shows your travel history on the map.
Search: Allows you to search for saved routes and waypoints.
Map Setup: Sets the perspective of the map and shows the heading line, which is a line drawn on the map from the bow of the boat in the direction of travel.
Overlay Numbers: Allows you to customize the data shown on the map.
Garmin Quickdraw Contours Settings
From a chart, select >Quickdraw Contours > Settings.
Recording Offset: Sets the distance between the sonar depth and the contour recording depth. If the water level has changed since your last recording, adjust this setting so the recording depth is the same for both recordings.
For example, if the last time you recorded had a sonar depth of 3.1 m (10.5 ft.), and today's sonar depth is 3.6 m (12 ft.), enter -0.5 m (-1.5 ft.) for the a Recording Offset value.
User Display Offset: Sets differences in contour depths and depth labels on your own contours maps to compensate for changes in the water level of a body of water, or for depth errors in recorded maps.
Comm. Display Offset: Sets differences in contour depths and depth labels on the community contours maps to compensate for changes in the water level of a body of water, or for depth errors in recorded maps.
Survey Coloring: Sets the color of the Garmin Quickdraw Contours display. When this setting is turned on, the colors indicate the quality of the recording. When this setting is turned off, the contour areas use standard map colors.
Green indicates good depth and GPS position, and a speed under 16 km/h (10 mph). Yellow indicates good depth and GPS position, and a speed between 16 and 32 km/h (10 and 20 mph). Red indicates poor depth or GPS position, and a speed above 32 km/h (20 mph).
Depth Range Shading
You can set color ranges on your map to show the water depths where your target fish are currently biting. You can set deeper ranges to monitor how quickly the bottom depth changes within a specific depth range. You can create up to ten depth ranges. For inland fishing, a maximum of five depth ranges can help reduce map clutter. The depth ranges apply to all charts and all bodies of water.
Some Garmin LakeVü ™ and premium supplemental charts have multiple depth range shading by default.
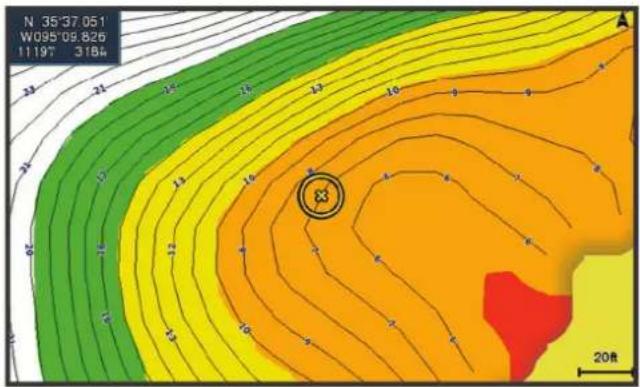
heatmap
| Value | |-------| | 35°37.051 | | W095°09.826 | | 11197 | | 3184 |Red From 0 to 1.5 m (from 0 to 5 ft.)
Orange From 1.5 to 3 m (from 5 to 10 ft.)
Yellow From 3 to 4.5 m (from 10 to 15 ft.)
Green From 4.5 to 7.6 m (from 15 to 25 ft.)
Navigation with the STRIKER Vivid
WARNING
When navigating, the course may pass over land or shallow water. Use visual sightings, and steer to avoid land, shallow water, and other dangerous objects. Failure to do so could result in an accident causing property damage, personal injury, or death.
You can set and follow a course to a destination using one of two methods: Go To or Route To.
Go To: Takes you directly to the destination. This is the standard option for navigating to a destination. The device creates a straight-line course or navigation line to the destination. The path may run over land and other obstacles.
Route To: Creates a route from your location to a destination, allowing you to add turns along the way. This option provides a straight-line course to the destination, but allows you to add turns into the route to avoid land and other obstacles.
Searching for a Destination by Name
You can search for saved waypoints, saved routes, saved tracks, and marine services destinations by name.
1 Enter at least a portion of the name of your destination.
2 If necessary, select Done.
The 50 nearest destinations that contain your search criteria appear.
3 Select the destination.
Creating a Waypoint on the Map
1 From the Quickdraw Map, select a location.
2 Select .√
A list of options appears along the right side of the chart. The options vary based on the location or object you selected.
3 Select Create Waypoint.
Navigating to a Waypoint
1 From the Quickdraw Map, use the arrow keys to select the waypoint.
The waypoint name appears on the screen.
2 Select .√
3 Select Navigate To > Go To.
Creating and Navigating a Route Using the Map
The starting point can be your present location or another location on the map.
1 Select User Data > Routes > New > Route Using Chart.
2 Pan the map to select the starting location of the route.
3 Select to add a turn to the route.
4 Repeat to add all of the turns in the route.
5 Select > Navigate To.
6 Select an option.
Stopping Navigation
From the Navigation chart or Fishing chart, select Stop Navigation.
Waypoints
Waypoints are locations you record and store in the device. Waypoints can mark where you are, where you are going, or where you have been.
Marking Your Present Location as a Waypoint
From any screen, select 🔒
Creating a Waypoint at a Different Location
1 Select Waypoints > New Waypoint.
2 Select an option:
- To create the waypoint by entering position coordinates, select Enter Coordinates, and enter the coordinates.
- To create the waypoint using a chart, select Use Chart, select the location, and select .√
- To create the waypoint using a range (distance) and bearing, select Enter Range/Bearing, and enter the information.
Marking and Navigating to a Man Overboard Location
From any screen, select 📋 Man Overboard > Yes.
The device sets a direct course back to the location.
Measuring Distance on the Map
You can measure the distance between your location and another location.
1 Pan the map.
2 Select ✅Measure Distance.
The distance between the locations appears in the upper-left corner of the screen.
3 If necessary, select to move the pin and measure the distance to another location.
Viewing a List of all Waypoints
Select User Data > Waypoints.
Editing a Saved Waypoint
1 Select User Data > Waypoints.
2 Select a waypoint.
3 Select Edit Waypoint.
4 Select an option:
• To add a name, select Name, and enter a name.
• To change the symbol, select Symbol.
• To change the depth, select Depth.
• To change the water temperature, select Water Temp..
• To change the comment, select Comment.
- To move the position of the waypoint, select Position.
Deleting a Waypoint or an MOB
1 Select User Data > Waypoints.
2 Select a waypoint or an MOB.
3 Select Delete.
Deleting All Waypoints
Select User Data > Manage Data > Clear User Data > Waypoints > All.
Routes
A route is a sequence of waypoints or locations that leads you to your final destination.
Creating and Navigating a Route Using the Map
The starting point can be your present location or another location on the map.
1 Select User Data > Routes > New > Route Using Chart.
2 Pan the map to select the starting location of the route.
3 Select to add a turn to the route.
4 Repeat to add all of the turns in the route.
5 Select > Navigate To.
6 Select an option.
Creating and Saving a Route
This procedure saves the route and all the waypoints in it. The starting point can be your present location or another location.
1 Select User Data > Routes > New > Use Chart.
2 Select the starting location of the route.
3 Follow the onscreen instructions to add a turn.
4 If necessary, repeat step 3 to add more turns.
5 Select the final destination.
Viewing a List of Routes
Select User Data > Routes.
Editing a Saved Route
You can change the name of a route or change the turns the route contains.
1 Select User Data > Routes.
2 Select a route.
3 Select Edit Route.
4 Select an option:
- To change the name, select Name, and enter the name.
- To select a waypoint from the turn list, select Edit Turns > Use Turn List, and select a waypoint from the list.
• To select a turn using the chart, select Edit Turns > Use Chart, and select a location on the chart.
Browsing for and Navigating a Saved Route
Before you can browse a list of routes and navigate to one of them, you must create and save at least one route.
1 Select User Data > Routes.
2 Select a route.
3 Select Navigate To.
4 Select an option:
• To navigate the route from the starting point used when the route was created, select Forward.
• To navigate the route from the destination point used when the route was created, select Backward.
A magenta line appears. In the center of the magenta line is a thinner purple line that represents the corrected course from your present location to the destination. The corrected course is dynamic, and it moves with your boat when you are off course.
5 Review the course indicated by the magenta line.
6 Follow the magenta line along each leg in the route, steering to avoid land, shallow water, and other obstacles.
7 If you are off course, follow the purple line (corrected course) to go to your destination, or steer back to the magenta line (direct course).
Browsing for and Navigating Parallel to a Saved Route
Before you can browse a list of routes and navigate to one of them, you must create and save at least one route.
1 Select User Data > Routes.
2 Select a route.
3 Select Navigate To.
4 Select Offset to navigate parallel to the route, offset from it by a specific distance.
5 Indicate how to navigate the route:
- To navigate the route from the starting point used when the route was created, to the left of the original route, select Forward - Port.
- To navigate the route from the starting point used when the route was created, to the right of the original route, select Forward - Starboard.
- To navigate the route from the destination point used when the route was created, to the left of the original route, select Backward - Port.
- To navigate the route from the destination point used when the route was created, to the right of the original route, select Backward - Starboard.
A magenta line appears. In the center of the magenta line is a thinner purple line that represents the corrected course from your present location to the destination. The corrected course is dynamic, and it moves with your boat when you are off course.
6 Review the course indicated by the magenta line.
7 Follow the magenta line along each leg in the route, steering to avoid land, shallow water, and other obstacles.
8 If you are off course, follow the purple line (corrected course) to go to your destination, or steer back to the magenta line (direct course).
Deleting a Saved Route
1 Select User Data > Routes.
2 Select a route.
3 Select Delete.
Deleting All Saved Routes
Select User Data > Manage Data > Clear User Data > Routes.
Tracks
A track is a recording of the path of your boat. The track currently being recorded is called the active track, and it can be saved. You can show tracks in each chart or 3D chart view.
Showing Tracks
Select User Data > Tracks > Tracks.
A trailing line on the chart indicates your track.
Clearing the Active Track
Select User Data > Tracks > Clear Active Track.
The track memory is cleared, and the active track continues to be recorded.
Saving the Active Track
The track currently being recorded is called the active track.
1 Select User Data > Tracks > Save Active Track.
2 Select an option:
- Select the time the active track began.
- Select Entire Log.
Viewing a List of Saved Tracks
Select User Data > Tracks > Saved Tracks.
Editing a Saved Track
1 Select User Data > Tracks > Saved Tracks.
2 Select a track.
3 Select Edit Track.
4 Select an option:
- Select Name, and enter the new name.
- Select Track Color, and select a color.
Saving a Track as a Route
1 Select User Data > Tracks > Saved Tracks.
2 Select a track.
3 Select Edit Track > Save As > Save as Route.
Browsing for and Navigating a Recorded Track
Before you can browse a list of tracks and navigate to them, you must record and save at least one track (Saving the Active Track, page 25).
1 Select User Data > Tracks > Saved Tracks.
2 Select a track.
3 Select Follow Track.
4 Select an option:
• To navigate the track from the starting point used when the track was created, select Forward.
- To navigate the track from the destination point used when the track was created, select Backward.
5 Review the course indicated by the colored line.
6 Follow the line along each leg in the route, steering to avoid land, shallow water, and other obstacles.
Deleting a Saved Track
1 Select User Data > Tracks > Saved Tracks.
2 Select a track.
3 Select Delete.
Deleting All Saved Tracks
Select User Data > Manage Data > Clear User Data > Saved Tracks.
Retracing the Active Track
The track currently being recorded is called the active track.
1 Select User Data > Tracks > Follow Active Track.
2 Select an option:
- Select the time the active track began.
- Select Entire Log.
3 Review the course indicated by the colored line.
4 Follow the colored line, steering to avoid land, shallow water, and other obstacles.
Setting the Color of the Active Track
1 Select User Data > Tracks > Active Track Options > Track Color.
2 Select a track color.
Managing the Track Log Memory During Recording
1 Select Record Mode.
2 Select an option:
- To record a track log until the track memory is full, select Fill.
• To continuously record a track log, replacing the oldest track data with new data, select Wrap.
Configuring the Recording Interval of the Track Log
You can indicate the frequency at which the track plot is recorded. Recording more frequent plots is more accurate but fills the track log faster. The resolution interval is recommended for the most efficient use of memory.
1 Select User Data > Tracks > Active Track Options > Record Interval > Interval.
2 Select an option:
- To record the track based on a distance between points, select Distance > Change, and enter the distance.
• To record the track based on a time interval, select Time > Change, and enter the time interval. - To record the track plot based on a variance from your course, select Resolution > Change, and enter the maximum error allowed from the true course before recording a track point.
Device Configuration
System Settings
Select Settings > System.
Display: Adjusts the backlight brightness (Adjusting the Backlight, page 4) and color scheme (Adjusting the Color Mode, page 4).
Beeper: Turns on and off the tone that sounds for alarms and selections (Setting the Beeper, page 4).
GPS: Provides information about the GPS satellite settings and fix.
Auto Power: Turns on the device automatically when power is applied.
Keyboard Layout: Sets the arrangement of the keyboard to an alphabetical or computer keyboard layout.
Language: Sets the on-screen language.
System Information: Provides information about the device and the software version.
Simulator: Turns on the simulator and allows you to set the speed and simulated location.
System Information
Select Settings > Settings > System Information.
Event Log: Allows you to view a log of system events.
Software Information: Provides information about the device and the software version.
Garmin Devices: Provides information about connected Garmin devices.
Reset: Restores the device to factory settings.
NOTE: This deletes any setting information you have entered.
My Vessel Settings
NOTE: Some settings and options require additional hardware. Some settings are available only when you have valid depth data.
Select Settings > My Vessel.
Transducer Type: Displays the type of transducer connected to the device (Selecting the Transducer Type, page 11).
Keel Offset: Offsets the surface reading for the depth of a keel, making it possible to measure depth from the bottom of the keel instead of from the transducer location (Setting the Keel Offset, page 28).
Temp. Offset: Compensates for the water temperature reading from a temperature-capable transducer (Setting the Water Temperature Offset, page 28).
Setting the Keel Offset
You can enter a keel offset to compensate the water depth reading for the transducer installation location. This allows you to view the depth of the water below the keel or the true depth of the water, depending on your needs.
If you want to know the water depth below the keel or the lowest point of your boat and the transducer is installed at the water line or anywhere above the end of the keel, measure the distance from the transducer location to the keel of the boat.
If you want to know the true water depth and the transducer is installed below the water line, measure the distance from the bottom of the transducer up to the water line.
NOTE: This option is only available when you have valid depth data.
1 Measure the distance:
- If the transducer is installed at the water line of anywhere above the end of the keel, measure the distance from the transducer location to the keel of the boat. Enter this value as a positive number.
- If the transducer is installed at the bottom of the keel and you want to know the true depth of the water, measure the distance from the transducer to the water line. Enter this value in as a negative number.

natural_image
Sailboat diagram with two numbered components, no text or symbols present2 Select Settings > My Vessel > Keel Offset.
3 Select + if the transducer is installed at the water line, or select — if the transducer is installed at the bottom of the keel.
Setting the Water Temperature Offset
You can set the temperature offset to compensate for the temperature reading from a temperature-capable sensor.
1 Measure the water temperature using the temperature-capable transducer that is connected to the device.
2 Measure the water temperature using a different thermometer or temperature sensor that is known to be accurate.
3 Subtract the water temperature measured in step 1 from the water temperature measured in step 2.
This is the temperature offset. Enter this value in step 5 as a positive number if the sensor connected to the device measures the water temperature as being colder than it actually is. Enter this value in step 5 as a negative number if the sensor connected to the device measures the water temperature as being warmer than it actually is.
4 Select Settings > My Vessel > Temp. Offset.
5 Use the arrow keys to enter water temperature offset measured in step 3.
Setting Alarms
CAUTION
The Beeper setting must be turned on to make alarms audible (Setting the Beeper, page 4). Failure to set audible alarms could lead to injury or property damage.
Navigation Alarms
Select Settings > Alarms > Navigation.
Arrival: Sets an alarm to sound when you are within a specified distance or time from a turn or a destination.
Anchor Drag: Sets an alarm to sound when you exceed a specified drift distance while anchored.
Off Course: Sets an alarm to sound when you are off course by a specified distance.
System Alarms
Alarm Clock: Sets an alarm clock.
Device Voltage: Sets an alarm to sound when the battery reaches a specified low voltage.
GPS Accuracy: Sets an alarm to sound when the GPS location accuracy falls outside the user-defined value.
Sonar Alarms
Select Settings > Alarms > Sonar.
Shallow Water: Sounds when the water depth is shallower than the specified depth.
Deep Water: Sounds when the water depth is deeper than the specified depth.
Water Temp.: Sounds when the water temperature varies more than ±2ircF ( ±1.1ircC ). Alarm settings are saved when the device is turned off.
NOTE: You must connect the device to a temperature-capable transducer to use this alarm.
Fish: Sets an alarm to sound when the device detects a suspended target.
- set the alarm to sound when fish of all sizes are detected.
- set to the alarm to sound only when medium or large fish are detected.
- sets the alarm to sound only when large fish are detected.
Unit Settings
Select Settings > Units.
System Units: Sets the unit format for the device.
Variance: Sets the magnetic declination, the angle between magnetic north and true north, for your present location.
North Reference: Sets the direction references used in calculating heading information. True sets geographic north as the north reference. Grid sets grid north as the north reference (000°). Magnetic sets the magnetic north as the north reference.
Position Format: Sets the position format in which a given location reading appears. Do not change this setting unless you are using a map or chart that specifies a different position format.
Map Datum: Sets the coordinate system on which the map is structured. Do not change this setting unless you are using a map or chart that specifies a different map datum.
Time Format: Sets a 12-hour, 24-hour, or UTC time format.
Time Zone: Sets the time zone.
Daylight Savings Time: Sets daylight savings time to Off or On.
Navigation Settings
NOTE: Some settings and options require additional hardware.
Select Settings > Navigation.
Route Labels: Sets the type of labels shown with route turns on the map.
Turn Transition Activ.: Sets the turn transition to be calculated based on time or distance.
Turn Transition Time: Sets how many minutes before the turn that you transition to it as the next leg, when Time is selected for the Turn Transition Activ. setting.
Turn Transition Dist.: Sets how far before the turn that you transition to it as the next leg, when Distance is selected for the Turn Transition Activ. setting.
Route Start: Selects a starting point for route navigation. You can select Boat to start navigation from the current vessel location, or Waypoints to start from the first waypoint on the route.
Restoring the Factory Default Settings
NOTE: This deletes all settings information you have entered, including all Garmin Quickdraw Contours you have generated.
Select Settings > System > System Information > Reset > Reset Settings > Yes.
Sharing and Managing User Data
WARNING
This feature allows you to import data from other devices that may have been generated by third parties. Garmin makes no representations about the accuracy, completeness, or timeliness of data that is generated by third parties. Any reliance on or use of such data is at your own risk.
You can share user data between compatible devices. User data includes waypoints, saved tracks, routes, and boundaries.
- You can share data if two compatible devices are connected using the blue and brown wires on the power cable or using the User Data Sharing Cable (Connecting to a Garmin Device to Share User Data, page 30).
Connecting to a Garmin Device to Share User Data
You can connect the STRIKER Vivid device to a compatible Garmin device to share user data, such as waypoints. If the devices are mounted near each other, you can connect the blue and brown wires. If the devices are mounted too far apart for the wires to reach, you can connect the devices using a User Data Sharing Cable (010-12234-06).
1 Make sure both devices are connected to the same ground.
2 Complete an action:
- If the devices are mounted near each other, connect the blue wire from the first device to the brown wire of the second, and connect the brown wire from the first device to the blue wire of the second.
- If the devices are not mounted near each other, obtain a User Data Sharing Cable (010-12234-06), and connect the devices following the instructions included with the cable (User Data Sharing Cable Wiring Diagram, page 31).
3 On both devices, select User Data > Manage Data > User Data Sharing.
User data is shared between the connected devices. If you select Clear User Data, data is removed from both connected devices.
User Data Sharing Cable Wiring Diagram

flowchart
graph LR
    A["①"] --> B["④"]
    C["②"] --> B
    D["③"] --> B
    B --> E["⑤"]
    F["②"] --> G["③"]
    H["③"] --> G
    G --> I["②"]
    J["①"] --> K["③"]
    L["②"] --> K
    K --> M["③"]
    N["②"] --> O["③"]
    P["③"] --> O
    O --> Q["③"]
    R["Ground Symbol"] --> S["+"]
    style A fill:#fff,stroke:#000
    style C fill:#fff,stroke:#000
    style D fill:#fff,stroke:#000
    style F fill:#fff,stroke:#000
    style H fill:#fff,stroke:#000
    style J fill:#fff,stroke:#000
    style L fill:#fff,stroke:#000
    style N fill:#fff,stroke:#000
    style P fill:#fff,stroke:#000
    style R fill:#fff,stroke:#000
| 1 | First device |
| 2 | User data cable |
| 3 | Second device |
| Item Wire Function Wire Color | ||
| 1 | Data Blue | |
| 2 | Data Brown | |
| 3 | Ground Black | |
| 4 | Data Green | |
| 5 | Data White | |
Clearing Saved Data
You can remove saved user data from the device memory.
1 Select User Data > Manage Data > Clear User Data.
2 Select an option.
NOTICE
If you select All, all the data you have saved will be removed, except Garmin Quickdraw contours data.
If you are connected to another device and User Data Sharing is enabled, data is removed from all connected devices.
Appendix
Registering Your Device with the Serial Number
If your device does not have Wi-Fi technology, you can register using the device's serial number. If your device has Wi-Fi technology, you should use the ActiveCaptain app to register the device (Getting Started with the ActiveCaptain App, page 5).
Keep the original sales receipt, or a photocopy, in a safe place.
1 Locate the serial number on the product box or on the device.
2 Go to my.garmin.com/registration.
3 Sign in to your Garmin account.
4 Enter the serial number.
Specifications
| Temperature range From -15° to 55°C (from 5° to 131°F) | |
| Water rating IEC 60529 IPX7 | 1 |
| Input voltage From 12 to 20 Vdc | |
| Rated current 1.5 A | |
| Fuse 3 A, 250 V fast-acting | |
| Wireless frequency and protocol 2 | Wi-Fi, 2.4 GHz @ 22 dBm maximum |
Troubleshooting
My device will not turn on or keeps turning off
Devices erratically turning off or not turning on could indicate an issue with the power supplied to the device. Check these items to attempt to troubleshoot the cause of the power issue.
- Make sure the power source is generating power.
You can check this several ways. For example, you can check whether other devices powered by the source are functioning. -
Check the fuse in the power cable.
The fuse should be located in a holder that is part of the red wire of the power cable. Check that the proper size fuse is installed. Refer to the label on the cable or the installation instructions for the exact fuse size needed. Check the fuse to make sure there is still a connection inside of the fuse. You can test the fuse using a multimeter. If the fuse is good, the multimeter reads 0 ohm. -
Check to make sure the device is receiving at least 12 Vdc.
To check the voltage, measure the female power and ground sockets of the power cable for DC voltage. If the voltage is less than 12 Vdc, the device will not turn on. - If the device is receiving enough power but does not turn on, contact Garmin product support.
Changing the Fuse in the Power Cable
1 Open the fuse housing .①
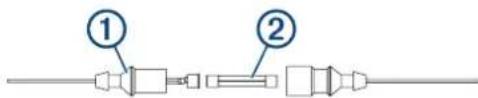
2 Twist and pull the fuse to remove it. ②
3 Insert a new 3 A fast-blow fuse.
4 Close the fuse housing.
My device will not acquire GPS signals
If the device is not acquiring satellite signals, there could be a few causes. If the device has moved a large distance since the last time it has acquired satellites or has been turned off for longer than a few weeks or months, the device may not be able to acquire the satellites correctly.
- Ensure the device is using the latest software. If not, update the device software (Updating Software with the ActiveCaptain App, page 6).
My sonar does not work
- Push the transducer cable all the way into the back of the device.
Even if the cable seems to be connected, you should push firmly so that it is fully seated.
- Press, and ensure sonar is enabled.
- Select the correct transducer type (Selecting the Transducer Type, page 11).
My device is not creating waypoints in the correct location
You can manually enter a waypoint location to transfer and share data from one device to the next. If you have manually entered a waypoint using coordinates, and the location of the point does not appear where the point should be, the map datum and position format of the device may not match the map datum and position format originally used to mark the waypoint.
Position format is the way in which the GPS receiver's position appears on the screen. This is commonly displayed as latitude/longitude in degrees and minutes, with options for degrees, minutes and second, degrees only, or one of several grid formats.
Map datum is a math model which depicts a part of the surface of the earth. Latitude and longitude lines on a paper map are referenced to a specific map datum.
1 Find out which map datum and position format was used when the original waypoint was created.
If the original waypoint was taken from a map, there should be a legend on the map that lists the map datum and position format used to create that map. Most often this is found near the map key.
2 Select Settings > Units.
3 Select the correct map datum and position format settings.
4 Create the waypoint again.
My device does not display the correct time
Time is set by GPS position and time zone setting.
1 Select Settings > Units > Time Zone.
2 Ensure the device has a GPS fix.
Index
A
ActiveCaptain 5
quickdraw 18
smart notifications 5
updating software 6
alarms 29
anchor drag 29
arrival 29
navigation 29
off course 29
sonar 29
anchor drag alarm 29
arrival alarm 29
B
backlight 4
beeper 4
C
charts 17, 18
appearance 20
quickdraw 17, 18
clock 29
alarm 29
color mode 4
combinations 3, 4
customizing 4
courses 20
D
data
clearing 31
management 30
data fields 17, 19
deleting
quickdraw 18
user data 31
depth shading 20
destinations, selecting 20
device
keys 1
registration 32
display settings 26
E
event log 27
F
factory settings 27, 30
fishfinder. See sonar
G
Garmin ClearVü 8
Go To 20, 21
GPS 33
settings 26
signals 2
GPS accuracy 29
H
home screen, customizing 3, 4
K
keel offset 27, 28
keys 1
power 1
L
language 26
M
man overboard 21
maps. See charts
mark location 21
measuring distance 22
N
navigating 21
navigation 20
navigation alarms 29
navigation inset 17
notifications 5
0
off course alarm 29
overlay numbers 17, 19
P
panning 2
product registration 32
Q
quickdraw 18
deleting 18
settings 19
R
registering the device 32
Route To 20
routes 22
creating 21-23
deleting 24
editing 23
navigating 21-23
navigating parallel to 24
sharing 30
viewing list of 23
\$
safe depth 30
safe height 30
satellite signals, acquiring 2
screen, brightness 4
settings 4, 19, 26, 27, 29, 30
system information 26
sharing data 30, 31
SideVü 9
smart notifications 5
software, updating 6
sonar 6, 9, 11
a-scope 15
alarms 29
appearance 15
bottom lock 13
color scheme 15
depth line 14
depth scale 14
flasher 10
frequencies 9, 11, 12
gain 13
Garmin ClearVü 8
interference 16
SideVü 9
surface noise 16
suspended targets 15
views 7, 9, 11, 12
waypoint 12
zoom 11,13
SOS 21
T
tracks 24
active 26
clearing 24
deleting 24, 25
editing 25
list 25
navigating 25, 26
recording 26
saving 25
saving as route 25
showing 24
transducer 6,11
transducer type 27
trip planner. See routes
troubleshooting 32, 33
U
units of measure 29
updating, software 6
user data, deleting 31
V
voltage 29
W
water, temperature offset 28
waypoints 19, 21, 33
creating 21
deleting 22
editing 22
man overboard 21
sharing 30
sonar 12
viewing list of 22
Wi-Fi 5
wireless devices, connecting to a wireless
device 5
Z
zoom 2
sonar 13
support.garmin.com
- STRIKER™ VIVID
- Table of Contents
- Introduction...... 1
- Customizing the Chartplotter...... 3
- ActiveCaptain® App...... 5
- Sonar Fishfinder......6
- Garmin Quickdraw Contours Mapping....17
- Navigation with the STRIKER Vivid.... 20
- Device Configuration...... 26
- Sharing and Managing User Data... 30
- Appendix....32
- Index....34
- Introduction
- WARNING
- Device Keys
- NOTICE
- Home Screen
- Zooming on the STRIKER Vivid 4
- Panning on the STRIKER Vivid 4
- GPS Satellite Signal Acquisition
- Customizing the Chartplotter
- Customizing the Home Screen
- Combination Pages
- Creating a New Combination Page with the STRIKER Vivid 5/7/9
- Creating a New Combination Page with the STRIKER Vivid 4
- Customizing a Combination Page
- Adjusting the Backlight
- Adjusting the Color Mode
- Setting the Beeper
- ActiveCaptain® App
- ActiveCaptain Roles
- Feature Owner Guest
- Getting Started with the ActiveCaptain App
- Enabling Smart Notifications
- Updating Software with the ActiveCaptain App
- Sonar Fishfinder
- Traditional Sonar View
- Garmin ClearVü Sonar View
- SideVü Sonar View
- Split-Screen Frequency
- Flasher
- Split-Zoom View
- Selecting the Transducer Type
- Sonar Frequencies
- Selecting the Transducer Frequency
- Creating a Waypoint on the Sonar Screen Using the Device Keys
- Pausing the Sonar
- Adjusting the Zoom
- Locking the Screen to the Water Bottom
- Sonar Gain
- Setting the Gain Automatically
- Setting the Gain Manually
- Adjusting the Range of the Depth Scale
- Sonar Setup
- Showing and Adjusting the Depth Line
- Setting the Scroll Speed
- Setting the Bottom Search Limit
- Sonar Appearance Settings
- Turning on the A-Scope
- Configuring the Appearance of Suspended Targets
- Sonar Noise Rejection Settings
- Overlay Number Settings
- Garmin Quickdraw Contours Mapping
- Mapping a Body of Water Using the Garmin Quickdraw Contours Feature
- Adding a Label to a Garmin Quickdraw Contours Map
- Deleting Garmin Quickdraw Contours
- Garmin Quickdraw Community
- Connecting to the Garmin Quickdraw Community with ActiveCaptain
- Downloading Garmin Quickdraw Community Maps Using ActiveCaptain
- Sharing Your Garmin Quickdraw Contours Maps with the Garmin Quickdraw Community Using ActiveCaptain
- Map Settings
- Garmin Quickdraw Contours Settings
- Depth Range Shading
- Navigation with the STRIKER Vivid
- Searching for a Destination by Name
- Creating a Waypoint on the Map
- Navigating to a Waypoint
- Creating and Navigating a Route Using the Map
- Stopping Navigation
- Waypoints
- Marking Your Present Location as a Waypoint
- Creating a Waypoint at a Different Location
- Marking and Navigating to a Man Overboard Location
- Measuring Distance on the Map
- Viewing a List of all Waypoints
- Editing a Saved Waypoint
- Deleting a Waypoint or an MOB
- Deleting All Waypoints
- Routes
- Creating and Saving a Route
- Viewing a List of Routes
- Editing a Saved Route
- Browsing for and Navigating a Saved Route
- Browsing for and Navigating Parallel to a Saved Route
- Deleting a Saved Route
- Deleting All Saved Routes
- Tracks
- Showing Tracks
- Clearing the Active Track
- Saving the Active Track
- Viewing a List of Saved Tracks
- Editing a Saved Track
- Saving a Track as a Route
- Browsing for and Navigating a Recorded Track
- Deleting a Saved Track
- Deleting All Saved Tracks
- Retracing the Active Track
- Setting the Color of the Active Track
- Managing the Track Log Memory During Recording
- Configuring the Recording Interval of the Track Log
- Device Configuration
- System Settings
- System Information
- My Vessel Settings
- Setting the Keel Offset
- Setting the Water Temperature Offset
- Setting Alarms
- CAUTION
- Navigation Alarms
- System Alarms
- Sonar Alarms
- Unit Settings
- Navigation Settings
- Restoring the Factory Default Settings
- Sharing and Managing User Data
- Connecting to a Garmin Device to Share User Data
- Clearing Saved Data
- Appendix
- Registering Your Device with the Serial Number
- Troubleshooting
- My device will not turn on or keeps turning off
- Changing the Fuse in the Power Cable
- My device will not acquire GPS signals
- My sonar does not work
- My device is not creating waypoints in the correct location
- My device does not display the correct time
- Index
- A
- B
- C
- D
- E
- F
- G
- H
- K
- L
- M
- N
- 0
- P
- Q
- R
- \$
- T
- U
- V
- W
- Z
Brand : GARMIN
Model : STRIKER Vivid 5cv
Category : Fish Finder