
Livecom1000 - Intercom Ikan - Free user manual and instructions
Find the device manual for free Livecom1000 Ikan in PDF.


| Product Type | Full-Duplex Wireless Intercom System |
| Brand | Ikan |
| Model | Livecom1000 |
| Base Station Dimensions (L x W x H) | 220 x 170 x 50 mm |
| Base Station Weight | 1400 g |
| Beltpack Dimensions (L x W x H) | 100 x 58 x 22 mm |
| Beltpack Weight | 180 g |
| Frequency Band | 1.9 GHz |
| Modulation | GFSK |
| Transmission Power | Maximum 24 dBm |
| Receiver Sensitivity | ≤ -93 dBm |
| Line-of-Sight Range | Up to 300 m (1000 ft) |
| Maximum Beltpacks per Base | 4 |
| Audio Frequency Response | 300 Hz – 4 kHz |
| Signal to Noise Ratio | > 50 dB |
| Distortion | < 2% |
| Base Station Power Input | 7–36 V DC via 4-pin XLR or F970 battery plate |
| Beltpack Battery | 1600 mAh polymer lithium, rechargeable via USB-C |
| Beltpack Runtime | > 8 hours per charge |
| Headset Interface | 3.5 mm (base and beltpack), 4-pin XLR (base for 4-wire) |
| Microphone Types Supported | Dynamic and electret (switchable in menu) |
| Operating Temperature | 0°C to +40°C (storage: -20°C to +60°C) |
| Included Accessories | 1 Base Station, 4 Beltpacks, 5 Headsets, 3 Antennas, 4 USB-C Cables, 1 XLR Adaptor, Quick Guide |
| Certifications / Safety | Use only supplied charger and batteries; avoid heat sources |
Frequently Asked Questions - Livecom1000 Ikan
User questions about Livecom1000 Ikan
0 question about this device. Answer the ones you know or ask your own.
Ask a new question about this device
Download the instructions for your Intercom in PDF format for free! Find your manual Livecom1000 - Ikan and take your electronic device back in hand. On this page are published all the documents necessary for the use of your device. Livecom1000 by Ikan.
USER MANUAL Livecom1000 Ikan
Thank you for purchasing IKAN LIVECOM1000 full-duplex wireless intercom system. With the DECT protocol technology, LIVECOM1000 is widely used in the areas of studio, stage events, EFP, webcasting, filmmaking etc. With a clean line of sight (LOS), the transmission range of LIVECOM1000 reaches up to 300m with full-duplex wireless communication and carrier-grade voice quality.
KEY FEATURES
• 1000ft Communication Range, Carrier-Grade Voice Quality
• 1.9GHz Frequency Bandwidth
• Full-Duplex Wireless Communication
• Built-In Lithium Batteries, with Longer than 8 Hours Run Time on a Full Charge (Beltpacks)
• Up to 4 Beltpacks Communication Simultaneously (Base Station)
• 3.5mm Headset and 4-Pin Analog Audio Connection (Base Station)
• Base Station Support 7-36V DC Wide Voltage Input
• USB Firmware Upgrade
• Industrial Metal Case, Stable and Reliable
APPLICATIONS
- Filmmaking
• Live Broadcasting
• Corporate Events
• Production Crew Communication
• Stage Activities
• Emergency Dispatch - Webcasting
natural_image
Line drawing of a rectangular electronic device with ports and control panel (no text or symbols)①
②
natural_image
Line drawing of a headset with attached microphone and cable (no text or symbols)③

④

⑤
⑥

⑦
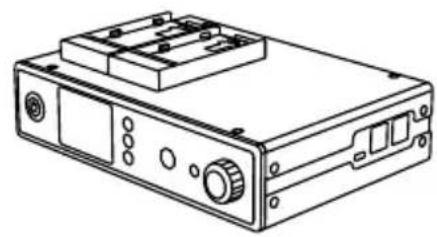
① Base Station x1
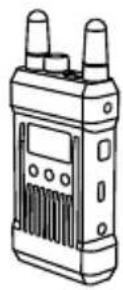
② Beltpack x4
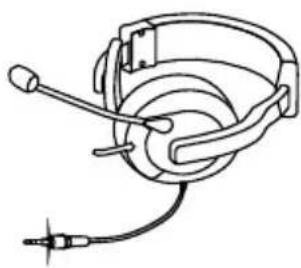
③ Professional Dynamic Side-Ear Headset x5
④ 1.9G High-Gain Base Station Antenna x3
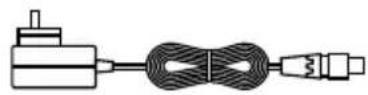
⑤ Type-C Cable x4
⑥ 4-Pin XLR Adaptor x1
⑦ Quick Guide x1
OPTIONAL ACCESSORIES:
(Not included in the standard packing list)
| Headset | Professional Electret Side-Ear Headset |
| Side-Ear Mobile Earphone | |
| Air Duct Earphone | |
| Earmuffs | |
| Professional Dynamic Double-Sided Headset |
• TALLY Cable TALLY Set (TALLY Switcher, Connector, External TALLY Light)
• Antennas Dual polarization high-gain panel antenna Antenna Extender
- Packing Hard Case Package
• Installation Base Station Ear Hanger
Beltpack Cold Shoe
- Charger 5-Port USB Beltpacks Charger (Can be configured to Chinese, US, UK, EU and Australian standard)
- Cascade Accessories 4-Wire to 2-Wire Converter Set
Ethernet to XLR Cable
3.5mm to XLR Cable
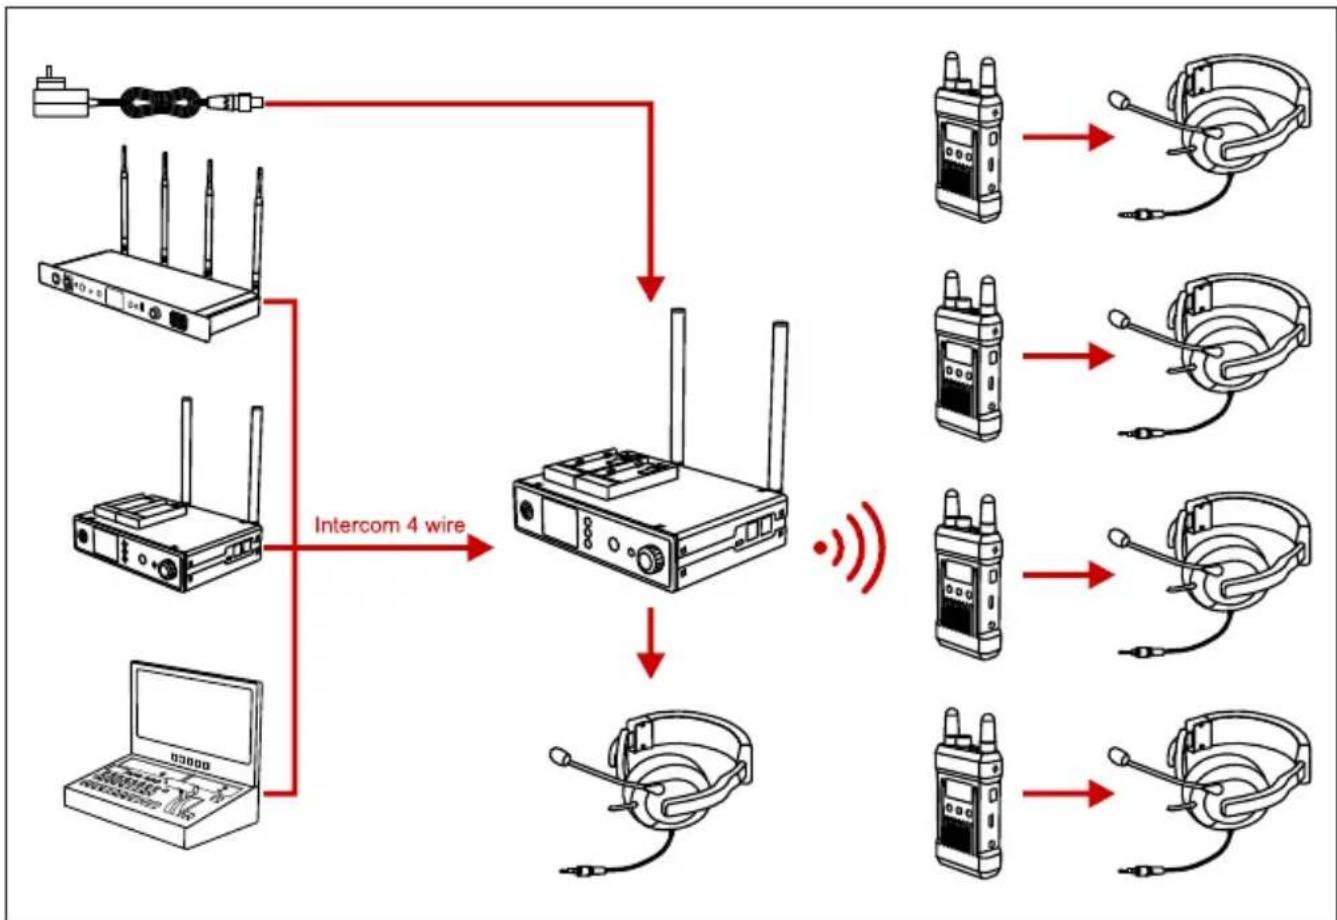
flowchart
graph TD
    A["Device 1"] -->|Intercom 4 wire| B["Router"]
    C["Device 2"] -->|Intercom 4 wire| B
    D["Device 3"] -->|Intercom 4 wire| B
    E["Device 4"] -->|Intercom 4 wire| B
    F["Laptop"] --> B
    B --> G["Radio Receiver"]
    B --> H["Headphones"]
    B --> I["Radio Receiver"]
    B --> J["Headphones"]
    B --> K["Radio Receiver"]
    B --> L["Headphones"]
The base station of this wireless full-duplex intercom system supports up to 4 beltpacks. The base station and the beltpacks support dynamic and electret mics. They could be switched by selecting different applications in the menu. The 4-pin audio interface on the base station enables the device to connect with other audio systems, which can increase the quantity of beltpacks and also the wireless communication range.
①
②
③
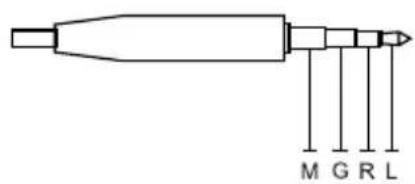
① 3.5mm Earphone
Interface: M G R L
Mic Impedance: 600
Speaker Impedance: 32
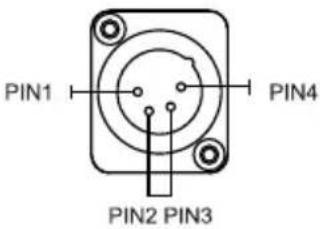
② DC Power Supply
Power Supply Range: 7\~36V DC
Pin 1: GND
Pin 2: NULL
Pin 3: NULL
Pin 4: POWER
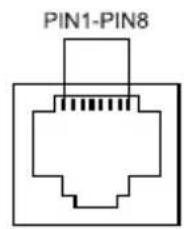
③ Intercom 4-Wire
Input Impedance: 10K
Pin 1: NULL
Pin 2: NULL
Pin 3: AUDIO OUT+
Pin 4: AUDIO IN+
Pin 5: AUDIO IN-
Pin 6: AUDIO OUT-
Pin 7: GND
Pin 8: GND
natural_image
Diagram of two electrical connectors inside a frame, with no text or symbols present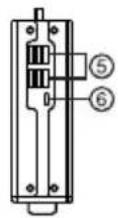
A

B
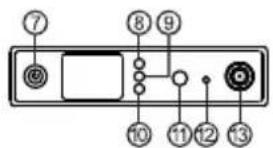
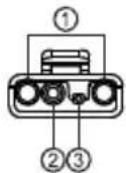
A BASE STATION
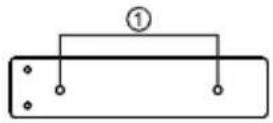
① RF Antenna Interfaces
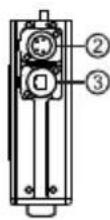
② DC Power Supply (4-Pin XLR Male)
③ 4-Pin Audio Input / Output (RJ45)
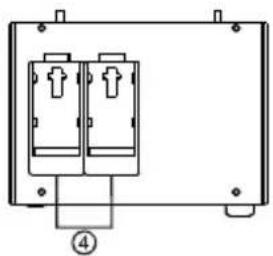
④ F970 Battery Plate
⑤ 4 USB Type-A Interfaces (For Beltpacks Charging and Cable Connection)
⑥ Type-C USB Debugging Interface
⑦ Power Switch
⑧ Up/Left Button
⑨ Menu/Confirm Button (Long Press to Enter Menu/Click to Confirm)
⑩ Down/Right Button
⑪ Remote Beltpack Mic Mute Button
⑫ 3.5mm Headset Interface
⑬ Base Station Volume Control Knob
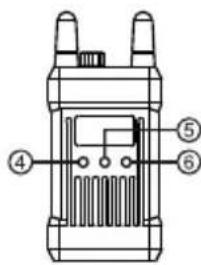
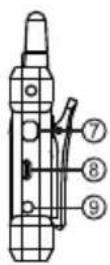
B BELTPACK
① Antennas Interfaces
② Power and Volume Control Knob
③ 3.5mm Headset Interface
④ Up/Left Button
⑤ Menu/Confirm Button (Long Press to Enter Menu /Click to Confirm)
⑥ Down/Right Button
⑦ Mute/Talk Switch Button (Double Click to Mute/Long Press to Talk)
⑧ Type-C USB Interface (For beltpacks Charging and Cable Connection)
⑨ 3-Segment 3.5mm TALLY Output Interface
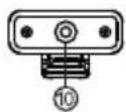
⑩ 1/4 Screw Hole
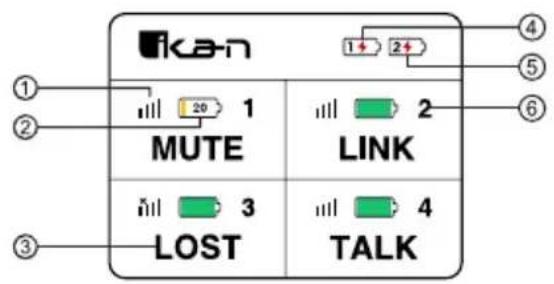
A
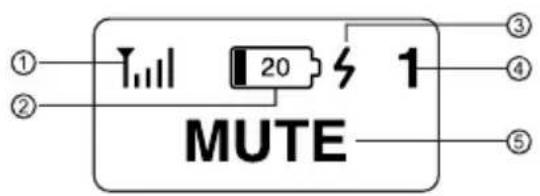
B
A BASE STATION
① Beltpack Signal Strength
② Beltpack Real-Time Battery Status
(Actual percentage will be displayed when the battery is lower than 20%)
③ Beltpack Current Status
④ F970 Battery 1 Low Battery Indicator
⑤ F970 Battery 2 Low Battery Indicator
⑥ Beltpack Number
B BELTPACK
① Beltpack Signal Strength
② Beltpack Real-Time Battery Status
(Actual percentage will be displayed when the battery is lower than 20%)
③ Battery Charging Indicator
④ Beltpack Number
⑤ Beltpack Current Status
flowchart
graph TD
    A["Mic Options"] --> B["Application"]
    C["4 Wire Setting"] --> D["System"]
    E["4 Wire Setting"] --> F["System"]
    G["Application"] --> H["Back"]
    I["4 Wire Setting"] --> J["Back"]
    K["System"] --> L["Reset"]
    M["Input Gain"] --> N["Back"]
    O["Output Gain"] --> P["Back"]
    Q["Reset"] --> R["OK"]
    S["Exit"] --> T["End"]
    U["Mic Type"] --> V["Dynamic"]
    U --> W["Electret"]
    X["Mic Gain"] --> Y["Back"]
    Z["Application"] --> AA["Quiet"]
    Z --> AB["Noisy"]
    AC["4 Wire Setting"] --> AD["Input Gain"]
    AC --> AE["Output Gain"]
    AF["Information"] --> AG["Back"]
    AH["4 Wire Input Gain(0)"]
    AH --> AI["Version(V1.0.6.12)"]
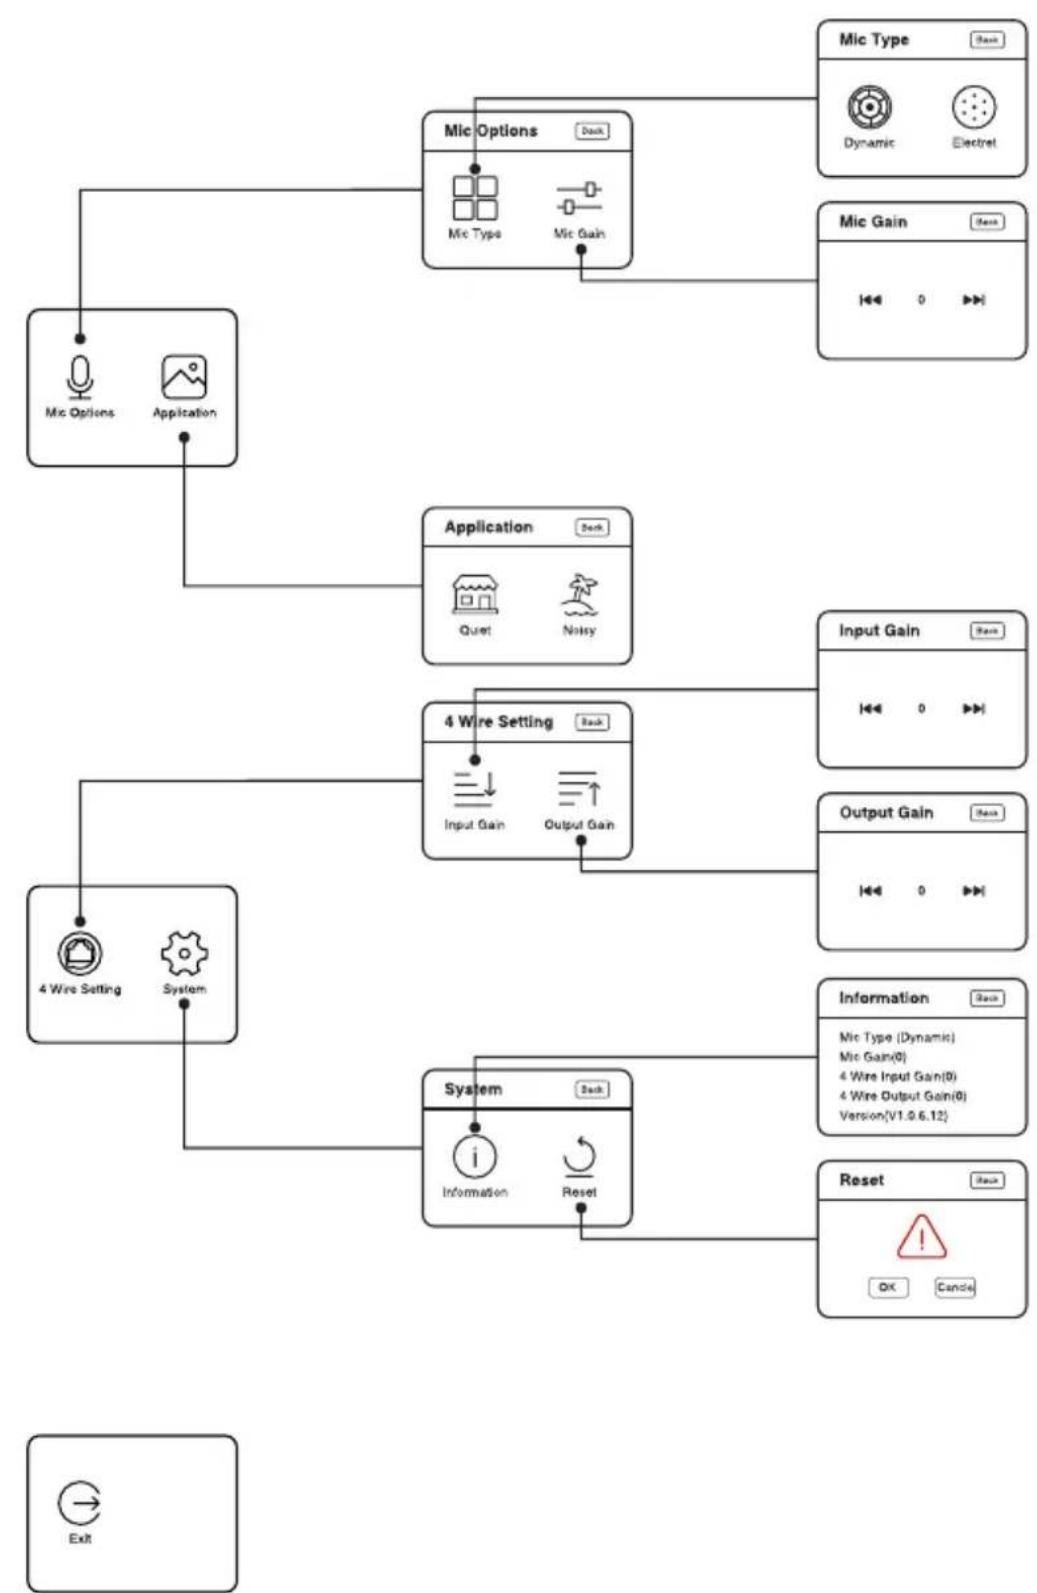
BASE STATION MENU FUNCTION INTRODUCTION
Long press the Menu/Confirm/OK button for about three seconds to enter the root menu, select the folder and press "OK" to enter the next menu. Each menu feature is introduced as follows.
1 Select "Mic Options" and press "OK" button to enter the secondary menu of Mic Setting
1.1. Select "Mic Type" and press "OK" to enter the third-level menu of Mic Setting;
1.1.1. Select "Dynamic" and press "OK" to switch to dynamic mic mode;
1.1.2. Select "Electret" and press "OK" to switch to electret mic mode;
1.2. Select "Mic Gain" and press "OK" to enter the third-level menu of Mic Gain Control;
1.2.1. Increase the mic gain, the beltpack will hear more sound while decrease the mic gain, the beltpack will hear less sound.
2 Select "Application" and press "OK" to enter the secondary menu of scene mode setting
2.1. Select "Quiet" and press "OK" when in a quiet environment;
2.2. Select "Noisy" and press "OK" when in a noisy environment.
3 Select "4 Wire Setting" and press "OK" to enter the secondary menu of 4 wire audio setting
3.1. Select "Input Gain" and press "OK" to enter the third-level menu of input gain adjustment;
3.1.1. Increase the gain, the 4 wire input sound will increase accordingly, and vice versa;
3.2. Select "Output Gain" and press "OK" to enter the third-level menu of output gain adjustment;
3.2.1. Increase the gain, the 4 wire output sound will increase accordingly, and vice versa.
4 Select "System" and press "OK" to enter the secondary menu of system setting
4.1. Select "Information" and press "OK" to enter the third-level menu of Information inquiry;
4.1.1. "Mic Type" displays the current mic type;
4.1.2. "Mic Gain" displays the current mic gain;
4.1.3. "Input Gain" displays the current 4 wire input gain;
4.1.4. "Output Gain" displays the current 4 wire output gain;
4.1.5. "Version" displays the current firmware version number;
4.2. Select "Reset" and press "OK", the confirmation alert to restore to factory setting will pop up on the screen;
4.2.1. Select "OK" and press "OK" to delete all beltpacks registration information and the base station will be restored to default setting.
5 Select "Exit" and press "OK" to return to the root menu

flowchart
graph TD
    A["Pair"] --> B["Application"]
    B --> C["Select ID Back"]
    C --> D["1 2 3 4"]
    E["Mic Type"] --> F["Battery"]
    G["Information"] --> H["Exit"]
    I["Application"] --> J["Back: Quiet Noisy"]
    K["Mic Type"] --> L["Back: Dynamic Electret"]
    M["Battery"] --> N["Back: Percentage 100%, Core: 2640, Version: 0048 925D"]
    O["Information"] --> P["Back: RSSI: 25%, Mic Type: Dynamic Application: Quiet Version: 1.2.4.0"]
Long press the "OK" button for about three seconds to enter the root menu, select the menu and press "OK" to enter the next level. Each menu feature is described as follows.
1 Select "Pair" and press "OK" button to enter the secondary menu of the registration feature
1.1. Connect the beltpack with the base station with a USB cable and select any ID from 1 to 4 then press "OK" to register the beltpack. "Pairing..." will be displayed on the main interface of the beltpack and the base station. Unplug the USB cable after "Pairing Successful" is displayed on the screen of both of them.
2 Select "Application" and press "OK" to enter the secondary menu of scene mode configuration
2.1. Select "Quiet" and press "OK" when in a quiet environment;
2.2. Select "Noisy" and press "OK" when in a noisy environment.
3 Select "Mic Type" and press the "OK" to enter the secondary menu of mic type selection
3.1. Select "Dynamic" and press "OK" to switch to the dynamic mic mode;
3.2. Select "Electret" and press "OK" to switch to the electret mic mode.
4 Select "Battery" and press "OK" to enter the secondary menu of the battery information interface
4.1. "Percentage" displays the current power percentage;
4.2. "Core" displays the current battery cell core version;
4.3. "Version" displays the current firmware version.
5 Select "Information" and press "OK" button to enter the secondary menu of system information inquiry
5.1. "RSSI" displays the current wireless signal strength;
5.2. "Mic Type" displays the current mic type setting;
5.3. "Application" displays the current scene mode setting;
5.4. "Version" displays the current firmware version.
6 Select "Exit" and press "OK" to return to the root menu
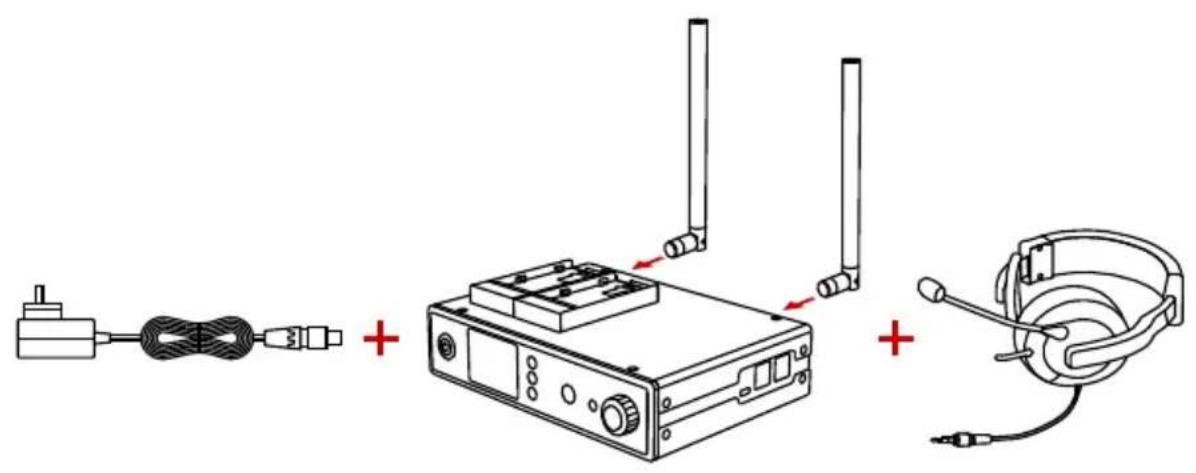
①
① Base Station Installation
- Install antennas as demonstrated.
- Connect the power adapter and the headset.
- Press the power switch to power it on.
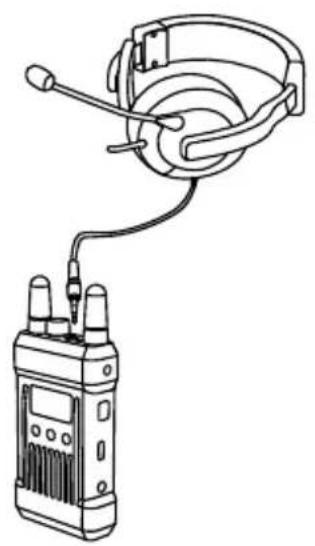
natural_image
Line drawing of a hand holding a headset connected to a walkie-talkie device (no text or symbols present)②
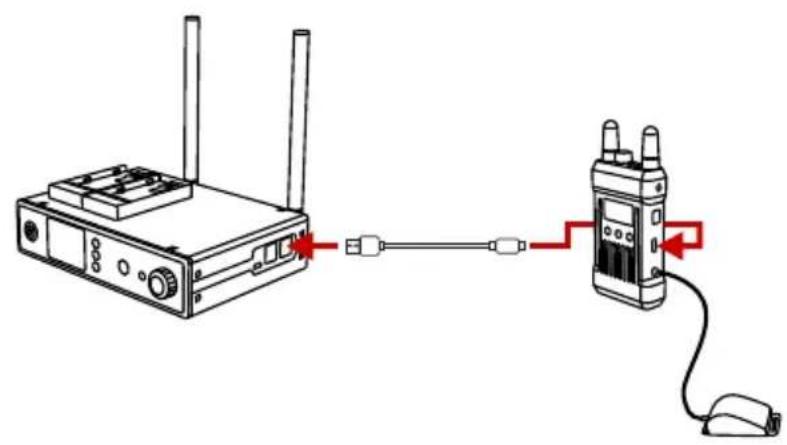
③
② Beltpack Installation
-
Connect headset as demonstrated.
-
Turn the power and volume control knob to turn on the beltpack.
-
When the status of the beltpack turns from "LOST" to "MUTE", long press the "MUTE/TALK" button on the side of the beltpack to switch it to "TALK" mode to communicate. If the beltpack operator doesn't want to talk with the base station, double click the "MUTE/TALK" button on the side of the beltpack to switch to "MUTE" mode. The beltpack operator can still hear the base station and other connected beltpacks under this mode.
-
Click the "REMOTE MIC KILL" button to mute all beltpacks if the base station operator doesn't want to hear from all beltpacks. When the indicator light is on, all beltpacks are switched to "MUTE" mode. Under this mode, beltpacks' operators can hear the base station but they cannot talk to each other and to the base station. If a beltpack operator wants to communicate with the base station, long press the "MUTE/TALK" button on the side of the beltpack to call the base station. The "REMOTE MIC KILL" button on base station will flash with a red light. Click the "REMOTE MIC KILL" button again to enable all beltpacks to switch back to "TALK" mode.
-
The default setting of mic is dynamic mic. Users can choose different types of mics based on different applications. Long press the menu button to enter the interface of mic setting and change the mic type to electret.
-
When connected with other intercom systems by 4 wire audio interfaces, users can enter the root menu and adjust input/output gain to reach gain balance for the whole intercom system.
-
Due to the noise differences in different applications, it may take some white noise to have better hearing experience. The background noise level can be adjusted by changing the "Application" in the root menu.
-
It is recommended that the users completely discharge the beltpack using the beltpack three times before, Since the battery has been in hibernation after a period of time.
③ Repairing
If any beltpack ID is lost while using the system resulted by incorrect operation or other reasons, connect the base station and the beltpack through the standard USB type-C data cable. Enter the pair menu and selects a master station vacancy ID for registration on the beltpack. "Pairing..." will appear on the main interface of the base station and the beltpack. Wait until "Pairing Successful" is displayed on the screen of both the base station and the beltpack before unplugging the cable. The beltpack will then be ready to use again.
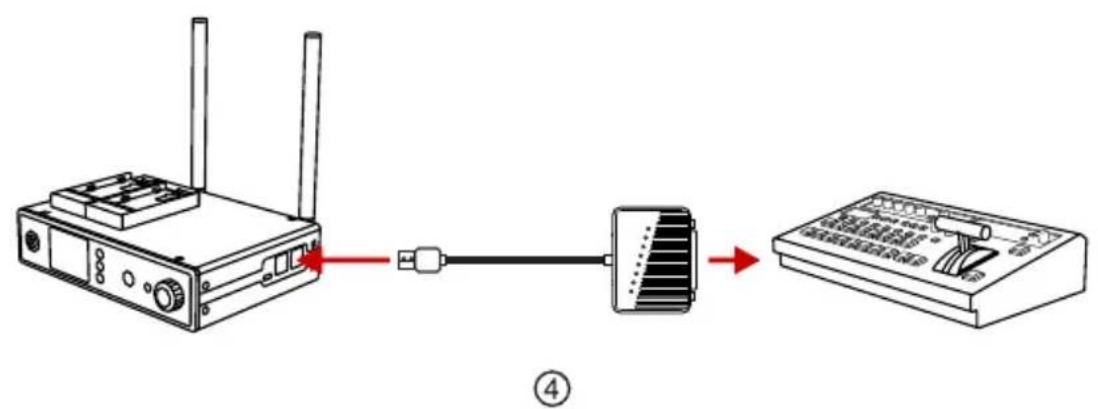
④ TALLY Features
TALLY universal signal converter is an optional accessory available on the market. It can help the product achieve the TALLY distribution feature. Please find the detailed user guide in the TALLY Universal Signal Converter Quick Guide.
| Base Station | Beltpack | |
| Interface | 2Antenna Interfaces4-Pin XLR Male DC Input3.5mm Headset InterfaceRJ45 Interface 4 wire audio interfaceUSB Type-C InterfaceDouble USB Type-A Interfaces | 2Antenna Interfaces3.5mm Headset Interface3.5mm TALLY Output InterfaceUSB Type-C Interface |
| Power Supply Mode | 7~36V DC; F970 Battery (Typical) | 1600mAh Polymer Lithium Battery |
| Frequency Response | 300Hz to 4KHz | 300Hz to 4KHz |
| Signal to Noise Ratio | >50dB | >50dB |
| Distortion | <2% | <2% |
| Transmission Range | 300m Between Beltpack and Base Station | 300m Between Beltpack and Base Station |
| Frequency Bandwidth | 1.9GHz | 1.9GHz |
| Modulation Mode | GFSK | GFSK |
| Transmission Power | Maximum 24dBm | Maximum 24dBm |
| Receiver Sensitivity | ≤-93dBm | ≤-93dBm |
| Bandwidth | 1.728MHz | 1.728MHz |
| Power Consumption | <4W | <0.7W |
| Dimension | (L*W*H): 220*170*50mm | (L*W*H): 100*58*22mm |
| Net Weight | 1400g | 180g |
| Temperature Range | 0~+40°C(working status)-20~+60°C(storage condition) | 0~+40°C(working status)-20~+60°C(storage condition) |
SAFETY NOTE
Do not place your beltpacks on heating equipment, cooking equipment, high-pressure containers (such as microwave ovens, induction cookers, electric ovens, heaters, pressure cookers, water heaters, gas stoves, etc.) to prevent the battery from overheating and exploding. The original mating type of charger, data cable, and battery must be used. Chargers, data cables, or batteries that are not certified by the manufacturer or not the companion model may cause electric shock, fire, explosion, or other hazards.
POOR AUDIO QUALITY
- First confirm whether the beltpack antennas are correctly installed and tightened. If there is no improvement, replace the antennas.
- Ensure that the beltpack and the base station are in the transmission range and there is no obstacle between the main station and the beltpack.
- Check if the volume of the beltpack is too low and turn it to a comfortable level.
- Due to the difference in impedance and setting bias, we generally don't recommend customers to use his own 4-stage 3.5mm headset. If the sound quality is poor, replace the headset.
BASE STATION CANNOT DISPLAY BELTPACK INFORMATION
- First confirm whether the beltpack antennas are correctly installed and tightened. If there is no improvement, replace the antennas.
- Check the status of the Beltpack. If "LOST" appears on the beltpack screen, make sure that the beltpack is within the transmission range from the base station.
- Check the status of the beltpack. If it is displayed as "NULL", it means that the beltpack information is lost due to incorrect operation, and it needs to be reregistered.
NO SOUND BETWEEN THE BASE STATION AND BELTPACK
- Confirm if the "REMOTE MIC KILL" button on the base Station is on. If the red light is on, click on it to turn it off.
- Check the current status on the beltpack screen. If it's on "MUTE", long press the "MUTE/TALK" button on the side to switch it to "TALK".
- Check if the headset functions well and if you wear the headset and mic properly. (correct way: put the headset on the head with the mic less than 10cm from your mouth)
TALLY FUNCTION UNAVAILABLE
- Confirm that the type of the switcher is correct. The TALLY interface definition is not unified on most switchers, so it will cause TALLY dysfunction;
- Due to various types of the switcher, high-level value will work when push the level switch to "High" on the TALLY signal universal converter; low-level value will work when push the level switch to "Low" on the TALLY signal universal converter;
- Confirm the ID of the beltpacks, and check if the TALLY converter connects with the USB Type-A interface on the base station correctly;
- The beltpack only supports external TALLY light. Confirm if the beltpack connects to an external TALLY correctly;
- DB25 INTERFACE AND TALLY INDICATOR WIRING RELATION TABLE
| Channel | Program | Preview | GND |
| TALLY 1 | PIN 1 | PIN 14 | PIN 13 |
| TALLY 2 | PIN 2 | PIN 15 | |
| TALLY 3 | PIN 3 | PIN 16 | |
| TALLY 4 | PIN 4 | PIN 17 | |
| TALLY 5 | PIN 5 | PIN 18 | |
| TALLY 6 | PIN 6 | PIN 19 | |
| TALLY 7 | PIN 7 | PIN 20 | |
| TALLY 8 | PIN 8 | PIN 21 |
ikan
Ikan International
11500 S. Sam Houston Pkwy West
Houston, TX 77031
TEL:+1.713.272.8822
FAX:+1.713.995.4994
SALES
Reseller and Consumer
sales@ikancorp.com
MARKETING
Sponsorship, Partnership, Brand Ambassadors, and Media
marketing@ikancorp.com
SUPPORT
Returns, exchanges, and general support
support@ikancorp.com
- KEY FEATURES
- APPLICATIONS
- OPTIONAL ACCESSORIES:
- (Not included in the standard packing list)
- A BASE STATION
- B BELTPACK
- BASE STATION MENU FUNCTION INTRODUCTION
- Select "Mic Options" and press "OK" button to enter the secondary menu of Mic Setting
- Select "Application" and press "OK" to enter the secondary menu of scene mode setting
- Select "4 Wire Setting" and press "OK" to enter the secondary menu of 4 wire audio setting
- Select "System" and press "OK" to enter the secondary menu of system setting
- ① Base Station Installation
- ② Beltpack Installation
- ③ Repairing
- ④ TALLY Features
- SAFETY NOTE
- POOR AUDIO QUALITY
- BASE STATION CANNOT DISPLAY BELTPACK INFORMATION
- NO SOUND BETWEEN THE BASE STATION AND BELTPACK
- TALLY FUNCTION UNAVAILABLE
- ikan
- Ikan International
- SALES
- MARKETING
- SUPPORT
Brand : Ikan
Model : Livecom1000
Category : Intercom