
HD11AU - Audio/video converter Blustream - Free user manual and instructions
Find the device manual for free HD11AU Blustream in PDF.


| Product Type | Audio/Video Converter (HDMI Audio Extractor/Embedder) |
| Brand | Blustream |
| Model | HD11AU |
| Dimensions (W x H x D) | 71 mm x 23 mm x 60 mm (without connectors); 83 mm x 23 mm x 60 mm (with connectors) |
| Shipping Weight | 0.4 kg |
| Power Supply | 5V DC, 1A (included) |
| Video Input | 1 x HDMI Type A |
| Video Output | 1 x HDMI Type A |
| Audio Input | 1 x Analogue left/right (3.5mm stereo jack) |
| Audio Output | 1 x Coaxial digital audio (RCA) & 1 x Analogue left/right (3.5mm stereo jack) |
| Max Video Resolution | 4K@60Hz 4:2:0 |
| HDCP Version | 1.4 |
| 3D Support | Yes |
| Audio De-embedding | Extracts up to 5.1ch audio from HDMI input to coaxial and analogue outputs |
| Audio Embedding | Replaces HDMI audio with analogue left/right input (embed mode) |
| EDID Management | 16 presets via DIP switches (including copy from display, 1080p/1080i/4K, various audio channels) |
| Mode Selection | DIP switches for de-embed or embed mode; forced HPD option |
| Operating Temperature | 32°F to 104°F (0°C to 40°C) |
| Storage Temperature | -4°F to 140°F (-20°C to 60°C) |
| Maintenance | Clean with soft dry cloth; do not use alcohol, paint thinner, or benzene |
| Safety | Use surge protection device recommended |
| Package Contents | HD11AU unit, 5V/1A DC power supply, mounting kit, user manual |
| Certifications | FCC Class B, ICES-003 |
Frequently Asked Questions - HD11AU Blustream
User questions about HD11AU Blustream
0 question about this device. Answer the ones you know or ask your own.
Ask a new question about this device
Download the instructions for your Audio/video converter in PDF format for free! Find your manual HD11AU - Blustream and take your electronic device back in hand. On this page are published all the documents necessary for the use of your device. HD11AU by Blustream.
USER MANUAL HD11AU Blustream
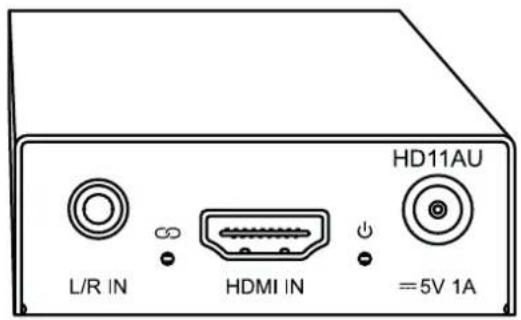
HD11AU
User Manual
Thank you for purchasing this product.
For optimum performance and safety, please read these instructions carefully before connecting, operating or adjusting this product. Please keep this manual for future reference.

Surge protection device recommended
This product contains sensitive electrical components that may be damaged by electrical spikes, surges, electric shock, lightning strikes, etc. Use of surge protection systems is highly recommended in order to protect and extend the life of your equipment.
Contents
Introduction 03
Features 03
Panel Descriptions 04
Specifications 05
Package Contents 05
Maintenance 05
Certifications 05
Schematics 06-07
Introduction
Our HD11AU is the perfect solution for either de-embedding or embedding audio within the HDMI signal path. This solution allows you to breakout up to 5.1ch audio signals.
Connect the HD11AU between your source and display via HDMI, then select whether de-embedding or embedding audio is required.
FEATURES:
- Extract audio from the HDMI video input
- Extract audio with or without an actual display connected
- Provides both coaxial digital and analogue left / right audio outputs concurrently
- Can remove the audio from the HDMI input signal and embed analogue left / right audio to the HDMI output signal
- Analogue left / right out supports 2ch PCM input signal only
• Support 3D video & 4K 60Hz 4:2:0 - HDCP 1.4 compatible
- Small compact size
Panel Descriptions
Front Panel
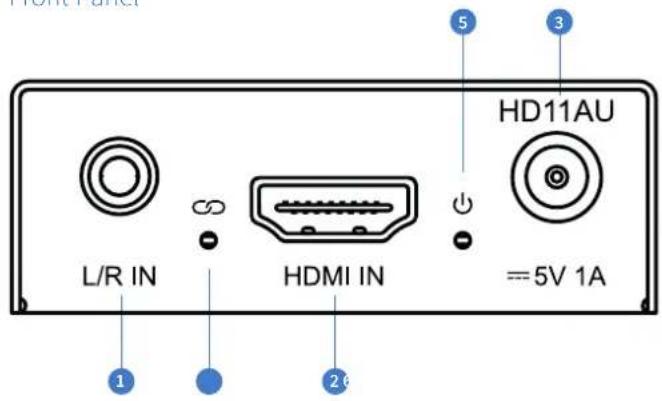
1 Left / Right Analogue audio input - 3.5mm Stereo jack
2 HDMI input
3 Power port – Use supplied 5V / 1A DC adaptor
4 HDMI input status – Lit when HDMI signal detected
5 Power status – Lit when unit is powered
6 Coaxial digital output – Used when audio is de-embedded from HDMI
Back Panel
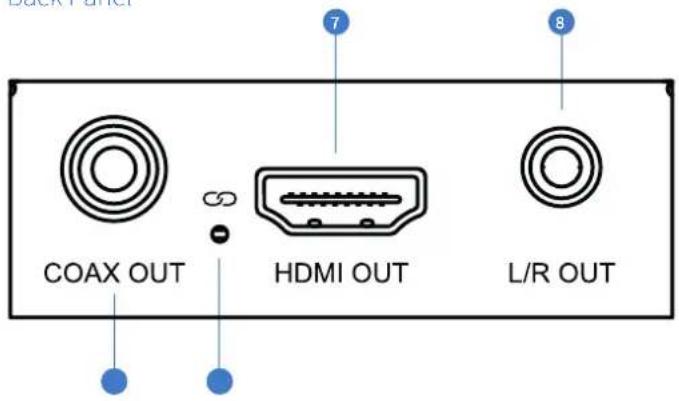
7 HDMI output
8 Left / Right Analogue audio output. Extract audio from HDMI input and convert to 2ch. NOTE: Source audio must be PCM
9 HDMI output status – Lit when HDMI signal detected
Side Panel
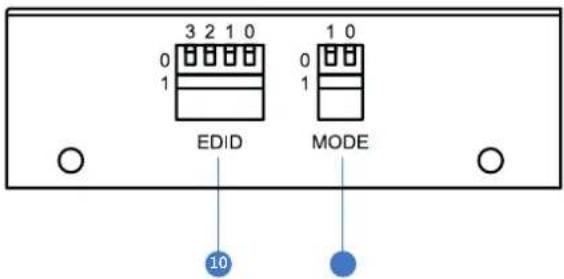
10 EDID management DIP switches – See adjacent table for settings
11 Mode Dip switches – See information below for mode settings
Mode Selection DIP Switches
Dip Switch 1 = 0: Input HDMI HPD (Hot Plug Detected depends on output HDMI HPD
Dip Switch 1 = 1: Input HDMI HPD forced high (for installations where no output device is connected)
Dip Switch 0 = 0: HDMI audio de-embed mode
Dip Switch 0 = 1: Analogue audio embed mode - removes the audio from HDMI input signal and embeds the analogue L/R audio input onto the HDMI output signal
EDID Management DIP Switches
| 3 2 1 0 EDID Type | |||
| Combination of DIP Positions | |||
| 0 0 0 0 Copy EDID from Display | |||
| 0 0 0 1 1080p 2.0ch | |||
| 0 0 1 0 1080p 5.1ch | |||
| 0 0 1 1 1080p 7.1ch | |||
| 0 1 0 0 1080i 2.0ch | |||
| 0 1 0 1 1080i 5.1ch | |||
| 0 1 1 0 1080i 7.1ch | |||
| 0 1 1 1 1080p 3D 2.0ch | |||
| 1 0 0 0 1080p 3D 5.1ch | |||
| 1 0 0 1 1080p 3D 7.1ch | |||
| 1 0 1 0 4K60 4:2:0 2.0ch | |||
| 1 0 1 1 4K60 4:2:0 5.1ch | |||
| 1 1 0 0 4K60 4:2:0 7.1ch | |||
| 1 1 0 1 DVI 1280x1024 (no audio) | |||
| 1 1 1 0 DVI 1920x1080 (no audio) | |||
| 1 1 1 1 DVI 1920x 1200 (no audio) | |||
Specifications
Audio Input Connectors: 1 x Analogue left / right audio (3.5mm stereo jack)
Audio Output Connectors: 1 x Coaxial digital audio & 1 x Analogue left / right audio (3.5mm stereo jack)
Video Input Connectors: 1 x HDMI Type A
Video Output Connectors: 1 x HDMI Type A
Casing Dimensions (W x H x D): 71mm x 23mm x 60mm
Dimensions Including Connections (W x H x D): 83mm x 23mm x 60mm
Shipping Weight: 0.4kg
Operating Temperature: 32°F to 104°F (0°C to 40°C)
Storage Temperature: -4°F to 140°F (-20°C to 60°C)
Package Contents
- 1×HD11AU
- 1 x 5V/1A DC Power Supply
- 1x Mounting Kit
- 1x User Manual
Maintenance
Clean this unit with a soft, dry cloth. Never use alcohol, paint thinner or benzene to clean this unit.
Certifications
FCC NOTICE
This equipment has been tested and found to comply with the limits for a Class B digital device, pursuant to part 15 of the FCC Rules. These limits are designed to provide reasonable protection against harmful interference in a residential installation. This equipment generates, uses, and can radiate radio frequency energy and, if not installed and used in accordance with the instructions, may cause harmful interference to radio communications. However, there is no guarantee that interference will not occur in a particular installation. If this equipment does cause harmful interference to radio or television reception, which can be determined by turning the equipment off and on, the user is encouraged to try to correct the interference by one or more of the following measures:
• Reorient or relocate the receiving antenna.
- Increase the separation between the equipment and receiver.
- Connect the equipment into an outlet on a circuit different from that to which the receiver is connected.
- Consult the dealer or an experienced radio/TV technician for help.
CAUTION - changes or modifications not expressly approved by the party responsible for compliance could void the user's authority to operate the equipment.
CANADA, INDUSTRY CANADA (IC) NOTICES
This Class B digital apparatus complies with Canadian ICES-003.
Operation is subject to the following two conditions: (1) this device may not cause interference, and (2) this device must accept any interference, including interference that may cause undesired operation of the device.
CORRECT DISPOSAL OF THIS PRODUCT
This marking indicates that this product should not be disposed with other household wastes. To prevent possible harm to the environment or human health from uncontrolled waste disposal, recycle it responsibly to promote the sustainable reuse of material resources. To return your used device, please use the return and collection systems or contact the retailer where the product was purchased. They can take this product for environmentally safe recycling.
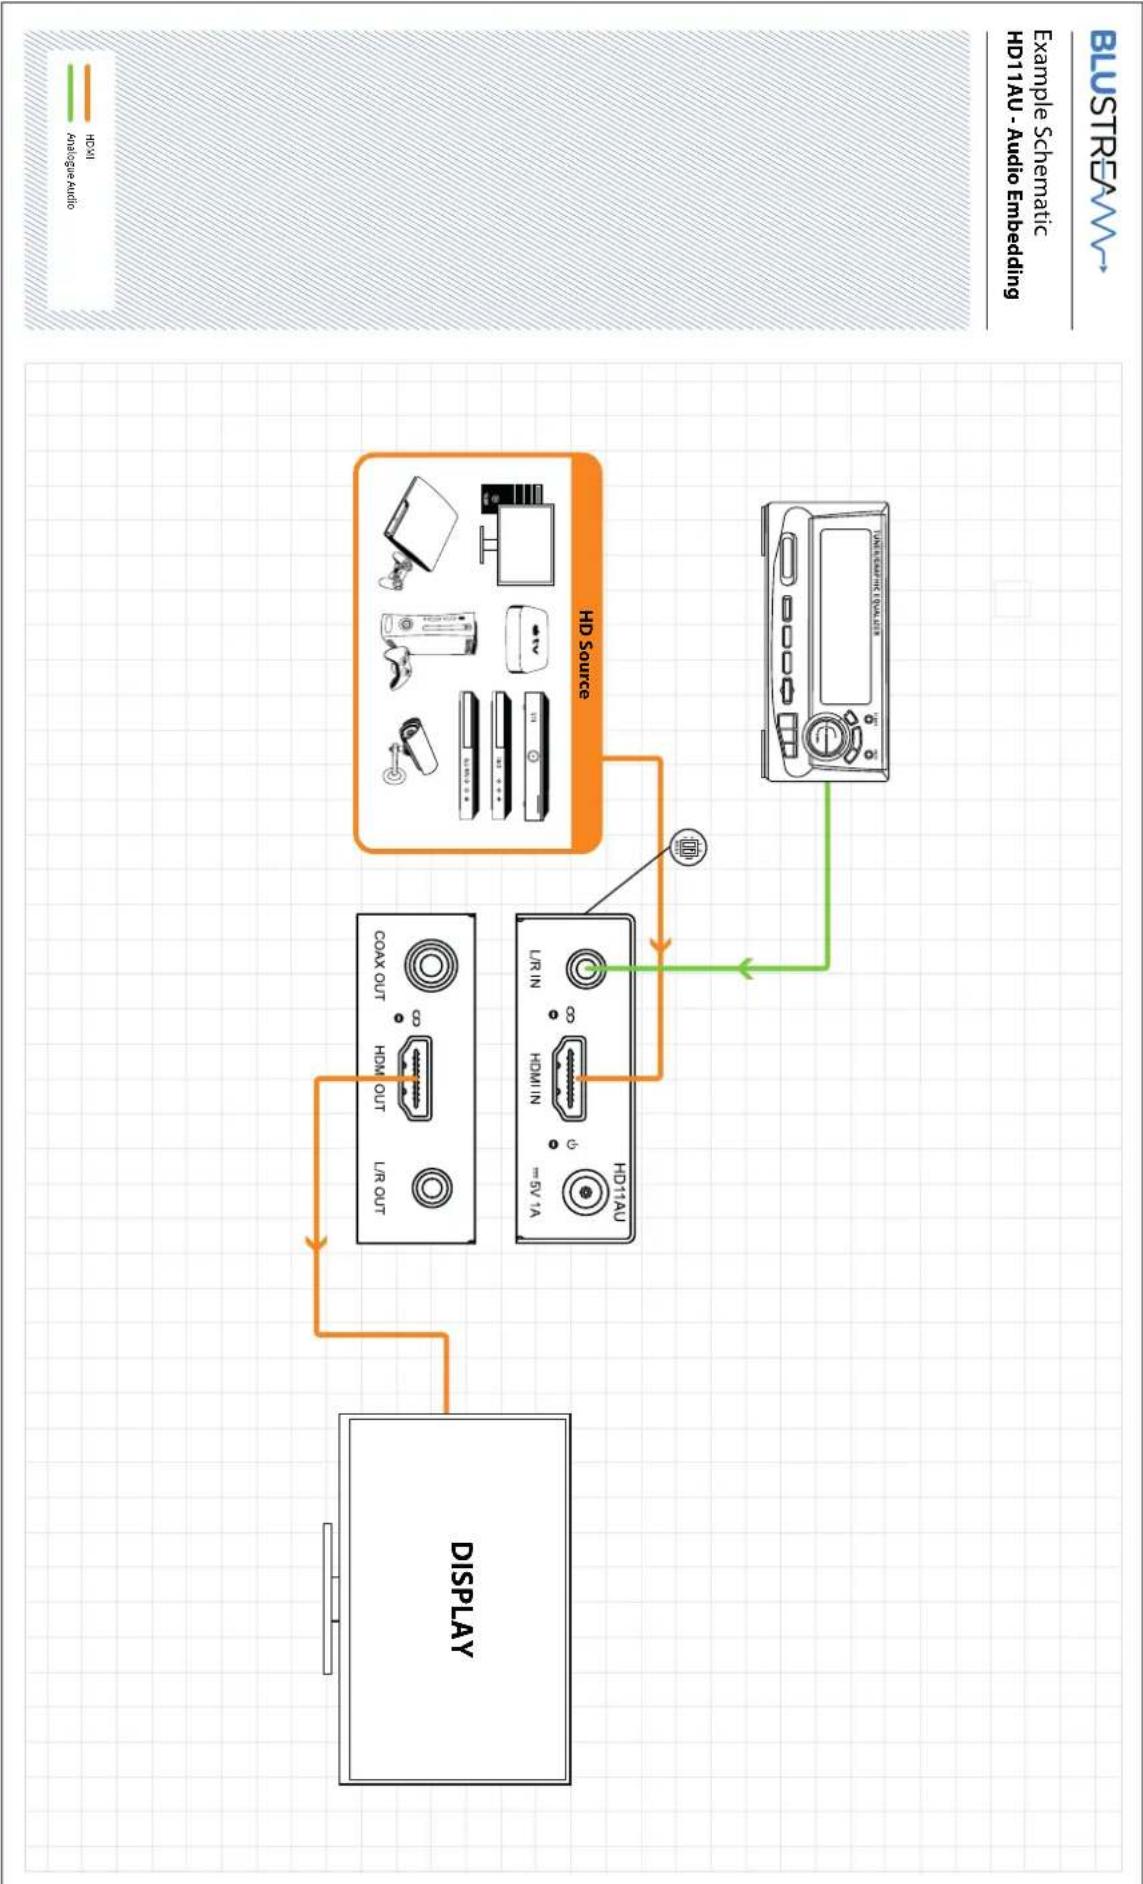
flowchart
graph TD
    A["Display"] --> B["HDA Source"]
    B --> C["HD Source"]
    C --> D["Display"]
    style A fill:#f9f,stroke:#333
    style B fill:#ccf,stroke:#333
    style C fill:#cfc,stroke:#333
    style D fill:#fcc,stroke:#333
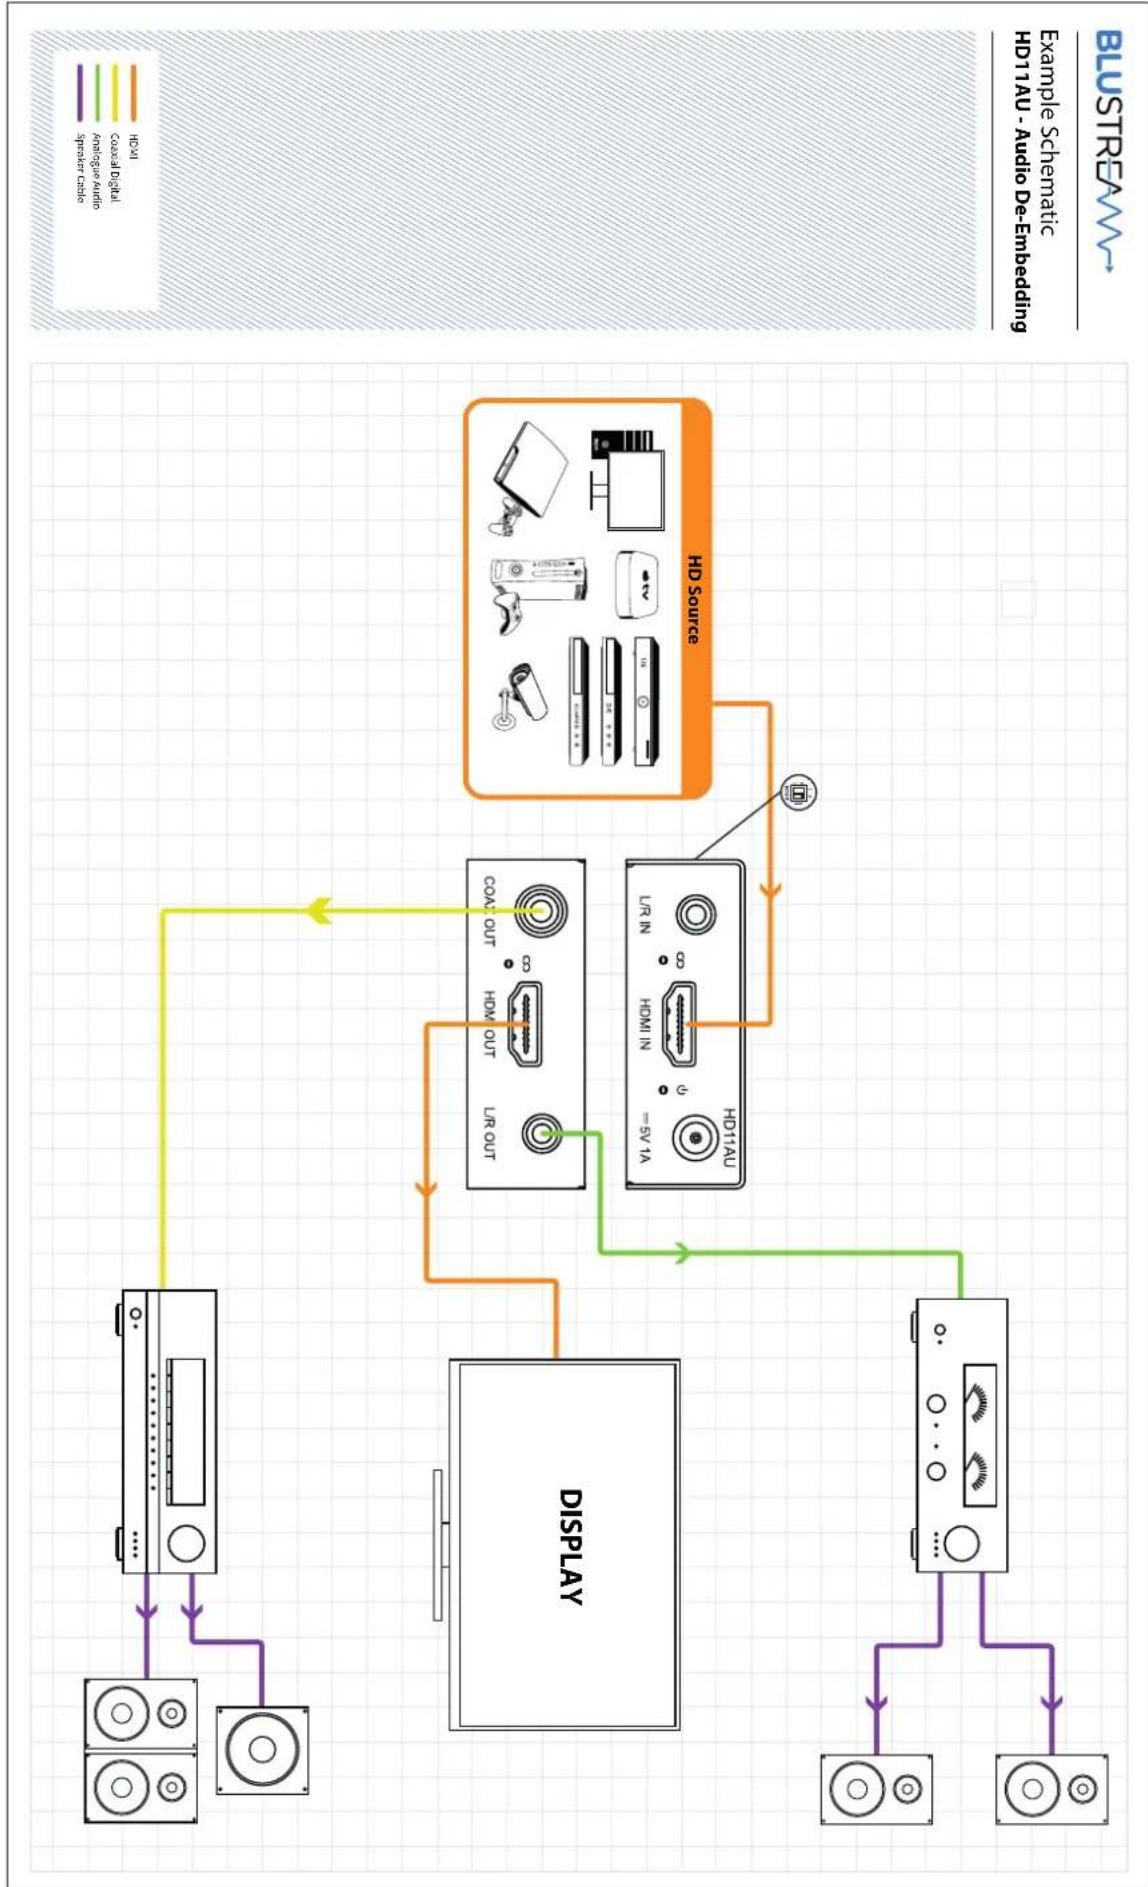
flowchart
graph TD
    A["Speaker"] --> B["Display"]
    C["Audio"] --> B
    B --> D["Audio Out"]
    D --> E["HD Source"]
    E --> F["Output"]
    G["Speaker"] --> H["Audio Out"]
    I["Audio"] --> H
    H --> J["Output"]
    K["Speaker"] --> L["Audio Out"]
    M["Audio"] --> L
    L --> N["Output"]
    O["Speaker"] --> P["Audio Out"]
    Q["Audio"] --> P
    P --> R["Output"]
    S["Speaker"] --> T["Audio Out"]
    U["Audio"] --> T
    T --> V["Output"]
    W["Speaker"] --> X["Audio Out"]
    Y["Audio"] --> X
    X --> Z["Output"]
    style A fill:#f9f,stroke:#333
    style C fill:#f9f,stroke:#333
    style I fill:#f9f,stroke:#333
    style M fill:#f9f,stroke:#333
    style Q fill:#f9f,stroke:#333
    style U fill:#f9f,stroke:#333
    style S fill:#f9f,stroke:#333
    style W fill:#f9f,stroke:#333
    style X fill:#f9f,stroke:#333
    style Y fill:#f9f,stroke:#333
    style Z fill:#f9f,stroke:#333
- HD11AU
- Thank you for purchasing this product.
- Surge protection device recommended
- Contents
- Introduction
- FEATURES:
- Panel Descriptions
- Mode Selection DIP Switches
- Specifications
- Package Contents
- Maintenance
- Certifications
- FCC NOTICE
- CANADA, INDUSTRY CANADA (IC) NOTICES
- CORRECT DISPOSAL OF THIS PRODUCT
Brand : Blustream
Model : HD11AU
Category : Audio/video converter