
Traktor Audio 2 - Hi-Fi System NATIVE INSTRUMENTS - Free user manual and instructions
Find the device manual for free Traktor Audio 2 NATIVE INSTRUMENTS in PDF.


| Product Type | DJ Audio Interface |
| Brand | Native Instruments |
| Model | Traktor Audio 2 (MK2) |
| Dimensions | 84.3 x 55 x 16.2 mm (3.3 x 2.17 x 0.63 in) |
| Weight | 68 g (0.15 lbs) |
| Power Supply | USB bus power (5V, 500mA); optional external power supply for iOS |
| Audio Converters | 24-bit, 44.1/48 kHz sample rate |
| Outputs | 2 stereo 1/8" (3.5mm) sockets: MAIN and Headphones |
| Headphone Output | Supports 80-6000Ω impedance, dedicated volume encoder |
| Cue Mix Control | Blend between main mix and cue signal in headphones |
| Driver Support | ASIO, Core Audio, DirectSound, WASAPI (Windows driver required) |
| Compatibility | Windows, macOS, iOS (with TRAKTOR DJ app) |
| Included Accessories | Mini USB cable, iOS connection cable, registration flyer |
| Cleaning | Clean with a soft, dry cloth. Do not use liquids or solvents. |
| Safety | Avoid exposure to high humidity or direct sunlight. Keep volume at safe levels to prevent hearing damage. |
| Spare Parts | No user-replaceable parts. Contact Native Instruments support for repairs. |
| Reparability | Not user-serviceable. Return to manufacturer for service. |
| Operating Temperature | +5 to +35°C (41 to 95°F) |
Frequently Asked Questions - Traktor Audio 2 NATIVE INSTRUMENTS
User questions about Traktor Audio 2 NATIVE INSTRUMENTS
0 question about this device. Answer the ones you know or ask your own.
Ask a new question about this device
Download the instructions for your Hi-Fi System in PDF format for free! Find your manual Traktor Audio 2 - NATIVE INSTRUMENTS and take your electronic device back in hand. On this page are published all the documents necessary for the use of your device. Traktor Audio 2 by NATIVE INSTRUMENTS.
USER MANUAL Traktor Audio 2 NATIVE INSTRUMENTS
Manual

The information in this document is subject to change without notice and does not represent a commitment on the part of Native Instruments GmbH. The software described by this document is subject to a License Agreement and may not be copied to other media. No part of this publication may be copied, reproduced or otherwise transmitted or recorded, for any purpose, without prior written permission by Native Instruments GmbH, hereinafter referred to as Native Instruments.
“Native Instruments”, “NI” and associated logos are (registered) trademarks of Native Instruments GmbH.
Mac, Mac OS, GarageBand, Logic, iTunes, iPod, iPad, OSX, are registered trademarks of Apple Inc, registered in the U.S. and other countries. iOS is a trademark or registered trademark of Cisco in the U.S. and other countries, where it is used under license.
Windows, Windows Vista and DirectSound are registered trademarks of Microsoft Corporation in the United States and/or other countries.
All other trade marks are the property of their respective owners and use of them does not imply any affiliation with or endorsement by them.
Document authored by: Christian Schulz
Software version: 2.9 (10/2015)
Hardware version: TRAKTOR AUDIO 2 MK2
Special thanks to the Beta Test Team, who were invaluable not just in tracking down bugs, but in making this a better product.
NATIVE INSTRUMENTS GmbH
© NATIVE INSTRUMENTS GmbH, 2015. All rights reserved.
Table of Contents
1 Welcome to TRAKTOR AUDIO 2 .... 7
1.1 About this Manual 7
1.2 Setup Overview 8
1.3 What is included in the Box? 9
1.4 Document Conventions 9
2 System and Power Requirements 11
2.1 Power Requirements 11
2.2 Software System Requirements 11
3 TRAKTOR AUDIO 2 at a Glance 12
3.1 Hardware Overview 12
3.2 Using the TRAKTOR AUDIO 2 (Setup Scenarios) 15
3.2.1 Overview of Internal Mixer Mode 15
3.2.2 Overview of External Mixer Mode 18
4 Using TRAKTOR AUDIO 2 with Your Computer 21
4.1 Setting up Your System for Internal Mixer Mode 21
4.1.1 Connecting TRAKTOR AUDIO 2 to Your Computer 22
4.1.2 Connecting Headphones to Your TRAKTOR AUDIO 2 23
4.1.3 Connecting an Amplification System to Your TRAKTOR AUDIO 2 23
4.1.4 Final Preparations in TRAKTOR 24
4.2 Setting up Your System for External Mixer Mode 26
4.2.1 Connecting TRAKTOR AUDIO 2 to Your Computer 26
4.2.2 Connecting TRAKTOR AUDIO 2 to Your DJ Mixer 27
4.2.3 Connecting Headphones to Your DJ Mixer 29
4.2.4 Connecting an Amplification System to Your DJ Mixer 29
4.2.5 Final Preparations in TRAKTOR 30
5 Using TRAKTOR AUDIO 2 with Your iOS Device 32
5.1 Setting up Your System for Internal Mixer Mode 33
5.1.1 Connecting TRAKTOR AUDIO 2 to Your iOS Device 33
5.1.2 Connecting Headphones to Your TRAKTOR AUDIO 2 35
5.1.3 Connecting an Amplification System to Your TRAKTOR AUDIO 2 36
5.1.4 Final Preparations in TRAKTOR DJ 36
5.2 Setting up Your System for External Mixer Mode 37
5.2.1 Connecting TRAKTOR AUDIO 2 to Your iOS Device 37
5.2.2 Connecting TRAKTOR AUDIO 2 to Your DJ Mixer 39
5.2.3 Connecting Headphones to Your DJ Mixer 41
5.2.4 Connecting an Amplification System to Your DJ Mixer 41
5.2.5 Final Preparations in TRAKTOR DJ 42
6 Using TRAKTOR AUDIO 2 as Your Computer's Default Audio Output Device .... 45
6.1 Driver Software Installation on Windows 46
6.2 Connecting TRAKTOR AUDIO 2 to Your Computer ....47
6.3 Connecting Headphones to Your TRAKTOR AUDIO 2 48
6.4 Connecting an Amplification System to Your TRAKTOR AUDIO 2 49
6.5 Final Steps on Mac OS X 50
6.6 Final Steps on Windows 51
6.7 Using TRAKTOR AUDIO 2 as Audio Output Device with Your Music Software .... 51
7 Advanced Configuration of Your TRAKTOR AUDIO 2 53
7.1 Advanced Configuration on Windows (Control Panel) 53
7.1.1 Audio Settings Page 54
7.1.2 Diagnostics Page 57
7.2 Advanced Configuration on Mac OS X 60
8 Troubleshooting and FAQ 62
8.1 Solving Hardware-related Problems 62
8.2 How to Check Whether the TRAKTOR AUDIO 2 Drivers are Installed on Windows Correctly ..... 63
8.3 USB Troubleshooting 63
8.4 Physically Re-configuring the TRAKTOR AUDIO 2 64
8.5 Check your IRQs (Windows only) 64
8.6 Installation Folder Not Found by an Update Installer 65
8.7 Audio Clicks and Drop-outs When Playing Tracks 65
8.8 More Troubleshooting Resources 65
9 Additional Documentation Resources 66
9.1 Further Documentation Resources 66
9.2 Knowledge Base / Readme / Online Support 66
9.3 Forum 67
9.4 Updates 67
10 Technical Specifications 68
11 Hardware Returns....70
1 Welcome to TRAKTOR AUDIO 2
Thank you for purchasing the TRAKTOR AUDIO 2 audio interface. It is the ultimate hardware complement for a variety of home studio and DJ applications. The TRAKTOR AUDIO 2 provides the following features:
- Ultra-portable audio interface for your computer or iOS device
• 24-bit/48 kHz pro sound quality - Cue and monitor – pre-listen to the next track
- Send two stereo tracks to separate mixer channels
- Two high-quality balanced audio output 18" (3.5mm)-sockets
• ASIO, Core Audio, DirectSound and WASAPI driver support - Increase TA2 volume output and charge your iOS devices with optional power supply
1.1 About this Manual
This manual will guide you through the basic steps you need to take to set up your TRAKTOR AUDIO 2 audio interface. After reading it, you should be able to start using TRAKTOR AUDIO 2 with the TRAKTOR software, the TRAKTOR DJ app, or as your computer's default audio output device. We recommend that you take the time to read this guide in its entirety.
With TRAKTOR or TRAKTOR DJ already installed, you will simply need to update to the latest software version. You can find detailed information on how to update TRAKTOR on your computer in TRAKTOR's Setup Guide. To update TRAKTOR DJ on your iOS device, download the latest version from the Apple App Store.
It is also suggested that you read the subsequent sections to understand how to configure the TRAKTOR AUDIO 2 audio interface with your computer or iOS device, whilst acknowledging potential Setup options, and further information available to you.
1.2 Setup Overview
This section provides a quick overview of the various steps required to get your TRAKTOR AUDIO 2 up and running, all of which will be described in greater detail in further sections of this manual.
- Using TRAKTOR AUDIO 2 with Your Computer: For Internal Mixer Mode, connect the TRAKTOR AUDIO 2 audio interface to your computer, and connect headphones and an amplification system to it. For External Mixer Mode, connect the TRAKTOR AUDIO 2 audio interface to your computer and a DJ mixer.
For more information on Internal and External mixer modes see section 3.2 , Using the TRAKTOR AUDIO 2 (Setup Scenarios).
For detailed instructions on setting up TRAKTOR AUDIO 2 with your computer, see section↑4, Using TRAKTOR AUDIO 2 with Your Computer.
- Using TRAKTOR AUDIO 2 with Your iOS device: For Internal Mixer Mode, connect the TRAKTOR AUDIO 2 audio interface to your iOS device, and connect headphones and an amplification system to it. For External Mixer Mode, connect the TRAKTOR AUDIO 2 audio interface to your iOS device and a DJ mixer.
For detailed instructions on setting up TRAKTOR AUDIO 2 with your iOS device, see section↑5, Using TRAKTOR AUDIO 2 with Your iOS Device.
- Using TRAKTOR AUDIO 2 as Your Computer's Default Audio Output Device: Connect the TRAKTOR AUDIO 2 audio interface to your computer, connect headphones and an amplification system to it. Then adjust the settings in your computer's system preferences.
For detailed instructions on using TRAKTOR AUDIO 2 as your computer's default audio output device, see section ↑6, Using TRAKTOR AUDIO 2 as Your Computer's Default Audio Output Device.
- Advanced Configuration of Your TRAKTOR AUDIO 2: The advanced configuration settings of the TRAKTOR AUDIO 2 can be accessed in the Control Panel software of Windows, or in the Audio MIDI Setup menu on OS X. For detailed instructions on how to access the advanced configuration settings, see section ↑7, Advanced Configuration of Your TRAKTOR AUDIO 2.
1.3 What is included in the Box?
The TRAKTOR AUDIO 2 box contains the following items:
• The TRAKTOR AUDIO 2 audio interface
- The Mini USB cable
- The Native Instruments iOS device connection cable
- The registration flyer with your TRAKTOR LE 2 software serial number, your TRAKTOR AUDIO 2 hardware serial number, and a link to the hardware registration page, where you can register your hardware and download the TRAKTOR LE 2 software
• The Safety Instructions Flyer
1.4 Document Conventions
This document uses particular formatting to point out special facts and to warn you of potential issues. The icons introducing the following notes let you see what kind of information can be expected:

Whenever this exclamation mark icon appears, you should read the corresponding note carefully and follow the instructions and hints given there if applicable.

This light bulb icon indicates that a note contains useful extra information. This information may often help you to solve a task more efficiently, but does not necessarily apply to the setup or operating systems you are using; however, it's always worth a look.
Furthermore, the following formatting is used:
- Text appearing in (drop-down) menus (such as Open..., Save as...) and paths to locations on your hard drive or other storage devices is printed in italics.
-
Text referring to elements appearing on the screen (labels of buttons, controls, text next to checkboxes, etc.) is printed in light blue. Whenever you see this formatting applied, you will find the same text appearing on your computer screen.
-
Text referring to elements printed on hardware is formatted orange. Whenever you see this formatting applied, you will find the same text appearing on the hardware.
- Important names and concepts are printed in bold.
▶ Single instructions are introduced by this play button type arrow.
→ Results of actions are introduced by this smaller arrow.
Naming Convention
Throughout the documentation, we will refer to the TRAKTOR AUDIO 2 hardware whether as "TRAKTOR AUDIO 2" or abbreviate "TA2."
2 System and Power Requirements
2.1 Power Requirements
When using the TA2 with your computer, the device will be powered by the standard USB connection.
When using the TA2 with TRAKTOR DJ on your iOS device, it will receive power from the iOS device in order to function. Running the iOS device off battery power with the TA2 connected will considerably reduce battery life. In order to allow longer mixing sessions, it is recommended to use the optional power supply (which can be purchased separately in the Native Instruments Online Shop) to power the audio interface. This power supply will also charge the battery of the connected iOS device.
2.2 Software System Requirements
For the minimum system requirements your computer needs to meet, see the TRAKTOR specifications section of the Native Instruments website:
http://www.native-instruments.com/en/products/traktor/dj-software/traktor-pro-2/specifications/.
To check the compatibility with several operating systems, please have a look at: http://www.native-instruments.com/compatibility.
3 TRAKTOR AUDIO 2 at a Glance
This section will provide you with an overview of the hardware components on the TA2. It also explains both setup scenarios, Internal Mixer Mode and External Mixer Mode when used either with computer or iOS device.
3.1 Hardware Overview
Top Panel
The image below shows a view of the top panel of the TA2.
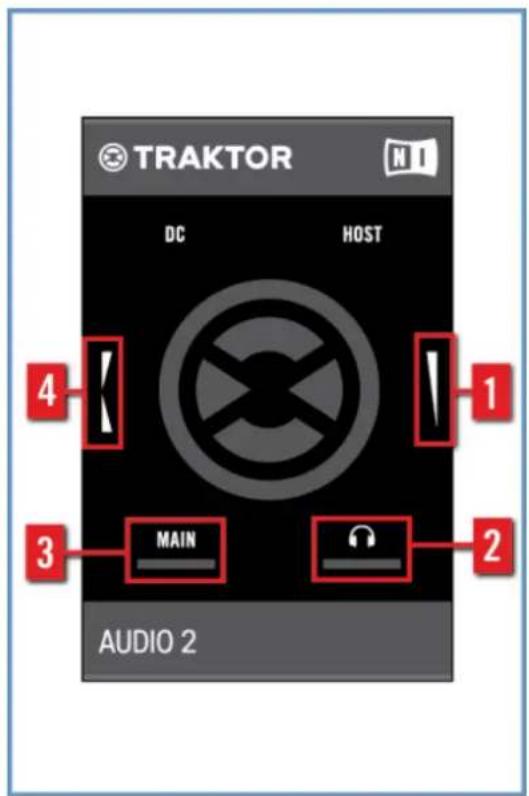
Top view of the TA2.
(1) Headphones Volume Encoder: This encoder controls the volume of the Headphones output. When the software is set to External Mixing Mode, this encoder will be ignored by the software.
(2) Headphones Signal Indicator: This LED will light in relation to the Headphones' output level. When the output level is higher the LED will be brighter.
(3) MAIN Signal Indicator: This LED will light in relation to the output level of the MAIN output. When the output level is higher the LED will be brighter.
(4) Cue Mix Encoder: This encoder is used to control the mix heard in headphones. When moving the encoder towards the rear of the TA2, you will hear more of the headphone/cue signal in the headphones. Moving the encoder towards the front of the unit results in hearing more of the Main output in the headphones. When TRAKTOR or TRAKTOR DJ is used in External Mixer Mode, the encoder will have no function.
Front Panel
The image below shows a view of the front panel of the TA2.
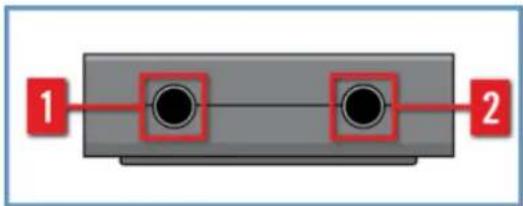
natural_image
Diagram of a mechanical component with two circular holes and red arrows indicating direction (no text or symbols)Front panel of the TA2.
(1) MAIN Output socket: This stereo 18 " socket is for connecting speakers or an amplification system when using in Internal Mixing Mode, or for connecting to a DJ mixer channel when using in External Mixer Mode. This output is always running at full volume.
(2) Headphones Output socket: This stereo 18 " socket is for connecting a set of stereo headphones when using in Internal Mixing Mode, or for connecting to a DJ mixer channel when using in External Mixer Mode.
Rear Panel
The image below shows a view of the rear panel of the TA2.
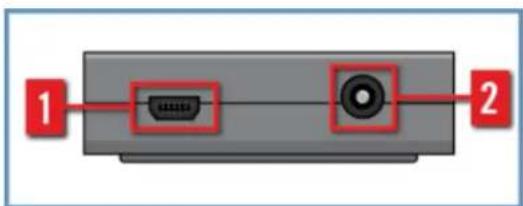
natural_image
Diagram of a device with two labeled ports (1 and 2) connected by red lines, showing internal components without any text or symbols.Rear panel of the TA2.
(1) Mini USB Socket: This socket connects the TRAKTOR AUDIO 2 to your computer or iOS device. The computer's USB connection handles data transmission and provides bus power to your TRAKTOR AUDIO 2. No external power supply is required.

The Mini USB socket is a special socket designed for use with the included USB cables. It is recommended to only use the included cables to connect TA 2.
(2) DC Power Socket: When using the TRAKTOR AUDIO 2 with an iOS device, it is recommended to use the optional power supply to provide power to the iOS device.
3.2 Using the TRAKTOR AUDIO 2 (Setup Scenarios)
The TRAKTOR AUDIO 2 addresses two specific use-cases when used with TRAKTOR or TRAKTOR DJ: Internal Mixer Mode and External Mixer Mode.
Both use-cases employ two stereo outputs, but the signals assigned to those outputs differ. Additionally, the purposes of the encoders change depending on the use-case. You can find more information in the following section 3.2.2 , Overview of External Mixer Mode and 3.2.1 , Overview of Internal Mixer Mode.
Furthermore, the TRAKTOR AUDIO 2 works as a class-compliant audio interface for Windows and Mac OS X.

A driver is required for Windows and needs to be downloaded from the Native Instruments website if TRAKTOR software is not installed.
3.2.1 Overview of Internal Mixer Mode
When TRAKTOR or TRAKTOR DJ is used in Internal Mixer Mode, the MAIN output will be dedicated to the Main Mix and the Headphones output is used for headphones.
The two encoders will affect the Headphones output – one encoder will control the volume of the headphones while the other encoder controls the Cue Mix (whether the DJ hears the Cued track, the Main Mix, or a blend of both).
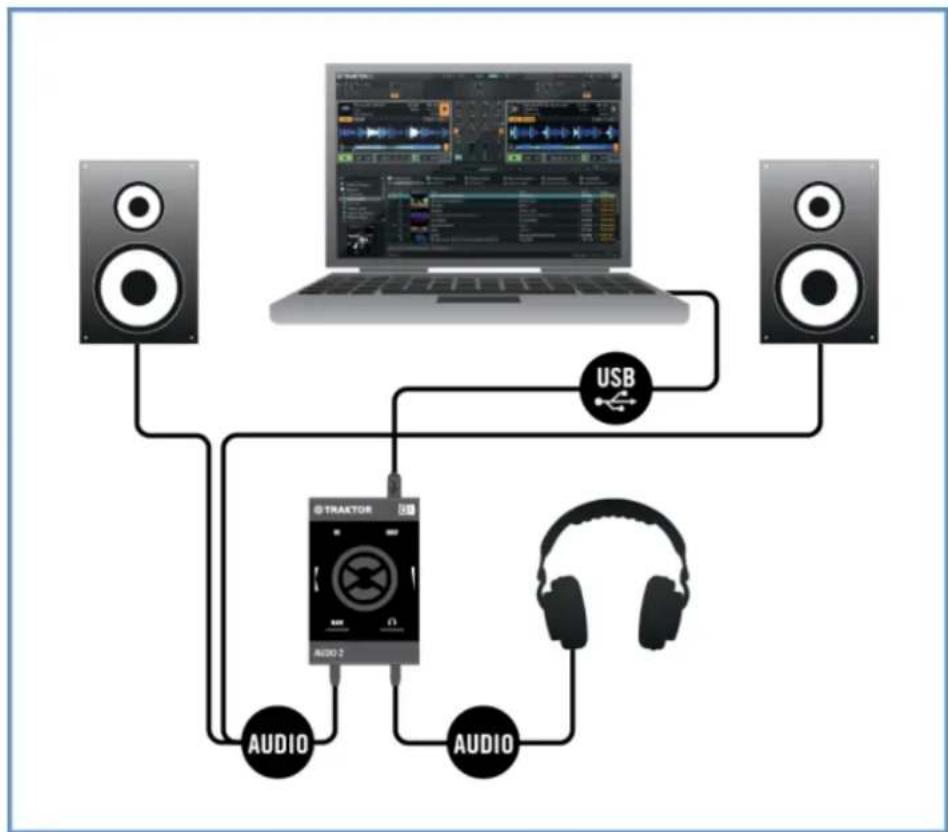
The headphones are plugged directly into the Headphones output in order to monitor while using another cable in the MAIN output to attach the TRAKTOR AUDIO 2 to a set of speakers or amplifier. The following image shows the TRAKTOR AUDIO 2 connected to a computer used in Internal Mixer Mode:
flowchart
graph TD
    A["Speaker 1"] --> B["Traktor"]
    C["Speaker 2"] --> B
    D["Speaker 3"] --> B
    B --> E["USB"]
    B --> F["AUDIO"]
    B --> G["AUDIO"]
Setup overview of using TA2 in Internal Mixer Mode with a computer.
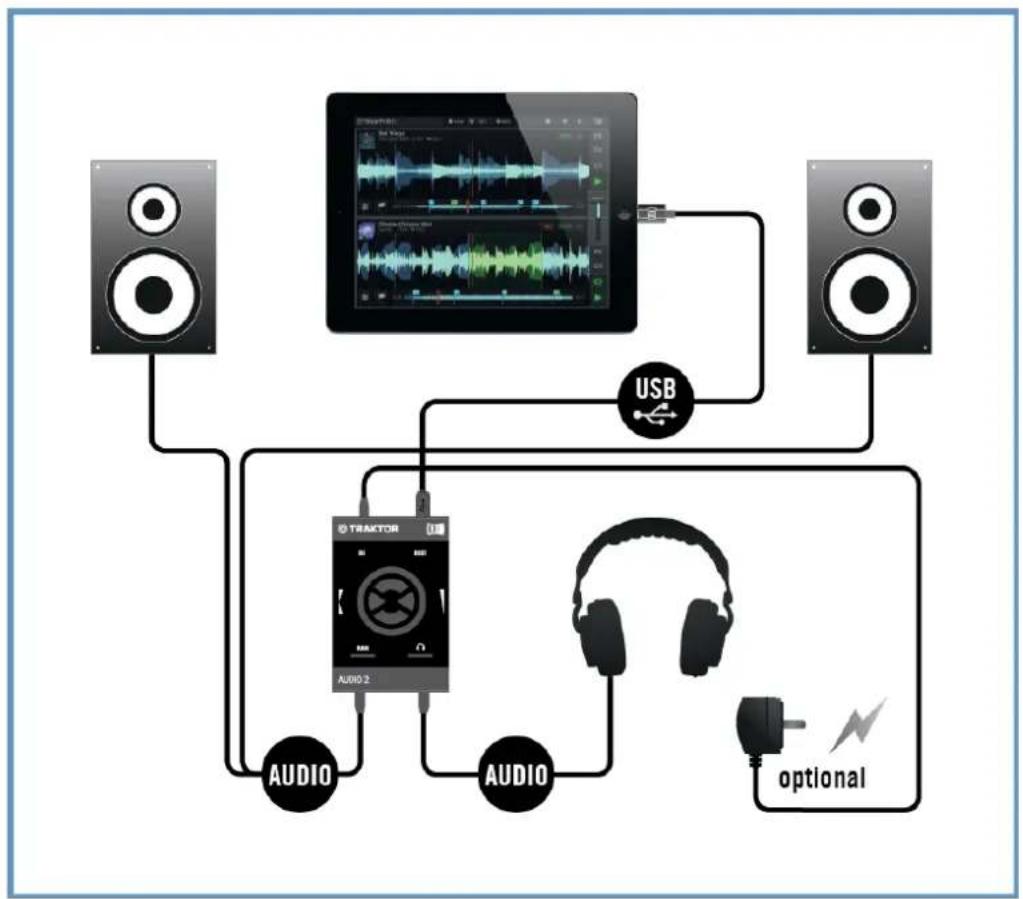
The following image shows the TRAKTOR AUDIO 2 connected to an iOS device used in Internal Mixer Mode:
flowchart
graph TD
    A["Speaker"] --> B["Audio"]
    C["Speaker"] --> B
    D["Audio"] --> E["TRACTOR"]
    E --> F["Audio 2"]
    F --> G["USB"]
    G --> H["Audio"]
    H --> I["optional"]
Setup overview of using TA2 in Internal Mixer Mode with an iOS device.

Note that iOS devices may not charge when connected to the TA2, if for example the iOS device's battery is completely discharged.
3.2.2 Overview of External Mixer Mode
This use-case for the TRAKTOR AUDIO 2 is to interface TRAKTOR or TRAKTOR DJ with a traditional (external) DJ mixer. In this scenario, the MAIN and the Headphones output carries the signal from one of TRAKTOR's or TRAKTOR DJ's Decks. These signals are then fed to separate channels to the DJ mixer allowing the DJ to mix using familiar hardware.
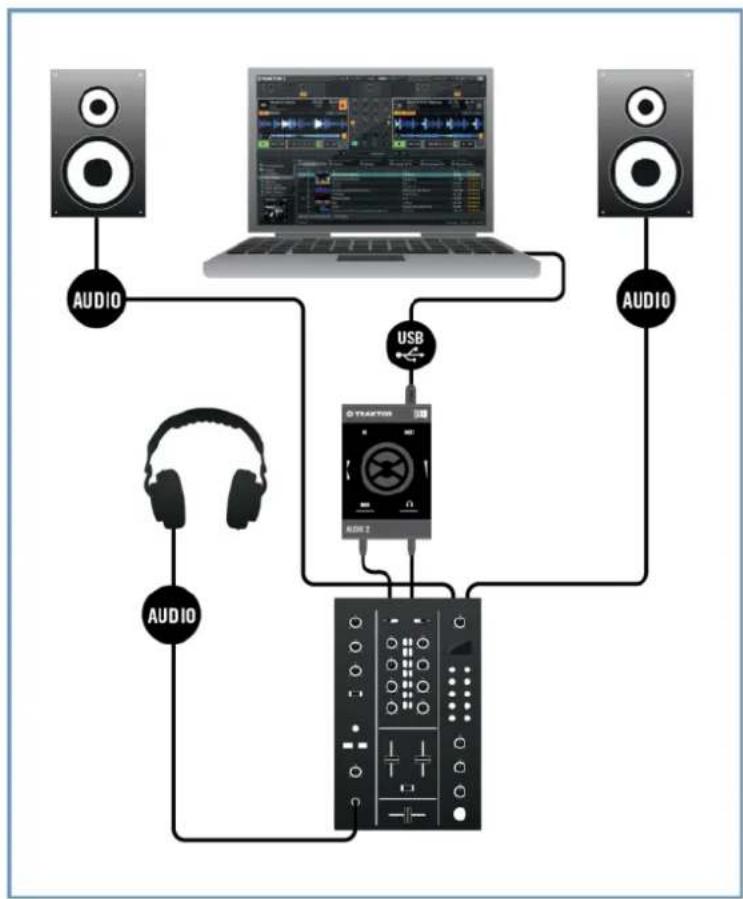
The encoders on the TRAKTOR AUDIO 2 will be disabled in this mode to ensure the correct signals are sent to the DJ mixer channels. The following image shows the TRAKTOR AUDIO 2 connected to a computer used in External Mixer Mode:
flowchart
graph TD
    A["Speaker 1"] --> B["Laptop"]
    C["Speaker 2"] --> B
    D["AUDIO"] --> B
    E["AUDIO"] --> B
    F["AUDIO"] --> G["USB"]
    H["AUDIO"] --> G
    I["AUDIO"] --> G
    G --> J["DAIR2"]
Setup overview of using TA2 in External Mixer Mode with a computer.
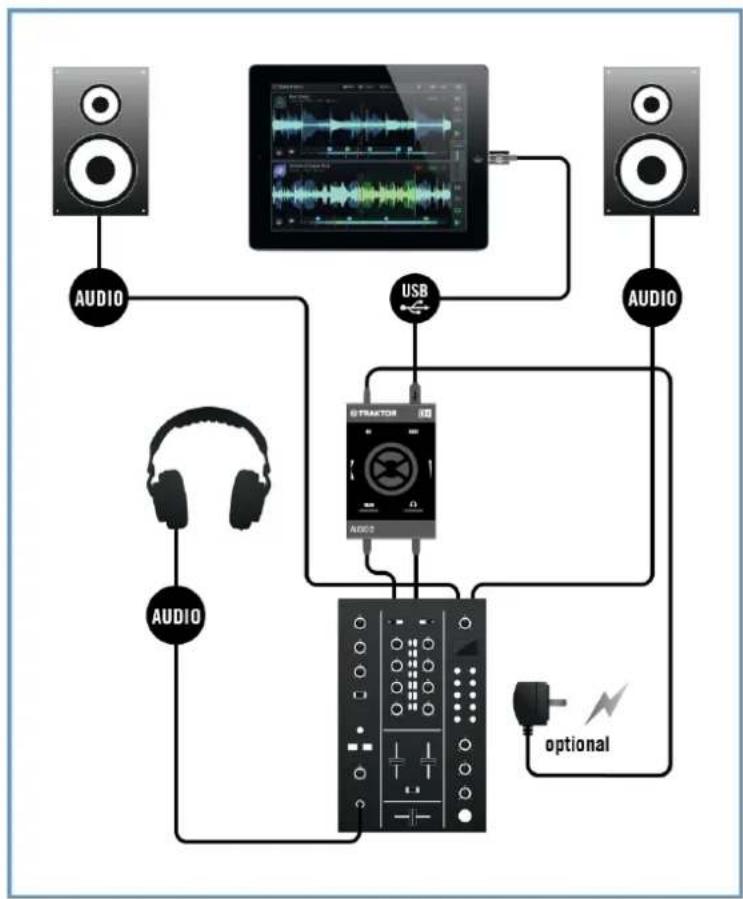
The following image shows the TRAKTOR AUDIO 2 connected to an iOS device used in External Mixer Mode.
flowchart
graph TD
    A["Speaker"] --> B["Audio"]
    C["Speaker"] --> D["Audio"]
    E["Speaker"] --> F["Audio"]
    G["Speaker"] --> H["Audio"]
    I["Tractor"] --> J["USB"]
    K["Optional"] --> L["Audio"]
Setup overview of using TA2 in External Mixer Mode with an iOS device.

Note that iOS devices may not charge when connected to the TA2, if for example the iOS device's battery is completely discharged.
4 Using TRAKTOR AUDIO 2 with Your Computer
This section provides you with information on how to set up your TRAKTOR AUDIO 2 audio interface with your computer, both for Internal Mixer Mode and External Mixer Mode. Before connecting the devices and setting up your TRAKTOR AUDIO 2 here are some points to be aware of:

The TA2—in combination with a power amplifier, speakers, or headphones—can produce sounds in decibel ranges that may cause hearing damage. Make sure the volume on your amplifier is turned down before you begin playing music. Then, gradually increase the volume to the desired level. Similarly, keep your headphones off until the volume is set correctly.
- When using TRAKTOR on a Windows system, make sure that you have updated TRAKTOR to the latest software version. For this, please follow the instructions in the TRAKTOR Setup Guide.
- The TA2 may not work properly when connected to a USB hub. Connect it directly to a USB port on your computer.
4.1 Setting up Your System for Internal Mixer Mode
This section will guide you to set up your TA2 for using in Internal Mixer Mode with your computer. If you want to set up your TA2 for using in External Mixer Mode, proceed with section ↑4.2, Setting up Your System for External Mixer Mode.
4.1.1 Connecting TRAKTOR AUDIO 2 to Your Computer
To connect the TRAKTOR AUDIO 2 to your computer:
-
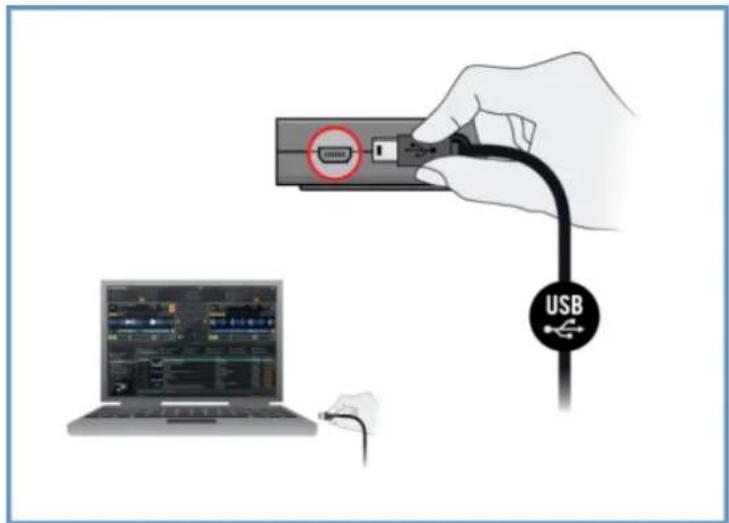
Connect the Mini USB connector of the supplied Mini USB cable to the Mini USB socket on the rear panel of your TRAKTOR AUDIO 2.
-
Connect the "computer end" of the Mini USB cable to an available USB port on your computer.
Windows Users Only: Completing the Device Driver Installation
Upon detection of the new hardware, Windows completes the device driver installation:
- A message reading Installing device driver software will be displayed.
- After device driver installation has finished, Windows will display "Your devices are ready to use."
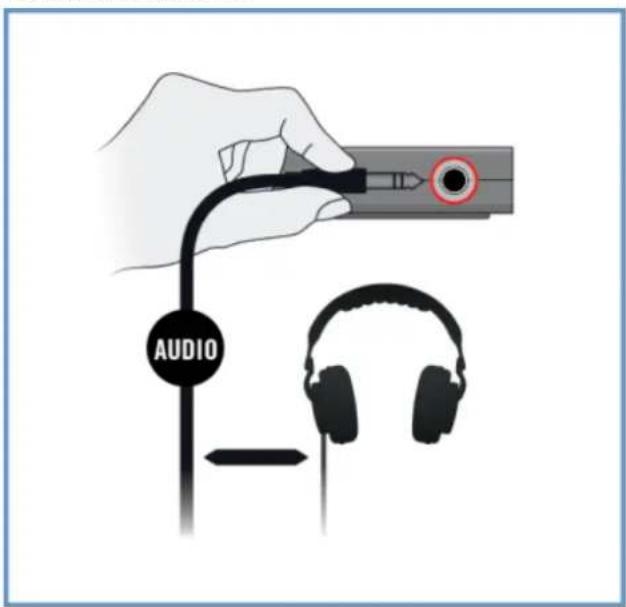
4.1.2 Connecting Headphones to Your TRAKTOR AUDIO 2
To connect your headphones to the TRAKTOR AUDIO 2:
Connect your headphones to the Headphones output socket on the front panel of the TRAKTOR AUDIO 2.
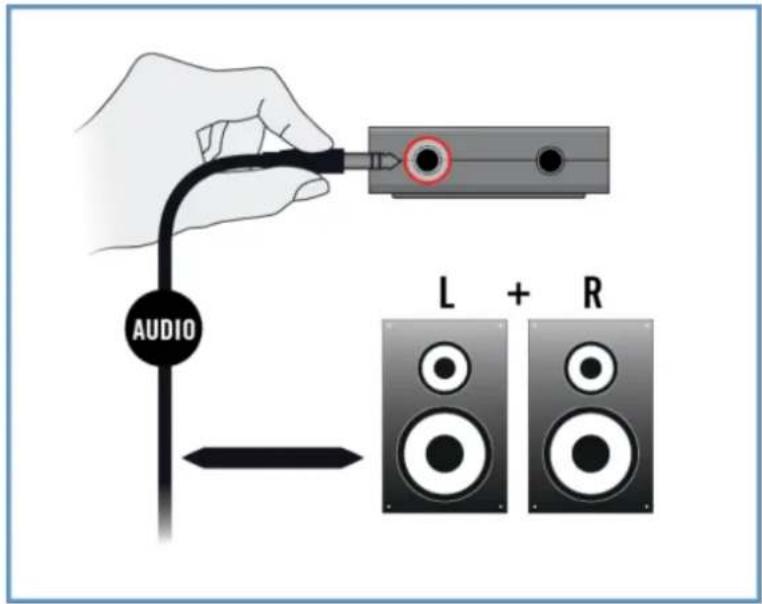
4.1.3 Connecting an Amplification System to Your TRAKTOR AUDIO 2
To connect your power amplifier or active speakers to the TRAKTOR AUDIO 2:
-
Switch off your amplification system.
-
Connect your amplification system to the MAIN output socket on the front panel of the TRAKTOR AUDIO 2 using an appropriate cable.
4.1.4 Final Preparations in TRAKTOR
To configure the TRAKTOR software for Internal Mixer Mode, proceed as follows:
- Start TRAKTOR.
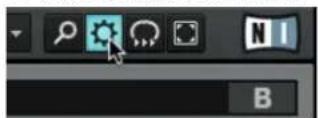
- Open the TRAKTOR Preferences dialog under the Preferences Icon in the top-left corner of the TRAKTOR window.
-
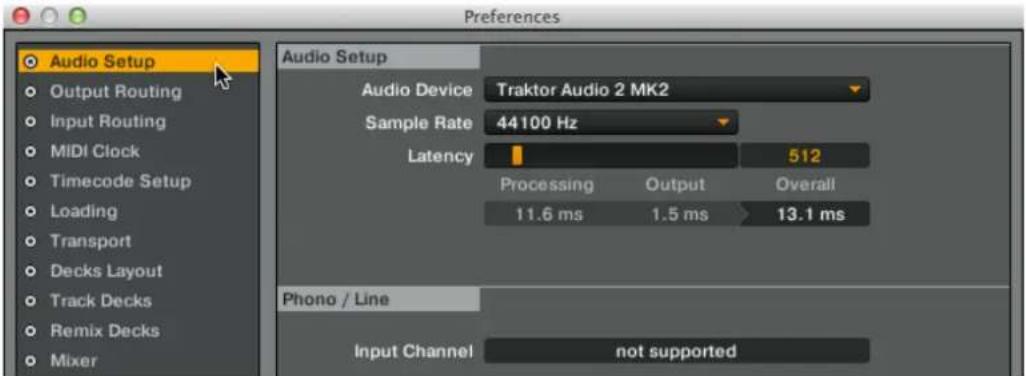
Select the Audio Setup tab.
-
In the Audio device drop-down menu ensure that Traktor Audio 2 MK2 (Traktor Audio 2 MK2 (ASIO) on Windows) is selected.
- Select the Output Routing tab.
- In the Mixing Mode section ensure Internal is selected to enable the Internal Mixer Mode. Decks A and B will be automatically configured to output their signal into the TA2's corresponding channels.
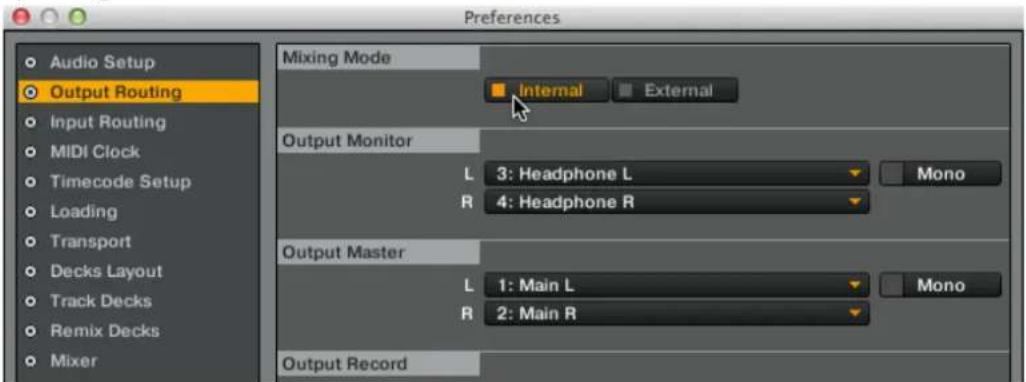
- Click on Close button.
→ TRAKTOR is now enabled for Internal Mixer Mode. You are now ready to load some tracks in TRAKTOR and start mixing in the software!
4.2 Setting up Your System for External Mixer Mode
This section will guide you through the set up of your TA2 for using it in External Mixer Mode with your computer. If you want to set up your TA2 for using in Internal Mixer Mode, proceed with section ↑4.1, Setting up Your System for Internal Mixer Mode.
4.2.1 Connecting TRAKTOR AUDIO 2 to Your Computer
To connect the TRAKTOR AUDIO 2 to your computer:
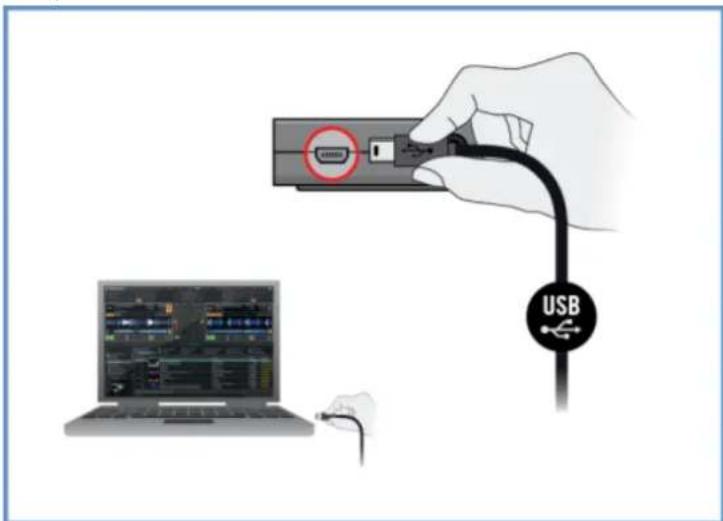
- Connect the Mini USB connector of the supplied Mini USB cable to the Mini USB socket on the rear panel of your TRAKTOR AUDIO 2.
- Connect the "computer end" of the Mini USB cable to an available USB port on your computer.
Windows Users Only: Completing the Device Driver Installation
Upon detection of the new hardware, Windows completes the device driver installation:
- A message reading Installing device driver software will be displayed.
- After device driver installation has finished, Windows will display "Your devices are ready to use."
4.2.2 Connecting TRAKTOR AUDIO 2 to Your DJ Mixer
To connect your TRAKTOR AUDIO 2 to your mixer:
- Switch off your DJ Mixer.
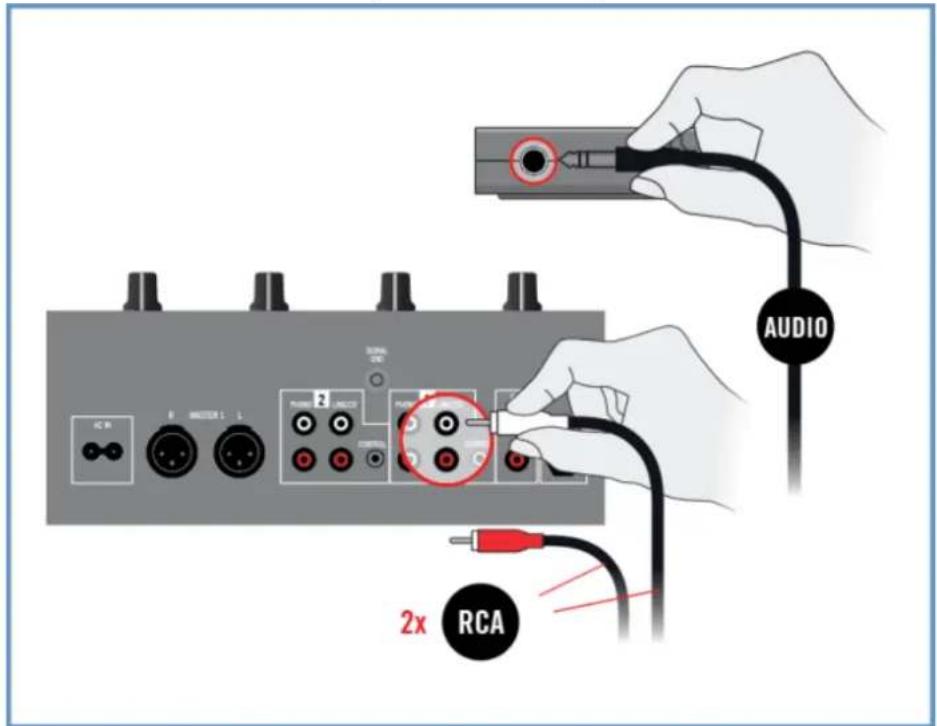
- Connect the MAIN output on the front panel of the TRAKTOR AUDIO 2 to the inputs of Line/CD channel of deck A on your DJ mixer using a stereo 18 "-to-RCA cable.
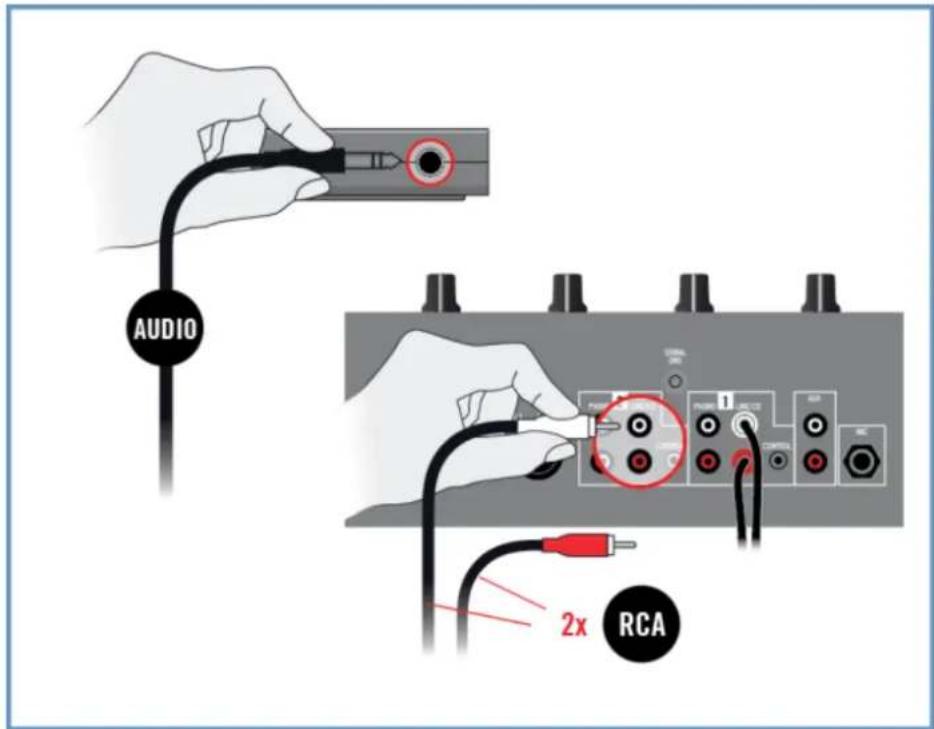
- Connect the Headphones output on the front panel of the TRAKTOR AUDIO 2 to the inputs of Line/CD channel of deck B on your DJ mixer using a stereo 18 "-to-RCA cable.
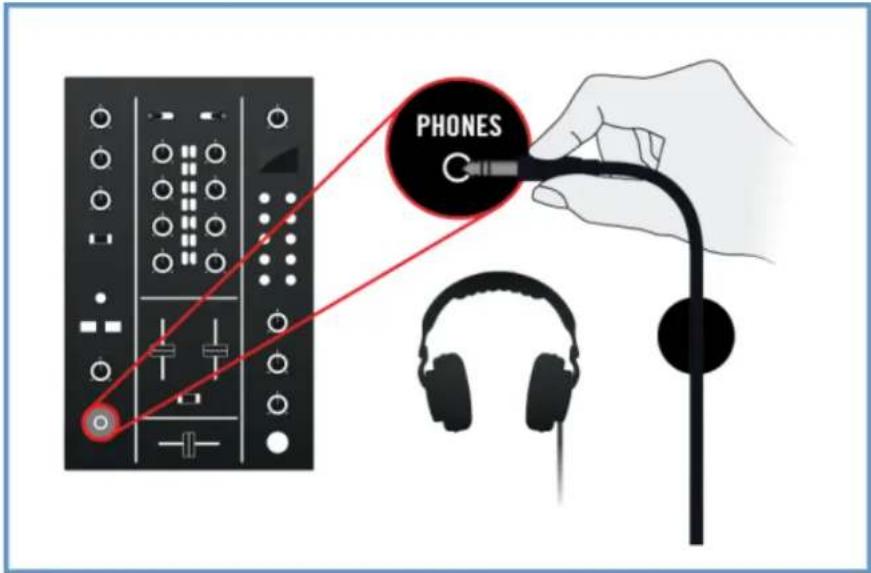
4.2.3 Connecting Headphones to Your DJ Mixer

Before putting on headphones, always make sure the headphone volume control of your DJ mixer is set to minimum.
To connect your headphones to the DJ mixer:
Connect your headphones to your DJ mixer's headphones socket (most often labeled "Phones" or "Headphones").
4.2.4 Connecting an Amplification System to Your DJ Mixer
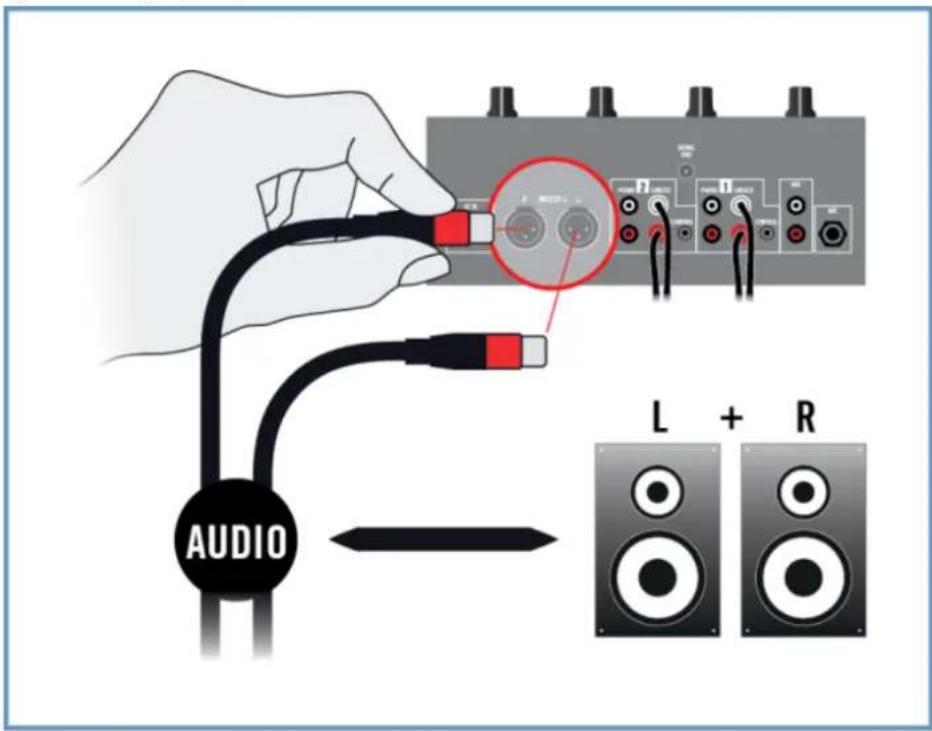
To connect your amplification system or a pair of active speakers to your DJ mixer:
Connect the Main (or Master) outputs of your DJ mixer to the inputs of your amplification system using appropriate cables.
4.2.5 Final Preparations in TRAKTOR
To configure the TRAKTOR software for External Mixer Mode, proceed as follows:
- Start TRAKTOR.
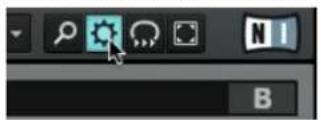
- Open the TRAKTOR Preferences dialog under the Preferences Icon in the top-left corner of the TRAKTOR window.
-
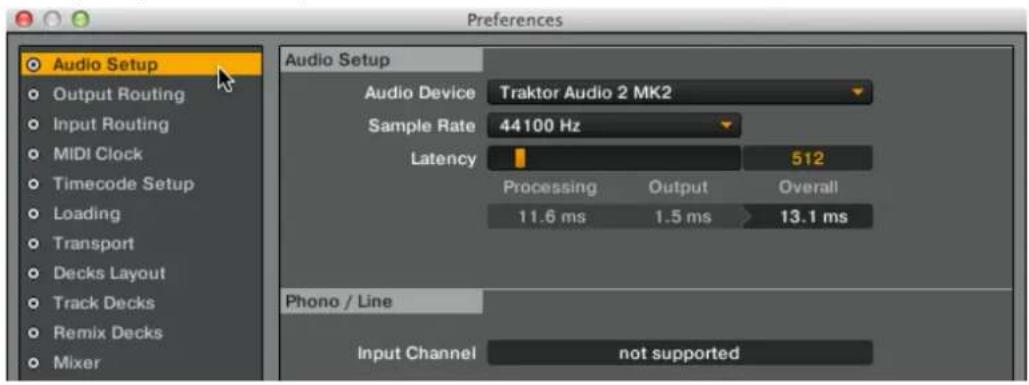
Select the Audio Setup tab.
-
In the Audio device drop down menu, ensure that Traktor Audio 2 MK2 (Traktor Audio 2 MK2 (ASIO) on Windows) is selected.
-
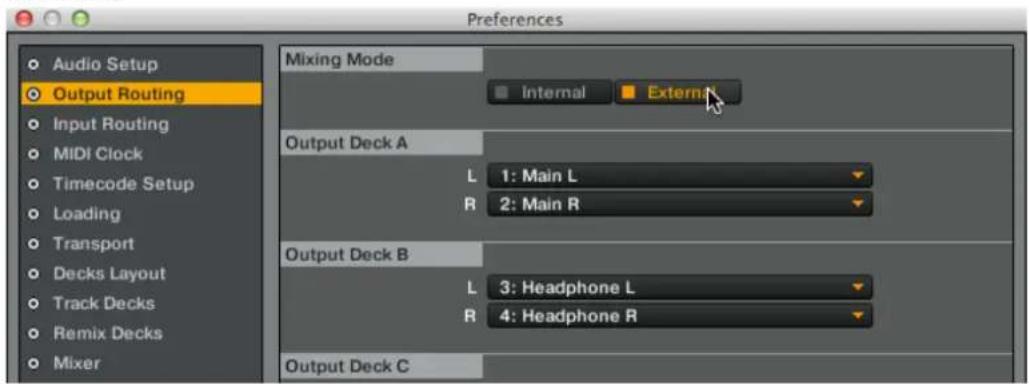
Select the Output Routing tab.
-
In the Mixing Mode section select External to enable the External Mixer Mode. Decks A and B will be automatically configured to output their signal into the TA2's corresponding channels.
- Click on Close button.
→ TRAKTOR is now enabled for External Mixing Mode. You are now ready to load some tracks in TRAKTOR and start mixing with your TA2 and your DJ mixer!
5 Using TRAKTOR AUDIO 2 with Your iOS Device
This section provides you with information on how to set up your TRAKTOR AUDIO 2 audio interface with your iOS device, both for using in Internal Mixer Mode and External Mixer Mode. Before connecting the devices, and setting up your TRAKTOR AUDIO 2, here are some points to be aware of:

The TA2—in combination with a power amplifier, speakers, or headphones—can produce sounds in decibel ranges that may cause hearing damage. Make sure the volume on your amplifier is turned down before you begin playing music. Then, gradually increase the volume to the desired level. Similarly, keep your headphones off until the volume is set correctly.
- Ensure that you have already downloaded the latest TRAKTOR DJ app before connecting the TA2 to your iOS device. You can download TRAKTOR DJ from the iTunes App Store. iOS devices that currently facilitate the running of TRAKTOR DJ, see the TRAKTOR DJ specifications section of the Native Instruments website: http://www.native-instruments.com/en/products/traktor/traktor-for-ios/traktor-dj/.
- The TA2 will receive power from the iOS device in order to function. However, especially when used with TRAKTOR DJ, this can put a heavy load on the iOS device's battery – the iOS device could discharge the battery within an hour or two. In order to allow longer mixing sessions, the optional power supply can be connected to the back of the TA2. This will power the TA2 and will also provide charging power to the connected iOS device.
5.1 Setting up Your System for Internal Mixer Mode
This section will guide you to set up your TA2 for using in Internal Mixer Mode with your iOS device. If you want to set up your TA2 for using in External Mixer Mode, proceed with section 5.2, Setting up Your System for External Mixer Mode.
5.1.1 Connecting TRAKTOR AUDIO 2 to Your iOS Device

If you intend to use the optional power supply, connect it to the TRAKTOR AUDIO 2 and to a power outlet before starting TRAKTOR DJ. Connecting the power supply during operation may result in a temporary audio drop out.
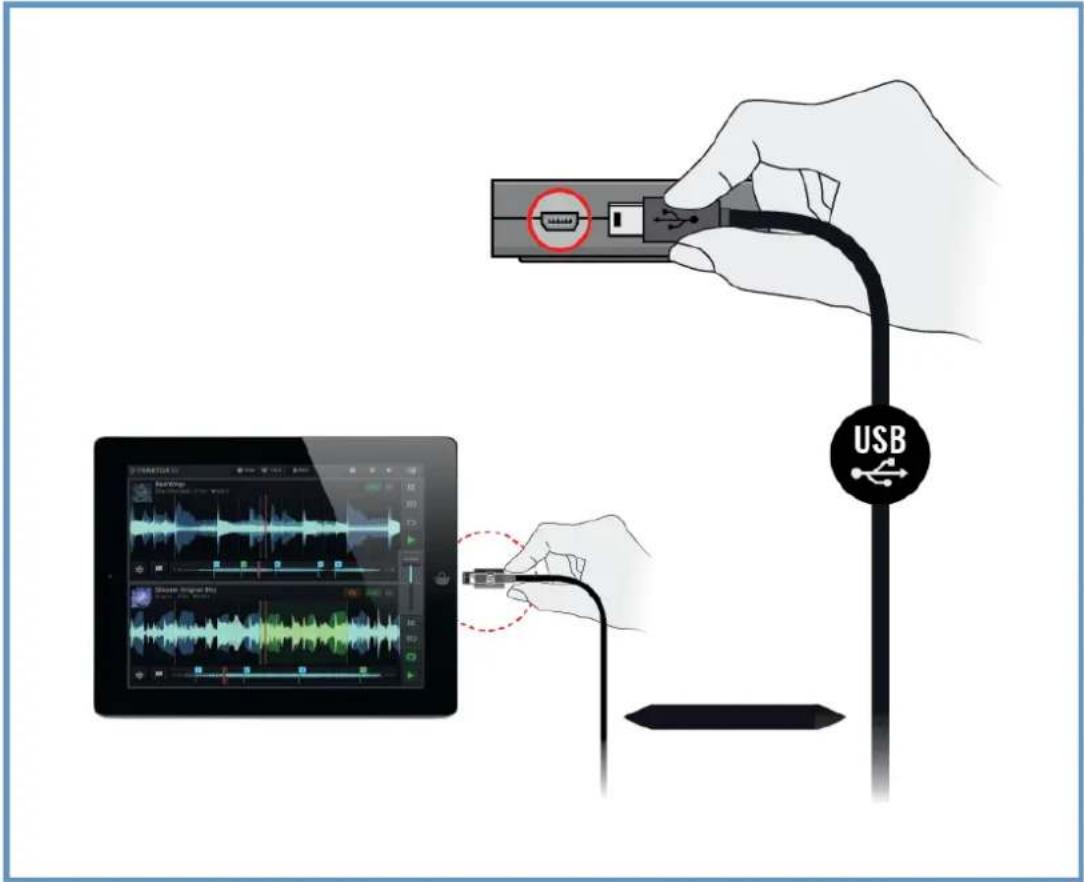
To connect the TRAKTOR AUDIO 2 to your iOS device:
-
Connect the mini USB connector of the supplied Native Instruments iOS device connection cable to the Mini USB socket on the rear panel of your TRAKTOR AUDIO 2.
-
Connect the Lightning connector of the Native Instruments iOS device connection cable to the Lightning connector on your iOS device.
5.1.2 Connecting Headphones to Your TRAKTOR AUDIO 2
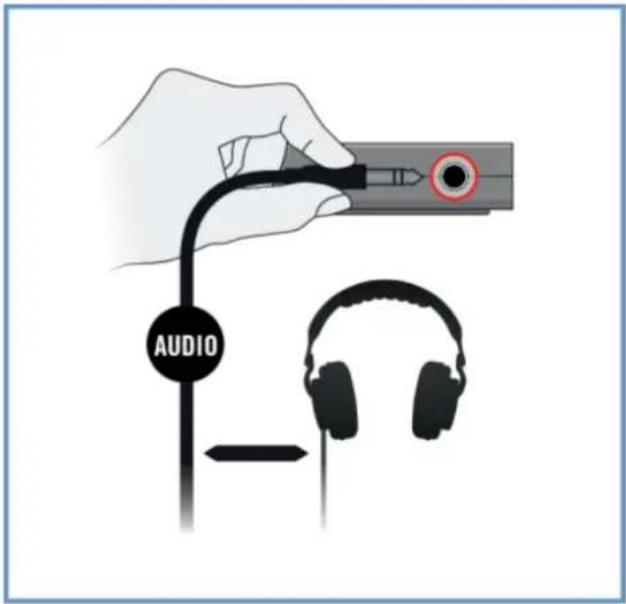
To connect your headphones to the TRAKTOR AUDIO 2:
Connect your headphones to the TRAKTOR AUDIO 2's Headphones output socket.
5.1.3 Connecting an Amplification System to Your TRAKTOR AUDIO 2
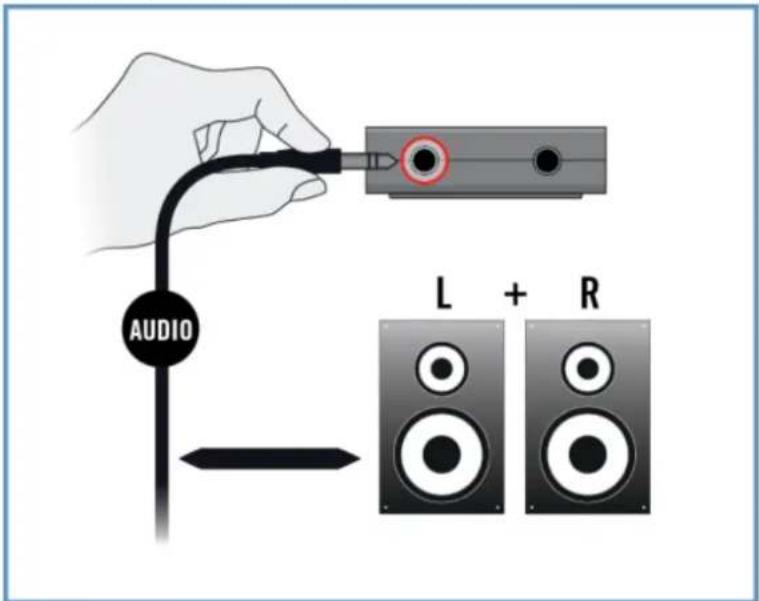
To connect your power amplifier or active speakers to the TRAKTOR AUDIO 2:
- Switch off your amplification system.
- Connect your amplification system to the MAIN output socket on the front panel of the TRAKTOR AUDIO 2 using an appropriate cable.
5.1.4 Final Preparations in TRAKTOR DJ
The Internal Mixer Mode is set by default when using TRAKTOR DJ in conjunction with the TRAKTOR AUDIO 2 audio interface. The Main Mix and Headphone Cue will be automatically configured to output from the labeled sockets on TA2. Further configuration of TRAKTRO DJ is not required.

If you use the optional power supply, ensure it is connected to the TRAKTOR AUDIO 2 and to a power outlet.
To start mixing with TRAKTOR DJ and the TRAKTOR AUDIO 2 in Internal Mixer Mode:
- Power up your iOS device.
- Launch the TRAKTOR DJ app on your iOS device by tapping its icon.
TRAKTOR DJ will automatically be configured with the TA2 in Internal Mixer Mode.
→ You are now ready to load some tracks in TRAKTOR DJ's Decks and start mixing!

Before putting on headphones, always make sure the headphone volume control is set to minimum! Then, while playing music, slowly increase the headphone volume until it reaches the desired listening level.
5.2 Setting up Your System for External Mixer Mode
This section will guide you to set up your TA2 for using in External Mixer Mode with your iOS device. If you want to set up your TA2 for using in Internal Mixer Mode, proceed with section 5.1, Setting up Your System for Internal Mixer Mode.
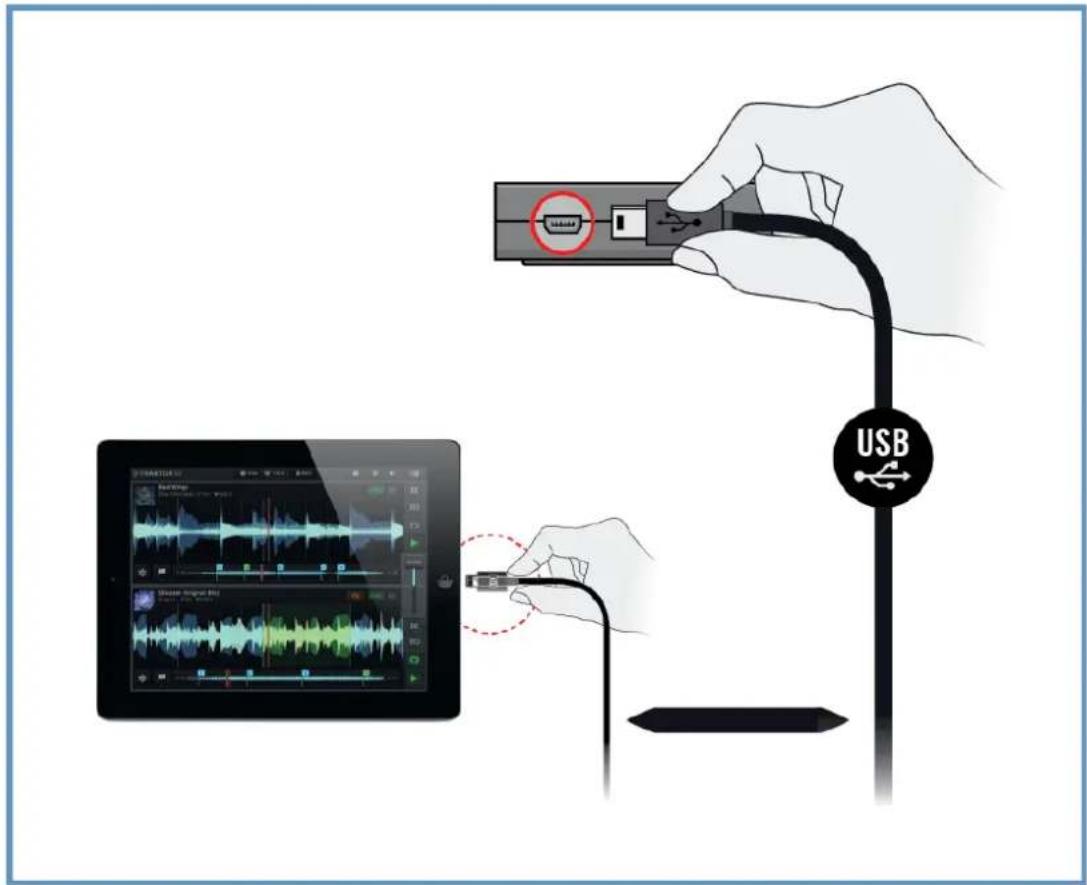
5.2.1 Connecting TRAKTOR AUDIO 2 to Your iOS Device

If you intend to use the optional power supply, connect it to the TRAKTOR AUDIO 2 and to a power outlet before starting TRAKTOR DJ. Connecting the power supply during operation may result in a temporary audio drop out.
To connect the TRAKTOR AUDIO 2 to your iOS device:
-
Connect the Mini USB connector of the supplied Native Instruments iOS device connection cable to the Mini USB socket on the rear panel of your TRAKTOR AUDIO 2.
-
Connect the Lightning connector of the Native Instruments iOS device connection cable to the Lightning connector on your iOS device.
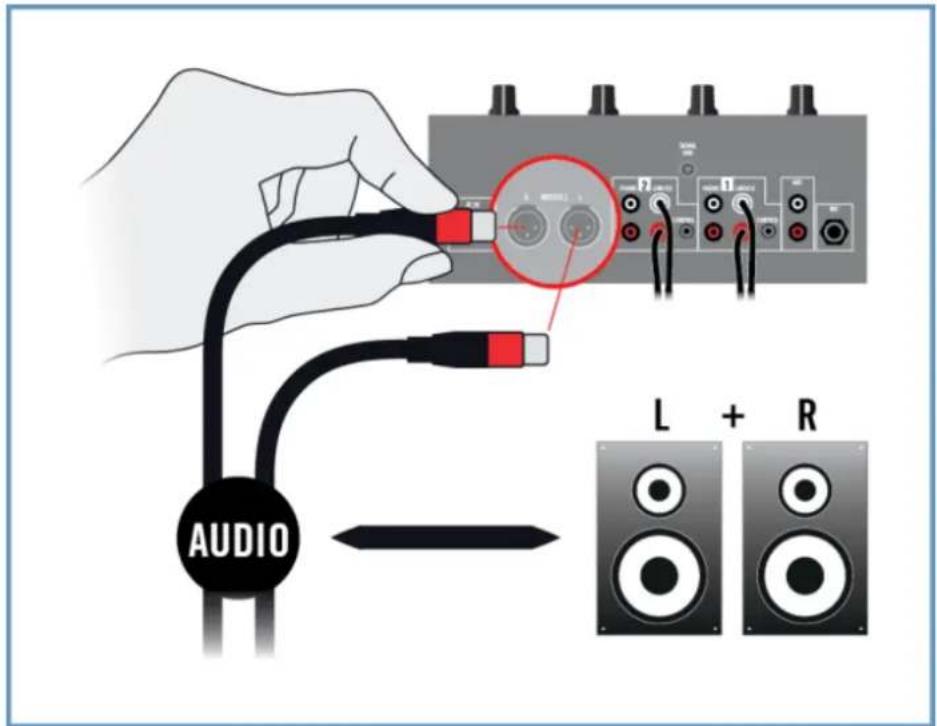
5.2.2 Connecting TRAKTOR AUDIO 2 to Your DJ Mixer
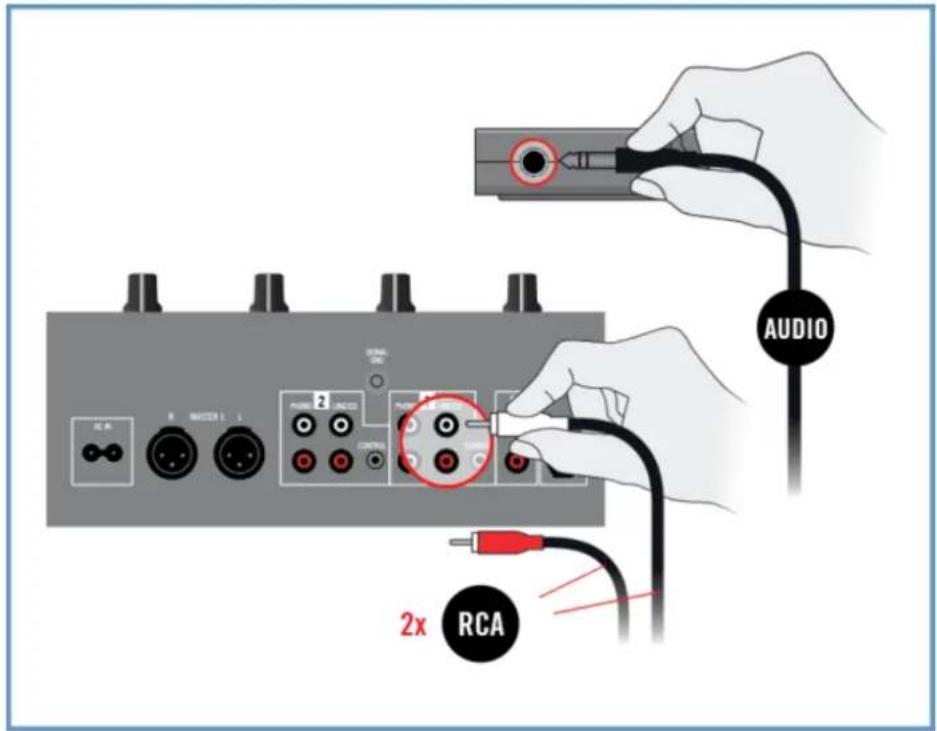
To connect your TRAKTOR AUDIO 2 to your DJ mixer:
- Switch off your DJ Mixer.
- Connect the MAIN output socket on the front panel of the TRAKTOR AUDIO 2 to the inputs of Line/CD channel of deck A on your DJ mixer using a stereo 18 "-to-RCA cable.
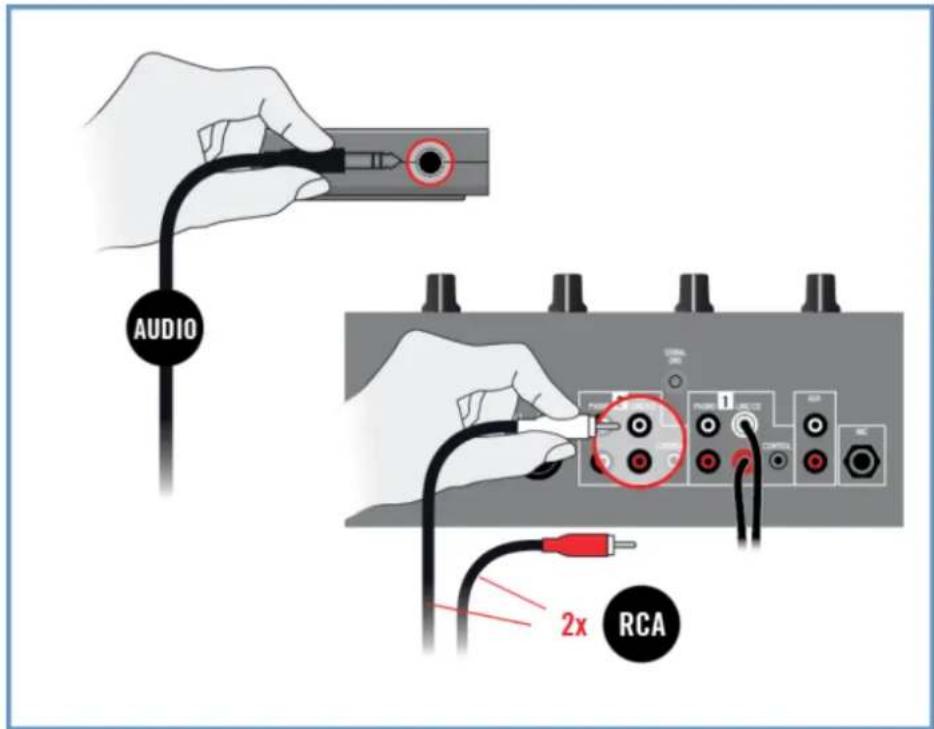
- Connect the Headphones output socket on the front panel of the TRAKTOR AUDIO 2 to the inputs of Line/CD channel of deck B on your DJ mixer using a stereo 18 "-to-RCA cable.
5.2.3 Connecting Headphones to Your DJ Mixer

Before putting on headphones, always make sure the headphone volume control of your DJ mixer is set to minimum.
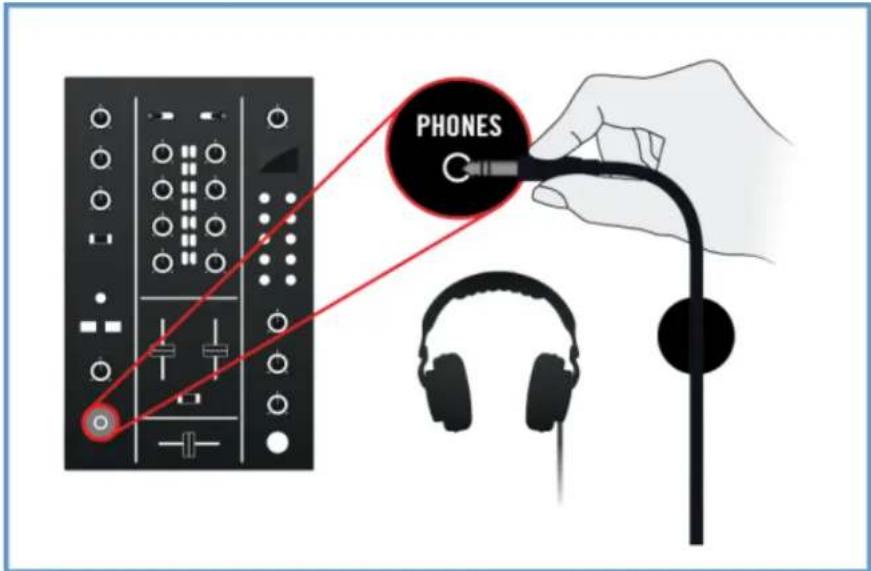
To connect your headphones to the DJ mixer:
Connect your headphones to your mixer's headphones socket (most often labeled "Phones" or "Headphones").
5.2.4 Connecting an Amplification System to Your DJ Mixer
To connect your power amplifier or active speakers to your DJ mixer:
-
Switch off your amplification system.
-
Connect the Main (or Master) outputs of your DJ mixer to the inputs of your amplification system using appropriate cables.
5.2.5 Final Preparations in TRAKTOR DJ

If you use the optional power supply, ensure it is connected to the TRAKTOR AUDIO 2 and to a power outlet.
To start mixing with TRAKTOR DJ and the TRAKTOR AUDIO 2 in External Mixer Mode it is recommended to follow the order below when switching on your devices and making final settings:
- Turn on your iOS device.
-
Launch the TRAKTOR DJ app on your iOS device by tapping its icon.
-
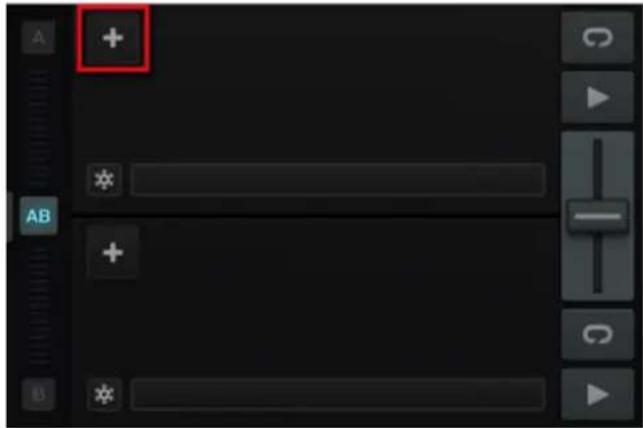
In TRAKTOR DJ open the Browser menu by tapping the Plus Icon either of Deck A or B.
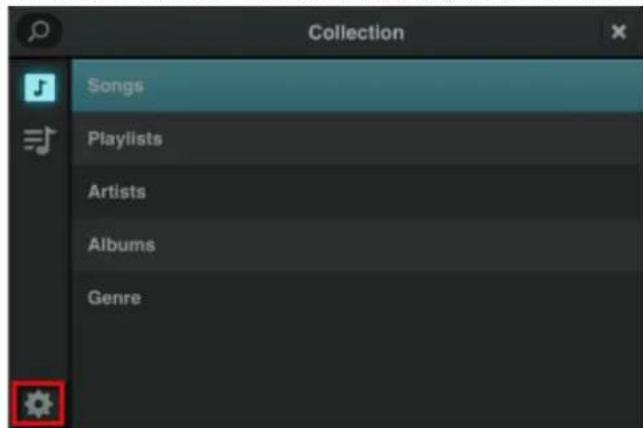
- Open the preferences dialog by tapping the preferences Icon.
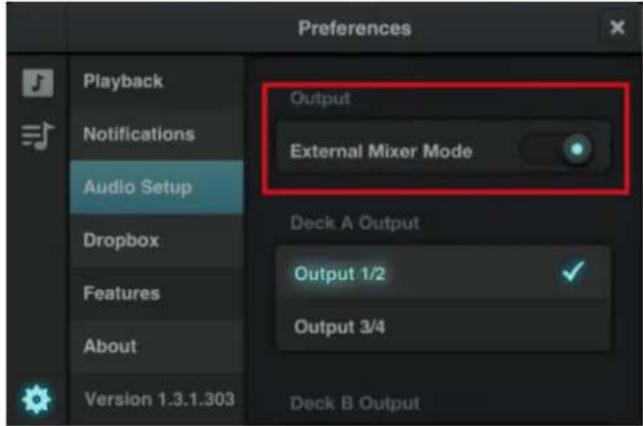
- Select the Audio Setup tab and enable External Mixer Mode in the Output option
- Close the preferences menu.
- Turn on your DJ mixer.
- Turn on the amplification system.
→ You are now ready to load some tracks in TRAKTOR DJ's Decks and start mixing with your external DJ mixer!

When TRAKTOR DJ is running and you have loaded tracks to TRAKTOR DJ's Decks, gradually raise the volume controls of your amplification system while music is playing until a comfortable listening level is reached.
6 Using TRAKTOR AUDIO 2 as Your Computer's Default Audio Output Device
In order for the TRAKTOR AUDIO 2 to operate as your computer's default audio output device, you will need to select it within the system's audio preferences. In the following sections, you will learn how to set up the TRAKTOR AUDIO 2 as your computer's default audio output device. For information on using the TRAKTOR AUDIO 2 as your music software's audio output device, see section ↑6.7, Using TRAKTOR AUDIO 2 as Audio Output Device with Your Music Software.
Before selecting the TA2 as your computer's default audio output device here are some points to be aware of:

The TA2—in combination with a power amplifier, speakers, or headphones—can produce sounds in decibel ranges that may cause hearing damage. Make sure the volume on your amplifier is turned down before you begin playing music. Then, gradually increase the volume to the desired level. Similarly, keep your headphones off until the volume is set correctly.
- When using TRAKTOR on a Windows system, make sure that you have installed the TA2 hardware driver with the latest TRAKTOR software, or you download and install the TA2 hardware driver as described in the following section ↑6.1, Driver Software Installation on Windows, before you connect the TA2 to your computer.
- The TA2 may not work properly connected to a USB hub. Connect it directly to a USB port on your computer.
- It is recommended to connect computer speakers to the MAIN output and headphones to the Headphones output sockets of TA2 since the TA2 Headphone output will automatically monitor the Main signal by default.

By default, the audio sent to the MAIN output will also be sent to the headphone output as well. This makes it much easier to use TA2 because you can leave headphones and computer speakers connected simultaneously and never have to make any changes to the operating system's audio settings to use either of them. This is because the Cue Mix encoder is set so that the Headphone output monitors the Main signal by default. You can therefore adjust the volume of the computer speakers using the volume control on the speakers themselves. Then, adjust the headphone volume independently with the Headphones Volume Encoder on the TA2.
6.1 Driver Software Installation on Windows
This section describes the process of installing the TRAKTOR AUDIO 2 hardware driver software on Windows in case you do not intend to install the TRAKTOR software. The TRAKTOR AUDIO 2 does not require a dedicated driver under Mac OS X. If you intend to use your TRAKTOR AUDIO 2 with a Mac computer skip to section ↑6.2, Connecting TRAKTOR AUDIO 2 to Your Computer. For Installing the TRAKTOR AUDIO 2 driver software on Windows continue with this section first. Before you proceed, here are some points to be aware of:
- Make sure you have downloaded the driver software installation program to your computer by following the instructions on the registration page:
www.native-instruments.com/go-ta2
Alternatively, you can get it from the following webpage: TRAKTOR AUDIO 2
- Please carefully review the installer screens and the suggested installation paths in order to avoid that any unwanted folders are created on your hard disk.
- Moving any folders related to Native Instruments software after installation is not recommended. Future software updates rely on the directory locations set during initial installation.
In order for the TRAKTOR AUDIO 2 to work properly with your computer, the following two programs are automatically installed on your system during the driver software installation process:
- The TRAKTOR AUDIO 2 driver. This handles the communication between the audio interface and your computer.
- The Control Panel software: In Windows, the Control Panel software allows you to adjust performance settings, preamp settings, and to perform diagnostics.
Locate and Start the Driver Software Installation Program

It may be necessary to disable your anti-virus software during installation, please refer to the software's own documentation for further information.

Make sure to run the installer using administrator privileges: right click on the installer file to open the shortcut menu and select Run as administrator.
To install the TRAKTOR AUDIO 2 driver software on Windows:
- Locate and unpack the downloaded installer package file on your computer.
- Double-click the installer file named Traktor Audio 2 MK2 Driver Setup PC.exe to start the installation procedure.
- Follow the on-screen instructions.
Once the installation procedure is finished continue reading with section 6.2 , Connecting TRAKTOR AUDIO 2 to Your Computer.
6.2 Connecting TRAKTOR AUDIO 2 to Your Computer
To connect the TRAKTOR AUDIO 2 to your computer:
-
Connect the Mini USB connector of the supplied Mini USB cable to the Mini USB socket on the rear panel of your TRAKTOR AUDIO 2.
-
Connect the "computer end" of the Mini USB cable to an available USB port on your computer.
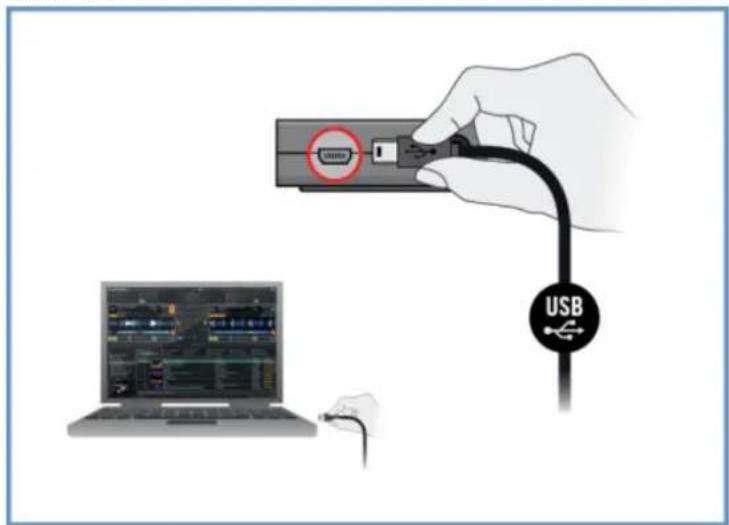
Upon detection of the new hardware, Windows completes the device driver installation:
- A message reading Installing device driver software will be displayed.
- After device driver installation has finished, Windows will display "Your devices are ready to use."
6.3 Connecting Headphones to Your TRAKTOR AUDIO 2
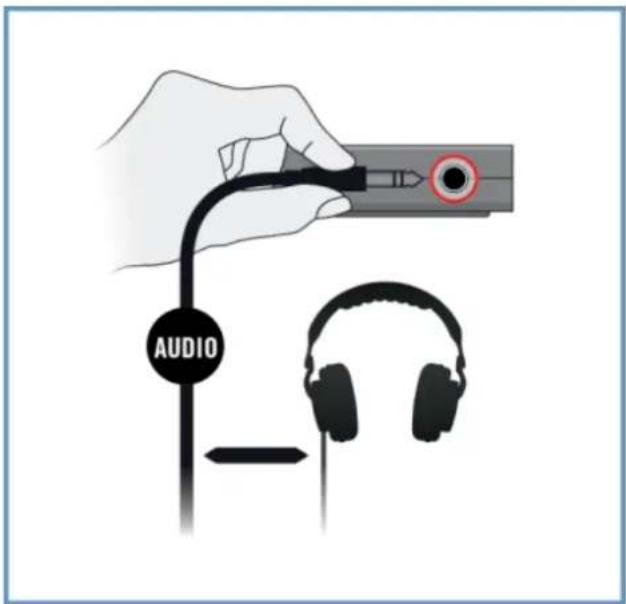
To connect your headphones to the TRAKTOR AUDIO 2:
Connect your headphones to the Headphones output socket on the front panel of the TRAKTOR AUDIO 2.
6.4 Connecting an Amplification System to Your TRAKTOR AUDIO 2
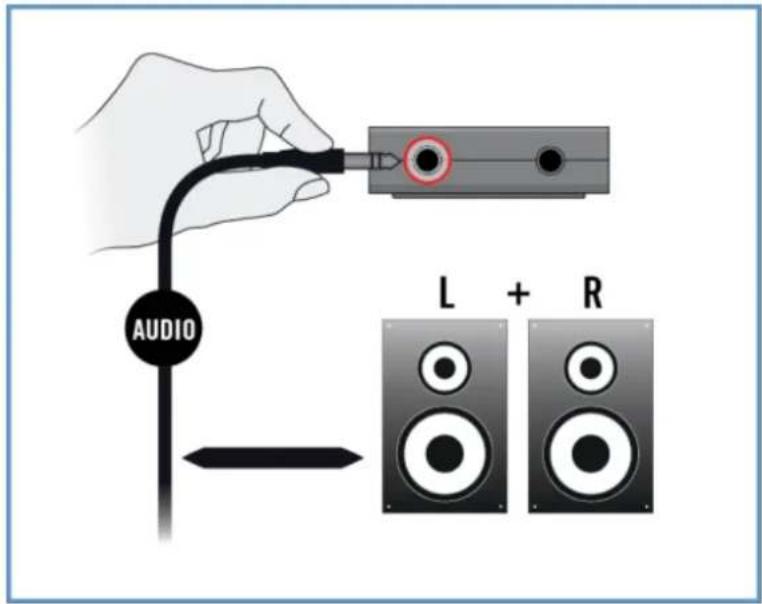
To connect your power amplifier or active speakers to the TRAKTOR AUDIO 2:
-
Switch off your amplification system.
-
Connect your amplification system to the MAIN output socket on the front panel of the TRAKTOR AUDIO 2 using an appropriate cable.
6.5 Final Steps on Mac OS X
- Open the System Preferences under the gray Apple Icon menu in the top left corner of your screen.
- In the Hardware category (second row from top), select Sound.
- In the Sound control panel, select the Output tab.
- Choose TRAKTOR AUDIO 2 MK2 from the list of available soundcards.
- Close the panel.
→ TRAKTOR AUDIO 2 is now selected as the default audio output device.
6.6 Final Steps on Windows
- Open Start > Control Panel > Hardware and Sound > Sound.
- In the Sound Control Panel, select the Playback tab.
- Choose the output channel Traktor Audio2 MK2 Main.
- Click Set Default.
- Click OK to confirm your selection and close the window.
→ TRAKTOR AUDIO 2 is now selected as the default audio output device.
6.7 Using TRAKTOR AUDIO 2 as Audio Output Device with Your Music Software
Beforeusing the TRAKTOR AUDIO 2 with music production or DJ software, here are a few notes to be aware of:
- When using TRAKTOR with your music software on a Windows system, make sure that you either have installed the TA2 hardware driver with the latest TRAKTOR software, or you download and install the TA2 hardware driver as described in section ↑6.1, Driver Software Installation on Windows, before you connect the TA2 to your computer.
- You will need to set it up as your software's output device. Most music production and DJ programs provide direct access to the soundcard properties in the audio and MIDI setup section of their preferences dialog.
- It is recommended to use the TA2 Main output in your operating system software since the TA2 Headphone output will automatically monitor the Main signal by default.

If you intent to set up your music software such that you can send a unique signal to the headphones, choose the TA2 Headphone output. In order to this you must rotate the Cue Mix encoder fully towards the rear of the TA2. This will then cause the Headphones output to monitor the discrete Headphone signal from your music software.
Please refer to the documentation of your music production or DJ software for information on how to configure audio and MIDI interfaces.
7 Advanced Configuration of Your TRAKTOR AUDIO 2
On Windows
All advanced configuration settings on Windows can be accessed from the Control Panel software, which was installed on your computer during the TRAKTOR software installation or the driver software installation procedure. You should open the Control Panel once you have installed the drivers, connected the hardware to your computer, and set up the interface as your default audio output device (see section 6). In this section, you will learn about the Control Panel and what you can do with it. Proceed with section ↑7.1, Advanced Configuration on Windows (Control Panel).

If you experience problems with your setup, please refer to the Audio Troubleshooting Guide, which you can access from the Information section of the Control Panel's Diagnostics page, or open it directly from the software's documentation folder.
On Mac OS X
On Mac OS X, the advanced audio and MIDI settings are accessed from the Mac OS X Audio MIDI Setup, located in the Applications > Utilities folder. Open the Audio MIDI Setup once you have connected the hardware to your computer and set up the interface as your default audio device (see section 6).
Proceed with section 7.2 , Advanced Configuration on Mac OS X.

If you experience problems with your setup, please refer to the Audio Troubleshooting Guide, which you can access directly from the software's documentation folder.
7.1 Advanced Configuration on Windows (Control Panel)
The Control Panel software allows you to change the driver's performance settings, monitor performance, and detect errors. To open the Control Panel:
▶ Navigate to Start > All Programs > Native Instruments > TRAKTOR AUDIO 2 MK2 > TRAKTOR AUDIO 2 MK2 Control Panel.
If you cannot find the Control Panel, the software is most likely not installed. In this case, please reinstall/install TRAKTOR or the driver software as described in section 16.1, Driver Software Installation on Windows.
On the left-hand side of the Control Panel, you find two tabs: Audio Settings, and Diagnostics:
▶ Click on the tabs to open the corresponding page of the Control Panel.
Proceed to sections ↑7.1.1, Audio Settings Page and ↑7.1.2, Diagnostics Page for more information on the Control Panel's pages.
7.1.1 Audio Settings Page
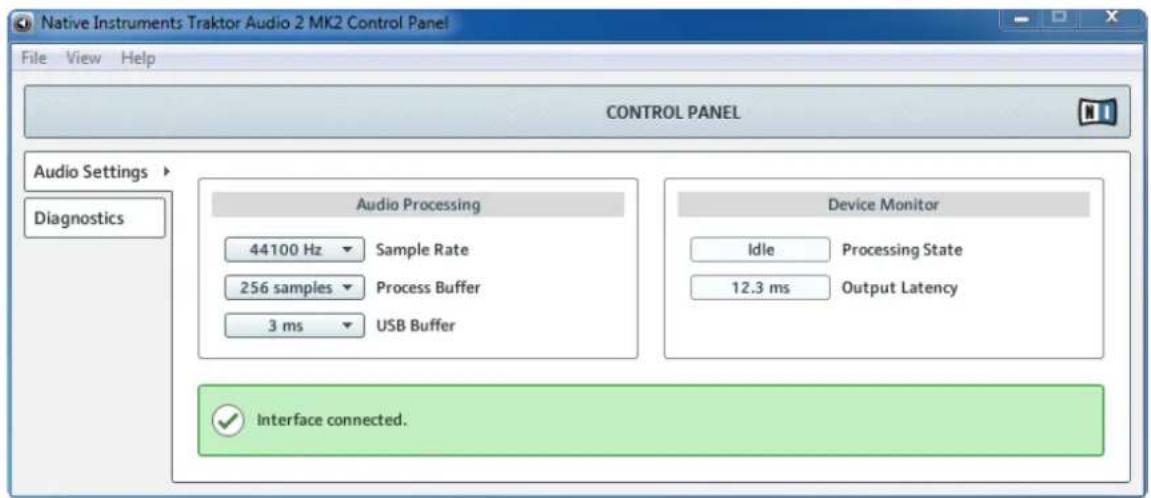
The Control Panel's Audio Settings page.
In the Audio Settings page, you can configure the audio latency and sample rate, and monitor the device's status.
The Audio Settings page consists of two sections: Audio Processing and Device Monitor. See the following subsections for further information.
Audio Processing Section
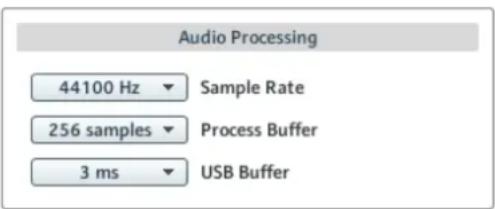
The Audio Processing section in the Audio Settings page of the Control Panel.
The Audio Processing section sets parameters for the analog-to-digital / digital-to-analog conversion done by your audio interface. It has two menus:
- Sample Rate: Choose a sample rate that is compatible with your music application and best suited to your computing power. A higher sample rate improves the audio quality, but also causes higher CPU load. By default, the sample rate is set to 44100 Hz (CD quality).
If you want to use multiple software clients simultaneously with the device, keep in mind they'll also have to share the same sample rate.
- Process Buffer : Lower the buffer size value for a quicker response time from your computer to audio software actions.

When converting audio information to digital and vice versa, the audio driver needs to store the data in buffer packages (audio buffers), which are then sent to and processed by the CPU. The higher the buffer size, the longer it takes for a signal to finally arrive at the output as audio. You might experience this as a delay between the time you hit a key on your computer or controller and when you actually hear the sound. This delay is called latency. A rule of thumb: lowering buffer size results in lower latency. However, there are more factors to latency than buffer size alone (e.g., CPU speed and RAM size). Start off with a higher buffer size setting and gradually decrease the value until you find the perfect balance between audio quality and system performance. If you experience crackling at the audio output, the chosen buffer size is very likely too low for your computer's CPU to handle considering that a lower buffer size causes higher CPU load.
- USB Buffer: Changing the USB Buffer size (Process Buffer) affects the ASIO and the WDM driver. Supported USB Buffers (in ms) are: 1, 2, 3, 4. Default USB Buffer: 3ms
Device Monitor Section
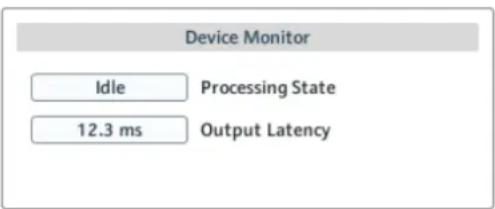
The Device Monitor section in the Audio Settings page of the Control Panel.
The Device Monitor section displays information about the audio interface's processing status and your system's output latency. It has two displays:
- Processing State: The processing state monitor provides feedback on the current status of the device. There are three possible status messages:
- Idle: interface is connected, but no client delivers audio data.
- Streaming: driver is working and processing audio data.
- Panic: driver stopped streaming. Too many USB I/O errors occurred in the interface communication.
- Output Latency: Shows the amount of output latency in milliseconds.
7.1.2 Diagnostics Page
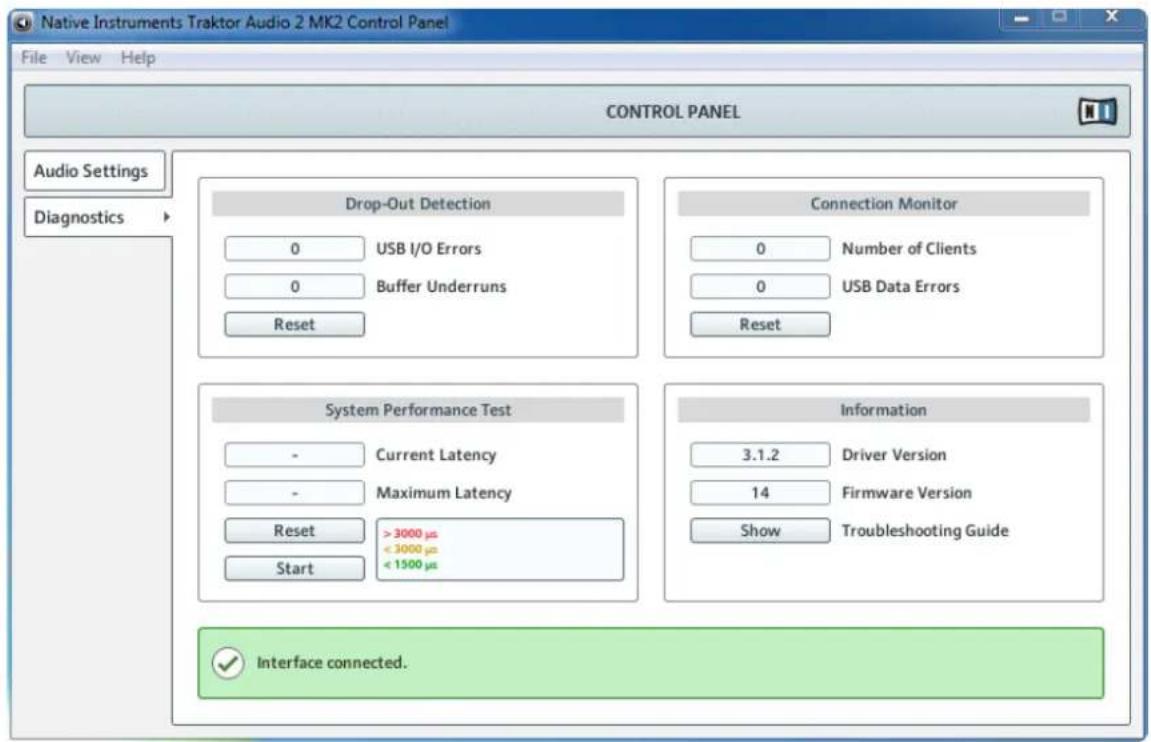
The Control Panel's Diagnostics page.
The Diagnostics page allows you to monitor performance and detect errors. The information provided in this page is primarily of interest to advanced users; however, in case of problems with the soundcard, you should refer to this page. The Diagnostics page consists of the four sections: Drop-Out Detection; Connection Monitor; System Performance Test; and Information. See the following subsections for further information on these sections.
Drop-Out Detection Section
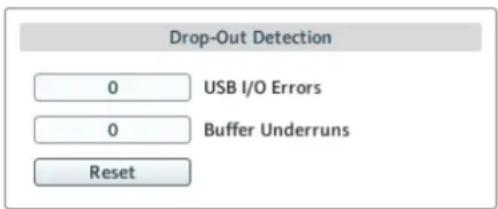
The Drop-Out Detection section in the Diagnostics page of the Control Panel.
The Drop-Out Detection section provides feedback on USB input/output and buffering errors. It has two displays and a button:
- USB I/O Errors: provides feedback on USB input/output errors. A high USB I/O Errors count points to your system being overloaded.
- Buffer Underruns: Buffer underruns occur when your computer isn't able to process an audio buffer in time. Reasons for underruns include too many ongoing background tasks or high CPU usage within a music program. Increasing the buffer size (Process Buffer parameter in the Audio Processing section of the Audio Settings page) will often prevent underruns.
- Reset: A click on this button resets the error count.
Connection Monitor Section
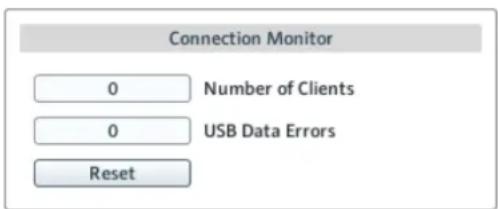
The Connection Monitor section in the Diagnostics page of the Control Panel.
The Connection Monitor section provides feedback on connected clients and USB data errors. It has two displays and a button:
- Number of Clients: displays the number of clients connected to the interface. Multiple ASIO applications are counted separately. WDM and WASAPI increase the number by one, no matter how many WDM / WASAPI applications play audio.
- USB Data Errors: counts USB data errors. Poor quality or long USB cables, as well as irradiation, can be the source of connection errors on the USB bus.
- Reset: A click on this button resets the error count.
System Performance Test Section
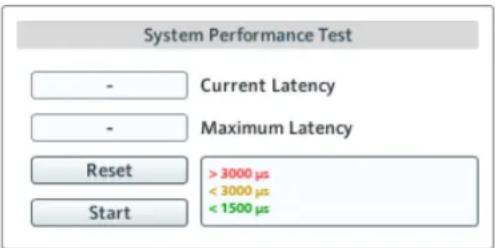
The System Performance Test section in the Diagnostics page of the Control Panel.
The System Performance Test section provides monitoring of the current DPC (Deferred Procedure Call) latency value of your Windows system. A Deferred Procedure Call is a Windows mechanism which allows high-priority tasks (such as the basic system tasks) to delay lower-priority tasks. The section has two displays and two buttons:
- Current Latency: displays the current DPC latency value.
- Maximum Latency: displays the highest DPC latency value monitored since the last time you either started or restarted monitoring.
- Reset: Press this button to reset the Maximum Latency value to zero.
- Start/Stop: Press this button to start monitoring DPC latency. Once started, the button label changes to Stop.
Information Section
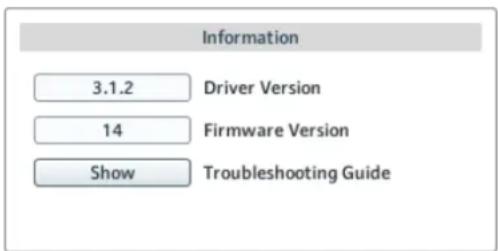
The Information section in the Diagnostics page of the Control Panel.
The Information section displays information about driver and firmware, and provides access to the Audio Troubleshooting Guide. This section has two displays and a button:
- Driver Version: See the currently installed driver version here.
- Firmware Version: See the currently installed firmware version here.
- Troubleshooting Guide: Click Show to open the Audio Troubleshooting Guide.
7.2 Advanced Configuration on Mac OS X
The advanced audio and MIDI settings are accessed from the Mac OS X Audio MIDI Setup.

If you experience problems with your setup, please refer to the Audio Troubleshooting Guide which you can access directly from the software's documentation folder.
To open the Audio MIDI Setup utility:
▶ Go to Applications > Utilities > Audio MIDI Setup.
→ The Audio MIDI Setup utility will pop up in a window, entitled Audio Devices.
The left half of the window displays the different hardware and software in and outs installed on the computer. If not selected already, click on Traktor Audio 2 MK2 to utilize the TRAKTOR AUDIO 2 device.
Output Pane
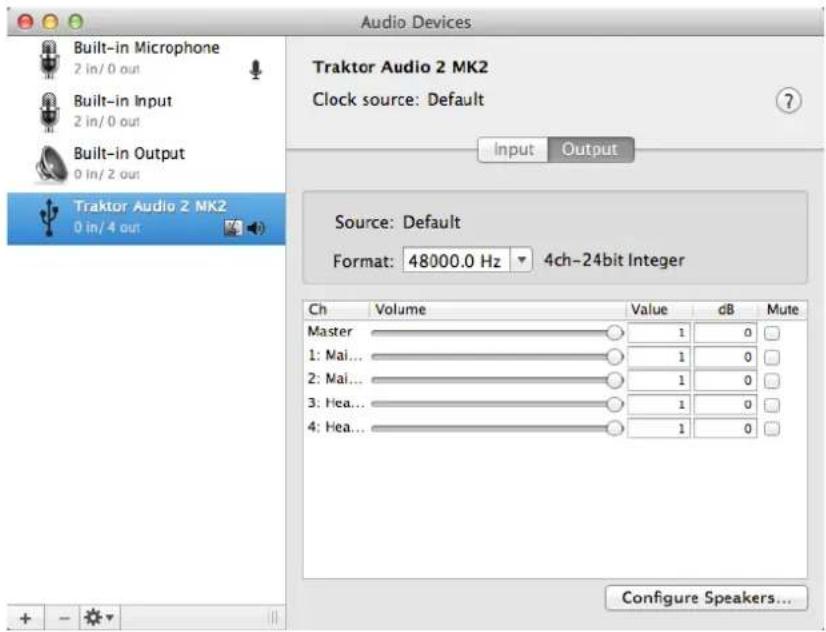
The Output pane of the Audio MIDI Setup utility in Mac OS X.
The Audio MIDI Setup's Output pane allows for selection of sample rate settings. The relevant element here is the Format drop-down menu.
- Format: Choose a sample rate that is compatible with your music application and suited to your computing power. A higher sample rate improves the audio quality but also causes higher CPU load.
Input Pane
As the TA2 provides no inputs, the Input pane will stay grayed out in the Audio MIDI Setup utility.
8 Troubleshooting and FAQ
The information provided in this section should help you to solve most of the problems you may encounter while you are using the TRAKTOR AUDIO 2.
8.1 Solving Hardware-related Problems
All Native Instruments products are extensively tested in real life situations during the development phase. However, if you encounter any problems with your hardware, please check the following points:
- Verify that you have installed the latest driver and the latest software update. Check the Native Instruments website for further information.
- Make sure the TRAKTOR AUDIO 2 is connected directly to a USB port of the computer and not through a USB hub.
- Make sure you use one of the USB cables provided with TA2.
- Disconnect all other USB devices from the computer (except keyboard/mouse).
- Try using another USB port on your computer.
If none of these tips help, please contact our Technical Support team. The contact information is available under the following URL: http://www.native-instruments.com/contactinfo. In case the TRAKTOR AUDIO 2 needs to be returned, the Technical Support team at Native Instruments will assign you an RA (Return Authorization) number, which is required to handle your return. Packages returned without this RA number will not be correctly identified and as such might not be processed properly.
8.2 How to Check Whether the TRAKTOR AUDIO 2 Drivers are Installed on Windows Correctly
Open Start > All Programs > Native Instruments > TRAKTOR AUDIO 2 MK2. There you will find the helper application TRAKTOR AUDIO 2 MK2 Control Panel. Make sure that the device is connected to the computer and open the Control Panel. If all the drop-down menus are grayed out (i.e., there are no presets in the preset drop-down list and no sample rate values to choose from) there must be something wrong with the connection. If the TRAKTOR AUDIO 2 MK2 entry in the Native Instruments folder of the Start Menu is missing, the driver is most probably not installed.
- If the driver is not installed, you can install it as described in section ↑6.1, Driver Software Installation on Windows.
- If the driver is not recognized, check your USB connection as described in section 4.
- As with any other USB device, the driver installs exactly for one USB port. If you connect the TRAKTOR AUDIO 2 to another port, a standard Windows dialog opens in which you can install the driver to that port. If you have previously installed the driver on your computer once, Windows will find the right drivers itself once that you start the driver installation procedure. If you cancel the installation procedure, the driver will not be installed and the interface will not work on that port.
- If you do not know whether drivers were installed correctly, it is advisable to start the setup program of the TRAKTOR AUDIO 2 again (see section ↑6.1, Driver Software Installation on Windows). If the setup program states that it will first uninstall the drivers, you already have installed the drivers on your computer. In this case you can connect the device to any other USB port and Windows will find the right driver when installing the TRAKTOR AUDIO 2 on another USB port.
8.3 USB Troubleshooting
If you experience problems caused by the USB connection between the TRAKTOR AUDIO 2 and your computer, check the following sections first; several possible sources for USB issues are covered here.
Using a powered USB hub
Connect the TRAKTOR AUDIO 2 to a USB port directly on your computer. In certain situations, a powered USB hub may also work (e.g., if you are having problems connecting your TRAKTOR AUDIO 2 to an onboard USB port).
Recommended USB-ports (MacBook Only)
For a current list of recommended ports on Mac Laptops (MacBook and MacBook Pro). Please refer to our knowledge base article http://www.native-instruments.com/knowledge/questions/263.
Disable USB Energy Saving Mode (Windows only)
If the TRAKTOR AUDIO 2 is causing crashes or performing badly on a Windows machine, disable power management to the USB hubs first; see the Windows documentation for further instructions.
Update the Driver
Whenever you encounter problems, you should also check if you have the latest software installed. For updates, visit the product's homepage on our website http://www.native-instruments.com.
8.4 Physically Re-configuring the TRAKTOR AUDIO 2
Connect the TRAKTOR AUDIO 2 to another USB port on your computer. Try all USB ports on your computer until you find the one that works best.
8.5 Check your IRQs (Windows only)
IRQ stands for Interrupt Request. This is the way in which Windows allocates resources to the various devices and ports in your system. If your TRAKTOR AUDIO 2 is on a port that shares an IRQ with other devices, you may have an IRQ conflict. Please refer to the Knowledge Base on the Native Instruments website and contact support.
This section contains some of the most frequently asked questions and answers along with references to Knowledge Base articles for additional details. In order to find an article, please visit the Native Instruments website, navigate to the Knowledge Base in the Support section and enter the article number in the search field.
8.6 Installation Folder Not Found by an Update Installer
If you have manually moved the location of a Native Instruments application on your hard drive, the installer, upon attempting to run an update, will display an error message and abort the installation. You can correct the application path in Service Center from the Overview tab. If an application cannot be found, a Locate button will appear on this tab. Click this button and browse to the actual location of the application.
8.7 Audio Clicks and Drop-outs When Playing Tracks
If you hear clicks and/or drop-outs when a track is playing, you might need to increase the latency setting of your TRAKTOR AUDIO 2. To learn how to do this, please refer to section ↑7, Advanced Configuration of Your TRAKTOR AUDIO 2 which thoroughly describes the TRAKTOR AUDIO 2 MK2 Control Panel — the tool that allows you to adjust the audio interface settings.
8.8 More Troubleshooting Resources
If none of the suggestions in this section covers your problem, the TRAKTOR 2 Manual provides more detailed information on the topics discussed in this Setup Guide. Also check if the Knowledge Base has an answer: http://www.native-instruments.com/knowledge/
9 Additional Documentation Resources
9.1 Further Documentation Resources
The following documents are also part of the TRAKTOR documentation:
- The TRAKTOR Getting Started guide provides you with essential information on using TRAKTOR, and explains how to accomplish fundamental tasks.
- The TRAKTOR Manual provides you with a detailed reference of your TRAKTOR software along with extra information (solving common issues, specifications, etc.).
You will find TRAKTOR documents in the documentation folder, which will be created in the program installation folder during the software installation, and you will find them on the Native Instruments website. The documents will also be available from the TRAKTOR software's Help menu.
In TRAKTOR DJ you can find the TRAKTOR DJ InApp Help. It provides you with essential information on using TRAKTOR DJ, and explains how to accomplish fundamental tasks.
9.2 Knowledge Base / Readme / Online Support
▶ Open the Service Center application and click on the Support button in the upper right corner. Here you will find direct links to the Native Instruments Online Knowledge Base and the Online Support Form.
The Online Knowledge Base gathers useful information about your Native Instruments product and can be of great help to solve possible issues you may encounter when working with Native Instruments products.
If no Knowledge Base entry matches your problem, or if the matching entry does not solve the problem, you can use the Online Support Form to contact the Technical Support team with Native Instruments. The Online Support Form will ask you to enter information about your hardware and software setup. This information is essential for our support team to be able to provide you with quality assistance.
When communicating with the Native Instruments support team, keep in mind that the more details you can provide about your hardware, your operating system, the version of the software you are running, and the problem you are experiencing, the better they will be able to help you. In your description, you should mention:
• How to reproduce the problem
• What you have already tried to fix the problem
- A description of your setup, including all hardware
- The brand and specifications of your computer
When installing new software or software updates, a Readme file is included that contains late breaking news and new information that was not yet included in the documentation. Please open and read this Readme file before contacting Technical Support.
9.3 Forum
In the Native Instruments User Forum you can discuss product features directly with other users and with experts moderating the forum.
http://www.native-instruments.com/forum
9.4 Updates
Whenever you encounter problems, it is recommended that you first download and install any available software updates. Updates are released regularly to fix known problems and to continuously improve the software. The version number of your software is displayed in the About dialog for any Native Instruments application. This dialog can be opened by clicking on the NI logo in the upper right corner of the user interface. Alternatively, you can find the version numbers of all installed Native Instruments applications when showing the details for an application within the Overview page of the Service Center. Updates are available on the Update page in Service Center or on our website under: http://www.native-instruments.com/updates
10 Technical Specifications
Supported Drivers
• ASIO
- Code Audio
- DirectSound
- WASAPI
Dimensions
- Size: 84,3 x 55 x 16,2mm / 3.3 x 2.17 x 0.63"
• Weight: 68g / 0.15lbs
| Audio Converters (Inputs A/D) | |
| Channels D/A 4 | |
| Channels A/D 0 | |
| Sample Rates 44.1, 48Hz | |
| Bit Resolution 24Bit |
| Line Outputs | |
| Max. Output Level +11.7dBu | |
| Dynamic Range (A weighted) 103 dB | |
| THD+N (Max. Level) 20Hz - 20kHz | |
| Cross Talk @ 1kHz to next channel -105dB | |
| Headphone output | |
| Load Impedance 80hms - 6000hms | |
| Maximum Output Level +5dBu dB @ | 320hms |
| Dynamic Range (A weighted) 102dB | |
| THD+N (Max Level, high Imp, 1000hms) | 0.004% |
| Frequency Response, +/-1.4dB 20Hz | - 20kHz |
Power Supply
Power supply via USB interface, 5V 500mA bus power from a computer - no external power supply is required. Low-power operation is possible from iOS devices. Full operation with iOS devices is achieved with use of an optional power supply (this increases output volumes and also charges the battery of the iOS device).
Sockets
- 1 Headphones socket for stereo 18 " (3.5mm) phone plug
- 1 MAIN socket for stereo 18 " (3.5mm) phone plug
- 1 Mini USB Type B socket
• 1 DC power supply socket
Environmental Specifications
- Operating temperature: +5 to +35°C (41 to 95°F), max 85% non-condensing humidity
- Storage temperature: 0 to 40^ (32 to 104^ ), max 85% non-condensing humidity
Do not install this unit in locations exposed to high humidity or direct sunlight.
11 Hardware Returns
Please contact our Technical Support team prior to returning an item. If your product needs to be returned, they will assign you an RA (Return Authorization) number to expedite the processing of your return.
Contact Native Instruments Technical Support
http://www.native-instruments.com/support
- NATIVE INSTRUMENTS GmbH
- Table of Contents
- Welcome to TRAKTOR AUDIO 2 .... 7
- System and Power Requirements 11
- TRAKTOR AUDIO 2 at a Glance 12
- Using TRAKTOR AUDIO 2 with Your Computer 21
- Using TRAKTOR AUDIO 2 with Your iOS Device 32
- Using TRAKTOR AUDIO 2 as Your Computer's Default Audio Output Device .... 45
- Advanced Configuration of Your TRAKTOR AUDIO 2 53
- Troubleshooting and FAQ 62
- Additional Documentation Resources 66
- Technical Specifications 68
- Hardware Returns....70
- Welcome to TRAKTOR AUDIO 2
- About this Manual
- Setup Overview
- What is included in the Box?
- Document Conventions
- Naming Convention
- System and Power Requirements
- Power Requirements
- Software System Requirements
- TRAKTOR AUDIO 2 at a Glance
- Hardware Overview
- Top Panel
- Front Panel
- Rear Panel
- Using the TRAKTOR AUDIO 2 (Setup Scenarios)
- Overview of Internal Mixer Mode
- Overview of External Mixer Mode
- Using TRAKTOR AUDIO 2 with Your Computer
- Setting up Your System for Internal Mixer Mode
- Connecting TRAKTOR AUDIO 2 to Your Computer
- Windows Users Only: Completing the Device Driver Installation
- Connecting Headphones to Your TRAKTOR AUDIO 2
- Connecting an Amplification System to Your TRAKTOR AUDIO 2
- Final Preparations in TRAKTOR
- Setting up Your System for External Mixer Mode
- Connecting TRAKTOR AUDIO 2 to Your Computer
- Connecting TRAKTOR AUDIO 2 to Your DJ Mixer
- Connecting Headphones to Your DJ Mixer
- Connecting an Amplification System to Your DJ Mixer
- Final Preparations in TRAKTOR
- Using TRAKTOR AUDIO 2 with Your iOS Device
- Setting up Your System for Internal Mixer Mode
- Connecting TRAKTOR AUDIO 2 to Your iOS Device
- Connecting Headphones to Your TRAKTOR AUDIO 2
- Connecting an Amplification System to Your TRAKTOR AUDIO 2
- Final Preparations in TRAKTOR DJ
- Setting up Your System for External Mixer Mode
- Connecting TRAKTOR AUDIO 2 to Your iOS Device
- Connecting TRAKTOR AUDIO 2 to Your DJ Mixer
- Connecting Headphones to Your DJ Mixer
- Connecting an Amplification System to Your DJ Mixer
- Final Preparations in TRAKTOR DJ
- Using TRAKTOR AUDIO 2 as Your Computer's Default Audio Output Device
- Driver Software Installation on Windows
- Locate and Start the Driver Software Installation Program
- Connecting TRAKTOR AUDIO 2 to Your Computer
- Connecting Headphones to Your TRAKTOR AUDIO 2
- Connecting an Amplification System to Your TRAKTOR AUDIO 2
- Final Steps on Mac OS X
- Final Steps on Windows
- Using TRAKTOR AUDIO 2 as Audio Output Device with Your Music Software
- Advanced Configuration of Your TRAKTOR AUDIO 2
- On Windows
- On Mac OS X
- Advanced Configuration on Windows (Control Panel)
- Audio Settings Page
- Audio Processing Section
- Device Monitor Section
- Diagnostics Page
- Drop-Out Detection Section
- Connection Monitor Section
- System Performance Test Section
- Information Section
- Advanced Configuration on Mac OS X
- Output Pane
- Input Pane
- Troubleshooting and FAQ
- Solving Hardware-related Problems
- How to Check Whether the TRAKTOR AUDIO 2 Drivers are Installed on Windows Correctly
- USB Troubleshooting
- Using a powered USB hub
- Recommended USB-ports (MacBook Only)
- Disable USB Energy Saving Mode (Windows only)
- Update the Driver
- Physically Re-configuring the TRAKTOR AUDIO 2
- Check your IRQs (Windows only)
- Installation Folder Not Found by an Update Installer
- Audio Clicks and Drop-outs When Playing Tracks
- More Troubleshooting Resources
- Additional Documentation Resources
- Further Documentation Resources
- Knowledge Base / Readme / Online Support
- Forum
- Updates
- Technical Specifications
- Supported Drivers
- Dimensions
- Power Supply
- Sockets
- Environmental Specifications
- Hardware Returns
- Contact Native Instruments Technical Support
Brand : NATIVE INSTRUMENTS
Model : Traktor Audio 2
Category : Hi-Fi System