
Duo - Multicooker Instant Pot - Free user manual and instructions
Find the device manual for free Duo Instant Pot in PDF.


| Product Type | Multi-Use Pressure Cooker |
| Brand | Instant Pot |
| Model | Duo (Mini 3 Qt, 6 Qt, 8 Qt) |
| Capacity (6 Qt) | 5.7 Liters / 6 Quarts |
| Dimensions (6 Qt) | 13.4 x 12.2 x 12.5 inches (34 x 31 x 31.7 cm) |
| Weight (6 Qt) | 11.80 lbs (5.35 kg) |
| Power | 1000 W, 120 V / 60 Hz |
| Main Material | Stainless Steel inner pot; stainless steel exterior |
| Control Panel | Digital LED display with touch buttons |
| Smart Programs | Pressure Cook, Soup/Broth, Meat/Stew, Bean/Chili, Poultry, Rice, Multigrain, Porridge, Steam, Slow Cook, Sauté, Yogurt, Keep Warm |
| Pressure Levels | Low (5.8–7.2 psi) and High (10.2–11.6 psi) |
| Cooking Functions | Pressure cooking, slow cooking, sauté, yogurt making, steaming, rice cooking, keep warm |
| Safety Features | Float valve, anti-block shield, sealing ring, steam release handle, lid lock, pressure sensor |
| Accessories Included | Steam rack with handles, condensation collector, sealing ring, power cord (detachable for 3 & 6 Qt) |
| Minimum Liquid for Pressure Cooking (6 Qt) | 1.5 cups (12 oz / 375 mL) water-based liquid |
| Cleaning | Inner pot and accessories dishwasher safe; lid parts hand wash with mild soap |
| Warranty | 1 year limited warranty |
| Special Features | Delay start (10 min–24 hr), keep warm (up to 10 hr), adjustable time/temperature, sound on/off |
| Voltage | 120 V / 60 Hz (North America) |
| Usage | Household countertop use only; not for commercial |
Frequently Asked Questions - Duo Instant Pot
User questions about Duo Instant Pot
0 question about this device. Answer the ones you know or ask your own.
Ask a new question about this device
Download the instructions for your Multicooker in PDF format for free! Find your manual Duo - Instant Pot and take your electronic device back in hand. On this page are published all the documents necessary for the use of your device. Duo by Instant Pot.
USER MANUAL Duo Instant Pot
Mini, 6 and 8 Quart Multi-Use Pressure Cookers
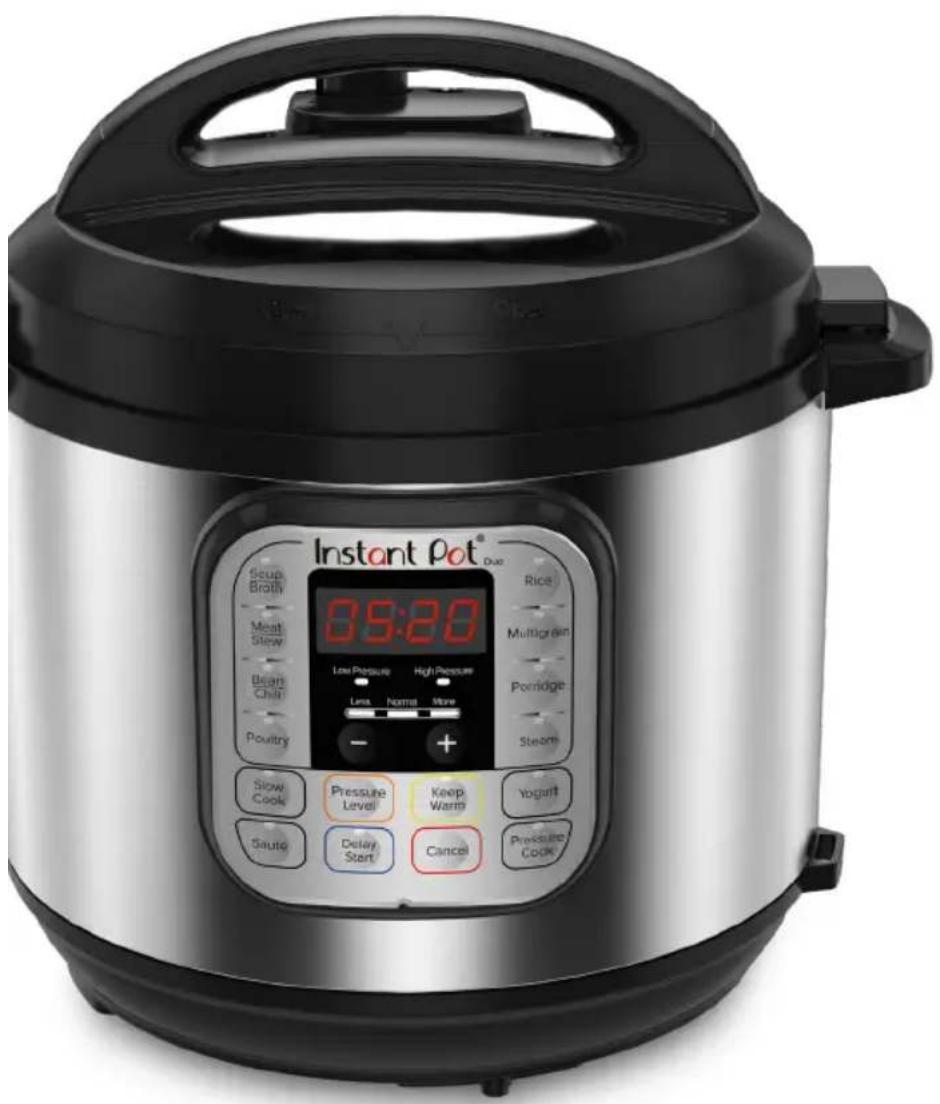
User Manual
Important Safeguards
Product Specifications
Initial Setup
Product, Parts and Accessories
Smart Program Settings
Cleaning Before First Use
Overview of Pressure Control
Features
Initial Test Run (Water Test)
Cooking with the Duo
Pressure Cooking Timetable
Grain-to-Water Ratios
Care and Cleaning
Troubleshooting
Warranty
Contact Information
Welcome to the world of Instant cooking.
Thank you for welcoming us into your kitchen.
Having families ourselves, we developed the Instant Pot ^® Duo ^TM pressure cookers to allow busy families and professionals alike to cook healthy, delicious meals more easily and in less time.
We have partnered with chefs, authors and bloggers to compile a collection of recipes that we hope you enjoy!
Happy cooking,

Robert J. Wang
Founder and Chief Innovation Officer

Download the Instant Pot App
• Original Recipes
- New User Tips
• Getting Started Videos

Find helpful how-to videos, download the app, or visit our recipe site.
IMPORTANT SAFEGUARDS....5-10
Special Cord Set Instructions....10
Product Specifications....10
Initial Setup 11
Product, Parts and Accessories 12-14
Control Panel 15-16
Smart Program Settings.... 17-19
Adjust and Save Pressure Cooking Temperature 17
Adjust and Save Pressure Cooking Time....17
Adjust and Save Non-Pressure Cooking Temperatures 17
Adjust and Save Non-Pressure Cooking Time 17
Cancel and Standby Mode 18
Turn Sound On/Off 18
Set a Delay Start Timer....18
Automatically Keep Food Warm for Long Periods 19
Reheat Food or Keep Warm for Long Periods....19
Reset Smart Programs to Factory Default Settings 19
Status Messages....20
Cleaning Before First Use 21
Overview of Pressure Control Features 22-29
Pressure Cooking Lid....22
Steam Release Handle....23-24
Anti-Block Shield 25
Sealing Ring....26
Float Valve....27-28
Condensation Collector....29
Table of Contents
Introduction to Pressure Cooking 30
Cooking with the Duo.... 30-31
Depressurizing the Cooker (Venting Methods).... 32-34
Initial Test Run (Water Test) 35
Using Pressure Cooking Smart Programs....36-42
Pressure Cooking Settings.... 39-40
Pressure Cooking Tips....41-42
Pressure Cooking Timetable and Grain-to-Water Ratios 43-44
Using Non-Pressure Cooking Smart Programs....45-49
Slow Cook....46
Sauté 47
Yogurt....48-49
Care and Cleaning 50-51
Troubleshooting 52-54
Warranty 55-56
Contact Information 57
IMPORTANT SAFEGUARDS
When using electrical appliances, basic safety precautions should always be followed:
- READ THE GETTING STARTED GUIDE AND ALL INSTRUCTIONS, SAFEGUARDS, AND WARNINGS BEFORE OPERATING THE APPLIANCE. FAILURE TO FOLLOW THESE SAFEGUARDS AND INSTRUCTIONS MAY RESULT IN INJURY AND/OR PROPERTY DAMAGE.
- Use only the Instant Pot Duo lid with the Instant Pot Duo pressure cooker base. Using any other pressure cooker lids may cause injury and/or damage.
- To reduce the risk of pressure leakage, cook only in an authorized stainless steel Instant Pot inner pot. DO NOT use the appliance without the removable inner pot installed.
- Always operate the appliance on a stable, non-combustible, level surface.
- Do not use the appliance for anything other than its intended use. Failure to follow these instructions may result in injury or property damage.
- For household use only. Do not use outdoors. Not for commercial use.
- ACAUTION Do not place the appliance on or in close proximity to a hot gas or electric burner, or a heated oven. Heat from an external source will damage the appliance. Failure to follow these instructions may result in injury or property damage.
- ACAUTION Do not use the appliance near water or flame. Keep out of direct sunlight. Failure to follow these instructions may result in injury or property damage.
- CAUTION Do not touch hot surfaces. Only use side handles for carrying or moving. Extreme caution must be used when moving the appliance containing hot liquids. Do not move the appliance when it is under pressure.
- The cooker base contains electrical components. To avoid electrical shock, do not put liquid of any kind into cooker base, and do not immerse power cord, plug, or the appliance in water or other liquid. Do not rinse the appliance under tap.
- CAUTION Do not fill over PC MAX - 2/3 as indicated on the inner pot. When cooking foods that expand during cooking such as rice or dried vegetables, do not fill the inner pot over -1/2 line. Overfilling may cause a risk of clogging the steam release pipe and developing excess pressure.
IMPORTANT SAFEGUARDS
-
AWARNING This appliance cooks under pressure. Inappropriate use may result in burns, injury and/or property damage. Make certain the appliance is properly closed before operating. Refer to Pressure Control Features—Pressure Cooking Lid.
-
When cooking meat with skin (e.g. sausage with casing), the skin can swell when heated. Do not pierce the skin while it is swollen; this could result in scalding injury.
-
ACAUTION When pressure cooking food with a doughy or thick texture, or a high fat/oil content, contents may splatter when opening the lid. Please follow recipe instructions for pressure release method. Refer to Depressurizing the Cooker (Venting Methods).
-
ACAUTION Before each use, check the steam release valve/handle, steam release pipe, anti-block shield and float valve for clogging. Failure to do so may result in injury or property damage.
-
DANGER Do not open the appliance until it has depressurized and all internal pressure has been released. If the float valve is still up and/or the lid is difficult to open, this indicates that the appliance is still pressurized – do not force it open. Any pressure in the appliance can be hazardous. Refer to Depressurizing the Cooker (Venting Methods) for information on releasing pressure. Opening appliance while it is still pressurized may lead to sudden release of hot contents and may cause burns or other injuries.
-
Do not use this appliance for deep frying or pressure frying with oil.
-
Do not lean over or place your hands or face over the steam release valve/handle or float valve when the appliance is in operation or has residual pressure. Do not touch the metal portion of the lid when the appliance is in operation; this could result in injury.
-
Do not cover or obstruct the steam release valve/handle and/or float valve with cloth or other objects. Obstructing the steam release valve/handle and/or float valve can create a safety issue and may cause injury.
-
Turn the appliance off if steam escapes from the steam release valve/handle and/or float valve in a steady stream for longer than 3 minutes. There may be residual pressure in the appliance. Allow the appliance to depressurize naturally or release all excess pressure before opening. For more information on how to release pressure, refer to Depressurizing the Cooker (Venting Methods).

WARNING
Read this manual carefully and completely, and retain for future reference. Failure to adhere to safety instructions may result in serious injury.
IMPORTANT SAFEGUARDS
- Turn the appliance off if steam escapes from the sides of the lid and ensure sealing ring is properly installed. Overview of Pressure Control Features-Sealing Ring for more information.
- To disconnect, select Cancel, then remove plug from power source.
- Unplug from the outlet when not in use, as well as before adding or removing parts or accessories, and before cleaning. To unplug, grasp the plug and pull from the outlet. Never pull from the power cord.
- Regularly inspect the appliance and power cord. Do not operate the appliance if the power cord or plug is damaged, or after the appliance malfunctions or is dropped or damaged in any manner. For assistance, contact Customer Care at support@instantpot.com or 1-800-828-7280.
- ⚠CAUTION Do not let the power cord hang over edges of tables or counters, or touch hot surfaces or open flame, including the stovetop.
-
CAUTION Spilled food can cause serious burns. A short power-supply cord is provided to reduce the hazards resulting from grabbing, entanglement and tripping.
-
Keep the appliance and cord away from children.
- Never drape the power cord over edges of tables or counters.
-
Never use below-counter power outlets, and never use with an extension cord.
-
Intended for countertop use only. Keep the appliance on a stable, heat-resistant platform. Do not place on anything that may block the vents on the bottom of the appliance. Do not place on a hot stove.
- ACAUTION Do not use any accessories or attachments not authorized by Instant Brands™ Inc. The use of attachments not recommended by the manufacturer, may cause a risk of injury, fire or electric shock.
- ACAUTION Before inserting the inner pot into the appliance, clean the outer surface of the inner pot and the heating element located on the inner surface of the outer pot with a clean, dry cloth. Ensure they are dry and free of food debris.
- Do not attempt to repair, replace, or modify components of the appliance, as this may cause electric shock, fire or injury, and will void the warranty.

WARNING
Read this manual carefully and completely, and retain for future reference.
Failure to adhere to safety instructions may result in serious injury.
IMPORTANT SAFEGUARDS
- Do not tamper with any of the safety mechanisms, as this may result in injury or property damage.
- Do not use the appliance in electrical systems other than 120 V/60 Hz for North America. Do not use with power converters or adapters.
- This appliance is NOT to be used by children or by persons with reduced physical, sensory, or mental capabilities. Close supervision is necessary when any appliance is used near children and these individuals. Children should not play with this appliance.
- To prevent personal injury and damage to the appliance, only replace the sealing ring with an authorized Instant Pot sealing ring.
- The use of accessory attachments not recommended by the appliance manufacturer may cause injuries.
- Proper maintenance is recommended after each use. Refer to Care and Cleaning. Let the appliance cool to room temperature before cleaning or storage.
- Never connect this appliance to an external timer switch or separate remote-control system.
- ⚠️CAUTION DO NOT touch accessories during or immediately after cooking. To avoid personal injury,
- Always use oven mitts when removing accessories, and to handle the inner pot.
• Always place hot accessories on a heat resistant surface or cooking plate. - Use extreme caution when disposing of hot grease.
Failure to follow these instructions may result in serious injury or property damage. - Do not leave the appliance unattended while in use.
- CAUTION Extreme caution must be used when the inner pot contains hot oil, hot food, or hot liquids. Improper use, including moving the cooker base, may result in personal injury. Do not move the appliance while it is in use.
- Oversized foods and/or metal utensils must not be inserted into the inner pot as they may cause risk of fire and/or personal injury.
- Do not store any materials in the cooker base or inner pot when not in use.

Read this manual carefully and completely, and retain for future reference. Failure to adhere to safety instructions may result in serious injury.
IMPORTANT SAFEGUARDS
- Do not place any combustible materials in the cooker base or inner pot, such as paper, cardboard, plastic, Styrofoam or wood.
- Do not use the included accessories in a microwave, toaster oven, convection or conventional oven, or on a ceramic cooktop, electric coil, gas range, or outdoor grill.
- The removable inner pot can be extremely heavy when full of ingredients. Care should be taken when lifting the inner pot from the cooker base to avoid burn injury.
- Use caution when removing the lid. Heat and steam escapes as soon as the lid is removed. Never place your face, hands or exposed skin over the appliance opening where heat and steam escapes when removing the lid.
SAVE THESE INSTRUCTIONS

WARNING
Read this manual carefully and completely, and retain for future reference.
Failure to adhere to safety instructions may result in serious injury.
IMPORTANT SAFEGUARDS
WARNING
To avoid injury, read and understand instruction manual before using this appliance. Failure to do so may result in injury.
WARNING
Electrical shock hazard. Use grounded outlet only. DO NOT remove ground. DO NOT use an adapter. DO NOT use an extension cord. Failure to follow instructions can cause electric shock or death.
WARNING
THE FAILURE TO FOLLOW ANY OF THE IMPORTANT SAFEGUARDS AND THE IMPORTANT INSTRUCTIONS FOR SAFE USE IS A MISUSE OF YOUR APPLIANCE THAT CAN VOID YOUR WARRANTY AND CREATE THE RISK OF SERIOUS INJURY.
Special Cord Set Instructions
As per safety requirements, a short power supply cord (0.6 m to 0.9 m / 24" to 35") is provided to reduce the hazards resulting from grabbing, entanglement and tripping.
This appliance has a 3-prong grounding plug. To reduce the risk of electric shock, plug the power cord into a grounded (earthed) electrical outlet that is easily accessible.
Product Specifications
| Duo Mini | 3 Quart2.8 Litres | 700 watts 120 V / 60 Hz | 3.9 kg8.6 lbs. | in: 11.4 L × 10 W × 11.2 Hcm: 29 L × 25.5 W × 28.5 H | |
| Duo 60 V3 | 6 Quart5.7 Litres | 1000 watts 120 V / 60 Hz | 5.35 kg11.80 lbs. | in: 13.4 L × 12.2 W × 12.5 Hcm: 34 L × 31 W × 31.7 H | |
| Duo 80 V2 | 8 Quart7.6 Litres | 1200 watts 120 V / 60 Hz | 7.16 kg15.79 lbs. | in: 14.8 L × 13.3 W × 14.2 Hcm: 37.6 L × 33.8 W × 36.1 H | |

WARNING
Read this manual carefully and completely, and retain for future reference. Failure to adhere to safety instructions may result in serious injury.
- Read all the Important Safeguards before using the appliance. Failure to read and follow the Important Safeguards may result in damage to the appliance, property damage or personal injury.
- Use only the Instant Pot Duo lid with the Instant Pot Duo pressure cooker base. Using any other pressure cooker lids may cause injury and/or damage.
- Remove all packaging material and accessories from within and around the appliance.
- Place the appliance on a stable, level surface, away from combustible material and external heat sources.
- Do not remove safety warning stickers from the lid or rating label from back of the cooker base.
- Follow Cleaning Before First Use instructions to clean the appliance before first use.
| CAUTION | |
| Do not place the appliance on a stovetop. Heat from an external source will damage the appliance. | Do not place anything on top of the appliance, and do not cover or block the steam release valve or anti-block shield located on the appliance lid. |
Duo Mini, 6 and 8 Quart Pressure Cookers
Before using the Instant Pot Duo, verify that all parts are accounted for.
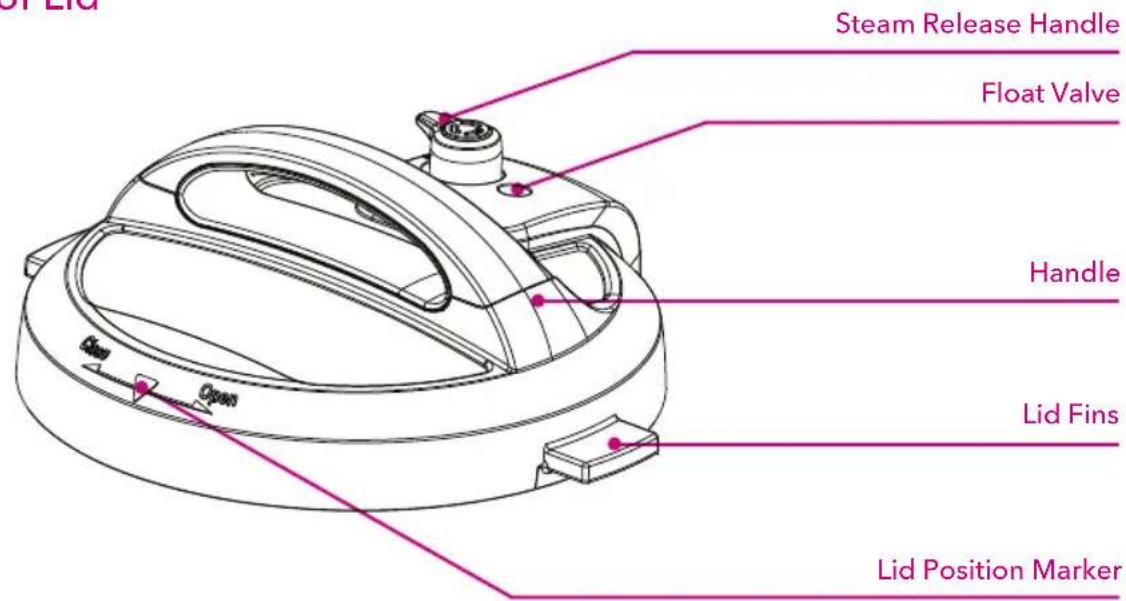
Top of Lid
Bottom of Lid
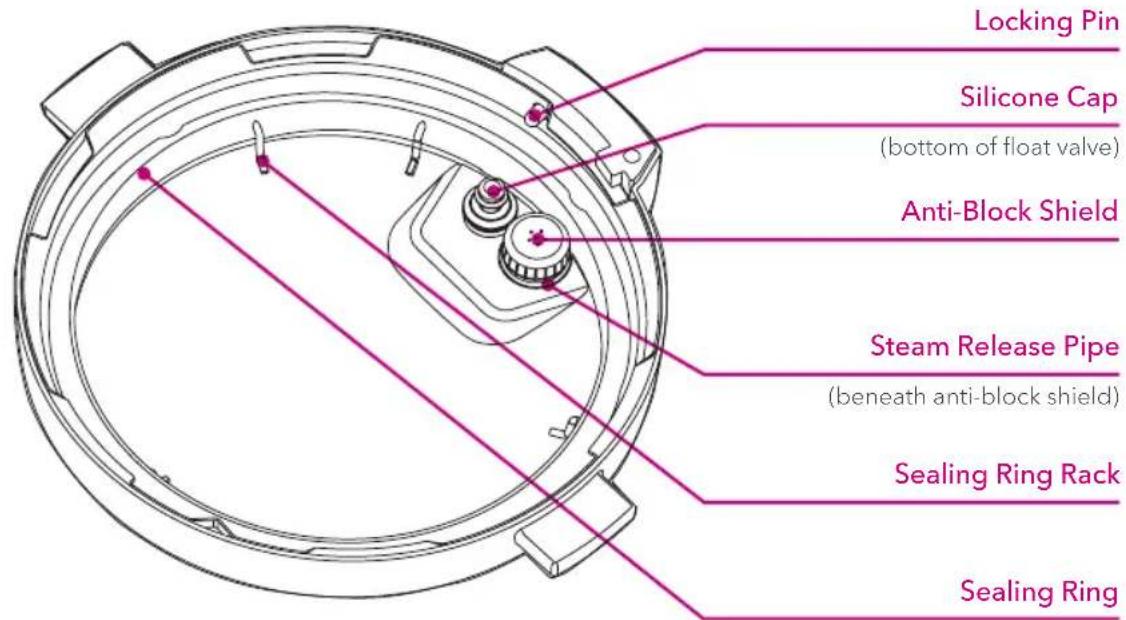
Illustrations are for reference only and may differ from the actual product.
Instant Tip: The lid has been designed with lid fins that fit perfectly inside the handles on the left and right sides of the cooker base to help keep your countertop dry!
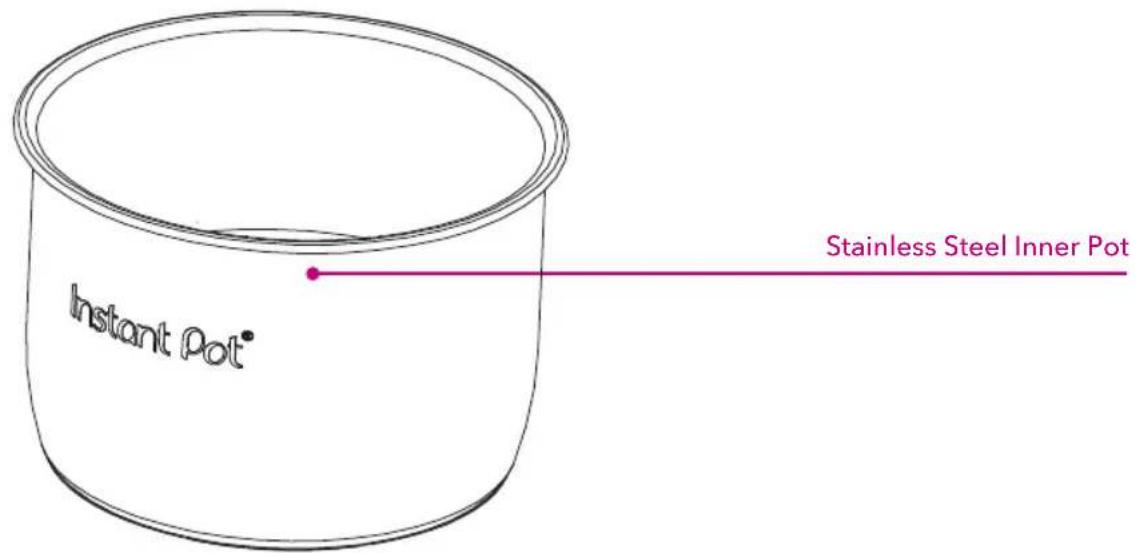
Inner Pot
Cooker Base
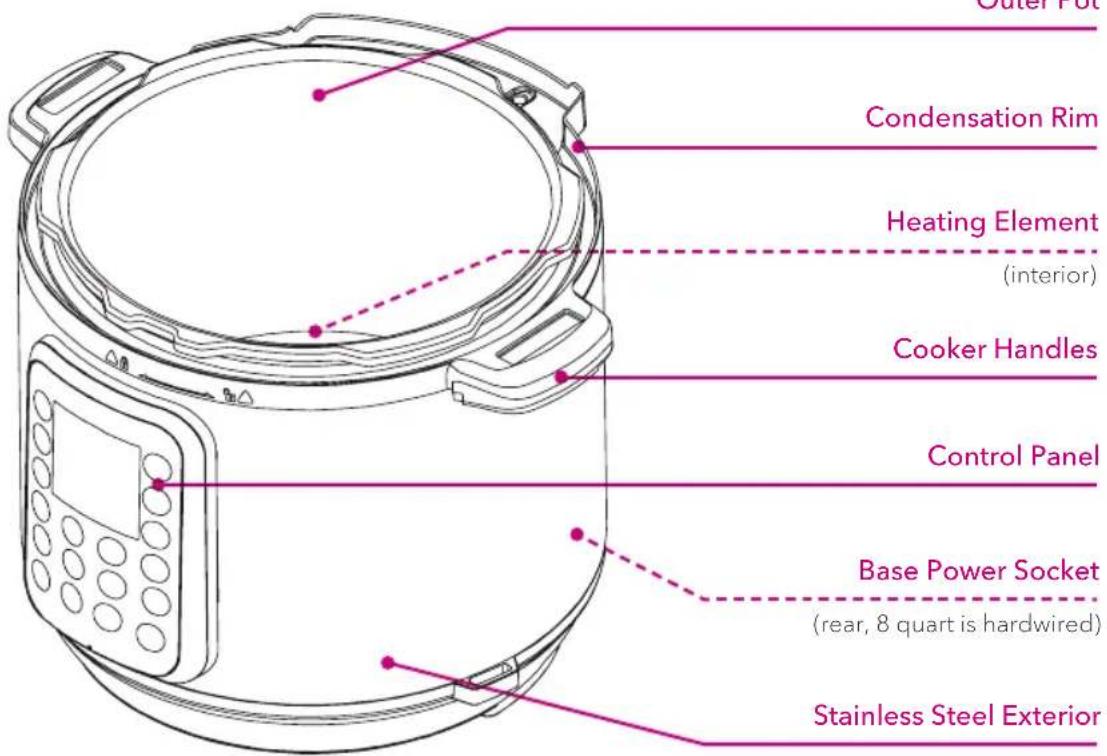
Illustrations are for reference only and may differ from the actual product.
Accessories
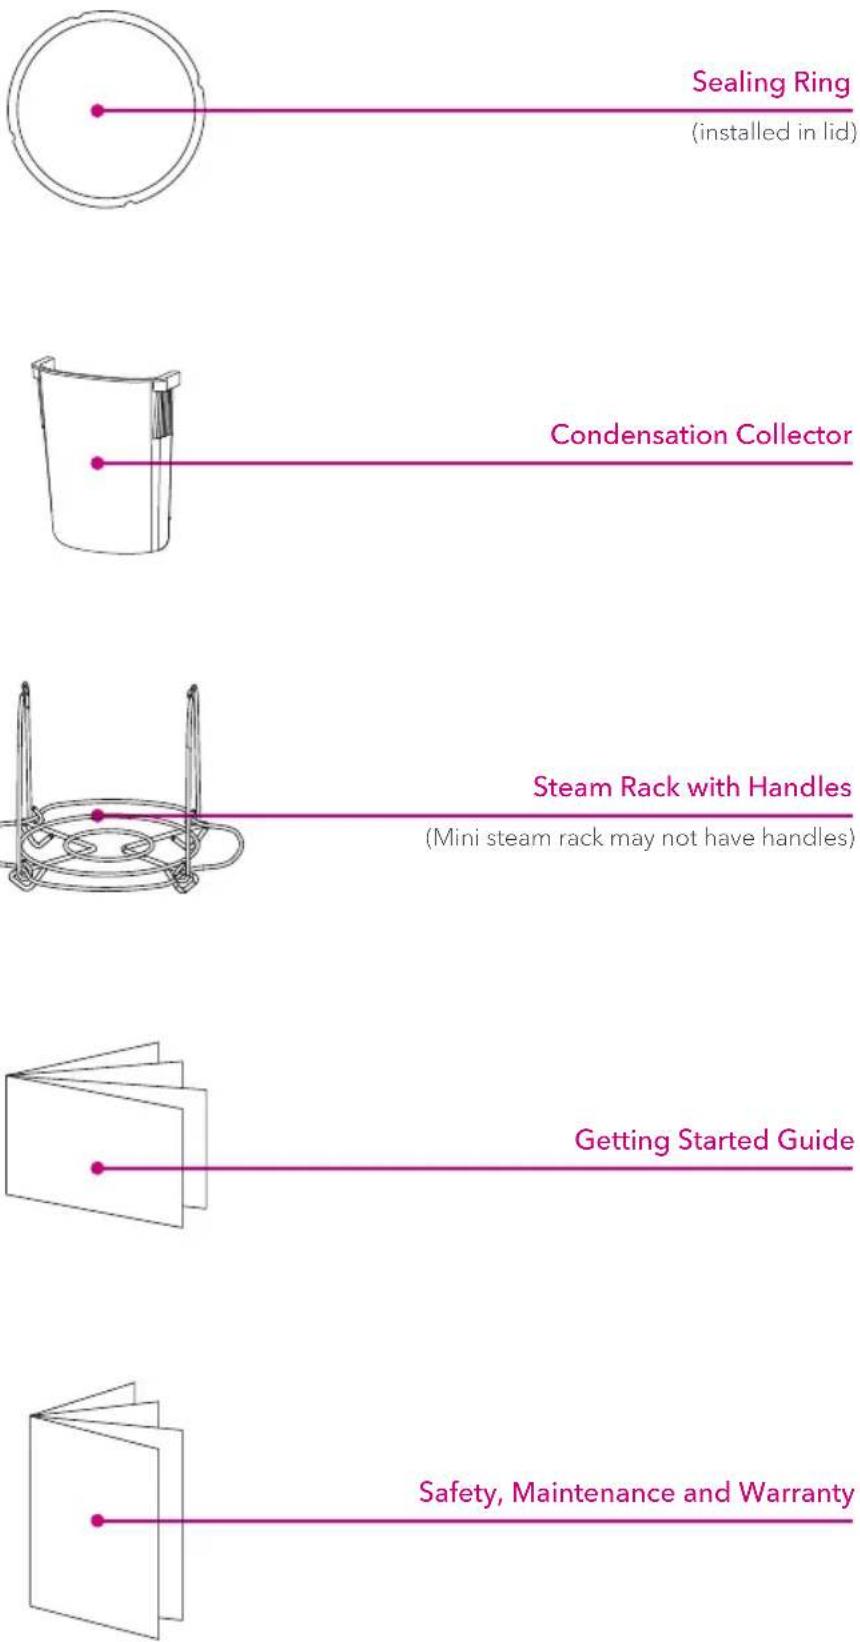
Sealing Ring
(installed in lid)
Condensation Collector
natural_image
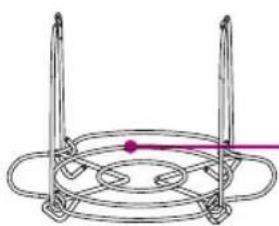
Simple line drawing of a circular mechanical structure with two vertical posts and a central dot (no text or symbols)Steam Rack with Handles
(Mini steam rack may not have handles)
Getting Started Guide
Safety, Maintenance and Warranty
Illustrations are for reference only and may differ from the actual product.
The Instant Pot Duo multi-use pressure cooker features an intuitive control panel to help make cooking fast and easy.
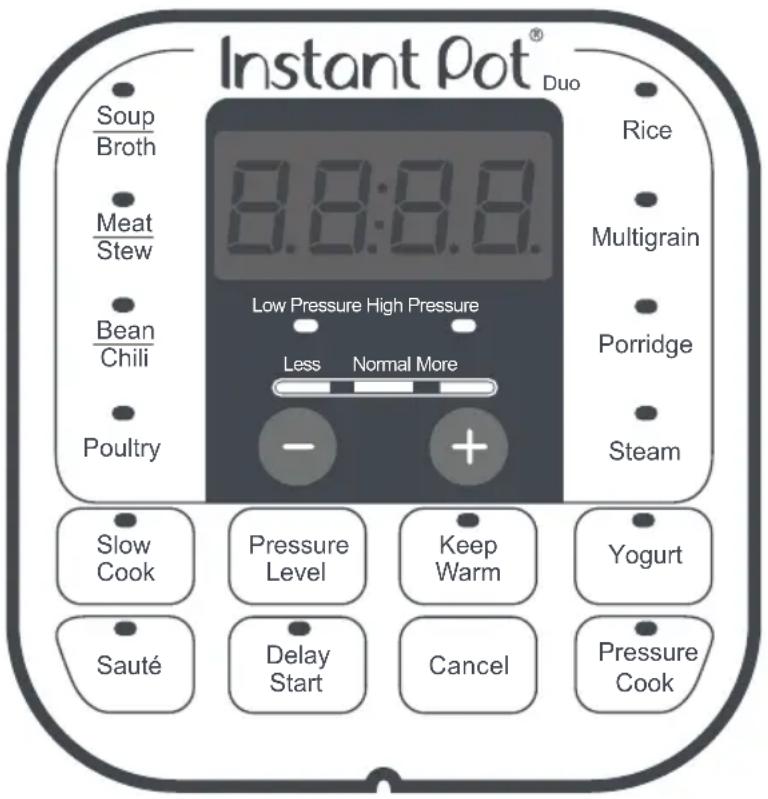
1 Time Display
- Countdown timer indicates cooking and Delay Start time in hour format: 05:20 is 5 hours, 20 minutes.
- Keep Warm timer counts up.
- Display also shows Status Messages as described below.
2 Pressure Field
• LED indicators illuminate to indicate Low or High pressure level.
3 Less - Normal - More
- Pressure cooking: 3 preset time options.
• Non-Pressure cooking: 3 temperature levels.
4 LED Indicators
- Illuminate to indicate the active Smart Program and settings selected.
5 Smart Program Settings
- Pressure Level
- Keep Warm
- / + buttons
- Delay Start
- Cancel
See Smart Program Settings for more information.
6 Smart Programs
Pressure Cooking:
- Pressure Cook
- Soup/Broth
- Meat/Stew
- Bean/Chili
- Poultry (Not available on Duo Mini)
- Rice
• Multigrain (Not available on Duo Mini) - Porridge
- Steam
Non-Pressure Cooking:
- Slow Cook
- Sauté
- Yogurt
- Keep Warm
Adjust and Save Pressure Cooking Temperature
Select a pressure cooking Smart Program, then press Pressure Level to toggle between High (10.2-11.6 psi) and Low (5.8-7.2 psi) pressure levels.
Note: A higher pressure results in higher cooking temperature.
When cooking begins, the pressure level you selected is saved and remembered the next time the Smart Program is selected.
The cooking temperature may be adjusted at any time during pressure cooking by pressing Pressure Level, but adjustments made after cooking has begun will not be saved.
Adjust and Save Pressure Cooking Time
Select a pressure cooking Smart Program, then press the Smart Program button again to cycle through the Less, Normal and More cooking time options.
If desired, use the - / + buttons to further customize the time.
When cooking begins, your customizations are saved and remembered the next time the Smart Program is selected.
The cooking time may be adjusted at any time during pressure cooking, but adjustments made after cooking has begun will not be saved.
Adjust and Save Non-Pressure Cooking Temperatures
Select a non-pressure cooking Smart Program, then press the Smart Program button again to cycle through the Less, Normal and More cooking temperature levels.
When cooking begins, the temperature level is saved and remembered the next time the Smart Program is selected.
The cooking temperature may be adjusted at any time during non-pressure cooking by pressing the Smart Program button, but adjustments made after cooking has begun will not be saved.
Adjust and Save Non-Pressure Cooking Time
Select a non-pressure cooking Smart Program, then use the - / + buttons to adjust the cooking time.
The cooking time may be adjusted at any time during non-pressure cooking, but adjustments made after cooking has begun will not be saved.
Cancel and Standby Mode
When the cooker is plugged in but not in operation, the display reads OFF to indicate Standby mode.
Press Cancel to stop a Smart Program at any time. The cooker returns to Standby mode.
Turn Sound On/Off
Sound On: When in Standby, press and hold + button until display indicates S On.
Sound Off: When in Standby, press and hold – button until display indicates SOFF.
Note: Audible safety alerts (beeps) cannot be turned off.
Set a Delay Start Timer
Delay Start can be set to a minimum of 10 minutes or a maximum of 24 hours.
- Select a Smart Program and adjust the settings as you desire, then press Delay Start. Note: Once Delay Start has been selected, there is no way to return to the cooking settings. To adjust Smart Program settings, press Cancel and enter new selections.
- When the hours field flashes, use the - / + buttons to adjust the delay time. E.g., 02:00 indicates that cooking will start after 2 hours.
- Press Delay Start again to toggle to the minutes field and follow the same process as the previous step.
- Delay Start begins automatically after 10 seconds and the timer counts down.
- When Delay Start ends, the Smart Program begins, and the display indicates On.
Delay Start is not available with the Sauté or Yogurt Smart Programs.
Automatically Keep Food Warm After Cooking
The Keep Warm setting turns on automatically after cooking on all Smart Programs except Sauté and Yogurt.
When automatic warming begins, the timer begins counting from 00:00 to indicate the time passed, up to 10 hours.
To turn automatic warming off, press Keep Warm. The LED above the button dims to indicate that it is off and will not turn on after cooking completes.
Reheat Food or Keep Warm for Long Periods
When in Standby, select Keep Warm. Press Keep Warm again to cycle through Less, Normal and More warming temperature levels.
Use the - / + buttons to set a warming timer up to 99 hours and 50 minutes.
Reset Smart Programs to Factory Default Settings
Reset Individual Smart Programs
With the cooker in Standby mode, press and hold one Smart Program button until the cooker returns to Standby and displays OFF.
The Smart Program's pressure level, cooking time and temperature are restored to the factory default setting.
Reset All Smart Programs
With the cooker in Standby mode, press and hold Cancel until the cooker beeps.
All Smart Program pressure levels, cooking times and temperatures are restored to the factory default setting.
OFF
Indicates that the cooker is in Standby mode.
Lid
Indicates that the pressure cooker lid is not properly secured or missing.
On
Indicates that the cooker is in Preheat mode.
05:20
Display timer indicates one of the following:
- When a Smart Program is running, the display timer counts down to indicate the cooking time remaining in the Smart Program.
- When Delay Start is running, the display timer counts down until the Smart Program begins.
- When Keep Warm is running, the display timer counts up to indicate how long food has been warming.
Auto
Indicates that the Rice Smart Program is running.
bo IL
Indicates that the Yogurt Smart Program is in the pasteurizing cycle (i.e., the Yogurt Smart Program is set to More).
Hot
Indicates that the Sauté Smart Program has reached cooking temperature and food may be added to the inner pot.
End
Indicates that a Smart Program has ended and Keep Warm is off.
Food
Indicates overheating in the cooking chamber. Refer to Troubleshooting.
burn
E ^*
Indicates that an error has occurred. Refer to Troubleshooting.
Remove the inner pot from the cooker base and wash it with hot water and dish soap. Rinse with warm, clear water and use a soft cloth to dry the outside of the inner pot.
Note: The inner pot is dishwasher safe.
Wipe the heating element to ensure it is free of stray packaging particles before returning the inner pot to the cooker base. Failure to do so may damage the cooker.
The inner pot is an integral part of product safety. Food must be placed in the inner pot, and never directly in the cooker base.
To avoid personal injury or damage to the appliance, replace a deformed or damaged inner pot. Use only authorized Instant Pot inner pots made for this model when cooking.
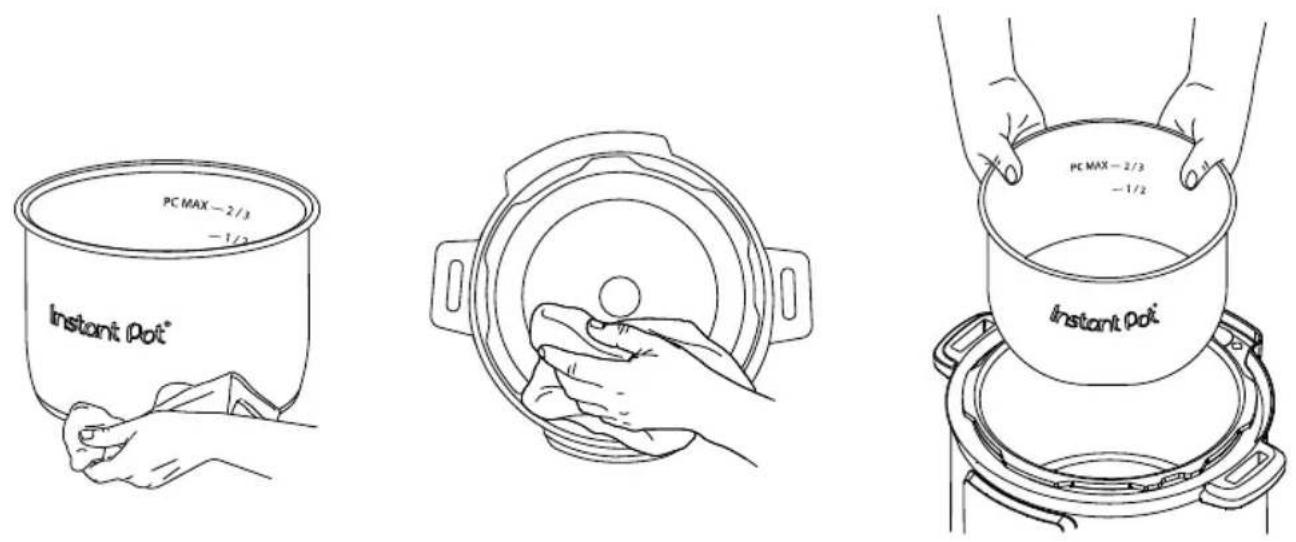
Illustrations are for reference only and may differ from the actual product.
CAUTION
To avoid risk of personal injury and/or property damage, do not pour food or liquid into cooker base.
WARNING
Do not fill the inner pot higher than the PC MAX —2/3 line (Pressure Cooking Maximum), as indicated on the inner pot.
Exercise extreme caution when cooking and venting food such as applesauce, cranberries, pearl barley, oatmeal, split peas, noodles, etc., as these foods may foam, froth, or spatter, and may clog the steam release pipe and/or steam release valve. Do not fill the inner pot higher than the — 1/2 line when cooking these foods, as indicated on the inner pot.
Pressure Cooking Lid
The stainless steel lid included is necessary for most cooking processes, and is essential for pressure cooking. Always ensure to use the Duo pressure cooking lid with the Duo cooker base.
For replacement parts and accessories, visit our store.
When plugged in, the cooker plays a jingle when the lid is opened and closed.
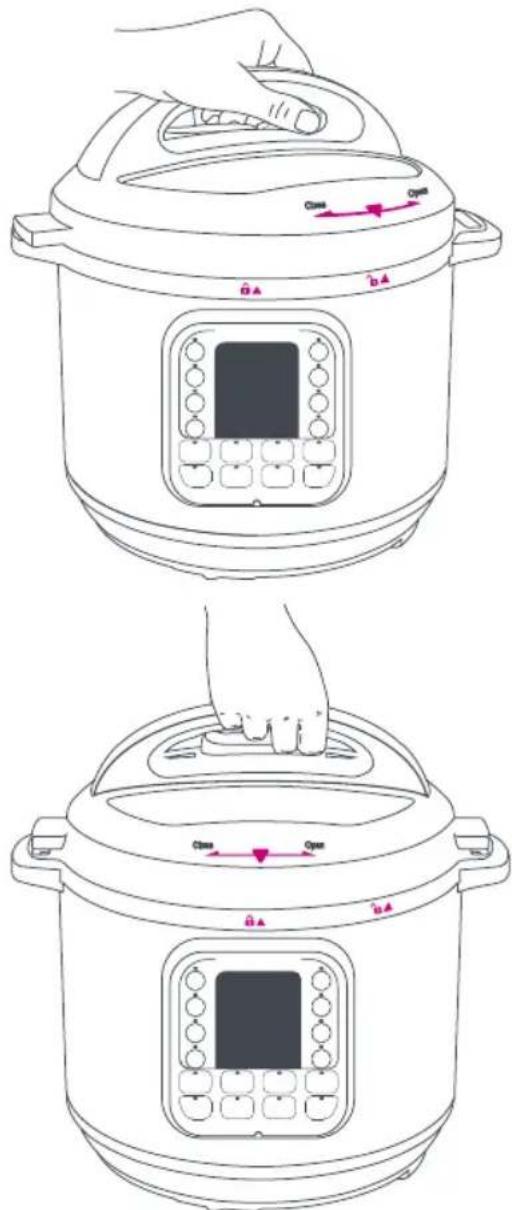
Open and Remove the Lid
Grip the lid handle and turn it counterclockwise to align the symbol on the lid with the symbol on the rim of the cooker base, then lift the lid up and off the cooker base.
Close the Lid
Align the symbol on the lid with the symbol on the cooker base and lower the lid onto the track. Turn the lid clockwise until the symbol on the lid aligns with the symbol on the cooker base.
Illustrations are for reference only and may differ from the actual product.
CAUTION
Always check the lid for damage and excessive wear prior to cooking.
WARNING
The Duo pressure cooking lid is not compatible with all Instant Pot pressure cookers. Always ensure to use an authorized Instant Pot pressure cooking lid compatible with Duo pressure cookers when pressure cooking. Using any other pressure cooker lid may cause injury and/or property damage.
Steam Release Handle
Turning the handle from Sealing to Venting and vice versa manually opens and closes the steam release valve, sealing and venting the cooker as you desire. When the cooker releases pressure, steam ejects from the top of the steam release handle.
Refer to Depressurizing the Cooker (Venting Methods) for details on safe depressurization.
The steam release handle is integral to product safety and necessary for pressure cooking. It should be installed before use and cleaned regularly.
Remove the Steam Release Handle
Pull steam release handle up and off steam release pipe.
Steam release handle must be installed before use and cleaned frequently.
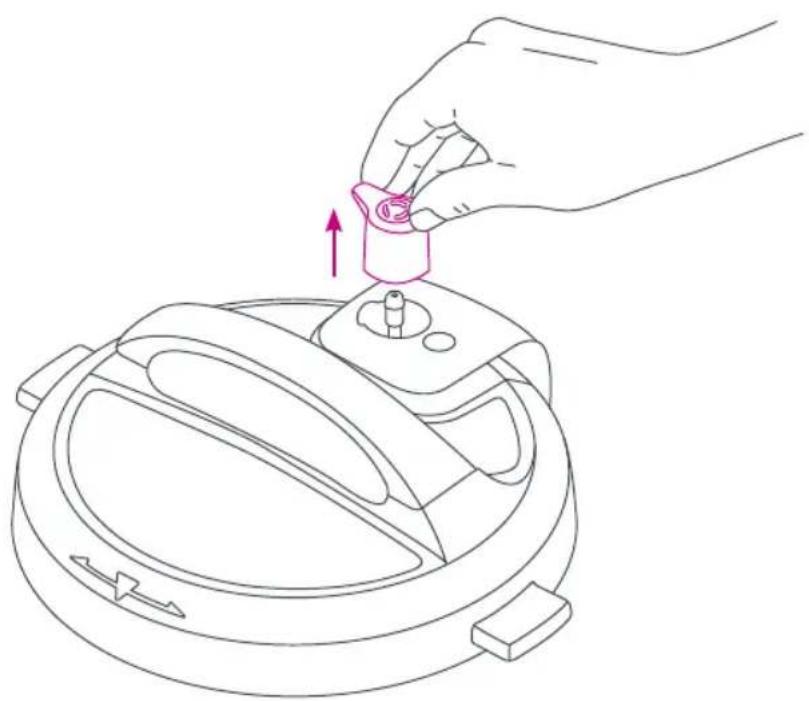
natural_image
Line drawing of a hand inserting a plug into a circular device component (no text or symbols)Illustrations are for reference only and may differ from the actual product.
WARNING
Do not cover or block the steam release handle.
Install the Steam Release Handle
Place the steam release handle on the steam release pipe and press down firmly.
The steam release handle sits loosely on the steam release pipe in order to pivot easily while the cooker is pressurized. It should remain in place when the lid is turned over.
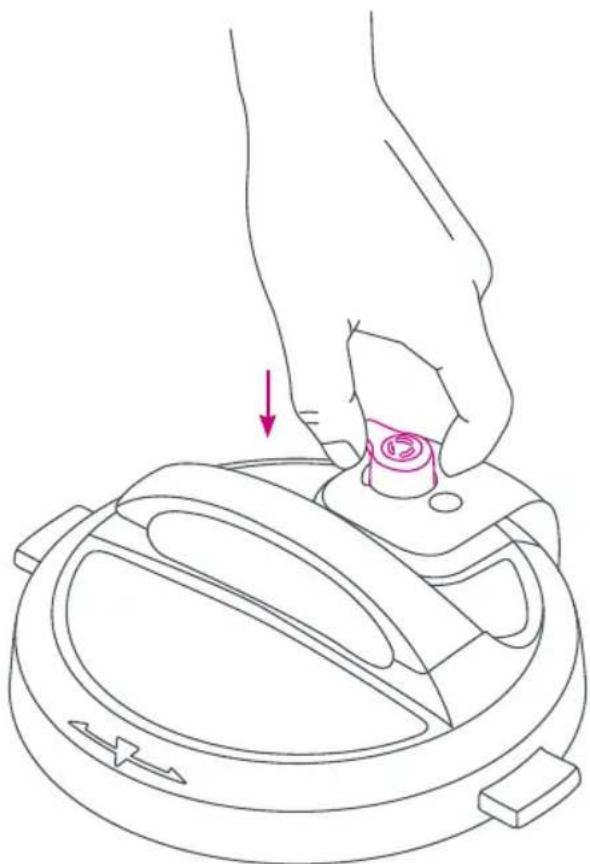
natural_image
Line drawing of a hand pressing down on a circular device with directional arrows (no text or symbols)Illustrations are for reference only and may differ from the actual product.

WARNING
Do not cover or block the steam release handle.
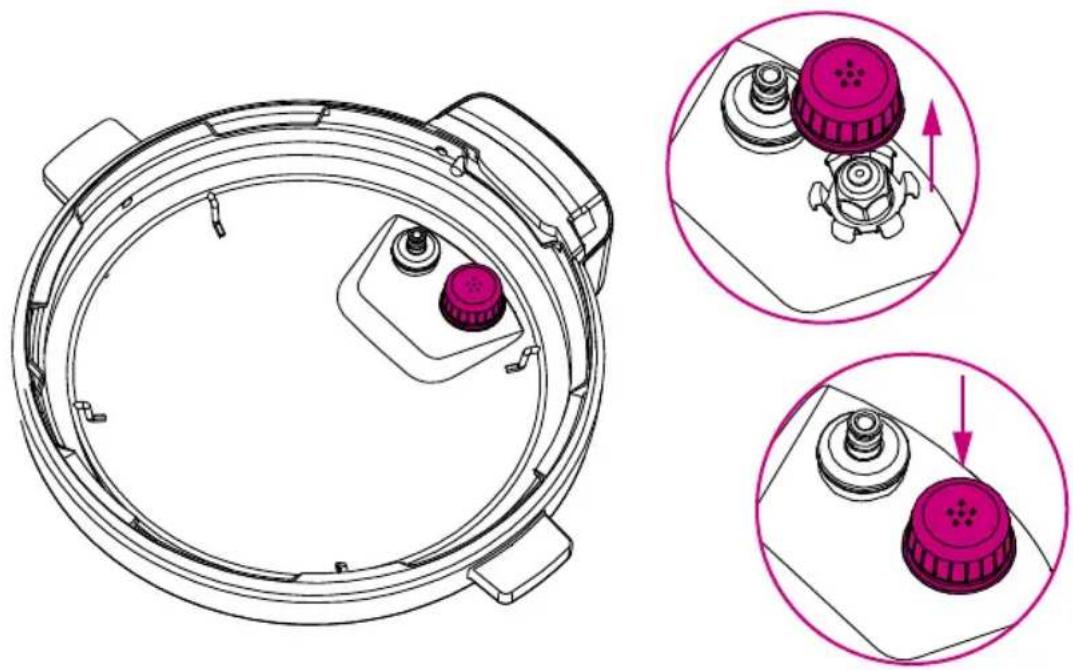
Anti-Block Shield
The anti-block shield prevents food particles from coming up through the steam release pipe, assisting with pressure regulation.
As an integral part of product safety, the anti-block shield must be installed before use and cleaned frequently.
Remove the Anti-Block Shield
Grip the lid like a steering wheel and use your thumbs to press firmly against the side of the anti-block shield (pressing towards the side of the lid and up) until it pops off the prongs underneath.
Install the Anti-Block Shield
Place anti-block shield over prongs and press down until it snaps into position.
Do not attempt to operate the pressure cooker without the anti-block shield installed.
natural_image
Technical line drawing of a mechanical component with two inset views showing internal components (no text or symbols)Illustrations are for reference only and may differ from the actual product.
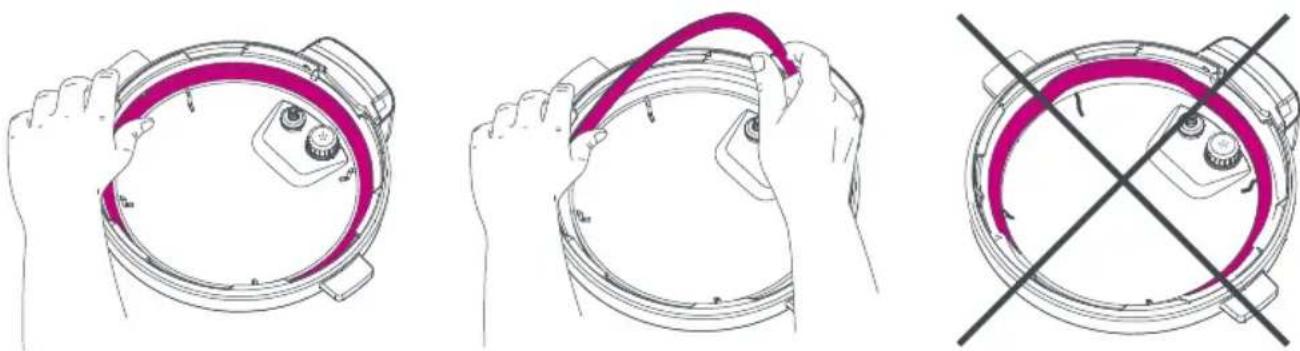
Sealing Ring
When the pressure cooking lid is closed, the sealing ring installed on the underside of the lid creates an air-tight seal between the lid and the cooker base.
The sealing ring must be installed before using the cooker and should be cleaned after each use. Only 1 sealing ring should be installed in the lid when using the cooker.
Sealing rings stretch over time with normal use. As an integral part of product safety, the sealing ring should be replaced every 12-18 months or sooner if stretching, deformation, or damage is noticed.
Remove the Sealing Ring
Grip the edge of the silicone rubber and pull the sealing ring out from behind the circular stainless steel sealing ring rack.
With the sealing ring removed, inspect the rack to ensure it is secured, centered, and an even height all the way around the lid. Do not attempt to repair a deformed sealing ring rack.
Install the Sealing Ring
Place the sealing ring over the sealing ring rack and press it into place. Press down firmly to ensure there is no puckering.
When installed properly, the sealing ring is snug behind sealing ring rack and should not fall out when the lid is turned over.
natural_image
Three-panel line drawing showing hands holding a circular device with a purple cable, no text or symbols present.Illustrations are for reference only and may differ from the actual product.
Instant Tip: Silicone is porous, so it may absorb strong aromas and certain flavors. Keep extra sealing rings on hand to limit the transfer of those aromas and flavors between dishes. Visit our store to color code your cooking.
CAUTION
Always check for cuts, deformation, and correct installation of the sealing ring prior to cooking. Do not use a stretched or damaged sealing ring. Only use authorized Instant Pot sealing rings. Failure to follow these instructions may cause food to discharge, which may lead to personal injury or property damage.
Float Valve
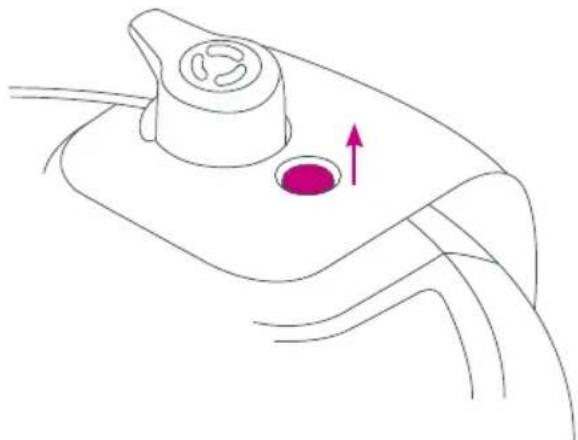
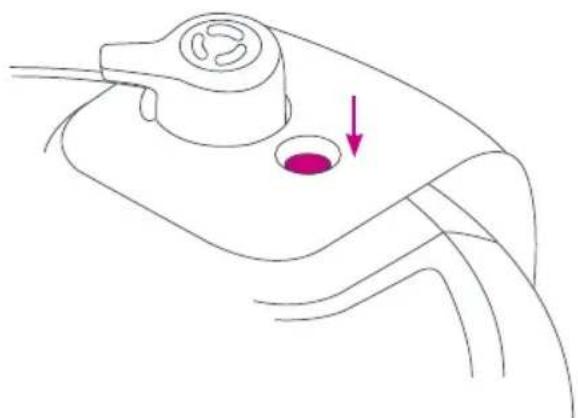
The float valve provides a visual indication of pressure within the cooker and appears in 2 positions.
Pressurized
The float valve is visible and flush with the lid.
natural_image
Line drawing of a mechanical component with a purple arrow indicating direction (no text or symbols)Depressurized
The float valve is sunken into the lid.
natural_image
Line drawing of a medical device with a purple arrow pointing to a circular opening (no text or symbols)The float valve and silicone cap work together to seal in pressurized steam. These parts must be installed before use and should be cleaned after each use.
Illustrations are for reference only and may differ from the actual product.
| WARNING | ||
| Do not lean over or touch the steam release assembly. | Do not place unprotected skin over the steam release assembly. | Do not cover or obstruct the steam release valve or cover. |
Remove the Float Valve from the Lid
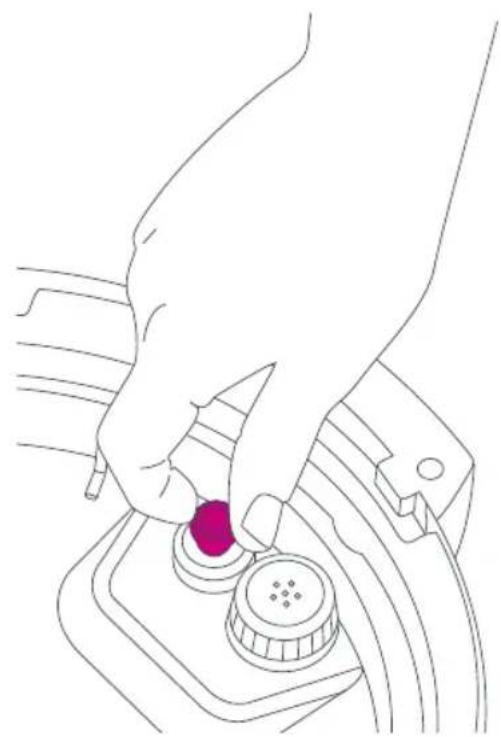
Place one finger on the flat top of the float valve, then turn the lid over. Detach the silicone cap from the bottom side of the float valve.
Remove the float valve from the top of the lid. Do not discard the float valve or silicone cap.
Install the Float Valve
Drop the narrow end of the float valve into the float valve hole on the top of the lid. Place one finger on the flat top of the float valve, then turn the lid over. Firmly attach the silicone cap to the bottom of the float valve.
Do not attempt to operate the pressure cooker without the float valve and/or silicone cap properly installed in the pressure cooking lid.
natural_image
Line drawing of a hand pressing a button on a car engine component (no text or symbols)Illustrations are for reference only and may differ from the actual product.

While the float valve is up, contents of cooker are under extreme pressure.
Do not attempt to remove the lid. All pressure must be released, and float valve must be down. Refer to Depressurizing the Cooker (Venting Methods) for information on releasing pressure. Failure to follow these instructions may result in property damage and/or personal injury.
Condensation Collector
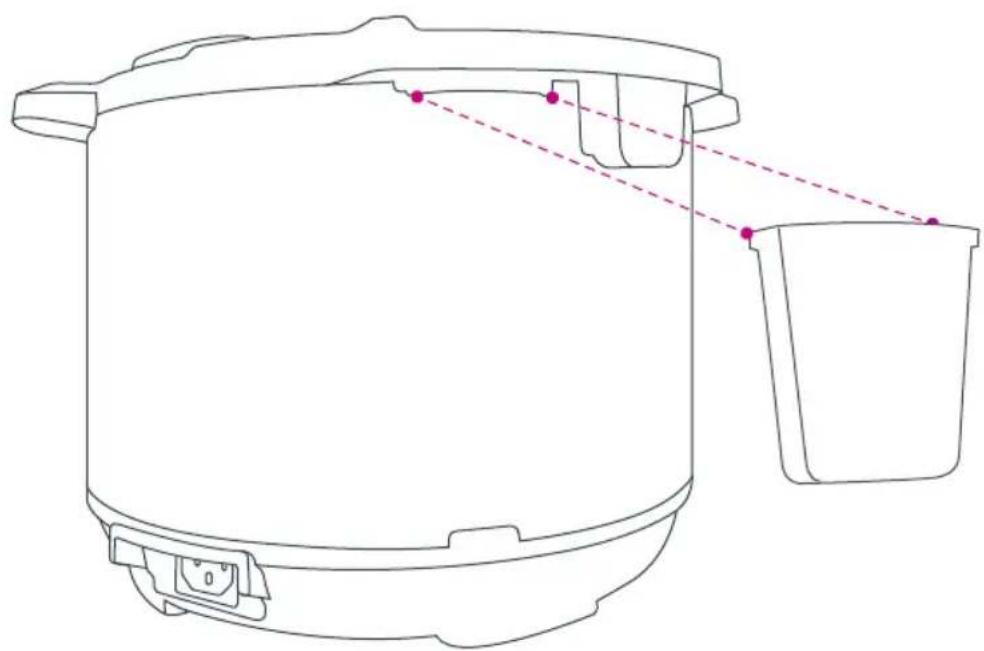
The condensation collector sits at the back of the cooker base and accumulates overflow moisture from the condensation rim. It should be installed before cooking, then emptied and rinsed out after each use.
Remove the Condensation Collector
Pull the condensation collector away from the cooker base; do not pull down. Note the tabs on the cooker base and the grooves on the condensation collector.
Install the Condensation Collector
Align the grooves on the condensation collector over the tabs on the back of the cooker base and slide the condensation collector into place.
natural_image
Line drawing of a cooking pot with a bucket and lid, showing structural components and a dashed line indicating alignment (no text or symbols)Illustrations are for reference only and may differ from the actual product.
Cooking with the Duo
Pressure cooking uses steam pressure to raise the boiling point of water above 100^ C / 212^ F. This energy-efficient cooking method is the fastest way to thoroughly cook a variety of your favorite meals.
Pressure cookers go through 3 stages when pressure cooking:
1. Pre-Heating and Pressurization
The cooker waits 10 seconds to ensure you have finished inputting your selections, then displays On to indicate it has begun pre-heating. While the cooker pre-heats, it vaporizes liquid in the inner pot to create steam. Once enough steam has built up inside the inner pot, the float valve pops up and locks the lid of the cooker in place for safe pressure cooking.
When the float valve pops up, the silicone cap attached to the bottom of the float valve (on the underside of the lid) seals the steam inside the cooking chamber (the inner pot) and allows the pressure to rise even higher. A higher pressure means a higher cooking temperature.
While it is normal to see some steam escaping through the float valve during pre-heating, if you see steam escaping from around the sides of the lid, press Cancel and refer to Troubleshooting.
Note: The time it takes your cooker to pressurize is determined by a variety of factors, including food and liquid volume.
2. Cooking
After the float valve pops up, the cooker needs a few minutes to finish building pressure. When the required pressure level is reached, cooking begins. The display switches from On to the cooking countdown timer, and is displayed in HH:MM (hours : minutes) format.
Smart Program settings (e.g., cooking time, temperature and/or pressure level, and whether Keep Warm will come on automatically or not) can be adjusted at any time during cooking. Refer to Smart Program Settings for details.
3. Depressurization
After pressure cooking completes, follow your recipe instructions for depressurizing the cooker.
If automatic Keep Warm is on after cooking completes, the timer counts up from 00:00 to indicate the elapsed time up to 10 hours. If not, the cooker returns to Standby and displays End.
Note: The cooker cools and depressurizes faster if automatic Keep Warm is off.
See Depressurizing the Cooker (Venting Methods) for information on releasing pressure after cooking.

While the float valve is up, contents of cooker are under extreme pressure.
Do not attempt to remove the lid while the float valve is still up. All pressure must be released, and float valve must be down before attempting to remove the lid. Never attempt to force the lid open. Failure to follow the instructions may result in property damage and/or personal injury.
Depressurizing the Cooker (Venting Methods)
Always follow recipe instructions for depressurizing the cooker.
Natural Release (NR)
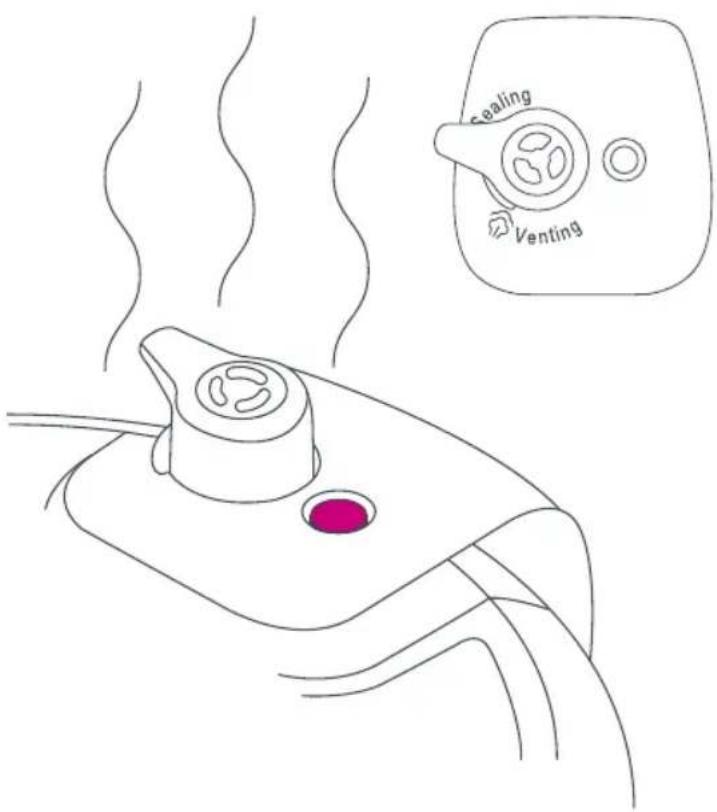
Leave the steam release handle in the Sealing position. As the temperature within the cooker drops, the cooker depressurizes naturally over time.
Depressurization time varies based upon the volume and type of food and liquid. When the cooker has completely depressurized, the float valve drops into the lid.
Illustrations are for reference only and may differ from the actual product.
NOTICE
Use NR to depressurize the cooker after cooking high-starch foods (e.g., soups, stews, chilis, pasta, oatmeal and congee) or when cooking foods that expand when cooked (e.g., beans and grains).
Depressurizing the Cooker (Venting Methods)
Quick Release (QR)
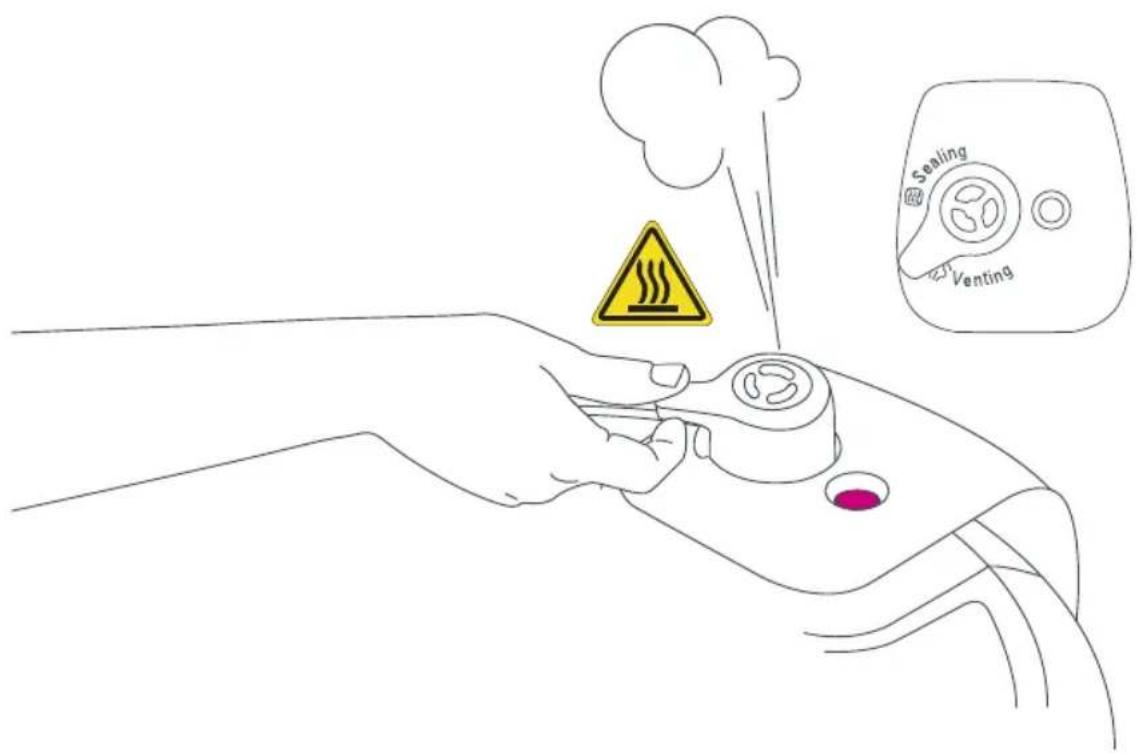
Quickly and carefully turn the steam release handle from the Sealing position to the Venting position.
A stream of steam releases through the top of the steam release handle.
Note: Steam may range in opacity but is always loud!
If continuous spatter occurs while venting, turn the steam release handle back to the Sealing position and try again after a few minutes.
If spatter continues, use NR to vent the remaining pressure.
Illustrations are for reference only and may differ from the actual product.
NOTICE
Do not use QR when cooking high-starch foods (e.g., stews, chilis, pasta and congee) or when cooking foods that expand when cooked (e.g., beans and grains).
WARNING
Steam is hot. Do not place hands or face over steam release handle when venting.
10-Minute NR
Leave the steam release handle in the Sealing position for 10 minutes after cooking has completed, then turn the steam release handle to the Venting position.
A stream of steam releases through the top of the steam release handle.
If continuous spatter occurs while venting, turn the steam release handle back to the Sealing position and try again after a few minutes.
If spatter continues, use NR to vent the remaining pressure.
| DANGER | While the float valve is up, contents of cooker are under extreme pressure. Do not attempt to remove the lid while the float valve is still up. All pressure must be released, and float valve must be down before attempting to remove the lid. Never attempt to force the lid open.Failure to follow the instructions may result in property damage and/or personal injury. |
| WARNING | ||
| Do not lean over or touch the steam release assembly. | Do not place unprotected skin over the steam release assembly. | Do not cover or obstruct the steam release valve or cover. |
Follow these steps to familiarize yourself with your Instant Pot Duo.
Total test time: Approximately 20 minutes.
- Remove the inner pot from the cooker base.
- Add 3 cups (24 oz / 750 mL) of water to the inner pot.
-
Insert the inner pot into the cooker base.
-
Mini and 6 Quart only: Secure the power cord to the base power socket at the back of the cooker base. Ensure the connection is tight.
All: Connect the power cord to a 120 V power source.
The display indicates OFF.
-
Place and close the lid as described in Pressure Control Features—Pressure Cooking Lid.
-
Turn the steam release handle to the Sealing position.
-
Press Pressure Cook to select the Pressure Cook Smart Program.
-
Use the - / + buttons to adjust the cooking time to 00:05 minutes.
Note: Cooking time adjustments are saved to the Smart Program when cooking begins.
- Press Keep Warm to deactivate the automatic Keep Warm setting.
After 10 seconds, the display reads On to indicate that Preheating has begun.
- The float valve rises when the cooker pressurizes.
After a few minutes the cooker reaches the target pressure level and Cooking begins.
The display changes from On to the cooking time countdown.
-
When the Smart Program is complete, the display indicates End.
-
Turn the steam release handle to Venting. Pressurized steam releases through the top of the steam release valve.
-
The float valve drops when the pressure has been fully released.
-
Open and remove the lid as described in Pressure Control Features—Pressure Cooking Lid.
-
Carefully remove the inner pot from the cooker base, discard the water and thoroughly dry the inner pot.
You're ready to start cooking!
CAUTION
The inner pot will be hot after cooking. Always use appropriate heat protection when handling a hot inner pot.
Whether you are a novice cook or a culinary expert, the Duo provides Smart Programs to get you cooking with the touch of a button.
The steps below follow the safest procedure for using the cooker and can be applied to the following Smart Programs: Soup/Broth, Meat/Stew, Bean/Chili, Poultry*, Rice, Multigrain*, Porridge, Steam (pressure and non-pressure) and Pressure Cook.
*Not available on Duo Mini. Use Pressure Cook instead.
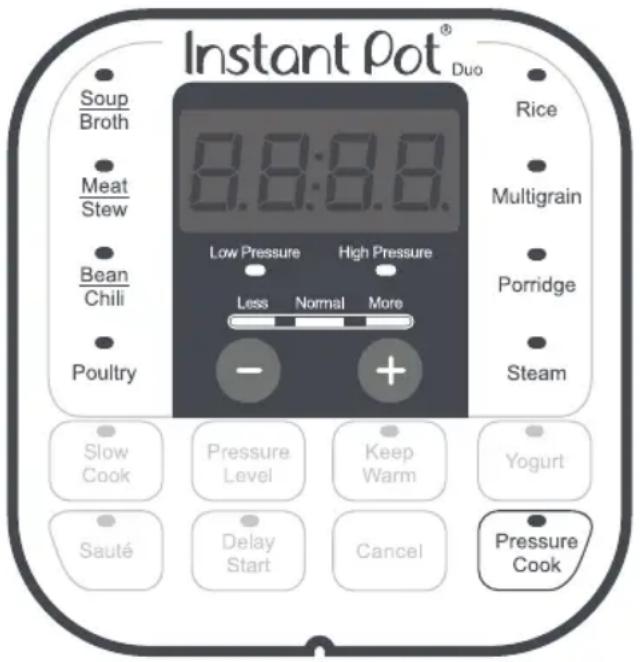
Always inspect your Instant Pot pressure cooking lid, inner pot and cooker base carefully to ensure they are clean and in good working condition before use.
| Instant Pot Size Minimum Liquid for Pressure Cooking* | |
| 3 Quarts / 2.8 Litres 1 cup (8 oz / 250 mL) | |
| 6 Quarts / 5.7 Litres 1 1⁄2 cups (12 oz / 375 mL) | |
| 8 Quarts / 7.6 Litres 2 cups (16 oz / 500 mL) | |
*Unless otherwise specified in recipe.
Pressure cooking liquids should be water-based, such as broth, stock, soup or juice. If using canned, condensed, or cream-based soup, add water as directed above.

To avoid scorching or scalding injury, be cautious when cooking with more than 1/4 cup (2 oz / 60 mL) oil, oil-based sauces, condensed cream-based soups, and thick sauces. Add suitable liquid to thin sauces. Avoid recipes that call for more than 1/4 cup (2 oz / 60 mL) of oil or fat content.
-
Open and remove the lid as described in Pressure Control Features—Pressure Cooking Lid.
-
Add food and liquid ingredients to the inner pot.
Note: Cold or frozen food items take longer to generate steam and slow down pressurization. For the fastest results, thaw frozen ingredients before cooking.
-
Insert the inner pot into the cooker base.
-
Mini and 6 Quart: Secure the power cord to the base power socket at the back of the cooker base. Ensure the connection is tight.
All: Connect the power cord to a 120 V power source. The cooker goes to Standby mode and the display indicates OFF.
-
Place and close the lid as described in Pressure Control Features—Pressure Cooking Lid.
-
Turn the steam release handle to the Sealing position.
-
Select your desired pressure cooking Smart Program.
-
Press the same Smart Program button again to cycle through Less, Normal and More time options.
-
For custom cooking, use the - / + buttons to adjust the cooking time.
-
Press Pressure Level to toggle between Low and High pressure.
Note: When pressure cooking, the pressure level controls the temperature. A higher pressure results in a higher cooking temperature.
Note: Cooking time and pressure level adjustments are saved to the Smart Program when cooking begins.
- Press Keep Warm to toggle the automatic Keep Warm setting off and on.
- After 10 seconds, the display reads On and indicates that Pre-heating has begun.
- When cooking completes, follow recipe directions to select the appropriate venting method. Refer to Depressurizing the Cooker (Venting Methods).
Instant Tip: Use the steam rack to lift foods out of the cooking liquid. This ensures even heat distribution, prevent nutrients from leeching into the cooking liquid, and stop food items from scorching on the bottom of the inner pot.
DANGER
While the float valve is up, contents of cooker are under extreme pressure.
Do not attempt to remove the lid while the float valve is still up. All pressure must be released, and float valve must be down before attempting to remove the lid. Never attempt to force the lid open. Failure to follow the instructions may result in property damage and/or personal injury.
WARNING
Do not fill inner pot higher than the PC MAX — 2/3 line as indicated on the inner pot.
When cooking foods that expand (e.g.; rice, beans, pasta) do not fill the inner pot higher than the — 1/2 line as indicated on the inner pot.
Always cook with the inner pot in place. Do not pour food or liquid into the cooker base.
To avoid risk of personal injury and/or property damage, place food and liquid ingredients in the inner pot, then insert the inner pot into the cooker base.
| Smart Program Settings | ||||
| Soup/Broth | Pressure | Low (35-55 kPa / 5.8-7.2 psi)High (65-85 kPa / 10.2-11.6 psi) | ||
| Time Setting Less Normal More | ||||
| Default Cooking Time (adjustable) 00:20 00:30 04:00 | ||||
| Cooking Time Range 00:01-04:00 | ||||
| Meat/Stew | Pressure | Low (35-55 kPa / 5.8-7.2 psi)High (65-85 kPa / 10.2-11.6 psi) | ||
| Time Setting Less Normal More | ||||
| Default Cooking Time (adjustable) 00:20 00:35 00:45 | ||||
| Cooking Time Range 00:01-04:00 | ||||
| Bean/Chili | Pressure | Low (35-55 kPa / 5.8-7.2 psi)High (65-85 kPa / 10.2-11.6 psi) | ||
| Time Setting Less Normal More | ||||
| Default Cooking Time (adjustable) 00:25 00:30 00:40 | ||||
| Cooking Time Range 00:01-04:00 | ||||
| Poultry* | Pressure | Low (35-55 kPa / 5.8-7.2 psi)High (65-85 kPa / 10.2-11.6 psi) | ||
| Time Setting Less Normal More | ||||
| Default Cooking Time (adjustable) 00:05 00:15 00:30 | ||||
| Cooking Time Range 00:01-04:00 | ||||
| Rice | Pressure | Low (35-55 kPa / 5.8-7.2 psi)High (65-85 kPa / 10.2-11.6 psi) | ||
| Time Setting Less Normal More | ||||
| Default Cooking Time (not adjustable) 00:08 00:12 00:15 | ||||
| Cooking Time Range | Cook time adjusts automatically depending on the volume of rice: 8-15 minutes. Display indicates Auto. | |||
*Not available on Duo Mini. Use Pressure Cook instead.
Pressure Cooking Settings
| Smart Program Settings | ||||
| Multigrain* | Pressure | Low (35-55 kPa / 5.8-7.2 psi)High (65-85 kPa / 10.2-11.6 psi) | ||
| Time Setting Less Normal More | ||||
| Default Cooking Time (adjustable) 00:20 00:40 | 01:00 (+00:45 soaking time) | |||
| Cooking Time Range 00:01-04:00 | ||||
| Porridge | Pressure | Low (35-55 kPa / 5.8-7.2 psi)High (65-85 kPa / 10.2-11.6 psi) | ||
| Time Setting Less Normal More | ||||
| Default Cooking Time (adjustable) 00:05 00:20 00:30 | ||||
| Cooking Time Range 00:01-04:00 | ||||
| Steam | Pressure | Low (35-55 kPa / 5.8-7.2 psi)High (65-85 kPa / 10.2-11.6 psi) | ||
| Time Setting Less Normal More | ||||
| Default Cooking Time (adjustable) 00:03 00:10 00:15 | ||||
| Cooking Time Range 00:01-04:00 | ||||
| Pressure Cook | Pressure | Low (35-55 kPa / 5.8-7.2 psi)High (65-85 kPa / 10.2-11.6 psi) | ||
| Time Setting Less Normal More | ||||
| Default Cooking Time (adjustable) 00:20 00:35 00:45 | ||||
| Cooking Time Range 00:01-04:00 | ||||
*Not available on Duo Mini. Use Pressure Cook instead.
| Smart Program Setting Suggested Use Notes | |||
| Soup/Broth | Less Soup without meat | Liquid remains clear due to lack of boiling motion. Always use NR to release pressure when cooking soup with a high starch content. | |
| Normal Soup with meat | |||
| More Rich bone broth | |||
| Meat/Stew | Less Soft texture Choose setting based on meat texture desired, or adjust cook time manually. | ||
| Normal Very soft texture | |||
| More Fall-off-the-bone | |||
| Bean/Chili | Less Firmer texture Choose setting based on bean texture desired, or adjust cook time manually. | ||
| Normal Soft texture | |||
| More Very soft texture | |||
| Poultry* | Less Soft texture Choose setting based on meat texture desired, or adjust cook time manually. | ||
| Normal Very soft texture | |||
| More Fall-off-the-bone texture | |||
| Rice | Less Tender but firm to bite | Automated cooking Smart Program. Displays Auto before cook time countdown. Depending on the volume of rice, cook time may range from 8 to 15 minutes. After cooking, wait 10 minutes, then use QR to release pressure, or allow to depressurize with NR. | |
| Normal Normal texture white rice | |||
| More Softer texture white rice | |||
| Multigrain* | Less Brown rice, wild rice, black beans, chickpeas, etc. | Select Less or Normal based on type of grain and desired texture. | |
| Normal Brown rice, wild rice, mung beans, etc. | |||
| More Tough grains or a mixture of grains and beans | Begins with 45 minutes of warm water soaking time prior to 60 minutes of pressure cooking. | ||
*Not available on Duo Mini. Use Pressure Cook instead.
| Smart Program Setting Suggested Use Notes | |||
| Porridge | Less | Oatmeal, steel cut or rolled | Adjust time as directed in recipe. Always use NR to release pressure when cooking foods that expand. |
| Normal | White rice, porridge/congee | ||
| More | Rice porridge/congee with a mixture of various grains | ||
| Steam | Less Vegetables | Use steam rack provided to elevate food from cooking liquid. Use QR to prevent food from overcooking. | |
| Normal Fish and Seafood | |||
| More Meat | |||
| Pressure Cook | Less | Manual Programming | Press Pressure Level to toggle between High and Low pressure. Use - / + buttons to adjust cook time. Adjust according to recipe or desired results. |
| Normal | |||
| More | |||
The following cooking times are recommendations only. Always follow a trusted recipe.
| Food Time | ||
| Vegetables | Asparagus, Beans (Yellow and Green), Broccoli | 1-2 minutes |
| Brussels Sprouts, Cabbage (Whole or Wedges), Cauliflower (Florets) | 2-3 minutes | |
| Butternut Squash 4-6 minutes | ||
| Carrots (Whole or Chunks) 6-8 minutes | ||
| Corn (on the Cob) 3-5 minutes | ||
| Potatoes (Large, Whole) 12-15 minutes | ||
| Potatoes (Small, Whole) 8-10 minutes | ||
| Potatoes (Cubed) 3-4 minutes | ||
| Sweet Potatoes (Whole) 12-15 minutes | ||
| Sweet Potatoes (Cubed) 2-4 minutes | ||
| Meat & Eggs | Beef (Stew) 20 minutes (per 450 g / 1 lb) | |
| Beef (Large Pieces), Beef (Ribs) 20-25 minutes (per 450 g / 1 lb) | ||
| Chicken (Breasts) 6-8 minutes (per 450 g / 1 lb) | ||
| Chicken (Whole) 8 minutes (per 450 g / 1 lb) | ||
| Chicken (Bone Stock) 40-50 minutes | ||
| Lamb (Leg), Pork (Butt Roast) 15 minutes (per 450 g / 1 lb) | ||
| Pork (Baby Back Ribs) | 15-20 minutes (per 450 g / 1 lb) | |
| Eggs | Hard: 5 mins | |
| Beans & Lentils (Dry & Soaked) | Black Beans | D: 20-25 mins / S: 6-8 mins |
| Black-Eyed Peas | D: 14-18 mins / S: 4-5 mins | |
| Chickpeas | D: 35-40 mins / S: 10-15 mins | |
| Kidney Beans (Red), Navy Beans | D: 20-25 mins / S: 7-8 mins | |
| Kidney Beans (White), Pinto Beans | D: 25-30 mins / S: 6-9 mins | |
| Lentils (Green) | D: 8-10 mins / S: N/A | |
| Lentils (Yellow) | D: 1-2 mins / S: N/A | |
| Lima Beans | D: 12-14 mins / S: 6-10 mins | |
| Soybeans D: 35-45 mins / S: 18-20 mins | ||
Pressure Cooking Timetable
| Food Time | ||
| Seafood | Fish (Whole) 4-5 minutes | |
| Fish (Fillet), Lobster 2-3 minutes | ||
| Mussels 1-2 minutes | ||
| Shrimp (Or Prawn) 1-3 minutes | ||
| Seafood Stock 7-8 minutes |

Always use a meat thermometer to ensure the internal temperature reaches a safe minimum temperature. Refer to the USDA's Safe Minimum Internal Temperature Chart for more information.
Grain-to-Water Ratios
| Rice and Grain Grain : Water Ratio | |
| White or Brown Rice 1:1 cup | |
| Quinoa 1:3/4 cup | |
| Oatmeal 1:3 cups | |
| Risotto 1:2 cups—add additional wine to taste | |
| Porridge 1:10 cups | |
Visit our website for a complete list of cooking timetables.
The Duo is much more than a pressure cooker. These non-pressure cooking Smart Programs get you cooking quickly and easily. Always ensure the lid is set to Venting when using non-pressure cooking programs.
The following sections provide the safest steps for using the cooker.
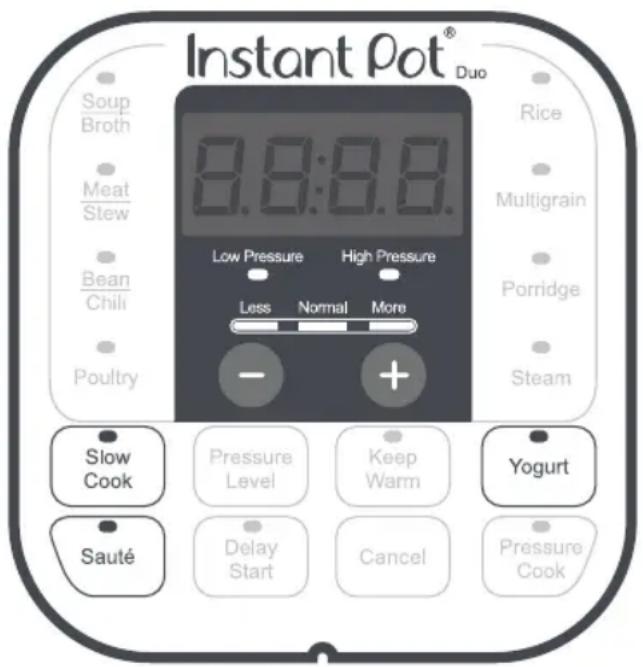
Always inspect your Instant Pot pressure cooking lid, inner pot and cooker base carefully to ensure they are clean and in good working condition before use.
WARNING
Do not fill inner pot higher than the PC MAX — 2/3 line as indicated on the inner pot.
When cooking foods that expand (e.g.; rice, beans, pasta) do not fill the inner pot higher than the — 1/2 line as indicated on the inner pot.
Always cook with the inner pot in place. Do not pour food or liquid into the cooker base.
To avoid risk of personal injury and/or property damage, place food and liquid ingredients in the inner pot, then insert the inner pot into the cooker base.
Slow Cook
Slow Cook is a non-pressure cooking program that is compatible for use with any common slow cooker recipe.
| Setting Suggested Use Notes | ||
| Less | Low setting on common slow cookers | Follow recipe directions for slow cooking. |
| Normal | Medium setting on common slow cookers | Less is commonly used for low and slow, all-day cooking, and should be set for a minimum of 10:00 hours for best results. |
| More | High setting on common slow cookers | |
- Remove inner pot from cooker base.
- Add food and liquid ingredients to the inner pot.
- Insert the inner pot into the cooker base.
- Mini and 6 Quart: Secure the power cord to the base power socket at the back of the cooker base. Ensure the connection is tight.
All: Connect the power cord to a 120 V power source. The cooker goes to Standby mode and the display indicates OFF. - Place and close the lid as described in Pressure Control Features-Pressure Cooking Lid, or use a glass lid with a venting hole.
- Turn the steam release handle to the Venting position.
- Press Slow Cook to select the Slow Cook Smart Program.
- Press Slow Cook again to cycle through the Less, Normal and More temperature options.
- Use the - / + buttons to adjust the cooking time.
Note: Cooking time and temperature level adjustments are saved to the Smart Program when cooking begins.
-
Press Keep Warm to toggle the automatic Keep Warm setting off or on.
-
After 10 seconds, cooking begins and the display timer counts down.
-
When cooking completes, the display indicates End if Keep Warm is turned off. If not, the timer begins counting from 00:00 up to 10 hours.
Note: The float valve should not rise during Slow Cook. The lid is removable throughout the cooking process for easy access. If the float valve rises, ensure the steam release handle is set to the Venting position. Refer to Depressurizing Your Cooker (Venting Methods).
Sauté
Sauté is a non-pressure cooking program that can be used in place of a frying pan or flat-top grill.
| Setting Suggested Use Notes | ||
| Less | Simmering, thickening and reducing liquids | The display switching from Hot to On indicates the cooker is maintaining the cooking temperature.As a safety precaution, 30 minutes is the maximum cooking time and cannot be adjusted. |
| Normal Pan searing or sautéing | ||
| More Stir-frying or browning meat | ||
- Insert the inner pot into the cooker base. Do not use a lid.
- Mini and 6 Quart: Secure the power cord to the base power socket at the back of the cooker base. Ensure the connection is tight.
All: Connect the power cord to a 120 V power source. The cooker goes to Standby mode and the display indicates OFF.
- Press Sauté to select the Sauté Smart Program.
- Press Sauté again to cycle through the Less, Normal and More temperature options.
Note: Cooking temperature adjustments are saved to the Smart Program when cooking begins.
- After 10 seconds, the cooker displays On to indicate that it has begun heating.
- When display switches from On to Hot, add recipe ingredients.
Note: If recipe ingredients are added before the Hot message appears, it may not appear at all. This is normal.
- When cooking completes, the display indicates End.
Note: Automatic Keep Warm cannot be turned on for the Sauté Smart Program.
Deglazing the Inner Pot (Pressure Cooking After Sauté)
Sautéing meat and vegetables before pressure cooking is the perfect way to boost flavors, as sugars caramelize from the high heat of the Sauté Smart Program.
To pressure cook after using Sauté, deglaze the inner pot to ensure food items do not scorch. To deglaze, remove food items from the inner pot and add a thin liquid (e.g., water, broth, wine) to the hot surface. Use a wooden or silicone scraper to loosen anything that may be stuck to the bottom of the inner pot.
WARNING
The Sauté Smart Program reaches high temperatures. If unmonitored, food may burn on this setting. Do not use the lid and do not leave your cooker unattended while using Sauté.
Yogurt
Yogurt is a non-pressure cooking Smart Program made for easy fermented dairy and non-dairy recipes.
| Instant Pot Size Minimum Milk Volume Maximum Milk Volume | |
| 3 Quarts / 2.8 Litres 2 cups | (16 oz / 500 mL) 2 quarts (64 oz / 1.9 L) |
| 6 Quarts / 5.7 Litres 4 cups | (32 oz / 1000 mL) 4 quarts (128 oz / 3.8 L) |
| 8 Quarts / 7.6 Litres 6 cups | (48 oz / 1500 mL) 6 quarts (192 oz / 5.7 L) |
Pasteurize Milk
- Add unpasteurized milk to the inner pot then insert the inner pot into the cooker base.
- Mini and 6 Quart: Secure the power cord to the base power socket at the back of the cooker base. Ensure the connection is tight.
All: Connect the power cord to a 120 V power source. The cooker goes to Standby mode and the display indicates OFF. - Place and close the lid as described in Pressure Control Features—Pressure Cooking Lid.
- Press Yogurt to select the Yogurt Smart Program.
- Press Yogurt again to cycle to the More option. The display indicates boiL.
- After 10 seconds the cooker begins heating.
- When pasteurization completes, the display indicates End.
- Remove the lid and use a thermometer to check the temperature.
Note: Milk must reach a minimum of 72^ C ( 161^ F) for pasteurization to occur.
Add Starter Culture
- Allow pasteurized milk to cool to just below 43^ C ( 110^ F).
- Add a starter culture to the milk according to package instructions.
Note: If using plain yogurt as a starter, ensure that it contains an active culture. Mix in 2 tbsp of yogurt per gallon of milk, or follow a trusted recipe. - Place and close the lid as described in Pressure Control Features—Pressure Cooking Lid.
Ferment Yogurt
| Setting Suggested Use Notes | ||
| Less | For lower temperature fermentation (e.g., Jiu Niang, a sweet fermented glutinous rice dessert) | Default fermentation time is 24 hours.Adjust fermentation time based on recipe. |
| Normal | Fermenting milk after culture has been added | A longer fermentation will result in tangier yogurt.Adjust as desired up to 99 hours and 30 minutes.. |
| More Pasteurizing milk | Pasteurization time is preset and cannot be adjusted.Display indicates boiL while program is running.For extra thick yogurt, pasteurize milk twice. | |
- Press Yogurt to select the Yogurt Smart Program.
- Press Yogurt again to cycle to the Normal option.
The display indicates 08:00. - Use the - / + buttons to adjust the fermentation time if desired.
- After 10 seconds the cooker begins heating. The display timer counts up to the set time from 00:00.
- When fermentation completes, the cooker beeps and displays End.
Yogurt Cups
Yogurt cups are a convenient way to portion out your yogurt for serving.
- After adding the starter culture to the pasteurized milk, carefully pour the milk into your yogurt cups and seal them tightly.
- Clean the inner pot thoroughly and place the steam rack on the bottom of the inner pot.
- Place the sealed yogurt cups on the steam rack and add water to the inner pot until the cups are submerged halfway.
- Follow steps in "Ferment Yogurt" above.
Clean your Duo after each use.
Always unplug your Duo and let it cool to room temperature before cleaning.
Let all surfaces dry thoroughly before use, and before storage.
| Part Instruction | Cleaning Method | |
| AccessoriesSteam RackCondensation Collector | Wash after each use.Never use harsh chemical detergents, powders or scouring pads on accessories.For dishwasher, place on top rack.Empty and rinse condensation collector after each use. | Dishwasher Safe* and Hand Washable |
| Lid and PartsAnti-Block ShieldSealing RingSteam Release ValveFloat ValveSilicone Cap | Wash after each use with hot water and mild dish soap and allow to air dry, or place in top rack of dishwasher.Remove all small parts from lid before washing.With steam release valve and anti-block shield removed, clean interior of steam release pipe to prevent clogging.To drain water from the lid after dishwashing, grasp the lid handle and hold the lid vertically over a sink, then turn it 360°–such as turning a steering wheel.After cleaning, store the lid upside down on the cooker base.Store sealing rings in a well-ventilated area to decrease residual odor of flavorful meals. To eliminate odors, add 1 cup (8 oz / 250 mL) water and 1 cup (8 oz / 250 mL) white vinegar to inner pot, and run Pressure Cook for 5-10 minutes, then QR pressure. | |
| Inner Pot | More acute hard water staining may require a vinegar-dampened sponge and some scrubbing to remove.If there is tough or burned food residue at the bottom, soak in hot water for a few hours for easy cleaning.Wash after each use.Ensure all exterior surfaces are dry before placing in cooker base. |
*Some discoloration may occur after machine washing, but this will not affect the cooker's safety or performance.
| Part Instruction | Cleaning Method | |
| Detachable Power Cord(3 and 6 Quart Only) | Use a barely-damp cloth to wipe any particles off power cord. | Damp Cloth Only |
| Cooker Base | Wipe the inside of the outer pot as well as the condensation rim with a barely-damp cloth, and allow to air dry.Clean cooker base and control panel with a soft, barely-damp cloth or sponge. |
| WARNING | |||
| Ensure heating element remains dry at all times. | Do not immerse cooker base in water or attempt to cycle through dishwasher. | Do not submerge power cord at any time. | Do not wet prongs of power cord. |
Register your product today.
Contact Customer Care:
1-800-828-7280
support@instantapot.com
instantpot.com/#Chat
| Problem Possible Reason Solution | ||
| Difficulty closing lid | Sealing ring not properly installed | Reposition sealing ring, ensure it is snug behind sealing ring rack. |
| Float valve in the popped-up position | Gently press the float valve downward with a long utensil. | |
| Contents in cooker are still hot | Turn steam release handle to Venting position, then lower lid onto cooker base slowly, allowing heat to dissipate. | |
| Difficulty opening lid | Pressure inside the cooker | Release pressure according to recipe; only open lid after float valve has dropped down. |
| Float valve stuck at the popped-up position due to food debris or residue | Ensure steam is completely released by quick releasing pressure, then press float valve gently with a long utensil.Open lid cautiously and thoroughly clean float valve, surrounding area, and lid before next use. | |
| AWARNING Contents may be under pressure; to avoid scalding injury, do not attempt to force lid open. | ||
| Inner pot is stuck to lid when cooker is opened | Cooling of inner pot may create suction, causing inner pot to adhere to the lid | To release the vacuum, turn steam release handle to Venting position. |
| Steam leaks from side of lid | No sealing ring in lid Install sealing ring. | |
| Sealing ring damaged or not properly installed | Replace sealing ring. | |
| Food debris attached to sealing ring Remove sealing ring and clean thoroughly. | ||
| Lid not closed properly Open, then close lid. | ||
| Sealing ring rack is warped or off-centre | Remove sealing ring from lid, check sealing ring rack for bends or warps. Contact Customer Care. | |
| Inner pot rim may be misshapen | Check for deformation and contact Customer Care. | |
| Float valve does not rise | Food debris on float valve or float valve silicone cap | Remove float valve from lid and clean thoroughly; perform Initial Test Run to check for function and record findings. Contact Customer Care. |
| Too little liquid in the inner pot | Check for scorching on bottom of inner pot. Add thin, water-based liquid to the inner pot according to its size:3 Quart: 1 cup / 250 mL6 Quart: 1 1/2 cups / 375 mL8 Quart: 2 cups / 500 mL | |
| Silicone cap damaged or missing Install | or replace float valve. | |
| Float valve obstructed by lid-locking mechanism | Tap float valve with a long utensil. If the float valve does not drop, turn the cooker off. Contact Customer Care. | |
| No heat in the inner pot | Perform Initial Test Run to check for function and record findings. Contact Customer Care. | |
| Inner pot base may be damaged | Perform Initial Test Run to check for function and record findings. Contact Customer Care. | |
| Minor steam leaking/hissing from steam release during cook cycle | Steam release handle not in Sealing position | Turn steam release handle to Sealing position. |
| Cooker is regulating excess pressure This is normal; no action required. | ||
| Steam gushes from steam release when steam release handle is in Sealing position | Not enough liquid in the inner pot | Add thin, water-based liquid to the inner pot according to its size:3 Quart: 1 cup / 250 mL6 Quart: 1 1/2 cups / 375 mL8 Quart: 2 cups / 500 mL |
| Pressure sensor control failure | Contact Customer Care. | |
| Steam release valve not seated properly | Turn steam release handle and ensure it is in Sealing position. | |
| Display remains blank after connecting the power cord | Bad power connection or no power | Inspect power cord for damage. If damage is noticed, contact Customer Care. Check outlet to ensure it is powered. |
| Cooker's electrical fuse has blown | Contact Customer Care. | |
| Problem Possible Reason Solution | |||
| Error code appears on display and cooker beeps continuously | C1C2C6C6HC6L | Faulty sensor | Contact Customer Care:1-800-828-7280support@instantapot.cominstantpot.com/#Chat |
| C5 | Temperature is too high because inner pot is not placed in the cooker base | Press Cancel and wait for heating element to cool; ensure there are no foreign objects in cooker base; insert or reposition inner pot in cooker base and re-enter commands. | |
| Temperature is too high because there is no water in inner pot | Check for scorching on bottom of inner pot. Add thin, water-based liquid to the inner pot according to its size:3 Quart: 1 cup / 250 mL6 Quart: 1 1/2 cups / 375 mL8 Quart: 2 cups / 500 mL | ||
| C7 or NoPr | Heat element has failed | Contact Customer Care | |
| Not enough liquid | Add thin, water-based liquid to the inner pot according to its size:3 Quart: 1 cup / 250 mL6 Quart: 1 1/2 cups / 375 mL8 Quart: 2 cups / 500 mL | ||
| Steam release handle is in the Venting position | Turn steam release handle to Sealing position. | ||
| Lid | Lid is not in the correct position for the selected program | Open and close the lid.Do not use a lid when using Sauté. | |
| OvHt / Burn / Food burn | High temperature detected at bottom of inner pot; cooker automatically reduces temperature to avoid overheating | Starch deposits at the bottom of the inner pot may have blocked heat dissipation.Turn the cooker off, release pressure according to the recipe, and inspect the bottom of the inner pot. | |
| PrSE | Pressure has accumulated during a non-pressure cooking program | Turn steam release handle to Venting position. | |
| Occasional clicking or light cracking sound | The sound of power switching and expanding pressure board when changing temperatures | This is normal; no action needed. | |
| Bottom of the inner pot is wet | Wipe exterior surfaces of inner pot. Ensure heating element is dry before inserting inner pot into cooker base. | ||
Limited Warranty
This Limited Warranty is effective for one year from the date of original consumer purchase. Proof of original purchase date and, if requested by an authorized representative of Instant Brands Inc. ("Instant Brands"), return of your appliance, is required to obtain service under this Limited Warranty. Provided that this appliance is operated and maintained in accordance with written instructions attached to or furnished with the appliance, Instant Brands will, in its sole and exclusive discretion, either: (i) repair defects in materials or workmanship; or (ii) replace the appliance. In the event that your appliance is replaced, the Limited Warranty on the replacement appliance will expire 12 months from the date of original consumer purchase.
This Limited Warranty extends only to the original purchaser and use of the appliance in the United States of America and Canada. This warranty does not cover units that are used outside of the United States of America and Canada.
Any modification or attempted modification to your appliance may interfere with the safe operation of the appliance and will void this Limited Warranty. This Limited Warranty does not apply in respect of any appliance or any part thereof that has been altered or modified unless such alterations or modifications were expressly authorized by an Instant Brands representative.
Limitation and Exclusions
The liability of Instant Brands, if any, for any allegedly defective appliance or part shall in no circumstances exceed the purchase price of a comparable replacement appliance.
This Limited Warranty does not cover:
- Damage resulting from accident, alteration, misuse, abuse, neglect, unreasonable use, use contrary to the operating instructions, normal wear and tear, commercial use, improper assembly, disassembly, failure to provide reasonable and necessary maintenance, fire, flood, acts of God or repair by anyone unless directed by an Instant Brands Representative;
- Repairs where your appliance is used for other than normal, personal use or when it is used in a manner that is contrary to published user or operator instructions; or
- Use of unauthorized parts and accessories, or repairs to parts and systems resulting from unauthorized repairs or modifications made to this appliance.
The cost of repair or replacement under these excluded circumstances shall be paid by you.
Disclaimer of Implied Warranties
EXCEPT AS EXPRESSLY PROVIDED HEREIN AND TO THE EXTENT PERMITTED BY LAW, INSTANT BRANDS MAKES NO WARRANTIES, CONDITIONS OR REPRESENTATIONS, EXPRESS OR IMPLIED, BY STATUTE, USAGE, CUSTOM OF TRADE OR OTHERWISE WITH RESPECT TO THE APPLIANCES OR PARTS COVERED BY THIS WARRANTY, INCLUDING BUT NOT LIMITED TO, WARRANTIES, CONDITIONS, OR REPRESENTATIONS OF WORKMANSHIP, MERCHANTABILITY, MERCHANTABILITY, FITNESS FOR A PARTICULAR PURPOSE OR DURABILITY.
Some states or provinces do not allow for the exclusion of implied warranties of merchantability or fitness, so this limitation may not apply to you. In these states and provinces, you have only the implied warranties that are expressly required to be provided in accordance with applicable law.
Limitation of Remedies; Exclusion of Incidental and Consequential Damage
YOUR SOLE AND EXCLUSIVE REMEDY UNDER THIS LIMITED WARRANTY SHALL BE APPLIANCE REPAIR OR REPLACEMENT AS PROVIDED HEREIN. INSTANT BRANDS SHALL NOT BE LIABLE FOR INDIRECT, INCIDENTAL OR CONSEQUENTIAL DAMAGES ARISING OUT OF OR IN CONNECTION WITH THE USE OR PERFORMANCE OF THE APPLIANCE OR DAMAGES WITH RESPECT TO ANY ECONOMIC LOSS, PERSONAL INJURY, LOSS OF PROPERTY, LOSS OF REVENUES OR PROFITS, LOSS OF ENJOYMENT OR USE, COSTS OF REMOVAL, INSTALLATION OR OTHER INDIRECT, INCIDENTAL OR CONSEQUENTIAL DAMAGES OF ANY NATURE OR KIND.
Warranty Registration
Please visit www.instantpot.com/support/register to register your new Instant Brands™ appliance and validate your warranty within thirty (30) days of purchase. You will be asked to provide the store name, date of purchase, model number (found on the back of your appliance) and serial number (found on the bottom of your appliance) along with your name and email address. The registration will enable us to keep you up to date with product developments, recipes and contact you in the unlikely event of a product safety notification. By registering, you acknowledge that you have read and understand the instructions for use, and warnings set forth in the accompanying instructions.
Warranty Service
To obtain service under this warranty, please contact our Customer Service Department by phone at 1-800-828-7280 or by email to support@instantpot.com. You can also create a support ticket online at www.instantpot.com/support. If we are unable to resolve the problem, you may be asked to send your appliance to the Service Department for quality inspection. Instant Brands is not responsible for shipping costs related to warranty service, save and except for shipping costs associated with the return of your appliance from Canada or within the 48 contiguous states and the District of Columbia of the United States of America, as provided herein. When returning your appliance, please include your name, mailing address, email address, phone number, and proof of the original purchase date as well as a description of the problem you are encountering with the appliance.
Instant Pot®
Instant Brands Inc.
11-300 Earl Grey Dr., Suite 383
Ottawa, Ontario
K2T 1C1
Canada
Register your product today:
instantpot.com/support/register
Contact Information:
1-800-828-7280
support@instantpot.com
instantpot.com/#Chat
instantpot.com
store.instantpot.com
Copyright © 2019 Instant Brands™ Inc
686-0101-51
- Mini, 6 and 8 Quart Multi-Use Pressure Cookers
- User Manual
- Welcome to the world of Instant cooking.
- Download the Instant Pot App
- IMPORTANT SAFEGUARDS....5-10
- Initial Setup 11
- Product, Parts and Accessories 12-14
- Control Panel 15-16
- Smart Program Settings.... 17-19
- Status Messages....20
- Cleaning Before First Use 21
- Overview of Pressure Control Features 22-29
- Table of Contents
- IMPORTANT SAFEGUARDS
- SAVE THESE INSTRUCTIONS
- WARNING
- Special Cord Set Instructions
- Duo Mini, 6 and 8 Quart Pressure Cookers
- Accessories
- Time Display
- Pressure Field
- Less - Normal - More
- LED Indicators
- Smart Program Settings
- Smart Programs
- Pressure Cooking:
- Non-Pressure Cooking:
- Adjust and Save Pressure Cooking Temperature
- Adjust and Save Pressure Cooking Time
- Adjust and Save Non-Pressure Cooking Temperatures
- Adjust and Save Non-Pressure Cooking Time
- Cancel and Standby Mode
- Turn Sound On/Off
- Set a Delay Start Timer
- Automatically Keep Food Warm After Cooking
- Reheat Food or Keep Warm for Long Periods
- Reset Smart Programs to Factory Default Settings
- Reset Individual Smart Programs
- Reset All Smart Programs
- CAUTION
- Pressure Cooking Lid
- Open and Remove the Lid
- Close the Lid
- Steam Release Handle
- Remove the Steam Release Handle
- Install the Steam Release Handle
- Anti-Block Shield
- Remove the Anti-Block Shield
- Install the Anti-Block Shield
- Sealing Ring
- Remove the Sealing Ring
- Install the Sealing Ring
- Float Valve
- Pressurized
- Depressurized
- Remove the Float Valve from the Lid
- Install the Float Valve
- Condensation Collector
- Remove the Condensation Collector
- Install the Condensation Collector
- Cooking with the Duo
- Pre-Heating and Pressurization
- Cooking
- Depressurization
- Depressurizing the Cooker (Venting Methods)
- Natural Release (NR)
- NOTICE
- Quick Release (QR)
- 10-Minute NR
- DANGER
- Pressure Cooking Settings
- Pressure Cooking Timetable
- Grain-to-Water Ratios
- Slow Cook
- Sauté
- Deglazing the Inner Pot (Pressure Cooking After Sauté)
- Yogurt
- Pasteurize Milk
- Add Starter Culture
- Yogurt Cups
- Register your product today.
- Limited Warranty
- This Limited Warranty extends only to the original purchaser and use of the appliance in the United States of America and Canada. This warranty does not cover units that are used outside of the United States of America and Canada.
- Limitation and Exclusions
- This Limited Warranty does not cover:
- Disclaimer of Implied Warranties
- Warranty Registration
- Warranty Service
- Instant Pot®
Brand : Instant Pot
Model : Duo
Category : Multicooker