
Connected wired thermostat - Thermostat SOMFY - Free user manual and instructions
Find the device manual for free Connected wired thermostat SOMFY in PDF.


| Product Type | Wired Thermostat |
| Brand | Somfy |
| Model | Connected Wired Thermostat |
| Category | Thermostat |
| Dimensions (H x W x D) | 85 x 85 x 25 mm |
| Weight (including batteries) | 120 g |
| Power Source | 2 AA batteries |
| Battery Type | AA alkaline (included) |
| Connectivity | Wi-Fi via gateway |
| Wireless Protocol | Wi-Fi 2.4 GHz |
| Compatible Wiring Systems | 2-wire, 3-wire, 4-wire |
| Mounting Height | 1.5 m above floor |
| Display Type | Touch-sensitive surface with LED |
| Control Interface | Smartphone app + touch surface |
| Smartphone App | Somfy Thermostat |
| App Compatibility | iOS and Android |
| Operating Temperature | 0°C to 40°C |
| Humidity Range | ≤80% RH |
| Included Accessories | Gateway, AA batteries x2, screwdriver, screws x2, wall plugs x2, double-sided adhesive tape, user ID stickers |
| Safety Precautions | Switch off mains before installation; strip wires ≤6 mm; avoid short circuits |
| Manufacturer | SOMFY ACTIVITES SA |
Frequently Asked Questions - Connected wired thermostat SOMFY
User questions about Connected wired thermostat SOMFY
0 question about this device. Answer the ones you know or ask your own.
Ask a new question about this device
Download the instructions for your Thermostat in PDF format for free! Find your manual Connected wired thermostat - SOMFY and take your electronic device back in hand. On this page are published all the documents necessary for the use of your device. Connected wired thermostat by SOMFY.
USER MANUAL Connected wired thermostat SOMFY
Connected wired thermostat
Installation guide
This pdf is interactive and designed to be read on a computer.
Buttons are indicated by grey zones.
Please do not hesitate to click on them to facilitate and optimise use of this user guide.
Begin!

Contents
Discovering the contents of the box 4
Before installation and recommendations 5
The Somfy thermostat application 6
Activating your thermostat 7
Removing your old thermostat 12
Installing your connected wired thermostat 20
Pairing with the gateway 28

Check that you have switched the mains supply off before performing any operations

A video tutorial relating to the installation of your product is available here
Discovering the contents of the box

natural_image
White 3D-rendered device with a curved top and 'SQmfy' branding (no other text or symbols)Somfy connected wired thermostat

natural_image
White product package with two leads, no visible text or symbols on bodyGateway

AA batteries x 2 User ID stickers


Double-sided adhesive tape

Screwdriver


Screws x 2 Wall plugs x 2
Contents
Before installation

Check that you have switched the mains supply off before performing any operations

natural_image
Yellow silhouette of a handheld electric tool emitting exhaust smoke (no text or symbols)Make sure you have the tools necessary for a wall installation
Recommendations
to ensure your thermostat works correctly
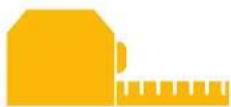
Install the thermostat 1 m 50 cm above the ground on an interior wall

Avoid any location exposed to direct sunlight, draughts or sources of heat
Contents
The Somfy thermostat application

Download the application by scanning the QR code on your thermostat.
The "Somfy thermostat" application is available for Android and iOS smartphones.
Contents
Next step
Activating your thermostat

Click on "Activate your thermostat" on your application.
Contents
Activating your thermostat
natural_image
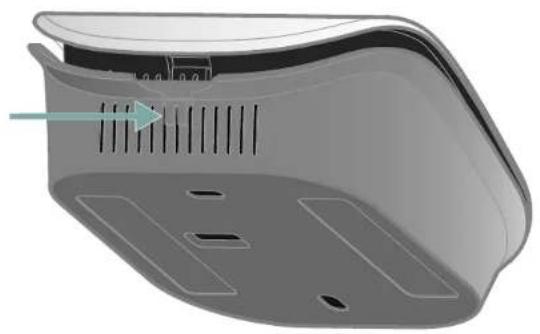
3D rendering of a gray plastic electronic device casing with ventilation slots and mounting holes (no text or symbols visible)Open your thermostat by pressing the pressure point to access the QR code and activate your thermostat.

On the back of the front panel, flash your QR code or enter the PIN code manually.
Activating your thermostat

Select your country and language and click on "Activate my product" on the Somfy Connect website.

Your product's PIN code is entered automatically. If this is not the case, you can enter it manually. It is located close to the QR code (see page 8).
Activating your thermostat

Enter the user name and password associated with your Somfy account. If you do not have a Somfy account, you can create one at this stage.

Once you have created your account, you will receiver an e-mail to confirm activation. Complete this step by clicking on the link contained in the e-mail. If you do not receive the e-mail, please check your spam folder.
Contents
Next step
Activating your thermostat

Return to the application and enter your user name and password to connect.
Contents
Next step
Removing your old thermostat
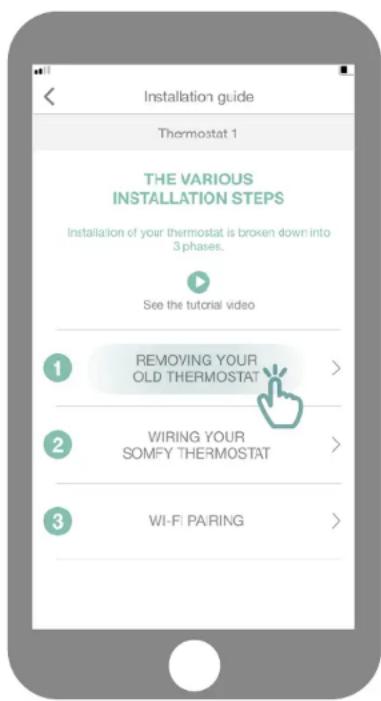
Click on
"Remove your old thermostat".
Contents
Removing your old thermostat

natural_image
Illustration of a washing machine with a clock and electrical socket, showing the process from left to right (no text or symbols)Depending on the model of your thermostat, unscrew or unclip the front panel.
Removing your old thermostat

natural_image
Illustration of a switch panel with two terminal blocks and a circular annotation highlighting the internal components (no text or symbols present)How many wire are connected to the thermostat?
Removing your old thermostat
If there are 2 wires connected to your thermostat
you will find indications close to the terminal block of your thermostat enabling you to identify the wiring.

natural_image
Simple diagram of a wall-mounted electrical outlet with two brown pipes and a labeled control box (COMNO), no text or symbols present.Identify the wires connected, i.e.
COM (or Ls) and NO (or Lr)
or
TA
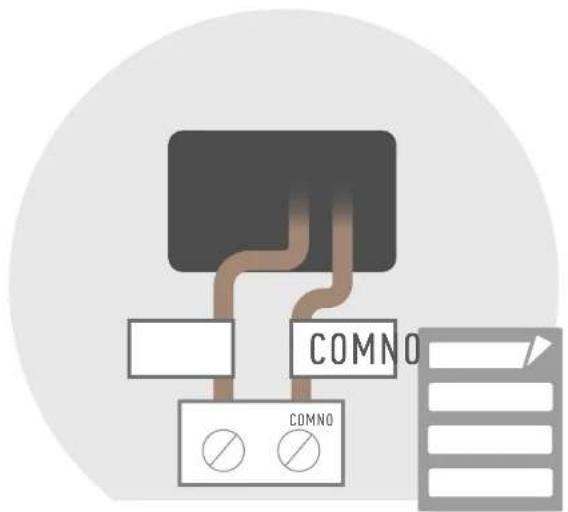
Attach the stickers provided to identify the cables when installing the new thermostat.
Next step
Removing your old thermostat
If there are 3 wires connected to your thermostat
you will find indications close to the terminal block of your thermostat enabling you to identify the wiring.

natural_image
Pure electrical circuit lines without any symbolsIdentify the wires connected, i.e.
COM (or Ls)
NO (or Lr)
P (or L)

Attach the stickers provided to identify the cables when installing the new thermostat.
Next step
Removing your old thermostat
If there are 4 wires connected to your thermostat
you will find indications close to the terminal block of your thermostat enabling you to identify the wiring.

natural_image
Pure electrical circuit lines without any symbolsIdentify the wires connected, i.e.
COM (or Ls), NO (or Lr), P (or L) and N

flowchart
graph TD
    A["Component"] --> B["NO"]
    A --> C["COM"]
    A --> D["P"]
    A --> E["N"]
    B --> F["Control Switch"]
    C --> G["Control Switch"]
    D --> H["Control Switch"]
    E --> I["Control Switch"]
    style A fill:#f9f,stroke:#333
    style B fill:#ccf,stroke:#333
    style C fill:#ccf,stroke:#333
    style D fill:#ccf,stroke:#333
    style E fill:#ccf,stroke:#333
    style F fill:#dfd,stroke:#333
    style G fill:#dfd,stroke:#333
    style H fill:#dfd,stroke:#333
    style I fill:#dfd,stroke:#333
Attach the stickers provided to identify the cables when installing the new thermostat.
Next step
Removing your old thermostat

Unscrew the terminal blocks to release the wires.
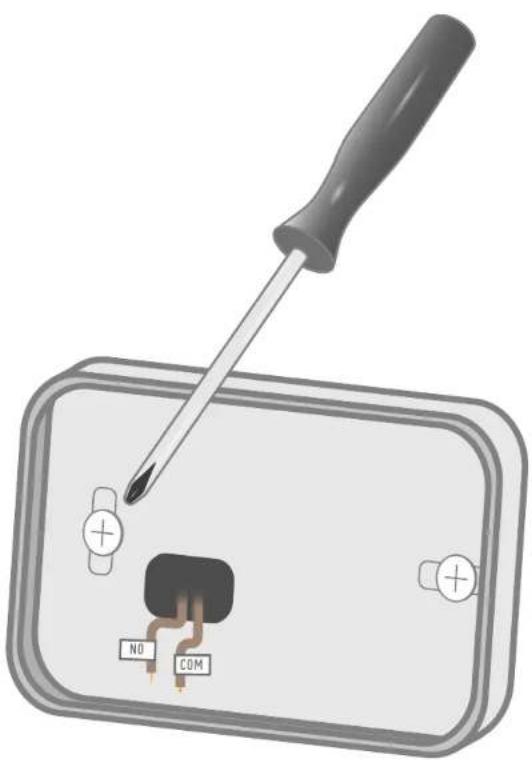
Removing your old thermostat
natural_image
Illustration of a screwdriver inserted into a device with a switch and labeled terminals (no text or symbols on the diagram itself)Complete removal by unscrewing the base holding the terminal block.
Contents
Next step
Installing your thermostat
Access the
"Cable your Somfy thermostat" sub-menu.
Installing your thermostat

natural_image
3D rendering of a gray plastic electronic device casing with ventilation slots and mounting holes (no text or symbols visible)
natural_image
Transparent plastic door panel with a black switch and directional arrows, no text or symbols visibleOpen the thermostat by pressing the pressure point. On the rear section, open the mounting brackets and pull the cover downwards to access the terminal block cover.
Installing your thermostat


Insert the wires through the rear base. Mount the socket to the wall using the accessories
provided, such as the screws and plugs. You can also stick the thermostat using the adhesive provided.
Installing your thermostat
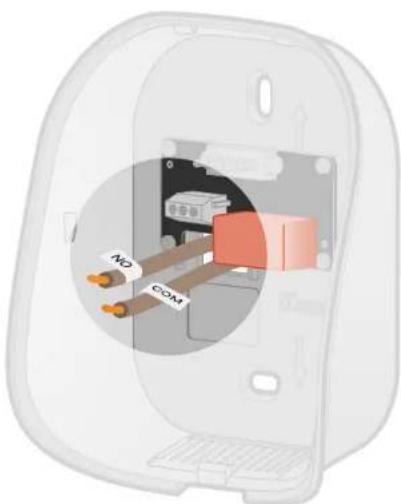
If necessary, strip the cables.

Do not leave more than 6 mm of wire visible. To prevent a short-circuit, the wires must not come into contact with each other.
Installing your thermostat

Connect the wires to the respective terminals and screw to secure.
Installing your thermostat
natural_image
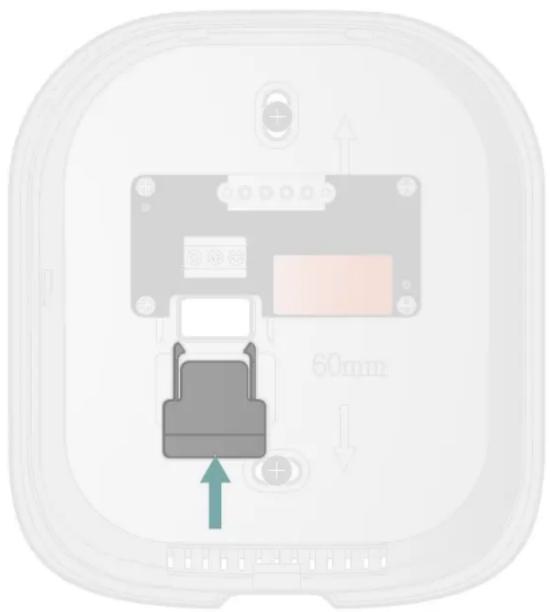
Diagram of a device component with a 60mm scale indicator and an arrow pointing to a mechanical assembly (no text or symbols beyond measurement)Push any surplus wire back into the wall. Replace the terminal block cover by sliding it upwards.
Installing your thermostat

Insert the 2 AA batteries supplied into the front panel, respecting the polarity.
Installing your thermostat

natural_image
White USB device with a curved arrow and 's0mfy' branding, no readable text or symbols beyond the label.
natural_image
White 3D device with curved top and arrow indicator (no text or symbols on body)Close the thermostat by inserting the front panel at the top than at the bottom.
You have completed the installation of your thermostat.
Contents
Next step
Pairing with the gateway


Access the
"WiFi pairing" sub-menu.
Contents
Pairing with the gateway

flowchart
graph LR
    A["WiFi"] --> B["Device"]
    B --> C["Rout"]

Connect to your WiFi network and enter your password.
Pairing with the gateway
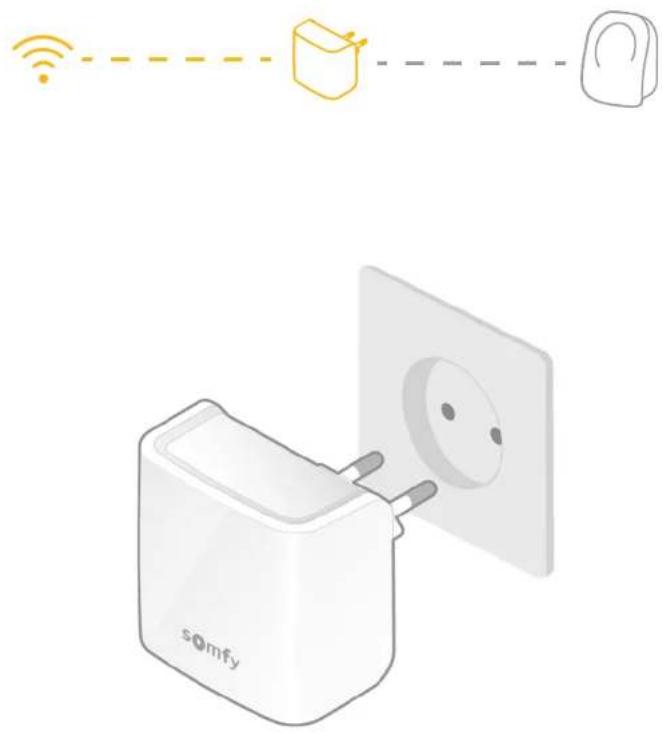
Connect your WiFi gateway in the same room as your thermostat.
The gateway will switch to pairing mode and flash red and green.
Pairing with the gateway

flowchart
graph LR
    A["Wi-Fi Signal"] --> B["Device Icon"]
    B --> C["Rout Router"]

Click on "Choose WiFi network".
Pairing with the gateway

flowchart
graph LR
    A["WiFi"] --> B["Wi-Fi Icon"]
    B --> C["Wi-Fi Symbol"]
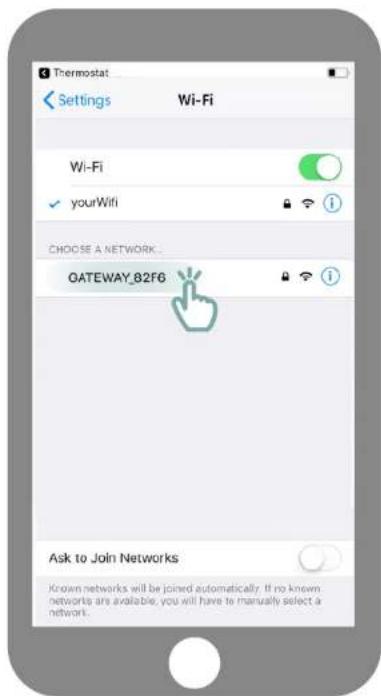
You will be redirected to the WiFi settings on your smartphone. Select the network created by your gateway, which will appear under the name GATEWAY_XXXX.
Pairing with the gateway

flowchart
graph LR
    A["WiFi Signal"] --> B["Wireless Device Icon"]
    B --> C["Gateway Icon"]
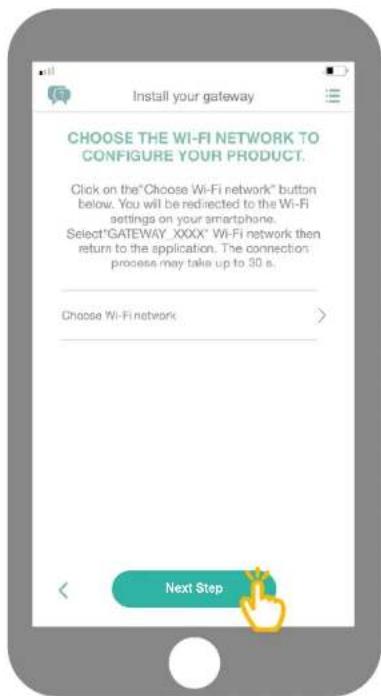
Then return to the application and click on "Next step".
Pairing with the gateway

flowchart
graph LR
    A["WiFi"] --> B["Device Icon"]
    B --> C["App Icon"]
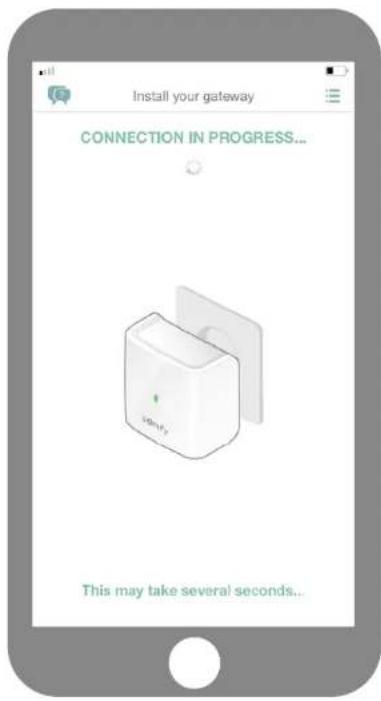
Wait for a few seconds while your gateway connects to your network.
Pairing with the gateway

flowchart
graph LR
    A["WiFi"] --> B["Device Icon"]
    B --> C["App Icon"]

What colour is the flashing LED?
blue
red
Pairing with the gateway

flowchart
graph LR
    A["Wireless Signal"] --> B["Device Icon"]
    B --> C["User Interface Icon"]

If your gateway LED is red:
- Check that your gateway is located close to your thermostat (less than 10 m)
-
Check that your Internet network is working
-
Check that your password is correct
- Avoid using the “&” character in your password
Then begin the procedure again.
Begin the procedure again
Pairing with the gateway

Activate your thermostat by touching the touch-sensitive surface. The figures will appear and the gateway LED will turn solid green.
Pairing with the gateway

flowchart
graph LR
    A["WiFi"] --> B["Device Icon"]
    B --> C["Router Icon"]

You have completed the pairing procedure of your connected thermostat!
Contents
SOMFY ACTIVITES SA



- Connected wired thermostat
- Contents
- Before installation
- Recommendations
- The Somfy thermostat application
- Activating your thermostat
- Removing your old thermostat
- If there are 2 wires connected to your thermostat
- If there are 3 wires connected to your thermostat
- If there are 4 wires connected to your thermostat
- Installing your thermostat
- Pairing with the gateway
Brand : SOMFY
Model : Connected wired thermostat
Category : Thermostat