
U-44 - Hi-Fi System ZOOM - Free user manual and instructions
Find the device manual for free U-44 ZOOM in PDF.


| Product Type | Audio Interface (4-in/4-out) |
| Brand | ZOOM |
| Model | U-44 |
| Dimensions | 198.8 mm (D) × 92.3 mm (W) × 42.7 mm (H) |
| Weight | 310 g (main unit only) |
| Power Sources | USB bus power, AC adapter (ZOOM AD-17), DC 5V external, 2 AA batteries |
| Sampling Rates | 44.1, 48, 88.2, 96 kHz |
| Bit Depth | 24-bit |
| Audio Inputs | 2 combo XLR/TRS (inputs 1-2), 1 S/PDIF (optical/coaxial, inputs 3-4), 1 MIC IN (for H-Series capsules), 1 MIDI IN |
| Audio Outputs | 2 TRS (main out), 2 RCA (line out 1-2), 1 stereo phone out, 1 S/PDIF out (optical/coaxial), 1 MIDI OUT |
| Phantom Power | +48V switchable on inputs 1-2 |
| Hi-Z Input | On input 1 (for guitar/bass with passive pickups) |
| Direct Monitoring | Yes, with balance control |
| Standalone Mode | Yes, as AD/DA converter and mic preamp |
| Frequency Response | 20 Hz – 20 kHz ±1.5 dB (44.1 kHz), 20 Hz – 40 kHz ±2 dB (96 kHz) |
| Input Gain Range | 0 – 43 dB |
| Input Impedance (MIC) | 2.6 kΩ |
| Input Impedance (Hi-Z) | 1.1 MΩ |
| Maximum Input Level | +2.7 dBu (MIC), +20.7 dBu (TRS) |
| Main Out Max Output Level | +10 dBu |
| Headphone Output Power | 30 mW × 2 into 32 Ω |
| Connectivity | USB 2.0 (Type B), MIDI (5-pin DIN), S/PDIF (TOSLINK & RCA) |
| Driver Required | Windows only (Mac driverless) |
| Compatibility | Windows, macOS, iOS (with Camera Connection Kit) |
| Safety Precautions | Do not open case; use only ZOOM AD-17 adapter; avoid extreme temperatures, moisture, and impacts |
| Cleaning | Soft dry cloth; do not use solvents |
Frequently Asked Questions - U-44 ZOOM
User questions about U-44 ZOOM
0 question about this device. Answer the ones you know or ask your own.
Ask a new question about this device
Download the instructions for your Hi-Fi System in PDF format for free! Find your manual U-44 - ZOOM and take your electronic device back in hand. On this page are published all the documents necessary for the use of your device. U-44 by ZOOM.
USER MANUAL U-44 ZOOM
Handy Audio Interface U-44
Operation Manual
![USB MIDI INPUT 1 Hi-Z CLIP SIG GAIN 1 48V [1-2] CLIP SIG GAIN 2 2 A L R LINE OUT 1 B L R LINE OUT 2 L R MAIN OUT PHONES BALANCE [1-2] DAW [3-4] - - - - - - - - - - - - - - - - - - - - - - - - - - - - - - - - - - - - - - - - - - - - - - - - - - - - - - - - - - - - - - - - - - - - - - - - - - - - - - - - - - - - - - - - - - - - - - - - - - - - + - - - - - - - - - - - - - - - - - - - - - - - - - - - - - - - - - - - - - - + - MUTE B POWER MIC IN [3-4]](/content/2026/05/760248/images/73621548e70accb0cf19e3c737b2a1663835c26ad6f17172358c1d46704a004d.jpg)
Contents
Introduction 2
Safety and Usage Precautions 3
Part Names 4
Connecting with a Computer/iOS device......6
Recording 11
Playback 14
Connecting MIDI Devices 18
Using Digital Audio Equipment 19
Connecting ZOOM H-Series Mic Capsules .....22
Using as a Standalone AD/DA Converter and Mic Preamp (Standalone Mode)....24
Troubleshooting 25
Specifications 26
Signal Flow Diagrams 27
Introduction
Thank you for choosing the ZOOM UHady Audio Interface. To achieve the best results—and to protect your investment—please read this manual carefully and retain it for future reference. Use this product only as directed.
4-in/4-out Audio Interface
The ZOOM Us44 high quality audio interface that supports audio recording and playback at resolutions up to 24-bit/96 kHz.
Featuring an asynchronous transfer system, U-44 is not impacted by computer jitter, and reproduces audio with complete accuracy.
U-44 can be used with computers running Windows and Mac OS X, as well as with an iOS device.
High-Performance Mic Preamps
U-44 is equipped with high-performance mic preamps that are based on the same design as our H-Series Handy Recorders.
+48V phantom power can be supplied to each input. INPUT 1 also supports Hi-Z input.
Additionally, H-Series mic capsules can be connected to the U-44.
Designed with the DJ in Mind
The U-44 features 2 RCA outputs that make it easy to connect DJ mixers or other devices. The balance between computer playback signals 1-2 and 3-4 can be adjusted for the LINE OUT 2 and PHONES outputs.
For example, you can balance the PHONES output between click and MAIN OUT signals during a live performance. Or you can balance between the cue and MAIN OUT signals during a DJ performance.
Plus, the PHONES jack delivers enough volume output for use in clubs and other small venues.
Standalone AD/DA Mode
In standalone mode, the U-44 can be used as a high-quality mic preamp and AD/DA converter.
U-44 can convert digital output from a DVD or Blu-ray player to analog output, and also convert analog input to digital output.
Safety and Usage Precautions
Safety Precautions
In this operation manual, symbols are used to highlight warnings and cautions that you must read to prevent accidents. The meanings of these symbols are as follows.

Something that could cause serious injury or death

Something that could cause injury or damage to the equipment
Other symbols used

An action that is mandatory

An action that is prohibited
⚠ Warning
Alterations
Do not open the case or modify the product.
Operation using an AC adapter
Never use any AC adapter other than a ZOOM AD-17.
Always hold the AC adapter itself when disconnecting it from an outlet.
Operation with external DC power supply
Use a 5V external DC power supply.
① Carefully study the warning indications of the external DC power supply before use.
Operation using batteries
Use 2 ordinary 1.5-volt AA batteries (alkaline or nickel-metal hydride).
Read battery warning labels carefully.
Always close the battery compartment cover when using the unit.
Caution
Product handling
Do not drop, bump or apply excessive force to the unit.
Be careful not to allow foreign objects or liquids to enter the unit.
Battery handling
Install the batteries with the correct +/- orientation.
Use a specified battery type.
Do not mix new and old batteries or different brands or types at the same time.
When not using the unit for an extended period of time, remove the batteries.
If a battery leak should occur, wipe the battery compartment and the battery terminals carefully to remove all residue.
Operating environment
Do not use in extremely high or low temperatures.
Do not use near heaters, stoves and other heat sources.
Do not use in very high humidity or where it could be splashed by water.
Do not use in places with frequent vibrations.
Do not use in places with much dust or sand.
Mic handling
Before connecting a mic, always turn the power off. Do not use excessive force when connecting it.
1 Attach the protective cap when no mic is connected for extended periods.
Connection cables and input/output jacks
Always turn the power OFF for all equipment before connecting any cables.
Always disconnect all connection cables and the AC adapter before moving the unit.
Volume
Do not use at a loud volume for a long time.
Usage Precautions
Interference with other electrical equipment
For safety considerations, U-44 is designed to minimize the emission of electromagnetic waves and suppress interference from external electromagnetic waves. However, interference could still occur if U-44 is placed next to equipment that is very susceptible to interference or that emits powerful electromagnetic waves. If this occurs, place the U-44 and the other device farther apart.
With any type of digital control device—including the U-44—electromagnetic interference can cause malfunction, corrupt or destroy data, or cause other unexpected issues. Always exercise caution.
Cleaning
Use a soft cloth to clean the exterior of the unit if it becomes dirty. If necessary, use a damp cloth that has been wrung out well to wipe it. Never use abrasive cleansers, wax or solvents such as alcohol, benzene or paint thinner.
Temperature considerations
The Unley become warm after long periods of continuous use. This is normal, as long as the unit does not become too hot to touch.
Breakdown and malfunction
If the Unalfunctions or operates abnormally, disconnect it immediately. Contact the store where you purchased the unit, or contact ZOOM customer service with the following information: product model, serial number, and the specific symptoms of the breakdown or malfunction—along with your name, address, and telephone number.
Copyrights
- Windows ^ is a registered trademark of Microsoft ^ Corporation.
- Mac ^ , iPad ^ and Lightning ^TM are trademarks or registered trademarks of Apple Inc.
- MIDI is a registered trademark of Association of Musical Electronics Industry (AMEI).
- iOS is a trademark or registered trademark of Cisco Systems, Inc. (USA).
- Other product names, registered trademarks and company names in this document are the property of their respective companies.
Note: All trademarks and registered trademarks in this document are for identification purposes only and are not intended to infringe on the copyrights of their respective owners.
Recording for any purpose other than personal use from copyrighted sources, including CDs, records, tapes, live performances, video works and broadcasts, without permission of the copyright holder is prohibited by law.
ZOOM Corporation will not assume any responsibility related to infringements of copyrights.
FCC regulation warning (for U.S.A.)
This equipment has been tested and found to comply with the limits for a Class B digital device, pursuant to Part 15 of the FCC Rules. These limits are designed to provide reasonable protection against harmful interference in a residential installation. This equipment generates, uses, and can radiate radio frequency energy and, if not installed and used in accordance with the instructions, may cause harmful interference to radio communications. However, there is no guarantee that interference will not occur in a particular installation. If this equipment does cause harmful interference to radio or television reception, which can be determined by turning the equipment off and on, the user is encouraged to try to correct the interference by one or more of the following measures:
- Reorient or relocate the receiving antenna.
- Increase the separation between the equipment and receiver.
- Connect the equipment to an outlet on a circuit different from that to which the receiver is connected.
- Consult the dealer or an experienced radio/TV technician for help.
For EU Countries

Declaration of Conformity
Part Names
Top
![MAIN OUT jacks LINE OUT 1 jacks INPUT 1 jack HI-Z switch Level indicators PHANTOM switch GAIN knobs INPUT 2 jack 200M Handy Audio Interface U-44 DIRECT MONITOR knob MUTE switches MUTE POWER Power indicator PHONES knob BALANCE knob R MAIN OUT R LINE OUT 1 R LINE OUT 2 A B MIDI I L R L R R LINE OUT 2 jacks LINE OUT 1 jacks PHONES jack BALANCE (1-2) SIN (1-4) MIC IN [3 - 4] MIC IN connector](/content/2026/05/760248/images/a519cab18658813721c3d50710ccf014f0a8191fc96f327f3dce70d7e49188f3.jpg)
XLRTRS
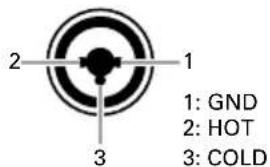
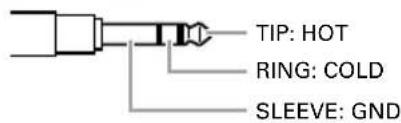
Part Names (continued)
■ Left side
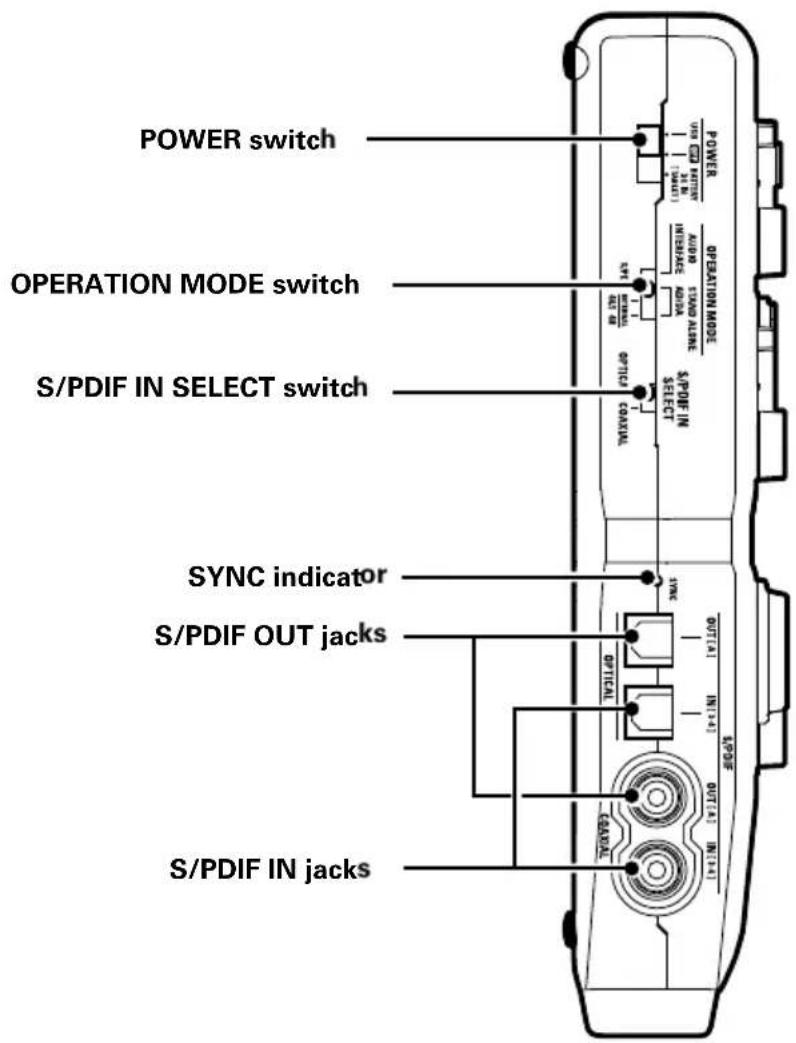
■ Back
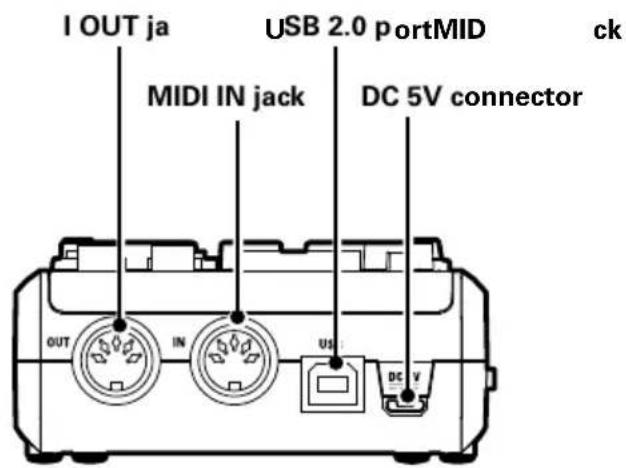
Installing the Driver
Do not connect the U+44 installation completes.
Windows
- Download the ZOOM U-44 Driver from http://www.zoom.co.jp/downloads/ to your computer.
NOTE
- You can download the latest ZOOM U-44 driver from the above website.
-
Download the driver for the operating system that you are using.
-
Launch the installer and install the driver.
Follow the instructions that appear on screen to install the ZOOM U-44 driver.
NOTE
• See the Installation Guide included in the driver package for detailed installation procedures.
Mac
Driver installation is not necessary when using a Mac.
Choosing a Power Source
■ Using bus power
Use a USB cable to connect the U-44 to the computer.
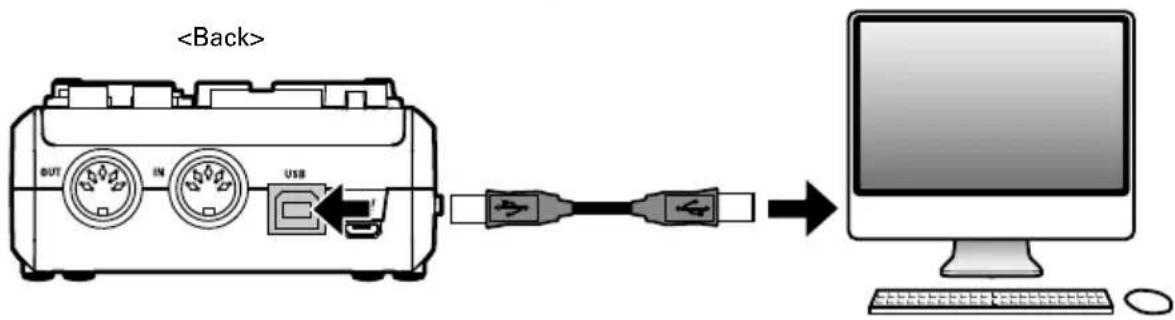
flowchart
graph LR
    A["<Back>"] --> B["USB"]
    B --> C["Computer"]
■ Using batteries
-
Open the battery cover on the Bottom.
-
Install the batteries.
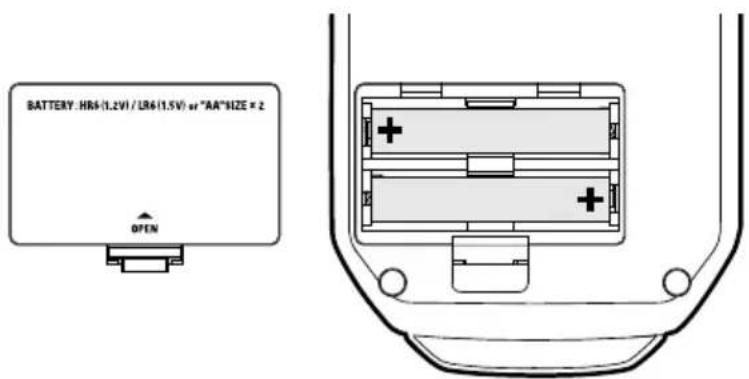
- Replace the battery cover.
NOTE
- Use only alkaline alkaline batteries or rechargeable NiMH batteries.
- The power indicator will blink when the battery charge becomes low. Turn the power off immediately and install new batteries.
■ Using an external power supply
Connect either the optional AD-17 adapter, a commercially available USB power adapter, or a mobile USB battery to the DC 5V connector.
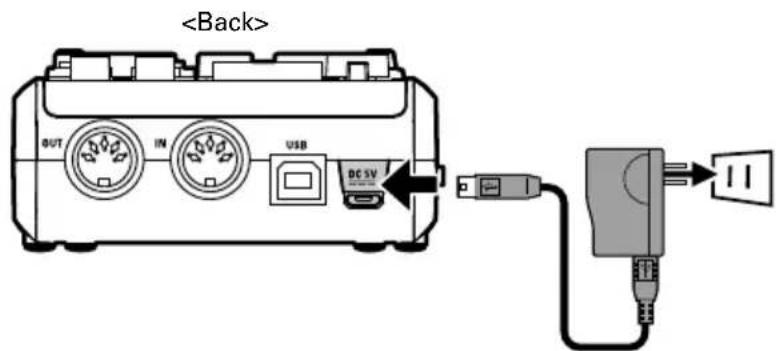
Connecting with a Computer
- Minimize the volume of any output devices that are currently connected to the U-44.
- Set MODEAUDIO STAND ALONE INTERFACE.
- Use a USB cable to connect the Uo4he computer.
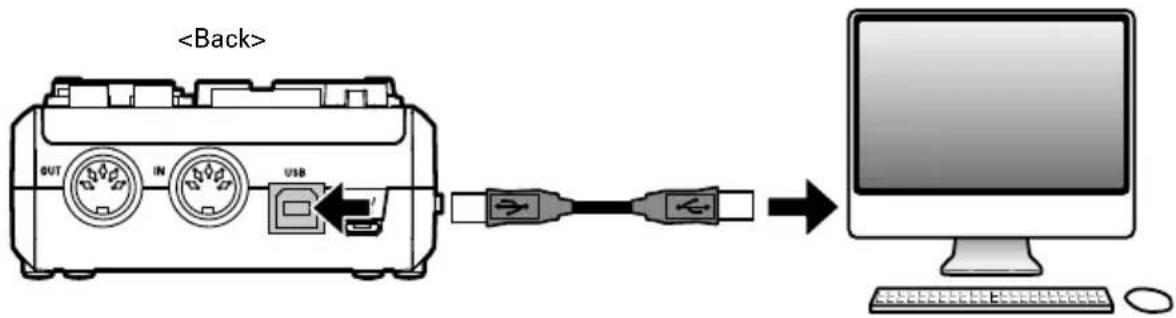
flowchart
graph LR
    A["<Back>"] --> B["USB"]
    B --> C["Computer"]
- Set QFD BATTERY DC IN to USB or BATTERY/DC IN to turn the power on.
NOTE
![OPERATION MODE AUDIO STAND ALONE INTERS SET ADOYA • If I can only be used, it is connected to a computer. • When using batteries or an external power supply, set POWER [TO BAKI ERY/DC IN. POWER USB CTR BATTERY [TABUT]](/content/2026/05/760248/images/88a8d259a3df95a515cf2f698d4841b9f844f06f3cafd36098b3213e4f747c99.jpg)
- Confirm that the power indicator is lit.
![MAIN OUT MITE A — MITE — B MIC IN [3 - 4]](/content/2026/05/760248/images/ef2b56dea455657bb60674c31be168df0c1426edfccbebf6c2878968a29d26e7.jpg)
iOS device Connection
You can connect the U+44 an iOS device when using either the optional AD-17 power adapter, an external DC power supply, or AA batteries.
-
Minimize the volume of any output devices that are currently connected to the U-44.
-
Set MODEAUDIO INTERFATE to -ALONEAUDIO INTERFACE .
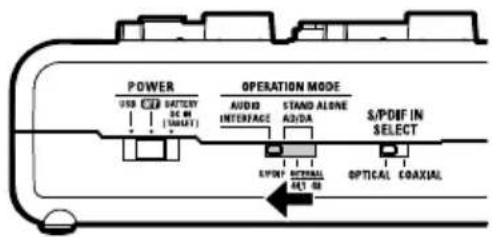
flowchart
graph TD
    A["Power"] --> B["USB"]
    B --> C["BATTERY"]
    C --> D["DC 60 (100kV)"]
    D --> E["OUTPUT MODE"]
    E --> F["AUDIO INTERFACE"]
    F --> G["STAND ALONE AD/DA"]
    G --> H["S/PDBF IN SELECT"]
    H --> I["S/PDBF IN OUTPUT"]
    I --> J["OPTICAL"]
    J --> K["COAXIAL"]
-
Install batteries or connect an external power supply. (→ P. 7)
-
Connect the UoAke iOS device using an Apple iPad Camera Connection Kit or Lightning to USB Camera Adapter.
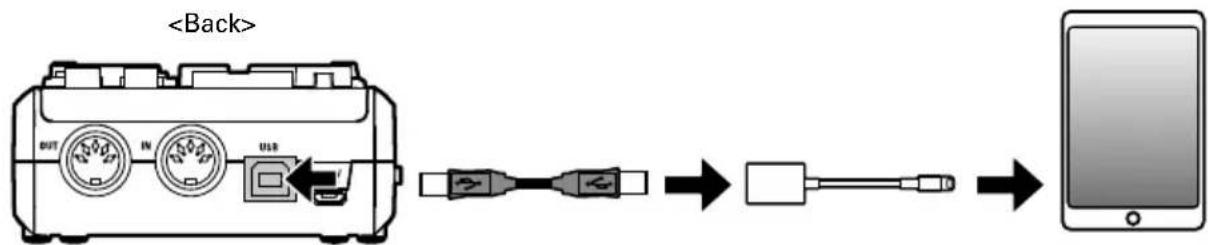
flowchart
graph LR
    A["Device Back"] --> B["USB Cable"]
    B --> C["USB Cable"]
    C --> D["Table Screen"]
- Set to BATTERY/DC IN. After the turns on, it will connect to the iOS device.
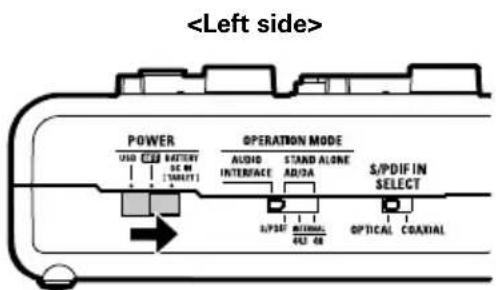
NOTE
- U cannot accept bus power from an iOS device.
- Confirm that the power indicator is lit.
Turning the Power Off
- Minimize the volume of any output devices that are currently connected to the U-44.
- Turn off amps, monitor speakers, and any other output equipment that is currently connected to the U-44.
- Set CFP BATTERY to OFF.
![POWER USB CLEB BATTERY DCM [SMART] OPERATION MODE AUDIO INTERFACE STAND ALONE ADORA S/PDEF IN SELECT S/PDEF INTERNAL 4x7.4x8 OPTICAL COAXIAL](/content/2026/05/760248/images/8fd22d7a9ba74fac6e2ca05a86fa7fdd9512135acc8b6322e8d1992d93303ff7.jpg)
Connecting Instruments
Instruments can be connected to INPUTS 1 and 2 using TRS or mono instrument cables.
![Guitar Bass guitar (mono instrument cable) Keyboard (TRS cable) 200M Handy Audio Interface U-44 DIRECT MONITOR INPUT MAIN OUT PHONES A — MUTE — B POWER MIC IN [3 - 4] 1 2 3 4 5 6 7 8 9 10 11 12 13 14 15 16 17 18 19 20 21 22 23 24 25 26 27 28 29 30 31 32 33 34 35 36 37 38 39 40 41 42 43 44 45 46 47 48 49 50 51 52 53 54 55 56 57 58 59 60 61 62 63 64 65 66 67 68 69 70 71 72 73 74 75 76 77 78 79 80](/content/2026/05/760248/images/ce773833f19bf026158bb7e5b9370e312f040b0310bc5e7042488e1bee984d2d.jpg)
Using the Hi-Z Function
- The Hi-Z function can only be used with INPUT 1.
- When connecting a guitar or bass with passive pickups, use INPUT 1 and turn ☐h( ).
- When connecting a keyboard or other instrument, connect it to INPUT 1 and turn ☐ ☐ ☐ ☐ ☐ ☐ ☐ ☐ ☐ ☐ ☐ ☐ ☐ ☐ ☐ ☐ ☐ ☐ ☐ ☐ ☐ ☐ ☐ ☐ ☐ ☐ ☐ ☐ ☐ ☐ ☐ ☐ ☐ ☐ ☐ ☐ ☐ ☐ ☐ ☐ ☐ ☐ ☐ ☐ ☐ ☐ ☐ ☐ ☐ ☐ ☑), or connect it to INPUT 2.
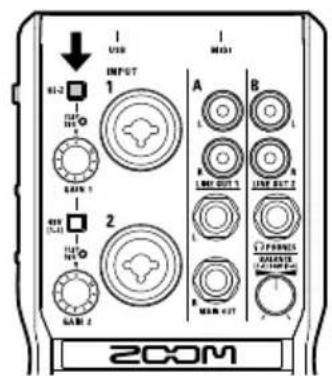
Connecting Mics
Mics can be connected to INPUTS 1/2 using XLR cables.
![Dynamic mic (XLR cable) Condenser mic (XLR cable) 200M Handy Audio Interface U-44 DIRECT MONITOR INPUT PLAT BASE MAIN OUT PHONES A — MUTE — B POWER MIC IN [3 - 4]](/content/2026/05/760248/images/1060650a29d1efaa22697ece49de37364f89a0706e84f31b61631baf65674de0.jpg)
Using Phantom Power
- When using a condenser mic, turn ^48 (1-2).
- When on, phantom power is supplied to both INPUTS 1 and 2.
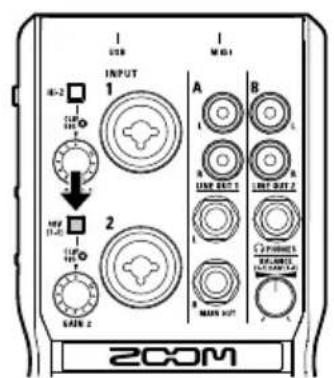
Adjusting Input Gain
You can adjust the gain of each input.
1. Check the status of the input signal.
Green light: Input signal is present.
Red light: Input signal is clipping.
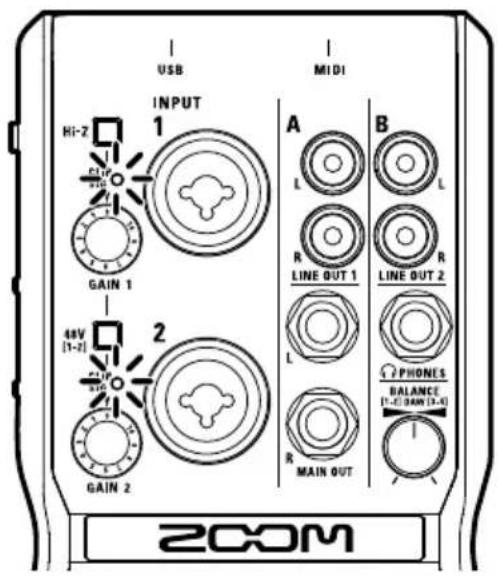
2. Adjust the input gain.
Turn the


![USB MIDI INPUT 1 HI-2 GAIN 1 48V [1-2] GAIN 2 A L R LINE OUT 1 L R LINE OUT 2 R L R PHONES BALANCE [1-2] 3AM [1-4] MAIN OUT 2COM](/content/2026/05/760248/images/21c0127cb7fec5397d550ebf296a528f4f053ff300a87b1f0f6ffbce0dfa5855.jpg)
HINT
- To avoid distorted recordings, adjust the input gain so the level indicator doesn't light up red.
Connecting Headphones and Speakers
Connect headphones to the PHONES jack, speakers to the MAIN OUT jacks, and adjust the volume levels accordingly.
1. Connect headphones or speakers.
![USB MIDI INPUT 1 Hi-2 CLIP SIG GAIN 1 48V [1-2] CLIP SIG GAIN 2 A L R LINE OUT 1 R LINE OUT 2 L R MAIN OUT 2COM Speakers Headphones](/content/2026/05/760248/images/976480d06d8a945f9127aff3f2061c16eb1efd06f9c542b52c6e8ce4295ddb93.jpg)
2. Adjust the headphones/speakers volume.
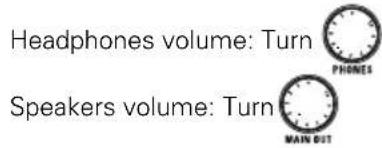
![200M dy Audio Inter U-44 DIRECT MONITOR INPUT PLAT BACK PHONES MAIN OUT A — MUTE — B POWER MIC IN [3-4]](/content/2026/05/760248/images/130c1cc59ef6c43fc858f06a8748c5cb2785562c14b490dbcdc69c774c624cc2.jpg)
NOTE
- The LINE OUT 1 jacks deliver the same signal output as the MAIN OUT jacks.
- The LINE OUT 2 jacks deliver the same signal output as the PHONES jack.
- The LINE OUT 1 and 2 volume levels can't be changed.
- The MAIN OUT/LINE OUT 1 jacks deliver output from computer playback signals 1-2.
- The PHONES/LINE OUT 2 jacks deliver output from the adjusted balance of computer playback signals 1-2 and 3-4. (→ P. 17)
Muting Outputs
The outputs of channels A (MAIN OUT/LINE OUT 1) and B (PHONES/LINE OUT 2) can be muted/unmuted.
1. Press○ for the channel you want to mute.
Lit: Muted
Unlit: Not muted
![200M Handy Audio Interface U-44 DIRECT MONITOR BONE BASED M/OL PHONES MUTE POWER MIC IN [3 - 4]](/content/2026/05/760248/images/397b99adf9904de9333dc2ba1bb7a656dcdce2173dab0377a358463239d0684a.jpg)
Using Direct Monitoring
Direct monitoring enables you to listen to input signals before they pass through the computer. This allows you to hear the sound coming into the U-44 without latency.
- Turn to adjust the balance between the U-44 audio input and the computer playback signals.
![200M Handy Audio Interface U-44 DIRECT MAIN OUT PHONES A —— MUTE —— B POWER MIC IN [3-4]](/content/2026/05/760248/images/59e40e22a9cb021bb3e118da99639da1d4d869ca31d23286b4900b18613a3ad1.jpg)
Adjusting the Computer Playback Signal Balance
The balance between computer playback signals 1-2 and 3-4 can be adjusted for the LINE OUT 2 and PHONES outputs.
For example, you can balance the PHONES output between click track and MAIN OUT signals during a live performance. Or you can balance between the cue and MAIN OUT signals during a DJ performance.
Live performance
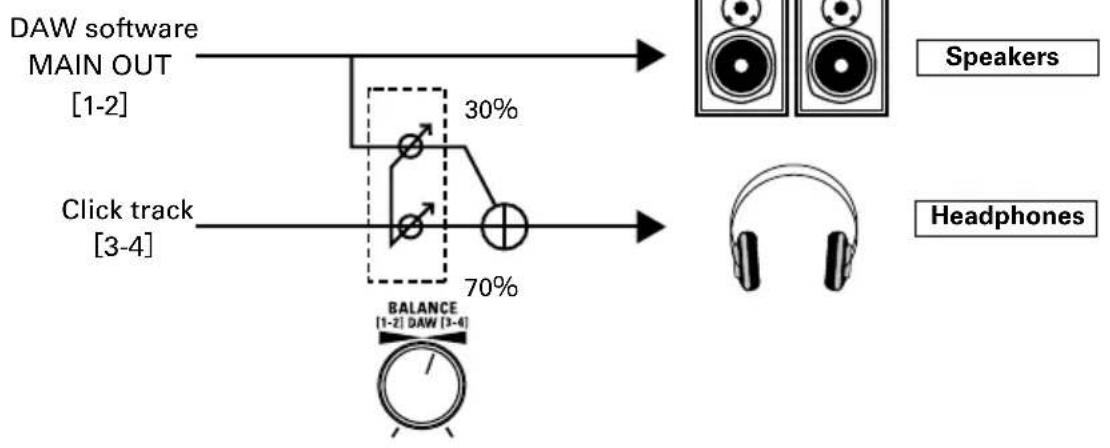
flowchart
graph LR
    A["DAW software MAIN OUT [1-2"]] --> B["30%"]
    C["Click track [3-4"]] --> D["70%"]
    E[" Speakers"] --> F["Headphones"]
    G["Balance [1-2"] DAW["3-4"]] --> H["Balance"]
DJ performance
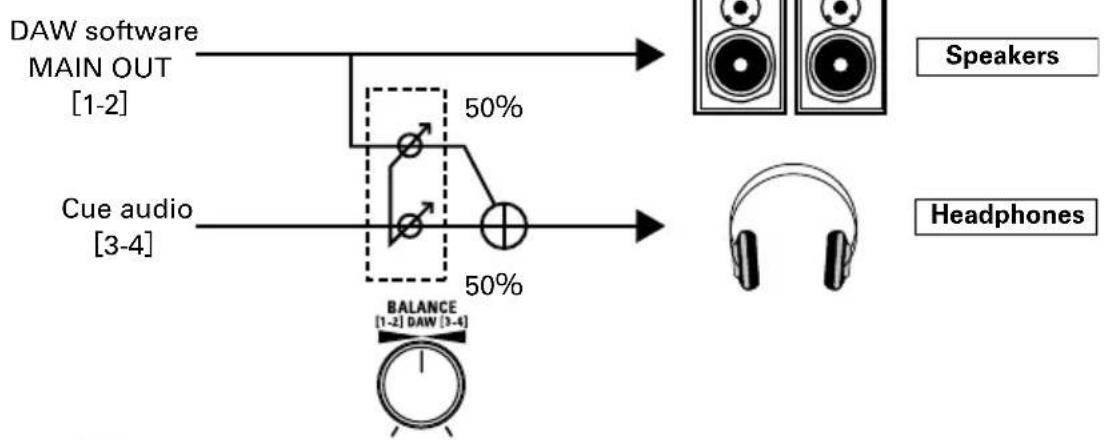
flowchart
graph LR
    A["DAW software MAIN OUT [1-2"]] --> B["Speaker 1"]
    C["Cue audio [3-4"]] --> D["Speaker 2"]
    E["Balance [1-2"] DAW["3-4"]] --> F["Speaker 3"]
    B --> G["Headphones"]
    D --> G
    F --> G
    style A fill:#f9f,stroke:#333
    style C fill:#f9f,stroke:#333
    style E fill:#ccf,stroke:#333
- Turn to adjust the balance between computer playback signals 1-2 and 3-4.
NOTE
- Computer playback signals 1-2 are output from the MAIN OUT/LINE OUT 1 jacks.
![USB MIDI INPUT 1 HI-2 CLIP SIG GAIN 1 48V [1-2] CLIP SIG GAIN 2 A L R LINE OUT 1 L R LINE OUT 2 B L R MAIN OUT RUNNIFS JAN 1- 2COM](/content/2026/05/760248/images/9f33200b1908ff5ad05a9f870e5730504343858ef7c807ea96bdcf0f7310e500.jpg)
Connecting MIDI Devices
Use MIDI cables to connect MIDI devices to the MIDI IN and MIDI OUT jacks.
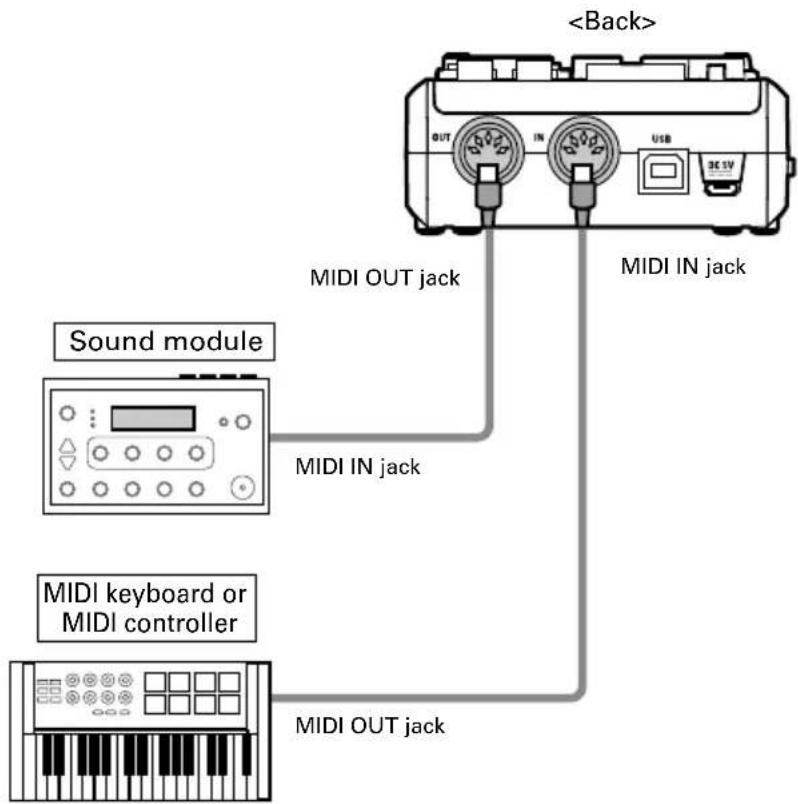
NOTE
- When you connect the top DAW using a MIDI port, follow the instructions below to ensure proper connectivity and functionality.
Use ZOOM U-44 Driver. Do not use MIDI IN/OUT 2 (ZOOM U-44 Driver).
Use ZOOM U-44 MIDI I/O Port. Do not use ZOOM U-44 Reserved Port.
Using Digital Audio Equipment
About the Digital Audio Clock
When the Us44 connected to other digital audio equipment, the audio clock must be synchronized in order to accurately transfer audio data. If the devices are not synchronized, unwanted noise and other problems will occur. To synchronize the audio clock, one device must operate as the master—which sets the reference clock—and the other must operate as a slave.
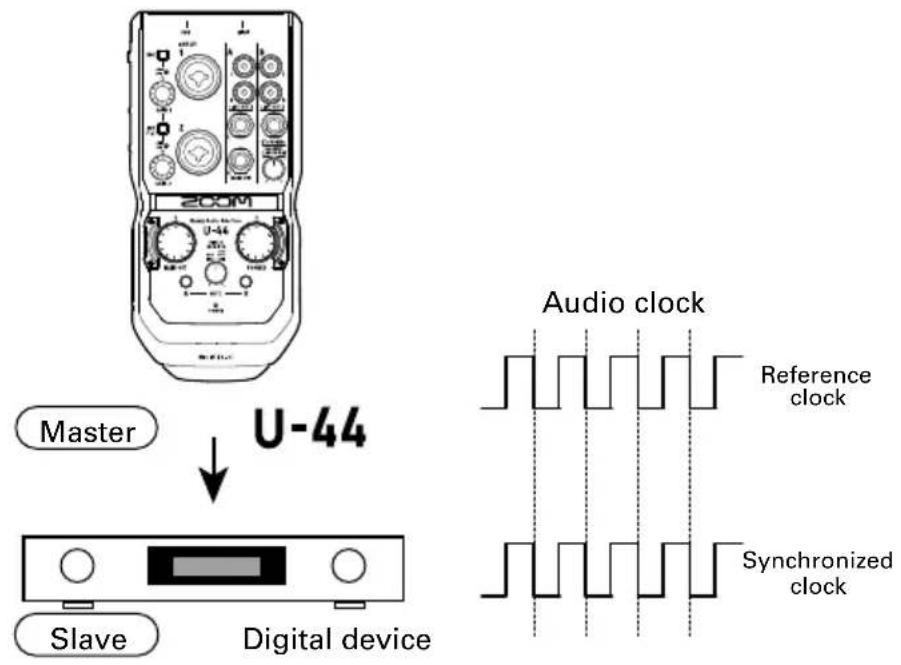
The U-44 is operating as the master, and the audio clock of the U-44 and the other digital device are synchronized.
■ Connecting S/PDIF Devices
- Minimize the volume of any output devices that are currently connected to the U-44.
HINT
• After you connect the device, noise may occur until the audio clock is synchronized.
- Set the same sampling rates for the Und the connected device.
Follow the procedures below to change the sampling rate.
Open the Control Panel on your computer. Select "Hardware and Sound" and select the desired sample rate on the ZOOM U-44 Control Panel.
Open the Utilities folder in the Applications folder, double-click the Audio MIDI Setup application, and then select the U-44.
Using Digital Audio Equipment (continued)
■ Inputting an S/PDIF signal
- Switch to OPTICAL or COAXIAL to select the input you want to use.
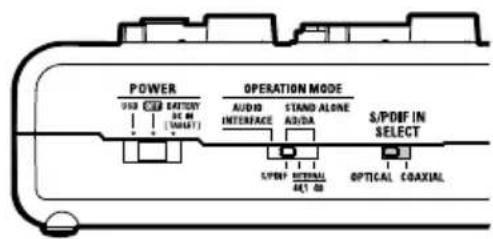
- Connect the S/PDIF device to the S/PDIF IN jack set in step 1.
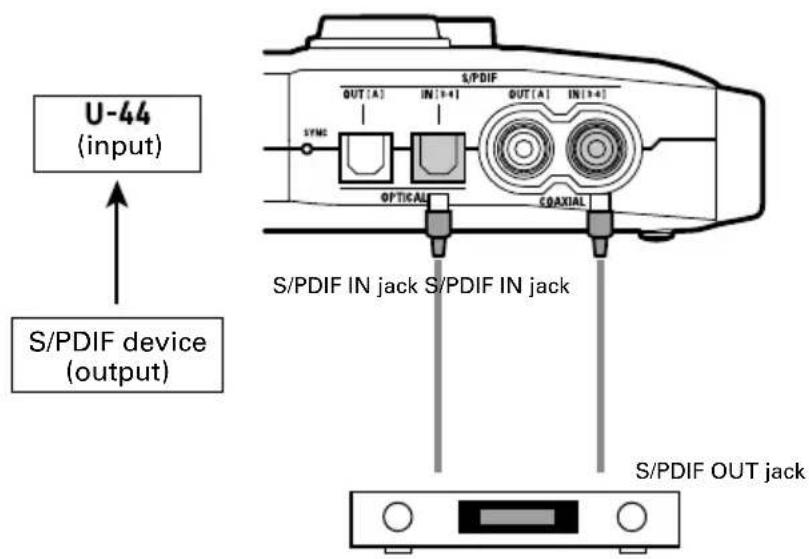
NOTE
-
When a mic capsule is connected to the MIC IN connector, the S/PDIF inputs are disabled.
• The S/PDIF inputs are assigned to INPUT 3/4. -
Confirm synchronization has occurred by checking that the SYNC indicator is lit.
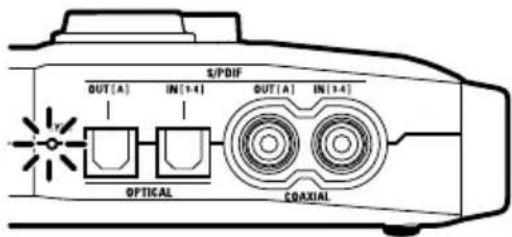
NOTE
- To synchronize audio clock, the U and the connected device must have the same sampling rate settings.
- The SYNC indicator will blink when a digital audio device is connected to a S/PDIF IN (OPTICAL or COAXIAL) but synchronization with the digital audio device is not possible. In this case, the U-44 will operate using its internal clock. Check the S/PDIF IN SELECT switch setting.
Using Digital Audio Equipment (continued)
■ Outputting a S/PDIF signal
1. Connect the S/PDIF device to the S/PDIF OUT jack.
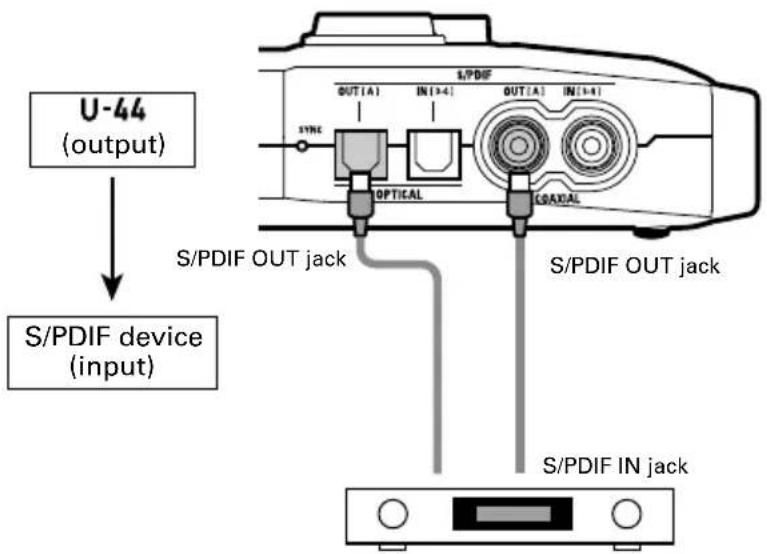
NOTE
- S/PDIF outputs the same signals as the MAIN OUT and LINE OUT 1 jacks.
HINT
- The S/PDIF IN SELECT switch only affects S/PDIF input. S/PDIF output signals are always delivered from both the OPTICAL OUT and COAXIAL OUT jacks.
Connecting ZOOM H-Series Mic Capsules
A ZOOM H-Series mic capsule can be connected to the MIC IN connector on the front of the U-44.
NOTE
- The mic capsule input is assigned to INPUT 3/4.
- When a mic capsule is connected, the S/PDIF IN (OPTICAL and COAXIAL) jacks cannot be used.
1. Turn the Up Power OFF.
NOTE
- Always turn the power off before connecting a mic capsule. If you connect a mic capsule while the power is on, it will not be usable.
2. Remove the protective caps from the Ua4d the mic capsule or extension cable.
![A — MUTE — B POWER MIC IN [3-4]](/content/2026/05/760248/images/4f35f08bae302189bf65958bf79493b764d725af78097e2afdca545ea23fcbde.jpg)
Connecting ZOOM H-Series Mic Capsules (continued)
3. Press the buttons on the sides of the mic capsule or extension cable, connect it to the U-44 MIC IN connector, and insert it completely.
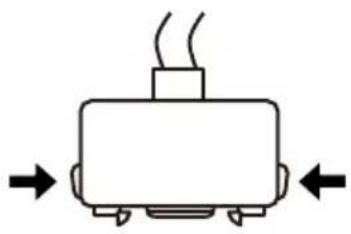
natural_image
Simple line drawing of a mechanical component with arrows indicating direction (no text or symbols)4. To disconnect a mic capsule or extension cable, turn the U-44 off. Press the sides of the capsule or cable and pull it away.
NOTE
- Be careful not to use too much force when disconnecting. You could damage the mic capsule, extension cable, or main unit.
- Attach the protective cap when a mic capsule or extension cable is not in use.
- With the MSH-6 and SSH-6, audio data is recorded in RAW format. Since the RAW data format is different from that used by ordinary stereo files, the stereo width must be adjusted and the data must be converted to an ordinary stereo file after recording by using ZOOM MS Decoder or other plug-in software.
• The SGH-6 is a mono mic.
HINT
• ZOOM H-Series Mic Capsules and Extension Cables
| XYH-6 Adjustable Stereo X/Y Microphone Capsule |
| XYH-5 Shock Mounted Stereo X/Y Microphone Capsule |
| MSH-6 Mid-Side Microphone Capsule |
| SGH-6 Shotgun Microphone Capsule |
| SSH-6 Mid-Side Stereo Shotgun Microphone Capsule |
| EXH-6 Dual XLR/TRS Input Capsule |
| ECM-3 The three-meter-long extension cable for ZOOM's Mic Capsule options. |
| ECM-6 The six-meter-long extension cable for ZOOM's Mic Capsule options. |
Using as a Standalone AD/DA Converter and Mic Preamp (Standalone Mode)
- Minimize the volume of output devices connected to the U-44
- Supply power. (→ P. 7)
- Use to set the sampling rate.
INTERNAL: Function using 44.1 or 48 kHz sampling rate. (Master)
S/PDIF: Use the sampling rate of the signal input through the OPTICAL IN or COAXIAL IN. (Slave)
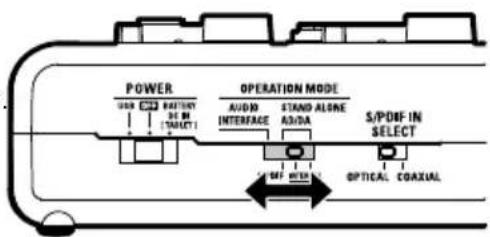
- Turn the using the power supplied in step 2.
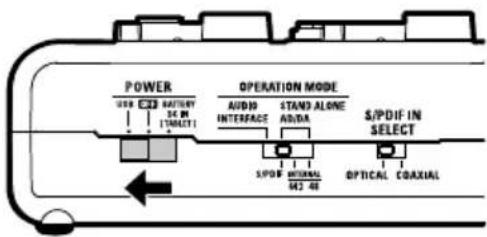
flowchart
graph TD
    A["POWER"] --> B["AUDIO INTERFACE"]
    B --> C["STAND ALONE OUTPUT"]
    C --> D["S/PDIF IN SELECT"]
    D --> E["OPTICAL COAXIAL"]
    style A fill:#f9f,stroke:#333
    style B fill:#ccf,stroke:#333
    style C fill:#cfc,stroke:#333
    style D fill:#fcc,stroke:#333
    style E fill:#cff,stroke:#333
- Confirm that the power indicator is lit.
![MAIN OUT INPUT PLAY BATH PHONES A — MUTE — B MIC IN [3 - 4]](/content/2026/05/760248/images/0482d35922e3eebe1a4a0899ae20a68877130ea24c31e2dec87edc722de62c0a.jpg)
NOTE
• See P. 27 for the signal flow diagram when using standalone AD/DA mode.

Troubleshooting
Cannot select or use the Udevice
- Confirm that the U+4 connected to the computer correctly.
- Quit all the software that is using the U-44, and disconnect and reconnect the USB cable connected to the U-44.
- Reinstall the driver.
- Connect the U-44 directly to a USB port on the computer. Do not connect it to a USB hub.
- Set OPERATION MODE to AUDIO INTERFACE. (→ P.8)
Playback sound cannot be heard or is quiet
- Check the speaker connections and volume settings on the speakers.
- Adjust the OUTPUT and PHONES volume controls.
- Confirm that the Sound setting of the computer that you are using is set to "ZOOM U-44".
- Adjust the DIRECT MONITOR knob.
- If no sound can be heard or the volume is low from the PHONES/LINE OUT 2 outputs, adjust the BALANCE knob.
Recorded audio is too loud, too quiet or silent
- Adjust the input gain of the U-44
- When using a condenser mic, turn phantom power on.
- Confirm that the Sound setting of the computer that you are using is set to "ZOOM U-44".
The sound of the device connected to the input jack is distorted
- Confirm that the level indicators are not lighting red. If they are, lower the input levels.
Sound skips during playback or recording
- If you can adjust the audio buffer size of the software that you are using, increase the buffer size.
- Turn the automatic sleep function and other computer power saving settings OFF.
- Connect the Udctly to a USB port on the computer. Do not connect it to a USB hub.
Cannot play or record
- Confirm that the Sound setting of the computer that you are using is set to "ZOOM U-44".
- Confirm that U-44 is set for input and output in the software you are using.
- Confirm that U-44 is connected to the computer correctly.
- Quit all software that is using the U-44, then disconnect and reconnect the U-44's USB cable.
Cannot use with an iOS device
- Set OPERATION MODE to AUDIO INTERFACE. (→ P.8)
- Confirm that the batteries are loaded or the external power supply is connected correctly. (→ P.7)
- Set the POWER switch to BATTERY/DC IN to turn the power on.
Sound skips during digital input or output
- Confirm that the device used for audio clock synchronization is connected correctly.
- If the U-44 is the master, confirm that audio clock is synchronized on the connected device.
- If the U-44 is a slave, confirm that the correct clock source and sampling rate are selected and that the SYNC indicator is lit.
Cannot use in standalone AD/DA mode
- Set the OPERATION MODE to STAND ALONE and select the correct clock source before turning the power on.
Specifications
| ANALOG IN INPUT 1/2 Connector TRS/XLR combo jacks | |||
| (XLR: 2 hot, TRS: TIP hot) | |||
| Input gain 0 - 43 dB | |||
| Input impedance 2.6 kΩ (MIC IN)1.1 MΩ (when Hi-Z ON) | |||
| Maximum input level +2.7 dBu (MIC IN) /+20.7 dBu (TRS IN) | |||
| Phantom power +48 V | |||
| MIC IN Supported mics XYH-6, MSH-6, SGH-6, EXH-6, SSH-6, XYH-5 | |||
| ANALOG OUT MAIN OUT L/R Connector TRS phone jacks (unbalanced) | |||
| Maximum output level +10 dBu (at 0 dBFS) | |||
| Output impedance 330 Ω | |||
| LINE OUT 1/2 | Connector RCA (coaxial) | ||
| Maximum output level +8 dBu (at 0 dBFS) | |||
| Output impedance 1 kΩ | |||
| PNONES | Connector Standard stereo phone jack30 mW x 2 (into 32 Ω load) | ||
| Maximum output level +10 dBu (at 0 dBFS) | |||
| Output impedance 33 Ω | |||
| DIGITAL IN/OUT | S/PDIFOPTICAL | Connector TOSLINK | |
| Supported sampling frequencies | 96 kHz, 88.2 kHz, 48 kHz, 44.1 kHz | ||
| S/PDIFCOAXIAL | Connector RCA (coaxial) | ||
| Supported sampling frequencies | 96 kHz, 88.2 kHz, 48 kHz, 44.1 kHz | ||
| Frequency characteristics | At 44.1 kHz: ±1.5 dB: 20 Hz - 20 kHzAt 96 kHz: ±2 dB: 20 Hz - 40 kHz | ||
| Input conversion noise | Measured EIN: -119.5 dB (IHF-A)(with 43 dB, 150 Ω input) | ||
| Number of audio recording and playback channels | Recording: 4 channels | ||
| Playback: 4 channels | |||
| Sampling frequencies | 96 kHz, 88.2 kHz, 48 kHz, 44.1 kHz | ||
| Bit depth | 24-bit | ||
| Interface | USB2.0 | ||
| MIDI IN/OUT | 5 pin DIN jack | ||
| Power Source | USB bus power (Type B)/ZOOM AD-17 (Micro-B)/DC 5V power supply(Micro-B)/2 AA batteries (about 4 hours continuous operation with phantom power off) | ||
| Power consumption | 5 W maximum | ||
| Dimensions | 198.8 mm (D) × 92.3 mm (W) × 42.7 mm (H) | ||
| Weight (main unit only) | 310 g | ||
* 0 dBu = 0.775 Vrms
Note: The continuous operation time with batteries is just an estimate. This result is from in-house testing methods. The actual time will vary greatly according to operating conditions.
Signal Flow Diagrams
■ AUDIO INTERFACE mode signal flow diagram
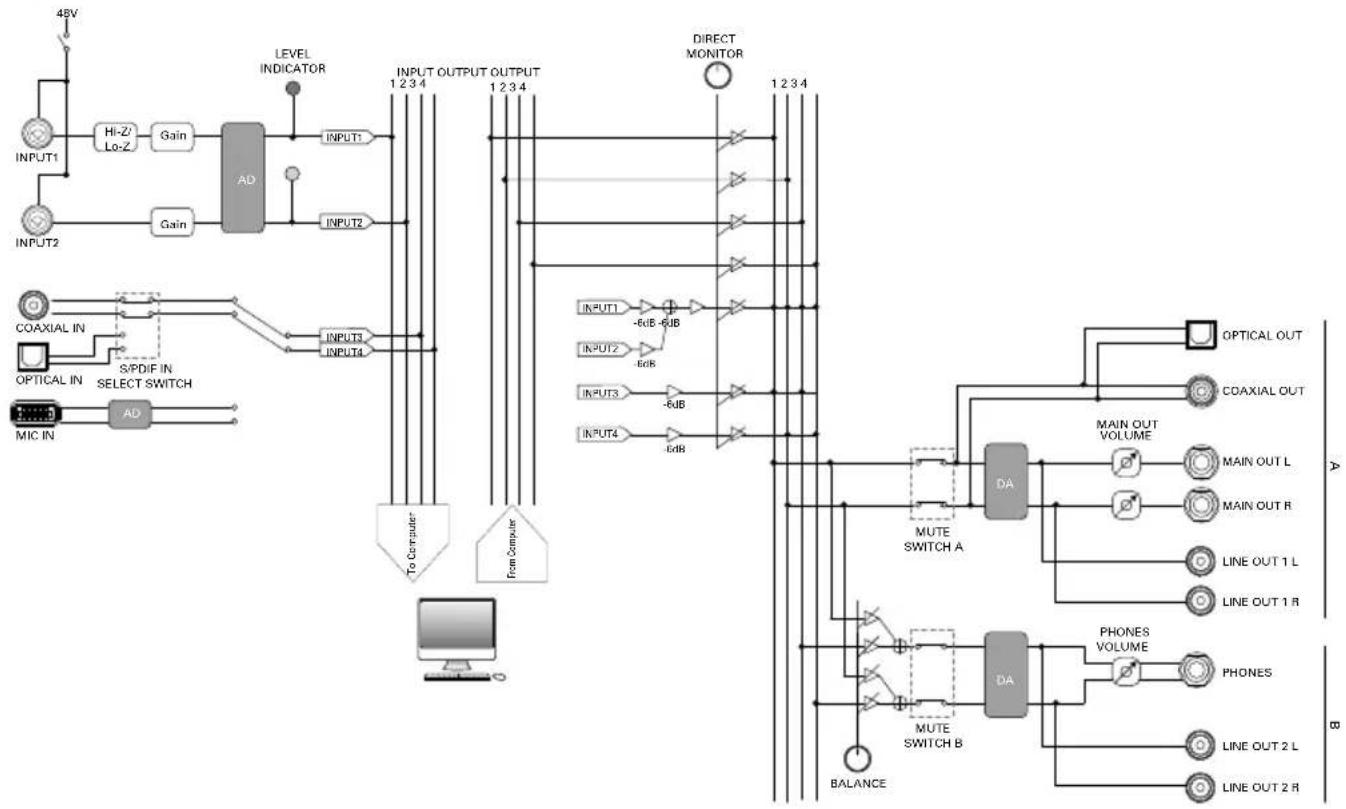
flowchart
graph TD
    A["48V"] --> B["INPUT1"]
    B --> C["Hi-Z Lo-Z Gain"]
    C --> D["AD"]
    D --> E["INPUT1"]
    E --> F["INPUT2"]
    F --> G["Gain"]
    G --> H["INPUT3 INPUT4"]
    H --> I["To Computer"]
    I --> J["Computer"]
    K["COAXIAL IN"] --> L["S/PDIF IN SELECT SWITCH"]
    M["MIC IN"] --> N["AD"]
    O["OPTICAL IN"] --> P["Select SWITCH"]
    Q["LEVEL INDICATOR"] --> R["INPUT OUTPUT OUTPUT 1 2 3 4"]
    S["DIRECT MONITOR"] --> T["1 2 3 4"]
    U["INPUT1"] --> V["-6dB -6dB"]
    W["INPUT2"] --> X["-6dB"]
    Y["INPUT3"] --> Z["-6dB"]
    AA["INPUT4"] --> AB["-6dB"]
    AC["MUTE SWITCH A"] --> AD["DA"]
    AE["MUTE SWITCH B"] --> AF["DA"]
    AG["BALANCE"] --> AH["PHONE VOLUME"]
    AI["OPTICAL OUT"] --> AJ["COAXIAL OUT"]
    AK["MAIN OUT VOLUME"] --> AL["MAIN OUT L"]
    AK --> AM["MAIN OUT R"]
    AK --> AN["LINE OUT 1 L"]
    AK --> AO["LINE OUT 1 R"]
    AK --> AP["LINE OUT 2 L"]
    AK --> AQ["LINE OUT 2 R"]
■ Standalone AD/DA mode signal flow diagram
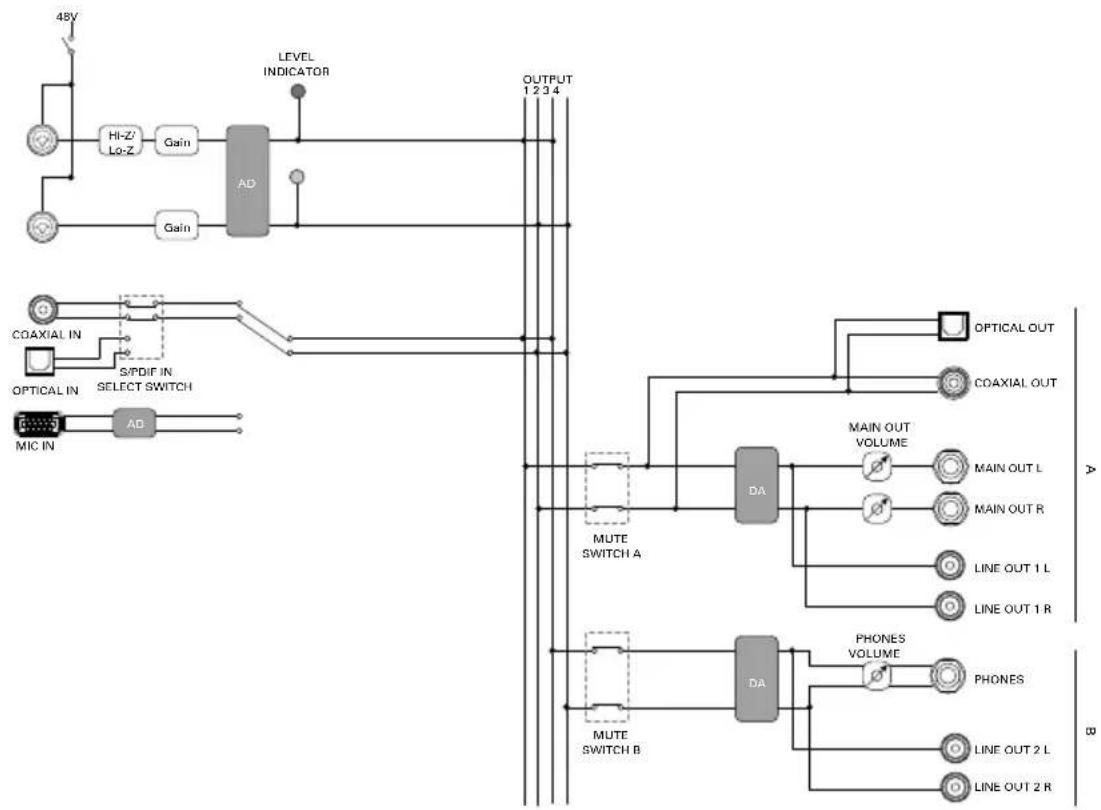
flowchart
graph TD
    A["48V"] --> B["HI-Z/Lo-Z Gain"]
    B --> C["AD"]
    C --> D["OUTPUT 1234"]
    E["COAXIAL IN"] --> F["S/PDIF IN SELECT SWITCH"]
    G["OPTICAL IN"] --> F
    H["MIC IN"] --> I["AD"]
    J["LEVEL INDICATOR"] --> C
    K["MUTE SWITCH A"] --> L["DA"]
    M["MUTE SWITCH B"] --> N["DA"]
    O["OPTICAL OUT"] --> P["COAXIAL OUT"]
    Q["MAIN OUT VOLUME"] --> R["MAINT OUT L"]
    Q --> S["MAIN OUT R"]
    T["LINE OUT 1 L"] --> U["LINE OUT 1 R"]
    V["LINE OUT 2 L"] --> W["LINE OUT 2 R"]
    X["PHONES VOLUME"] --> Y["PHONES"]
200M®
ZOOM CORPORATION
4-4-3 Kandasurugadai, Chiyoda-ku, Tokyo 101-0062 Japan
http://www.zoom.co.jp
- Handy Audio Interface U-44
- Contents
- Introduction
- 4-in/4-out Audio Interface
- High-Performance Mic Preamps
- Designed with the DJ in Mind
- Standalone AD/DA Mode
- Safety and Usage Precautions
- Safety Precautions
- ⚠ Warning
- Alterations
- Operation using an AC adapter
- Operation with external DC power supply
- Operation using batteries
- Caution
- Product handling
- Battery handling
- Operating environment
- Mic handling
- Connection cables and input/output jacks
- Volume
- Usage Precautions
- Interference with other electrical equipment
- Cleaning
- Temperature considerations
- Breakdown and malfunction
- Copyrights
- FCC regulation warning (for U.S.A.)
- For EU Countries
- Part Names
- Top
- Part Names (continued)
- Installing the Driver
- Windows
- NOTE
- Mac
- Choosing a Power Source
- ■ Using bus power
- ■ Using batteries
- ■ Using an external power supply
- Connecting with a Computer
- iOS device Connection
- Turning the Power Off
- Connecting Instruments
- Using the Hi-Z Function
- Connecting Mics
- Using Phantom Power
- Adjusting Input Gain
- Check the status of the input signal.
- Adjust the input gain.
- HINT
- Connecting Headphones and Speakers
- Connect headphones or speakers.
- Adjust the headphones/speakers volume.
- Muting Outputs
- Press○ for the channel you want to mute.
- Using Direct Monitoring
- Adjusting the Computer Playback Signal Balance
- Connecting MIDI Devices
- Using Digital Audio Equipment
- About the Digital Audio Clock
- ■ Connecting S/PDIF Devices
- Using Digital Audio Equipment (continued)
- ■ Inputting an S/PDIF signal
- ■ Outputting a S/PDIF signal
- Connect the S/PDIF device to the S/PDIF OUT jack.
- Connecting ZOOM H-Series Mic Capsules
- Turn the Up Power OFF.
- Remove the protective caps from the Ua4d the mic capsule or extension cable.
- Connecting ZOOM H-Series Mic Capsules (continued)
- Press the buttons on the sides of the mic capsule or extension cable, connect it to the U-44 MIC IN connector, and insert it completely.
- To disconnect a mic capsule or extension cable, turn the U-44 off. Press the sides of the capsule or cable and pull it away.
- Using as a Standalone AD/DA Converter and Mic Preamp (Standalone Mode)
- Troubleshooting
- Cannot select or use the Udevice
- Playback sound cannot be heard or is quiet
- Recorded audio is too loud, too quiet or silent
- The sound of the device connected to the input jack is distorted
- Sound skips during playback or recording
- Cannot play or record
- Cannot use with an iOS device
- Sound skips during digital input or output
- Cannot use in standalone AD/DA mode
- Specifications
- Signal Flow Diagrams
Brand : ZOOM
Model : U-44
Category : Hi-Fi System