
Micro 3.0 - Camera SEALIFE - Free user manual and instructions
Find the device manual for free Micro 3.0 SEALIFE in PDF.


| Product Type | Underwater Digital Camera |
| Model | Micro 3.0 |
| Brand | SeaLife |
| Dimensions | 2.1 x 2.9 x 4.2 in (5.4 x 7.4 x 10.7 cm) |
| Weight | 11.6 oz (329 g) |
| Battery Type | Internal Li-ion 2000 mAh, 3.7V, 7.4 Wh |
| Charging | 5V USB wall charger (not included); includes USB cable and adapter |
| Memory | 64 GB internal solid state (approx. 59 GB available) |
| Image Sensor | 16 MP Sony IMX083 1/2.3" CMOS |
| Lens | F2.8, 7-element multic coated aspheric; Focal length 3.37mm (19mm equiv); Field of view 100° land / 75° underwater |
| Focus | Fixed focus: 15 in (38 cm) to infinity |
| Waterproof Depth | 200 ft (60 m) individually depth tested |
| WiFi | 802.11b/g/n; range approx. 100 ft (30 m) |
| App | SeaLife Micro 3+ (iOS 12+ / Android 6+) |
| Video Resolutions | 4K 30fps, 1080p 120/60/30fps, 720p 120/60/30fps, 480p 120/60/30fps |
| Photo Resolutions | 16MP (4608x3456) to 2MP (1920x1080); multiple aspect ratios |
| File Formats | JPEG, RAW (.dng), MP4 (H.264) |
| LCD Display | 2.4" 260K TFT color |
| USB | USB 2.0 High Speed (Micro-B with waterproof adapter) |
| Operating Temperature | Land: 23°F to 122°F (-5°C to 50°C); Underwater: 33°F to 110°F (0.5°C to 44°C) |
| Storage Temperature | -20°F to 140°F (-29°C to 60°C) |
| Tripod Mount | 1/4-20 UNC |
| Warranty | 1 year limited (manufacturing defects) |
| Optional Accessories | Sea Dragon lights, 10X close-up lens, AquaPod, Photo Pro Backpack |
| Care | Rinse in fresh water after use; dry contacts before charging; avoid sunscreens |
Frequently Asked Questions - Micro 3.0 SEALIFE
User questions about Micro 3.0 SEALIFE
0 question about this device. Answer the ones you know or ask your own.
Ask a new question about this device
Download the instructions for your Camera in PDF format for free! Find your manual Micro 3.0 - SEALIFE and take your electronic device back in hand. On this page are published all the documents necessary for the use of your device. Micro 3.0 by SEALIFE.
USER MANUAL Micro 3.0 SEALIFE
natural_image
Three underwater scenes: coral reef with colorful fish, a colorful clownfish in a nest, and a sea turtle on the seabed (no text or symbols)For Español, Deutsch, Français, Italiano, Nederlands and other languages, visit sealife-cameras.com/manuals
Table of Contents
I. Package Contents 4
II. Getting to Know Your Camera 5
a. Front view 5
b. Rear view 5
c. LCD Display: Capture Mode 7
d. LCD Display: Playback Mode 8
III. Basic Camera Operation 10
a. Power On 10
b. Take a Picture 11
c. Record a Video 12
d. Easy Setup 13
e. Playback Pictures and Videos 14
f. Charge Battery 16
g. Download Pictures to PC 20
IV. WiFi Connection with Sealife Micro 3+ App 25
a. WiFi Connection to Smartphone/Tablet 25
b. Home Screen 30
c. Playback Screen 31
d. Downloading Files 32
V. Menu Settings 33
a. Easy Setup 33
b. Image Settings 34
c. System Settings 49
VI. Great Underwater Pictures Made Easy 55
VII. Optional Accessories 59
VIII. Care and Maintenance 63
IX. Troubleshooting 65
X. Spare Parts and Service 68
XI. Specifications 69
XII. FCC Statement 78
XIII. Warranty Statement 83
I. Package Contents
natural_image
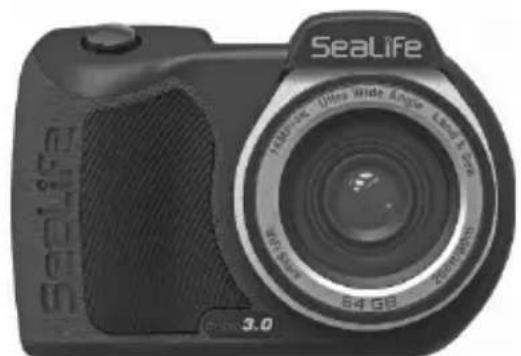
Black SeaLife digital camera with visible lens and grille (no text or symbols on body)Micro 3.0 Camera (SL550)

natural_image
Coiled black cable with two USB connectors (no text or symbols visible)USB cable (SL51004) (2ft/60cm USB 2-A to Micro-B)
natural_image
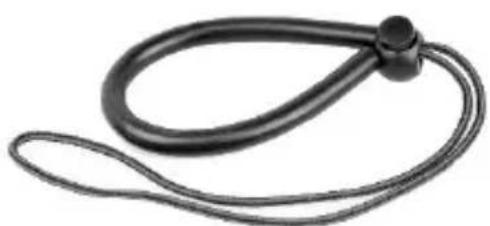
Black rubber hose with a black cap, isolated on white background (no text or symbols)Wrist strap (SL50102)
natural_image
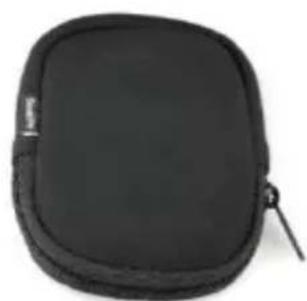
Black rounded rectangular device with a zipper, no visible text or symbolsCamera pouch (SL50107)
natural_image
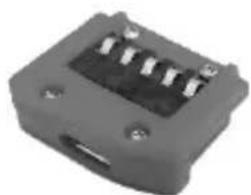
Close-up of a black electrical connector with four pins (no visible text or symbols)USB adapter (SL50103)
Instruction Manual (SL55008)
II. Getting to Know Your Camera
Front view
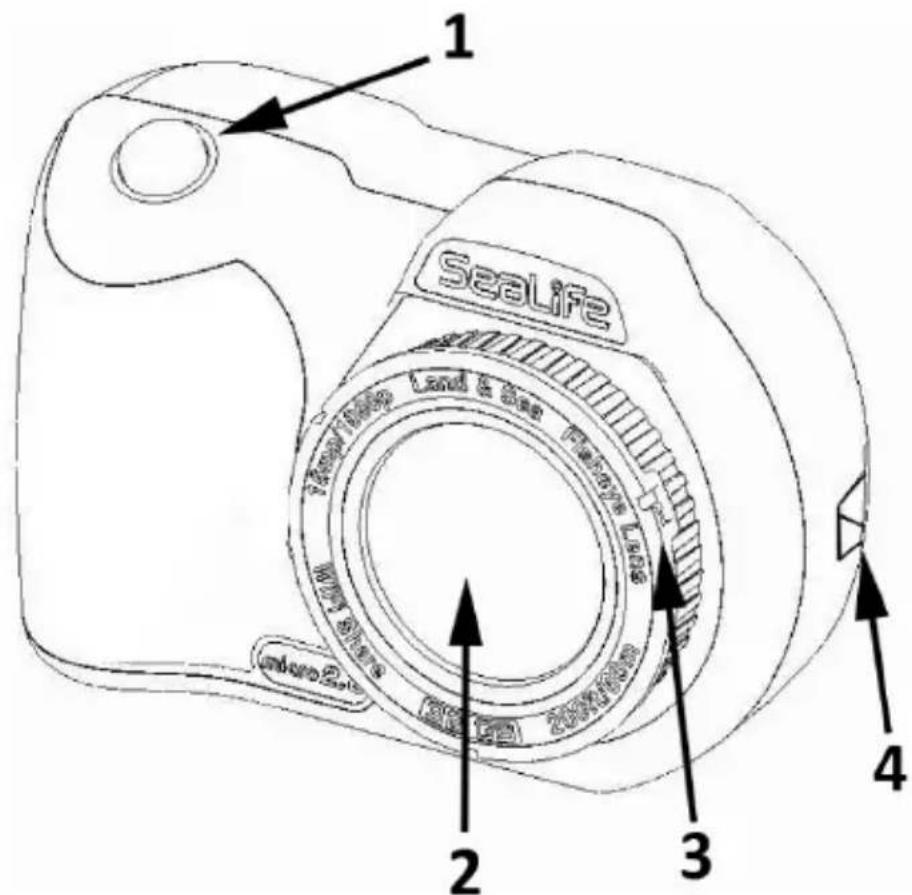
- Shutter button
- Optical glass lens port
- Lens adapter ring (for attaching lens accessories)
- Wrist strap connection point
Rear view:
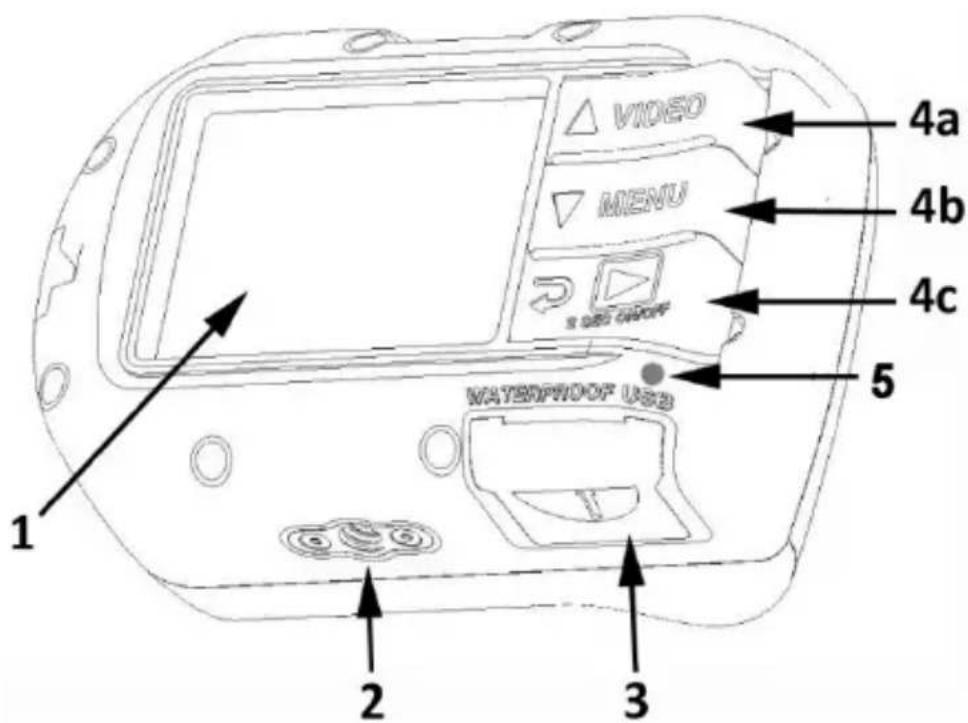
- 2.4" TFT color display
- 1/4-20 tripod accessory mount
- Waterproof USB contacts (Serial# under USB cover)
- "Piano Key" control buttons:
a. Video (up)
b. Menu (down)
c. Playback / Power / Back 1-step [in menu]
- LED Charging / Data connection Status Indicator
LCD Display - Capture Mode:
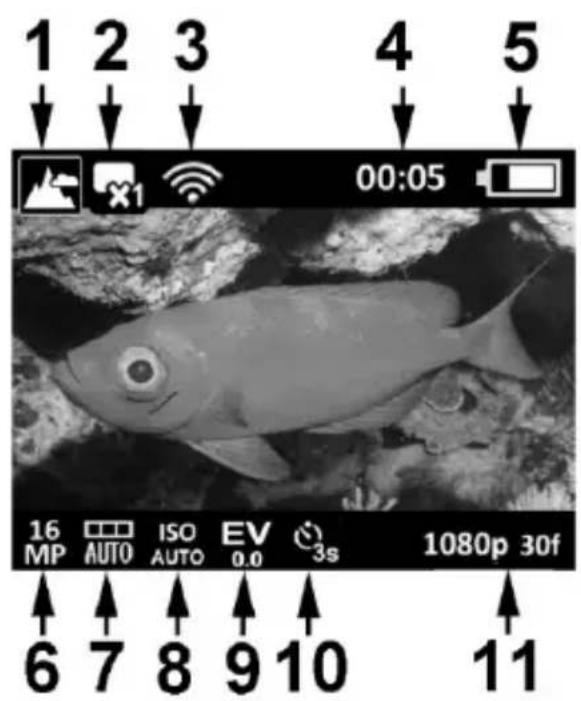
- Scene modes
- Capture Mode
- WiFi On
- Elapse Timer (H:MM:SS)
- Battery condition
- Picture Resolution
-
White Balance
-
ISO value
- Exposure Value (EV)
- Self-timer or Time Lapse time interval
- Video resolution size (with frames per second)
Note: When shooting Video Time Lapse, the video frame rate is replaced by the time lapse time interval.
LCD Display - Playback Mode:
Thumbnail view
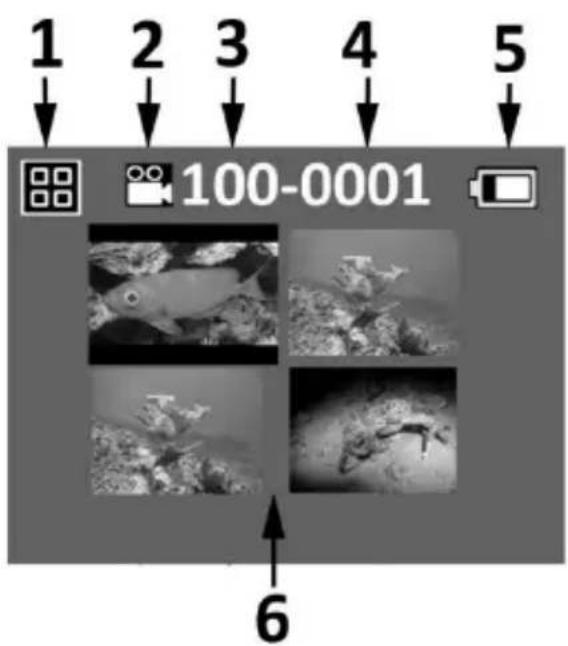
- Playback icon - Thumbnail view
- File type: Photo or Video
- Folder # (100 to 999)
- File # (0001 to 9999)
- Battery condition
- Thumbnails (4 per page)
LCD Display - Playback Mode:
Single Image view

- Playback icon - Single image view
- Folder # (100 to 999)
- File # (0001 to 9999)
- Battery condition
- Elapse time H:MM:SS (video files only)
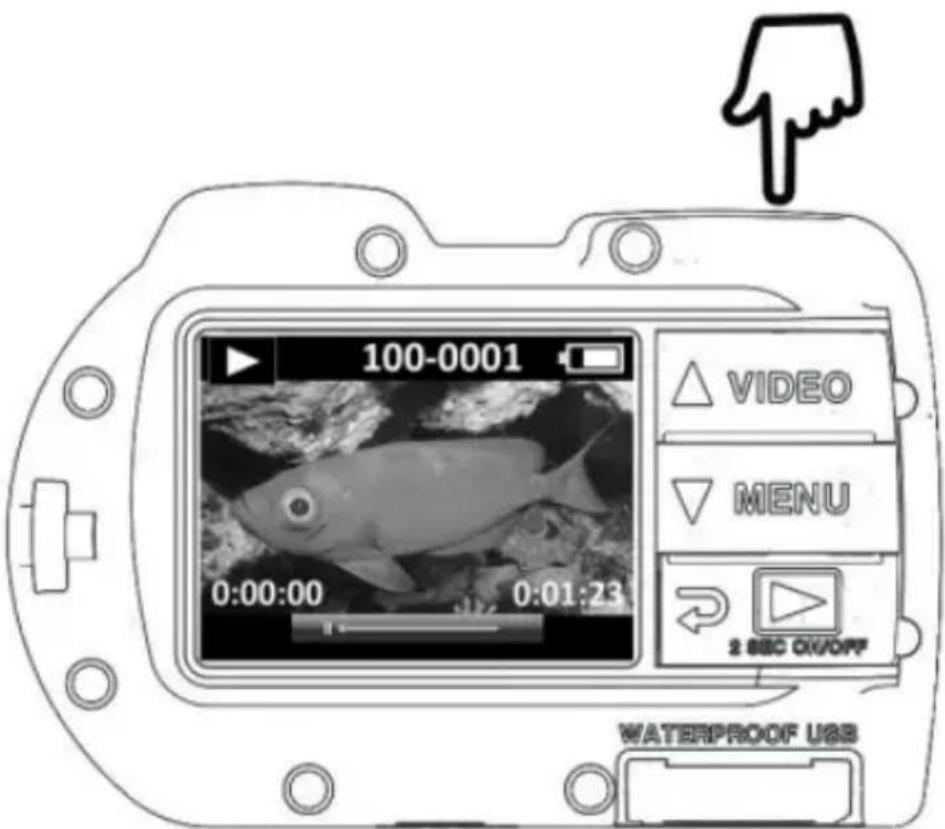
- Video status bar (video files only)
- Total recorded time H:MM:SS (video files only)
III. Basic Camera Operation
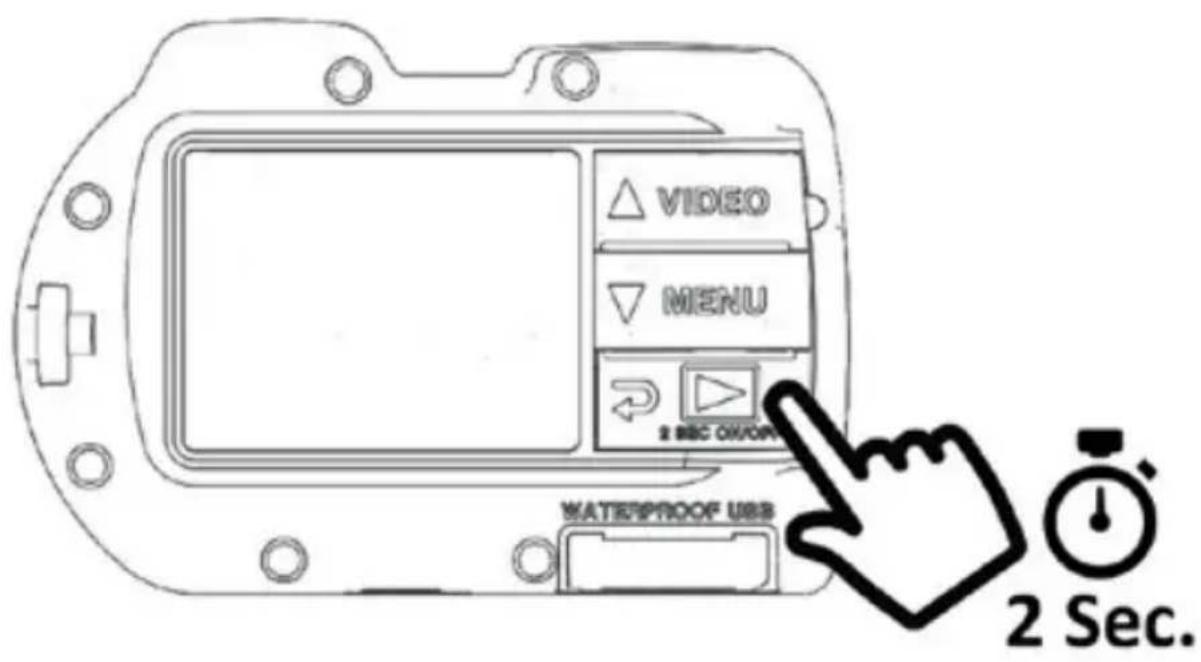
Power On/Off:
Push Power [bottom] button for 2 sec. to power camera ON or OFF.
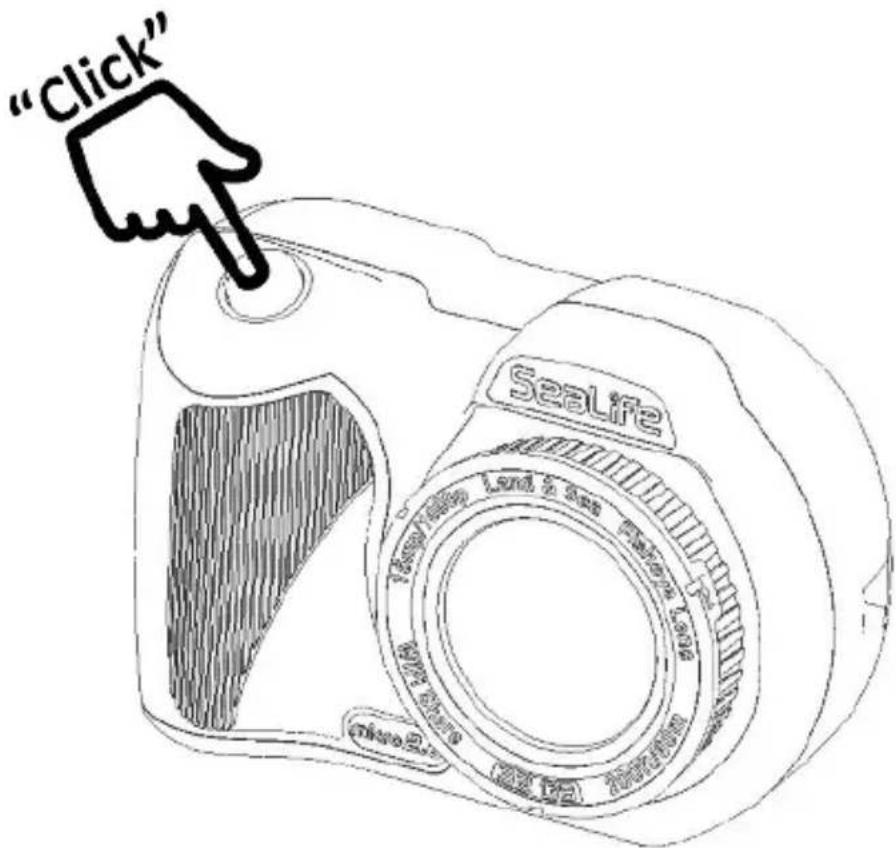
Take a Picture:
Aim, hold camera steady and push shutter button.
Record a Video:
Push video button to start and stop video recording.
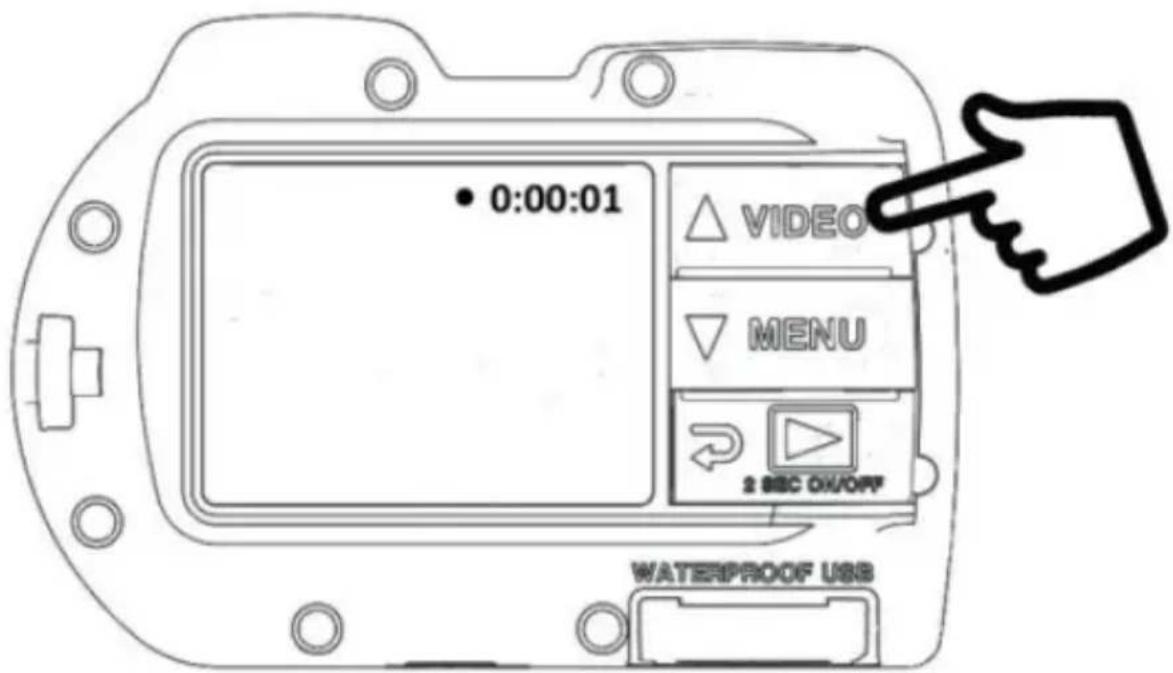
Note:
- During video recording, an elapse record timer will be on the top of the LCD display.
- Pushing the shutter button during video record will capture an 8MP picture for 4K video and 2MP for 1080p video.
• Maximum record time per video clip is 29 minutes.
Easy Setup:
Follow the on-screen guide to set the camera correctly.
- Push MENU button
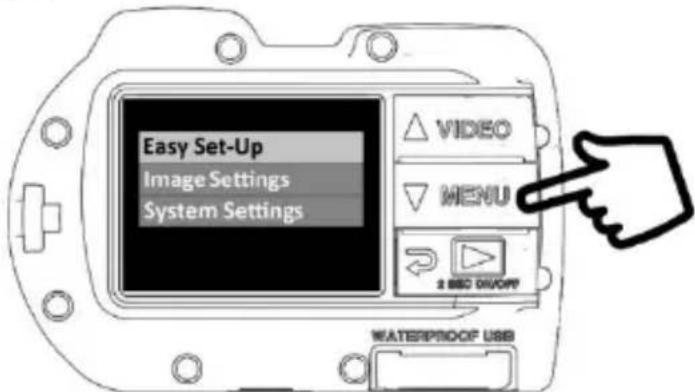
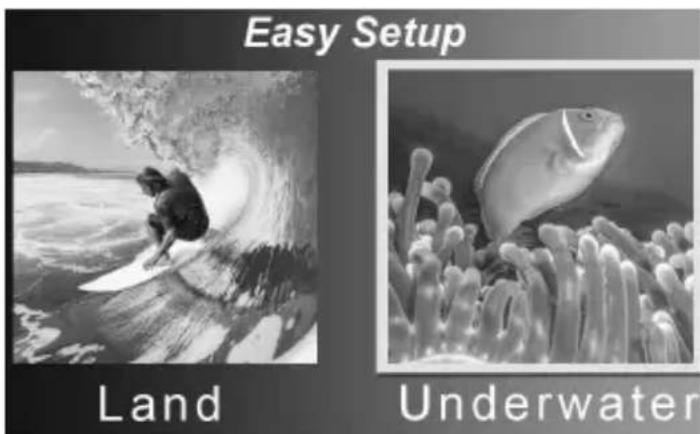
- Push shutter button to select “Easy Setup.” Follow the on-screen guide using the Up (Video) or Down (Menu) buttons to select desired option and Shutter button to confirm setting.
Playback Pictures and Videos:
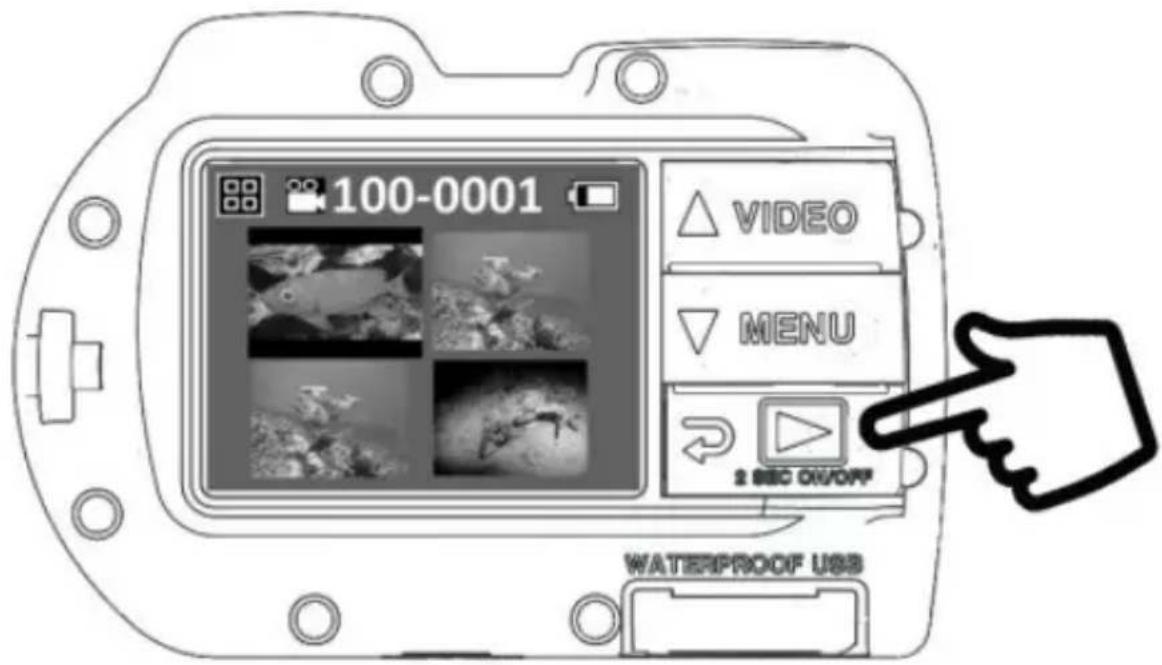
- Push Playback button to display thumbnail images.
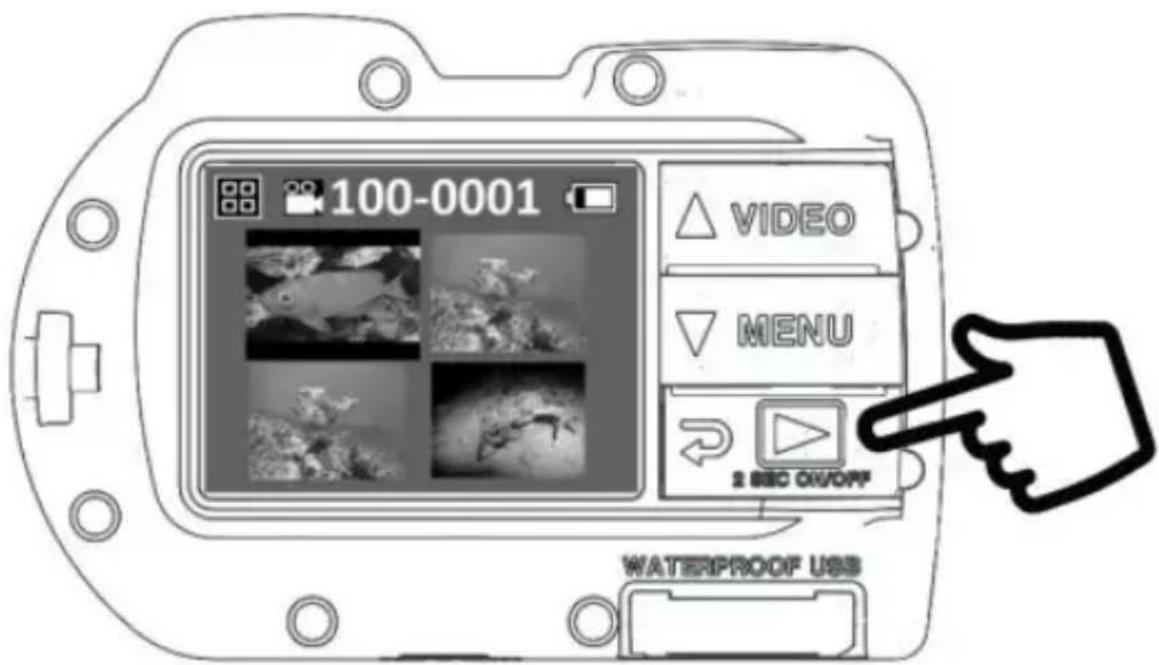
-
Use the Up or Down buttons to scroll through thumbnails.
-
Push Shutter button to display single images/videos.
Note:
- Push Shutter button to start or pause video playback.
• Use Up/Down buttons to increase/decrease video playback speed - To delete ONE or ALL files, select a file in thumbnail view, and push and hold the shutter button. Then follow the on-screen instructions.
Charge Battery:
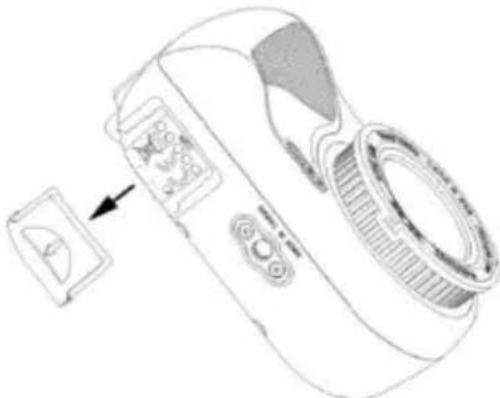
- Remove USB cover.
natural_image
Line drawing of a digital camera with an open control panel and a circular lens (no text or symbols)- Make sure camera and USB contacts are completely dry. Insert USB cable into USB adapter, and insert into waterproof USB port.
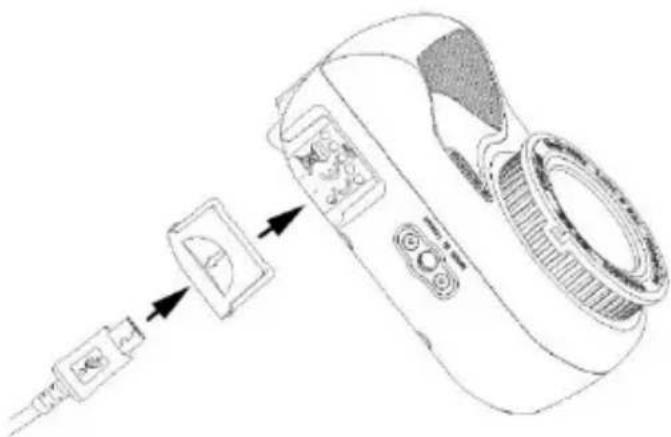
Important: Camera MUST be completely dry before inserting USB adapter. USB adapter is not waterproof.
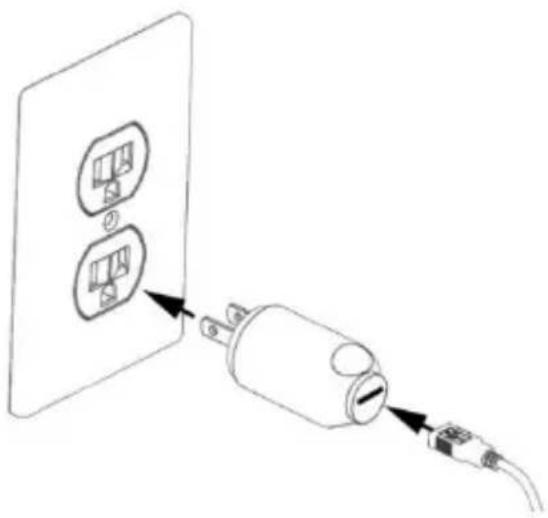
- Connect other end of the USB cable into any 5V (0.5, 1.0 or 2.0 amp) wall charger, and insert wall charger into outlet.
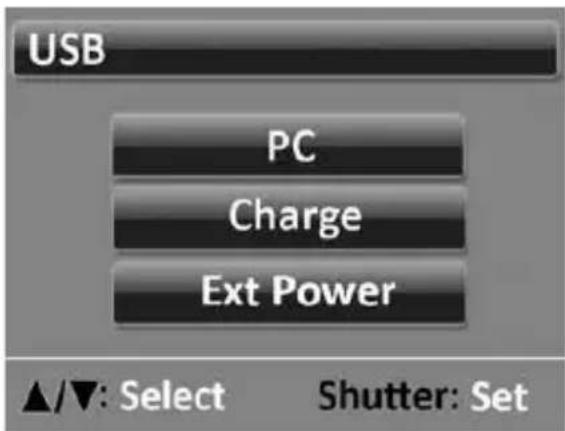
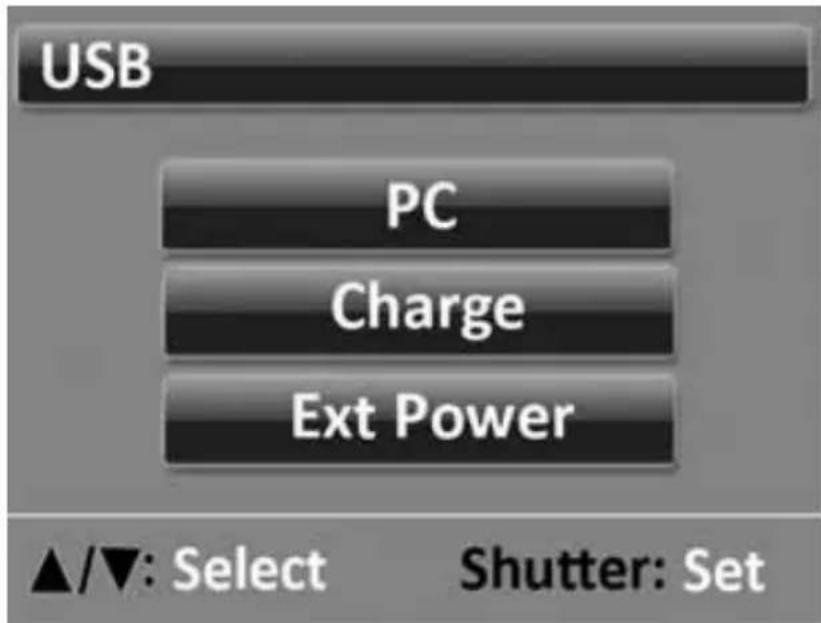
- The camera will display PC, Charge and Ext Power. Use the Up or Down buttons to select Charge and push Shutter button to confirm selection.
- A battery icon on the display will blink from 1 to 3 bars repeatedly when battery is charging, and 3 solid bars when fully charged. The LED status indicator above the USB will blink red during charge and solid red when fully charged.
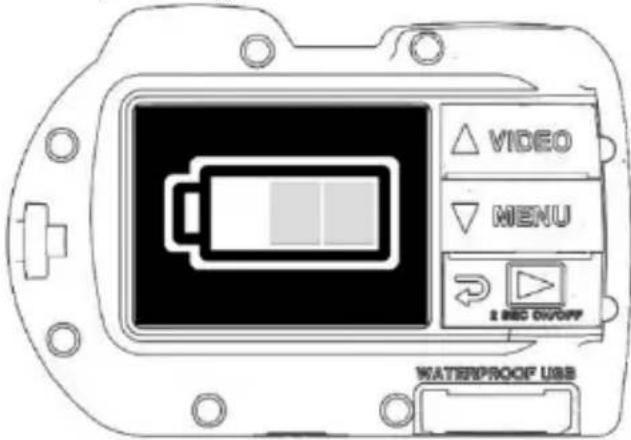
- After 1 minute of charging, the display will turn off to save power and charge faster. Push any button to turn on display.
Note:
- Allow about 3 hours to fully charge the camera when using a 5 volt /1 or 2 amp wall charger. Using a PC or 5V/0.5A wall charger takes about 6 hours to fully charge.
- Pushing the MENU button while the camera is charging will stop charging and show USB option screen.
- Select Ext Power to operate the camera while it is connected to any 5V USB wall charger or power bank.
• See troubleshooting tips on page 65 if camera is not charging.
Download pictures to PC:
- Remove USB cover.
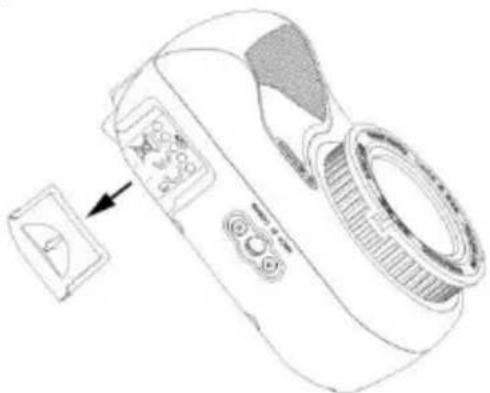
natural_image
Line drawing of a handheld device with control panel and display screen (no text or symbols)- Make sure camera and USB contacts are completely dry. Insert USB cable into USB adapter, and insert into the waterproof USB port.
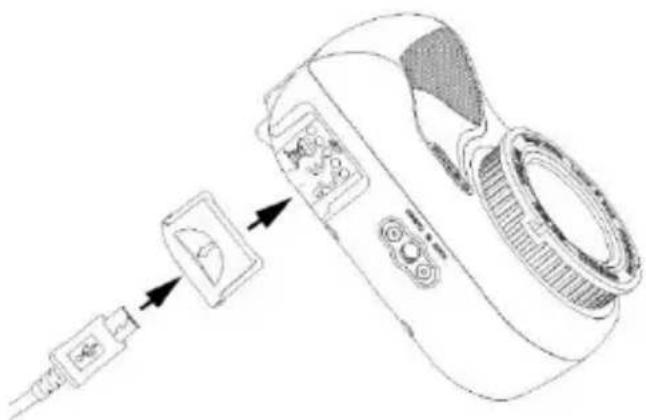
Important: Camera MUST be completely dry before inserting USB adapter. USB adapter is not waterproof.
- Connect other end of the USB cable into the computer's USB port.
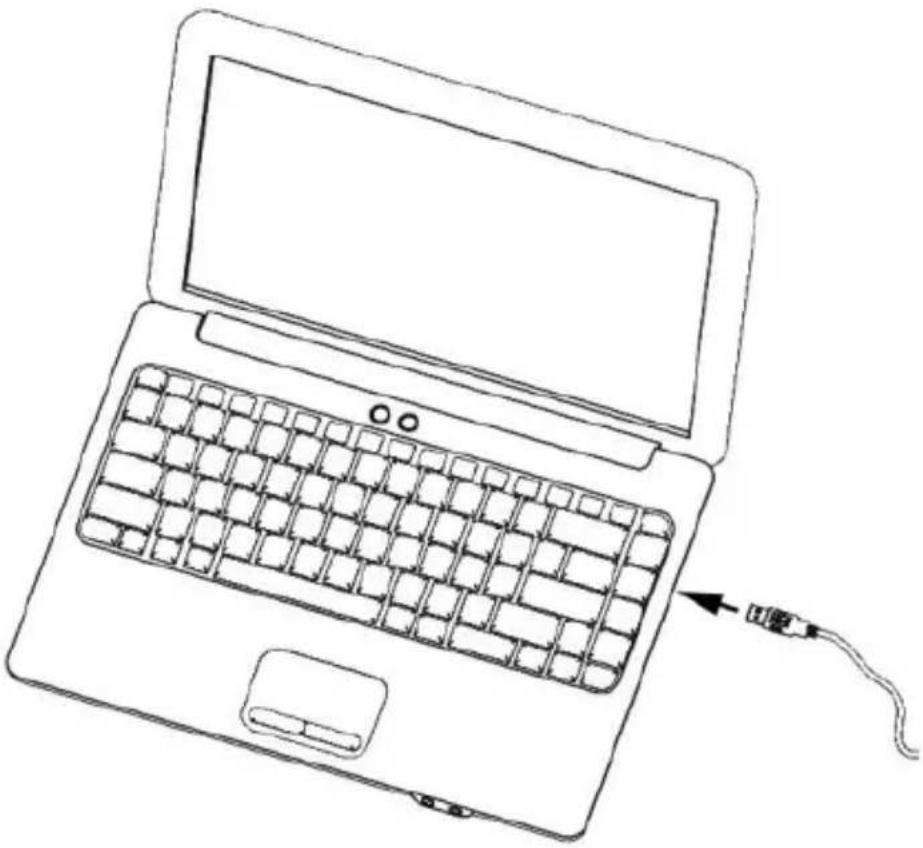
natural_image
Line drawing of a laptop with a keyboard and cable, showing the open top view and connection point (no text or symbols)- The camera will display PC, Charge or Ext Power. Use the Up or Down buttons to select PC and push the Shutter button to confirm selection.
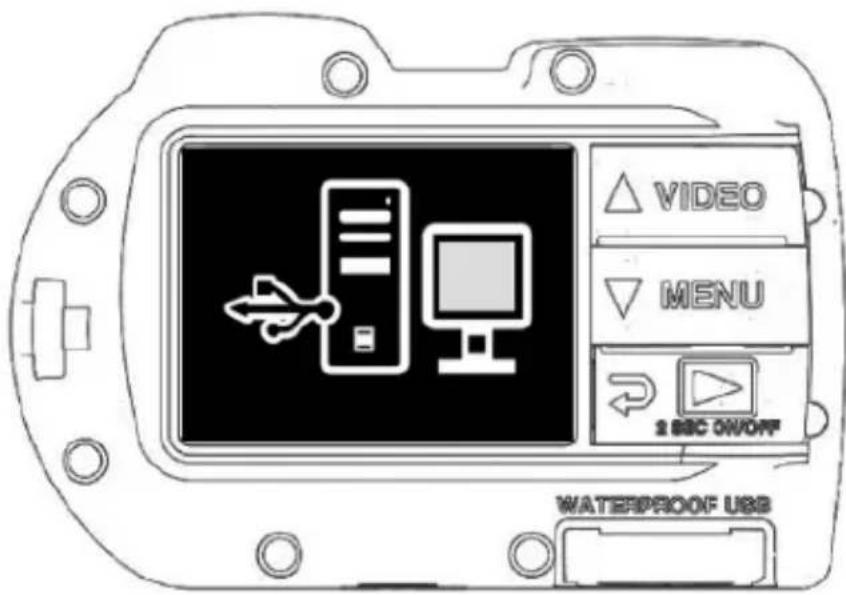
- The PC connection icon will appear on the display and the LED status indicator above the USB will be solid green. A flashing green LED indicates a connection failure. In that case, thoroughly clean the USB contacts.
- For Windows, right-click the Windows logo on bottom left of computer and select “File Explorer”. Locate and double-click the drive titled “MICRO3.0”. For MAC, double-click on “untitled” or “unlabeled” disk drive icon or your desktop. The DCIM folder contains all pictures and videos.
Note:
- After 1 minute, the display will turn off to save power. Push any button to turn on display.
- Pushing the MENU button will interrupt PC connection and show USB option screen.
- The battery will keep its charge (not charge or discharge) during PC Connection.
- You may also make direct wired connection between the camera and smart phone or tablet. You will need a USB adapter specific to the make / model of your smart phone or tablet. For iPhones or iPads, a special Y-cable is needed to provide power + data to the smartphone/tablet. For details, please refer to Tech Support section of the SeaLife-Cameras.com website.
- See troubleshooting tips on page 65 if the camera does not connect to PC.
IV. WiFi Connection with SeaLife Micro 3+ App
WiFi Connection to Smartphone or tablet
- On your iOS or Android device, go to the Apple App Store or Google Play Store and download and install the free "SeaLife Micro 3+" app. For iPads, select "iPhone Only" when searching for the app..
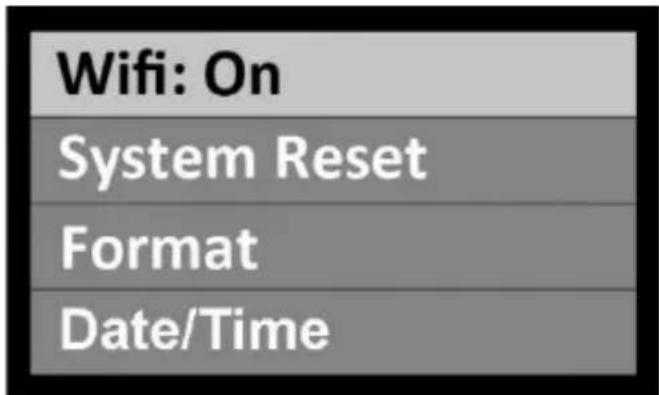
- Go to the camera's System Setting menu and turn WiFi On. Allow about 15-30 seconds for the WiFi transmitter to start-up.
| Wifi: On |
| System Reset |
| Format |
| Date/Time |
- Go to the WiFi setting on your iOS or Android device and select "SeaLife Micro 3 camera [serial #]" from the list of available hotspots. When prompted, enter password 1234567890.
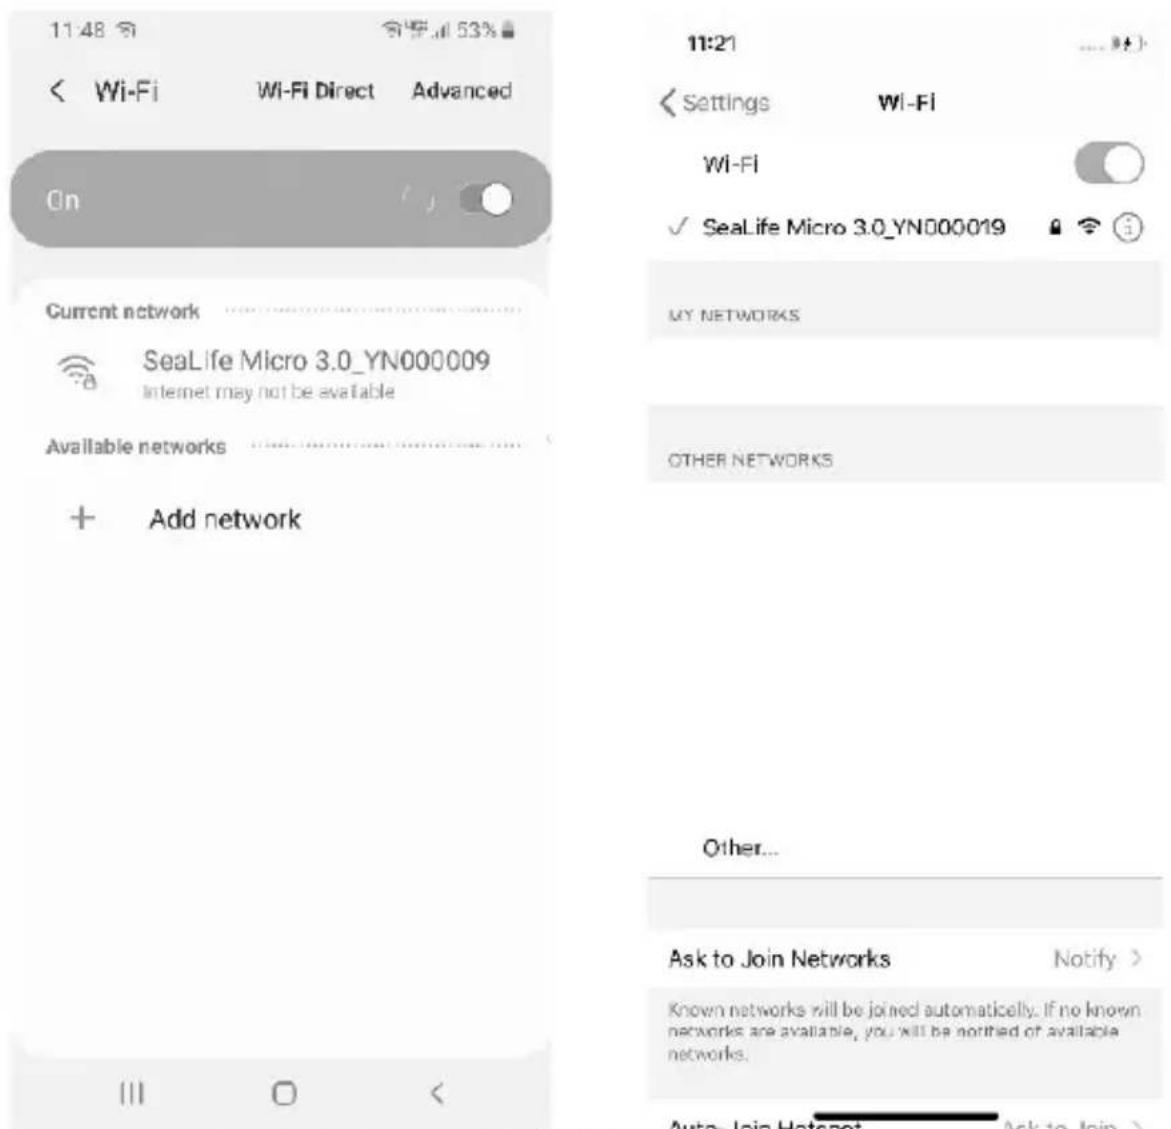
Android
iOS iPhone/iPad
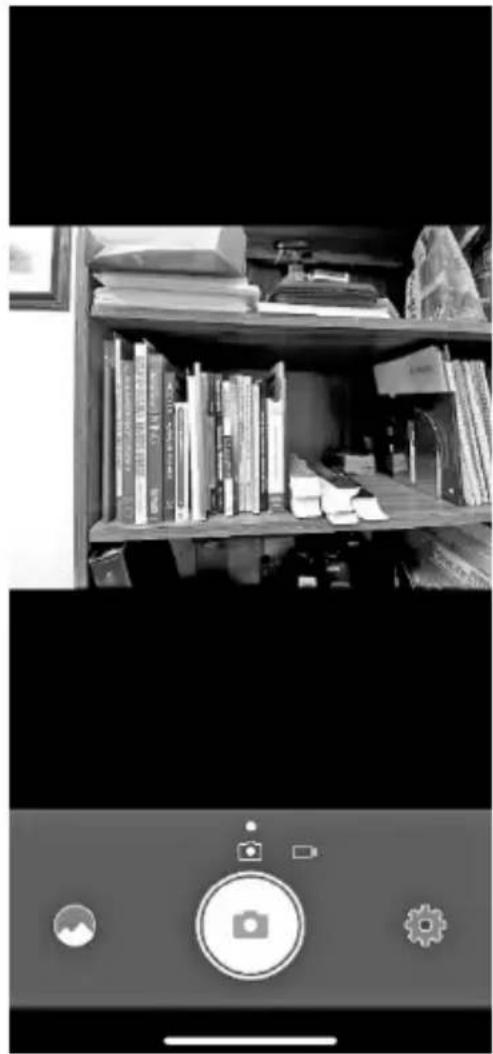
- Open the SeaLife Micro 3+ app. The app should show a live-stream view from the camera lens and the camera should show "Connected". If not, repeat above steps.
natural_image
Black-and-white photo of a cluttered desk with bookshelves and a smartphone control panel (no readable text or symbols)- To disconnect WiFi, push the camera's power (Playback) button.
Note: The camera password may be changed. Go to the app's Settings icon (gear icon on bottom right) and select "Change Password". Follow the on-screen instructions.
Home Screen:
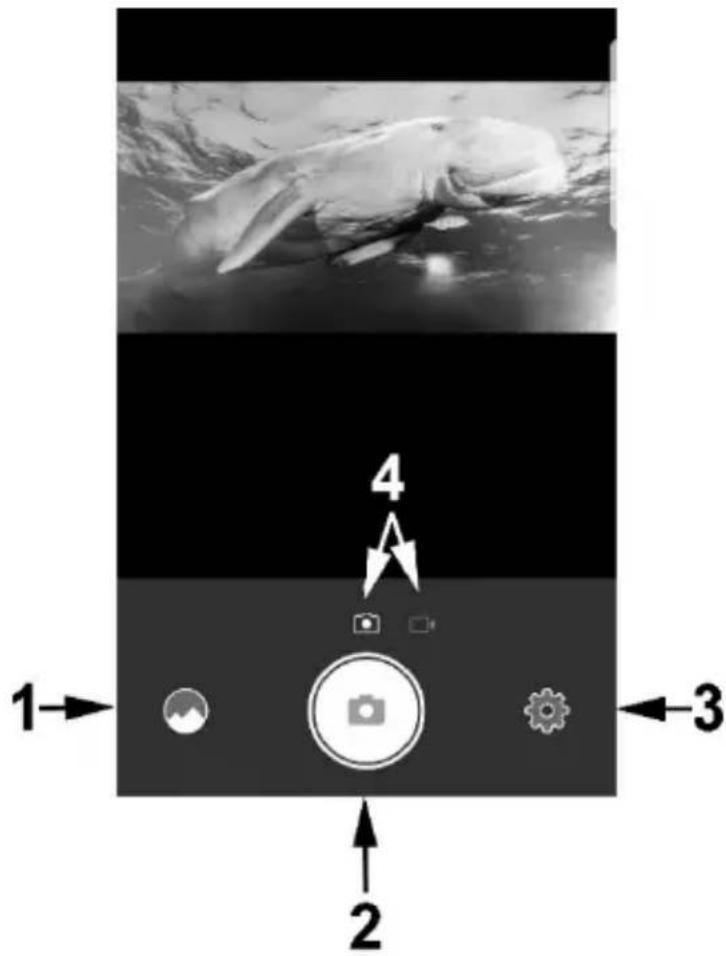
- Playback Gallery
- Take picture or start/stop video
- Camera settings menu (gear icon)
- Picture / Video mode
Playback Screen:
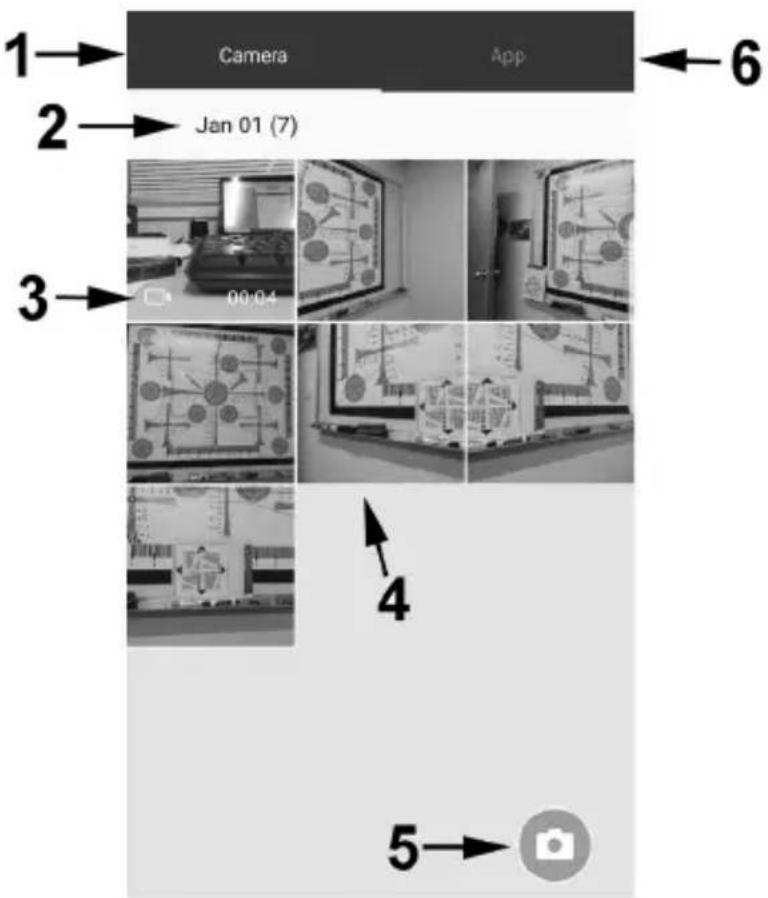
- Camera Gallery (files saved on camera)
- Date pictures/videos were taken (# of files for that day)
- Video icon indicates files is a video
- Thumbnails (touch for larger single view)
- Return to home screen (live view)
- App Gallery (Files downloaded to app)
Downloading files:
Push and hold any thumbnail to open download screen.
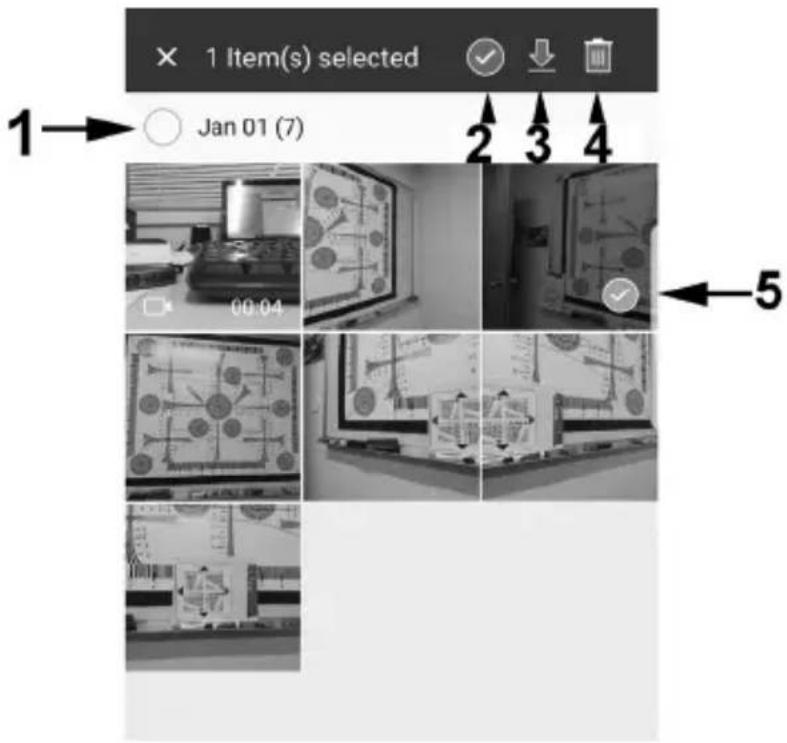
- Select files for a specific date
- Select ALL files
-
Download selected files
-
Delete selected files
- Check mark icon indicates files is selected
Note:
Photos/videos downloaded from the camera to your smartphone/tablet will automatically be saved to the device's photo gallery.
v. Menu Settings
Easy Setup:
A step-by-step guide that helps you set the camera correctly. Simply follow the on-screen guide and select land or underwater, and choose among the available options.
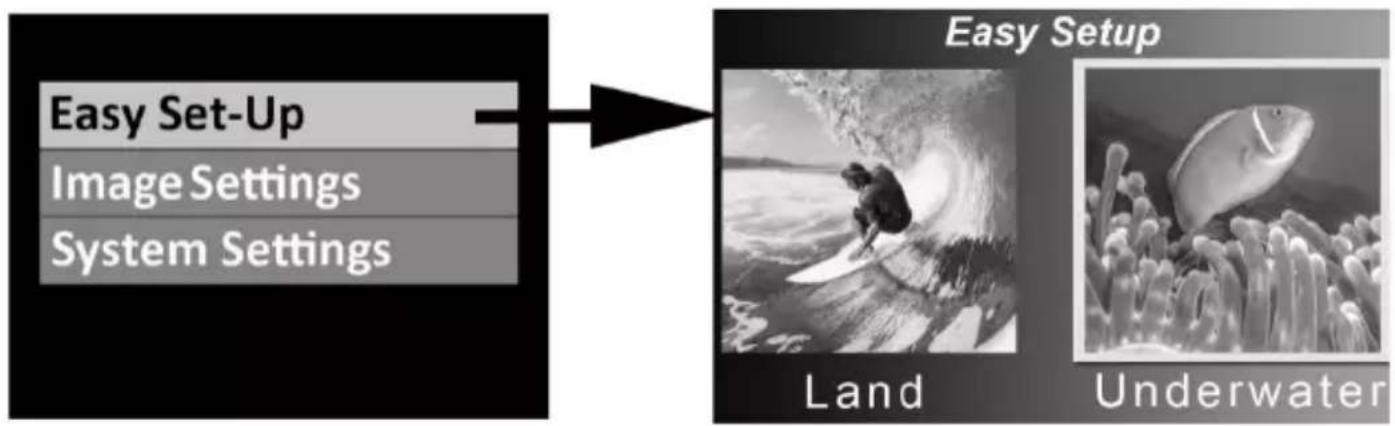
flowchart
graph LR
    A["Easy Set-Up"] --> B["Image Settings"]
    B --> C["System Settings"]
    D["Easy Setup"] --> E["Land"]
    D --> F["Underwater"]
Easy Setup options include:
1. Land
a. Land (Auto) - For most land photos/videos
b. Sports/Action - Uses Burst capture for fast moving subjects
2. Underwater
a. Dive - Camera only below 25ft/8m
b. Snorkel - Camera only above 25ft/8m
c. Ext Light - When using a photo-video light(s).
Image Settings:
The Image Settings menu contains all the photo and video exposure, color and quality settings. To open Image Settings, push the Menu button, scroll down to Image Settings and push the shutter button to confirm selection. The following describes each of the settings in the order as they appear in the camera menu.
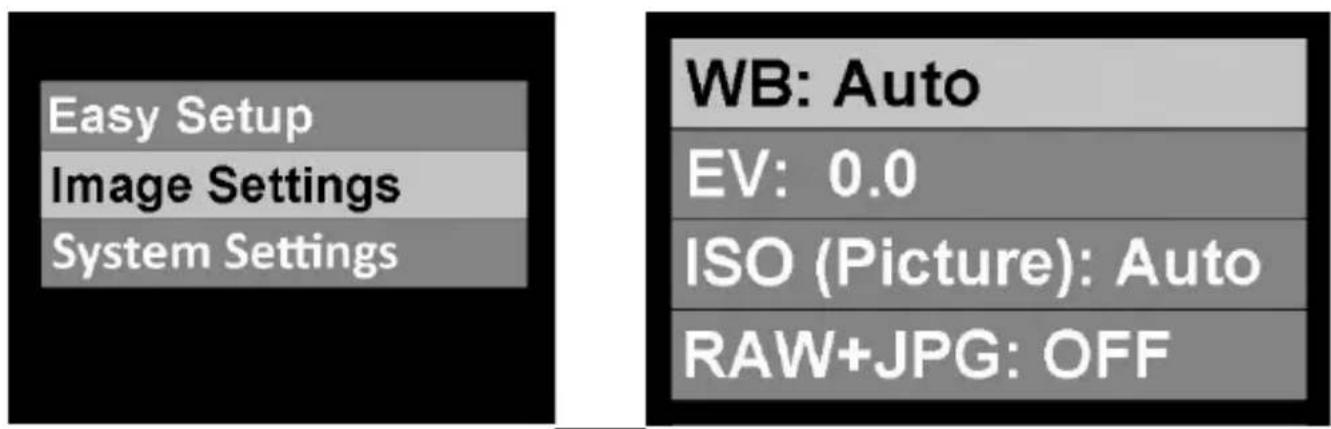
White Balance (WB) - Applies to photos and videos
White balance is a digital color filter that adjusts the color of photos/video under specific lighting environments. If set properly, the photo/video colors should appear natural. For example, a white object should appear white.
One of the following icons is shown on the LCD display. Select from 7 white balance filters:

A.

B

C.

D.

E.

F.

G.
A. Auto - Automatically selects the best white balance for land (not for underwater).
B. Underwater Deep - Ideal for shooting underwater at depths greater than 25ft/8m.
C. Underwater Shallow - Ideal for shooting underwater at depths less than 25ft/8m.
D. Underwater Green - Ideal for shooting underwater in green (algae) water.
E. Manual – Manually adjust the white balance color for a specific lighting environment using a white or gray card.
After selecting Manual, hold a white (or gray) card about 12"/30cm in front of the camera lens, so the card fills up all or most of the image frame. Push the shutter button to confirm and the camera will adjust the color according to the card. The card should appear white or gray if Manual white balance was set properly. The camera will save the Manual WB color until it's set again.
F. Daylight - Ideal for shooting on land in sunny conditions.
G. Cloudy - Ideal for shooting on land in cloudy conditions.
Exposure Value (EV) - Applies to photos and videos
This setting adjusts the camera's auto exposure program and is useful to force the camera to capture slightly over-exposed or under-exposed photos/video. Increasing the EV value results in a brighter image exposure. Decreasing the value results in a darker image exposure.

The above icon is shown on the LCD display with the corresponding EV value. The EV setting can be adjusted from +2.0 to -2.0 in 0.3 step increments, and 0.0 EV is the factory default setting.
ISO - Applies to Photos only
ISO adjusts the image sensor's light sensitivity. Select from Auto, 100, 200, 400, 800, 1600 and 3200. The following icon is shown on the LCD display with the corresponding ISO value.

The higher the ISO value, the more sensitive the camera will be to light, and is ideal for low light shooting conditions. The lower the ISO value, the less sensitive the camera will be to light, and is ideal for brighter light shooting conditions. A lower ISO value results in sharper, less grainy image quality compared to higher ISO value. Selecting AUTO ISO automatically selects the optimal setting.
RAW+JPG - Applies to Photos only
When RAW+JPG is turned On, the camera will save one uncompressed RAW (.dng) file and one compressed JPG file. Shooting in RAW allows for the greatest degree of photo editing because the file is unprocessed and uncompressed. This setting is recommended for advanced photographers familiar with the art of RAW photo editing.
The .dng RAW file format was created by Adobe. Use Adobe Photoshop Lightroom or Elements photo editing software to open and edit .dng RAW files.

The above icon is shown on the LCD display when RAW+JPG is turned on. Please allow approximately 2 seconds for the camera to write the two larger files to memory.
Capture mode - Applies to Photos only
The capture mode sets the quantity of photos captured when pushing the shutter button. One of the following icons is shown on the LCD display. Select from 5 options:

A. Single – Push and release the shutter button to capture one photo.
B. Continuous – Push and hold the shutter button to capture multiple photos at a rate of 10 frames for the first second and 2 photos per second, thereafter.
C. Time Lapse – Push and release the shutter button to record a series photos at pre-set time intervals of 2 sec, 5 sec, 10 sec, 30 sec, 1 min, 5 min and 30 min. Useful for shooting a sequence of pictures without holding the camera or disturbing the subject. Later, you can select the best image or combine all the images into a time lapse video using video editing software. After setting the capture mode to Time Lapse, go to the Photo Time Lapse setting to select the desired shooting interval. See Photo Time Lapse setting below for more details.
D. Burst – Push and hold the shutter button to capture 10 frames in one second.
E. AEB (Auto Exposure Bracketing) - Push and release the shutter button to capture three photos at slightly different exposures. One optimal exposure, one slightly brighter exposure and one slightly darker exposure.
Scene Mode - Applies to photos and videos
Scene mode automatically adjusts one or more image settings for the best possible image and video under specific types of shooting environments (scenes). One of the following icons is shown on the LCD display. Select from 5 different scene modes:

natural_image
Simple white mountain and cloud icon on black background (no text or symbols)A.

B.
natural_image
Silhouette of a diver in water with bubbles above, no text or symbols presentC.

natural_image
White stylized icon of a diving gear and snout on black background (no text or symbols)D.

natural_image
Abstract white silhouette of a stylized arm or robotic arm against a black background (no text or symbols)E.
A. Land - For above water. Uses auto white balance and single image capture mode suitable for most land photos/videos.
B. Sports/Action - For above water. Uses auto white balance and Burst capture mode suitable for fast moving subjects.
C. Dive - Uses underwater Deep white balance and single image capture mode suitable for underwater photos/video at depths greater than 25ft/8m.
D. Snorkel - : Uses underwater Shallow white balance and single image capture mode suitable for underwater photos/video at depths less than 25ft/8m.
E. Ext Light - For underwater at any depth with one or two photo-video lights. Uses Auto white balance. For optimized colors, use Manual white balance to set the specific color temperature of the photo-video light being used.
Quality - Applies to Photos only
Quality adjusts how much the photo image file is compressed. The Quality icon is not shown on the LCD display. Select between 3 options:
Super Fine - Lowest degree of compression, resulting in best quality and largest file size.
Fine - Moderate degree of compression, resulting in good quality and smaller file size.
Standard - Highest degree of compression, resulting in fair quality and lowest file size.
Picture Resolution – Applies to photos only
Select from 8 different resolutions and aspect ratios depending on how you want to compose the picture. 4:3 and 3:2 are the most common picture aspect ratios. 3:2 aspect ratio was used by original 35mm film cameras and most DSLR's, and is useful for composing landscapes or slightly wider scenes. 4:3 aspect ratio is used by micro four-thirds and compact digital cameras, and is utilizing the full frame size of the image sensor. 16:9 is a wide-screen format commonly used to view pictures on an HD TV, smartphone or other wide screen devices. The following icon is shown on the LCD display with the corresponding picture resolution.
| Picture Resolution | Comment |
| 16MP (4:3) | Highest full frame resolution. Recommended |
| 14MP (3:2) | Highest 3:2 aspect ratio resolution. |
| 12MP (16:9) | Highest wide-screen resolution. |
| 9MP (4:3) | Medium resolution with 4:3 aspect ratio. |
| 7MP (16:9) | Medium resolution with 16:9 aspect ratio. |
| 4mp (4:3) | Lowest resolution with 4:3 aspect ratio. |
| 3mp (16:9) | Lower resolution useful for time lapse |
| 2MP (16:9) | Lowest resolution useful for time lapse |
Video Resolution – Applies to videos only
Select from 10 different video recording resolutions and frame rate speeds (fps). The following icon is shown on the LCD display with the corresponding video resolution and frame rate.
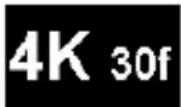
Shooting in 4K-30 produces the highest quality video but will use the most memory space, which is about 450MB per minute. 1080p-30fps is also considered high quality HD video resolution and is recommended for most video recordings. Recording at 120fps or 60fps is useful for
video recording of faster moving subjects. Recording at 120fps uses a high amount of memory space (See below). 120fps will playback in slow motion at 30fps but playback speed can be increased with most computer video players.
Video resolution setting and corresponding file size
| Video resolution – Frame Rate | File Size per minute |
| 4K – 30fps | 480 MB |
| 1080p – 120fps | 460 MB |
| 1080p – 60fps | 320 MB |
| 1080p – 30fps | 120 MB |
| 720p – 120fps | 310 MB |
| 720p – 60fps | 165 MB |
| 720p – 30fps | 85 MB |
| 480p – 120fps | 185 MB |
| 480p – 60fps | 95 MB |
| 480p – 30fps | 50 MB |
Metering - Applies to photos and videos
This determines the metering area used by the camera to calculate the exposure. No icon is shown on the LCD display for this setting.
Average - The entire area of the screen is measured, and the exposure is calculated.
Center - Averages the light from the entire image frame, but gives greater weight to the subject matter at the center. This is the recommended setting for most pictures.
Spot - A very small portion of the center of the screen is measured to calculate the correct exposure. Results in good exposure of brighter objects located in the center of the image frame, especially when using an external photo-video light.
Sharpness - Applies to photos only
Choose from 3 sharpness levels – hard, standard and soft. Hard uses sharper edges and lines but may not appear natural. Soft has smoother lines. The Standard setting is recommended for most applications. No icon is shown on the LCD display for this setting.
Photo Time Lapse - Applies to photos only
Record a series of still images at pre-set time intervals of 2 sec, 5 sec, 10 sec, 30 sec, 1 min, 5 min and 30 min. The following icon is shown on the LCD display with the corresponding time lapse interval.

Photo Time Lapse is used to shoot a sequence of pictures without holding the camera or disturbing the subject. Later, you can select the best image or combine all the images into a time lapse video using video editing software. This menu setting will only appear when Capture Mode is set to Time Lapse.
Self Timer - Applies to photos and videos
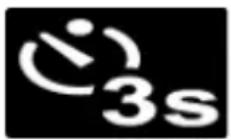
Useful for capturing self-portraits or videos. Delays image photo capture or video start time by 3 sec. or 10 sec. after pushing shutter button. The following icon is shown on the LCD display with the corresponding delay time.
Video Time Lapse - Applies to videos only
Records video at a slow frame rate of 1, 2, 5, 10, 15, 20 and 30 seconds and plays back at standard 30 frames per second. Useful for recording very slow moving subjects, like sunset, starfish walking, plant growing, etc. Push video button to start / stop time lapse video. Turn Video Time Lapse OFF to disable this feature. The following chart shows the resulting video playback length in seconds based on the Video Resolution setting, Video Time Lapse setting and record time.
| Video Resolution Setting Frame Rate | Video Time Lapse Setting (seconds) | Record time (minutes) | Video Playback Length (seconds) |
| 30 | 1 | 30 | 60.0 |
| 30 | 2 | 30 | 30.0 |
| 30 | 5 | 30 | 12.0 |
| 30 | 10 | 30 | 6.0 |
| 30 | 15 | 30 | 4.0 |
| 30 | 20 | 30 | 3.0 |
| 30 | 30 | 30 | 2.0 |
Note: Video Time Lapse is not available for Video resolution setting with 120fps. Only 60fps and 30fps Video Resolution setting may be used to record Video Time Lapse. "Video Time Lapse In Progress" message appears on the LCD display when recording video time lapse. The LCD display will turn off after 1 minute to save battery power, but video will continue recording. Push any button to turn on the display.
Video Stabilization - Applies to videos only
When turned On, the camera will electronically stabilize video recording to reduce minor shakes and hand movements. It is recommended to keep Video Stabilization turned On.
Turning stabilization Off will slightly increase the video field of view and slightly improve battery life.
System Settings:
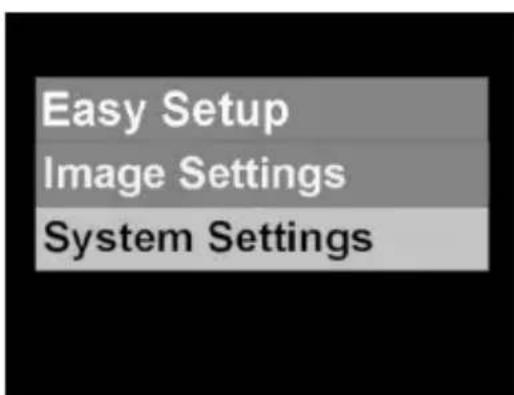
The System Settings menu contains all other camera settings, like WiFi On/Off, Date/Time, Language, etc. To open System Settings, push the Menu button, scroll down to System Settings and push the shutter button to confirm selection. The following describes each of the settings in the order as they appear in the camera menu.
WiFi
Turn WiFi ON to enable the wireless transmitter needed to connect the camera to your smartphone or tablet. Please allow about 15 seconds for the device to boot-up. A green WiFi indicator will appear on the top of the display when WiFi is turned on. See page 25 for information on how to connect the camera to your smartphone/tablet.
System Reset
This will restore all camera settings to the original factory default settings and reboot the camera. System Reset will not change the Date/Time or Language settings.
Format
This will delete all files in the internal memory. It is useful to format memory if internal memory is corrupted by other files saved on the camera. It is recommended to format the memory occasionally to refresh the memory's folder structure.
Performing System Reset after Formatting, will reset the file name to MICR0001.
Date / Time
Set camera date and time. Format is YYYY/MM/DD HH:MM. The Date/Time may also be synchronized with the date/time of your smartphone using the Micro 3+ app. When the camera is WiFi connected to your smartphone, select Camera Settings in the app and scroll down to Date/Time Setup.
Memory Available
Shows available memory space in GB. The camera uses about 5GB internal memory for operating system files, so 59 GB is available for storing photos and videos.
Microphone
The camera's microphone (mic) is located inside the waterproof enclosure. The mic may be set to OFF, Low, Mid or High. Even when set to High, the audio volume when recording video on land is minimal because of the waterproof design. The microphone is more effective underwater. You may consider turning the mic Off and use YouTube or some other video editing software to add music or narrations to your video production.
Sound
The camera includes a speaker located inside the waterproof enclosure, which may be set to OFF, Low or High. Even at High, the speaker may be difficult to hear because of the waterproof design.
Quick View
When Quick View is turned On, the camera will display the captured image for 2 seconds after it has been captured.
Language
Select among English, German, French, Spanish, Italian, Dutch, Russian, Turkish, Simplified Chinese and Traditional Chinese.
System
This refers to the color encoding system used by televisions. PAL is used mostly in Europe and Asia, while NTSC is used in North America. Selecting PAL will use slower frame rate of 25fps, 50fps or 100fps, while NTSC uses 30fps, 60fps and 100fps.
Light Frequency
To avoid flicker effect when taking pictures indoors under fluorescent lighting, select 60Hz for USA and other countries using 110-120V electrical system. Select 50Hz for Europe and other countries using 220-240V electrical system.
Date Stamp
Turning Date Stamp ON will imprint the data and time on the bottom right corner of each picture. Not available for videos.
Auto Off
Camera will automatically turn off after 3 minutes of not pushing any buttons. The Auto Off function can be disabled by selecting “Auto off: Off” or extended to 5 minutes by selecting “Auto off: 5 min.”
Upside-Down - Applies to photos and videos
Allows the camera to be oriented upside-down, while pictures and video are saved right-side-up.
Shortcut
Creates shortcut to one menu setting when pushing menu button for 2 seconds. Select between Off, WB, ISO, EV, Capture Mode, Scene Mode, Metering, Color, Self-Timer, RAW+JPG, Upside-Down and WiFi.
SSID
This is the username used for making wireless connection to a smartphone or tablet. The default name is “SeaLife Micro 3.0” but it can be changed using the SeaLife Micro 3+ app.
Conformity Marking
Contains the FCC symbol and FCC ID number.
Firmware Version
Displays what firmware (software) version is installed on the camera. SeaLife may occasionally release firmware updates if any operation and performance enhancements are discovered. Check the SeaLife Micro 3+ app for any available firmware updates.
VI. Great Pictures Made Easy
Taking underwater images is much different than taking land photos or video. Water absorbs light and color, and tiny particles suspended in the water can reduce visibility. Here are the most important tips to taking great pictures underwater:
Crystal clear water
Crystal clear water is essential for good underwater pictures. Tiny particles floating in the water cause low visibility and poor picture quality. Avoid stirring up the sandy bottom with your fins. These floating particles cause small spots to appear in your picture, known as “backscatter.” Try to limit your shooting distance to 1/10 of the water visibility. For example, if the visibility is 60 feet (18m), you should keep your maximum shooting distance to within 6 feet (1.8m).
Get close to your subject
The ideal shooting distance is within 4ft (1.2 meters). This distance will result in greater detail. The camera's minimum focus range is 15" (38cm). For shooting closer shooting distances of 6" to 24" (15cm to 60cm), consider purchasing the optional 10X close-up lens (item # SL572).
Move calmly and control your buoyancy before taking a picture
It's hard to take good pictures when you are moving. Position yourself at the best shooting angle and neutralize your buoyancy. Be calm and patient: Sometimes you have to wait so the fish that were frightened away come back. Don't chase the fish, let the fish come to you. Always be in control of your buoyancy before taking pictures and observe all safe diving rules. Shoot many pictures of the same subject - if you don't like it, delete it later.
Use one or two underwater photo-video light to enhance color and brightness
Water filters out light and red/yellow colors resulting in blue images. The Dive and Snorkel modes will correct for lost colors, which is effective to about 60ft/18m depth, depending on available sunlight and water visibility.
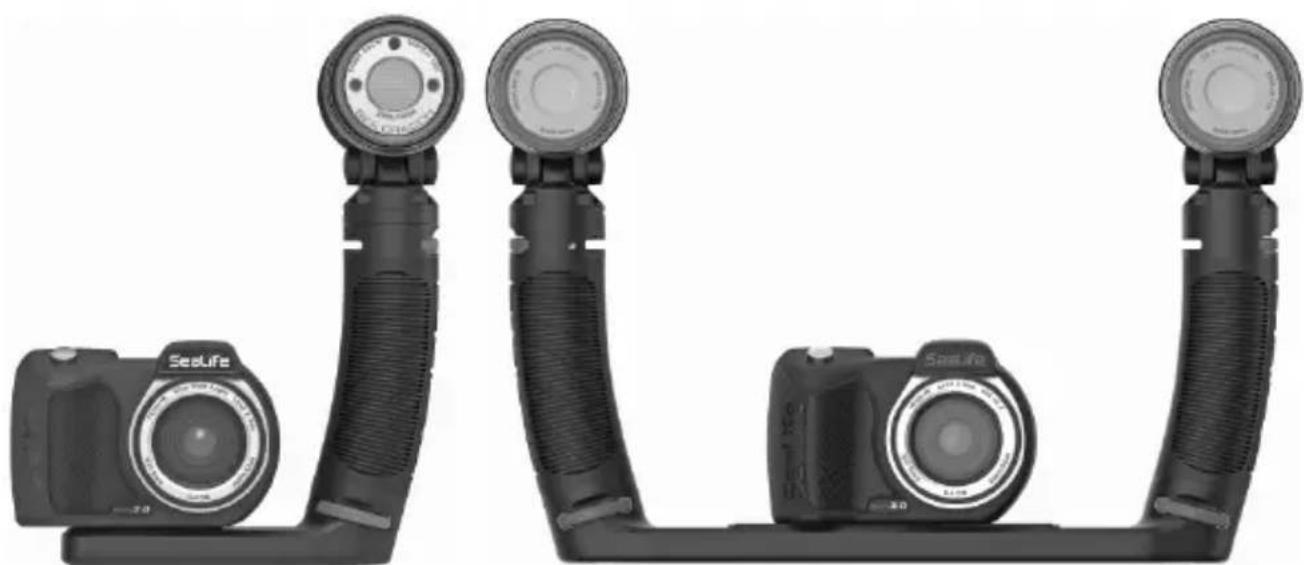
The most effective way to compensate for lost colors is by using an underwater light specifically designed for photography and video. SeaLife makes a variety of underwater photo-video lights (under Sea Dragon name) that easily mounts to the bottom of the camera. The Flex-Connect system of trays, grips, flexible arms and adapters can click together and apart in seconds without tools, for compact travel. Two lights can be mounted to the camera for wide angle illumination. Visit
your local authorized SeaLife dealer or the SeaLife website for more details.
Pan very slowly or not at all
When recording video, keep the camera aimed steady at the subject. Avoid making any sudden or jerky movements. If you pan the camera, move it very, very slowly or you will get seasick watching it later. A better way is to slowly move the camera off of the subject, stop recording, change the angle or distance, then start the recording again.
Limit video clips to 10 seconds or less
It's easier to share and edit smaller video clips. Remember, the file size for a 1-minute video clip recorded at 1080p-30fps is about 170MB, which is about 30 time larger file size than a 16 megapixel still image. Shorter video clips can be stitched together using video editing software, like YouTube, Adobe Premier, Microsoft Movie Maker or Apple iMovie. You can also add music and titles to produce a dramatic movie of your dive adventure.
Visit SeaLife website for updates and helpful tips
Updates to this manual, troubleshooting tips and underwater photography tutorials are all available at www.sealife-cameras.com.
Ask your local SeaLife dive dealer about underwater camera courses
Most SeaLife dive dealers offer underwater camera courses which include hands-on training as well as many helpful tips and techniques to underwater videos and photography.
VII. Optional Accessories
Sea Dragon Underwater Photo-Video Lights
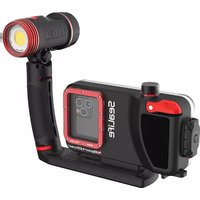
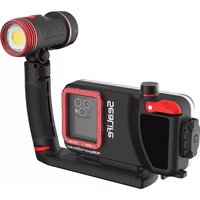
Sea Dragon Photo/Video Lights have been engineered to produce exceptional brightness with “True Lumen” output, and an optimal Color temperature and color rendering. The results are stunning natural underwater colors, as if the subjects were lit by the sun itself. Sea Dragon Photo/Video lights also offer a consistent and wide beam angle.
natural_image
Three black camera modules with attached flexible cables, no visible text or symbolsLeft: Micro 3.0 with Sea Dragon 3000 Auto UW photo-video light, including Flex Connect Grip and Micro Tray. Right: Micro 3.0 with two Sea Dragon 2500 UW photo-video lights, including Flex Connect Grips and Dual Tray
AquaPod (SL912)
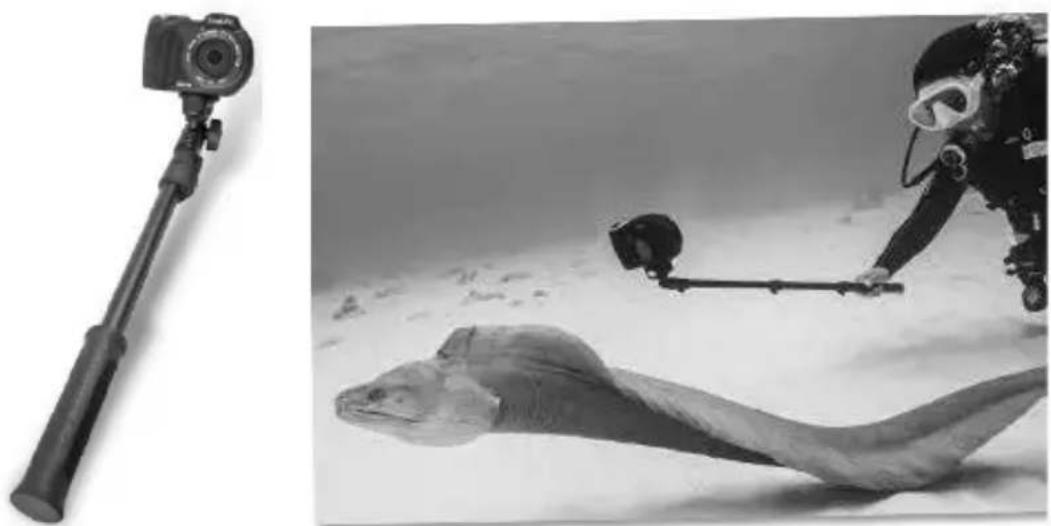
The SeaLife AquaPod Mini lets you to get your camera close to both land and sea creatures while maintaining your distance, and allows you to get that perfect shot of yourself amidst all of the action. Rotate the camera on the AquaPod Mini to easily take self-portrait images. Easy to use and hold steady, the AquaPod Mini extends from 15.5 inches (39cm) to 38 inches (97cm). It is particularly travel friendly because its collapsed size easily fits into a briefcase or carry-on luggage.
natural_image
Black-and-white photo showing a selfie stick and a scuba underwater with a fish, alongside a camera and detector (no text or symbols visible)When using the AquaPod, set the camera to “Time Lapse” mode so you can easily to shoot a series of pictures without. For videos, just push the video button on the camera and start shooting. For best results, make smooth and gentle movements so the lens stays focused on your subject.
10X Close-up Lens (SL572)
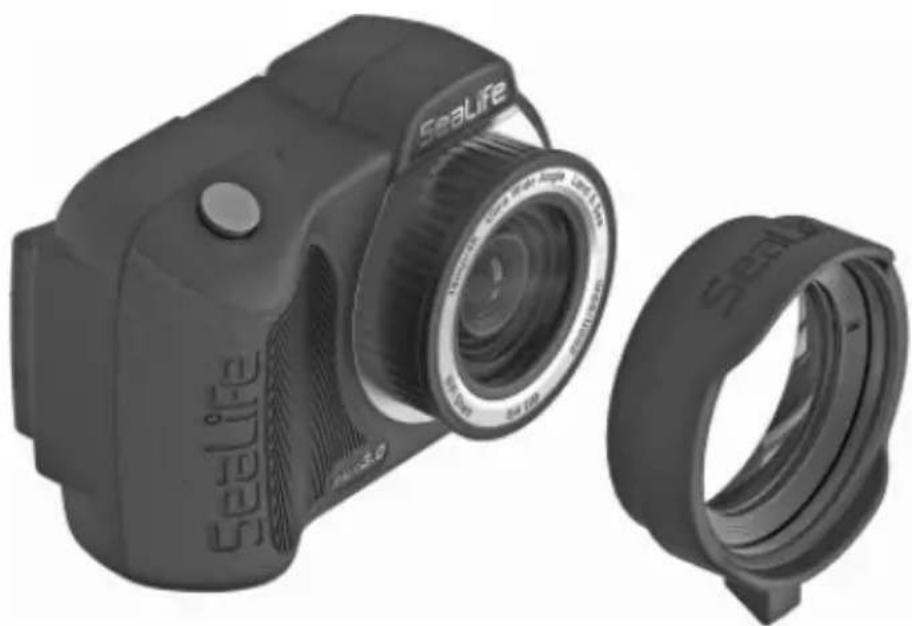
For shooting sharp close-ups from 6" to 24" (15cm to 60cm). The lens easily attaches to the lens port above or below water and includes a safety lanyard that connects to the camera.
natural_image
Black and white photo of a Sealife camera with attached ring (no visible text or symbols)Photo Pro Backpack (SL940)
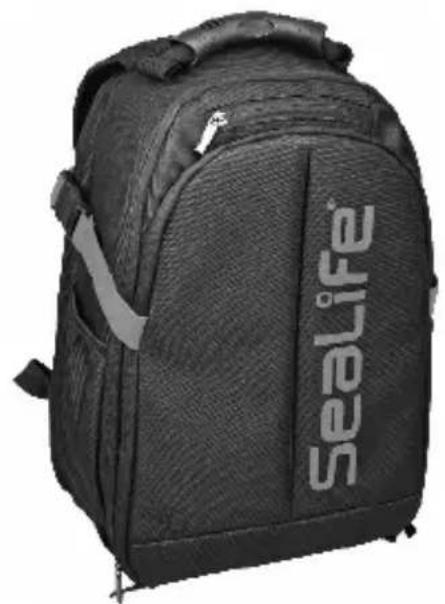
Features an 8-liter padded camera/lighting “wet” compartment with 6 adjustable dividers to fit virtually any combination of cameras, lights, lenses and accessories. The compartment’s waterproof liner prevents damp camera gear from leaking into the adjoining dry compartments. Above the larger camera compartment, there is a dry accessory compartment with 5 zippered pockets for storing common items, like cables, spare batteries, chargers, adapters, manuals, smartphone, sunglasses, etc.
natural_image
Black and white photo of a Sealife backpack with visible branding (no text or symbols on the backpack itself)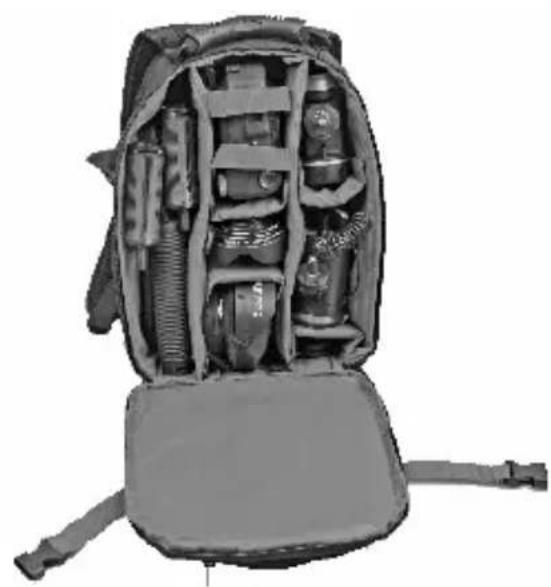
natural_image
Back view of a tactical backpack with internal compartments and straps (no visible text or symbols)VIII. Care and Maintenance
- Soak camera in a fresh water tub for about 20 minutes immediately after underwater use. While holding camera underwater, push each button a 20 times to rinse out trapped debris and saltwater. Remove the rubber USB cover to allow fresh water to rinse the waterproof USB contacts
- Do not directly or indirectly expose the camera to spray-on sunscreens. Most spray-on sunscreens contain chemicals that attack the polycarbonate material of the underwater housing, causing cracks that comprise the waterproof seal.
- Do not use abrasives, chemicals, cleaning solvents or detergents to clean the UW camera.
- Dry the camera and USB contact area with a clean towel the fresh water rinse. Don't allow water to dry on the lens or LCD window, which can cause water stains.
- Make sure camera and USB contacts are perfectly dry before charging, PC connection or storage.
- Do not take apart or attempt to service the camera yourself. Contact your local authorized SeaLife dealer if the camera becomes damaged and requires service. Opening and tampering
with the camera will void your warranty.
- Keep camera away from extreme temperatures or prolonged exposure to direct sunlight.
- Store camera in a clean dry area. Storage temperature range is -20°F to 140°F (-29°C to 60°C).
- For long-term storage, charge battery to about 50%. Storing camera with 0% charge may shorten battery lifespan or permanently damage the battery.
- The camera's internal battery maintains 85% of its original power after 500 recharge cycles and 70% after 1000 recharge cycles. The battery can be replaced by an Authorized SeaLife Service Center.
- For updates to this manual and troubleshooting information, visit www.sealife-cameras.com Tech Support webpage..
IX. Troubleshooting
Camera locks up
- In the unlikely event the camera locks-up, push and hold the shutter and power buttons at the same time for about 5 seconds to force-off and reboot the camera.
- Check SeaLife website for firmware updates: www.sealife-cameras.com/firmware
Camera not connecting to computer or wall charger
- Thoroughly clean the gold contacts on the camera and USB adapter with cotton swab moistened with isopropyl alcohol. Do not use pencil eraser or other abrasives to clean the contacts as that will remove the gold plating.
- Check and remove any debris that may be obstructing the USB adapter from being fully inserted into the camera's waterproof USB port.
- Reboot computer and try again.
- Inspect the USB cable and replace if damaged. Only use the USB cable provided with your SeaLife Micro camera. Other micro-B
type USB cables may not be compatible because of insufficient conductivity or lack of proper shielding. Replace the USB cable (item # SL51004) if you see any signs of corrosion or damage.
- The USB adapter is not waterproof and needs to be replaced if it got wet.
- Try connecting the camera to a PC or wall charger and pulling back slightly on the adapter. This may be a temporary solution to get a USB connection until the adapter can be replaced.
Pictures/videos not sharp or out of focus
- The camera uses a fixed focus lens that is sharp from 15" (38cm) to infinity. Make sure to maintain at least 15" (38cm) distance between the camera and the subject. For close-up shooting distances of 6" to 24" consider purchasing the SeaLife 10X Close-Up lens (SL572).
- There are other factors that may contribute to pictures or videos not being sharp. Most common is shooting in low light conditions, which may cause a grainy image or motion blur. Consider purchasing a Sea Dragon photo-video light, which is ideal for capturing sharp, colorful pictures and videos underwater or in low light conditions.
Downloading SeaLife Micro Cam app for iPad
- Search App Store for “SeaLife Micro 3+” and select “iPhone Only” from the dropdown menu on the top left of your iPad. The SeaLife Micro 3+ app is originally designed for iPhones but works equally well with iPad.
More information
- Check SeaLife website Tech Support page for the latest tips, updates and troubleshooting advice.
- For technical support, please contact the USA SeaLife Service Center at service@sealife-cameras.com or the SeaLife distributor in your country. A list of distributors is on the SeaLife website: www.sealife-cameras.com/authorized-dealer-locator.
X. Spare Parts and Service
Parts - To order spare parts, please contact your local SeaLife dealer. Visit the Dealer Locator at www.sealife-cameras.com to find a dealer near you. US residents can also order spare parts online at www.SealifePartsDirect.com
Service - If the camera is not performing to your expectations or requires repair service, please follow these important instructions:
- Visit the SeaLife website Tech Support page for troubleshooting tips, updates and other helpful information
- Check that you have the most recent firmware loaded on your camera. The camera's firmware may be updated through the Micro 3+ app settings menu. Firmware updates are also available in the Technical Support menu of the sealife-cameras.com website.
- Contact the dealer from whom you purchased the camera. The Dealer Locator page contains a complete list of local dealers.
- If none of the above options help, please follow the return instructions available on the seaLife-cameras.com website.
XI. Specifications
Note: Product specification subject to change without notice. Please visit www.sealife-cameras.com for updates
Image Sensor:
16 mega pixel SONY IMX083 1/2.3" CMOS sensor
Image resolution/sizes:
16mp (4608x3456 4:3);
14mp (4608x3072 3:2)
12mp (4608x2592 16:9)
9mp (3456x2592 4:3)
7mp (3456x1944 16:9)
4mp (2304x1728 4:3)
3mp (2304x1296 16:9)
2mp (1920x1080 16:9)
Picture / Video file format:
JPEG (.jpg) and RAW (.dng)
MPEG4 h.264 (.mp4)
Video Resolution/sizes:
4K at 30fps (frames per second)
1080p at 120 fps
1080p at 60 fps
1080p at 30 fps
720p at 120fps
720p at 60fps
720p at 30fps
480p at 120fps
480p at 60fps
480p at 30fps
Audio:
Microphone: Yes (mono)*
Speaker: Yes (mono)
Audio format: ACC (video/ audio compressed together)
* Note: Microphone and speaker are sealed inside waterproof enclosure which lowers audio recording and speaker volume. Volume levels shall be fine-tuned, so mic and speaker function as good or better than Micro 2.0 camera.
Lens:
Aperture F2.8
7 element, fully multi-coated, aspheric optical lens (Confirm qty of elements)
Focal length 3.37mm (35mm film equivalent = 19mm)
Focus:
Fixed-focus lens
15" to Infinity (40cm to infinity)
Field of View:
100° diagonal FOV (Land) / 75° diagonal FOV (Underwater)
Shutter speed:
1/25 to 1/2000 second
LCD:
2.4" 260K TFT LCD color display
Memory (internal):
64GB internal solid state memory
1GB NAND Flash
USB:
2.0 High Speed
PC connection:
PC: Windows XP / 7 and up
MAC: OS 10.8 and up
Battery:
Internal Li-ion battery. 2000 mAh, 3.7V. 7.4Wh.
3+ hours when shooting pictures or recording 1080p-30fps video
2+ hours when RAW+JPEG images or recording 4K-30fps video
Charging:
Use any 5V USB wall charger (not included)
Includes USB cable (Type A to Micro-b) and 5-pin USB adapter
4 hour charging time with 1.5A+ wall charger (8 hours with 0.PC USB output)
App:
Works with SeaLife Micro 3+ app installed on phones and tablets running Android 6 and up or Apple iOS 12 and up.
WiFi:
Wi-Fi 802.11b/g/n (Approximate range = 100ft / 30m)
Environment
Individually depth tested to 200' (60 m)
Operational to 25,000ft (7600m) above sea level
3ft / 1m
Buoyancy:
Negative 1.8 oz. (52g)
Operating / Storage temp:
Land: 23^ F to 122^ F ( -5^ C to 50^ C)
Underwater: 33^ F to 110^ F ( 0.5^ C to 44^ C)
Storage temp -20^ to 140^(-29^ to 60^)
Tripod mount:
Standard 14 -20 UNC tripod threads
Certification:
CE, AS/NZS, ROHS, FCC, IC
Product weight / dimensions
11.6 oz. (329g) / 2.1" x 2.9" x 4.2" (5.4cm x 7.4cm x 10.7cm)
Warranty period:
1 year limited warranty for manufacturing defects
FCC Statement
Class B: Section 15.105
FEDERAL COMMUNICATIONS COMMISSION INTERFERENCE STATEMENT
This equipment has been tested and found to comply with the limits for a Class B digital device, pursuant to part 15 of the FCC Rules. These limits are designed to provide reasonable protection against harmful interference in a residential installation. This equipment generates, uses and can radiate radio frequency energy and, if not installed and used in accordance with the instructions, may cause harmful interference to radio communications. However, there is no guarantee that interference will not occur in a particular installation. If this equipment does cause harmful interference to radio or television reception, which can be determined by turning the equipment off and on, the user is encouraged to try to correct the interference by one or more of the following measures:
-Reorient or relocate the receiving antenna.
-Increase the separation between the equipment and receiver.
-Connect the equipment into an outlet on a circuit different from that to which the receiver is connected.
-Consult the dealer or an experienced radio/ TV technician for help.
Section 15.21
CAUTION:
Any changes or modifications not expressly approved by the grantee of this device could void the user's authority to operate the equipment.
Section 15.19(a)(3)
This device complies with Part 15 of the FCC Rules. Operation is subject to the following two conditions: (1) this device may not cause harmful interference, and (2) this device must accept any interference received, including interference that may cause undesired operation.
RF Exposure Information (SAR)
This device meets the government's requirements for exposure to radio waves. This device is designed and manufactured not to exceed the emission limits for exposure to radio frequency (RF) energy set by the Federal Communications Commission of the U.S. Government.
The exposure standard employs a unit of measurement known as the Specific Absorption Rate, or SAR. The SAR limit set by the FCC is 1.6 W/kg. Tests for SAR are conducted using standard operating positions accepted by the FCC with the EUT transmitting at the specified power level in different channels.
The FCC has granted an Equipment Authorization for this device with all reported SAR levels evaluated as in compliance with the FCC RF exposure guidelines. SAR information on this device is on file with the
FCC and can be found under the Display Grant section of www.fcc.gov/eot/ea/fccid after searching on FCC ID: 2AAD3AA2G1J1
End Product Labeling
This transmitter module is authorized only for use in device where the antenna may be installed such that 20cm may be maintained between the antenna and users. The final end product must be labeled in a visible area with the following: "Contains FCC ID: 2AAD3AA2G1J1" and "Contains IC: 10290A-AA2G1J1"
Information for the OEMs and Integrators
The following statement must be included with all versions of this document supplied to an OEM or integrator, but should not be distributed to the end user.
1) This device is intended for OEM integrators only.
2) Please see the full Grant of Equipment document for other restrictions.
IC Statement
(RSS-Gen section 7.1.3)
Canada, Industry Canada (IC) Notices
This device complies with Canada license-exempt RSS standard(s). Operation is subject to the following two conditions: (1) this device may not cause interference, and (2) this device must accept any interference, including interference that may cause undesired operation of the device.
Canada, avis d'Industry Canada (IC)
Radio Frequency (RF) Exposure Information
The radiated output power of the Wireless Device is below the Industry Canada (IC) radio frequency exposure limits. The Wireless Device should be used in such a manner such that the potential for human contact during normal operation is minimized.
This device has been evaluated for and shown compliant with the IC Specific Absorption Rate (“SAR”) limits when operated in portable exposure conditions.
"Hereby, Pioneer Research, declares that this device Micro 3.0 is in compliance with the essential requirements and other relevant provisions of Directive 2014/53/EU."

XII. Limited Warranty
Please register your SeaLife product online at: www.sealife-cameras.com/warranty. SeaLife will not
Limited Warranty
Manufacturer warrants to the original purchaser (the “Purchaser”) of this product (the “Product”), provided the Product was at the time of purchase, new and unused and in its original packaging for a period of one (1) year from the date of purchase (the “Warranty Period”), that the Product is free from defects in workmanship and materials when used in accordance with Manufacturer’s published specifications. In the event that the Purchaser believes the Product contains a defect, the Purchaser should seek troubleshooting advice from the SeaLife website at www.sealife-cameras.com or the importer of the Product in the country in which the Product was purchased by the Purchaser. The local authorized SeaLife Dealer can also assist with Product servicing and, in the event it is determined that the product requires servicing, can issue to Purchaser a return authorization number. To be entitled to any remedy hereunder, Purchaser must return the Product to Manufacturer within the Warranty Period, at the sender’s risk, accompanied by the following (the “Claim Requirements”): (a) a Manufacturer issued return authorization number, (b) a letter describing in the defect in reasonable detail; (c) a valid address for the Purchaser; and (d) a copy of the original purchase receipt or proof of purchase specifying the purchase date of
the Product For more information about repair service, or to locate a service center in your country, please visit the SeaLife website at www.sealife-cameras.com.
Important: The foregoing limited warranty applies only to the Product sold by Manufacturer. This limited warranty does not cover, and does not provide any remedy for damage to, any smart phones, other electronic devices, or other products, used in connection with the Product. Purchaser understand and agrees that while Manufacturer has undertaken commercially reasonable efforts to ensure that the Product functions in accordance with Manufacturer's applicable published specifications, some risk of flooding or other failure remains when the Product is used, which risk the Purchaser assumes.
In the event Purchaser returns the Product to Manufacturer with the Claim Requirements, and Manufacturer is able to replicate the alleged defects or leaks, and determines in its reasonable discretion that the Product contains a defect in workmanship or materials, Manufacturer will, in its absolute and sole discretion, repair or replace this Product and return it to Purchaser free of charge. In the event that Manufacturer is unable to replicate alleged defects or leaks, or determines that the product does not contain a defect in workmanship or materials, Manufacturer will notify Purchaser and upon request by Purchaser Manufacturer will return the Product to Purchaser at Purchaser expense.
Excluded from this warranty are any damages caused by the failure to
use the Product in accordance with Manufacturer's published specifications, cosmetic damages, damages caused by abuse, misuse, wear, tear, water damage caused by damaged O-ring or O-ring contact surfaces or debris trapped between the product housing and the O-ring, damages caused by exposure to sunscreens or other chemicals, repair or attempted repair by unauthorized persons, improper storage, non-performance of scheduled maintenance, and battery leakage.
THE FOREGOING IS PURCHASER'S SOLE AND EXCLUSIVE REMEDY, AND MANUFACTURER'S SOLE AND EXCLUSIVE OBLIGATION, WITH RESPECT TO A CLAIM THAT A PRODUCT IS DEFECTIVE. EXCEPT FOR THE LIMITED WARRANTY SET FORTH ABOVE, MANUFACTURER DISCLAIMS ALL WARRANTIES, EXPRESS OR IMPLIED, WITH RESPECT TO THE PRODUCT INCLUDING, WITHOUT LIMITATION, THE IMPLIED WARRANTIES OF MERCHANTABILITY, FITNESS FOR A PARTICULAR PURPOSE, AND NON-INFRINGEMENT. UNDER NO CIRCUMSTANCES SHALL MANUFACTURER BE LIABLE TO PURCHASER OR ANY THIRD PARTY FOR ANY SPECIAL, INCIDENTAL, INDIRECT, CONSEQUENTIAL OR PUNITIVE DAMAGES INCLUDING, WITHOUT LIMITATION, LOSS OF PROFITS, INJURIES TO PERSONS OR PROPERTY, OR DAMAGES FOR WHICH PURCHASER MAY BE LIABLE TO OTHER PERSONS OR ENTITIES, EVEN IF MANUFACTURER HAS BEEN ADVISED OF THE POSSIBILITY OF SUCH DAMAGES, AND WHETHER THE CLAIM IS FOR BREACH OR REPUDIATION OF CONTRACT, BREACH OF WARRANTY, TORT, NEGLIGENCE OR OTHERWISE. SOME JURISDICTIONS DO NOT
ALLOW THE EXCLUSION OR LIMITATION OF INCIDENTAL OR CONSEQUENTIAL DAMAGES OR ALLOW LIMITATIONS ON HOW LONG AN IMPLIED WARRANTY LASTS, SO THE FOREGOING LIMITATIONS MAY NOT APPLY. ANY OF THE FOREGOING NOTWITHSTANDING, IN NO EVENT SHALL MANUFACTURER'S MAXIMUM AGGREGATE LIABILITY ARISING OUT OF OR RELATING TO THE SALE OF THE PRODUCT EXCEED THE PURCHASE PRICE PAID TO MANUFACTURER FOR THE PRODUCT.
This limited warranty is governed by the laws of the State of New Jersey, U.S.A. Any warranty claim, or other dispute arising out of or related to this limited warranty or the Product, shall be brought exclusively in the state or federal courts located in the State of New Jersey, U.S.A., the exclusive jurisdiction and venue of which Purchaser and any party from which Purchaser purchased the Product, directly or indirectly, irrevocably consent to for this purpose.
SeaLife ^® micro3.0 ^TM

natural_image
Two underwater photos: one showing a colorful tropical fish swimming near coral, the other a close-up of a spotted marine organism on coral (no text or symbols visible)SL55025 | June 2020
Share your photos and videos with us on the web!
sealife-cameras.com

SeaLifeCameras

SeaLifeCameras
Visit sealife-cameras.com/manuals for Español, Deutsch, Français, Italiano and Nederlands
- For Español, Deutsch, Français, Italiano, Nederlands and other languages, visit sealife-cameras.com/manuals
- Table of Contents
- Package Contents
- Getting to Know Your Camera
- Front view
- Rear view:
- LCD Display - Capture Mode:
- LCD Display - Playback Mode:
- Basic Camera Operation
- Power On/Off:
- Take a Picture:
- Record a Video:
- Note:
- Easy Setup:
- Playback Pictures and Videos:
- Charge Battery:
- Download pictures to PC:
- WiFi Connection with SeaLife Micro 3+ App
- WiFi Connection to Smartphone or tablet
- Home Screen:
- Downloading files:
- v. Menu Settings
- Easy Setup options include:
- Land
- Underwater
- Image Settings:
- White Balance (WB) - Applies to photos and videos
- Exposure Value (EV) - Applies to photos and videos
- ISO - Applies to Photos only
- RAW+JPG - Applies to Photos only
- Capture mode - Applies to Photos only
- Scene Mode - Applies to photos and videos
- Quality - Applies to Photos only
- Picture Resolution – Applies to photos only
- Video Resolution – Applies to videos only
- Metering - Applies to photos and videos
- Sharpness - Applies to photos only
- Photo Time Lapse - Applies to photos only
- Self Timer - Applies to photos and videos
- Video Time Lapse - Applies to videos only
- Video Stabilization - Applies to videos only
- System Settings:
- WiFi
- System Reset
- Format
- Date / Time
- Memory Available
- Microphone
- Sound
- Quick View
- Language
- System
- Light Frequency
- Date Stamp
- Auto Off
- Upside-Down - Applies to photos and videos
- Shortcut
- SSID
- Conformity Marking
- Firmware Version
- Great Pictures Made Easy
- Crystal clear water
- Get close to your subject
- Move calmly and control your buoyancy before taking a picture
- Use one or two underwater photo-video light to enhance color and brightness
- Pan very slowly or not at all
- Limit video clips to 10 seconds or less
- Visit SeaLife website for updates and helpful tips
- Ask your local SeaLife dive dealer about underwater camera courses
- Optional Accessories
- Sea Dragon Underwater Photo-Video Lights
- AquaPod (SL912)
- 10X Close-up Lens (SL572)
- Photo Pro Backpack (SL940)
- Care and Maintenance
- Troubleshooting
- Camera locks up
- Camera not connecting to computer or wall charger
- Pictures/videos not sharp or out of focus
- Downloading SeaLife Micro Cam app for iPad
- More information
- Spare Parts and Service
- Specifications
- Image Sensor:
- Image resolution/sizes:
- Picture / Video file format:
- Video Resolution/sizes:
- Audio:
- Lens:
- Focus:
- Field of View:
- Shutter speed:
- LCD:
- Memory (internal):
- USB:
- PC connection:
- Battery:
- Charging:
- App:
- WiFi:
- Environment
- Buoyancy:
- Operating / Storage temp:
- Tripod mount:
- Certification:
- Product weight / dimensions
- Warranty period:
- FCC Statement
- Class B: Section 15.105
- FEDERAL COMMUNICATIONS COMMISSION INTERFERENCE STATEMENT
- Section 15.21
- CAUTION:
- Section 15.19(a)(3)
- RF Exposure Information (SAR)
- End Product Labeling
- Information for the OEMs and Integrators
- IC Statement
- (RSS-Gen section 7.1.3)
- Canada, Industry Canada (IC) Notices
- Canada, avis d'Industry Canada (IC)
- Radio Frequency (RF) Exposure Information
- Limited Warranty
- Limited Warranty
- SeaLife ® micro3.0 TM
- Share your photos and videos with us on the web!
Brand : SEALIFE
Model : Micro 3.0
Category : Camera