
MT1411C - Air-conditioner SENCOR - Free user manual and instructions
Find the device manual for free MT1411C SENCOR in PDF.


| Product Type | Portable Air Conditioner |
| Brand | Sencor |
| Model | MT1411C |
| Cooling Capacity | 13,307 Btu/h |
| Power Input | 1,500 W |
| Rated Power | 1,890 W |
| Current Consumption | 6.7 A |
| EER (Energy Efficiency Ratio) | 2.6 |
| Dehumidification Capacity | 3.74 L/h |
| Refrigerant Type and Weight | R290 / 280 g |
| Air Flow Volume | 420 / 380 / 330 m³/h (high / medium / low) |
| Noise Level | 65 dB(A) (high setting) |
| Dimensions (W × D × H) | 481 × 392 × 769 mm |
| Net Weight | 35 kg |
| Operating Temperature Range | 17 – 30 °C |
| Recommended Room Area | 18 – 26 m² |
| Power Supply | 220 – 240 V ~ / 50 Hz |
| Control Type | Control panel and remote control |
| Operating Modes | Cooling, Dehumidification, Fan, Automatic |
| Additional Functions | Sleep, Timer, Swing Flaps, Auto Restart |
| Filter Type | Washable air filters (top and bottom) |
| Drainage System | Automatic evaporation; manual drain for bottom tank |
| Installation Requirements | Exhaust hose required for cooling/dehumidification; window or wall installation |
| Included Accessories | Remote control, flexible exhaust hose, window insert, adapters |
| Safety Features | Overheat protection, auto shut-off, R290 safety compliance |
Frequently Asked Questions - MT1411C SENCOR
User questions about MT1411C SENCOR
0 question about this device. Answer the ones you know or ask your own.
Ask a new question about this device
Download the instructions for your Air-conditioner in PDF format for free! Find your manual MT1411C - SENCOR and take your electronic device back in hand. On this page are published all the documents necessary for the use of your device. MT1411C by SENCOR.
USER MANUAL MT1411C SENCOR
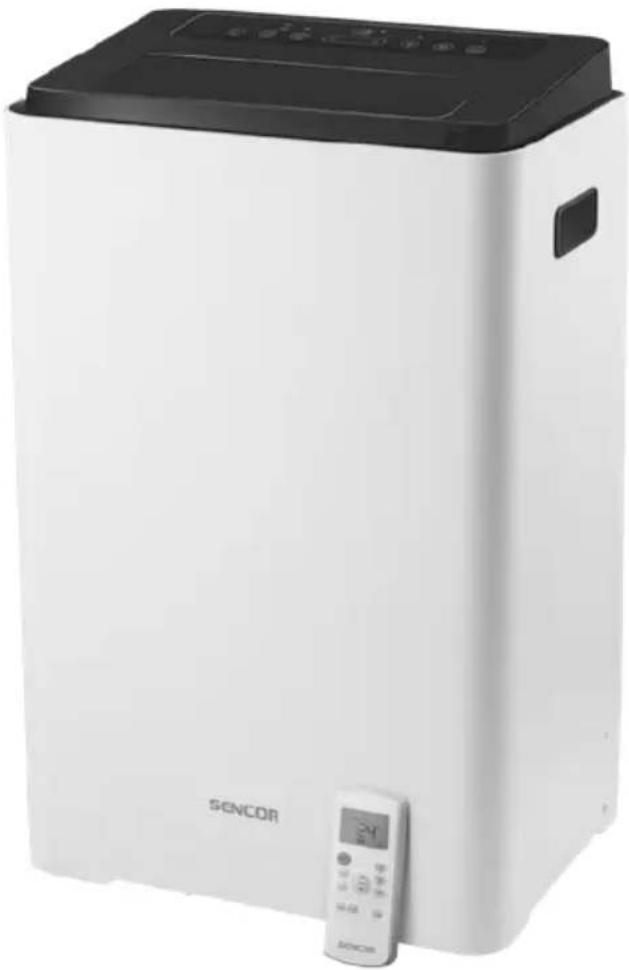
natural_image
White and black SENCOR air purifier device with control panel (no visible text or symbols on body)EN • Portable Air Conditioner
Translation of the original manual
READ CAREFULLY AND STORE FOR FUTURE USE.

This symbol indicates that ignoring the instructions may cause death or serious injury.

WARNING: To prevent death or injury to the user or other people and property damage, the following instructions must be followed. Incorrect operation due to ignoring the instructions may cause death, harm or damage.
- This appliance may be used by children 8 years of age and older and by persons with physical or mental impairments or by inexperienced persons, if they are properly supervised or have been informed about how to use the product in a safe manner and understand the potential dangers. Cleaning and maintenance performed by the user must not be performed by unsupervised children. Children must not play with the appliance.
- If the power cord is damaged, it must be replaced by an authorised service centre or by another similarly qualified person, this will prevent the creation of a dangerous situation. It is forbidden to use the appliance if it has a damaged power cord.
- This appliance is not intended for use by persons (including children) with reduced physical, sensory or mental capabilities or lack of experience and knowledge, unless they have been given supervision or instruction concerning use of the appliance by a person responsible for their safety. (be applicable for other countries except the European Countries )
-
Children should be supervised to ensure that they do not play with the appliance.
■The appliance must be stored in a manner that prevents its mechanical damage. -
The appliance must be stored in a well ventilated location, where the dimensions of the room correspond to the dimensions specified for its operation.
- The appliance must be stored in a room where there an open flame is not continuously in use (e.g. running gas appliance) or where there are sources of fire (e.g. running electrical heating element).
Before connecting the appliance to a power socket, check that the rated voltage on its rating label matches the electrical voltage in the power socket.
■The installation must be performed in accordance with the installation instructions. Incorrect installation may cause leakage of water, electric shock or fire. - To reduce the risk of fire or electric shock, do not use this appliance with any solid-state speed control device.
■The appliance must be installed in accordance with the internal national regulations of electro-installation.
Connect the appliance only to a properly grounded socket. In case the socket that you are intended to use is not properly grounded or it is not protected by a circuit breaker or fuse with a time delay (type of fuse/circuit breaker is determined by maximum unit current. Maximum current is indicated on the rating label which is located on the unit), ask a qualified electrician to install the correct socket.
Use this appliance only for the purposes described in this user's manual.
■The power socket must be freely accessible so that it is possible to quickly disconnect the power cord from the power source if necessary. - The appliance is designed for use at home, in offices and similar types of areas. Do not use it in very dusty or humid rooms such as laundries or bathrooms, in areas where chemical or explosive substances are stored, in industrial surroundings or outdoors!
- Do not place the appliance in the vicinity of an open flame or appliances that are sources of heat.
- Do not place the appliance on unstable surfaces such as carpets with very long and thick fibres.
■The appliance may only be used on a dry, stable, smooth and horizontal
surface. Otherwise it may cause damage or extreme noise and vibration.
- The appliance is equipped with travel wheels so pay extra attention when handling it so that it does not fall down stairs or travel down from sloped areas. If necessary secure the wheels using the stoppers.
- Only use original parts to assemble the appliance. Before starting to assemble the appliance, make sure that it is turned off and disconnected from the power socket.
- Use only accessories and parts that are delivered with the appliance and tools explicitly intended to installation. Using of non-standard parts and accessories may cause leakage of water, electric shock, fire, injury or damage on property.
DO NOT adjust the length of the unit's power cord, do not use extension cord to power the unit.
- DO NOT plug the unit into the power socket where other electric appliances are already connected. Incorrect choice of supply may cause fire or electric shock.
- Do not cover the power cord by a carpet. Do not place carpet, batten or other covering on the power cord. Do not place the power cord under furniture or appliances. Place the power cord on places where nothing can run it over or drive it.
- Prior to connecting appliance to a power socket, make sure that the appliance is correctly assembled according to the instructions in this user's manual.
Do not touch the appliance with wet or damp hands. This applies especially when it is connected to a power socket.
Do not expose the appliance to dripping or spraying water or submerge it in water or another liquid. Otherwise, immediately unplug the unit from the power socket.
Do not cover or insert anything into the air inlet or air outlet openings. Otherwise, this could damage the appliance.
- During operation there needs to be sufficient space for air circulation of at least 30 cm on all sides of the appliance.
- Do not expose yourself to a cold air current for a long time. This could have a negative effect on your health.
■To turn the appliance on or off, always use the appropriate buttons on the control panel or the remote control. Do not turn off the appliance by disconnecting the power cord from the power socket.
Always turn off the appliance and disconnect it from the power socket when leaving it without supervision, when not using it and before moving, disassembling or cleaning it.
- Do not attempt to remove the outer case of the appliance.
- Disconnect the appliance from the power socket by pulling on the plug, never pulling on the power cord. Otherwise, this could damage the power cord or the socket.
- In the event that the power cord or power plug are damaged in any way, do not use the appliance.
■Store the appliance in a vertical position. It may be transported in a vertical position or tilted on the sided. If you have already used the appliance, check that all the condensate has been drained. After transporting it, wait at least 1 hour before using the appliance.
If the unit is turned over while using it, turn it off and immediately unplug it from the power socket. Check it visually if it is not damaged. If you suspect that the unit has been damaged, contact a technician or customer service centre.
During the thunderstorm, the power supply must be disconnected in order to prevent damage to the unit when the lightning strikes.
- Disconnect the power supply of the appliance if it produces strange sound or it smells or smokes.
- Do not use the appliance if it is not working correctly, if it has been damaged or has been submerged in water. To avoid a hazardous situation arising, do not repair the device yourself or modify it in any way. Have all repairs or adjustments performed at an authorised service centre. By tampering with the appliance, you risk voiding your legal rights arising from unsatisfactory performance or quality warranty.

Read this user's manual.
SPECIFIC WARNINGS FOR APPLIANCES USING REFRIGERANT GAS R290
■ Carefully study any warnings.
For defrosting and cleaning, do not use any other tools than those recommended by the manufacturer.
- This appliance must be located in an environment that has no continuously running fire sources (for example an open fire, a gas appliance or electrical appliances).
-
Do not perform any drilling and do not burn it.
■ Refrigerant gases may be odourless.
■ Do not cover the ventilation slots. -
This appliance must be located in rooms with an area greater than 14m^2 .
■ This appliance contains approx. 280g of refrigerant gas R290.
R290 is a refrigerant gas that meets European environmental protection directives. Do not make holes or drill into any part of the cooling circuit.
The room in which this appliance is installed, operated or stored must prevent the collection of such leaked refrigerants, that could be the cause of explosion or fire as a result of the refrigerant igniting following the start up of electrical heaters, cookers or other sources of ignition.
- The appliance must be stored in such a manner that its mechanical damage is prevented.
Persons working with or repairing cooling circuits must have appropriate authorisation issued by an authorised institution that certifies this person's competence to work with refrigerants in accordance with the specific assessment of the association for this sector.
- Maintenance tasks must be performed solely on the basis of the recommendations of this appliance's manufacturer. Maintenance and repair tasks that required the contribution of other qualified expert personnel may only be performed under the supervision of specialised experts in the flammable refrigerants sector.
- Check the rating label for the type of refrigerant gas used in your appliance.
■ Compliance with national gas regulations shall be observed.
SENCOR®
SAC MT1411C
A
B
natural_image
Simple line drawing of a cylindrical object with no text or symbols1
natural_image
Line drawing of a circular mechanical component with four rings and mounting brackets (no text or symbols)234
natural_image
Line drawing of a bowl with a handle and lid, no text or symbols present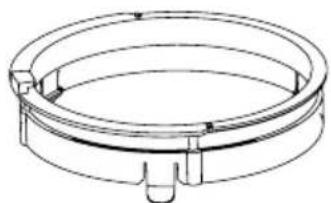
natural_image
Technical line drawing of a circular mechanical component with mounting flanges (no text or symbols)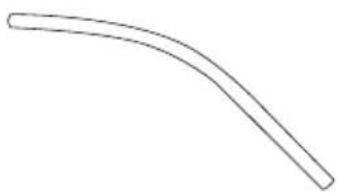
natural_image
Simple curved line drawing without any text, numbers, or symbols5678
natural_image
Technical line drawing of a circular mechanical component with mounting brackets (no text or symbols)
natural_image
Abstract circular diagram with concentric rings and a diagonal line, no text or symbols presentC
D
EN
Portable Air Conditioner
User's manual
- Prior to using this appliance, please read the user's manual thoroughly, even in cases, when one has already familiarised themselves with previous use of similar types of appliances. Only use the appliance in the manner described in this user's manual. Keep this user's manual in a safe place where it can be easily retrieved for future use.
- We recommend saving the original cardboard box, packaging material, purchase receipt and responsibility statement of the vendor or warranty card for at least the duration of the legal liability for unsatisfactory performance or quality. In the event of transportation, we recommend that you pack the appliance in the original box from the manufacturer.
DESCRIPTION OF THE APPLIANCE
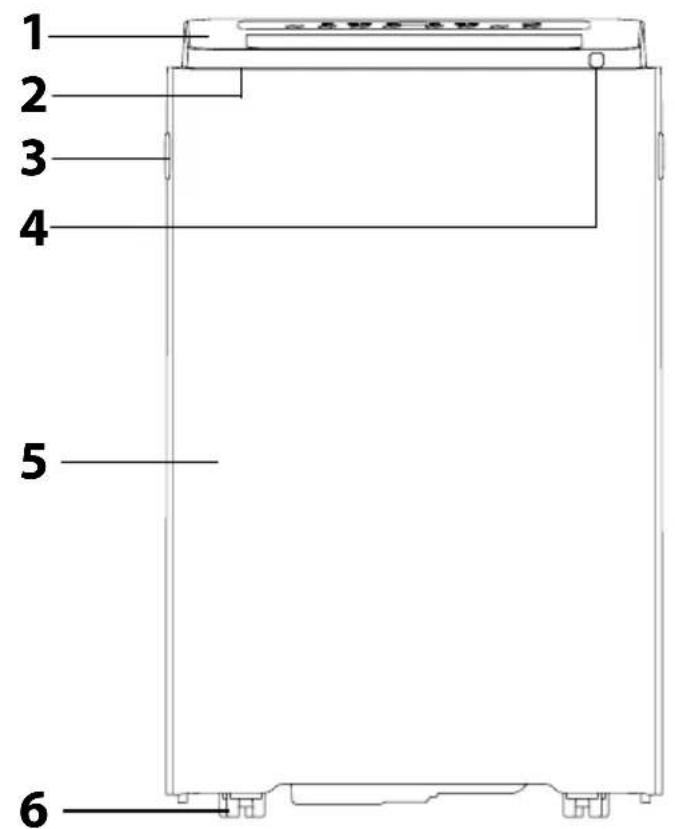
A1 Control panel
A2 Automatically-tilting horizontal flaps
A3 Handles (located along both sides)
A4 Remote control sensor
A5 Front cover
A6 Wheels
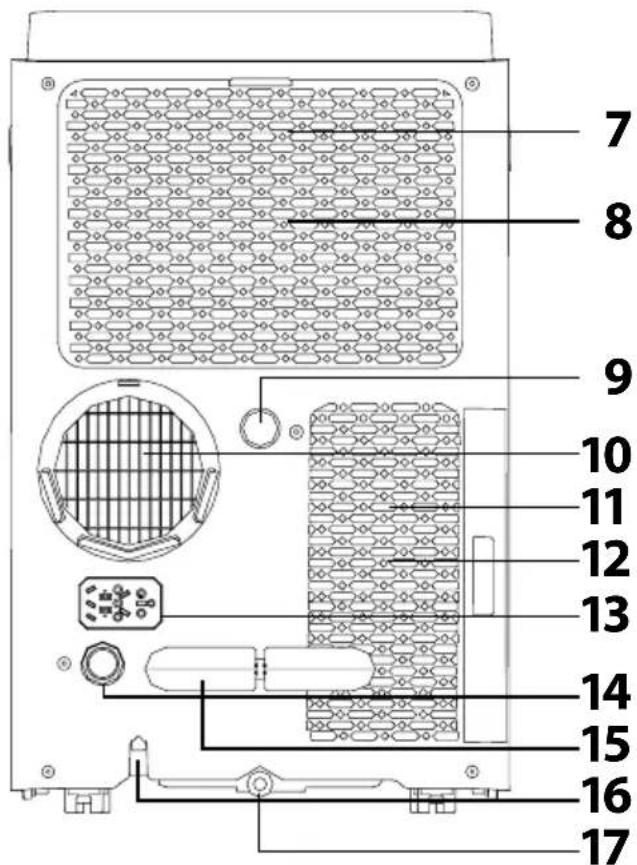
A7 Top air filter (behind a protective grille)
A8 Top air inlet
A9 Top drain outlet
DESCRIPTION OF ACCESSORIES
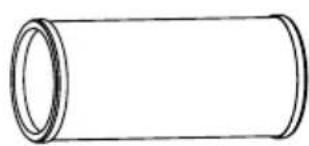
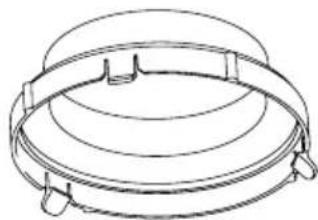
B1 Flexible air exhaust hose
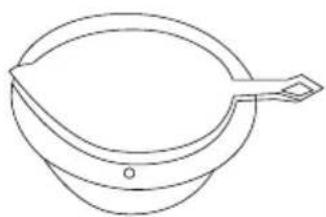
B2 Adapter A for installation of flexible hose into a wall
B3 Flange with plug
B4 Round adapter for connection of flexible hose to air outlet
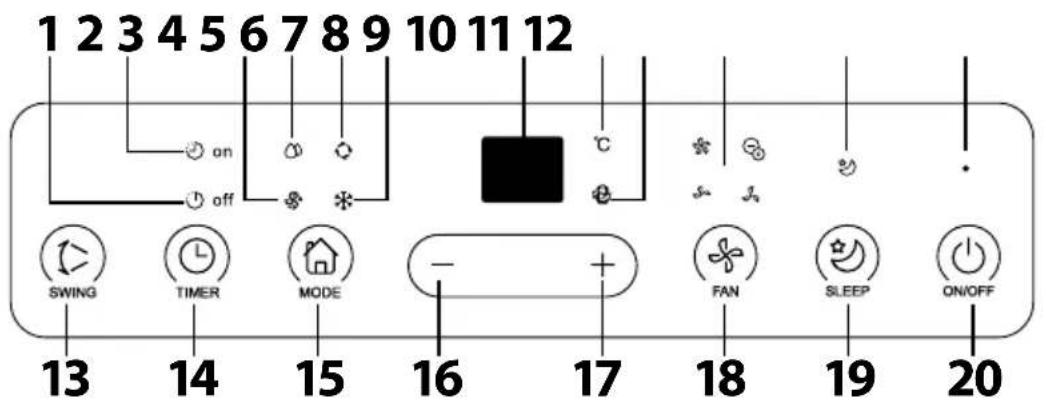
DESCRIPTION OF THE CONTROL PANEL
C1 Automatic shut off indicator
C2 Automatic start indicator
C3 Fan mode indicator
C4 Dehumidification mode indicator
C5 Automatic mode indicator
C6 Cooling mode indicator
C7 LED display
C8 Temperature unit indicator
C9 Power-saving mode indicator (only on certain models)
C10 Fan speed indicators (low - medium - high)
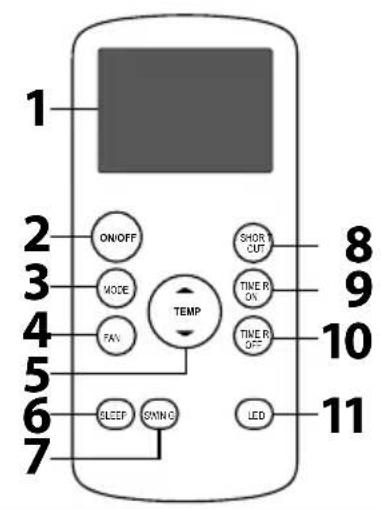
REMOTE CONTROL
D1 Display
D2 ON/OFF button
D3 MODE button
D4 FAN button
D5 TEMP button
D6 SLEEP button
INSTALLATION
Installation location for the portable air conditioner
Locate the portable air conditioner on an even, dry and stable surface and within reach of a grounded power socket. To achieve optimal efficiency, maintain a distance of at least 30 cm from the wall or other obstacles.

Note:
Do not use the portable air conditioner to cool a room where computer servers, etc. are located. Installation, adjustment, maintenance and repairs must only be performed by a qualified person.
Installation of flexible hose to portable air conditioner
The flexible hose B1 must be connected to the portable air conditioner and installed into a window / a wall in accordance with the operating modes that you wish to set. Install the flexible hose B1 when you wish to select the operating modes: cooling, dehumidification or automatic mode. It is not necessary to install the flexible hose B1 when you wish to select the fan mode.
Put the round adapter B4 on to one end of the flexible hose B1 and then attach it to the air outlet A10 so that the tab on the round adapter B4 slides into the cut-out in the air outlet A10.
On to the free end of the flexible hose attach either adapter B for installation of the flexible hose into a window B7 or adapter A for installation of the flexible hose into a wall B2.
Installing the flexible hose into a slide window
The window insert with hole B6 is designed to be compatible with the majority of sliding windows (vertical and horizontal). Nevertheless, for certain types of slide windows it may be necessary to modify the installation procedure described below.
Slide the window sash upwards and place the window insert B6 on to the window sill. Adjust the dimensions of the window insert B6 to the width of the window (on a vertical slide window) / height of the window (on a horizontal slide window). Secure the set dimension of the window insert B6 using the foam gasket seal B8. Close the sliding sash all the way on to the window insert B6.
First attach adapter B for installation of the flexible hose in a window B7 on to the free end of the flexible hose. Then stretch out the flexible hose B1 so that it is possible to attach adapter B B7 to the hole in the window insert B6. Avoid excessive bending of the hose.
Installing the flexible hose into a wall
It is important that the installation into a wall is performed by a qualified technician.
Drill a hole into the wall with a hole diameter of 125 mm at a height between 30 cm and 120 cm from floor. Insert the flange with plug B3 into the hole and secure it to the wall using a set of screws and dowels (these are not included).
A10 Air outlet
A11 Bottom air filter (behind a protective grille)
A12 Bottom air inlet
A13 Power plug travel compartment
A14 Drain outlet (only on models with a pump)
A15 Power cord clip
A16 Power cord outlet
A17 Bottom tank drain hole
B5 Drain hose
B6 Window insert with hole
B2 Adapter B for installation of flexible hose into a window
B8 Foam gasket seal
C11 Sleep function indicator
C12 Power On indicator
C13 SWING button
C14 TIMER button
C15 MODE button
C16 - button
D17 + button
C18 FAN button
C19 SLEEP button
C20 ON/OFF button
D7 SWING button
D8 SHORT CUT button
D9 TIMER ON button
D10 TIMER OFF button
D11 LED button
D7 SWING button
D8 SHORT CUT button
D9 TIMER ON button
D10 TIMER OFF button
D11 LED button
called into a window / a wall in accordance with the operating modes that you modes: cooling, dehumidification or automatic mode. It is not necessary to install
First attach adapter B for installation of the flexible hose in a wall B2 on to the free end of the flexible hose. Then stretch out the flexible hose B1 so that it is possible to attach adapter B B2 to the hole in the wall. Avoid excessive bending of the hose.
When not using the portable air conditioner, close the plug on the flange B3.

Note:
To ensure proper operation of the portable air conditioner, it is important not to overload the hose or to bend it unnecessarily. Excessive loading or bending may damage the hose.
CONDENSATE DRAIN OUTLET
The portable air conditioner is equipped with an automatic condensate evaporation system. Under normal operating conditions it is not necessary to empty the built-in condensate tank. The water tank may fill up if the portable air conditioner is operated in a room with a high level of humidity or when operated in the dehumidification mode for an extended period of time. For such situations the air conditioner is equipped with a condensate drain outlet and a self-diagnostic system which will inform you that the tank is full. When the tank is full, the set operating mode will automatically stop and it will only resume after the condensate is drained out.
Remove the plug of the top drain outlet A9, install the drain connector (universal 5/8"coupler) with a 3/4"hose (not included). On models without a drain connector, simply attach the drain hose B5 to the outlet. Place the free end of the drain hose B5 directly into the draining area.

Note:
Before starting it again, securely install the plug of the top drain outlet A9; this will ensure maximum performance and prevent liquids from leaking.

Attention:
Lead the drain hose B5 directly into the drain ensuring that there are no kinks in the hose preventing water from flowing through it. The hose may rise to a maximum height of 1.8 m, but it is important to ensure sufficient overlap. It is recommended to use a single piece of hose.
CONDENSATE DRAIN OUTLET IN THE BOTTOM TANK
In the event that the water level in the bottom tank reaches a predefined level, 8 sounds will be made and the display C7 will show error code «P1». In such an event, the cooling/dehumidification process will be stopped immediately. The motor fan will, however, continue running, this is a normal event. Carefully re-locate the portable air conditioner to a location where the water may be drained. Remove the plug from the drain outlet of the bottom tank A17, connect the drain hose B5 and allow the water to drain out. Re-install the plug and restart the portable air conditioner until the error code "P1" disappears. In the event that the fault reoccurs, please contact an authorised service centre.

Note:
Before using the portable air conditioner, check that the plug of the bottom tank drain outlet A17 is properly installed as this will prevent liquid leaks.
CONTROLS OF THE PORTABLE AIR CONDITIONER
A.CONTROL PANEL
Insert the power plug into a power socket. A sound will be made and the LED display will be backlit. The LED display will show the set temperature in ^ C and the automatic start/shut-off setting. In the dehumidification and fan modes, the LED display will show the room temperature.
Turning the portable air conditioner on and off
To turn on the portable air conditioner, press the ON/OFF button C20. Press it again to turn the portable air conditioner off.

Note:
Never turn off the portable air conditioner by pulling the power cord out of the power socket. Turn off the portable air conditioner using the ON/OFF button C20, wait a few minutes and then pull out the power cord.
Operating modes
1. Cooling mode
Repeatedly press the MODE button C15 until the cooling indicator C6 is lit. Using the +/- buttons C16 and C17, set the desired temperature. You can set the temperature in the range from 17 to 30 °C.
Use the FAN button C18 to set the fan speed. Press the FAN button C18 repeatedly to set the fan speed in the following order: low speed – medium speed – fast speed – automatic speed. Each time the button is pressed, the respective indicator C10 will be lit on the control panel. In the event that automatic fan speed is selected then all the indicators will be off.
2. Dehumidification mode
Repeatedly press the MODE button C15 until the dehumidification indicator C4 is lit. It is not possible to set the temperature or fan speed in this mode. The fan speed is automatically set to low speed. To ensure the most effective dehumidification, check that all doors and windows are closed. Do not insert the flexible air outlet hose B1 into the wall or window.
3. Automatic mode
Repeatedly press the MODE button C15 until no indicator C4 is lit. Using the +/- buttons C16 and C17, set the desired temperature. The portable air conditioner will automatically select the appropriate mode and fan speed based on the set temperature and the room temperature. It is not possible to set the fan speed in the automatic mode. In this mode, the automatic mode indicator C5 will be lit and at the same time the indicator of the currently active mode will also be lit: cooling C6, dehumidification C4 or fan C3.
4. Fan mode
Repeatedly press the MODE button C15 until the fan mode indicator C3 is lit. Use the FAN button C18 to set the fan speed. Press the FAN button C18 repeatedly to set the fan speed in the following order: low speed – medium speed – fast speed – automatic speed. Each time the button is pressed, the respective indicator C10 will be lit on the control panel. In the event that automatic fan speed is selected then all the indicators will be off. In this mode, it is not possible to set the temperature, nor is it necessary to connect the flexible hose B1 to the portable air conditioner.
Functions of the portable air conditioner
1. Automatic start and shut-off function
When the portable air conditioner is turned on, press the TIMER button C14 until the automatic shut-off indicator C1 is lit. Using the +/- buttons C16 and C17 set the shut-off time and confirm by pressing the TIMER C14 button within 5 seconds. The automatic start indicator C2 will be lit. Using the +/- buttons C16 and C17, set the desired start time.
When the portable air conditioner is turned off, press the TIMER button C14 until the automatic start indicator C2 is lit. Using the +/- buttons C16 and C17 set the start time and confirm by pressing the TIMER C14 button within 5 seconds. The automatic shut-off indicator C1 will be lit. Using the +/- buttons C16 and C17, set the desired shut-off time.
Using the +/- buttons C16 and C17 set the time in 30-minute increments (up to 10 hours) and then in 1-hour increments (up to 24 hours). If no button is pressed within 5 seconds, the portable air conditioner will return to the initial mode. When the automatic start / shut off time is set to "0.0", the function will be turned off. In the event of a fault, the automatic start or shut-off function will be automatically cancelled.
2. Sleep function
Press the SLEEP button C19 and the selected temperature will increase by 1 °C after 30 minutes (cooling mode). After another 30 minutes the temperature will again increase by another 1 °C (cooling mode). The portable air conditioner will maintain the new temperature for a period of 7 hours and then will revert to the initially set temperature. In this way, the sleep function will be completed and the portable air conditioner will continue in the initially set operation.

Note:
This function is not available in the fan and dehumidification modes.
3. Setting the flaps
The flaps may be set in the air flow direction. When the portable air conditioner is turned on, the flaps are fully open. Press the SWING button C13 to activate the automatic oscillation function. The flaps will oscillate up and down automatically. Do not set the flaps manually.
B. REMOTE CONTROL
Inserting and replacing batteries
Slide out the battery compartment cover, which is located on the rear side of the remote control. Place two AAA/LR03 (2× 1.5V) alkaline batteries into the battery compartment and close the cover.
When inserting the batteries ensure the correct polarity as shown in the battery compartment.
When replacing the batteries, always use batteries of the same type, never combine old and new batteries or batteries of various types.

Note:
Removing the batteries from the remote control will delete all the settings. After new batteries are inserted the default remote control settings as programmed by the manufacturer will be renewed.
If you will not be using the remote control for longer than 2 months, remove the batteries.
Using the remote control
For the remote control to work correctly, ensure that the maximum distance of the remote control from the portable air conditioner is not greater than 8 m and that there is no obstacle between the remote control and the portable air conditioner that could prevent the transmission of the signal.
Point the remote control directly at the remote control sensor on the portable air conditioner A4. The transmission of the signal is confirmed by a short sound signal.
Do not expose the remote control nor the sensor A4 to direct sunlight or high temperatures. Otherwise the signal may not be transmitted.
Turning the portable air conditioner on and off
To turn on the portable air conditioner, press the ON/OFF button D2 once. When it is first started, the cooling mode is set automatically. When it is started again, the mode that was activated previously is automatically resumed.
To turn off the portable air conditioner, press the ON/OFF button D2 again. The portable air conditioner will switch off to stand-by mode.
Setting the temperature
The temperature of the portable air conditioner can be set to a range between 17 °C and 30 °C . Increasing or decreasing the temperature is always performed in increments of 1 °C .
Operating modes
1. Cooling mode
Repeatedly press the MODE button D3 until COOL is lit on the display D1. Using the TEMP button D5, set the desired temperature.
Using the FAN button D4, set the fan speed. Press the FAN button D4 repeatedly to set the fan speed in the following order: low speed – medium speed – fast speed – automatic speed.
Press the ON/OFF button D2 to turn on the portable air conditioner.
2. Dehumidification mode
Repeatedly press the MODE button D3 until DRY is lit on the display D1.
Using the TEMP button D5, set the desired temperature.
Press the ON/OFF button D2 to turn on the portable air conditioner.

Note:
It is not possible to change the fan speed in the dehumidification mode.
3. Automatic mode
Repeatedly press the MODE button D3 until AUTO is lit on the display D1. Using the TEMP button D5, set the desired temperature.
Press the ON/OFF button D2 to turn on the portable air conditioner.
The portable air conditioner will automatically select the appropriate mode and fan speed based on the set temperature and the room temperature. It is not possible to set the fan speed in the automatic mode.
4. Fan mode
Repeatedly press the MODE button D3 until FAN is lit on the display D1.
Using the FAN button D4, set the fan speed. Press the FAN button D4 repeatedly to set the fan speed in the following order: low speed – medium speed – fast speed – automatic speed.
Press the ON/OFF button D2 to turn on the portable air conditioner.

Note:
In the fan mode, it is not possible to set the temperature, therefore no temperature information will be shown on the display D1.
Functions of the portable air conditioner
1. Automatic start and shut-off function
A. Automatic start
The automatic start function makes it possible to set a time after which the portable air conditioner will start automatically.
- While the portable air conditioner is turned off, press the TIMER ON D9 button. The last set time in hours (h) will be shown on the display D1.
- Repeatedly press the TIMER ON D9 button until the time after which the portable air conditioner will automatically start appears on the display D1. For example, when a time of "2 h" is set, the portable air conditioner will start 2 hours after the current time.
- Wait approximately 2 seconds for the entered time to be confirmed and saved to memory. The set temperature is shown on the display D1.
B. Automatic shut-off
The automatic shut-off function makes it possible to set a time after which the portable air conditioner will shut off automatically.
- While the portable air conditioner is turned on, press the TIMER OFF D10 button. The last set time in hours (h) will be shown on the display D1.
- Repeatedly press the TIMER OFF D10 button until the time after which the portable air conditioner will automatically shut off appears on the display D1. For example, when a time of "2 h" is set, the portable air conditioner will shut off 2 hours after the current time.
- Wait approximately 2 seconds for the entered time to be confirmed and saved to memory. The set temperature is shown on the display D1.

Note:
Using the +/- buttons C16 and C17 set the time in 30-minute increments (up to 10 hours) and then in 1-hour increments (up to 24 hours). If no button is pressed within 5 seconds, the portable air conditioner will return to the initial mode. When the automatic start / shut off time is set to "0.0", the function will be turned off. In the event of a fault, the automatic start or shut-off function will be automatically cancelled.
C. Automatic start and shut-off
In the event that you need set the automatic start and shut-off at the same time, it is important that the shut-off time is longer than the start time. Likewise, it is important to take the current time into account.
- While the portable air conditioner is turned off, press the TIMER ON D9 button once.
- Repeatedly press the TIMER ON D9 button until the time after which the portable air conditioner will automatically start appears on the display D1.
- Wait approximately 3 seconds for the entered time to be confirmed and saved to memory.
- Press the TIMER OFF button D10 once.
- Repeatedly press the TIMER OFF D10 button until the time after which the portable air conditioner will automatically shut off appears on the display D1.
- Wait approximately 3 seconds for the entered time to be confirmed and saved to memory.
2. Sleep function
The sleep function is used to reduce overnight power consumption, when a constant temperature is not necessary.
Press the SLEEP button D6 and the selected temperature will increase by 1 °C after 30 minutes (cooling mode). After another 30 minutes the temperature will again increase by another 1 °C (cooling mode). The portable air conditioner will maintain the new temperature for a period of 7 hours and then will revert to the initially set temperature. In this way, the sleep function will be completed and the portable air conditioner will continue in the initially set operation.
3. Flap angle setting function
The SWING button D7 may be used to set the angle of the flaps. Each time the SWING button D7 is pressed, the flap angle will change upwards or downwards. If the button is held down for approximately 2 seconds, the flaps will automatically move up and down.
4. Renew settings function
The renew settings function makes it possible to renew the current settings or to continue with the previous settings.
While the remote control is turned on, press the SHORT CUT D8 button and the portable air conditioner will switch to the previously used setting, including operating mode, temperature setting, fan speed, etc.
If the SHORT CUT button D8 is held down for approximately 2 seconds, the current operating settings will be renewed, including the operating mode temperature setting, fan speed, etc.
Automatic restart
In the event that the portable air conditioner is unexpectedly turned off due to a power outage, once power is restored the portable air conditioner will automatically turn on to the initial settings.

Note:
After turning off the portable air conditioner, wait approximately 3 minutes before turning it on again.
MAINTENANCE AND CLEANING
Before cleaning the portable air conditioner, turn it off and wait a few minutes, and then pull the power cord out of the power socket.
Cleaning the air filters
If the portable air conditioner is used regularly, clean the air filters at least once every 14 days to avoid the fan from becoming clogged with dust.
The water collection tank must be drained immediately when the code P1 appears on the display and also before this appliance is stored in order to prevent the formation of moulds.
In households with pets, it is necessary to wipe the grille regularly to prevent it from becoming clogged by animal fur.
Hold the air filters A7 and A11 by the strips and slide them out of the appliance.
To remove the dust, use a vacuum cleaner. In the event of greater soiling, wash the filters A7 and A11 by hand in a solution of lukewarm water (max. 40 °C) and neutral detergent. Then thoroughly rinse under running water and allow to dry naturally. Do not dry it in a clothes dryer or in direct sunlight.
Once the filters A7 and A11 are dry, you can install them back in their place.

Note:
Do not use the portable air conditioner without the air filters properly installed and do not use it with wet or damp air filters.
Cleaning the outer case
To clean the outer case, use a soft wiping cloth dipped in a solution of lukewarm water and neutral detergent. Then wipe the surface dry.
When cleaning it, do not spray the portable air conditioner with water or any other liquid, do not pour water on it or submerge it in water or in any other liquid.
Do not use abrasive cleaning products, solvents, petrol, etc. for cleaning.
Storing the portable air conditioner
In order to dry it and to prevent the formation of moulds, leave the portable air conditioner running in a warm room in the fan mode for approximately 12 hours.
Disconnect the flexible hose B1 and store it in a safe place out of the reach of children.
Drain all the condensate from the built-in water tank – see chapter Condensate drain outlet.
Clean the air filters and reinstall them. Wipe the outer case of the portable air conditioner. Remove the batteries from the remote control.
Store the air conditioner in a cool, dry and dark location.
Putting into operation again
Check that the power cord and plug are not damaged and that the air filters are clean. Insert a new set of batteries into the remote control. Proceed according to the instructions in section "Inserting and replacing batteries". Install the portable air conditioner according to the instructions contained in the preceding part of this user's manual "Installation".
TROUBLESHOOTING
Error messages
E1 – Fault of room temperature sensor
E2 - Fault of vaporizer temperature sensor
E3 - Fault of condenser temperature sensor (on certain models)
E4 – Fault of the display's communications panel
P1 – Bottom tank is full – Connect the drain hose B5 and drain the accumulated condensate from the air conditioner. In the event that this code reoccurs, please contact an authorised service centre.

Note:
In the event that one of the aforementioned faults occurs, turn off the portable air conditioner and check for the cause of the fault. Turn it on again, and if the fault reoccurs, turn it off, disconnect the power cord from the power socket and contact the manufacturer, an authorised service centre or a person with relevant qualifications and have the unit repaired.
Troubleshooting
Before contacting an authorised service centre, please check the appliance according to the following instructions:
| Problem Possible cause Remedy | ||
| After pressing the ON/OFF button C20, the portable air conditioner does not turn on. | Fault code P1 The condensate collection tank is full. Turn | off the air conditioner, drain the condensate from the tank and turn it on again. |
| In the cooling mode: the temperature in the room is lower than the set temperature. | Adjust the set temperature. | |
| The portable air conditioner does not cool sufficiently. | Air filters A7 and A11 are clogged with dirt and dust or animal fur. | Turn off the air conditioner and clean the filters according to the provided instructions. |
| The flexible air exhaust hose B1 is not connected or it is blocked. | Turn off the air conditioner, disconnect the hose, check that it is not blocked and reconnect the hose. | |
| There is not enough refrigerant in the air conditioner. Contact an authorised service centre and have the refrigerator amount checked and filled up. | ||
| The temperature is set too high. Lower the set temperature. | ||
| The windows and doors of the room are open. Make sure that all doors and windows are closed. | ||
| The room area is too large. Perform a double-check of the cooled area. | ||
| There are heat sources inside the room. If possible remove these heat sources. | ||
| The portable air conditioner is noisy and vibrates excessively. | The floor is not level. Place the air conditioner on a firm and level surface.\ | |
| Air filters A7 and A11 are clogged with dirt and dust or animal fur. | Turn off the air conditioner and clean the filters according to the provided instructions. | |
| The portable air conditioner is emitting gurgling sounds. | This noise is caused by the flow of refrigerant through the inner system. | This is normal. |
TECHNICAL SPECIFICATIONS
| Power supply 220 – 240 V ~ / 50 Hz | |
| Cooling power output 13 307 Btu/hour | |
| Power input: 1,500 W | |
| Rating power 1,890 W | |
| Current consumption 6.7 A | |
| EER cooling factor 2.6 | |
| Dehumidification capacity | 3.74 litres/hour |
| Refrigerant type and weight | R290/280 g |
| Air flow volume | 420 / 380 / 330 (high / medium / low setting) |
| Noise level | 65 dB (A) (high setting) |
| Maximum permitted value of excess operating pressure: Suction/exhaust part of the cooling circuit | 2.6 / 1.0 MPa |
| Dimensions of the portable air conditioner (w × d × h) | 481 × 392 × 769 mm |
| Weight | 35 kg (net) |
| Operating temperature | 17 – 30 °C |
| Recommended room area | 18 – 26 m^2 |
The declared noise emission level of the appliance is 65 dB(A), which represents a level A of sound power with respect to a reference sound power of 1 pW.

Note:
The efficiency of the portable air conditioner may be reduced in the event that it is used outside the above described operating temperature range.
We reserve the right to change text and technical specifications.
INSTRUCTIONS AND INFORMATION REGARDING THE DISPOSAL OF USED PACKAGING MATERIALS
Dispose of used packaging material at a site designated for waste in your municipality.
DISPOSAL OF USED ELECTRICAL AND ELECTRONIC EQUIPMENT
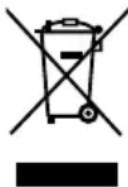
This symbol on products or original documents means that used electric or electronic products must not be added to ordinary municipal waste. For proper disposal, renewal and recycling hand over these appliances to determined collection points. Alternatively, in some European Union states or other European countries you may return your appliances to the local retailer when buying an equivalent new appliance.
Correct disposal of this product helps save valuable natural resources and prevents potential negative effects on the environment and human health, which could result from improper waste disposal. Ask your local authorities or collection facility for more details.
In accordance with national regulations penalties may be imposed for the incorrect disposal of this type of waste.
For business entities in European Union states
If you want to dispose of electric or electronic appliances, ask your retailer or supplier for the necessary information.
Disposal in other countries outside the European Union.
This symbol is valid in the European Union. If you wish to dispose of this product, request the necessary information about the correct disposal method from the local council or from your retailer.

This product meets all the basic requirements of EU directives related to it.
- EN • Portable Air Conditioner
- READ CAREFULLY AND STORE FOR FUTURE USE.
- SPECIFIC WARNINGS FOR APPLIANCES USING REFRIGERANT GAS R290
- SENCOR®
- SAC MT1411C
- EN
- Portable Air Conditioner
- User's manual
- DESCRIPTION OF THE APPLIANCE
- DESCRIPTION OF ACCESSORIES
- DESCRIPTION OF THE CONTROL PANEL
- REMOTE CONTROL
- INSTALLATION
- Installation location for the portable air conditioner
- Note:
- Installation of flexible hose to portable air conditioner
- Installing the flexible hose into a slide window
- Installing the flexible hose into a wall
- CONDENSATE DRAIN OUTLET
- Attention:
- CONDENSATE DRAIN OUTLET IN THE BOTTOM TANK
- CONTROLS OF THE PORTABLE AIR CONDITIONER
- A.CONTROL PANEL
- Turning the portable air conditioner on and off
- Operating modes
- Cooling mode
- Dehumidification mode
- Automatic mode
- Fan mode
- Functions of the portable air conditioner
- Automatic start and shut-off function
- Sleep function
- Setting the flaps
- REMOTE CONTROL
- Inserting and replacing batteries
- Using the remote control
- Setting the temperature
- Automatic start
- Automatic shut-off
- Automatic start and shut-off
- Flap angle setting function
- Renew settings function
- Automatic restart
- MAINTENANCE AND CLEANING
- Cleaning the air filters
- Cleaning the outer case
- Storing the portable air conditioner
- Putting into operation again
- TROUBLESHOOTING
- Error messages
- TECHNICAL SPECIFICATIONS
- INSTRUCTIONS AND INFORMATION REGARDING THE DISPOSAL OF USED PACKAGING MATERIALS
- DISPOSAL OF USED ELECTRICAL AND ELECTRONIC EQUIPMENT
- For business entities in European Union states
- Disposal in other countries outside the European Union.
Brand : SENCOR
Model : MT1411C
Category : Air-conditioner