
XDR-S100CD - Radio SONY - Free user manual and instructions
Find the device manual for free XDR-S100CD SONY in PDF.


| Product Type | DAB/FM Radio with CD Player |
| Brand | Sony |
| Model | XDR-S100CD |
| Tuner Bands | DAB Band-III, FM (87.5-108 MHz) |
| CD Player | Slot-in type, plays CD, CD-R, CD-RW |
| Presets | 20 DAB + 20 FM station presets |
| Display | 16 characters × 4 lines LCD with backlight |
| Audio Output | Stereo speaker (built-in), LINE OUT (3.5mm) |
| Audio Input | AUDIO IN (3.5mm stereo mini jack) |
| Power Source | AC adaptor (supplied) 9V DC, or 6 × R14 (C) batteries |
| Remote Control | Supplied, uses 2 × R6 (AA) batteries |
| Sleep Timer | Yes (selectable duration) |
| Alarm Timer | Yes (via guide or manual setting) |
| Electronic Programme Guide (EPG) | Supports DAB EPG download and display |
| Pause & Rewind (DAB) | Up to ~25 minutes storage (at 128kbps) |
| Tone Control | Yes (adjustable) |
| Clock | 24-hour system, auto-set via DAB or manual |
| Dimensions | Approx. 300 × 150 × 200 mm (estimated) |
| Weight | Approx. 1.5 kg (with batteries, estimated) |
| Care & Cleaning | Wipe with a soft, dry cloth; avoid solvents |
| Safety | Do not expose to rain/moisture; use only supplied AC adaptor; keep batteries away from children |
Frequently Asked Questions - XDR-S100CD SONY
User questions about XDR-S100CD SONY
0 question about this device. Answer the ones you know or ask your own.
Ask a new question about this device
Download the instructions for your Radio in PDF format for free! Find your manual XDR-S100CD - SONY and take your electronic device back in hand. On this page are published all the documents necessary for the use of your device. XDR-S100CD by SONY.
USER MANUAL XDR-S100CD SONY
Operating Instructions
XDR-S100CD
DAB
Digital Audio Broadcasting
©2008 Sony Corporation Printed in China
http://www.sony.net/
WARNING
To reduce the risk of fire or electric shock, do not expose this apparatus to rain or moisture.
To reduce the risk of fire, do not cover the ventilation of
the apparatus with newspapers, tablecloths, curtains, etc. And do not place lighted candles on the apparatus.
To reduce the risk of fire or electric shock, do not expose
this apparatus to dripping or splashing, and do not place objects filled with liquids, such as vases, on the
apparalus.
Do not install the appliance in a confined space, such as a bookcase or built-in cabinet.
The unit shall be connected to a AC outlet with a
protective earthing connection.
As the main plug is used to disconnect the unit from the mains, connect the unit to an easily accessible 4G outlet.
mails, connect the unit to an easily accessible AC outlet. Should you notice an abnormality in the unit, disconnect
the main plug from the AC outlet immediately.
You are cautioned that any changes or modifications not expressly approved in this manual could void your
authority to operate this equipment.
Excessive sound pressure from earphones and
headphones can cause hearing loss.
Notice for customers: the following information is only applicable to equipment sold in countries
applying EU directives
The manufacturer of this product is Sony Corporation, 1-7-1 Konan Minato-ku Tokyo 108-0075 Japan. The
Authorized Representative for EMC and product safety is
Sony Deutschland GmbH, Hedelfinger Strasse 61, 70327 Stuttgart, Germany. For any service or guarantee matters
please refer to the addresses given in separate service or
guarante
WARNING
- Danger of explosion if battery is incorrectly replaced.
- Replace only with the same or equivalent type. - Battery may explode if mistreated. Do not recharge,
disassemble or dispose of in fire.
- Do not expose the batteries (battery pack or batteries installed) to excessive heat such as sunshine, fire or the
like for a long time.
- Dispose of used battery promptly. Keep away from children.
• DAB(Band-III)/FM Radio
• Built-in CD Player with Slot-in Style
- High Quality Sound with Stereo Speaker
- Pause & Reset Function
• Electronic Programme Guide
- Easy to Read Large Display (16 × 4 lines character)
- Easy Station Selection with 1oz Dial
● DAB 20/ EM 20 Station Presets
- Guide/Alarm/Sleep Timer
- Tone Control Function
• Audio in for Digital Music Players
• AC/DC Operation (AC Power Adaptor Supplied)
- Remote Control
Choosing power sources
Using house current
(See fig. A-①)
Connect the AC power adaptor (supplied) to the DC IN
,
Notes on the AC power adaptor
- When operating the unit with the internal batteries, remove the AC power adaptor from the wall outlet and the
DC IN 9 V jack. Make sure that the plug of the external
power source is disconnected before operating the unit.
• Use the supplied Sony AC power adaptor only. The
2.5 and supplied suit, 115 power diaptr. 027. The polarity of the plugs of other manufacturers may be
different. Failure to use the supplied AC power adaptor may cause the unit to malfunction.
,

Installing batteries (See fig. A-②)
1 Open the battery compartment at the rear of
the unit
2 Install six R14 (size C) batteries (not
supplied), observing polarity, and then close
the lid.
Battery Life
When using DAB FM CD
Sony alkaline LR14 (size C) 10 7 4
Sony R14 (size C) 3 2 1
* Measured by JEITA (Japan Electronics and
Information Technology Industries Associa
standards. The actual battery life may vary depending on the circumstance of the unit

Note on replacing the batteries
When the batteries are replaced, the unit may revert to the factory settings (except preset).
the history findings (except packet).
Notes on batteries
- Do not attempt to recharge dry batteries.
- Do not carry batteries with coins or other
- Do not carry batteries with cold or other metallic objects. It can generate heat if the positive and negative
terminals of the b
a metallic object.
- If you are not going to use the unit for a long time.
- If you are not going to use the unit for a long time, remove the batteries to avoid damage from battery.
remove the batteries to avoid damage from battery leakage and corrosion.
- Do not use different types of batteries at the same time.
- When you replace the batteries, replace all with new
OAK
Improving the reception
(See fig. B)
DAB Band-III/FM:
Extend the telescopic aerial and adjust the length and the
angle
Notes
Notes
- Adjust the direction of the aerial holding the bottom of it. The aeri
can be damaged if you move the
aerial with excessive force.
- Be careful not to have the aerial touch the carrying
handle when listening to radio. It may cause noise.
m = 311
Preparing the remote
control
control
Installing the batteries into the remote control (See Fig. ①)
Remote control (See Fig. 1)
Insert two R6 (size AA) batteries (not supplied).
When to replace the batteries
With normal use, the batteries should last for about six months. When the remote control no longer operates the
unit, replace all the batteries with new ones.
Notes
- Do not charge dry batteries.
- If you are not going to use the remote control for a long
time, remove the batteries to avoid any damage caused by leakage and corrosion.
by leakage and conduction.
Initial setting for the DAB
When the AC power adaptor is plugged in, or the
batteries are installed for the first time after purchase (or
after resetting), the unit will automatically scan and
create a list of receivable broadcasts.
1 Adjust the aerial accordingly.
2 Press POWER to turn on the radio. "DAR TUNING" → "DAR NO SERVI
DHD TUNING "DAD NO SERVICE" "DHL INITIAL SCAN" appears in the display, the unit will
automatically scan, create a list of receivable DAB
broadcasts and adjusts the clock.
1.2.20
DAB
INITIAL SCAN
60%
|
(1) (2) (3)
DAB scan takes a few minutes. When finished, the unit receives the first service in order stored by the
DAB scan.
Notes
- If you change the unit's location of use, or want to
add a new service after the initial setting, press and
hold DAB/FM. "INITIAL SCAN?" appears in the display and then press ENTER. The unit will
disply and their press available. The aim will automatically scan and create a list of receivable
services.
- If you set the initial setting or scan, any software registered or magnet are saved
• If no services are found by the DAB scan, "NO
SERVICE ^TM appears in the display. In that case, if
DAB is selected again, the unit will automatically
- This unit supports only EPG in data service.
- This limit supports only LFG in data service.
A
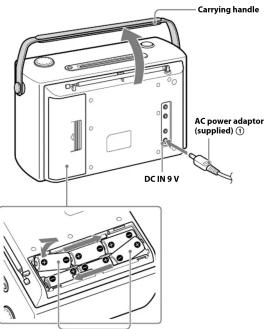
R14 (size C) × 6 ② Insert the ● side of the battery first. Be sure to insert batteries from this position one by one.
B

C

Set the clock
Do the following if DAB broadcasts are not available (depending on area). The time setting mode by DAB becomes invalid.
1 Press MENU and turn TUNING/SELECT to
select "CLOCK SETTING," and then press
ENTER. The hours indiction will be displayed as follows.
The flour indication will be displayed as follows.
例:各制位上
| CLOCK>>
-
-0.00
1
- Tum tuning/SELECT to set the home and
2 Turn TUNING/SELECT to set the hour, and then page ENTER
- Repeat step 2 to set the minutes
5 Repeat step 1 to set the minutes. After setting the time, the clock starts from 0
seconds.
Notes
• The time will be adjusted automatically during DAB
service reception.
- The clock system of this unit is 24-hour system (0:00
= midnight).
Time adjustment-
Summer time
Time adjustment is performed only during DAB service
Some subjumbers is performed only, during the last 10% reception.
DAB service reception for at least one minute is required to reset the time to Summer time.
Operating the radio
The unit can receive DAB services and FM stations.
1. Press DAB/EM (RADIO/BAND on the
1 Press/DBB/FM (RADIO/BAND on the remote) to turn on the radio.
When the unit is turned on again, the last band you
listened to is received.
2 Press DAB/FM (RADIO/BAND on the
remote) repeatedly to select the desired band.
Each press changes the band as follows:
→ DAB FM
[EMPTY]
3 Turn TUNING/SELECT (press TUNE + or -
on the remote) to tune to the desired service
or station.
4 Adjust the volume using VOLUME.
Notes in FM usage
• The frequency can be set in 0.05 MHz steps for FM.
- If the FM broadcast is noisy, press and hold MODE or
the unit more than 2 seconds (press MODE on the
remote) until MONO app radio will play in monaural.
- When the unit receives an FM station transmitting
RDS data, text information appears in the display.
• Each time you press DISPLAY, the display changes current time and frequency
Current time and frequency):
To listen with headphones
You can enjoy the radio and external equipment connected to the line in by headphones (not su
Connected to the line in by headphones (not supplied). Connect headphones (not supplied) to the ☐
(headphones) jack. The speaker is deactivated when
headphones are con
Presetting your favorite
services or stations
Presetting services and stations
You can preset 20 services and stations each for DAB and
FM. 3 Hold down SCAN + or - (TUNE + or -
1 Follow steps 1 to 3 in "Operating the radio" remote) for more than 2 seconds.
and tune into service or station you wish to + : scans to the higher frequency.
preset. - : scans to the lower frequency. Framing start from the four-way leading two
2 Hold down MEMORY for more than 2 Scanning starts from the frequency being too When a station is received, scanning stops.
seconds. 4 If necessary, turn TUNING/SELECT (pr
"ENTER PRESET NO." appears and preset number flashes in the display. TUNE + or - on the remote) to tune in
The next preset number from the most recent preset station more precisely.
is displayed (but if the last preset number was 20, 1 5 Adjust the volume using VOLUME.
will be displayed).
3 Turn TUNING/SELECT to select the preset
number, then press ENTER. "PRESET COMPLETE" appears in the display and
TRESET COST LEVEL: appears in the display and service or station is stored with the selected preset
number.
To preset another service or station, repeat these steps.
Notes
- If you try to store another station with the same preset
number, the previously stored station will be replaced.
- If DAB reception is poor, the service may not be stored.
Playing preset services or
stations
- Press DAB/FM to select the band
2 Press MODE on the unit until "PRESET"
appears in the display.
3 Turn TUNING/SELECT to tune in the stored
service or station
Tip
On the remote, press PRESET + or - to tune in the
stored service of station
Scan tuning (for FM)
The unit will automatically scan EM stations.
1. Power output is the right
1 Press POWER to turn on the radio.
2 Press DAB/FM (RADIO/BAND on the remote) to select the FM band.
3. Hold down SCAN + or = (TUNE + or -
- Hold down a run of (Tone 1 of - on the remote) for more than 2 seconds
- Scans to the higher frequency.
- : scans to the lower frequency.
Scanning starts from the frequency being tuned in. When a station is received, scanning stops
4 If necessary turn TUNING/SELECT (pr
TUNE + or - on the remote) to tune in to the
station more precisely.
5 Adjust the volume using VOLUME.
(No text)
[Non-Text]
[Non-Text]
[Non-Text]
[Non-Text]
[Non-Text]
[Non-Text]
[Non-Text]
[Non-Text]
[Non-Text]
[Non-Text]
[Non-Text]
[Non-Text]
[Non-Text]
[Non-Text]
[Non-Text]
[Non-Text]
[Non-Text]
[Non-Text]
[Non-Text]
[Non-Text]
Other useful functions for DAB
Changing the display
To change the display mode, press DISPLAY during DAB reception.
The display can be up to 16 characters. Each time you press DISPLAY, the bottom of the display changes as
follow

①: Dynamic
②: Signal strength and PTY ④: Ensemble
③: Ensemble ④: Frequency
④: Frequency und ⑤: Clock and date
Note
The display mode returns to ① after several seconds
The display mode (1) will be also displayed when you turn the unit off and on again, or change to another
function.
...
Using the GUIDE
This unit downloads the EPG (electronic programme guide) included in the DAB data and displays it. The unit
also enables you to perform timer operations, using the
downl
To download the EPG
1 Follow steps 1 to 3 in "Operating the radio"
and tune into DAB service.
2 Press GUIDE for more than 2 seconds. "GUIDE DOWNLOAD" appears in the display.
3 Turn TUNING/SELECT to select the
"CURRENT" or "ALL."
"CURRENT": Only the current station is
downloaded. "A12". All
ALL: All stations are downloaded in order. 4. Pass ENTER
4 PRESS ENTER "GUIDE DOW
until “%” and current ensemble name appears.
When download is completed, the EPG is displayed as
follow
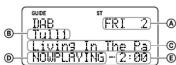
Ⓐ Day of the week
⑧ Component (or secondary) label
© Programme name
⑥ Programme start ti
(currently broadcast programme is
displayed as "NOWPLAYING") ⑥ Programme and time
© Programme end time
To display the EIPress GUIDE
To display the media description in EPG:
Press DISPLAY
To check another station in EPG:
Turn TUNING/SELECT.
To check another programme time in ENG: Press SCAN + or -.
To store the guide timer:
Press ENTER
Notes
- Set this unit to receive DAB for about 2 minutes so as to download the EPG data.
• If DAB reception is poor, ti
while downloading the EPG data.
Perform the above operation where the reception is
good
- If you move into a place with post-reception (in the building, etc.) after downloading the EPG. EPG may
Not being displayed, after the viewing of all 30, all 30 may not be displayed.
- If there is no data, or data cannot be displayed, "Not
Available ^TM appears in the display. - The downloaded EPC data will be agreed if the other
- The downloaded IPO data will be erased if of the following operations is executed:
-When you operate the power saving mod
-When you turn off the unit during battery operation.
Pausing and rewinding radio
This unit always stores DAB data and you can pause and
rewind the data. When the memory becomes full, new audio data will over write from the oldest one.
Audio call will over while from the closest one.
1 Press PAUSE & REWIND during DAB
reception. The current broadcast mutas and the RAUSE &
The current broadcast index and the PACSE & REWIND indicator and the rewind time" appear in
the display

- Pass PAUSE & REWIND wins until the
2 Press PAUSE & REWIND again until the desired version of time spans
desired rewind time appears. You can also rewind the current broadcast by holding
You can also return the current broadcast by nothing down ◀◀◀ (◀◀ on the remote). You can adjust
the rewind time by holding down ▶▶▶▶ or
◀◀◀◀ (▶▶ or ◀◀ on the remote).
The operation is cancelled when you:
- Change channels
- Select ALL on the GUIDE DOWNLOAD menu. - Press ■ or POWER
- Press ■ of POWER. - Hold down ■
- Hold down 2.5.2.1 (2.5. On the remote) until the rewind time displays "0:00" (current time).
- Change a function
N
Notes - When EPG is displayed, this operation is disabled. In
this case, |◀◀ ◀◀, ▶▶ ▶▶| can not be operated.
- Rewind time is depending on bit rate of broadcast.
128kbps DAB data is storable for about 25 minutes.
- In DVD reception is poor, this function may not operate properly.
- When the memory becomes full during pause mode,
this function will be playback automatically.
PTY (Programme type)
This function indicates services by programme type
This function includes all videos by programme type, such as NEWS, SPORTS, etc., in the PTY list, transmitted as
DAB
If the received service or station does not transmit the
programme type, "None" appears.
Programme type Display
Undefined None
News News
Current Affairs Affairs
Information Info
Sport Sport
Education Educate
Drama Drama
Culture
Science Science
Varied Varied
Pop Music Pop M
Rock Music Rock M
Easy Listening Music Easy M
Light Classical Light M
Serious Classical Classics
Other Music Other M
Weather Weather
Finance Finance
Children's programmes Children
Social Affairs Social
Religion Religion
Phone In Phone In
Travel Travel
Leisure Leisure
Jazz Music Jazz
Country Music Country
National Music National M
Oldies Music Oldies
Folk Music
Documentary Document
Playing a CD

1 Press CD on the unit.
2 Slot the CD into the unit
Total tracks and time appear in the display.
3 Press ▶II (▶ on the remote).
The unit plays all the tracks once.
To Press
Pause playback ▶‖ (▶ or || on the
remote)
Stop playback Go to the next track Turn TUNIG/SELECT OR
Go to the next track Turn TONG/SELECT OF press ▶▶▶▶ (▶▶) on
the remote)
Go back to the previous Turn TUNIG/SELECT or
track press on the remote)
Locate a point while (forward) or
listening to the sound (backward)
(▶▶ or ◀◀ on the remate) while playing and
hold it until you find the
point
Locate a point while (forward) or
observing the display (backward) or on the
(2-1) of 1-2 on the remote) in pause and hold
it until you find the point.
Remove the CD
About CD-Rs/CD-RWs
This unit is compatible with CD-Rs/C
playback capability may vary depending on the quality of
the disc, the recording device and application software.
Music discs encoded with copyright protection technologies
This product is
to the Compact Disc (CD) standard.
Recently, various music discs encoded with copyright
protection technologies are marketed by some record companies. Please be aware that among those discs, there
are some that do not conform to the CD standard and
may not be playable by this product.
To handle compact discs
Correct
)
6
Handle the disc by its edge.
m - 1 0 ;
©
Incorrect
(
Do not touch the surface
1.0 was reached the surface.
m = 311
V
X
Do not stick paper or tape on the surface.
Cape on the surface
Note on DualDiscs
A DualDisc is a two-
recorded material on one side with digital audio material
on the other side. However, since the audio material side does not conform to the Compact Disc (CD) standard
does not conform to the Compact Disk (CIS) standard, playback on this product is not guaranteed.
Notes
• Disc
star) cannot be played on this unit. Attempting to do so
may damage the unit. Do not use such discs. • To prevent a CD from being damaged while inserting/
to prevent a 12.0 mm rolling damage while suffering removing it, set the carrying handle down when
playing a CD.
- When you eject a disc, handle the disc by its edge. Do not touch the surface.
Not touch the surface. Using the display
Using the display
To check the total track number and playing time
In stop mode, press DISPLAY.
To check the remaining time
Press DISPLAY repeatedly while playing a CD
The display changes as follows:
The current track number and playing time
↓
The current tr
current track
The number of tracks left and remaining time on the CD
The following table is in English.
Clock display (current time)
Playing tracks repeatedly
(repeat play)
You can play tracks repeatedly in normal, shuffle o
program play modes.
1 Follow steps 1 and 2 in "Playing a CD"
2 Proceed as follo
To repeat Do this
A single track 1 Press
A single tooth 1. Pless not used on the remote until "REPEAT 1" appears.
2 Press ◀◀◀ ◀◀ or ▶▶ ▶▶◀ to
select the track that you want to repeat.
[Non-Text]
All tracks on the 1 Press REPEAT on the remote until
CD
2 Press ▶ (▶ on the remote). 1. Start shuffle play / see "Playing
Tracks in random order tracks in random order").
2 Press REPEAT on the rem
[Non-Text]
Programmed 1 Program tracks / see "Creating
Programmica tracks files
2 Press REPEAT on the remote ur
[Non-Text]
- Press 4.1 (p - on the remote);
To cancel repeat play
Press REPEAT on the remote until "REPEAT" disappears from the display.
Plainted by
Playing tracks in random order
(shuffle play)
You can play tracks in random order.
1 Follow steps 1 and 2 in "Playing a CD"
2 Press MODE until "SHUFFLE" appears in the
display.
3 Press ▶II (▶
play.
To cancel Shuffle Play
Stop playing first. Then press MODE until "SHUFFLE" displays from the display.
disappears from the display Tip
During shuffle play, you cannot select the previous track
by pressing
Creating your own programme
creating your own programme (programme play)
(programme play)
You can arrange the playing order of up to 20 tracks on a CD
1 Follow steps
2 Press MODE until "PROGRAM" appears in
the display.
3 Press ▶ ▶ or ▶ ▶ or turn TUNING/SELECT to select the track
TUNING/SELECT to select the track and the press ENTER to add it to the programme
Press ENVAT Revel to pro
you want.
After programming the first track, "STEP 1" appears, followed by selected track.
followed by selected track. Each time you add a track, a step number is added
4 Press ▶II (▶ on the remote) to start
Programme Play
To cancel programme play
Stop playing first. Then press MODE until "PROGRAM"
disappears from the display.
To clear the prog
- Press CLEAR on the remote. - Stop playback first. Then press
Step (12) each time then press 2.7.3.
Tip You
You can play the same programme again, since the programme is saved until you elect the CD.
programme is saved until you effect the case
The Ground Truth image displays a single, solid horizontal line. According to Rule 2 (UNDERSCORE & LINE RULES), if the GT contains lines used for stylistic emphasis or as background (like ruled paper), the OCR result must ignore them. The provided OCR content is "____", which consists of four underscores. This is incorrect because underscores are not equivalent to a solid line and are not permitted under the “Stylistic/Background Lines (Ignore)” rule. Outputting underscores for a stylistic line violates the rule and constitutes an error. Therefore, the OCR result is inconsistent with the Ground Truth.
Connecting optional
component
component
To enhance your system, you can connect optional components. Be sure to turn off the window of each
components. Be sure to turn on the power of each component before making any connections. For details, refer
to the instruction manual of the component to be connected.
To listen to the sound from optional
components in the unit
- 2024年
Connect the AUDIO IN jack on the unit to
the line output jack of the portable digital movie player or other components using an
music player of other components using audio connecting cable* (not supplied)
* For a PG: use a cable which fills the connector of
your PC. For a TV or VCR: use a cable with a ster
mini plug on one end and two phono plugs on the
other end. For cable with a
- Turn the unit and the connected component on
3 Press AUDIO IN and start playing sound on
the connecte
The sound from the connected component is output
from the speal
To listen to the sound of the unit by optional
components
Connect the LINE OUT jack on the unit to the line in each of the other common lines.
Jack of the other to
Note The volume and to
The volume and cost adjusted on this mill does not affect the sound output from LINE OUT.
Using the timers
The unit of the time for time is
The unit offers three timer functions. If you use the alarm times or guide times with the sleep times, the sleep
anearly timer of guide timer with the sleep timer, the sleep timer has priority.
Setting the clean times
Setting the sleep timer
The sleep timer allows you to fall asleep to the sound of a CD, the radio, or input from the AUDIO IN function. It
does this by automatically turning off the CD, the radio, or
input from the AUDIO IN function after a preset duration.
1 Press SLEEP while the unit is turned on.
“SLEEP” appears in the display.
2 Press SLEEP to set the sleep timer duration.
Each time you press SLEEP, the duration changes as follows:
- WARNING
- Choosing power sources
- Using house current
- (See fig. A-①)
- Installing batteries (See fig. A-②)
- Open the battery compartment at the rear of
- OAK
- Improving the reception
- (See fig. B)
- Preparing the remote
- Installing the batteries into the remote control (See Fig. ①)
- Initial setting for the DAB
- A
- B
- C
- Set the clock
- Time adjustment-
- Summer time
- Operating the radio
- To listen with headphones
- You can enjoy the radio and external equipment connected to the line in by headphones (not su
- Presetting your favorite
- services or stations
- Playing preset services or
- Scan tuning (for FM)
- Other useful functions for DAB
- Changing the display
- Pausing and rewinding radio
- PTY (Programme type)
- Playing a CD
- About CD-Rs/CD-RWs
- Note on DualDiscs
- Not touch the surface. Using the display
- Using the display
- Playing tracks repeatedly
- component
- Using the timers
Brand : SONY
Model : XDR-S100CD
Category : Radio