
SC-HD505MD - Hi-Fi TECHNICS - Free user manual and instructions
Find the device manual for free SC-HD505MD TECHNICS in PDF.


| Product Type | Hi-Fi System (separate components: amplifier, tuner, CD player, MD deck, speakers) |
| Brand | Technics |
| Model | SC-HD505MD |
| Amplifier Dimensions (W x H x D) | 202 x 104.5 x 277 mm |
| Amplifier Weight | 3.5 kg |
| Tuner Dimensions (W x H x D) | 202 x 76 x 262.5 mm |
| Tuner Weight | 1.2 kg |
| CD Player Dimensions (W x H x D) | 202 x 76 x 254 mm |
| CD Player Weight | 1.4 kg |
| MD Deck Dimensions (W x H x D) | 202 x 104.5 x 254 mm |
| MD Deck Weight | 1.4 kg |
| Speaker Dimensions (W x H x D) | 175 x 287 x 225 mm |
| Speaker Weight (each) | 3.9 kg |
| Power Supply | AC 230-240 V, 50 Hz (UK); AC 220-230 V, 50 Hz (others) |
| Power Consumption | 77 W (standby normal 9 W, eco 0.8 W) |
| Amplifier Power Output (low frequency) | 2 x 12 W (DIN, 1 kHz, 1% THD, 6 Ω); 2 x 15 W (RMS, 10% THD) |
| Amplifier Power Output (high frequency) | 2 x 5 W (DIN, 10 kHz, 1% THD); 2 x 8 W (RMS, 10% THD) |
| Speaker Type | 2-way, 2-speaker, bass-reflex system (12 cm woofer, 2.5 cm tweeter) |
| Speaker Impedance | 6 Ω (high and low) |
| FM Frequency Range | 87.5 – 108.0 MHz (0.05 MHz step) |
| AM Frequency Range | 522 – 1629 kHz (9 kHz step) / 520 – 1630 kHz (10 kHz step) |
| Maintenance | Wipe with soft, dry cloth; do not use alcohol, paint thinner, or benzine |
| Safety Class | Class 1 laser product; avoid exposure to laser beam; do not open covers |
| Reparability | Refer servicing to qualified personnel; no user serviceable parts inside |
Frequently Asked Questions - SC-HD505MD TECHNICS
User questions about SC-HD505MD TECHNICS
0 question about this device. Answer the ones you know or ask your own.
Ask a new question about this device
Download the instructions for your Hi-Fi in PDF format for free! Find your manual SC-HD505MD - TECHNICS and take your electronic device back in hand. On this page are published all the documents necessary for the use of your device. SC-HD505MD by TECHNICS.
USER MANUAL SC-HD505MD TECHNICS
Operating Instructions
natural_image
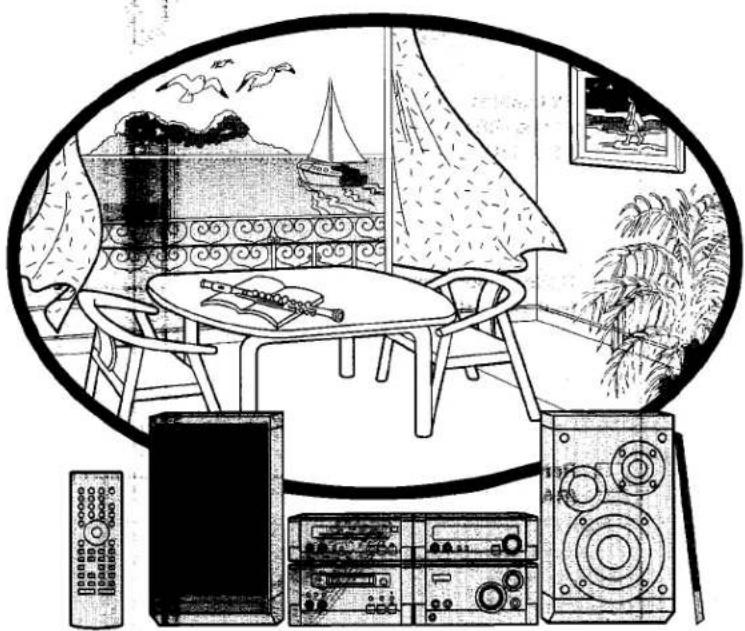
Illustration of a vintage home scene with a table, TV, audio equipment, and a scenic island (no text or symbols)EB EG


Technics®
alq, viatsa bae econmioing numido to yiluteo sencunien
| OH-O2 | metay2 |
| OH-32 | seffiqnA |
| OH-12 | venuF |
| H-12 | revaig QD |
| H-12 | xkoq GM |
| H-82 | zebese2 |

900 5108
!MOITUAO
The "EB" indication shown on the outside packing


Dear Customer
Thank you for purchasing this system.
For optimum performance and safety, please read these instructions carefully.
| System | SC-HD505MD |
| Amplifier | SE-HD505MD |
| Tuner | ST-HD505MD |
| CD player | SL-HD505 |
| MD deck | SJ-HD505 |
| Speakers | SB-HD505 |
CAUTION!
THIS PRODUCT UTILIZES A LASER. USE OF CONTROLS OR ADJUSTMENTS OR PERFORMANCE OF PROCEDURES OTHER THAN THOSE SPECIFIED HEREIN MAY RESULT IN HAZARDOUS RADIATION EXPOSURE. DO NOT OPEN COVERS AND DO NOT REPAIR YOURSELF REFER SERVICING TO QUALIFIED PERSONNEL.
CAUTION!
DO NOT INSTALL OR PLACE THIS UNIT IN A BOOKCASE, BUILT IN CABINET OR IN ANOTHER CONFINED SPACE IN ORDER TO KEEP WELL VENTILATED CONDITION. ENSURE THAT CURTAINS AND ANY OTHER MATERIALS DO NOT OBSTRUCT THE VENTILATION CONDITION TO PREVENT RISK OF ELECTRIC SHOCK OR FIRE HAZARD DUE TO OVERHEATING.
(Back of product)

| DANGER | INVISIBLE LASER RADIATION WHEN OPEN. AVOID DIRECT EXPOSURE TO BEAM. |
| ADVARSEL | USYNLIG LASERSTRALUNG VED ÄNING, NÄR SIKERHEDSAF BRYDERE ER UDE AF PUNKTÖN. UNOGÄUSSETTILISE FOR STRÜLN. |
| VAROI | AVATTAESSA JA SUOJALUKITUS OHITTETAESSA CLET ALTIINA NÄKNYMÄ TÖNTÄ LASERSÄTEBILYLE. ÄLA KATSO SÄTEESSEER. |
| VARNING | OSYNLIG LASERSTRÄLNING NÄR DEINNA DEL ARÖPPNÃO OCH SPÄRNEN ÄHR URIOPIPLAD. BETRAKTAJ EJ STRÄLEN. |
| ADVARSEL | USYNLIG LASERSTRALING NÄR DEXSEL APNEG OG SIKERHEDSLÄS BRYTES. UNNGÄ EKSPONERING FORSTRÄLEN. |
| VORSICHT | UNSICHTARE LASERSTRANLING, WERN ABECKUNG GEÖFFNET NOCT DEV STRANL ALSETZEN. |
(Inside of product)
(Indersiden at apparatet)
(Tuotteen sisällä)
(Apparatens insida)
(Produktets innside)
Supplied accessories
Please check and identify the supplied accessories.
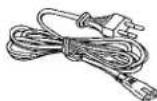
□ AC mains lead....1 pc.
For United Kingdom (RJA0053-2X)
For others (RJA0019-2K)

☐ Flat cables • Long (REX0900)....1 pc. • Short (REX0812)....1 pc.


☐ Optical fiber cable ....1 pc. (RJL1X001B05D)

☐ Remote control transmitter ....1 pc. (RAK-HDB04WH)

☐ Remote control batteries....2 pcs.

☐ FM indoor antenna (RSA0007)....1 pc.

AM loop antenna set (RSA0021)....1 pc.

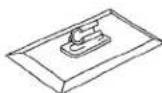

☐ Speaker cords • Red and black (REE0499)....2 pcs. • Blue and gray (REE0853)....2 pcs.

Antenna plug adapter (SJP9009)....1 pc. (United Kingdom only)

Use numbers indicated in parentheses when asking for replacement parts.
Before use
2751
Safety precautions....3
Caution for AC Mains Lead 4
The remote control 5
Installation: 5
Connections 6
Front panel controls 8
Turning the DEMO function off 9
Setting the time 10
ECO mode....10
Some useful information about MDs ....11
Listening operations
MDs 12
CDs 13
Other MD and CD functions....14
The Radio: manual tuning....16
The Radio: preset tuning....17
Convenient functions 18
Recording operations
Recording the radio....19
Recording CDs
One touch recording (AI EDIT)....20
Manual recording....21
Editing operations
Titling discs and tracks....22
Dividing tracks - DIVIDE....24
Moving tracks - MOVE 25
Combining tracks - COMBINE....26
Erasing tracks and creating blank discs 27
Timer operations
Using the timers
The play timer....28
The record timer 29
The play and record timers....30
The sleep timer....30
Using the timers together 30
Reference
Using other equipment....31
Displays 32
Troubleshooting guide....33
Technical specifications 34
Maintenance 34
Placement
Set the system up on an even surface away from direct sunlight, high temperatures, high humidity, and excessive vibration. These conditions can damage the cabinet and other components, thereby shortening the unit's service life.
Place it at least 15 cm away from wall surfaces to avoid distortion and unwanted acoustical effects.
Do not place heavy items on the unit.
Voltage
Do not use high voltage power sources. This can overload the unit and cause a fire.
Do not use a DC power source. Check the source carefully when setting the unit up on a ship or other place where DC is used.
AC mains lead protection
Ensure the AC mains lead is connected correctly and not damaged. Poor connection and lead damage can cause fire or electric shock. Do not pull, bend, or place heavy items on the lead.
Grasp the plug firmly when unplugging the AC mains lead. Pulling the AC mains lead can cause electric shock.
Do not handle the plug with wet hands. This can cause electric shock.
Foreign matter
Do not let metal objects fall inside the unit. This can cause electric shock or malfunction.
Do not let liquids get into the unit. This can cause electric shock or malfunction. If this occurs, immediately disconnect the unit from the power supply and contact your dealer.
Do not spray insecticides onto or into the unit. They contain flammable gases which can ignite if sprayed into the unit.
Service
Do not attempt to repair this unit by yourself. If sound is interrupted, indicators fail to light, smoke appears, or any other problem that is not covered in these instructions occurs, contact your dealer or an authorized service center. Electric shock or damage to the unit can occur if the unit is repaired, disassembled or reconstructed by unqualified persons.
Extend operating life by disconnecting the unit from the power source if it is not to be used for a long time.
(For United Kingdom)
("EB" area code model only)
For your safety, please read the following text carefully.
This appliance is supplied with a moulded three pin mains plug for your safety and convenience.
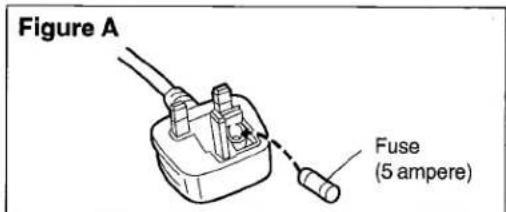
A 5-ampere fuse is fitted in this plug.
Should the fuse need to be replaced please ensure that the replacement fuse has a rating of 5-ampere and that it is approved by ASTA or BSI to BS1362.
Check for the ASTA mark 📄 or the BSI mark 🌐 on the body of the fuse.
If the plug contains a removable fuse cover you must ensure that it is refitted when the fuse is replaced.
If you lose the fuse cover the plug must not be used until a replacement cover is obtained.
A replacement fuse cover can be purchased from your local dealer.
CAUTION!
IF THE FITTED MOULDED PLUG IS UNSUITABLE FOR THE SOCKET OUTLET IN YOUR HOME THEN THE FUSE SHOULD BE REMOVED AND THE PLUG CUT OFF AND DISPOSED OF SAFELY.
THERE IS A DANGER OF SEVERE ELECTRICAL SHOCK IF THE CUT OFF PLUG IS INSERTED INTO ANY 13-AMPERE SOCKET.
If a new plug is to be fitted please observe the wiring code as stated below.
If in any doubt please consult a qualified electrician.
IMPORTANT
The wires in this mains lead are coloured in accordance with the following code:
Blue: Neutral, Brown: Live.
As these colours may not correspond with the coloured markings identifying the terminals in your plug, proceed as follows:
The wire which is coloured Blue must be connected to the terminal which is marked with the letter N or coloured Black or Blue.
The wire which is coloured Brown must be connected to the terminal which is marked with the letter L or coloured Brown or Red.
WARNING: DO NOT CONNECT EITHER WIRE TO THE EARTH TERMINAL WHICH IS MARKED WITH THE LETTER E, BY THE EARTH SYMBOL ✦ OR COLOURED GREEN OR GREEN/YELLOW.
THIS PLUG IS NOT WATERPROOF-KEEP DRY.
Before use
Remove the connector cover.
How to replace the fuse
The location of the fuse differ according to the type of AC mains plug (figures A and B). Confirm the AC mains plug fitted and follow the instructions below. Illustrations may differ from actual AC mains plug.
- Open the fuse cover with a screwdriver.


- Replace the fuse and close or attach the fuse cover.

A
B

C

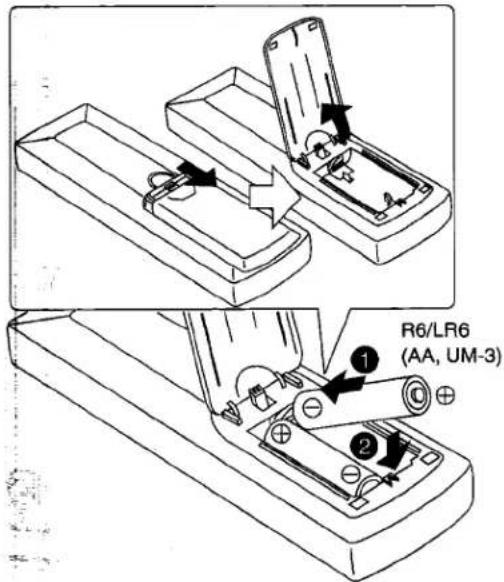
A Batteries
Insert so the poles (+ and −) match those in the remote control.
Do not;
- mix old and new batteries.
- use different types at the same time.
- heat or expose to flame.
- take apart.
- short circuit.
- attempt to recharge alkaline or manganese batteries.
Mishandling of batteries can cause electrolyte leakage which can damage items the fluid contacts and may cause a fire.
If electrolyte leaks from the batteries, consult your dealer.
Wash thoroughly with water if electrolyte comes in contact with any part of your body.
Do not use rechargeable type batteries.
Remove if the remote control is not going to be used for a long period of time. Store in a cool, dark place.
Replace if the unit does not respond to the remote control even when held close to the front panel.
If the battery lid comes loose, slide it back into place horizontally.
B Use
Aim at the sensor, avoiding obstacles, at a maximum range of 7 meters directly in front of the unit.
- Keep the transmission window and the unit's sensor free from dust.
- Operation can be affected by strong light sources, such as direct sunlight, and the glass doors on cabinets.
Do not;
- put heavy objects on the remote control.
• take the remote control apart.
• spill liquids onto the remote control.

① CD player
b Tuner
© MD deck
d Amplifier
(e) Left speaker
f Right speaker
Note
Do not put the CD player and MD deck on the amplifier. Heat from the amplifier can damage your discs.
Caution
- Use the speakers only with the recommended system. Failure to do so can damage the amplifier and speakers, and can cause fire. Consult a qualified service person if damage occurs or if a sudden change in performance is apparent.
- Do not attach these speakers to walls or ceilings.
These speakers are designed to be used close to a television, but the picture may be affected in some cases. If this occurs, turn the television off for about 30 minutes. The television's demagnetizing function should correct the problem. If it persists, move the speakers further away from the television.

A
A

1
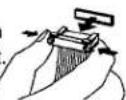
a) To connect cables
b Connector

© White line
(e) Hold the connector from both ends and pull it out
2

3

©

4
5
h Amplifier

① Speaker
Blue (-)

6
Insertion of connector
Even when the connector is perfectly inserted, depending on the type of inlet used, the front part of the connector may jut out as shown in the drawing. However there is no problem using the unit.

B
(k) Other equipment
① Tuner
(ST-HD505MD)

C

Be-1: connections for supplied accessories
A Before connection
- Do not connect the AC mains lead until all other connections are complete.
- To prepare the AM loop antenna, and speaker cables, twist the vinyl tip, and pull off (A).
1 Flat cables
Keep the cables as flat as possible against the back of the unit.
2 FM antenna
Fix the other end of the antenna where reception is best.
3 AM loop antenna
Attach to the supplied antenna stand (1), or use the other holder and attach to a wall or pillar (2).
Keep loose antenna cord away from other wires and cords.
4 Optical fiber cable
Remove the dust caps before use.
5 Speaker cables
Connect the cables to the terminals of the same color. Never allow the exposed wires to contact each other when connected.
Use only the supplied speakers.
The combination of the system and the front speakers provides the best sound. Using other speakers can damage the unit and sound quality will be negatively affected.
(United Kingdom only)
BE SURE TO READ THE CAUTION FOR THE AC MAINS LEAD ON PAGE 4 BEFORE PROCEEDING TO STEP 6.
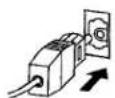
6 Connect the AC mains lead.
For your-reference
Information you enter into the unit's memory, except for time, remains intact for up to two weeks after the mains lead is disconnected.

- Turn off the power to all units before making connections.
• Refer to the manual of the other unit for details.
(Cables and equipment not included.)
Stereo phono cable (not included)
White (L)
Red (R)

B To listen to other equipment and make analog recordings
Connect other equipment to the EXT IN terminals to output sound through this unit's speakers or to analog record onto the MD deck. Connect this unit to other equipment through the EXT OUT terminals to record onto another recording device or to output sound from this unit through the other unit.
C To make digital recordings
Remove the dust cap before use.
Use an optical fiber cable to connect other digital equipment to DIGITAL OPTICAL IN EXT on the back of the MD deck. This connection enables you to make digital recordings. To listen to other digital equipment or make analog recordings of digital material, you must connect the stereo connection cables as well.
Optional antenna connections
Use outdoor antennas if radio reception is poor.
FM outdoor antenna
Note
- Disconnect the FM indoor antenna.
- The antenna should be installed by a competent technician.

AM outdoor antenna
Run a piece of vinyl wire horizontally across a window or other convenient location.
Note
- Leave the loop antenna connected.
- Disconnect the antenna when the unit is not in use. Do not use the antenna during an electrical storm.
- Leave the loop antenna connected.
- Disconnect the antenna when the unit is not in use. Do not use the antenna during an electrical storm.
- Leave the loop antenna connected.
- Disconnect the antenna when the unit is not in use. Do not use the antenna during an electrical storm.
- Leave the loop antenna connected.
- Disconnect the antenna when the unit is not in use. Do not use the antenna during an electrical storm.
- Leave the loop antenna connected.
- Disconnect the antenna when the unit is not in use. Do not use the antenna during an electrical storm.
- Leave the loop antenna connected.
- Disconnect the antenna when the unit is not in use. Do not use the antenna during an electrical storm.
- Leave the loop antenna connected.
- Disconnect the antenna when the unit is not in use. Do not use the antenna during an electrical storm.
- Leave the loop antenna connected.
- Disconnect the antenna when the unit is not in use. Do not use the antenna during an electrical storm.
- Leave the loop antenna connected.
- Disconnect the antenna when the unit is not in use. Do not use the antenna during an electrical storm.
- Leave the loop antenna connected.
- Disconnect the antenna when the unit is not in use. Do not use the antenna during an electrical storm.

A
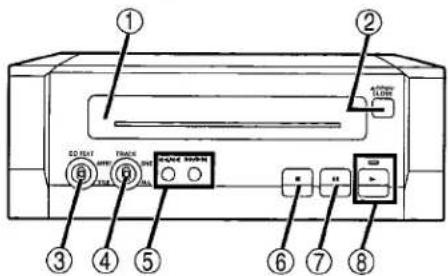
B

C

D

Front panel controls
A CD player
① Disc tray
② Disc tray open/close button ( ▲ OPEN/CLOSE)......13
③ CD TEXT switch (CD TEXT) 13
④ One track/all tracks switch (TRACK) 13
⑤ Skip/search buttons ( ◀◀/◀◀, ▶▶/▶▶) ......13
⑥ Stop button (■) 13
⑦ Pause button (Ⅲ)....13
⑧ Play button and indicator (▶)....13
The color of the indicator depends on the operation taking place.
If stopped: orange
If playing: green
B MD deck
⑨ Edit button (EDIT) 24
⑩ Enter button (ENTER)....24
⑪ CD edit recording button (CD EDIT)....20
⑫ MD slot
⑬ Eject button (▲ EJECT)....12
⑭ Record button and indicator (REC)....19
⑮ Marking mode select switch (MARKING) .....19
⑯ One track/all tracks switch (TRACK) 12
⑰ Skip/search buttons ( |◀◀/◀◀, ▶▶/▶▶| ) ......12
⑱ Stop button (■) 12
⑲ Pause button (Ⅱ)....12
⑳ Playback button and indicator (▶) 12
The color of the indicator the button depends on the operation taking place.
If stopped: orange
If playing or recording: green
C Tuner
②1 Display panel
The display also shows information for the MD deck, CD player, and amplifier.
② Station selection and JOG dial (TUNE/JOG)....10, 16
②3 Tuning mode switch (TUNE MODE)....16
②4 Sidelight switch (SPOT) 18
②5 Clock/timer button (CLOCK/TIMER)....10, 28
② Set button (SET)....10
②7 Band select button (BAND)....16
D Amplifier
28 Standby/on switch (☐/I) 9
Press to switch the unit from on to standby mode or vice versa.
In standby mode, the unit is still consuming a small amount of power.
29 Standby indicator
When the unit is connected to the AC mains supply, this indicator lights up in standby mode and goes out when the unit is turned on.
③0 ECO button (ECO)....10
③1 Fine tweeter control (FINE TWEETER CONTROL)....18
③2 Headphone jack ( ∩ ) 31
③3 Input selector (INPUT SELECTOR) 31
③4 Volume control (VOLUME)....12
35 Bass, demo button (BLFS, -DEMO)....9, 18
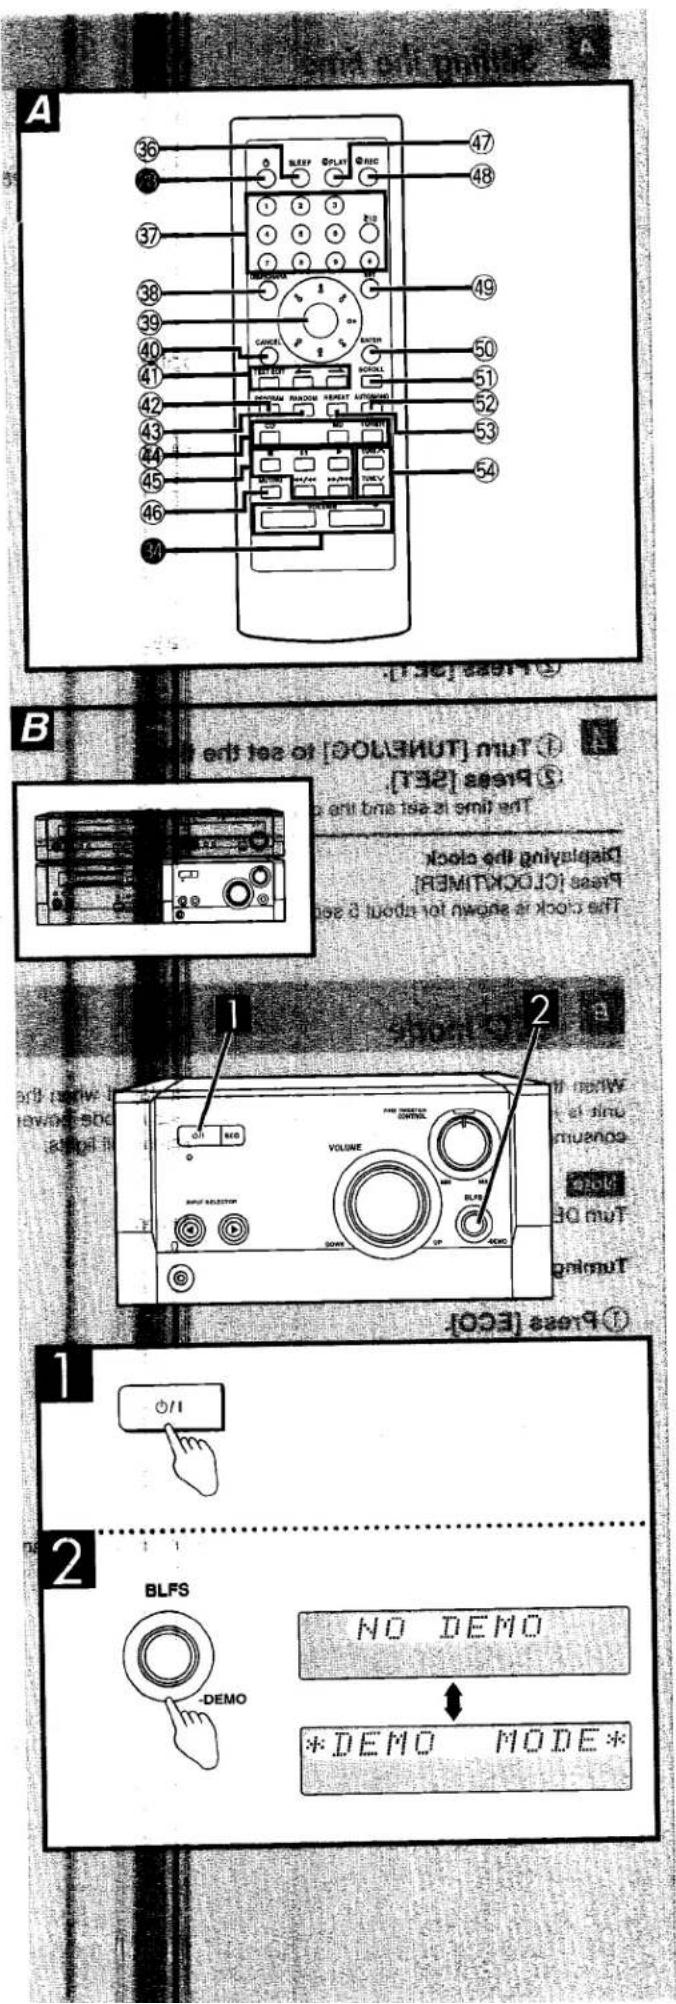

A Remote control
Buttons 28 and 30 function in the same way as the controls on the main unit.
③ Sleep timer button (SLEEP)....30
③7 Numbered buttons....14
③8 Display mode/Character select button (DISP/CHARA)....16, 22
③9 Jog dial ....22
④ Program cancel button (CANCEL)....15
④1 Text editing buttons (TEXT EDIT)....22
④2 Program button (PROGRAM)....15
④3 Random button (RANDOM)....14
④ Input select buttons (CD, MD, TUNER)....12, 13, 17
45 Basic operating buttons
Function changes according to the source.
④6 Muting button (MUTING) 18
④7 Play timer button ( play )....28
48 Record timer button (↓ REC) 29
④9 Set button (SET)....22
⑤0 Enter button (ENTER)....22
⑤ Scroll button (SCROLL) 14
⑤2 FM mode button (AUTO/MONO)....16
⑤3 Repeat button (REPEAT)....14
⑤4 Tuning buttons (TUNE ∧, TUNE ∨) ......16
B
If the clock has not been set, a demonstration of the display is shown when the unit is off.
This function is set to on at the time of purchase.
To get the most from ECO mode ( page 10), turn this function off.

Press [ ⏻ /l] to turn the unit on.

Press and hold [BLFS, -DEMO] until "NO DEMO" is displayed.
Each time you press and hold the button:
NO DEMO (off) ⇌ DEMO MODE (on)

natural_image
Diagram of two electronic equipment units with labeled ports and a numbered annotation pointing to one (no readable text or symbols)A

1

2
CLOCK/TIMER
3
①

4
①

flowchart
graph TD
    A["① TUNE/JOG"] --> B["DOWN"]
    B --> C["UP"]
    C --> D["② SET"]
    D --> E["Hand icon"]
B


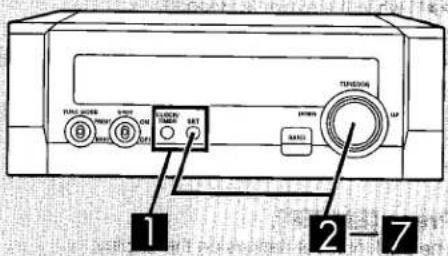
Setting the time
This is a 24-hour clock.
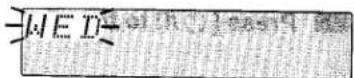
The example shows how to set the clock for Wednesday 16:25 (4:25 pm).

Press [⏻/l] to turn the unit on.

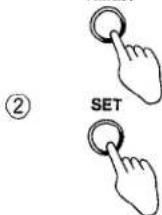
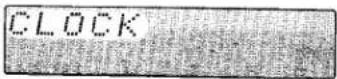
① Press [CLOCK/TIMER] to display "CLOCK."
Each time you press the button:

② Within 7 seconds Press [SET].

① Turn [TUNE/JOG] to set the day.
② Press [SET].

① Turn [TUNE/JOG] to set the time.
② Press [SET].
The time is set and the original display is restored.
Displaying the clock
Press [CLOCK/TIMER].
The clock is shown for about 5 seconds.

ECO mode
When this mode is turned on, the clock is not displayed when the unit is in standby mode, thereby reducing standby mode power consumption from 9 W to 0.8 W. The standby indicator still lights.
Note
Turn DEMO off. ECO does not work when DEMO is on.
Turning ECO on and off:
① Press [ECO].
The current mode is displayed.
② Within 2 seconds
Press [ECO] again.
The mode changes.
NORMAL (off) ECO (on)
The mode can be switched to ECO when the unit is off but it can not be switched back to NORMAL.
Types of MDs

Prerecorded MDs
These discs are
for playback only.

Recording MDs
Apart from the time limitations, it is possible to record up to 254 tracks on an MD.
Recording on MDs
MDs are different to tapes
MDs give you control over how tracks are recorded and editing functions allow you to change the contents of an MD after recording.
Unlike cassettes, it is not necessary to find an empty portion to record onto. All recordings start from the first available space. The MD fills up and when the disc is full, either because the time limit has been reached or 254 tracks have been recorded, recording is no longer possible. You can use the editing functions to erase and move your recording around within the MD.
Limitations on digital recording
The serial copy management system (SCMS) prevents unlimited recording of digital material.
Digital recordings are of high quality, but to protect the rights of the producer of the original material, it is only possible to make one digital recording of a digital recording. This also applies if you record analog material digitally. That digital recording can be recorded digitally once more, but is blocked after that.
Analog recordings are otherwise unaffected.

Stereo and monaural recording
This unit is capable of recording in stereo and can playback MDs recorded in stereo or monaural.
Monaural recording allows approximately twice the amount of material to be recorded and played back, but sound quality is affected.
Protecting your recordings
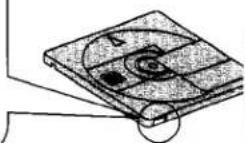
Move the switch to open the write protect hole. Close the hole when you want to record or edit the MD again.
Record protected

open
Record enabled

closed
Glossary of terms
Analog - This is the method that records and cassettes use to handle sound signals. It is possible to make analog recordings with MDs.
Digital - This is the usual method used by MDs and CDs to carry and record sound signals. Digital recording can be of very high quality.
Editing - This refers to any post-recording changes made to the MD.
Marking - This is the act of adding track marks. It can be done automatically when recording, or it can be done manually during recording or after recording with the editing functions.
TOC - Table of contents. Information stored on the MD about the tracks and times.
Track marks - These marks separate tracks. There can be up to 254 marks on one MD. They can be inserted automatically or manually during recording, and they can be added or removed with the editing functions after recording.
UTOC - User table of contents. This is information the user can edit, such as text and track positions.
The message "UTOC Writing" appears on the display after recording and editing.
Care and storage
Label MDs only as recommended. Extra labels and exposed adhesive can cause malfunctions.
Do not open the shutter, and close it immediately if it accidentally opens. Never touch the disc inside the MD cartridge.
Keep your MDs out of direct sunlight, humid and dusty places, and away from the direct heat of heating appliances.

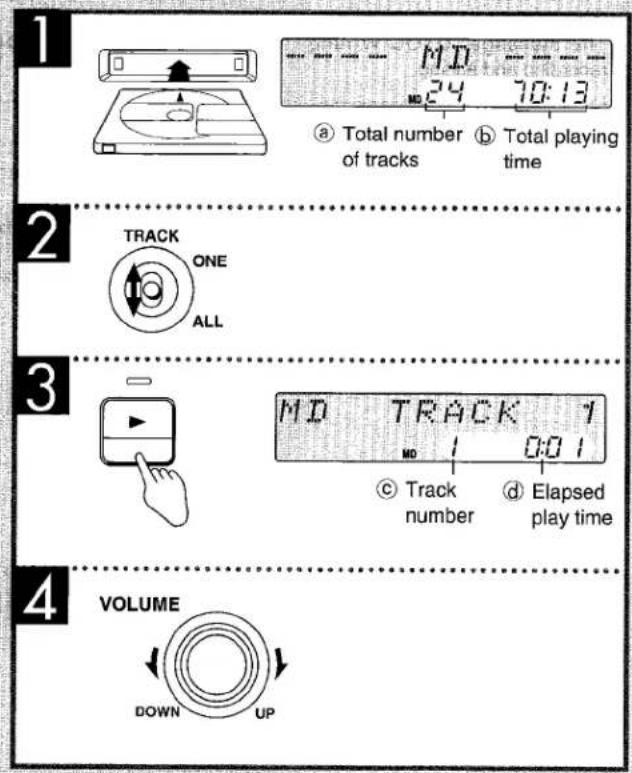

1 Insert the MD.
The unit comes on automatically and if MD input is selected, the message "TOC Reading" flashes on the display, then any text information about the disc is shown.
2 Select "ALL" or "ONE" with [TRACK].
ALL: all tracks are played.
ONE: one track is played.
3 Press [▶] to start play.
4 Adjust the volume.
To stop the disc
Press [■].
To pause play
Press [Ⅲ] during play. Press [Ⅲ] or [▶] to resume play.
Skipping tracks
Press [ ◀◀◀ / ◀◀◀ ] (backward) or [ ▶▶/ ▶▶▶ ] (forward).
Searching through tracks
During play
Press and hold [ ◀◀◀/◀◀] (backward) or [▶▶/▶▶] (forward).
Note
- You cannot skip to tracks already played in random play (→ page 14).
- Skipping is done in the selected order in program play (→ page 15).
- You can search only within tracks in random play.
To eject the MD
Press [▲ EJECT]
One touch play
When a MD is loaded and the unit is off, press [MD] on the remote control. The unit comes on and starts play.
Preparation: turn on the unit.
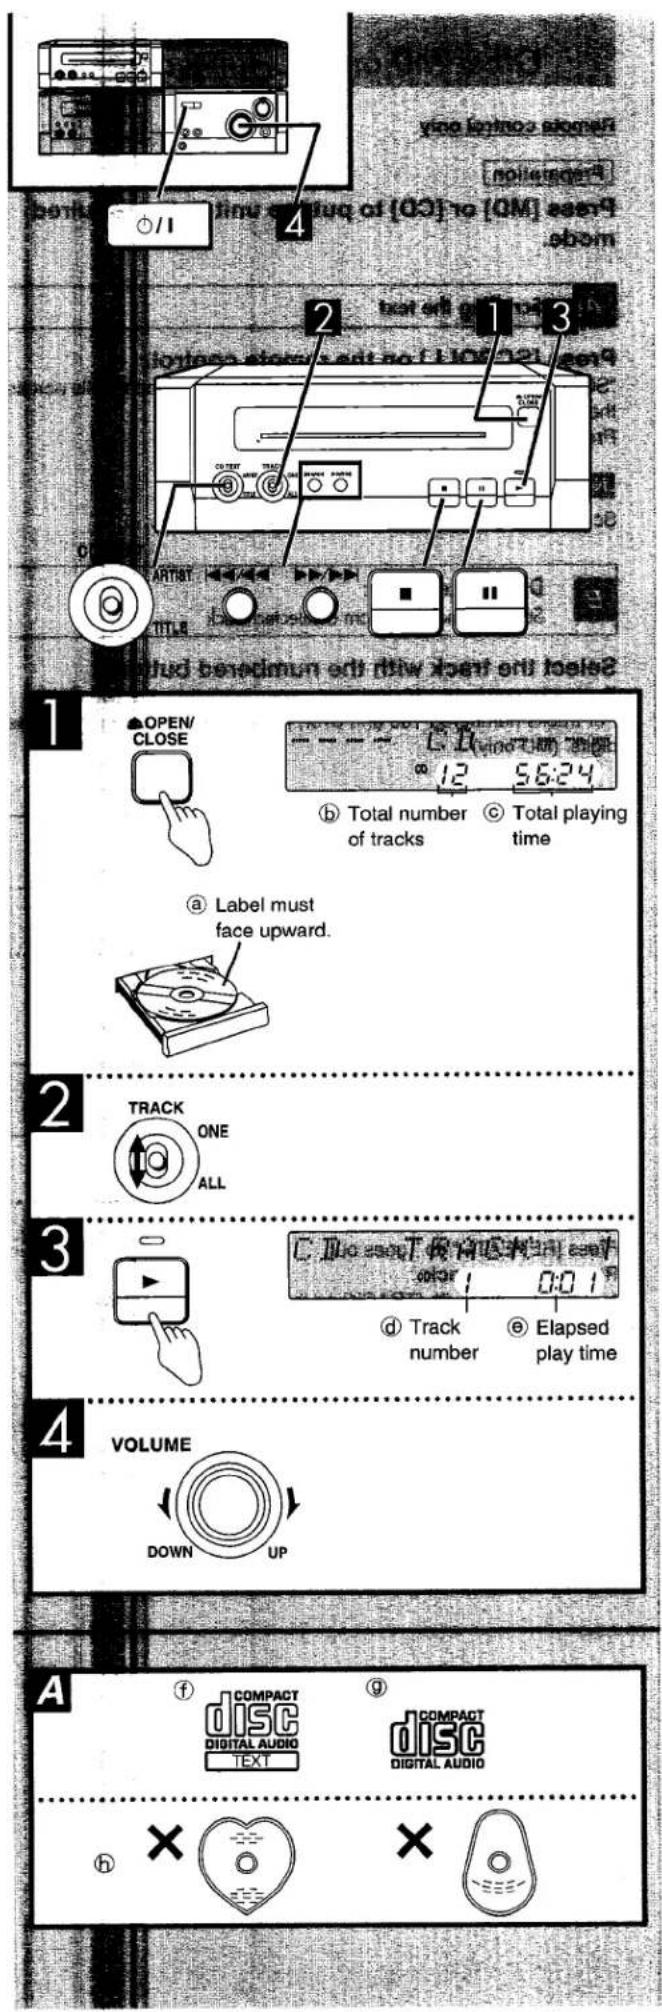
1 Press [▲ OPEN/CLOSE] to open the tray. Set a CD label up on the tray. Press [▲ OPEN/CLOSE] to close the tray.
The number of tracks and playing time is displayed if "CD" is selected as the source.
2 Select "ALL" or "ONE" with [TRACK]. ALL: all tracks are played. ONE: one track is played.
3 Press [▶] to start play.
4 Adjust the volume.
To stop the disc Press [■].
To pause play Press [Ⅲ] during play. Press [Ⅲ] or [▶] to resume play.
Skipping tracks Press [◀◀/◀◀] (backward) or [▶▶/▶▶] (forward).
Searching through tracks During play Press and hold [ ◀◀/◀◀ ] (backward) or [▶▶/▶▶] (forward).
Note
- You cannot skip to tracks already played in random play. (→ page 14).
- Skipping is done in the selected order in program play. (→ page 15).
- You can search only within tracks in random and program play.
A CD text discs (f)
This unit reads and displays the information on these discs. Display the album title or the artist's name. Select either "TITLE" or "ARTIST" with [CD TEXT].
One touch play
When a CD is loaded and the unit is off, press [CD] on the remote control. The unit comes on and starts play.
A CD selection
Choose discs with these marks: (f, g)
Do not
- use irregularly shaped discs (h).
- use discs that have extra labels or stickers attached. (Carefully remove leftover adhesive before use.)
- attach scratch-proof covers or any other kind of accessory.
- write anything on the CD.
- clean CDs with liquids. (Wipe with a soft, dry cloth.)
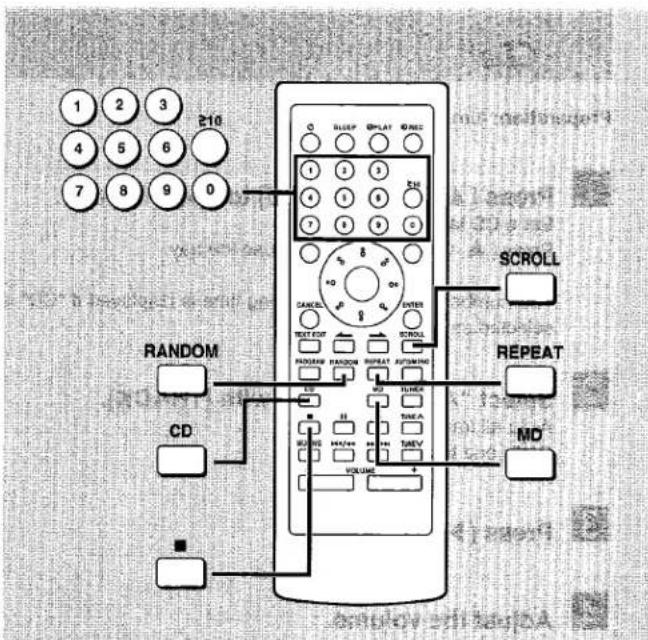



Other MD and CD functions
Remote control only
Preparation
Press [MD] or [CD] to put the unit in the required mode.
A Scrolling the text
Press [SCROLL] on the remote control.
"SCROLL ON" is shown and the selected information scrolls across the display.
Press [SCROLL] again to cancel.
Note
Scroll does not work if the text is less than 12 letters.
B Direct access play: Starts normal play from a selected track
Select the track with the numbered buttons.
For tracks numbered 10 and over, press [≥ 10] then the two digits. For tracks numbered 100 and over, press [≥ 10] twice then the three digits. (MD only)
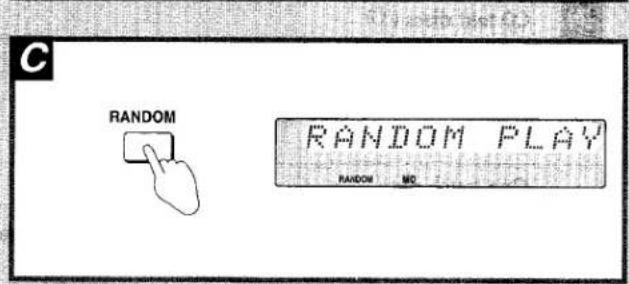
c Random play: Plays the tracks once each in random order
Press [RANDOM]. (MD must be stopped)
To cancel
Press [■]. "RANDOM" goes out.
D Repeat: Repeats all tracks or programmed tracks
Press [REPEAT] before or during play.
To cancel
Press [REPEAT]. " ⊙" goes out.
Repeating one track
- Select "ONE" with [TRACK] on the MD deck or CD player.
- Press [REPEAT] to display " ⊙".
- Select the track with the numbered buttons.
![2 [CHAS] search search apply to search MA = MA 3 USE "I" search USE "I" search USE "I" search USE "I" search USE "I" search USE "I" search USE "I" search USE "I" search USE "I" search USE "I" search USE "I" search USE "I" search USE "I" search USE "I" search USE "I" search USE "I" search USE "I" search USE " I" search USE "I" search USE "I" search USE "I" search USE "I" search USE "I" search USE "I" search USE "I" search USE "I" search USE "I" search USE "I" search USE "I" search USE "I" search USE "I" search USE "I" search USE "I" search USE "I" search Use user or link A](/content/2026/05/759416/images/1ef16043b7a23c1b849a312fae81f667f9bf24471ebc0710216723ab723191a0.jpg)
1
2

3


Remote control only
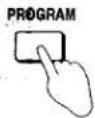
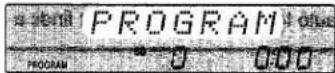
Program play:
Select up to 24 tracks to play in the order you choose
Preparation
Press [MD] or [CD] to put the unit in the required mode.

Press [PROGRAM].

Enter the track number with the numbered buttons.
For tracks numbered 10 and over, press [≥10] then the two digits.
For tracks numbered 100 and over, press [≥10] twice then the three digits. (MD only)
Repeat this step to program the tracks in the required order.

Press [▶].
All the tracks are played in the selected order.
To cancel program play
Press [PROGRAM]. (MD must be stopped)
"CLEAR" is displayed and all the tracks are canceled.
"FULL" is displayed
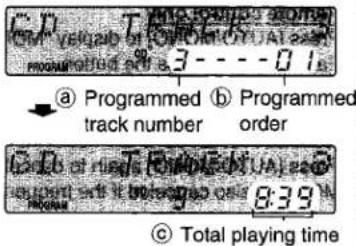
24 tracks have been programmed.
“--:--” is displayed
Total playing time for the tracks is over 199 minutes and 59 seconds, or a CD track numbered 25 or over was programmed. Tracks can still be programmed and played.
To check the contents of the program
Press [ ◀◀/◀◀] or [▶▶/▶▶] while stopped. The track numbers and program positions are displayed in order.
To add to the end of the program
Repeat step 2. (MD must be stopped)
Canceling tracks (only while stopped)
| From the last track | Press [CANCEL]. "CANCEL" is displayed. |
| A particular track | Select the track with [ ◀◀/◀◀ ] or [▶▶/▶▶] then press [CANCEL]. |
| All tracks | Press [■]. Program play is also cleared. |

A

| a PTY displays | |||
| NEWS | VARIED | FINANCE | COUNTRY |
| AFFAIRS | POP M | CHILDREN | NATIONAL |
| INFO | ROCK M | SOCIAL A | OLDIES |
| SPORT | M.O.R. M | RELIGION | FOLK M |
| EDUCATE | LIGHT M | PHONE IN | DOCUMENT |
| DRAMA | CLASSICS | TRAVEL | TEST |
| CULTURE | OTHER M | LEISURE | ALARM |
| SCIENCE | WEATHER | JAZZ | |
The Radio: manual tuning
Radio stations can be tuned manually by selecting the station's frequency or they can be preset into channels to make it easy to tune with the remote control (→ page 17).
Preparation: Turn the unit on.

Press [BAND] to select FM or AM.
Each time you press the button:
FM ← AM.

Select "MANU" with [TUNE MODE].

Turn [TUNE/JOG] to select the frequency of the required station.
"TUNED" is displayed when a radio station is tuned.
"STEREO" is displayed when a stereo FM broadcast is being received.

Adjust the volume.
Auto tuning
Press and hold [TUNE ∧] or [TUNE ∨] on the remote control for a moment until the frequency starts changing rapidly. The unit begins auto tuning, stopping when it finds a station.

If noise is excessive in FM
Remote control only
Press [AUTO/MONO] to display "MONO."
Each time you press the button:
AUTO ← MONO
This mode improves sound quality if reception is weak for some reason but broadcasts are heard in monaural.
Press [AUTO/MONO] again to cancel the mode.
MONO is also canceled if the frequency is changed.
Leave the tuner in AUTO for normal listening. Stereo and monaural broadcasts are automatically played as they are received.

RDS broadcasting
Remote control only
This unit can display the text data transmitted by the radio data system (RDS) available in some areas.
Changing the display
Press [DISP/CHARA].
Each time you press the button:
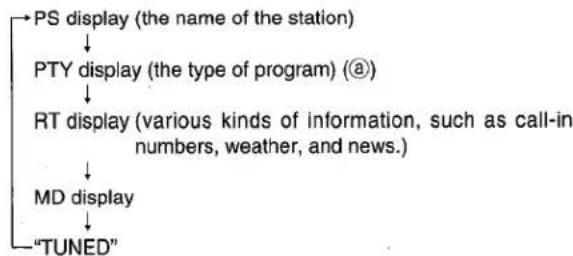
flowchart
graph TD
    A["PS display (the name of the station)"] --> B["PTY display (the type of program) (@)"]
    B --> C["RT display (various kinds of information, such as call-in numbers, weather, and news.)"]
    C --> D["MD display"]
    D --> E["TUNED"]
Note
- RDS displays may not be available if reception is poor.
- The MD display and "TUNED" displays revert back to the PS display after 5 seconds.


natural_image
Pure black-and-white abstract pattern with no discernible text, symbols, or structured elementsChoose either automatic presetting, which presets all the stations the tuner can receive, or manual presetting, which allows you to select the stations to preset and the order they are to be preset in. There are 39 channels available for presetting.
A Automatic presetting
Do the following once each for FM and AM.
Preparation: Tune to the frequency presetting is to begin at. (→ page 16).
Hold down [SET].
Release the button when "AUTO MEMORY" appears.
The tuner presets all the stations it can receive into the channels in ascending order. FM stations are preset into channels 1 to 39, and AM stations are preset into channels 21 to 39.
"SET OK" is shown when presetting is complete and the last station to be preset is played.
"ERROR" is displayed if the tuner doesn't receive any stations. Do presetting manually if this happens (see below).
Note
AM stations replace any FM channels that were preset in channels 21 to 39.
Manual presetting
Preset the stations one at a time.
① Tune to the required station.
② Press [SET].
③ Turn [TUNE/JOG] to select a channel.
④ Press [SET].
The station occupying a channel is erased if another station is preset in that channel.
B Selecting channels
On the remote control
1 Press [TUNER].
The unit automatically comes on.
2 Press the numeric buttons to select the channel.
For channels 1 to 9 press the corresponding number. For channels 10 or over press [≥10], then the two digits. e.g. To select channel 21 [≥10] → [2] → [1]
3 Adjust the volume.
On the unit
- Select "PRESET" with [TUNE MODE].
- Turn [TUNE/JOG] to select the channel.



A Adjusting the treble range
Fine adjustments to the treble range can be made due to separation of the tweeter and woofer.
Turn [FINE TWEETER CONTROL] to adjust sound quality.
Turn towards MAX to emphasize the treble or towards MIN to lessen the effect.
Note
The effect is not noticeable through headphones.
B Emphasizing the bass (BLFS)
BLFS (brisk low frequency sound) boosts the low frequency range to give music more power.
Press [BLFS, -DEMO].
Each time you press the button:
![TECHNICS SC-HD505MD - Press [BLFS, -DEMO]. - 1](/content/2026/05/759416/images/7eee00a824c51c06bfd3c53f62b38b4c27b124a497dd6101d3369270b87937cd.jpg)
To cancel
Press [BLFS, -DEMO] to select "BLFS OFF."
C Muting the volume
Remote control only
Press [MUTING].
Volume is reduced to minimum.
To cancel
Press [MUTING] again.
"MUTING OFF" is displayed and the volume is restored.
To cancel from the unit, turn [VOLUME] to minimum (- - dB), then raise it to the required level.
Muting is also canceled when the unit is turned off.
D The sidelight
Turn the sidelight on and off with [SPOT].
Note
The sidelight comes on when the demonstration ( page 9) starts while the unit is on even if [SPOT] is switched off.
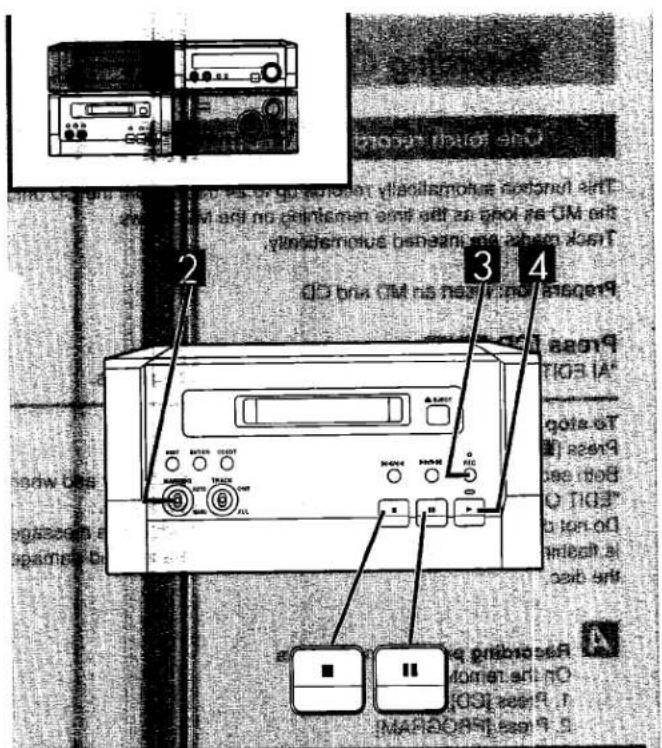


Preparation: Insert an MD.
1 Tune to the required station.
(→ pages 16–17).
2 Select "MANU" with [MARKING].
Insert the track marks where required during recording (see below) or with the editing functions after recording (→ page 24).
Recording is still possible if "AUTO" is selected but you will not be able to add track marks during recording.
3 Press [REC].
The deck goes into the recording standby mode and the [▶] indicator starts flashing. "Normal REC" and the remaining time on the MD flash on the display.
4 Press [▶].
Recording starts.
To stop recording
Press [■].
Recording is complete after the message "UTOC Writing" stops flashing on the display.
Do not disconnect the unit from its power source while this message is flashing. This can cause the recording to be erased and damage the disc.
To pause recording
Press [Ⅱ]
The deck goes into the recording standby mode and the [▶] indicator starts flashing. If "AUTO" was selected in step 2, a track mark is added.
Press [▶] to resume recording.
Adding track marks while recording (when "MANU" is selected)
Press [REC] where the track mark is required.
These marks can be removed after recording with the editing functions ( see page 26).
Your attention is drawn to the fact that recording pre-recorded tapes or discs or other published or broadcast material may infringe copyright laws.
Volume and sound quality
Recordings are unaffected by changes to volume and sound quality.
To display the remaining time on the MD
Press [DISP/CHARA] on the remote control.
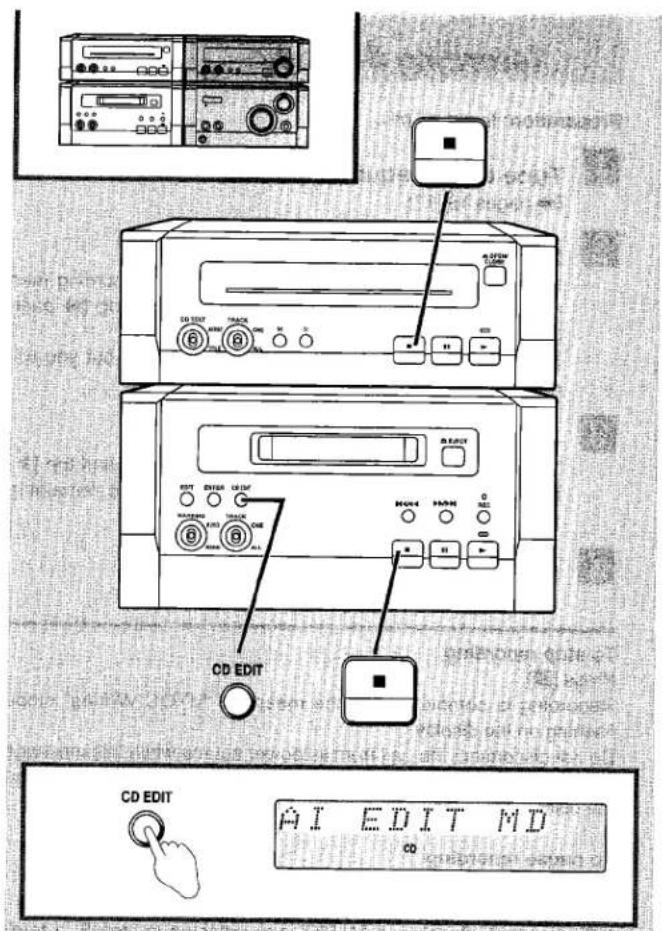

One touch recording (AI EDIT)
This function automatically records up to 24 tracks from the CD onto the MD as long as the time remaining on the MD allows.
Track marks are inserted automatically.
Preparation: Insert an MD and CD
Press [CD EDIT].
"AI EDIT MD" is shown on the display and recording starts.
To stop editing
Press [■] on the MD deck or CD player.
Both sections stop, "UTOC Writing" flashes on the display and when "EDIT OUT" appears on the display recording is complete.
Do not disconnect the unit from its power source while this message is flashing. This can cause the recording to be erased and damage the disc.
A
Recording programmed tracks
On the remote control
- Press [CD].
- Press [PROGRAM].
- Select the tracks with the numbered buttons.
On the MD deck - Press [CD EDIT].
Recording CD Text discs
The titles from the CD can be recorded easily onto the MD.
After recording CD text discs, the display automatically shows the text editing display (a).
To enter the text as it is:
On the remote control
Press [ENTER].
To clear the titles:
Press [■].
The titles can be changed with the text editing functions after recording is finished.


Manual recording
Preparation: Insert an MD and CD.
1 Select the marking mode with [MARKING].
AUTO: Track marks are automatically recorded from the CD. MANU: Insert the track marks where required during recording (see below) or with the editing functions after recording (→ see page 24).
2 Press [REC].
The deck goes into the recording standby mode and the [▶] indicator starts flashing. "Normal REC" and the remaining time on the MD flash on the display.
3 Press [▶] on the CD player.
Recording starts.
To stop recording
EITHER
Press [■] on the CD player. The CD stops but the MD deck goes into recording standby mode. OR
Press [■] on the MD player. Recording stops but the CD continues playing. Recording is complete after the message "UTOC Writing" stops flashing on the display.
Do not disconnect the unit from its power source while this message is flashing. This can cause the recording to be erased and damage the disc.
To pause recording
EITHER
Press [■] on the CD player. The CD and MD deck pause. Press [▶] on the CD player to resume recording.
OR
Press [■] on the MD deck. The MD pauses but the CD continues playing. If "AUTO" was selected in step 1, a track mark is added.
Adding track marks while recording (when "MANU" is selected)
Press [REC] where the track mark is required. These marks can be removed after recording with the editing functions ( see page 26).
A Recording programmed tracks
- Press [CD].
- Press [PROGRAM].
- Select the tracks with the numbered buttons.
- Follow the procedure for manual recording.
Recording CD Text discs
The titles from the CD can be recorded easily onto the MD. While a track is being recorded
- Press [TEXT EDIT].
- Press [ENTER].
The titles can be changed with the text editing functions after recording is finished.

1
A
TEXT EDIT


B

2
ENTER


3
DISP/CHARA


4


5
SET


6
ENTER


Titling discs and tracks
Remote control only
Titles of up to 100 characters long can be given to an MD and the tracks on it.
Preparation: Press [MD]
1
A To title a disc
Press [TEXT EDIT] while the disc is stopped.
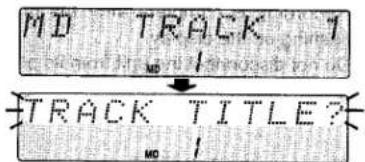
"DISC TITLE?" flashes on the display.
B To title tracks
① Press [◀◀/◀◀] or [▶▶/▶▶] to select the track while the disc is stopped.
② Press [TEXT EDIT].
"TRACK TITLE ?" flashes on the display.
2
Press [ENTER].
The text editing display appears.
3
Press [DISP/CHARA] to select the type of character ( see page 23).
Each time you press the button:
CAPITALS/symbol → lower case/symbol → Numbers
4
Turn the dial to move the right-hand cursor over the required character.
Press [→] to leave a space.
5
Press [SET] to enter the character.
The letter appears on the left-hand side of the display.
Repeat steps 3 to 5 to complete the title
6
Press [ENTER].
Titling is complete after the message "UTOC Writing" stops flashing on the display.
To cancel partway through titling
Press [TEXT EDIT]
The previous display is restored.
Titling a track while recording or playing it
Tracks can be titled by following the above steps.
Titling can be continued even after the track finishes recording.
When titling during playback, the track plays repeatedly until you are finished.
The title is entered after play stops and "UTOC Writing" disappears from the display.
Note
If the unit is in the titling mode and an operation is not performed for a long time, the display may not respond when the dial is turned. If this occurs, press another button (one of the volume buttons, for example) and operation should return to normal.

natural_image
Pure black-and-white image with no visible text, symbols, or identifiable objects| Characters available for titles | |
| Text mode | Character (○: space) |
| CAPITALS/symbol | ABCDE FGHIJ KLMNO PQRST UVWXYZ Z ! " # %&' ( ) *+, - ./ : ;<= >?@_-` |
| lower case/symbol | \( abcdefghij klmnopqrstuvwxy z\( ! " # %&' ( ) *+, - ./ : ;<= >?@_-` |
| Numbers | 0 1 2 3 4 5 6 7 8 9 |

To move the cursor
Press [←] or [→].
Erasing letters
Move the cursor over the letter to be erased and press [CANCEL].
The letter is erased and the letters move back to fill the space.
Inserting a letter or space
Move the cursor over the letter to the right of the place where the new letter or space is to go.
Now select and enter the new letter (→ steps 3 to 5 on page 22).
Replacing letters
-
Erase the old letter.
-
Insert the new letter.
Making corrections to a title
- Select the title to be corrected ( steps 1 and 2 on page 22).
- Use the above editing techniques to correct the title.
- Press [ENTER].

1


2

3

4


5
Dividing tracks - DIVIDE
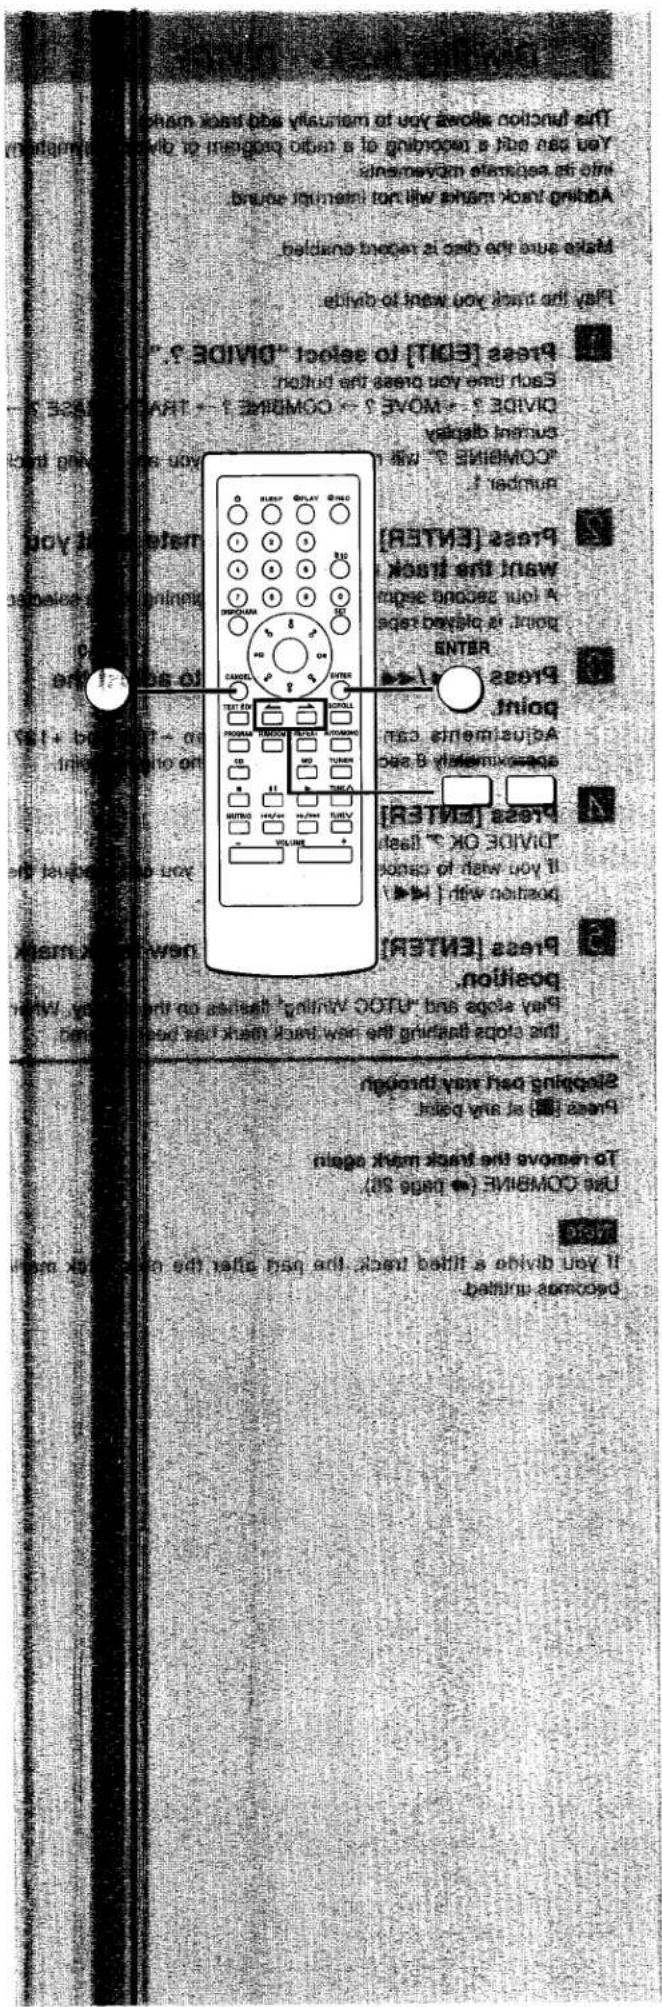
This function allows you to manually add track marks.
You can edit a recording of a radio program or divide a symphony into its separate movements.
Adding track marks will not interrupt sound.
Make sure the disc is record enabled.
Play the track you want to divide.
1
Press [EDIT] to select "DIVIDE ?."
Each time you press the button:
DIVIDE ? → MOVE ? → COMBINE ? → TRACK ERASE ? → current display
"COMBINE ?" will not be displayed if you are playing track number 1.
2
Press [ENTER] at the approximate point you want the track mark to go.
A four second segment of the track, beginning at the selected point, is played repeatedly.
3
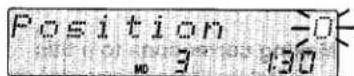
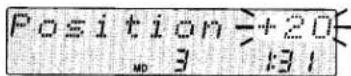
Press [◀◀/◀◀] or [▶▶/▶▶] to adjust the point.
Adjustments can be made between -128 and +127, approximately 8 seconds either side of the original point.
4
Press [ENTER].
"DIVIDE OK ?" flashes on the display.
If you wish to cancel press [■] now, or you can readjust the position with [◀◀/◀◀] or [▶▶/▶▶].
5
Press [ENTER] to confirm the new track mark position.
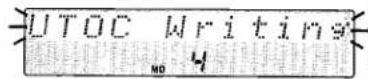
Play stops and "UTOC Writing" flashes on the display. When this stops flashing the new track mark has been entered.
Stopping part way through
Press [■] at any point.
To remove the track mark again
Use COMBINE (→ page 26).
Note
If you divide a titled track, the part after the new track mark becomes untitled.


natural_image
Pure black rectangular shape with no visible text, numbers, or symbolsThis function allows you to permanently change the order tracks are played in.
Make sure the disc is record enabled.
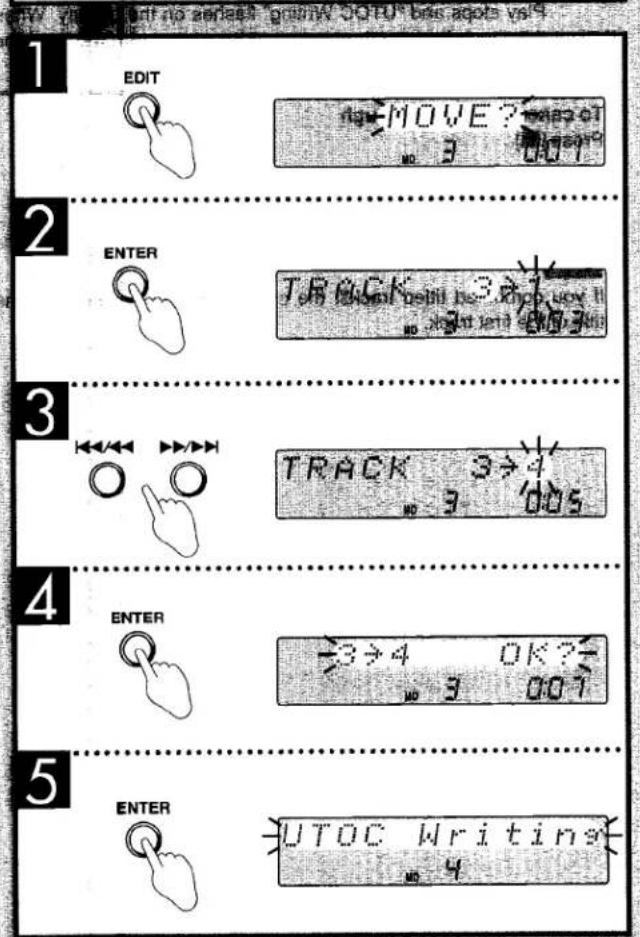
Play the track you want to move, or select it with [◀◀/◀◀] or [▶▶/▶▶] while the player is stopped.
1 Press [EDIT] to select "MOVE ?".
Each time you press the button:
DIVIDE ? → MOVE ? → COMBINE ? → TRACK ERASE ? → current display
"DIVIDE ?" is only displayed if the track is playing.
2 Press [ENTER].
The current number of the track is shown and the new position flashes to the right of it.
3 Press [◀◀/◀◀] or [▶▶/▶▶] to select the new track number.
4 Press [ENTER].
The old track number and new track number flash on the display.
If you wish to cancel press [■] now.
5 Press [ENTER] to confirm the new track number.
Play stops and "UTOC Writing" flashes on the display. When this stops flashing the new track number has been entered.
To cancel part way through
Press [■].
To return the track to its original position
Repeat the above steps, selecting the track's original number in step 4.
![TECHNICS SC-HD505MD - Press [ENTER] to confirm the new track number. - 1](/content/2026/05/759416/images/b5b05c95649bc61aec7289d4b32bea2ac9902e7989c0886a6d1512efc408f299.jpg)
![TECHNICS SC-HD505MD - Press [ENTER] to confirm the new track number. - 2](/content/2026/05/759416/images/35b985d94a809626843b409ff126fd92882cdcebec816b5bef2108bc60986dcf.jpg)
Combining tracks - COMBINE
This function removes track marks so the tracks either side effectively become one track.
Make sure the disc is record enabled.
Play the track that comes after the track mark you want to remove, or select it with [◀◀/◀◀] or [▶▶/▶▶] while the player is stopped.
1
Press [EDIT] to select "COMBINE ?".
Each time you press the button:
DIVIDE ? → MOVE ? → COMBINE ? → TRACK ERASE ? → current display
"DIVIDE ?" is only displayed if the track is playing.
"COMBINE?" will not be displayed if you are playing track number 1.
2
Press [ENTER].
The track numbers to be combined flash on the display.
You can change the tracks to be combined at this stage by pressing [ ◀◀◀/◀◀] or [▶▶/▶▶].
3
Press [ENTER].
If you are playing a track, the unit plays a segment of music starting eight seconds before the old track mark and continuing eight seconds after it. If you wish to cancel press [■] now.
4
Press [ENTER] to confirm the combination.
Play stops and "UTOC Writing" flashes on the display. When this stops flashing the track mark has been removed and the two tracks now are counted as one.
To cancel part way through
Press [■].
To divide the tracks again
Use DIVIDE ( page 24).
Note
If you combined titled tracks, the combined track retains only the title of the first track.



A Erasing tracks
Unneeded tracks can be erased and the available recording time can be increased.
Make sure the disc is record enabled.
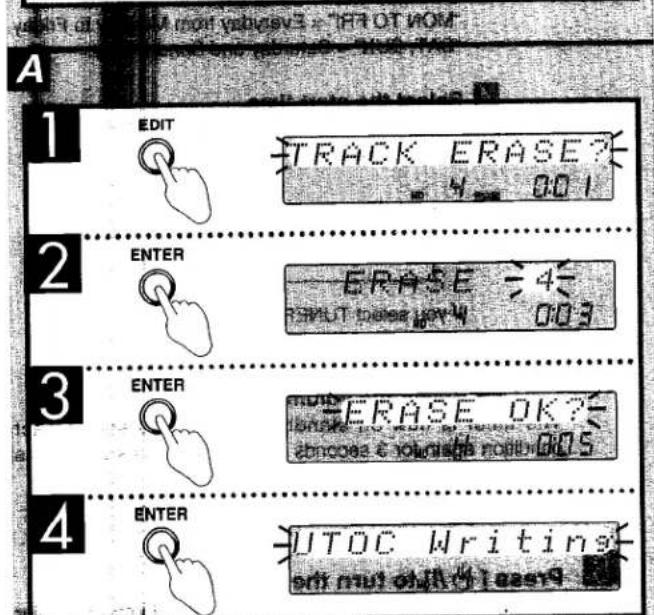
Play the track you want to erase, or select it with [◀◀/◀◀] or [▶▶/▶▶] while the player is stopped.
1 Press [EDIT] to select "TRACK ERASE ?".
Each time you press the button: DIVIDE ? → MOVE ? → COMBINE ? → TRACK ERASE ? → current display "DIVIDE ?" is only displayed if the track is playing.
2 Press [ENTER].
The track number flashes on the display. You can change the track to be erased at this stage by pressing [ ◀◀◀ / ◀◀◀ ] or [ ▶▶▶ / ▶▶▶ ] .
3 Press [ENTER].
"ERASE OK ?" flashes on the display. If you wish to cancel press [■] now.
4 Press [ENTER] to erase the track.
Play stops and "UTOC Writing" flashes on the display. When this stops flashing the track has been erased. The tracks after it move back to fill the space so there is no missing track number after a track is erased.
To cancel part way through
Press [■].
B Erasing a disc
This creates a blank disc.
Make sure the disc is record enabled.
While the disc is stopped
1 Press [EDIT].
"ALL ERASE ?" flashes on the display.
2 Press [ENTER].
"ERASE OK ?" flashes on the display. If you wish to cancel press [■] now.
3 Press [ENTER] to erase the disc.
"UTOC Writing" flashes on the display. When this stops flashing the disc has been erased and "BLANK DISC" is shown on the display.
To cancel part way through
Press [■].
![TECHNICS SC-HD505MD - Press [ENTER] to erase the disc. - 1](/content/2026/05/759416/images/50badc6f6cfe7195e7a19b3edd3b1ef70ce9b081f422042541ffc08878731d5f.jpg)
8
1
①
CLOCK/TIMER
![TECHNICS SC-HD505MD - Press [ENTER] to erase the disc. - 3](/content/2026/05/759416/images/2bf9397017d8ea3b4dc2c1ac308f6453edefe5c6bbf15d358f71a902205230d9.jpg)
②
![TECHNICS SC-HD505MD - Press [ENTER] to erase the disc. - 4](/content/2026/05/759416/images/bb4ecac83e257a5e4882e5c853f0c0fb1f21a2cfb58c864d14192e9e1803cf34.jpg)

2-7
①
![TECHNICS SC-HD505MD - Press [ENTER] to erase the disc. - 6](/content/2026/05/759416/images/014d9d57373d487905fb695fc8c9b7bf9257cb54b5794505677e72b4bd130e3e.jpg)
②
![TECHNICS SC-HD505MD - Press [ENTER] to erase the disc. - 7](/content/2026/05/759416/images/c13e9624a7f48827f4e039c3b8d2216e7da722ea6259f4fef51b6d422ecd5b81.jpg)
2
![TECHNICS SC-HD505MD - Press [ENTER] to erase the disc. - 8](/content/2026/05/759416/images/99a1b1fcaa55208749d40304f386016c36531a14336463074d4e73c0620bb28b.jpg)
3
![TECHNICS SC-HD505MD - Press [ENTER] to erase the disc. - 9](/content/2026/05/759416/images/829d8504cb3ee166110c251f69b8099f311dbacb49a413cb35588b02164f6ef8.jpg)
4
![TECHNICS SC-HD505MD - Press [ENTER] to erase the disc. - 10](/content/2026/05/759416/images/862bbaf29cfa5dc2bc3f2432705b12fdcb31cc811b02959cc5a13e0e191b1285.jpg)
5
![TECHNICS SC-HD505MD - Press [ENTER] to erase the disc. - 11](/content/2026/05/759416/images/cfb2c32f44c757788b00653864c8583a94b095f9da902c48251064eddba30a91.jpg)
6
![TECHNICS SC-HD505MD - Press [ENTER] to erase the disc. - 12](/content/2026/05/759416/images/02cf046763cf71b467434a0621083723116360af0a6e27b22cc9efff79fd093d.jpg)
![TECHNICS SC-HD505MD - Press [ENTER] to erase the disc. - 13](/content/2026/05/759416/images/3b3d826228a566eeaef7e6f151060a0f7aa242f07812fa5ecffc7245810eb78b.jpg)
7
![TECHNICS SC-HD505MD - Press [ENTER] to erase the disc. - 14](/content/2026/05/759416/images/462111b25db4013577d777a6bb55127b0892059b90f1b9bca2b56aeacfde9fed.jpg)
8
![TECHNICS SC-HD505MD - Press [ENTER] to erase the disc. - 15](/content/2026/05/759416/images/6200c09a01835ccc536ccf4b2cd5a9b85281659d38c396054dc2f241c4246983.jpg)
Using the timers
The play timer
This timer starts play of the selected source at the selected time. The example shows settings for preset radio channel 8 to play between 6:30 and 7:40, Monday to Friday at -40 dB.
Preparation: Turn the unit on, set the time (→ page 10), preset radio stations if you want the timer to start playing the radio (→ page 17).
1
① Press [CLOCK/TIMER] to select
“PLAY.”

② Press [SET] within 15 seconds.
2-7
① Turn [TUNE/JOG] to select the condition required and
② press [SET].

Select "SET".

Select the day.
"SUN" ... "SAT" = One day of the week.
"SUN TO SAT" = Everyday of the week.
"MON TO SAT" = Everyday from Monday to Saturday.
"MON TO FRI" = Everyday from Monday to Friday.
"SAT, SUN" = Saturday and Sunday only.

Select the start time.

Select the finish time.

Select the source.

If you select TUNER
Select a preset channel.

Select the volume.
The timer is now on standby. The display shows each condition again for 3 seconds each then restores the original display.
Confirm "∅ PLAY" is illuminated.
8
Press [ ⊙ /l] to turn the unit off.
The timer starts at the set time with the volume increasing gradually to the set level.
To cancel the timer
Turn the unit on
On the remote control
Press [ play ] so " play" goes out.
On the unit
- Press [CLOCK/TIMER] to select "∅ PLAY" and press [SET].
- Turn [TUNE/JOG] to select "∅ PLAY CANCEL" and press [SET].
If you set the timer incorrectly
Repeat the procedure from step 1.


natural_image
Two abstract black-and-white photos showing a building interior with a central structure and a smaller structure on the right (no visible text or symbols)The record timer
This timer records the radio at the set time.
The example shows settings for recording preset channel 8 on Saturday from 18:30 to 19:30.
Preparation: Turn the unit on, set the time (→ page 10), preset radio stations (→ page 17).
1 ① Press [CLOCK/TIMER] to select “ ⏻ REC”.
② Press [SET] within 15 seconds.
$$ \begin{array}{c} \text { CLOCK } \leftrightarrow \text { PLAY } \leftrightarrow \text { REC } \leftrightarrow \text { Original display } \ \uparrow \end{array} $$
2-6
① Turn [TUNE/JOG] to select the condition required and
② press [SET].
2 Select "SET".
3 Select the day.
4 Select the start time.
5 Select the finish time.
6 Select the preset channel.
The timer is now on standby. The display shows each condition again for 3 seconds each then restores the original display.
Confirm "① REC" is illuminated.
7 Press [ ⏻ /l] to turn the unit off.
Recording starts 30 seconds before the set time with the volume muted during the set time.
To cancel the timer
Turn the unit on
On the remote control
Press [💡 REC] so "💡 REC" goes out.
On the unit
-
Press [CLOCK/TIMER] to select "① REC" and press [SET].
-
Turn [TUNE/JOG] to select "☑ REC CANCEL" and press [SET].
If you set the timer incorrectly
Repeat the procedure from step 1.


The play and record timers
Checking the timers
Press [CLOCK/TIMER] to select "① PLAY" (or "② REC")
The timer conditions are shown in the following order:
Day → start time → finish time → source → volume (or "REC MD")
The timers can be checked even if the unit is off.
Playing the unit after the timers are set
The unit can be used after the timers are set. Make sure the unit is off before the set start time.
Turning the timers on and off
The timers come on at the set times if their indicators are alight before the unit is turned off. They can be turned on and off with the remote control by pressing [∅ PLAY] or [∅ REC].
Note
If the unit is turned off while a timer is functioning, the finish time setting will not be activated.
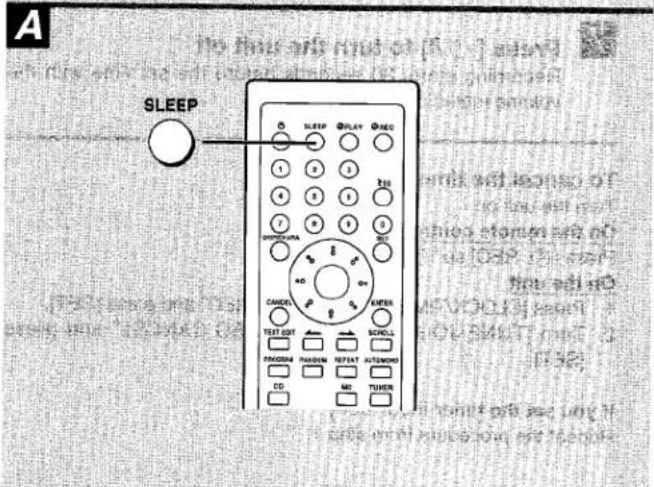
A The sleep timer
Remote control only
This timer turns the unit off after a set time.
While playing a source
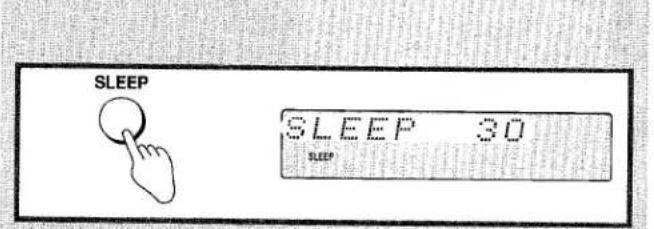
Press [SLEEP] to select the time (minutes).
"SLEEP" lights up.
Each time you press the button:
![TECHNICS SC-HD505MD - Press [SLEEP] to select the time (minutes). - 1](/content/2026/05/759416/images/da8c9de8f03ea13a1adeb1db861cb31126f0134e005625dd745fd719637229a2.jpg)
To cancel the sleep timer
Press [SLEEP] to select "SLEEP OFF."
"SLEEP" goes out.
To confirm the remaining time
(While the timer is functioning)
Press [SLEEP]
The remaining time is shown for about five seconds.
To change the setting
Press [SLEEP] to display the remaining time, then press again to select the required time.
Note
The sleep timer is turned off if AI editing is started.
Using the timers together
Any of the timers can be used together, but ensure the unit is off before the start time for the record and play timers.

natural_image
Black textured surface with no visible text, symbols, or identifiable objectsA Listening to an external source
1 Press [INPUT SELECTOR (◀ or ▶)] to select "EXT".
Each time you press the button:
![TECHNICS SC-HD505MD - Press [INPUT SELECTOR (◀ or ▶)] to select "EXT". - 1](/content/2026/05/759416/images/2e0f04dbfe63478a706f86851a4841a59207aaed58f35009d317b92938695975.jpg)
2 Operate the unit.
See the unit's operating instructions for details on operation and connection.
B Recording an external source
If you have connected the source through the MD deck's DIGITAL OPTICAL EXT terminal, recording will be digital. To record the source in analog, connect it to the stereo EXT IN terminals on the back of the tuner and disconnect the optical fiber cord.
1 Press [INPUT SELECTOR (◀ or ▶)] to select "EXT".
2 Select the "AUTO" or "MANU" with [MARKING].
AUTO: If recording a digital source with track marks (MDs, etc.) through the DIGITAL OPTICAL EXT terminal or an analog source that has clear breaks between tracks (cassettes, etc.).
MANU: If you want to add track marks while recording (→ page 19).
3 Press [REC].
4 Press [▶] on the MD deck to start recording.
5 Start the source to be recorded.
See the unit's operating instructions for details on operation and connection.
To stop recording
Press [■] on the MD deck.
Recording is complete after "UTOC Writing" stops flashing on the display.
This unit is also able to digitally record the sound from satellite tuners (32 kHz and 48 kHz).
Recording onto an external unit
Select the source to be recorded with [INPUT SELECTOR (◄ or ►)].
Start recording on the external unit and start playing the source to be recorded.
C Using headphones (not included)
Reduce the volume before connection.
Avoid listening for long periods of time.
Plug type: 3.5 mm stereo.
| ---:--- | Shown when the clock hasn't been set. |
| BLANK DISC | A blank disc has been inserted. |
| CANNOT COMBINE | The limitations of the system sometimes mean tracks cannot be combined. |
| CANNOT DIVIDE | The limitations of the system sometimes mean tracks cannot be divided. |
| CANNOT EDIT | Editing functions cannot be used while program or random play are in progress. |
| CANNOT REC | You tried to begin recording while "MD" was selected as the input source. |
| DISC ERROR | There is a problem with the disc and it needs to be replaced. |
| EJECT ERRORLOAD ERROR | A problem occurred while loading or ejecting the disc. After this is displayed the unit automatically switches off. Remove the MD and start again. |
| EMERGENCY STOP | A problem occurred during recording. Eject the MD, reinsert it and start recording from the beginning again. |
| ERROR | Incorrect operation performed. Read the instructions and try again. |
| F15 | There is a problem with the mechanism. Consult the dealer. |
| F61 | There is a problem with the amplifier. Consult the dealer. |
| MD DIGITAL IN UNLOCK | Check the digital optical fiber cable connections and try again. |
| MD DISC FULL | The maximum time or number of tracks has been reached. Either erase some tracks or record with another disc. |
| MD DISC PROTECTED | The write protect hole is open. Close it to enable recording and editing. |
| MD PLAYBACK DISC | The disc can only be used for playback. It cannot be recorded on or edited in any way. |
| NO DISC | A disc hasn't been inserted. |
| SCMS CANNOT COPY | You are trying to make a second copy of a digital recording. |
| TRACK PROTECTED | The track has been protected with a function on another unit. Check whether you want to erase or edit the track before proceeding. |
| UTOC FULL | This display appears for one of the following reasons.The section reserved for text information is full; erase unneeded titles to make room.The maximum number of tracks (254) has been reached; erase unneeded tracks.Due to limitations of the recording system, UTOC may become full before the maximum number of tracks or time capacity is reached. Replace the MD. |
| U70 | Connect the flat cables firmly. If "U70" remains on the display, contact the dealer. |
Before requesting service, make the below checks. If you can't fix the system as described below, or if something not listed here occurs, refer to the enclosed directory to locate an Authorized Service Center convenient to you or contact your dealer.
Reference pages are shown as black circled numbers 6.
Common Problems
No sour | Turn the volume up.The speaker cords may be shorted. Turn the unit off, check and correct the connections and turn the unit on.1Check the speaker connections.2An AC mains lead or fluorescent light is near the cables. Keep other appliances and leads away from this unit's cables.If possible in your area, turn the AG mains lead's plug or connector over to reverse the lead's polarity.Turn DEMO off.3 |
Sounds unfixed, reversed or come from one speaker only.Hummlr  | |
| ECO mode on but display still lights up in standby mode. |
Listening to the radio
| Noise is heard.The sten# indicator flickers or doesn't I had.Sound is reported.A beat sound is heard.A low h# is heard during AM broadcasts.The correct AM frequency can't be tuned in. | Use an outdoor antenna.7### ### ### ### ### ### ### ### ### ### ### ### ### ### ### ### ### ### ### ### ### ### ### ### ### ### ### ### ### ### ### ### ### ### ### ### ### ### ### ### ### ### ### ### ### ### ### ### ### ### ### ### ### ### ### ### ### ### ### ### ### ### ### ### ### ### ### ### ### ### ### ### ### ### ### ### ### ### ### ### ### ### ### ### ### ### ### ### ### ### ### ### ### ### ### ### ### ### ### ### ### ###### ### ### ### ### ### ### ### ### ### ### ### ### ### ### ### ### ### ### ### ### ### ### ### ### ### ### ### ### ### ### ### ### ### ### ### ### ### ### ### ### ### ### ### ### ### ### ### ### ### ### ### ### ### ### ### ### ### ### ### ### ### ### ### ### ### ### ### ### ### ### ### ### ### ### ### ### ### ### ### ### ### ### ### ### ### ### ### ### ### ### ### ### ### ### ### ### ### ### ### ## ### ### ### ### ### ### ### ### ### ### ### ### ### ### ### ### ### ### ### ### ### ### ### ### ### ### ### ### ### ### ### ### ### ### ### ### ### ### ### ### ### ### ### ### ### ### ### ### ### ### ### ### ### ### ### ### ### ### ### ### ### ### ### ### ### ### ### ### ### ### ### ### ### ### ### ### ### ### ### ### ### ### ### ### ### ### ### ### ### ### ### ### ### ### ### ### ### ### ### # | Use an outdoor antenna.7### ### ### ### ### ### ### ### ### ### ### ### ### ### ### ### ### ### ### ### ### ### ### ### ### ### ### ### ### ### ### ### ### ### ### ### ### ### ### ### ### ### ### ### ### ### ### ### ### ### ### ### ### ### ### ### ### ### ### ### ### ### ### ### ### ### ### ### ### ### ### ### ### ### ### ### ### ### ### ### ### ### ### ### ### ### ### ### ### ### ### ### #### |
The MD deck
Cannot  | ay. | There may be condensation inside the deck. Wait for an hour and try again. |
| Cannot | Close the write protect hole.11Check all connections.6Replace with a recordable MD.11 | |
The so conned OPTIC/ heard d  | m an external unit ough the DIGITAL terminal cannot be cording. | Connect the unit with stereo phono cables to the EXT IN terminals on the tuner as well.10 |
| Cannot enter text. | Reduce the amount of text on the MD. (An MD can hold up to 1700 character.)22 | |
The dis into th pushed  | nulled automatically or it needs to be lly to go in. | Turn the unit off then on again. This situation can occur if the MD is stopped when ejecting or, if it is forced into the slot. |
| No operation or incorrect display. | The MD may not act correctly in some cases because of the system used for recording. This may cause the following problems.UTOC FULL is displayed despite there being space on the MD and the maximum number of tracks is yet to be reached.COMBINE or DIVIDE cannot be used.Remaining time doesn't increase after erasing a track. |
The CD player
| The disclay is wrong or play won't sten. | The disc may be upside down.10 Wipe the disc.Replace the disc if it is scratched, warped, or nonstandard.12 There may be condensation inside the player. Wait for an hour and try again. |
All components are required to service the system. If service is ever necessary, bring the entire system.
Technical specifications (DIN 45 500)
Maintenance
TUNER
■ Pre-amplifier section
Input sensitivity/impedance
EXT IN 300 mV/15 kΩ
Output level/impedance
EXT OUT 250 mV/1.5 kΩ
Tuner section
FM frequency range 87.50–108.00 MHz
(0.05 MHz step)
FM antenna terminal 75 Ω (unbalance)
AM frequency range
522–1629 kHz (9 kHz step)
520–1630 kHz (10 kHz step)
Timer section
Clock Quartz lock type
Function Play timer: 1 time or everyday
Rec timer: 1 time or everyday
Sleep timer: 120 min, 30 min intervals
GENERAL
Dimensions (W×H×D)
202×76×262.5 mm
Weight 1.2 kg
AMPLIFIER
Amplifier section
(Low frequency side)
Power output
DIN 1 kHz, THD 1 %, 6 Ω,
both channels driven 2×12 W
RMS 1 kHz, THD 10 %, 6 Ω,
both channel driven 2×15 W
Total harmonic distortion
Half power at 1 kHz, 6 Ω 0.09 %
S/N 75 dB
Load impedance 6 Ω
Amplifier section
(High frequency side)
Power output
DIN 10 kHz, THD 1 %, 6 Ω,
both channels driven 2×5 W
RMS 10 kHz, THD 10 %, 6 Ω,
both channels driven 2×8 W
S/N 75 dB
Load impedance 6 Ω
Headphones
Jack type 3.5 mm STEREO
Load impedance 16–32 Ω
General
Power supply
For United Kingdom
AC 230-240 V, 50 Hz
AC 220-230 V, 50 Hz
Power consumption 77 W
STANDBY condition
Normal 9 W
Eco 0.8 W
Dimensions (W×H×D)
202×104.5×277 mm
Weight 3.5 kg
CD PLAYER
Digital output terminal Optical×1
■ Audio section
DA converter 1 bit 2 DAC MASH
Format
Sampling frequency 44.1 kHz
Pickup
Wavelength 780 nm
General
Dimensions (W×H×D) 202×76×254 mm
Weight 1.4 kg
MD DECK
■ Digital input/output terminal
Input Optical×2
Output None
Format
Sampling frequency 44.1 kHz
Sampling late converter
Pickup
Wavelength 780 nm
General
Dimensions (W×H×D)
202×104.5×254 mm
Weight 1.4 kg
SPEAKER SYSTEM
Type 2 way, 2 speaker, bass-reflex system
Speaker(s)
Woofer: 12 cm cone type
Tweeter: 2.5 cm semi-dome type
Impedance
Input power
High 30 W (Music), 15 W (DIN)
LOW 60 W (Music), 30 W (DIN)
Output sound pressure level
90 dB/W (1.0 m)
Cross over frequency 5.5 kHz
Frequency range 55 Hz–50 kHz (−16 dB)
65 Hz-46 kHz (-10 dB)
General
Dimensions (W×H×D)
175×287×225 mm
Weight 3.9 kg
Notes:
- Specifications are subject to change without notice.
Weight and dimensions are approximate.
- Total harmonic distortion is measured by the digital spectrum analyzer.
US and foreign patents licensed from
Dolby Laboratories Licensing
Corporation.
To clean this unit, wipe with a soft, dry cloth.
If the surfaces are extremely dirty, use a soft cloth dipped in a soap-and-water solution or a weak detergent solution.
- Never use alcohol, paint thinner or benzine to clean this unit.
- Before using chemically impregnated cloth, read the instructions that came with the cloth carefully.
- Technics®
- !MOITUAO
- Dear Customer
- CAUTION!
- Supplied accessories
- Before use
- Listening operations
- Recording operations
- Editing operations
- Timer operations
- Reference
- Placement
- Voltage
- AC mains lead protection
- Foreign matter
- Service
- (For United Kingdom)
- IMPORTANT
- THIS PLUG IS NOT WATERPROOF-KEEP DRY.
- How to replace the fuse
- A Batteries
- Do not;
- B Use
- Note
- Caution
- Be-1: connections for supplied accessories
- A Before connection
- Flat cables
- FM antenna
- AM loop antenna
- Optical fiber cable
- Speaker cables
- Connect the AC mains lead.
- For your-reference
- B To listen to other equipment and make analog recordings
- C To make digital recordings
- Optional antenna connections
- FM outdoor antenna
- AM outdoor antenna
- Front panel controls
- A CD player
- B MD deck
- C Tuner
- D Amplifier
- A Remote control
- B
- Setting the time
- ECO mode
- Types of MDs
- Recording on MDs
- MDs are different to tapes
- Limitations on digital recording
- Stereo and monaural recording
- Protecting your recordings
- Glossary of terms
- Care and storage
- Insert the MD.
- Select "ALL" or "ONE" with [TRACK].
- Press [▶] to start play.
- Adjust the volume.
- One touch play
- A CD text discs (f)
- A CD selection
- Do not
- Other MD and CD functions
- A Scrolling the text
- B Direct access play: Starts normal play from a selected track
- c Random play: Plays the tracks once each in random order
- D Repeat: Repeats all tracks or programmed tracks
- Remote control only
- Preparation
- The Radio: manual tuning
- Auto tuning
- Changing the display
- A Automatic presetting
- Hold down [SET].
- Manual presetting
- B Selecting channels
- Press [TUNER].
- Press the numeric buttons to select the channel.
- Adjust the volume.
- On the unit
- A Adjusting the treble range
- Turn [FINE TWEETER CONTROL] to adjust sound quality.
- B Emphasizing the bass (BLFS)
- Press [BLFS, -DEMO].
- To cancel
- C Muting the volume
- Press [MUTING].
- D The sidelight
- Turn the sidelight on and off with [SPOT].
- Tune to the required station.
- Select "MANU" with [MARKING].
- Press [REC].
- Press [▶].
- To stop recording
- To pause recording
- Adding track marks while recording (when "MANU" is selected)
- Volume and sound quality
- To display the remaining time on the MD
- One touch recording (AI EDIT)
- Press [CD EDIT].
- To stop editing
- A
- Recording programmed tracks
- Recording CD Text discs
- Manual recording
- Select the marking mode with [MARKING].
- Press [REC].
- Press [▶] on the CD player.
- A Recording programmed tracks
- 1
- 2
- 3
- 4
- 5
- 6
- Titling discs and tracks
- To move the cursor
- Erasing letters
- Inserting a letter or space
- Replacing letters
- Making corrections to a title
- Dividing tracks - DIVIDE
- Press [EDIT] to select "DIVIDE ?."
- Press [ENTER] at the approximate point you want the track mark to go.
- Press [◀◀/◀◀] or [▶▶/▶▶] to adjust the point.
- Press [ENTER].
- Press [ENTER] to confirm the new track mark position.
- Press [EDIT] to select "MOVE ?".
- Press [ENTER].
- Press [◀◀/◀◀] or [▶▶/▶▶] to select the new track number.
- Press [ENTER].
- Press [ENTER] to confirm the new track number.
- Combining tracks - COMBINE
- Press [EDIT] to select "COMBINE ?".
- Press [ENTER] to confirm the combination.
- A Erasing tracks
- Press [EDIT] to select "TRACK ERASE ?".
- Press [ENTER].
- Press [ENTER] to erase the track.
- B Erasing a disc
- Press [EDIT].
- Press [ENTER] to erase the disc.
- Using the timers
- The play timer
- The record timer
- 2-6
- To cancel the timer
- The play and record timers
- Checking the timers
- Playing the unit after the timers are set
- Turning the timers on and off
- A The sleep timer
- While playing a source
- Press [SLEEP] to select the time (minutes).
- To cancel the sleep timer
- To confirm the remaining time
- To change the setting
- Using the timers together
- A Listening to an external source
- Press [INPUT SELECTOR (◀ or ▶)] to select "EXT".
- Operate the unit.
- B Recording an external source
- Select the "AUTO" or "MANU" with [MARKING].
- Press [▶] on the MD deck to start recording.
- Start the source to be recorded.
- Recording onto an external unit
- C Using headphones (not included)
- Reduce the volume before connection.
- Technical specifications (DIN 45 500)
- Maintenance
- TUNER
- AMPLIFIER
- CD PLAYER
- MD DECK
- SPEAKER SYSTEM
- Notes:
Brand : TECHNICS
Model : SC-HD505MD
Category : Hi-Fi