
SDB 550T - Receiver SENCOR - Free user manual and instructions
Find the device manual for free SDB 550T SENCOR in PDF.


| Product Type | Digital Terrestrial Receiver (DVB-T/T2) |
| Model | SDB 550T |
| Brand | Sencor |
| Dimensions (approx.) | 180 x 120 x 40 mm (W x D x H) |
| Weight (approx.) | 0.5 kg |
| Power Supply | DC 12V, 1A (external adapter) |
| Input Frequency | 174-230 MHz (VHF), 470-862 MHz (UHF) |
| Signal Level | -15 to -70 dBm |
| Video Decoding | MPEG-2 MP@HL, AVC/H.264 HP @L4.1, MPEG-4 ASP, HEVC/H.265 |
| Audio Decoding | MPEG-1 Layer 1/2, PCM, HE-AAC, Dolby Digital Plus |
| Video Output | HDMI, SCART (RGB/CVBS) |
| Audio Output | HDMI, Coaxial SPDIF, SCART |
| USB Port | 1 x USB 2.0 for multimedia playback and PVR |
| PVR Features | Time-shift, manual/timer recording, playback from USB |
| Electronic Program Guide (EPG) | Yes (Now/Next, Daily, Weekly views) |
| Channel Memory | Up to 1000 channels (approx.) |
| Favorite Lists | Yes (multi-color groups) |
| Parental Control | System lock, parental rating, channel lock |
| Timer | Up to 27 timers (once, daily, weekly, monthly, weekdays) |
| Multimedia Playback | Movie, Music, Photo, Ebook (from USB) |
| Aspect Ratio | 4:3 LB, 4:3 PS, 16:9, Full Screen |
| Video Resolution (HDMI) | 480i/60 up to 1080p/50, Auto |
| Energy Consumption | Max. 12W |
| Safety Class | Double insulation (Class II) |
| Included Accessories | Remote control, power adapter, remote sensor, user manual |
Frequently Asked Questions - SDB 550T SENCOR
User questions about SDB 550T SENCOR
0 question about this device. Answer the ones you know or ask your own.
Ask a new question about this device
Download the instructions for your Receiver in PDF format for free! Find your manual SDB 550T - SENCOR and take your electronic device back in hand. On this page are published all the documents necessary for the use of your device. SDB 550T by SENCOR.
USER MANUAL SDB 550T SENCOR
SAFETY INFORMATION 2
IMPORTANT SAFETY INSTRUCTIONS 3
Installation 3
Using 4
Repairs 5
Remote control and batteries 5
INTRODUCTION 7
Information about this STB 7
Remote control....8
System connection....9
Connecting to a TV set....9
Connecting power adaptor and remote sensor 9
GETTING STARTED 10
Installation 10
OPERATION 12
Changing channels....12
Electronic programming guide (EPG) 12
Audio Description Setting 13
CHANNEL MENU 14
Channel Manager 14
Favorite List (List of favourites)....15
PREFERENCE MENU 16
Language 16
Multimedia Preference 16
PVR Config (Recorder setting) 17
SETTING MENU 18
Timers (Timer) 18
Child Lock (Child lock) 19
Date and time 20
Auto Search in Standby 20
Factory Reset 20
Upgrade 20
Version 20
Auto Standby 20
AUDIO/VIDEO MENU 21
MULTIMEDIA PLAYER 22
To minimize fire hazard or electric shock, do not remove the cover (or the rear panel) of the device. Have all repairs performed by qualified service technicians.

The lightning symbol located in an equilateral triangle informs the user about the existence of an uninsulated "dangerous voltage" inside the device, which can have such an intensity as to cause injury by electrical shock.

The exclamation mark symbol located inside an equilateral triangle informs the user about important instructions for operation and maintenance in the attached device documentation.

VWARNING
TO MINIMIZE FIRE HAZARD OR ELECTRIC SHOCK, DO NOT EXPOSE THIS DEVICE TO RAIN OR HUMIDITY.

CAUTION
TO PREVENT FIRE HAZARD OR ELECTRIC SHOCK, ALIGN THE PLUG WIDE BLADE WITH THE SOCKET WIDE SLOT AND PUSH THE PLUG AS FAR AS IT GOES.

This symbol indicates that the device has double insulation between the dangerous mains voltage and the user serviceable parts. In the case of servicing, use only identical spare parts.
Do not expose the appliance to the effects of dripping or spraying water and do not place objects filled with a liquid such as vases on the appliance.
IMPORTANT SAFETY INSTRUCTIONS
During the manufacture of this set-top-box, great attention has been paid not only to meeting quality requirements, but also to providing safety which is a key factor in designing all of our products. Providing security, however, requires your actions as well. This document contains important information that will help you learn how to correctly use this set-top box and its accessories to your satisfaction. Please read them carefully before installation and using this set-top-box.
Installation
- Read and observe the instructions - Please read all safety and operating instructions before using this set-top-box. Adhere to all instructions.
- Retain the instructions - Keep the safety and operating instructions for future use.
- Heed the warnings - Observe all warnings on the set-top-box and in the operating instructions.
- Power supply - This set-top-box is powered from a DC power supply plug. To prevent a risk of electric shock, please make sure to connect the power supply to your power outlet correctly.
- Sources of energy - To power this set-top-box, you may only use sources whose specifications meet the nameplate ratings on the set-top-box rear panel. If in doubt about the type of energy source at home or in your office, please contact your set-top-box dealer or an electrician. For set-to-boxes designed for battery operation or powering from other energy sources, please refer to the operating instructions.
- Overloading - Do not overload the power outlets and extension cords to avoid risk of fire or electric shock. Overloaded power outlets and extension cords, frayed power cords, damaged or cracked conductor insulations and damaged plugs are dangerous and may lead to electric shock or fire. Inspect the cord on regular basis and if it appears that insulation damage or property deterioration may have occurred, ask a qualified service technician for a replacement.
- Power cord protection - Route the power cords so they are not likely to be stepped on or damaged by placing objects on or against them, while paying extra attention to the points of their exit from the set-top-box.
-
Ventilation - Openings and holes in the unit's cabinet are designed for ventilation to ensure reliable operation of the set-top-box and its protection from overheating. There holes should not be covered or blocked. These holes should be never blocked by placing the set-top-box on bed, sofa, mat or an air heating appliance. Do not place this set-top-box in an enclosed space such as a fridge or a self unless proper ventilation is provided or it this is inconsistent with the set-to-box manufacturer requirements.
-
Accessories - To avoid any danger, do not use any accessories other than those recommended by this set-top-box manufacturer.
- Do not expose the appliance to the effects of dripping or spraying water and do not place objects filled with a liquid such as vases on the appliance.
Attention: Ensure safety when using electric energy. Any equipment or accessories powered from the grid and connected to this unit must be marked with a certification label on the equipment itself and must not be modified to avoid locking the safety features. This will minimize potential risk of electric shock or fire. In case of any doubt, please contact a qualified service technician.
- Accessories - Do not put this set-top-box on an unstable cart, stand, tripod, console or table. Otherwise, your set-top-box might fall on the floor, resulting in a serious injury to children, adults or a serious damage to itself. Use this set-top-box only with a cart, base, stand, console or table recommended by the manufacturer or supplied with the set-top-box. Any mounting of the unit must be carried out according to the manufacturer's instructions and the mounting accessories recommended by the manufacturer should be used.
11a. Take care while moving the cart with the set-top-box. Sudden stops, applying excessive force and uneven surfaces may lead to the set-top-box damage. - Outdoor aerial grounding - If an outdoor aerial or cable system is connected to this set-top-box, it's necessary that this aerial or cable system should be earthed to provide a certain protection against voltage surges and static charge formation. Section 810 of the National Electrical Code, ANSI/NFPA No. 70-1984 (Section No. 54 of the Canadian Electrical Code, Part 1) provides instructions on proper grounding of the pole and the supporting framework, grounding the connecting lead to the aerial's discharge unit, connecting to the grounding electrodes and grounding electrode requirements.
- Power lines - The outdoor antenna system should not be located in the vicinity of overhead power lines, other electric lighting or power lines or in such locations where fall of the antenna system on such power lines or circuits could occur. When installing an outdoor antenna system, take extreme care not to touch and/or come close to such electric conductors or circuits as this might have lethal consequences. As installation of an outdoor aerial could be dangerous, have this task made by professional aerial installers.
Using
- Cleaning - Prior to cleaning, please disconnect this set-to-box from your power outlet. Do not use liquid cleaning agents or cleaning agents in sprays. Use a dampened cloth for cleaning.
- Objects which could get in touch with dangerous voltage points or "short-circuit" the parts may cause fire or electric shock. Avoid spilling any liquid on the set-top-box.
- Lightning thunderstorms - For increased protection of this set-top-box during a lightning thunderstorm or for longer periods when the device will not be used, disconnect the power cord from the power socket and disconnect the antenna or cable system. This will protect your set-top-box from lightning and surge damage in the grid.
Repairs
- Repairs - No not attempt to repair this set-top-box by yourself as opening the cabinet and removing the covers may expose you to a dangerous voltage or other risk. Have all repairs performed by qualified service technicians.
- Damage requiring a repair - In the following situations, disconnect your set-top-box from the power outlet and have it repaired by qualified service technicians:
A. The power supply or power connecting lead has been damaged.
B. Liquid or foreign objects have fallen into the set-top-box.
C. The set-top-box has been exposed to rain or water.
D. The picture does not appear correctly even if the operating instructions are observed.
Only use the controls described in these user's manual. Incorrect settings of other controls may lead to damage, while restoring normal operating condition of the set-top-box involves a great deal of work of a qualified service technician.
E. The set-top-box has fallen on the ground or its cabinet has been damaged.
F. The set-top-box shows a apparent change in its operating behaviour which clearly indicates a need to make a repair.
- Spare parts - If any spare parts are required, ask your service technician to verify if the used spare parts have the same safety specifications as the original ones. Using the spare parts as specified by the set-top-box manufacturer will protect your from the risk of fire, electric shock or other danger.
- Safety check - After finishing any service job or repair of your set-top-box, ask your service technician to perform manufacturer recommended safety checks to verify the set-top-box safety operating condition.
- Wall or ceiling mount - This unit can be mounted on the wall or under the ceiling only in a manner recommended by the manufacturer.
- Heat - This device must be located away from any sources of heat such as radiators, air heaters, stoves or similar appliances (including amplifiers) that produce heat.
Remote control and batteries
- Do not expose the remote control or the batteries to direct sunlight or sources of heat, such as heaters, heat exchangers, stoves or other appliances (including amplifiers) that produce heat. Do not use or leave the appliance in the vicinity of an open fire.
- Ensure that the sensor is not exposed to a strong light source (e.g. sunlight) or light from fluorescent light tubes, which could reduce the effectiveness and reliability of the remote control.
- Neither the remote control nor the batteries may be exposed to dripping or running water and objects filled with water must not be placed on them, e.g. vases. Protect against exposure to rain, spraying or pouring of any kind of liquid. Do not use outdoors. Failure to observe these instructions may lead to a risk of damage to the remote control or the batteries.
- Do not use this appliance near water.
- It is necessary pay attention to the environmental impact aspects of battery disposal.
- The incorrect use of batteries may cause the leakage of the electrolyte and corrosion.
To ensure that the remote control works correctly, proceed according to the instructions below:
- Do not insert the batteries in the wrong direction.
- Do not recharge, heat, open or short circuit the batteries.
- Do not throw batteries into a fire.
- Do not leave discharged batteries in the remote control.
- Do not combine various types of batteries or new and old batteries.
- If you will not be using the remote control for a long period of time, remove the batteries to prevent potential damage caused by a subsequent battery leakage.
- If the remote control is not working correctly or its operational range is reduced, change all batteries for new ones.
- If electrolyte leaks out from the batteries, have the remote control cleaned by an authorised service centre.
Introduction
Information about this STB
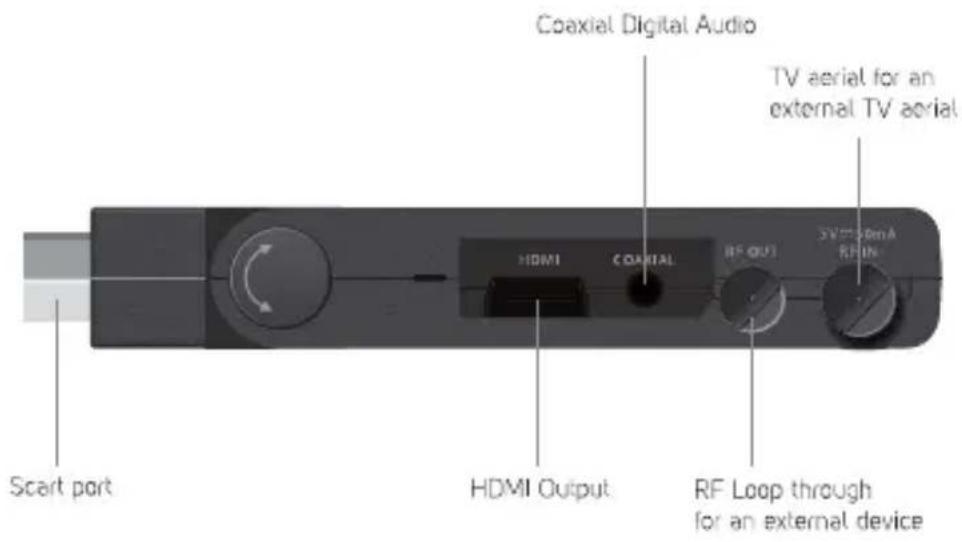
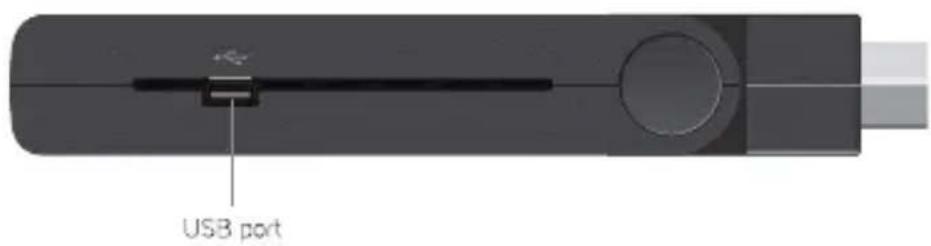
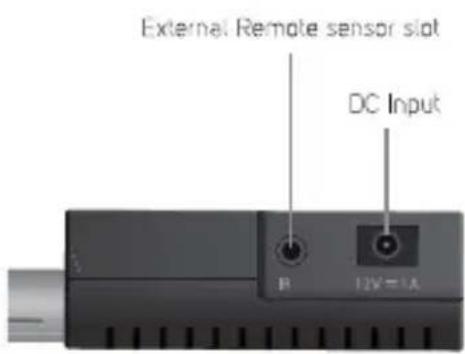
Remote control
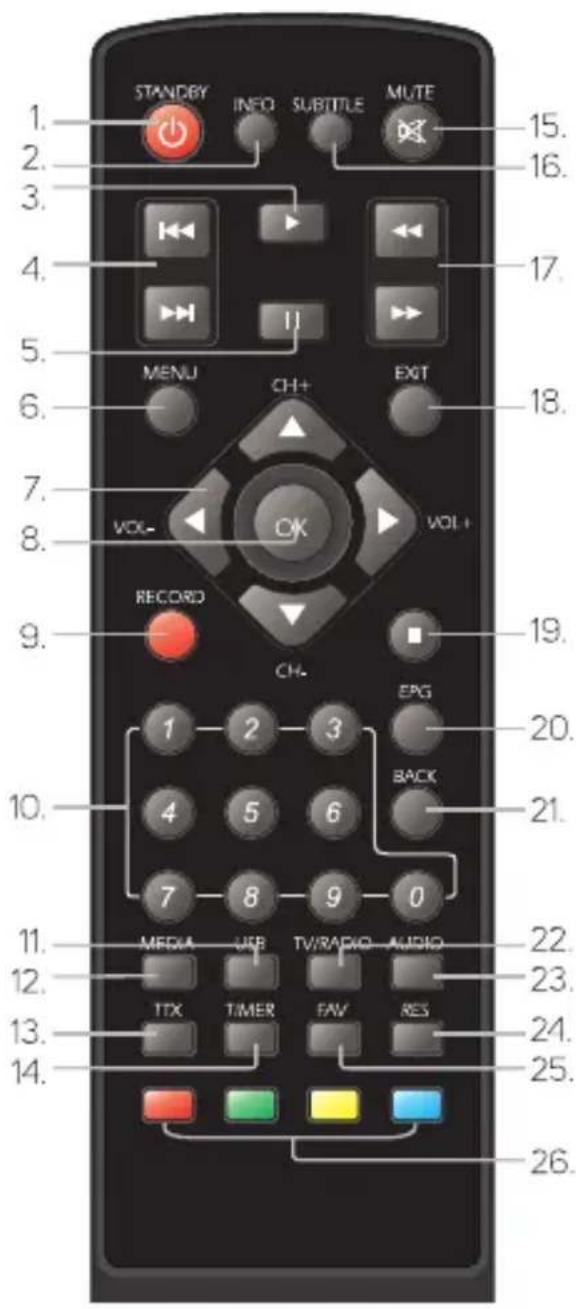
- STANDBY (Standby mode) (Turning the STB on or switching to standby)
- INFO (Information) (Press to view information on the current channel)
- PLAY (Playback)
- Previous/Next (Previous/Next)
-
PAUSE (Pause / Enable the time-shift feature)
-
Menu (Menu) (Open and close the menu screen)
- Cursor / CH+,- (Previous/Next channel) / VOL+,- (Increase/decrease volume) (Cursor: Navigation buttons to browse the menu items) (CH +/-: Previous/Next channel) (VOL+/-: Increase/Decrease volume)
- OK button (Confirm a menu selection)
- RECORD (Record) (Recording a TV program)
- Numeric keys (To enter numeric values and select a channel by direct number entering)
- USB (Enter the Device List menu)
- MEDIA (Media) (Enter the Disk Manager menu)
- TTX (Teletext - verify interactive services)
- TIMER TIMER (Timer) (Setting the timer)
- MUTE (Mute/unmute the sound)
- SUBTITLE (Subtitles on/off)
- Search backward /forward (Searching backward /forward)
- EXIT (Exit the menu)
- STOP (Stop) (Stop the playback or program recording)
- EPG (Electronic programming guide) (Opening the electronic programming guide menu)
- BACK (Back) (Switch to previous channel)
- TV/RADIO (TV/radio) (Switching between the television and radio modes)
- AUDIO (Audio) (Select the sound mode and track)
- RES (Resolution - switch to the HDMI resolution)
- FAV (Favourites) (Open the list of favourites)
- RED/GREEN/YELLOW/BLUE button (For interactive features / Buttons of the nested menu features)
System connection
There many various types of TV sets and other devices that can be connected to this STB. This manual describes the most common methods of connecting your equipment.
Connecting to a TV set
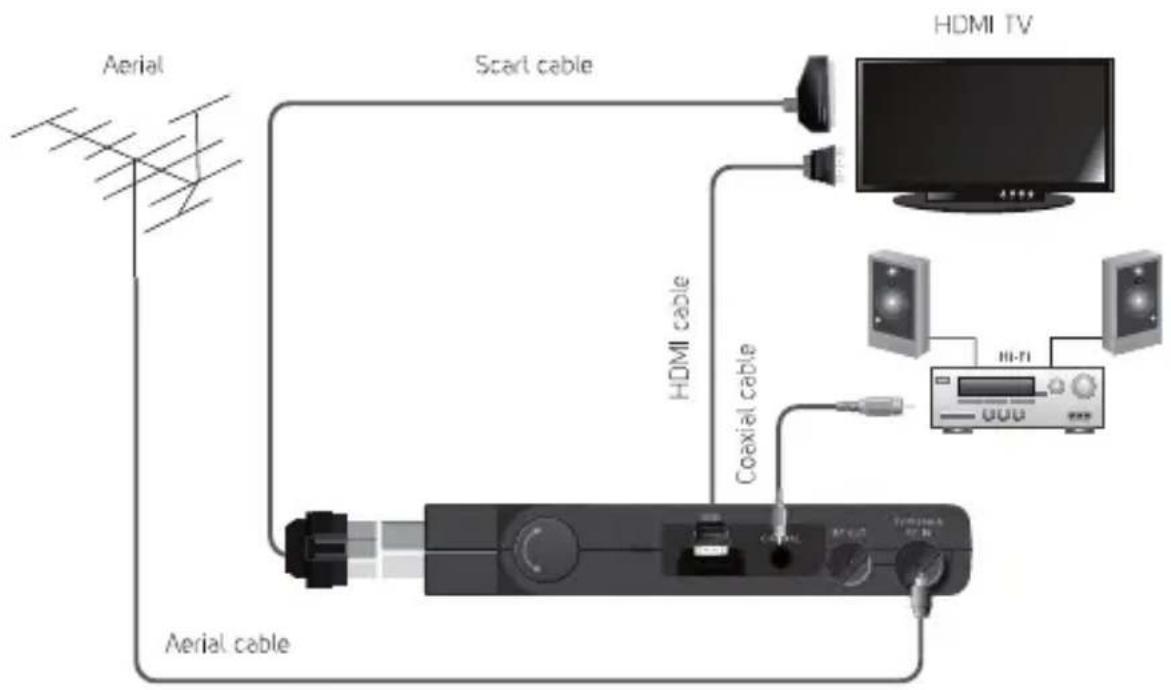
flowchart
graph TD
    A["Aerial"] --> B["Scart cable"]
    B --> C["HDMI TV"]
    C --> D["Hi-Fi"]
    D --> E["OLED"]
    B --> F["HDMI cable"]
    F --> G["COaxial cable"]
    G --> H["Coaxial cable"]
    H --> I["Aerial cable"]
Connecting power adaptor and remote sensor
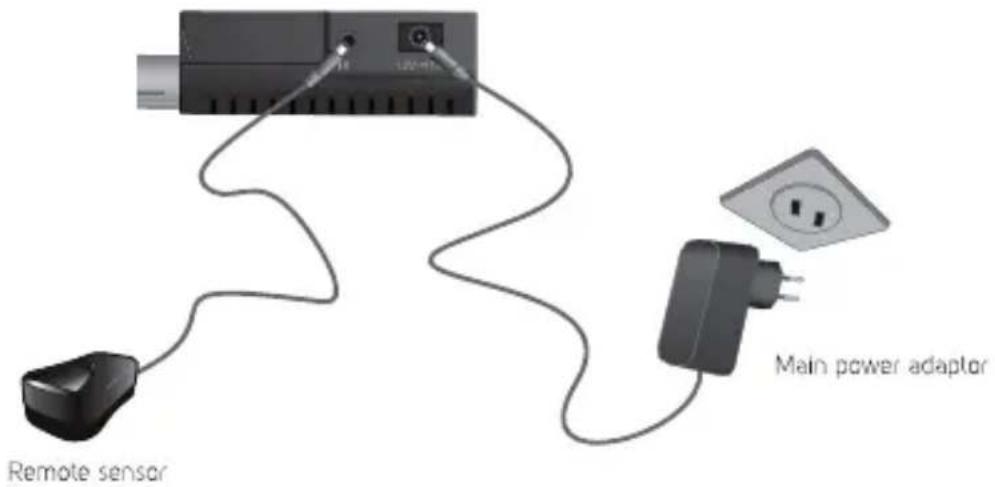
Getting Started
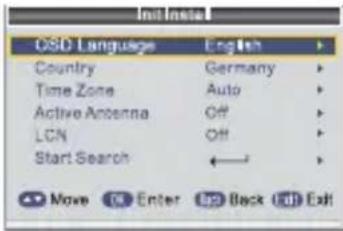
When using this STB for the first time, "Init Install" menu (Installation guide) appears. Press the cursor buttons to set Language, Country, Time Zone, Active Antenna, LCN. Highlight "Start Search" and press "OK" to start searching the channels.
Installation
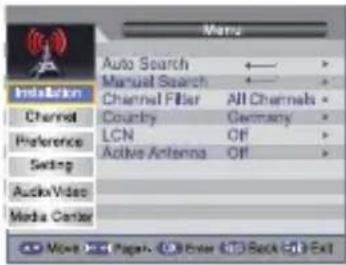
The "Installation" menu allows you to set the channel searching.
- Press the "MENU" button to show the main menu.
- Press the "UP" or "DOWN" button to highlight "Installation" and press "RIGHT" to open the "Installation" menu.
- Press the "UP" or DOWN" cursor button to highlight the desired item, then press "OK" to open the nested menu.
- Press the "EXIT" button to exit.
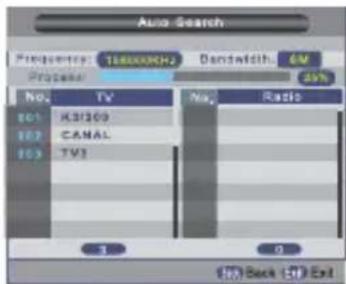
Auto Search (Automatic searching)
The "Auto Search" allows you to set automatic channel searching.
- Select "Auto Scan" and press "OK" to open the "Auto Scan" menu.
- Select if the existing program list is to be erased (Yes) or kept (No) before searching.
- Press "OK" to start the automatic scan.
Manual Search
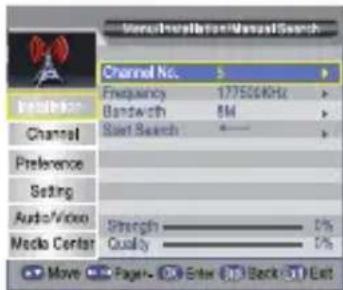
The "Manual Search" menu allows you to set manual channel searching.
- Select Manual Search and press "OK" to enter the menu.
- Press the cursor buttons to make the following settings: Channel No. Frequency, Bandwidth, then highlight "Search" and press "OK" to start the channel searching.
Channel filter
Please select between "All channels" or "FTA Only" (free).
Country (Country)
Select appropriate country from the menu.
LCN (Logical channel numbering)
To enable/disable the LCN feature, set the "LCN" to on/off.
Active Antenna (antenna 5V power supply)
Enable if your antenna requires this power supply.
Operation
Changing channels
There are three channel selection methods available - step-by-step browsing the channel list, selecting by number and selecting from the screen channel list.
- Step-by-step browsing the channel list: To move in the channel list, press the arrow up or down button on the remote control.
- Selecting by a number: Enter the channel number directly using the numeric buttons, then press "OK" to select the desired channel.
- Selecting from the screen channel list: To select the desired channel number, you can also press the UP/DOWN arrow buttons and then confirm by pressing "OK" directly in the screen channel list. This list is displayed by pressing "OK" or eventually by pressing LEFT and RIGHT arrow buttons to select a favourite channel group. For more details, please refer to "Channel management" section in this manual.
Electronic programming guide (EPG)
- Press "EPG" to open the EPG (Electronic programming guide) menu.
- Press the cursor buttons to switch between the channel list, selected channel's event schedule and current/next events.
- Press the "GREEN" button repeatedly to set the event timer (record/reminder).
- Press the "RED" button repeatedly to switch from the display of two shows of all programs Now/Next to the display of one program's daily show overview and the Weekly "Time Bar" display.
- Press the "Info" button to display information on the selected event.
- Press the "EXIT" button to return to the previous menu.
In the Daily and Weekly "Time bar" display:
EPG display control: RED button - switches between Now/Later, Daily, Weekly (Time bar) modes GREEN button - fast show entering for recoding or reminding YELLOW button - select the previous day, if possible BLUE button - select the next day, if possible Arrows - move between the programs and shows Info - display more details
Note:
The EPG information is supplied by the broadcaster who is responsible for its accuracy and correctness. The broadcast information such as Teletext is being cycled. The unit will display only those information that have been so far uploaded and stored in its memory, which is erased when turned off.
Audio Description Setting
If you want to use audio description (supplied by the broadcaster with some shows), press the BLUE button on the remote control. Press the volume arrow buttons (LEFT/RIGHT) to set the audio description mixing ratio with the current sound track.
Setting range: 0-10.
Channel menu
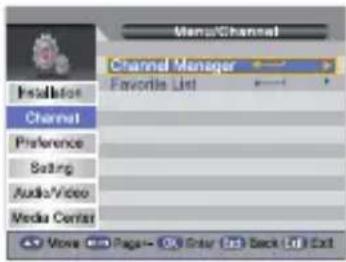
- Press the "MENU" button to show the main menu.
- Press the "UP" or "DOWN" button to highlight "Channel" and press "RIGHT" to open the menu.
- Press the "UP" or DOWN" cursor button to highlight the desired item, then press "OK" to open the nested menu.
- Press the "EXIT" button to exit.
Channel Manager
- In the Channel menu, select "Channel manager" and press "OK" to open the menu.
- Press the "UP and "DOWN" button to highlight the channel and then press "OK" to move it to another place.
- Use the "UP" and "DOWN" buttons to move the channel to a new location and from there, press "OK" again. The channel has been moved now.
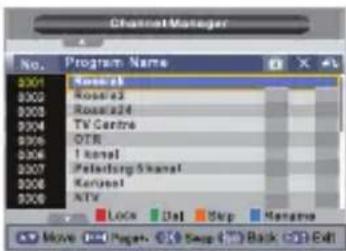
Use this menu to set the channel's locking, skipping, erasing and renaming.
- Press the "RED" button to enable the "Lock" function. You will be prompted to enter a password (default password is "0000"); then lock the selected channels.
- Press the "YELLOW" button to skip the selected channel.
- Press the "GREEN" button to select a desired channel to be deleted, which will be completed by leaving this Manager.
• Press the "BLUE" button to open the nested Rename channel menu. - Press the "colour" button again to cancel the relevant function.
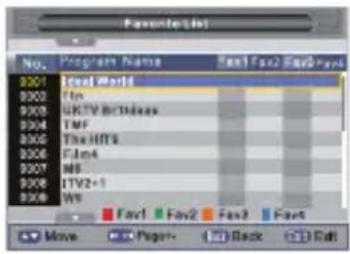
Favorite List (List of favourites)
- In the Channel menu, select "Favorite list" and press "OK" to open the menu.
- Press the "UP and "DOWN" button to highlight the channel and then press a color button to add it to one of the favorite groups.
- Press the "Exit" button to save and return.
Preference menu
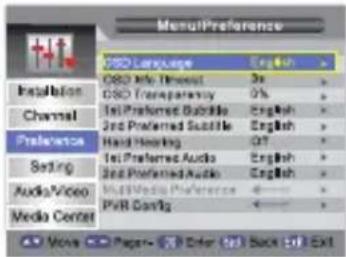
The Preference menu allows you to set the following items: OSD language, OSD Info Timeout, OSD Transparency, 1st Preferred Subtitle, 2nd Preferred Subtitle, Hard Hearing, 1st Preferred Audio, 2nd Preferred Audio, Multimedia Preference and PVR Config.
- Press the "MENU" button to show the main menu.
- Press the "UP" or DOWN" button to highlight the desired item, then press the "RIGHT" button to enter the menu.
- Press the "UP" or DOWN" cursor button to highlight the desired item, then press "OK" to open the nested menu.
- Press the "EXIT" button to exit.
Language
OSD language, 1st Preferred Subtitle, 2nd Preferred Subtitle, 1st Preferred Audio, 2nd Preferred Audio menus allow you to set system, audio and subtitle language and turn on the subtitle feature if the appropriate audio and subtitles are available in the broadcast.
Hard Hearing (Subtitles for deaf persons):
Off/On, if contained in the broadcast
Multimedia Preference
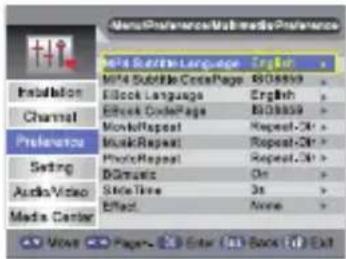
Switch the unit in the Multimedia mode using the MEDIA remote control button. This will enable the multimedia playback setting to your taste. Press "OK" on the remote control to set the following:
MP4 Subtitle Language - subtitle recognition by identification
MP4 Subtitle CodePage - setting the subtitles with no identification
EBook Language - Ebook language recognition by identification
EBook CodePage - setting the Ebook character coding
MovieRepeat - method of repeating movies
MusicRepeat - method of repeating music files
PhotoRepeat - method of repeating images
BGmusic - music playback will underscore projecting the photos
SlideTime - setting the time interval between photos
Effect (Transition) - setting the transition directions between the photos (dissolve, roll up, open).
PVR Config (Recorder setting)
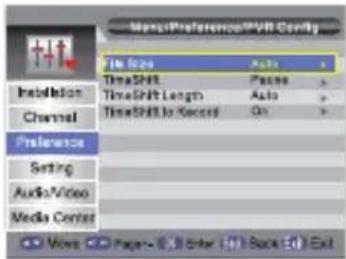
In the "Preference" menu select "PVR Config" and press "OK" to open the menu. Press the "UP" or "DOWN" cursor button to select the desired item, then press the "LEFT" or "RIGHT" cursor button to change the setting and press "OK" to open the nested menu. Press the "EXIT" button to exit.
File Size:
Timeshift:
Timeshift Lenght:
Timeshift to Record
Auto/1GB/2GB/3GB/4GB
Pause/Off/Auto
Auto/30min/1hr/2hr
On/Off
Setting menu
The Setting menu allows you to set the following items: Timers, Child Lock, Date Time, Auto Search in Standby, Factory Reset, Upgrade, Version, Auto Standby.
- Press the "MENU" button to show the main menu.
- Press the "UP" or "DOWN" button to highlight "Setting" and press "RIGHT" to open the menu
- Press the "UP" or DOWN" cursor button to highlight the desired item, then press "OK" to open.
- Press the "EXIT" button to exit.
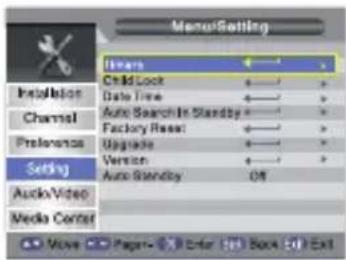
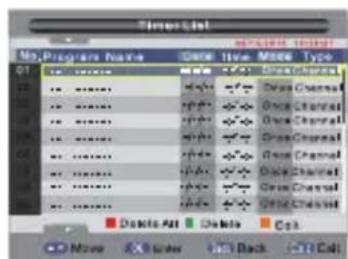
Timers (Timer)
This menu enables you to set the program timers. You can set up to 27 timers.
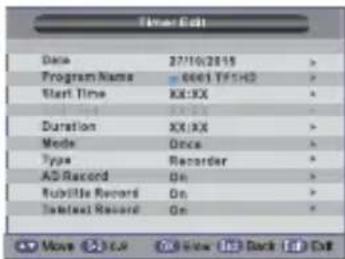
Press "OK" on an open position to open a new entering window. Press "RIGHT" to set individual items:
Date - move to the desired figure and press numeric buttons or the UP/DOWN arrows to change the date
Program Name - select the desired program
Start Time - press the numeric buttons or the UP/DOWN arrows to change the start time. Duration - press the numeric buttons or the UP/DOWN arrows to set the duration, this will change the end time
Mode - select Once/Daily/Weekly/Monthly/WeekDay
Type - select the timer's task from On, Recorder, Channel, Standby
AD Record
Subtitle Record
Teletext Record
Note:
If an item is not applicable for a given task, it will grey out as unavailable. The setting of accompanying sounds and subtitles depends on the actual content of a given program's standard components. Correct function of the timers requires that the broadcast contains accurate time information.
Child Lock (Child lock)
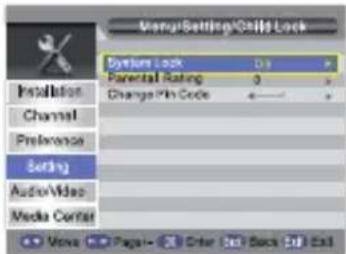
This menu allows you to protect the menu a channels or to change your password.
- In the "Setting" menu, select "Child Lock" and press "OK" - you will be asked to enter a password (default password is "0000").
- When the correct password has been set using the numeric buttons, the child lock menu appears.
System Lock: The lock can be turned on/off.
Parental Rating: 0 (Off) / 4-18 (years, applicable according to the information broadcast with individual programs).
Change Pin Code: To change the password.
Date and time
Date Time Mode - select Auto (from broadcast, recommended) or Manual
Date/Time - enter if Manual mode has been selected
Time Zone - enter if Auto mode has been selected. You can select a band manually or Auto if it's contained in the broadcast
Day Light Saving - select On/Off if manual time zone has been selected
Auto Search in Standby
When in standby (at night, for example), the unit can search for broadcast changes according to a specific setting. It depends on the specific conditions in your region whether this feature will provide acceptable results. Please check carefully.
Factory Reset
If you have changed more settings of the unit, resetting factory setting can restore the function state including new tuning of the unit.
Upgrade
If a software upgrade is issued by the manufacturer in the future, it can be uploaded in the unit. Please follow exactly the instructions supplied with the new software and use only the software provided by the unit manufacturer. Possible subsequent faults and problems are not covered by the manufacturer warranty.
Version
Display the unit software version
Auto Standby
Setting the user inactivity time after which the unit will switch to the ready state (Standby). Select 1/2/3 hours or Off to disable the unit's automatic standby.
Audio/Video menu
- Press the "MENU" button to show the main menu.
- Press the "UP" or "DOWN" button to highlight "Audio/Video" and press "RIGHT" to open the menu.
- Press the "UP" or DOWN" cursor button to highlight the desired item, then press "OK" to open the nested menu.
- Press the "EXIT" button to exit.
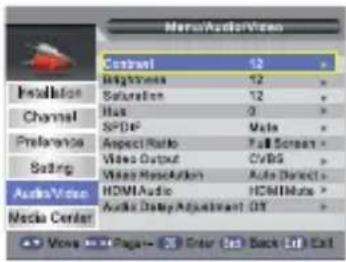
Contrast/Brightness/Saturation/Hue
- this can be adjusted to your taste. However, we recommend to keep the factory settings of 12 and 0 respectively for Hue.
SPDIF - set the digital audio output to PCM/Bitstream/Mute. Select Bitstream if you connect a receiver with a built-in audio decoder.
Aspect Ratio - select 4:3 LB/4:3 PS/16:9/Full Screen according to your TV set's screen.
Video Output SCART - select RGB/CVBS for analogue video output. Please verify if your TV set as well as cable supports both systems.
Video Resolution HDMI - select appropriate resolution from 480i/60 to 1080p/50 or Auto according to your TV set. Be cautious! A higher value than is supported by your TV set may lead to unwanted effects from a fluttering picture up to a black picture with no signal. Digital connection may reject some unsupported modes.
HDMI Audio - selecting the digital sound at HDMI. Select HDMI RAW/HDMI PCM/HDMI Mute depending on the decoder used by your TV or whether you want to completely mute the audio output and listen via the S/PDIF output.
Audio Delay Adjustment - you can set the delay - 500ms/Off / +500ms. Be cautious and make several attempts! This setting is used to synchronize sound with picture which may be affected by processing a high picture resolution in the TV set, for example. The broadcast may sometimes contain wrong synchronization in certain channels, programs, times etc. which is variable and cannot be properly removed by a user.
Multimedia player
Make sure that external data storage device is connected to the USB port.
- Press the "MENU" button to show the main menu.
- Press the "UP" or "DOWN" button to highlight "Media Center" and press the "RIGHT" button twice to open the multimedia player menu.
- Press the "LEFT" or "RIGHT" cursor button to highlight the desired item Movie/Music/Photo/Record Manager/Disk Manager/Ebook, then press "OK" twice to open the file menu.
- Press the "EXIT" button to exit.
Functions of the colour buttons in the Record Manager mode:
If there are more partitions on the disc.
GREEN - select a partition to record
YELLOW - formatting a partition to NFTS. Attention! This action will erase all data!
BLUE - formatting a partition to FAT32. Attention! This action will erase all data!
If you see the records already made.
GREEN - rename a record
YELLOW - erase a selected record
BLUE - erase all records
Functions of the colour buttons in the Disc Manager mode:
In the partitions menu.
RED - move or copy files.
GREEN - formatting a partition to FAT32. Attention! This action will erase all data
YELLOW - formatting a partition to NFTS. Attention! This action will erase all data
BLUE - information on the USB device.
If you select a file or a folder.
RED - move or copy files.
GREEN - rename a file
YELLOW - erase a selected file
BLUE - erase all files
For common operations, please follow the button on-screen help.
Time shift / recording
Connecting a Mass Storage Device to the USB port will enable the Time Shift/Record feature for a broadcast program.
- Pause the program being broadcast and resume the watching later on (Time Shift feature). The feature must be enabled and configured in the unit's Preference/PVR config/Timershift settings.
• Record the broadcast program.
• If the Mass Storage Device is out of free space, the broadcast recording operation will stop.
Note:
For recording or the time-shift feature, please use a USB 2.0 disc.
For the time-shift and recording feature, please use a USB flash disc with a higher capacity or a hard disc (> 2 GB).
Timeshift:
Starting
• To start the Time Shift feature in the broadcast view mode, press "PAUSE" if you have selected PAUSE or BACKWARD/SKIP BACK in Settings or if you have selected Auto in Settings and some broadcast is already recorded on the USB.
• To view information on the on-going time-shift, press INFO.
Playback
During the playback, you can perform the following actions:
• Press "PAUSE" to stop the playback temporarily
• Press "FORWARD" to fast forward the playback
• Press "BACKWARD" to backward the playback
To stop the time-shift
To stop the TimeShift feature, press "STOP".
Record
Instantaneous record
• To start recording the main channel immediately, press "RECORD" in the view mode.
• Press "RECORD" once again to set the time duration.
To stop the recording, press "STOP" - a confirmation window will appear.
• To stop the recording, select "OK". To resume recording, select "EXIT".
Timer recording
- You can open the timer setting menu and set the timer recording using EPG or the System Setup option.
Note:
While the recording feature is enabled, you can watch another show from the same multiplex.
Note:
For the recording and time-shift feature, please use a USB disc or a USB 2.0 flash disc from a reliable manufacturer, such as SAMSUNG, HITACHI a SONY. Some USB devices may not be supported because of low quality.
Notes on the USB connector:
- A USB memory device must be inserted directly into the unit. To prevent data transmission failure or interference, do not use USB extension cables.
- Before using a USB memory device, test its ability to communicate with the unit, its data reading and writing speed.
- To achieve maximum reading speed, we recommend that you keep disk space defragmented. If reading and writing on the USB flash disk is discontinuous, undesirable effects may occur such as partial image loss (block noise) or complete image loss, audio defects, and in extreme cases the operation will be stopped. Unexpected behaviour of the connected flash drive, or the presence of viruses or other damaging software may cause the functions of the appliance to stop working, necessitating a restart.
- The USB connector is the standard type and is not able to power a USB device with a high power usage (e.g. hard disk drives HDD). Use devices with independent power supplies and power them from their own power supplies.
- The appliance has been designed to achieve maximum compatibility with memory devices. With respect to the variety of devices on the market it is not possible to guarantee compatibility with every USB device. In the event of difficulties try formatting the flash drive directly in the appliance. If problems persist, use a different memory device.
Troubleshooting
In some regions, the terrestrial broadcast digital signal may be too weak. For this reason, we recommend to use an antenna with a built-in amplifier to watch channels with weak signal.
| Problem | Possible cause | What to do |
| Standby mode indicator is not lit | Remote sensor disconnected | Check connection of sensor |
| No signal has been captured | Disconnected antenna | Check the antenna cord |
| Damaged / incorrectly adjusted antenna | Check the antenna | |
| You are outside the digital signal coverage area | Please consult your dealer | |
| No picture and sound | No Scart/AV input has been selected on your TV | Switch to another channel |
| Encoded channel message | The channel is encoded | Select an alternate channel |
| No response to the remote control | The receiver is turned off | Connect and turn it on |
| The remote control is not pointing in the right direction | Point the remote control at the front panel | |
| The front panel is covered | Check for obstacles | |
| The batteries in the remote control are flat | Replace the batteries in the remote control | |
| Forgotten code to lock the channels | The factory code is always 0000 | |
| The remote control fails to control your STB | (1) The batteries in the remote control need to be replaced | (1) Replace the batteries |
| (2) There is an obstacle blocking the signal path between the remote control and the set-top-box. | (2) Please check if there is any barrier to the signal transmission between the remote control and the receiver | |
| (3) Strong sunlight or fluorescent light shining on to the sensor. | (3) Prevent sunlight or light from inappropriate fluorescent tubes from falling on to the sensor. | |
| When the STB is brought in another room, the digital broadcast cannot be received | The antenna new connection point may be part of a distribution system that may reduce the digital signal level received by the set-top-box. | Check the direct connection from the antenna |
Technical specifications
| TUNER AND CHANNEL | VF INPUT CONNECTOR × 1(IEC TYPE, IEC169-2, FEMALE TYPE)VF OUTPUT CONNECTOR × 1(IEC TYPE, IEC169-2, MALE(BYPASS LOOP))FREQUENCY BAND:174MHz - 230MHz (VHF)470MHz - 862MHz (UHF)SIGNAL LEVEL:-15 - -70dBm |
| DECODERVideo decoderAudio decoderVIDEO FORMATSVIDEO OUTPUTMODULATION | MPEG-2 MP@HL, AVC/H.264 HP @L4.1MPEG-4 ASP, HEVC/H.265 SUPPORTMPEG-1 Layer 1,2/PCM/HE-AAC V1.0ICE958 SPDIF/Dolby D+ and Dolby D4:3/16:9 SWITCHABLEHDMI, SCARTQPSK, 16QAM, 64QAM, 256QAM |
| CONNECTIONPOWER CORDTUNERHDMIDATA PORTSCARTSPDIF | 12 VANTENNA INPUT × 1, VF OUTPUT × 1HDMI OUTPUT × 1USB x 1TO TV x 1COAXIAL × 1 |
| POWER SOURCEINPUT VOLTAGE | 12 V= / 1A |
Note:
The design and technical specifications are subject to change without prior notice.

DOLBY. DIGITAL PLUS
Manufactured under the license of Dolby Laboratories. Dolby and the double D symbol are the trademarks of Dolby Laboratories.
INSTRUCTIONS AND INFORMATION REGARDING THE DISPOSAL OF USED PACKAGING MATERIALS
Dispose of packaging material at a public waste disposal site.
DISPOSAL OF USED ELECTRICAL AND ELECTRONIC APPLIANCES
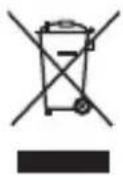
The meaning of the symbol on the product, its accessory or packaging indicates that this product shaft not be treated as household waste. Please, dispose of this product at your applicable collection point for the recycling of electrical & electronic equipment waste. Alternatively in some states of the European Union or other European states you may return your products to your local retailer when buying an equivalent new product. The correct disposal of this product will help save valuable natural resources and help in preventing the potential negative impact on the environment and human health, which could be caused as a result of improper liquidation of waste. Please ask your local authorities or the nearest waste collection centre for further details. The improper disposal of this type of waste may fall subject to national regulations for fines.
For business entitles in the European Union
If you wish to dispose of an electrical or electronic device, request the necessary information from your seller or supplier.
Disposal in other countries outside the European Union
If you wish to dispose of this product, request the necessary information about the correct disposal method from local government departments or from your seller.

Hereby, FAST ČR a.s. declares that the radio equipment type SDB 550T is in compliance with Directive 2014/53/EU.
The full text of the EU declaration of conformity is available at the following internet address: www.sencor.eu
Changes to the text, design and technical specifications may occur without prior notice and we reserve the right to make these changes.
SENCOR®
EN Warranty conditions
Warranty card is not a part of the device packaging.
This product is warranted for the period of 24 months from the date of purchase to the end-user. Warranty is limited to the following conditions. Warranty is referred only to the customer goods using for common domestic use. The claim for service can be applied either at dealer's shop where the product was bought, or at below mentioned authorized service shops. The end-user is obligated to set up a claim immediately when the defects appeared but only till the end of warranty period. The end user is obligated to cooperate to certify the claiming defects. Only completed and clean (according to hygienic standards) product will be accepted. In case of eligible warranty claim the warranty period will be prolonged by the period from the date of claim application till the date of taking over the product by end-user, or the date the end-user is obligated to take it over. To obtain the service under this warranty, end-user is obligated to certify his claim with duly completed following documents: receipt, certificate of warranty, certificate of installation.
This warranty is void especially if apply as follows:
■ Defects which were put on sale.
■ Wear-out or damage caused by common use.
The product was damaged by unprofessional or wrong installation, used in contrary to the applicable instruction manual, used in contrary to legal enactment and common process of use or used for another purpose which has been designed for.
■ The product was damaged by uncared-for or insufficient maintenance.
■ The product was damaged by dirt, accident of force majeure (natural disaster, fire, and flood).
■ Defects on functionality caused by low duality of signal, electromagnetic field interference etc.
■ The product was mechanically damaged (e.g. broken button, fall).
■ Damage caused by use of unsuitable media, fillings, expendable supplies (batteries) or by unsuitable working conditions (e.g. high temperatures, high humidity, quakes).
■ Repair, modification or other failure action to the product by unauthorized person.
■ End-user did not prove enough his right to claim (time and place of purchase).
■ Data on presented documents differs from data on products.
Cases when the claiming product cannot be identified according to the presented documents (e.g. the serial number or the warranty seal has been damaged).
Authorized service centers
Visit www.sencor.eu for detailed information about authorized service centers.


- SAFETY INFORMATION 2
- INTRODUCTION 7
- GETTING STARTED 10
- OPERATION 12
- CHANNEL MENU 14
- PREFERENCE MENU 16
- SETTING MENU 18
- AUDIO/VIDEO MENU 21
- MULTIMEDIA PLAYER 22
- VWARNING
- CAUTION
- IMPORTANT SAFETY INSTRUCTIONS
- Installation
- Using
- Repairs
- Remote control and batteries
- Introduction
- Information about this STB
- System connection
- Getting Started
- Auto Search (Automatic searching)
- Manual Search
- Channel filter
- Country (Country)
- LCN (Logical channel numbering)
- Active Antenna (antenna 5V power supply)
- Operation
- Changing channels
- Electronic programming guide (EPG)
- In the Daily and Weekly "Time bar" display:
- Note:
- Audio Description Setting
- Channel menu
- Channel Manager
- Favorite List (List of favourites)
- Preference menu
- Language
- Hard Hearing (Subtitles for deaf persons):
- Multimedia Preference
- PVR Config (Recorder setting)
- Setting menu
- Timers (Timer)
- Child Lock (Child lock)
- Date and time
- Auto Search in Standby
- Factory Reset
- Upgrade
- Version
- Auto Standby
- Audio/Video menu
- Contrast/Brightness/Saturation/Hue
- Multimedia player
- Functions of the colour buttons in the Record Manager mode:
- Functions of the colour buttons in the Disc Manager mode:
- Time shift / recording
- Timeshift:
- Starting
- Playback
- To stop the time-shift
- Record
- Instantaneous record
- Timer recording
- Notes on the USB connector:
- Troubleshooting
- DOLBY. DIGITAL PLUS
- INSTRUCTIONS AND INFORMATION REGARDING THE DISPOSAL OF USED PACKAGING MATERIALS
- DISPOSAL OF USED ELECTRICAL AND ELECTRONIC APPLIANCES
- For business entitles in the European Union
- Disposal in other countries outside the European Union
- SENCOR®
- EN Warranty conditions
- This warranty is void especially if apply as follows:
- Authorized service centers
Brand : SENCOR
Model : SDB 550T
Category : Receiver