
Design Juicer Advanced Pro - Juicer Gastroback - Free user manual and instructions
Find the device manual for free Design Juicer Advanced Pro Gastroback in PDF.


| Product Type | Centrifugal Juicer |
| Brand | Gastroback |
| Model | Design Juicer Advanced Pro |
| Category | Juicer |
| Motor Power | 1500 W |
| Voltage / Frequency | 220-240 V, 50/60 Hz |
| Speed Settings | Low and High |
| Feed Chute Width | Extra wide (accommodates whole fruits like apples) |
| Juice Jug Capacity | 1 L |
| Pulp Container Capacity | Approx. 2 L (estimation) |
| Filter Type | Stainless steel micro mesh, titanium reinforced |
| Safety Features | Safety locking arm, overload protection button, auto shut-off |
| Overload Protection | Yes, resettable button on motor base |
| Dishwasher Safe Parts | Filter bowl surround, juicer cover, filter basket, pulp container, juice jug (top shelf only) |
| Weight | Approx. 5.5 kg (estimation) |
| Dimensions (H x W x D) | Approx. 40 x 25 x 30 cm (estimation) |
| Cord Storage | Yes, wraps around feet |
| Material | Stainless steel, plastic |
| Color | Stainless steel / black |
| Warranty | 2 years |
Frequently Asked Questions - Design Juicer Advanced Pro Gastroback
User questions about Design Juicer Advanced Pro Gastroback
0 question about this device. Answer the ones you know or ask your own.
Ask a new question about this device
Download the instructions for your Juicer in PDF format for free! Find your manual Design Juicer Advanced Pro - Gastroback and take your electronic device back in hand. On this page are published all the documents necessary for the use of your device. Design Juicer Advanced Pro by Gastroback.
USER MANUAL Design Juicer Advanced Pro Gastroback
INSTRUCTIONS FOR USE AND RECIPES DESIGN JUICER ADVANCED PRO
natural_image
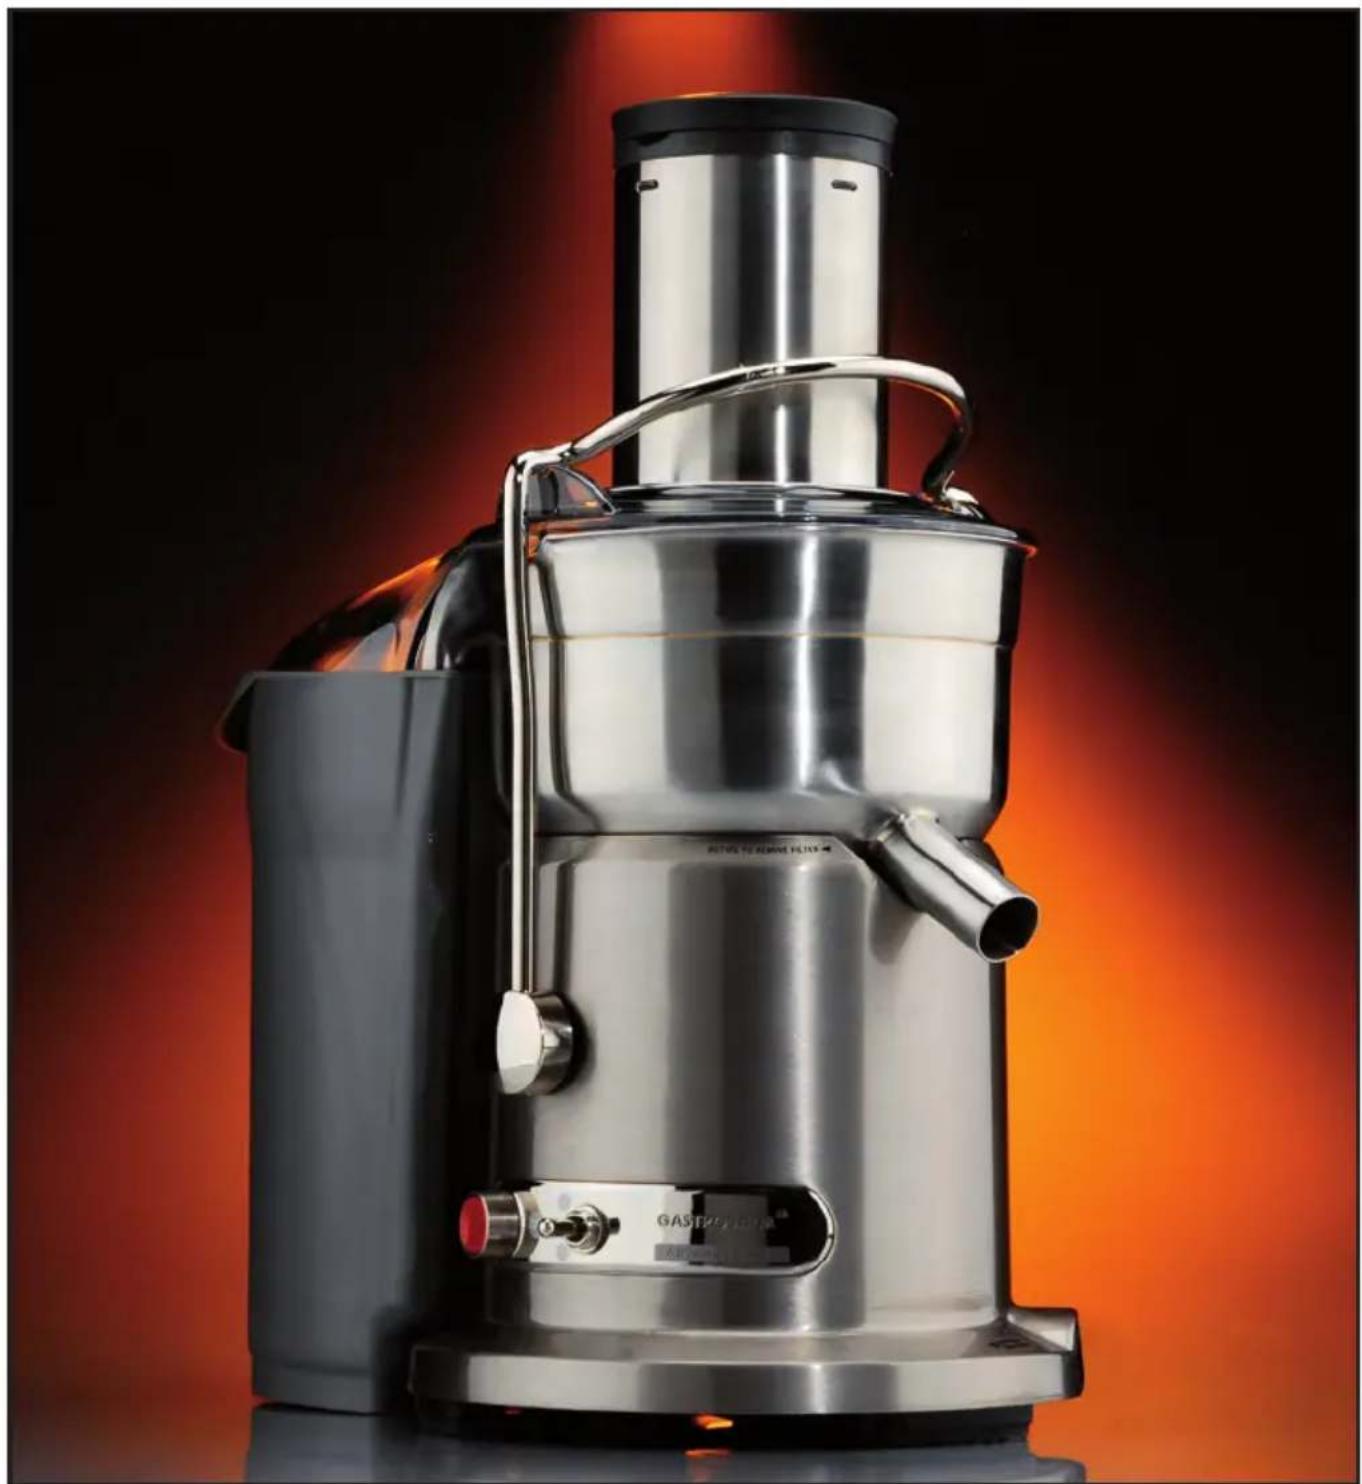
Modern stainless steel-colored outdoor grimmer with attached filter, set against a warm orange gradient background (no text or symbols visible)Art.-Nr. 40133 Design Juicer Advanced Pro
Read all provided instructions before first usage!
Model and attachments are subject to change
Important Instructions
- Always make sure the appliance is properly and completely assembled before connecting to power outlet and operating. The unit will not turn 'ON' unless properly assembled.
- Never leave the appliance unattended when in operational mode.
- Do not let the motor run permanently for longer then 7 minutes to avoid overheating.
- Do not operate the appliance continuously on heavy loads for more than 1 minute. The Design Juicer Advanced Pro is fitted with a safety device which safeguards against overheating with excessive loads. If this occurs, the juicer will automatically activate the overload protection button and the unit will switch itself off. If this occurs turn the power OFF at the power outlet and allow the unit to cool down. Then press the overload protection button found on the bottom of the motor base. The safety device will then be reset and the juicer is ready for use again.
- ATTENTION: Extra wide feed chute. Never put fingers, wooden spoons or other foreign substance (such as hair, clothing, brushes, cloths) into the feed chute when the appliance is plugged into the power point. Do not push products into the feed chute with your fingers or other foreign substances. Always use the food pusher provided. Always turn the appliance off, wait for the motor to stop moving and then pull the plug before taking off the lid of the juicer.
- Do not push products into the feed chute with your fingers or foreign objects. Always use the food pusher provided.
- Never hold your face or other body parts over the feed chute when the motor is running because little pieces of food could be thrown out of the feed chute.
- WARNING: The blades on the base of the stainless steel micro mesh filter and inside the feed chute are very sharp. Pay attention when handling the units. Only touch the stainless steel micro mesh filter on the edge and handle with care when cleaning with the nylon bristle brush.
- ATTENTION: Ensure that the filter basket is clean before starting to operate the appliance. Do not leave food leftovers dehumidify on the appliance or units of the appliance. If pulp dehumidifies on the micro mesh filter it may clog the fine pores of the micro mesh filter thereby lessening the effectiveness of the juicer.
• Note: The juice jug lid can be used to avoid any splatter. - ATTENTION: Empty the pulp container and juice jug in time to avoid run-over and splatter which might causes damages to the appliance.
- Never clean the motor block in the dishwasher.
- Always turn the appliance off and pull the plug when the appliance is not in use or when disassembling, moving or cleaning the appliance.
The current interest in fresh and unprocessed food is the reason for fresh fruit and vegetable juices to become a favourite component of our daily food and well balanced diet.
The Design Juicer Advanced Pro has a special designed large feed chute, a big pulp container, a big juice jug and a stainless steel titanium reinforced micro mesh filter. It operates with a high performance 1.500 watt motor which makes the juice production easy and efficient.
The units have a smooth surface with no grooves and rough edges and can be cleaned easily after use. The provided juice jug finishes with the juice run-out and therefore eliminates any splatter during operation. It has a volumetric capacity of 1.000 ml and a nice grip for easy and comfortable handling.
Please read all the advice and instructions with care and keep the manual. Only use the appliance to process fresh food.
Important safeguards
Carefully read all instructions before operating and save the instructions for further reference. Do not attempt to use this appliance for any other than the intended use, described in these instructions. Any other use, especially misuse, can cause severe injury or damage by electric shock, fire or moving mechanical parts. This instruction is an essential part of the appliance. When passing on the appliance to a third person, ensure to include these instructions.
Never leave the appliance unattended when in operational mode.
Any operation, repair and technical maintenance of the appliance or any part of it other than described in these instructions may only be performed at an authorised service centre. Please contact your vendor.
Safeguards for Daily Operation
- Only use the appliance for the intended purpose. Any non-appropriate use and misuse can cause damages and heavy personal injuries through voltage, fire and moving units. Only proceed the appliance as described in the directions.
- Do not use the appliance in moving vehicles or boats. Only use the appliance indoors.
- Store and use the appliance in a clean, frost free environment where it is protected from dampness, moist and immoderate and extraordinary burden (such as: downfall, beat, overheating, moisture in the motor base).
- Do not use or store the appliance outdoors.
- Store appliance and units out of reach of children.
- The work space has to be easily accessible, solid, even, dry and of sufficient size. Do not use the appliance in moist and wet areas.
- Operate the appliance on a well accessible, stable, level, dry, and suitable large surface. Do not place the appliance or any part of it on or near hot surfaces (heater, gas burner, grill, or oven). Do not place the appliance near the edge of the table or counter or on inclined or wet surfaces or where it can fall.
- Reparation and technical maintenance of the appliance or line cord are just allowed to be accomplished by an authorised specialist reparation shop.
- Do not use the appliance if it is damaged or units of the appliance are damaged. Do not use the appliance if it does not function properly or if it was excessively loaded. The appliance is likely damaged if the appliance or units of the appliance show cracks, exorbitant wearing down, alterations or leaks. It is also likely damaged if the drive wheel of the motor base moves slowly. Do not use the appliance if the rotating sieve is damaged. Take the appliance for technical maintenance and repair to an authorised specialised reparation shop.
- Only use units, spare parts and supplies which are provided and recommended by the manufacturer. Damaged or improper units may break in use, damage the appliance or cause injury.
- Do not push products into the feed chute with your fingers or foreign objects. Always use the food pusher provided.
- Do not touch the small cutting blades in the base of the stainless steel filter basket.
- Always make sure the appliance is properly and completely assembled before connecting to power outlet and operating. The unit will not turn 'ON' unless properly assembled.
- Do not let the motor run permanently for longer then 7 minutes to avoid overheating.
- Do not operate the appliance continuously on heavy loads for more than 1 minute. The Design Juicer Advanced Pro is fitted with a safety device which safeguards against overheating with excessive loads. If this occurs, the Juicer will automatically activate the overload protection button and the unit will switch itself off. If this occurs turn the power OFF at the power outlet and allow the unit to cool. Then press the overload protection button found on the bottom of the motor base. The safety device will then be reset and the Juicer is ready for use again.
- While proceeding Do not push the food pusher too hard down. Empty the pulp container and juice jug in time to avoid run-over and splatter which might causes damages to the appliance. When proceeding hard or stringily food or if you press the stamp down too hard the motor could stop or slow down. In this case turn off the appliance immediately and pull the plug to avoid overheating. Operate according to the instructions 'Trouble shooting guide'.
- Do not leave food leftovers dehumidify on the appliance or units of the appliance. If pulp dehumidifies on the micro mesh filter it may clog the fine pores of the micro mesh filter thereby lessening the effectiveness of the juicer. Remove such dirt immediately and operate according to the instructions 'Care and cleaning' before you continue to proceed.
- Never clean or operate the appliance or units of the appliance with abrasive or hard sharp-edged items.
- Never clean the motor block in the dishwasher.
- Never use force operating the appliance to avoid damage of the units of the appliance.
- The appliance is not suitable for mincing nuts, chocolate or similar ingredients. The appliance is not suitable to make minced meet or to blend food.
- Do not put any cloth or napkins underneath the appliance to avoid endangering by fire and electric shocks.
- Never let water or other liquids run into the motor base.
- Never clean the line cord or the motor base in the dishwasher, pour liquids over the appliance or douse or dip it in water or other liquids. In case that water or other liquids ran into the motor base while operating turn off the appliance immediately, pull the plug and dry the appliance with a clean cloth.
- Never leave children unsupervised when the appliance or units of the appliance are in reach.
- Never let children play with the appliance or units of the appliance. Children and invalid people have to be supervised using the appliance.
- This appliance is not intended for use by persons (including children) with reduced physical, sensory or mental capabilities, or lack of experience and knowledge, unless they have been given supervision or instruction concerning use of the appliance by a person responsible for their safety. Children should be supervised to ensure that they do not play with the appliance.
- Never leave the appliance unattended, when the plug is plugged into the power point.
- Always turn the appliance off and pull the plug when the appliance is not in use or when disassembling, moving or cleaning the appliance.
- Make sure that the appliance is turned off before pulling the plug out of the power point.
- To avoid damage, do not use any abrasive cleaners, corrosive chemicals (i.e. disinfectants, bleach) or cleaning pads for operation or cleaning. Do not use any hard or sharp utensils for operation or cleaning.
Important Safeguards for all Electrical Appliances
- Always uncoil the line cord completely before installing the appliance.
- Place the appliance close to a power point and connect it directly without using any extension cords to avoid additional risks of injury through fire or voltage.
- Only install the appliance in proper form secure grounding receptacle with adequate electric power supply (alternating current; 230/240 V, 50/60 Hz) and ground fault circuit interrupter. The maximum power consumption of the appliance is 1.500 Watt. You should also install a fuse with a release current of maximum 30mA. If necessary ask your electrician for help.
- Never pull, rip, bend, clamp, squish or knot the line cord. Pay attention to the line cord not hanging of the table. Attend to nobody getting caught in loops of the line cord or pulling the appliance of the work space. When pulling the plug always catch hold of the enclosure of the plug.
- Do not immerse the motor housing or power cord in water or any other liquid. Do not pour or drip any liquids on the motor housing or power cord. When liquids are spilled
on the motor housing, immediately unplug the appliance and dry the motor housing to avoid risk of electric shock or fire. Do not attempt to operate the appliance, when liquids are on or in the motor housing.
Movable and sharp-edged units - risk of injury
- The feed chute is designed exceedingly large. Never put fingers, wooden spoons or other foreign substance (such as hair, clothing, brushes, cloths) into the feed chute when the appliance is plugged into the power point.
- Always turn the appliance off, wait for the motor to stop moving and then pull the plug before taking off the lid of the juicer.
- Only use the provided food pusher to push food through the feed chute.
- Never hold your face or other body parts over the feed chute when the motor is running because little pieces of food could be thrown out of the feed chute.
- The blades on the base of the stainless steel micro mesh filter and inside the feed chute are very sharp. Pay attention when handling the units. Only touch the stainless steel micro mesh filter on the edge and handle with care when cleaning with the nylon bristle brush. Only store the appliance completely assembled. This way the blades will be out of reach.
- Never put foreign substance or hard objects into the feed chute. Remove all inedible parts (such as stem, hard peeling and seeds) of the food before putting them into the feed chute.
- The motor pursues running for a little while after turning the appliance off. Wait until the motor stops running completely before you open or move the appliance.
Get to know your Gastroback juicer
Patented extra wide feed chute: You can fill in whole fruit such as apples, carrots, tomatoes and peeled oranges. For quick and easy juicing of fruit and vegetables.
Juicer cover (dishwasher suitable) with interlocking safety arm: stops the juicer operating without the juicer cover locked in place.
Large pulp container (dishwasher suitable)
Juice spout
Heavy duty 1.500 watt motor
OFF-switch
natural_image
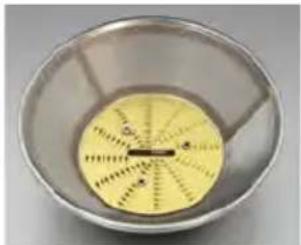
Close-up of a yellow circular object with measurement markings inside a metallic bowl (no visible text or symbols)Stainless steel, titanium reinforced micro mesh filter basket (dishwasher suitable)
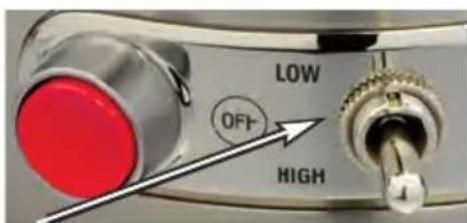
Speed control:
LOW: for juicing soft fruit with a lot of moist
HIGH: for juicing hard fruit and vegetables (view 'speed selector table')
natural_image
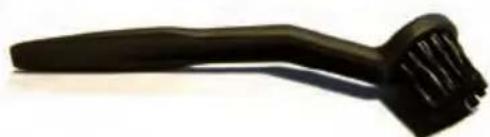
Black hairbrush with bristles, isolated on white background (no text or symbols)assists in removal of pulp from the pulp container when juicing large quantities, nylon brush end for easy cleaning of the stainless steel filter basket (dishwasher suitable)
Food pusher with cannelure: for pushing whole fruit and vegetables down the feed chute (dishwasher safe)
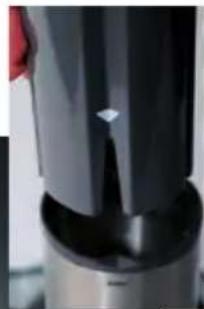
natural_image
Close-up of a black cylindrical object with a diamond-shaped indentation, possibly a knob or knob (no visible text or symbols)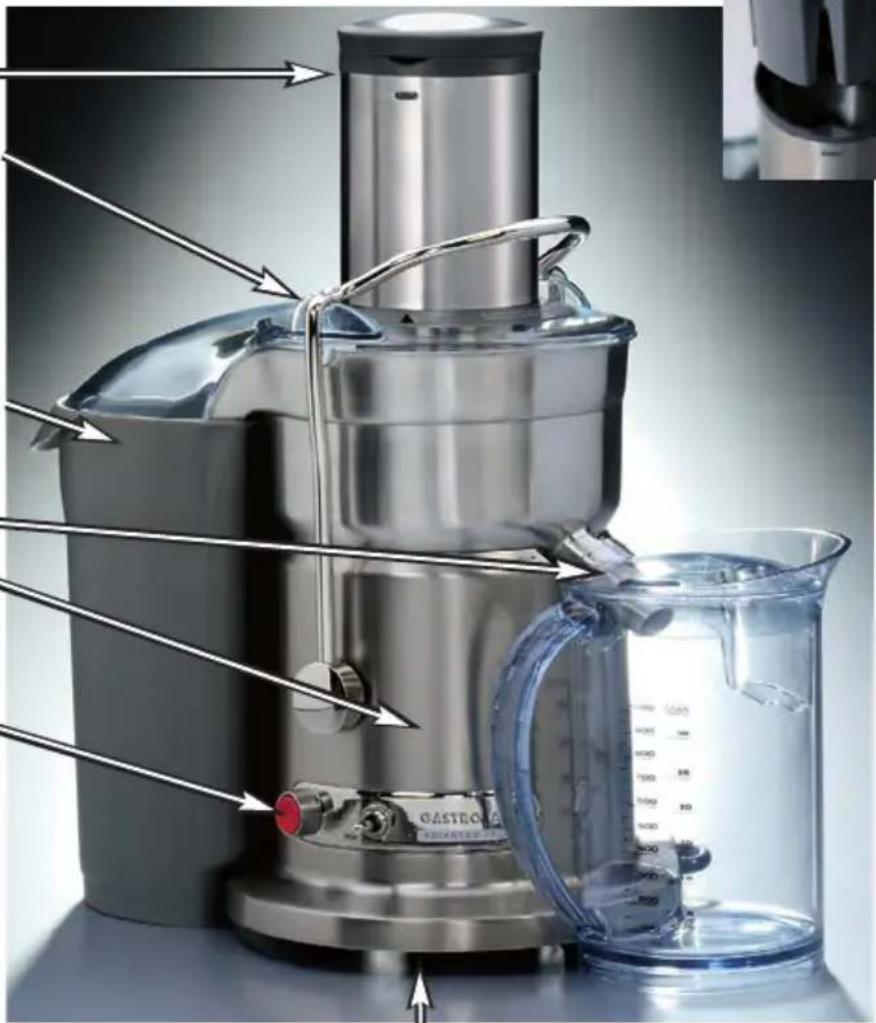
natural_image
Close-up of a modern electric juice maker with a clear blue filter, showing internal components and airflow direction (no text or symbols visible)Overload protection button on the bottom to safeguard against overheating (not shown in picture)
Cord storage: wraps around feet and clips into position under base
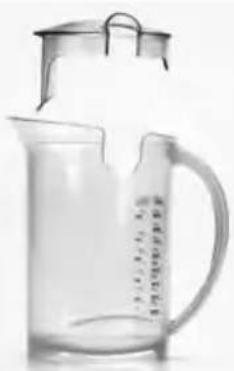
1 litre juice jug with handle and lid (dishwasher suitable)
Built in froth separator lid: ensures juice froth is separated from juice when poured into a glass (if preferred)
Lid: using the lid you avoid splatter while operating or to stor the juice in the fridge
natural_image
Black-and-white photo of a glass pitcher with liquid and a measuring cup, no visible text or symbolsAssembling the appliance
Step 1:
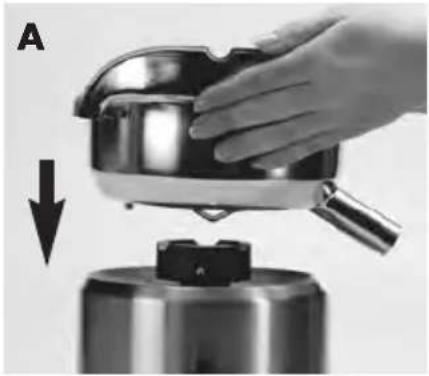
Place the filter bowl surround on the motor base. Locate the integrated pulp container so that the spout fits through the hole on the front of the motor base (picture A).
Step2:
WARNING: Handle the units with care and do not use any force. Pay attention to the sharp blades on the stainless steel micro mesh filter and the feed chute to avoid injury. Always completely assemble your juicer before you plug the plug into the power point.
ATTENTION: Ensure the stainless steel filter basket is clean before assembling. Any dehumidified left over food on the basket will block the fine mesh holes. If necessary remove excess fibre build up (from fruit or vegetables) according to the instructions 'Care and Cleaning'.
Align the arrows on the stainless steel filter basket with the arrows on the motor drive coupling and push down until it clicks into place. Ensure the stainless steel filter basket is fitted securely inside the integrated pulp container and onto the motor base (picture B).
Step 3:
Place the juicer cover over the stainless steel filter on top of the filter bowl surround (picture C). The feed chute has to be positioned in the middle of the filter basket and the pulp spouting of the cover has to face away from the interlocking safety arm.
Step 4:
Raise the safety locking arm straight up and lock into the two grooves on either side of the juicer cover. The safety locking arm should now be in a vertical position and locked into place on top of the juicer cover (picture D).
Important: If the safety locking arm is not in the right position the motor will not start moving.
Step 5:
Slide the food pusher down the feed chute by aligning the groove of the food pusher with the small protrusion on the inside of the top of the feed chute. Continue to slide the food pusher down the feed chute (picture E)
natural_image
Close-up of a hand pressing down on a stainless steel pot with a downward arrow indicating motion (no text or symbols)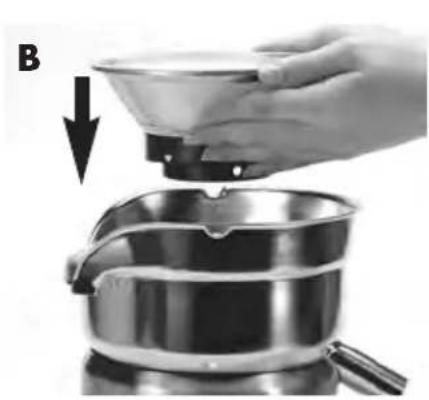
natural_image
Hand pouring liquid from a bowl into a metal pot (no text or symbols visible)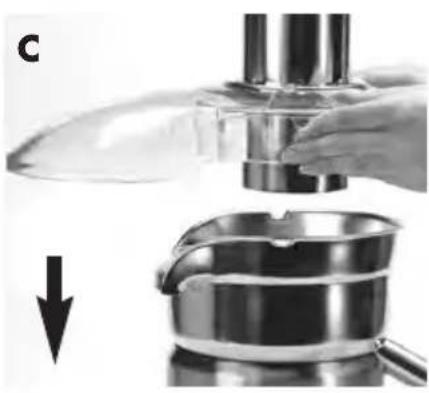
natural_image
Close-up of a kitchen presser with a downward arrow indicating a drop, showing the blade and handle (no text or symbols)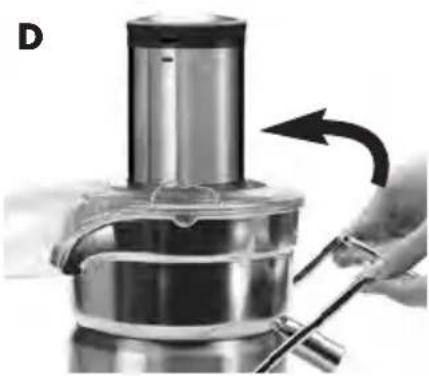
natural_image
Close-up of a hand using a tool to press or adjust a mechanical component, no visible text or symbols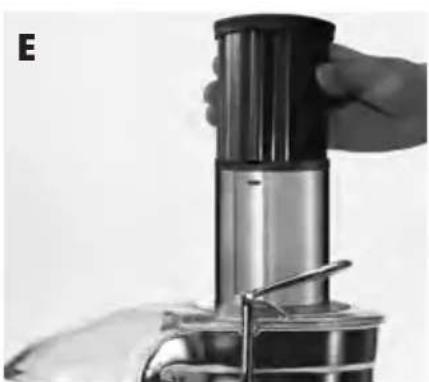
natural_image
Close-up of a hand operating a stainless steel portable air purifier (no visible text or symbols)Step 6:
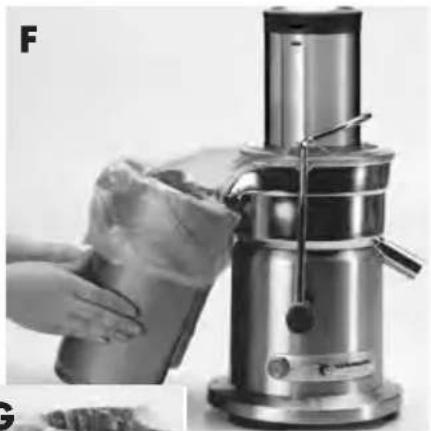
Place the pulp container into position by tilting the pulp container slightly to the right. Insert the container under the juicer cover on the left-hand side ensuring it is supported by the container support extending from under the motor base (picture F).
Note: To minimise cleaning, line the pulp container with a plastic freezer bag to collect the pulp (picture G). Pulp can then be used in other dishes, or as compost for the garden or discarded.
Step 7:
Place the juice jug provided under the spout on the right-hand side of the appliance. The juice jug lid can be used to avoid any splatter.
natural_image
Close-up of a hand cleaning a food item from a stainless steel juice grater (no visible text or symbols)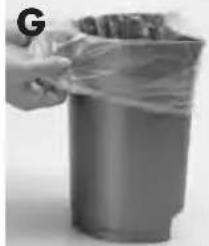
natural_image
Hand holding a plastic bag over a cylindrical container (no visible text or symbols)Operating your Design Juicer Advanced Pro
Step 1:
Wash selection of fruit and vegetables to be juiced and remove if necessary the peel (oranges, citrus fruits), stems and stones (nectarines, peaches, plums) and all inedible elements.
NOTE: Most fruit and vegetables such as apples, carrots and cucumber will not need to be cut or trimmed to size as these will fit whole into the feed chute. Ensure vegetables such as beetroot, carrots, etc. have all soil removed, are well washed and trimmed of leaves before juicing. When juicing carrots place the tip of the carrot into the feed chute last.
Step 2:
Ensure the Design Juicer Advanced Pro is correctly assembled and that there are nor foreign objects in the feed chute before putting the plug into the power point. Ensure the stainless steel filter is thoroughly cleaned before each use (refer to 'Care and cleaning'). Ensure you place the juice jug with lid fitted (or glass) under spout before commencing juicing.
Step 3:
Plug the power cord into a 220/230 V power outlet. With the motor running, place food into the feed chute. and turn the appliance 'ON' by switching the speed control. Dial to the desired speed (High or LOW) depending on the type of fruit or vegetable being juiced. Use the speed selector table as a guide for juicing different fruit and vegetables.
Note: Hard fruit and vegetables will put excess strain onto the motor if a low speed is selected. Please refer to the speed selector table to determine the correct speed for the fruit and vegetables being juiced.
Speed selector table
Fruit / Vegetables Suggested Speed
| Apples HIGHBeetroot (cleaned, trimmed) HIGHBrussel sprouts (trimmed) HIGHCarrots (cleaned) HIGHCelery HIGHFennel HIGHPears hard (stalks removed) HIGHPineapple (peeled) HIGHBroccoliCabbage HIGHCauliflower HIGHApricots (stone removed) LOWCucumberKiwi fruit (peeled) LOWMangoes (peeled, stone removed) LOWMelons (peeled) LOWNectarines (stone removed) LOWOranges (peeled)Peaches (stone removed) LOWPears soft (stalks removed)Plums (stone removed)TomatoesWatermelon (peeled) | HIGHLOWLOWLOWLOWLOWLOWLOWLOWLOWLOWLOWLOWLOWLOWLOWLOWLOWLOWLOWLOWLOWLOWLOWLOWLOWLOWLOWLOWLOWLOWLOWLOWLOWLOWLOWLOWLOWLOWLOWLOWLOWLOWLOWLOWLOWLOWLOWLOWLOWLOWLOWLOWLOWLOWLOWLOWLOWLOWLOWLOWLOWLOWLOWLOWLOWLOWLOWLOWLOWLOWLOWLOWLOWLOWLOWLOWLOWLOWLOWLOWLOWLOWLOWLOWLOWLOWLOWLOWLOWLOWLOWLOWLOWLOWLOWLOWLOWLOWLOWLOWLowLOWLOWLOWLOWLOWLOWLOWLOWLOWLOWLOWLOWLOWLOWLOWLOWLOWLOWLOWLOWLOWLOWLOWLOWLOWLOWLOWLOWLOWLOWLOWLOWLOWLOWLOWLOWLOWLOWLOWLOWLOWLOWLOWLOWLOWLOWLOWLOWLOWLOWLOWLOWLOWLOWLOWLOWLOWLOWLOWLOWLOWLOWLOWLOWLOWLOWLOWLOWLOWLOWLOWLOWLOWLOWLOWLOWLOWLOWLOWLOWLOWLOWLOWLOWLOWLOWLOWLOWLOWLOWLOWLOWLOWLOWLOWLOWLOWLOWLOW LOWLOWLOWLOWLOWLOWLOWLOWLOWLOWLOWLOWLOWLOWLOWLOWLOWLOWLOWLOWLOWLOWLOWLOWLOWLOWLOWLOWLOWLOWLOWLOWLOWLOWLOWLOWLOWLOWLOWLOWLOWLOWLOWLOWLOWLOWLOWLOWLOWLOWLOWLOWLOWLOWLOWLOWLOWLOWLOWLOWLOWLOWLOWLOWLOWLOWLOWLOWLOWLOWLOWLOWLOWLOWLOWLOWLOWLOWLOWLOWLOWLOWLOWLOWLOWLOWLOWLOWLOWLOWLOWLOWLOWLOWLOWLOWLOWLOWLOWLOW LowLOWLOWLOWLOWLOWLOWLOWLOWLOWLOWLOWLOWLOWLOWLOWLOWLOWLOWLOWLOWLOWLOWLOWLOWLOWLOWLOWLOWLOWLOWLOWLOWLOWLOWLOWLOWLOWLOWLOWLOWLOWLOWLOWLOWLOWLOWLOWLOWLOWLOWLOWLOWLOWLOWLOWLOWLOWLOWLOWLOWLOWLOWLOWLOWLOWLOWLOWLOWLOWLOWLOWLOWLOWLOWLOWLOWLOWLOWLOWLOWLOWLOWLOWLOWLOWLOWLOWLOWLOWLOWLOWLOWLOWLOWLOWLOWLOWLOWLOWLOYLOWLOWLOWLOWLOWLOWLOWLOWLOWLOWLOWLOWLOWLOWLOWLOWLOWLOWLOWLOWLOWLOWLOWLOWLOWLOWLOWLOWLOWLOWLOWLOWLOWLOWLOWLOWLOWLOWLOWLOWLOWLOWLOWLOWLOWLOWLOWLOWLOWLOWLOWLOWLOWLOWLOWLOWLOWLOWLOWLOWLOWLOWLOWLOWLOWLOWLOWLOWLOWLOWLOWLOWLOWLOWLOWLOWLOWLOWLOWLOWLOWLOWLOWLOWLOWLOWLOWLOWLOWLOWLOWLOWLOWLOWLOWLOWLOWLOWLOWLWLOWLOWLOWLOWLOWLOWLOWLOWLOWLOWLOWLOWLOWLOWLOWLOWLOWLOWLOWLOWLOWLOWLOWLOWLOWLOWLOWLOWLOWLOWLOWLOWLOWLOWLOWLOWLOWLOWLOWLOWLOWLOWLOWLOWLOWLOWLOWLOWLOWLOWLOWLOWLOWLOWLOWLOWLOWLOWLOWLOWLOWLOWLOWLOWLOWLOWLOWLOWLOWLOWLOWLOWLOWLOWLOWLOWLOWLOWLOWLOWLOWLOWLOWLOWLOWLOWLOWLOWLOWLOWLOWLOWLOWLOWLOWLOWLOWLOWLOWLOWLOWLOWLOWLOWLOWLOWLOWLOWLOWLOWLOWLOWLOWLOWLOWLOWLOWLOWLOWLOWLOWLOWLOWLOWLOWLOWLOWLOWLOWLOWLOWLOWLOWLOWLOWLOWLOWLOWLOWLOWLOWLOWLOWLOWLOWLOWLOWLOWLOWLOWLOWLOWLOWLOWLOWLOWLOWLOWLOWLOWLOWLOWLOWLOWLOWLOWLOWLOWLOWLOWLOWLOWLOWLOWLOWLOWLOWLOWLOWLOWLOWLOWLOWLOWLOWLOWLOWLOWLOWLOWLOWLOWLOWLOWLOWLOWLOWLOW LOW LOW LOW LOW LOW LOW LOW LOW LOW LOW LOW LOW LOW LOW LOW LOW LOW LOW LOW LOW LOW LOW LOW LOW LOW LOW LOW LOW LOW LOW LOW LOW LOW LOW LOW LOW LOW LOW LOW LOW LOW LOW LOW LOW LOW LOW LOW LOW LOW LOW LOW LOW LOW LOW LOW LOW LOW LOW LOW LOW LOW LOW LOW LOW LOW LOW LOW LOW LOW LOW LOW LOW LOW LOW LOW LOW LOW LOW LOW LOW LOW LOW LOW LOW LOW LOW LOW LOW LOW LOW LOW LOW LOW LOW LOW LOW LOW LOW LOW LOW Low LOW LOW LOW LOW LOW LOW LOW LOW LOW LOW LOW LOW LOW LOW LOW LOW LOW LOW LOW LOW LOW LOW LOW LOW LOW LOW LOW LOW LOW LOW LOW LOW LOW LOW LOW LOW LOW LOW LOW LOW LOW LOW LOW LOW LOW LOW LOW LOW LOW LOW LOW LOW LOW LOW LOW LOW LOW LOW LOW LOW LOW LOW LOW LOW LOW LOW LOW LOW LOW LOW LOW LOW LOW LOW LOW LOW LOW LOW LOW LOW LOW LOW LOW LOW LOW LOW LOW LOW LOW LOW LOW LOW LOW LOW LOW LOW LOW LOW LOW LWW LOW LWW LOW LWW LOW LWW LOW LWW LOW LWW LOW LWW LOW LWW LOW LWW LOW LWW LOW LWW LOW LWW LOW LWW LOW LWW LOW LWW LOW LWW LOW LWW LOW LWW LOW LWW LOW LWW LOW LWW LOW LWW LOW LWW LOW LWW LOW LWW LOW LWW LOW LWW LOW LWW LOW LWW LOW LWW LOW LWW LOW LWW LOW LWW LOW LWW Low LWW LOW LWW LOW LWW LOW LWW LOW LWW LOW LWW LOW LWW LOW LWW LOW LWW LOW LWW LOW LWW LOW LWW LOW LWW LOW LWW LOW LWW LOW LWW LOW LWW LOW LWW LOW LWW LOW LWW LOW LWW LOW LWW LOW LWW LOW LWW LOW LWW LOW LWW LOW LWW LOW LWW LOW LWW LOW LWW LOW LWW LOW LWW LOW LWW LOW LOW LWW LOW LWW LOW LWW LOW LWW LOW LWW LOW LWW LOW LWW LOW LWW LOW LWW LOW LWW LOW LWW LOW LWW LOW LWW LOW LWW LOW LWW LOW LWW LOW LWW LOW LWW LOW LWW LOW LWW LOW LWW LOW LWW LOW LWW LOW LWW LOW LWW LOW LWW LOW LWW LOW LWW LOW LWW LOW LWW LOW LWW LOW LWW LOW LTT LOW LTT LOW LTT LOW LTT LOW LTT LOW LTT LOW LTT LOW LTT LOW LTT LOW LTT LOW LTT LOW LTT LOW LTT LOW LTT LOW LTT LOW LTT LOW LTT LOW LTT LOW LTT LOW LTT LOW LTT LOW LTT LOW LTT LOW LTT LOW LTT LOW LTT LOW LTT LOW LTT LOW LTT LOW LTT LOW LTT LOW LTT LOW LTT LOW LTT HIGH |
Step 4:
WARNING: The feed chute is extra large! Never put fingers, wooden spoons or other foreign substances (such as hair, clothing, brushes, cloth) into the feed chute. Never use fingers to push food down the feed chute or to clear the feed chute. Always use the food pusher provided. With the motor running, place food into the feed chute and use the food pusher to gently guide food down. To extract the maximum amount of juice, always push the food pusher down slowly.
Step 5:
As fruit and vegetables are processed, juice will flow into the juice jug and the separated pulp will accumulate in the pulp container.
ATTENTION: Do not allow the pulp container to overfill as this may affect the operation of the appliance (refer to disassembling instructions). Reassemble machine to continue juicing. To minimise cleaning, line the pulp container with a plastic freezer bag to collect
the pulp. Pulp can then be used in other dishes (see recipes), or as compost for the garden or discarded (see recipes in the back of the nanual).
Empty the pulp container during juicing
The pulp container can be emptied during juicing by turning the appliance 'Off' at the control panel and then carefully removing the pulp container. Remove the pulp container by tilting the pulp container slightly to the right and unlatch it from under the juicer cover and the container support extending from under the motor base. Replace the empty pulp container into position before continuing to juice.
Overload protection button
The Design Juicer Advanced Pro is fitted with a safety device which safeguards against overheating with excessive loads. If this occurs, the juicer will automatically activate the overload protection button and the unit will switch itself off. If this occurs turn the power OFF at the power outlet and allow the unit to cool. Then press the overload protection button found on the bottom of the motor base. The safety device will then be reset and the juicer is ready for use again.
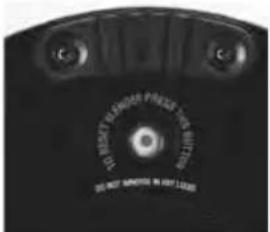
IMPORTANT: Put aside the juice jug and the pulp container before you turn the motor base around carefully to activat the overload protection button. The juicer is ready for use and you can continue juicing after putting the pulp container and the juice jug back into position. In case overload protection button gets activated straight away again refer to the trouble shooting guide.
Disassembling your Design Juicer Advanced Pro
WARNING: Always turn the appliance off and pull the plug when the appliance is not in use or when disassembling, moving or cleaning the appliance.
Step 1:
Ensure the appliance is turned off by pressing the Off-switch on the control panel and unplug the cord.
Step 2:
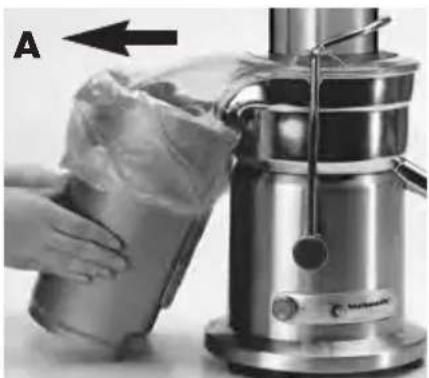
Remove the pulp container by tilting the pulp container slightly to the right and unlatch it from under the juicer cover and the container support extending from under the motor base (picture A).
Step 3:
Use the grip handle located on the safety locking arm to lift the locking arm from the juicer cover and lower down out of position (picture B).
natural_image
Close-up of a hand holding a packaged food item next to a Kilkshake blender (no visible text or symbols)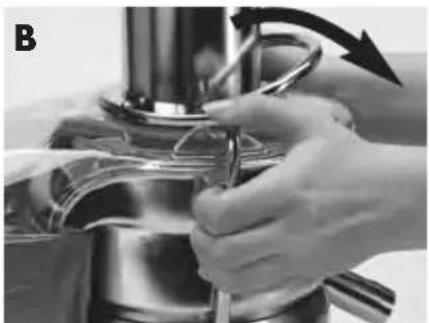
natural_image
Close-up of hands operating a kitchen utensil with a curved handle (no visible text or symbols)Step 4:
Lift the juicer cover off the juicer (picture C).
Step 5:
Remove the filter bowl surround with the stainless steel filter basket still in place. To remove the filter bowl hold the base of the juicer and turn the filter bowl surround by the juice spout clockwise (picture D).
Step 6:
WARNING: The stainless steel filter basket contains small sharp blades to cut and process fruit and vegetables. Do not touch blades when handling the filter basket.
To remove the stainless steel filter basket from the filter bowl surround, turn the filter bowl surround upside down and carefully remove the filter basket. For easy cleaning, it is recommended to remove the filter basket over the sink.
ATTENTION: There are sharp blades on the bottom of the stainless steel filter basket (see picture).
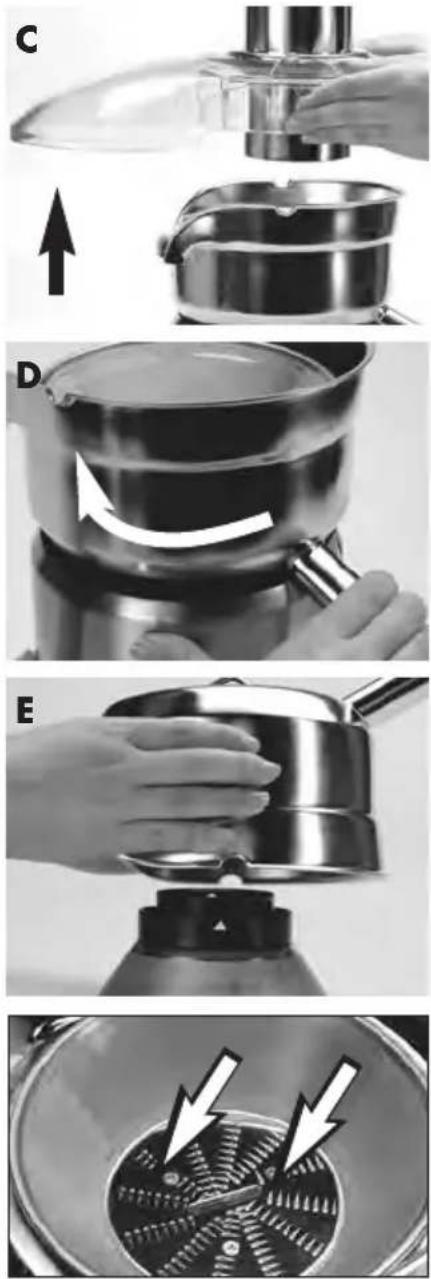
Care and Cleaning
WARNING: Always ensure that the juicer is switched off at the power outlet. Then remove the plug from the power outlet before cleaning, dissembling and storing the appliance. Do not immerse the motor base in water or any other liquid. Do not use water jet to clean the motor base. Do not clean the motor base in the dishwasher.
The centre of the filter basket and feed chute contain small sharp blades to process fruit and vegetables during the juicing function. Do not touch blades when handling the filter basket or feed chute.
ATTENTION: Abrasive and strong cleaner damage the surface of the plastic units and could cause discolouration. Never clean the appliance or units with abrasive and strong cleaner. For easier cleaning and to avoid discolouration: Clean as you go and avoid dried on juice or pulp residue. Immediately after each use, rinse removable parts in hot water to remove wet pulp. Otherwise discolouration of the plastic may occur with strongly
coloured fruit and vegetables. Allow parts to air dry.
Never use hard or sharp-edged subjects when using or cleaning the juicer or the stainless steel micro mesh filter. Do not use force when using the appliance to avoid damages. Always assemble the appliance completely before storing. The units are protected this way and can not get lost.
Ensure the Design Juicer Advanced Pro is correctly disassembled. Refer to 'Disassembling your Design Juicer Advanced Pro'. Follow these instructions to clean all surfaces of parts that come into contact with food during normal use.
Filter bowl surround, juicer cover, stainless steel micro mesh filter, pulp container and juice jug are dishwasher safe (top shelf only). Use a program to be suited for glasses (low temperature). A program with high temperature might cause discolouration and distortion of the plastic units. Plastic units might tarnish being frequently cleaned in the dishwasher.
IMPORTANT: Do not clean the food pusher in the dishwasher.
IMPORTANT: Soak the stainless steel filter basket in hot soapy water for approximately 10 minutes immediately after juicing is completed. If pulp dehumidifies on the micro mesh filter it may clog the fine pores of the micro mesh filter thereby lessening the effectiveness of the juicer.
Using the cleaning brush, hold the filter basket under running water and brush from the inside of the basket to the outer rim. Avoid touching the small sharp blades in the centre of the filter basket. After cleaning the filter basket, hold it up towards a light to ensure the fine mesh holes are not blocked. If the holes are blocked, soak the filter basket in hot water with 10% lemon juice to loosen the blocked holes. Alternatively, wash the filter basket in the dishwasher.
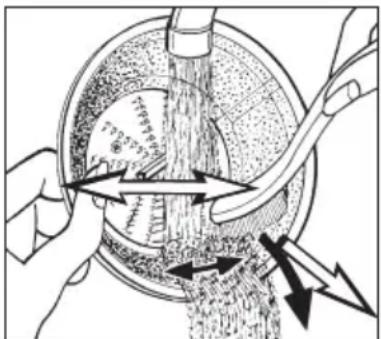
Note: Alternatively you can soak the filter basket in hot water with dental prosthesis detergent. Rinse thoroughly with clear water and the provided nylon brush.
IMPORTANT: Do not soak the stainless steel filter basket in bleach. Always treat the filter basket with care as it can be easily damaged.
Note: To minimise cleaning, line the pulp container with a plastic freezer bag to collect the pulp. Pulp can then be used in other dishes (see recipes), or as compost for the garden or discarded.
Wipe the motor base with a damp cloth. Ensure of no water intrusion into the inside of the motor base.
Allow parts to air dry or thoroughly dry them with a clean cloth. Always assemble the appliance completely before storing (regard 'Assembling the appliance'). The units are protected this way and cannot get lost.
ATTENTION: Occasionally clean the drive coupling (see picture) with a damp cloth. Ensure the stainless steel balls of the basket adjustment are clean and free from dried on juice or pulp residue. After every fifth usage put some vaseline onto the balls of the adjustment.
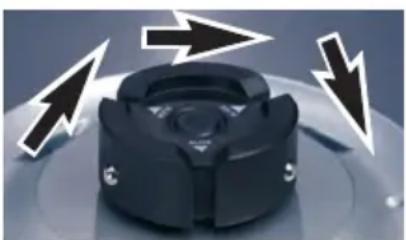
natural_image
Close-up of a black mechanical component with directional arrows indicating motion or pressure (no text or symbols)WARNING: Please store the juicer in a frost free, clean and dry location where it is out of reach of children and is protected against excessively loads (such as downfall, voltage, heat, humidity). Never lay heavy or hard objects on top of the appliance.
To clear blockage
When juicing hard or stringily fruit or vegetables, or if you push down the food pusher too fast or with too much pressure or the juicing action is too vigorous, wet pulp can build up under the juicer cover or the motor appears to stall when juicing. Wet pulp would block the fine mashes of the filter basket. Try slower juicing action by pushing the food pusher down more slowly. Follow Disassembling and Cleaning instructions and clean the filter bowl surround, the stainless steel filter basket and the juicer cover.
- Turn the appliance off, wait for the motor to stop moving and pull the plug.
- Disassemble the appliance according to the instructions. WARNING: Do not touch blades when handling the filter basket.
- Remove residue of food on the filter basket with a small wooden or plastic spoon.
- Assemble the appliance according to the instructions and continue juicing.
5.5. If another blockage occurs clean the appliance according to the instruction 'Care and Cleaning'.
To avoid further blockage:
- When juicing hard or stringily fruit or vegetables choose a high speed.
- Remove very hard and stringily elements such as stalks and stems.
- Try slower juicing action by pushing the food pusher down more slowly.
- Avoid overloading pulp in the pulp container. The pulp has to be able to fall easily and unhindered into the pulp container.
- Try other fruit and vegetables.
Trouble Shooting Guide
Possible problem Easy solution
| Machine will not work when switched 'ON' | The safety locking arm may not be correctly engaged in the vertical operating position with the locking arm located into the two grooves on either side of the juicer cover (regard 'Assembling the appliance'). |
| Motor appears to stall when juicing | Wet pulp can build up under the cover if the juicing action is too vigorous. Try slower juicing action by pushing the food pusher down more slowly. Clean the integrated pulp container, the stainless steel filter basket and the juicer cover (regard 'Clear blockage'). |
| Excess pulp building up in the micro mesh filter basket | Stop the juicing process. Remove the juicer cover, scrape off pulp. Re-assemble and begin juicing again. Try alternating (soft and hard) vegetable and fruit varieties. |
Possible problem Easy solution
| Pulp too wet and reduced extracted juice | Try a slower juicing action by pushing the food pusher down more slowly. Remove stainless steel filter basket and thoroughly clean mesh walls with the nylon brush. Rinse the stainless steel filter basket under hot water. If the fine mesh holes are blocked, soak the stainless steel filter basket in a solution of hot water with 10% lemon juice to unblock the holes or wash in the dishwasher. This will remove excess fibre build up (from fruit or vegetables) which could be inhibiting the juice flow. |
| Juice leaks between the rim of the juicer and the cover of the filter | Try a slower juicing action by pushing the food pusher down more slowly. Fruit and vegetables with a high water content (tomatoes and watermelon) should be juiced on low speed. |
| Bowl surround juice sprays out from spout | Try a slower juicing action by pushing the food pusher down more slowly. |
| Juicer makes loud noise when turned on | Filer basket is not properly snapped into position. Turn the On/OFF button to OFF. Turn the power OFF. Disassemble the Design Juicer Advanced Pro (refer to 'disassembling'). Re-assemble (refer to 'assembling'). |
| No juice coming out while juicing | Check that the spout is not blocked with pulp. Refer to 'Care and cleaning'. |
Tips on juicing
The inside information on juicing
Although juice drinks are usually developed with flavour, texture and aroma at the forefront, the health benefits certainly add to the pleasurable taste experience. 95% of the nutrient content of fruit and vegetables is found in the juice. Liquids extracted from fresh fruit and vegetables form an important part of a well balanced diet. Fresh fruit and vegetable juices are an easy to make source of vitamins and minerals.
Juices are rapidly absorbed into the blood stream therefore being the quickest way in which the body can digest nutrients. When you make your own juices, you have complete control over what you include in them. You select the ingredients and decide if you need to use sugar, salt or other flavouring agents. Freshly extracted juices should be consumed just after they have been made to avoid a loss of vitamin content.
Purchasing and storage of fruit and vegetables
• Always wash fruit and vegetables before juicing.
• Always use fresh fruit and vegetables for juicing.
• To save money and obtain fresher produce, purchase fruit or vegetables that are in season.
- Keep your fruit and vegetables ready for juicing by washing them before storing.
- Most fruit and hardier type vegetables can be stored at room temperature. The more delicate and perishable items such as tomatoes, berries, leafy greens, celery, cucumber and herbs should be stored in the refrigerator until required.
Preparation of fruit and vegetables
- If using fruits with hard or inedible skins such as mangoes, kiwi, guava, melons or pineapple, always peel before juicing.
- Citrus fruits can be juiced in the Design Juicer Advanced Pro if peeled first.
- All fruits with pits, hard seeds or stones such as nectarine, peaches, mangoes, apricots, plums and cherries must be pitted before juicing.
- A small amount of lemon juice can be added to apple juice to prohibit browning.
NOTE: Your Design Juicer Advanced Pro makes invigorating, frothy orange juice. Simply peel the oranges and juice. (It is best to refrigerate oranges before juicing).
The right technique
- When juicing a variety of ingredients with varying textures start with the softer textured ingredients then change to for harder texture ingredients. Choose the correct speed according to the speed selection table.
- If you are juicing herbs, sprouts or leafy green vegetables either wrap then together to form a bundle or juice them in the middle of a combination of ingredients to obtain the best extraction.
- If juicing herbs or leafy green vegetables on their own, the juice yield will be low due to the nature of centrifugal juicing, it is advised to juice them as with a combination of other fruit and vegetables.
- All fruit and vegetables produce different amounts of liquids. This varies within the same group i.e. one batch of tomatoes can produce more juice than another batch. Since juice recipes are not exact, the precise quantities of any juice are not crucial to the success of a particular mixture.
NOTE: To extract the maximum amount of juice always push the food pusher down slowly.
Getting the right blend
It is easy to create great tasting juice. If you have been making your own vegetable and fruit juices, then you know how simple it is to invent new combinations. Taste, colour, texture and ingredient preferences are a personal thing. Just think of some of your favourite flavours and foods – would they work well together or would they clash. Some strong flavours could over power the more subtle flavours of others. It is however, a good rule of thumb to combine starchy, pulpy ingredients with those high in moisture.
Using the pulp
The remaining pulp left after juicing fruit or vegetables is mostly fibre and cellulose which, like the juice, contains vital nutrients necessary for the daily diet and can be used in many ways. However, like the juice, pulp should be used that day to avoid loss of vitamins.
Some of the uses of pulp are to bulk out rissoles, thicken casseroles or soups or in the case of fruit, simply placed in a bowl topped with meringue and baked for a simple dessert. Quite apart from the consumption use, pulp is great used in the garden for compost.
NOTE: When using the pulp, there may be some pieces of fruit or vegetables remaining. These should be removed before using the pulp in any recipes.
Fruit and vegetable facts
| Fruit and vegetables | Best season to buy | Storage | Nutritional value | Kilojoule/calorie count |
| Apples | Autumn/Winter | Vented plastic bags in refrigerator | High in Dietary Fibre and Vitamin C | 200 g Apple=300 Kj (72 cals) |
| Apricots | Summer | Unwrapped in crisper of refrigerator | High in Dietary Fibre, Contains Potassium | 30 g Apricot=85 Kj (20 cals) |
| Beetroot | Winter | Cut off tops, then refrigerate unwrapped | Good source Folate and Dietary Fibre, Vitamin C and Potassium | 160 g Beetroot=190 Kj (45 cals) |
| Broccoli | Autumn/Winter | Plastic Bag in refrigerator | Vitamin C, Folate, B2, B5, E, B6 and Dietary Fibre | 100 g Broccoli=195 Kj (23 cals) |
| Brussels Sprouts | Autumn/Winter | Unwrapped in crisper of refrigerator | Vitamin C, B2, B5, E, Folate and Dietary Fibre | 100 g Brussels Sprouts=110 Kj (26 cals) |
| Cabbage | Winter | Wrap, trimmed in the refrigerator | Vitamin C, Folate, Potassium, B6 and Dietary Fibre | 100 g Cabbage=110 Kj (26 cals) |
| Carrots | Winter | Uncovered in refrigerator | Vitamin A, C, B6 and Dietary Fibre | 120 g Carrots=125 Kj (30 cals) |
| Cauliflower | Autumn/Winter | Remove outer leaves, store in Plastic bag in refrigerator | Vitamin C, B5, B6, Folate, Vitamin K and Potassium | 100 g Cauliflower=55 Kj (13 cals) |
| Celery | Autumn/Winter | Refrigerate in plastic bag | Vitamin C and Potassium | 80 g Celery= 55 Kj (7 cals) |
| Cucumber | Summer | Crisper in refrigerator | Vitamin C | 280 g Cucumber=120 Kj (29 cals) |
| Fennel | Winter/Spring | Crisper in refrigerator | Vitamin C and Dietary Fibre | 300 g Fennel=145 Kj (35 cals) |
| Kiwi Fruit | Winter/Spring | Crisper in refrigerator | Vitamin C and Potassium | 100 g Kiwi Fruit=100 Kj (40 cals) |
| Mangoes | Summer | Refrigerated | Vitamin A, C, B1, B6 and Potassium | 240 g Mango=200 Kj (48 cals) |
| Melons including Watermelon | Summer/Autumn | Crisper in refrigerator | Vitamin C, Folate, Dietary Fibre and Vitamin A | 200 g Melon=210 Kj (50 cals) |
| Nectarine | Summer | Crisper in refrigerator | Vitamin C, B3, Potassium and Dietary Fibre | 80 g Nectarine=355 Kj (85 cals) |
| Oranges | Autumn/Winter Spring | cool and dry place for 1 week, transfer to refrigerator keep longer | Vitamin C 35 mg/100 g | 150 g Orange=160 Kj (38 cals) |
| Peaches | Summer | Refrigerate uncovered | Vitamin C, B3, Potassium and Dietary Fibre | 150 g Peach=205 Kj (49 cals) |
| Pears | Autumn | Refrigerate uncovered | Dietary Fibre | 150 g Pears=250 Kj (60 cals) |
| Pineapples | Summer | Refrigerate uncovered | Vitamin C | 150 g Pineapple=245 Kj (59 cals) |
| Plums | Summer | Refrigerate uncovered | Dietary Fibre | 70 g Plums=110 Kj (26 cals) |
| Tomatoes | Summer | Uncovered in crisper of refrigerator | Vitamin C, Dietary Fibre, Vitamin E, Folate and Vitamin A | 100 g Tomatoes= 90 Kj (22 cals) |
Note: Your Design Juicer Advanced Pro makes invigorating frothy orange juice. Simply peel the oranges and juice (best to refrigerate oranges before juicing).
Apple-Pear-Strawberry-Juice
Makes 3 cups:
1 small Granny Smith apple
3 small ripe pears
1 cup strawberries, trimmed
Process apple, pears and strawberries through the juicer. Serve immediately.
Rockmelon-Mint-Mango-Juice
Makes 2 cups:
1/2 small rockmelon, peeled, seeded
and halved
3 sprigs fresh mint leaves
1 mango, halved, seeded and peeled
Process rockmelon, mint and mango through the juicer. Serve immediately.
Tomato-Cucumber-Parsley-Carrot-Juice
Makes 3 cups:
3 medium tomatoes
1 large cucumber
1 large bunch fresh parsley
3 medium carrots, trimmed
Process tomatoes, cucumber, parsley and carrots through the juicer. Serve immediately.
Kumera-Celery-Ginger-Orange-Juice
Makes 3 cups:
4 sticks celery, trimmed
1 small kumera (sweet potato), peeled and halved
2.5 cm piece fresh ginger
4 oranges, peeled
Process celery, kumera, ginger and oranges through the juicer. Serve immediately.
Parsnip-Celery-Pear Juice
Makes 3 Cups:
2 parsnips, trimmed
4 sticks celery, trimmed
4 medium pears, stalks removed
Process parsnips, celery and pears through the juicer. Serve immediately.
Fresh Starts
Apple-Carrot-Celery-Juice
You may alter the amounts of either the carrots or apple to make the juice sweeter or savoury to suit your taste buds:
Makes 2 cups:
4 small Granny Smith apples
3 medium sized carrots, trimmed
4 sticks celery
Process apples, carrots and celery through the juicer. Mix well and serve immediately.
Tomato-Carrot-Celery-Lime-Juice
Makes 3 cups:
2 medium tomatoes
1 large carrot, trimmed
2 celery stalks, trimmed
1 lime, peeled
Process tomatoes, carrot, celery and lime through the juicer. Serve immediately.
Carrot-Beetroot-Orange-Juice
Makes 2 cups:
2 medium carrots, trimmed
3 medium beetroot, trimmed
4 oranges, peeled
Process carrots, beetroot and oranges through the juicer. Serve immediately.
Apple-Peach-Grapefruit-Juice
Makes 2 cups
1 small Delicious apple
2 large peaches, halved and seeds removed
2 grapefruits, peeled
Process apple, peaches and grapefruit through the juicer. Serve immediately.
Pineapple-Peach-Pear-Juice
Makes 3 cups
1/2 small pineapple, peeled and halved
2 peaches, halved and seeds removed
2 small ripe pears
Process pineapple, peaches and pears through the juicer. Serve immediately.
Vitamin replacer
Tomato-Carrot-Red Capsicum-Juice
Makes 3 cups:
2 small red capsicum
3 medium tomatoes
3 carrots, trimmed
4 sprigs parsley
Trim base of capsicum and remove seeds. Process tomatoes, carrots, parsley and capsicum through the juicer. Serve immediately.
Blackberry-Pear-Grapefruit-Juice
Makes 3 cups:
250g blackberries
3 ripe pears
2 grapefruits, peeled
Process blackberries, pears and grapefruit through the juicer. Serve immediately.
Beetroot-Apple-Celery-Juice
Makes 2 cups:
4 medium sized beetroot, trimmed
2 medium Granny Smith apples
4 sticks celery
Process beetroot, apples and celery through the juicer. Serve immediately.
Cucumber-Celery-Fennel-Bean Sprout-Juice
Makes 3 cups:
1 large cucumber
3 sticks celery
1 bulb fennel, trimmed
2 cups bean sprouts
Process cucumber, celery, fennel and bean sprouts through the juicer. Serve immediately.
Frothie orange juice
Makes 8-10 cups:
Process oranges through the juicer. Serve immediately. (Best to refrigerate oranges before juicing)
Liquid lunches
Mango, rockmelon and orange yogurt drink
Serves 4:
1 mango, halved, peeled and seeded
1/2 small rockmelon, peeled, seeded and
cut into two equal portions
5 oranges, peeled
3 tablespoons natural yogurt
Process mango, rockmelon and oranges through the juicer. Pour into a large bowl whisk in yogurt. Serve immediately.
Fresh vegetable soup with noodles
Serves 4
1 small tomato
1 small onion, peeled and trimmed
2 carrots
1 green capsicum, base removed and seeded
1 tablespoon butter
1 tablespoon wholemeal flour
375ml vegetable stock
425g canned baked beans
1 packet 2 Minute Noodles
Freshly ground black pepper
Process tomato, onion, carrots and green pepper through the juicer. Melt butter in a large saucepan over a medium heat. Stir in flour, cook for one minute, stirring constantly. Stir in the extracted juice, vegetable stock and baked beans. Bring to the boil, then reduce heat and allow to simmer for 10 minutes. Add noodles, cook for 2 minutes or until noodles are tender. Pour into 4 soup bowls, sprinkle with black pepper to taste and serve immediately.
Gazpacho
Serves 4:
4 medium tomatoes
4 sprigs fresh parsley
1 large clove garlic, peeled
1 small onion, peeled and trimmed
2 carrots
2 stalks celery
1 red capsicum, base removed and seeded
1 lebanese cucumber
2 tablespoons red wine vinegar
freshly ground black pepper
1 cup crushed ice
3 tablespoons chopped fresh basil
Process tomatoes, parsley, garlic, onion, carrots, celery, red capsicum and cucumber through the juicer. Stir in vinegar and black pepper. Arrange ice in four soup bowls. Pour in extracted juice, sprinkle with basil and serve immediately.
Pasta with provencal style sauce
Serves 4:
4 tomatoes
2 sprigs fresh parsley
1 stick celery
2 large cloves garlic
1 small onion, peeled and trimmed
1 red capsicum, base removed and seeded
1 tablespoon tomato paste
1/2 cup red wine
2 teaspoons dried oregano
500g cooked pasta
3 tablespoons grated Parmesan cheese
Process tomatoes, parsley, celery, garlic, onion and red capsicum. Blend tomato paste with red wine, stir in the extracted juice. Pour into a saucepan and cook over medium heat for 3-4 minutes. Add pasta and toss to coat pasta well. Divide mixture between 4 serving bowls. Sprinkle with oregano and Parmesan cheese. Serve immediately.
Icy Coolers
Sparkling pear and apricot cooler
Makes 4 cups:
4 large apricots, halved and seeded
3 large pears
250 ml mineral water
1 cup crushed ice
Process apricots and pears through the juicer. Scoop ice into 4 tall glasses. Divide extracted juice between the glasses. Top with mineral water, stir well to blend. Serve immediately.
Rockmelon, strawberry and passion crush
Makes 4 cups:
1/2 rockmelon, peeled, seeded and divided
into 2 equal portions
250g strawberries, hulled
pulp of 2 passion fruit
1 cup crushed ice
Process rockmelon and strawberries through the juicer. Stir in passion fruit pulp. Scoop ice into
4 glasses, pour over juice, mix well to combine. Serve immediately.
Tropical blend
Makes 4 cups
2 mangoes, halved, seeded and peeled
3 kiwi fruit, peeled
1/2 small pineapple, peeled and halved
1/2 cup fresh mint leaves
1 cup crushed ice
Process mangoes, kiwi fruit, pineapple and mint through the juicer. Scoop ice into 4 glasses, pour over juice, mix well to combine. Serve immediately.
Tomato, nectarine, passionfruit and mint icer
Makes 4 cups:
6 tomatoes
2 nectarine
1/2 cup fresh mint leaves
pulp of 4 passion fruit
1 cup crushed ice
Process tomatoes, nectarine and mint leaves through the juicer. Stir in passionfruit pulp. Scoop ice into 4 glasses, pour over juice, mix well to combine. Serve immediately.
Cucumber, pineapple and coriander ice
Makes 4 cups:
1/2 small pineapple, peeled and halved
2 cucumber
1/2 cup fresh coriander leaves
1 cup crushed ice
Process pineapple, cucumber and coriander through the juicer. Scoop ice into 4 glasses, pour over juice, mix well to combine. Serve immediately.
Pear, radish and celery crush
Makes 4 cups:
3 medium pears
4 radishes, trimmed
3 sticks celery
1 cup crushed ice
Process pears, radishes and celery through the juicer. Scoop ice into 4 glasses, pour over juice, mix well to combine. Serve immediately.
Spirited juices
Coconut pineapple colada
Makes 4 cups:
1/2 coconut, peeled and halved
1/2 large pineapple, peeled and quartered
3 tablespoons Malibu liqueur
500ml soda water
1 cup crushed ice
Process coconut and pineapple through the juicer. Stir in liqueur and soda water. Scoop ice into 4 tall glasses, pour over juice mixture, mix well to combine. Serve immediately.
Bloody Mary
Makes 4 cups
4 medium tomatoes
2 sticks celery
1 large red capsicum, base removed and seeded
1/3 cup Vodka
1 cup crushed ice
Process tomatoes, celery and red capsicum through the juicer. Stir in Vodka. Scoop ice into 4 glasses, pour over tomato mixture, mix well to combine. Serve immediately.
Honeydew dream
Makes 4 cups:
1 honeydew melon, peeled, seeded and quartered
Process honeydew melon through the juicer. Stir in liqueur and soda water. Scoop ice into 4 tall glasses, pour over melon mixture, mix well to combine. Serve immediately.
Peach and mint julep
Makes 4 cups:
6 peaches, halved and seeded
1/2 cup fresh mint leaves
2 tablespoons Creme de Menthe
2 teaspoons sugar
1/2 cup crushed ice
500ml mineral water
Process peaches and mint leaves through juicer. Stir in Creme de Menthe and sugar. Scoop ice into 4 glasses, pour over peach mixture, mix well to combine. Serve immediately.
Energy fuel
Grape, kiwi fruit and berry booster
Grapes contain potassium and iron, providing a great pick-me-up after a strenuous day.
Makes 6 cups:
500g green seedless grapes, stems removed
2 kiwi fruit, peeled
250g strawberries, hulled
500ml skim milk
2 tablespoons powdered protein drink mix
1/2 cup crushed ice
Process grapes, kiwi fruit and strawberries through the juicer. Mix in milk, protein drink mix and crushed ice. Serve immediately.
Beetroot, carrot and orange quencher
8 carrots
2 small beetroot, trimmed
1/4 cup fresh mint leaves
4 oranges, peeled
Process carrots, beetroot, mint leaves and oranges through the juicer. Serve immediately.
Apricot, apple and pear sparkle
Makes 4 cups
4 large apricots, halved and seeded
4 small red apples
3 medium pears
250ml sparkling mineral water
1/2 cup crushed ice
Process apricots, apples and pears through the juicer. Stir in mineral water and ice. Serve immediately.
Fibre favourites
Rather than waste the fibre from the fruit and vegetables that have been juiced, the following recipes have been developed using the left over pulp.
Carrot, pumpkin and feta flan
Serves 6:
8 sheets filo pastry
60g butter, melted
1 leek finely sliced
1 cup pumpkin pulp
1 cup carrot pulp
250g feta cheese, crumbled
3 eggs
1 egg white
1/2 cup milk
2 tablespoons orange rind
3 tablespoons chopped fresh parsley
Layer the sheets of pastry, brushing between each sheet with butter. Lift pastry into a 25 cm flan tin, press over base and side. Trim pastry edge to about 1.5cm higher than side of tin. Combine leek, pumpkin, carrot, feta cheese, eggs, egg white, milk, orange rind and parsley. Pour into pastry case and bake at 180^ C for 25-30 minutes or until golden and set.
Vegetable and bacon soup
Serves 4:
3 teaspoons butter
1 onion, finely chopped
1 ham bone
350g beetroot pulp, strained and juice reserved
50g potato pulp, strained and juice reserved
50g carrot pulp, strained and juice reserved
100g tomato pulp, strained and juice reserved
50g cabbage pulp, strained and juice reserved
reserved juices and enough water to make up 2 litres
4 bacon rasher, chopped
1 tablespoon lemon juice
1/2 cup sour cream
Melt butter in a large saucepan, cook onion over a medium heat for 2-3 minutes or until golden. Add ham bone to pan, stir in beetroot pulp, potato pulp, carrot pulp, tomato pulp, cabbage pulp, reserved juices and water, bacon and lemon juice. Bring to the boil, reduce heat and simmer for 30-40 minutes. Remove ham bone, discard bone, finely chop meat and return to the pan. Serve topped with sour cream.
Carrot, apple and celery strudels
Serves 8:
30g butter
1 small onion, finely chopped
41/2 cups carrot, apple and celery
pulp, strained
(see juice recipe on page R3)
250g cottage cheese
2 tablespoons chopped fresh mint
1 egg, beaten
12 sheets filo pastry
60g butter, melted extra
1 cup grated fresh Parmesan cheese
Melt butter in a saucepan, add onion, cook for
2-3 minutes, or until soft, seasoning to taste. Combine onion, carrot, apple and celery pulp, cottage cheese, mint and egg in a bowl. Mix well. Cut filo sheets in half, place 3 sheets on bench, cover remaining pastry with greaseproof paper, then a damp cloth to prevent drying. Brush 1 sheet of pastry with extra butter, sprinkle with Parmesan cheese, top with another sheet of pastry, brush with butter, sprinkle with more cheese. Repeat with last sheet of pastry. Place tablespoons of carrot mixture on one end of pastry, fold in sides and roll up like a swiss roll. Repeat with remaining pastry and pulp mixture. Place on a greased oven tray and bake at 200^ C for 20-25 minutes or until golden.
Berry and white chocolate mousse
Serves 6:
200g white chocolate
200g strawberry pulp
200g raspberry pulp
3 teaspoons gelatin dissolved in 3 tablespoons
hot water
3 egg yolks
300ml carton thickened cream
1/4 cup icing sugar
2 tablespoons Grand Marnier
Melt chocolate over hot water, cool, being careful not to let it set. Combine strawberry pulp and raspberry pulp, set aside. Combine melted chocolate, gelatin mixture and egg yolks, whisk until pale and glossy. In a separate bowl, beat cream and icing sugar together until soft peaks form, fold through chocolate mixture with berry pulp and Grand Marnier. Pour into a wetted 5 cup capacity mould. Refrigerate several hours or overnight.
Carrot cake
Serves 16:
13/4 cups plain flour
2 teaspoons baking powder
1/2 teaspoon nutmeg
1/2 teaspoon cinnamon
1/2 teaspoon cardamom
1/2 cup peanuts, chopped
1/2 cup sultana
1/2 cup brown sugar, firmly packed
11/2 cups carrot pulp
1/2 cup oil
2 eggs, lightly beaten
1/4 cup sour cream
Grease and line a 25cm x 15cm loaf pan. Sift flour and baking powder into a large mixing bowl, add nutmeg, cinnamon, cardamom, peanuts, sultana, brown sugar and carrot pulp, stir to combine. Add eggs, oil and sour cream. Beat with electric mixer, using medium speed until all ingredients are well blended. Pour into loaf pan. Bake at 180°C for 1 hour or until cake is cooked when tested with a skewer. Remove from oven, stand in cake pan for 5 minutes before inverting out onto a wire cake rack.
Storage
Always clean the appliance before storing. Operate according to the instructions 'Care and Cleaning'. Please store the juicer in a frost-free, clean and dry location where it is out of reach of children and is protected against excessively loads (such as down-fall, voltage, heat, humidity). Never lay heavy or hard objects on top of the appliance.
Warranty
We guarantee that all our products are free of defects at the time of purchase. Any demonstrable manufacturing or material defects will be to the exclusion of any further claim and within 2 years after purchasing the appliance free of charge repaired or substituted.
There is no Warranty claim of the purchaser if the damage or defect of the appliance is caused by inappropriate treatment, over loading or installation mistakes.
The Warranty claim expires if there is any technical interference of a third party without an written agreement.
The purchaser has to present the sales slip in assertion-of-claims and has to bear all charges of costs and risk of the transport.
Waste Disposal
The appliance has to be deposed by the definition of the regional waste disposal of electricalscrap. If necessary get information of the regional waste management enterprise.
Notes
Notes
GASTROBACK GmbH

- INSTRUCTIONS FOR USE AND RECIPES DESIGN JUICER ADVANCED PRO
- Important Instructions
- Important safeguards
- Never leave the appliance unattended when in operational mode.
- Safeguards for Daily Operation
- Important Safeguards for all Electrical Appliances
- Movable and sharp-edged units - risk of injury
- Get to know your Gastroback juicer
- Assembling the appliance
- Step 1:
- Step2:
- Step 3:
- Step 4:
- Step 5:
- Step 6:
- Step 7:
- Operating your Design Juicer Advanced Pro
- Step 2:
- Speed selector table
- Empty the pulp container during juicing
- Overload protection button
- Disassembling your Design Juicer Advanced Pro
- Care and Cleaning
- To clear blockage
- To avoid further blockage:
- Trouble Shooting Guide
- Tips on juicing
- The inside information on juicing
- Purchasing and storage of fruit and vegetables
- Preparation of fruit and vegetables
- The right technique
- Getting the right blend
- Using the pulp
- Apple-Pear-Strawberry-Juice
- Rockmelon-Mint-Mango-Juice
- Tomato-Cucumber-Parsley-Carrot-Juice
- Kumera-Celery-Ginger-Orange-Juice
- Parsnip-Celery-Pear Juice
- Fresh Starts
- Apple-Carrot-Celery-Juice
- Tomato-Carrot-Celery-Lime-Juice
- Carrot-Beetroot-Orange-Juice
- Apple-Peach-Grapefruit-Juice
- Pineapple-Peach-Pear-Juice
- Vitamin replacer
- Tomato-Carrot-Red Capsicum-Juice
- Blackberry-Pear-Grapefruit-Juice
- Beetroot-Apple-Celery-Juice
- Cucumber-Celery-Fennel-Bean Sprout-Juice
- Frothie orange juice
- Liquid lunches
- Mango, rockmelon and orange yogurt drink
- Fresh vegetable soup with noodles
- Gazpacho
- Pasta with provencal style sauce
- Icy Coolers
- Sparkling pear and apricot cooler
- Rockmelon, strawberry and passion crush
- Tropical blend
- Tomato, nectarine, passionfruit and mint icer
- Cucumber, pineapple and coriander ice
- Pear, radish and celery crush
- Spirited juices
- Coconut pineapple colada
- Bloody Mary
- Honeydew dream
- Peach and mint julep
- Energy fuel
- Grape, kiwi fruit and berry booster
- Beetroot, carrot and orange quencher
- Apricot, apple and pear sparkle
- Fibre favourites
- Carrot, pumpkin and feta flan
- Vegetable and bacon soup
- Carrot, apple and celery strudels
- Berry and white chocolate mousse
- Carrot cake
- Storage
- Warranty
- Waste Disposal
- Notes
- GASTROBACK GmbH
Brand : Gastroback
Model : Design Juicer Advanced Pro
Category : Juicer