
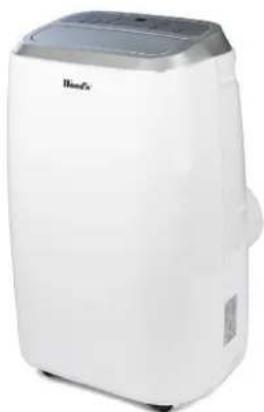
Venezia 18K - Air Conditioning Wood's - Free user manual and instructions
Find the device manual for free Venezia 18K Wood's in PDF.

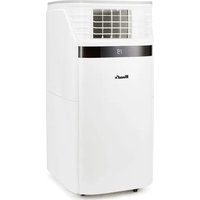
| Product type | Monoblock mobile air conditioner |
| Brand | Wood's |
| Model | Venezia 18K |
| Cooling capacity | 5.2 kW |
| Nominal power consumption | 2.0 kW |
| Airflow | 680 m³/h |
| Energy class | A |
| Dehumidification | 52.8 L/24h |
| Adjustable temperature range | 16 °C to 31 °C |
| Operating temperature | 18 °C to 43 °C |
| EER (Energy Efficiency Ratio) | 2.6 |
| Refrigerant | R290 (propane), 300 g |
| Noise level (min/max) | 56 dB / 65 dB |
| Weight | 32 kg |
| Dimensions (L x D x H) | 376 x 490 x 768 mm |
| Power supply | 230 V ~ 50 Hz, grounded plug |
| Operating modes | Cooling, Dehumidification, Fan, Eco |
| Special functions | WiFi, Remote control, Timer, Oscillation, Auto clean, Sleep |
| Maximum recommended area | 15 m² (minimum for installation) |
| Filter maintenance | Clean every 2 weeks |
| Warranty | 2 years (consumer) |
| Safety | Flammable refrigerant, compressor protection, full tank alarm |
Frequently Asked Questions - Venezia 18K Wood's
User questions about Venezia 18K Wood's
0 question about this device. Answer the ones you know or ask your own.
Ask a new question about this device
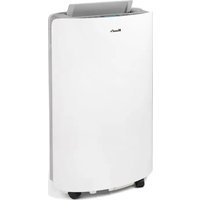
Download the instructions for your Air Conditioning in PDF format for free! Find your manual Venezia 18K - Wood's and take your electronic device back in hand. On this page are published all the documents necessary for the use of your device. Venezia 18K by Wood's.
USER MANUAL Venezia 18K Wood's
OPERATING INSTRUCTIONS FOR:
AC Venezia 18K Smart Home WAC1802G
natural_image
White portable air conditioner unit with gray top and control panel (no visible text or symbols)Visit woods.se for more information and updated instruction manuals.
For extended warranty register your product at warranty-woods.com Visit our website, www.woods.se, for the latest updated owners manual.
GB Operating Instructions
SE Bruksanvisning
NO Bruksanvisning
Visit our website to:
Get usage advice, updated brochures, troubleshooting and service information
Register your product for additional services: www.warranty-woods.com
CUSTOMER CARE AND SERVICE
Always use original spare parts.
When contacting our authorised service centre,
ensure that you have the following data available:
Model number, receipt and serial number.
The refrigerant used in portable air conditioner is the environmentally friendly hydrocarbon R290. This refrigerant is odorless, and compared to the alternative refrigerant, the R290 is an ozone-free refrigerant.
Warning / Caution-Safety information.
General information and tips.
Environmental information.
Subject to change without notice.
CONTENTS: PAGE NO.
TABLE OF CONTENTS
OPERATING INSTRUCTIONS
English 12-20
Swedish 21-29
Norwegian 30-38
Danish 39-47
German 48.56
French 57-65
Spanish 66-74
Dutch 75-83
Polish 84-92
Romanian 93-10
Finnish 102-110
Lithuanian 117-119
Latvian 120-128
Estonian 129-137
Greek 138-146
Icelandic 147-155
A.
12
3
4

natural_image
Simple line drawing of a rectangular box with a circular hole on the side (no text or symbols)5
6
7
natural_image
Simple diagram of a rectangular box with four small squares inside, each containing an oval shape (no text or symbols)B.
1 →
natural_image
White outdoor air conditioner unit with 'Wood's' branding on top (no other text or symbols visible)C
D
natural_image
Front view of a white electric air conditioner unit with solar panels and ventilation grilles (no visible text or labels)E.
F
G

natural_image
White outdoor air conditioner unit with a digital display, no visible text or symbols on the device body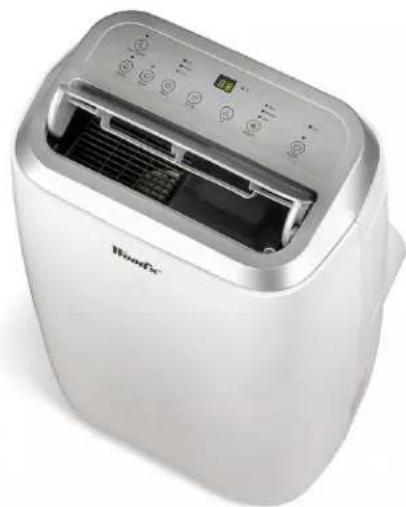
natural_image
White portable air conditioner unit with control panel and ventilation grille (no visible text or symbols)H
natural_image
Simple line drawing of a washing machine with a faucet above it and a 'X' symbol below (no text or labels)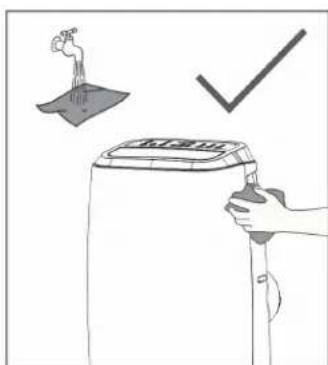
natural_image
Illustration of a hand holding a washing machine with a checkmark and a small object above it (no text or symbols)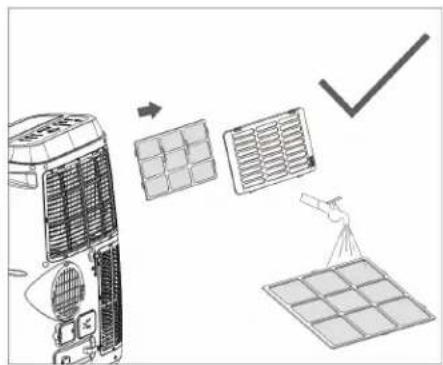
I.
J
natural_image
Simple line drawing of a rectangular device with a triangular button and downward arrow, no text or symbols present.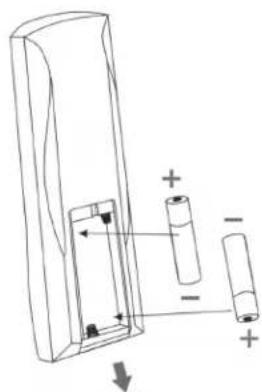
natural_image
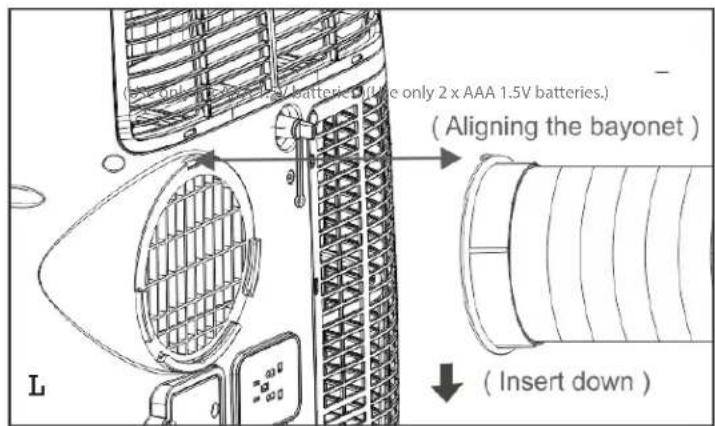
Diagram of a battery holder with two cylindrical cells and polarity indicators (no text or symbols)(Use only 2xAAA 1,5 V batteries.)
natural_image
Line drawing of a portable air conditioner unit connected to a door via a coiled hose (no text or symbols)M.
natural_image
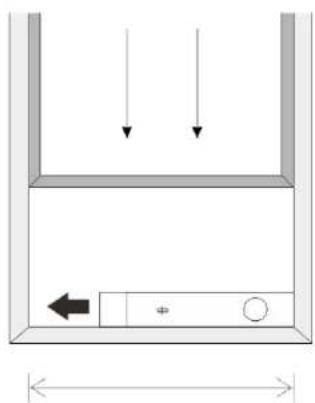
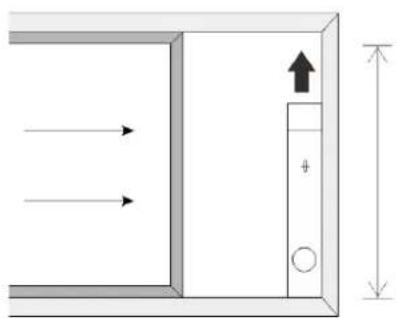
Simple diagram of a container with arrows indicating downward flow and a left-pointing arrow inside (no text or symbols)Window width
min:67.5cm
max:123cm
natural_image
Diagram showing airflow or pressure direction with arrows and a vertical bar, no text or symbols presentWindow height
min:67.5cm
max:123cm
N.
natural_image
Line drawing of an air conditioner unit connected to a wall-mounted panel (no text or symbols)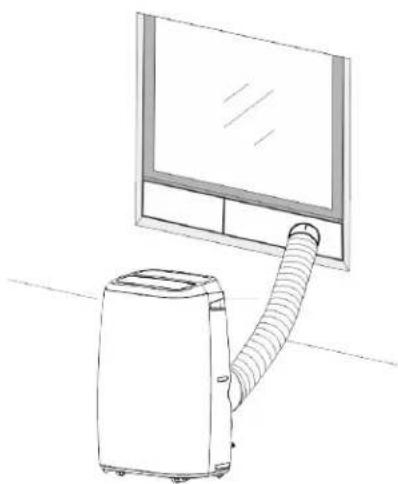
natural_image
Line drawing of an air conditioner unit connected to a monitor (no text or symbols)O. (The drain hose is optional)
P.
(A)
natural_image
Diagram of an air conditioner unit with internal fan and connector, shown with a close-up inset showing internal components (no text or labels)
natural_image
Line drawing of an air conditioner unit with attached cable and connector, showing internal components and a close-up inset (no text or symbols)(B)
natural_image
Line drawing of an air conditioner unit with internal fan and control panel, shown with a close-up inset (no text or symbols)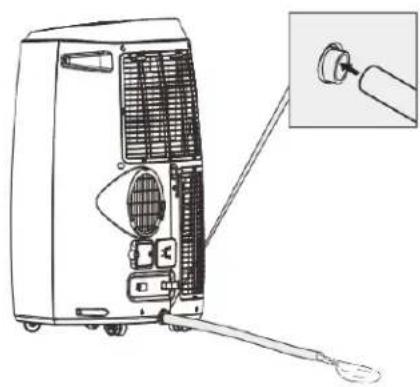
natural_image
Diagram of a portable air conditioner unit with a close-up inset showing the internal components (no text or symbols)WOOD'S FOR CLEAN AND HEALTHY INDOOR AIR
The brand Wood's was born with the Wood's family over 65 years ago in the Canadian city of Guelph, Ontario. This is where Wood's began developing and manufacturing dehumidifiers in 1950. Since then Wood's has helped several hundred thousand households to prevent damages from mould damp, and to breathe cleaner air.
Our portable air conditioners are suitable for use in most climates, where capacity is good even at different temperatures and humidity levels. They are used with good results in premises that become hot such as livingrooms, offices or bedrooms. The amount of hot air that the air conditioner removes depends on the temperature, humidity level and placement. External weather conditions may also affect the performance of the air conditioner. Wood's air conditioners are safe in operation and intended for continuous use over many years.
HOW DOES THE AIR CONDITIONING UNIT WORK?
Low pressure gives cold air
The main element of the air conditioner is a coolant, which under low pressure is converted to gas. The process “creates cold”, which is transmitted inward, while keeping the warm air out.
A liquid coolant is passed through an expansion valve and into a pipe where the pressure is low.
The coolant evaporates and turns into a gas. The process absorbs heat from the surroundings and the pipe is cooled. A fan blows the cold air into the room. The gas is passed through a compressor, which increases the pressure and converts the gas into liquid.
In this process, heat is released, which is led to pipes on the opposite side and blown out by a fan.
A thermostat shuts off the unit when the indoor air is cold enough.
1. SECURITY WARNINGS
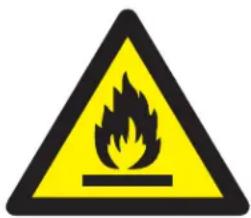

Flammable material. This appliance contains R290/Propane a flammable refrigerant.

Refer to this manual for safety information.

Read technical manual

Read operators manual.
SAFETY INFORMATION
Before the installation and use of the appliance, carefully read the supplied instructions. The manufacturer is not responsible if an incorrect installation and use causes injuries and damages. Always keep the instructions with the appliance for future reference.
Children and vulnerable people safety
WARNING

Risk of injury or permanent disability.
This appliance can be used by children aged 8 years and above and persons with reduced physical, sensory or mental capabilities or lack of experience and knowledge if they have been given supervision or instruction concerning use of the appliance in a safe way and understand the hazards involved.
Do not let children play with the appliance.
Children of less than 3 years should be kept away unless continuously supervised.
Keep all packaging away from children.
Cleaning and user maintenance shall not be made by children without supervision.
General Safety
This appliance is intended to be used in households and similar applications such as: Family room, living room, staff kitchen areas in shops, offices and other working environments. The rating plate is located at the side or back of the Air Conditioner.
Keep ventilation openings clear of obstruction.
Do not use mechanical devices or other means to accelerate the defrosting process, other than those recommended by the manufacturer.
The appliance shall not be stored in a room with operating ignition sources (for example: open flames, an operating gas appliance or an operation electric heater. Do not pierce or burn.
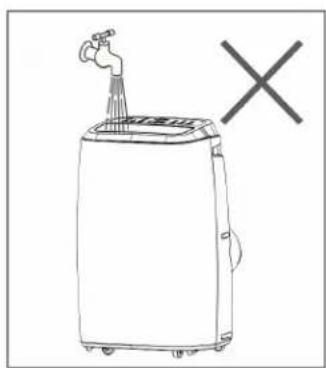
Be aware that refrigerants may not contain an odour. Do not use water spray and steam to clean the appliance. Clean the appliance with a moist soft cloth. Only use neutral detergents. Do not use abrasive products, abrasive cleaning pads, solvents or metal objects.
If the supply cord is damaged, it must be replaced by the
manufacturer, its authorised service centre or similarly qualified persons in order to avoid a hazard.
SAFETY INSTRUCTIONS
Installation WARNING

Only a qualified person must install this appliance.
Remove all the packaging.
Do not install or use a damaged appliance. The appliance shall be installed, operated and stored in a room with a floor area larger than 15 m². Obey the installation instruction supplied with the appliance.
Always be careful when you move the appliance because it is heavy. Always wear safety gloves. Be aware that refrigerants may not contain an odour.
Make sure the air can circulate around the appliance.
Wait at least 4 hours before connecting the appliance to the power supply. This is to allow the oil to flow back into the compressor.
Do not install the appliance close to radiators or other heat sources. Do not install the appliance where there is direct sunlight.
Electrical connection
WARNING

Risk of fire and electrical shock. The appliance must be connected to a grounded outlet. Make sure that the electrical information on the rating plate matches with the power supply. If
not, contact an electrician.
Always use a correctly installed shockproof socket.
Do not use multi-plug adapters and extension cables.
Make sure not to cause damage to the electrical components (e.g. mains plug, mains cable).
Contact the Authorised Service Centre or an electrician to change the electrical components.
The mains cable must stay below the level of the mains plug.
Connect the mains plug to the mains socket only at the end of the installation.
Make sure that there is access to the mains plug after the installation.
Do not pull the mains cable to disconnect the appliance. Always pull at the mains plug.
Use

WARNING
Risk of injury, burns, electrical shock or fire.
Do not change the specification of this appliance.
Be careful not to cause damage to the refrigerant circuit. It contains propane (R290), a natural gas with a high level of environmental compatibility. This gas is flammable.
If damage occurs to the refrigerant circuit, make sure that there are no flames and sources of ignition in the room. Ventilate the room.
Do not put flammable products or items that are wet with flammable products near or on the appliance.
Disposal

WARNING
Risk of injury.
Disconnect the appliance from the mains supply.
Cut off the mains cable and discard it.
The refrigerant circuit of this appliance is ozone-friendly.
Contact your municipal authority for information on how to discard the appliance correctly.
Do not cause damage to the part of the cooling unit that is near the heat exchanger.
SET UP AIR CONDITIONER FOR INSTALLATION
IMPORTANT:
2. Installation
BEFORE FIRST USE
Let the machine stand up for 4 hours before use
Selecting a Location
Important
- This air conditioner may be moved around indoor conveniently; keep the unit in upright position while moving it. The air-conditioner shall be placed at a flat surface.
Do not install or operate this air-conditioner in a bathroom or other wet environment.
Since a portable air conditioner is on wheels, it is easy to change positions. When the heat turns on, you just move your portable air conditioner into the room and can quickly get started cooling the space. Air conditioner must be operated in an enclosed area to be most effective.
Close all doors, windows, and other outside openings to the room. The effectiveness of the Air Conditioner depends on the temperature and humidity level.
- Place the air conditioner in a location that does not restrict airflow through the front of the unit.
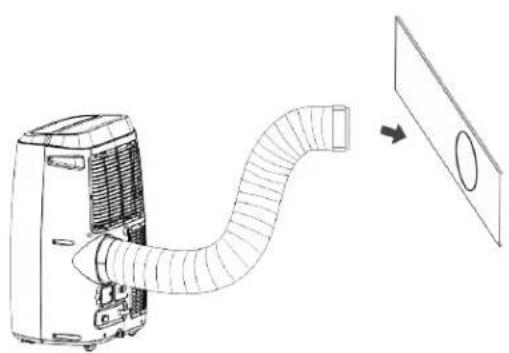
- An Air Conditioner operating in a room will have little or no effect in drying an adjacent enclosed storage area, such as a closet, unless there is adequate circulation of air in and out of the area. A portable Air Conditioner evacuates the heat from the unit with a ventilation hose through a window or exhaust air valve.
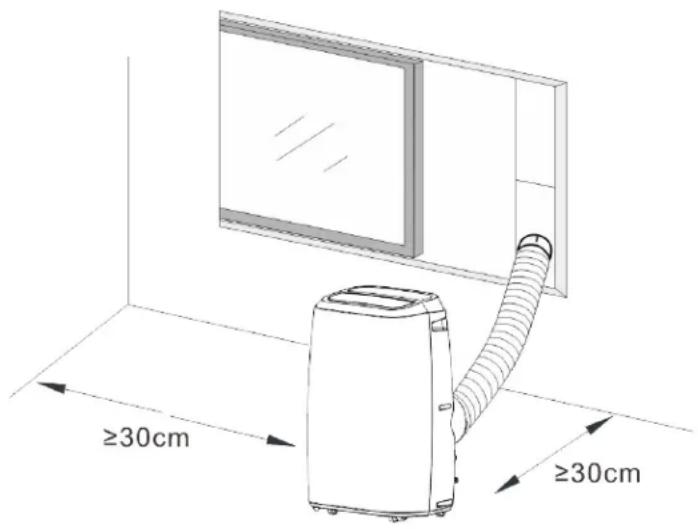
- There should be a minimum of 30 cm distance between Air Conditioner and closest object. See picture for reference.
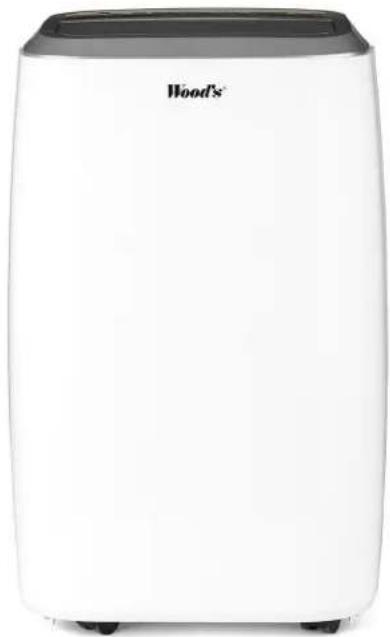
PRODUCT DESCRIPTION
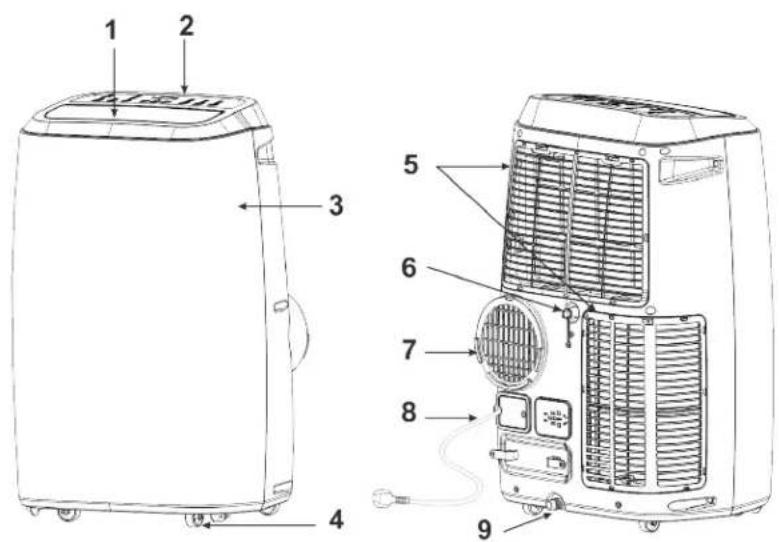
3. Product description
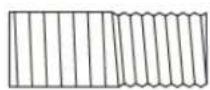
A
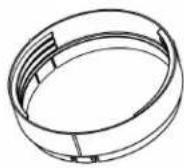
- Exhaust hose
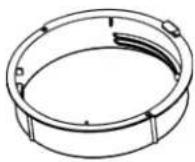
- Window Connector
- Housing adaptor
- Window Kit
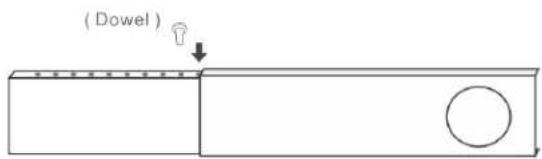
- Dowel
- Batteries
- Remote Control
B
- Product pictures
C.
- Louver
- Control panel
- Front cover
- Castor
- Air inlet
- Drainage outlet
- Air outlet
- Power cord
- Drainage outlet
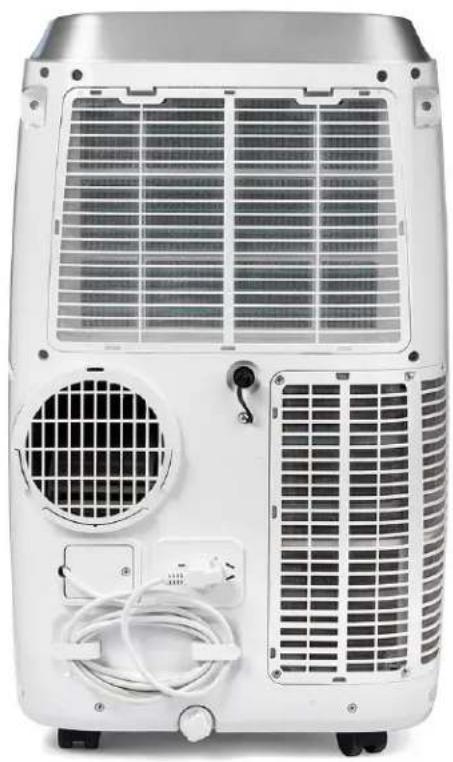
D
- Product back pictures
E
- Product top picture
F
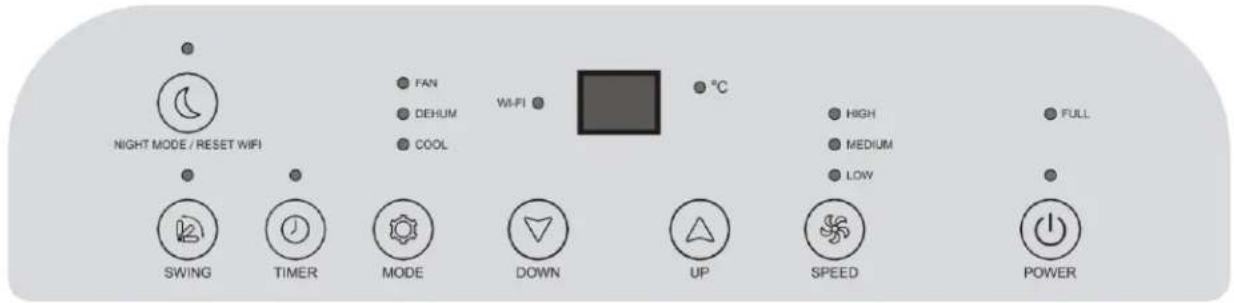
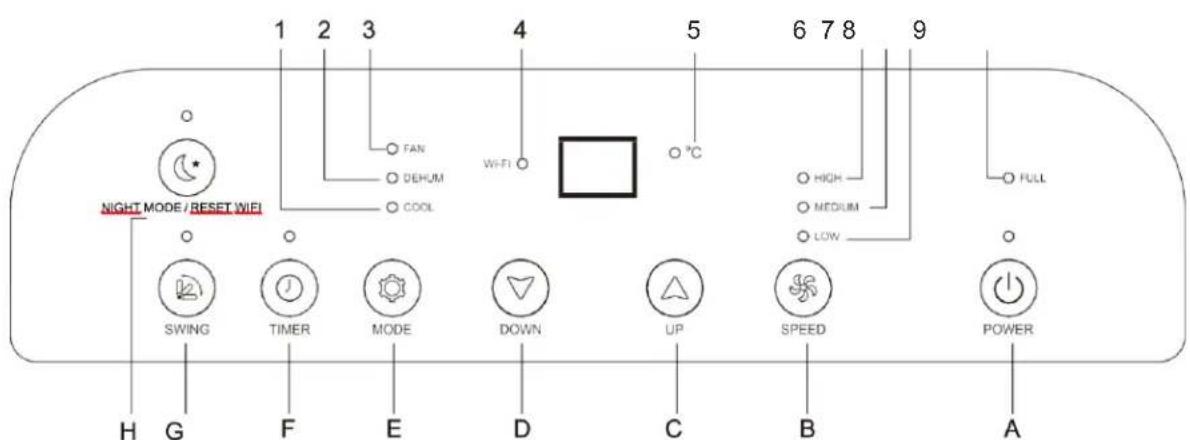
- Cooling
- Dehumidify
- Fan
- WIFI function
- Centigrade temperature
- High fan speed
- Medium fan speed
- Low fan speed
-
Water full
-
A. Power on/off
B. Fan speed
C. Temperature up
D. Temperature down
E. Operation mode
F. Timer on/off
G. Auto swing
H. Sleep mode
G
- Product picture side and Swing mode
H
- Schematic diagram of filter screen cleaning
|
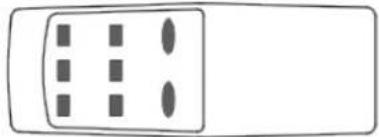
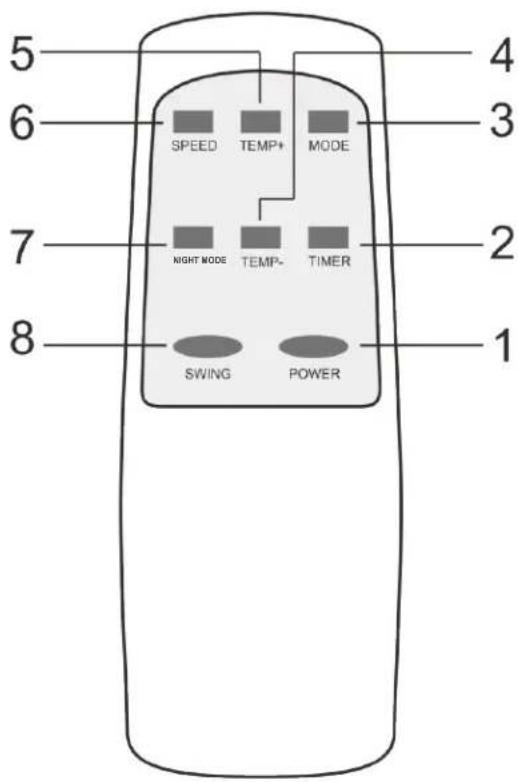
- Power on/off
- Timer on/off
- Operation MODE
- Temperature down
- Temperature up
- Speed
- Sleep mode
- Auto swing
J
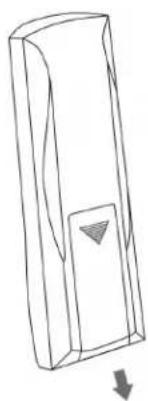
- Battery installation / replace
K
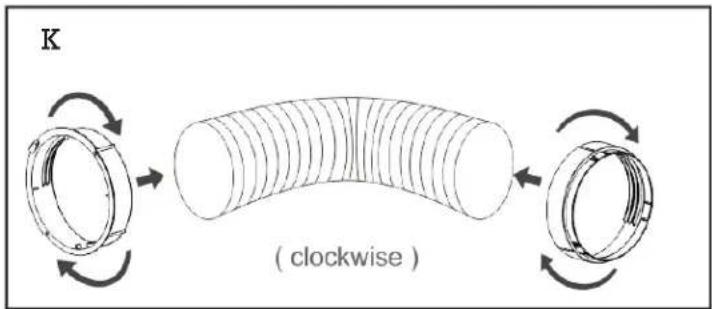
- Twist both ends of the exhaust hose into the Hose Connector.
L
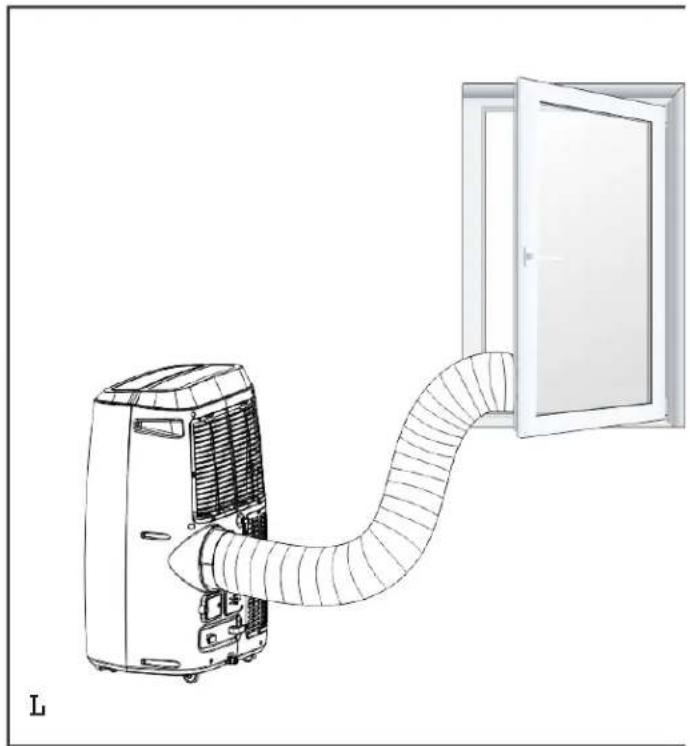
- Introduction to Exhaust Hose Installation
M
- Window Slider Kit Installation
N
- Shows how the plug should be located for installing Window Slider Kit
O
- Connect drain hose
P
- Picture of water outlet
FUNCTION OF THE OPERATION MODES AND INSTALLATION DESCRIPTIONS
Installation
If the unit has been transported horizontally, keep it in an upright position for 4 hours before using it.
Place the unit on a flat and solid surface.
Do not install the unit in bathrooms or other wet environments.
Make sure that air flow isn't blocked, always keep at least 50 cm distance to surrounding surfaces.
INSTALLING THE EXHAUST HOSE
- Extend one end of exhaust hose, screw the end without slot of round connector onto it with anticlockwise direction at least 3 laps.
- Extend another end of exhaust hose, screw the adapter onto it with anticlockwise direction at least 3 laps.
- Extend the exhaust hose and lead it outside through a door or window.
USING THE WINDOW KIT
- To use the window kit, open the window and place the window kit either horizontally or vertically, depending on the window.
- Adjust the length of the window kit and fasten it with the screws.
- Shut the window and attach the adapter on the exhaust hose to the window kit.
USING THE WINDOW KIT
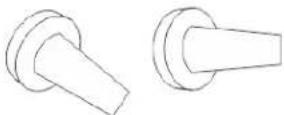
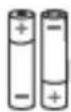
Before using your remote, install the AAA batteries into remote control.
- Press and slide the battery cover on the back of the remote control, then you can remove the cover.
- Insert two new alkaline AAA batteries into the battery compartment, being sure to note the proper polarity.
- Put back the battery cover, making sure the locking tab clicks into place.
Use alkaline batteries only. Do not use rechargeable batteries.
When replace batteries, always replace both batteries with new batteries, do not mix old and new batteries.
If the air conditioner will not be used for an extended period of time, remove the batteries from the remote control.
Operating instructions
- Starting the unit. Press the POWER button to start and stop the unit.
-
Select mode. The unit has 4 different modes: cooling, dehumidify, energy conservation and fan mode. Press MODE on the control panel or remote control to select mode.
-
Cooling mode: Set desired temperature with the arrows on the control panel or the remote control. Set temperature is shown in the display.
- Dehumidify. In dehumidify mode, the fan will run on low speed only. Temperature cannot be set.
- Fan mode. The compressor stops and only the fan will run. Temperature cannot be set.
-
Energy conversation mode. Low energy consumption under Energy Conversation mode. When the ambient temperature is higher than the set temperature, the unit operates in cool mode. When the ambient temperature reaches the set temperature, the compressor stops running and the upper fan also stops running. After 2 minutes and 30 seconds, the upper fan will run at low speed for 30 seconds. If the compressor does not start (that is, the ambient temperature is lower than the set temperature), the upper fan will repeatedly operate in this mode (stop for 2 minutes 30 seconds / low wind operation for 30 seconds).
-
Set timer.
-
To set timer for shut off, press the TIMER button when the unit is operating.
-
To set timer for start, press the TIMER button when the unit is switched off. Set time with the up and down arrows on the control panel or remote control. When the timer is activated, a light is shown on the control panel.
-
Set fan speed. Press the SPEED button on the control panel to choose fan speed. On the remote control, press the FAN button to choose fan speed.
-
Celsius/Fahrenheit On the control panel, press the up and down arrows at the same time to switch between Celsius and Fahrenheit.
-
Sleep mode. Use the sleep mode during the night and the unit will not disturb your sleep. When in cooling mode, press the TIMER and UP together to enter sleep mode. On the remote, press the SLEEP button. Press again to deactivate.
-
Auto swing function. Press the TIMER and SPEED button at the same time to activate swing function. On the remote, press the Auto-swing button. Press again to deactivate.
-
Auto clean function. Press the AUTO-CLEAN button on the remote control to clean the unit internally. The unit will clean for 3 minutes before shutting off.
PROTECTION FUNCTIONS
Automatic defrost
The unit will automatically defrost when needed. In defrost mode, the display shows E4 and no buttons except the POWER button are active.
Compressor protection
The unit has a compressor protection function causing a 3-minute start delay after the unit is restarted.
Water full alarm
When the water tank is full, the unit will stop working. A water-full indication light is shown in the display and a warning sound is heard. Empty the water tank and restart the unit.
FUNCTION OF THE OPERATION MODES AND INSTALLATION DESCRIPTIONS
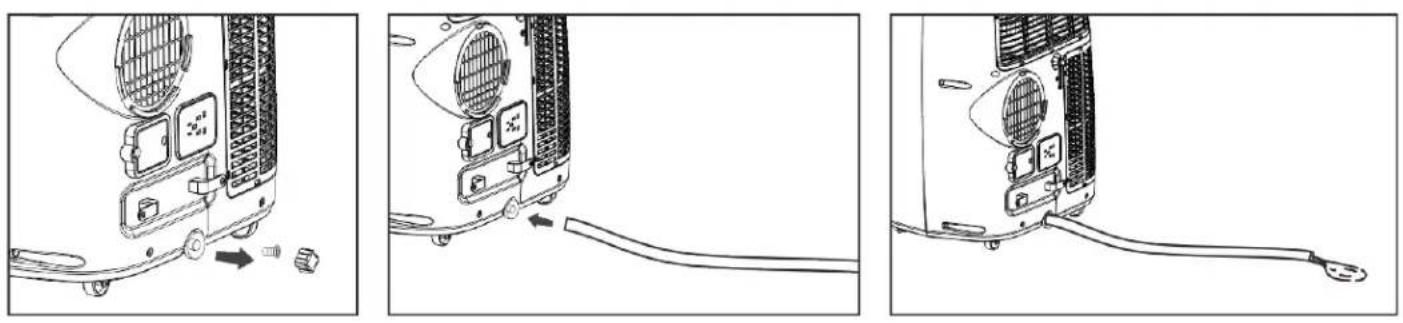
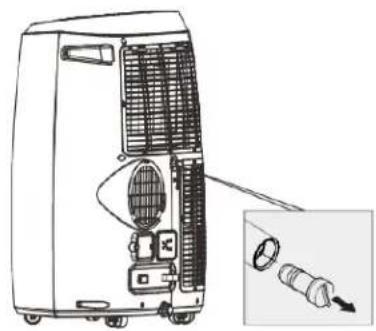
Water drainage instruction
Empty the water tank
Unscrew the drain cover and remove the water stopper. Empty the water tank and reattache the water stopper and drain cover.
Notes:
- Move the unit carefully to avoid leakage.
- Tilt the unit slightly backwards when draining.
- Block the drain hole as soon as possible before the tray is full if it cannot hold all water in the unit to prevent the water leakage and wet the floor or carpet.
- Water stopper and drain cover must be tightly installed, to avoid new condensate to wet the floor or carpet when the unit re-starts working.
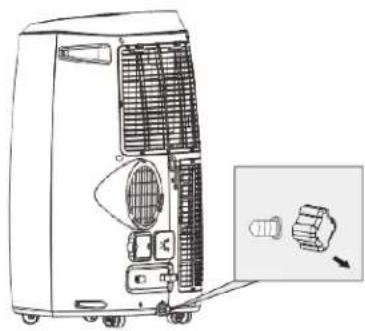
Connecting a water hose for continuous drainage
Unscrew the drain cover and remove the water stopper. Attach a 13 mm water hose to the pipe on the unit. Lead the other end of the water hose to a drain. Make sure that the water can be drained downwards.
Notes:
- Drain hose must be installed when there's no water in the tray.
- It is suggested that not to use continuous drainage when unit is in COOL mode, to ensure enough water recycle in the unit to enhance the system cooling effects.
- Put the drain hose in an inaccessible place, not higher than drainage hole and keep drain hose straight without any flexure.
- Keep the drain cover and its stopper properly when continuous drainage is adopted.
The air filter
The air filter prevents dust and dirt from entering the machine, prolonging its life expectancy. It is important the filter is cleaned regularly. otherwise the unit may be seriously damaged. Therefore, clean the filters at least once every two weeks.
Filter cleaning
- Remove the filter.
- Wash it with warm water and a mild cleansing agent. Alternatively the filter may be vacuum cleaned.
- Let the filter dry and put it back.
Filter installation
Aim the end of the filter toward slot then push filter gently into slot.
Notes:
- Be sure to install the filter to side panel then for the filter to back panel.
• Install the filter with opposite direction of removal.
• Install the filter into place gently to avoid any damage to filter.
It is very important that the filter is cleaned regularly; otherwise the air conditioner might lose capacity and even be seriously damaged.
Storage instructions
Remote Control Storage
- Insert remote controller into built-in compartment in left side of unit.
- Press the lower part of built-in compartment gently to open it and take out remote controller.
End of Season Storage
- Screw off the drain cover and pull out the stopper to drain condensate water completely.
- Keep unit running in fan mode for half day to dry inside of unit completely to prevent from going moldy.
- Turn off the unit, pull out plug then wrap the power cord around the wire-winding pillar, insert the plug into the universal fixing hole at the back panel of the unit, install the water stopper
and drain cover.
- Remove the heat exhaust hose assembly, clean and keep it properly.
Notes:
- Hold the exhaust hose assembly with both hands when removal.
-
Push the fasteners aside on exhaust air outlet using your thumbs, then pull out exhaust hose assembly.
-
Pack the air-conditioner properly with soft plastic bag and put it in dry place with appropriate dust-proof measures, and keep the unit away from children.
-
Take out the batteries from the remote control and keep it properly.
Note:
• Assure the unit is stored in a dry place.
- All accessories of the unit shall be protected together properly.
Maintenance
Read more about how to clean your unit at woods.se Clean the unit with a soft moist cloth. Do not use solvents or strong cleaners as this might damage the surface of the unit.
Service
If the Air Conditioner requires servicing, you must first contact your local retailer. Proof of purchase is required for all warranty claims.
| PROBLEM CAUSE REMEDY | ||
| The unit fails to start up | Power supply failureWater-full and its icon lightingAmbient temperature too low or highThe room temperature is lower than the set temperature in cooling mode. | Connect the unit to a live socket and turn it onDrain the water stored in the unit.It is recommended to use this unit between 8-35Change the set temperature |
| Bad cooling effects There is direct sunlightThe doors and windows are open, the room is crowded or there are other heat sourcesDirty filterAir inlet or air outlet clogged | Close the window curtainClose the door and window, remove other heat sourcesClean or replace the filter meshRemove the obstruction | |
| High noise level The unit is being placed at uneven surface. Put the unit at a flat and firm place (may reduce noise) | ||
| The compressor does not work | Initiation of overheat protection | Wait until the temperature decrease, the unit will re-start automatically |
| The remote control does not work | Too long distanceThe remote control didn't aim at signal receptor on unit.The batteries have no electricity | Bring the remote control close to the air-conditioner and point it to the signal receptor on the unit.Replace the batteries |
| If you are having trouble with your air conditioner, please refer to below trouble shooting. If nothing of the below works, please contact your retailer for servicing of your air conditioner. | ||
| Error Codes CAUSE REMEDY | ||
| E0 | Room temperature sensor failure | The product must be returned to the dealer for service. |
| E2 Water full tank when | cooling Take off rubber stopper and empty the water. | |
| E3 | Evaporator temperature sensor failed | The product must be returned to the dealer for service. |
Guarantees
2 years consumer warranty against production faults. Please note that the warranty is only valid upon the production of the receipt. The warranty is only valid if the product is used in accordance with the instructions and security warnings expressed in this manual. The warranty does not cover any damages caused by improper handling of the product.
NOTE: The 2 years warranty only applies for consumers and not for commercial use of the unit.
| TECHNICAL DATA | AC Venezia 18K Smart Home |
| Cooling capacity 5,2 KW | |
| Power consumption 2.0W | |
| Air flow: 680m3/h | |
| Energy class A | |
| Dehumidification 52,8 L / 24h | |
| Temperature setting 16-31°C | |
| Working temperatur 18-43°C | |
| EER 2,6 | |
| Refrigerant gas R290/300g | |
| Noise level in decibels 56dB /65dB | |
| Weight 32kg | |
| Dimensions in mm, L x Bx H 376x490x768 |
*Technical changes and improvements may occur. All values are approximate and may vary due to external circumstances such as temperature, ventilation and humidity.

NOTE!
Register at www.warranty-woods.com and read about how to get extended warranty. Please visit www.woods.se for more information.
Recommended limits for use
The best operating ambient temperature for cooling is 18-35 °C. The unit runs up to +43°C .Fuse Parameter: φ5.0x20mm 2A, 250Vac.
AC Venezia 18K Smart Home is in conformity with the technical requirements of the following standard(s):
| LVD:2014/35/EU | EMC:2014/30/EU EN 55014-1:2017 | RED:2014/53/EU |
| EN 60335-2-40: 2003 + A11: 2004 | EN 55014-2:2015 | EN 301 489-1V2.2.3, |
| +A12: 2005 + A1: 2006 + A2: 2009 | EN IEC 61000-3-2:2019 E | Draft EN 301 489-17 V3.2.2 EN 300 328 V2.2.2, |
| +A13: 2012 | N 61000-3-3:2013+A1:2019 | EN62311:2008 |
| EN 60335-1: 2012 + A11: 2014 + A13: 2017 + A1: 2019 | EN 55014-1:2017, EN55014-2:2015 | |
| +A14: 2019 | EN IEC 61000-3-2:2019, EN61000-3-3:2013+A1:2019 | |
| +A2: 2019 | ||
| EN 62233: 2008 |
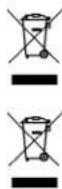
*This marking indicates that this product should not be disposed with other household wastes throughout the EU. To prevent possible harm to the environment or human health from uncontrolled waste disposal, recycle it responsibly to promote the sustainable reuse of material resources. To return your us device, please use the return and collection systems or contact the retailer where the product was purchased. They can take this product for environmental safe recycling.
*Used batteries must not be disposed of through household garbage, since they might contain toxic elements and heavy metals that can be harmful to the environment and human health. Return empty batteries to an appropriate recycling facility.
WiFi function
1. Download and Install APP
Download Woods Connect app from App Store or Google Play
- Register/Login/Forgot password
Register
If you don't have an App account, register an account or sign in with verification code by SMS.
This page describes the registration process.
- Tap to enter registration page
-
The system automatically recognises your country / area. You can also select your country code. Enter the mobile number/E-mail and tap "Next".
-
If you enter the mobile number, then enter the verification code in the message and enter the password tap "Confirm" to finish your registration.
-
If you enter the E-mail enter the password and tap "Confirm" to finish your registration.
2. Sign in with username and password or verification code via SMS
Sign in with username and password
-
The system automatically recognises your country / area. You can also select your country code. Enter the mobile number/E-mail and tap "Next
-
Enter your registered mobile number or Email, and password to login.
Sign in with verification code
-
Tap "Sign in with SMS verification" to new page
-
The system automatically recognises your country / area.
You can also select your country code by yourself.
Forgot password
If you forgot your password, please
follow these procedures:
-
Tap "Forgot password"
-
The system automatically recognises your country / area. You can also select your country code by yourself. Enter the mobile number/E-mail and tap "Next"
-
Enter the verification code in the message/E-mail and enter the new password tap "Confirm" to finish.
4. Pair/Factory reset
To pair the unit with WiFi press and hold the Night Mode/Reset WiFi button. When the WiFi symbol rapidly flashes the pairing is activated follow instructions in the app.
WiFi Woods Connect supports below functions:
Power on/Power off
Cool Mode
Dehum Mode
Fan Mode
Eco Mode
Temperature settings
Speed: Low, Medium and High
Timer: 1-24 h
Sleep: On/Off
Auto clean: On/Off
Celsius/Fahrenheit
Swing: On/Off
3. Follow the procedures in the APP to enjoy WiFi.
Smart Home
If you have a Smart Home product please finish step 1 to 3.
Third-party Access Service: Tap a third-party voice service icon to see how to connect to the service. You find this icons
Smart Home Woods Connect supports below functions by voice command:
Power on/Power off
Temperature settings
Mode settings
Fan speed settings
For more information visit:
https://woods.se/en/
WOOD'S FÖR REN OCH HÄLSOSAM INOMHUSLUFT

FÖRBEREDA LUFTKONDITIONERINGEN FÖR INSTALLATION
VIKTIGT!
2. Installation
PRODUKTBESKRIVNING

Brennbart materiale. Denne enheten inneholder det brennbare kuldemediet R290/propan.

PRODUKTBESKRIVELSE
3. Produktbeskrivelse
A
- Eksosslange
- Vindustilkobling
- Husadapter
- Vindussett
- Tapp
- Batterier
- Fjernkontroll
B
- Produktbilder
C.

Installation ADVARSEL

PRODUKTBESKRIVELSE
3. Produktbeskrivelse
A
https://woods.se/en/
GERÄTE VON WOOD'S FÜR SAUBERE UND GESUNDE RAUMLUFT
PRODUKTBESCHREIBUNG
DE
https://woods.se/de/
WOOD'S POUR UN AIR INTÉRIEUR PROPRE ET SAIN
DESCRIPTION DU PRODUIT
Operating instructions
https://woods.se/en/
ELIJA WOOD'S SI QUIERE DISFRUTAR DE UN AIRE INTERIOR LIMPIO Y SALUDABLE
VEILIGHEIDSINSTRUCTIES Installatie WAARSCHUWING
PRODUCTBESCHRIJVING
BESCHERMINGSFUNCTIES
OPIS PRODUKTU
PL
3. Opis produktu
A
V2.2.2, EN 62311:2008
EN 55014-1:2017, EN 55014-2:2015
EN IEC 61000-3-2:2019, EN 61000-3-3:2013
+A1:2019


DESCRIEREA PRODUSULUI
Temporizator: 1-24 h
https://woods.se/en/
WOOD'S PUHDISTAA SISÄILMAN

TUOTTEEN KUVAUS
3. Tuotteen kuvaus
A
PRODUKTO APRAŠYMAS

PRODUKTA APRAKSTS
3. Produkta apraksts
A

OHUTUSALASED JUHISED
Paigaldus HOIATUS

TOOTEKIRJELDUS
3. Toote kirjeldus
A
https://woods.se/en/

ΠΕΡΙΓΡΑΦΗ ΠΡΟΪΟΝΤΟΣ
Eldfim efni. Petta tæki inniheldur R290/própan sem er eldfimt kæliefni.


VÖRULÝSING
3. Vörulýsing
A
- Útblástursbarki
- Gluggatengi
- Hústengi
- Gluggasett
- Stýring
- Rafhlöður
- Fjarstýring
B
- Vörumyndir
C.
- Gardína
- Stjórnborð
- Framhlif
- Hjól
- Loftinntak
- Afrennslisúttak
- Loftúttak
- Rafmagnssnúra
- Afrennslisúttak
D
Wood's is marketed and distributed by:
Woods Production Sweden AB
Box 356
441 27, Alingsås
Sweden.
woods.se
info@woods.se
+46 317613610
Wood's®


- OPERATING INSTRUCTIONS FOR:
- AC Venezia 18K Smart Home WAC1802G
- CUSTOMER CARE AND SERVICE
- CONTENTS: PAGE NO.
- TABLE OF CONTENTS
- OPERATING INSTRUCTIONS
- WOOD'S FOR CLEAN AND HEALTHY INDOOR AIR
- HOW DOES THE AIR CONDITIONING UNIT WORK?
- SECURITY WARNINGS
- SAFETY INFORMATION
- Children and vulnerable people safety
- WARNING
- General Safety
- SAFETY INSTRUCTIONS
- Installation WARNING
- Electrical connection
- Use
- Disposal
- SET UP AIR CONDITIONER FOR INSTALLATION
- Installation
- BEFORE FIRST USE
- Let the machine stand up for 4 hours before use
- Important
- PRODUCT DESCRIPTION
- Product description
- A
- B
- C.
- D
- E
- F
- G
- H
- |
- J
- K
- L
- M
- N
- O
- P
- FUNCTION OF THE OPERATION MODES AND INSTALLATION DESCRIPTIONS
- Installation
- INSTALLING THE EXHAUST HOSE
- USING THE WINDOW KIT
- PROTECTION FUNCTIONS
- Automatic defrost
- Compressor protection
- Water full alarm
- Water drainage instruction
- Empty the water tank
- Notes:
- Connecting a water hose for continuous drainage
- The air filter
- Filter cleaning
- Filter installation
- It is very important that the filter is cleaned regularly; otherwise the air conditioner might lose capacity and even be seriously damaged.
- Storage instructions
- Remote Control Storage
- End of Season Storage
- Note:
- Maintenance
- Service
- Guarantees
- NOTE!
- Recommended limits for use
- WiFi function
- Download and Install APP
- Register
- Sign in with username and password or verification code via SMS
- Sign in with verification code
- Forgot password
- follow these procedures:
- Pair/Factory reset
- Power on/Power off
- Follow the procedures in the APP to enjoy WiFi.
- Smart Home
- Temperature settings
- Mode settings
- Fan speed settings
- WOOD'S FÖR REN OCH HÄLSOSAM INOMHUSLUFT
- FÖRBEREDA LUFTKONDITIONERINGEN FÖR INSTALLATION
- PRODUKTBESKRIVNING
- PRODUKTBESKRIVELSE
- Produktbeskrivelse
- Installation ADVARSEL
- GERÄTE VON WOOD'S FÜR SAUBERE UND GESUNDE RAUMLUFT
- PRODUKTBESCHREIBUNG
- WOOD'S POUR UN AIR INTÉRIEUR PROPRE ET SAIN
- DESCRIPTION DU PRODUIT
- ELIJA WOOD'S SI QUIERE DISFRUTAR DE UN AIRE INTERIOR LIMPIO Y SALUDABLE
- VEILIGHEIDSINSTRUCTIES Installatie WAARSCHUWING
- PRODUCTBESCHRIJVING
- BESCHERMINGSFUNCTIES
- OPIS PRODUKTU
- Opis produktu
- DESCRIEREA PRODUSULUI
- WOOD'S PUHDISTAA SISÄILMAN
- TUOTTEEN KUVAUS
- Tuotteen kuvaus
- PRODUKTO APRAŠYMAS
- PRODUKTA APRAKSTS
- Produkta apraksts
- OHUTUSALASED JUHISED
- Paigaldus HOIATUS
- TOOTEKIRJELDUS
- Toote kirjeldus
- ΠΕΡΙΓΡΑΦΗ ΠΡΟΪΟΝΤΟΣ
- VÖRULÝSING
- Vörulýsing
Brand : Wood's
Model : Venezia 18K
Category : Air Conditioning