
LD24 - Humidifier Wood's - Free user manual and instructions
Find the device manual for free LD24 Wood's in PDF.
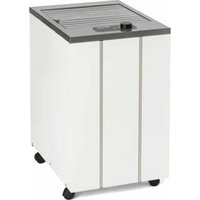


| Product type | Dehumidifier |
| Brand | Wood's |
| Model | LD24 |
| Max. working area | 80 m² |
| Air flow | 200 m³/h |
| Dehumidification capacity (20°C / 70% RH) | 6.5 L/24 h |
| Dehumidification capacity (30°C / 80% RH) | 12 L/24 h |
| Power consumption (20°C / 70% RH) | 160 W |
| Energy consumption (20°C / 70% RH) | 4.3 kWh/24 h |
| Water tank volume | 11.4 L |
| Refrigerant | R290 (Propane) |
| Refrigerant charge | 99 g |
| Supply voltage | 230 V ~ 50 Hz |
| Recommended fuse | 10 A |
| Protection rating | IP X1 |
| Dimensions (L × D × H) | 400 × 345 × 580 mm |
| Weight | Approximately 16 kg |
| Operating temperature range | +2 °C to +35 °C |
| Operating relative humidity range | 30 % to 90 % |
| Humidity control | Adjustable hygrostat |
| Automatic shut-off | Yes, when the tank is full |
| Automatic defrost | Yes |
| Filter type | Washable and replaceable SMF filter |
| Filter maintenance | Replacement at least once a year |
| Warranty | 2 years (extendable to 10 years upon registration) |
Frequently Asked Questions - LD24 Wood's
User questions about LD24 Wood's
0 question about this device. Answer the ones you know or ask your own.
Ask a new question about this device
Download the instructions for your Humidifier in PDF format for free! Find your manual LD24 - Wood's and take your electronic device back in hand. On this page are published all the documents necessary for the use of your device. LD24 by Wood's.
USER MANUAL LD24 Wood's
OPERATING INSTRUCTIONS FOR
LD40PRO/LD24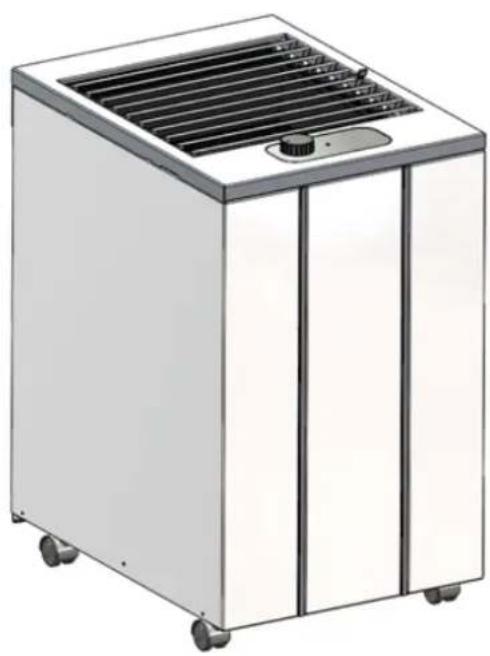
EN Instructions for use, SV Bruksanvisning, DK Betjeningsvejledning, DE Gebrauchsanweisung, EL Οδηγίες χρήσης, ES Instrucciones de uso, ET Kasutusjuhend, FI Käyttöohje, FR Mode d'emploi, IS Notkunarleiðbeiningar, KO 사용 지침, LT Naudojimo instrukcija, LV Lietošanas instrukcija, NO Bruksanvisning, NL Gebruiksaanwijzing, PL Instrukcje użytkowania, RO Instructiuni de utilizare
GET 10 YEARS WARRANTY!
Register and follow the instructions at
warranty-woods.com
Register and find the latest
updated user manual at
woods.se
CONTENT PAGE NO
English 04
Swedish 12
Danish 20
German 28
Greek 36
Spanish....44
Estonian 52
Finnish 60
French 68
Icelandic 76
Korean 84
Lithuanian 92
Latvian 100
Norwegian 108
Dutch 116
Polish 124
Romanian 132
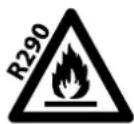
INSTRUCTIONS FOR USE
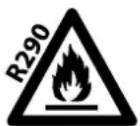
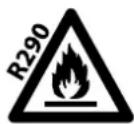
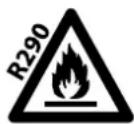
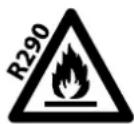
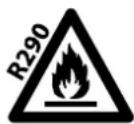
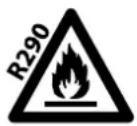
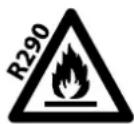
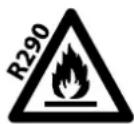
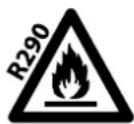
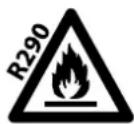
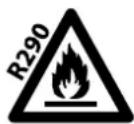
Flammable material. This appliance contains R290/Propane a flammable refrigerant.

Refer to operator's manual.

Read technical manual

Read operators manual.
SAFETY INFORMATION
Before the installation and use of the appliance, carefully read the supplied instructions. The manufacturer is not responsible if an incorrect installation and use causes injuries and damages. Always keep the instructions with the appliance for future reference.
CHILDREN AND VULNERABLE PEOPLE SAFETY
WARNING
Risk of injury or permanent disability.
This appliance can be used by children aged 8 years and above and persons with reduced physical, sensory or mental capabilities or lack of experience and knowledge if they have been given supervision or instruction concerning use of the appliance in a safe way and understand the hazards involved. Do not let children play with the appliance. Children of less than 3 years should be kept away unless continuously supervised. Keep all packaging away from children. Cleaning and user maintenance shall not be made by children without supervision.
GENERAL SAFETY
This appliance is intended to be used in household and similar applications such as: – basements, crawl spaces; staff kitchen areas in shops, offices and other working environments. The rating plate is located behind the water tank of the dehumidifier. Keep ventilation openings clear of obstruction.
Do not use mechanical devices or other means to accelerate the defrosting process, other than those recommended by the manufacturer. The appliance shall not be stored in a room where ignition sources are operating continuously (open flames, working gas appliance, operation electric heater, etc). Do not pierce or burn.
Be aware that refrigerants may not have an odour. Do not use water spray and steam to clean the appliance. Clean the appliance with a moist soft cloth. Only use neutral detergents. Do not use abrasive products, abrasive cleaning pads, solvents or metal objects. If the power cord is damaged, it must be replaced by the manufacturer, its authorized Service Centre or similarly qualified persons in order to avoid a hazard.
SAFETY INSTRUCTIONS
WARNING
Only a qualified person can install this appliance.
Remove all packaging material. Do not install or use a damaged appliance. The appliance shall be installed, operated and stored in a room with a floor area larger than 4 m². Strictly follow the installation instruction supplied with the appliance. Always be careful when you move the appliance because it is heavy. Always wear safety gloves.
Make sure the air can circulate around the appliance. Wait at least 4 hours before connecting the appliance to the power outlet. This is to allow the oil to flow back in the compressor. Do not install the appliance close to radiators or other heat sources. Do not install the appliance in direct sunlight.
ELECTRICAL CONNECTION
WARNING
Risk of fire and electrical shock.
The appliance must be connected to a grounded outlet. Make sure that the electrical information on the rating label is in accordance to the power supply. If not, contact an electrician. Always use a correctly installed shockproof socket. Do not use multi-plug adapters and extension cables. Make sure not to cause damage to the electrical components (e.g. plug, cable). Contact the authorized Service Centre or an electrician to change the electrical components. The cable must stay below the level of the plug. Connect the plug to the power socket only at the end of the installation. Make sure that there is access to the plug after the installation. Do not pull the power cable to disconnect the appliance. Always unplug the power cable from the plug only.
USE
WARNING
Risk of injury, burns, electrical shock or fire.
Do not change the specification of this appliance. Be careful not to cause damage to the refrigerant circuit. It contains propane (R290), a natural gas with a high level of environmental compatibility. This gas is flammable. If damage occurs to the refrigerant circuit, make sure that there are no flames and sources of ignition in the room. Ventilate the room. Do not put flammable products or items that are wet with flammable products near or on the appliance.
DISPOSAL
WARNING
Risk of injury.
Disconnect the appliance from the mains supply. Cut off the mains cable and discard it. The refrigerant circuit of this appliance is ozone-friendly. Contact your local authority for information on how to discard the appliance correctly. Do not cause damage to the part of the cooling unit that is near the heat exchanger.
A.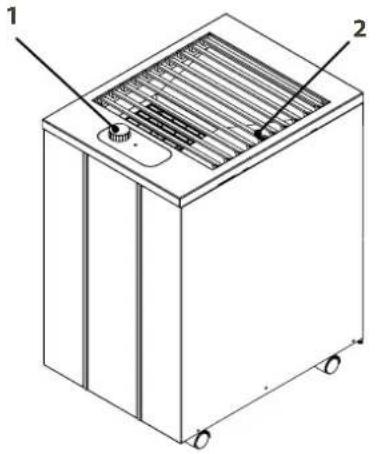
PRODUCT DESCRIPTION
A.
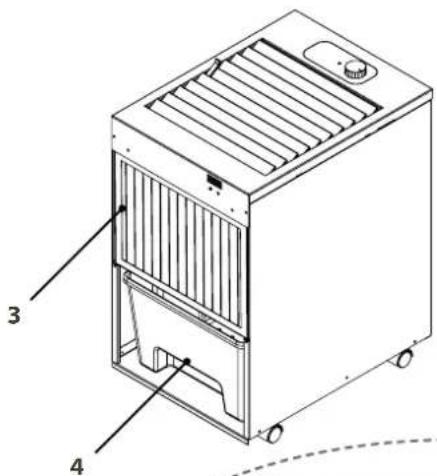
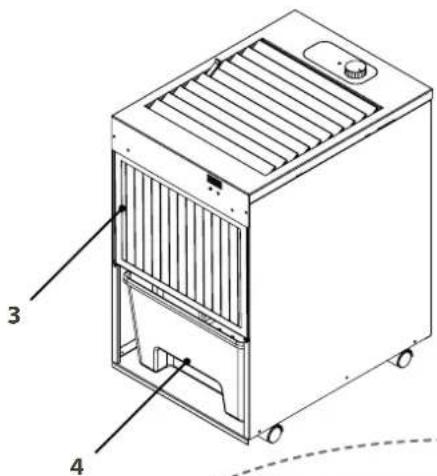
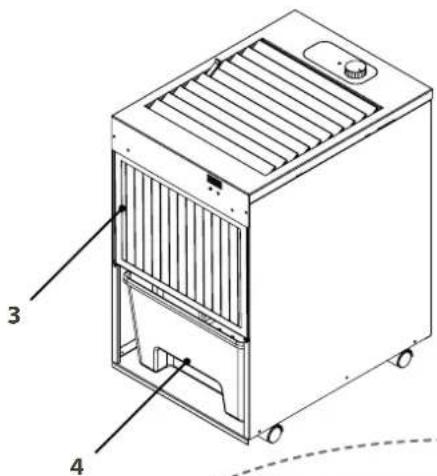
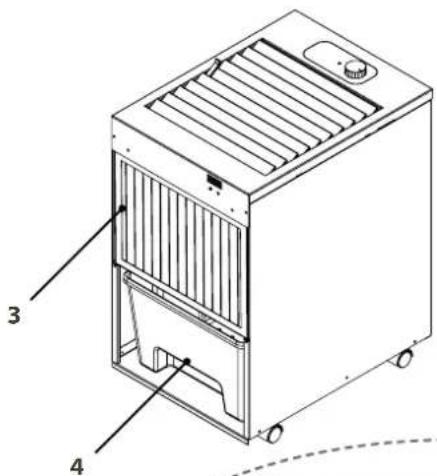
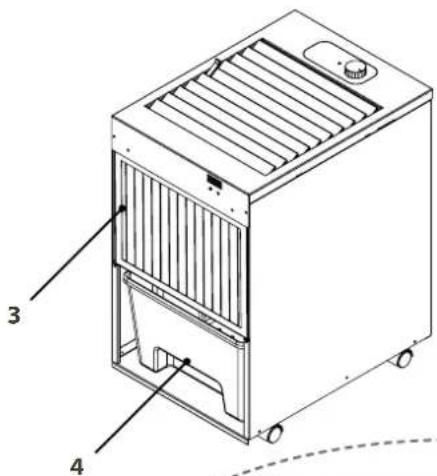
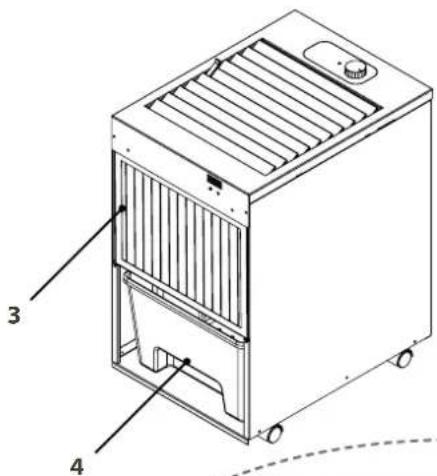
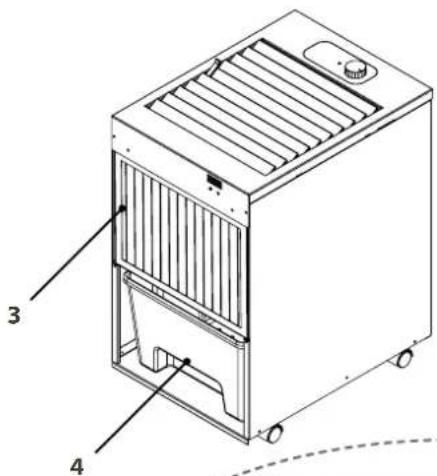
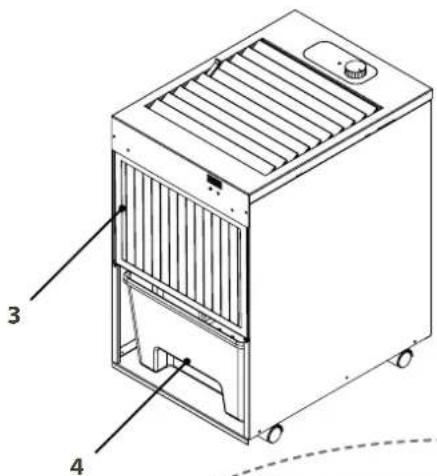
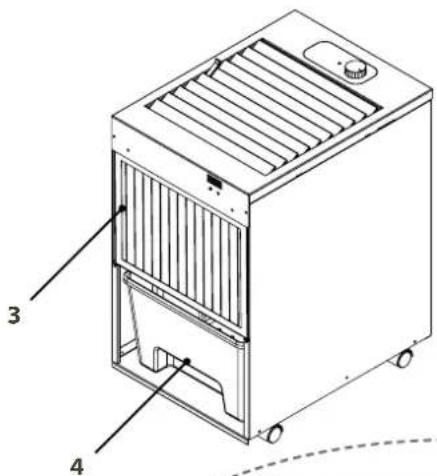
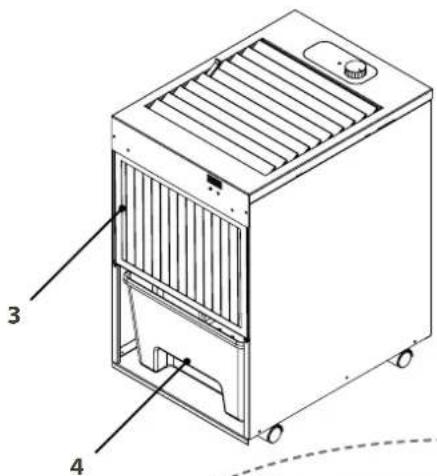
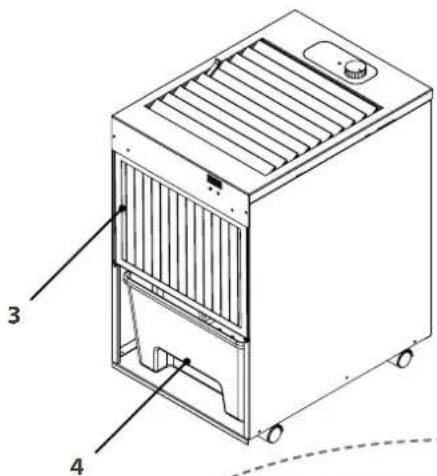
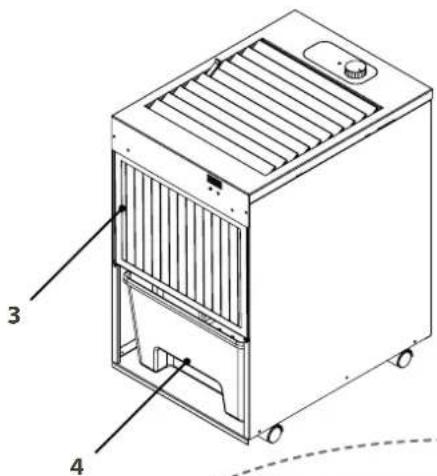
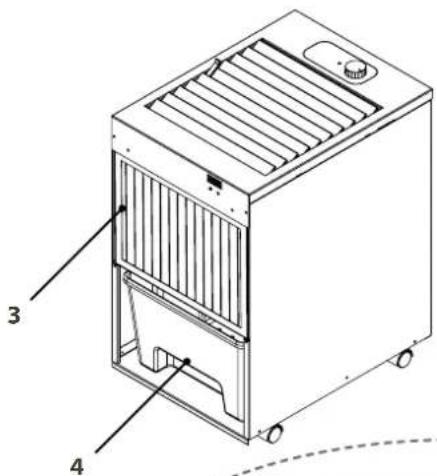
- Hygrostat dial
- Controls for closing / opening / aiming the return air
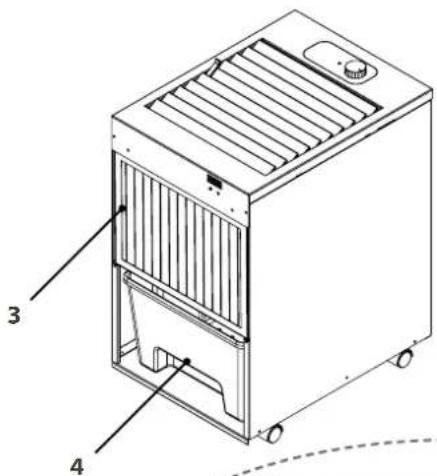
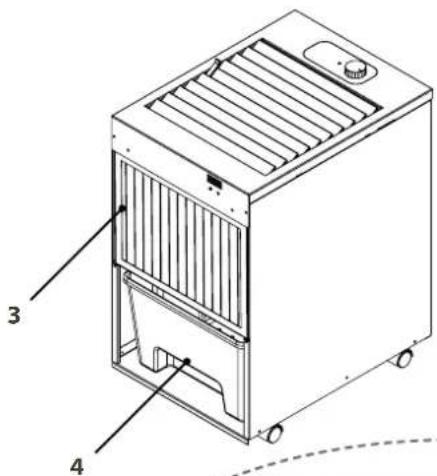
- Air filter
- Water tank
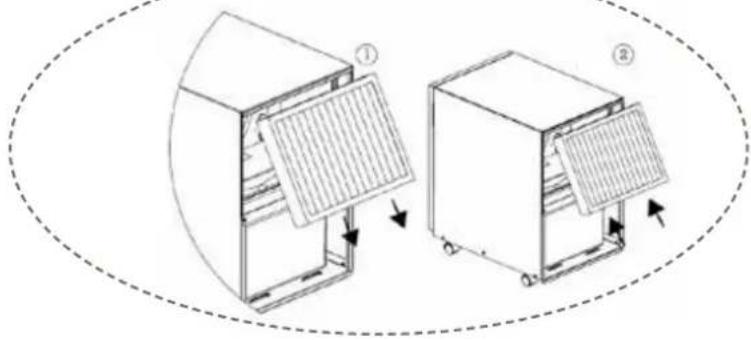
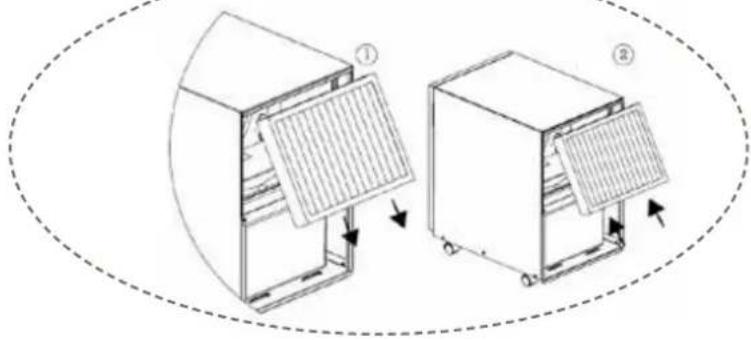
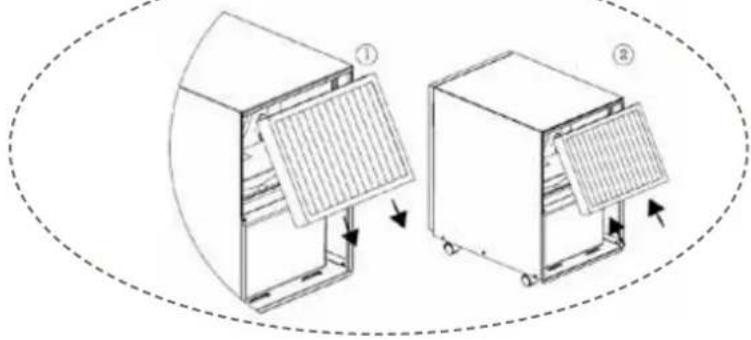
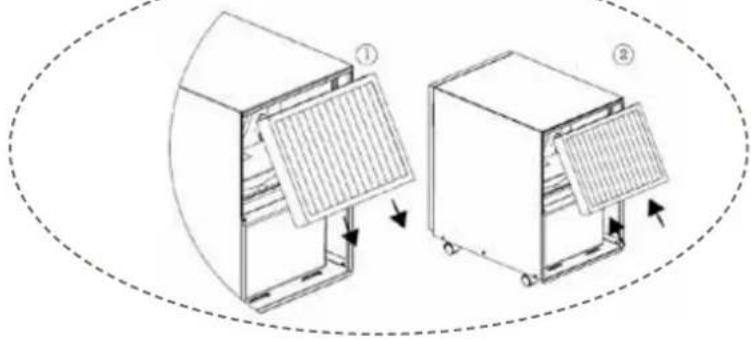
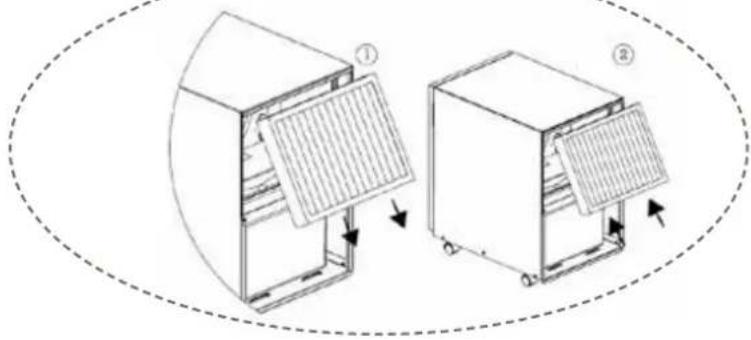
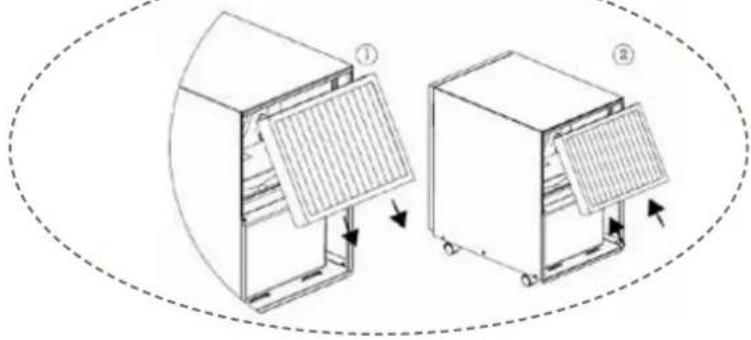
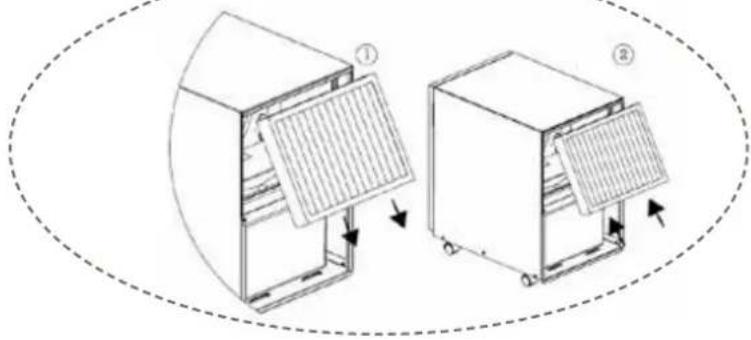
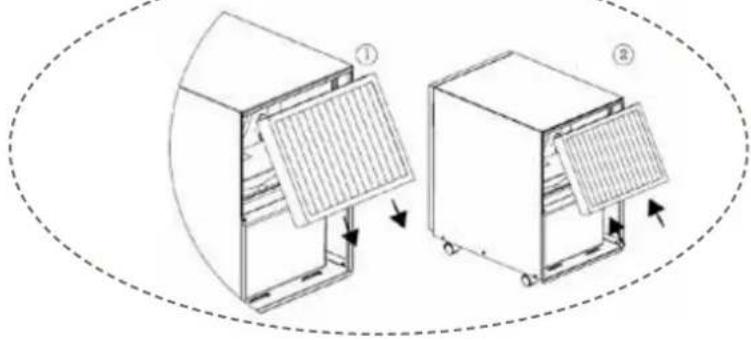
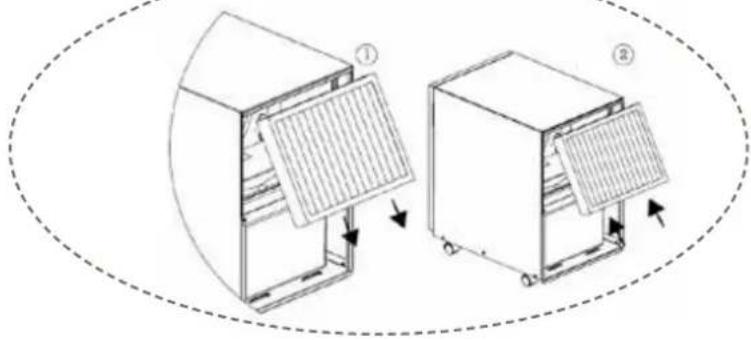
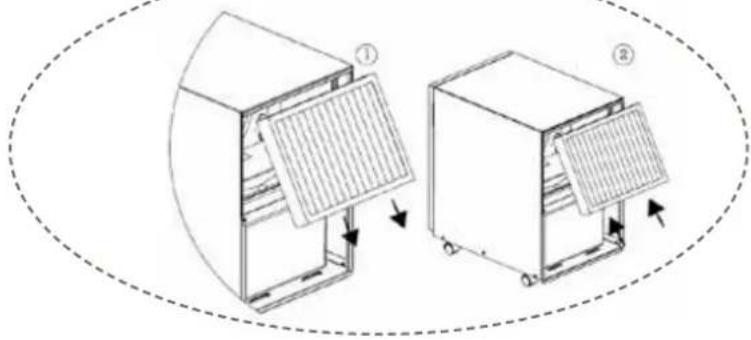
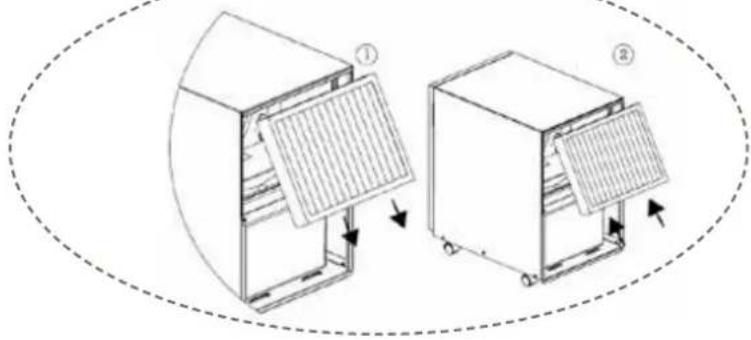
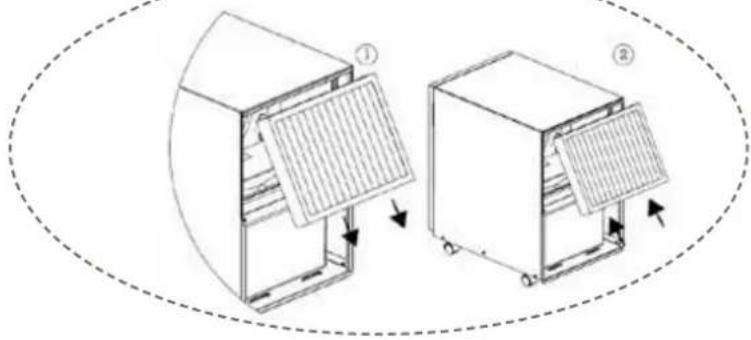
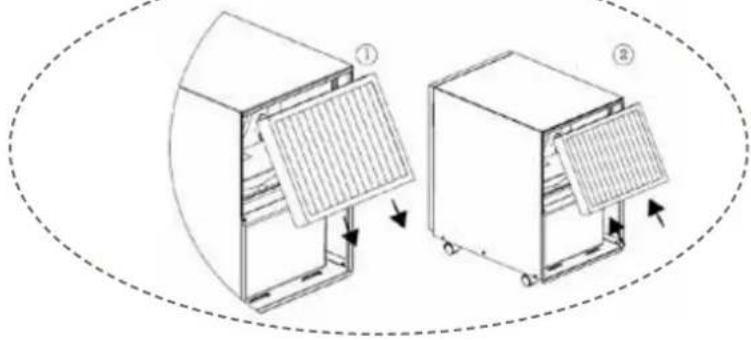
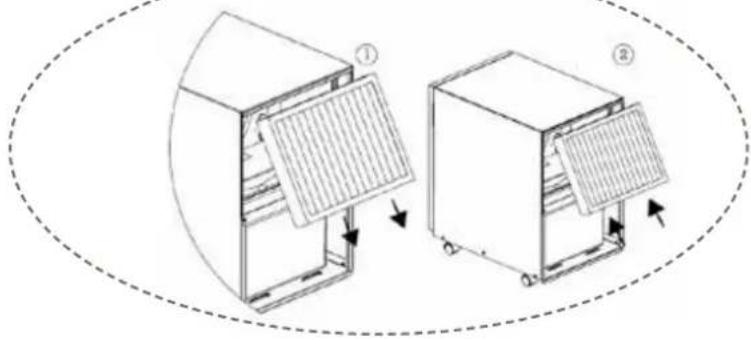
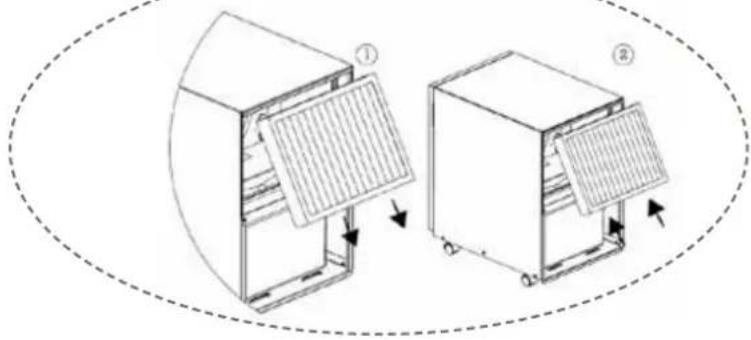
- Replacing the air filter
*Technical changes and improvements may occur. All values are approximate and may vary depending on external circumstances such as temperature, ventilation and humidity.
PROBLEM REMEDY
| The dehumidifier does not start | Make sure that the dehumidifier is connected to the socket and that the fuse has not blown.If the indicator light is red, check that the water tank is empty and correctly positioned in the dehumidifier. Ensure the float hangs freely.Check that the hygrostat works by turning it up to max. The dehumidifier should then start within 5 min. |
| The dehumidifier does not start | Make sure the fan wheel is spinning.Make sure that the air can flow freely through the dehumidifier. Air emissions and air filters must be clean and the dehumidifier must be at least 20-30 cm from the wall.Listen if the compressor is running, but keep in mind that the dehumidifier may be defrosting cycle and then the compressor will stop. Start by waiting for about 30 minutes.Check that a thick layer of ice does not form on the cooling coils / slats behind the filter. |
| High noise level/rattling | Increase the distance between the dehumidifier and surrounding surfaces.The cooling coils may make contact to each other and cause vibrations. Disconnect the dehumidifier from the electrical outlet and separate the loops |
| No condensate water collected | Check that no dirt etc. is deposited on the drip tray underneath the cooling coils, clean if necessary.Check that the temperature is above 2 °C or below 35 °C. |
| Does not shut off when water tank is full. | It is important that the float hangs freely in the water tank. If it does not, it does not sense the water level is and can therefore not ensure that the dehumidifier stops |
If you have a problem with your dehumidifier, refer to the troubleshooting guide. If none of the above works, contact your dealer to get your dehumidifier serviced.
WOOD'S, THE WORLD'S LEADING DEHUMIDIFIERS
Wood's dehumidifier products have been known as market leaders for many years. Our dehumidifiers are suitable for use in the most demanding climates, where dehumidifying capacity is good even at lower temperatures and humidity levels. They are used with good results in premises that become damp such as basements, garages, or summer houses. They also work great when drying washing without wear on textiles, in pool areas, and in laundry rooms. They are efficient and have low energy consumption. They are also excellent for drying laundry, attics, pool rooms, and more. Being efficient and low in energy consumption.
The amount of moisture that the dehumidifier removes depends on temperature, humidity level, and placement. The weather outdoors also affects dehumidifier performance. In cold weather, the relative humidity indoors drops, thus reducing the dehumidifier's moisture absorption from the air. Therefore, the dehumidifier is adapted for use in the temperature range +2°C to +35°C. Wood's dehumidifiers are safe and designed to operate continuously for many years.
EXCESSIVE AIR HUMIDITY - A DANGER
Condensation occurs when the water vapor in the air comes into contact with a cold surface such as a ceiling, window, or wall. When the water vapor cools down, condensation takes place whereby water droplets form. At high humidity, stale air can occur and mold is formed which damages the house and its interior. This environment can also lead to illnesses of the inhabitants when, among other things, mites thrive in a humid environment. A dehumidifier with high performance creates a good and healthy moisture level. To achieve the best effect, doors and windows of the spaces to be dehumidified should be kept closed. The dehumidifier removes bad odor, dries wood, and removes moisture from sports equipment for outdoor use, etc. A dehumidifier can be used in basements, laundry rooms, garages, caravans, summer cottages, and in boats. If the dehumidifier is used in colder environments, take a closer look at the hints at the end of the instructions for use.
NOTE!
When placed in a shower or bathing area, the dehumidifier should be fixed in place. It is mandatory to check and follow the local bathroom electrical regulations before use.
MOISTURE CONTROL
Wood's dehumidifier is equipped with a hygrostat which is set to the desired level. The hygrostat senses the current humidity level and starts and stops the dehumidifier automatically.
Procedure:
- Set the dial to the maximum position.
- When the desired humidity level is reached, turn the dial back until the dehumidifier turns off.
USE WOOD'S DEHUMIDIFIERS
If the dehumidifier is transported horizontally, leave it standing upright for 4 hours before use. It is very important for the oil to flow back into the compressor, as the dehumidifier otherwise may take serious damage. Wood's dehumidifiers are easy to move around when they are equipped with wheels. All that is required is the proximity to an electrical outlet for 220-240 V, but keep in mind the following:
The dehumidifier should not be placed near radiators or other heat sources and not exposed to direct sunlight as it lowers performance.
- You can use a radiator or heating fan to keep the temperature above + 2°C.
- The dehumidifier should be placed at least 25 cm away from walls and other obstruction to ensure maximum air flow.
- It is ideal to place the dehumidifier as centrally in the room/area as possible.
- Check that the water tank is correctly positioned.
- Connect the dehumidifier to a grounded electrical outlet.
- Set the desired humidity level using the hygrostat. Refer the section on moisture control.
NOTE!
When the dehumidifier switches off, it takes 5 minutes before it restarts.
FLOAT
The float consists of a white plastic cylinder suspended by two wires hanging in two arms. The float is buoyant and when the water level rises, the float is lifted up. When the float has reached a certain height, the dehumidifier detects this and turns off automatically to prevent flooding. When the water tank is emptied it should be put back in position the following way:
EMPTYING WATER CONTAINERS
- When the water tank is full, pull it gently outwards and empty it into the drain.
- Push the water container back in until it touches the float.
- Lift the bottom edge of the water tank to incline it slightly.
- Push the water tank in the last distance. The float should now have ended up in the water tank, instead of being clamped behind it.
NOTE!
It is important that the float hangs freely, because its purpose is to detect the water level in the tank and ensure that the dehumidifier switches off when the level is high. An incorrectly positioned float can cause the water tank to overflow.
DRAIN THE WATER TO THE SEWER
- Disconnect the dehumidifier from the electrical outlet and remove the water tank to access the threaded connection underneath the drip tray.
- Attach the hose coupling to the threaded connector and lead the hose to the drain. Ensure that the hose is positioned lower than the drip tray.
- Insert the dehumidifier plug into the socket.
- Without hose and directly over the drain:
- Place the dehumidifier directly over the drain so that the condensed water can drip through the hole in the bottom of the dehumidifier and into the drain.
AUTOMATIC SHUTDOWN
When the water tank is full, the dehumidifier shuts off automatically, signaling that the water tank must be emptied before you can use the dehumidifier again. Refer to the function description.
- Disconnect the dehumidifier from the electrical outlet.
- Empty the water tank.
- Replace the emptied water tank and make sure the float hangs free, refer to the Float section.
- Connect the dehumidifier to the electrical outlet. The dehumidifier restarts in the same mode as when disconnected.
AIR FILTER
The air filter on the back of the dehumidifier ensures that the cooling coils are kept free of dust. It is important that the filter is clean so that the air can flow freely through the dehumidifier. The filter should therefore be replaced when needed.
The dehumidifier is equipped with an SMF filter which improves the capacity of the dehumidifier at the same time as it further purifies the air. Refer to instructions for changing the air filter. We recommend at least one filter change per year. To follow the warranty program, register your dehumidifier at warranty-woods.com.
AUTOMATIC DEFROST
Wood's dehumidifiers are equipped with a control system ensuring that the cooling coils are defrosted if necessary. The control system switches off the compressor, which causes the cooling of the coils to stop. The fan continues to draw the room temperature air through the dehumidifier and thus the ice melts and the
water flows down into the water tank. Note that this control system allows the dehumidifier to operate at temperatures as low as +2°C.
FAN
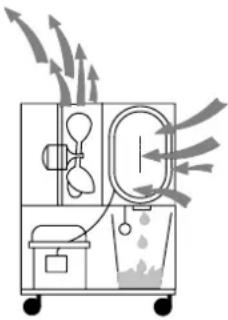
The fan ensures that air flows through the dehumidifier. Moist air is sucked in from the back and through the evaporator and condenser and released dry on the top of the dehumidifier.
CLEANING AND MAINTENANCE
Wood's dehumidifiers require cleaning and filter replacement to maintain their high dehumidification capacity.
- The air outlet can be vacuumed or cleaned with a brush. Use caution to prevent the slats from being damaged.
- The cooling coils are best cleaned with a cloth and warm water. Use caution.
- The fan motor is permanently lubricated and requires no maintenance.
NOTE!
Unplug the power cord from the electrical outlet before cleaning.
HINTS
- For maximum dehumidification capacity in a room it is recommended that the supply air from the outside and adjoining rooms are minimized - close doors and valves. If possible, place the dehumidifier in the middle of the room.
- Raise the temperature in the room for faster dehumidification. (Hot air can carry more water). Use a frost guard if the temperature drops below +2 °C
- The dehumidifier extracts more water during the summer and autumn because the outdoor air is warm and moist. (The absolute humidity is normally higher).
Recommended limits for use:
Temp. SW + 2°C to + 35°C
Relative humidity: 30% to 90%
Recommended moisture level c.a. 50% RH
IF THE DEHUMIDIFIER REQUIRES SERVICE
If the dehumidifier requires servicing, firstly contact the retailer. For all warranty claims, a proof of purchase is required.
NOTE!
Get a 10-year warranty! Register at warranty-woods.com Replace the SMF filter at least once a year. Visit woods.se for more information
IMPORTANT!
Wood's dehumidifier shall be connected to a grounded electrical outlet having a voltage of 220V-240V 50Hz.
GUARANTEES
2 year's guarantee against faults in manufacturing. Please note that the guarantee is only valid upon presentation of a purchase receipt.
GUARANTEE
TO GET AN EXTENDED WARRANTY, FROM 2 TO 10 YEARS, PLEASE FOLLOW THESE STEPS.
- Register your dehumidifier after your purchase at warranty-woods.com
- Replace the SMF filter in your dehumidifier regularly, at least once a year. If you want, we'll send you a reminder when a filter change is due. The reminder is, of course, free of charge. You can find filters at your local retailer, or distributor. Please visit woods.se to locate your closest Wood's distributor.
NOTE!
There is no obligation to purchase filters when you register your dehumidifier at warrantywoods.com
SAVE YOUR RECEIPTS!
These will be required for any warranty claim during the period.

SAFETY WARNINGS
PRODUCT DESCRIPTION
A.
NOTE!
Temp. SW +2°C to +35°C
OPERATING INSTRUCTIONS
PRODUCT DESCRIPTION
A.
DRAINING THE WATER TANK
DRAINING WATER TO THE DRAIN
NOTE!
OPERATING INSTRUCTIONS
PRODUCT DESCRIPTION
A.
NOTE!
OPERATING INSTRUCTIONS
PRODUCT DESCRIPTION
A.
NOTE!
NOTE!
PRODUCT DESCRIPTION
A.
NOTE!
KEEP THE RECEIPTS!
INSTRUCTIONS FOR USE

PRODUCT DESCRIPTION
A.
NOTE!

INSTRUCTIONS FOR USE
PRODUCT DESCRIPTION
A.
NOTE:
NOTKUNARLEIÐBEININGAR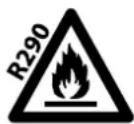
Flammable material.

Read the technical manual.
SAFETY INFORMATION
PRODUCT DESCRIPTION
A.
NOTE!
INSTRUCTIONS FOR USE
PRODUCT DESCRIPTION
A.
NOTE!
INSTRUCTIONS FOR USE
PRODUCT DESCRIPTION
A.
- Humidity regulator
- Controls for closing / opening / redirecting return air flow
- Air filter
- Water tank
- Replacing the air filter
TECHNICAL DATA LD24 LD40PRO
NOTE!
OPERATING INSTRUCTIONS
NOTE.
USER MANUAL
Flammable material. This unit contains the flammable refrigerant R290/propane.

See user manual.

PRODUCT DESCRIPTION
A.
INSTRUCTIONS FOR USE
CAUTION!
INSTRUCTIONS FOR USE
PRODUCT DESCRIPTION
A.
CAUTION!
INSTRUCTIONS FOR USE
PRODUCT DESCRIPTION
A.
CAUTION!
Wood's is marketed and distributed by:


- OPERATING INSTRUCTIONS FOR
- GET 10 YEARS WARRANTY
- CONTENT PAGE NO
- INSTRUCTIONS FOR USE
- SAFETY INFORMATION
- CHILDREN AND VULNERABLE PEOPLE SAFETY
- WARNING
- GENERAL SAFETY
- SAFETY INSTRUCTIONS
- ELECTRICAL CONNECTION
- USE
- DISPOSAL
- PRODUCT DESCRIPTION
- A
- WOOD'S, THE WORLD'S LEADING DEHUMIDIFIERS
- EXCESSIVE AIR HUMIDITY - A DANGER
- NOTE
- MOISTURE CONTROL
- PROCEDURE
- USE WOOD'S DEHUMIDIFIERS
- FLOAT
- EMPTYING WATER CONTAINERS
- DRAIN THE WATER TO THE SEWER
- AUTOMATIC SHUTDOWN
- AIR FILTER
- AUTOMATIC DEFROST
- FAN
- CLEANING AND MAINTENANCE
- HINTS
- IF THE DEHUMIDIFIER REQUIRES SERVICE
- IMPORTANT
- GUARANTEES
- GUARANTEE
- TO GET AN EXTENDED WARRANTY, FROM 2 TO 10 YEARS, PLEASE FOLLOW THESE STEPS
- SAVE YOUR RECEIPTS
- SAFETY WARNINGS
- OPERATING INSTRUCTIONS
- DRAINING THE WATER TANK
- DRAINING WATER TO THE DRAIN
- KEEP THE RECEIPTS
- USER MANUAL
- CAUTION
Brand : Wood's
Model : LD24
Category : Humidifier