
WOZ400 - Air purifier Wood's - Free user manual and instructions
Find the device manual for free WOZ400 Wood's in PDF.

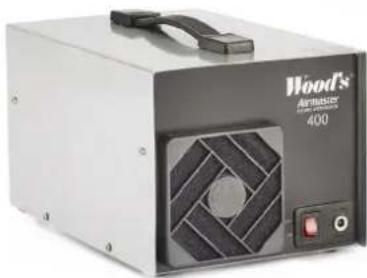
| Product type | Ozone generator (air purifier) |
| Brand | Wood's |
| Model | WOZ400 |
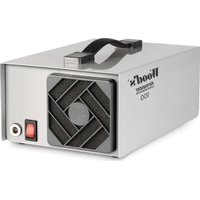
| Dimensions (L x W x H) | 270 x 180 x 160 mm |
| Weight | 2.1 kg |
| Power supply | 12 V DC (100-240 V AC adapter included) |
| Power consumption | 20 W |
| Ozone output | 500 mg/h (fixed) |
| Fan capacity | 116 m³/h |
| Housing material | Stainless steel |
| Ozone generator type | Quartz glass ozone tube |
| Integrated timer | No |
| USB port | No |
| Hose connection | Yes (optional accessory, not included) |
| Operating temperature range | +1 °C to +35 °C |
| Treatment method | Ozone oxidation |
| Wear parts | Pre-filter, ozone tube |
| Included accessories | Cigarette lighter cable (specific to WOZ400), AC adapter |
| Warranty | 2 years (factory) against manufacturing defects |
| Installation | Tabletop or wall-mounted (keyhole under chassis) |
| Recommended use | Deodorization of unoccupied rooms (home, office, car, boat, etc.) |
Frequently Asked Questions - WOZ400 Wood's
User questions about WOZ400 Wood's
0 question about this device. Answer the ones you know or ask your own.
Ask a new question about this device
Download the instructions for your Air purifier in PDF format for free! Find your manual WOZ400 - Wood's and take your electronic device back in hand. On this page are published all the documents necessary for the use of your device. WOZ400 by Wood's.
USER MANUAL WOZ400 Wood's
OPERATING INSTRUCTIONS FOR:
Wood's Airmaster WOZ400
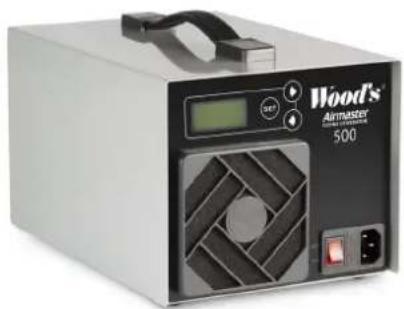
Wood's Airmaster WOZ500
Wood's Airmaster WOZ2000
Wood's Airmaster WOZ4000
GB Operating Instructions
English 4-15
Swedish 16-23
Norwegian 24-31
Danish 32-39
German 40-47
French 48-59
Finnish 56-63
Icelancic 64-71


C.
Wood &Armchair WOZ500/2000/4000
D.
Consumable Parts
Actual product may vary
E.
Extra Accessories (Not Included)
F.
Wood's Airmaster WOZ2000
F.
Wood's Airmaster WOZ4000
PRODUCT DESCRIPTION
Product description
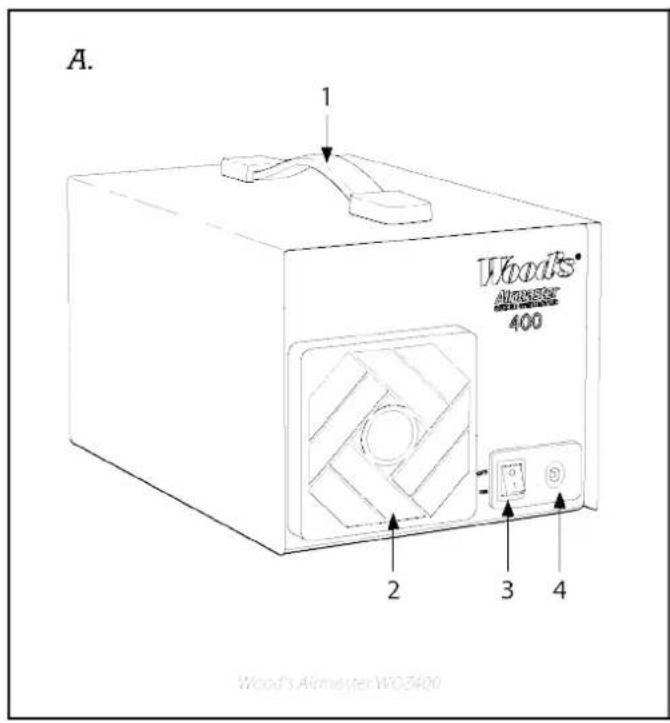
A.
- Handle
- Filter holder
- ON/OFF button
- Network connection
- Fuse holder
- Digital display
- Adjustment buttons
B.
- Connection for hose nipple
- USB port
- Connection to supply air filter (optional extra)
C.
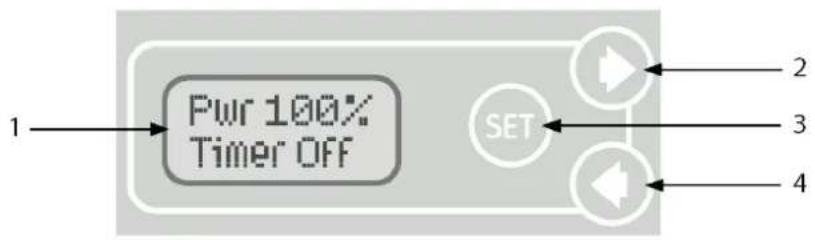
Digital control
- Digital display
- Forward (increase)
- Set (menu)
- Back (reduce)
D.
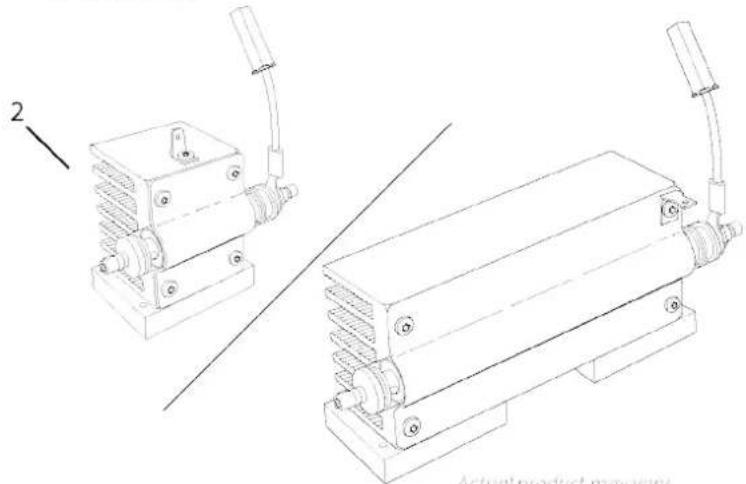
Wear parts
- Pfilter
- Ozone pipe
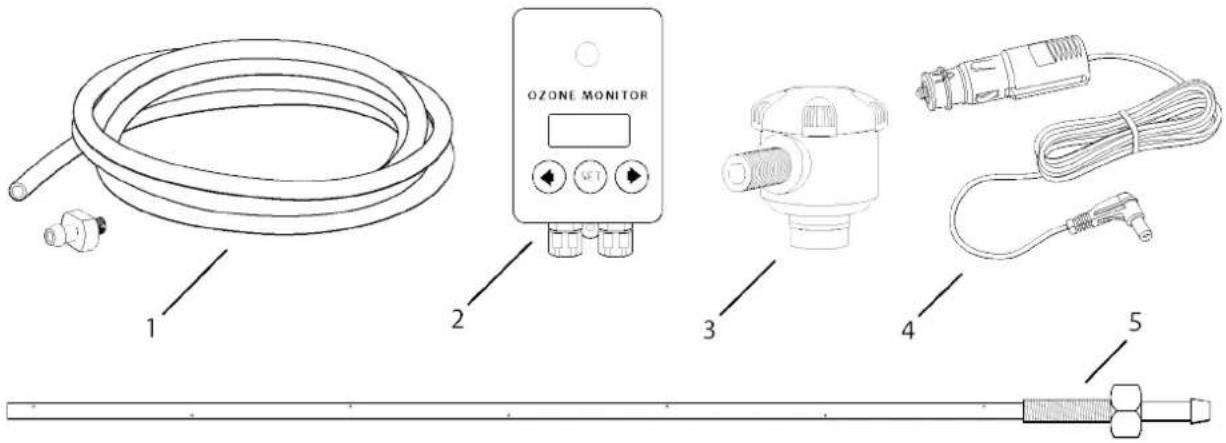
E.
Additional accessories (not included)
- Hose nipple with 2-metre silicone hose
- Ozone meter (not WOZ400)
- Supply air filter (not WOZ400)
- Cigarette lighter cable (WOZ400 only)
- Ventilation nozzle 400mm
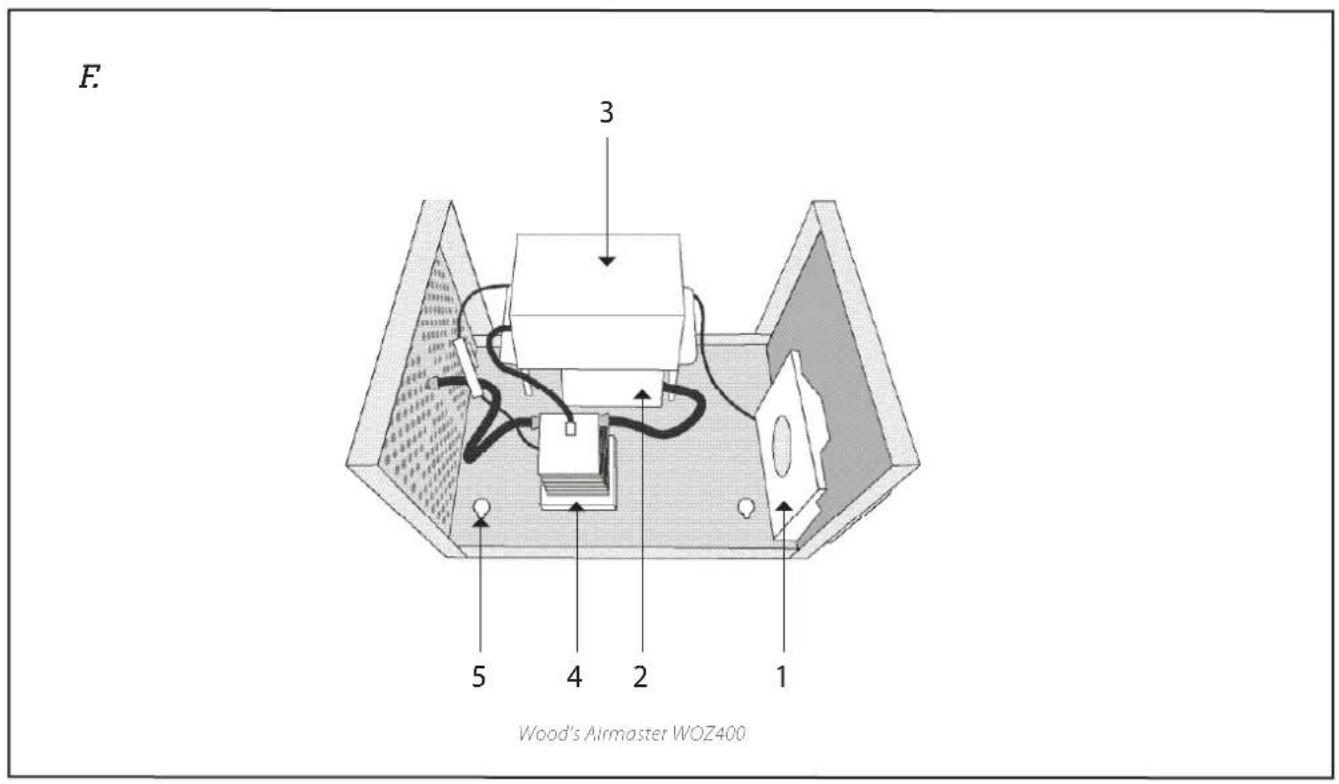
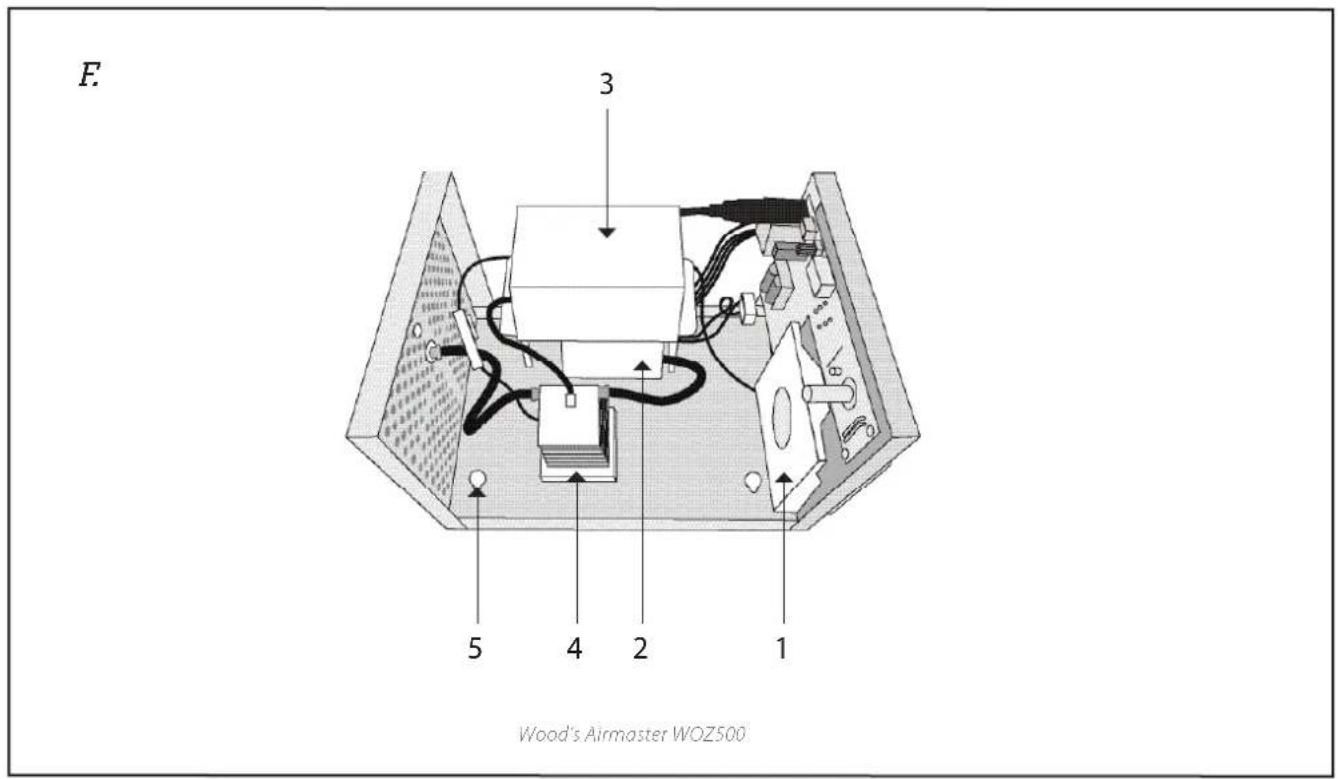
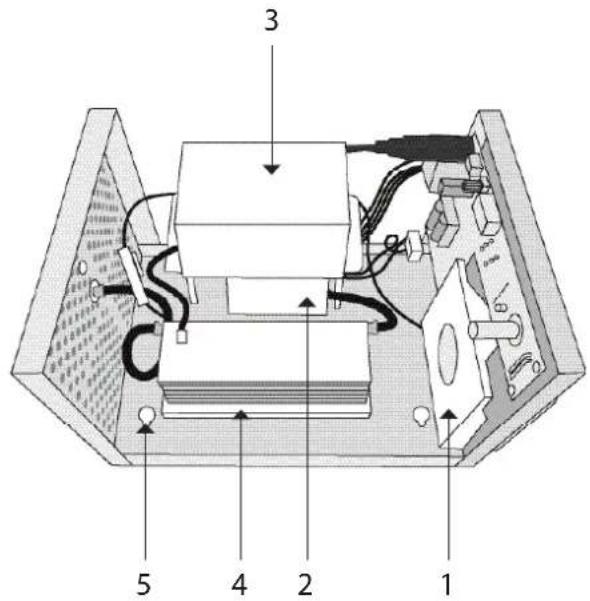
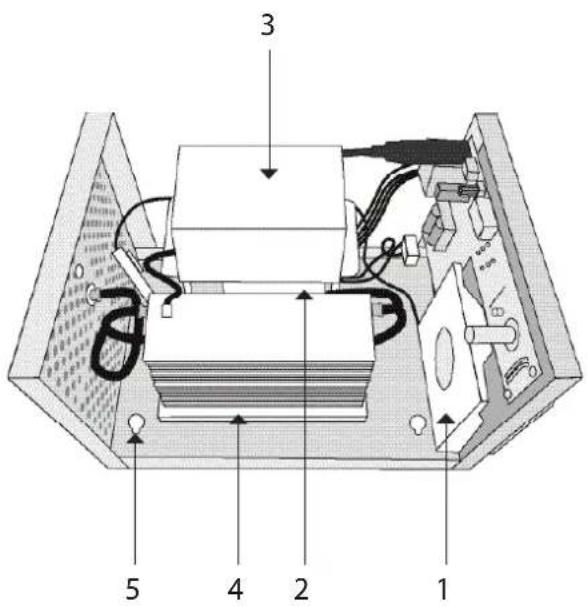
F.
- Fan
- Air pump
- High-voltage module
- Ozone pipe
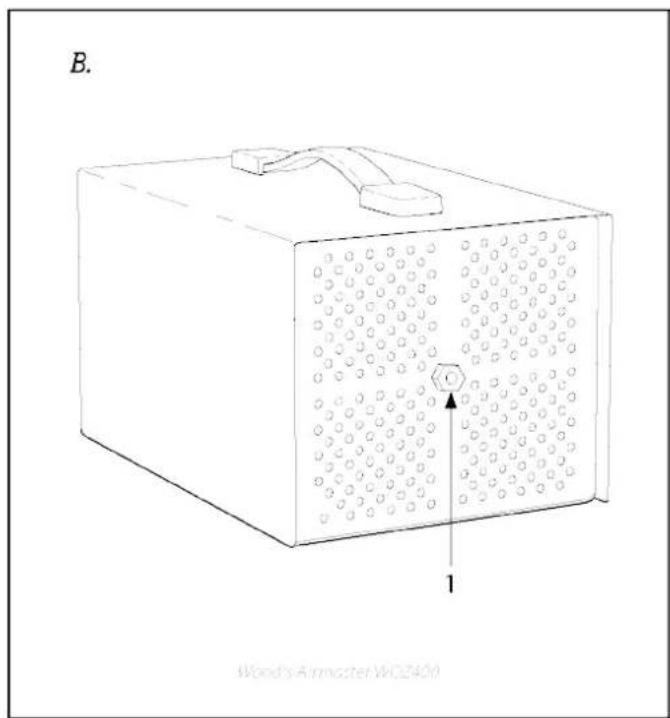
- Hole for hanging up (keyhole)
THANK YOU FOR CHOOSING THE WOOD'S AIRMASTER - AN EFFICIENT, SWEDISH QUALITY OZONE GENERATOR
The Wood's Airmaster is an odour control device made in Sweden, with stainless steel parts that are able to withstand harsh operating conditions year after year. This ozone device rapidly and efficiently eliminates bacteria, viruses and odours from damp, mould, refuse, waste, smoke and pets.
The Wood's Airmaster WOZ400/500 is ideal for eliminating odours in the home, office, car, boat, caravan, refuse storage room and hygiene areas. Anywhere you'd like to restore a fresh, clean smell.
The ozone also penetrates into textiles and sits on the surface of fittings and wallpapers.
WOOD'S FOR CLEAN, HEALTHY INDOOR AIR
Wood's has been characterised by top quality, reliability, high capacity and minimal energy consumption for more than 60 years. Today, Wood's is distributed to more than 19 countries from the company's head office in Alingsås.
MEMBER OF THE EUROPEAN OZONE TRADE ASSOCIATION (EUOTA) AND CO-OWNER OF THE EUOTA OZONE DOSSIER FOR ACTIVE BIOCIDAL PRODUCTS.
This futureproofs the Wood's Airmaster, preparing it for future legislation and biocidal products regulations.
EUO3TA. org European Ozone Trade Association
HOW DOES AN OZONE GENERATOR WORK?
Ozon is a special kind of oxygen known as active oxygen, and it's formed by passing electrical energy into an ozone generator. The ozone works by oxidising organic substances, thereby effectively eliminating foreign odours, bacteria and viruses. In the majority of cases, the only end products are carbon dioxide and water.
The concentration of ozone in outdoor air varies from 0.001 to 0.040 parts per million (ppm). The National Board of Occupational Safety and Health has set the threshold value to 0.1 ppm of ozone over 8 hours of exposure when working. The gas is perceived as clean, fresh air (like after a thunderstorm) at concentrations of around 0.015-0.020 ppm. The gas starts to take on a pungent odour at 0.050 ppm, and at 0.1 ppm it may cause irritation of the eyes and throat.
IMPORTANT!

Locate and eliminate whatever is causing the odour problem before running the ozone control device, otherwise the odour will return.
Ozone is harmful when inhaled, so ozone devices must be used with care.
Wood's Airmaster
In the event of accidental exposure to ozone, leave the area immediately. Do not enter the space again until it is certain that the ozone level is below the applicable limit values.
Read the instructions carefully before use.
SAFETYWARNINGS

See these instructions for safety information.

Read the technical manual

Read the instructions.
SAFETY INFORMATION
Read carefully through the instructions supplied before installing and using the device. The manufacturer accepts no liability for incorrect installation resulting in injury and damage to property. Always keep the instructions together with the device for future reference.
Safety for children and vulnerable people
WARNING

Risk of injury or permanent disability.
Do not allow children to play with the device.
Keep all packaging out of the reach of children.
Children must not clean or maintain the device.
General safety
In the event of accidental exposure to ozone, leave the area immediately. Do not enter the space again until it is certain that the ozone level is below the applicable limit values.
Do not rinse the equipment with water, and do not position it anywhere where it will come into contact with water.
The power supply to the equipment must be switched off for all servicing and repair work. All use of the equipment must be in accordance with this manual. No liability is accepted for any other use.
SAFETY AND SECURITY REGULATIONS
Installation
WARNING

Remove all packaging and check that the product is not damaged. Do not use/install the product if it is damaged.
Connection to the power supply
WARNING

Risk of fire and electric shocks if used incorrectly. The device must be connected to an earthed socket.
Make sure that the electrical information on the rating plate matches the power supply. If not, contact an electrician.
Always use a correctly installed, shockproof socket. Never use a damaged branch socket or extension cable.
Make sure that the electrical components are not damaged (e.g. plug, mains cable).
Contact the authorised service centre or an electrician if
electrical components need to be replaced.
Only connect the plug to the power socket when installation is complete.
Make sure that accessing the plug is easy after installation.
Do not pull on the cable when disconnecting the device.
Always hold onto the plug when pulling it out.
Disposal
WARNING

Disconnect the device from the mains.
Please use the return and collection systems to recycle your device. Get in touch with your municipality for information on how to dispose of the device correctly.

USING AND MAINTAINING YOUR OZONE DEVICE
IMPORTANT!
Locate and eliminate whatever is causing the odour problem before running the ozone control device, otherwise the odour will return.
Ozone is harmful when inhaled, so the ozone device must be used with care. In the event of accidental exposure to ozone, leave the area immediately. Do not enter the space again until it is certain that the ozone level is below the applicable limit values.
Reentry Precautions: Wait until ozone levels have decreased to meet accepted legal values before entering the room. If levels exceed these standards, refrain from entering until ozone has dissipated.
Treatment with the Wood's Airmaster
1.Preparation:
Clean the room thoroughly, vacuum and wipe down all surfaces and/or repair/eliminate the problem causing the odour.
2. Make sure that the area is safe to treat:
Remove pets and plants. Remove valuable high-tech equipment such as laptops and valuable oil paintings. Make sure that there are no people in the room.
3. Ozone treatment:
Position the ozone device in the middle of the room (ideally on a slightly raised surface such as a table). Connect the mains cable supplied to the mains socket (A4). The ozone device can now be started by pressing the on-off button (A3), and you set the timer (C) to the preferred time (models with a timer). Always use a timer when operating your ozone unit. If your ozone unit lacks a built-in
timer, connect it to an external shutoff timer to prevent ozone exposure before it dissipates.
It can take up to about 5 minutes to achieve the full effect.
4. Duration of treatment:
2 to 72 hours, depending on the intensity of the odour. The average treatment time is 24 hours. Ideally, start off with 4-8 hours and repeat as necessary.
5. After the ozone treatment:
Wait until ozone levels have decreased to meet accepted legal values before entering the room. If levels exceed these standards, refrain from entering until ozone has dissipated.
Permanent installation
The ozone device can be wall-mounted by means of a "keyhole solution" (F5) on the underside of the ozone device.
Connect the mains cable supplied to the mains socket (A4). The ozone device can now be started by pressing the on-off button (A3).
Connecting the silicone hose (El)
The nipple and silicone hose accessories (E1) are mounted in the connecting nut (B1) and the ozone can be directed into the space to be treated such as air conditioning systems, partition walls, ventilation ducts and water treatment.
Connecting the ozone meter (E2)
The ozone meter accessory (E2) is connected to the USB port (B2) on the back.
USING AND MAINTAINING YOUR OZONE DEVICE
Use
Position the ozone device in a dry place that is ventilated well, ideally high up and approx. 1.5m above the floor. It is important to ensure that nothing prevents the air entering the fan.
Connect the mains cable supplied to the mains socket (A4).
The ozone device can now be started by pressing the on-off button (A3). The ozone device starts in operating mode, with full power (100%)
It can take up to about 5 minutes to achieve the full effect.
Starting the machine
- Start the ozone device.
Press the switch (A3) to ON
- Switch off the ozone device
Press the power switch (A3) to OFF
Digital control with timer
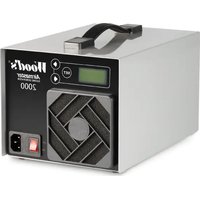
(Applicable to Wood's Airmaster WOZ500/2000/4000)
The ozone quantity/output can be varied between 0 and 100% .
Timer modes: daily, interval and shut-off timer.
See "Digital control" instructions on the next page for further information.
Using the silicone hose
The nipple and silicone hose accessory (E1) is mounted in the connecting nut (B1) and the ozone can be directed into the space to be treated such as car interiors, partition walls and water treatment.
Connecting to a ventilation duct
When connecting to a ventilation duct/spiral pipe, the ventilation
nozzle (E5) is connected by means of a nut rivet. The ozone device is then connected with the hose nipple and silicone hose (E1).
Maintenance
NOTE!
Always unplug the device before carrying out servicing/maintenance.
Replacing the prefilter
The prefilter has to be replaced every two to four months, depending on the ambient environment.
- Undo the filter holder (A2) by hand.
- Replace the filter with a new one.
- Put back the filter holder (A2).
Replacing the ozone pipe
Ozone is formed when a high-voltage power supply is passed into the ozone pipe. The ozone pipe must be replaced if the ozone concentration declines or ceases entirely.
A. If your ozone device has four chassis screws per long side:
- Undo the eight screws on the long sides of the chassis.
- Lift the cover off the machine.
- Go to point C.
B. If your ozone device has no visible chassis screws:
- Undo the two screws that hold the handle in place.
- Turn the machine upside down.
- Undo the four screws that hold the machine's feet in place.
- Remove the chassis cover by pulling/pushing the cover forwards.
- Go to point C.
C. Replace the ozone pipe:
- Carefully remove the two air hoses from the ozone pipe (F4).
- Undo the two cables between the high-voltage module (F3) and the ozone pipe (F4).
- The screws that hold the ozone pipe in position (F4) are undone from the underside.
- Assemble in reverse order.
NOTE: The ozone pipe and prefilter are wear parts and are not covered by the warranty.
All servicing other than that described here must be performed by the manufacturer or an authorised partner.
Servicing
You must contact your local dealer if your ozone device requires maintenance. Receipts must be presented for all warranty claims.
Storage instructions
Store your ozone device at room temperature between +1^ and +35^
It is important to replace the prefilter at regular intervals and to replace the ozone pipe regularly. Failing to do this may impair the capacity of the ozone device and possibly harm the device.
USING THE OZONE DEVICE
Applicable to Wood's Airmaster WOZ500/2000/4000
Digital control
| Pur 100% TimerOff | Normal operating mode Use the forward (C2) and back (C4) buttons to set ozone production to the preferred level, 1-100%. The timer is switched off. |
| Menu | Menu Press set (C3) to access the menu. Then use the forward button (C2) to scroll until you arrive at the function you want to change. (You can always leave the menu by holding down the set button.) |
| Timer Settings | Timer Press set (C3), the set timer mode is displayed. Press set (C3), again, the text starts to flash. Use the forward button (C2) to scroll until you find the preferred timer function. Press set (C3) to select a function. |
| Mode Off | Timer off (factory default) |
| Mode Once | Shut-off timer The Wood's Airmaster operates for the preferred time and then shuts off. Press forward (C2), "Set Timer" appears in the display. Press set (C3), the text flashes, set the preferred time by pressing forward (C2) / back (C4) (e.g. 15 min 00:15). Press set (C3) to confirm the time (the timer stops flashing). Hold down set (C3) start the timer and leave the menu. "TimedOut" is displayed when the timer has reached the end. Hold down forward (C2) and back (C4) at the same time to restart the timer. |
Set the time in the following timer modes in the same way as described in Shut-off timer.
| Mode Interval | Interval timer The Wood's Airmaster switches between operating mode and shutdown mode at set times. First, set the operating time: "Step on". Press forward (C4). Then set the shut-down time: "Step off". |
| Mode Daytimer | Daily timer The Wood's Airmaster operates according to set times of day. NOTE: Set the clock first! (see Clock) Set the "on" time 1: "Step on 1". Press forward (C2), set "off" time 1: "Step off 1". Set "on" time 2: "Step on 2". Press forward (C2), set "off" time 2: "Step off 2". Set "on" time 3: "Step on 3". Press forward (C2), set "off" time 3: "Step off 3". If a mode (e.g. 3) is left blank, i.e. 00:00, that mode is disabled. |
| SetClock 00:00 | Clock This is where you set the clock used by the daily timer. Press set (C3): the digits flash. Set the required time using forward (C2) and back (C4). Press set to confirm your setting. (24-hour backup in the event of a power outage) |
| Blight On | Backlight The display backlight can be switched on or off. |
| ExtInput settings | Connection for external devices (USB) The input for external devices (e.g. ozone meter) can be enabled or disabled. eller pa. Operating mode can be selected: Ozone Control – A connected ozone meter can control the ozone generator to maintain a constant ozone concentration. Ozone Alarm – If a connected ozone meter discovers a leak, the machine shuts down and alerts the operator. |
| Factory reset | Factory default Restores the device to the factory defaults. NOTE: All settings will be deleted. |
| KEYS LOCKED | Key lock The buttons are locked by holding down set (C3) and forward (C2) at the same time until "KEYS LOCKED" appears in the display. The buttons are unlocked in the same way. |
Troubleshooting
| PROBLEM CAUSE REMEDY | ||
| The device does not switch on and the power switch does not light up. | Power supply problem. | Connect the device to a functioning power socket and switch it on. |
| The fuse is broken (WOZ3000/6000). Replace the fuse. | ||
| The power adapter is broken (WOZ400). | Try a different power adapter (making sure that the adapter is to the correct specification). | |
| The device is operating but not producing ozone. | The ozone pipe has reached the end of its life or is broken. | Replace the ozone pipe. |
| Loud fan noise. The prefilter is dirty/clogged. Replace the filter. | ||
| The machine is behaving strangely. The software has hanged. | Perform a factory reset.. | |
| The machine settings (e.g. timer) are incorrect The machine has been set accidentally. | ||
| Contact your local dealer after you have worked through the above troubleshooting list or if your project requires a service. | ||
Warranties
2- year factory warranty covering workmanship. Please note, the warranty is valid only on presentation of a receipt. The warranty is valid only if the product is used in accordance with the instructions and safety warnings in this manual. The warranty does not cover damage caused by incorrect use of the product.

NOTE:
Register your product at www.warrantywoods.com to benefit from the special Wood's offers available for your product.
Take a look at www.woods.se for more information.
CUSTOMER SERVICE
Always use original parts.
Make sure you have the following to hand when you contact our customer service team: Model designation, receipt and serial number.
Note that all information, safety instructions and technical data in this manual may be amended.

TECHNICAL DATA
Airmaster WOZ400 Airmaster WOZ500 Airmaster WOZ2000 Airmaster WOZ4000
| Ozon production 500 mg/hour 0-500 mg/hour 0-2000 mg/hour 0-4000 mg/hour | |||
| Fan capacity 116 m | 3/hour 116 m | 3/hour 116 m | 3/hour 116 m |
| Technology | Ozone pipe (quartz glass) | Ozone pipe (quartz glass) | Ozone pipe (quartz glass) |
| Timer - Yes Yes Yes | |||
| Hose coupling Yes Yes Yes Yes | |||
| USB port - Yes Yes Yes | |||
| Energy consumption | 20 W/12 V DC(100-240 V mains adapter supplied) | 20 W/100-230 V | 45 W/100-230 V |
| Temperature range | +1℃- +35℃ | +1℃- +35℃ | +1℃- +35℃ |
| Dimensions (LxWxH) | 270x180x160 mm | 270x180x160 mm | 270x180x160 mm |
| Fuse parameter | - | 630mAT 250v | 630mAT 250v |
| Weight | 2.1 kg | 2.1 kg | 3.0 kg |
| Finish | Stainless steel | Stainless steel | Stainless steel |
| Extra accessories | Hose nipple, silicone hose, cigarettelighter cable | Hose nipple, silicone hose, ozone meter | Hose nipple, silicone hose, ozone meter, ventilation filter |
| Wear parts | PrefilterOzone pipe | PrefilterOzone pipe | PrefilterOzone pipe |
*Technical modifications and improvements may be made. All values are approximate and may vary depending on external circumstances such as temperature and humidity.
PRODUKTBESKRIVNING
Produktbeskrivning
A.
Wood's Airmaster WOZ400/500
Under behandling skutrymmet ej betradas. Utrymmet far inte betradas forran ozonkoncentrationen ar under gallande gransvarden.
(Galler Wood's Airmaster
WOZ500/2000/4000)
Gäller Wood's Airmaster WOZ500/2000/4000
Wood's Airmaster WOZ400/500
Wood's Airmaster WOZ2000/4000
(Gjelder Wood's Airmaster
WOZ500/2000/4000)
Ozonmengden/effecteken kan varieres mellom 0-100%.
Gjelder Wood's Airmaster WOZ500/2000/4000
Digital styring
Wood's Airmaster WOZ400/500
Ma参加会议的人员在会议开始前,就与会人员进行沟通。参加会议的人员包括:Må, Må, Må, Må, Må, Må, Må, Må, Må, Må, Må, Må, Må, Må, Må, Må, Må, Må, Må, Må, Må, Må, Må, Må, Må, Må, Må, Må, Må, Må, Må, Må, Må, Må, M. Må参加会议的人员在会议开始前,就与会人员进行沟通。参加会议的人员包括:Må, Må, Må, Må, Må, Må, Må, Må, Må, Må, Må, Må, Må, Må, Må, Må, Må, Må, Må, Må, Må, Må, Må, Må, Må, Må, M. Må参加会议的人员在会议开始前,就与会人员进行沟通。参加会议的人员包含:Må, Må, Må, Må, Må, Må, Må, Må, Må, Må, Må, Må, Må, Må, Må, M. Må参加会议的人员在会议开始前,就与会人员进行沟通。参加会议的人员包含:Må, Må, Må, Må, Må, Må, Må, M.
Wood's Airmaster WOZ2000/4000
Wood's Airmaster WOZ400/500
Wood's Airmaster WOZ2000/4000
Gilt fur Wood's Airmaster WOZ500/2000/4000
Wood's Airmaster WOZ400/500
Wood's Airmaster WOZ2000/4000
Wood's Airmaster WOZ400/500
Wood's Airmaster WOZ2000/4000
Koskee Wood's AirmasterIA WOZ500/2000/4000
Wood's Airmaster WOZ400/500
Ma ekkinota lenghti par sem folk eoa dyr halda til. Skammvinn vahrif eru skolaus, svo sem i ruslageymslum og pess hattar.
Wood's Airmaster WOZ2000/4000
Tenging osonmaelis (E2)
Osonmaelirinn (E2) er aukabunaour sem tengdur er vio USB-gattina (B2) aftan a taekinu.
NOTKUN OG VIDHALD ÖlONTÄKISINS
Notkun
Settu osontaiki a purran sta o me góörloftraestingu, helst hatt uppi um 1,5 myfir golfi. Mikilvaegt er aekkert hindri flaei lofta a viftunni.
Tengdu meofylgjandi rafmagnssnuru vio innstungu (A4).
Nu er ma rasa osontaekio meo A/ Af-hnappinum (A3). Osontaekio byrjar af fullri orku (100%)
Wood's is marketed and distributed by:
Woods Production Sweden AB.
Maskingatan 2-4
441 27, Alingsos
Sweden.
woods.se
info@woods.se
+46317613610

- OPERATING INSTRUCTIONS FOR:
- PRODUCT DESCRIPTION
- A.
- B.
- C.
- D.
- E.
- F.
- THANK YOU FOR CHOOSING THE WOOD'S AIRMASTER - AN EFFICIENT, SWEDISH QUALITY OZONE GENERATOR
- WOOD'S FOR CLEAN, HEALTHY INDOOR AIR
- MEMBER OF THE EUROPEAN OZONE TRADE ASSOCIATION (EUOTA) AND CO-OWNER OF THE EUOTA OZONE DOSSIER FOR ACTIVE BIOCIDAL PRODUCTS.
- HOW DOES AN OZONE GENERATOR WORK?
- IMPORTANT!
- Wood's Airmaster
- SAFETYWARNINGS
- SAFETY INFORMATION
- Safety for children and vulnerable people
- WARNING
- General safety
- SAFETY AND SECURITY REGULATIONS
- Installation
- Connection to the power supply
- Disposal
- USING AND MAINTAINING YOUR OZONE DEVICE
- Treatment with the Wood's Airmaster
- 1.Preparation:
- Make sure that the area is safe to treat:
- Ozone treatment:
- Duration of treatment:
- After the ozone treatment:
- Permanent installation
- Connecting the silicone hose (El)
- Connecting the ozone meter (E2)
- Use
- Starting the machine
- Digital control with timer
- Using the silicone hose
- Connecting to a ventilation duct
- Maintenance
- NOTE!
- Replacing the prefilter
- Replacing the ozone pipe
- If your ozone device has four chassis screws per long side:
- If your ozone device has no visible chassis screws:
- Replace the ozone pipe:
- Servicing
- Storage instructions
- USING THE OZONE DEVICE
- Warranties
- NOTE:
- CUSTOMER SERVICE
- PRODUKTBESKRIVNING
- Wood's Airmaster WOZ400/500
- Wood's Airmaster WOZ2000/4000
- Tenging osonmaelis (E2)
- NOTKUN OG VIDHALD ÖlONTÄKISINS
- Notkun
Brand : Wood's
Model : WOZ400
Category : Air purifier