
M10G - Humidifier Wood's - Free user manual and instructions
Find the device manual for free M10G Wood's in PDF.

| Product type | Compressor dehumidifier |
| Brand | Wood's |
| Model | M10G |
| Recommended area | 4-30 m² |
| Maximum area | 40 m² |
| Airflow rate | 120 m³/h |
| Dehumidification capacity (30°C, 80% RH) | 10 L/day |
| Power consumption | 280 W |
| Noise level | 42 dB |
| Operating temperature | +5°C to +35°C |
| Number of speeds | 1 |
| Dimensions (L x W x H) | 276 x 185 x 480 mm |
| Refrigerant | R290 (Propane) |
| Protection rating | IP21 |
| Power supply | 220-240 V, grounded plug |
| Water tank | With float, automatic shut-off when full |
| Permanent drainage | Possible via 10 mm hose (gravity) |
| Main functions | Electronic hygrostat, automatic restart, automatic defrost, timer 1-24h, continuous mode |
| Maintenance | Clean the air filter regularly with warm water and mild detergent |
| Safety | Automatic shut-off when tank full, frost protection, use prohibited for children without supervision |
| Warranty | 2 years (subject to domestic use and presentation of invoice) |
Frequently Asked Questions - M10G Wood's
User questions about M10G Wood's
0 question about this device. Answer the ones you know or ask your own.
Ask a new question about this device
Download the instructions for your Humidifier in PDF format for free! Find your manual M10G - Wood's and take your electronic device back in hand. On this page are published all the documents necessary for the use of your device. M10G by Wood's.
USER MANUAL M10G Wood's
natural_image
White electronic device labeled 'Wood's' with visible branding and ventilation slots (no additional text or symbols)Wood's®
Visit our website www.woods.se for: Usage advice, updated brochures, trouble shooter and service information. Register your product for additional warranty: www.warranty-woods.com
CUSTOMER CARE AND SERVICE
Always use original spare parts.
When contacting our Authorised Service Centre, ensure that you have the following data available: Model number, receipt and serial number.
Warning / Caution-Safety information.
General information and tips.
Environmental information.
Subject to change without notice.
Please read this manual carefully before installing and using your Wood's product.
Store the manual in a safe place for future reference and product warranty.
Users manual Wood's dehumidifier M10G
Table of contents
| 4 | English | |
| 13 | Swedish | |
| 25 | Danish | |
| 30 | Norwegian | |
| 37 | German | |
| 42 | French | |
| 48 | Spanish | |
| 57 | Dutch | |
| 66 | Lithuania | |
| 71 | Latvian | |
| 80 | Estonian | |
| 89 | Finnish | |
| 94 | Icelandic | |
| 103 | Romanian | |
| 111 | Greek | |
| 120 | Polish |
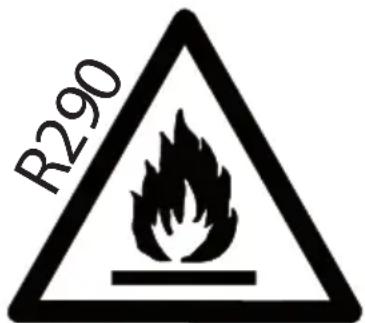
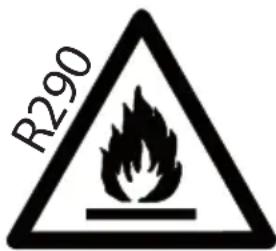
Flammable material. This appliance contains R290/Propane a flammable refrigerant. Refer to this manual for safety information. R290 refrigerant gas complies with European environmental directives. Do not pierce or burn. Maintenance and repairs requiring the assistance of other qualified personnel must be carried out under the supervision of specialists in the use of inflammable refrigerants.

Refer to this manual for safety information

Read technical manual

Read operators manual.
SAFETY INFORMATION

Before the installation and use of the appliance, carefully read the supplied instructions. The manufacturer is not responsible if an incorrect installation and use that causes injuries and damages. Always keep the instructions
with the appliance for future reference.
Children and vulnerable people safety
WARNING

Risk of injury or permanent disability.
This appliance can be used by children aged 8 years and above and persons with reduced physical, sensory or mental capabilities or lack of experience and knowledge if they have been given supervision or instruction concerning use of the appliance in a safe way and understand the hazards involved.
Do not let children play with the appliance.
Children of less than 3 years should be kept away unless continuously supervised. Keep all packaging away from children.
Cleaning and user maintenance shall not be made by children without supervision.
General Safety
This appliance is intended to be used in household and similar applications such as: – bathrooms, staff kitchen areas in shops, offices and other working environments. The rating plate is located at the back or the side of the dehumidifier. Keep ventilation openings clear of
obstruction.
Do not use mechanical devices or other means to accelerate the defrosting process, other than those recommended by the manufacturer.
The appliance shall not be stored in a room with continuously operating ignition sources (for example; open flames, an operating gas appliance or an operation electric heater.
Do not pierce or burn.
Be aware that refrigerants may not contain an odour.
Do not use water spray and steam to clean the appliance. Clean the appliance with a moist soft cloth. Only use neutral detergents. Do not use abrasive products, abrasive cleaning pads, solvents or metal objects.
If the supply cord is damaged, it must be replaced by the manufacturer, its Authorised Service Centre or similarly qualified persons in order to avoid a hazard.
SAFETY INSTRUCTIONS
Installation
WARNING

Only a qualified person must install this appliance.
Remove all the packaging.
Do not install or use a damaged appliance. The appliance shall be installed,
operated and stored in a room with a floor area larger than 4m^2 . Obey the installation instruction supplied with the appliance. Always be careful when you move the appliance because it is heavy. Always wear safety gloves.
Make sure the air can circulate around the appliance.
Wait at least 4 hours before connecting the appliance to the power supply. This is to allow the oil to flow back in the compressor.
Do not install the appliance close to radiators or other heat sources.
Do not install the appliance where there is direct sunlight. This device is only for indoor use. Ensure that the unit is placed on a stable and flat surface. If the surface is not stable there is a risk that the unit may be unstable and cause excessive vibration and that water will be released.
Electrical connection
WARNING

Risk of fire and electrical shock.
The appliance must be connected to a grounded outlet.
Make sure that the electrical information on the rating plate matches the power supply. If not, contact an
electrician.
Always use a correctly installed shockproof socket. Do not use multi-plug adapters and extension cables.
Make sure not to cause damage to the electrical components (e.g. mains plug, mains cable).
Contact the Authorised Service Centre or an electrician to change the electrical components. The mains cable must stay below the level of the mains plug.
Connect the mains plug to the mains socket only at the end of the installation. Make sure that there is access to the mains plug after the installation. Do not pull the mains cable to disconnect the appliance. Always pull at the mains plug.
Use
WARNING

Risk of injury, burns, electrical shock or fire. Do not change the specification of this appliance.
Be careful not to cause damage to the refrigerant circuit. It contains propane (R290), a natural gas with a high level of environmental compatibility. This gas is flammable.
If damage occurs to the
refrigerant circuit, make sure that there are no flames and sources of ignition in the room. Ventilate the room. Do not put flammable products or items that are wet with flammable products near or on the appliance.
Disposal
WARNING

Risk of injury.
Disconnect the appliance from the mains supply.
Cut off the mains cable and discard it.
The refrigerant circuit of this appliance is ozone-friendly. Contact your municipal authority for information on how to discard the appliance correctly.
Do not cause damage to the part of the cooling unit that is near the heat exchanger.
Always see to that the appliance is kept clean. Do not cover the unit.
Thank you
Thank you for choosing a Wood's dehumidifier. You are one of more than 600.000 people who have chosen a Wood's dehumidifier to prevent damages from excessive moisture and mould. Originating in Canada in 1950, Wood's has more than 60 years experience of developing and manufacturing dehumidifiers. When choosing a Wood's dehumidifier you'll get a unit with great quality, high capacity and that will extract the most litres per consumed kWh.
Workings of your dehumidifier
The Wood's M10G is a compressor dehumidifier. As the air is drawn through the dehumidifier by the fan, the air passes over the compressor cooled copper coils. The coils cool the water vapour, separating the water from the air.
The water drips down from the coils and is drained away with the water hose. Left is the dry air that is exhausted in the room. As the dehumidifier condensates the water vapour, heat energy is released. That is why a compressor dehumidifier will exhaust dry air that is extra beneficial for drying clothes, laundry, wood etc.
A compressor dehumidifier is the most energy efficient way to remove excess moist and bad odour. Keep the relative humidity level between 50% and 60% to maintain a safe and healthy indoor environment.
1. Installation and placement
Wood's dehumidifiers are easy to move around, but bare in mind the following.
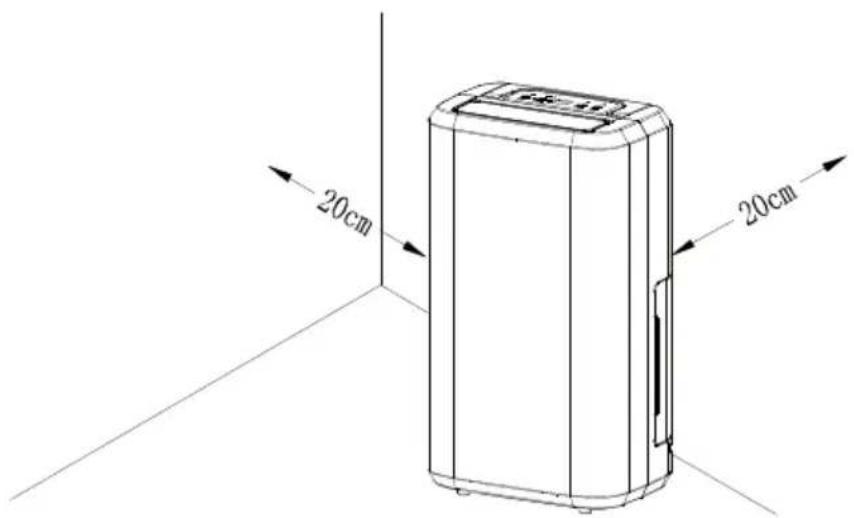
- The dehumidifier should not be placed near radiators or other heat sources or exposed to direct sunlight, as it will reduce its performance.
- Keep at least 25cm distance from walls and other obstructions to max-
imize the air flow.
- For optimum performance, place the dehumidifier in the middle of the room.
- Make sure that the air flow from the inlet and outlet isn't blocked
Installation:
- Place the dehumidifier on a flat and solid ground, preferably in the middle of the room.
- Close all windows and ventilators in the room. Otherwise, moist air from the outside will continue to flow into the room.
- Connect the dehumidifier to a grounded power outlet.
If the dehumidifier is transported horizontally, oil may have run out of the compressor and into the closed piping system. In such a case, let the dehumidifier stand for a few hours before being used. It is very important that the oil runs back into the compressor, otherwise the dehumidifier may be seriously damaged.
2. Using the M10G
Hygrostat controlled
The unit will run only when the ambient humidity exceeds your set value.
Automatic restart
In the event of a power failure, the unit will continue to work according to your latest settings once the power returns.
Automatic defrost
The unit will defrost automatically when needed and resume to work when the defrost is completed.
When defrosting, the compressor shuts off and the defrost indication light is lit.
Start and stop the dehumidifier by pressing the ON/OFF button.
When the compressor is working, the compressor light is illuminated.
Set desired humidity
Press the UP and DOWN arrows to choose desired humidity level between 30% and 90%. The dehumidifier will shut off when desired humidity level is reached. Set value is shown in the display for a couple of seconds. After, the display returns to showing the ambient humidity level. Press the DOWN arrow until the display shows CO to have the dehumidifier running continuously. Continue function, no matter room humidity, machine continue running.
When ambient humidity level is below 35%, the display shows LO. When ambient humidity level is above 95%, the display shows HI.
NOTE: when desired humidity level is reached, the fan will continue to work for a couple of minutes before shutting off.
Set timer for automatic shut off
Press the timer button repeatedly to active the timer for automatic shut off between 1 and 24 hours. When activated, the timer light illuminates. Set value is shown in the display for a couple of seconds. After, the display returns to showing the ambient humidity level. Press the timer button until the display shows 0 and the timer light shuts off to deactivate. When shut off due to the timer, you need to press the power button to restart the unit.
4. Water drainage
When the water reservoir is full, the dehumidifier is shut off automatically.
Once the water reservoir is emptied the unit will automatically restart.
- Disconnect the dehumidifier from the power source.
- Empty the water reservoir.
- Put the empty water reservoir back and check that the float moves freely.
- Connect the dehumidifier to the power source.
English
Direct water drainage
Connect a water hose (10 mm) to the pipe on the back of the dehumidifier. Lead the other end to a drain. Make sure that the water can be drained downwards.
5. The air filter
The air filter prevents dust and dirt from entering the machine, prolonging its life expectancy. It is important the filter is cleaned regularly. Filter cleaning:
- Remove the filter.
- Wash it with warm water and a mild cleansing agent. Alternatively the filter may be vacuum cleaned.
- Let the filter dry and put it back
It is very important that the filter is cleaned regularly; otherwise the dehumidifier might lose capacity and even be seriously damaged.
6. Maintenance
- Clean the unit with a soft moist cloth. Do not use solvents or strong cleaners as this might damage the surface of the unit.
- The cooling coils are best cleaned with a rag and warm water.
7. Service
If the dehumidifier requires servicing, you must first contact your local retailer. Proof of purchase is required for all warranty claims.
8. Warranties
2 years consumer warranty against production faults. Please note that the warranty is only valid upon the production of the receipt. The warranty is only valid if the product is used in accordance with the instructions and security warnings expressed in this manual. The warranty does not cover any damages caused
by improper handling of the product.
NOTE: The 2 years warranty only applies for consumers and not for commercial use of the unit.
This machine complies with EMC - Directives 2014/30/EU and its amendments
The unit is set to work between +5°C and +35°C.
If the temperature goes outside this range the unit might not work properly.
9. Hints
Sometimes it may be useful to use a frost guard or heater fan to make sure that the temperature does not fall below +10°C. Even if the M10G works down to temperatures as low as +5°C, its capacity will increase at higher temperatures as warm air carries more water.
For maximum dehumidifying power in a room, it is recommended that the air supply from outside and from adjoining rooms is minimized – close doors and ventilators.
Expect higher dehumidification capacity during Autumn / Summer because the outside air is warmer and more humid.
To achieve a safe and reliable protection against mould and moisture damage, keep the relative humidity 5 between 50% and 60%.
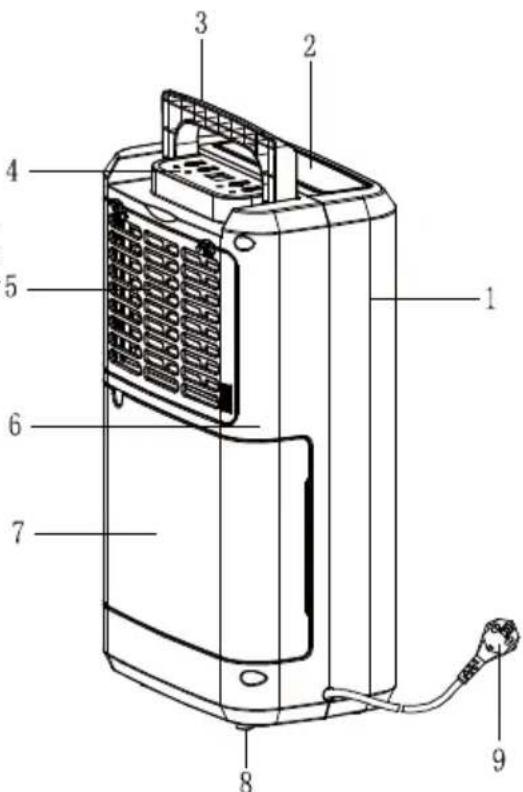
PARTS
Parti componente
- Front shell
- Outlet
- Handle
- Control Panel
- Filter box
- Back shell
- Tank
8.Rubber feet - Supply cord
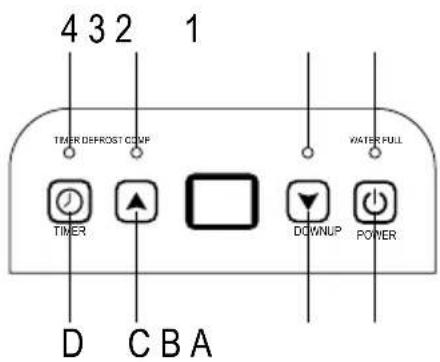
OPERATING INSTRUCTIONS LED INDICATORS
- WATER FULL-LED Red
- COMP-LED Blue
- DEFROST Blue
- TIMER-LED Blue
Humidity Level & Timer 2 digit display
The indicator features 3 functions:
- when you set the humidity, it will indicate the humidity that you have selected
- when you program the time for the unit to turn on and off, it will show the hours.
- When the environment humidity is lower than 35%, it will show "LO"
- When the environment humidity is higher than 95%, it will show "HI"
Functions
A. On/Off button
B. Press arrow down to set lower the humidity
C. Press arrow up to set higher humidity
D. Timer button


OPERATING INSTRUCTIONS
-
Plug in the unit.
-
Press 📋 button to start operation, the power indicator will be on. Press it again to stop operation.
-
Press or button to set the desired humidity level in the room, which can be set from 30% to 90% at 5% intervals or "CO".
After a period of working, when environment humidity is lower than the selected humidity by 2%, compressor will stop; When environment humidity is equal to or higher than the selected humidity by 3%, compressor will restart once 3-minute compressor protection time over.
When setting the humidity to "CO", the compressor will run continuously.
- press 📋 button can be timer setting:
Press the button to program the time when the unit turns on and turns off. If you want to cancel the timer programming, press the button to adjust the time at 00, and press the button ,it will be circulate from 00-01-02.....23-24.It is the programmed time to switch the machine. The programmed time will be cancelled when to switch compressor manually each time. The programmed time remains unchanged if the machine stops to wok due to water full or during defrosting
Noted: when ambient humidity reaches what you set before, both compressor and fan motor stop for 60mins firstly, and then, fan motor works for 3mins to detect ambient humidity, if it is higher than set, both compressor and motor works again; If it is lower than set, both compressor and motor stop for 60mins, and then motor works for 3mins again;
DRAINING THE COLLECTED WATER
When the drainage tank is full, the tank full indicator light will turn on, the operation will stop automatically and the buzzer will beep 15 times to alert the user, that the water need to be emptied from the drainage tank.
Emptying the Drainage Tank
-
Lightly press on the sides of the tank with both hands and pull the tank out gently.
-
Discard the collected water
NOTE!
- Do not remove the float from the water tank. The water full sensor will no longer be able to detect the water level correctly without the float and water may leak from the water tank.
- If the drainage tank is dirty, wash it with cold or lukewarm water. Do not use detergent, scouring pads, chemically treated dust cloths, gasoline, benzene, thinner, or other solvents, as these can scratch and damage the tank and cause water leakage
- When replacing the drainage tank, press the tank firmly into place with both hands. If the tank is not positioned properly, the "TANK FULL" sensor will be activated, and the dehumidifier will not operate.
English
natural_image
Three technical line drawings of industrial air purifiers with ventilation grilles, showing internal components and mounting points (no text or symbols)Continuous Water Drainage
The unit features a continuous drainage port .Using a plastic pipe (with an inner diameter of 10mm) inserts into drain hole (on intermediate p late), reach out from side of water tank, install it in place, and arrange the drain pipe.
The water in the drainage tank can be continuously drained out from the continuous port on the unit.
MAINTENANCE
Cleaning the Dehumidifier
To clean the Body: Wipe it with a soft damp cloth.
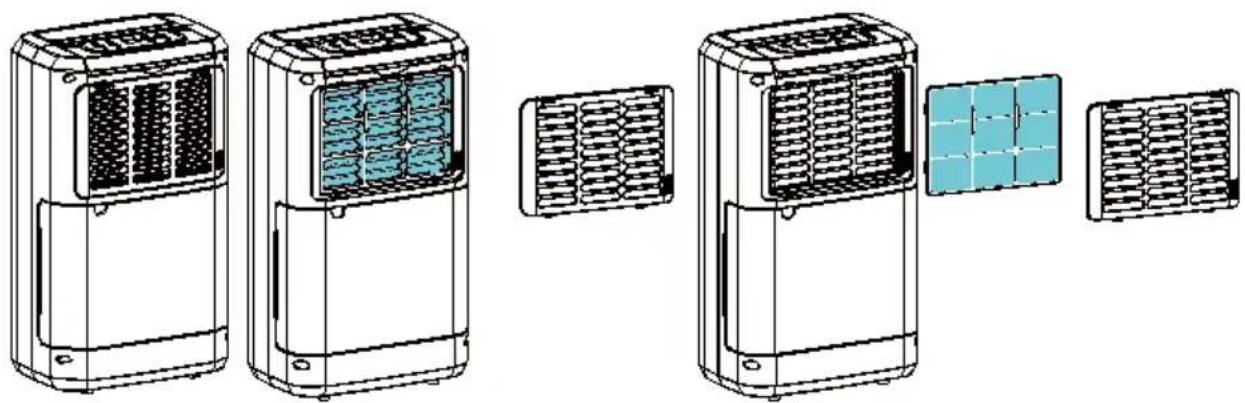
To Clean the Air Filter
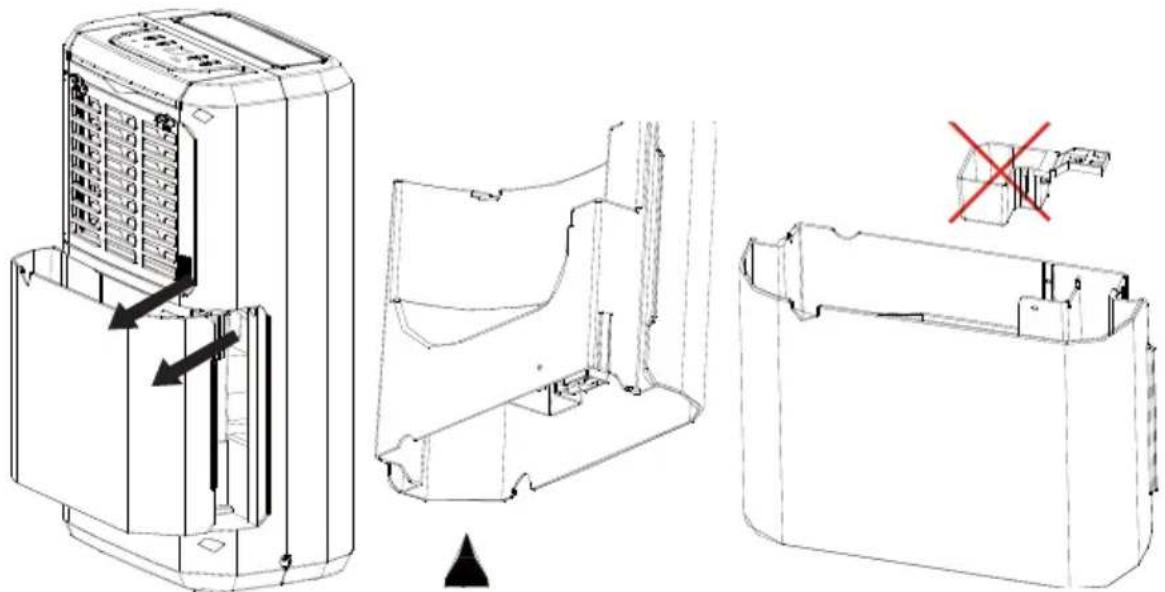
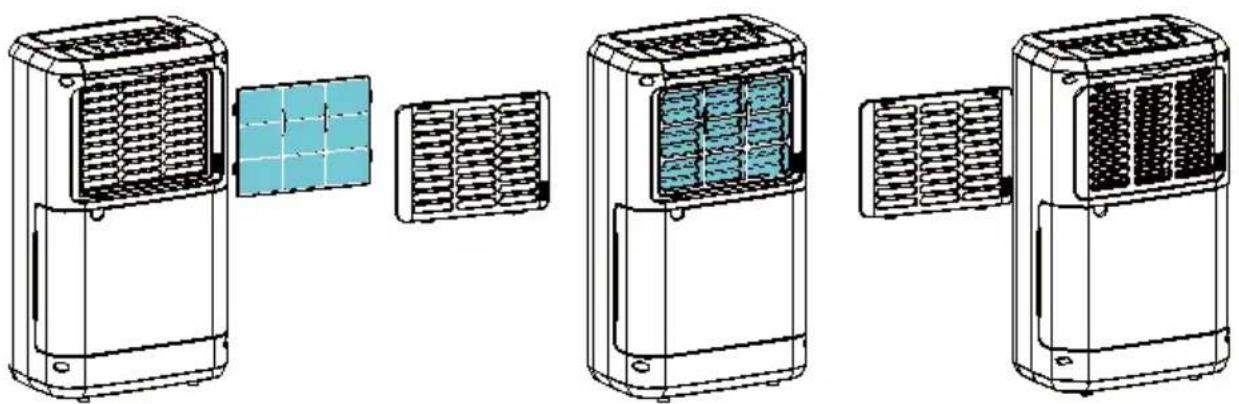
- Open the inlet grill firstly and remove the air filter
natural_image
Technical line drawings of five different air purifiers with internal ventilation systems, shown from front to side (no text or labels)2. Clean the air filter
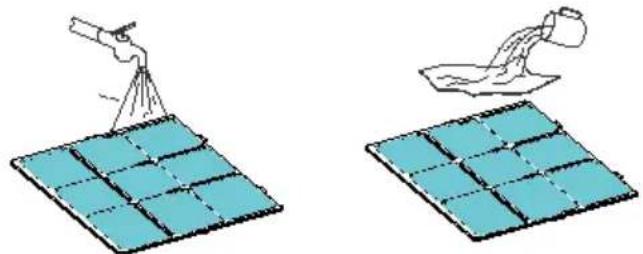
Run a vacuum cleaner lightly over the surface of the air filter to remove dirt. If the air filter is exceptionally dirty, wash it with warm water and a mild cleanser and dry thoroughly.
English
natural_image
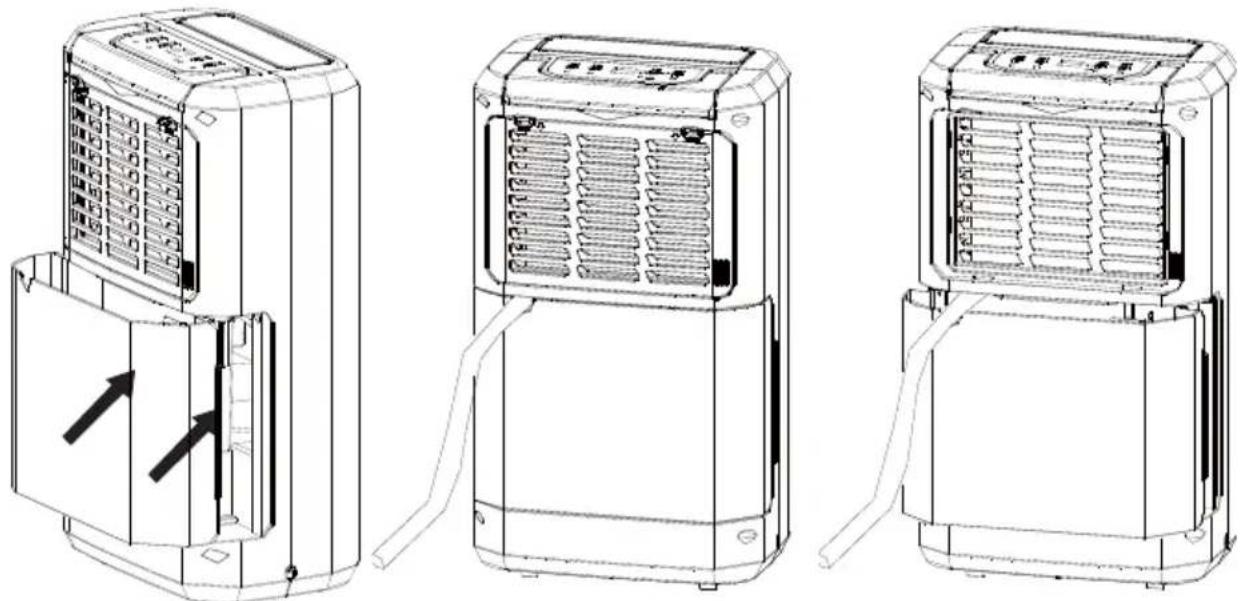
Two diagrams showing a hand spraying water onto a grid of blue tiles, with one being compressed and the other lying on top (no text or symbols)3. Attach the air filter
Insert the filter into the grill smoothly, and place the inlet grill into right place.
natural_image
Line drawings of four different household air purifiers with heat sinks, shown from different angles (no text or symbols)Storing the Dehumidifier
When the unit is not being used for a long period of time and you want to store it note the following steps:
- Empty any water left in the drainage tank.
- Fold up the power supply cord and put it in the water tank.
- Clean the air filter
- Discard in a cool and dry place.
Clearance
Maintain the minimum clearance around the dehumidifier when the unit is operating as shown in the left drawing.
TROUBLESHOOTING
If a condition listed below occurs, please check the following items before calling customer service.
| Problem Possible Cause Solution | ||
| The unit doesn't operate Has the power cord been disconnected? | Plug the power cord into the outlet. | |
| Empty the water in the drainage tank and then reposition the tank. | ||
| The protection device is activated and the unit cannot be started. | ||
| The dehumidifying function doesn't work | Is the air filter clogged? Clean the air filter as instructed under "Cleaning the dehumidifier". | |
| Is the intake duct or discharge duct obstructed? | Remove the obstruction from the discharge duct or intake duct. | |
| No air is discharged Is the air filter clogged? Clean the air filter as instructed under "Cleaning the dehumidifier". | ||
| Operation is noisy Is the unit tilted or unsteady? | Move the unit to a stable, sturdy location. | |
| Is the air filter clogged? Clean the air filter as instructed under "Cleaning the dehumidifier". | ||
| "E1" error code Defrosted sensor failed. Replace defrosted sensor. | ||
Technical data Wood's M10G
| Max. Working area 40 m | ^2 |
| Recommended Room Size | 4-30 m^2 |
| Airflow 120 m | ^3/h |
| Capacity (at 30°C & 80% RH) 10 Litres | |
| Power 280 W | |
| Tank Volume 2 Litres | |
| Noise-Level 42 dB | |
| Working Temperature | +5°C to +35°C |
| Fan Speeds | 1 |
| Dimensions, L x W x H | 276x185x480 mm |
| Weight 9,5 kg | |
| Refrigerant | R290 |
| IP Code | IP21 |
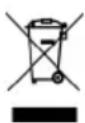
This marking indicates that this product should not be disposed with other household wastes throughout the EU. To prevent possible harm to the environment or human health from uncontrolled waste disposal, recycle it responsibly to promote the sustainable reuse of material resources. To return your device, please use the return and collection systems or contact the retailer where the product was purchased. They can take this product for environmental safe recycling.
Svenska
ANVISNINGAR FÖR LED LAMPOR
WARNING!
natural_image
Three technical line drawings of industrial air purifiers with ventilation grilles, shown from different angles (no text or labels)Direktavrinning till avloppsbrunn
natural_image
Technical line drawings of various household air purifiers with ventilation grilles and heat sinks (no text or labels)natural_image
Illustration of two scenarios: one showing a telescope on a solar panel, the other showing a person pouring liquid from a bowl into a container (no text or symbols)3. Fäst luftfiltret
natural_image
Illustration of three different air purifiers with heat sinks, shown from different angles (no text or symbols present)Förvara avfuktaren
Installation ADVARSEL

MERK!
natural_image
Three technical line drawings of industrial air purifiers with internal heat sinks and ventilation slots, shown from different angles (no text or symbols present)Kontinuerlig drenering
Enheten har en port for kontinuerlig drenering. Monter en plastslange (med 10 mm innvendig diameter) i dreneringshullet (på mellomplaten). Strekk deg rundt vannbeholderen, monter slangen og legg den dit du ønsker.
natural_image
Illustration of five different air purifiers with different internal compartments and heat sinks, shown from different angles (no text or labels present)natural_image
Illustration showing two scenarios of a person using telescopes to observe or drag over a grid-patterned surface (no text or symbols)3. Fest luftfilteret
natural_image
Line drawings of four different air purifiers with internal grating and ventilation systems (no text or symbols)natural_image
Technical line drawing of a device housing with internal components and a warning symbol (no text or labels present)¡NOTA!
natural_image
Three technical line drawings of industrial air purifiers with ventilation grilles, shown from different angles (no text or symbols)natural_image
Technical line drawings of various air purifiers and heat exchangers, showing front, side, top, and side views (no text or labels)2. Limpie el filtro de aire
natural_image
Illustration of a telescope on a tilted surface with grid panels (no text or symbols)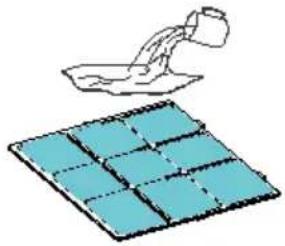
natural_image
Illustration of a person pouring liquid into a container with blue tiles (no text or symbols)3. Acople el filtro de aire
natural_image
Line drawings of four different air purifiers with heat sinks, shown from different angles (no text or symbols)HET VERZAMELDE WATER AFVOEREN
OPMERKING!
natural_image
Three technical line drawings of industrial air purifiers with ventilation grilles, showing internal components and airflow direction (no text or symbols)Continue waterafvoer
natural_image
Line drawings of various household air purifiers with ventilation grilles and heat sinks (no text or symbols)natural_image
Illustration of a person using a telescope to observe a solar panel array (no text or symbols visible)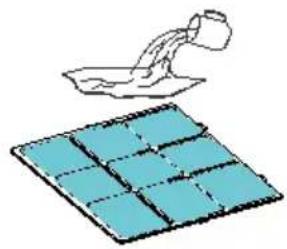
natural_image
Illustration of a person pouring liquid into a boat above a grid-patterned surface (no text or symbols)natural_image
Line drawings of four different air purifiers with internal grating and ventilation grids, shown from different angles (no text or symbols)DALAS
natural_image
Technical line drawing of a device with internal components and a warning symbol (no text or labels present)IEVĚROJIET!
natural_image
Three technical line drawings of industrial air purifiers with internal heat sinks and ventilation systems (no text or symbols)natural_image
Illustration of five different air purifiers with internal ventilation systems, shown from front to side (no text or labels)natural_image
Two diagrams showing a person cleaning a solar panel with a tool, no text or symbols presentnatural_image
Line drawings of three different air purifiers with ventilation grilles, shown from different angles (no text or symbols)OHUTUSALASED JUHISED
Paigaldus
HOIATUS

MÄRKUS!
natural_image
Three technical line drawings of industrial air purifiers with heat exchangers and ventilation slots, shown from different angles (no text or symbols present)Pidev vee äravool
natural_image
Line drawings of various household air purifiers with ventilation grilles and heat sinks (no text or symbols)2. Puhastage öhufilter.
natural_image
Two diagrams showing a person using a tool to lift a blue panel onto a surface, with another figure pouring liquid from a bottle (no text or symbols present)natural_image
Line drawings of four different air purifiers with internal heat sinks, shown from different angles (no text or symbols)Õhukuivati hoiustamine
ATHUGID!
natural_image
Three technical line drawings of industrial air purifiers with internal heat sinks and ventilation slots, shown from different angles (no text or symbols present)Stöðug vatnstæming
natural_image
Line drawings of various household air purifiers with ventilation grilles and a grid-patterned panel (no text or symbols)2. Hreinsun loftsíu
natural_image
Illustration of a hand spraying water onto a grid-patterned surface (no text or symbols)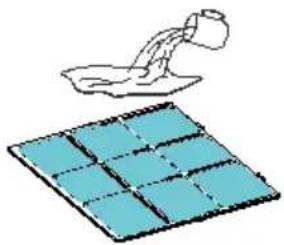
natural_image
Illustration of a person pouring liquid into a grid on a surface (no text or symbols)3. Hreinsið loftsíu
natural_image
Line drawings of four different air purifiers with internal heat sinks, shown from different angles (no text or symbols)Geymsla rakaeyðisins
ATENTIE!
natural_image
Three technical line drawings of a device with internal components and arrows indicating assembly or operation (no text or symbols present)natural_image
Technical line drawing of a multi-tiered air conditioner unit with internal ventilation systems and a solar panel (no text or symbols)natural_image
Two diagrams showing a hand pouring liquid onto a grid of blue tiles, with no text or symbols present.natural_image
Line drawings of four different air purifiers with internal grating and heat sinks, shown from different angles (no text or symbols)Ελληνικά
natural_image
Technical line drawing of a device casing with internal components and a warning symbol (no text or labels present)ΠΡΟΣΟΧΗ!
natural_image
Three technical line drawings of industrial air purifiers with internal heat sinks and ventilation slots, shown from different angles (no text or symbols present)natural_image
Technical line drawings of various air purifiers and heat exchangers, showing front, side, and top views (no text or labels)natural_image
Two diagrams showing a person using a telescope to lift a solar panel, and another pouring liquid from a container into a bowl (no text or symbols)natural_image
Line drawings of four different air purifiers with heat sinks, shown from different angles (no text or symbols)UWAGA!
natural_image
Three technical line drawings of industrial air purifiers with ventilation grilles, shown from different angles (no text or symbols present)natural_image
Illustration of five different air purifiers with internal ventilation systems, shown from front to side (no text or labels)natural_image
Two diagrams showing a person using a tool to clean or fabric the same sheet of blue tiles (no text or symbols present)natural_image
Line drawings of four different air purifiers with internal grating and ventilation grids, shown from different angles (no text or symbols)Wood's is marketed and distributed by Woods Production AB
Maskingatan 2-4
441 39 – Alingsås, Sweden
+46(0)31-761 36 10
woods.se
info@woods.se
- Users manual Wood's dehumidifier M10G
- SAFETY INFORMATION
- Children and vulnerable people safety
- WARNING
- General Safety
- SAFETY INSTRUCTIONS
- Installation
- Electrical connection
- Disposal
- Thank you
- Workings of your dehumidifier
- Installation and placement
- Installation:
- Using the M10G
- Hygrostat controlled
- Automatic restart
- Automatic defrost
- Start and stop the dehumidifier by pressing the ON/OFF button.
- Set desired humidity
- Set timer for automatic shut off
- Water drainage
- English
- Direct water drainage
- The air filter
- Maintenance
- Service
- Warranties
- Hints
- PARTS
- Humidity Level & Timer 2 digit display
- Functions
- OPERATING INSTRUCTIONS
- DRAINING THE COLLECTED WATER
- NOTE!
- Continuous Water Drainage
- MAINTENANCE
- To Clean the Air Filter
- Clean the air filter
- Attach the air filter
- Storing the Dehumidifier
- Clearance
- TROUBLESHOOTING
- Svenska
- ANVISNINGAR FÖR LED LAMPOR
- WARNING!
- Direktavrinning till avloppsbrunn
- Fäst luftfiltret
- Förvara avfuktaren
- Installation ADVARSEL
- MERK!
- Kontinuerlig drenering
- Fest luftfilteret
- ¡NOTA!
- Limpie el filtro de aire
- Acople el filtro de aire
- HET VERZAMELDE WATER AFVOEREN
- OPMERKING!
- Continue waterafvoer
- IEVĚROJIET!
- OHUTUSALASED JUHISED
- Paigaldus
- HOIATUS
- MÄRKUS!
- Pidev vee äravool
- Puhastage öhufilter.
- Õhukuivati hoiustamine
- ATHUGID!
- Stöðug vatnstæming
- Hreinsun loftsíu
- Hreinsið loftsíu
- Geymsla rakaeyðisins
- ATENTIE!
- Ελληνικά
- ΠΡΟΣΟΧΗ!
- UWAGA!
Brand : Wood's
Model : M10G
Category : Humidifier