DLG7188WM - Tumble drier LG - Free user manual and instructions
Find the device manual for free DLG7188WM LG in PDF.
Download the instructions for your Tumble drier in PDF format for free! Find your manual DLG7188WM - LG and take your electronic device back in hand. On this page are published all the documents necessary for the use of your device. DLG7188WM by LG.
USER MANUAL DLG7188WM LG
Thankyoufor buying aLG Dryer. Pleasereadyourmanual carefully, asit provides instructions onsafe Installation, Use andMaintenance.RecordtheModelandSerial Numbers, and retain themanualforfuturereference.PRODUCT FEATURES TABLE
OUTSTANDINGPERFORMANCENottomentionunmatched big capacity, you canbenefitfrom good time efficiency, quiet operation and energy saving system.STAINLESSSTEELDRUMStainlesssteeldrumdoesn'tgenerate any rust.ARTISTICDESIGNModernfront panel lookand big crystal-clear glass doormake your dryer look stylish. DIGITALFABRICCARE Multi-Level temperature control takes better care
your clothes EASYOFUSE
loadsize.So regardless ofload weight, moreaccurate sensing isensured.
What are Sensor Dry and Time Dry? Your dryer provides sensor drying and time drying programs. Sensor Dry
Dryer electronically sense laundry humidity and
automatically determines operation time based the dryness
the load and the selected program.
times, youcansee sudden increase decrease
happens because asensor will detect laundry humidity within certain period. Sudden change
You can manualy set drying time
complete drying. Use dry performance
clothes are still damp after sensor dry cycle
more effective for heavyweight and bulky items such king-size bed sheets and thick work clothes.3 Part
Ibs (57.2 kg) Specifications are subject change
manufacturer. ACCESSORIES Dryer rack
each) Purchased Separately Pedestal
each) Purchased Separately Remote Laundry MonitorPurchased Separately Design ofpedestals are subject change without manafaturers notice.The Warranty foryour Dryer islocatedattheendofthismanual. Warranty Serviceisavailable
IMPORTANT WARRANTY AND SAFETY INSTRUCTIONS SEEKING WARRANTY ASSISTANCE WARNING! For your safety,therecommendations thismanual must befollowed.Toreducetheriskoffire explosion,electricshock
prevent property damage,personalinjury, deathwhenusing your appliancefollowbasicprecautions,includingthefollowing. Part
IMPORTANT WARRANTY AND SAFETY INSTRUCTIONS 1)Readallinstructionsbeforeusingtheappliance.2)Donotdryarticlesthathave come intocontactwithgasoline,dry-cleaningsolvents, otherflammable explosivesubstances, theygiveoffvaporsthatcouldignite explode.3)Donotallowchildrentoplay
equipment-groundingconductormustbe run withthecircuitconductorsandconnectedtotheequipment-groundingterminal lead theappliance. WARNING!
help reduce any risk
electric shock, fire, other personal injury property damage when using your dryer, please exercise care and follow basic safety precautions, including the following:
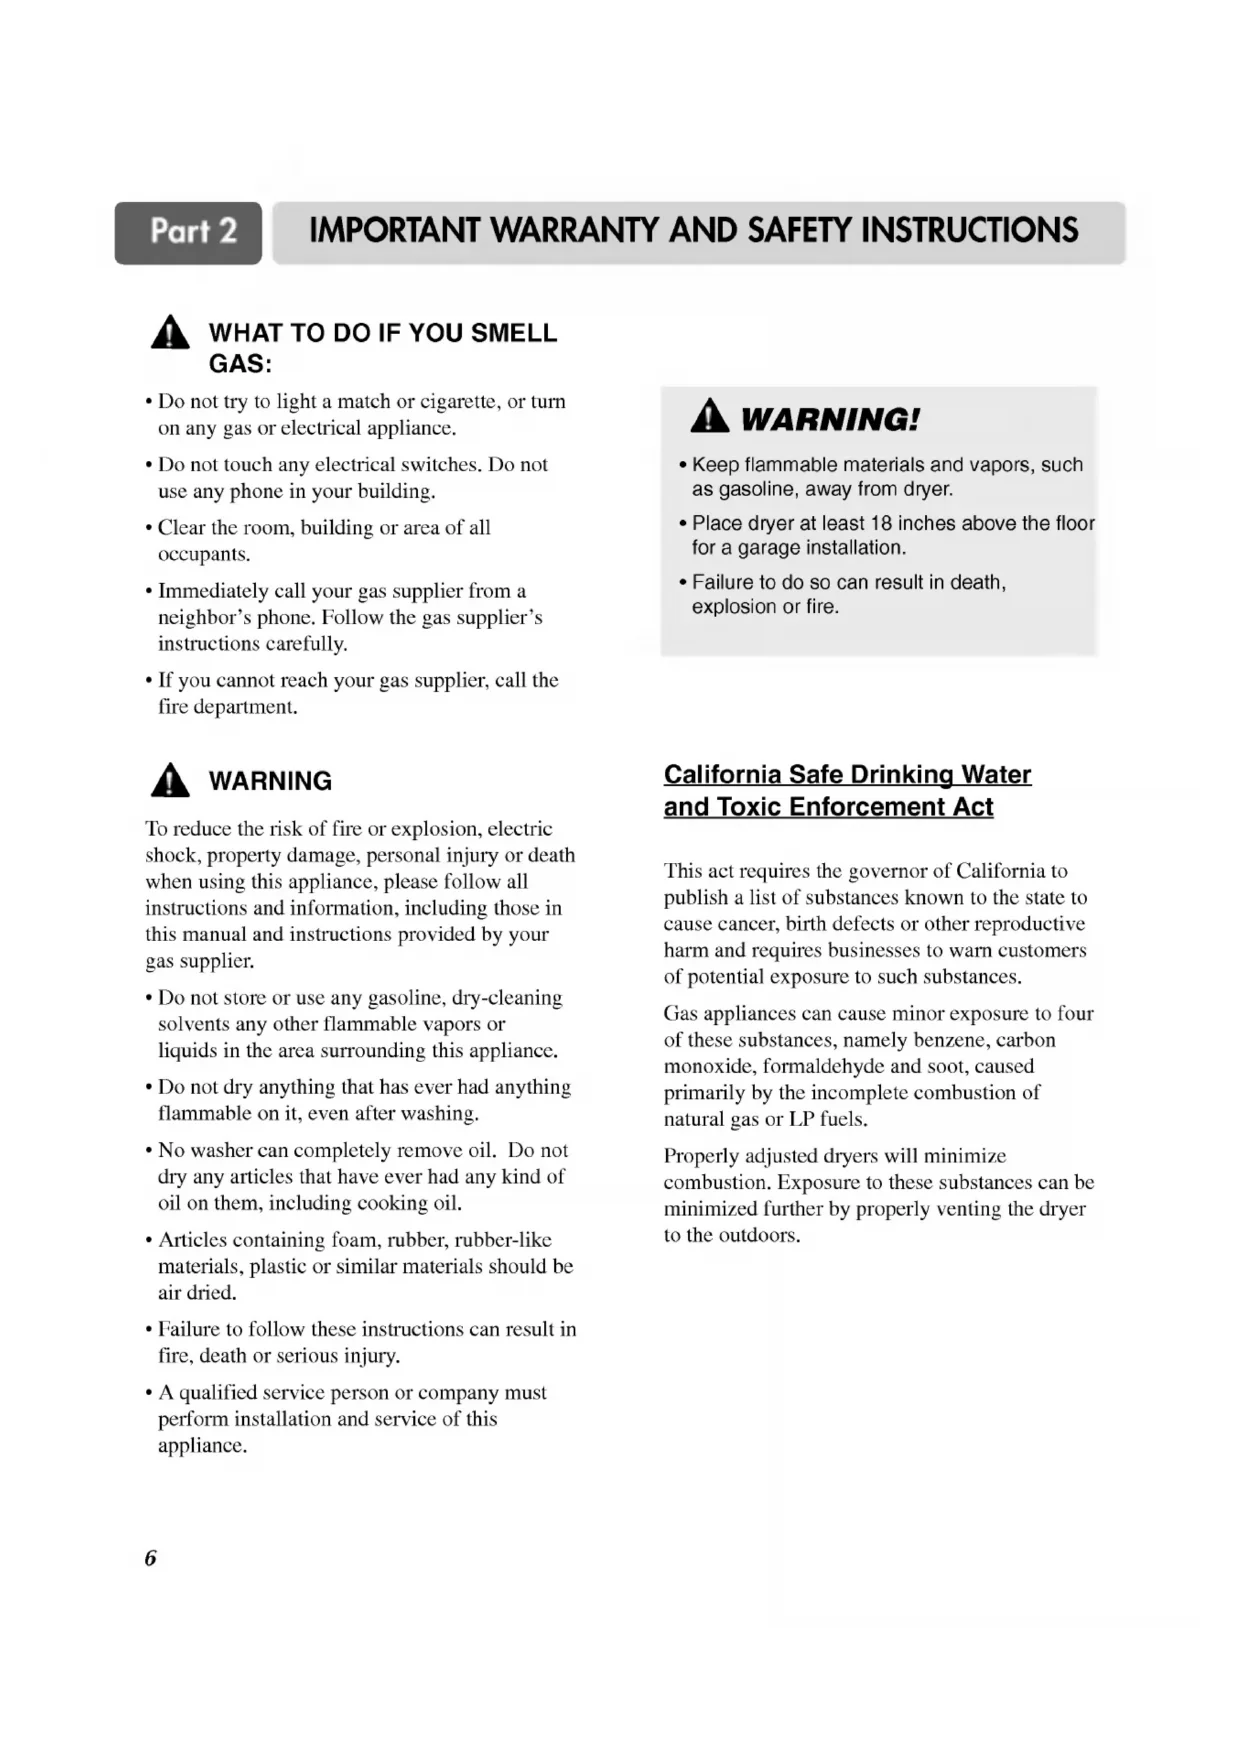
IMPORTANT WARRANTY AND SAFETY INSTRUCTIONS ?Donottryto light amatchor cigarette, orturnonanygasorelectrical appliance. ?Donottouchanyelectrical switches. Donotuseany phone inyour building. Clear the room, building orareaofalloccupants.? Immediately callyourgas supplier froma neighbor's phone. Follow thegas supplier's instructions carefully. ?Ifyoucannotreachyourgas supplier, callthefire department. Toreducetheriskoffireor explosion, electric shock, property damage, personal injury ordeath when using this appliance, please follow allinstructionsand information, including thoseinthismanualandinstructions provided
yourgas supplier. ?Donotstoreoruseany gasoline, dry-cleaning solvents anyotherflammablevaporsor liquids inthearea surrounding this appliance. ?Donot dry anything thathas ever had anything flammableon it, even after washing. ?No washer can completely remove oil. Donot dry anyarticlesthat have ever hadanykindofoilon them, including cooking oil. ?Articles containing foam, rubber, rubber-like materials, plastic orsimilarmaterialsshouldbeair dried. ?Failureto follow theseinstructionscanresult in fire, deathorserious injury. qualified service personorcompanymust perform installationand service ofthis appliance. California Safe Drinking WaterandToxic Enforcement ActThisact requires thegovernorof California publish alistofsubstances known tothestatetocause cancer, birthdefectsorother reproductive harmand requires businessesto warn customersof potential exposuretosuch substances. Gas appliances cancauseminorexposuretofourofthese substances, namely benzene, carbon monoxide, formaldehyde andsoot,caused primarily
the incomplete combustionofnaturalgasorLP fuels. Properly adjusted dryers will minimize combustion. Exposure tothesesubstancescanbeminimizedfurther
properly venting the dryer tothe outdoors. WHAT
INITIAL STEPS FOR INSTALLING YOUR DRYER The following instructionswill help guide you through theinitialstepsof setting upyour dryer foruse.Pleasenotethateverysectionofthismanual provides important information regarding the preparation anduseofyour dryer, anditis important thatyoureviewthisentiremanualbefore proceeding withanyinstallationoruse. More detailedinstructions concerning electrical connections, gas connections, andexhaust requirements are provided inotherpartsofthismanual. Choose
solid floor for your dryer. Place the dryer
least eighteen inches above the floor for
garage installation. After placing the dryer
the desired location, please make sure that
has the required clearances shown below.
you are installing your dryer
mobile home, please refer
below for additional instructions. Certainminimumclearances are required above, behind, and thesidesofthe unit,
shownbelow. Those required minimum clearances are set forth
the picture below. Please keep the following instructions
Consider allowing additional clearance for installation and servicing.
Wall, door and floor molding may force additional clearances.
Consider space needed for companion appliances.
For closet installations, the picture below shows the minimum required ventilation openings for the door.
louvered door with comparable ventilation openings
Most installations require
Positioning the Dryer. Leveling legs shouldbesecured. All four legs are stably placed
thesolidand even floor.If dryer not level, laundry may not tumble properly and sensor will not detectthe accurate humidity information.When leveling, please becautious not
injure your fingers and toes. Ifyouinstallthe dryer
the optional pedstal.
isnessary level with the pedestal leveling legs. Note 38.7" (98.3 cm) 27" (68.6 cm) 29.9" (76.1 cm) 49.8" (126.4 cm)8 Part
INITIAL STEPS FOR INSTALLING YOUR DRYER Oncein position, adjust the leveling legs ofthe dryer untilitislevelfromleftto right andfronttoback.The leveling legs mustremain firmly onthefloorandthe dryer shouldnotrock.Themaximum slope ofthe dryer fromleftto right orfronttobackshouldnotexceed2.5cm(1inch).Ifthe dryer isnotlevel,andifthe slope exceeds2.5cm(1inch),aloadmaynottumble properly andinternalsensorsmaymalfunction.Note:Othersectionsofthismanualalso provide important information concerning the placement ofandclearancesforyour dryer. Pleasereviewthisentiremanualbefore proceeding withanyinstallation.Thedooronyour dryer canbeinstalledtoopeneithertotheleftorthe right. Followtheseinstructionsto reverse thedirectioninwhichyourdooropens:
Procedure for Reversing the Door Door and latch should
the center when closed. Note9 Part
Clean old ducts before installing this dryer Themaleendofeachsectionofexhaustductmustpointawayfromthedryer Useasfew elbowjointsaspossible. Useduct tape onallductjoints Insulateductworkthatrunsthroughunheatedareasinordertoreducecondensationandlintbuild-uponpipewalls.
notuse plastic thin foil duct.
Failure follow these instructions can result
Clean old ducts before installing this dryer
Remove screw andexhaustduct. 2-1. Detachand remove theknockoutthatmatchesthedesired venting direction (Right side not available Gas Dryers)
theorderofwork. 2-2. Reconnecttheduct theblower housing andattachtheduct the base.(Duct
SVC part) 3-1. Pre-assemble4"elbowwith4" duct. Wrap duct tape around joint. 3-2. Insertelbowduct assembly first through theside opening and connect theelbow theinternalduct. STEP Connecting the Exhaust and Venting System. Vent end will face
the outside home and impropertaping and unstable installation
vent will cause undesirable drying performance. Note10 Part
INITIAL STEPS FOR INSTALLING YOUR DRYER (Gasdryeronly).Inadditiontothefollowing,pleaserefertomanualsectionon Gas Requirementsand Instructions. 1.Confirmthatthe type ofgasavailableinyour laundry room isappropriatefor the dryer. The dryer ispreparedforNaturalGaswith 3/8" NPT gasconnection.2.Removethe shipping cap fromthegasconnection thebackofthe dryer. Make sure thatyoudon't damage thethreadsofthegasconnectionpipewhenyouremovethe shipping cap. 3.Connectthe dryer
your laundry room'sgas supply using
newflexiblestainlesssteel connector (as noted below, only use
newstainlesssteelflexible connector ifallowed yourlocal codes). Securely tighten allconnectionsbetweenthe dryer andyour laundry room'sgas supply. Turn
(Liquefied Petroleum) gas connection, refer thismanual'ssectionentitledGasRequirementsandInstructions.
1/8" NPT Pipe Plug (for checking inlet gas pressure)
Equipment Shut-OffValve-Installedwithin6'(1.8
Use 3/8" pipe. Longer than 20' (6.1
Use 1/2" pipe. 3/8" N.P.T. Gas Connection Following are several warnings andinstructions concerning making theelectricalconnectionforelectric dryers. More detailedinformation concerning theelectricalconnectionisprovidedinthemanualsectionentitledElectricalRequirementsforElectricDryer. isimportantthatyou thoroughly reviewthatsectionandtheremainderofthis manual, before taking any steps
clothes dryer. 2.Four-wirecordisrequiredformanufactured (mobile) homeinstallationsandwherelocalcodesdo not allow grounding ofthisappliance through neutral. ElectricalPlug Connections. For additionalinstruction
connecting the dryer
electrical power source,pleaserefer thismanual'ssection ElectricalRequirementsandElectricDryer.
center terminal. Groundwire(green barewire) must beconnected greenground connector.
Securelytightenallelectricalconnections Seeinstallationinstructionsforcompleteinstructions. Failure
can resultinfire electricalshock.
Gas Supply Make sure the burner nozzle
gas you are provided with. For instance,using LPG with LNG nozzle will result
explosion. using LNG with LPG nozzle will not ignite burner.
needed, nozzle conversion should
qualified service technician and mark
located the elevation
10,000 feet. Adjusting burner inputsetting not needed this elevation because A.G.A certifies this dryerwillnot have any problemwith the B.T.U ratingat this altitude.
above 10,000 feet, you arerequiredtoadjusta four percent(4%) reduction
the burner B.T.U rating indicated the model/serial ratingplate. Note STEP Electrical Plug Connections11 Part
Dryer Airflow. STEP Confirming Heat Source Operation. Manometer Exhaust Duct12 Part
NOT connect exhaust ducts with metal screwsor fasteners that extend into the duct.
NOT vent the exhaust duct under the manufactured mobile home.
Additional Instructions for Installation
top plate picture shows. Secure stacking kit sidebracket thewasher with ascrewonthebackofbracket. Repeat Steps
fortheotherside.Placethedryeron top ofthewasherbyfittinglegsasshown the picture. Avoidfingerinjuries becareful not
not usestacking kit with gas dryer potentiallyunstableconditionslikeamobilehome. Stacking kit
Stacking Kit InstallationInstructionsIfthere are some foreign objects
apply double-sided tape on. WARNING!
NoteIncorrectInstallationcancauseseriousaccidents.Theweightofthedryerandtheheightofinstallationmakesthestacking procedure too riskyforoneperson.This procedure shouldbe performed
ormore experienced service personnel.Part
ELECTRICAL REQUIREMENTS FOR ELECTRIC DRYERS Following areadditionalinstructions regarding electricalconnectionsand requirements forelectric dryers. Important
help preventfire,electricshock,serious injury ordeath,the wiring and grounding must conform thelatesteditionofthe National ElectricalCode, ANSI/NFPA
andall applicable local regulations. Please contact qualified electrician checkyourhome's wiring andfuses ensurethatyourhomehas adequate electricalpower operatethe dryer. 115V/ 230V, Hertz, 3-Wire Installation! Instructions for Grounding
your Electric Dryer:
This dryer must beconnected
grounded metal,permanent wiring systemoran equipment-grounding conductor must berun with thecircuitconductorsandconnected the equipment-grounding terminalorleadonthe dryer.
The dryer hasits own terminalblockthat must beconnected aseparate Hertz single phaseAC circuit,fused
Amperes (the circuit must befusedonbothsidesofthe line). ELECTRICAL SERVICE FOR THEDRYER SHOULD
VOLT CIRCUIT. Heating elementsare available forfieldinstallationin dryers which are beconnected electrical service ofdifferent voltage thanthatlistedon nameplate.
orlessin length, useU.L. (Underwriters Laboratories) listedNo.
local codes. Allow sufficientslackin wiring dryer canbe moved fromitsnormallocation when necessary. Thepowercord (pigtail) connection between wall receptacle and dryer terminalblock
NOT supplied with dryer. Type pigtail andgaugeof wire must conform localcodesand with instructionsmentionedonthe following pages. Themethodof wiring the dryer optional and subject
localcode requirements. Refer
wire your dryer according
localcodeandordinance requirements. Sample methodsareincludedinthe following pages.16 Part
ELECTRICAL REQUIREMENTS FOR GAS DRYERS 120Volt,60Hertz,with3-ProngGroundingPlugFollowingare additional instructions regarding electrical connections and requirements for gas dryers. Important
help prevent fire, electric shock, serious injuryordeath, the wiring and grounding must conform
the National Electrical Code, ANSI/NFPA 70,or the Canadian Electrical Code, CSA C22.1, and all applicable local regulations. Please contact aqualified electrician
check your home's wiring and fuses
ensure that your home has adequate electrical power
Please note that the wiringdiagram provided inside the dryer control hood. Label all wires prior
disconnection when servicing the dryer, because wiringerrorscancause serious injury
(alternating current) circuit protectedbya Amperefuse,equivalent fuse circuit breaker.
Use separately fused circuits for washers and dryers, and
NOT operate washer and adryeron the same circuit.
The dryer has athree-prongplug helpguardagainst shock. The plug should
plugged directed into aproperlygroundedthree-prongreceptacle that
(alternating current)
properly and fullyeffective, must
plugged into aproperly installed outlet that
accordance with all local codes and ordinances.
electric shock,includinga malfunction breakdown.
your laundryroom does not meet the specificationsrequiredby this manual,or
you are uncertain whether not your laundryroom meets these specifications,please have aqualified service person company. Review your laundry room's electrical supply for any problems. WARNING! not overloadthecircuitbyoperatingother appliances
the same circuitwhenthis appliance isoperating,byusing extensioncord
connect thedryer thepower source,
Round Grounding Prong
NOT modifytheplugprovidedwiththedryer.Ifitdoes not fittheoutletin your laundry room,
properoutletwillneed beinstalledin your laundry room
qualified serviceperson
isalsoimportantthatyouusepipejointcompoundthatisinsolublein gas.6. reducethedangerofgas leaks, explosion,and fire, pleasefollowandobservethefollowing instructions and WARNINGS.
Use anew AGA CSA approved gas supply line.
Install shut-off valve.
Securely tighten all gas connections.
connected toLP, have qualified person make sure gas pressure does not exceed
qualified person include licensed heating personnel, authorized gas company personnel, and authorized service personnel.
death, explosion, fire.
WARNING! DO NOT attempt any disassembly
the dryer, any disassembly requires the attention and tools
authorized and qualified service person company.
EXHAUST REQUIREMENTS AND MAINTENANCE Following are important instructionsandinformation concerning theexhaust requirements foryour dryer. Important
Toreducetheriskoffire,combustion,oraccumulationofcombustiblegases,DONOTexhaust dryer airintoanenclosedandunventilated area, suchasanattic,wall, ceiling, crawlspace, chimney, gasvent,orconcealedspaceofa building. Toreducetheriskoffire,DONOTexhaustthe dryer with plastic orthinfoil ducting. Exhaust Requirements and Instructions: Venting materials are not provided withthe dryer andyoushouldobtainthenecessary venting materials locally. For example, the outer endofexhaust pipe must have weatherhoodwith hinged dampers
prevent back-draftwhenthe dryer not use. 2.Theexhaustduct must befourinches (10.2 cm) indiameterwith obstructions.Theexhaustductshouldbe kept
cleananyoldductsbefore installing yournew dryer. Rigid
transition ducting betweenthe dryer andandthewall.
special installationswhenitis impossible
make connectionwiththeabove recommendations, then UL-listedflexiblemetaltransitionductmaybeusedbetweenthe dryer andwallconnection only. The use ofthis ducting willaffect dry time.4.DONOT use sheetmetalscrews exhaust pipe joints
other fastening means whichextendintotheductthatcouldcatchlintandreducethe efficiency oftheexhaust system. Secureall joints withduct tape.
(10.2cm) (10.2cm) 2-1/2" (6.35cm)19 Part
EXHAUST REQUIREMENTS AND MAINTENANCE ExhaustandDryerMaintenance1.Afteroneyearofuse,theinteriorand complete exhaust system ofthe dryer shouldbeexaminedandcleanedifnecessary.2.Beforeoneyearofuse,when drying performance hasbecome unsatisfactory, please examineandcleantheexhaustductfor better drying performance. 3.Checktheweatherhoods frequently
ensurethe dampers are moving freely, thatthe dampers are not pushed inandthat nothing hasbeen set against the dampers. 4.A qualified servicepersonorcompanyshouldbeused
perform thismaintenance.5.AFlexibleMetalVentKit,available
extra cost,canbe used exhaustthe dryer whenitis placed inhard reach places. ThisKitcomesintwo pieces, oneofwhichisattached the dryer andtheotherisattached thewallexhaustoutlet. Following attachmentofthetwo separate pieces
the dryer andthewall,the dryer maybereturned itsfinal position, afterwhichthetwo pieces themselvescanbeconnected.7. Ordinarily, the dryer drumwillneedno care. Wipe theexteriorofthe dryer required, and always wipe theexteriorofthe dryer intheeventany detergent, bleach,orother washing products spilled onthe dryer. 8.Cleanthecontrol panel witha damp clothasnecessary.
spray pre-wash products may damage thefinishofthecontrol panel. 9.Pleasecleanthelintfiltereitherbefore drying eachloadorafter drying eachload.10. Always makesurethelintfilteriscleanbefore starting new load,becausea clogged lintfiltermayincrease drying times.11. Annually remove thelintfilterandattachit the vacuum duct.Seeitem#2above.12.Please note thatthe wiring diagram provided insidethe dryer controlhood.Labelallwires prior
disconnectionwhen servicing the dryer, because wiring errorscancauseserious injury
youandyour dryer. Cleaning the Lint Screen 1.Cleanthelintfiltereitherbefore drying eachloadorafter drying eachload. Always makesurethelintfilteriscleanbefore starting new load,becausea clogged lintfiltermayincrease drying times.2. clean, pull thelintscreen straight upandrollanylintoffthescreenwithyour fingers.
the dryer andarticles being dried.4.Somearticlesof clothing mayshedmorelintthanothers (towels for example), causing theLintScreen
prevent this type ofbuildup,and help ensureproper operation ofyour dryer, cleanthelintscreenwitha nylon brusheverysixmonthsor,ifnecessary,more frequently. Thelintfiltercanalsobewashedasfollows: After rolling thelintoffofthescreenwithyour fingers, wetbothsidesofthescreenwithhotor warm water. Weta nylon brushwithhotwaterand liquid detergent andscrubthelintscreenwiththebrush
remove the buildup detergent andfabricsoftener. Aftertheresiduehasbeenremoved,rinsescreenwithhotwater. After drying thelintscreenwithacleantowel, firmly replace thelintscreeninyour dryer. WARNING! Disconnectthedryer'selectricpower prior any cleaning maintenance. !20 Part
reducetheriskoffire,electricshock,orinjurytoperson,readthisentiremanual,includingthe Important Safety Instructions, beforeoperatingthisdryer. WARNING! Fire Hazard
washer can completely remove oil.
not dry anything that has ever had any type
(including cooking oils). Items containing foam, rubber, plastic must
follow these instructions can result
WARNING! Explosion Hazard Keep flammable materials and vapors, such gasoline, away from dryer.
not dry anything that has ever had anything flammable
(even after washing). Failure
follow these instructions can result
death, explosion, fire.
available only with Manual Dry, Time Dry and Rack Dry programs. Note?
dialing the knob, selectthedesired cycle basedon laundry typesandconditions.
pressing MORETIMEorLESSTIME. Speed Dry Useforsmallloadsorloadsthatneedashort drying time. Freshen
remove wrinklesfrom items, suchasclothes packed inasuitcaseoritemswrinkledfrom being leftinthe dryer too long. Air
UsetheAir Dry Modifierforitemsthat require drying withoutheatsuchas rubber, plastic andheat-sensitivefabrics. Sensor Dry Cycles Load Type Temp. High Medium High Medium LowLowUltraLow Time* (Minutes)
the status window. disableChild Lock, pressandholdRack Dry for3seconds again. 1.CUSTOMPROGRAM.Setupyourfavoritecombinationof settings and save themhereforone-touchrecall.2.Rack Dry 1.Select
cycle Change DRY LEVELandTEMP.CONTROL.3.SelectOPTIONSyou want. Press andholdtheCUSTOMPROGRAM.TorecallyourstoredCUSTOMPROGRAM Press CUSTOMPROGRAM button, thenpressSTART/PAUSE.Rack Dry designed for use withitemswhich are not designed fortumble drying such sweaters,silk
shows status drying operation. WhenWrinkleCareis selected, this option light will glow. Whenpoweris on, CheckFilteris displayed until start/pause isselected. WARNING! Forbetter drying performance and safety, cleanlintfilterevery single use.
use the RACK DRY 1.Open thedoor.Holdthe dryer rackwithbothhands.2.Put the dryer rackintothedrum3.Make sure Dryer RACKis evenly spaced right ontothedruminsideanddoorrim.1
Option Buttons Don't use Rackfornormaltumble drying. Rack Dry shipped place inyour dryer
remove rackfornormal laundry. NoteLow2020/3050/305020Low/UltraLowAir Dry/ UltraLowAir Dry Air Dry
Anti BacterialThisoptionreducesbacteriabyusinghigh temperature duringthecycle.Thisoption can onlybeused with the Heavy Duty, Cotton/Towels and Normal cycles. DampDryBeep When youselectthedampdrybeepoption, beep will alertyou when yourloadisapproximately 80% dry.Thisnotice will allow youto remove lightweightitemsthat are dry otheritemsthatyoumay wish iron. not use thiscycle with delicatefabrics. Note The BEEPER controlsthe volume ofthebeepthatismade when youpressanyofthebuttons thecontrolpanel. Press BEEPER toadjustthesound level
turnoffthesignal.Use Temp. Control Optiontoselect temperatures fortheManualCycles. Press TEMP. CONTROL untilthedesired temperature settingglows. Temperature modifierscannotbe used with the Sensor Dry Cycles.
Beeper UseTime Dry OptiontochangeDryingTime your own. You can selectthedesiredoperationtimemanuallybypressingTime Dry button which rangesfrom
Check see thatcoverings are securely stitched.
Shake andfluffpillowsbyhandperiodicallyduringthecycle.
Dry itemcompletely. Foam rubberpillows are slow todry.NOTE:Air Dry isnot available with Sensor Dry Cycles.When using Air Dry24 Part
made while using Sensor Dry Cycles. Selecting MORE Dry
LESS Dryautomaticallyadjusts the sensed time needed. Note Starting your dryer ?Usethisbutton
set drylevel? First, select sensor drycycle.?Selectdrylevel adjusthowmuchyou want
drytheload.Asthecycle runs, thecontrol senses thedrynessoftheloadandadjuststhetimeautomaticallybased theselecteddrynesslevel.
Dryness Intensity Control DRY LEVEL selections can only
made while using Sensor Dry Cycles. Selecting MORE Dry
LESS Dryautomaticallyadjusts the needed time which
already sensed. Note Heavy Work Clothes 4jeans4workpants4workshirts2sweatpants2sweatshirts Cotton/Towels 10bathtowels10handtowels14washcloths Mixed Load3sheets king,2 twin) 4pillowcases3shirts3blouses9T-shirts9shorts10handkerchiefsFollowing are sample loads for SuperCapacity Dryers:
Wipe out the door opening. Otherwise, build-ups
dirty and foreign objects will damage sealing
Clean the transparent glass door keep inside view clear through the glass. Run the fingers across the filter 2.Clean the filter using one
the following methods. Vacuum the lint filter Wash the lint screen
warm, soapy water. Dry thoroughly and replace. Clean the door and its opening Maintenance
(OPTIONAL STEP) Ifdesired,selectOPTIONS. For moredetails,seeOptions.
Press START/PAUSE. surethedoorisclosed. Ifyoudo not pressSTART/PAUSEwithin10minutesofselectingthecycle,thedryerautomaticallyshutsoff. Ifyouwish endyourdryingcycleafterpressingSTART/PAUSE,pressSTART/PAUSEagain.To stop your dryer
any time OpenthedoororpressSTART/PAUSEonce.To restart the dryer Closethedoor. Press START/PAUSE.Drying will continue from where the cycle was interrupted
you close the door and press START within
the cycle interrupted for more than
minutes, the dryer will shut off. Select new cyclesettings before restarting the dryer. Note The MORE TIME
LESS TIME feature can
used with Manual Dry, Time Dry and Rack Dry Cycles. Note WARNING! Improper wire connection
isthecircuitbreaker tripped? Confirmthatthe dryer's plugissecurelyandcompletelypushedintothelaundry room's poweroutletCheckyour home's
laundry room's fusebox/circuitbreakerboxandreplacethefuse
reset thecircuitbreaker. (IMPORTANT: electricdryersgenerally use two fuses
off? Ifthefuseis blown
thecircuitbreakertripped,thedryermighttumblebut not heat.Checkyour home's
laundry room's fusebox/circuitbreakerboxandreplacethefuse
reset thecircuitbreaker. (IMPORTANT: electricdryers generally use two fuses
breakers.) Confirmthatthehousegasshutoffandthedryergasshutoff are bothfullyopen. 3.Problem:There are Greasy Spots
Clothes Question What
Didyou follow theinstructions yourfabricsoftener product?
Areyoudryingcleananddirtyclothes together?
Wereyourclothesentirely clean? Confirmand follow theinstructionsprovided with yourfabricsoftenerproduct.Make sure
use yourdryer dry onlyclean items, becausedirtyitems can soilcleanclothesplacedinthe same load laterplacedinthedryerdrum.Stains driedclothes are actuallystainsthatweren'tcleansedduringthewashingprocess.Please review andconfirmthatyou are followingyourwashinginstructionsandthattheclothes are being completelycleaned.4. Problem:
Dryer Displayed Error Question tE1 tE2 What
service center.27 Part
TROUBLESHOOTING GUIDE 6.Problem:There isstaticinmy clothes after drying QuestionWhattoDo 5.Problem:There isLintonmy Clothes QuestionWhattoDo Please refer
cleaning the lint filter, and please confirm that the lint filter
important that the lint filter
clean before each new load
laundry, sort lint producers (like
fuzzy white cotton towel) separately from clothes that might catch lint (such
clothes after drying. Divide your larger load into smaller loads. Sometimes
pants, and this paper, tissue,
similar material can cause excess lint
load of laundry. Confirm that the pockets
pants, shirts, and other articles
clothing are empty before washing and drying.
your lint filter full?
Did you properly sort your load
your clothes have excess static electricity?
Did you overload your dryer?
Did you place any paper, tissue,
other similar material
Did you use fabric softener?
Did you over dry the load
Are you dryingsynthetic, permanent press and blends? Tryusing
reduce static electricity. Over-drying
adjust your settings and use
shorter drying time. These materials can cause static
dried clothes. Tryusing
fabric softener. 7.Problem:The drying timeis not consistentQuestion
Are you using consistent heat settings and consistent load sizes? The drying time for
the heat setting, the type
the clothes and the condition
the exhaust ducts and lint filer. WhattoDo28 Part
Did you properly sort your loads
Are you dryinglarge loads
Are the dryer controls properly set?
the lint filter clean before each new load
Are the exhaust ducts clear and properly configured?
the circuit breaker tripped?
Did you overload your dryer?
Did you under load your dryer? Separate heavyweight items from lightweight items when creating loads. Heavy fabrics take longer dry because they tend
retain more moisture.
help reduce and maintain more consistent drying times for large and heavyfabrics, separate these items into smaller loads
consistent size. Use the appropriate control settings for the type of load you are drying. Please confirm that the lint filter
laundry. Confirm through review
the appropriate sections
this manual that the exhaust venting ductwork
properlyconfigured. Confirm that the venting
obstructions. Confirm that the outside wall dampers are movingfreely, that the dampers are not pushedin, and that nothing has been set against the dampers. Check your home's
laundry room's fuse box/circuit breaker box and replace the fuse
reset the circuit breaker. (IMPORTANT: electric dryers generally use two fuses
breakers.) Divide your larger load into
few extra pieces help ensure proper tumbling action. 9.Problem:My clothes are wrinkled QuestionWhattoDo
Are you over drying your laundry?
Are you removing your laundry from the dryer soon after the dryingcycle
complete? Over drying
wrinkled clothes. Try
shorter dryingtime, and remove items while they still retain
moisture. Remove your laundry from the dryer after the dryingcycle ends and either hang
fold the items. 10.Problem:My clothes are shrinking QuestionWhattoDo
Are you following the care instructions for your garment?
avoid shrinkage,pleasecarefully follow the care and use instructions for your garment, because some fabrics will naturally shrink when washed. Other fabrics can
washed but will shrink when dried
dryer. See the Owner's Manual
(10.2cm) (10.2cm) 2-1/2" (6.35cm)19 PARTIE
temperature recommandee.
temperature Temps suggere* (minutes) Articles
temperature desiree figure.
temperature desiree figure.