
RTV 640 PL ISR - Cooker ROSIERES - Free user manual and instructions
Find the device manual for free RTV 640 PL ISR ROSIERES in PDF.
| Technical specifications | ROSIERES RTV 640 PL ISR cooker, 4 burners, convection oven, energy class A |
|---|---|
| Dimensions | Width: 60 cm, Height: 85 cm, Depth: 60 cm |
| Cooking type | Gas and electric |
| Oven capacity | 60 liters |
| Oven functions | Grill, fan oven, traditional cooking |
| Usage | Ease of use with manual controls, heat indicators |
| Maintenance | Easy cleaning thanks to the enamelled surface, regular maintenance recommended |
| Safety | Gas safety system, overheating protection |
| General information | 2-year warranty, after-sales service available |
Frequently Asked Questions - RTV 640 PL ISR ROSIERES
Download the instructions for your Cooker in PDF format for free! Find your manual RTV 640 PL ISR - ROSIERES and take your electronic device back in hand. On this page are published all the documents necessary for the use of your device. RTV 640 PL ISR by ROSIERES.
USER MANUAL RTV 640 PL ISR ROSIERES
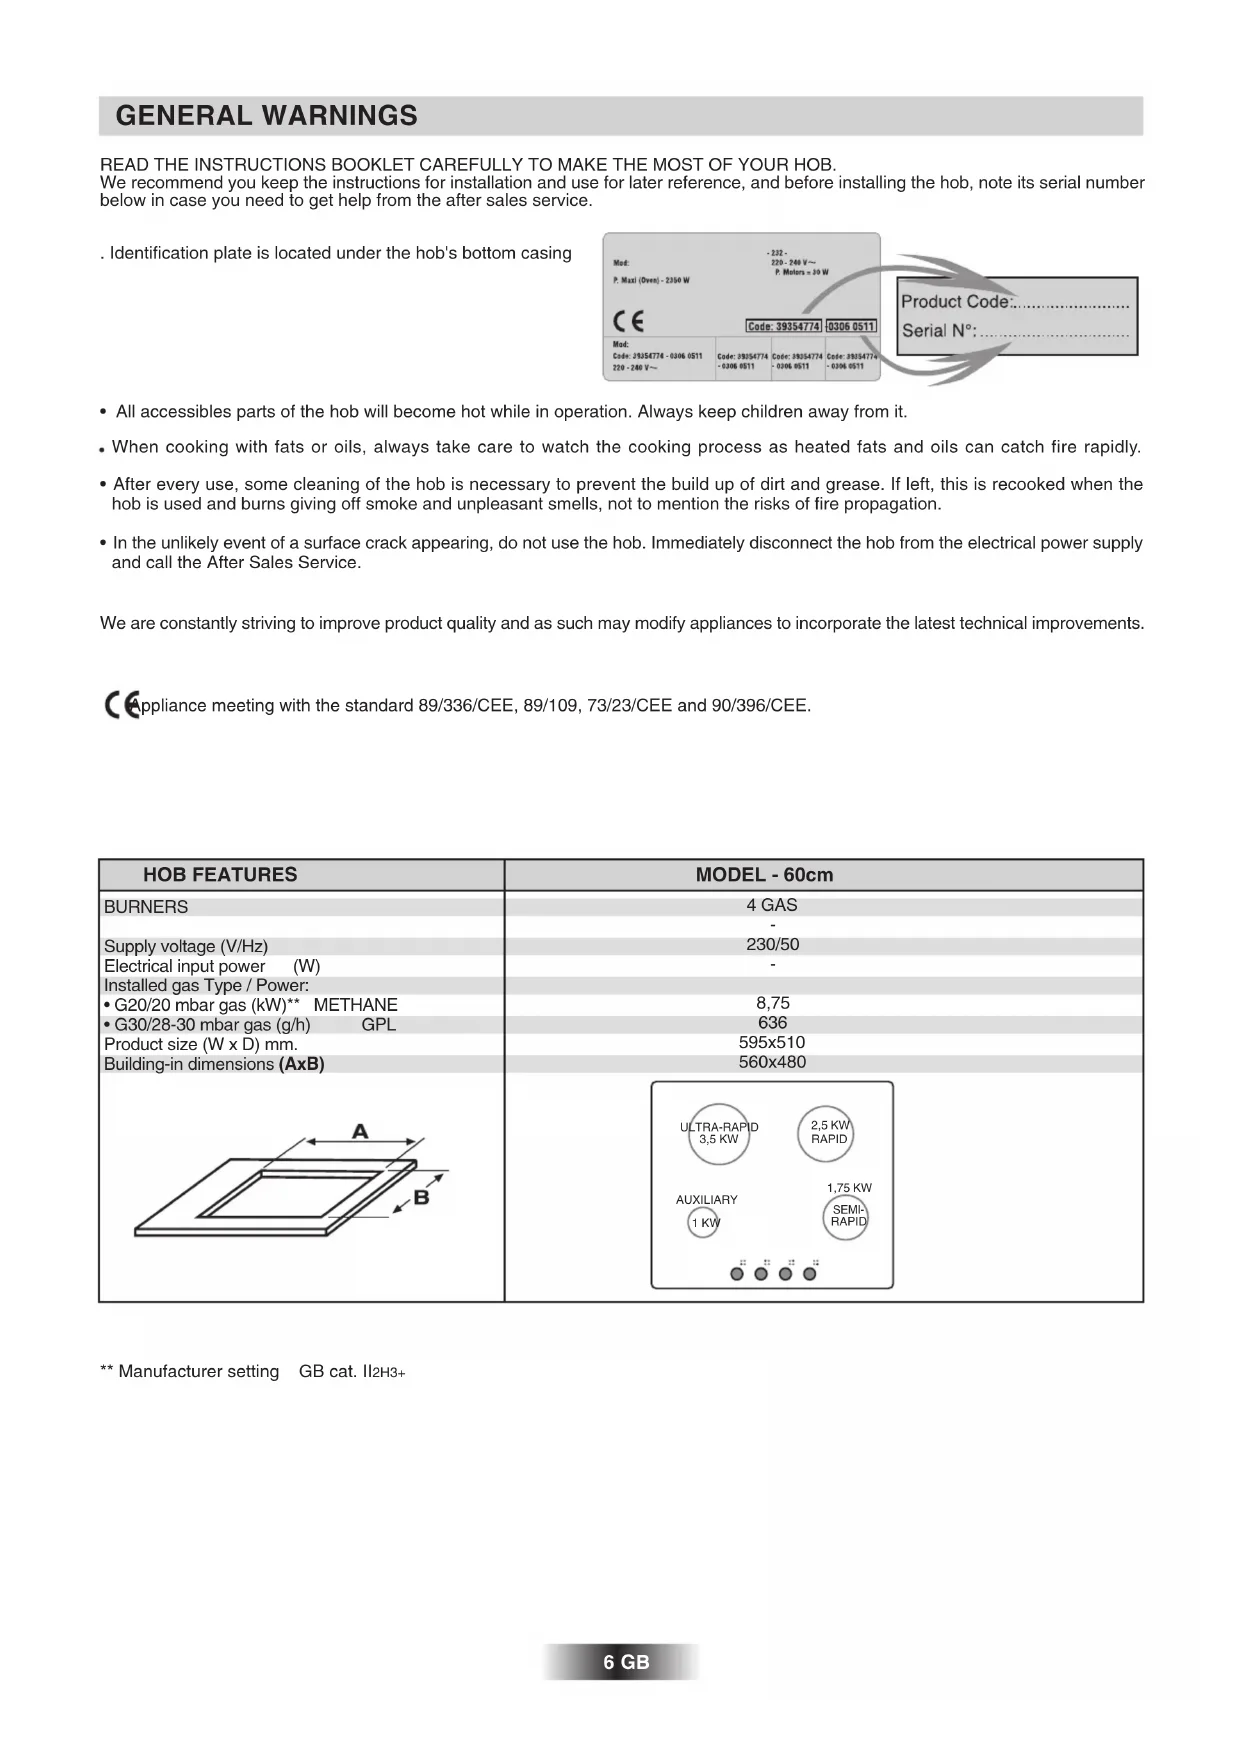
- All accessibles parts of the hob will become hot while in operation. Always keep children away from it. When cooking with fats or oils, always take care to watch the cooking process as heated fats and oils can catch fire rapidly.
- After every use, some cleaning of the hob is necessary to prevent the build up of dirt and grease. If left, this is recooked when the hob is used and burns giving off smoke and unpleasant smells, not to mention the risks of fire propagation.
- In the unlikely event of a surface crack appearing, do not use the hob. Immediately disconnect the hob from the electrical power supply and call the After Sales Service. We are constantly striving to improve product quality and as such may modify appliances to incorporate the latest technical improvements. Appliance meeting with the standard 89/336/CEE, 89/109, 73/23/CEE and 90/396/CEE. ** Manufacturer setting GB cat. II2H3+ AUXILIARY 1 KW HOB FEATURES BURNERS Supply voltage (V/Hz) Electrical input power (W) Installed gas Type / Power:
595x510 560x480 ULTRA-RAPID3,5 KW"The installation must conform to the standard directives". The manufacturer declines all responsibility for any damage that may be caused by unsuitable or unreasonable use.
Warning : before proceeding with the connection:
- check the continuity of the earthing of the power supply unit. We cannot be held responsible for any accident which has resulting from the use of an appliance which is not connected to earth, or whose earthing is defective.
- Always check before any electrical operation, the supply tension shown on the electricity meter, the adjustment of the circuit- breaker, the continuity of the connection to earth to the installation and that the fuse is suitable.
- The electrical connection to the installation should be made via a socket with a plug with earth, or via an omni pole cut-out switch with an opening gap of at least 3 mm. The hob is fitted with a power supply cable* without plug which allow it to be connected only to a power supply of 230 V between phases, or between phase and neutral.
- Connect to a 10/16 Amp socket. Note : the socket must be reachable for any eventual repair. Take care of its location at the time you install the hob.
- the eventual replacement of the supplying cord must be carried on by the After Sales Service or by an agreed engineer, with a cord whose characteristics must be similar to the original one. . cord type H05V2V2-F (section 3 x 0,75 mm2). Installing a domestic appliance can be a complicated operation which if not carried out correctly, can seriously affect consumer safety. It is for this reason that a professionally qualified person should undertake the task who will carry it out in accordance with the technical regulations in force. In the event that this advice is ignored and the installation is carried out by an unqualified person, the manufacturer declines all responsibility for any technical failure of the product whether or not it results in damage to goods or injury to individuals. 7 GB The hob can be built-in ; it is in class 3 (in compliance with gas regulations EN 30.1.1) ; adjoining furniture should not be higher than the level of the hob. This appliance is not connected to an evacuation device for the products of combustion. It must be installed and connected in compliance with the norms in force in the country of installation. Particular attention should be given to the availability of ventilation. The turnover of air necessary for combustion is a minimum of 2 m3/h per kW of power. Gas connection should be carried out in compliance with the norms in force in the country of installation. A stop tap, a regulator valve or a release valve for propane gas, should be fitted to the gas supply pipe. Use only taps, regulator valves, connectors and flexible hoses with the official mark of approval of the country of installation. Built-in appliance Butane Rigid - Flexible pipe with mechanical connectors (1) - Propane Rigid - Flexible pipe with mechanical connectors (1) - Natural Rigid - Flexible pipe with mechanical connectors (1) - (1) on condition that the hose is accessible along the whole of its length it should be located so it cannot be reached by naked flame or affected by combustion gases. Neither should it be near hot parts of the hob nor anywhere where hot spillages could affect it. GAS CONNECTION BUILDIN-IN Both the worktop where the hob will be fitted and any adjacent kitchen furniture must be made from heat resistant material and fixed with heat resistant adhesive. If, when installing the hob, the lower hob face is adjacent to an area normally accessible when handling or cleaning, fit a heatproof partition 1 cm below the base of the hob with a 10X10 cm opening at the rear right-hand corner, to avoid any risk of scorching or damage. A foam adhesive is supplied with the hob. Stick this seal under the edge of the body as near as possible to the outer edge of the hob. Press round the edges of the hob, so that the seal flattens out and ensures an air tight seal. The body of the hob is fitted with 4 location holes to take the fixing brackets that secure the hob in the unit. Place the 4 fixing brackets in such a way that the hob is placed perfectly in the support unit. ELECTRICAL CONNECTION INSTALLATION 2 POSSIBLES MEANS OF CONNECTION : Fit the appliance with the cylindrical or the conical gas adaptor, in accordance to the installation Country standards, and then proceed to the connection, two possibilites:
- CONNECTION BY RIGID PIPE Connect directly to the threaded end of the inlet pipe.
- CONNECTION BY FLEXIBLE PIPE WITH MECHANICAL CONNECTOR Screw the nuts of the flexible pipe directly on to the inlet pipe at one end and the gas supply stop tap at the other. We recommend this type of connection. Important: In all cases, make sure the seal is fitted. Following the connection operations, test the leak tightness using soapy water, testing by flame is strictly prohibited. CYLINDRICALCONICALCYLINDRICALmin 10 mmSp of 25 to 45 mmaccessiblespace SEAL OVEN WITH FANCOOLED OVEN WITHOUT FAN COOLEDmin 70 cm
in 5,5 cm min 15 cmThe calorific capacity and pressure of the gas vary according to the type of gas. When changing the gas, the technician should successively : change the jets, make the gas connection to the installation and set the minimum flow of all the gas burner tap.
- SETTING THE IDLE FLAME If the gas type has been altered, the stability of the flame in the minimum flow must be checked and set by adjusting the by-pass screw. To access the top burner by-pass screw, remove the control panel knobs. a) Natural gas : - unscrew the by-pass screw one turn, - replace the combined control-knob, light the burner and set to low flame, - remove the combined control-knob again, screw the by-pass screw until a reduced flame is obtained, staying stable when going from high to low position. - replace the combined control-knob. b ) Butane- propane gas : the setting is done by screwing right in (without forcing) the by-pass screw whose calibrated hole provides the minimum flow.
- CHANGING THE JETS Each jet is designated by size. To gain access to the jets, remove the pan supports, and remove the burner cap and body. Take a spanner and unscrew the jet. According to the table below, fit the correct jet for the type of gas to be used. Secure the jet tightly. Set the idle flame. Replace the burner body, cap and the pan support. By-pass screw auxiliary semi-rapid rapid ultra- rapid Gas mbar Jet kW kWJet Jet kW Jet G 20 20 76 1,00 1,75101 118 2,50 144* G 25 25 76 0,90 1,60101 118 2,30 144* G 30 29 50 1,00 1,7566 80 2,50 94 G 31 37 50 1,00 1,7566 80 2,50 94
Manufacturer setting: G 20-20 mbar - G 25-25 mbar kW = Power of the burner
3,50 3,20 3,50 3,50Each burner is contolled by a tap with progressive settings allowing:
- a wider choice of settings from the maximum position to the lowest and most precise one,
- easier flame regulation according to the pan diameter,
- no risk of cutting off the flame or switching off when the flame is turned down quickly. IGNITION RECOMMENDATIONS : when the burners are not in service, the general gas supply tap should always be turned off.
- Turn on the gas tap,
- A symbol next to each control knob indicates which burner is lit.
- Turn and press in the relevant burner control knob to the symbol, keeping it pressed in until the flame ignites. On models fitted with electronic ignition the flame is ignited by an electric spark. This is operated by the button or by pressing the knob (for models with ignition under the knob). For models not fitted with electronic ignition, or if there is no electric power, light the flame with a match.
- Set the flame according to your cooking requirements. Intermediate positions are available between the maximum and minimum settings on the control knob.
- To turn the flame out, turn the control knob back to stop position.
- If the burner is accidentally extinguished, turn the knob to “0”, wait one minute and then try to ignite again. PANS For a proper use of the burners, choose pans which match the dimensions given below :
- Pans with curved, ridged or warped bottoms are not recommended.
Aluminium pans may leave marks on the enamelled pan support. These marks can easily be removed with a damp cloth and a light abrasive product. SOME TIPS ....
- Avoid boiling food too intensely. Food is not cooked any more quickly this way. In fact, it is subjected to severe agitation, which may cause the food to lose some of its flavour.
- To save gas, make sure that the flames do not overlap the bottom of the pan.
- Do not use the gas burner with an empty pan.
9 GB NB: for models fitted with the SAFETY thermocouple, keep the knob pressed in for a few seconds in order to activate the safety system. If the knob is released straightaway there is not time for the safety system to be activated and the flame goes out. If this happens, repeat the ignition procedure from the beginning waiting longer after the flame is lit. The rapid thermocouple safety device automatically cuts off the gas supply if the flame is accidentally extinguished. If there are particular local gas supply conditions which make ignition difficult, you are advised to repeat the ignition procedure, turning the knob to “minimum” ( ). USE
CLEANING AND MAINTENANCE
Before carrying out any cleaning, you must :
- Disconnect the appliance from the electrical supply and wait for all the hot parts to cool.
- Never use abrasive cleaners, wire wool or sharp objects to clean the appliance.
- It is advisable to keep away from the hob all substances which are liable to melt, such as plastic items, sugar, or sugar- based products.
- THE GLASS HOB - Maintenance : - place a few drops of a specialist cleaning product on the hob surface. - rub any stubborn stains with a soft cloth or with slightly damp kitchen paper. - wipe with a soft cloth or dry kitchen paper until the surface is clean. Stubborn stains : - place a few drops of a specialist cleaning product on the hob surface. - scrape with a scraper, holding it at an angle of 30° to the hob, until the stains disappear. - wipe with a soft cloth or dry kitchen paper until the surface is clean. Repeat the operation if necessary. A scraper with a razor blade will not damage the surface, as long as it is kept at an angle of 30°. Never leave a scraper with a razor blade within reach of children. A few hints : Frequent cleaning leaves a protective layer which is essential for preventing scratches and wear. Make sure that the surface is clean before using the hob again. To remove marks left by water, use a few drops of white vinegar or lemon juice. Then wipe with absorbent paper and a few drops of specialist cleaning fluid. The glass surface will withstand scraping from flat-bottomed cooking vessels, however, it is always better to lift them when moving. THE KNOBS For thorough cleaning, the control knobs can be removed by pulling them upwards. Only clean with soapy water and dry well before rplacing them. Do not try to pull the watertightness rings. They are originally fitted and must not be pulled out.
For cleaning, it is recommended to remove all greasy or burnt deposits with ammonia base products or usual cleaning products. Regular cleaning will maintain the burners original appearance. The use of abrasive cleaners is not recommended as they scratch and dull the enamel.
- The burner cap : it is simply placed on the burner head. Just lift it off and clean with a damp, slightly soapy sponge. Do not immerse it in cold water immediately after use to avoid cracking the enamel from the thermal shock.
- The burner head : clean with soapy water, rinse and wipe with a clean dry cloth. If the holes are clogged, brush them using soapy water and dry with a clean cloth. When re-assembling the burners, make sure that the burner caps and the burners themselves are dry and after, seat them correctly.
- Caution : Be careful not to let any water get into the burners.
It is simply placed on the hob. Lift it up to remove them. Fot the maintenance of the support, never use harsh abrasives, scouring pad or sharp objects as this will cause irreparable damage to the enamel. When the pan support is cold, simply clean with soapy water, rinse and dry with a clean cloth.10 GB This appliance is marked according to the European directive 2002/96/EC on Waste Electrical and Electronic Equipment (WEEE). By ensuring this product is disposed of correctly, you will help prevent potential negative consequences for the environment and human health, which could otherwise be caused by inappropriate waste handling of this product. The symbol on the product indicates that this product may not be treated as household waste. Instead it shall be handed over to the applicable collection point for the recycling of electrical and electronic equipment Disposal must be carried out in accordance with local environmental regulations for waste disposal. For more detailed information about treatment, recovery and recycling of this product, please contact your local city office, your household waste disposal service or the shop where you purchased the product. AFTERCARE Before calling out a Service Engineer please check the following: — that the plug is correctly inserted and fused; If the fault cannot be identified: switch off the appliance — do not tamper with it — call the Aftercare Service Centre. The appliance is supplied with a guarantee certificate that ensures that it will be repaired free of charge at the Service Centre.03-2007 • Cod. 41024527 Le constructeur décline toute responsabilité concernant d’éventuelles inexacitudes imputables à des erreurs d’impression ou de transcription contenue dans cette notice. Le constructeur se réserve le droit de modifier les produits en cas de nécessité, même dans l’intérêt de l’utilisation, sans causer de préjudices aux caractéristiques de fonctionnement de sécurité des appareils.
The manufacturer will not be responsible for any inaccuracy resulting from printing or transcript errors contained in this brochure. We reserve the right to carry out modifications to products as required, including the interests of consumption, without prejudice to the characteristics relating to safety or function.